

Page 1
2.5'' / 3.5'' USB 3.0
SSD/HDD RAID SATA enclosure
User Manual
DA-71116 / DA-71117
1 Introduction
1.1 Features
-Supports Big (JBOD), RAID0, RAID1, Normal mode
-Enhanced data protection and high-performances storage
-Automatic disk rebuild
-Support with USB3.0 high speed reach up to 5.0Gbps
-Supports plug and play
-Support mode select by RAID switch
Page 2

1.2 Specifications
Inner Interface: SATA I/II/III
Outer Interface: USB3.0
Date Transfer rate: Support USB 3.0 super-speed (5Gbps),
Complies with USB 2.0 high speed
(480Mbps),
USB 1.1 Full speed (12Mbps)
Suitability: DN-71116: 2 x 2.5" SATA I/II/III HDD
DN-71117: 2 x 3.5" SATA I/II/III HDD
Supports Plug-play and Hot-plug
Power Supply: DN-71116: DC5V supplied by the
Computer
DN-71117: AC 100~240V, 50~60Hz; DC
12V, 2.5A
Material: Aluminum
OS Compatibility: Windows 2000/XP/Vista/7/8/10,
Linux and MAC OS 10.6 or above
Dimension : DN-71116: 152 x 85 x 28.5 mm (L x W x H)
DN-71117: 220 x 120 x 68 mm (L x W x H)
1.3 System Requirements
PC Requirements
· Minimum Intel Processor Pentium II/50MHz, 64MB RAM
· Windows 2000 / XP / VISTA / 7 / 8 / 10
· Active USB port
Page 3

MAC Requirements
· Minimum Apple G processor, 64MB RAM
· Mac OS 10.6 and above
· Active USB port
Supported Hard Drives
· DN-71116: One or two 2.5" SATA I/II/III hard drives
· DN-71116: Capacity up to 2TB X 2
· DN-71117: One or two 3.5" SATA I/II/III hard drives
· DN-71116: Capacity up to 4TB or more x 2
· Hard drives of identical capacities are recommended
· Supports large volumes in 2TB
Note: In order for the computer to access volumes larger than 2TB.
Both the hardware and OS need to have the capacity to support large
volumes (e.g.: Windows 7/Vista or Mac OS 10.4 and above).
1.4 Package Contents
· 1x 2-bay RAID storage enclosure
· 1x Power supply
· 1x USB3.0 cable
· 1x DN-711116: DC power cable
· 1x DN-711117: Power supply
· 1x Manual
Page 4

2 RAID Function
What is RAID?
RAID (Redundant Array of Independent Disks) is a set of
technology standards for teaming disk drives to improve fault
tolerance and performance
Why RAID?
Increased data protection. If in an unfortunate event where a
drive fails, the same data is preserved on the mirrored drive.
Intelligent array controllers can apply different types of RAID
for different hard disk drives. Increased overall network system
data capacity. Increased I/O read/write efficiency.
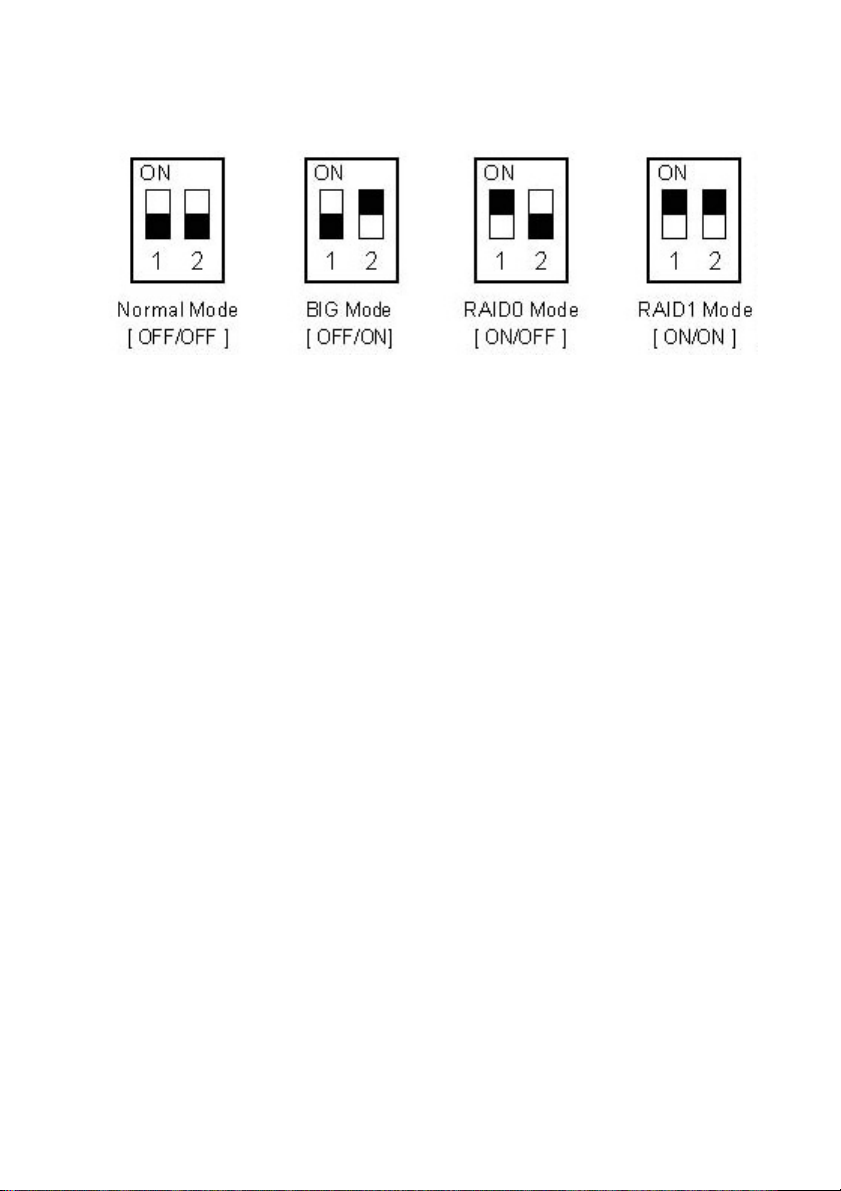
Setting the RAID Mode:
The RAID mode should be set before installing the drives and
then first formatting the drives.
1. Open the rear cover and pull out the plastic frame from the
aluminum-shell.
2. Set the RAID switch and select your preferred RAID mode.
There have 2 mode switch in the inner of the product, it can
form 4 kinds of different ways through these 2 switches, it
can realize 4 kinds of different functions as below:
Page 5
3. Install the hard drives and replace the rear cover.
4. Connect the product into the PC USB 3.0 port by USB3.0
cable, HDD LED should turn ON to indicate the SATA hard
drives were detected.
5. Format the drives.
6. Done
Note: Changing the RAID mode will require you to re-format the
drivers. Make sure to backup all existing data first!
※ Normal Mode (Non-Raid):
Normal mode, it's the default setting of HDD enclosure, and will
not use any RAID mode. In Normal condition, both of the two
hard disk mode inside the enclosure are in independent
operation state, and also will be identified as the two separate
hearts in the system, users can choose any hard drive for
storing files. If one piece of hard disk is damaged, the other
piece of hard disk data would not be influenced.
Page 6
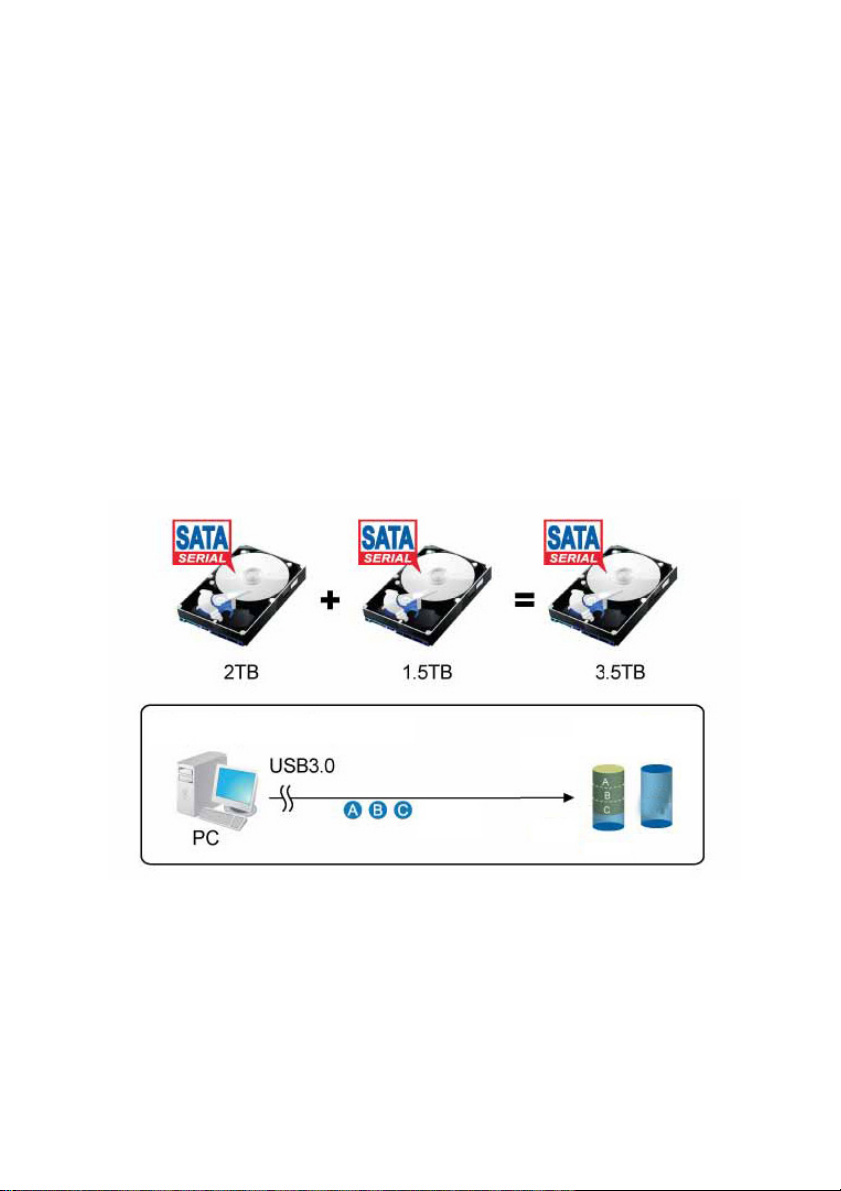
※ BIG Mode (JBOD or Spanning):
BIG model, in this mode, 2 hard disks will simply be bound for
one, the merger hard drive performance and literacy speed will
be same as single block of hard disk, the total capacity of the
portable hard disk equal to the sum of 2 hard drives of
capacities. Once writing data, the system specify date and start
storage from the first disk, when the storage space of the first
disk use up, the data will start be stored from the back disk in
turns. If the data in the first disk appears damaged, all of the
data in the two hard disks will be totally lost.
※ FAST Mode(Striping):
FAST mode it's also our familiar RAID 0 mode. In RAID 0 state,
data storage is divided into two parts, respectively in two hard
Page 7

disk storage, then the theory storage speed of hard disk is twice
the one of single block hard disk, the actual capacity equals to
twice the smaller capacity of the one hard drive(between the
two hard disk). The deficiency of RAID 0 is that any piece of
hard disk is failure; the whole RAID on data will not be restored.
Note: It's more suitable for copying HD movie
※ SAFE Mode(Mirroring):
Safe mode also is RAID 1 mode in this state, 2 hard drives are
closely mirrored. The actual capacity of portable hard drive
equals to the smaller capacity one, storage speed is same as a
single block of hard disk. The advantage of RAID 1's lies that any
piece of hard disk stored data losing, others can not lose, its
weakness is the capacity loss of hard drive is bigger.
Page 8

Note: For very important material, such as databases, personal
data, this is an absolutely safe storage solution.
3 System Setup
3.1 Hard Drive Assembly
For DN-71116
The drives can be installed at any position, there is no specific
order required.
Step 1: Unlock the switch at the rear cover and open it.
Page 9

Step 2: Pull out the plastic frame from the aluminum-shell
Step 3: Insert the HDDs to 7+15P SATA connectors on the PCBA
Corresponding. Fix two HDDs by the screws
Page 10

Step 4: Inset the plastic frame into the aluminum housing
Page 11

Step 5: Close the rear cover, HDD Installation completed
3.2 Hard Drive Assembly
For DN-71117
The drives can be installed at any position, there is no specific
order required.
Step 1: Take out the four screws on the back
Page 12

Step 2: Pull out the plastic frame from the aluminum-shell
Step 3: Insert the HDDs to 7+15P SATA connectors on the PCBA
Corresponding. Fix two HDDs by the screws
Page 13

Step 4: Inset the plastic frame into the aluminum housing
Page 14

Step 5: Fix the back panel by four screws
Step 6: HDD Installation completed
Page 15

3.3 Connect to computer
1. Connect one end (type Mini) of the USB cable into
the mini USB Port of your HDD enclosure.
2. Connect the other end of the USB cable (type A) into
any active USB port of the computer.
3. Connect Power supply to the enclosure and power up
the enclosure
4. Let OS search and install the driver automatically.
5. Use the disk management tool (PC) or disk utility (MAC)
to create a new partition and format the drives
6. Open “My Computer” to see your external hard drive
ready to use.
NOTE:
To enjoy USB 3.0 super speed up to 5Gbps,your computer must
be equipped with built-in USB 3.0 ports, or a USB 3.0 host PCI-e
card
Should use DC power cable to connect the computer for
providing extra power.
It is not possible to add more drivers to an existing RAID array
without re-formatting it. When adding additional drivers at a
later point, they will only be detected after the device has been
restarted and the drivers have been re-formatted.
Page 16

3.3 Files Backup Application
Please consult the help of application software for the backup
application installation and operation.
3.4 Replacing Hard Drives
When one drive fails, the HDD LED will display below state:
Model DN-71116:
If HDD1 Fails: LED1 off
If HDD2 Fails: LED2 off
Page 17

Model DN-71117:
If HDD1 Fails: LED1 off
If HDD2 Fails: LED2 off
If one drive fails and the RAID mode is set to RAID0 or BIG
(JBOD), the data will be lost and the system can not be accessed
again until the drive have been replace.Check the HDD LED
state and replace the faulty drive. The power must turn off
when replacing the driver.
1. For RAID 1, the RAID array will be rebuilt
automatically.During this process,the HDD LED will flash
(HDD R/W). Rebuilding the RAID array will take several
Page 18

hours,depending on the drive capacity.If RAID rebuilding
is OK, the HDD LED will keep light normally.If the
capacity of the new drive is less than the previous
drive,the HDD LED will display as above state.The rebuild
process can not be completed.
2. For RAID 0 and JBOD,restart the system and then format
the drives again.
3. For Non-RAID (Normal Mode),simply format the new
drive.
Note: We recommend not turning off the power during the rebuild
process but if the process is interrupted,it will continue rebuilding the
data as soon as the power is turned back on.
Hereby Assmann Electronic GmbH, declares that the Declaration of Conformity is
part of the shipping content. If the Declaration of Conformity is missing, you can
request it by post under the below mentioned manufacturer address.
www.assmann.com
Assmann Electronic GmbH
Auf dem Schüffel 3
58513 Lüdenscheid
Germany
 Loading...