

Page 1
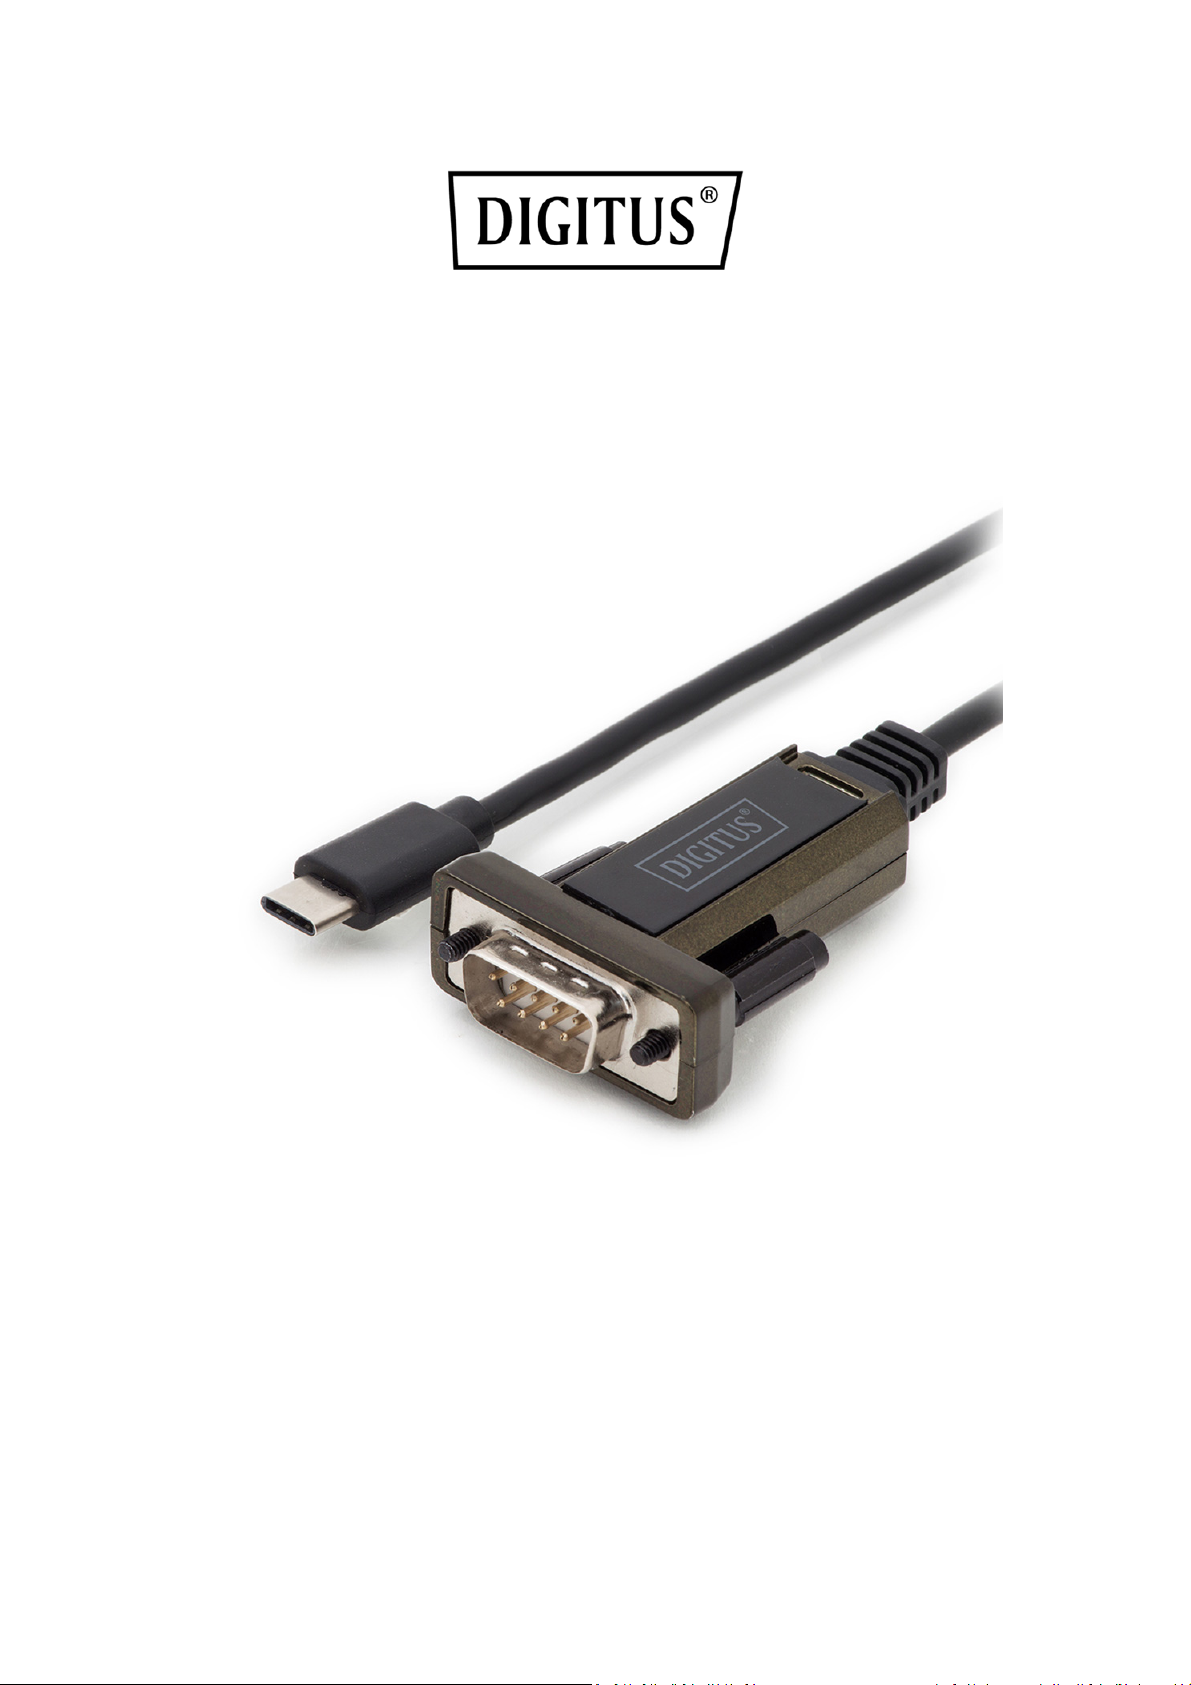
USB Type-C™ to Serial Adapter
Quick Installation Guide
DA-70166
This is elegant way to connect serial devices, for example weather stations,
sensors, motor controls, set-top-boxes, gaming consoles…etc. via USB. The high
compatibility guarantees transfer rates from more than 1Mbps.
Page 2
For Windows
Installing Drivers
To install drivers for a DA-70166 device under Windows 7, follow the instructions below:
Connect the device to a spare USB port on your PC.
If there is an available Internet connection, Windows 7 will connect to the
Windows Update website and install any suitable driver it finds for the device.
If the automatic installation takes place there is no need to continue with the
procedure outlined below.
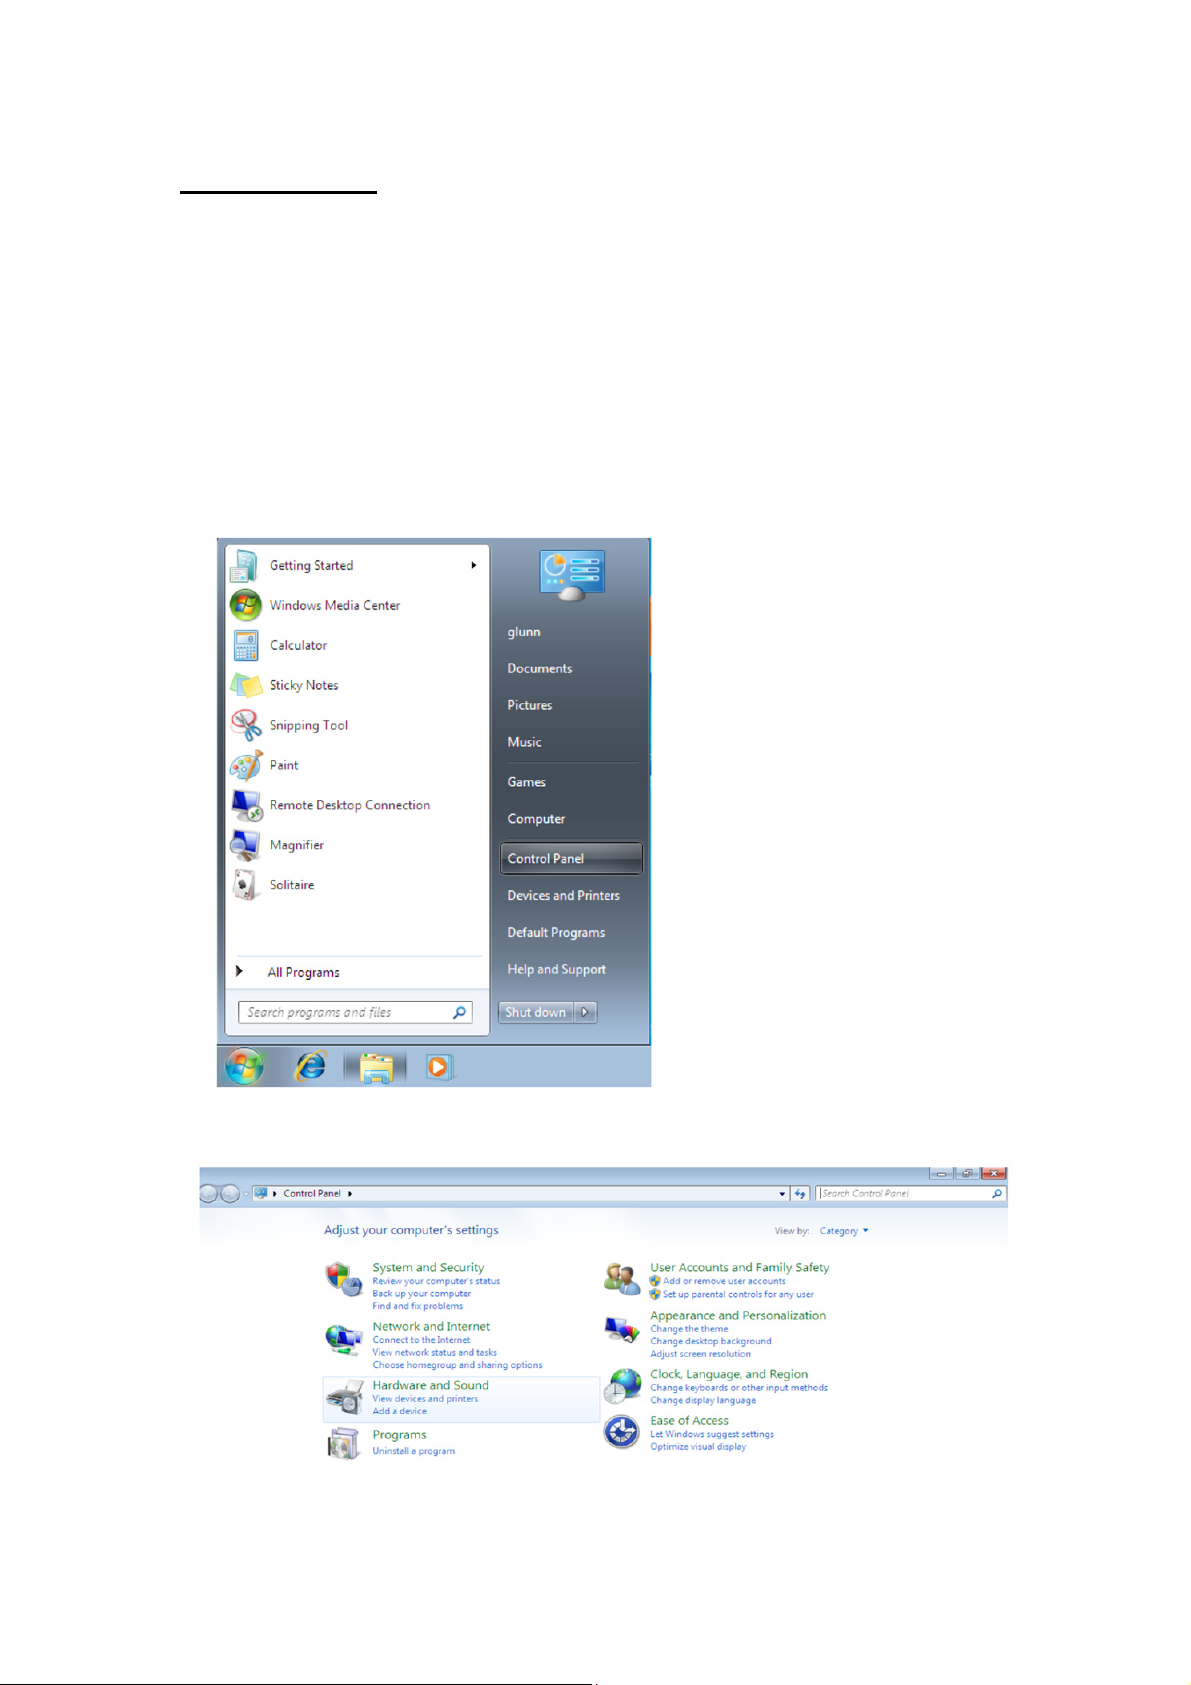
If no suitable driver is automatically found then the following procedure should
be followed. Press the Windows start button to bring up the start menu and
select “Control Panel”.
From the Control Panel window select Hardware and Sound
Page 3
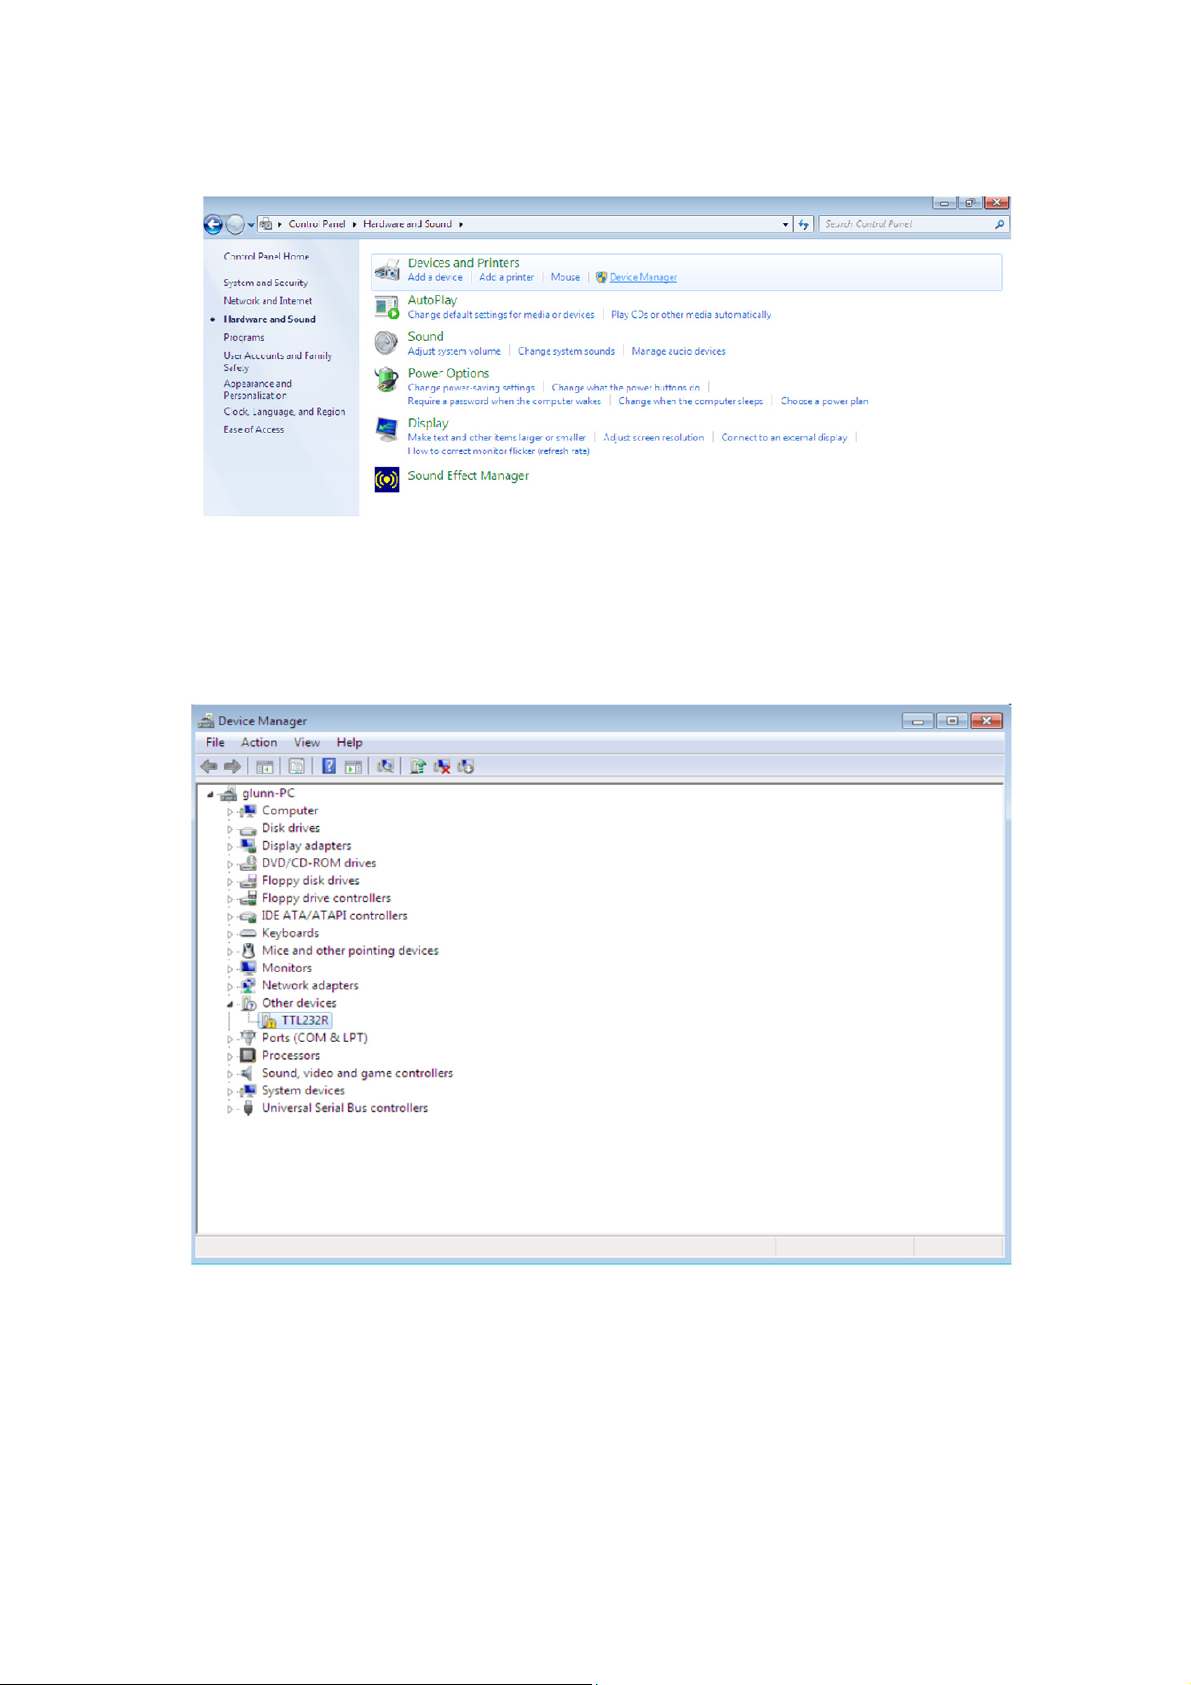
At the next screen select Device Manager:
In the Device Manager window there will be a device under Other Devices with a
yellow warning symbol to indicate a problem, i.e. no driver installed. The text next to
this device will depend on the device attached. In this example the device was a
TTL232R device.
Page 4
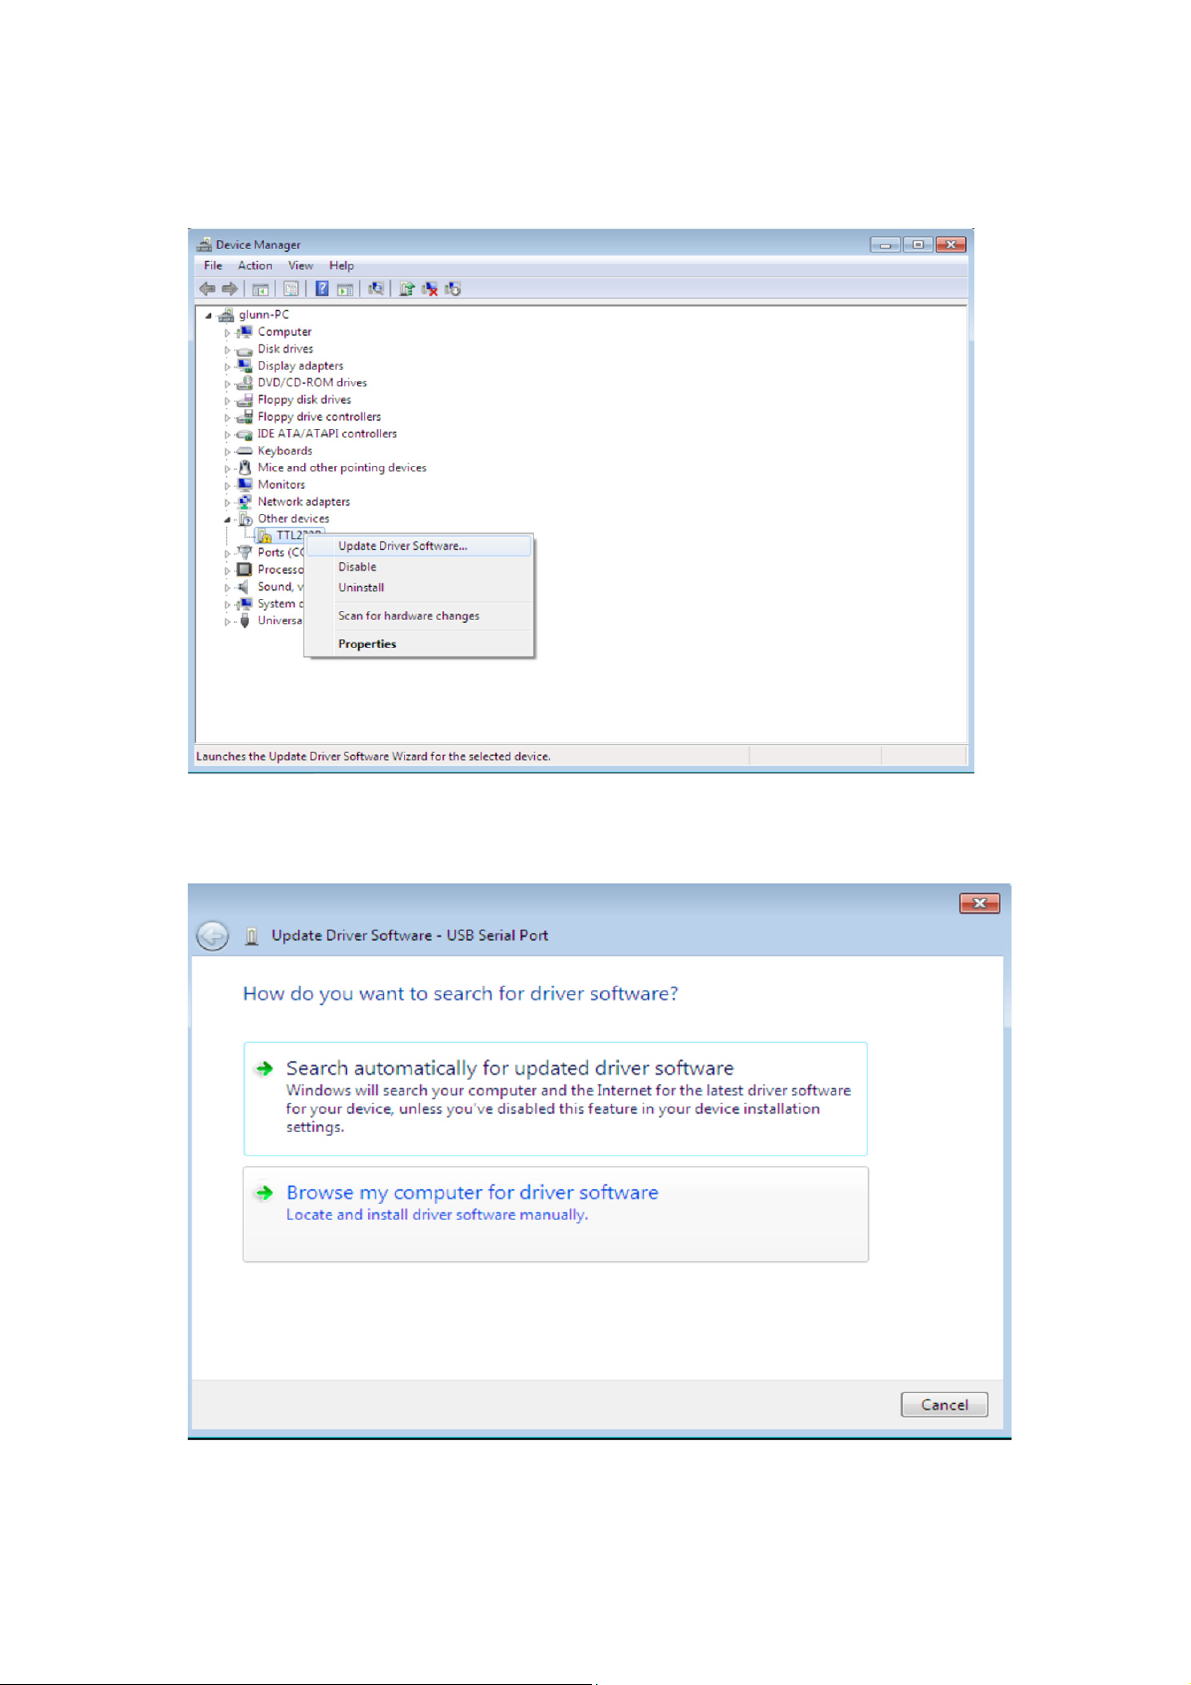
Right click on the other device (TTL232R in this example) to bring up a menu as
shown below.
From the displayed menu select “Update Driver Software…”
This then displays the option for an automatic search or a manual search.
Page 5
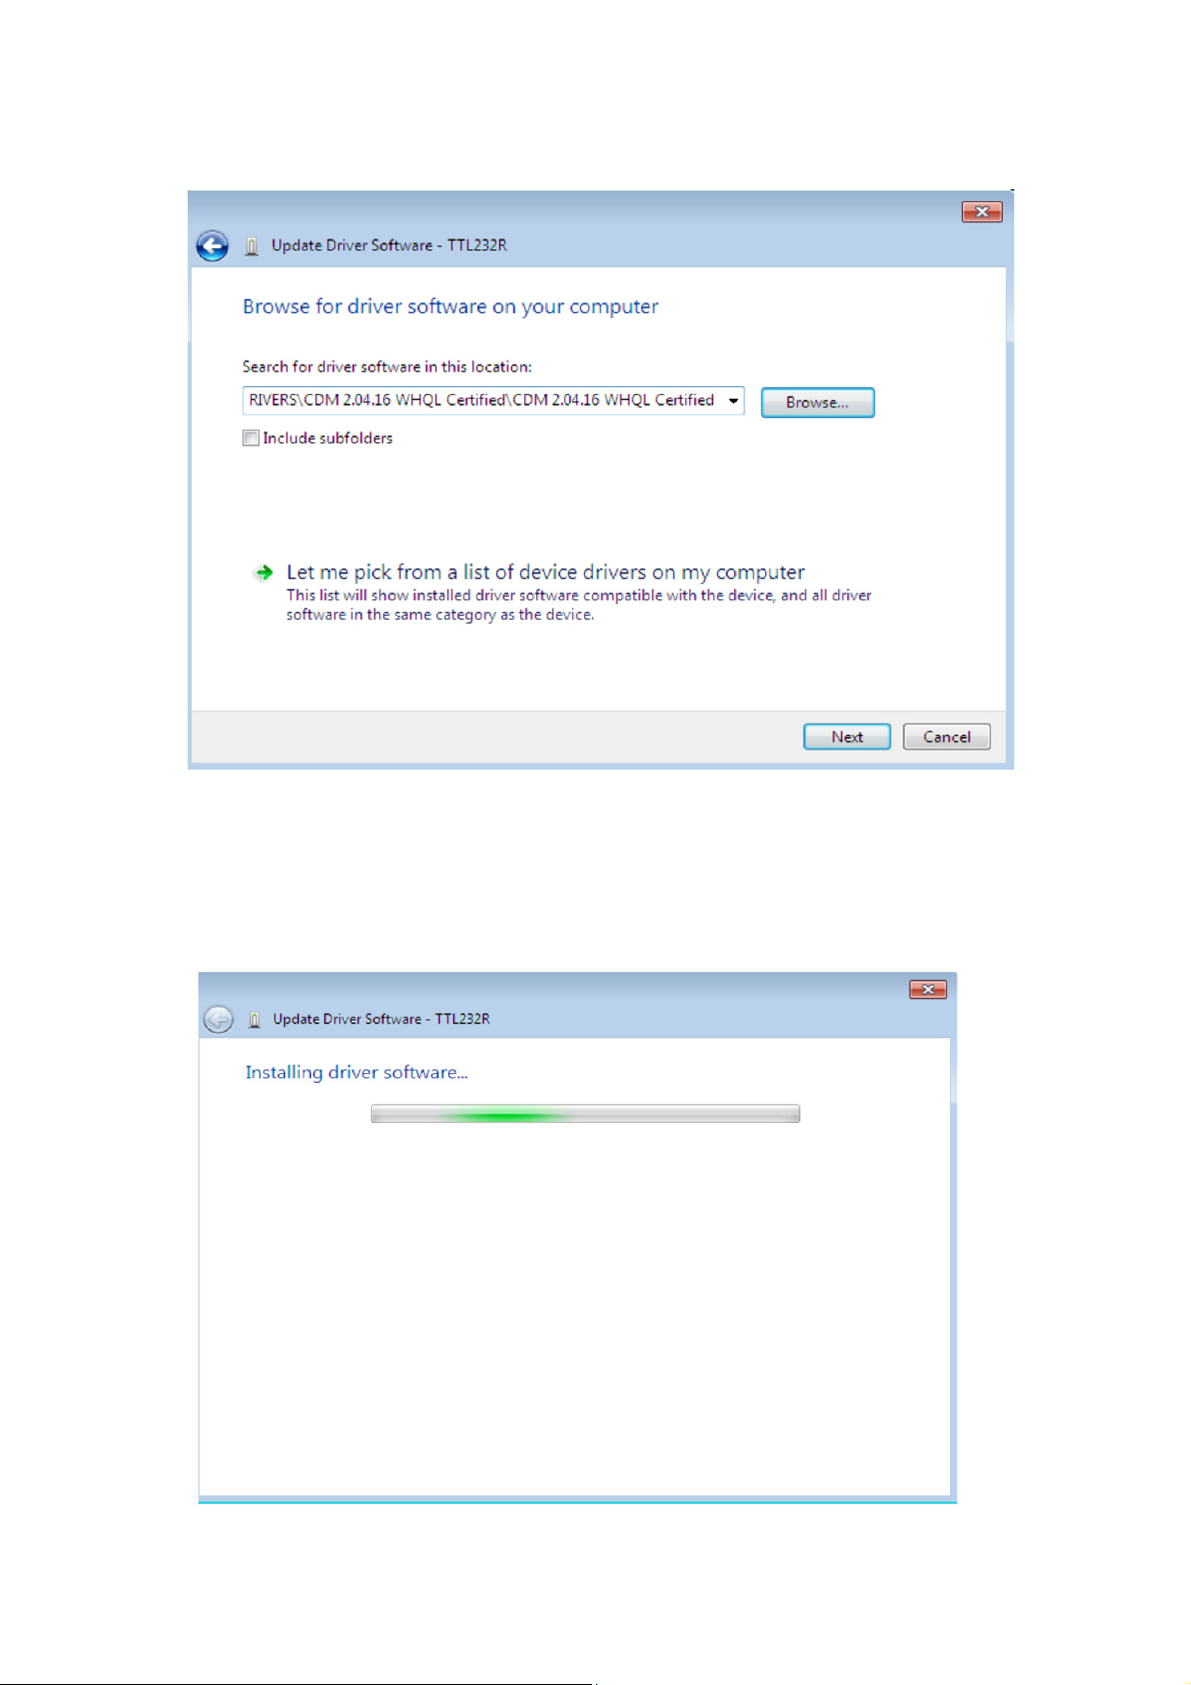
Select the second option to browse manually.
In the address box put the exact location where the drivers have been saved to. This
may be on a CD or in a folder on the PC. It is not necessarily the exact same location
as shown in the screenshot. The drivers could have been saved anywhere of the
users choosing.
After entering the address select “NEXT” to start the installation.
Page 6
When the installation has finished a completion screen is displayed.
Press Close to close this window and go back to the Device Manager Window.
Page 7

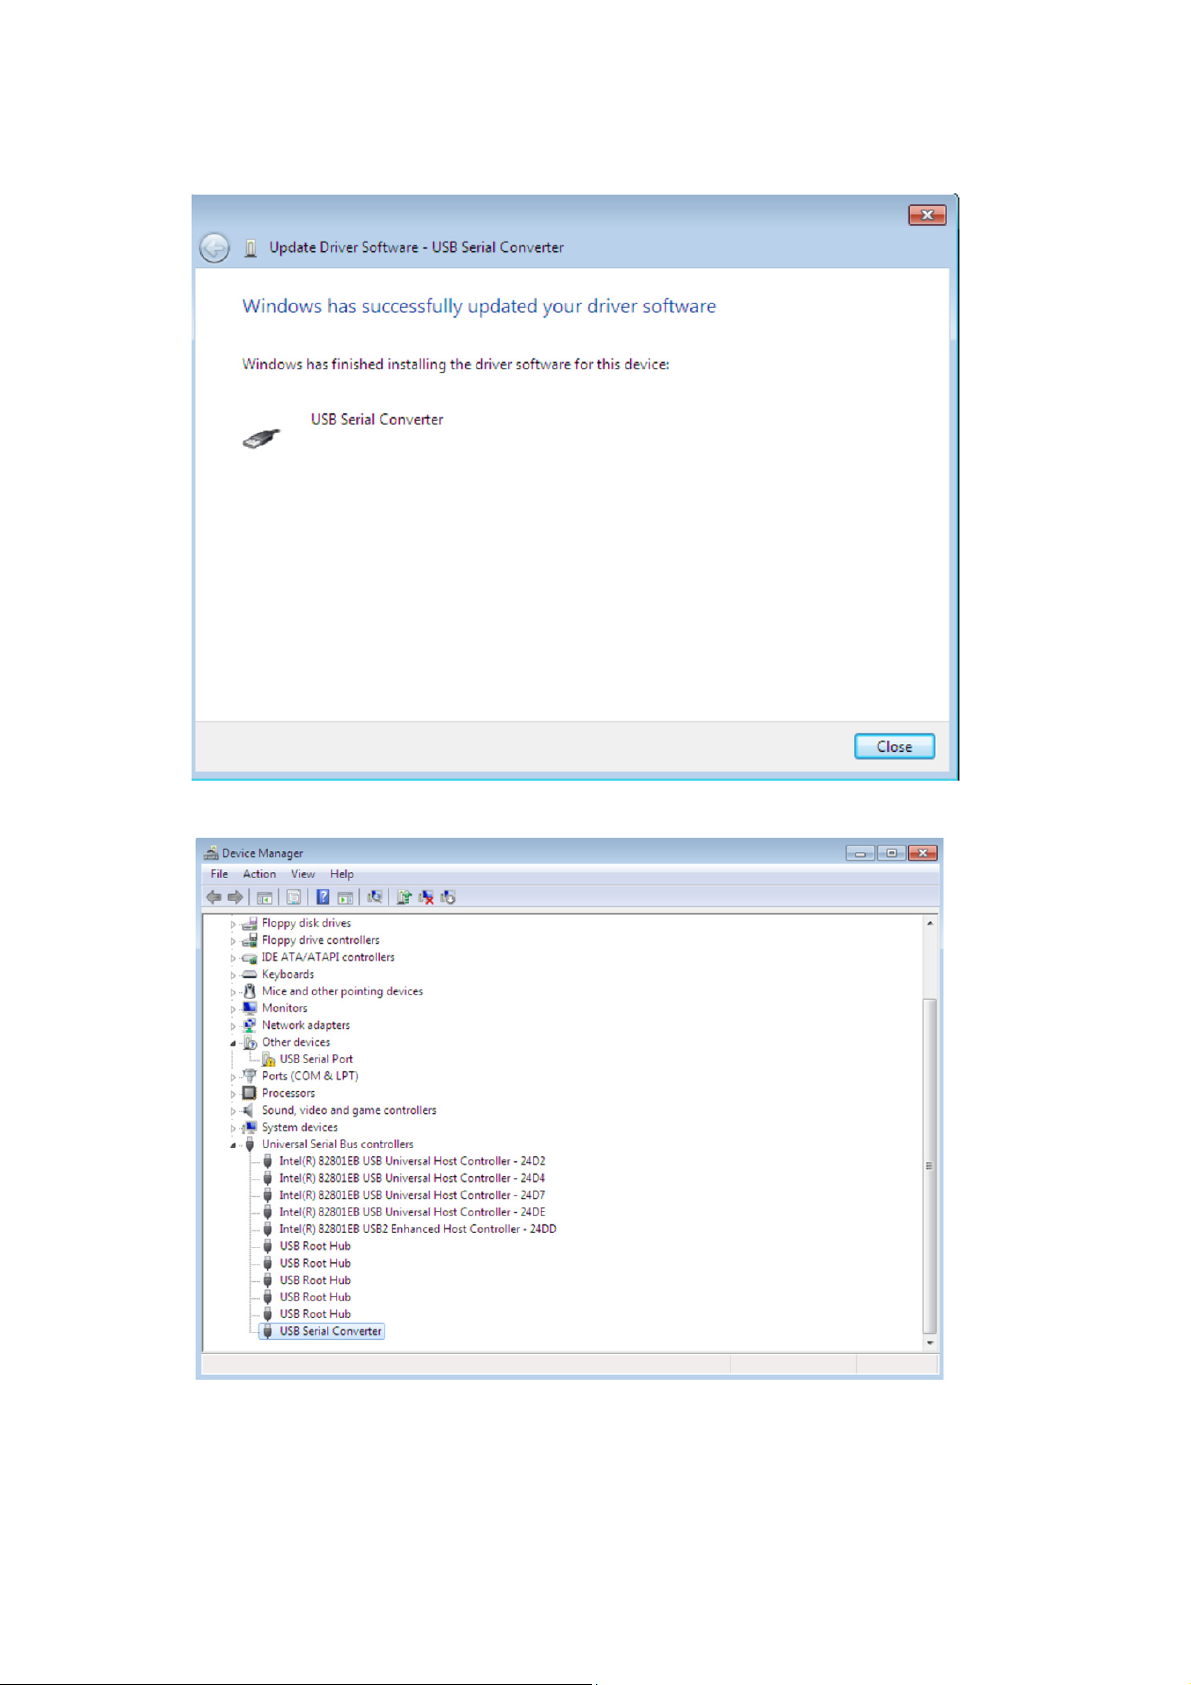
The Device Manager will still show a device under Other Devices but in addition to
this there is a new entry under Universal Serial Bus Controllers indicated in the
screenshot above as the USB Serial Converter. This indicates the bus layer of the
driver is installed. Installing the Virtual Com Port layer of the driver is almost a repeat
of the last few steps. Right click on the other device (TTL232R in this example) to
bring up a menu as shown below.
From the displayed menu select “Update Driver Software…” This displays the option
for an automatic search or a manual search.
Page 8

Select the second option to browse manually.
In the address box put the exact location where the drivers have been saved to. This
may be on a CD or in a folder on the PC. It is not necessarily the exact same location
as shown in the screenshot. The drivers could have been saved anywhere of the
users choosing. After entering the address select “NEXT” to start the installation.
Page 9

When the installation is finished a completion screen is displayed.
Note this screen also displays the COM port assigned to the device.
Press Close to close this window and go back to the Device Manager Window.
Page 10
This time the Device Manager does not have a TTL232R entry under Other Devices
but does show entries under Universal Serial Bus Controllers and Ports (COM & LPT).
The above screen shot displays a correct installation. The device is now ready to use
on COM3.
NOTE: Not all devices will install to COM3. The COM port allocation is determined by
the installation wizard on the basis of the next free com port as designated in the PC
registry.
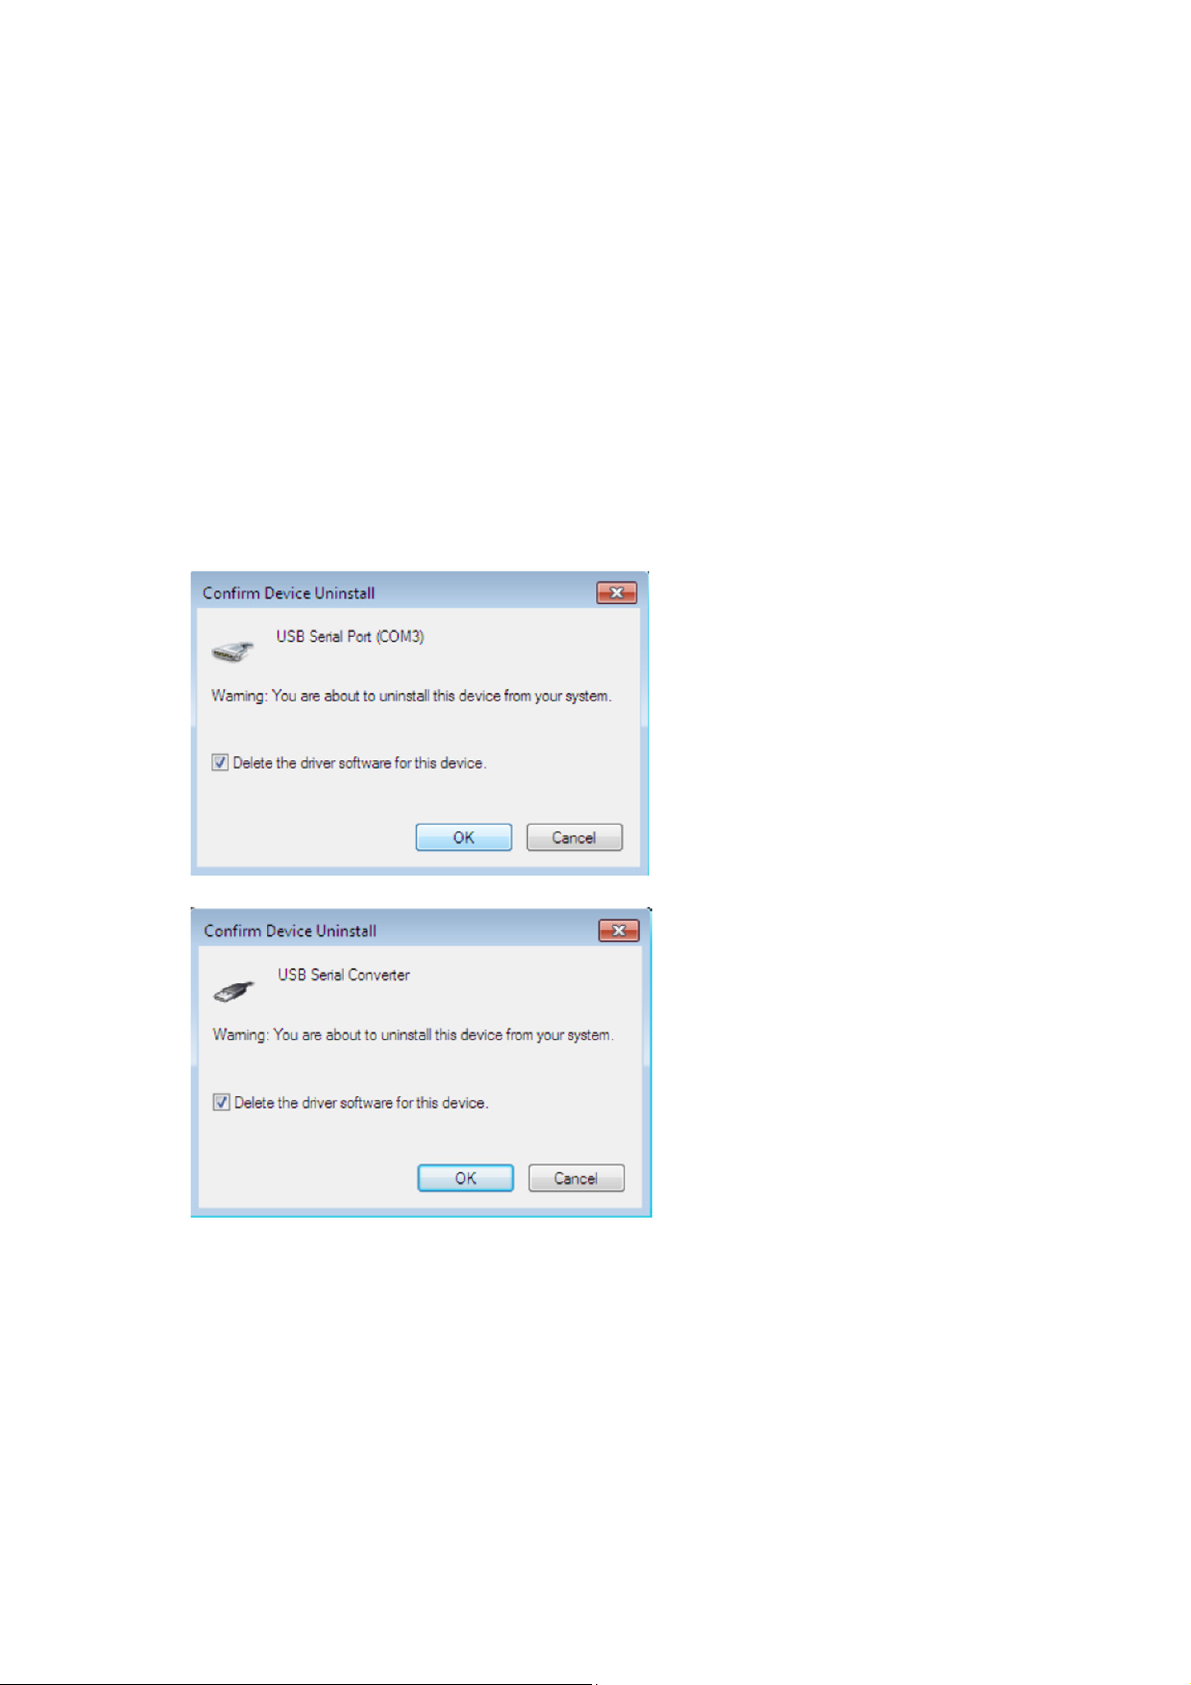
Uninstalling DA-70166 Devices
DA-70166 has produced an uninstaller application called CDM Uninstaller.
Devices can also be removed by using the Device Manager by simply right-clicking on
the mouse and selecting "Uninstall". This will delete the associated registry entries
for that device only. Windows 7 provides an automatic method to delete
This stage is done twice. Once for the device under Ports (COM & LPT) and once for
the device under Universal Serial USB Controllers. Windows 2000, XP and Server
2003 do not have this check box, so driver files and OEM INF and PNF files must be
removed manually or by using a custom application.
Page 11

Some points to note about the new un-installation method:
In the case of FT2232/FT4232 devices, a composite device is also installed. This can
also be removed by right-clicking and selecting "Uninstall". There is no option to
delete the driver files when doing this as the driver for the composite device is a
native Windows driver. If the VCP driver has been installed, the COM port driver
should be uninstalled before the USB driver. If the bus is removed first, the COM
port will no longer appear in the Device Manager.
If the files are deleted while other installed devices still require them those devices
will not work correctly. This can be fixed by right clicking the device and selecting
"Reinstall Driver" which will replace the missing files. If a device to be uninstalled is
not connected to the PC, the device can still be removed by setting the device
manager to show phantom devices. This also allows a virtual COM port to be
uninstalled if the bus layer has been removed first.
Troubleshooting
Windows 7 cannot find drivers for your device
This error can occur if the VID and PID programmed into the device EEPROM do not
match those listed in the INF files for the driver. The VID and PID programmed into
the device EEPROM may be found by using the USB View utility from the FTDI web
site. These can then be checked against the VID and PID entries in the driver INF files.
If they do not match, that driver cannot be installed for that device without either
re-programming the device EEPROM or modifying the list of VID and PID numbers in
the INF files.
Devices not shown in Device Manager for uninstalling
Devices that have been installed on a system but are not currently available are
referred to as "phantom devices". These devices are not usually displayed in the
device manager, but can be made to be displayed as though they are attached. This
allows device properties to be changed or devices to be uninstalled via Device
Manger even though the device is not physically connected to the PC.
Page 12

To display phantom devices in Device Manager, a new system variable is required.
Open "Control Panel > System" then select the "Advanced" tab and click "Environment
Variables". In the System Variables section (NOT THE USER VARIABLES SECTION), click
"New..." to display the following window:
Create a new System Variable called "DevMgr_Show_NonPresent_Devices" and set
the value to 1, then click OK.
Open the Device Manager ("Control Panel > System", then select the "Hardware" tab
and click "Device Manager…", or "Control Panel > Device Manager" in Windows 7)
and select "View > Show Hidden Devices". Device Manager will then show all hidden
and phantom devices available on that PC as shaded.
Windows 7 shows a warning that the driver is not certified
If the driver is not certified then a pop up window such as shown below will be
displayed.
If you are certain of the source of the driver the warning can be ignored and you can
continue installation by selecting “Install this driver software anyway”.
If you are unsure about the driver source contact your vendor.
Page 13

Appendix A - Abbreviations
Terms Description
PID Product ID, a unique product identification issued by the holder of the
Vendor ID
VID Vendor ID, a unique vendor identification number issued by the USB
USB USB Universal Serial Bus
WHQL WHQL Microsoft Windows® Hardware Quality Labs
OS Operating System
For Mac:
Installing USB Serial Driver
Download the driver from the Drivers section of the FTDI web site and save it to the
hard disk. The driver is now available in disk image (.dmg) format. Run the installer
by double clicking on the USBSerialDriver.dmg.icon.
Page 14

Click Continue to proceed with the installation and follow the instructions on screen.
When the installation is complete, reboot the computer.
When the computer has rebooted, plug in the device. If the device is installed
properly, you will see entries in the/dev directory:
/dev/cu.usbserial-xxxxxxxx
/dev/tty.usbserial-xxxxxxxx
where xxxxxxxx is either the device's serial number or, for unsterilized devices, a
location string that depends on which USB port your device is connected to. Note
that for FT2232C devices port A is denoted by the serial number appended with "A"
and port B is designated by the serial number appended with "B".
/dev can be accessed through the Terminal application. The Terminal application can
be launched by selecting Go > Applications > Utilities > Terminal. Type the following
lines in the Terminal window to produce the file list:
cd/dev
ls-l
Page 15

If you run the application System Preferences and select Network (Go > Applications
> System Preferences > Network), you should see the text "New Port Detected".
Click OK and select Network Port Configurations from the Show list. The new port
can be enabled from this screen by checking the on box and clicking Apply Now.
Page 16

At this point, it is possible to exit Network and use the device as a COM port. If you
wish to set the device up a modem for an Internet connection, select the new port
from the Show list to display the window below. Please note that the FT2232C
device has two ports available and these must be configured separately.
Entries for this screen are specific to the Internet account for each user. If you do not
know the required details, contact your Internet service provider.
Page 17

Uninstalling USB Serial Driver
To remove the drivers from Mac OS X, the user must be logged on as root. Root is a
reserved username that has the privileges required to access all files.
Start a Terminal session (Go > Applications > Utilities > Terminal) and enter the
following commands at the command prompt:
cd/System/Library/Extensions
rm -r USB Serial Driver.kext
The driver will then be removed from the system.
To remove the port from the system, run the application System Preferences and
select Network. Selecting Network Port Configurations from the Show menu will
display the port as greyed out. Select the uninstalled port and click Delete. Confirm
the deletion to remove the port.
Page 18

Troubleshooting
How do I know what my device ID is?
Launch the System Profiler utility or Apple System Profiler for earlier versions of OS X.
This can be accessed by going to the Finder and selecting Applications from the Go
menu then open the Utilities folder.
If the device does not work after installing the driver, it is likely to be because the
PID is not supported by the driver. If this is the case, contact FTDI Support with the
PID that needs to be added to the driver. If the VID is not 0x0403, it is likely that the
device is not an FTDI device and we cannot support it.
The device does not appear in the/dev directory or the text "New Port Detected" is
not displayed in SystemPreferences-Network
USB Serial Driver does not support your device ID (VID and PID). Disable the EEPROM
so that the device reverts to its default device ID, then re-plug.
To get support for your device ID built into USB Serial Driver, contact FTDI quoting
your device ID and a description of your device.
Page 19

The device cannot be accessed even though the device ID is supported in USB
Serial Driver
An ownership or permissions problem is preventing the system from making the
device accessible. Check that the driver is owned by root and wheel. The most
common symptom is the group for USB Serial Driver is not wheel. To change the
group, login as root and perform the following script in a Terminal window
(Go > Applications > Utilities > Terminal):
cd/system/library/extensions
chgrp -R wheel USB Serial Driver.kext
Reboot for the change to take effect.
How do I open a Terminal window?
A Terminal window can be started by selecting
Go > Applications > Utilities > Terminal
The terminal window is equivalent to a DOS prompt in Windows.
Herby Assmann Electronic GmbH, declares that the Declaration of Conformity is part
of the shipping content.
If the Declaration of Conformity is missing, you can request it by post under the
below mentioned manufacturer address.
www.assmann.com
Assmann Electronic GmbH
Auf dem Schüffel 3
58513 Lüdenscheid
Germany
 Loading...