

Page 1

2-PORT NAS
SATA HDD ENCLOSURE
Quick Installation Guide
Page 2
Getting started
This is a step-by-step instruction on how to start using the storage server.
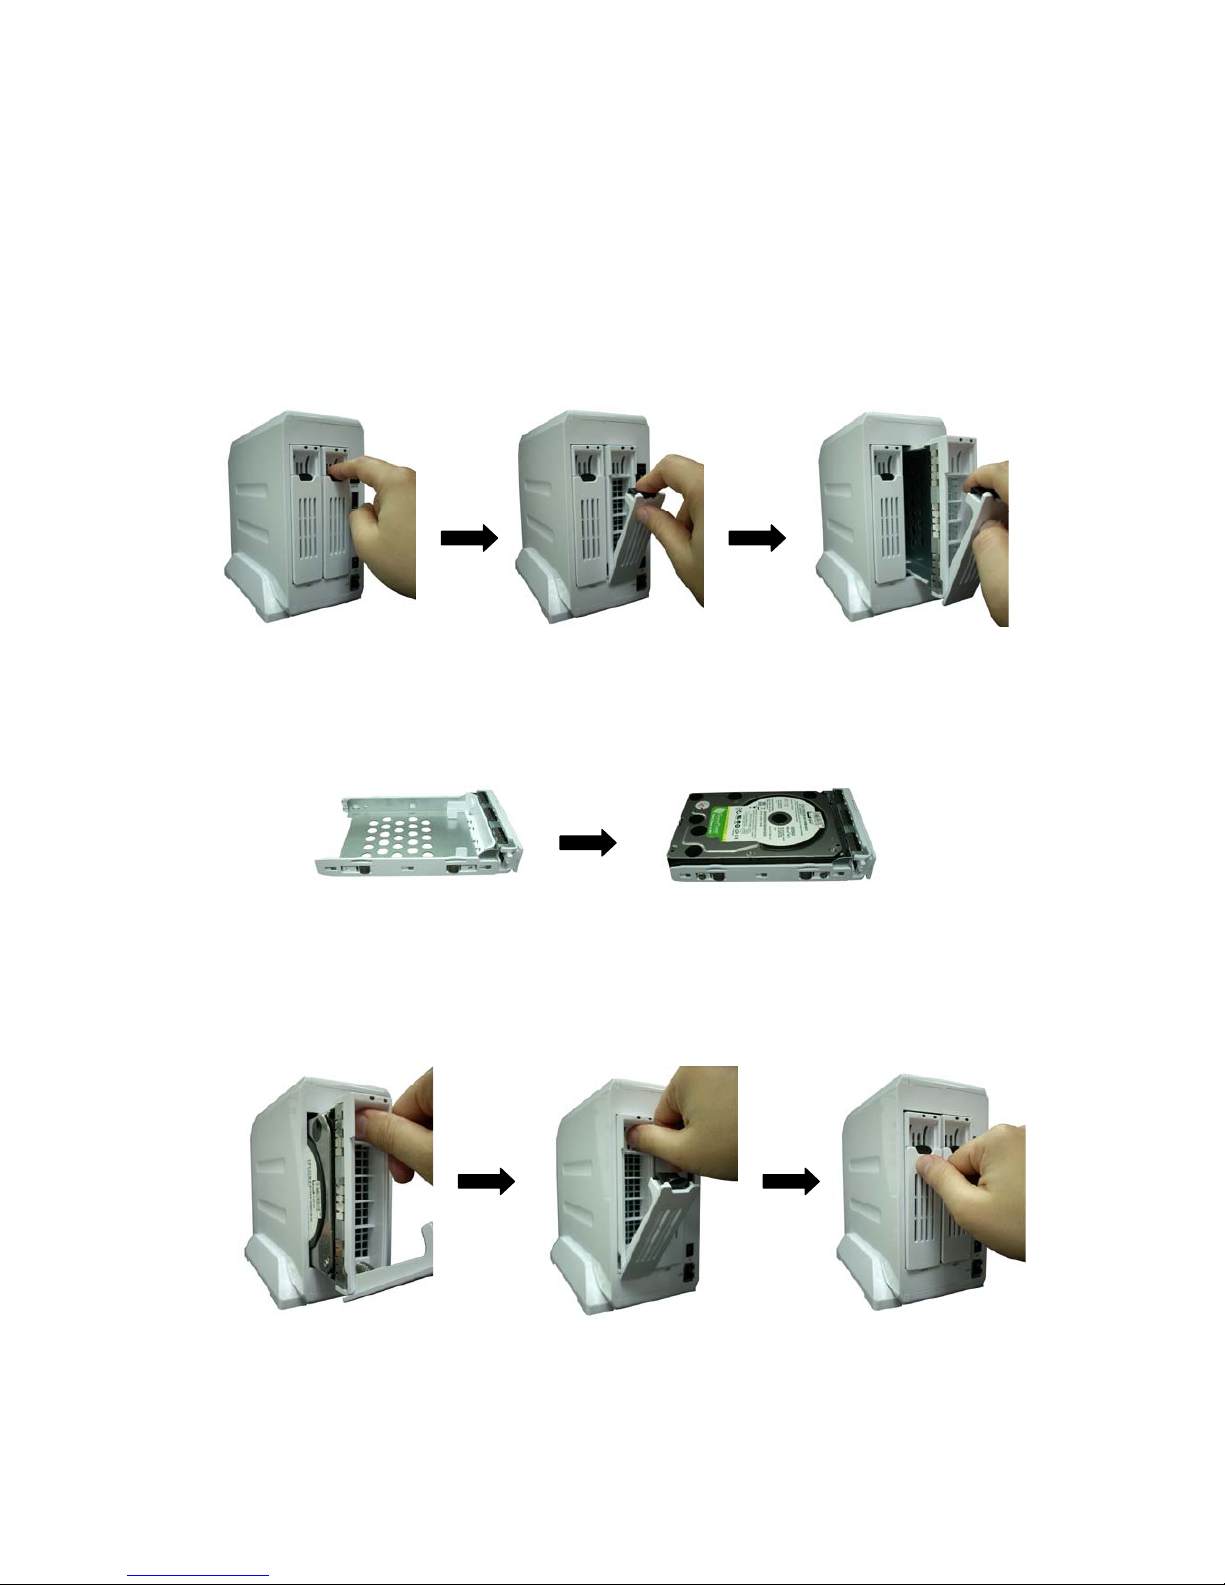
1) Pull out the disk drawer from the case of storage server as shown in the setup di agram
below.
2) Fix your SATA hard disk driver in the drawer by screws as shown in the setup diagram
below.
3) Push the disk drawer with hard disk driver installed back into the case of storage server as
shown in the setup diagram below.
Page 3
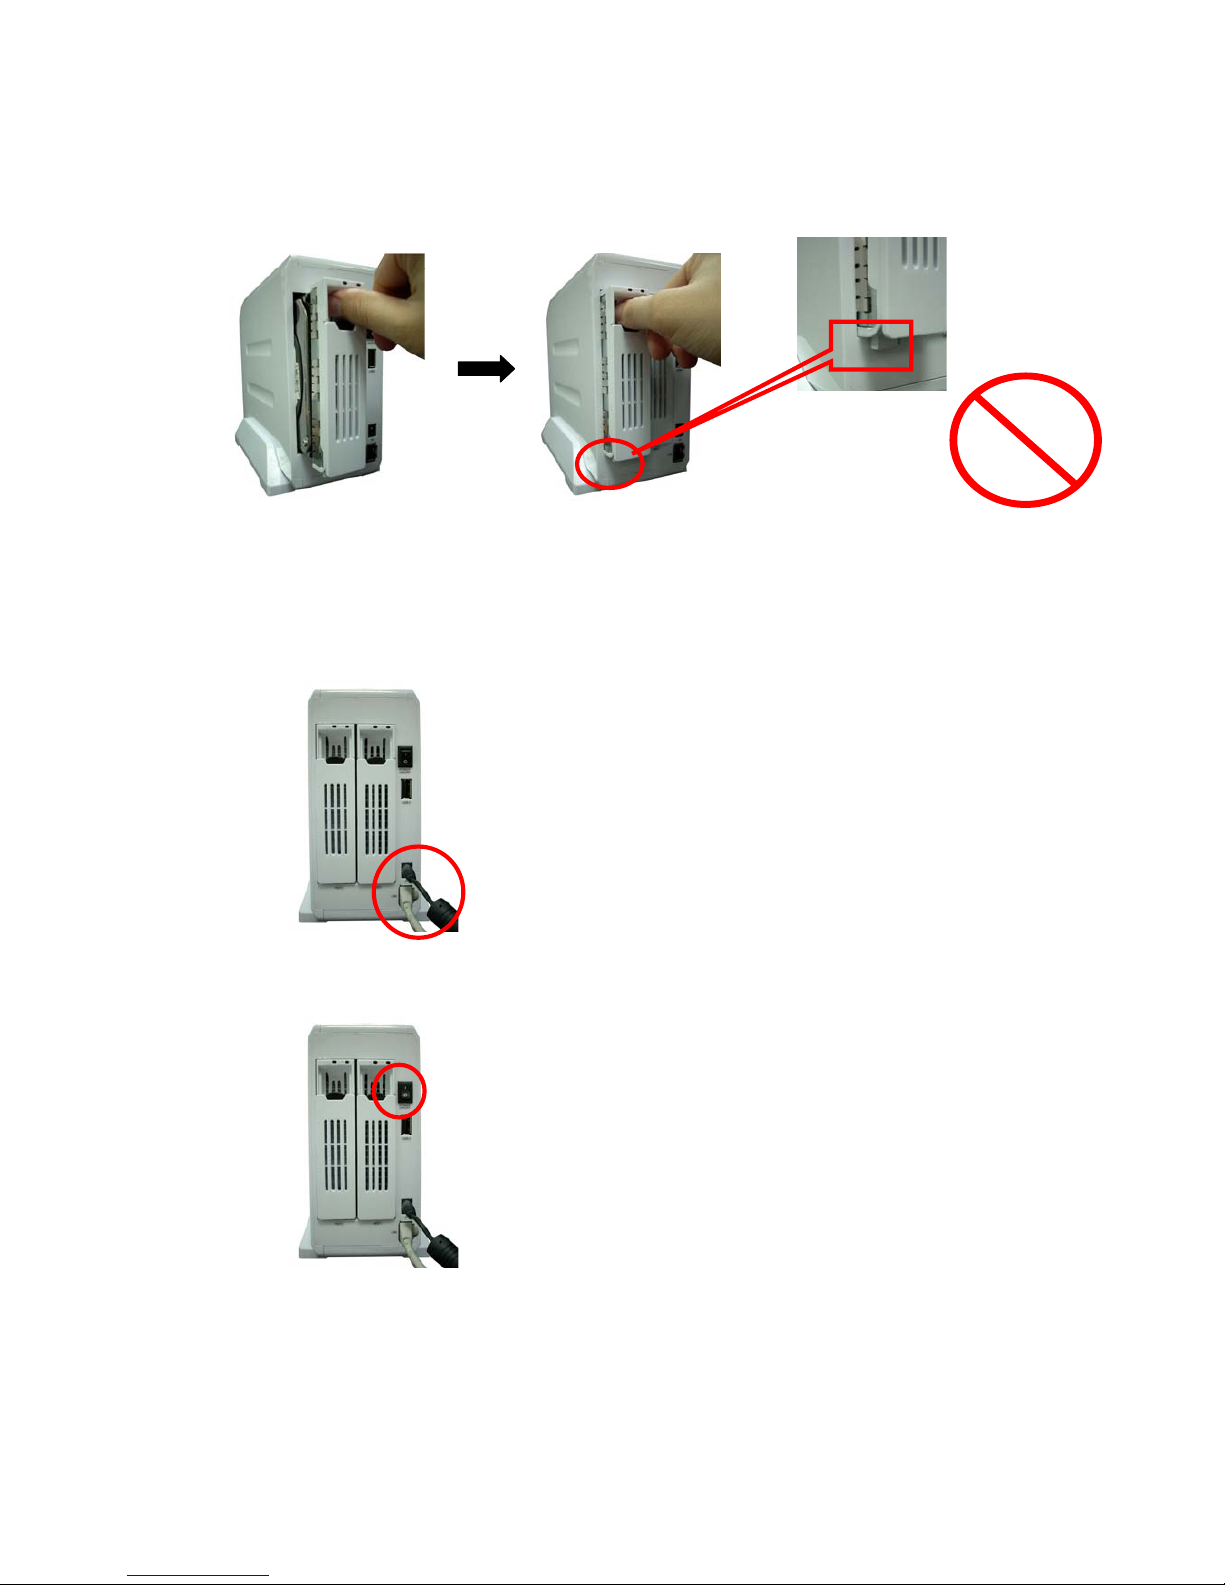
Note: Please make sure the disk drawer is safely installed.
For example, please DO NOT install hard disk by the way showed in the following pictures.
The disk drawer is
not safely installed
4) Plug the power adaptor to the storage server and connect the storage server to your
network as shown in the setup diagram below.
5) Power on the storage server by pressing the power switch of the storage server on as
shown in the setup diagram below.
6) When the HDD LED of SATA is lighted, the storage server is ready.
Page 4
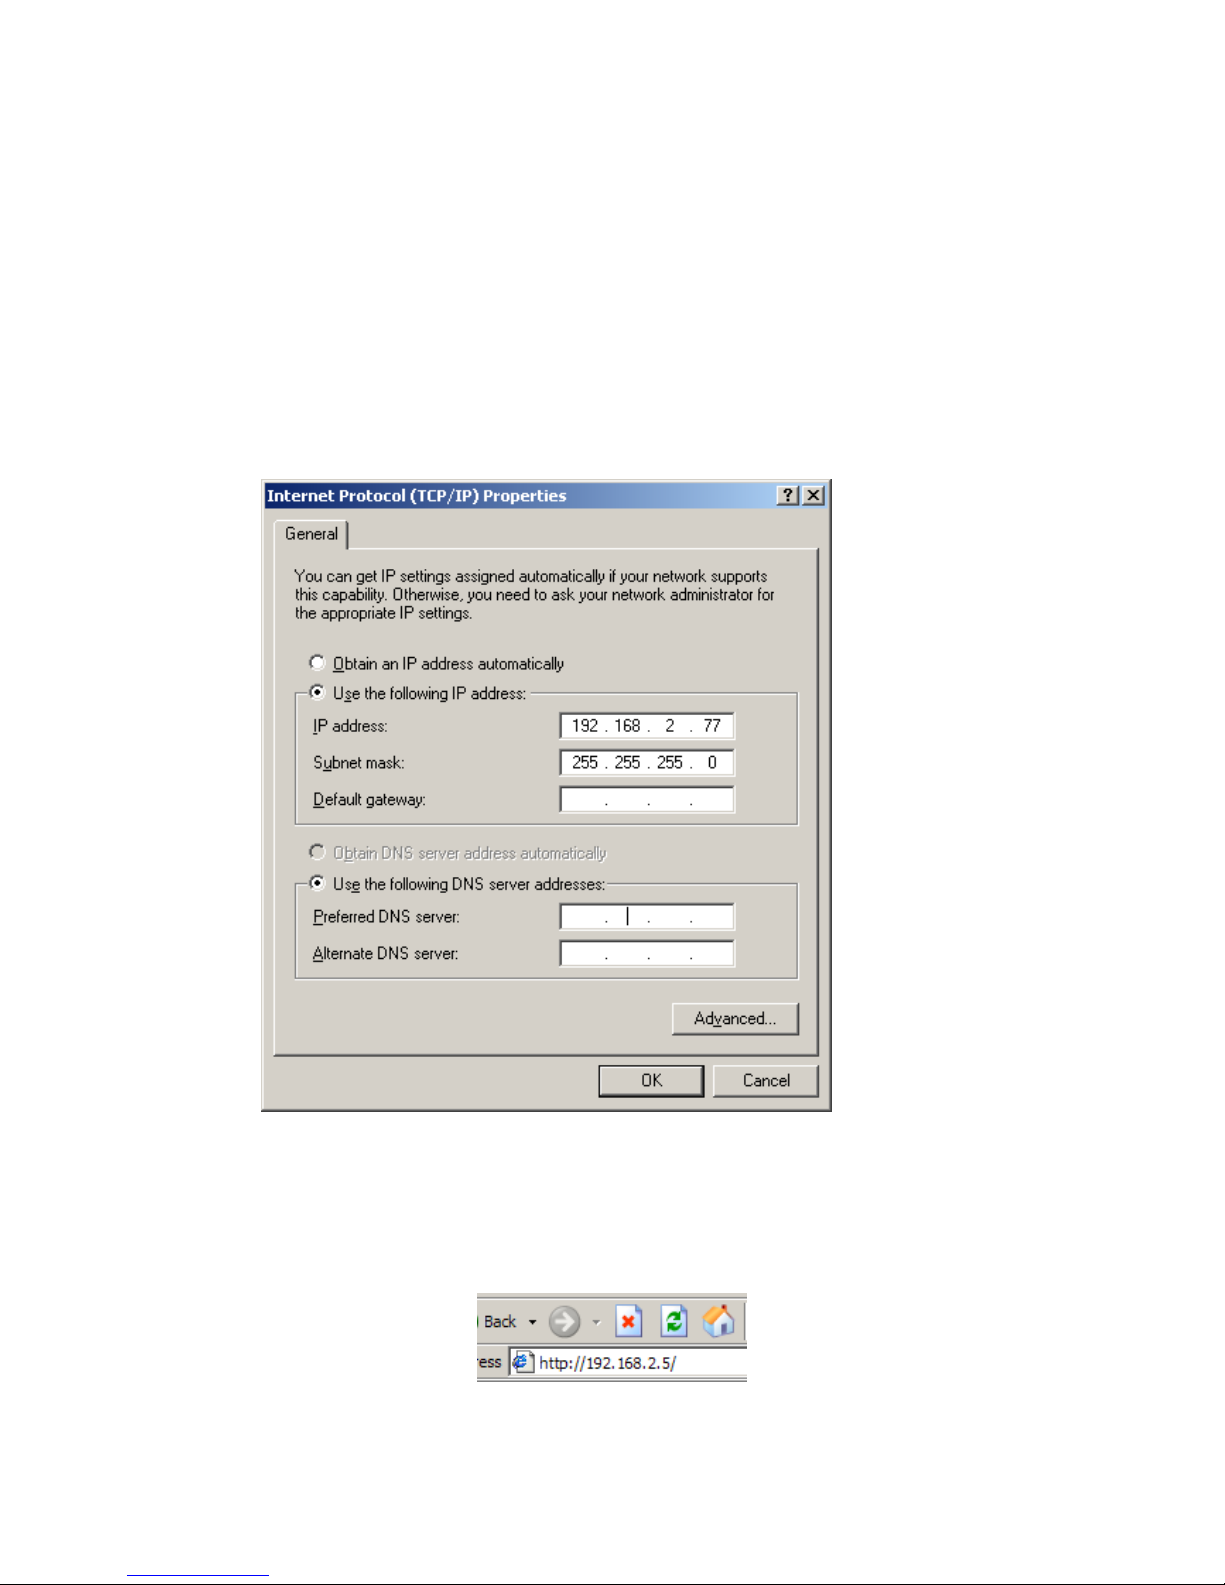
7) The default IP address of storage server is 192.168.2.5. The PC to setup the sto rage
server should be in the same subnet as the storage server. If the IP address of your PC is
not in the range of 192.168.2.1~254, please modify the Windows IP address of your PC as
following diagram.
Note: If you have to modify the Windows IP address of your PC, please remember the original
Windows IP address settings of your PC. After you finished the whole quick setup procedure,
you have to modify the Windows IP address settings of your PC back to the original values to
make your PC work well.
8) Once the IP address of your PC is in the same subnet of the storage server, enter the
URL of default IP address http://192.168.2.5 (default IP address of this storage server)
into your PC’s web browser and press <enter>
Page 5
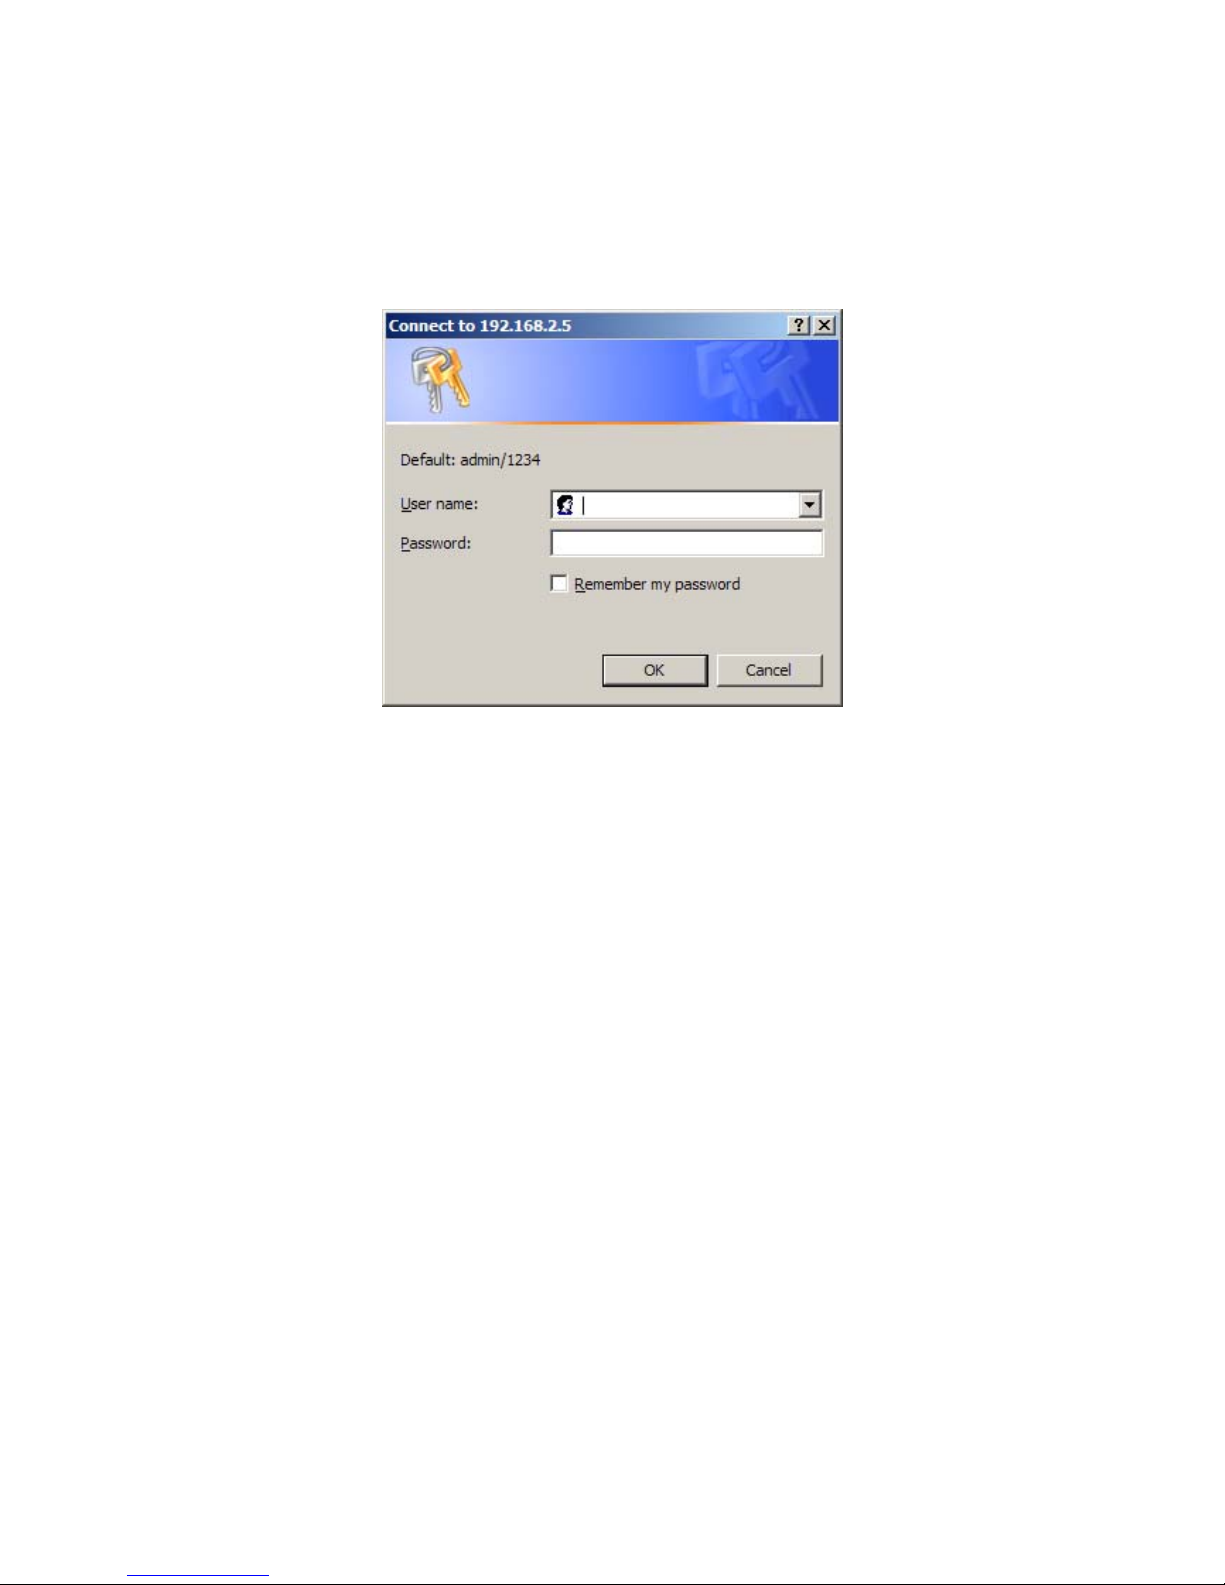
9) The login screen below will appear . Enter the “User Name ” and “Passwo rd” and then cli ck
<OK> to login.
Note: By default the user name is “admin” and the password is “1234”.
Quick Setup
The Quick Setup section is designed to get you using the storage server as quickl y as possible.
In the Quick Setup you are required to fill in only the information necessary to simply share the
storage in your network. Once you click on the Basic in the HOME page, you should see the
screen below.
Step 1) Setup Time Zone
The Time Zone allows your storage server to base it s time on the settings config ured here. It is
important to keep track of correct update time of all files stored in this storage server. You can
setup the storage server to automatically get correct time from the Internet every time when it
startup. Or you can also enter current time manually, and the storage server will count the time
by itself (There is a battery inside the storage server to make it keep counting correct time
when the storage server is powered off).
Page 6
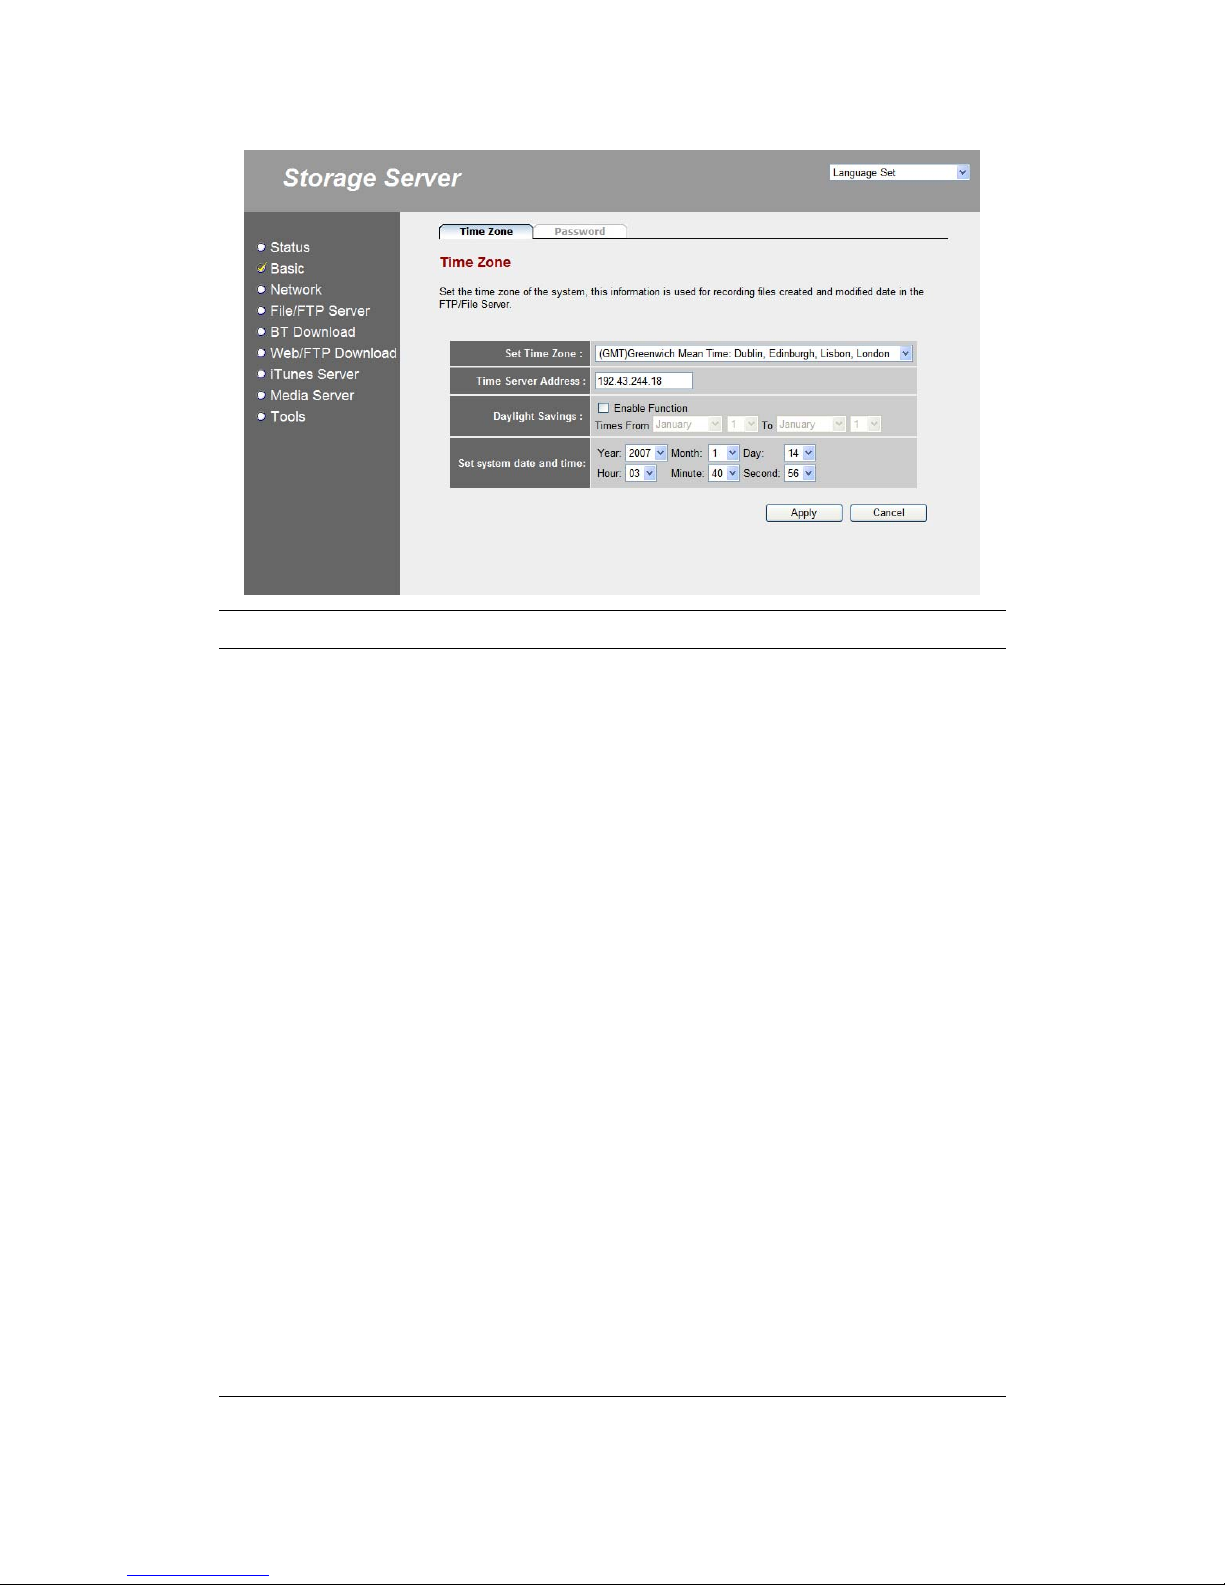
Parameter Description
Set Time Zone Select the time zone of the country you are currently in.
The router will set its time based on your selection.
Time Server Address You can manually assign time server address if the
default time server does not work.
Enable Daylight Savings The router can also take Daylight savings into account.
If you wish to use this function, you must check/tick the
enable box to enable your daylight saving configuration
(below).
Start Daylight Savings Time Select the period in which you wish to start daylight
Savings Time
End Daylight Savings Time Select the period in which you wish to end daylight
Set System Date and Time If your network is not connected to the Internet, the
storage server will have no chance to get correct time
from the time server. In this case, you can manually
assign current time here.
Click on Apply to save settings and then in the next page, click Continue to continue setting.
Page 7

Step 2) Setup Network
A suit able IP address is required to make the storage server work well in your network. The IP
address used by the storage server should be of the same subnet as your network. If there is
an active DHCP server in your network and you do not need the FTP server fun ction, you can
set the storage server to obtain an IP address automatically. Otherwise, it is suggested
assigning a static IP to the storage server.
Parameter Description
Obtain an IP address Select Obtain an IP address automatically if you
automatically want this storage server get an IP from an active DHCP
server in your network.
Use the following IP address Select Use the following IP address if you want to
assign a static IP address to the storage server.
IP address The IP address used by the storage server in your
network. Please make sure that this IP address is not
used by any other PC and network device in your
network.
Subnet Mask Please enter the subnet mask of your network.
Page 8

Gateway Address Please enter the default gateway IP address of this
storage server. Usually, it is the LAN IP address of the
router that you are using to access the Internet.
DNS Address Please enter at least one DNS address. DNS address
is the IP address of DNS server which provides domain
name service to you.
Click on Apply to save settings and then in the next page, click Continue to continue setting.
Page 9

Step 3) Partition and format internal hard disk drive
Click Tools, and in the first page Storage Tools click Auto Partition & Format button of HDD
1 Port.
This function will automatically clear your hard disk drive (remove all old partitions in your hard
disk drive), create one partition and format the newly created partition with ext2 format which
provides the best performance.
Note: All dat a originally stored in the internal hard disk drive will be removed. Please backup
the old data in the hard disk drive before using it. If this is not what you want, please stop the
quick setup procedure and refer to the User’s Manual for advanced setup.
If you make sure that you want this tool to clear the content of the internal hard disk drive and
make new partition and format for you, please click OK to continue.
Page 10

During the process of partition and format, the following screen will display. It will take several
minutes. The time required depends on the size of the hard disk drive.
When the process of partition and format is finished, the following screen will display. Click OK
to continue setup.
Page 11

Step 4) Setup File Server
Click File/FTP Server, and go to the second page File Server.
The default storage name is “Storage” which will be displayed in the “My network places” list.
Please make sure that the name does not conflict with other PC or devices in your network.
You also can assign another name and then click Save to save the new name.
After setting the storage name, you have to add a folder and share it. The following procedure
is step-by-step instructions to help you creating a new folder named “public” and share it to all
users anonymously in your network (It means all users in your network can access the new
created folder “public” without password). If this is not what you want, please stop the quick
setup procedure and refer to the User’s Manual for advanced setup.
Click Add in the Shared Folders section in the same page. Then an Add/Edit Shared Folder
page shows.
Page 12

In the Add/Edit Shared Folder page, enter the folder name “public”. Click Browse to assign a
path for the folder, then the assign folder path window pops up.
In the assign folder path window, click HDD1 icon (HDD1 represent the internal SATA hard disk
drive). Then the partitions of HDD1 will display in the bottom right list.
Page 13

Click partition C: icon. Then the list of folders in partition C: will be displayed.
Because partition C: of HDD1 is newly created by Auto Partition & Format function, there is
no folders in partition C: now . So the list is empty. We have to create a new folder named
“public” in partition C: Click New Folder, and then an Add New Folder window pops up.
Page 14

Enter the name of the new folder “public”, and then click New.
Now you can see the newly created folder “public” displayed in the folder list of partition C:.
Select folder “public” by click its icon. Th en the content list of folder “public” will be displayed.
Because the folder “public” is newly created and there is no file or folder in it, so the list is
empty . Now the Path displ ays the complete path of the folder “public”. Click Submit to confirm
and return to the Add/Edit Shared Folder page.
Page 15

Now you can see the path of newly created folder “public” is assigned as the path of the
shared folder. Select Anon ymous Sharing to allow users access the folder without
authentication by password. Click Read & Write to allow users have the right the read and
write files in the folder “public”. You also can enter a description of this folder. After you have
confirmed every thing, click Save to save the settings.
Page 16

Step 5) Restart the storage server
Shut down the storage server by pressing the power button and wait until the LEDs are all
turned off. And then start the storage server by pressing the power button and wait until the
SATA LED is lighted.
Step 6) Start to use the File Server
In a Windows PC, open the Windows Explorer . Enter the address “\\Storage” and press
<enter>.
Page 17

Then the icon of the shared folder “public” will be displayed. You can double click the icon of
the shared folder “public” to enter the folder and start to use it.
 Loading...