

Page 1

User`s Manual
1/12
SM-800
DVB-S/S2 METER
User`s Manual
Buttons and Indicators ................................................................................................................... 2
How to measure ............................................................................................................................. 3
Main menu ....................................................................................................................................... 4
LNB Setting ..................................................................................................................................... 4
Edit Satellite .................................................................................................................................... 6
Spectrum Chart ............................................................................................................................... 7
Constellation ................................................................................................................................... 8
Angle Calculation ........................................................................................................................... 9
Settings .......................................................................................................................................... 10
TP Control ..................................................................................................................................... 10
Main Features ............................................................................................................................... 11
Specifications ................................................................................................................................ 12
Accessories ................................................................................................................................... 12
Trouble shooting ........................................................................................................................... 12
Please refer to the following notes before use.
• Please read this user manual carefully to be able to safely use and maintain your meter.
• The technical specifications and operation guides in this manual are subject to changes without notice.
• Before using the first time, please charge the battery for 3 hours.
• Please use the special adapter for charging attached with the meter and do not use it for other product
• In case of any technical questions, please contact your local dealer.
Page 2
User`s Manual
2/12
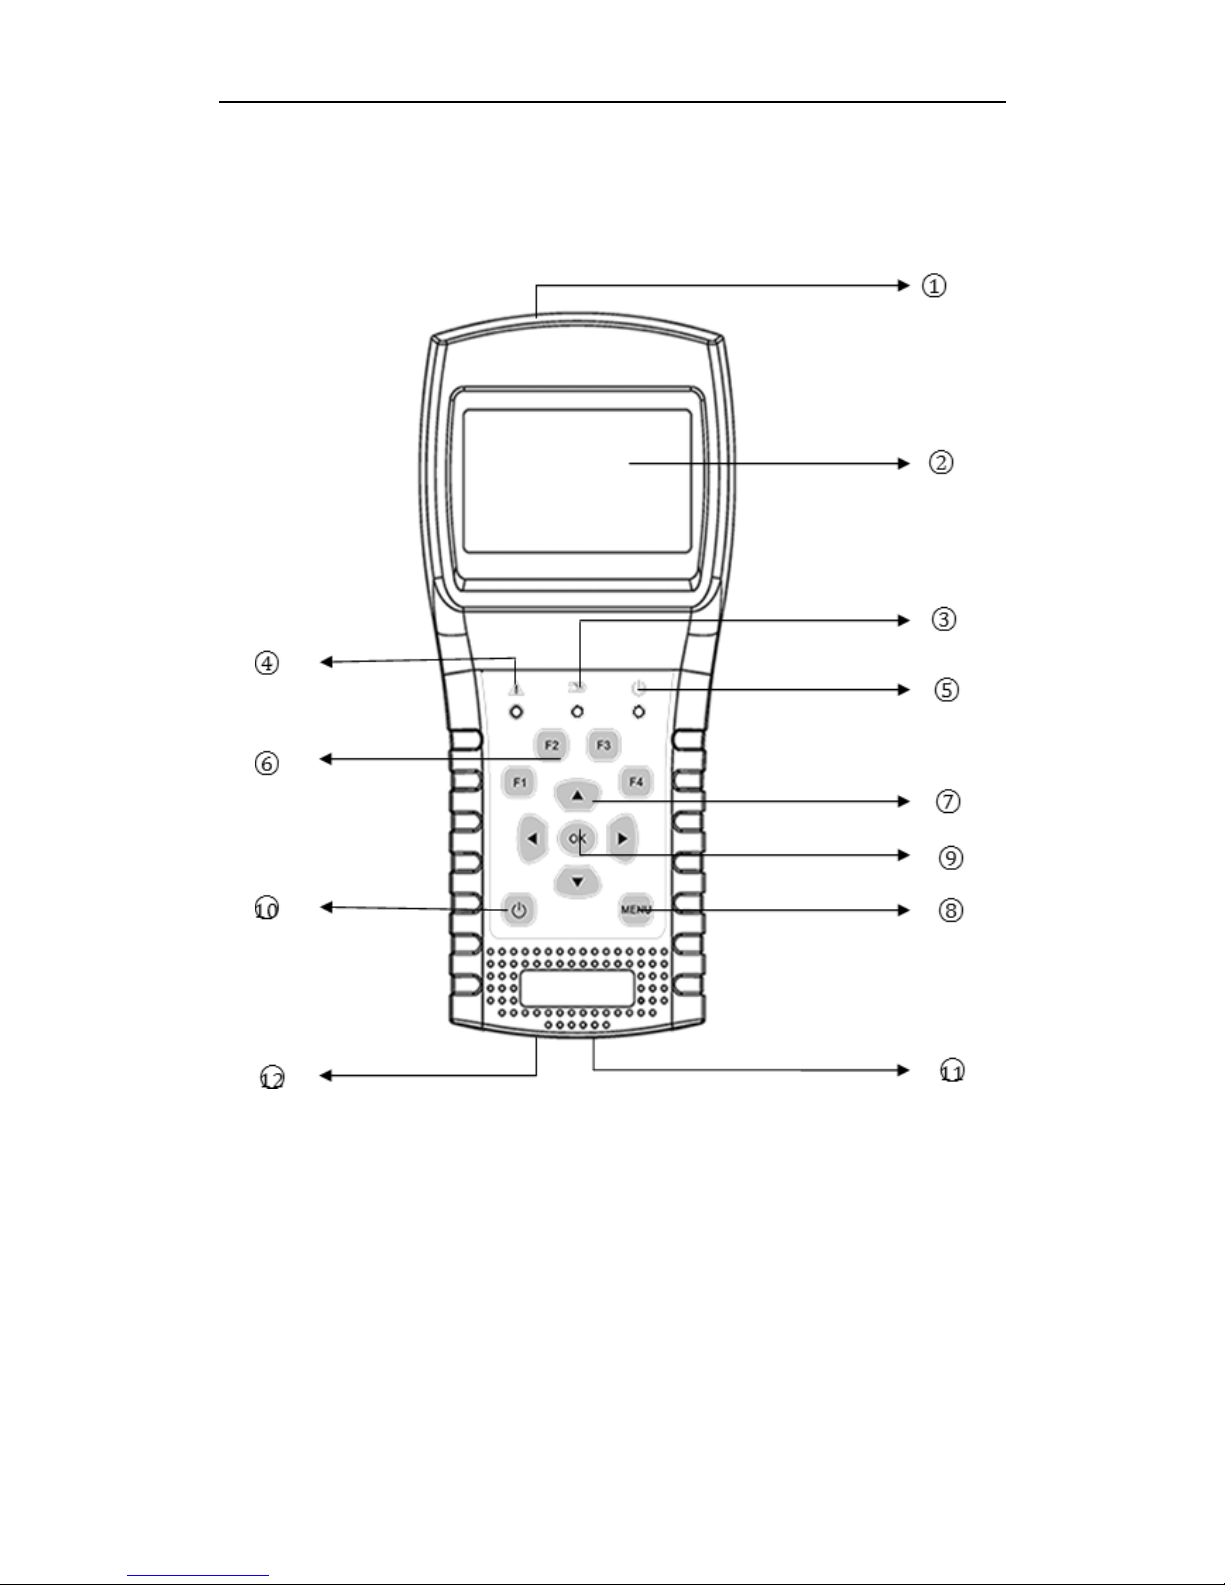
Buttons and Indicators
○
1 . LNB INPUT: signal input port, connects directly to antenna using coaxial cable.
○
2 . LCD Screen: Show menus and parameters.
○
3 . Charge Light:
Red: the battery is being charged.
Blue: the battery is full.
○
4. Warn Light: Flash if LNB is short connected
○
5 . Working Light:
Green: the meter is in working status
○
6. F1: Turn on/off the screen display
Page 3
User`s Manual
3/12
F2: Enable/disable deep when pressing keys
F3: Unused with this product
F4: Unused with this product
○
7. ◄/►: Move focus or change value . ▲/▼: Move focus or change value
○
8 . MENU: Go into main menu or exit from the current menu
○
9. OK: Confirm
○
10. : Turn the meter on/off, press and hold for 2 seconds to power on the meter.
○
11 . Charging: Connect with the charger cord for charging the equipment.
○
12 . Reset: Reset the meter
How to measure
Connect the antenna to LNB INPUT port first.
Power on the meter, then FINDER menu will be show on the screen. Press [▲/▼] to switch between Satellite,
transponder, LNB type. Press [◄/►] to change the value of focused item. Press [OK] to edit value or enter the data list
to select. Please select the correct satellite which the signal cable is connecting to and the correct LNB type of your
current LNB antenna. Then switch between transponders to check the signal. The lock status, CNR, PWR, Strength
and Quality will be displayed on the screen.
Please refer below descriptions if you want to learn all functions.
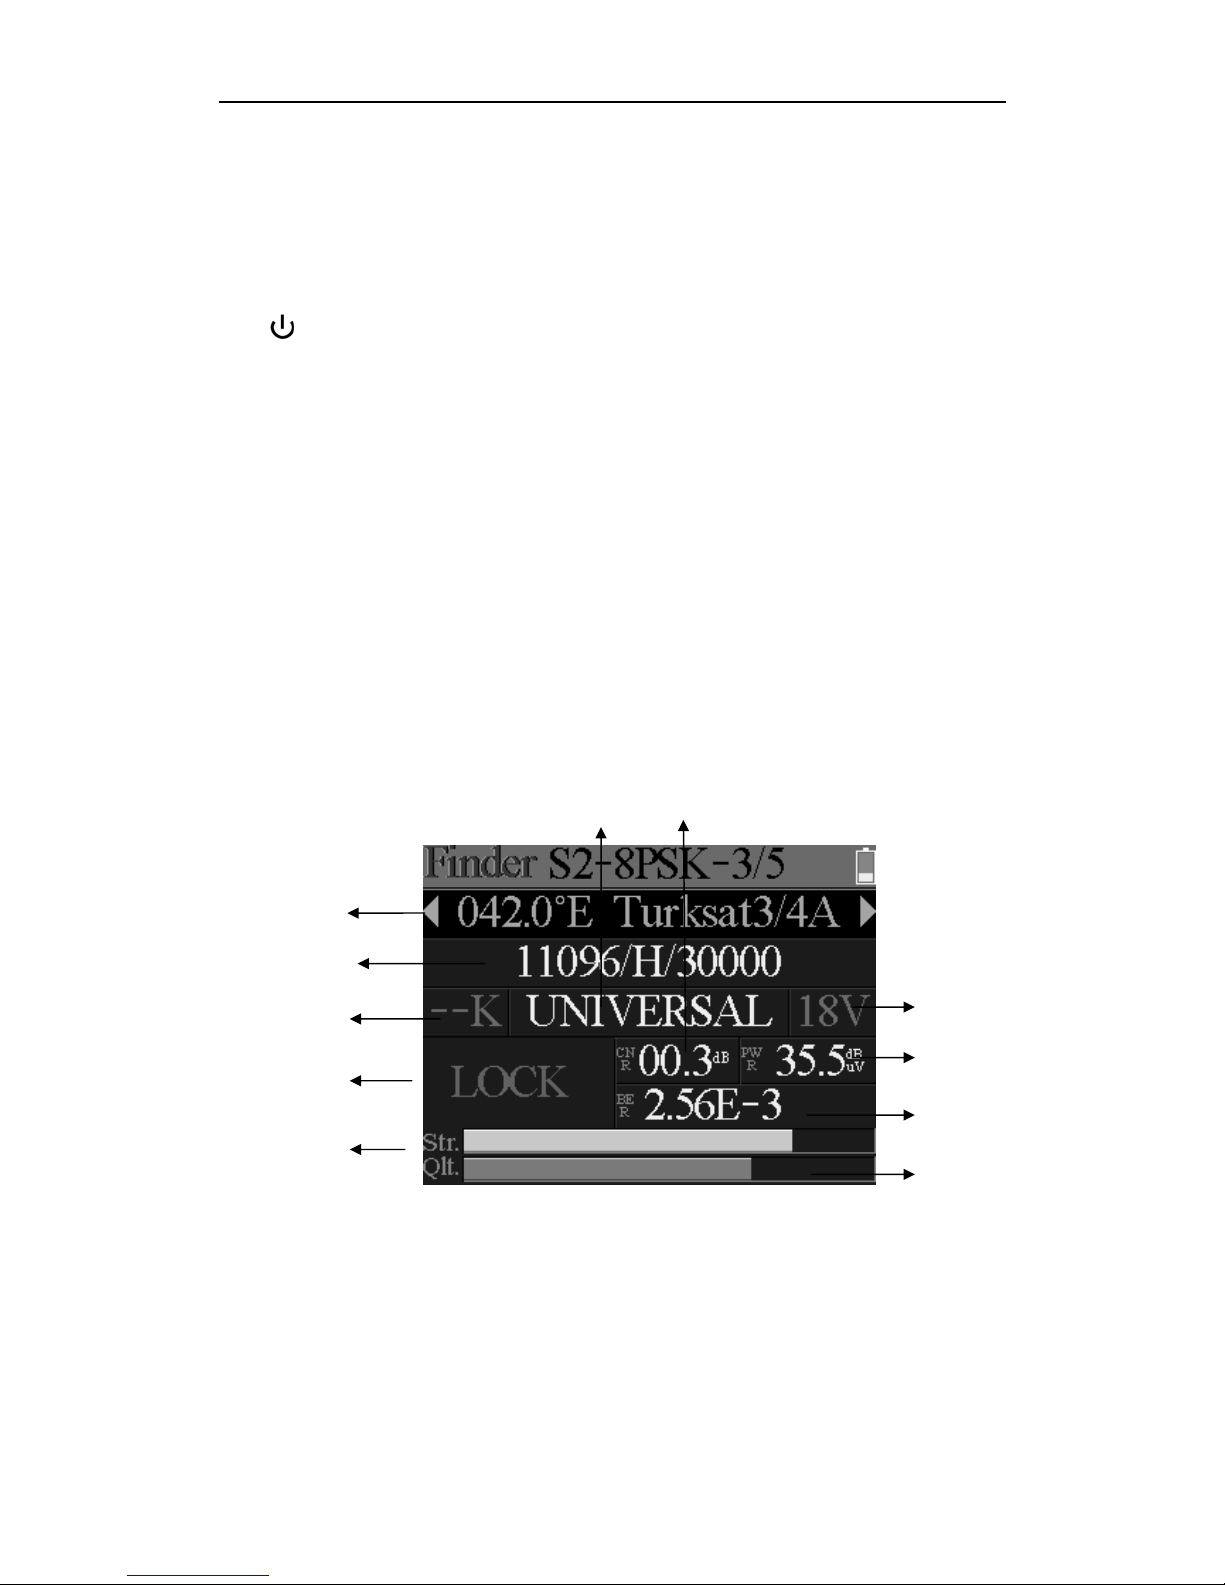
Finder menu
The meter will enter this menu first during power on. Press [▲/▼] to switch items and [◄/►] or [OK] to change
and edit value of each focused items.
○
1. Satellite: The current satellite. Press [◄/►] to switch between satellites and press [OK] to enter satellite list
to select satellite. Press [OK] button to select the focused satellite and press [MENU] to exit from edit menu. All the
other parameters on the menu will be refreshed according to the selected satellite.
○
2. Transponder: The current transponder. Press [◄/►] to switch between transponders and press [OK] to
enter edit. Press [◄/►] to move curse and [▲/▼] to change value of each focused item in edit menu.
○
3. 22k status: The 22k current status.
○
4. LNB type: The current LNB type. Press [◄/►] to switch between LNB types and press [OK] to enter list to
select type.
1
3
5
6
○
2
8
10
11
4
9
○
7
Page 4
User`s Manual
4/12
○
5. LNB power status: The current LNB power status.
○
6. Lock status: The lock status.
○
7. PWR: The power level of signal.
○
8. STR: The strength of signal.
○
9. CNR: The CNR value of signal.
○
10 . BER: The BER value of signal.
○
11 . QLT: The quality value of signal.
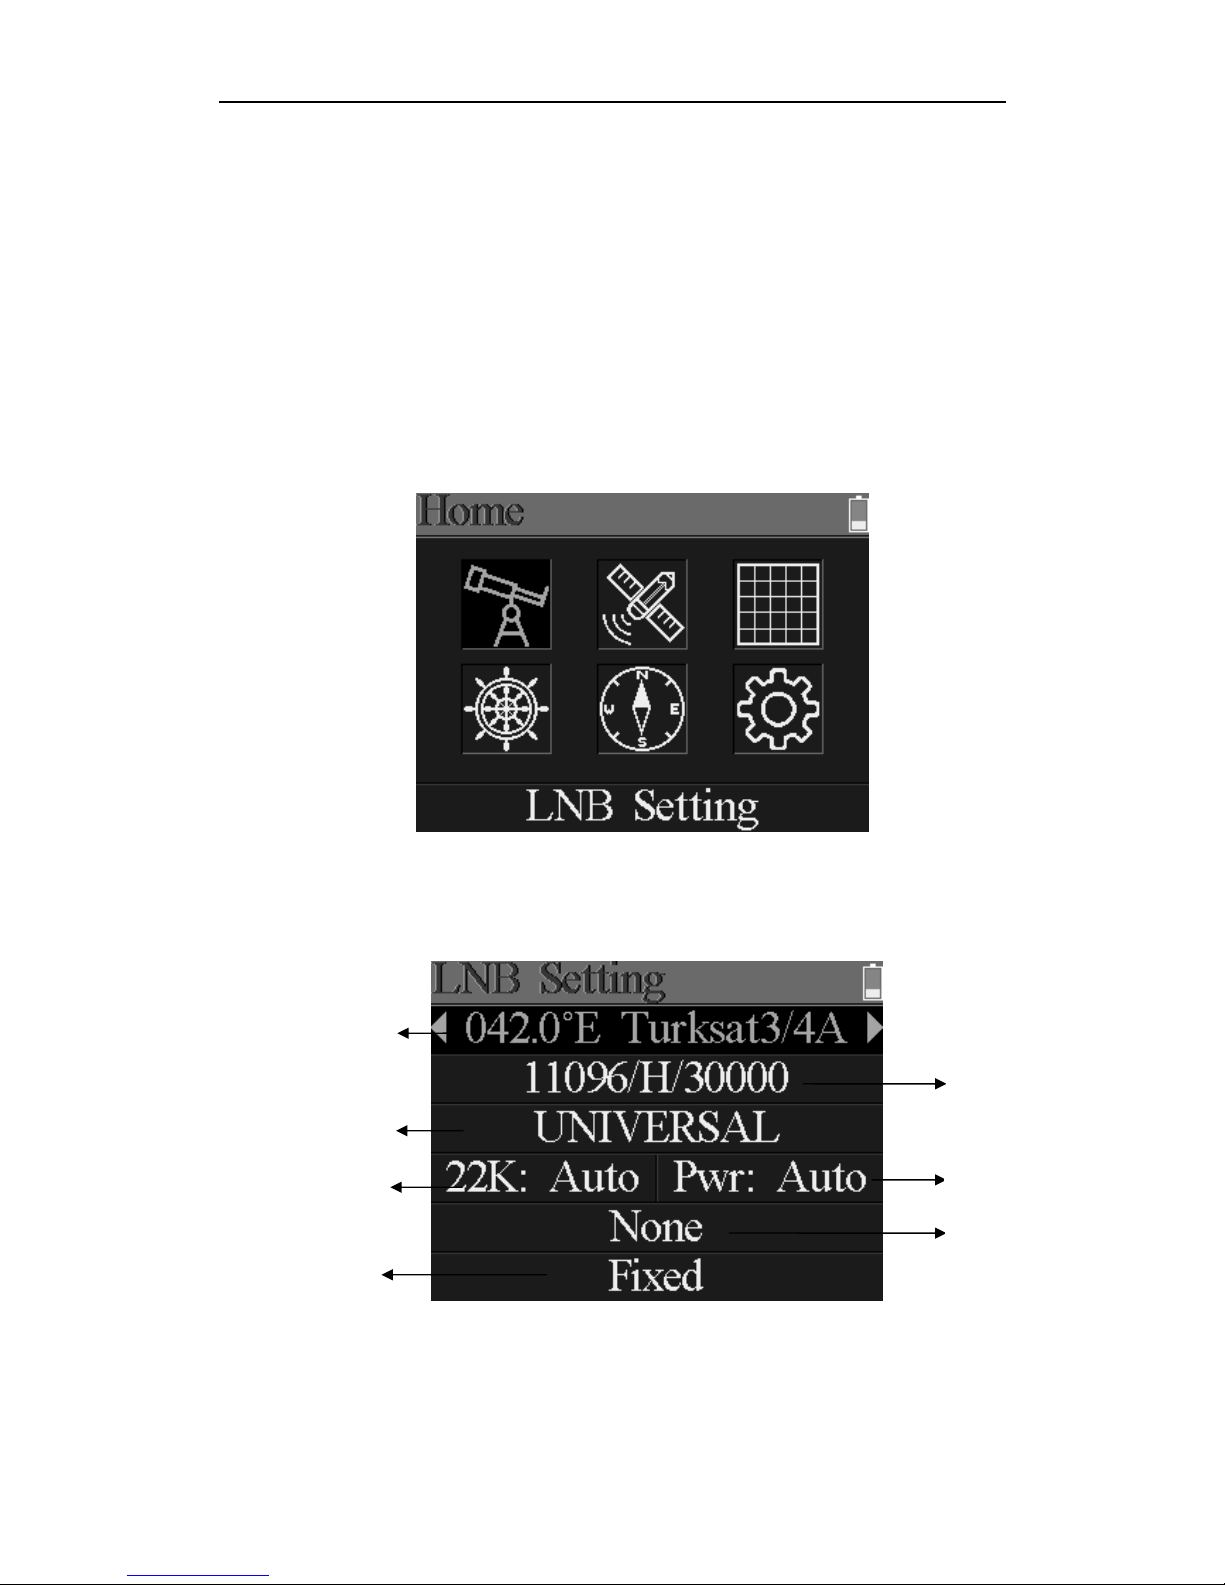
Main menu
Press [MENU] button to enter to main menu in Finder menu and press again to exit. There are six sub-menus in
the menu: LNB Setting, Satellite Edit, Spectrum Chart, Constellation, Calculate Angles and System Settings. Press
[◄/►] or [▲/▼] to switch between sub-menus and [OK] button to enter sub-menu.
LNB Setting
All the LNB parameters are set in this menu. Such as LNB type, LNB power, 22k, Diseqc type and motor type.
○
1 . Satellite: The current satellite. Press [◄/►] to switch between satellites and press [OK] to enter satellite list to
select satellite. Press [OK] button to select the focused satellite and press [MENU] to exit from edit menu. All the other
parameters on the menu will be refreshed according to the selected satellite.
○
1
○
2
○
3
○
4
○
5
○
6
○
7
Page 5

User`s Manual
5/12
○
2 . Transponder: The current transponder. Press [◄/►] to switch between transponders and press [OK] to enter
edit. Press [◄/►] to move curse and [▲/▼] to change value of each focused item in edit menu.
○
3 . LNB type: The LNB type. Press [◄/►] to switch between LNB types and press [OK] to enter list to select type.
○
4. 22K: The 22k parameter. Press [◄/►] button to switch between Auto, Off and On.
○
5. PWR: The power parameter of the LNB. Press [◄/►] button to switch between Auto, Off, 13v and 18v.
○
6. Diseqc 1.0/1.1: The Diseqc port setting for Diseqc 1.0 and 1.1. Press [◄/►] button to switch between ports or
press [OK] button to select port in the list.
○
7. Motor type: Set the motor type. Press [◄/►] to switch between Fixed, USALS and Diseqc 1.2.
USALS Setting:
Press [OK] to enter USALS SETUP menu on Position Type if the type sets to USALS parameters
z Longitude: The longitude of local. Press [OK] to enter edit mode, then press [▲/▼] to change the value
and [◄/►] to move curse. Press [OK] again to exit edit mode
z Location: The location of local. Press [◄/►] to switch between East and West
z Latitude: The latitude of local. Press [OK] to enter edit mode, then press [▲/▼] to change the value and
[◄/►] to move curse. Press [OK] again to exit edit mode
z Hemisphere: The hemisphere of local. Press [◄/►] to switch between North and South
z Move to position: Press [OK] to confirm to move to setting position
Diseqc 1.2 Setting:
Press [OK] to enter Diseqc 1.2 setting menu on Position Type if the type sets to Diseqc 1.2
Page 6

User`s Manual
6/12
z Move single step: Move the motor by step. Press [◄/►] to move to west or east
z Move incessantly: Move the motor incessantly. Press [◄/►] to move to west or east
z Move to centre: Press [OK] to move to centre point
z Limit east: Set the move limit to east
z Limit west: Set the move limit to west
z Save and Commit: Press [OK] to save current position
z Str.: The strength of signal
z Qlt.: The quality of signal
Edit Satellite
The parameters of satellite, such as Orbit Position and Transponder can be edited in this menu. All the satellites
will be listed in this menu.
Press [▲/▼] buttons to move curse in list and press [OK] button to edit.
Press [OK] button to edit the orbit position of current satellite when the curse focusing on the orbit position. And
then press [◄/►] to move curse and [▲/▼] to change value of each focused item in edit menu.
Page 7

User`s Manual
7/12
Press [OK] button to edit selected transponder. And then press [◄/►] to move curse and [▲/▼] to change value
of each focused item in edit menu.
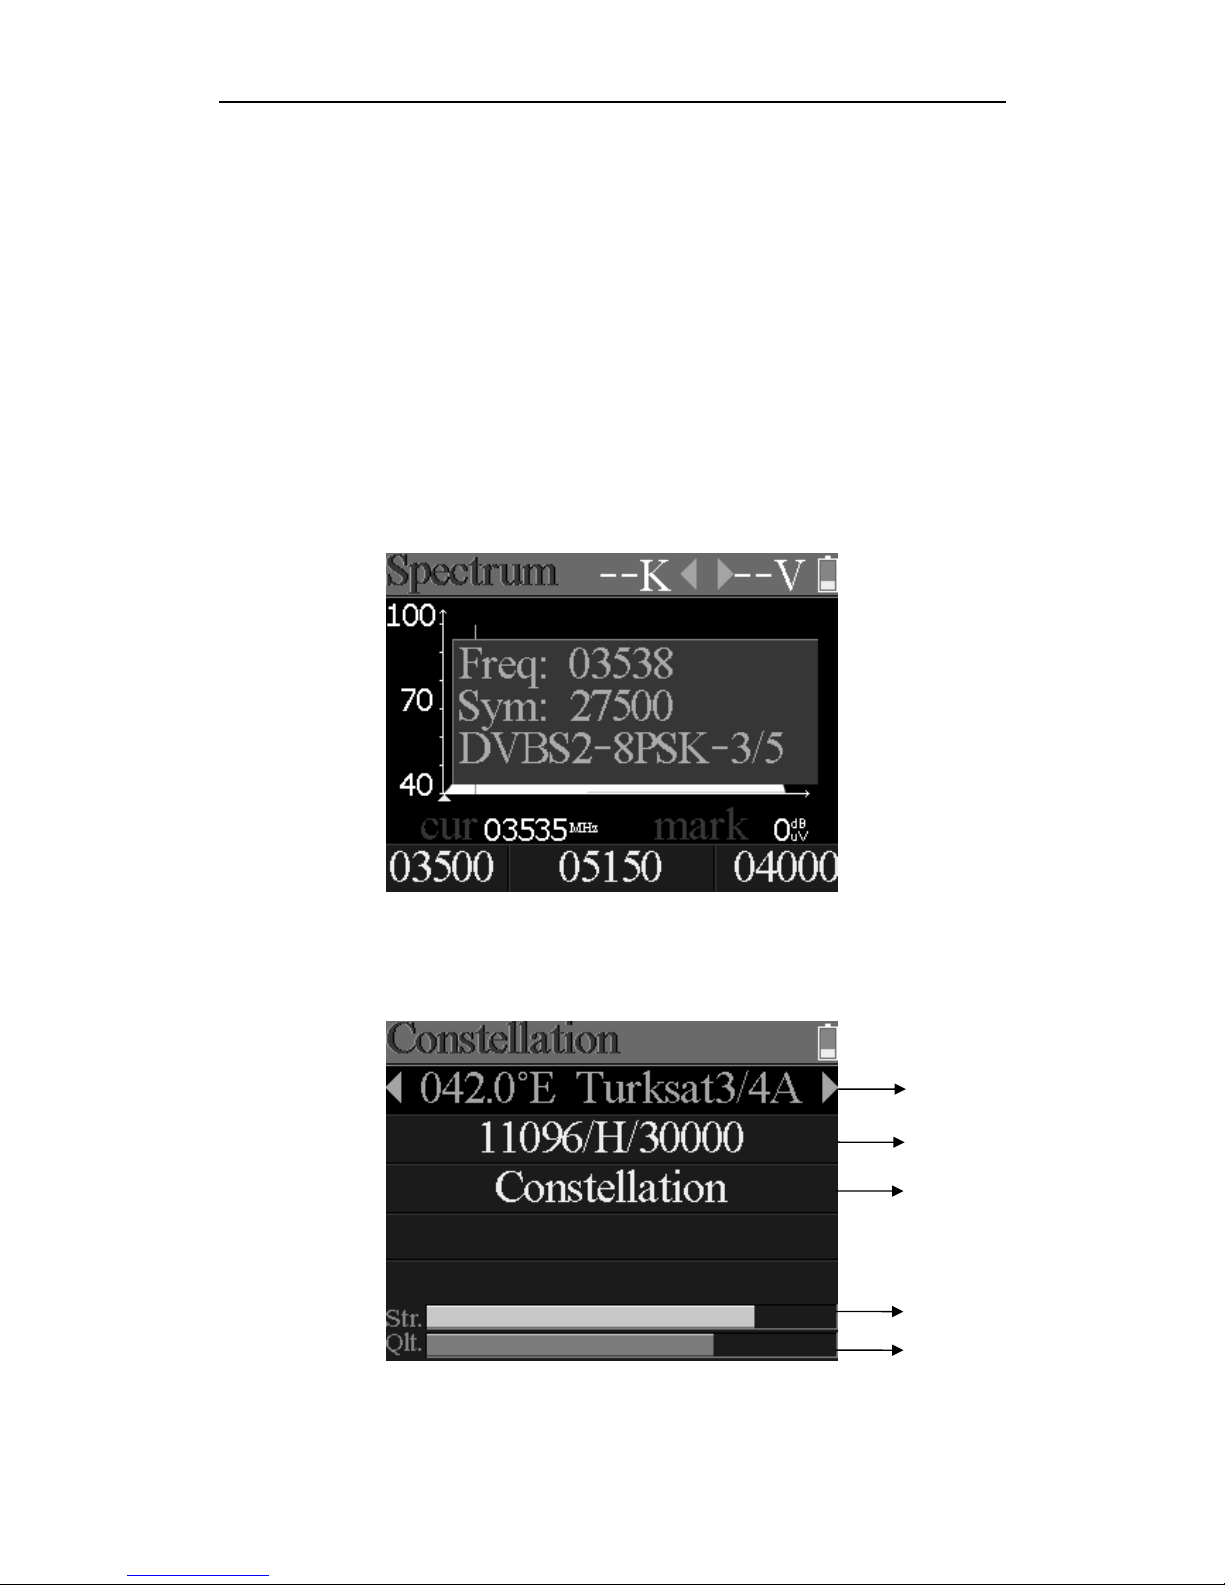
Spectrum Chart
This menu will show the spectrum chart of setting frequency range on current cable line. Press [▲/▼] to switch
curser focus between Start Frequency, LNB Type, End Frequency, LNB Power/22K and Current Frequency Mark.
○
9
○
3
○
7
○
2
○
4
○
5
○
6
○
10
○
1
○
8
Page 8
User`s Manual
8/12
○
1 . Show the 22k status. –K: 22k off; 22k: 22k on
○
2 . Show the RF power output status. The values are: 13V, 18V and OFF
○
3 . The range of power level. And the range is 0 ~ 100
○
4 . The area that shows the spectrum chart
○
5 . The current frequency curse, press [◄/►] to set the current frequency.
○
6 . The start frequency of the spectrum chart
○
7 . The power level value of current frequency
○
8 . The end frequency of the spectrum chart
○
9 . The current frequency
○
10 . The current LNB type mode
Press [OK] button to check whether the current frequency can be locked or not. A dialog will show the locked
transponder once it locks. Please see below figure:
Constellation
Move the curse to Constellation icon and press OK to select satellite and transponder for constellation analyzer.
See the figure below:
○
1 . The current satellite, press [◄/►] to switch between satellites
○
2 . The current transponder, press [◄/►] to switch between transponders of selected satellite
○
1
○
2
○
3
○
5
○
4
Page 9

User`s Manual
9/12
○
3 . Constellation button, press [OK] to start and show the constellation
○
4 . The strength of signal
○
5 . The quality of signal
Below is the constellation menu:
The CNR, Power level and constellation chart will be showed on the menu. Press [OK] to refresh.
Angle Calculation
The elevation and azimuth of the antenna will be calculated according to the customized longitude and latitude.
Press [OK] to enter edit mode on My Longitude or My Latitude. And press [◄/►] to switch the focused item and press
[▲/▼] to change values for each item under edit mode. Press [OK] to calculate the elevation and azimuth. Please see
below figure:
Page 10

User`s Manual
10/12
Settings
On this menu, many system parameters can be set. Please see below figure:
z Beep: The beep status during pressing keys or when the signal is locking. Press [◄/►] to turn on or turn
off beep
z Auto Standby: Set the time for meter to enter standby mode automatically. Press [◄/►] to switch
between Off, 10 min, 20 min, 30 min and 60 min
z Language: The language of UI. Press [◄/►] to switch between available languages
z Factory Reset: Press [OK] to display a confirm dialog. Then select YES to do a factory reset or select NO
to cancel.
z Hardware Ver: The version number of hardware
z Software Ver: The version number of software
TP Control
TP Control is short for transponder control. Press [F3] in Finder menu to enter this menu. It is very easy and
useful to check the output status of each port of Quattro LNB . Press [MENU] to exit to Finder menu. Please see below
figure:
Page 11

User`s Manual
11/12
Main Features
z Support DVBS/DVBS2.
z LNB short-circuit protection and indicator.
z Extremely fast and accurate with high sensitivity.
z Signal level and quantity display together.
z 320 * 240 color screen.
z Real time Spectrum-Analyzer.
z Constellation diagram.
z Angle calculation of azimuth, elevation and LNB tilt.
z C/N, BER, Modulation mode display.
z DisEqC1.0, DisEqC1.2 supported.
z Transponder and satellite list editable by user easily.
z Signal lock audible notification: on/off.
z Firmware can be upgraded by USB port.
z Satellite and transponder list can be edited on PC and downloaded by USB port.
z Power-supply100-240V/50/60Hz 12V, 1A.
z Ultra-long standby, low power consumption.
z Fast charging Li-ion battery can last around 3 hours
Page 12
User`s Manual
12/12
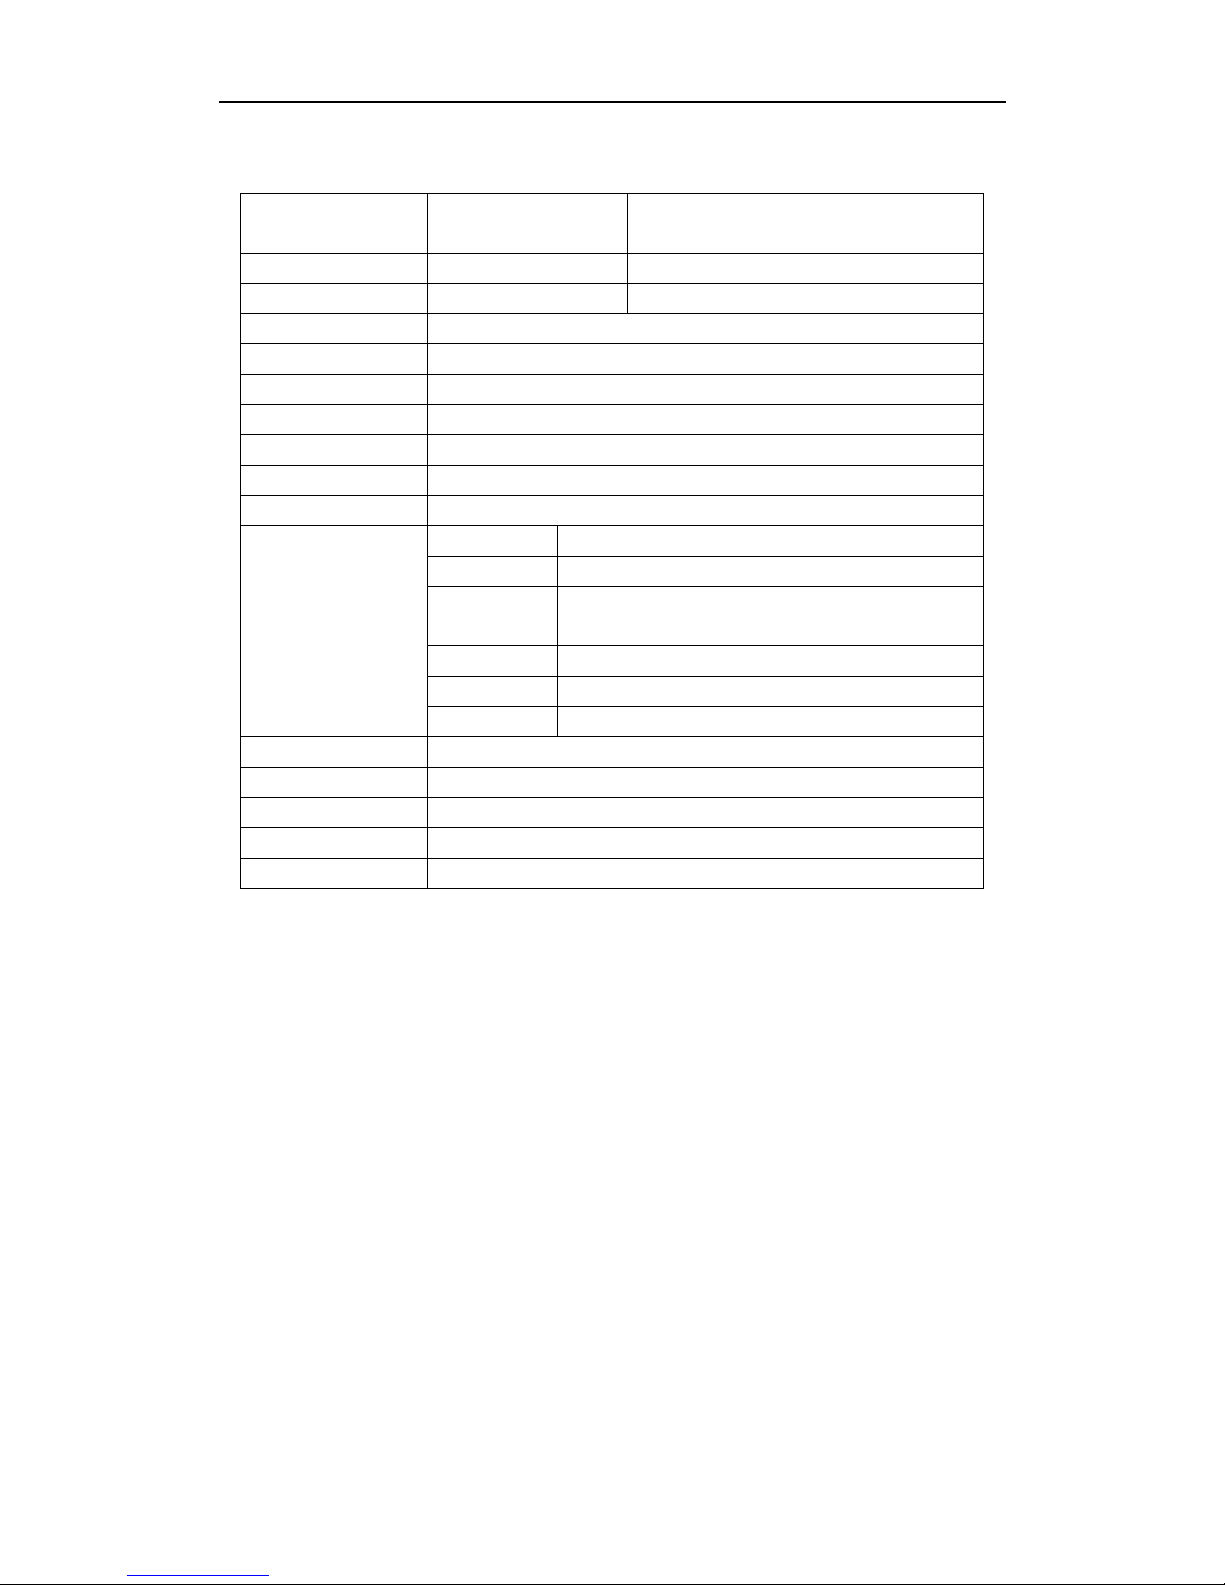
Specifications
Identification
DVB-S
DVB-S2
Demodulation
QPSK QPSK, 8QPSK
Code Rate
1/2, 2/3, 3/4, 5/6, 7/8, 1/4, 1/3, 2/5, 1/2, 3/5, 2/3, 3/4, 5/6, 8/9, 9/10,
Symbol Rate
2~90MSPS
Input frequency
950-2150MHz
Input Impedance
75Ω
Min.level in
35dBuV(noise)
Max.level in
90dBuV
LNB Power and Pol
Vertical 13V, Horizontal 18V, 500mA
Bandwidth
C/Ku-band Selectable
Edit Satellite
Satellite Name Maximum support 11 characters in length
LNB Power 18V, 13V, AUTO, OFF
LNB Type Universal, OCS, SINGLE1, SINGLE2,
SINGLE3,SINGLE4,SINGLE5 ,Customized
22KHz AUTO, OFF, ON
Switch Type DiSEQC1.0(LNB1~LNB4), DiSEQC1.1(LNB1~LNB16)
Position Type USALS, DiSEQC1.2
Satellite Finding
Display the signal strength of selected frequency
Edit TP
Frequency, Symbol Rate, Polarity(950~2150MHz)
Spectrum Analyzer
Display waveforms of selected frequencies
Constellation
Constellation with 8PSK or QPSK
Angle Calculate
Azimuth, Elevation, Polarization
Accessories
Power adapter, 1 RF connector, 1 CD for user manual.
Trouble shooting
1. Unable to power on: Charge the meter about 3 hours until the charge light turn blue.
2. Warning LED flashing: Antenna overload, power off the meter and check the signal cable. After that please
power on again.
3. Hung up: Press the reset button to reset the meter.
4. Can’t lock signal: Please confirm the signal cable is connected correctly and make sure the antenna power is
been set to ON if the antenna needs power supply.
5. Other questions: please contact your dealer
 Loading...