

Digi-Tron ULD Operation Manual

Suspended Scale
Operation Manual
April 2007
Digi-Tron Specialists in Industrial Weighing
www.digitronbalancas.com.br
Index
1. Introduction………3
2. Installation………...4
Accessories provided together with the scale………….4
3. Operation……………….6
Keypad functions……6
Scale functions…………6
Zeroing……………6
Automatic zero………..6
Manual zero………………..6
Weighing with tare……………..7
Weighing tare……………7
Weight counter……………..7
Remote Control…………………..8
Automatic shut-down of the scale…8
Battery Use……………………8
Setting the clock………………9
RS 232 Serial Port………….10
Communication with a computer- terminal mode………10
Label printer…………..11
Maximum limit retention…………12
4. General Configurations…………………15
Digital Filter…………15
Readings per second…………………………16
Serial interface…………………….16
Communication speed……………..17
Display shut off time……………17
Miscellaneous…………………18
Keypad tone………………18
Clock………………18
Activating weight counter…..19
Maximum limit…….19
5. Troubleshooting…………………..21
Error Zero……………………21
Error Five……………..21
Error Six………………..21
Error Seven……………………..21
Error Eight…………………..22
Low battery……………………..22
Excess Weight……………….22
Underweight……………..22
Blinking display……………….22
Display with some segments dimly lit…………………..23
Scale fails to turn on…………………….23
Scale turns off after weighing or counting………….23

1. Introduction
Dear User,
This manual contains instructions on how to install and operate the suspended scale model ULD,
designed with technology and quality standards set by Digi-Tron, a company specialized in
precision instruments.
Its proper functioning, however, depends also on the treatment and care given by the user, as much
in the installation as in its daily use. It is, therefore, necessary to carefully read all the instructions
contained in this manual, as well as abide by them.
Only technicians certified by IPEM (Instituto de Pesos e Medidas/ Weights and Measures Institute)
are allowed to open the instrument’s seal. The breaking of the seal by persons not certified by
IPEM will result in the automatic annulment of the Digi-Tron guarantee and violates federal laws.
We recommend that any technical problem be directed to Digi-Tron´s Technical Assistance
Department so that we may direct you to an authorized technician.
2. Installation
Your product is a mass weighing instrument and you should take certain cautions during its use.
Before putting your scale to use, it is important to observe the following items:
- Verify that the instrument has not suffered any damage during delivery.
- Check accessories
- Take off protective insulation. (Instruments with dimensions up to 700x700mm)
- Fasten the articulated feet that are in the indicator’s packaging. (Scales 800x800mm
and up, follow the following instructions)
- Adjust the level and then lock the articulated feet using the nuts and bolts if the case
may be.
- The scale cannot undergo any kind of impact or overweighing on the weighing
platform so that there is no damage to the load receptor. Always place cargo as close
to the center of the scale as possible so that there is no lateral force on the load
receptors and so that you get the best weight distribution over the entire scale.
- Do not use the keypad with sharp objects in order to avoid damages to the keypad’s
circuits.
- The cleaning and keeping of the entire scale will also avoid unnecessary
maintenance. When possible, clean the scale with a damp cloth.
- Always clean the scale with the power cord unplugged.
- Always make sure that the scale’s cables and connectors are in perfect condition for
they are essential for proper function.
Maximum performance of your instrument depends on proper installation.
2.1 Accessories provided together with the scale:
- 01 Battery charger 12V 110/220V;
- 01 Remote Control to Tare Key (instruments up to 1000Kg);
- 02 Batteries 12V/12Ah (instruments up to 1000Kg);
- 02 Batteries 12V/7Ah (instruments until 500Kg).
3. Operation
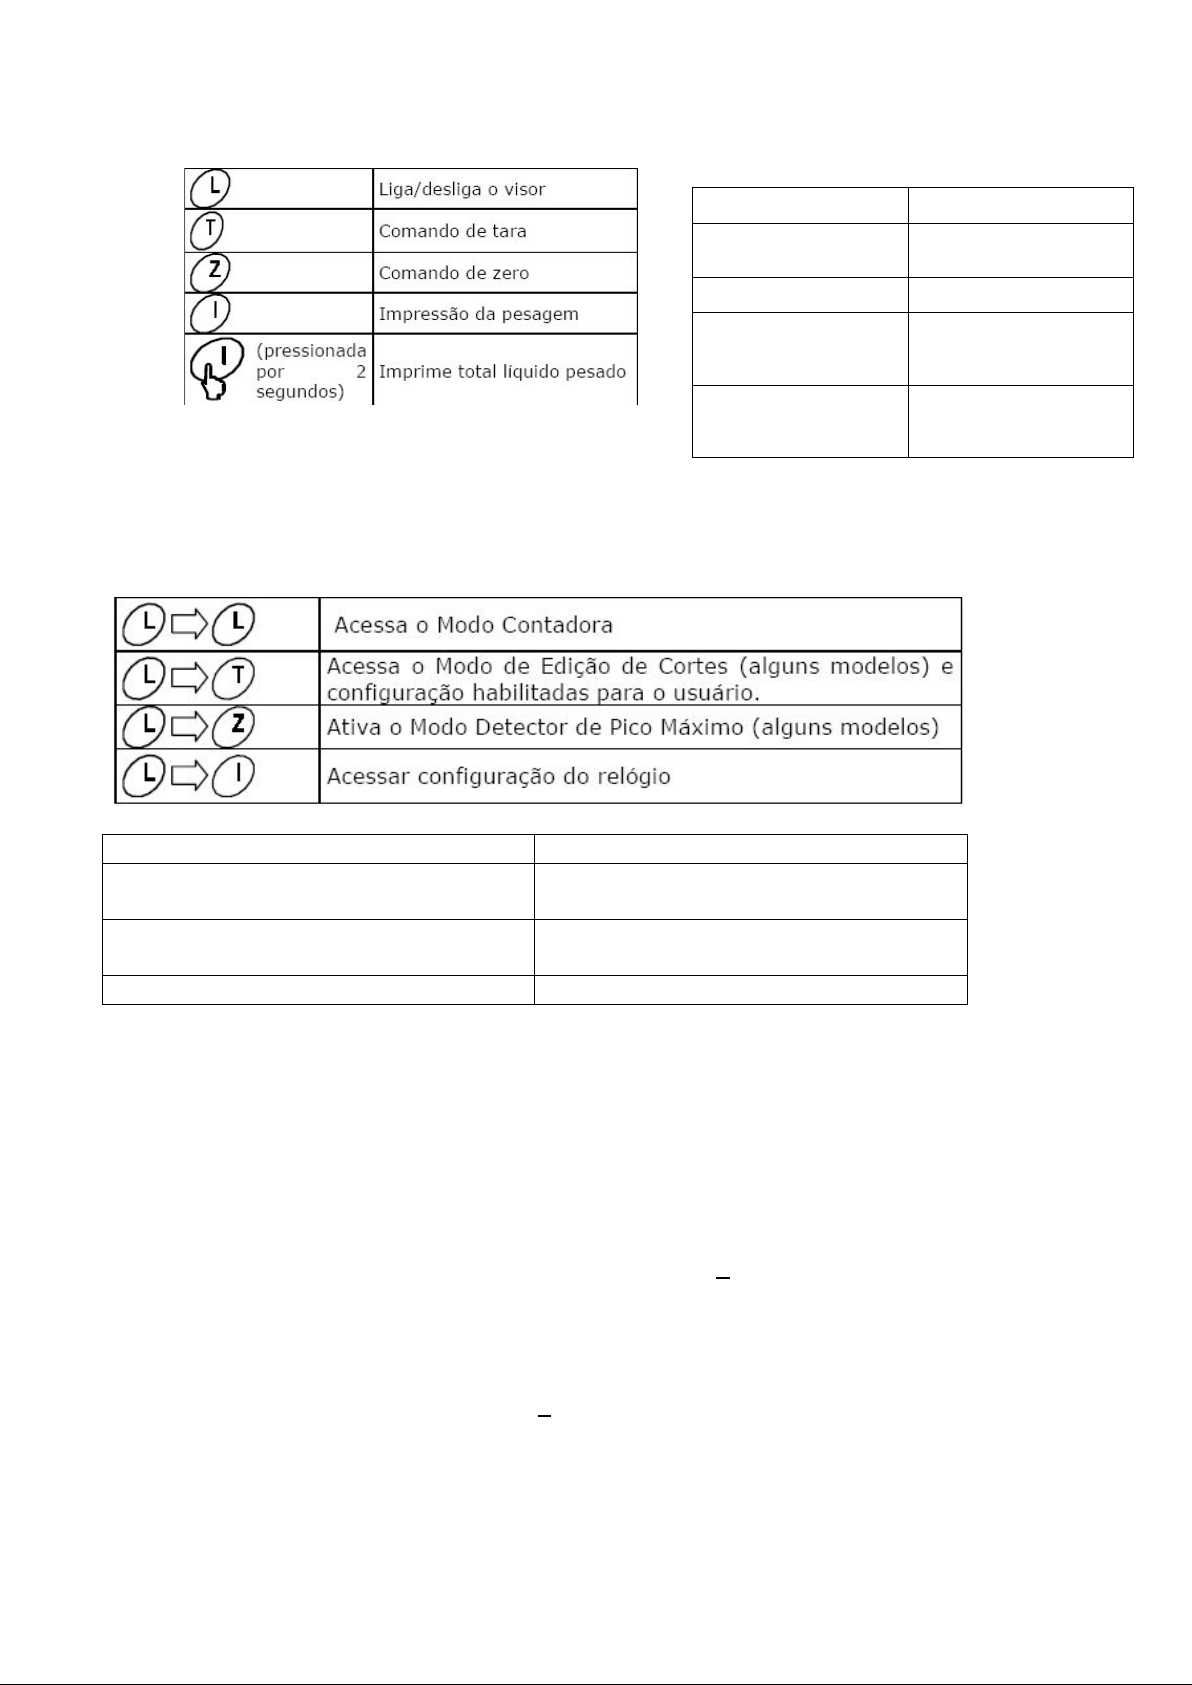
3.1 Keypad functions
L Turn display on/off
T Set tara
Z Set zero
I Print weight
3.2 Scale Functions
L >>L Access counter mode
L>>T Access Cut edit mode (some models) and
configure user privileges.
L>>Z Activate Maximum Limit Detector Mode
(some models)
L>>I Access clock configuration
3.3 Zeroing
Bias in zeroing occurs due to variations in temperature, residue on the platform, impact
incurred to the weighing platform, or the scale being uneven. If there is nothing on the
platform and the zero indicators is off, it is necessary to zero the scale. There are two ways
to do so:
3.4 Automatic Zero
It is activated periodically and zeroes the reading up to + units. For example: if you have a
10kg scale with 1g divisions, this setting zeroes in the range of -3g to 3g.
3.5 Manual Zero
Press Z with the platform empty to zero the scale.
This setting zeroes the reading up to +20 units. After a successful weighing, the zero
indicator should be lit and the display showing zero. In the case that the indicator does not
light up, the weight is too heavy and is out of the automatic zero range or the platform is
oscillating. In this case press the Z button to zero the reading on the display.
3.6 Weighing without tare
I (held for 2
seconds)
Print total net
weight
Before starting a simple weighing, verify these items:
keypad.
-The platform is empty
-There are no obstructions to the weighing platform
-The zero and kg indicators are lit
With these items in order, you may place the product to be weighed on the scale. Avoid
impacting the platform. When the cargo is on the scale and only the kg indicator is lit, it
means that the cargo is stable and the reading is accurate.
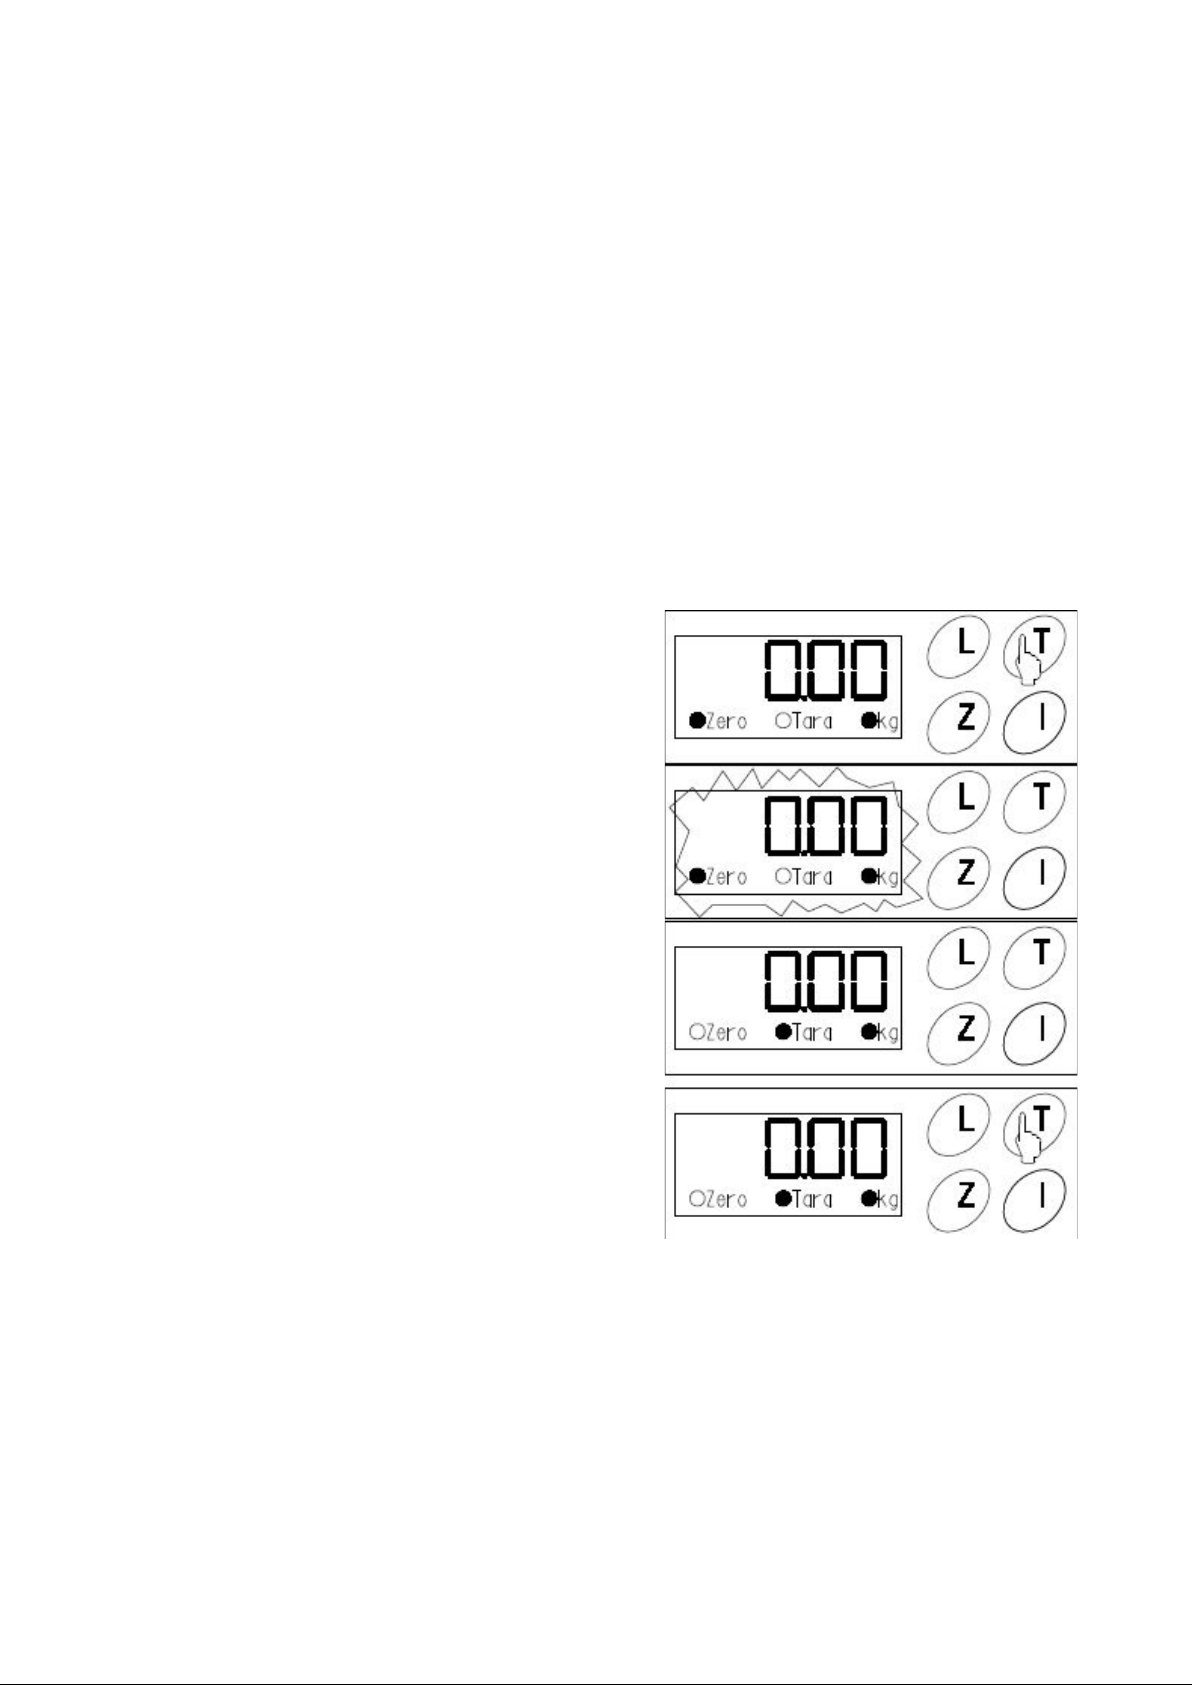
3.7 Weighing with tare
In this process you wish to weigh a product and subtract the weight of packaging, for
example.
- Gross weight: Weight of the packaging plus the material, that is, the total weight that
is on the scale.
- Net weight: is the weight that is inside the packaging.
- Tara: is the weight that will be subtracted. Ex: packaging
Place the weight to be subtracted on the scale
and press the T button. The scale reads the tare.
The display will blink in the case that the
platform is oscillating or without any cargo.
The tare indicator will stay lit, indicating that the
scale is operating in tare mode.
To exit tare mode, press the T button again.
Note: The button is only accessible from the
moment that the minimum weight limit is
exceeded (20 units), which is indicated on the
3.8 Weight Counter
The sensitivity of the scale counter is 1/10, that is, one tenth of the unit division value. For
example: a scale with a maximum cargo of 100kg with unit divisions of 0.01kg is capable of
counting pieces weighing 0.001kg and up.
To use the counter mode you need to configure the scale giving the weight and number of
samples.
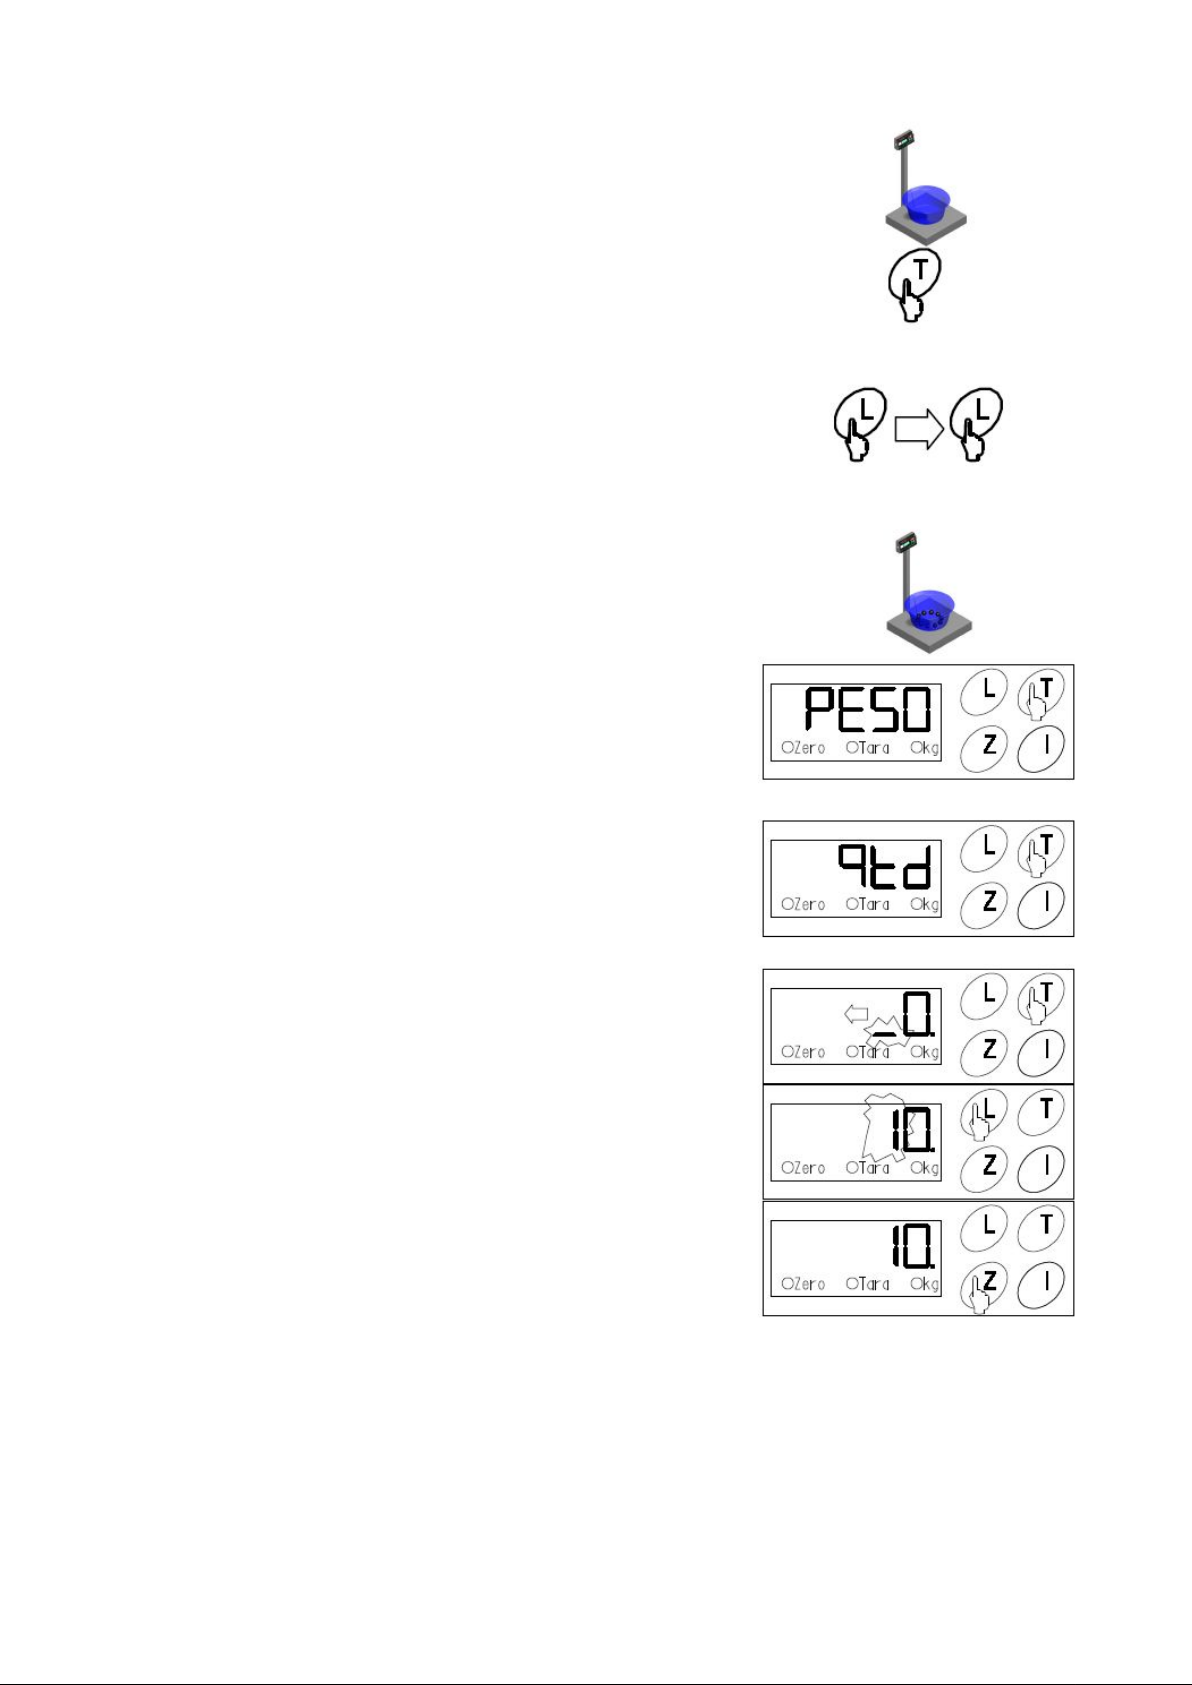
Set the tare with the packaging that with receive the
sample.
Press the T button to set the tare.
Press the L button two times and the word ``tare´´ will
appear on the display. Press the T button and the text will
start to blink. At this time, do not touch the platform.
OBS: In the case that you are not using any packaging the
display will read `VAZIA´ (empty).
The word PESO (weight) will appear the samples should
be placed in the packaging.
Press ´T`, the word will start to blink. At this time do not
touch the platform. Whatever mistake will cancel the
configuration (message ERRO 6/ error 6) and the
procedure will have to be repeated.
After reading the weight, the message qtd will appear.
Press ´T´ to enter the number of samples.
Note: The qtd message will only appear if the number of
samples is greater than or equal to the minimum weight
(20 unit divisions).
For example, there are 10 pieces to be weighed. Press the
´T` button to see the cursor.
Press the `L` button to change the value.
Press the ´Z´ button to accept the value and start the
counter.
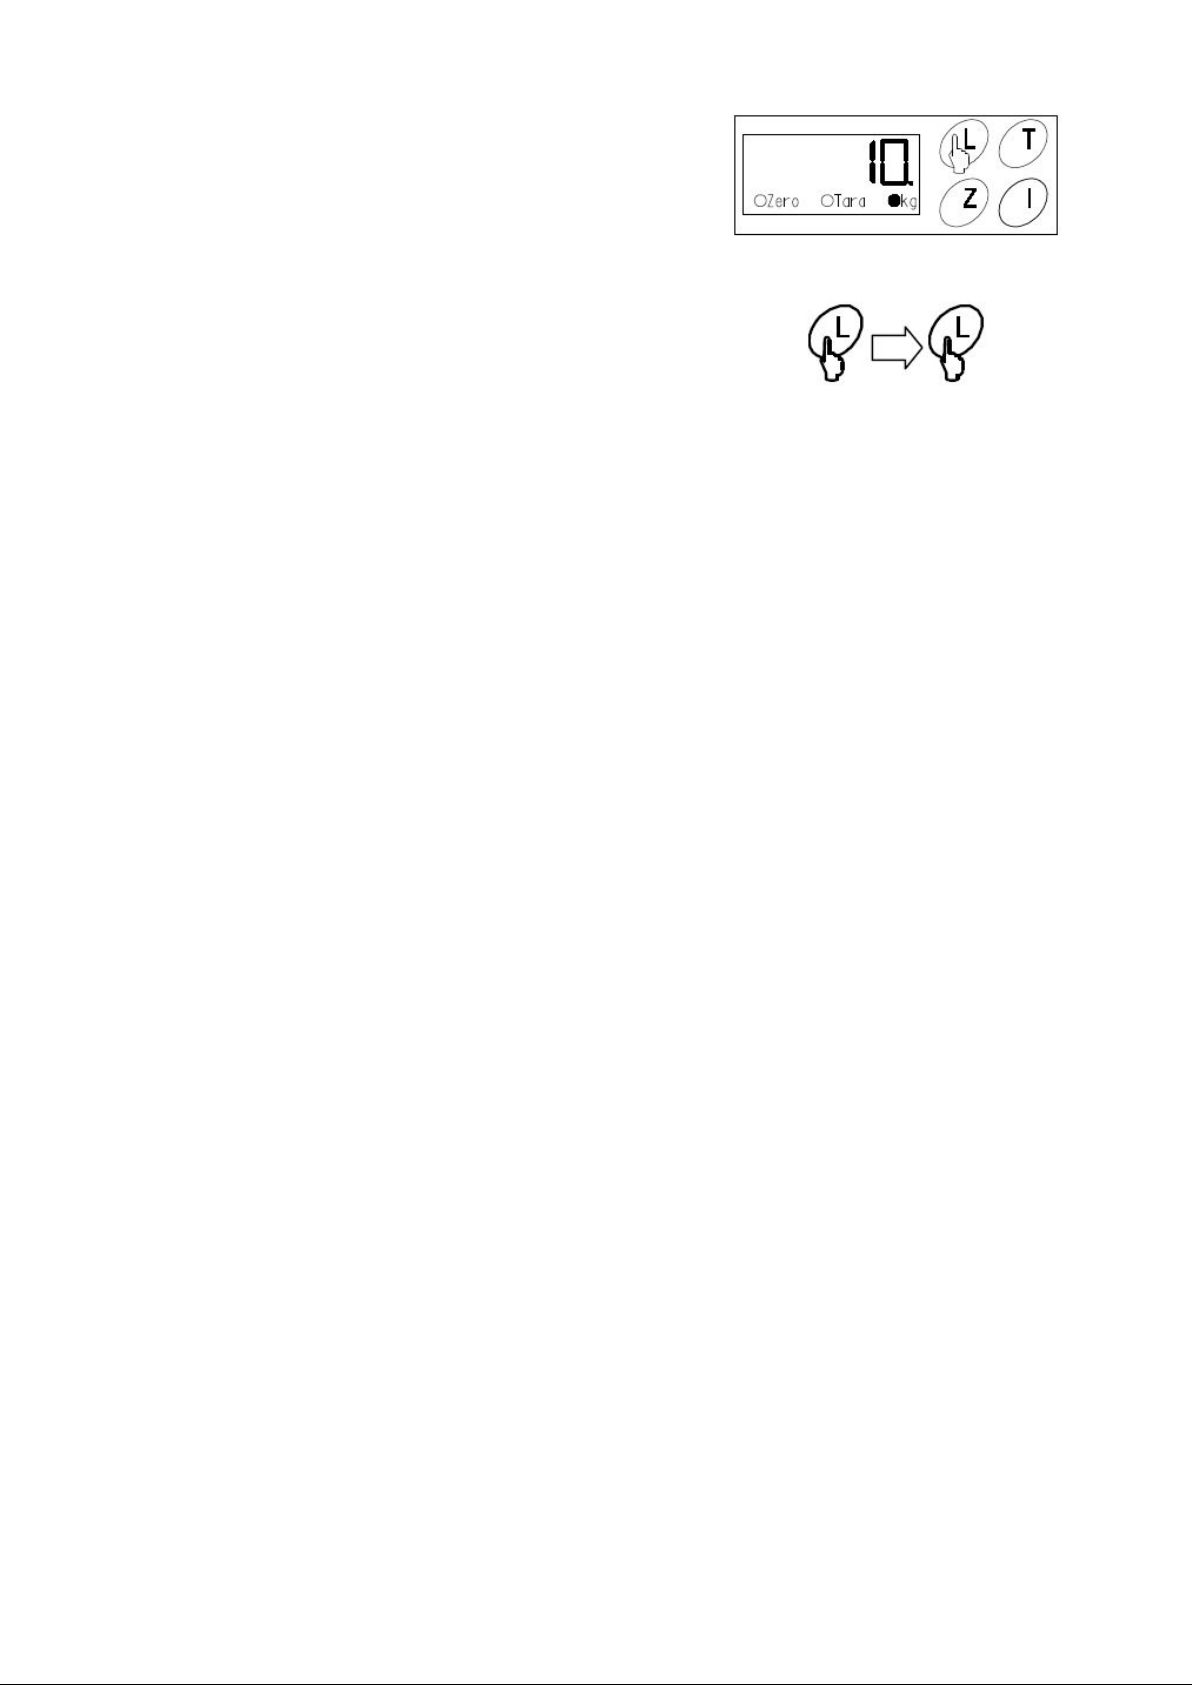
Press the ´L`button to alternate between w
eight and
number of pieces.
Finalizing the weight counter mode
To finalize the weight counter mode and return to
weighing mode, press the `L´button two times.
Note 1: The more weight samples you use, the fewer the counting errors, and the closer the
sample’s unit weight will be to the average weight calculated by the scale.
Note 2: To be more efficient in counting, it is essential that the scale be level and away from
any outside interference (air currents, vibrations, etc.).
3.9 Remote Control
This resource is offered only in the capacities up to 1000Kg.
The control provided with the scale performs the “T” key function. It should be used when
there is no possibility to accede manually the Tare key. If a tare is started manually, it should
be cancelled by the remote control or vice versa.
3.10Automatic shut-down of the display.
The scale is configured to shut-down the display automatically when it’s in stand-by loaded
or not. The time is 60s.
In this case, the stable weight LED keeps blinking.
Press the “L” button or move the scale and it will return to the weighing mode.
OBS: To change the automatic shut-down time of the display it is necessary verify the menu
general configurations item 4.1.
3.11Battery Use
The suspended scale is provided with two 12V/12Ah batteries and a battery charger. We
recommend change the battery every twelve hours. The battery charging time is
approximately 6 hours. In the case of using the scale with low battery the display will show
the message “LOW BAT” or “Erro 8”.
 Loading...