

!
!
!
!
!
!
!
!
!
!
1100T/D
Thermometer
Instruction
Manual

!
!
!
!
!
!
!
!
!
T
ABLE OF CONTENTS
!
A.
INTRODUCTION
1.
Congratulations
................................3
2.
Product
Description ..........................3
3.
Declaration
of
Conformity
............. 4
!
B.
SAFETY CONSIDERATIONS
...................5
!
C.
TECHNICAL DATA
1.
Features and
Benefits........................6
2.
Product Applications
....................7
3.
Specifications....................................8
!
D.
MEASUREMENT TECHNIQUES
1.
Controls and Functions
.................9
2.
Clock, Timer & Alarm......................10
3.
Performing
Measurements........14
4.
Menu
Mode...............................22
!
E.
LOGGING PARAMETERS (1100D ONLY)
..30
!
F.
RETRIEVING LOGGED DATA (1100D)
....34
!
G.
TROUBLESHOOTING & MAINTENANCE
35
A.
INTRODUCTION
!
1. Congratulations!!
Thank you
for
purchasing DIGITRON products. The 1100
series
thermometers ar e easy
to
use and built
to last.
They
are
backed by a 2 year limited warranty.
!
2.
Product
Description
The ergonomically designed 1100 ser ies hand-held
ther
mometers are waterproof and offer high accuracy
and reliability.
!
!
!
!
!
!
2
3

4
5
!
!
!
!
!
!
!
!
!
!
3.
EC Declaration of Conformity
This
is to
certify that DIGITRON 1100 series
thermometers
con
form
to
the protection requirements
of
the council
direc
tive 89/336 /EEC,
in
the approximation
of
laws
of the
member states relating
to
Electromagnetic
compatibility
and 73/23/EEC. The
Low Voltage Directive
by application
of
the following
standards:
!
EN
50081-1
1992 Emissions Standard
EN
50082-1
1992 Immunity Standard
EN
61010-1
1993 Safety
Standard
EN
61010-2-031
1995 Safety
Standard
EN
61010-2-032
1995 Safety
Standard
!
To ensure conformity with these standards, this
instru
ment must be operated
in
accordance with the
instruc
tions and specifications given
in
this
manual.
!
CAUTION: Even though this instrument complies
with
the immunity standards, its accuracy can be
affected
by strong radio emissions not covered in the
above
standards. Sources such as hand-held radio
trans
ceivers, radio and TV transmitters, vehicle radios
and
cellular phones generate elec tromagnetic
radiation
that could be inducted into the test leads of
this instru
ment. Care should be take n to avoid such
situations or
alternatively,
check to make sure that the
instrument
is
not being influence by these
emissions.
!
!
CAUTION: Please follow manufacturers test
proce
dures whenever possible. Do not attempt to
measure
unknown voltages or components until
a
complete
understanding of the circuit is
obtained.
B.
SAFETY CONSIDERA
TIONS
!
WARNING: Use caution when performing
mea
surements on temperatures above
38ºC.
!
!
!
GENERAL
GUIDELINES
ALWAYS
•
Test your thermometer before using
it to
make sure
it is
operating
properly.
•
Inspect temperature probes before using
to
make
sure
there are no breaks
or shorts.
•
Double check all connections before
testing.
!
NEVER
•
Insert the probe in to an electrically charg ed
medium.
•
Touch the probe
tip or
shaft after
it
has been inserted
in
a hot
substance.

6
7
!
!
!
!
!
!
!
!
!
C. TECHNICAL DATA
!
1.
Features and
Benefits
Large LCD Easy
to
read measurement
results
!
High Accuracy Reliable test
results.
!
!
Water Proof Rugged and built
to last.
!
!
Auto Off
Automatically p ow er s
off after
30 minutes
of inactivity.
Data Logging Record and time stamp results.
(1100D
Only)
!
2.
Product
Applications
!
Perform the following tests and/or measurements
with
the 1100 series
thermometers:
Validate the temperature of incoming food product
prior to accepting
deliveries.
!
Measure food storage
temperature.
Verify cooking and storage
temperature.
Confirm hot and cold holding cabinet
temperatures.
Measure food reheating
temperatures.
Monitor frozen food thawing
temperature.
!
!
!
!
!
!
!
3. Specifications
!
Input T
ype
Range
Thermistor
-50ºC
to 150ºC (
-58ºF
to
302ºF)
K-Type
Thermocouple
-200ºC
to
600ºC (
-328ºF
to
1,112ºF)
T-Type
Thermocouple
-200ºC
to 400ºC (
-328ºF
to
752ºF
)
D.
Measurement Techniques
!
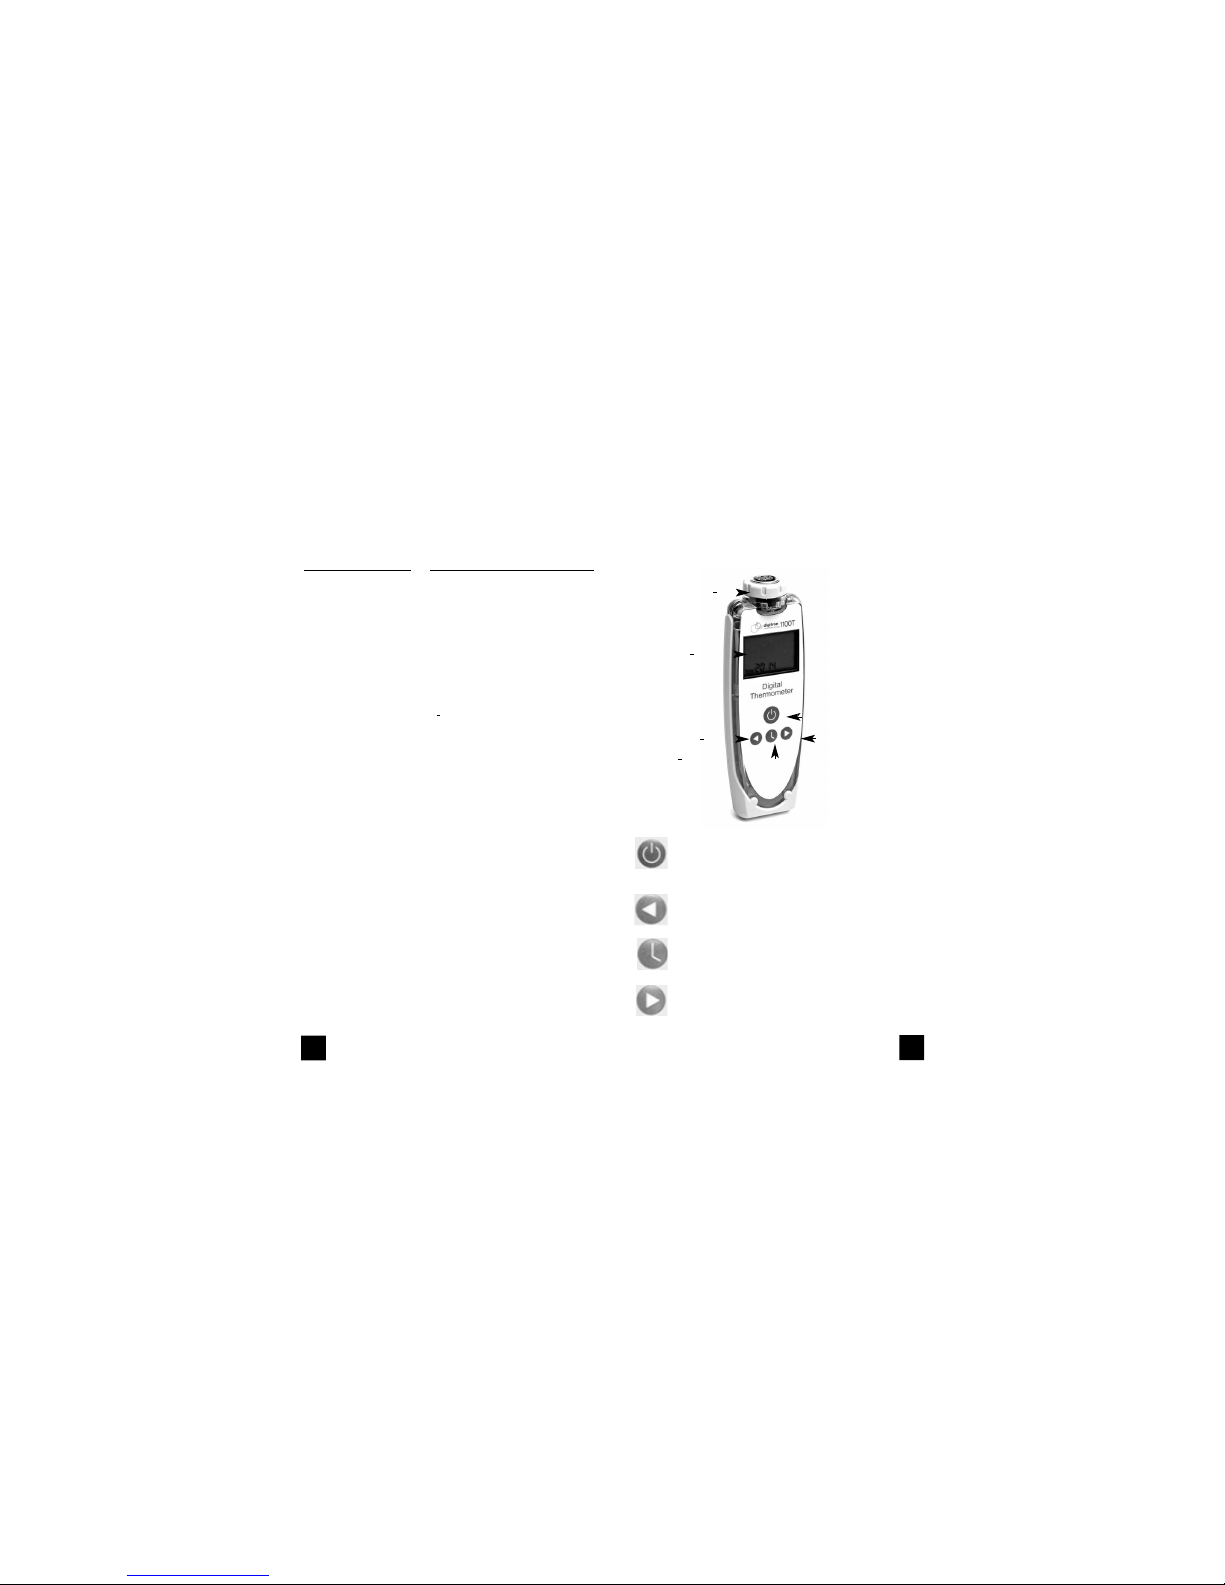
1.
Controls & Functions
!
!
Input Connector
!
K-Type
Probe
Green Cord
T-Type
Probe
Brown
Cord
Thermistor
Probe
White
Cord
Accuracy +/- (0.1%
of
reading +
0.2ºC (
0.4ºF
))
!
Display resolution: > –100°C/F = 0.1°C/F,
≤ –100°C/F = 1°C/F
IP
Rating
IP 67
!
Units of Measure ºC / ºF
Selectable
!
Operating Temperature
-20ºC
to 50ºC
(-4ºF
to
122ºF
)
!
Battery Type AA (LR6)
x 2
!
!
LCD Display
!
!
!
!
!
Left Arrow Key
!
Menu Key
!
!
!
!
!
!
On / Off Key
!
Right Arrow Key
!
Battery
Life
Up
to
14,000 hours
!
Countdown Timer Select from 1 second
to
24
hours
!
Real Time Clock Yes
!
Auto Power Off Off after 5 minutes, can be disabled
!
Over Temperature Alarm Yes
Field Calibration
Mode Yes
Fast Update
Mode Yes
Data Logg ing
Mode
(1100D only)
!
!
!
!
8
!
On / Off Key turns the 1100T/D on for use or off
(Standby mode).
The clock is displayed when the
instrument is off and the timer and alarm clock
are accessible.
Left Ar row Key is used to select parameters
when the 1100T/D is in “menu” mode. This
key is also used to activate data hold.
!
Menu Key is used to activate menu mode and
is also used to cycle through various displays.
!
Right Arrow Key is used to change data,
start/stop the timer and activate alar m mode.
!
!
9

10
11
!
!
!
!
!
!
!
!
!
2.
Clock, Timer, & Alarm
!
When the 1100T/D
is off,
the real time clock
is
displayed and
the
countdown timer and alarm clock functions are available. Press
the
MENU key
to
cycle through each
of
the
displays.
!
Real time clock
display
!
!
The clock displays
in
a 24 hour format (hh:mm) and can be set
from
the menu
mode.
!
Press the MENU key
to
cycle
to
the next
display.
Clock, Timer, &
Alarm
(continued)
!
Countdown timer
display
!
!
One
of
the three preset countdown timers
is displayed.
!
Pressing the LEFT ARROW key cycles through the timers. The
timers
can be set from the menu
mode.
!
Pressing the RIGHT ARROW key activates the timer and the arrows
on
the left s ide
of
the timer
will
begin
to
scroll. Pressing the RIGHT ARROW
key again stops and resets the
timer.
!
When the countdown timer reaches
0,
an alarm consisting
of 3 short
beeps repeating continuously
will
activate. Pres s any key
to
turn
off the
alarm and rese t the
timer.
!
Press the MENU key
to
cycle
to
the next
display.

12
13
!
!
!
!
!
!
!
!
Clock, Timer, &
Alarm
(continued)
!
Alarm clock
display
!
!
The alarm clock set time
is displayed.
!
To set the alarm press the LEFT ARROW key and the minute’s digits w il l
blink. Press the RIGHT ARROW key
to
set the desired value. Holding
the
key down
will
increase the value
rapidly.
!
Press the LEFT ARROW key
to
cycle
to
the hour digits. Press the RIGHT
ARROW key
to
set the desired value. Holding the key down
will
increase
the value
rapidly.
!
Press the LEFT ARROW key
to
exit (no digits blinking) and the alarm
is
set.
Clock, Timer, &
Alarm
(continued)
!
To activate the al arm press the RIGHT ARROW key and an alarm bell
will
display next
to
the
time.
!
To deactivate alarm mode, press the RIGHT ARROW key
again.
!
When the alarm cloc k set time
is
reached the alarm
will
begin
to
sound.
Press any key
to
turn
off
the
alarm.

15
14
!
!
!
!
!
3.
Performing
Measurements
!
1.
Turn the 1100T/D on by pressing the On/Off key. The display
will
read
“OPEN”
if
no probe
is attached.
MENU mode can be activated
to
change clock, display, and
data
logging (1100D only) setting s afte r the 1100T/D has been turned
on.
Please see page 22.
If
no changes are necessary please
proceed
to
the next
step.
2.
Attach a temperature probe
to
the input connector and use
the
screw collar
to
secure the probe
to
the
thermometer.
3
Touch
or
insert the probe into the item under test. The temperature
measured at the probe
will
display on the 1 100T/D. Press t he MENU
key to
set the sub disp lay
to
clock mode. The temperature
will
be
dis
played
in
the main display. Please see
below.
!
!
!
!
!
!
!
!
!
4.
From the temperature / clock display th e following functions can
be
performed.
!
Data Hold - Pressing the LEFT ARROW key freezes the display
and
“HOLD”
will
be displayed. Pressing the LEFT ARROW key again
returns
the 1100D
to
normal
operation.
Performing Measurements (continued)
!
Increased Update Rate - Pressing the RIG HT ARROW key increa ses
the
update rate allowing quickly changing temperatures
to
be meas ured.
“F”
will
blink
in
the display while this mode
is
active. Please see
below.
!
!
To return the update rate
to
normal press the RIGHT ARROW
key.
Note:
The update rate
will
automatically return
to
normal after
5 minutes.
!
5.
Pressing the menu key
will
cycle through the clock, alarm
clock,
timer, and data logging (1100D only)
functions.
1100D Only
- If
you do not have a 1100D please skip to page
20
6.
Press the MENU key repeatedly until the sub display switc hes
to
logger display mode. Please see
below

16
17
!
!
!
!
!
!
Performing Measurements (1100D
Only)
7. “L” will
flash when the 1100D
is
logging. Pressing the
RIGHT
ARROW key
will
activate and deactivate logging. The number
to the
right
will
increase each time a new measurement has been
logged.
NOTE: When logging is started
all
previously logged data will
be
overwritten.
8.
Pressing the LEFT ARROW k ey dis plays the current logging
inter
val
setting (See below). The logging interval can be changed
in menu
mode. (See appendix
A)
!
!
!
!
!
!
!
!
!
9.
Pressing the LEFT ARROW key again
will
cycle the 1100D
to
the
log
ging reserved display (see
below).
Performing Measurements (1100D
Only)
10.
Reserved logging
is
used
to
tell the 1100D
to
log at the preset
start
and stop times. Pre ssing the RIGHT ARROW key enables
(LrES
yes)
or
disables (LrES no) reserved logging. The start and
stop
times can be checked as shown
below.
11.
Pressing the LEFT ARROW k ey dis plays the current logging
start
time (See below). The logging start time can be changed
in
menu
mode. (See appendix
A)
!
!
!
!
!
!
!
!
!
12.
Pressing the LEFT ARROW key again displays the
current logging
stop tim e (See below). The logging stop time can be changed
in
menu mod e. (See appendix
A)

18
19
!
!
!
!
!
!
!
!
Performing Measurements (1100D
Only)
!
!
13.
Press the MENU repeatedly
to
switch the 1100D
to
store
/
recall
mode (See
below)
!
!
!
!
!
!
!
!
!
14.
Press the RIGHT ARROW key
to
select the location
to
store the
cur
rently displayed measurement. Allow 1 second
for
data
storage.
15.
Pressing the RIGHT ARROW key cycles
to
the next stora ge
location.
There are 16 (0~15) total storage locations. Any existing data
is
overwritten when the storage location
is selected.
Performing Measurements (1100D
Only)
!
!
16.
Pressing the LEFT ARROW key switches the 1100D
to
recall
mode
(See
below).
!
!
17.
Pressing the LEFT ARROW key selects the location
to
recall and
dis
play. Allow 1 second
for
data
retrieval.

20
21
!
!
!
!
!
!
!
!
Performing Measurements
(continued)
!
!
18.
Press the MENU key
to
cycle the 1100T/D
to
temperature / timer
display
mode.
The temperature and one
of
three preset countdown
timers is
displayed. See
below.
!
!
!
!
!
!
!
!
!
19.
Pressing the LEFT ARROW key cycles through the timers.
The
timers can be set from the menu mode. Pressing the
RIGHT
ARROW key activates the timer and the arrows on the left side
of
the timer
will
begin
to
scroll. Pressing the RIGHT ARROW key
again
stops and resets the
timer.
When the countdown timer reaches
0,
an alarm consisting
of 3
short beeps repeating continuously
will
activate. Pres s any key
to
turn
off
the alarm and reset the
timer.
Performing Measurements
(continued)
!
!
20.
Pressing the MENU key cycles the sub display
to
the temperature
/
alarm cloc k display. See
below.
To set the alarm press the LEFT ARROW key and the minutes
digits
will
blink. Press the RIGHT ARROW key
to
set the desired
value.
Holding the key down
will
increase the value rapidly. Press the LEFT
ARROW key
to
cycle
to
the hour digits. Press the RIGHT
ARROW
key
to
set the desired value. Holding th e key down
will
increase
the
value rapidly. Press the LEFT ARROW key
to
exit (no digits
blinking)
and the alarm
is
set. To activate the alarm press the RIGHT
ARROW
key and an alarm bell
will
display next
to
the time. To
deactivate
alarm mod e, pres s the RIGHT ARROW key again. When the
alarm
clock set time
is
reached the alarm
will
begin
to
sound. Press
any
key
to
turn
off
the
alarm.
21.
Pressing the MENU key cycles the 1100D the temperature / clock
display.

22
23
!
!
!
!
!
!
4.
Menu
Mode
Setting countdown
timers
1.
To activate menu mode, press and hold down the MENU key
until
the 1100T/D beeps and “EDIT”
is
displayed. Pressing the M ENU
key
repeatedly
will
cycle through the various menu
parameters.
2.
Press the menu key and countdown timer
1 will
be
displayed.
!
!
!
!
!
!
!
!
!
!
a. Use the LEFT ARROW key
to
select hour, minute,
or
seconds
and
use the RIGHT ARROW key
to
set the required time. Holding
down
the RIGHT ARROW key
will
change the value
rapidly.
3.
When changes are complete, press and hold the MENU key
to exit
menu mode and return
to
normal operation
or
press the MENU
key
to
cycle
to
the next
timer.
4. “tr1” will
change
to “tr2”
and timer two can be set by per
forming
the steps a
& b above.
5. “tr2” will
change
to “tr3”
and timer three can be set by
per
forming
steps a
& b
above. Press and hold the MENU key
to
exit
menu
mode and return
to
normal operation
or
press the MENU key
to
cycle
to
the next
function.
Menu Mode (continued)
Setting the clock
1.
To activate menu mode, press and hold down the MENU key
until
the 1100T/D beeps and “EDIT”
is displayed.
2.
Press the menu key repeatedly until clock mode
is displayed.
!
!
a. Use the LEFT ARROW key
to
select hour, minute,
or
seconds
and
use the RIGHT ARROW key
to
set the required time. Holding
down
the RIGHT ARROW key
will
change the value
rapidly.
3.
When changes are complete, press and hold the MENU key
to exit
menu mode and return
to
normal operation
or
press the MENU
key
to
cycle
to
the
function.

!
!
!
!
!
!
!
Menu Mode (continued)
Field
calibration
1.
To activate menu mode, press and hold down the MENU key
until
the 1100T/D beeps and “EDIT”
is displayed.
2.
Press the menu key repeatedly until field calibration m ode
is
dis
played (see display below). TO USE FIELD CALIBRATION AN
ICE BATH IS REQUIRED.
!
!
!
!
!
!
!
!
!
3.
Insert the temperature probe into the ice bath. The measured
tem
perature
is
displayed. Allow the thermometer
to
completely
stabilize
(approximately 5 minutes) and then press the
LEFT ARROW
key.
4.
Calibration
is complete.
Menu Mode (continued)
Auto power off
The auto power
off
function conserves battery life by turning
the
1100T/D
off
after 5 minutes
of
inactivity. To disable
or
enable this
func
tion per form the following
steps.
If
menu mode
is
active skip
to
step
2.
1.
Press the menu key repeatedly until auto power
off
mode
is dis-
played (see display
below).
!
2.
Press the RIGHT ARROW key
to
activate (yes)
or
deactivate
(no)
auto power
off mode.
!
!
!
!
!
!
!
!
!
!
24
25

!
!
!
Menu Mode (continued)
Over temperature
alarm
1.
To activate menu mode, press and hold down the MENU key
until
the 1100T/D beeps and “EDIT”
is displayed.
2.
Press the menu key repeatedly until over temperature alarm
mode
is
displayed (see display
below).
!
!
!
!
!
!
!
!
!
3.
Press the RIGHT ARROW key
to
activate (Lt-yes)
or
deactivate
(Lt-
no) the over temperature
alarm.
4.
To increase the alarm point press the LEFT ARROW key until
Lt-uP
is
displayed. Press the RIGHT ARROW key
to
increase the displayed
value. Holding the RIGHT ARROW key down increases the
display
rapidly.
5.
To decrease the alarm point press the LEFT ARROW key until
Lt-dn
is
displayed. Press the RIGHT ARROW key
to
decrease the
dis
played value. Ho lding the RIGHT ARROW key down decrease s
the
display rapidly. After the desired alarm point
is
set press the
MENU
key
to
go
to
the next sele ction
or
press and hold the ME NU
key
to
exit menu
mode.
Menu Mode
(continued)
Over temperature alarm
gap
1.
To activate menu mode, press and hold down the MENU key
until
the 1100T/D beeps and “EDIT”
is displayed.
2.
Press the menu key repeatedly until over temperature alarm
mode
gap
is
displayed (see display
below).
!
!
!
!
!
!
!
!
!
3.
Gap mode sets how far away
from the alarm set point the
tempera
ture must be before the alarm
sounds.
4.
To increase the gap point press the LEFT ARROW key until
GAP-uP
is
displayed. Press the RIGHT ARROW key
to
increase the displayed
value. Holding the RIGHT ARROW key down increases the
display
rapidly.
5.
To decrease the alarm point press the LEFT ARROW key until
GAP-
dn
is
displayed. Press the RIGHT ARROW key
to
decrease the
dis
played value. Holding the RIGHT ARROW key down decreases
the
display
rapidly.
6.
After the desired gap
is
set press the MENU key
to
go
to
the
next
selection
or
press and hold the ME NU key
to
exit menu mode.
!
26 27
!
!
!
!
!
!
!
Menu Mode (continued)
Unit of
measure
If
menu mode
is
active skip
to
step
2.
1.
To activate menu mode, press and hold down the MENU key
until
the 1100T/D beeps and “EDIT”
is displayed.
2.
Press the menu key repeatedly until unit
of
measurement mode
is
displayed (see display
below).
!
!
!
!
!
!
!
!
!
3.
Press the RIGHT ARROW key
to
switch between Celsius
and
Fahrenheit, unit
of measurement.
4.
After the desired unit
of
measure
is
set press the MENU key
to go
to
the next selection
or
press and hold the MENU key
to
exit menu
mode.
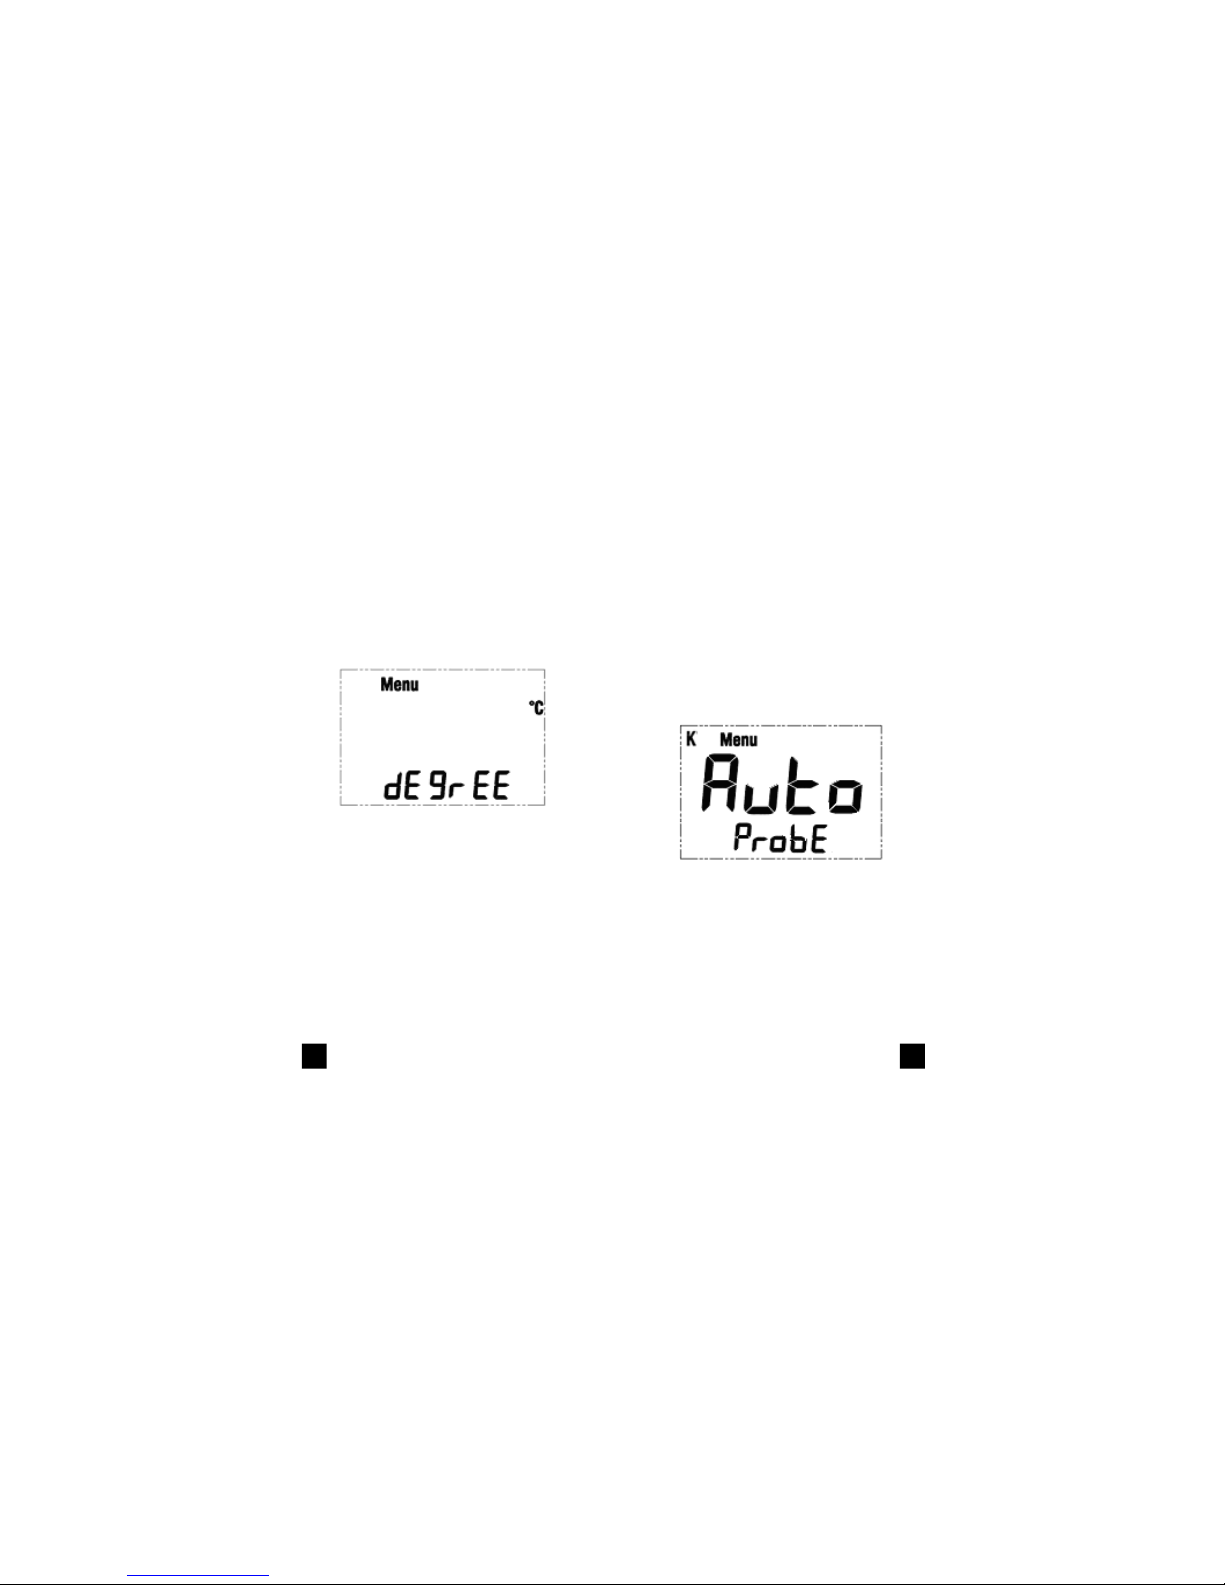
Menu Mode (continued)
Probe type
select
The 1100T/D
will
automatically detect the type
of
probe
connected.
To manually selec t the type
of
probe follow the steps
below.
If
menu mode
is
active skip
to
step
2.
1.
To activate menu mode, press and hold down the MENU key
until
the 1100T/D beeps and “EDIT”
is displayed.
2.
Press the menu key repeatedly until probe type selection m ode
is
displayed (see display
below).
!
!
!
!
!
!
!
!
!
3.
To manually sele ct the type
of
probe being used press the LEFT
ARROW key
to
switch the main display
to
SEL. Press the
RIGHT
ARROW key
to
select between
“K”
and
“T”
type thermocouple
input.
4.
To return the 1100T/D
to
auto select press the LEFT ARROW key
until
Auto
is displayed.
5.
After the desired probe type
is
selected pres s the MENU key
to go
to
the next selection
or
press and hold the MENU key
to
exit me nu
mode.
!
!
28 29

!
!
!
!
!
!
!
E. Logging Parameters (1100D
Only)
1.
To change the logging interval, press and hold the ME NU key
down
to
activate menu mode until the 1100D beeps and “EDIT”
is
displayed.
2.
Press the menu key repeatedly until logger interval mode
is
dis
played. See
below.
!
!
!
!
!
!
!
!
!
3.
To set the intervals p re ss the RIGHT ARROW key
to
set the
desired
value
in
seconds. Holding the key down
will
increase the
value
rapidly. Press the L EFT ARROW key and the minute’s di gi ts
wi ll
blink. Press the RIGHT ARROW key
to
set the desired
value.
Press
the LEFT ARROW key
to
cycle
to
the hour digits. Press the
RIGHT
ARROW key
to
set the desired
value.
4.
After the desire d interval
is
set press the MENU key
to
go
to the
next selection
or
press and hold the ME NU key
to
exit menu mode.
Logging Parameters 1100D Only
(continued)
1.
To change the logging start time, press and hold the MENU
key
down
to
activate menu mode until the 1100D beeps and “EDIT”
is
displayed.
2.
Press the menu key repeatedly until logger start time mode
is dis-
played. See
below.
!
!
!
!
!
!
!
!
!
3.
To set the start time press t he RIGHT ARROW key
to
set the desired
value
in
seconds. Holding the key down
will
increase the
value
rapidly. Press the L EFT ARROW key and the minute’s di gi ts will blink.
Press the R IGHT ARROW key
to
set the desired
value.
Press
the
LEFT ARROW key
to
cycle
to
the hour digits. Press the
RIGHT
ARROW key
to
set the desired
value.
4.
After the desired start time
is
set press the MENU key
to
go
to the
next selection
or
press and hold the ME NU key
to
exit menu
mode.
!
!
!
!
!
30
31

32
33
!
!
!
!
!
!
!
!
Logging Parameters 1100D Only
(continued)
1.
To change the logging stop time, press and hold the MENU
key
down
to
activate menu mode until the 1100D beeps and “EDIT”
is
displayed.
2.
Press the menu key repeatedly until logger start time mode
is dis-
played. See
below.
!
!
!
!
!
!
!
!
!
3.
To set the stop time press t he RIGHT ARROW key
to
set the desired
value
in
seconds. Holding the key down
will
increase the
value
rapidly. Press the L EFT ARROW key and the minute’s di gi ts will
blink. Press the RIGHT ARROW key
to
set the desired
value.
Press
the LEFT ARROW key
to
cycle
to
the hour digits. Press the
RIGHT
ARROW key
to
set the desired
value.
4.
After the desired stop time
is
set press the MENU key
to
go
to the
next selection
or
press and hold the ME NU key
to
exit menu mode.
Logging Parameters 1100D Only
(continued)
1.
To enable (reserve) the logging function
to
begin at the specified
start time, p ress and hold the MENU key down
to
activate
menu
mode until the 1100D beeps and “EDIT”
is displayed.
2.
Press the menu key repeatedly until logger reserve mode
is
dis
played. See
below.
!
!
!
!
!
!
!
!
!
3.
Pressing the RIGHT ARROW key enables (LrES yes)
or disables
(LrES no) reserved
logging.
4.
After the desired reserved mode
is
set press the MENU key
to
go
to
the next sele ction
or
press and hold the ME NU key
to
exit
menu
mode.

34
35
!
!
!
!
!
!
!
F.
Retrieving Logged Data (1100D
Only)
1.
Install the 1100D PC interface software on the
computer.
2.
Attach the 1100D interface dock
to
the 1100D and connect the
USB
cable from the dock
to
the PC.
3.
The 1100D interface software
will
automatically detect the 1100D
and
begin
communication.
4.
Through the software all data logged can be
retrieved.
!
!
!
!
G.
Troubleshooting and
Maintenance
!
T
roubleshooting
Problem
Probable Causes
!
Does not power up
•
Dead
or
defective
battery
•
Broken wire from
batter
y
snap
to
PCB
!
Temperature
reads •
Very weak battery that
will
high
not turn on the low
battery
indicator on the LCD
!
Only reads OPEN
•
Temperature probe not
connected
•
Temperature probe
defective
!
!
!
Maintenance
1.
Battery Replacement: The 1100D
will
display a
batter
y symbol when the internal 1.5 Volt batteries
needs replacement.
a. Disconnect the temperature
probe.
b.
Loosen the 4 battery cover screws located on
the
back
cover.
c.
Remove the battery
cover.
d.
Remove old batteries and replace with new
batteries.
Observe the correct
polarity.
e. Reassemble the instrument
in
reverse
order from
above.
2.
Cleaning your
1100T/D:
Use a mild detergent and slightly damp cloth
to
clean
the
surfaces
of
the un it .
 Loading...