

Page 1
1
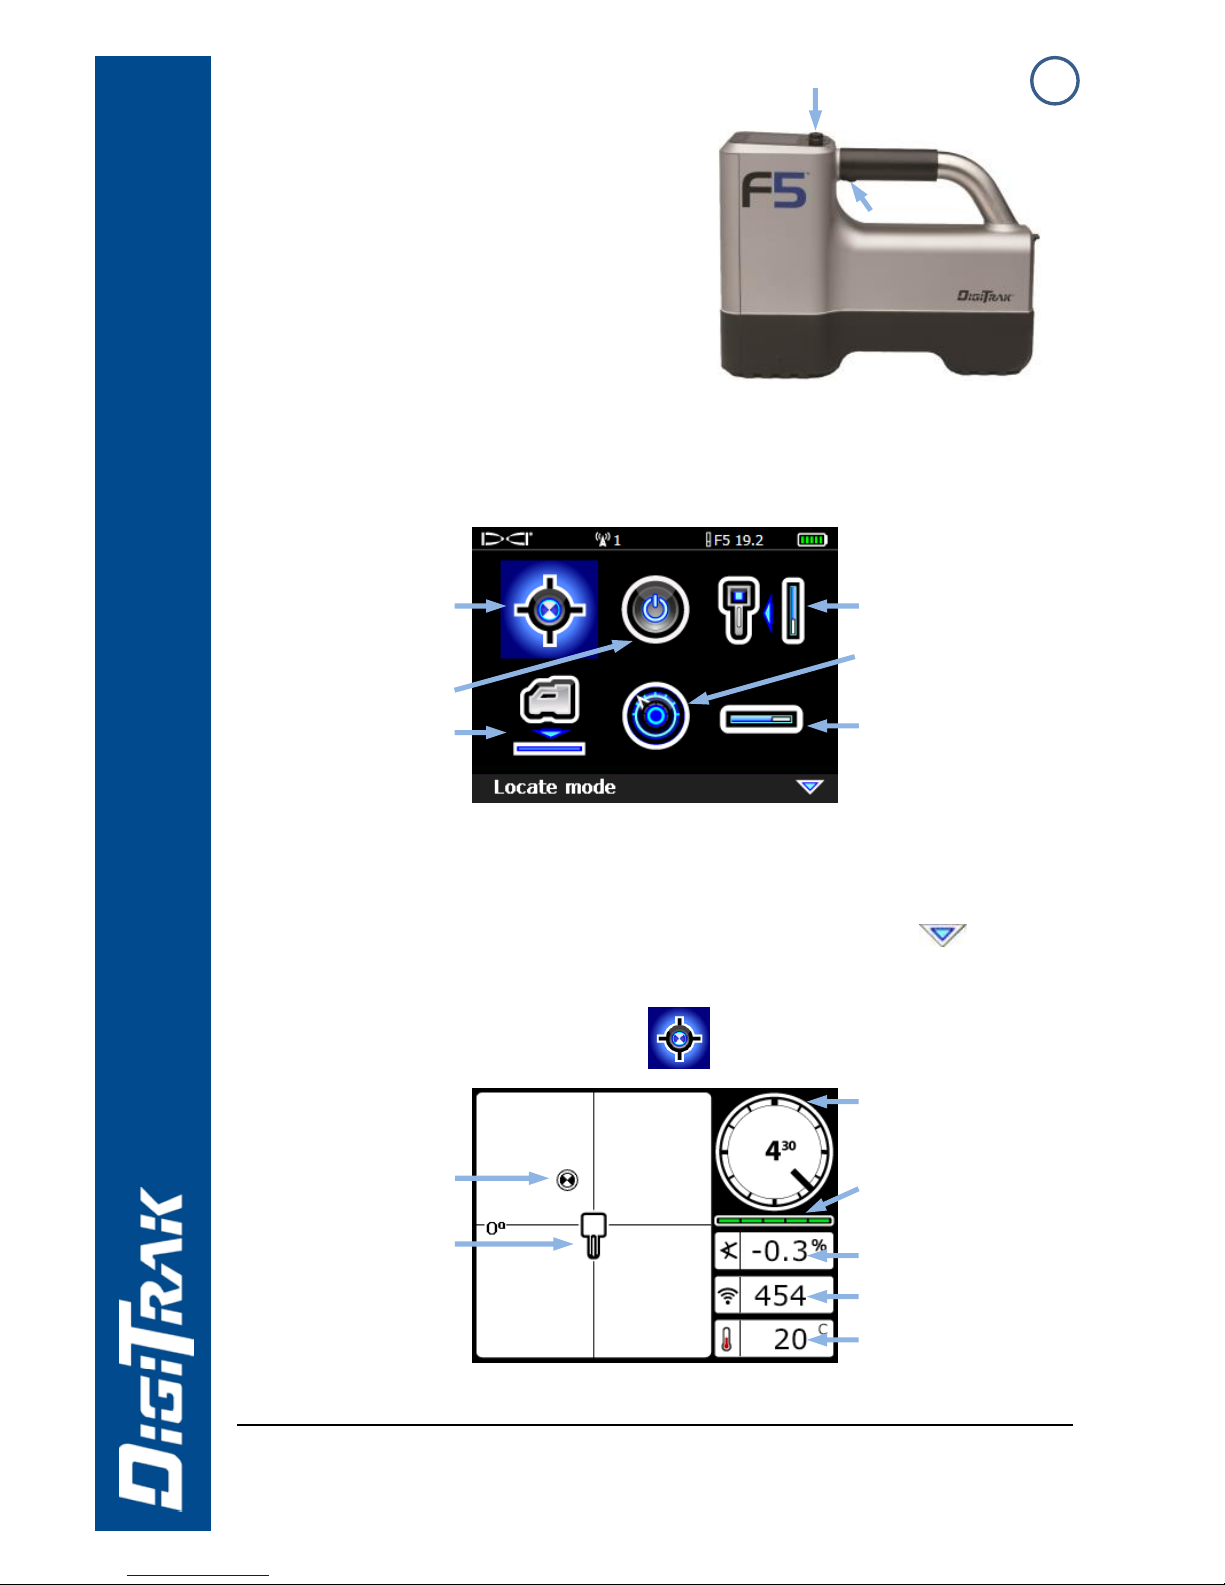
Power On Receiver
1. Install battery pack and hold
trigger for one second.
2. Click trigger to acknowledge
the warning screen.
3. Note number in globe icon on
startup screen.
4. Click trigger to open Main
menu (or toggle down at the Locate screen).
Receiver Main Menu
1. Telemetry channel 3. Tx frequency
2. Tx type 4. Battery strength
Toggle to menu options and click trigger to select;
indicates a second page. Use Locate mode for locating.
Receiver Locate Screen
© Jul 2015 Digital Control Incorporated
All rights reserved. 402-1003-22-A Australia
www.DigiTrak.com
F5
System Quick Start Guide
Toggle
Trigger
Battery & S/N
Locate
mode
1 2 3 4
Transmitter (Tx)
selection
Settings
Calibration
Power off
HAG
Roll indicator
Locating
target ball
(FLP or RLP)
Receiver
Roll/pitch
update meter
Pitch
Signal strength
Tx temperature
Page 2
2
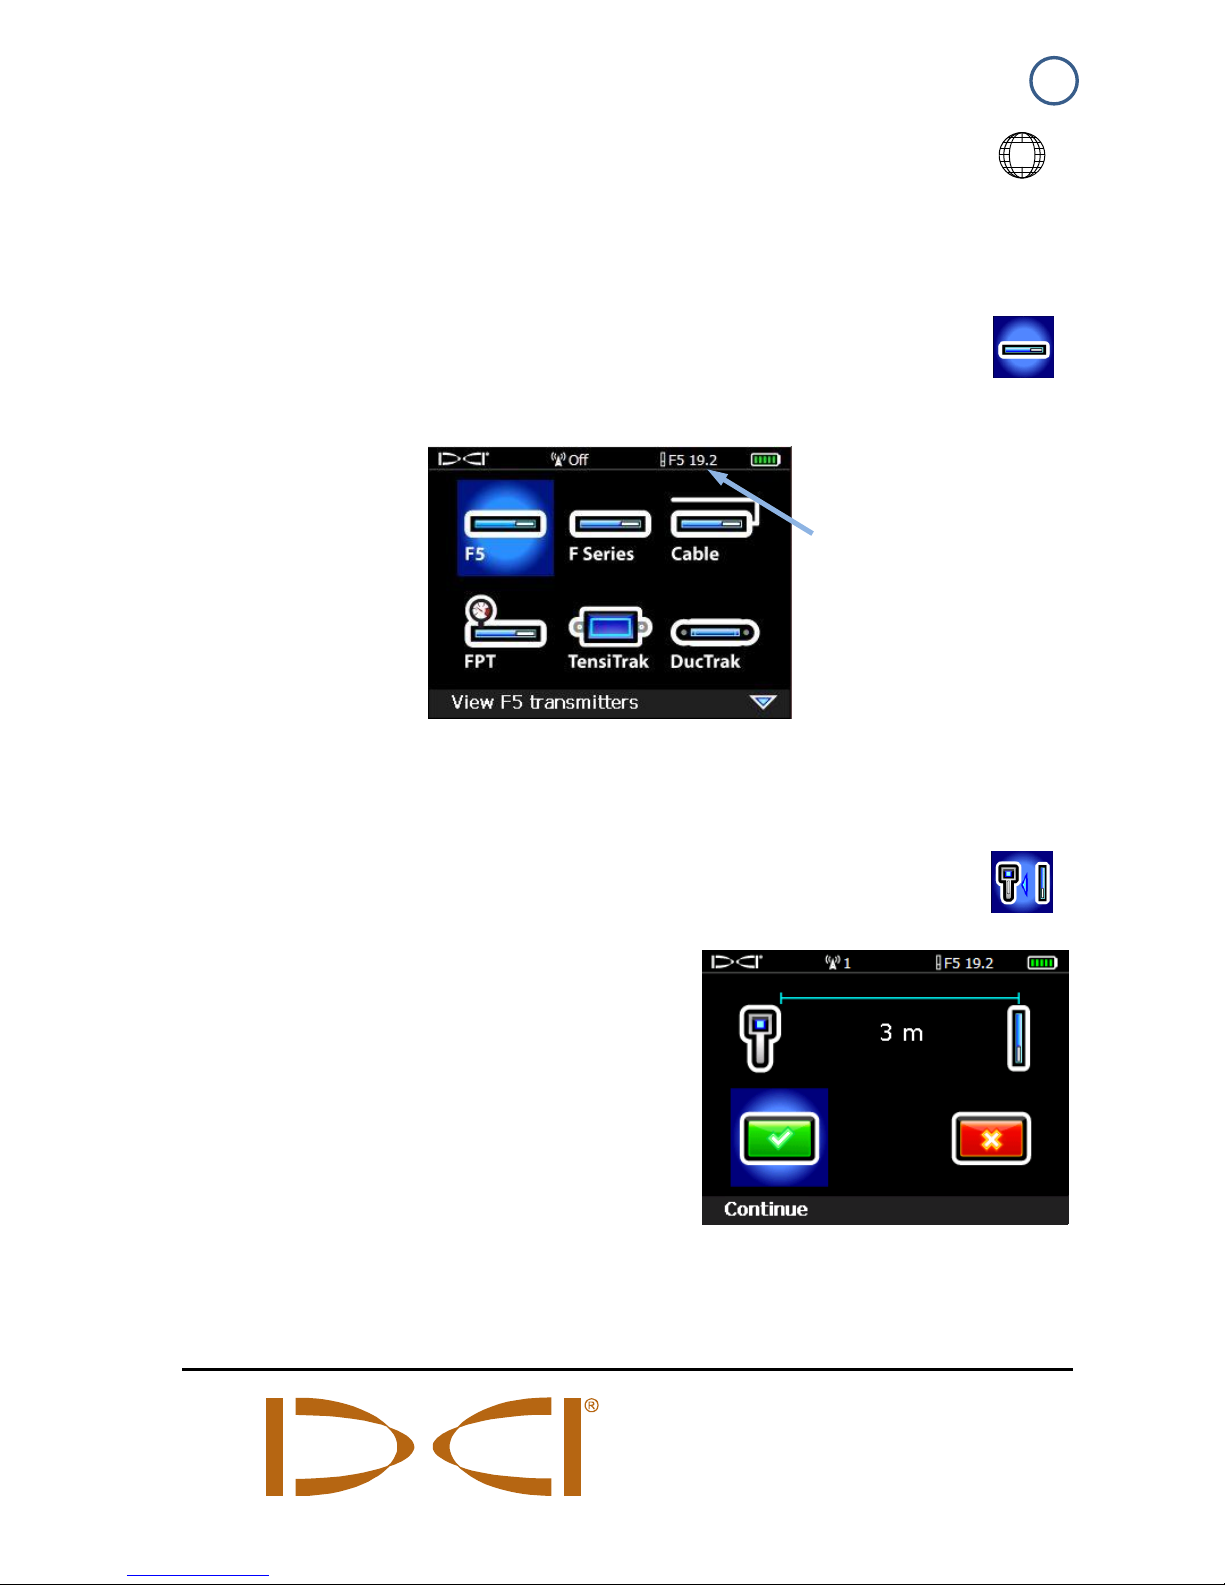
Transmitter Selection Menu and Batteries
1. Ensure number in globe icon on transmitter matches that
on the receiver startup screen.
2. Install batteries. Dual-frequency transmitter batteries must be
loaded with transmitter in proper orientation (pointing up or
down) to set the desired frequency.
3. Use Transmitter Selection option on Main menu to select
transmitter type and frequency.
Transmitter Selection Menu
Calibration Menu
Only calibrate with transmitter in housing and in an
interference-free environment. Verify calibration daily.
1. Place transmitter in housing on
level ground 3 m from receiver
(measure from inside edge of
receiver as shown).
2. Record signal strength.
3. Select 1-pt calibration from
calibration menu and follow the
instructions.
4. Verify calibration by moving the receiver ±1.5 m, then holding the
trigger to take a depth/distance reading.
DIGITAL
CONTROL
INCORPORATED
Current transmitter
type (F5) and
frequency (19.2) are
shown at the top
Page 3
3
Settings Menu
Use the Settings menu to set the time zone, language,
depth units, pitch units, telemetry channel, and other units
as needed to the desired settings. Set the remote display to
match receiver settings.
Height-Above-Ground (HAG) Menu
Use the HAG menu to set the distance from the bottom of
the receiver to the ground while holding the receiver. With
the HAG set, you can take accurate below-ground depth
measurements without placing the receiver on the ground. HAG
resets to Off when the F5 receiver powers off.
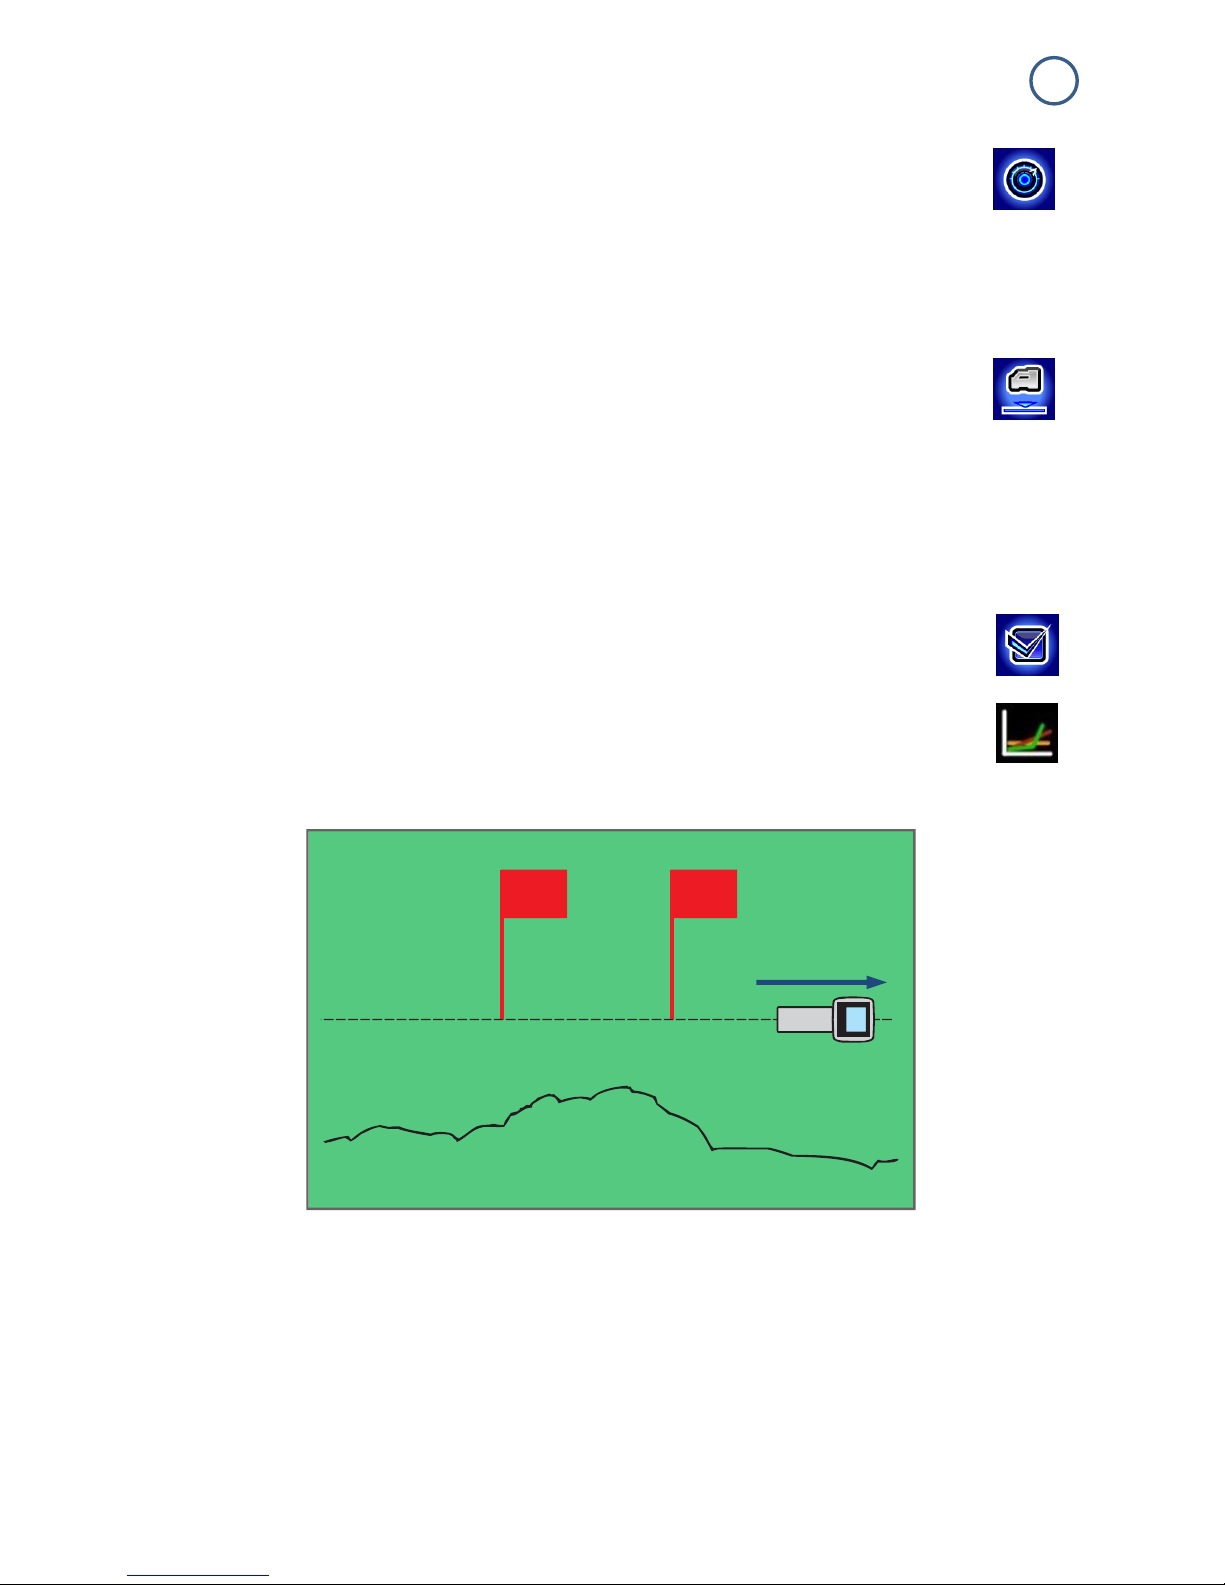
Background Interference Check
At the Locate screen or in Interference Noise Check mode
(under Diagnostics) with no active transmitters in range,
walk the bore path while checking for background noise.
Mark areas with increased background noise (red flags
used below).
One-Person Background Signal Strength Check
Conduct this check for all transmitters/frequencies you have
available (up to five), then use the one with the lowest ambient
interference level (signal noise). When drilling, the signal from the
transmitter must be at least 150 points above the ambient noise
level. Where noise is excessive, data signal may be temporarily
random or unavailable.
LL
Intended bore path
Background noise
Red flag area
Page 4

4
Bird’s-Eye View on Locate Screen
Receiver Locate Screen
(Line-in-the-box at LL)
Actual Position of
Receiver and
Transmitter
Depth and Predicted Depth Readings
Depth Screen (Line-in-the-Box at LL)
Predicted Depth Screen (Ball-in-the-Box™ at FLP only)
For detailed information, see the F5 System Operator’s Manual, available at
www.DigiTrak.com. If you have questions, contact your regional
DCI office at 61.7.5531.4283 or U.S. Customer Service at 1.425.251.0559.
LL
(transmitter)
Box
(receiver)
Transmitter
(underground)
Receiver
HAG on
Tx depth
Pitch
Horizontal distance
between transmitter
and FLP
Predicted
depth of Tx
Trigger held
at LL
Trigger held
at FLP
HAG off
Page 5

5
Basic Locating Instructions
1. Find FLP and RLP by centering the target ball in the box.
2. At FLP, hold trigger for predicted depth reading.
3. Find LL by centering the line in the box between FLP and RLP
(see Locate screen on page 4).
4. View depth by holding trigger at LL.
Transmitter Signal Field Geometry
» Level
Transmitter
» Pitched
Transmitter
Bird’s-eye
view
Side
view
RLP
FLP
LL
Drill rig
Drill rig
RLP
FLP
LL
30°
40°
Side view
RLP: Rear
Locate Point
FLP: Front
Locate Point
LL: Locate
Line
70°
FLP and
RLP are not
equidistant
from the LL
when the
transmitter is
pitched.
Page 6

6
Changing Transmitter Frequency or Mode
For models with dual frequencies or XRange
Install transmitter (Tx) batteries with opposite end of Tx pointing up
to select high frequency or down for lower frequency.
1. Disable Roll Offset (if enabled).
2. Change Tx frequency or turn XRange mode on/off:
Above Ground (Pre-Bore) Tilt Method:
Frequency Change: Let Tx sit at level (0±10°) for
at least five seconds (sec.), tilt Tx up at approx.
+65° for 10–18 sec., then return to level for 10–18
sec., maintaining ±2 clock positions (CP) during
this sequence.
XRange Mode On/Off: Same as above, but use approx. -65°
pitch and maintain constant 12 o'clock CP.
Below Ground (Mid-Bore) Methods:
Frequency Change 10-2-7: Roll the Tx clockwise (CW) to a
CP of 10±1 and wait 10–18 sec., slowly roll CW to CP 2±1
and wait 10-18 sec., and slowly roll CW to CP 7±1. Tx
changes frequency within 20 sec.
Frequency Change RRS1: Remain at any CP for at least 40
sec to clear timers. Complete one full CW rotation (±2 CP)
within 1–30 sec., wait 10-18 sec, and repeat twice for a total of
three rotations (RRS3). Tx changes frequency within 60 sec.
XRange Mode On/Off RRS1: Same as frequency change
RRS above but a total of four rotations (RRS4).
3. At the Locate screen, hold toggle right
to open the Tx Shortcut menu.
4. Select appropriate Tx frequency and
toggle XRange on/off, then select
to return to the Locate screen.
5. Re-enable Roll Offset if applicable.
1
Repeating Roll Sequence is available on select transmitters s/n 30070000 and above.
Tx Shortcut Menu Shown with
12/19 kHz transmitter
Page 7

7
Using XRange
Fluid pressure data from an FPT transmitter and audio are not
supported in XRange (XR) mode; monitor temperature visually.
XRange Real-Time Method
The receiver is using this method when you have selected the XR
check box and “XR” displays on the top right of the Locate screen
(see next image). Locate as you normally would.
Transmitter data will update less frequently on the receiver and
remote display as XRange works to overcome interference. Always
use this method first before trying XRange Max.
XRange Max Method
The drill head must be stationary when using XRange Max, which
helps stabilize fluctuating XRange roll/pitch data. If the Real-time
method did not produce data, the Max method will not either.
1. Hold the trigger at the Locate screen to take a depth reading.
2. As the XRange Max reading
counter increases, the receiver
takes multiple data readings to
determine a roll/pitch value. Greater
interference or deeper bores will
require a higher number of
readings.
3. When the roll and pitch data display
is steady, and before the reading counter reaches 99 and
restarts, note the data and release the trigger.
At a count of 99, XRange Max deletes all current readings, resets
the counter, and starts taking new readings; this is the same as
releasing and holding the trigger to start a new XRange Max
reading. Holding the trigger beyond a count of 99 does not increase
the reliability of the current reading.
Take three XRange Max readings; all three readings must be
identical and stabilize within 10 counts. See F5 System Supplement
A for additional important information on using XRange in highinterference environments.
Page 8

8
Power On Remote Display
1. Install the battery pack or connect to a
DC power source.
2. Connect the antenna.
3. Press Execute for two seconds;
display enters the Remote Mode
locating screen.
4. Press the Down arrow to access the
Main menu.
Remote Display Main Menu
Use the arrow buttons to highlight menu options and Execute to
select. Use Remote Mode during drilling.
Use the Settings menu to set items such as telemetry channel and
display units to match those on receiver.
Remote Mode Locating Screen
For other DigiTrak displays, see separate manual or Quick Start Guide.
Watch our DigiTrak Training Videos at
http://www.youtube.com/dcikent
Settings
Remote mode
Power off
Telemetry
update meter
Tx pitch
Tx roll
Tx temp.
Battery strength
Telemetry channel
Tx battery strength
Arrow
buttons
Execute
button
F Series
Display
(FSD)
 Loading...