

Page 1

Pag. 1 Digit-KD instruction manual
ENGLISH
1.0. Description ......................................................................................................... 2
2.0. Connections ....................................................................................................... 2
3.0. Buttons and indicators ...................................................................................... 3
4.0. Access code ....................................................................................................... 5
4.1. Self-learning of access code ....................................................................... 5
5.0. Maintenance status .......................................................................................... 6
6.0. Disarming ............................................................................................................ 6
7.0. Total arming (DAY mode) ................................................................................. 7
8.0. Partial arming (NIGHT mode) ........................................................................... 8
9.0. Arming Test-Control (DAY mode)..................................................................... 9
10.0. Arming Test-Control (NIGHT mode) ................................................................. 10
11.0. By-passing zones ............................................................................................... 11
12.0. Tamper keypad ................................................................................................... 12
13.0. Technical characteristics................................................................................... 12
Summary
Summary Summary
Summary
Page
Page Page
Page
Remote keypad with LCD display
for VISION series control panels
Page 2
Page 2 Digit-KD instruction manual
ENGLISH
The Digit-KD has a 16 x 2 LCD characters with which you may:
Arm the control panel in the modes “Day”, “Night” and “Test-Control” (Day and Night)
Disarm the control panel
By-pass zones
Visualize the alarms detected which indicate (alarm memory)
The keypad is supplied with an access code which must be self-learned by the control panel
and 5 LED.
The LCD display immediately supplies all the information regarding the system status.
In case of alarm, the last event detected will remain visualized on the display, other events
detected can be easily visualized.
Other characteristics:
- Back light illumination of all buttons and display for approximately 30 seconds after a button
is pressed. In the case that more than one button is pressed, the 30 seconds starts from the
last operation executed.
- Beep confirmation of each button pressed.
1.0. DESCRIPTION
Congratulations on your purchase of the Digit-KD, a remote keypad with LCD display for
use with the VISION series control panels.
The unit has been built using the most advanced microprocessor technology and production
methods. Tested by means of special computerized test jig, the Digit-KD offers security and
durability in time.
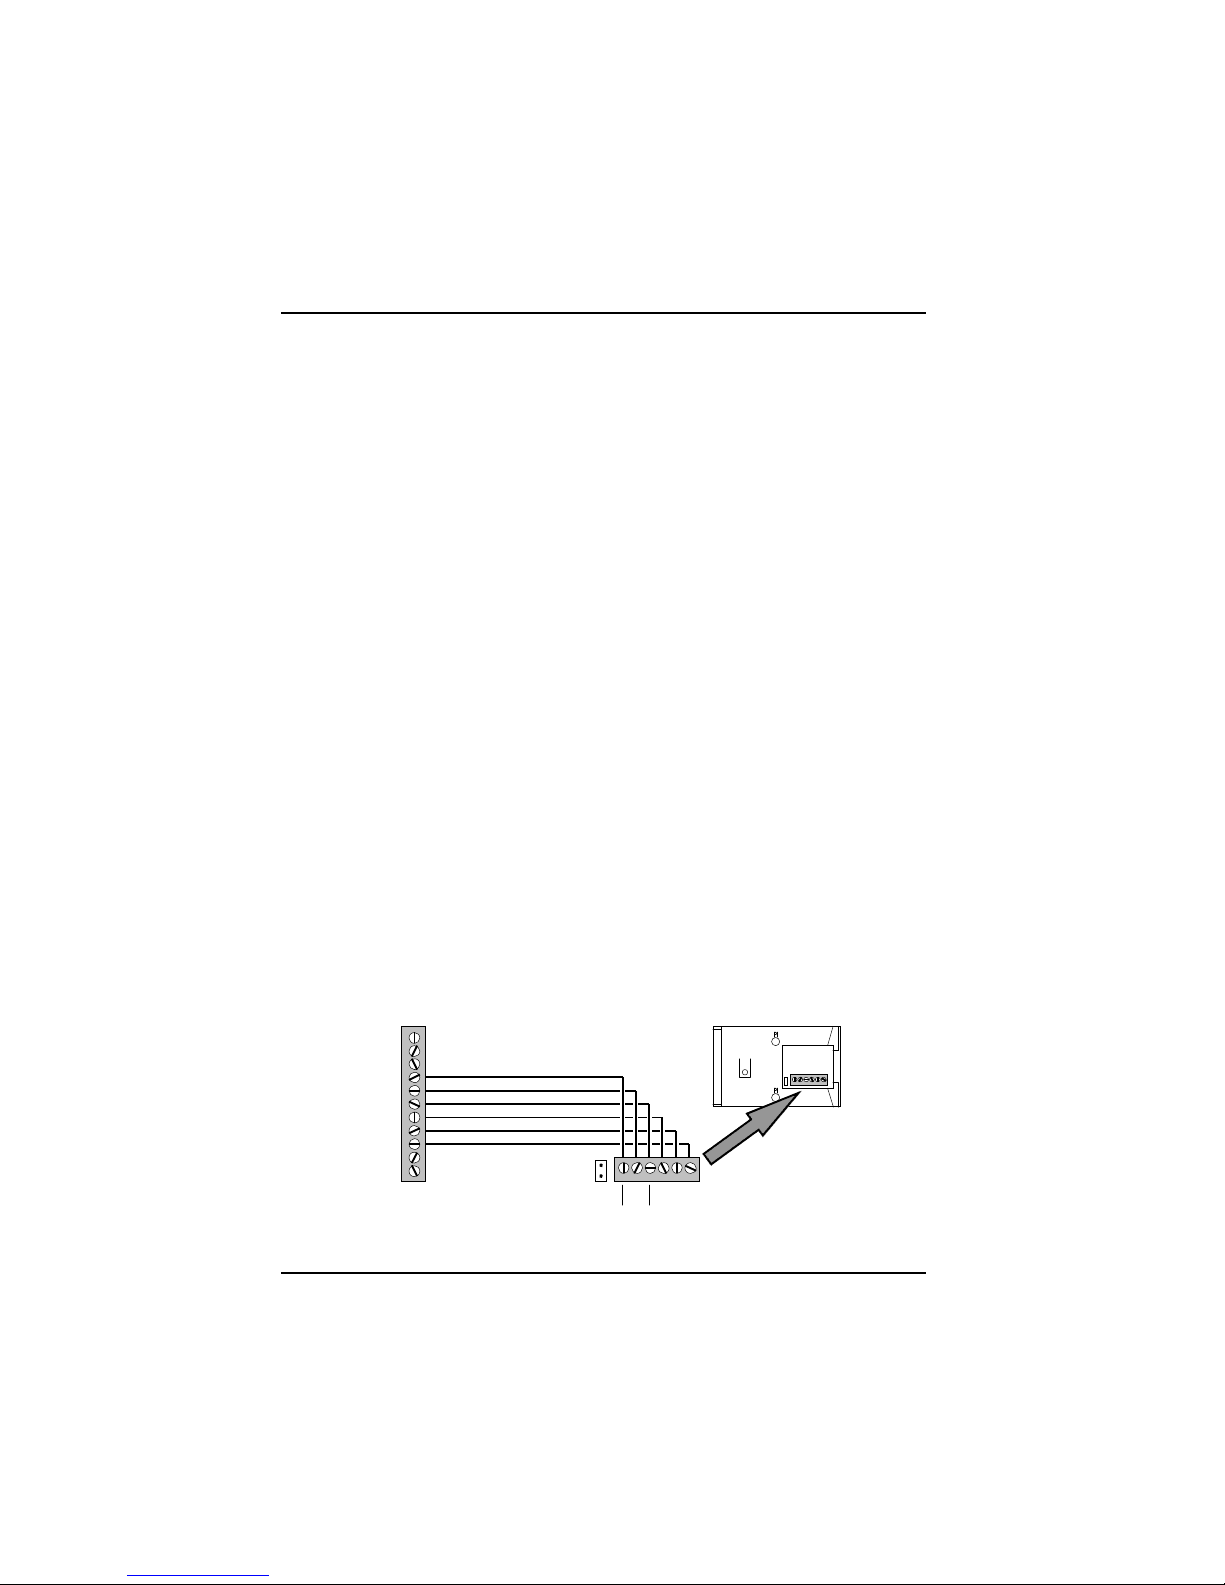
2.0. CONNECTIONS
Terminal
block of the
VISION
control panel
KEY
12 V
GND
C
B
A
KEY GND
12 V C B A
Keypad
terminals
Back view of
keypad
50
49
48
47
46
45
Page 3
Pag. 3 Digit-KD instruction manual
ENGLISH
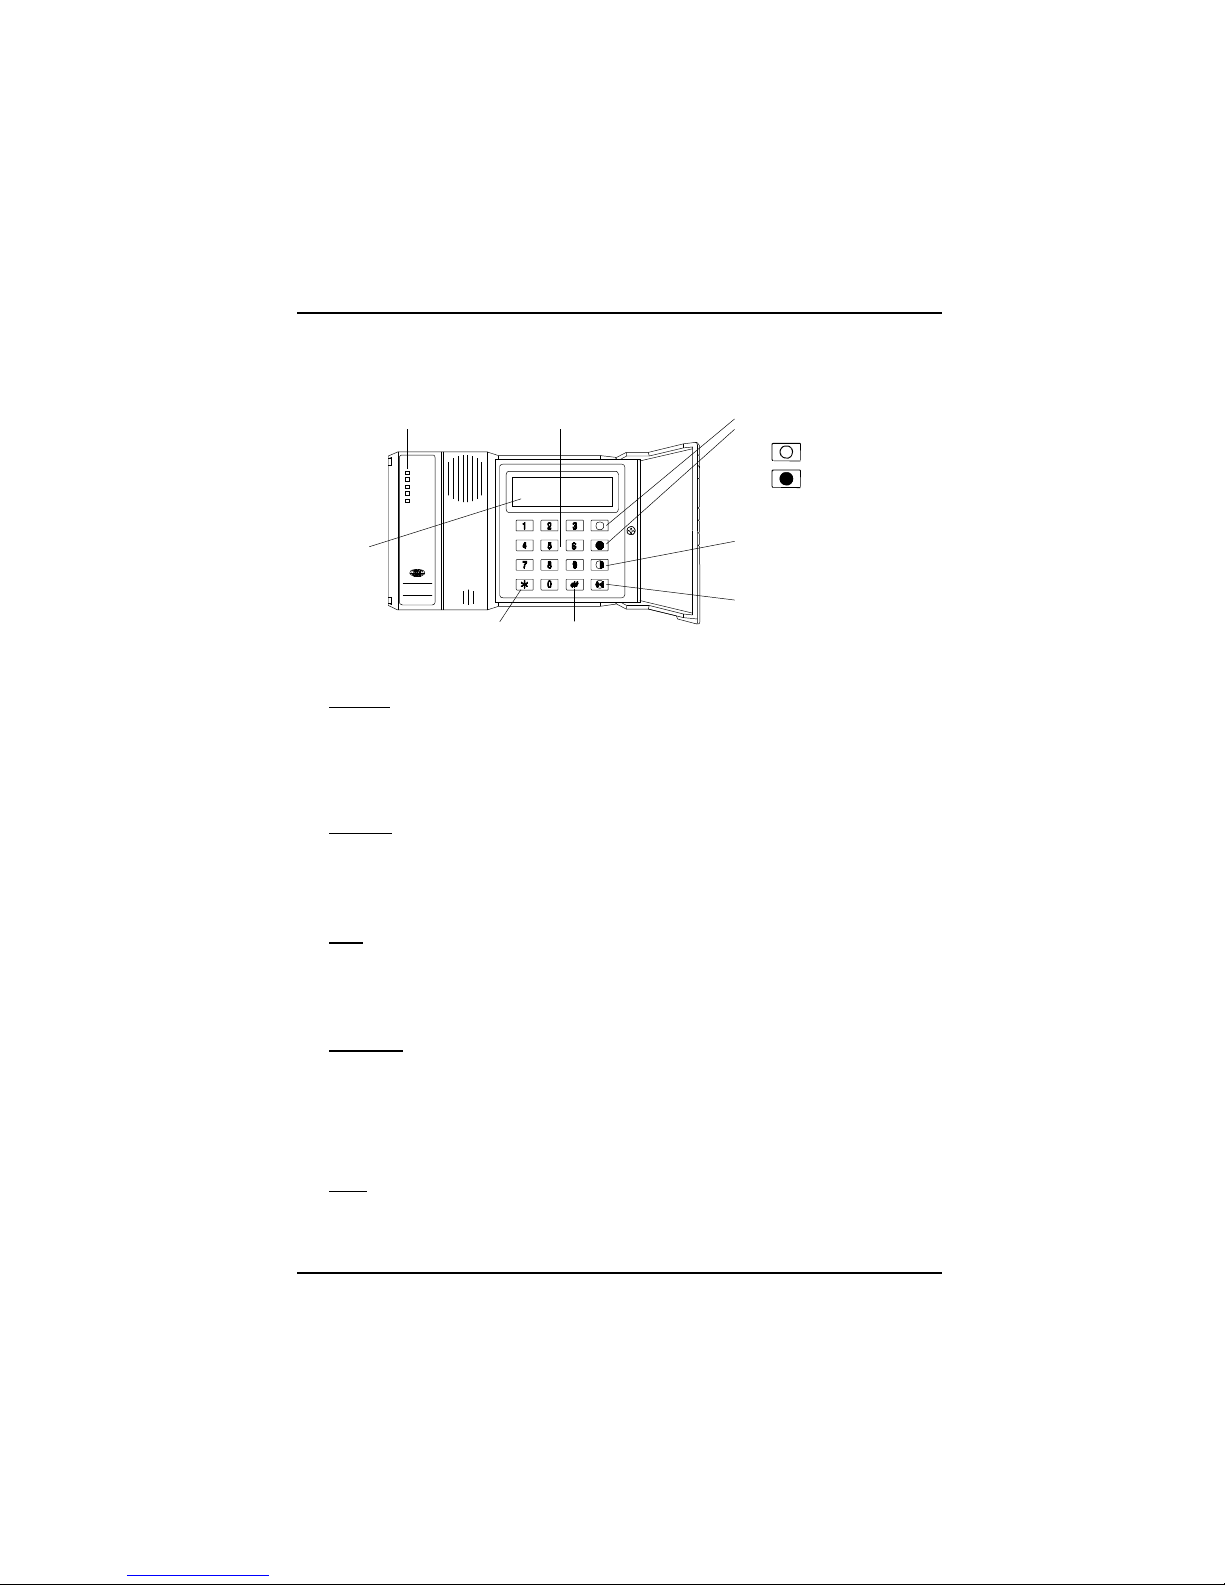
3.0. BUTTONS AND INDICATORS
Digit-KD
UNIT ON
TAMPER
FIRE
LOW BAT.
TEST
Buttons used to visualize or for
running menu (*)
Forward
Backward
Button for arming in Night
and Test-Control modes
Button to
by-pass zones
Optical
indicators
The buttons from 0 to 9 are used
to digit access code
Button for confirmation Not used
Display
LCD
On the left of the keypad are present the following optical signalling with LED indications:
UNIT ON Control panel armed in Day and Night mode.
- Flashes quickly during exit time, then will light until the control panel is disarmed.
- If the option 8 is active (see VISION instructions) and when you arm the control panel
there is an open line or the control panel's battery is low, the LED flashes slowly during
exit time and then will light until the control panel is disarmed.
- If the option 8 is not active, the LED flashes slowly for a few seconds, then will go “off”.
The control panel does not arm when this takes place.
TAMPER Tamper alarm
- In Maintenance mode, the LED will light for the time that the line remains unbalanced.
- In Programming mode, the LED will light during the keychain transmitters programming
and flashes quickly during zone configuration (immediate/delayed).
- With the control panel armed in (Day or Night mode) or disarmed, if a tamper alarm is
triggered the LED flashes slowly until the control panel is re-armed.
FIRE Fire alarm
- In Maintenance mode, this LED will light for the time that the line remains unbalanced
.
- In Programming mode, the LED will light during the wireless sensor programming and
flashes quickly during the association of the zones to the Night group.
- With the control panel armed in (Day or Night mode) or disarmed, if a fire alarm is
triggered the LED flashes slowly until the control panel is re-armed.
LOW BAT. Low battery
- In Maintenance mode, the LED will light to signal low battery of the control panel and of
wireless sensor (every time the sensor triggers an alarm).
- In programming mode, the LED will light during the electronic keys or remote keypads
learning process and flashes quickly during the zone configuration (NC or balanced).
- With the control panel disarmed, armed and Test control mode, the LED flashes slowly
to signal low battery of the control panel, and will flashes quickly to signal low battery of
the wireless sensor. The signalling will remain active until the control panel is re-armed.
TEST Test-control
- In Maintenance mode, the LED flashes slowly.
- In Programming mode, the LED flashes quickly during all phases.
- The LED will light while by-passing zones and Test-control arming mode.
Page 4
Page 4 Digit-KD instruction manual
ENGLISH
Wireless control panel Hardwire control panel
MAINT
OK
MAINT RF
OK
1 2 0
Backward
Forward
MAINT
OK
1 2
3 4
MAINT
OK
Bat Tmp
Firendio
MAINT
OK
5 6
7 8
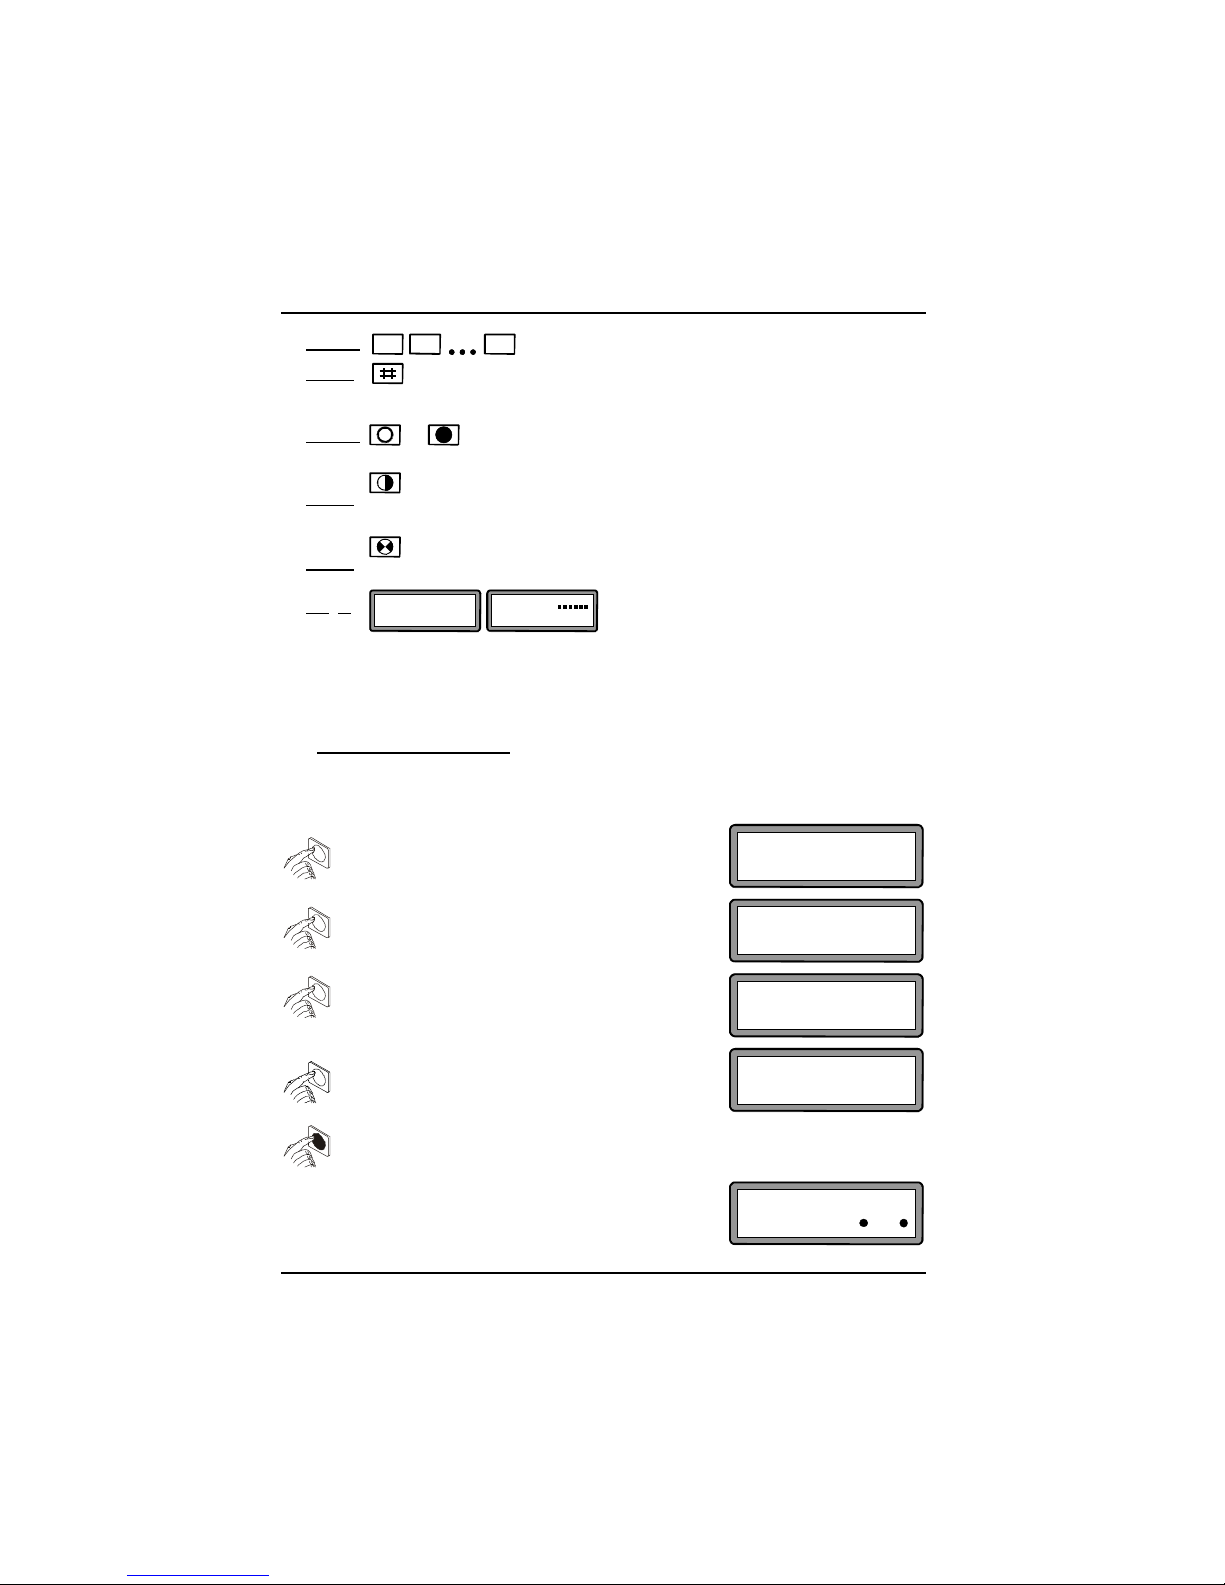
By pressing the same button again, the
2nd menu
will be visualized, showing status of the first 4 zones
.
MAINT
OK
The menu can be seen regardless of the control panel status (maintenance, control panel
disarmed, control panel armed in Day, Night or Test-Control mode).
In the following example the status of the control panel is in Maintenance.
(*) Visualization of menu
By newly pressing the same button, the 3rd
menu will be visualized, showing the status of
the other 4 zones.
1°
Pressing the "
FORWARD
" button, next to the status
of the control panel the 1th menu is visualized:
battery status, 24 hour line and fire.
2°
3°
By pressing the "BACKWARD" button, the menu will run in the opposite direction.
The dots (flashing or with fixed light) on the display
indicate the zones in alarm or alarm memory.
In the example on the right zones 3 and 4 have been
triggered and an alarm has taken place.
Buttons
Are used to digit the access code.
Button - Confirm after having digited the access code.
- While by-passing zones, allows you to pass to the next
group of zones to program. .
Buttons
Allow to visualize, in group of 4, the list of all zones (max
40), plus low battery (
Bat
), tamper (
Tmp
) and
Firendio
(fire)
.
Button - Arming in Night and Test-Control mode.
- Allows to modify the zone configuration while
by- passing zones.
Button Allows you to enter into zone by-pass mode and to pass
to the next zone while by-passing the zones.
Display
Visualizes the control panel status and all
operations executed.
The square symbols that appear next to RF
indicate presence of a radio signal. The more
square dots present, the stronger is the RF signal.
N.B. Unless otherwise indicated in this instruction manual, you will see only the
To remove the menu from the display, newly
press the "FORWARD" button or wait for the
automatic cancellation that takes place after 40
seconds.
MAINT
OK
1 2
3 4
Page 5
Pag. 5 Digit-KD instruction manual
ENGLISH
4.0. ACCESS CODE
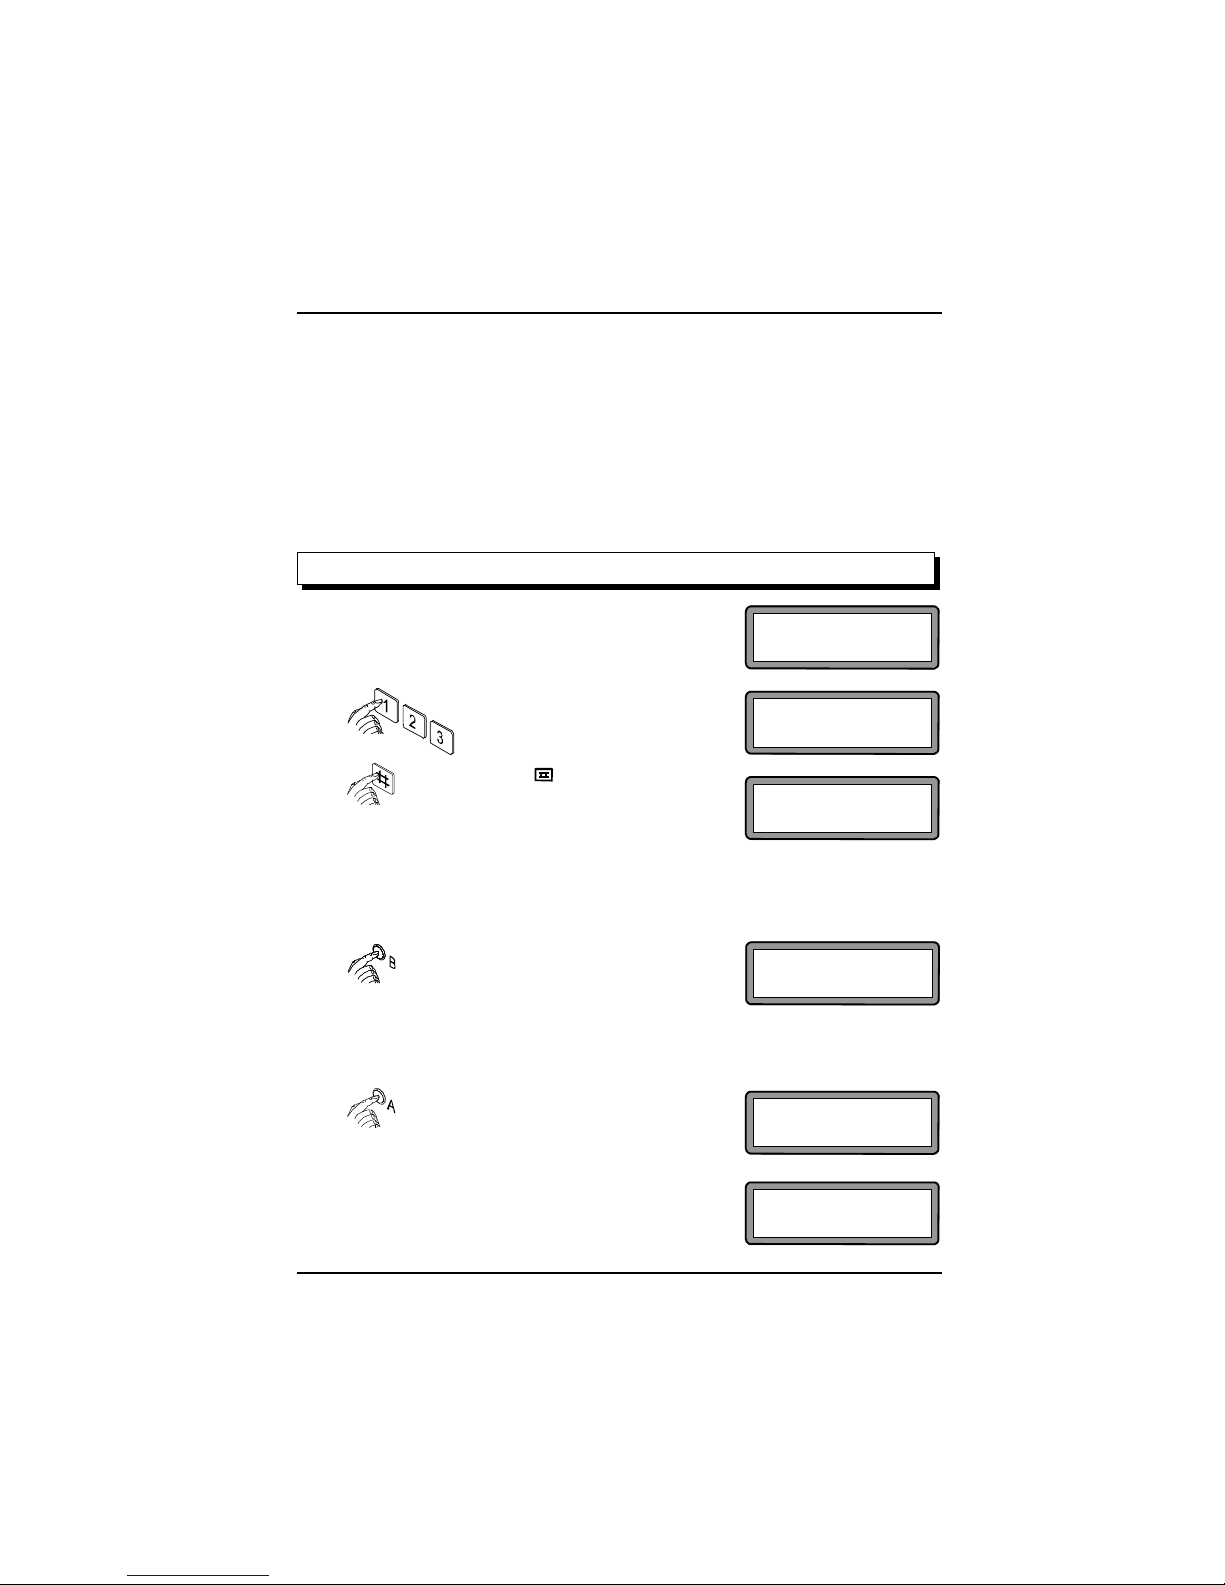
In order to execute the desired function of the Digit-KD, it is necessary to enter an access code
and press a function button.
-
The code may be made from of a minimum of 1 digit to a maximum of 4 digits
(from 0 to 9).
- There is no limit in the choice of a code: the digits can all the same, or they can be all
different. Example: 2 - 305 - 119 8888 - 4567 etc.
- The control panel can learn and memorize a maximum of 8 different codes.
- For each code you may use an unlimited number of remote keypads.
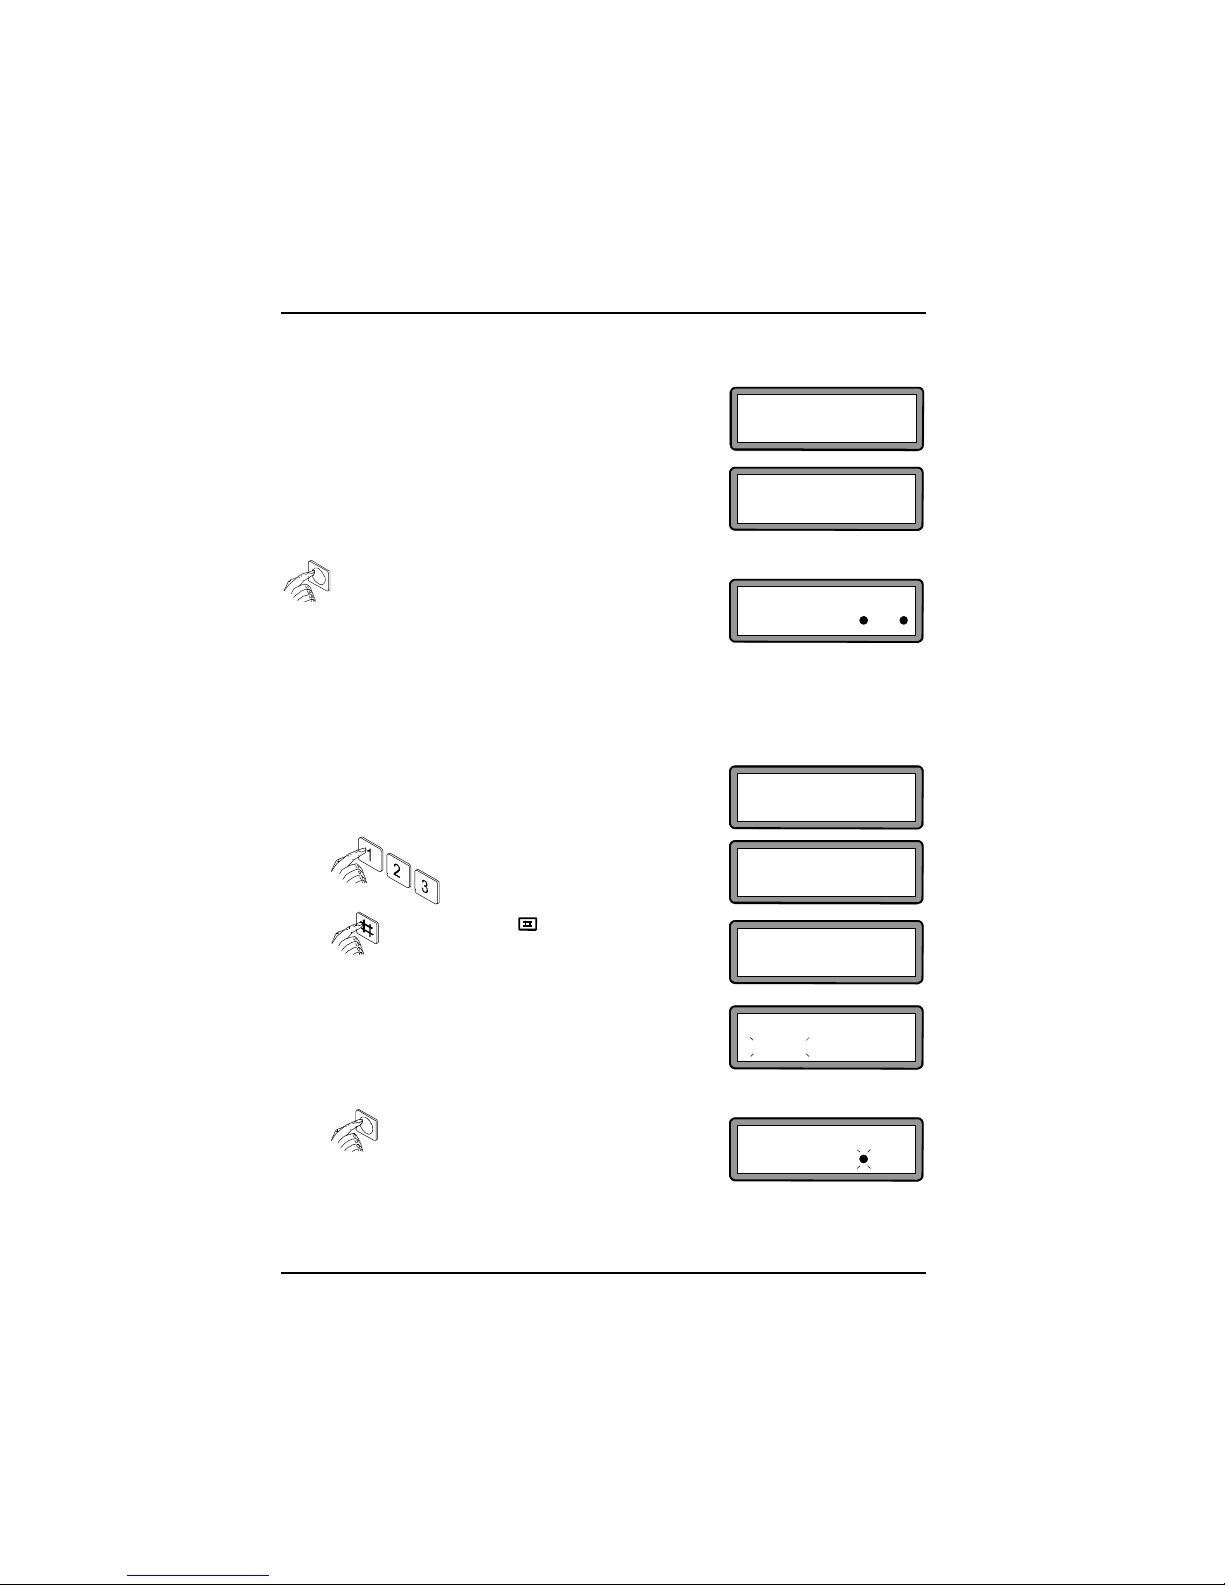
Enter in programming mode and advance to selflearning of keys.
The LED “TEST” quickly flashes, while the LED
“LOW BAT.” is lit fixed. On the display appears:
PROG KEY
ch. n. 1 : no
PROG KEY
ch. n. 1 : no
Digit a code (for example 1, 2, 3).
3 asterisks will appear on the
display.
***
PROG KEY
ch. n. 2 : no
MAINT
OK
PROG KEY
ch. n. 1 : si (yes)
Press the button to memorize the code.
A beep is emitted from the control panel
confirming that the code has been learned.
The display shows the message on the
right.
Failure of confirmation on the display that the code has been learned,
indicates that this code is already memorized in another position.
Therefore, repeat operations described in points 2) and 3).
4.1. SELF-LEARNING OF ACCESS CODE
To cancel the codes memorized, press the
button “B” on the control panel.
The keypad displays the message shown
on the right.
To enter a new code in position n. 1 not occupied, repeat the operations 1),
2), 3) and 4).
To move to the next position, press the
button “A” on the control panel and repeat
operations 1), 2), 3) and 4) and so forth up
to the eighth position.
After having memorized the code or codes,
exit programming mode (see control panel
instructions). On the display the message
shown on the right will appear.
Page 6
Page 6 Digit-KD instruction manual
ENGLISH
MAINT
OK
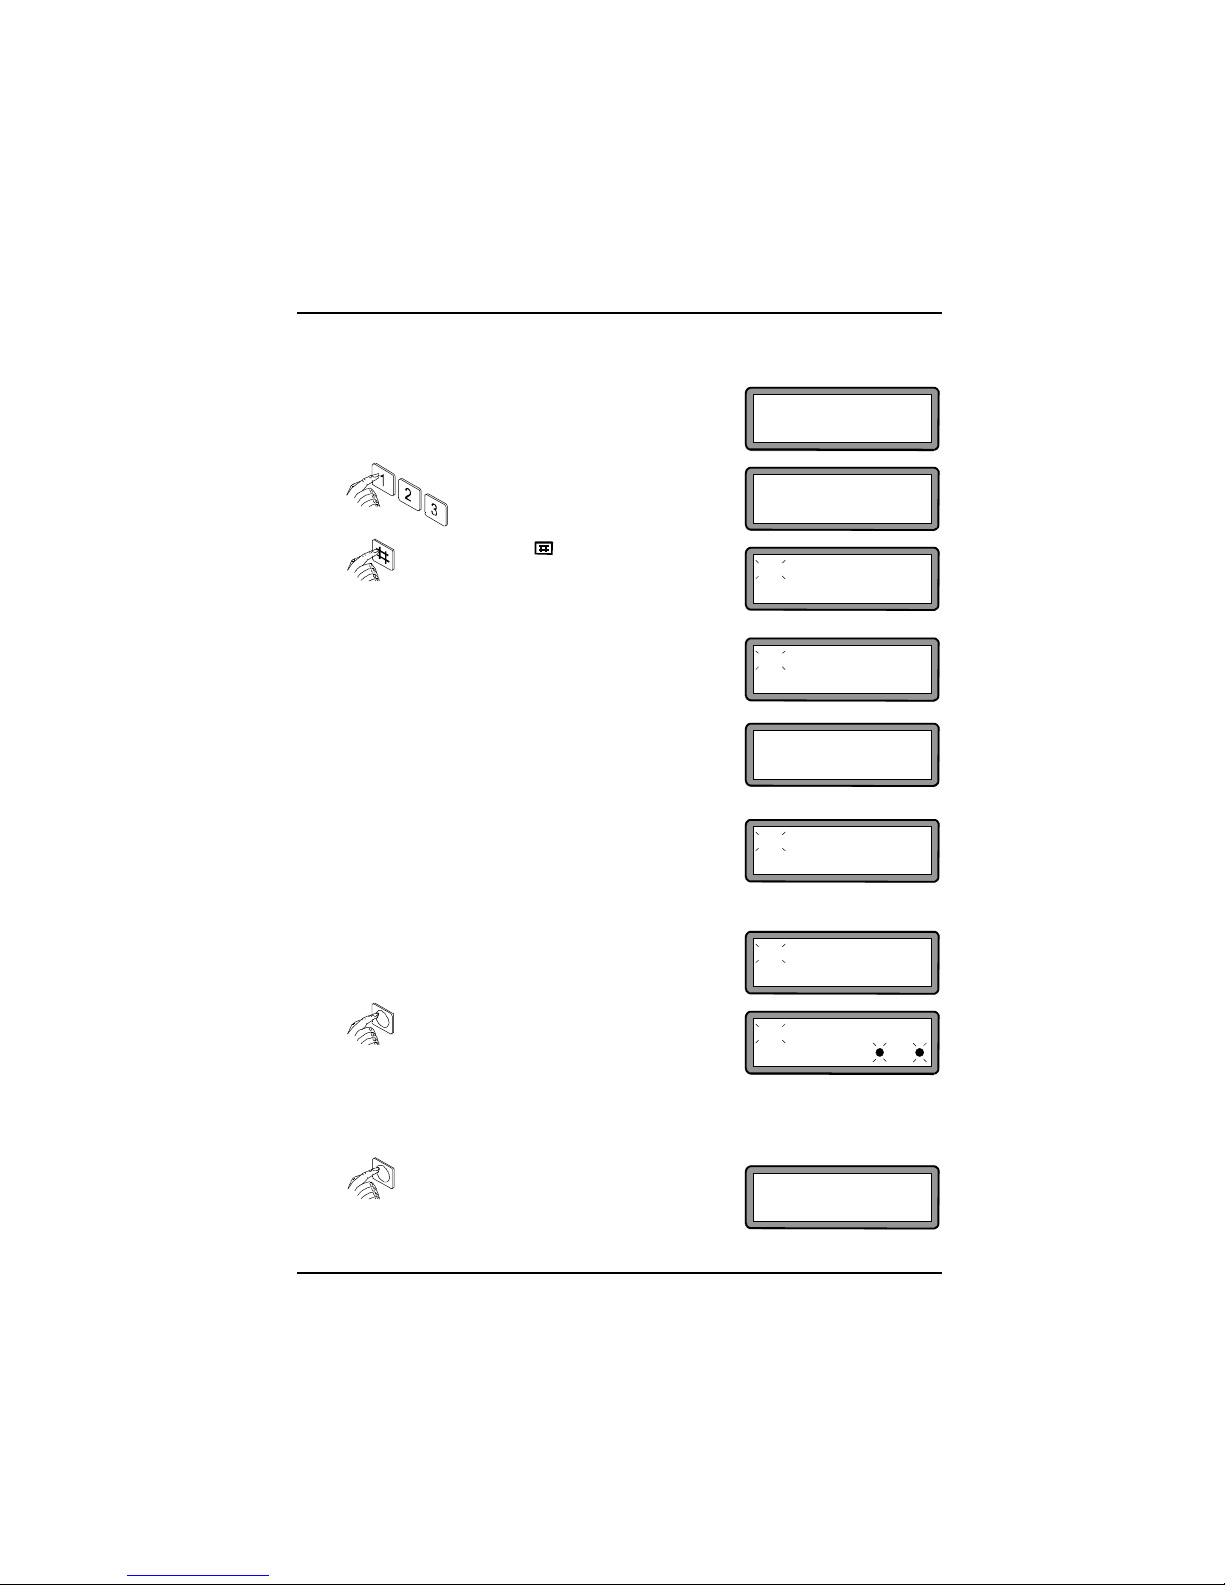
As soon as the control panel is powered up, it switches automatically into Maintenance status. On the keypad the
“TEST” LED will flash slowly and, if no zone is triggered,
on the display the message shown will appear:
5.0. MAINTENANCE STATUS
In the case that an alarm has been triggered in one or more
zones, the zone will be indicated on the display starting
from the highest priority. At equal priority level, the first zone
violated will be indicated.
MAINT
fire wire
Fire zone in alarm
Zones 3 and 4 in alarm
MAINT
OK
1 2
3 4
To verify if there are others zones triggered,
press more times the button "FORWARD".
On the display will be visualized the menu with
the list of all zones, plus Bat (low battery), Tmp
(tamper) and Firendio (fire).
Next to each triggered zone a dot lit will appear
(see example on the right).
MAINT
OK
6.0. DISARMING
With the control panel in Maintenance, armed or TestControl status, to disarm the control panel proceed as
follows:
Digit one of any of the memorized
codes (example 1, 2, 3). On the
display 3 asterisks will appear.
***
OFF
OK
If while the control panel is armed alarms
have been triggered, when you disarm, on
the display the message related to the last
zone that has been triggered flashes
slowly (see example on the right).
In the above example, the
"zone 2" has triggered an alarm
OFF
Z.2 filo
To verify if other alarms have been
triggered, press more times the button
"FORWARD". On the display will be visualized the menu with the list of all zones,
plus Bat (low battery), Tmp (tamper) and
Firendio (fire). Next to each triggered
zone a dot will appear that flashes slowly
(see example on the right).
OFF
1 2
3 4
In the above example, the
"zone 3" has triggered an alarm
Press the button to confirm. The control
panel emits 2 beeps (only from control
panel armed to disarmed
). On the display
“
OFF
” appears.
The control panel is disarmed.
Page 7
Pag. 7 Digit-KD instruction manual
ENGLISH
OFF
OK
7.0. TOTAL ARMING
(DAY mode)
With the control panel disarmed (OFF), proceed as follows:
Digit any one of the memorized
codes (example 1, 2 and 3). On
the display 3 asterisks will appear.
***
ON
OK
After a few seconds, the writing “delay” will
appear which indicates the countdown of
the exit time (30 seconds).
ON delay
OK
ON
OK
To verify the zones by-passed, press more
times the button "FORWARD" during the
exit time. On the display the menu (in
groups of 4) are visualized with the
complete list of all zones, plus Bat (low
battery),
Tmp
(Tamper) and
Firendio (fire).
Next to each by-passed zones a dot will
appear that flashes quickly.
ON
OK
1 2
3 4
To remove the menu from the display,
press the button "FORWARD" or wait for
automatic cancellation that takes place
after approximately 40 seconds.
ON
OK
ON
OK
zone by-p
If a few zones are by-passed, during the
exit time on the display will appear the
message “zone by-p” instead of “delay”.
Press the button to confirm.
The control
panel emits one beep. On the
display the message on the right appears.
The writing “ON” and the LED “UNIT ON”
will flash quickly.
If while arming there are zones triggered
or unbalanced not by-passed, or control
panel has low battery, the writing “ON” on
the display and the LED “ON” will flash
slowly during the exit time.
Furthermore, the message “zone in alarm” or “battery centr.” will appear.
ON delay
zone in alarm
At the end of the exit time, the writing “
delay”
disappears and both the writing ”ON” and
the LED “UNIT ON” from flashing become
fixed. The control panel is armed in DAY
mode and is fully functional.
In the above example, the zones 3
and 4 are by-passed.
The flashing dots will remain vis-
ualized only during the exit time.
Page 8
Page 8 Digit-KD instruction manual
ENGLISH
OFF
OK
8.0. PARTIAL ARMING
(NIGHT mode)
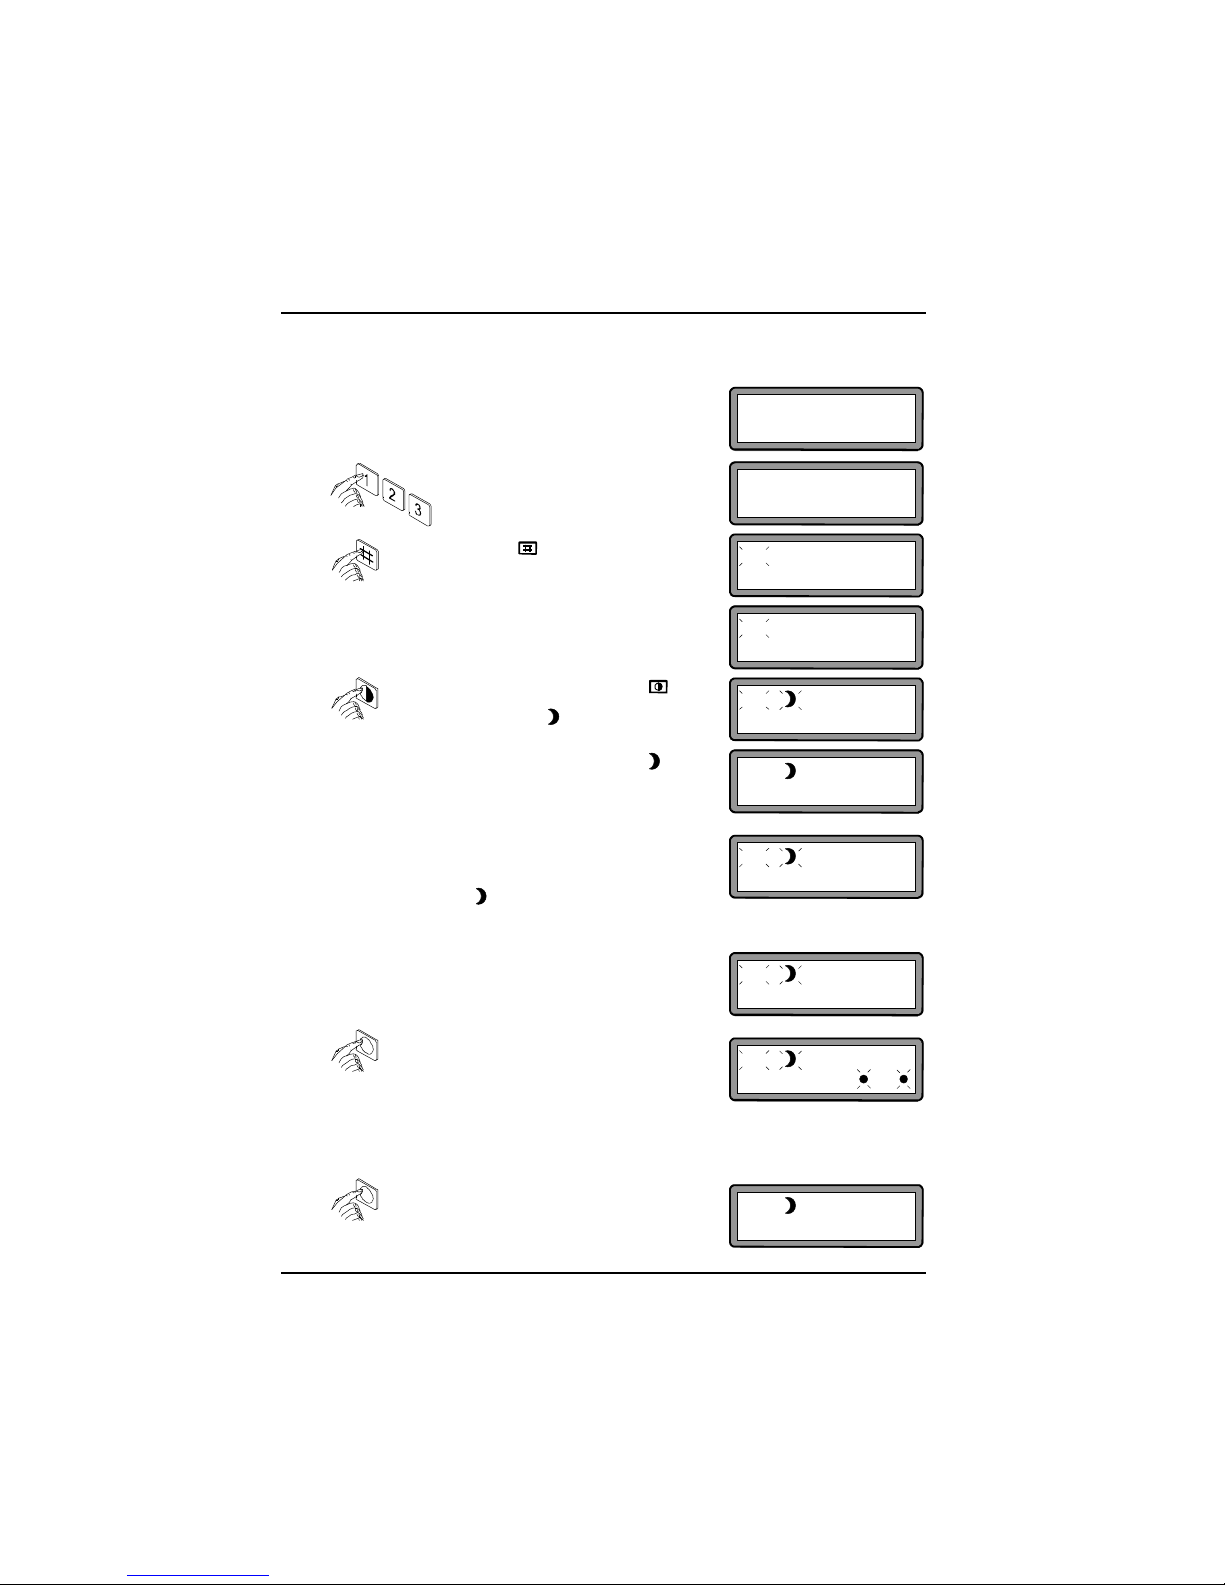
With the control panel disarmed (OFF), proceed as follows:
****
ON
OK
ON
OK
delay
ON
OK
1 2
3 4
Digit any one of the memorized
codes (example 1, 2 and 3). On
the display 3 asterisks will appear.
ON
OK
If a few zones are by-passed or associated
to the Night group, during the exit time on
the display will appear the message
“zone by-p” instead of “delay”.
ON
OK
zone by-p
To verify the zones by-passed or associated
to the Night group, press more times the
button "FORWARD" during the exit time.
On the display the menu (in groups of 4)
are visualized with the complete list of all
zones, plus
Bat
(low battery),
Tmp
(Tamper)
and Firendio (fire). Beside the by-passed
zones or associated to the Night group a
dot will appear that flashes quickly.
In the above example, the zones 3
and 4 are by-passed.
The flashing dots will remain vis-
ualized only during the exit time.
ON delay
OK
ON
OK
Press the button to confirm.
The control
panel emits one beep. On the
display the message on the right appears.
The writing “ON” and the LED “UNIT ON”
will flash quickly.
After a few seconds, the writing “delay” will
appear which indicates the countdown of
the exit time (30 seconds).
During the exit time press the button .
The control panel emits one beep. On the
display a moon symbol that
flashes quickly
will appear. At the end of the exit time, the
writing “delay” will disappear and the
writing “ON”, the symbol of the moon and
the LED “UNIT ON” from flashing quickly
will become fixed. The control panel is armed
in NIGHT mode and is fully functional.
If while arming there are zones triggered or
unbalanced not by-passed and not associated
to the Night group, or control panel has low
battery, the writing “ON”, the symbol of
the moon on the display and the LED
“ON” will flash slowly during the exit time.
Furthermore, the message “zone in alarm” or “battery centr.” will appear.
To remove the menu from the display,
press the button "FORWARD" or wait for
automatic cancellation that takes place
after approximately 40 seconds.
ON
zone in alarm
delay
Page 9
Pag. 9 Digit-KD instruction manual
ENGLISH
OFF
OK
9.0.
ARMING TEST-CONTROL
(DAY mode)
***
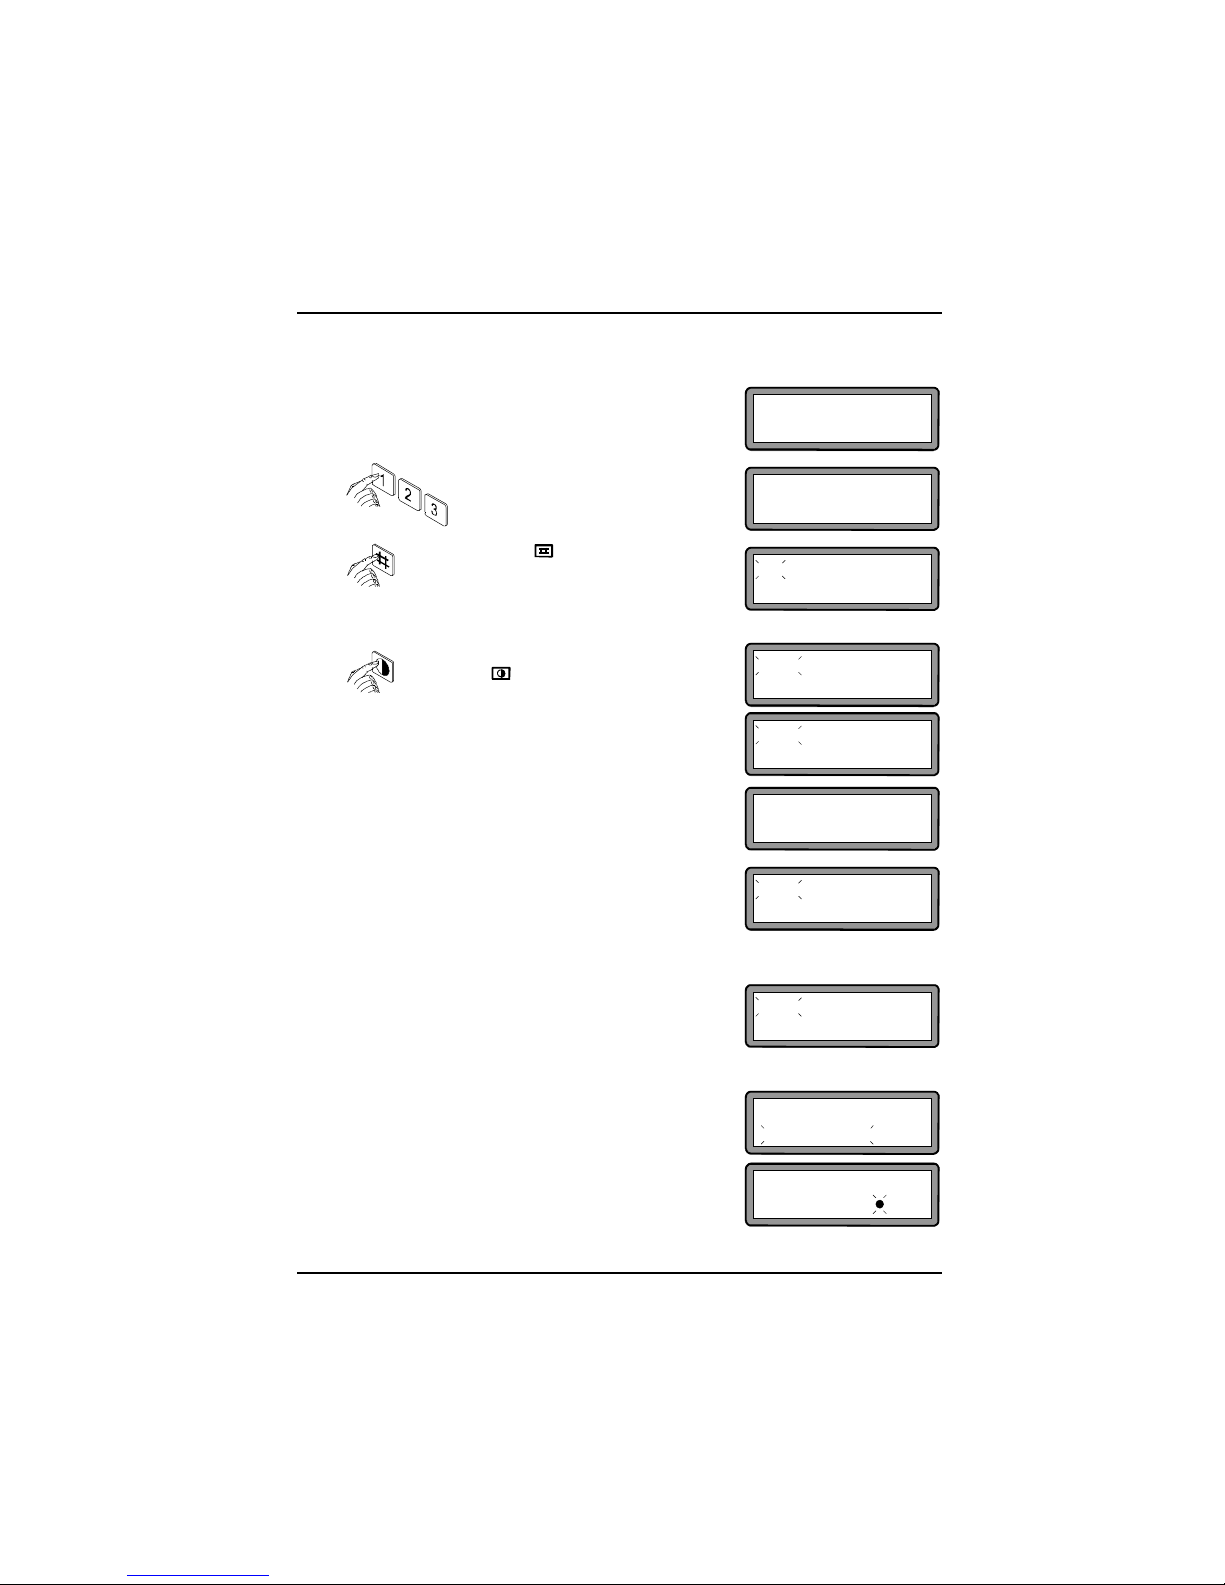
At the end of the exit time, the writing
“delay” disappears and both the writing
“TEST” and the LED “UNIT ON” from
flashing become fixed. The control panel is
armed in Test-Control Day mode.
TEST
OK
TEST
OK
TEST
OK
delay
If while arming there are zones triggered
or unbalanced not by-passed, or control
panel has low battery, the writing “TEST”
on the display and the LED “ON” will flash
slowly during the exit time.
Furthermore, the message “zone in alarm” or “battery centr.” will appear.
If a few zones are by-passed, during the
exit time on the display will appear the
message “zone by-p” instead of “delay”.
To verify the zones by-passed, proceed as
indicated on the points 3) and 4) of the
paragraph 7.0.
Violation of one or more zones provokes the appearance of a flashing message on the display. Keep in
mind that only the alarm with the highest priority level
is visualized entirely on the display and remains in
memory until the control panel is re-armed.
To verify if there have been other alarm events,
access the menu by pressing the button "
FORWARD".
Next to each zone that has triggered an alarm a dot
will appear that flashes slowly (see on the right).
TEST
hold-up wire
TEST
OK
1 2
3 4
"zone 3" has triggered an alarm
TEST zone by-p
OK
With the control panel disarmed (OFF), proceed as follows:
Digit any one of the memorized
codes (example 1, 2 and 3). On
the display 3 asterisks will appear.
Press the button to confirm.
The control
panel emits one beep. On the
display the message on the right appears.
The writing “ON” and the LED “UNIT ON”
will flash quickly. The LED “TEST” will
light and remains so until the control panel is disarmed.
ON
OK
Before the writing “delay” appears, press
the button .
The writing “TEST” will appear and it will
flash quickly.
After a few seconds the writing “delay”
that indicates a 60 seconds exit time will
appear.
TEST delay
zone in alarm
Page 10
Page 10 Digit-KD instruction manual
ENGLISH
OFF
OK
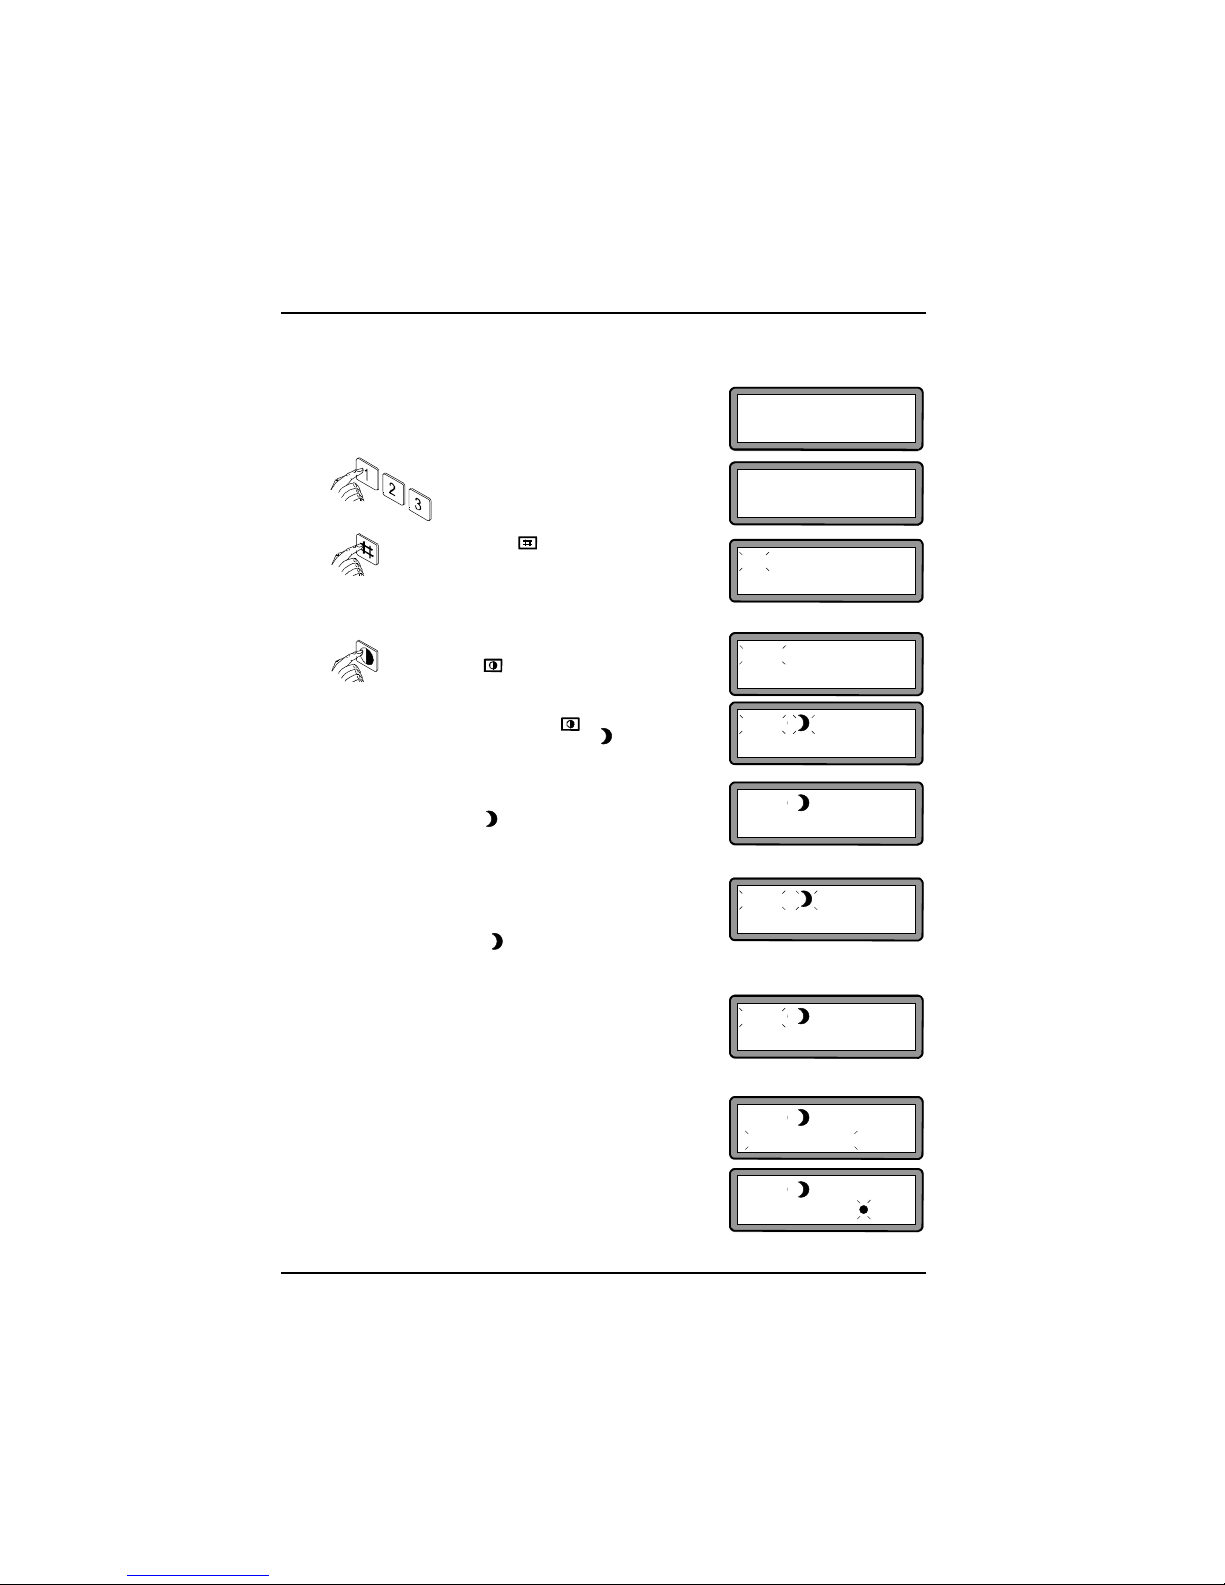
10.0.
ARMING TEST-CONTROL
(NIGHT mode)
With the control panel disarmed (OFF), proceed as follows:
***
TEST
OK
Before the writing “delay” appears, press
the button . The writing “TEST” will
appear and it will flash quickly.
After a few seconds the writing “delay” that
indicates a
60 seconds
exit time will appear.
Press again the button .
On the
display a moon symbol that
flashes
quickly
will appear.
TEST
OK
delay
Violation of one or more zones provokes the appearance of a flashing message on the display. Keep in
mind that only the alarm with the highest priority level
is visualized entirely on the display and remains in
memory until the control panel is newly armed.
To verify if there have been other alarm events,
access the menu by pressing the button "
FORWARD".
Next to each zone that has triggered an alarm a dot
will appear that flashes slowly (see on the right).
"zone 3" has triggered an alarm
TEST
OK
If a few zones are by-passed or associated
to the Night group, during the exit time on
the display the message “zone by-p”
instead of “delay” will appear. To verify the
zones by-passed or associated to the
Night group, proceed as indicated on the
points 3) and 4) of the paragraph 7.0.
TEST
OK
zone by-p
TEST
hold-up wire
TEST
OK
1 2
3 4
If while arming there are zones triggered or
unbalanced not by-passed and not associated to
the Night group, or control panel has low
battery
, the writing “TEST” and the symbol
of the moon on the display and the LED
“ON” will flash slowly during the exit time
.
Furthermore, the message “zone in alarm” or “battery centr.” will appear.
Digit any one of the memorized
codes (example 1, 2 and 3). On
the display 3 asterisks will appear.
Press the button to confirm.
The control
panel emits one beep. On the
display the message on the right appears.
The writing “ON” and the LED “UNIT ON”
will flash quickly. The LED “TEST” will
light and remains so until the control panel is disarmed.
ON
OK
At the end of the exit time, the writing “
delay
”
will disappear and the writing “ON”, the symbol
of the moon and the LED “
UNIT ON
” from
flashing quickly will become fixed. The control
panel is armed in
Test-Control
Night mode
.
TEST
zone in alarm
delay
Page 11
Pag. 11 Digit-KD instruction manual
ENGLISH
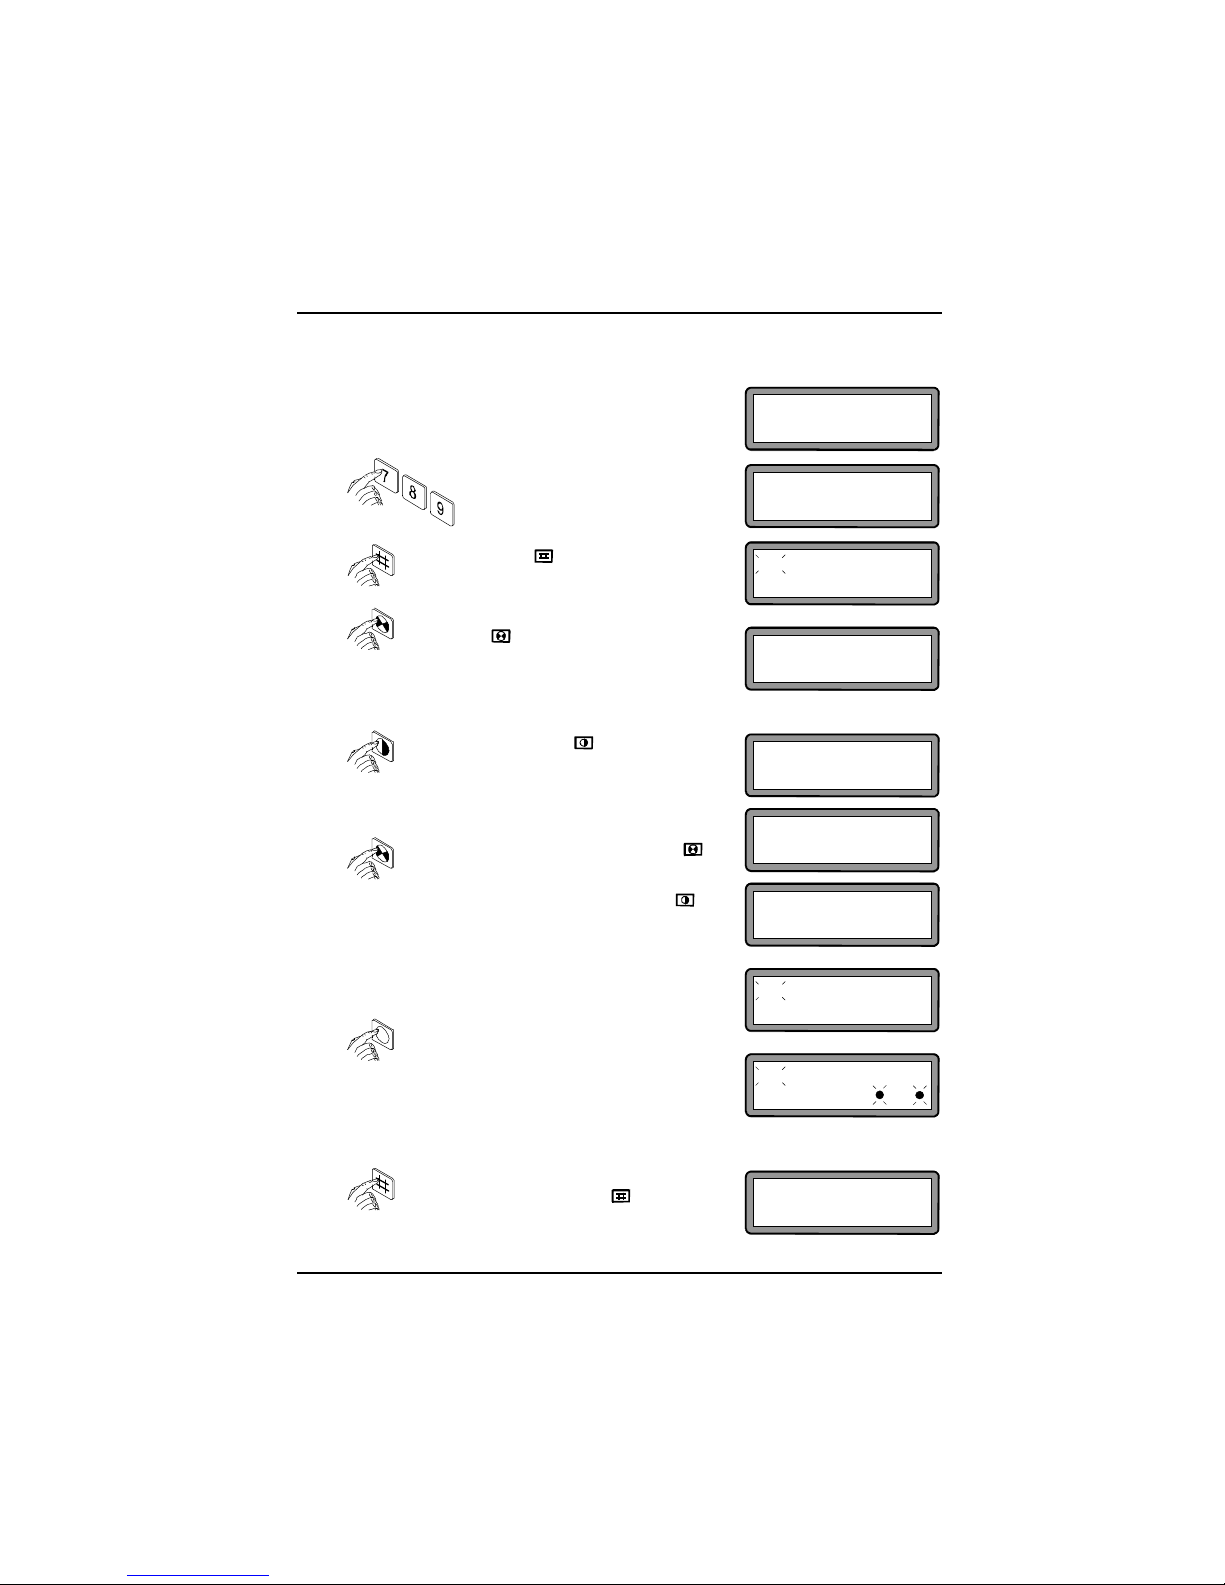
11.0. BY-PASSING ZONES
OFF
OK
With the control panel disarmed (OFF), proceed as follows:
Digit any one of the memorized
codes (example 7, 8 and 9). On
the display 3 asterisks will appear.
***
Press the button to confirm.
The writing “ON” will flash quickly.
ON
OK
Before the writing “delay” appears, press
the button .
The LED "TEST" will light. A message that
indicates the status of the first zone will
appear on the display.
In the case that the zone is not by-passed, the above message will be visualized.
BY-PASS
zone 1 : si (yes)
By pressing the button , the zone will be
by-passed. The message on the right will
appear on the display.
By newly pressing the same button, the
zone will be re-armed and so forth.
BY-PASS
zone 2 : no
To pass to the next zone, press the button .
A message regarding the status of the
second zone will appear on the display.
To by-pass the zone, press the button .
BY-PASS
zone 2 : si (yes)
Repeat operations 4) and 5) for all zones to by-passing.
OFF
OK
To exit by-passing zones at any moment,
press more times the button until on the
display the message of control panel
disarmed (OFF) will appear.
ON zone by-p
OK
ON
5 6
7 8
In the above example, the
zones 7 and 8 are by-passed.
If a few zones are by-passed, during the exit time on the display
the message “zone by-p” instead of “delay” will appear.
To verify the zones by-passed, press more
times the button "FORWARD" during the
exit time. On the display the menu (in
groups of 4) are visualized with the
complete list of all zones, plus Bat (low
battery),
Tmp
(Tamper) and
Firendio (fire).
Next to each by-passed zones a dot will
appear that flashes quickly.
BY-PASS
zone 1 : no
Page 12
Page 12 Digit-KD instruction manual
ENGLISH
The Digit-KD is protected against tampering in the case of attempts to change the control
panel status with a false code.
If the control panel detects for 5 consecutive times an unknown code, the keypad goes into
block by ignoring all the following codes.
If within the following 30 seconds, the control panel detects another 5 times an unknown
code, the tamper alarm is activated (see instructions of the control panel installed).
12.0. TAMPER KEYPAD
Even if the control panel is armed with the mechanical key, the tamper
of the remote keypad is always in function.
ATTENTION
13.0. TECHNICAL CHARACTERISTICS
•
Power: 12 Vdc
•
Consumption with display non illuminated : 14 mA
•
Consumption with illuminated display: 93 mA
•
SMD technology
•
Dimensions: 165x100x30 mm
•
Weight: 250 g
Latest revision 05-04-2011
Do not litter. Turn the device over to a designated disposal at the end of lifetime.
Do not litter. Separate and discard the packaging materials in the containers (depending on the rules in
force at the place of residence).
 Loading...