

BELTPACK
User Guide
DE-DPS BELTPACK
Version 21/12/2017
English

CONTENTS
1 - DESCRIPTION OF THE SYSTEM 3
2 - OVERVIEW : 4
3 - BELTPACK DESCRIPTION 5
4 - HOW TO... 6
4 - 1 ...Switch ON the BELTPACK: 6
4 - 2 ...Unlock the BELTPACK : 6
4 - 3 ...Adjust the volume : 7
4 - 4 ...Connect to a TX-BOX : 7
4 - 5 ...To connect to a Digitear Network: 7
4 - 6 ...Changing the channel used by the BELTPACK: 7
4 - 7 ...Pairing with an INEAR : 8
4 - 8 ...Enabling the Eco mode: 8
4 - 9 ...Delete the saved INEAR list: 8
4 - 10 ...Change the battery: 9
5 - ADVANCED BELTPACK OPERATION 10
5 - 1 BELTPACK Startup : 10
5 - 2 Txboxes Menu : 11
5 - 3 Wlan Menu : 12
5 - 4 Lock Menu: 13
5 - 5 Update Menu : 14
5 - 6 Connect IE Menu : 15
5 - 7 Find IE Menu: 16
5 - 8 Microphone Menu: 17
5 - 9 Channel Menu: 18
5 - 10 Low Battery Status Display: 18
6 - TECHNICAL FEATURES 19
7 - TECHNICAL TROUBLESHOOTING 20
8 - WARRANTY 21
Page 3 of 21
Users Guide BELTPACK
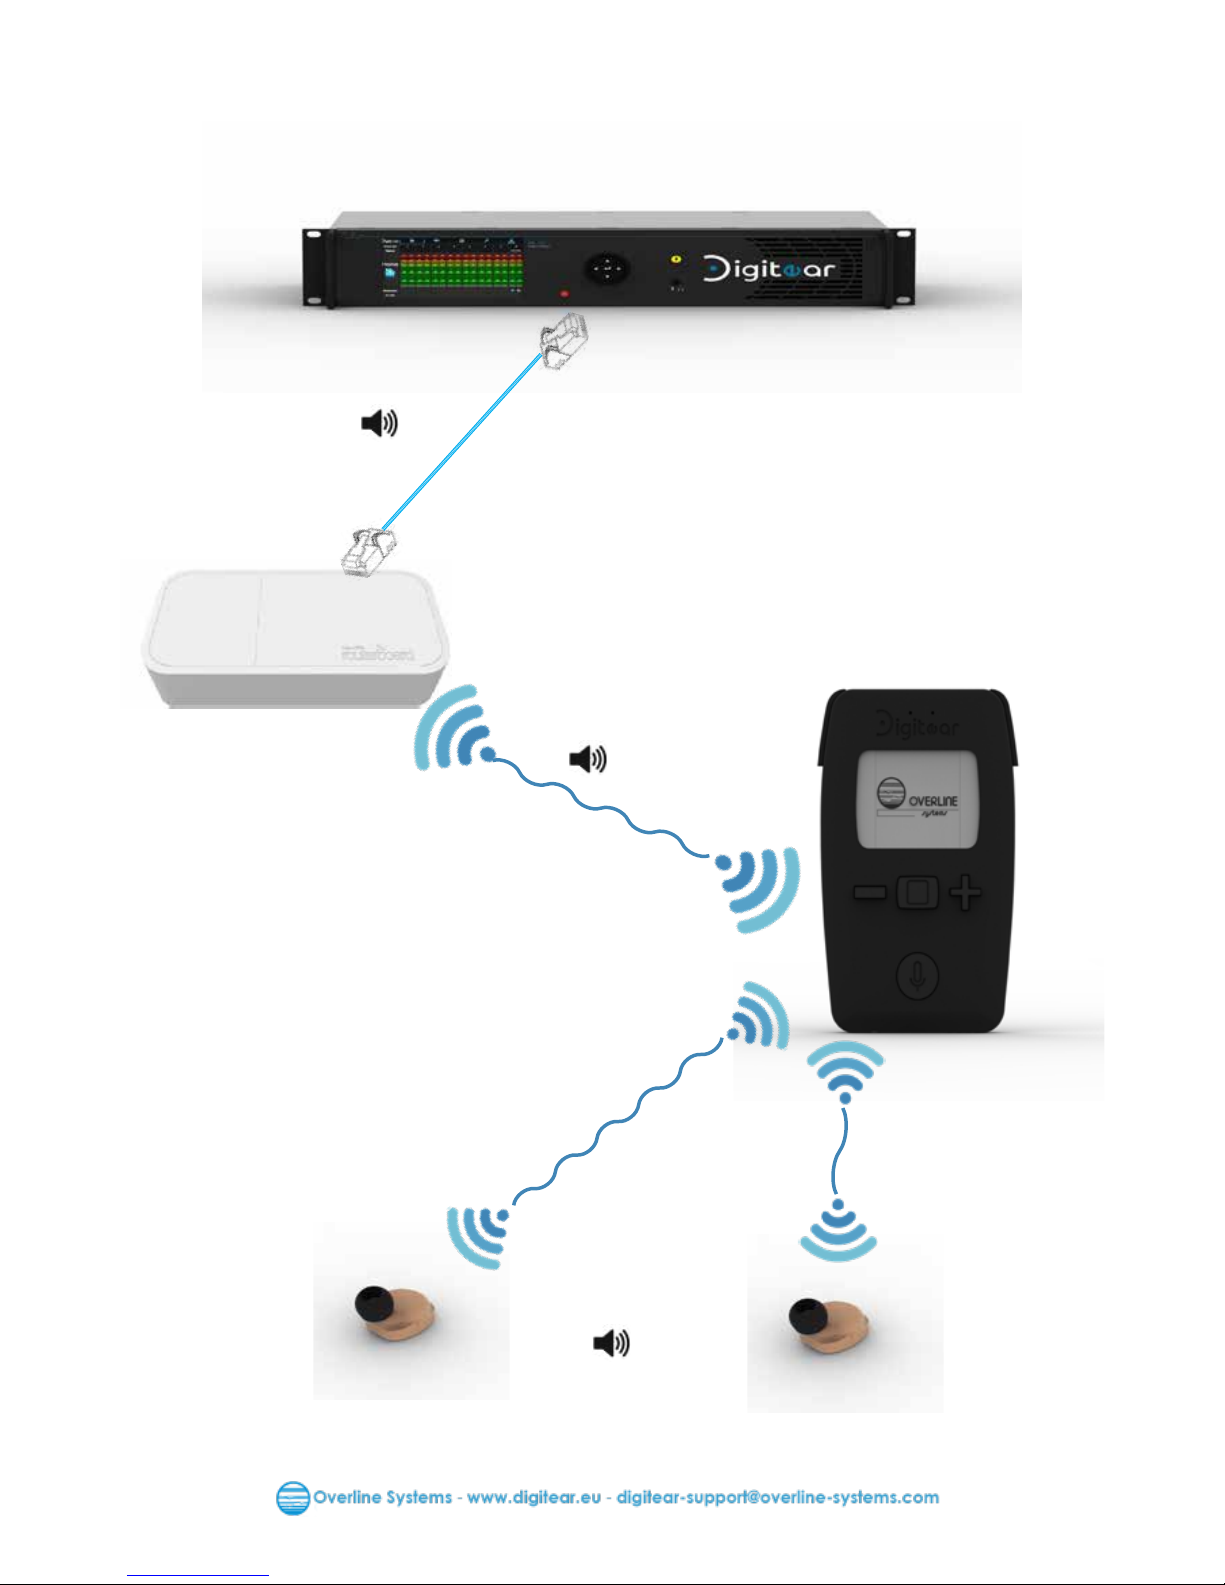
1 - DESCRIPTION OF THE SYSTEM
Data
Data
Data
Range < 50 m
Range < 10 m
Distance < 100 meters depending on installation
ACCESS POINT
BELTPACK
INEAR
INEAR
TX-BOX

Page 4 of 21
Users Guide BELTPACK
2 - OVERVIEW :
A compact solution ensuring wireless communication between the network and
the INEAR, as well as the functions of channel selection, settings, and Talk Back
User Guide available www.digitear.eu
Page 5 of 21
Users Guide BELTPACK
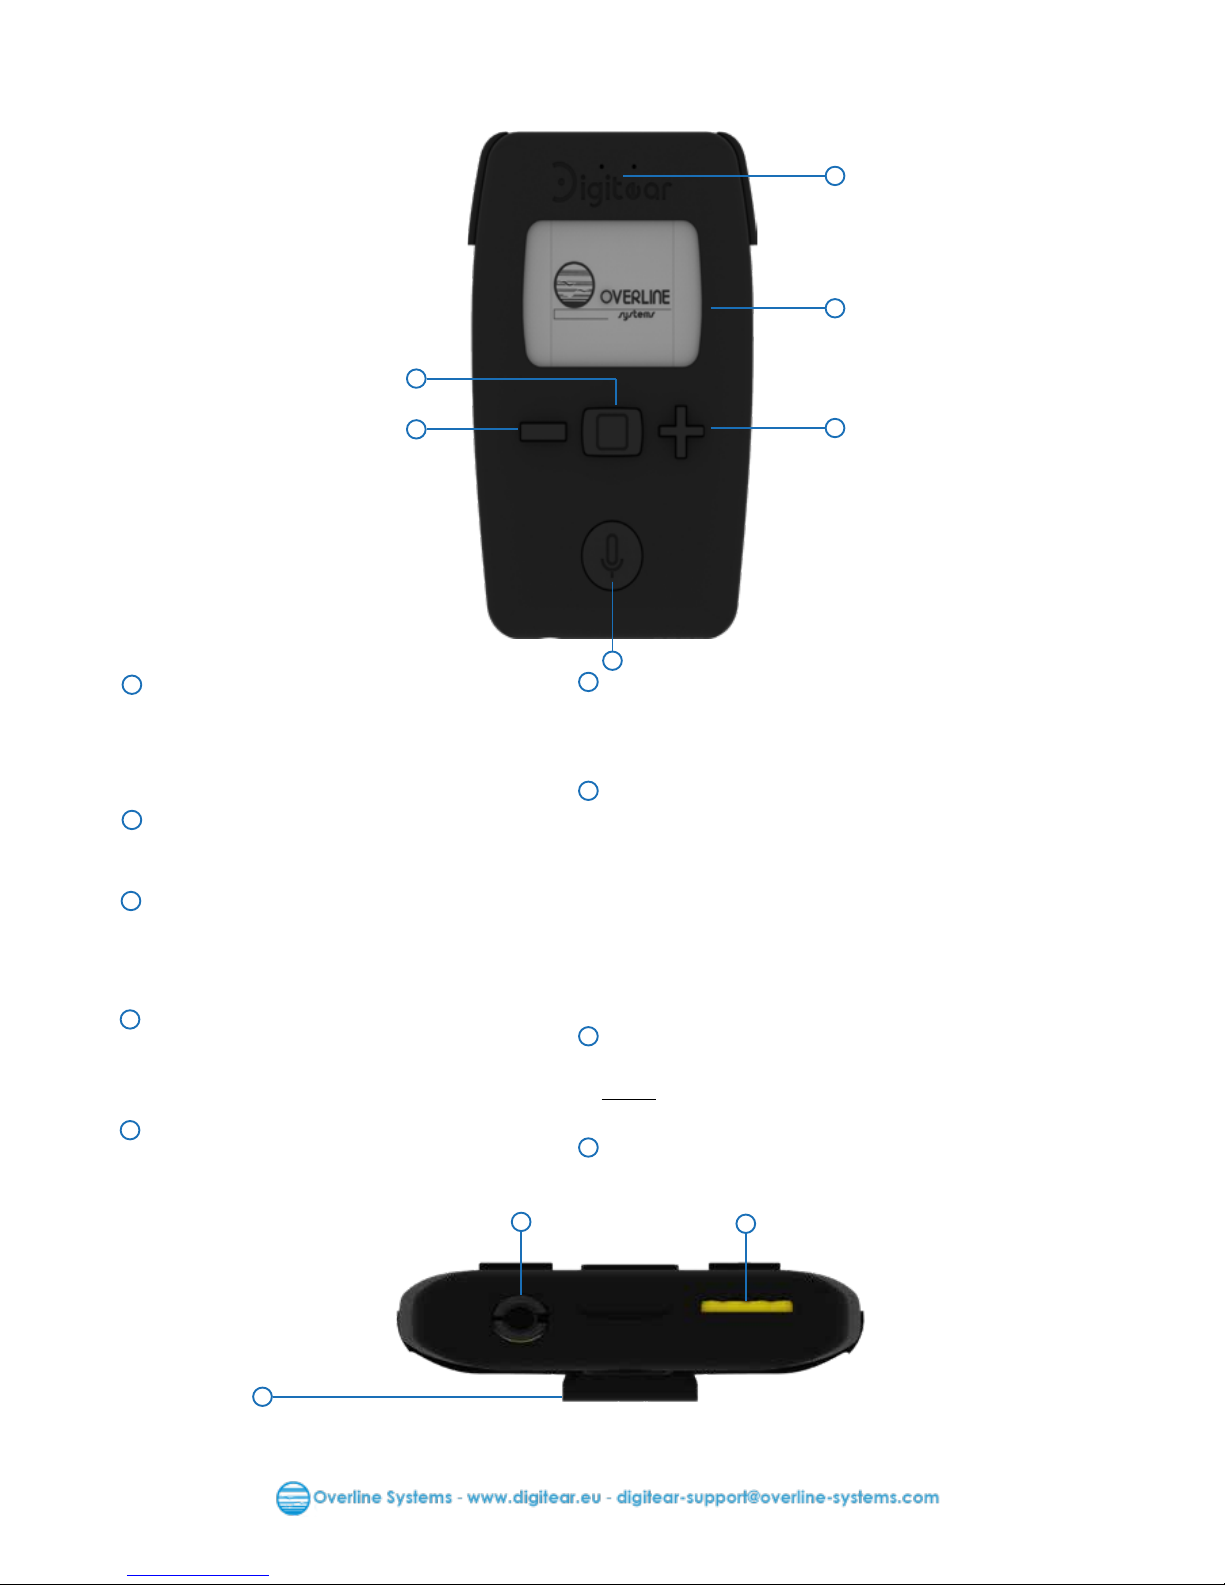
3 - BELTPACK DESCRIPTION
2
3
4
6
7
8
9
1
1
2
3
4
6
7
8
9
Microphone
When pressing the key Talk ,
it enables to speak on the channel
upstream path on which the BELTPACK
is linked.
LED Display
Displays the different menus and
information.
The plus ‘+’ key
The ‘+’ Key enables to navigate
through the menus, and/or to
increase a value (volume, gain,...).
The minus ‘-’ key
The ‘-’ Key enables to navigate through the
menus, and/or to decrease a value (volume,
gain,...).
TALK BACK
Function “Push to talk”.
The output sound corresponds to the
BELTPACK channel.
The central key
This key has several functions:
- Pressing briey serves as a validation (to
enter a menu, or to validate the value). And
switch On the Beltpack.
- A long key press enables to unlock the
BELTPACK, and to access to the menus.
- A very long key press enables switching Off
the BELTPACK.
JACK 3.5mm - 4 Poles
For using the headset on the BELTPACK.
Note : If you use the Jack you cannot use the
INEAR.
Charging Connector
BELTPACK charge connector
5
5
Belt clip
Page 6 of 21
Users Guide BELTPACK
4 - HOW TO...
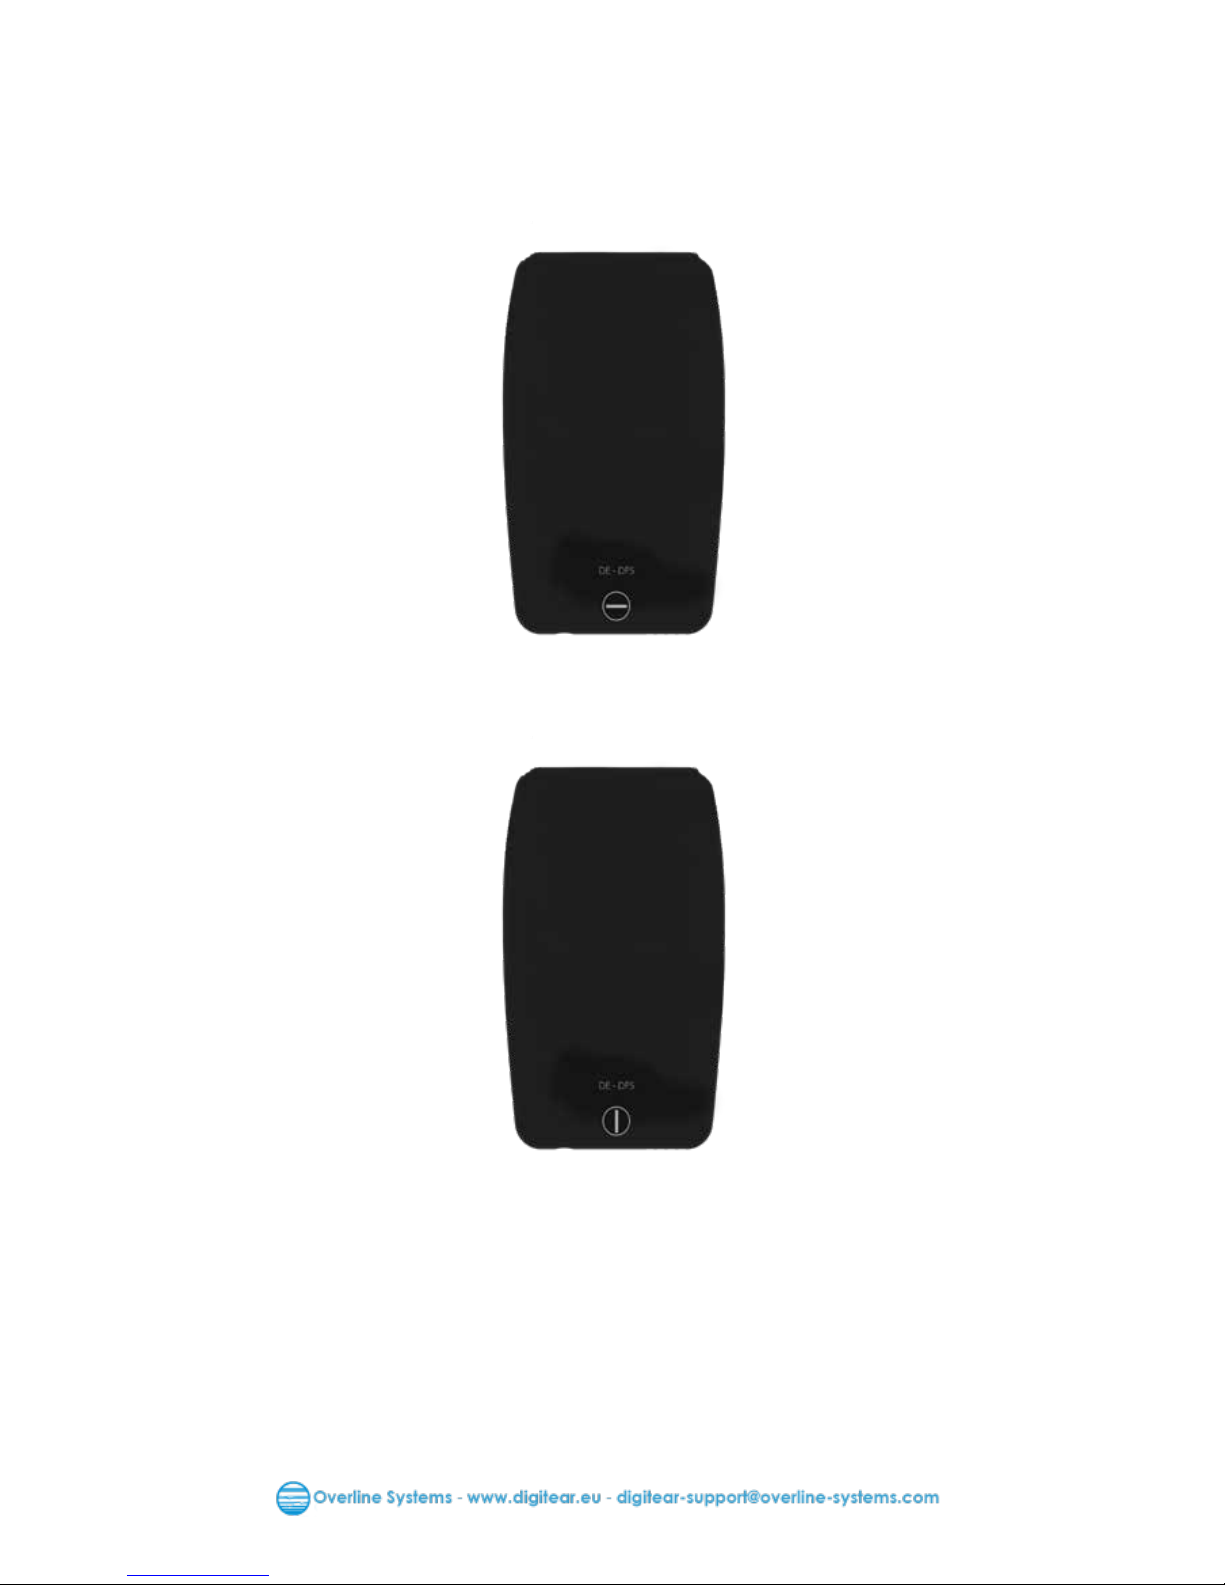
4 - 1 ...Switch ON the BELTPACK:
Simply press the central button in order to switch ‘ON’ the BELTPACK
4 - 2 ...Unlock the BELTPACK :
Pressing and holding on the central button will unlock the BELTPACK, and enables to
access to the menus.
Page 7 of 21
Users Guide BELTPACK
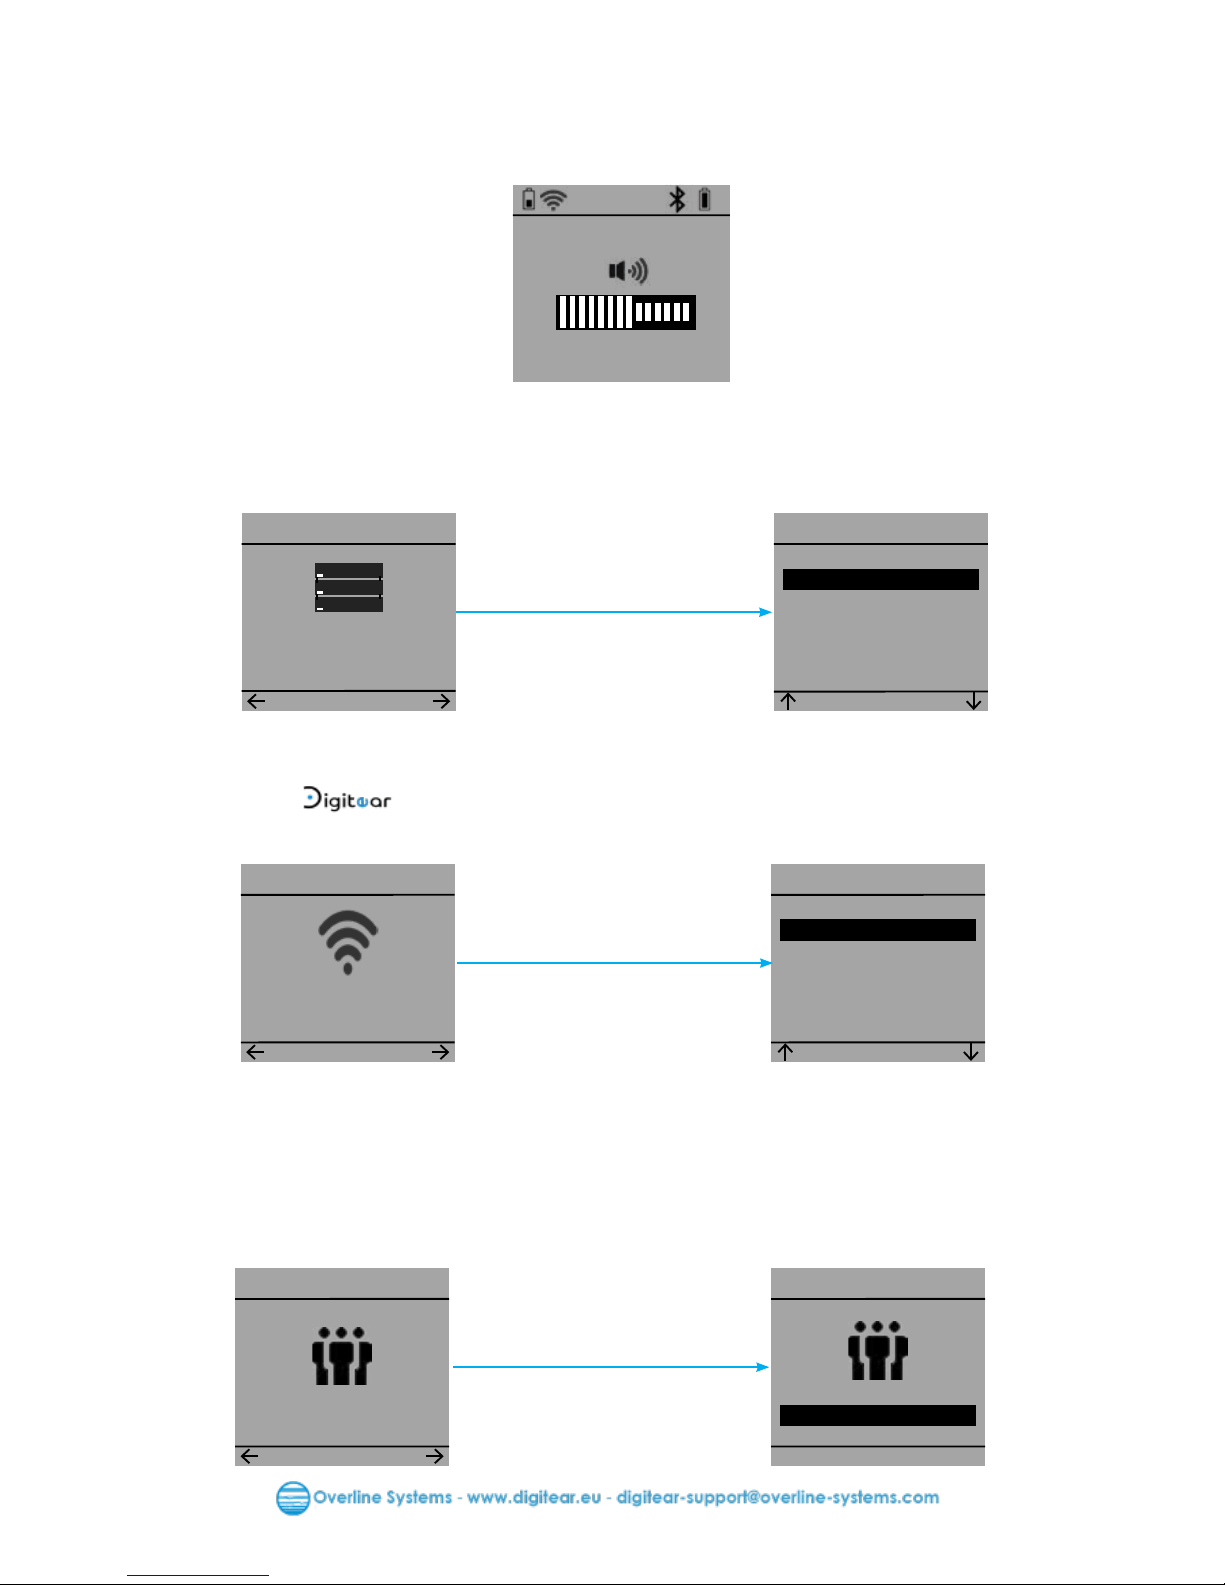
4 - 4 ...Connect to a TX-BOX :
In order to connect to TX-BOX, or to select another TX-BOX, access to the menu called
"TxBoxes".
Pair
SET
> TX Box 1
Back
4 - 5 ...To connect to a Digitear Network:
To connect to a
network or to select another network, you need to access the
menu named "Wlan". If there are several accessible networks, the screen will display the
multiple possible networks.
WiFi
SET
> DigitEar
Back
4 - 3 ...Adjust the volume :
On the main screen, using the keys ‘+’ and ‘-’ in order to adjust the volume, once the
value is selected, validate by pressing the central button.
OK
-
+
4 - 6 ...Changing the channel used by the BELTPACK:
When using the BELTPACK, you can select the channel of the communication network
you want to use on the TX-BOX (used by default during the rst connection).
Access to the "Channel" menu.
Menu
OK
< Ch 8 >
+
-
TxBoxes
Menu
SET
Wlan
Menu
SET
Channel
Menu
SET

Page 8 of 21
Users Guide BELTPACK
4 - 7 ...Pairing with an INEAR :
In order to pair an INEAR with the BELTPACK, access to the "Connect IE" menu.
Upon validation, the BELTPACK will be paired with the nearest INEAR.
Notes :
- The INEAR shall be set in "Discoverable Mode" (see INEAR User Guide).
- The BELTPACK memory storage capacity is limited to two INEAR.
- The BELTPACK can transmit an audio stream simultaneously to two INEARs. The two INEAR
shall be paired during the rst utilization. This will occur automatically after rst use (see TX-
BOX User Guide ).
Connect IE
Menu
SET
4 - 8 ...Enabling the Eco mode:
The Eco mode maximizes the INEAR battery autonomy.
The principle is to stop the audio stream between the "INEAR" and the "BELTPACK" when
no signal is transmitted from the "BELTPACK". The calibration of the noise limit level is
automatically made when the “Eco” mode is activated.
The "Calibrate" button enables to redo a new calibration (if needed).
Calibration should optimally be performed in a “quiet” environment, otherwise the
calibration operation shall be repeated.
Eco Mode
Menu
SET
Eco Mode
SET
Enable
Back
Calibrate
4 - 9 ...Delete the saved INEAR list:
The BELTPACK can only store two INEARs in its memory. In order to delete the list, access
the "ClearPDL" menu. The list is then emptied and two new "INEARs" can be connected
to the "BELTPACK".
Clear PDL
Menu
SET
Page 9 of 21
Users Guide BELTPACK
4 - 10 ...Change the battery:
A spare battery is supplied with the BELTPACK.
To change the battery, open the back cover of the BELTPACK.
Only the provided Battery type must be used.
Locked position
Unlocked position
Including Li-Ion Battery, type : BL-5C

Page 10 of 21
Users Guide BELTPACK
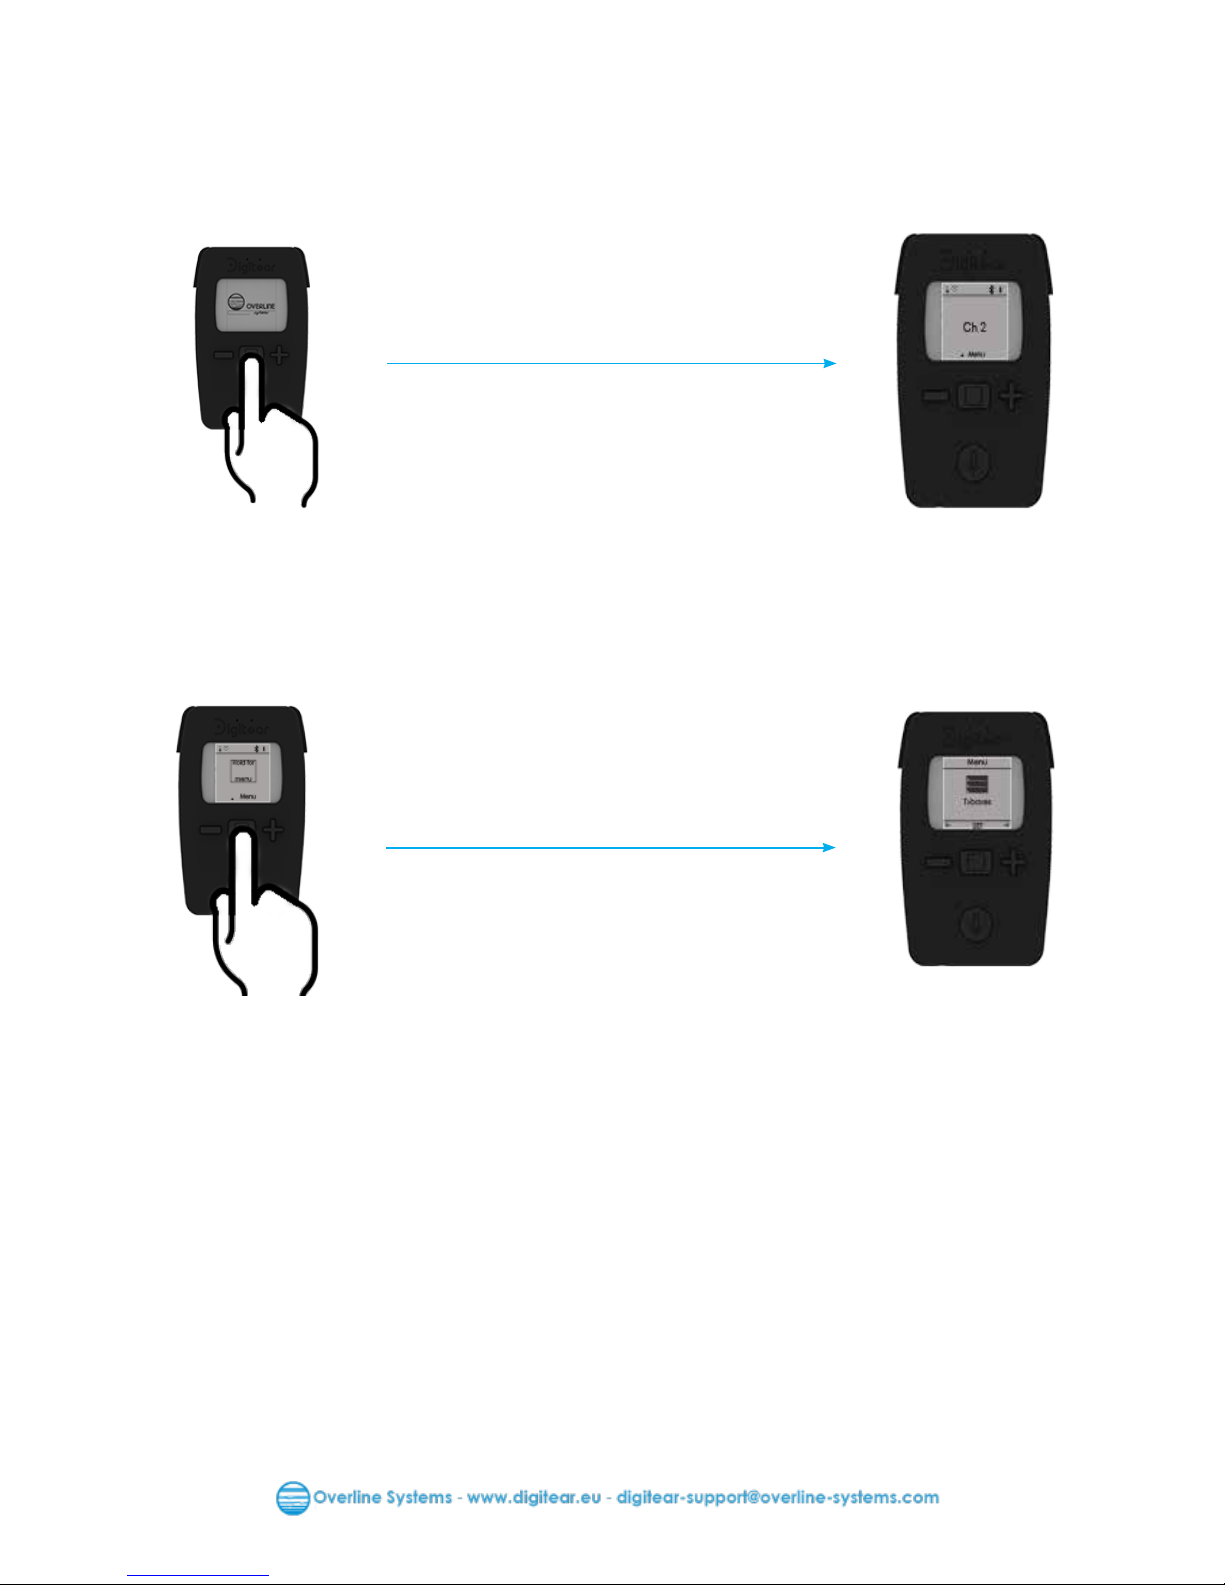
5 - ADVANCED BELTPACK OPERATION
5 - 1 BELTPACK Startup :
Select
TxBOX
Menu
Connecting
Digitear
Menu
Ch 2
Menu
The status bar can differ depending on the status of the connection and the following :
1
2
3 5
4
6
1
BELTPACK battery level
2
network signal strength
If the symbol eld is empty. The "BELTPACK" is not connected to any network.
3
Headset is connected to the Jack 3,5mm.
7
4
The microphone is inactive:
The conguration of the “Latency Mode” does not permit the use of the BELTPACK
micro (see User Guide TX-BOX).
5
The Eco mode becomes active, it will replace the Bluetooth symbol.
6
INEAR is connected.
7
The connected INEAR battery charge level .
The BELTPACK is connected to
a
network, but not to
a TX-BOX.
The BELTPACK is not connected
to a network search
mode.
Pressing briey the
central key

Page 11 of 21
Users Guide BELTPACK
Review of the "TxBoxes" menu options.
TxBoxes
Menu
SET
5 - 2 Txboxes Menu :
Pair
SET
No TxBox
Back
Pair
SET
TX Box 1
Back
TxBoxes
OK
Connected!
Pair
SET
> TX Box 1
Back
TxBoxes
Disconnecting
Pair
SET
TX Box 1
Back
TxBoxes
OK
Timeout !
No TX-BOX is available on the
network.
If "Timeout" is displayed:
- Check the
network.
- Check the TX-BOX conguration.
Page 12 of 21
Users Guide BELTPACK
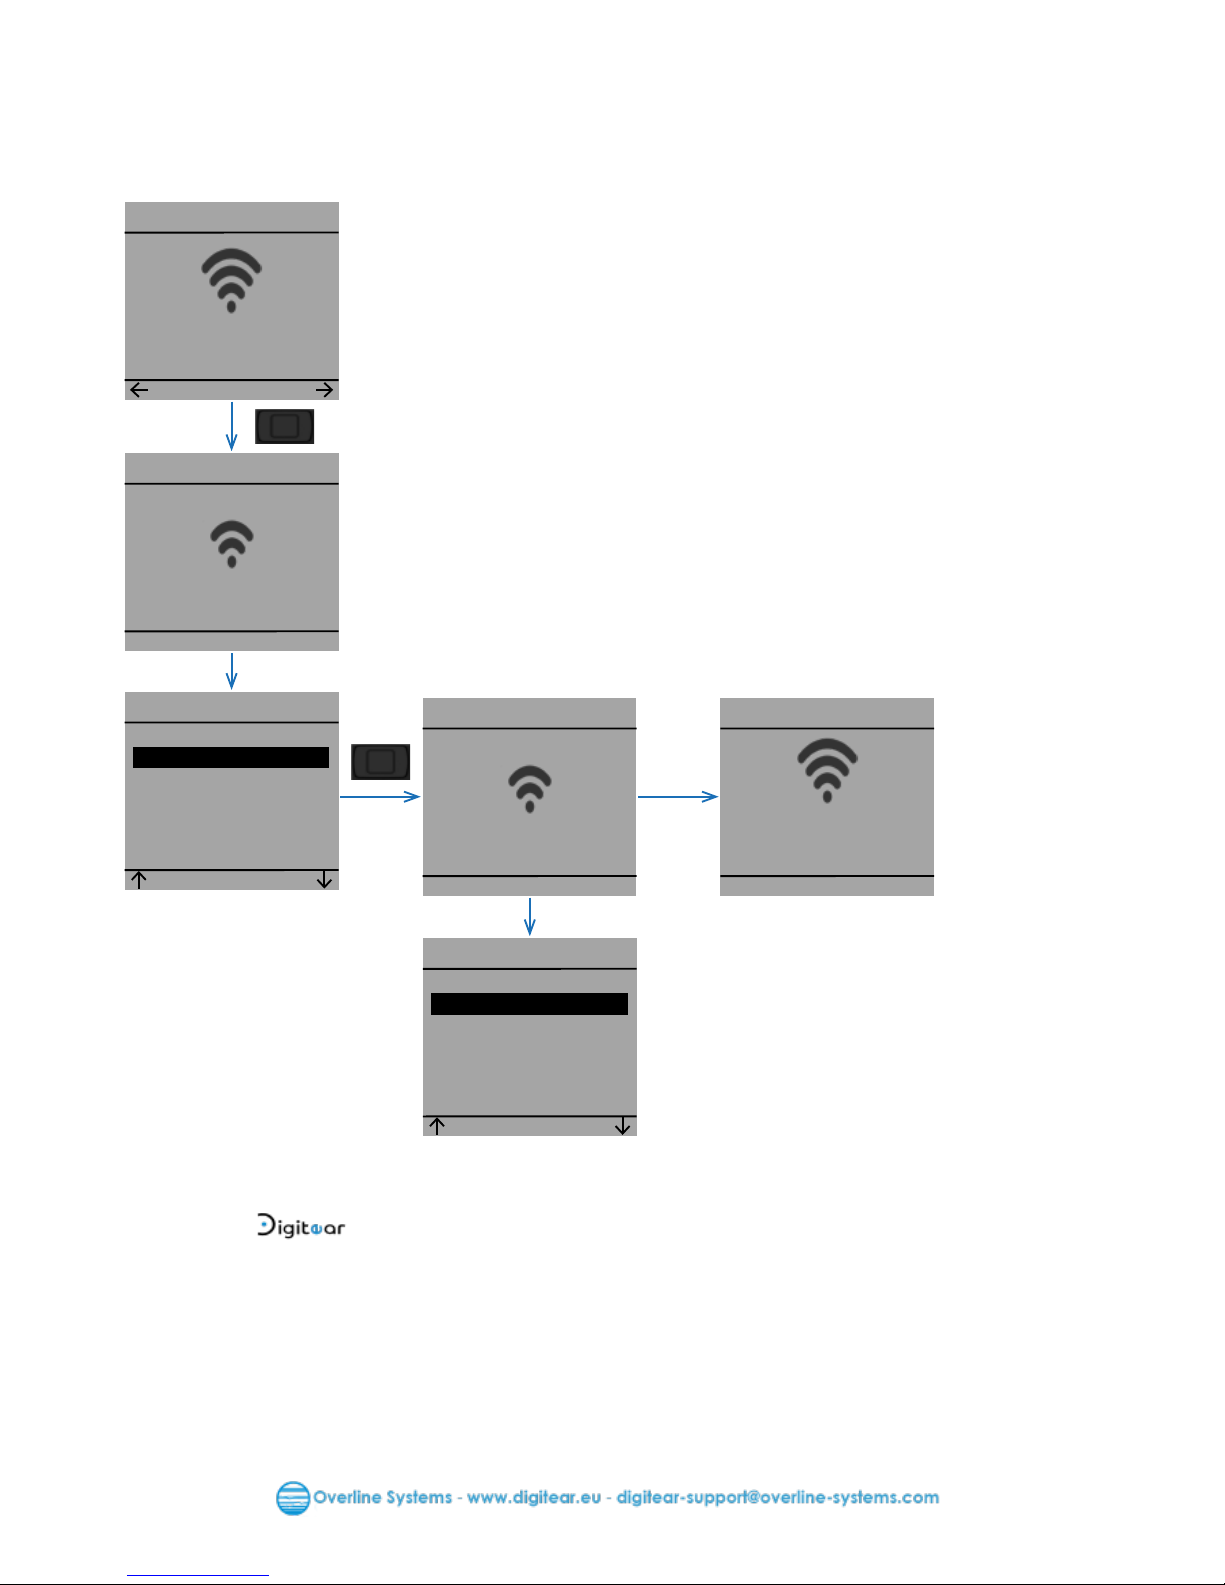
Wlan
Menu
SET
WLAN
WiFi
SET
Digitear
Back
Scanning
WiFi
Connecting
WiFi
SET
> DigitEar
Back
WLAN
OK
Timeout !
Review of the "Wlan" menu options.
5 - 3 Wlan Menu :
If "Timeout" is displayed:
- Check the
network.
- Check the ACCESS POINT settings.

Page 13 of 21
Users Guide BELTPACK
On
Menu
SET
5 - 4 Lock Menu:
Lock
OK
<On>
Lock
OK
<Off>
+
Locked
Menu
Unlocked !
Menu
+
Two different ways to unlock the BELTPACK.
- Off : A long press and hold on center button will provide access directly to the menus.
- On : A long press and hold on center button, and the conrmation with the ‘+’ key, will
provide access to the menus

Page 14 of 21
Users Guide BELTPACK
Update
Menu
SET
Update
Checking
This menu enables the user to update the BELTPACK software.
The "BELTPACK" will update after extracting the update data from USB drive on the TXBOX. (see: TX-BOX User Guide )
By the end of the update, the BELTPACK will restart.
5 - 5 Update Menu :
Updating ?
Update
YES
NO
No updates
Update
OK

Page 15 of 21
Users Guide BELTPACK
Connect IE
Menu
SET
5 - 6 Connect IE Menu :
Connecting
Connected!
OK
Timeout !
Connect IE
OK
Connect IE
Disconnect
Menu
SET
Disconnected !
OK
Connect IE
Connect IE
If "Timeout" is displayed:
- Check that the INEAR is set in the "connectable" mode.
- Empty the BELTPACK memory (Refer p.8 section 4-9).
- Check whether the INEAR is not charging; an INEAR during charge can not be paired
(Refer INEAR user guide).
- If it has just been disconnected, then wait 10 seconds before trying to reconnect.

Page 16 of 21
Users Guide BELTPACK
This menu enables the user to search the paired INEAR with the BELTPACK.
The INEAR starts ashing for approximately 10 seconds.
Find IE
Menu
SET
5 - 7 Find IE Menu:
OK
Find IE
Not connected
OK
Find IE
Blinking

Page 17 of 21
Users Guide BELTPACK
This menu enables the user to set the microphone source used for the "Talk-Back" function.
Mic
Menu
SET
5 - 8 Microphone Menu:
Mic
SET
Gain
Device
Back
+
Mic
SET
Device
Gain
Back
Gain
OK
50%
+
-
Device
SET
> Auto
Internal
Back
Device
SET
> Internal
Auto
Back
+
With this option the BELTPACK will switch automatically from the
internal microphone to the external one, when the user connects
a microphone to the 3.5mm jack, however once the Jack 3,5mm is
connected the INEAR cannot be used.
With this option the BELTPACK will not switch to the external
microphone (as in the previous case), when the user connects a
microphone to the 3.5mm jack.
> Auto
> Internal

Page 18 of 21
Users Guide BELTPACK
+
Channel
Menu
SET
5 - 9 Channel Menu:
Menu
OK
< Ch 7 >
+
-
Changing
Menu
Menu
OK
< Ch 8 >
+
-
When the BELTPACK battery charge level is very low, it is displayed.
From this moment, less than 5 minutes of utilization.
5 - 10 Low Battery Status Display:
BELTPACK
battery low
OK

Page 19 of 21
Users Guide BELTPACK
6 - TECHNICAL FEATURES
Bluetooth
Version
Class
Battery
Type
Operating life
Recharging
Materials
Type
Weight
Size
Nominal capacity
Nominal voltage (DC)
Range of frequencies
Operating distance
Operating conditions
Bluetooth 4.2
3
2400 MHz - 2483 MHz
<10 meters
Lithium-ion battery, BL-5C
~6 h
~3 h
1200 mAh (4,44 Wh)
Operating voltage (DC)
Operating conditions
3.7 V
3.3 V and 4.2 V
+5 °C to +45 °C
ABS-PC
60g with battery
(13x53x93)mm
+5 °C to +45 °C
WiFi
Standards
Frequency
802.11n
5 GHz
Version CE :
5180MHz, 5200MHz, 5220MHz, 5240MHz
Version FCC/IC :
5180MHz, 5200MHz, 5220MHz, 5745MHz, 5765MHz,
5785MHz, 5805MHz, 5825MHz
Range Approx. 50 meters
Recommended accessories: Sennheiser CX275s

Page 20 of 21
Users Guide BELTPACK
7 - TECHNICAL TROUBLESHOOTING

Page 21 of 21
Users Guide BELTPACK
8 - WARRANTY
Elements NOT covered by the guarantee.
This warranty covers only defects in parts and manufacturing of the product. This warranty
does not cover:
- Periodic maintenance and repair or replacement of parts as a result of normal wear and
tear.
- Transportation costs and the risks associated with the sending and retrieval of the
product by the nal customer
- Any adaptation of the product which would be necessary for the purpose of complying
with the technical or safety standards applicable in a country other than that for which
the product was originally designed and manufactured;
- Consumable elements (elements which are intended to be replaced periodically during
the life of the product, for example ear tips, batteries-beyond 12 months to date of
purchase-, connecting cables, etc.);
- Damage or defects in the product resulting from:
- Improper use or installation of the product (use or installation not in accordance with
the use to which the product is intended, installation or use not in accordance with the
instructions or the technical or safety standards in force in the country where it is
used, etc.)
- Maintenance of the product not in accordance with the instructions or
negligence in the maintenance of the product.
- Improper handling or mistreatment of the product (false maneuvers, fall, shock,
immersion, etc.) or an improper environment (poor ventilation, vibration, exposure to
moisture, excessive heat, contact with sand or any Other substance, improper power
supply, etc.)
- The use of the product with a product (hardware or software), consumable, accessory
or peripheral not compatible or defective, an adaptation of the product for the purpose
of complying with the technical or safety standards applicable in a country other than
that for which the product was originally designed and manufactured;
- A modication or repair of the product not carried out by a service provider approved
by Overline Systems
- Cases of force majeure, sinister (re, ood, etc.), lightning, etc.
- Produit: (TX-BOX, Charger Box, BELTPACK, INEAR)
Warranty Period:
24 months parts and labor in workshop
Battery: 12 months (starting from the date of purchase)
ACCESS POINT: Covered by the original manufacturer’s warranty.
No sole accessory will be accepted or repaired by our repair centers.
 Loading...