

Digitax F1 plus User Manual
Serial Nr. ................................................
Date of Installation .................................
Name .....................................................
...............................................................
Address .................................................
...............................................................
Tel n° .....................................................
WARRANTY TERMS
AND CONDITIONS
Digitax warrants this product to be free from defects
in materials and workmanship for a period of twelve
calendar months from the date of installation.
To obtain the benefi ts of this warranty, the registration
card must be completed and returned to the factory
or your national importer within 14 days of purchase.
In case the taximeter needs to be repaired, it must be
sent, free of transportation cost, back to the manufacturer or to the service center as indicated by the local
representative.
This warranty is void if the equipment is modifi ed or
misused in any way or serviced by unauthorized persons.
No responsibility can be accepted for any loss or damage caused in transit, except for repair or substitution
of defective parts. No other liability will be recognized
by Digitax for any kind of damage or loss to person
or goods.
User Manual
ver.1.0
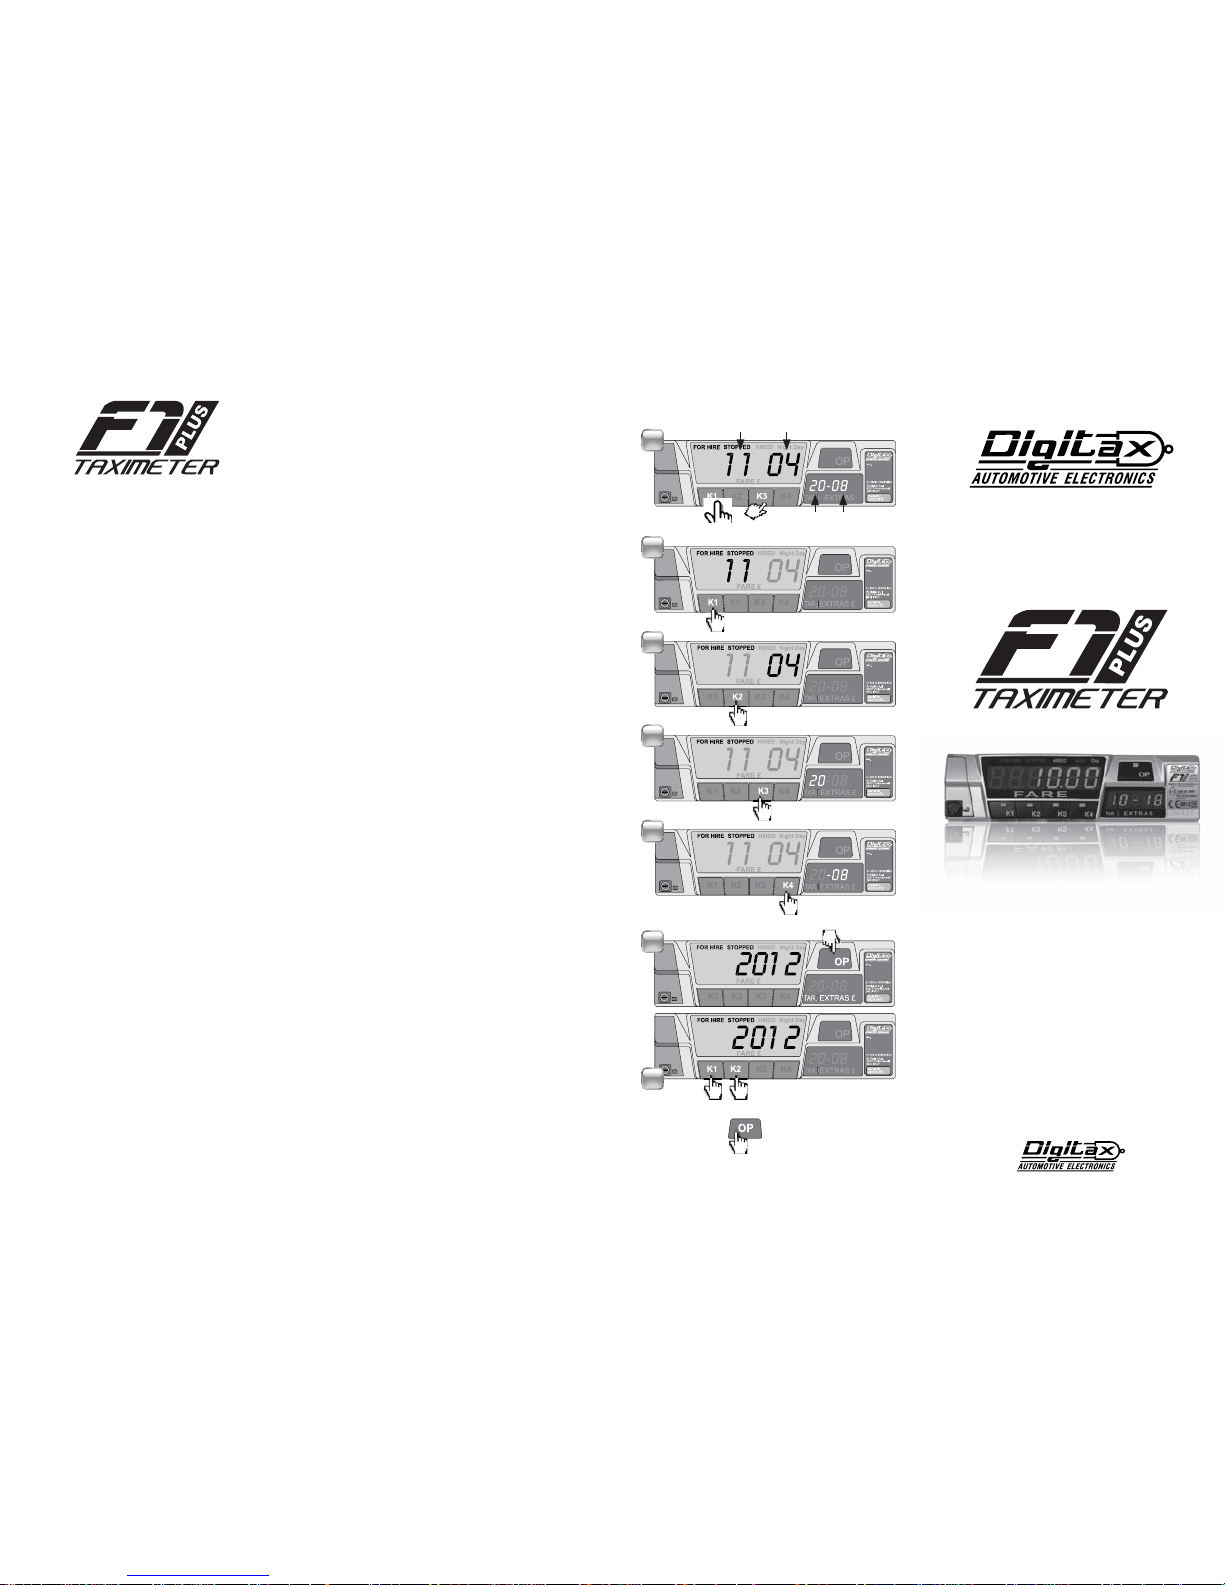
SET TIME AND DATE
Settings
In order to manually programme the clock, please check
that you are in For Hire position (by OP) and then
press K1 and K3 at the same time. The sign “Time”
appears on the main display for a few seconds and then
For Hire and Stopped will fl ash at the same time.
In the two left digits of the main display, the day is displayed, in the right ones the month. On the secondary
display, in the left digit, the hours are displayed and
in the right ones the minutes. Please fi nd here below
the functions of the keys in this programming menu:
PROGRAMMING START:
PRESS K1 + K3 AT THE SAME TIME
K1 Sets the day number
K2 Sets the month number
K3 Sets the hour
K4 Sets the minutes
OP By pushing it, you move to the year set up
When you select the year to change by OP, K keys
have the following functions:
K1 Decreases the year of one unit
K2 Increases the year of one unit
K3 Sets the taximeter manufacturing year
PROGRAMMING END AND DATA CONFIRMATION:
PRESS OP
HOW TO CONVERT THE LOCAL
CURRENCY INTO EURO AND VICE-VERSA
IN HIRED & STOPPED MODE
DEPRESS and RELEASE K1 + K2 keys
to toggle from the local currency to Euro
and vice-versa
Day Month
Hour Minutes
Push Together
Sets the Day
Sets the Month
Sets the Hour
Sets the Minutes
Press to set the Year
Set the Year
Press to end the programming and to confi rm data
+-
1
2
3
4
5
6
7

The taximeter has, in its front side, 5 keys (or buttons)
called: OP, K1, K2, K3, K4.
The taximeter has three working modes called:
The taximeter’s working modes are selectable by
pressing the OP button in the following sequence:
For Hire Hired Stopped
In any of the above taximeter’s working mode (FOR
HIRE, HIRED, STOPPED), the other four buttons K1, K2,
K3, K4 will exploit a different function, as below de-
scribed.
A) Taxi in “For Hire”
When the Taxi is parked or it moves without any passenger on board, the taxi driver selects the For Hire
position by OP. The clock is displayed and the keys will
have the following functions:
For Hire Hired Stopped
For Hire Chrono Start Chrono Stop
For Hire Go back from Chrono to Clock
For Hire Shows calendar Day and Month
For Hire Shows Year
B) Taxi in “Hired”
Once the taxi starts the trip, the taxi driver selects the Hired
position by OP. The “Taxi” roof sign will turn off and the taximeter starts the fare calculation by distance or time.
Hired Stopped For Hire
Hired Selects Rate Nr (if inabled)
Hired Insert Extra Nr 1 (If enabled)
Hired Insert Extra Nr 2 (If enabled)
Hired Reset Extras
C) Taxi in “Stopped”
At the end of the trip, the taxi driver has to select the
Stopped position by OP.
The waiting time counting is thus blocked.
Stopped For Hire Stopped
Stopped Insert Special Extras
Stopped Insert Extra Nr 3 (If enabled)
Stopped Insert Extra Nr 4 (If enabled)
Stopped Reset Extras
STATISTICAL MEMORY:
READ / PRINT / ERASE
The taximeter has, inside, 2 blocks of memory called:
BLOCK 1 --- BLOCK 2
Each one is divided in 45 locations. Each one is enabled to
record and keep the taximeter’s activity.
Block 1 is the Partial Block since the activity information contained in its 45 locations can be read, printed and erased
whenever desired (See specifi c procedure).
This “Partial Function” is very useful and may be utilized for
working shift data’s control and analisys.
Block 2 is the Total or Cumulative Block since the activity
information contained in its 45 locations can only be read
and printed.
HOW TO READ THE INFORMATION
CONTAINED IN BLOCK 1 and 2
1)Select the For Hire mode by pressing OP button;
2)Press K1 + K2 buttons at the same time to enter “Statistical
Reading”; (Fig.1)
3)The secondary display will now show: (Fig.2) at its left-side:
1 - indicating the Memory Block Nr. being read pressing K3 button
now, to go to Block 2; (Fig.3) pressing K3 button again, to go back to
Block 1. at its right-side: a number between 1 and 45, indicating the
Location Number. (Fig.2)
4)The main display will now show a Nr. which is the information
contained in the correspondent memory location being read and
now indicated at right-side of secondary display;(please see
locations’ list ) (Fig. 2 /3)
5)Press K1 or K2 buttons if You wish to decrease or increase
respectively memory location’s Nr. (memory location Nr. is indicated
on right side of secondary display);(Fig. 2)
6)Press OP button to go back to For Hire mode and to END the
Reading Procedure
STATISTICAL MEMORY: PRINT-OUT
1)Select the For Hire mode by pressing OP button;
2)Press K1+K2 buttons at the same time to enter
“Statistical Reading”; (Fig. 4)
3)Press K2 buttons till You reach memory location Nr.5
(memory locations Nrs. are shown at right side on secondary
display); (Fig. 5)
4)When You have reached memory location Nr.5, press K4
button to print out all information contained in memory locations of both memory blocks. (Fig. 6)
5)Press OP button to go back to For Hire mode and to
END procedure.
HOW TO ERASE INFORMATIONS CONTAINED
IN MEMORY LOCATIONS OF BLOCK 1
1)Select the FOR HIRE mode by pressing OP button;
2)Press K1+K2 buttons at the same time to enter “Statistical
Reading”;(Fig. 7)
3)Press K2 buttons till You reach memory location Nr.19; (memory
locations Nrs. are shown at right on secondary display);(Fig. 8)
4)When You have reached memory location Nr.19, press K4 button
to erase all information contained in memory locations of BLOCK
1; (when pressing K4, if the printer is ON all the information
would be printed before being erased);(Fig. 9)
5)Press OP button to go back to FOR HIRE mode and to END
procedure.
STATISTICAL MEMORY READING
Memory Location List
1) Trips total number idem
2) Taximeter units total number idem
3) Total Kilometers idem
4) Total Kilometers in For Hire idem
5) Total Kilometers in Hired idem
6) Km in for For Hire with passenger on board idem
7) Km in Over speed idem
8) Collected Total (Fare+Extras+Tax) idem
9) Collected by Credit Card Total idem/100
10) Fare Total Amount (excluded Extras+Tax) idem/100
11) Extras Total Amount idem/100
12) Tax Total Amount idem/100
13) Run time in Stopped idem
14) Run time in Hired and Stopped idem
15) Waiting time in Hired idem
16) Meter on total time idem
17) Total Tariff 1 collection idem
18) Total Tariff 2 collection idem
19) Total Tariff 3 collection idem
20) Total Tariff 4 collection idem
21) Total Tariff 5 collection idem
22) Total Tariff 6 collection idem
23) Total collections from 7th to 64th idem
24) Total tariff 1 units idem
25) Total tariff 2 units idem
26) Total tariff 3 units idem
27) Total tariff 4 units idem
28) Total tariff 5 units idem
29) Total tariff 6 units idem
30) Total units from 7th to 64th tariff idem
31) Total Kilometers in tariff 1 idem
32) Total Kilometers in tariff 2 idem
33) Total Kilometers in tariff 3 idem
34) Total Kilometers in tariff 4 idem
35) Total Kilometers in tariff 5 idem
36) Total Kilometers in tariff 6 idem
37) Total Km from 7th to 64th idem
38) Not used
39) Not used
40) Not used
41) Not used
42) Not used
43) Not used
44) Not used
45) Not used
ML Block 1 Block 2
FOR HIRE STOPPED HIRED
K1
K2 K3
OP
FOR HIRE
STOPPE D
HIRE D
By
Digitax S.r.l
62017 Portorecanati
(MC) ITALY
Serial Nr.
960000100
k= 200 to 100000 i/km
Mod.
2012
FARE £
Night Da y
K4
TAR.
EXTRAS £
1 19
K1
K2
K3
OP
FOR HIRE
STOPPED HIRED
By
Digitax S.r.l
62017 Portorecanati
(MC) ITALY
Serial Nr.
960000100
k= 200 to 100000 i/km
Mod.
36
FARE £
K4
TAR.
EXTRAS £
1 1
Night Da y
K1
K2 K3
OP
FOR HIRE
STOPPE D
HIRE D
By
Digitax S.r.l
62017 Portorecanati
(MC) ITALY
Serial Nr.
960000100
k= 200 to 100000 i/km
Mod.
2012
FARE £
Night Da y
K4
TAR.
EXTRAS £
1 19
Push these keys at the same time
Push to reach loc.19
Push to Erase Block 1
Push here to go back to Stopped
K2
3
K1
K2 K3
OP
By
Digitax S.r.l
62017 Portorecanati
(MC) ITALY
Serial Nr.
960000100
k= 200 to 100000 i/km
Mod.
STATIS
K4
FOR HIRE ST OPPED
HIRED
FARE £
Night Day
TAR.
EXTRAS £
K1
K2
K3
OP
FOR HIRE
STOPPED HIRED
By
Digitax S.r.l
62017 Portorecanati
(MC) ITALY
Serial Nr.
960000100
k= 200 to 100000 i/km
Mod.
36
FARE £
K4
TAR.
EXTRAS £
1
1 11
Night Day
K1
K2 K3
OP
FOR HIRE
STOPPED
HIRED
By
Digitax S.r.l
62017 Portorecanati
(MC) ITALY
Serial Nr.
960000100
k= 200 to 100000 i/km
Mod.
36
FARE £
Night Da y
K4
TAR.
EXTRAS £
2 28
FIG. 1
FIG. 2
FIG. 3
Push these keys at the same time
Changes Memory Block
Decrease Increase
Memory Location Number
Memory
Block
Memory Data
Memory
Location
Number
+-
K1
K2 K3
OP
FOR HIRE
STOPPED
HIRE D
By
Digitax S.r.l
62017 Portorecanati
(MC) ITALY
Serial Nr.
960000100
k= 200 to 100000 i/km
Mod.
420
FARE £
Night Da y
K4
TAR.
EXTRAS £
1 5
K1
K2
K3
OP
FOR HIRE
STOPPED HIRED
By
Digitax S.r.l
62017 Portorecanati
(MC) ITALY
Serial Nr.
960000100
k= 200 to 100000 i/km
Mod.
36
FARE £
K4
TAR.
EXTRAS £
1 1
Night Day
K1
K2 K3
OP
FOR HIRE
STOPPED
HIRE D
By
Digitax S.r.l
62017 Portorecanati
(MC) ITALY
Serial Nr.
960000100
k= 200 to 100000 i/km
Mod.
420
FARE £
Night Da y
K4
TAR.
EXTRAS £
1 5
Push these keys at the same time
Push to reach loc.5
Push to Print Out
Push here to go back to Stopped
2
2
K
4
FIG.7
FIG.4
FIG.8
FIG.5
FIG.9
FIG.6
 Loading...