

Page 1
Page 2
UHD Stream Generator UHD Stream Generator
User’s Manual User’s Manual
Contents Contents
Getting Started
FeaturesSummary
ETC
PLAY
UPDATE
SETTINGS
Important Safety Instructions
Guide to Parts and Controls
How to Use Top Buttons
Remote
Package and Accessories / Cautions
Connecting Cable
Troubleshooting
Specifications
Safety Instruction
PLAYLIST Menu
How to Playback Files
How to Change Resolution
Loop Play with One File
Loop Play with Multiple Files
Changing PLAYLIST Order and Selecting File(s)
Selecting File(s)
Managing PLAYLIST Number
Deleting File(s) and Checking File Information
Contents Update by USB Automatically
See Update Progress Status
Sub Folder
Deleting File(s) From System
VIDEO
Settings VIDEO
SYSTEM
Setting DATE & TIME
How to Reserve Power ON/OFF Time
Setting Key Lock
UPDATE
PLAY
UPDATE Menu
How to Update Contents by USB
SETTINGS
SETTINGS Menu
How to Update Firmware Manually
01
03
02
04
5
6
7
8
9
11
12
14
15
16
17
18
19
21
22
23
24
25
26
27
28
29
30
38
40
42
31
32
34
34
35
36
Page 3
UHD Stream Generator
User’s Manual
01. Summary
5
Summary
01
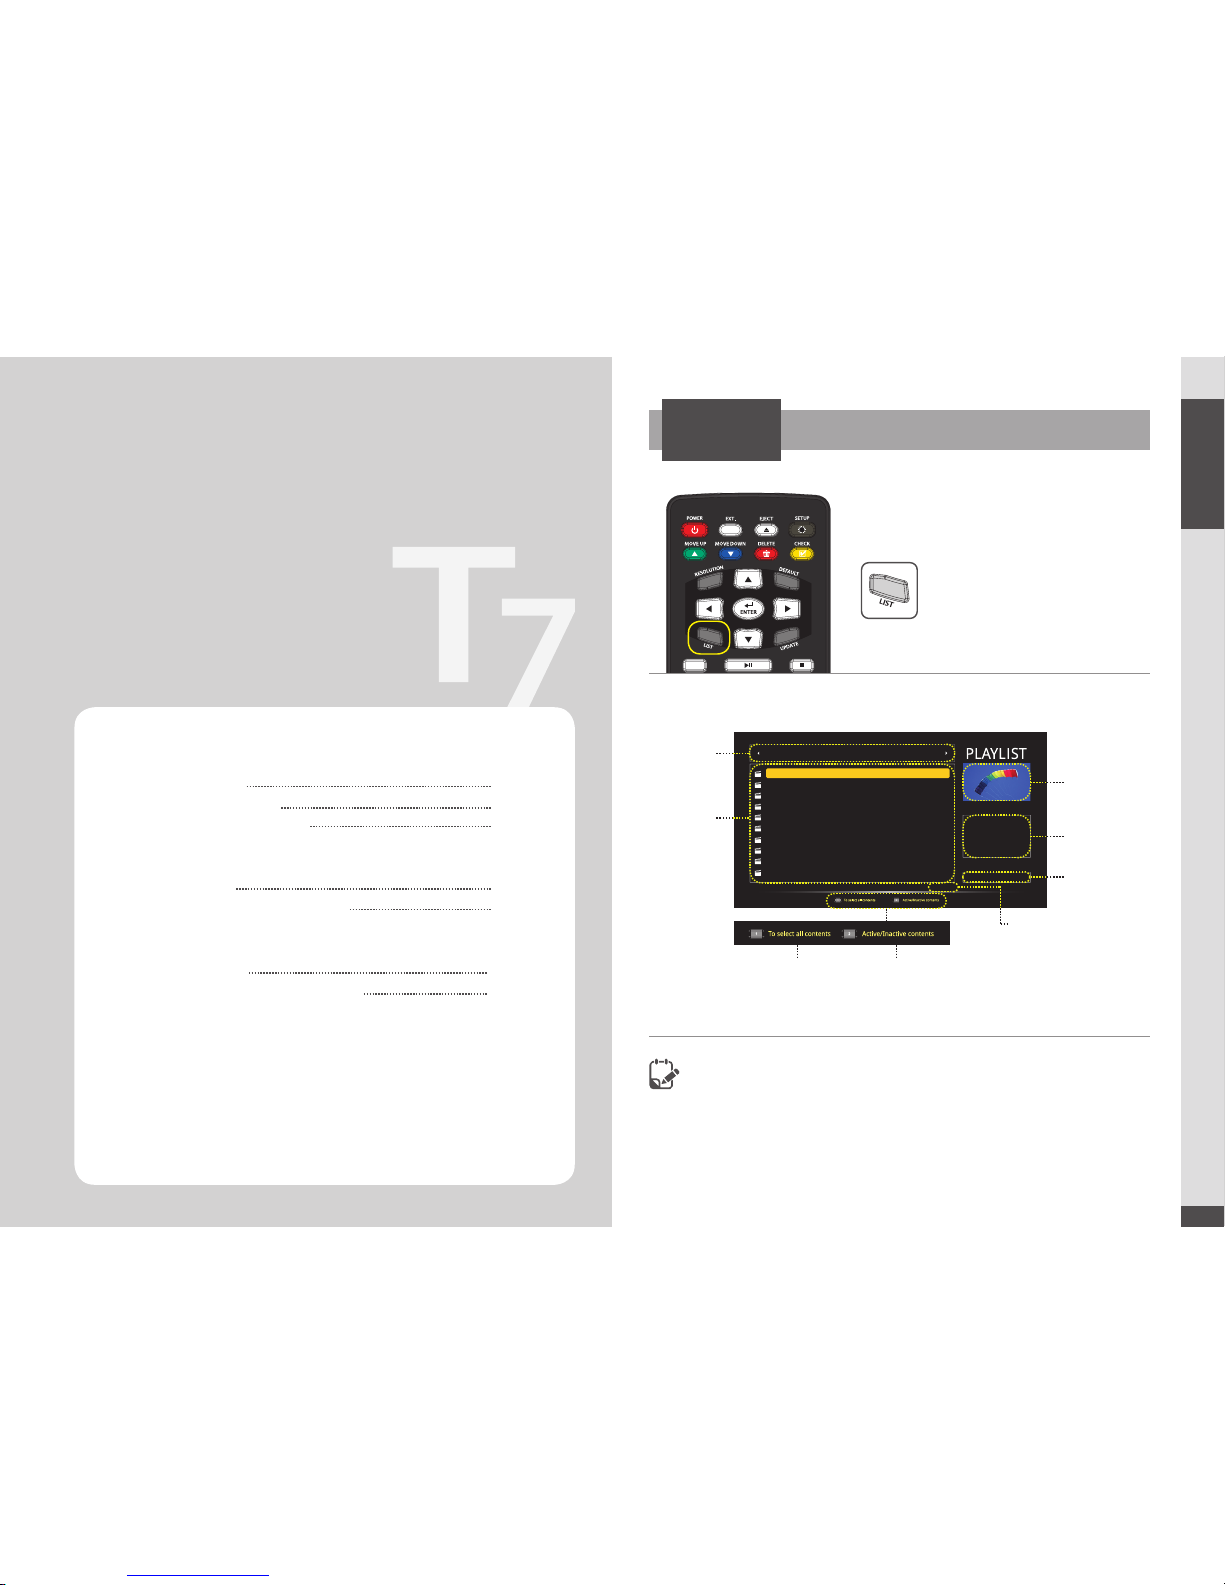
PLAYLIST Menu
PLAY
Image Preview
Current Selected
File Information
Current Video
Output Resolution
Page Information of
Current Selected List
PLAYLIST
Number
Contents List
To select all contents Active/Inactive contents
PLAYLIST is frequently used menu, please read carefully before using the device.
Press [LIST] button.
Playlist 9 Playlist 1Default
Date
Size
Video
Audio
Bitrate
2015-01-24
496MB
AVC/4K29.97p
AC-3/2Ch
80Mbps
Resolution
Page : 1 / 5
2160p30
1
2
3
4
5
6
7
8
9
10
Digital-01.m2ts
Digital-02.m2ts
Digital-03.m2ts
Digital-04.m2ts
Digital-05.m2ts
Digital-06.m2ts
Digital-07.m2ts
Digital-08.m2ts
Digital-09.m2ts
Digital-10.m2ts
PLAYLIST Menu
How to Playback Files
How to Change Resolution
UPDATE
PLAY
UPDATE Menu
How to Update Contents by USB
SETTINGS
SETTINGS Menu
How to Update Firmware Manually
5
6
7
8
9
11
12
Page 4
UHD Stream Generator
User’s Manual
01. Summary
6
UHD Stream Generator
User’s Manual
01. Summary
7
How to Change ResolutionHow to Playback Files
PLAYPLAY
- If no image is displayed when resolution is changed,
press the [DEFAULT] button in the remote. (HDMI output will be changed into 1080p60)
-
Refer to the page 32 in SETTINGS menu.
1
3
3 5
2
2
4
Digital-01.m2ts
Digital-02.m2ts
Digital-03.m2ts
Digital-04.m2ts
Playlist window
Digital-01.m2ts
Digital-02.m2ts
Digital-03.m2ts
Digital-04.m2ts
Select a file
Playback the selected file
1
1
2
2
3
3
4
5
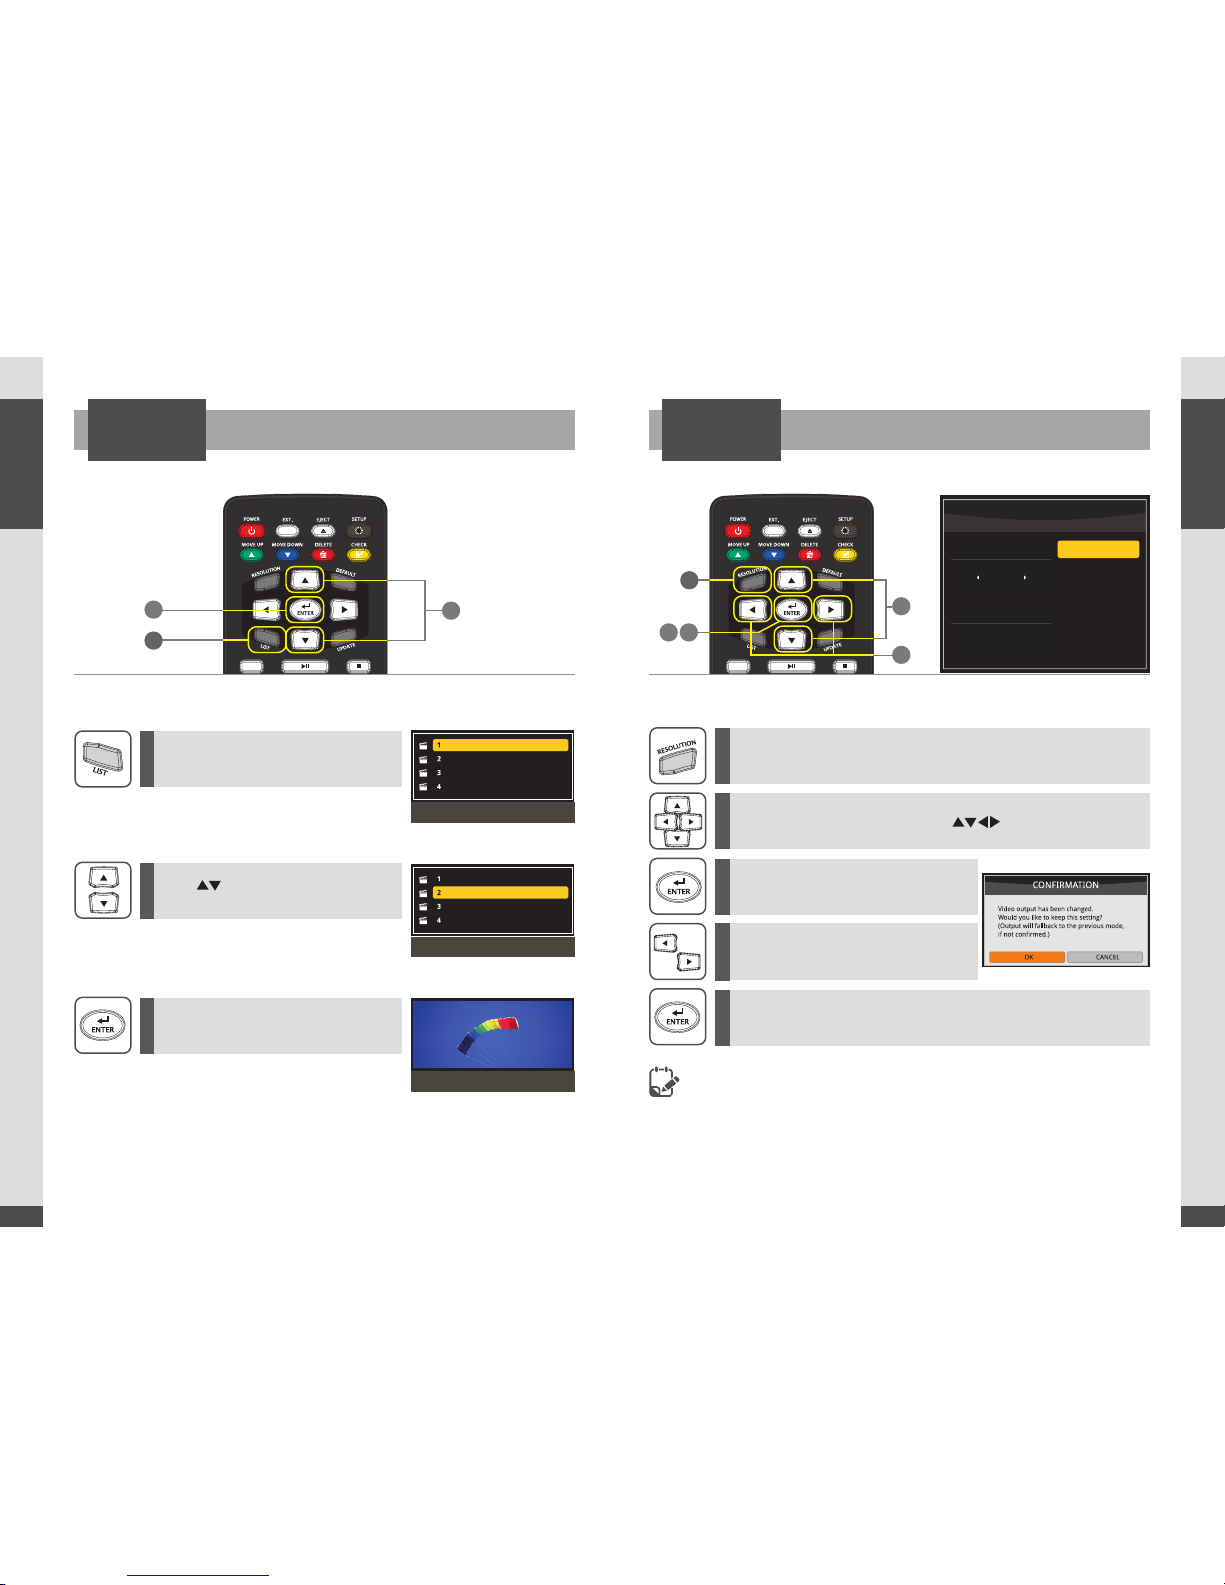
Press [LIST] button.
Press [RESOLUTION] to open Resolution menu while Playing back
files or in PLAYLIST menu.
Use [ ]buttons to move to
desired file.
Select desired sub-resolution with [ ] direction buttons.
Press [ENTER] after moving the cursor to
the desired le.
Press [ENTER] button to set the output
resolution.
Conrmation pop-up menu will be
opened to get the conrmation.
Resolution change executed by pressing [ENTER] button.
RESOLUTION
2160p60
2160p50
2160p30
2160p25
2160p24
MENU
CURRENT
2160p60
4K
1
Page 5
UHD Stream Generator
User’s Manual
01. Summary
8
UHD Stream Generator
User’s Manual
01. Summary
9
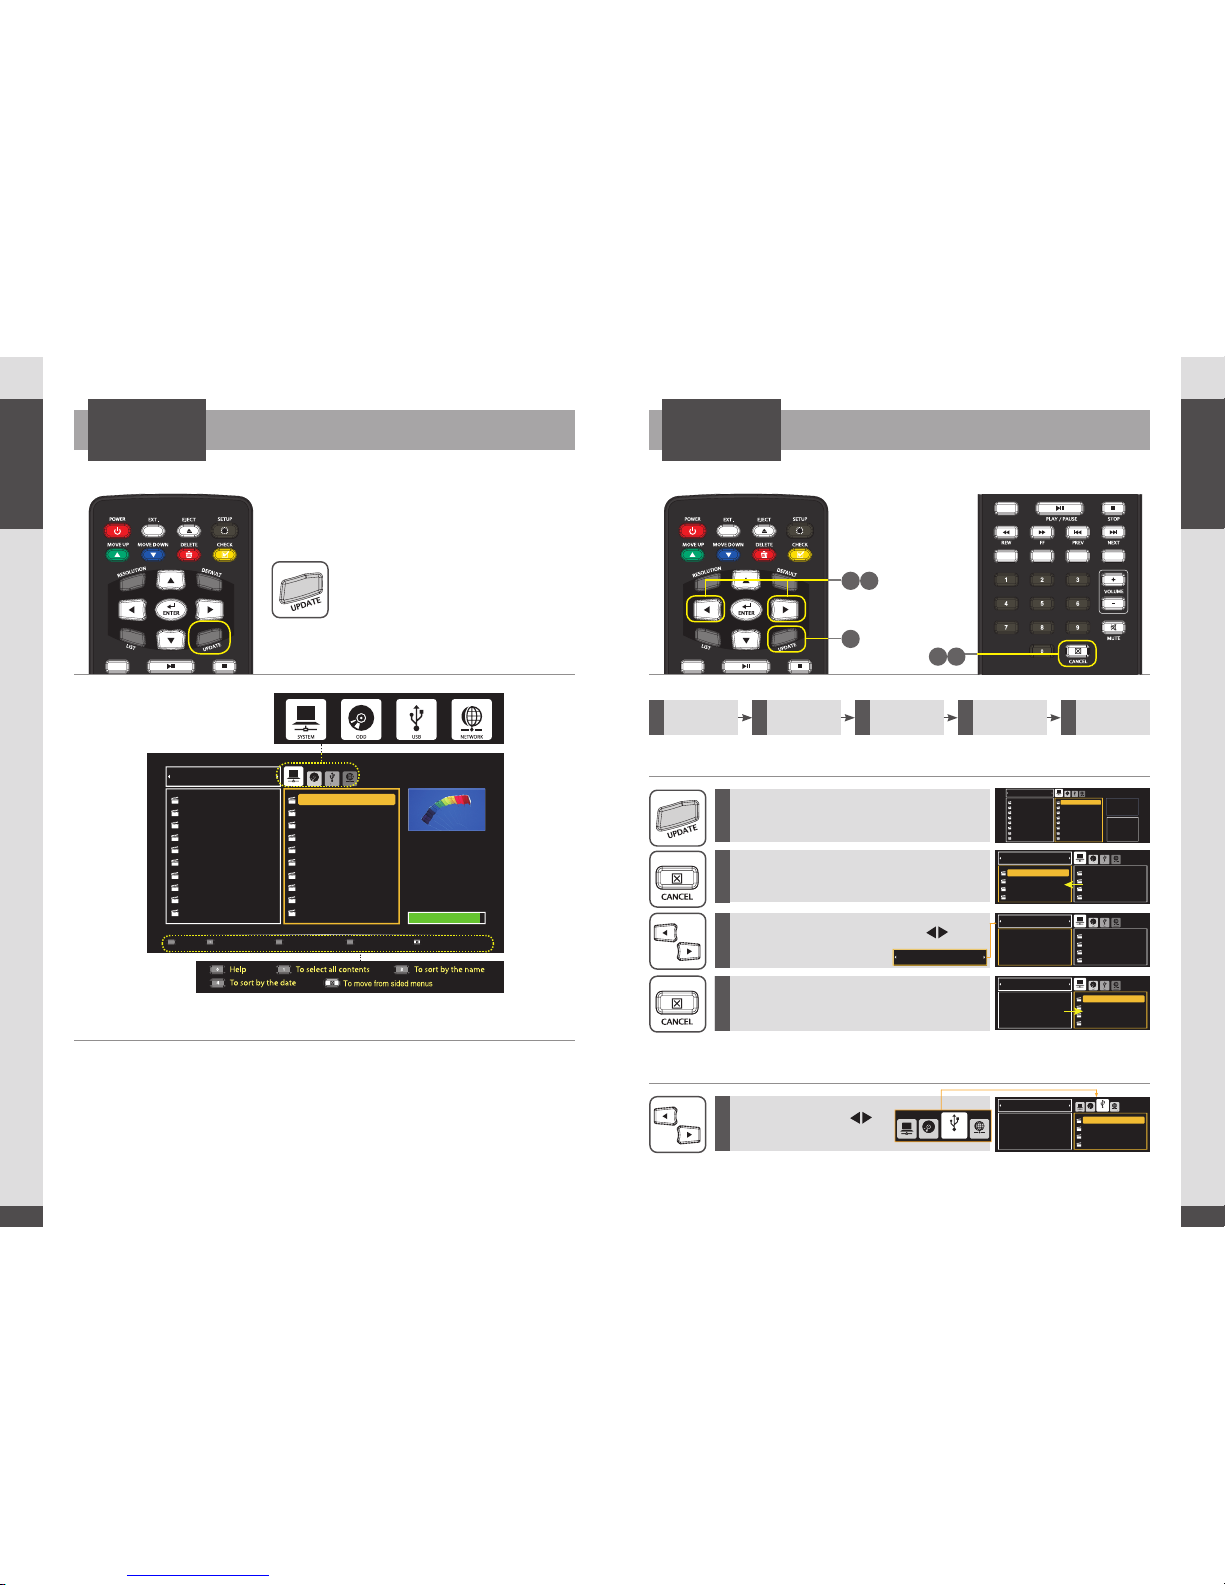
UPDATE Menu
UPDATE
Press [UPDATE] button.
How to Select MEDIA
Select one of MEDIA (SYSTEM/ODD/USB/NETWORK) using Direction button.
Press Number 1 : Select all files
Press [ENTER] : Proceed uploading all selected files.
How to Select PLAYLIST
You can select PLAYLIST number from the update menu.
Press [CANCEL] : Possible to switch menus between UPDATE and PLAYLIST.
How to Update Contents by USB
UPDATE
File(s) stored in USB Storage Device can be updated to UHD Stream Generator.
How to Select PLAYLIST Number
How to Select Media to USB
1
5
2
3
4
Press [UPDATE] button.
(Move to UPDATE Menu)
Press [CANCEL] button.
(Move to PLAYLIST Menu)
Select PLAYLIST NUMBER using [ ]
direction buttons.
Select USB using [ ]
direction buttons.
Press [CANCEL] button.
(Move to UPDATE Menu)
1
Select Playlist
number
2
Select USB
from media
3
Select files
4
Updating
files
5
Check
Updated files
Playlist 9 Playlist 1
Default
1
2
3
4
5
6
7
8
Digital-01.m2ts
Digital-02.m2ts
Digital-03.m2ts
Digital-04.m2ts
Digital-05.m2ts
Digital-06.m2ts
Digital-07.m2ts
Digital-08.m2ts
1
2
3
4
5
6
7
8
Digital-01.m2ts
Digital-02.m2ts
Digital-03.m2ts
Digital-04.m2ts
Digital-05.m2ts
Digital-06.m2ts
Digital-07.m2ts
Digital-08.m2ts
UPDATE
SYSTEM
ODDUSBN
ETWORK
Date
Size
Video
Audio
Bitrate
2015-01-24
496MB
HEVC
2160P60
AAC/2Ch
80Mbps
Playlist 9 Playlist 1
Default
1
2
3
4
Digital-01.m2ts
Digital-02.m2ts
Digital-03.m2ts
Digital-04.m2ts
1
2
3
4
Digital-01.m2ts
Digital-02.m2ts
Digital-03.m2ts
Digital-04.m2ts
SYSTEM
ODD USB NETWORK
Playlist 2 Playlist 4
Playlist3
1
2
3
4
Digital-01.m2ts
Digital-02.m2ts
Digital-03.m2ts
Digital-04.m2ts
SYSTEM
ODD USB NETWORK
Playlist 2 Playlist 4
Playlist3
1
2
3
4
Digital-01.m2ts
Digital-02.m2ts
Digital-03.m2ts
Digital-04.m2ts
SYSTEM
ODDUS
B NETWORK
Playlist 2P laylist 4
Playlist3
Playlist 2 Playlist 4
Playlist3
1
2
3
4
Digital-01.m2ts
Digital-02.m2ts
Digital-03.m2ts
Digital-04.m2ts
SYSTEM
O
DD
USB
NETWORK
SYS
TEM
ODD
USB
NETWOR
K
1
3 5
2 4
Playlist 9 Playlist 1
Default
System Free Size
Page : 1 / 5Page : 1 / 5
34 GB (88%)
1
2
3
4
5
6
7
8
9
10
Digital-01.m2ts
Digital-02.m2ts
Digital-03.m2ts
Digital-04.m2ts
Digital-05.m2ts
Digital-06.m2ts
Digital-07.m2ts
Digital-08.m2ts
Digital-09.m2ts
Digital-10.m2ts
1
2
3
4
5
6
7
8
9
10
Digital-01.m2ts
Digital-02.m2ts
Digital-03.m2ts
Digital-04.m2ts
Digital-05.m2ts
Digital-06.m2ts
Digital-07.m2ts
Digital-08.m2ts
Digital-09.m2ts
Digital-10.m2ts
UPDATE
SYSTEM
ODD USB NETWORK
0 3 4
To select all contentsHelp To sort by the name To sort by the date To move from sided menus
Page 6
UHD Stream Generator
User’s Manual
01. Summary
10
UHD Stream Generator
User’s Manual
01. Summary
11
SETTINGS Menu
How to Update Contents by USB
UPDATE
SETTINGS
How to Select Designated Files
Update
Check Update
6
8
9
7
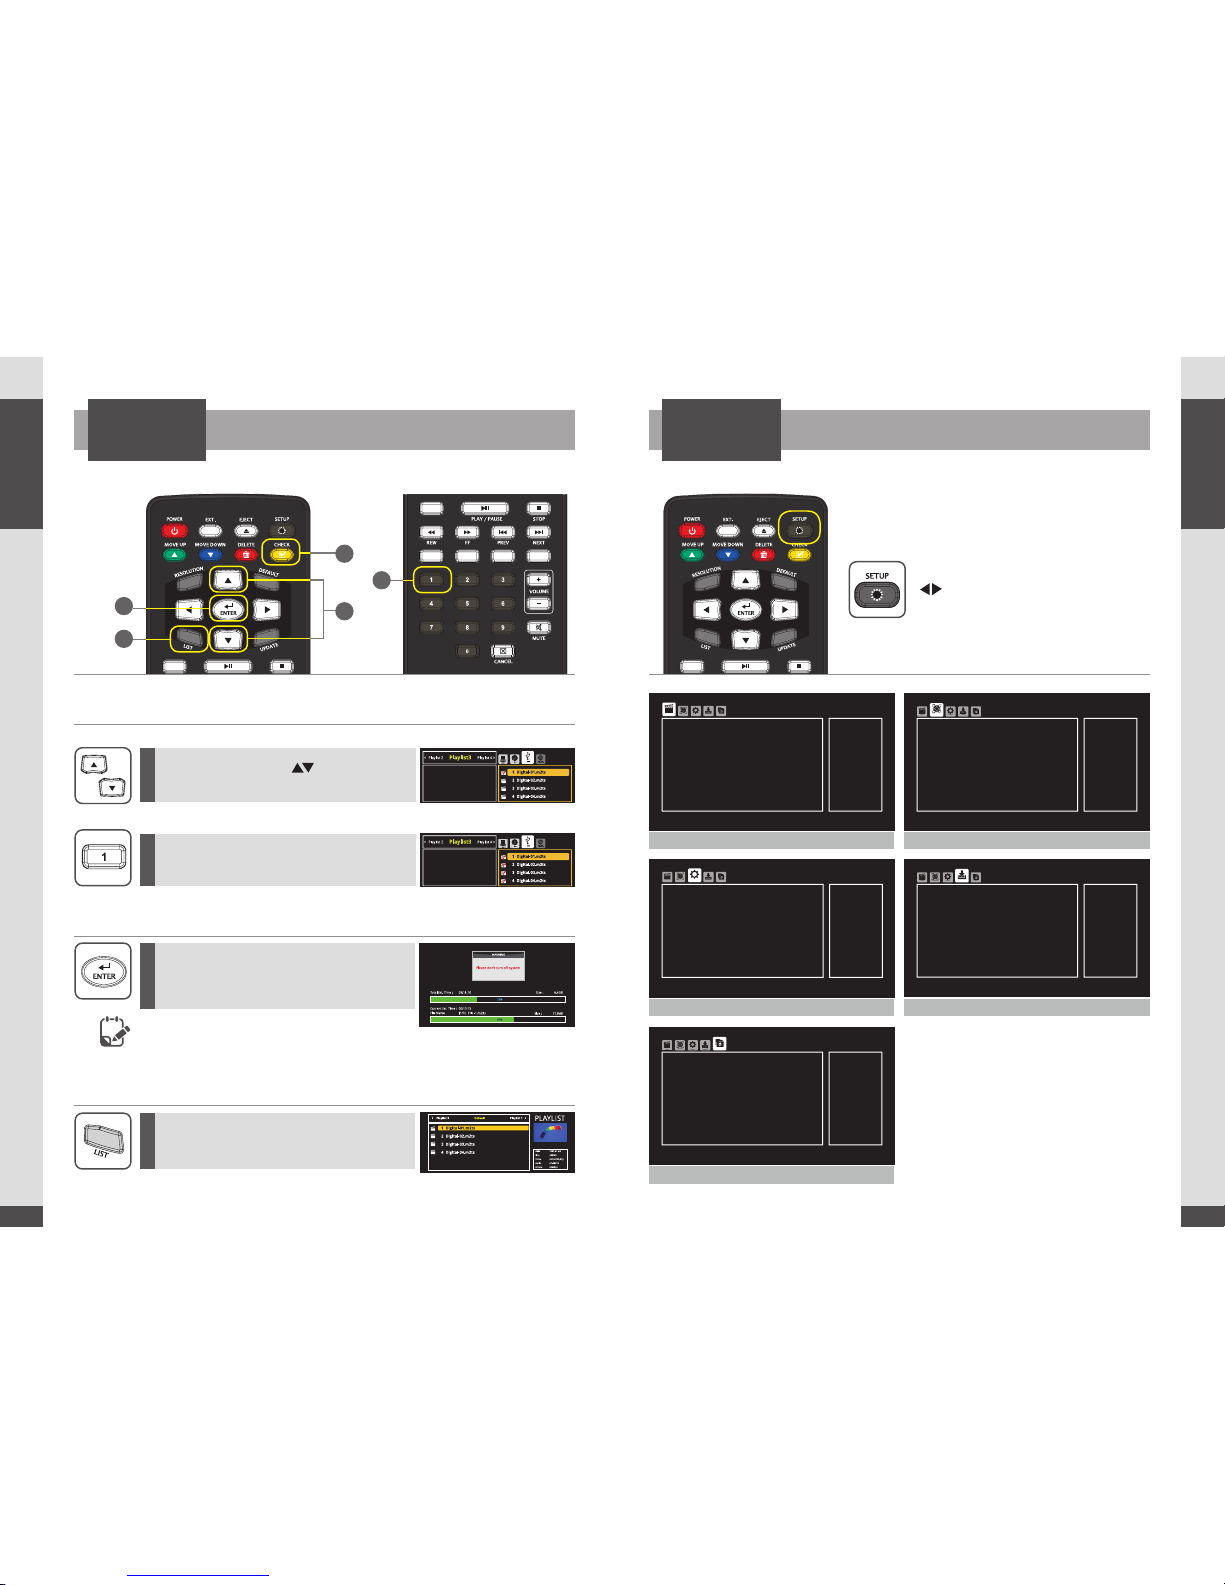
Move the cursor using [ ] direction button.
And then press [CHECK] button to select files.
Press [Number 1] button to select all
files in the selected folder.
Press [ENTER] button to activate update.
(When update process is completed, automatically
changed into PLAYLIST menu.)
Press [LIST] button.
(You can check updated files in PLAYLIST menu.)
※
Select files one by one
※
Select all files
Do not power o UHD Stream Generator during update.
Updated fi le(s) is/are damaged when power is manually turned o during updating stage.
Delete all file(s) updated to PLAYLIST when manually turned o and repeat update procedure once again.
Press [SETUP] button and use
[ ]direction button to select
sub-menu.
UHD Stream Generator gathers
information and describe TV
capabilities.
- On:Enable and TV
capabilities are synchronized
- OFF:Disabled and output is
forced regardless of TV
capabilities
EDID Limit
On
Native
FHD
Auto
All
None
10 Sec
EDID Limit
Refresh Rate
4K/FHD mODE
Color Space
OSD Mode
3D Mode
Picture Show Time
SETTINGS
S
HAR
E
VIDEO
NETWOR
K
SYSTEM UPDATE
Select type of network
connection
Interface
Wired
Auto(DHCP)
192.168.XX.XX
255.255.XX.XX
211.63.XX.XX
192.168.XX.XX
Interface
Configure
IP Address
Subnet Mask
DNS Server
Gateway
SETTINGS
S
HAR
E
V
IDE
O
NETWORK
SYSTEM
UPDATE
To upgrade new firmware
New Version
None
1.XX
1.XX
T7
New Version
Software Version
System Version
Model
SETTINGS
S
HAR
E
V
IDE
O
NETWOR
K
SYSTEM
UPDATE
MAC Address
00:00:00:00:00:00
192.168.XX.XX
None
10Min
MAC Address
Server IP
Connection Type
Connection Period
SETTINGS
SHARE
V
IDE
O
NETWOR
K
SYSTEM
UPDATE
VIDEO
SYSTEM
SHARE
UPDATE
NETWORK
6
6
7
8
9
YYYY/MM/DD
Date
2015/01/16
00:00
Disable
00:00
00:00
Off
Date
Time
Reservation
Power On Time
Power Off Time
Key Lock
SETTINGS
S
HAR
E
VIDE
O
NETWOR
K
SYSTEM
UPDAT
E
Page 7
UHD Stream Generator
User’s Manual
01. Summary
12
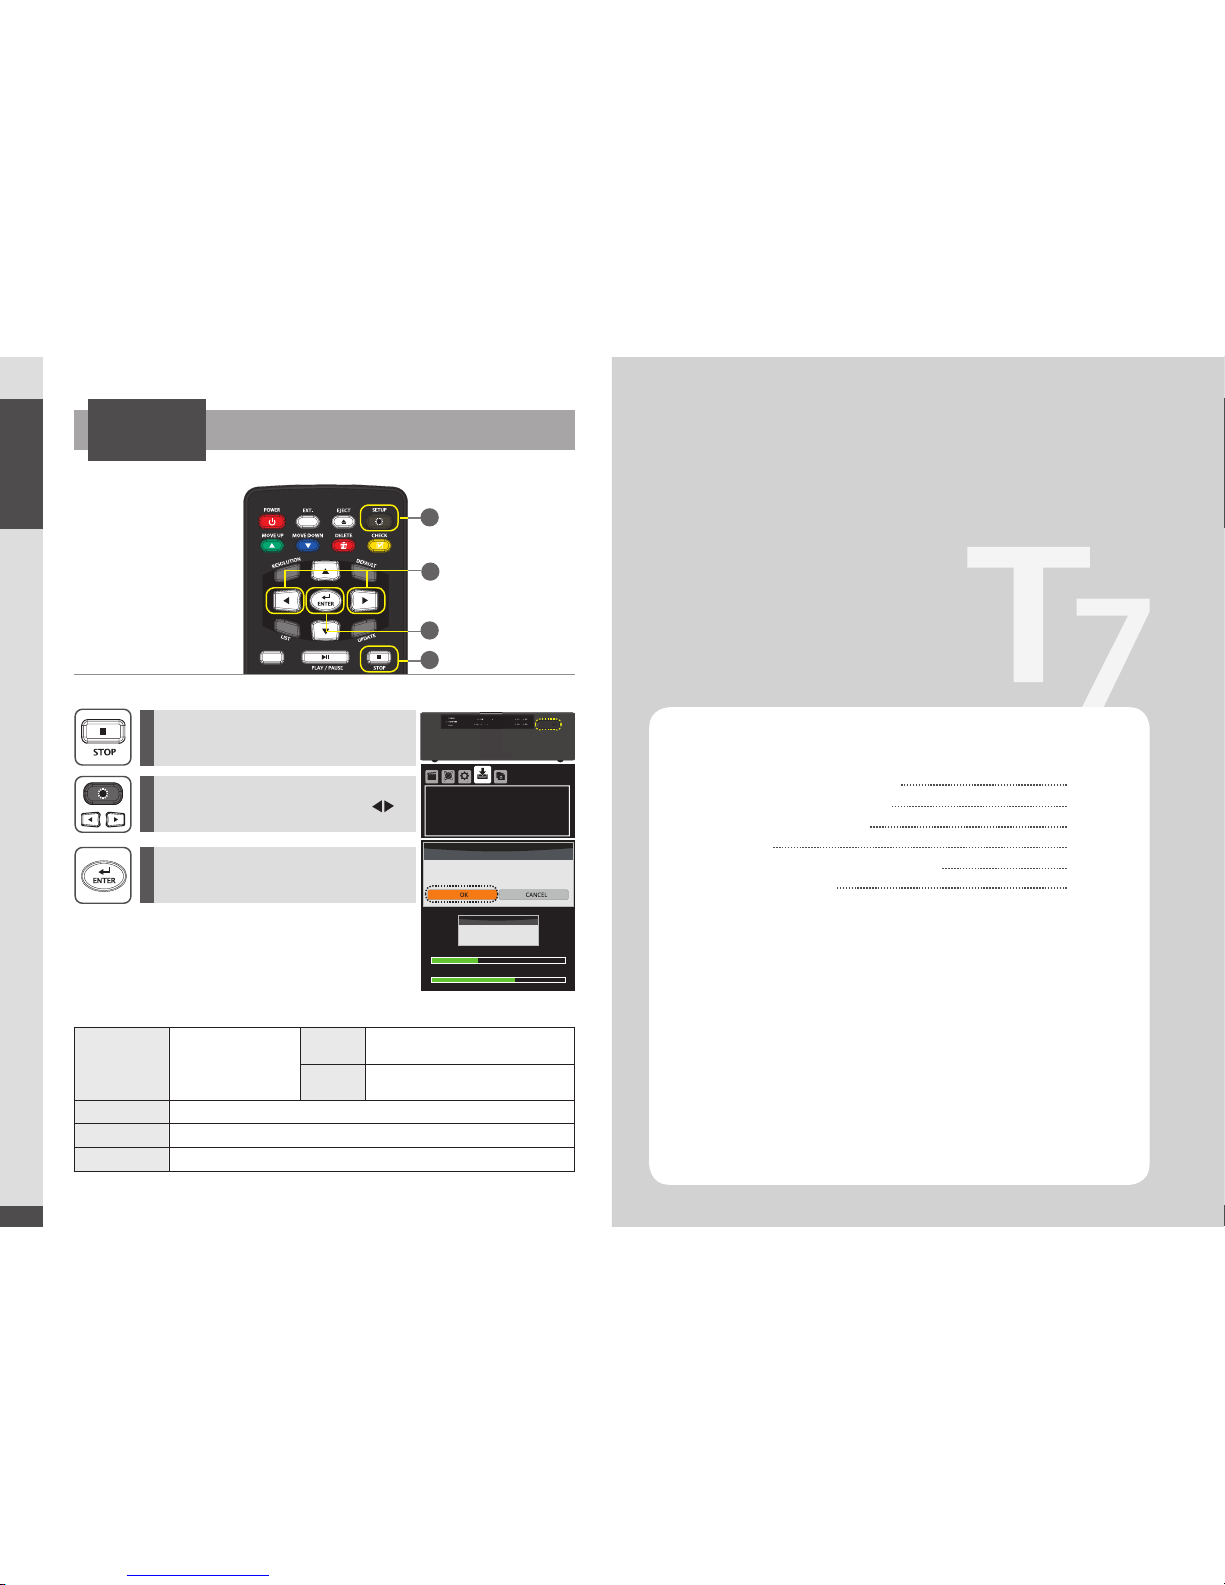
How to Update Firmware Manually
2
1
3
Press [SETUP] button to open settings menu
and
then move to
‘UPDATE’ menu using [ ]
direction button.
Press [STOP] to stop playing files and then
plug USB into UHD Stream Generator.
Move to ‘New Version’ and then press [ENTER].
Select ‘OK’ on CONFIRMATION Pop-up menu
and then Press [ENTER].
SETTINGS
New Version
It will be displayed new
rmware version in USB.
Update will be processed if
you press [ENTER] button on
new rmware
None There is no upgradable rmware le(s)
X.XX
(version NO.)
Possible to upgrade rmware
Software Version It is showing current Firmware version
System Version It is showing current System version
Model
Shows UHD Stream Generator model name
Getting Started
02
※ Automatic Firmware Update:
2
2
1
3
Firmware will be automatically updated if USB device is connected while it is
playing files. CONFIRMATION Pop -up menu will be appeared on the screen If
USB device contains a firmware file .
Select OK button to update the firmware.
(Firmware file has to be stored in the root folder of USB)
USB
CONFIRMATION
Current version : xxx
Would you like to update software to Vxxx?
None
1.XX
1.XX
T7
New Version
Software Version
System Version
Model
S
HAR
E
V
IDE
O
NETWOR
K
SYSTEM
UPDATE
WARNING
Please don’t turn off system
Total Est. Time : 0:00:16 Status : File Copying
Size : 190MB
File Name xxxx.xx
Current Est. Time : 00:00:13
35%
65%
Important Safety Instructions
Guide to Parts and Controls
How to Use Top Buttons
Remote
Package and Accessories / Cautions
Connecting Cable
14
15
16
17
18
19
Page 8
14
UHD Stream Generator
User’s Manual
02. Getting Started
15
UHD Stream Generator
User’s Manual
02. Getting Started
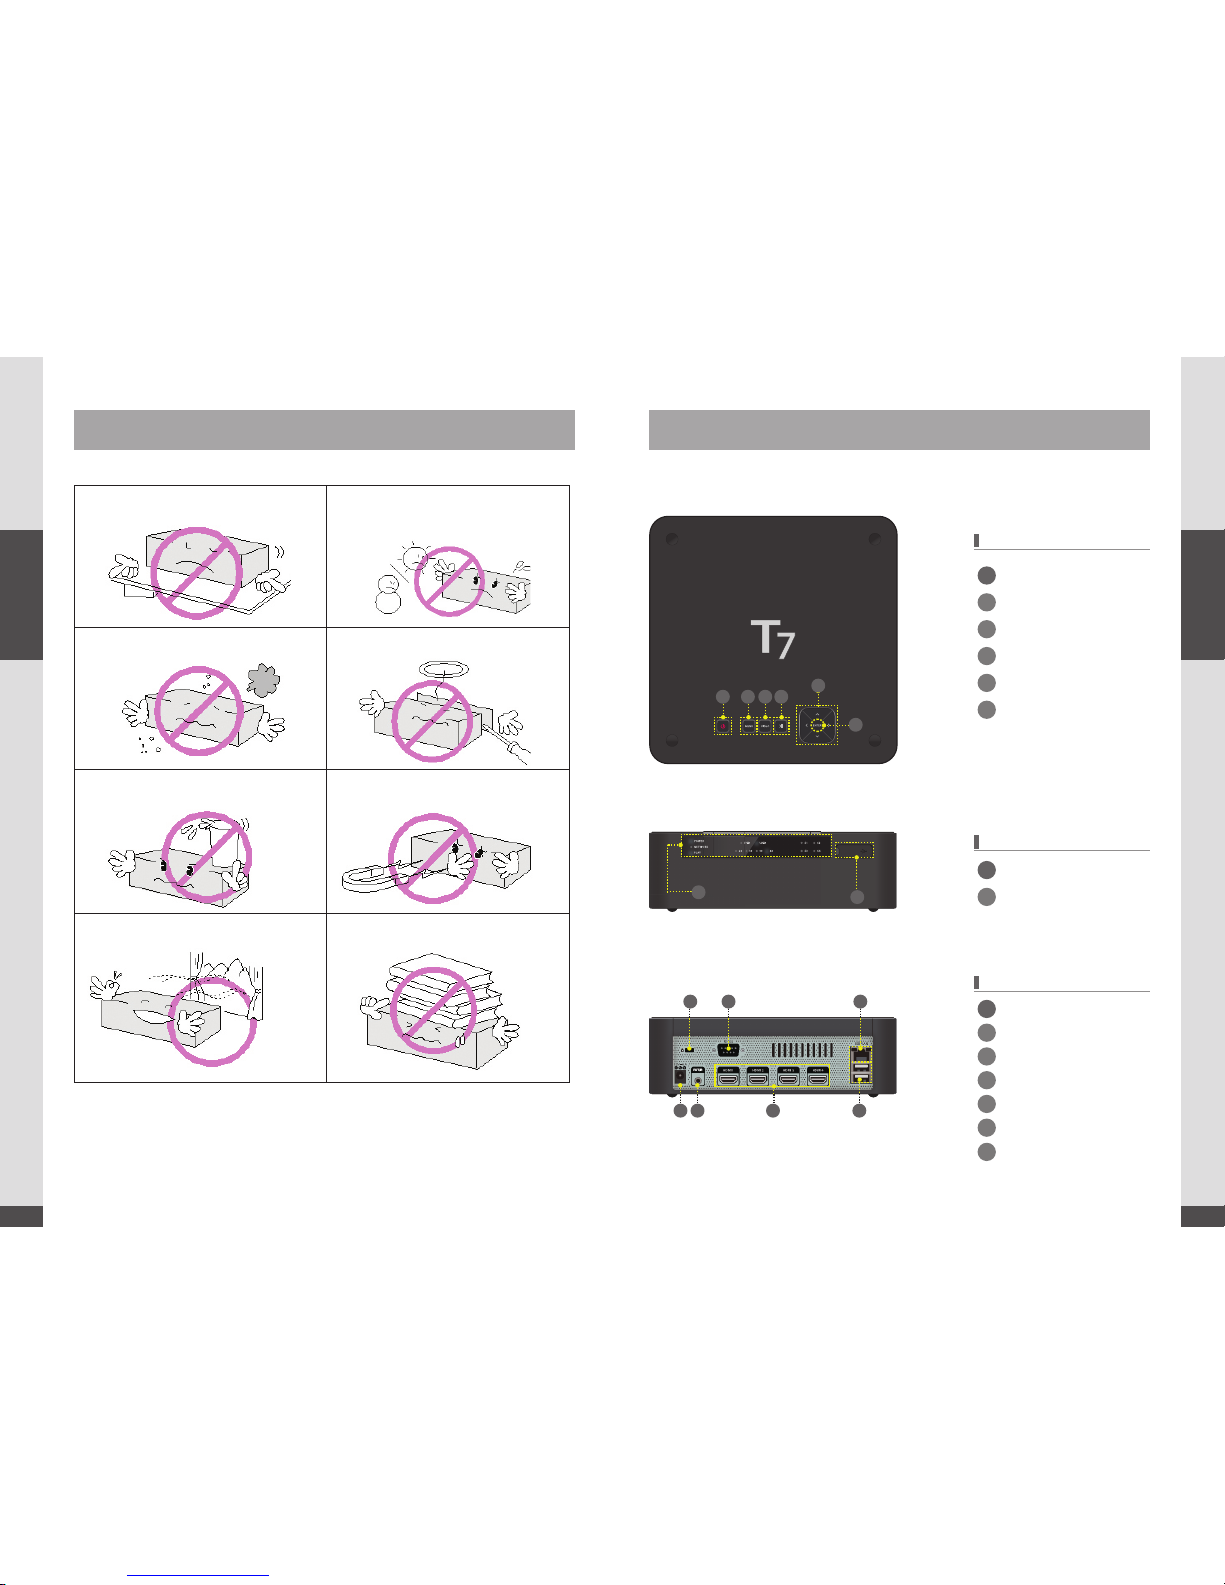
Important Safety Instructions
Guide to Parts and controls
Model
: HVP-7004N
TOP
FRONT
REAR
POWER
MENU
VIDEO
PLAY/PAUSE
ENTER
DIRECTION Buttons
Adapter Power Input
LEDs : Status Indicators
IR Extension Receiver Input
1 x USB
HDMI Output
2 x USBs
Kensington Lock
RS 232
LAN
1
1
1
3
3
5
5
6
6
7
2
2
2
4
4
1 2 3 4
6
5
1
2
1 2 3
5 6 7
4
Please read following recommended safety instructions carefully.
© Copyright 2014, DIGITALZONE Co., Ltd. All rights reserved.
Read these operating instructions carefully before using the product.
Follow the safety instructions on the unit and the safety precautions listed in the manual.
Keep this manual handy for future reference.
* DIGITALZONE Logo is registered trade mark of DIGITALZONE Co., Ltd.
Do not attempt to repair this product yourself.
Do not install on a surface where exposed to
direct sunlight, near heating. Equipment or
heavy cold area
Do not place this product on an uneven surface.
Prevent water or dust from the product.
Do not place glass contained of liquid
on the product.
Do not install this product near any magnetic
source.
Place the product at proper ventilation area. Do not place heavy items on the product.
Page 9
16
UHD Stream Generator
User’s Manual
02. Getting Started
17
UHD Stream Generator
User’s Manual
02. Getting Started
1 2 3 4
6
5
※
Top buttons have the
same functions as
Remote.
3
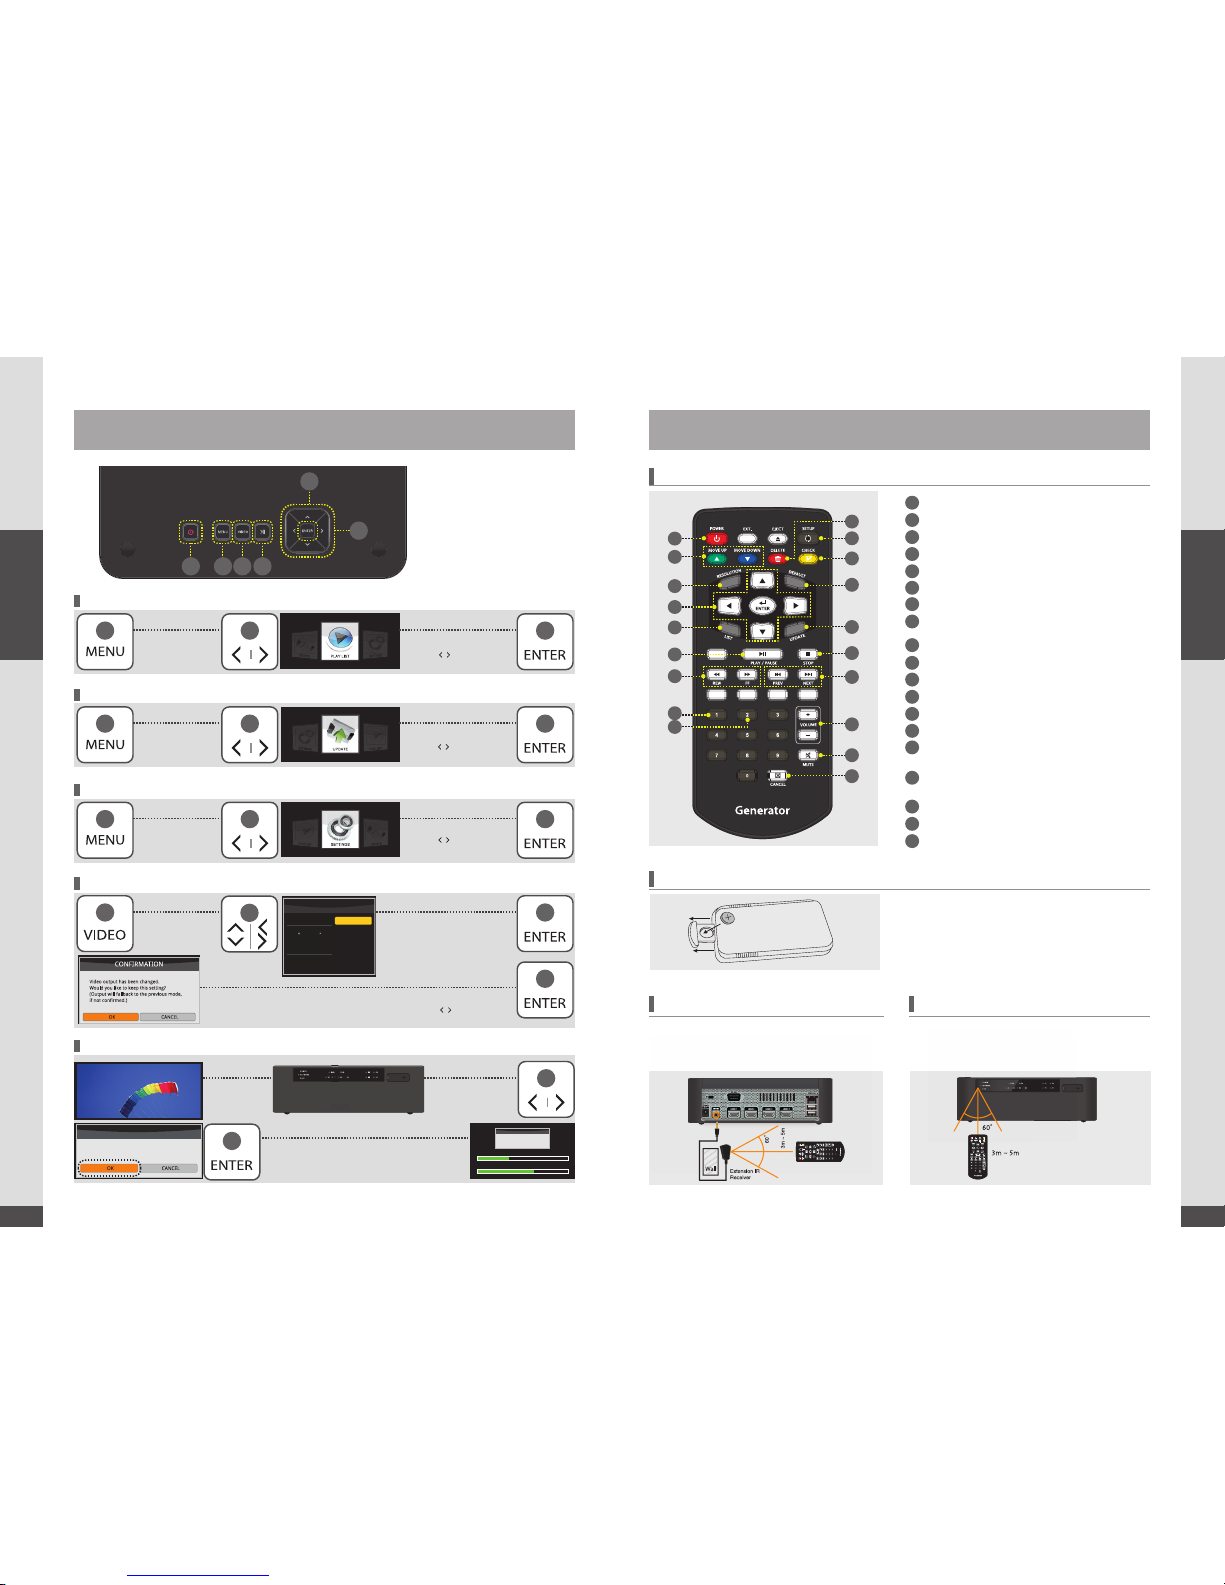
How to Use Top Buttons
Remote
2
2
2
5
5
5
5
5
5
Press [MENU]
button
Press [MENU]
button
Press [MENU]
button
Press [VIDEO]
button
Playing files
Insert USB device which
contains Firmware file in
the root folder
Select PLAYLIST menu
using [ , ] button and
press [ENTER] button
Select UPDATE menu
using [ , ] button and
press [ENTER]button
Select SETTINGS menu
using [ , ] button and
press [ENTER]button
Select desired RESOLUTION
using direction buttons and
press [ENTER] button
When you change the resolution, CONFIRMATION PopUp menu
will be appeared. Select [OK] or [CANCEL] using [ , ] button.
How to Open UPDATE Menu
How to Open SETTINGS Menu
How to Update Firmware Automatically
How to Open and Change RESOLUTION Menu
How to Open PLAYLIST Menu
RESOLUTION
2160p60
2160p50
2160p30
2160p25
2160p24
MENU
CURRENT
2160p60
4K
6
6
6
6
Remote Buttons
Inserting Battery to Remote
Using IR Extension Receiver Remote Angle Range
Remote angle range is within 3~5m distance with 60
degree of angle scope.
IR extension receiver is used to control the UHD Stream
Generator from far distance or behind an obstacle.
When IR extension receiver is connected, top buttons of
UHD Stream Generator will not work.
1. Pull out the insert part.
2. Place the battery checking “+” polarity.
3. Push in the insert part.
Select & [Enter] ‘OK’ on CONFIRMATION Pop-up menu.
(Firmware file have to be stored in the root folder of USB)
CONFIRMATION
Current version : xxx
Would you like to update software to Vxxx?
6
WARNING
Please don’t turn off system
Total Est. Time : 0:00:16 Status : File Copying
Size : 190MB
File Name xxxx.xx
Current Est. Time : 00:00:13
35%
65%
POWER
Change Playing Order in PLAYLIST Menu
Open RESOLUTION Menu
(Apply Only for Play and PLAYLIST)
Direction buttons
Open PLAYLIST Menu
Play & Pause
Trick Mode
Select or Deselect All Files
(Applying Only for PLAYLIST & UPDATE M enu)
Activate or Inactivate Files
Delete file(s) in PLAYLIST and UPDATE Menu
Open SETTINGS Menu
Select or Deselect File(s)
Resolutions (1080p60)
Open UPDATE Menu
Volume Up(+)/Down(-)
MUTE
Playing: Stop playing the file
(Stop the current playing file)
Updating: Cancel updating all the file (Cancel all the updating files)
Playing file : Move to Previous or Next File
PLAYLIST/UPDATE : Page Up or Down
Updating Files : Cancel the current updating file
Update Menu : Toggle from Sided Menus
(Apply Only at UPDATE Menu)
1
2
3
4
5
6
7
8
9
10
11
12
13
14
15
16
17
18
19
2
3
4
5
6
7
8
9
1
10
11
12
13
14
15
16
17
18
19
Page 10
18
UHD Stream Generator
User’s Manual
02. Getting Started
19
UHD Stream Generator
User’s Manual
02. Getting Started
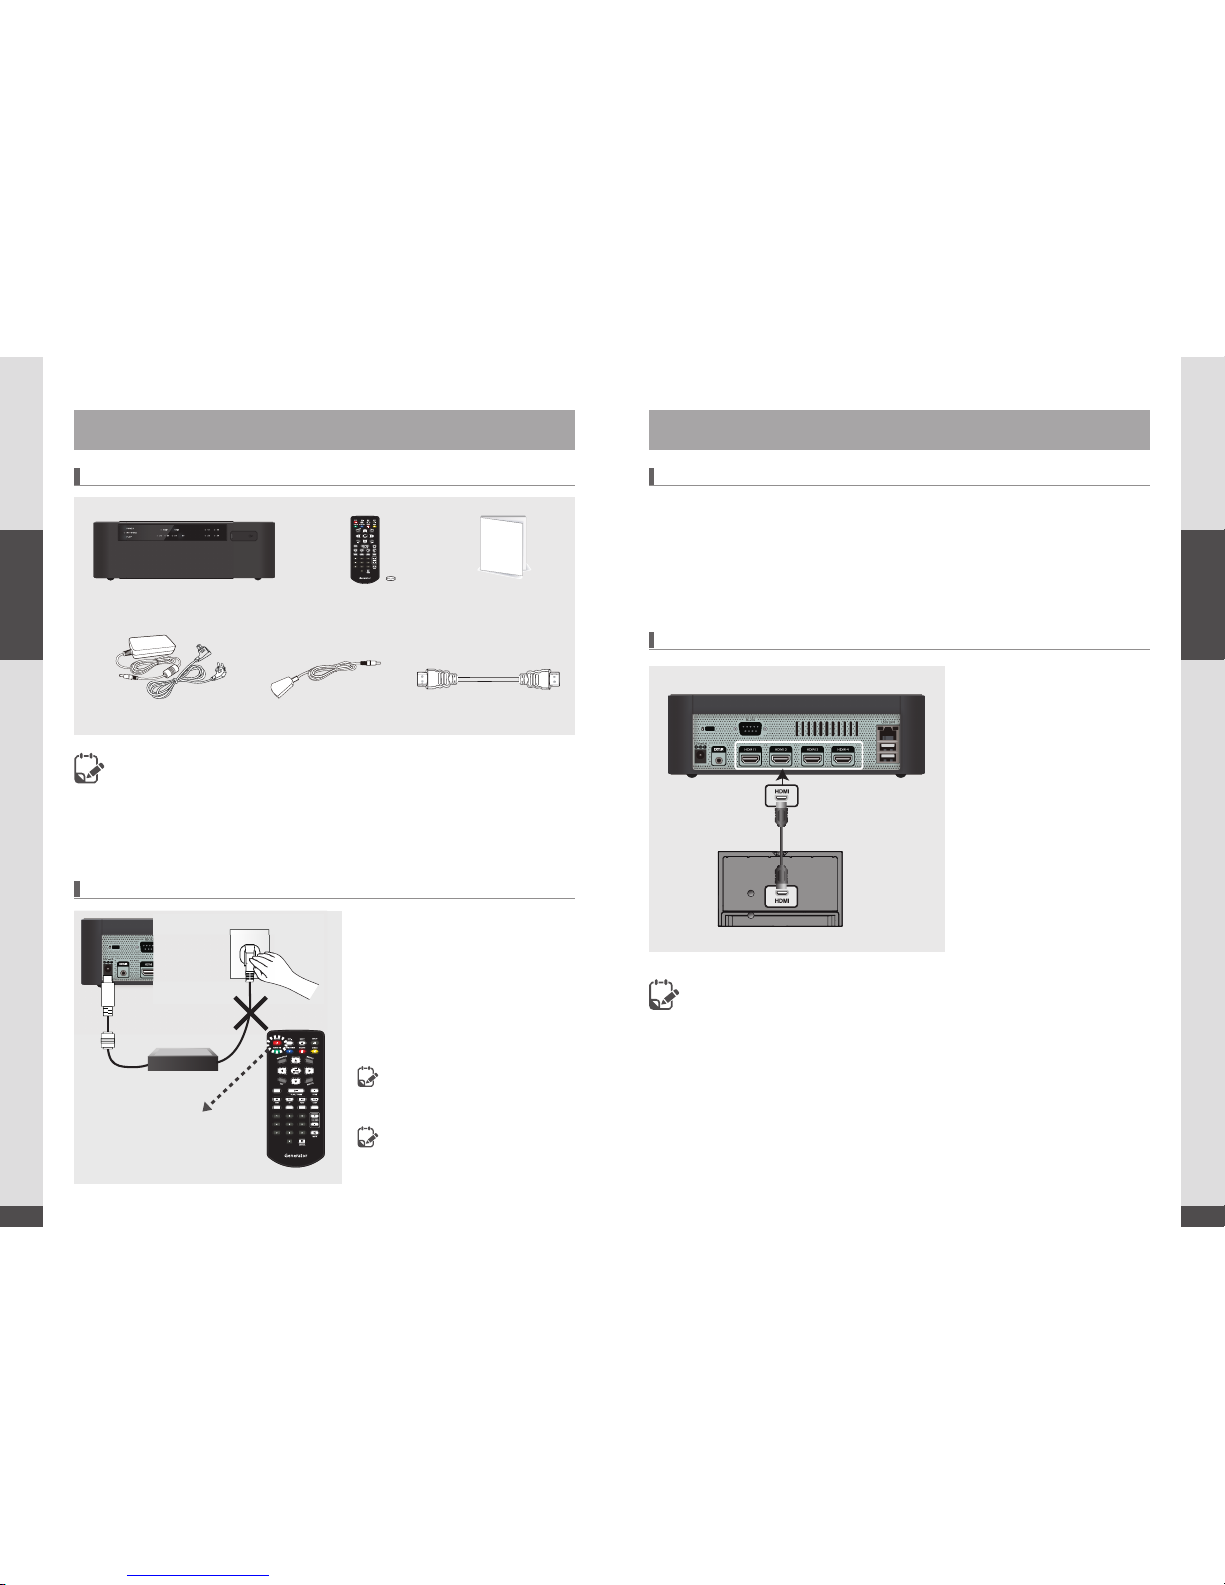
Package and Accessories / Cautions Connecting Cable
Before Connecting
Connecting HDMI Cable
Package and Accessories
Cautions
UHD Stream Generator
HDMI Cables (Option)
Remote & Battery
Adaptor & Power Cord
User Manual
IR Extension Receiver
- Accessories could be changed without any notice.
- Additional accessories or any accessories other than above should be purchased separately.
(www.dzonei.com)
- Distributors and users should keep in mind that the device is for commercial use
(Grade A), which acquired EMC (Electromagnetic Compatibility), and it is intended to
be used in areas, except for a domestic purpose.
- Digitalzone will not be responsible for any problems adapter cautions.
Press power button in remote or
on top to turn o the power.
1. DO NOT pull plug out of outlet while the
device is running.
2. This can cause defect to system.
In case of system error, turn the power o
and on.
3. This can recover the error.
(The booting time could take longer than usual)
About A/S: +82.2.6330.2358
(www.digitalzone.co.kr, www.dzonei.com)
1. Dee Van Electronics(Longchan) Co., Ltd
2. DSA-42D-12 3 120300
Listing of manufacturers and models of
the relevant power supplies.
1. Check each name of the port(s).
2. Check output of UHD Stream Generator and input of TV is respectively connected with same cable.
3. Check output setting of UHD Stream Generator and input selection of TV is respectively matched.
4. Check whether cable(s) is connected tightly without loose.
5. When there’s no picture in TV, check whether TV’s input selection is selected to correct port.
1. Connect UHD Stream Generator to TV
with HDMI cable.
2. HDMI supports both audio and video
signal together, there’s no additional
audio cable needed.
- UHD Stream Generator is collecting EDID information from the connected TVs. HDMI output
number “1” has the top priority and then the HDMI port which is connected in advance or
adjacent from the number “1” port has the priority.
- Use High speed HDMI cable or HDMI cable oered by Digitalzone.
(Possible to use HDMI certied cable up to 10M. It is possible to have some problems longer than.)
Page 11
21
UHD Stream Generator
User’s Manual
03. Features
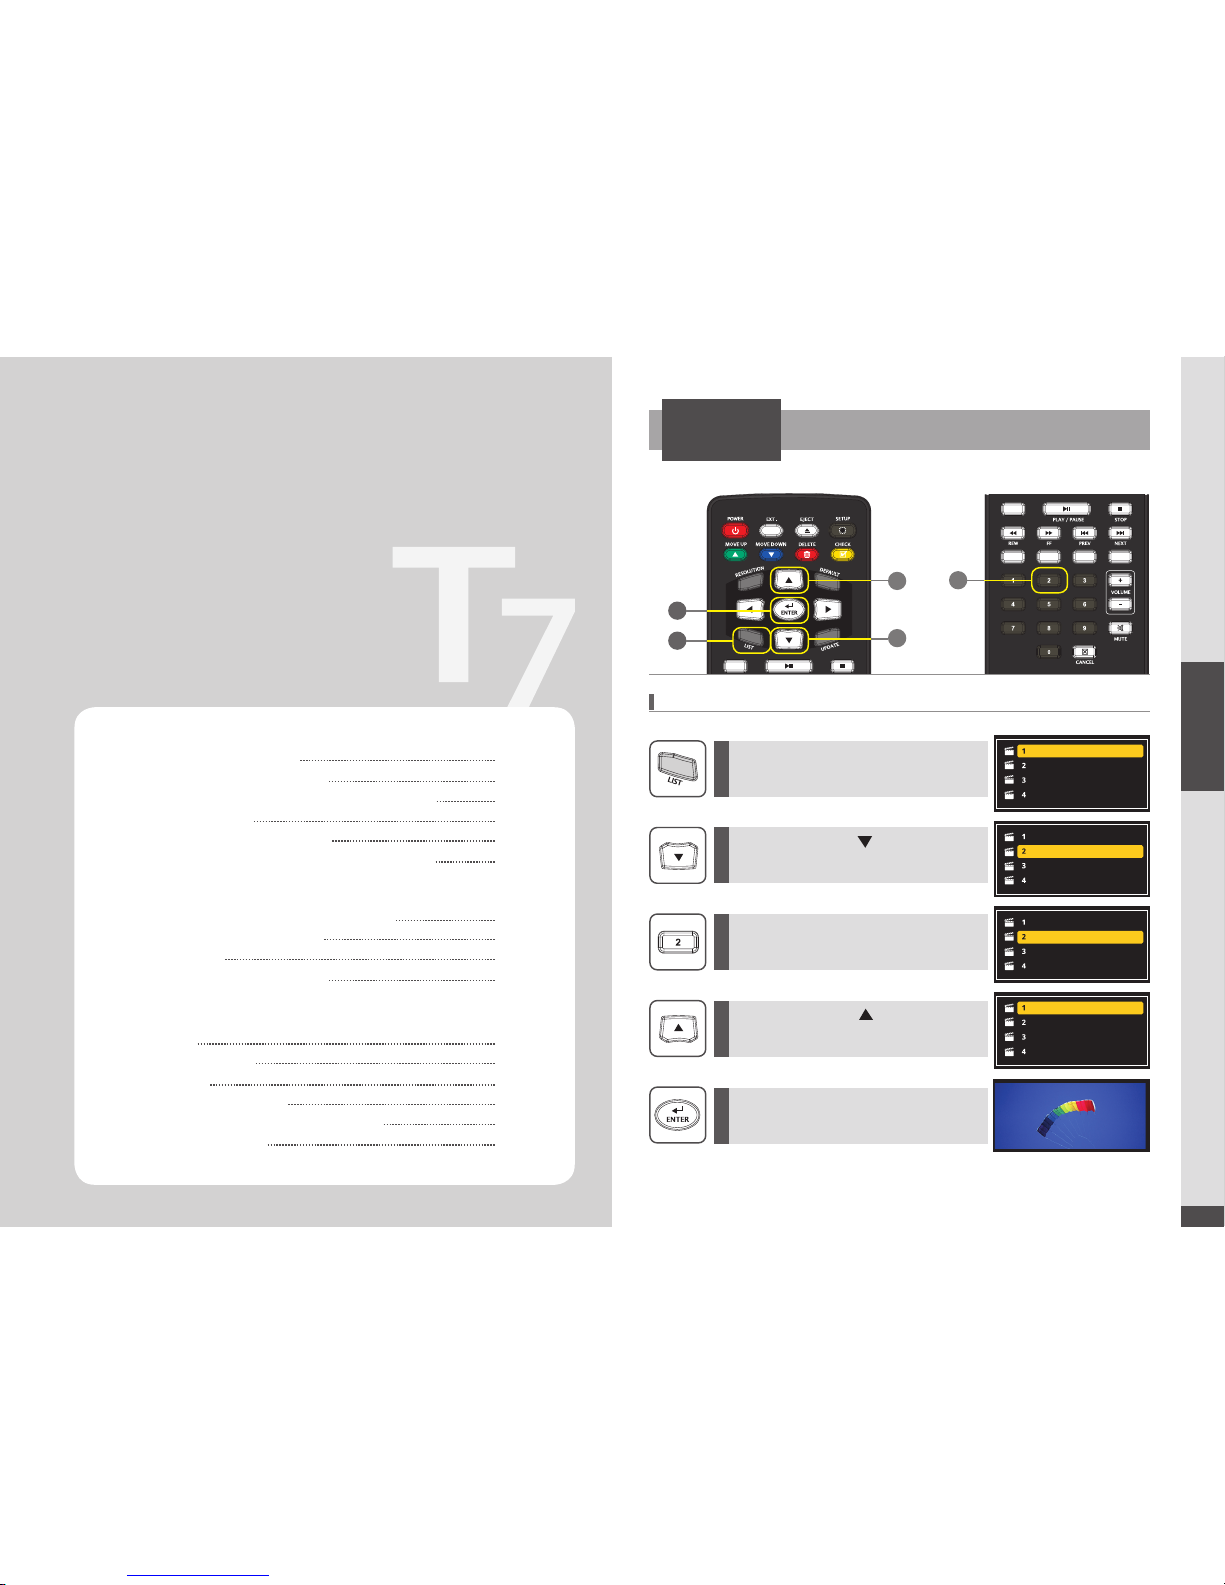
Loop Play with One File
PLAY
1
5
3
2
4
When playing only “Digital-01.m2ts”
1
2
3
4
5
Press [LIST] button.
(Startup status)
Move cursor using [ ] direction button
to “Digital-02.m2ts”.
(Cursor moved into “Digital-02.m2ts”)
Move cursor using [ ]direction button
to “Digital-01.m2ts”.
(Cursor moves to “Digital-01.m2ts”)
Press Number [2] button to uncheck files.
(Now “Digital-02.m2ts, Digital-03.m2ts,
Digital-04.m2ts” will be inactivated)
Press [ENTER] for file play.
(Played “Digital-01.m2ts” only)
Digital-01.m2ts
Digital-02.m2ts
Digital-03.m2ts
Digital-04.m2ts
Digital-01.m2ts
Digital-02.m2ts
Digital-03.m2ts
Digital-04.m2ts
Digital-01.m2ts
Digital-02.m2ts
Digital-03.m2ts
Digital-04.m2ts
Digital-01.m2ts
Digital-02.m2ts
Digital-03.m2ts
Digital-04.m2ts
Features
03
PLAY
UPDATE
SETTINGS
Loop Play with One File
Loop Play with Multiple Files
Changing PLAYLIST Order and Selecting File(s)
Selecting File(s)
Managing PLAYLIST Number
Deleting File(s) and Checking File Information
Contents Update by USB Automatically
See Update Progress Status
Sub Folder
Deleting File(s) From System
VIDEO
Settings VIDEO
SYSTEM
Setting DATE & TIME
How to Reserve Power ON/OFF Time
Setting Key Lock
21
22
23
24
25
26
27
28
29
30
31
32
34
34
35
36
Page 12
22
UHD Stream Generator
User’s Manual
03. Features
23
UHD Stream Generator
User’s Manual
03. Features
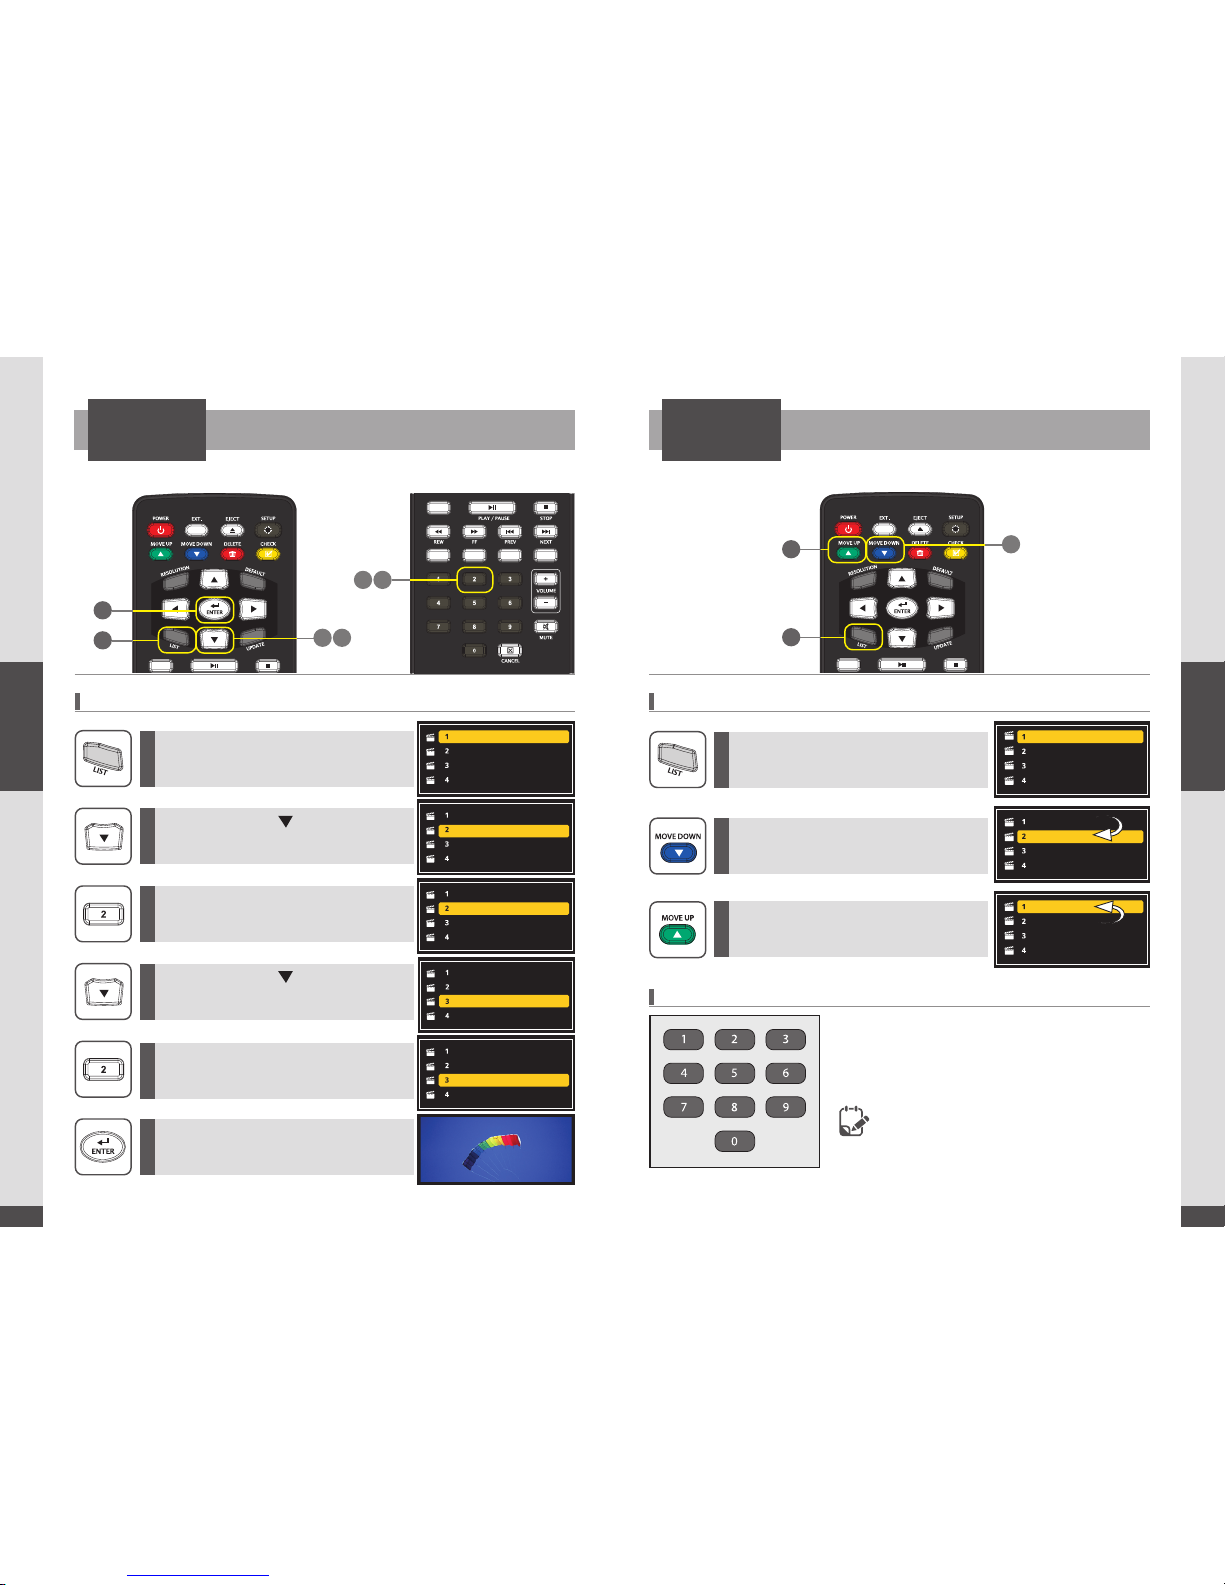
Loop Play with Multiple Files
Changing PLAYLIST Order and Selecting File(s)
PLAY PLAY
1
1
3
6
3 5
224
When playing “Digital-01.m2ts”, “Digital-02.m2ts”, “Digital-03.m2ts”
Changing PLAYLIST Order and Selecting File(s)
Direct Play by Number Button
1
1
2
2
3
3
4
5
6
Press [LIST] button.
Move selected file down using
[MOVE DOWN] button.
Move selected file up using
[MOVE UP] button.
Digital-01.m2ts
Digital-02.m2ts
Digital-03.m2ts
Digital-04.m2ts
Digital-01.m2ts
Digital-02.m2ts
Digital-03.m2ts
Digital-04.m2ts
Digital-01.m2ts
Digital-02.m2ts
Digital-03.m2ts
Digital-04.m2ts
Digital-01.m2ts
Digital-02.m2ts
Digital-03.m2ts
Digital-04.m2ts
Digital-01.m2ts
Digital-02.m2ts
Digital-03.m2ts
Digital-04.m2ts
Digital-01.m2ts
Digital-02.m2ts
Digital-03.m2ts
Digital-04.m2ts
Digital-02.m2ts
Digital-01.m2ts
Digital-03.m2ts
Digital-04.m2ts
Digital-01.m2ts
Digital-02.m2ts
Digital-03.m2ts
Digital-04.m2ts
Press [LIST] button.
(Startup status)
Move cursor using [ ] direction button
to “Digital-02.m2ts”.
(Cursor moved into “Digital-02.m2ts”)
Move cursor using [ ]direction button
to “Digital-03.m2ts”.
(Cursor moves to “Digital-03.m2ts”)
Press Number [2] button the selected to
check file.
(“Digital-02.m2ts” will be activated)
Press Number [2] button the selected to
check file.
(“Digital-03.m2ts” will be activated)
Press [ENTER] for file play.
(“Digital-01.m2ts”, “Digital-02.m2ts”,
“Digital-03.m2ts” will be played)
File Play by Number Button
It is possible to playback directly the desired le by
pressing number button on Remote.
User can see the number in front of le in the play list.
File play by number button only operates in
Play/Pause state.
Page 13
24
UHD Stream Generator
User’s Manual
03. Features
25
UHD Stream Generator
User’s Manual
03. Features
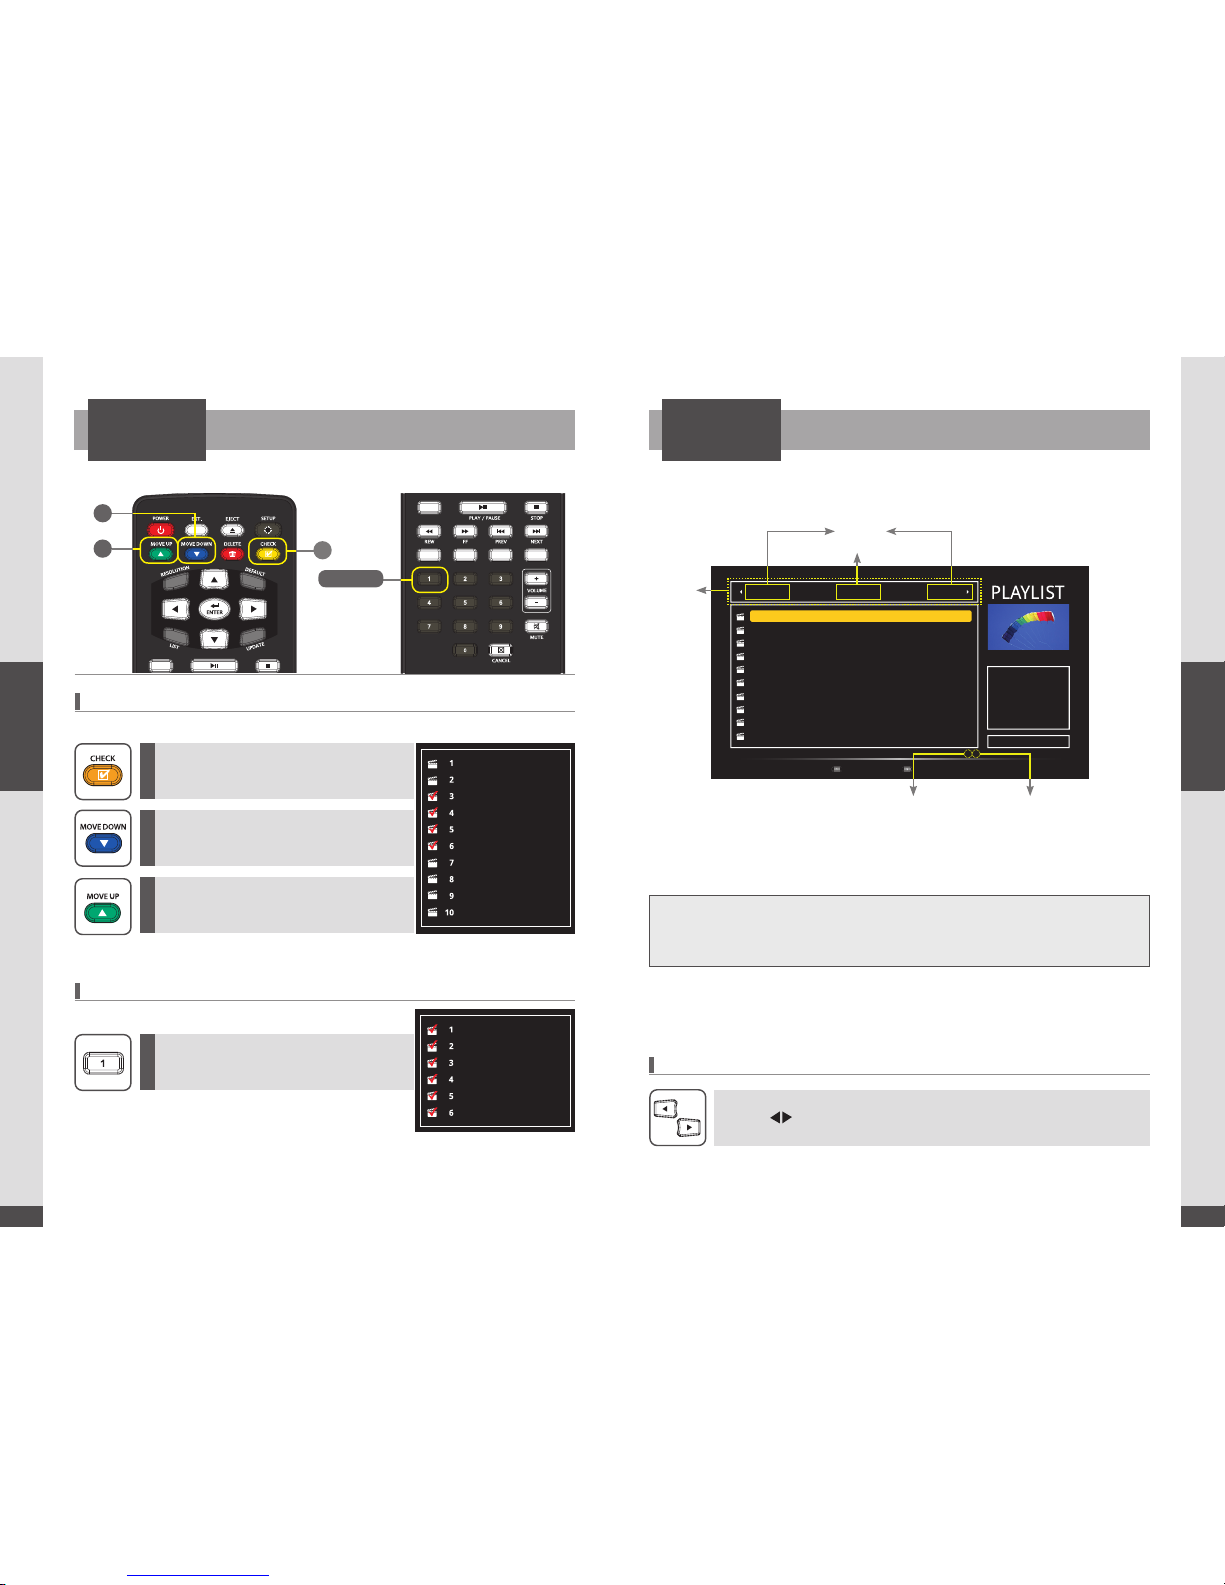
Selecting File(s) Managing PLAYLIST Number
PLAY PLAY
3
2
1
Multi-Select
Select All
How to Change PLAYLIST
1
2
3
Press [CHECK] button for selecting files.
Press number [1] button to select all files.
(Select All Files)
Press [MOVE Down] button.
The selected files will move down.
Press [MOVE UP] button.
The selected files will move up.
※
Possible to select multiple files to move.
Possible to select all files.
Digital-01.m2ts
Digital-02.m2ts
Digital-03.m2ts
Digital-04.m2ts
Digital-05.m2ts
Digital-06.m2ts
Digital-07.m2ts
Digital-08.m2ts
Digital-09.m2ts
Digital-10.m2ts
Digital-01.m2ts
Digital-02.m2ts
Digital-03.m2ts
Digital-04.m2ts
Digital-05.m2ts
Digital-06.m2ts
※You can utilize multi “PLAYLIST” and also orders for each “PLAYLIST”
Press [ ] buttons to move to the next playlist in stop status.
Playlist 9 Playlist 1Default
Resolution
Page : 1 / 5
2160p60
1
2
3
4
5
6
7
8
9
10
Digital-01.m2ts
Digital-02.m2ts
Digital-03.m2ts
Digital-04.m2ts
Digital-05.m2ts
Digital-06.m2ts
Digital-07.m2ts
Digital-08.m2ts
Digital-09.m2ts
Digital-10.m2ts
To select all contents Active/Inactive contents
Date
Size
Video
Audio
Bitrate
2015-01-24
496MB
HEVC
2160P60
AAC/2Ch
80Mbps
Current Page Number
Default 1EA
Playlist 9EA
PLAYLIST
Number
Total Number of Pages
[1] Select All
Advantage :
1. Possible to manage many files easily.
2. Easily checkup current PLAYLIST Number information.
- PLAYLIST Number feature is given for the purpose of numerous les more eciently.
- Users can set up and manage total 10 sets of PLAYLIST.
- It is possible to change & arrange the list ONLY in PLAYLIST menu.
Page 14
26
UHD Stream Generator
User’s Manual
03. Features
27
UHD Stream Generator
User’s Manual
03. Features
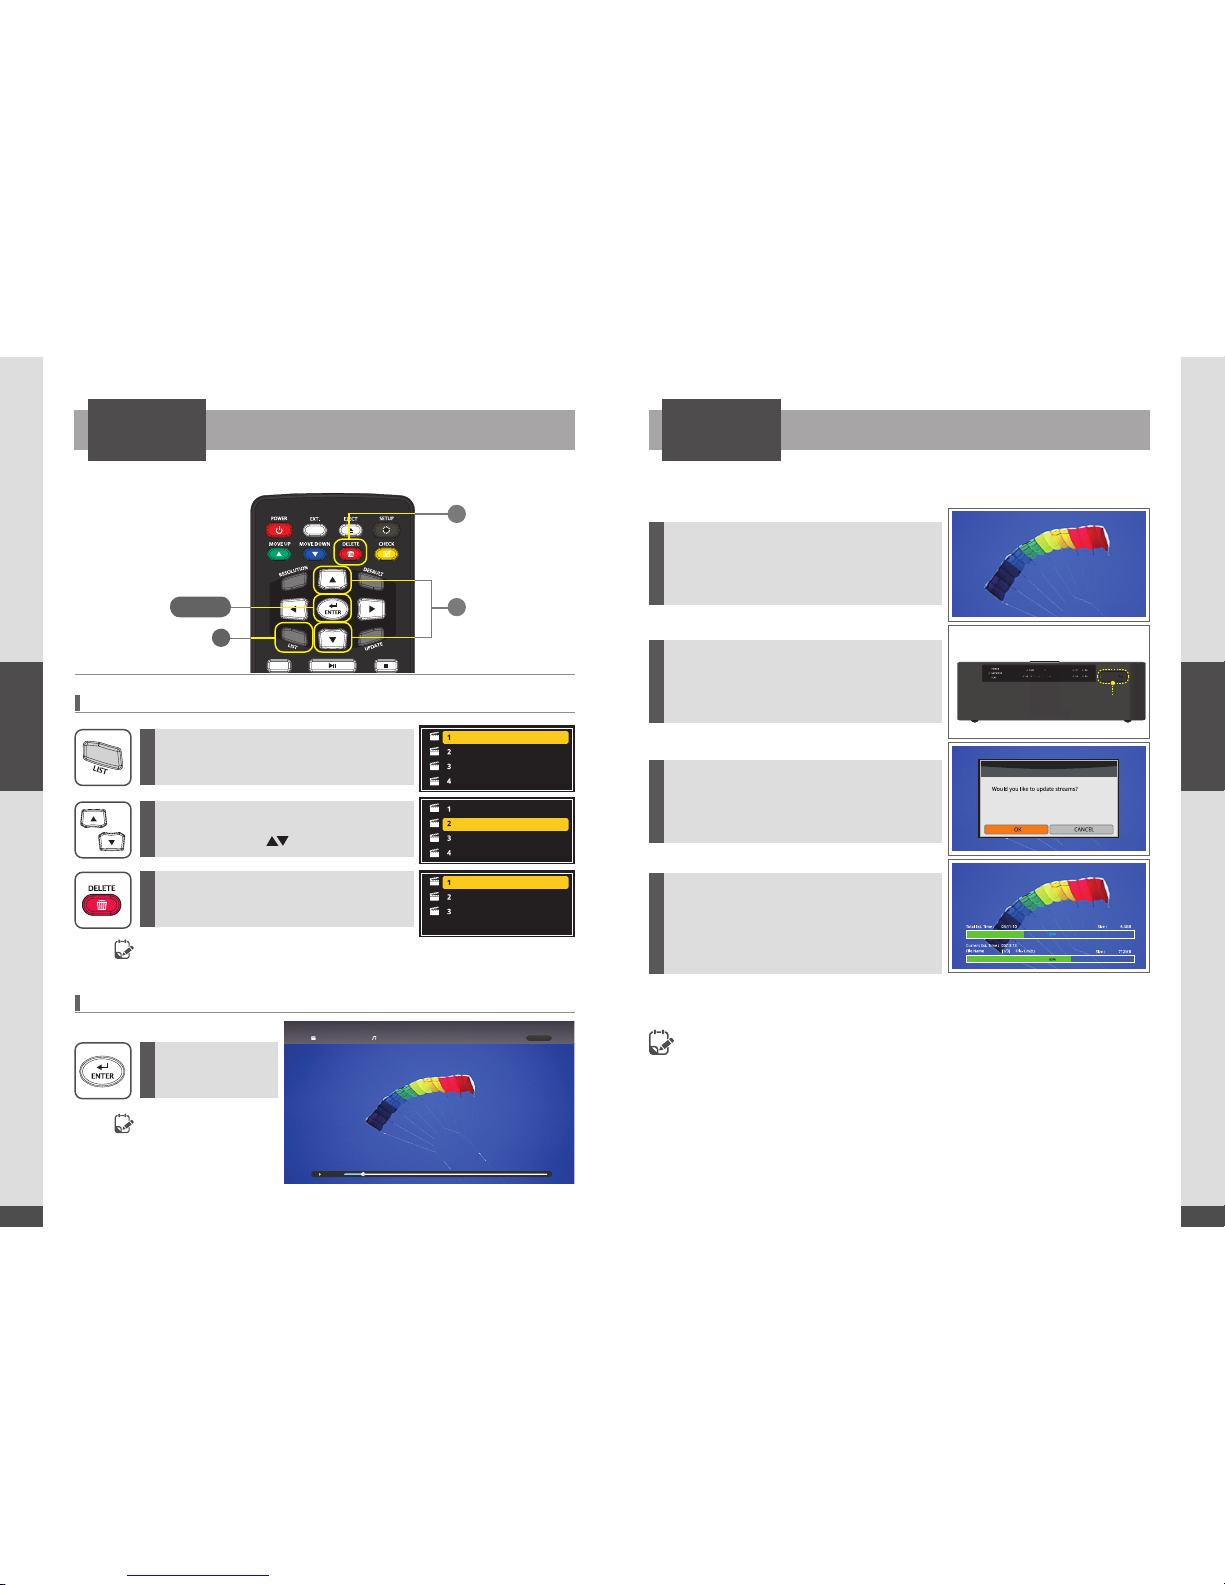
Deleting File(s) and Checking File Information
Contents Update by USB Automatically
PLAY
1
3
2
How to Delete Files from the PLAYLIST
Checking Information for the Current Playing File
Automatic Update by USB
1
2
3
Press [LIST] button.
Press [ENTER]
button.
Move to the desired file which you want
to delete using [ ] button.
Press [DELETE] button.
※
While playing files
※
CONFIRMATION Pop -up menu will be appeared on the screen if USB device is connected during
playing files. Select OK button to update contents automatically.
Digital-01.m2ts
Digital-02.m2ts
Digital-03.m2ts
Digital-04.m2ts
Digital-01.m2ts
Digital-02.m2ts
Digital-03.m2ts
Digital-04.m2ts
Digital-01.m2ts
Digital-03.m2ts
Digital-04.m2ts
- File(s) deleted from PLAYLIST will be moved to SYSTEM- sub-menu of UPDATE for backup.
- Backup le(s) can be updated later if you want to.
- Possible to DELETE all files after selecting all files using number [1] button.
00:36/09:39
Digitalzone_Move.m2ts
AVC/4K29.97p
AC-3/2ch
2160p30
Check file name and output
resolution and play time of
current file.
UPDATE
1
2
3
4
Playing state.
(USB is not connected)
Connect USB device.
Select ‘OK’ and press [ENTER] on
CONFIRMATION Pop-up menu.
It’ll start updating files automatically.
You will see updating information.
- An updating screen will be displayed and converse to
a play screen.
- Press [ENTER] button to view updated status.
- The les you want to update automatically should be stored on the root folder in USB device.
- When it’s on auto updating procedure, updated les will be listed to the current selected PLAYLIST.
- Do not turn o the power during the update.
Insert USB device which contains
contents in the root folder
ENTER
CONFIRMATION
Page 15
28
UHD Stream Generator
User’s Manual
03. Features
29
UHD Stream Generator
User’s Manual
03. Features
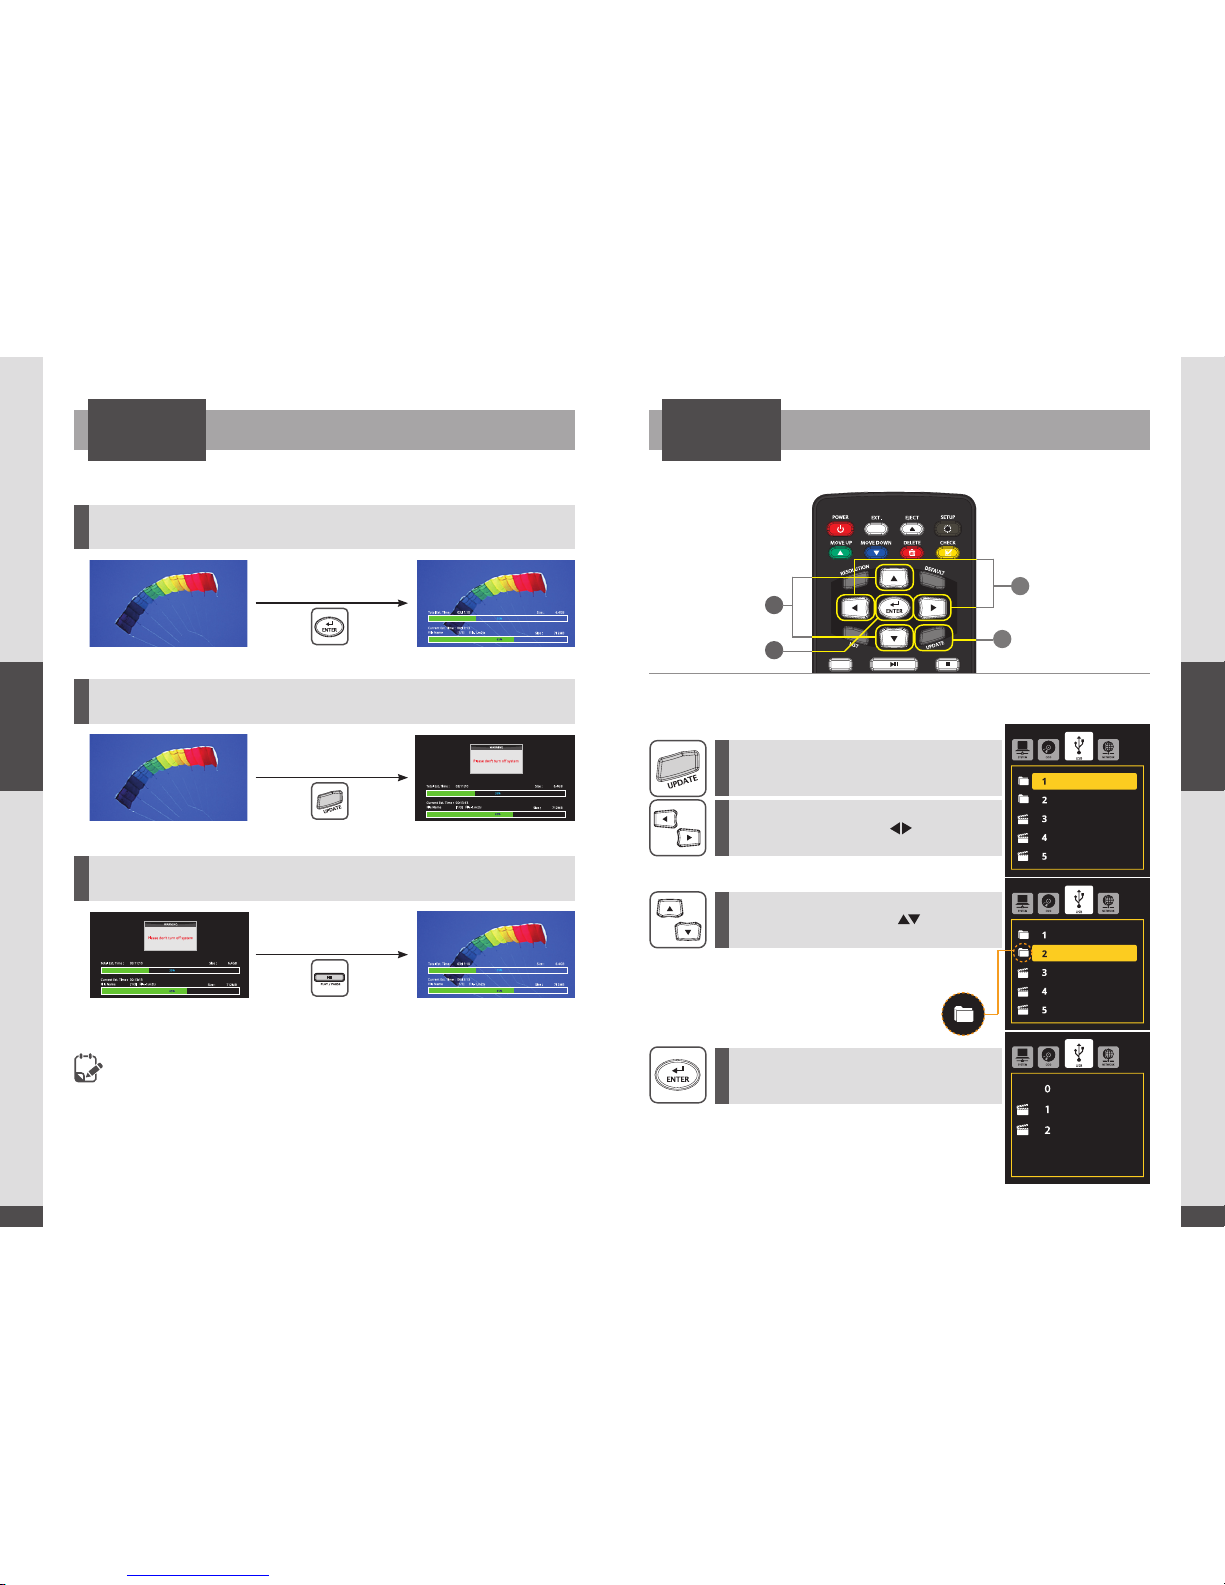
See Update Progress Status Sub Folder
UPDATEUPDATE
1
2
3
Press [ENTER]
Press [UPDATE]
Press [PLAY/PAUSE]
In Playing State → To check update status while playing
In Playing State → To check update status Only
In contents updating state → To go back to the playing files status
1. Automatic Update: Total Estimation Time is the time for existing update, thus no
consideration is given for additional update.
Updating process is on going internally while playing contents. Because of this reason, the
total update time can be increased.
2. In contents updating status: The next file will be updated when you press [CANCEL]
button during the updating. You can stop updating procedure by simply click [STOP] button.
3
4
1
2
※
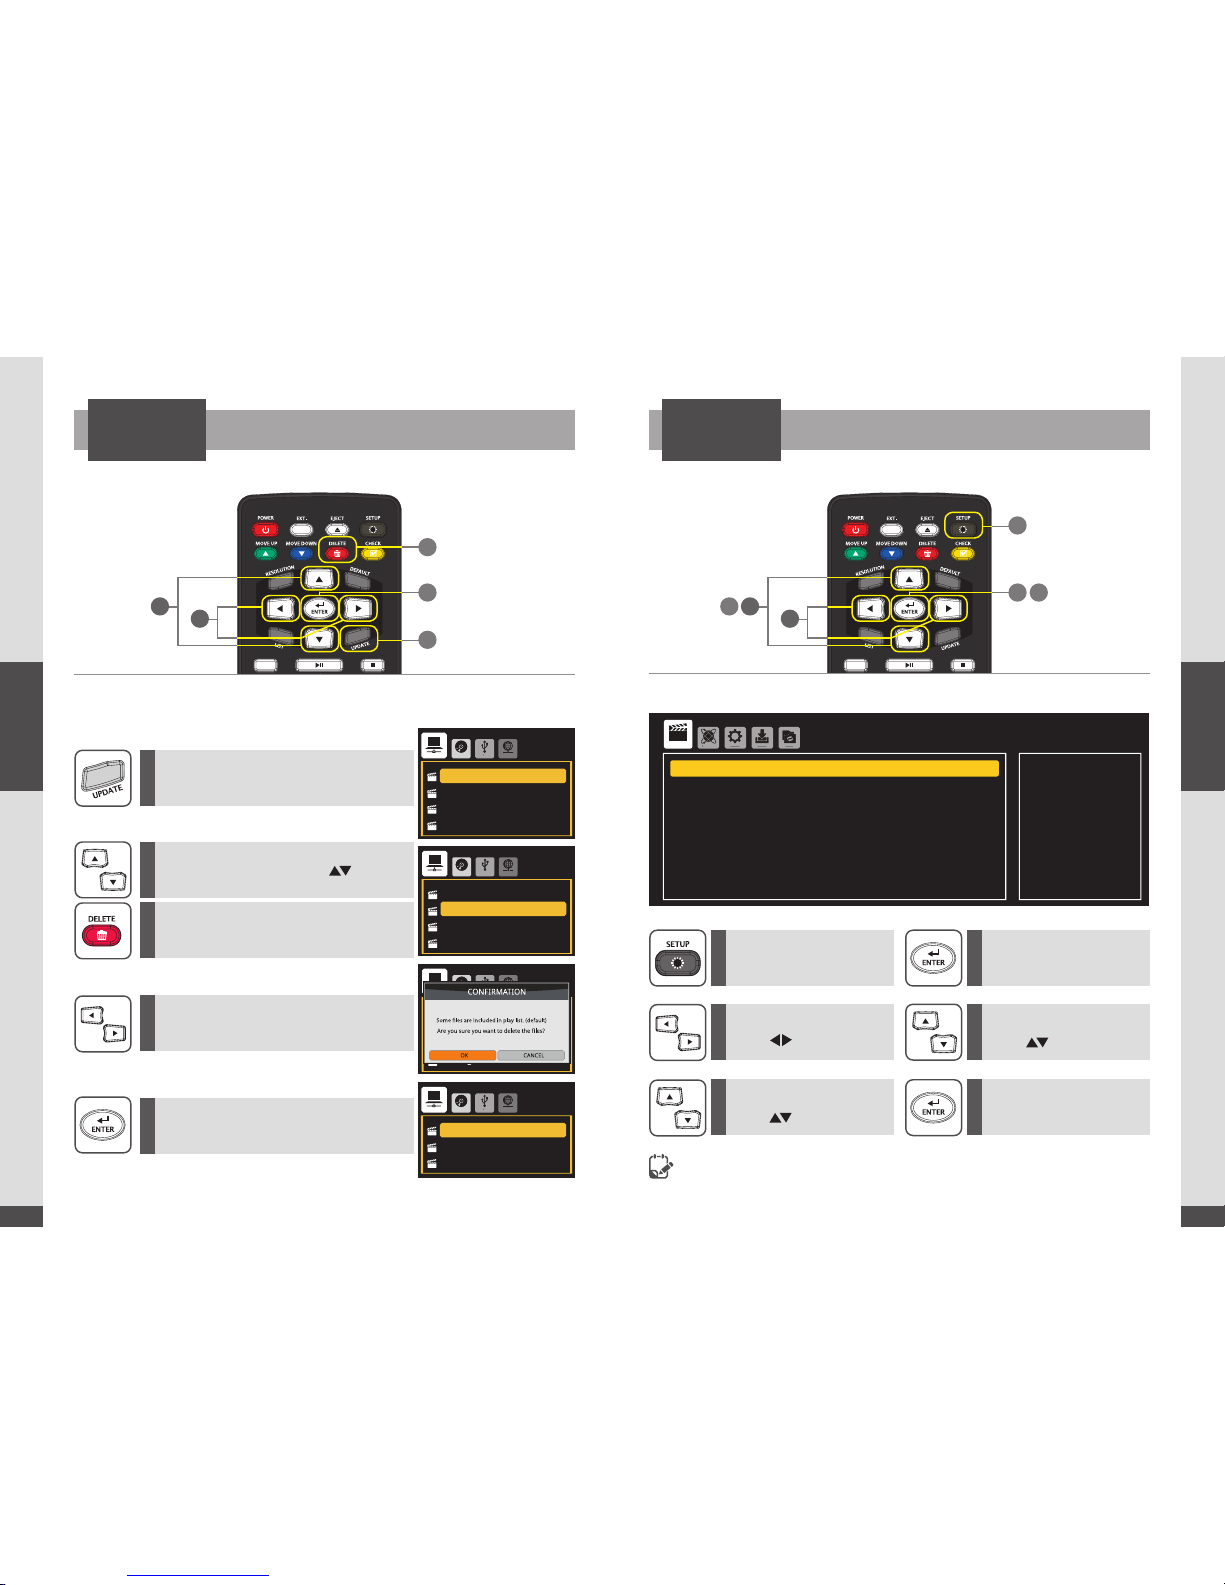
You can update les from USB device’s sub folder
Folder Icon
※
You can update from the Selected folder
1
3
2
4
Press [UPDATE] button.
Select folder or file using [ ] button.
Select USB media using [ ] button.
Press [ENTER] button and move to sub
directory folder.
Digital-01
Digital-02
Digital-01.m2ts
Digital-02.m2ts
Digital-03.m2ts
Digital-01
Digital-02
Digital-01.m2ts
Digital-02.m2ts
Digital-03.m2ts
[UP_DIR]
Digital-05.m2ts
Digital-06.m2ts
Page 16
30
UHD Stream Generator
User’s Manual
03. Features
31
UHD Stream Generator
User’s Manual
03. Features
1
4 6
523
Deleting File(s) From System
VIDEO
SETTINGS
UPDATE
※
VIDEO menu in SETTINGS. (Do not change HDMI cables while setting up)
1
5
3
※
File(s) can be permanently removed from SYSTEM (HDD).
1
1
2
3
5
4
6
2
4
3
5
Press [UPDATE] button.
Press [SETUP] to open
update menu.
Move & Select SUB MENU
using [ ] direction buttons.
Move & Select SUB MENU
using [ ] direction buttons.
Move & Select desired settings
using [ ] direction buttons.
Press [ENTER] to set submenu selection.
Press [ENTER] again after
selecting options.
Move to desired file using [ ]button.
Select ‘OK’ on Confirmation Pop-up
menu.
Press [DELETE] button.
Press [ENTER] on remote or Top
button to activate delete.
1
2
3
4
Digital-01.m2ts
Digital-02.m2ts
Digital-03.m2ts
Digital-04.m2ts
SYSTEM
ODD
USB
N
ETWOR
K
1
2
3
4
Digital-01.m2ts
Digital-02.m2ts
Digital-03.m2ts
Digital-04.m2ts
SYSTEM
O
DD USBNETWORK
1
2
3
4
Digital-01.m2ts
Digital-02.m2ts
Digital-03.m2ts
Digital-04.m2ts
SYSTEM
O
DD USBNETWORK
1
2
3
Digital-01.m2ts
Digital-03.m2ts
Digital-04.m2ts
SYSTEM
ODD
USB
N
ETWOR
K
4
2
Refresh Rate : Native, Auto, 50, 60, 50&60
UHD Stream Generator gathers
information and describe TV
capabilities.
- On:Enable and TV
capabilities are synchronized
- OFF:Disabled and output is
forced regardless of TV
capabilities
EDID Limit
SETTINGS
HAR
E
VIDEO
NETWOR
K
SYSTEMUPDAT
E
On
Native
FHD
Auto
All
None
10 Sec
EDID Limit
Refresh Rate
4K/FHD Mode
Color Space
OSD Mode
3D Mode
Picture Show Time
s
Page 17
32
UHD Stream Generator
User’s Manual
03. Features
33
UHD Stream Generator
User’s Manual
03. Features
Settings VIDEO Settings VIDEO
SETTINGSSETTINGS
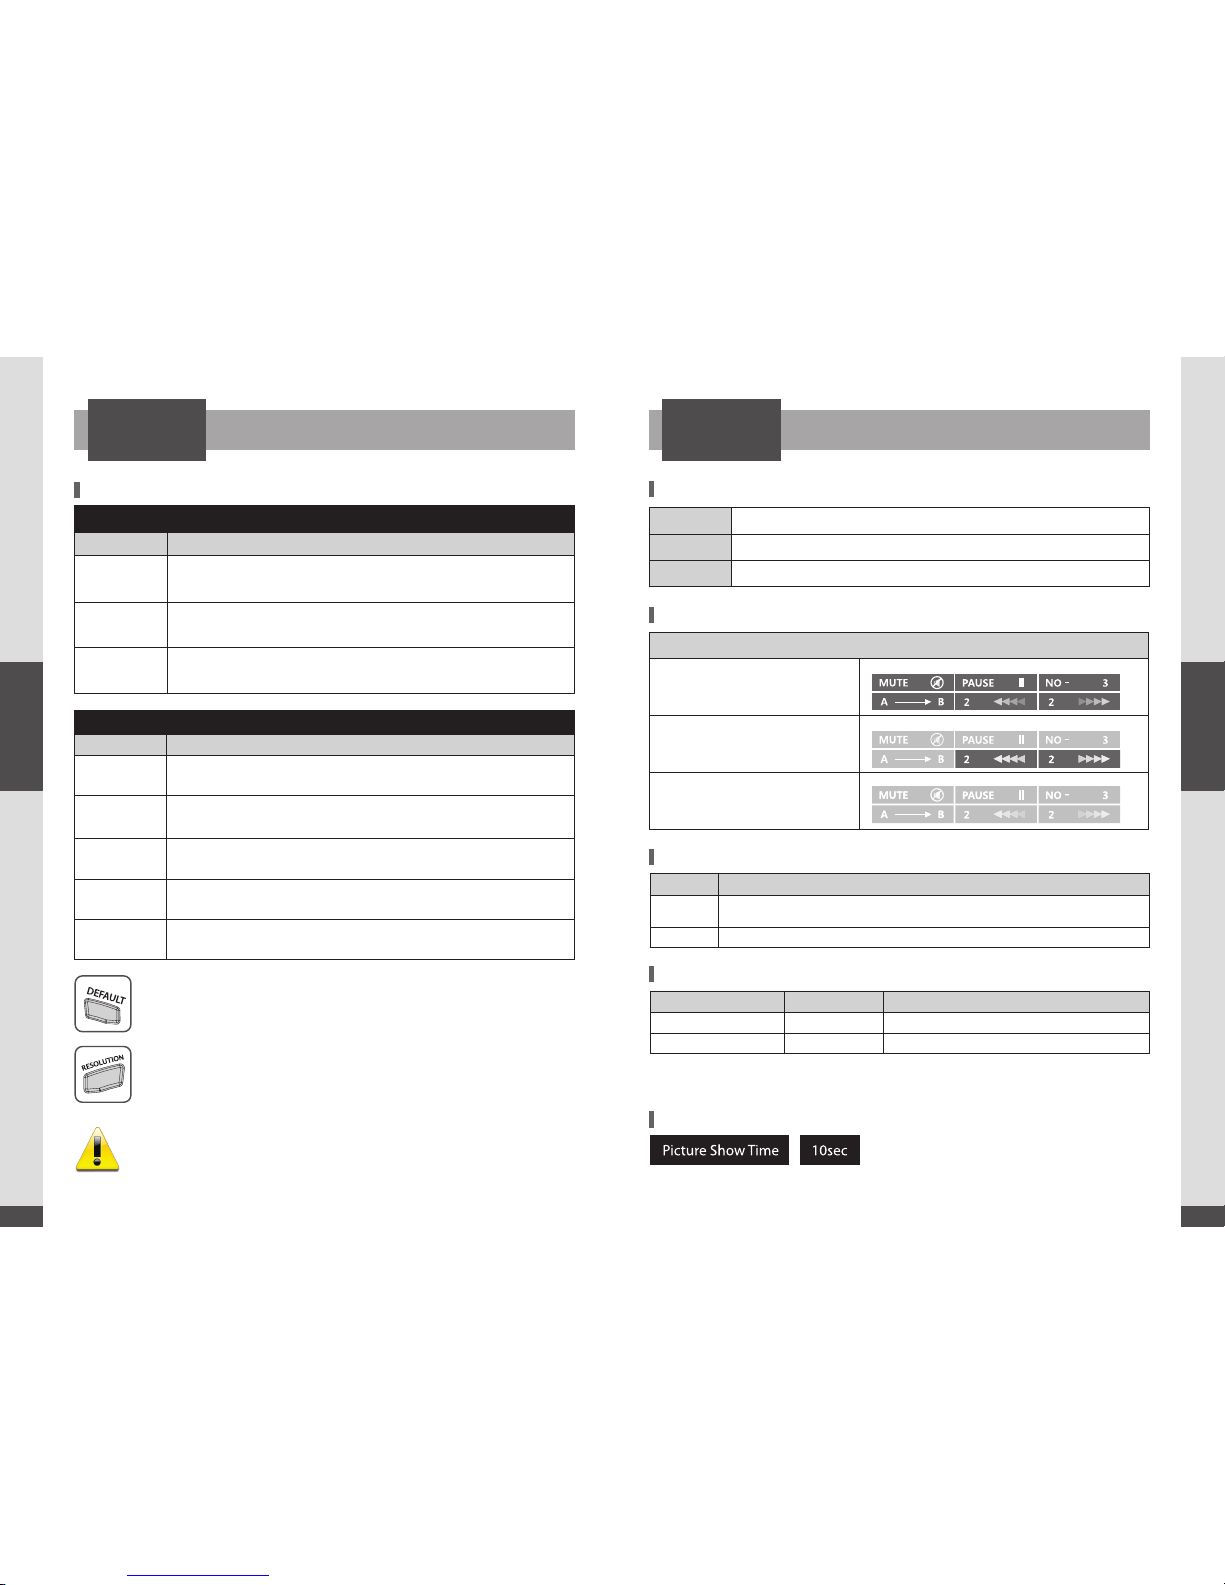
EDID Limit : OFF
Refresh Rate Status
Native
Output is set based on file information.
(Refresh Rate and Resolution is automatically changed)
Auto
Output is set based on file information.
(Only Refresh Rate is automatically changed, Resolution is changed depends on 4K/FHD setting)
50Hz
Refresh rate set to 50Hz series.
(Resolution is changed depends on 4K/FHD setting)
60Hz
Refresh rate set to 60Hz series.
(Resolution is changed depends on 4K/FHD setting)
50&60Hz
Refresh rate set to 50Hz or 60Hz series.
(Resolution is changed depends on 4K/FHD setting)
EDID Limit : ON
Refresh Rate Status
Native
Output most suitable resolution after reading TV EDID and File information.
(Refresh Rate and Resolution is automatically changed)
Auto
Output most suitable resolution after reading TV EDID and File information
(Only Refresh Rate is automatically changed, Resolution is changed depends on 4K/FHD setting)
50Hz, 60Hz,
50&60Hz
Output is set based on TV EDID information.
(Refresh Rate is set fixed by Setting, Resolution is changed depends on 4K/FHD setting)
When there is no image on Screen
Press [DEFAULT] button on the remote. Output 1080p60 forcefully.
You can set each JPEG image files play time from
1~99 seconds.
EDID On+HDMI connection case (Setting EDID ON on Settings Menu) :
Possible to select resolutions which TV can support.
EDID O case : Any kind of resolutions can be selected.
UHD Stream Generator is collecting EDID information from the connected TVs.
HDMI output number “1” has the top priority and then the HDMI port which is connected in advance or
adjacent from the number “1” port has the priority.
Therefore in case of displaying multiple TV Sets with various models, you must connect relatively low-end
model to No. 1 output port.
Auto
Color space menu can be set automatically by connected TV’s EDID information
YCbCr
Set to YCbCr
RGB
Possible to select 0-255 or 16-235
OSD Mode (OSD Display is selectable in three modes.)
ALL MODE
Every OSD will be displayed on default
setting.
SHOW MODE
As shown in left, 3 dierent OSD are only
displayed. Ecient in Exhibition, etc.
SPECIAL MODE
It displays nothing.
Please select it in specified circumstance.
Type Description
NONE
There is no 3D output.
All les are played in 2D play-back mode
AUTO
will be automatically changed to 2D/3D playback mode according to the le name format
3D Structure File Ax Example
Side-by-Side(Half ) 3D_SxS 3D_SxS_your_file_name.extension
Top-and-Bottom 3D_TnB 3D_TnB_your_fi le_name.extension
EDID Limit
Setting 3D Mode
3D File Name Format
Color Space
Setting OSD Mode
Image File Play Time
RESOLUTION
※
File names with 3D ‘File Affix ’ will be played in 3D.
ex) 3D_SxS_your_file_name.extension / your_file_name_3D_SxS.extension
Page 18
34
UHD Stream Generator
User’s Manual
03. Features
35
UHD Stream Generator
User’s Manual
03. Features
1
4 6
523
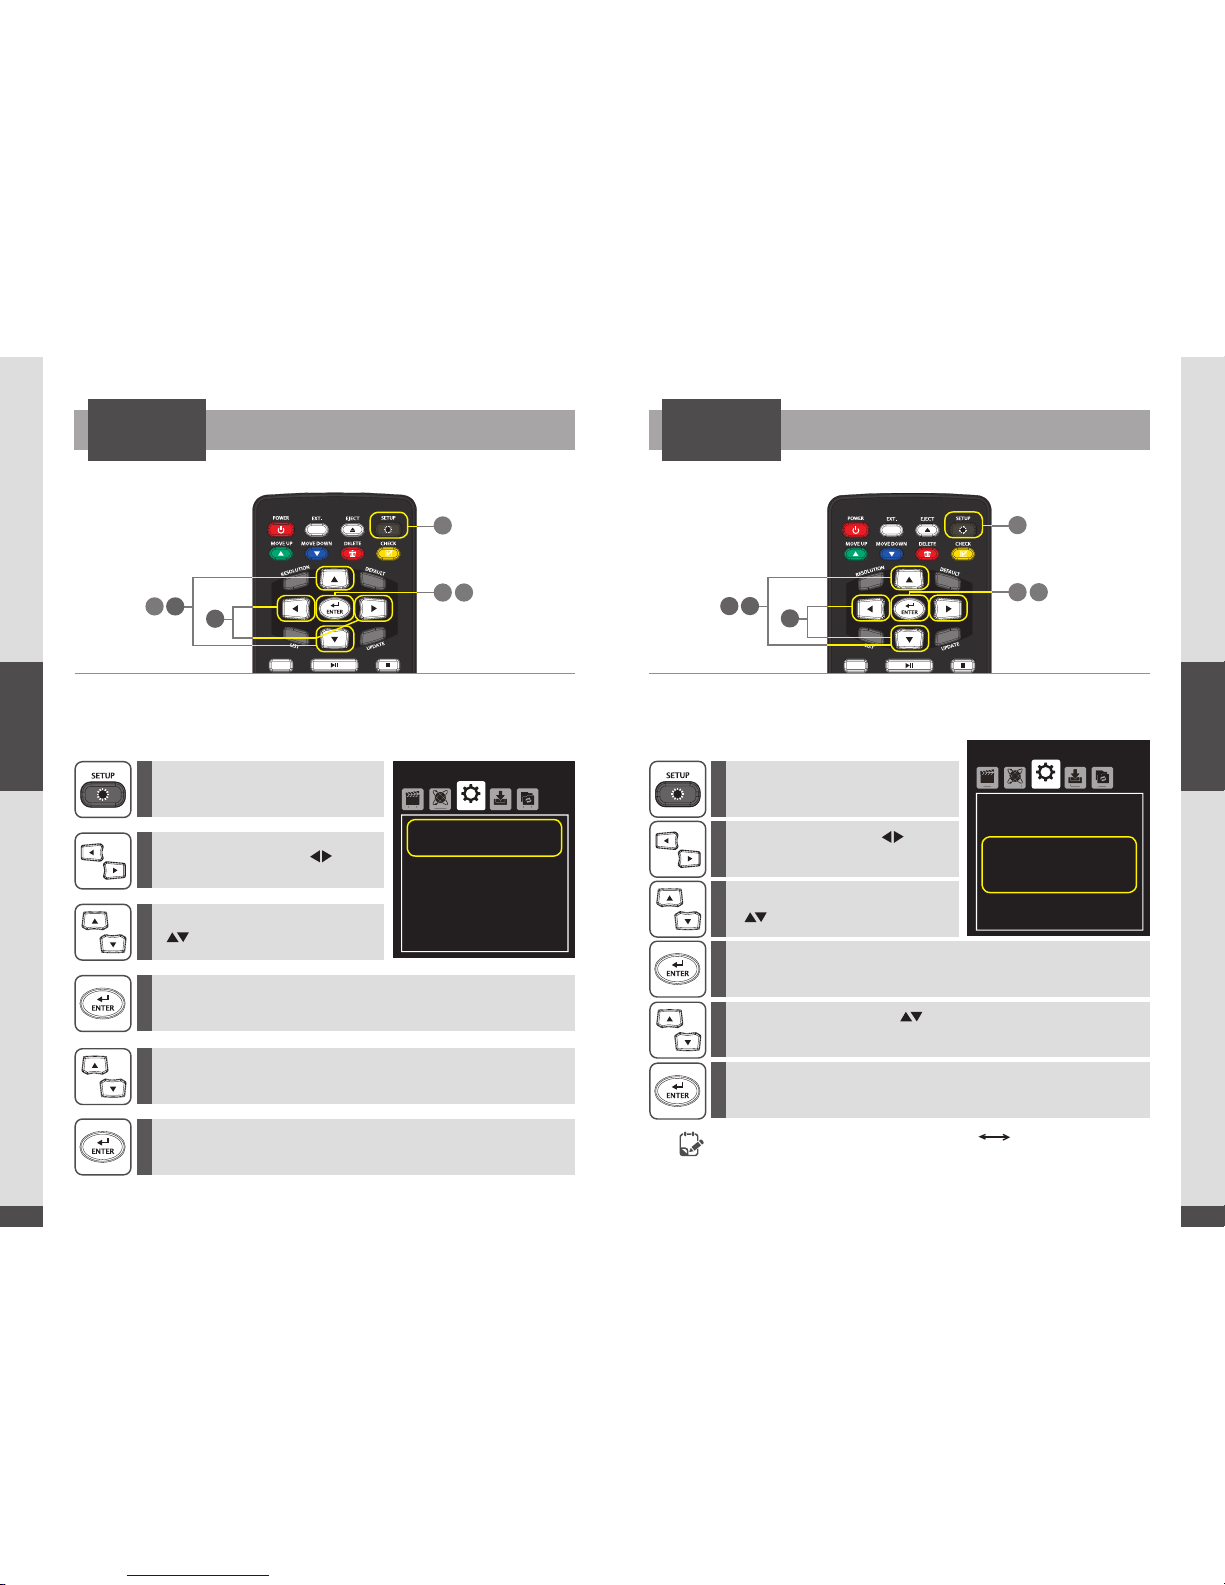
Setting DATE & TIME
SETTINGS
※
Set Date, time function.
1
2
3
5
4
6
Press [SETUP] to open Settings menu.
Select SYSTEM menu, using [ ]
direction buttons.
Move to the Date or Time menu using
[ ] direction buttons.
Move & Select desired settings using direction or number buttons.
Press [ENTER] to modify Date or Time.
Press [ENTER] again after selecting options.
- To selec t sub-menu : Use Direction buttons to move to the sub-menu and press
[ENTER] to complete the setting.
2015/01/16
00:00
Disable
00:00
00:00
Off
Date
Time
Reservation
Power On Time
Power Off Time
Key Lock
SHARE
VIDEO
ETWORK
SYSTEM
PDATE
1
4 6
523
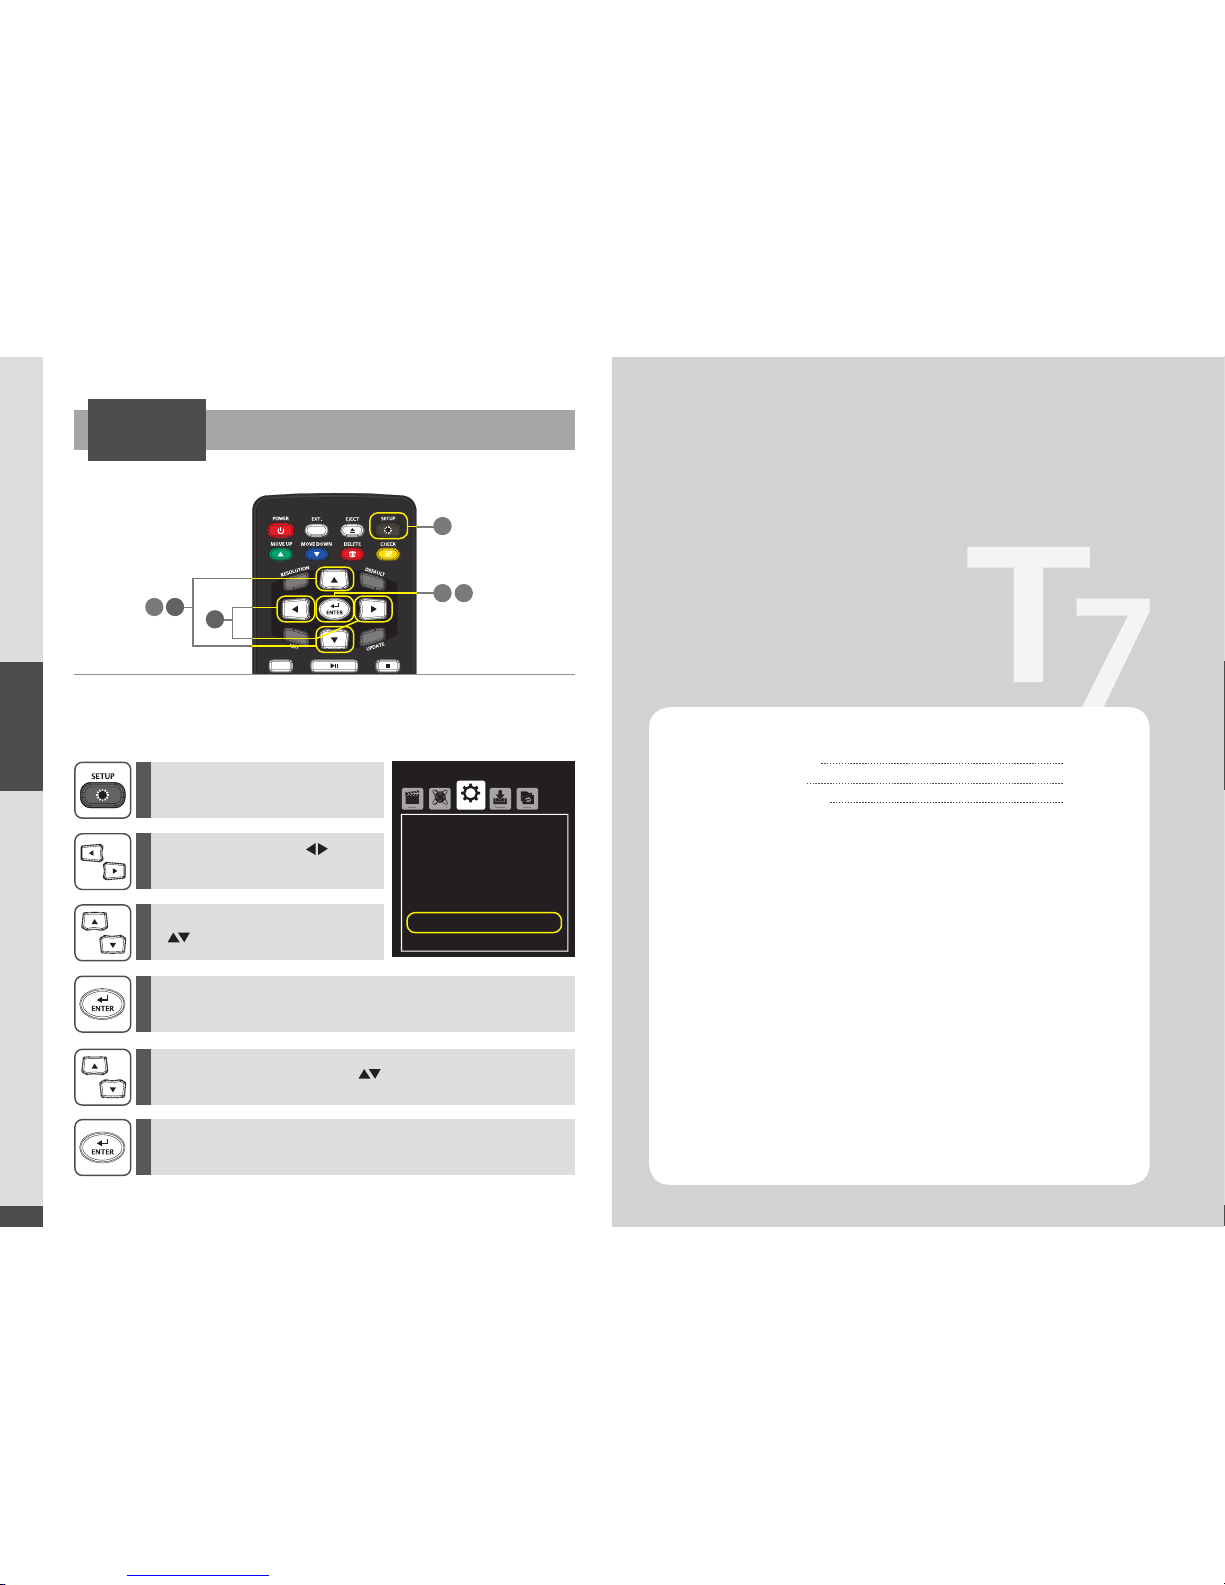
How to Reserve Power ON/OFF Time
SETTINGS
※
Possible to reserve Power ON/OFF time for UHD Stream Generator.
1
2
3
5
4
6
Set Power ON/OFF time using [ or number] button.
Press [ENTER] to select ‘Enable’.
Press [ENTER] again after sele cting options.
- Power On Time : Scheduling power ON time of UHD Stream Generator.
- Power O Time : Scheduling power OFF time of UHD Stream Generator.
If power is supplied between scheduled Power On O time,
UHD Stream Generator will be powered on and played files automatically.
2015/01/16
00:00
Disable
00:00
00:00
Off
Date
Time
Reservation
Power On Time
Power Off Time
Key Lock
S
HARE
VIDE
O
ETWORK
SYSTEM
PDATE
- To selec t menu or time setting : Use Direction buttons
- To complete setting : Press [ENTER]
Press [SETUP] to open Settings menu.
Select SYSTEM menu, using [ ]
direction buttons.
Move to the Reservation menu using
[ ] direction buttons.
Page 19
36
UHD Stream Generator
User’s Manual
03. Features
SETTINGS
1
4 6
523
※
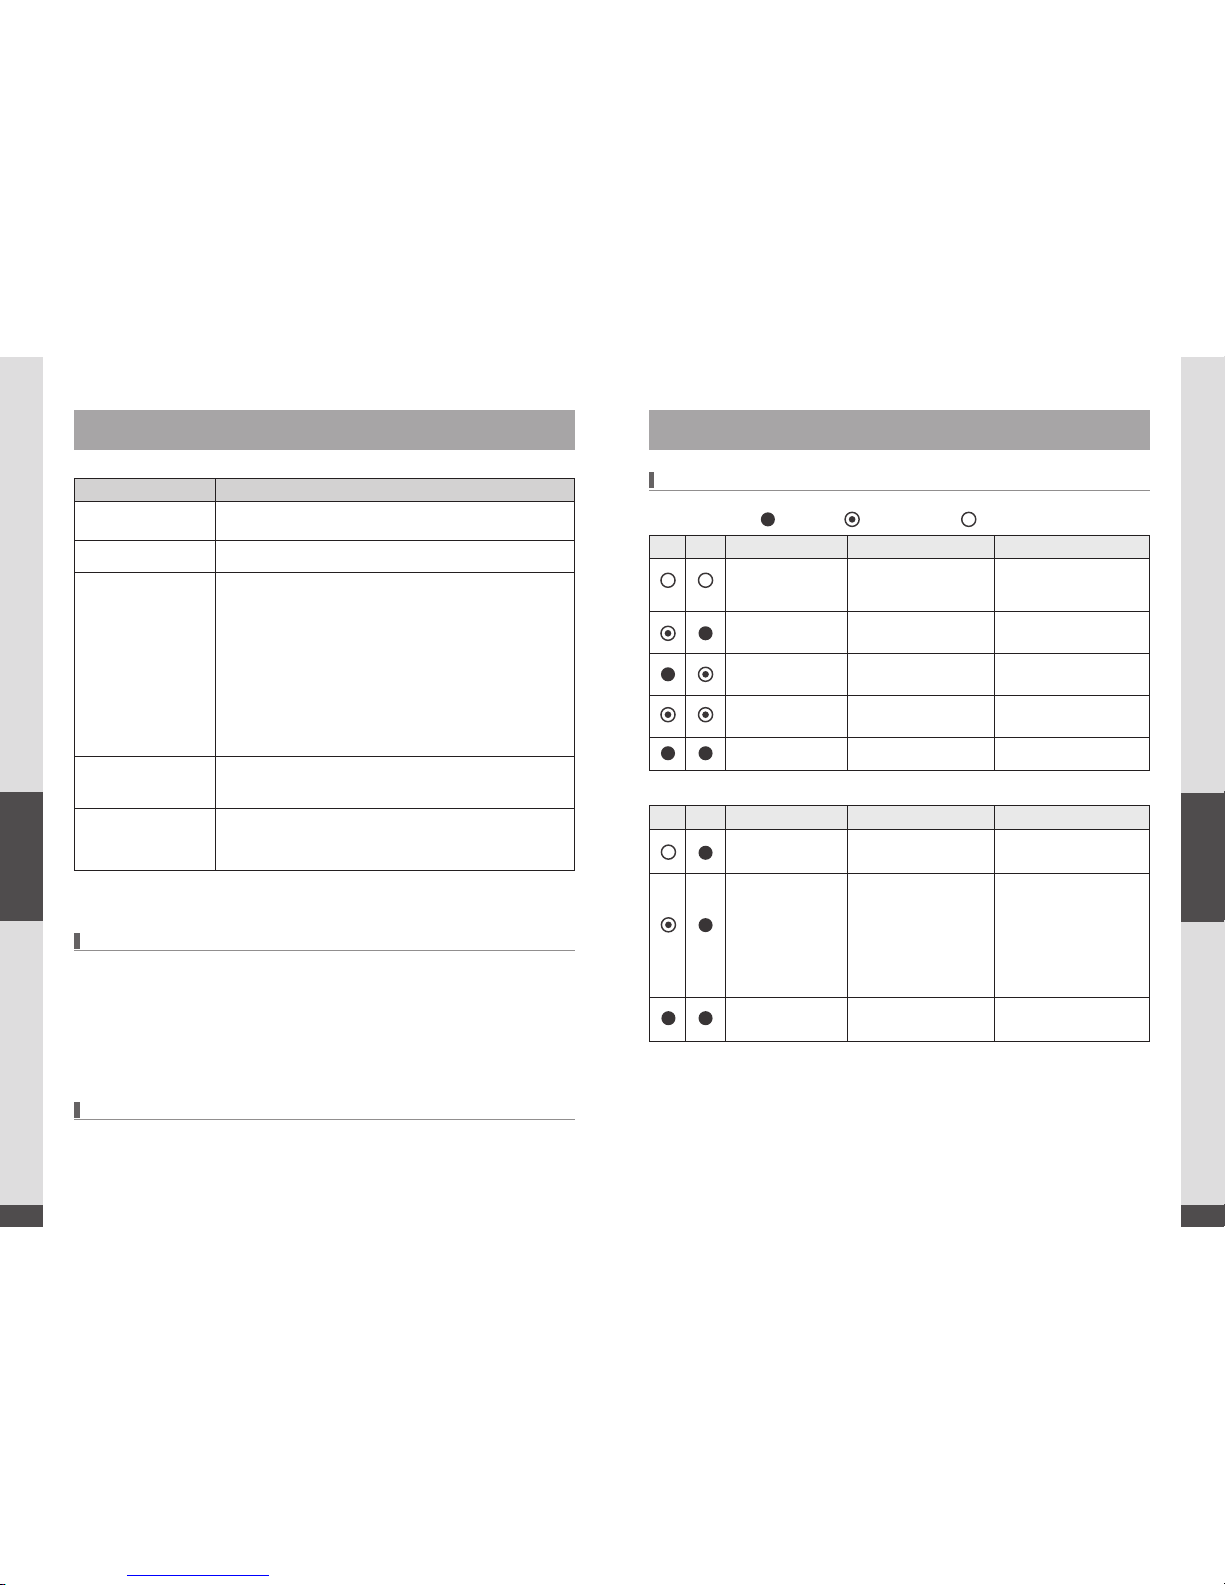
You can lock the top buttons of the UHD Stream Generator.
1
2
3
5
4
6
Press [ENTER] to select Key Lock options.
2015/01/16
00:00
Disable
00:00
00:00
Off
Date
Time
Reservation
Power On Time
Power Off Time
Key Lock
S
HARE
VIDE
O
NETWORK
SYSTEM
PDATE
- Item Selection : Direction buttons on remote.
- Selection & Setting : [ENTER] button on remote.
Press [SETUP] to open Settings menu.
Select SYSTEM menu, using [ ]
direction buttons.
Move to the Key Lock menu using
[ ] direction buttons.
Setting Key Lock
Move & Select desired settings using [ or Number ] direction buttons.
Press [ENTER] again after selecting options.
ETC
04
Troubleshooting
Specifications
Safety Instruction
38
40
42
Page 20
38
04. ETC
UHD Stream Generator
User’s Manual
39
04. ETC
UHD Stream Generator
User’s Manual
Error Troubleshooting
No power Check power cord connection and conrm connection.
File(s) is not playing Check if it is right le format.
No display on TV
- Check power of TV.
- Check input selection of TV.
(Use “External Input” on your TV remote)
- Check TV and UHD Stream Generator connection.
- If there's no display on TV, try to press [DEFAULT] button
on remote. (Output 1080p60)
- Check that the HDMI input port on your TV matches the
output port.
- Check the front LEDs to make sure the Generator is running
properly. (During normal operation, Power LED stays green and
the front LEDs are on FHD or UHD and one of 24, 30, 50, 60)
No audio
Press [MUTE] button on TV and UHD Stream Generator.
Adjust TV or Generator’s volume button.
Remote doesn’t work
Check angle and distance between remote and UHD Stream
Generator.
Change battery for the remote.
1. Use the enclosed adapter supplied by DIGITALZONE.
2. Check to see if the input/output HDMI cable is connected properly.
3. We do not recommend to connect FHD T Vs with UHD TVs together.
4. Do not disassemble or modify the product.
The warranty is void if product is disassembled or modied.
5. Turn the power o when not in use.
1. You may not be able to update video contents other than those included in the UHD
Stream Generator due to compatibility issues.
2. Make sure USB connected properly before updating contents.
Troubleshooting
Precautions for the Installation of Generator
Updating Files (Contents)
S1 S2 Status Details Troubleshooting
No HDD
Impossible to recognize
HDD or there is no HDD
Contact to the customer
Service center
(E-mail to [email protected])
Error for disk partition
number
Damaged HDD partition
Necessary to format HDD
(E-mail to [email protected])
Partition le system
Error
Damaged HDD le system
Necessary to format HDD
(E-mail to [email protected])
Recovering mode for
HDD
Disk recovery mode is in
process
Please wait until screen
shows
No error
S3 S4
Status Details Troubleshooting
Using network service
+ work properly
Network service is running
without any problem
Using network service
+ Error occurred
Network service is set
enabled but network
or protocol error has
appeared
1. Rebooting router rst and
check the network cables
2. If you see error in
continue after checking,
please contact the customer
service center (E-mail to
[email protected])
No using network
service
Network service is set on
disable
S1~4 Signal Service
LED OFF LED BLINKING LED ON
Troubleshooting
Page 21
40
04. ETC
UHD Stream Generator
User’s Manual
41
04. ETC
UHD Stream Generator
User’s Manual
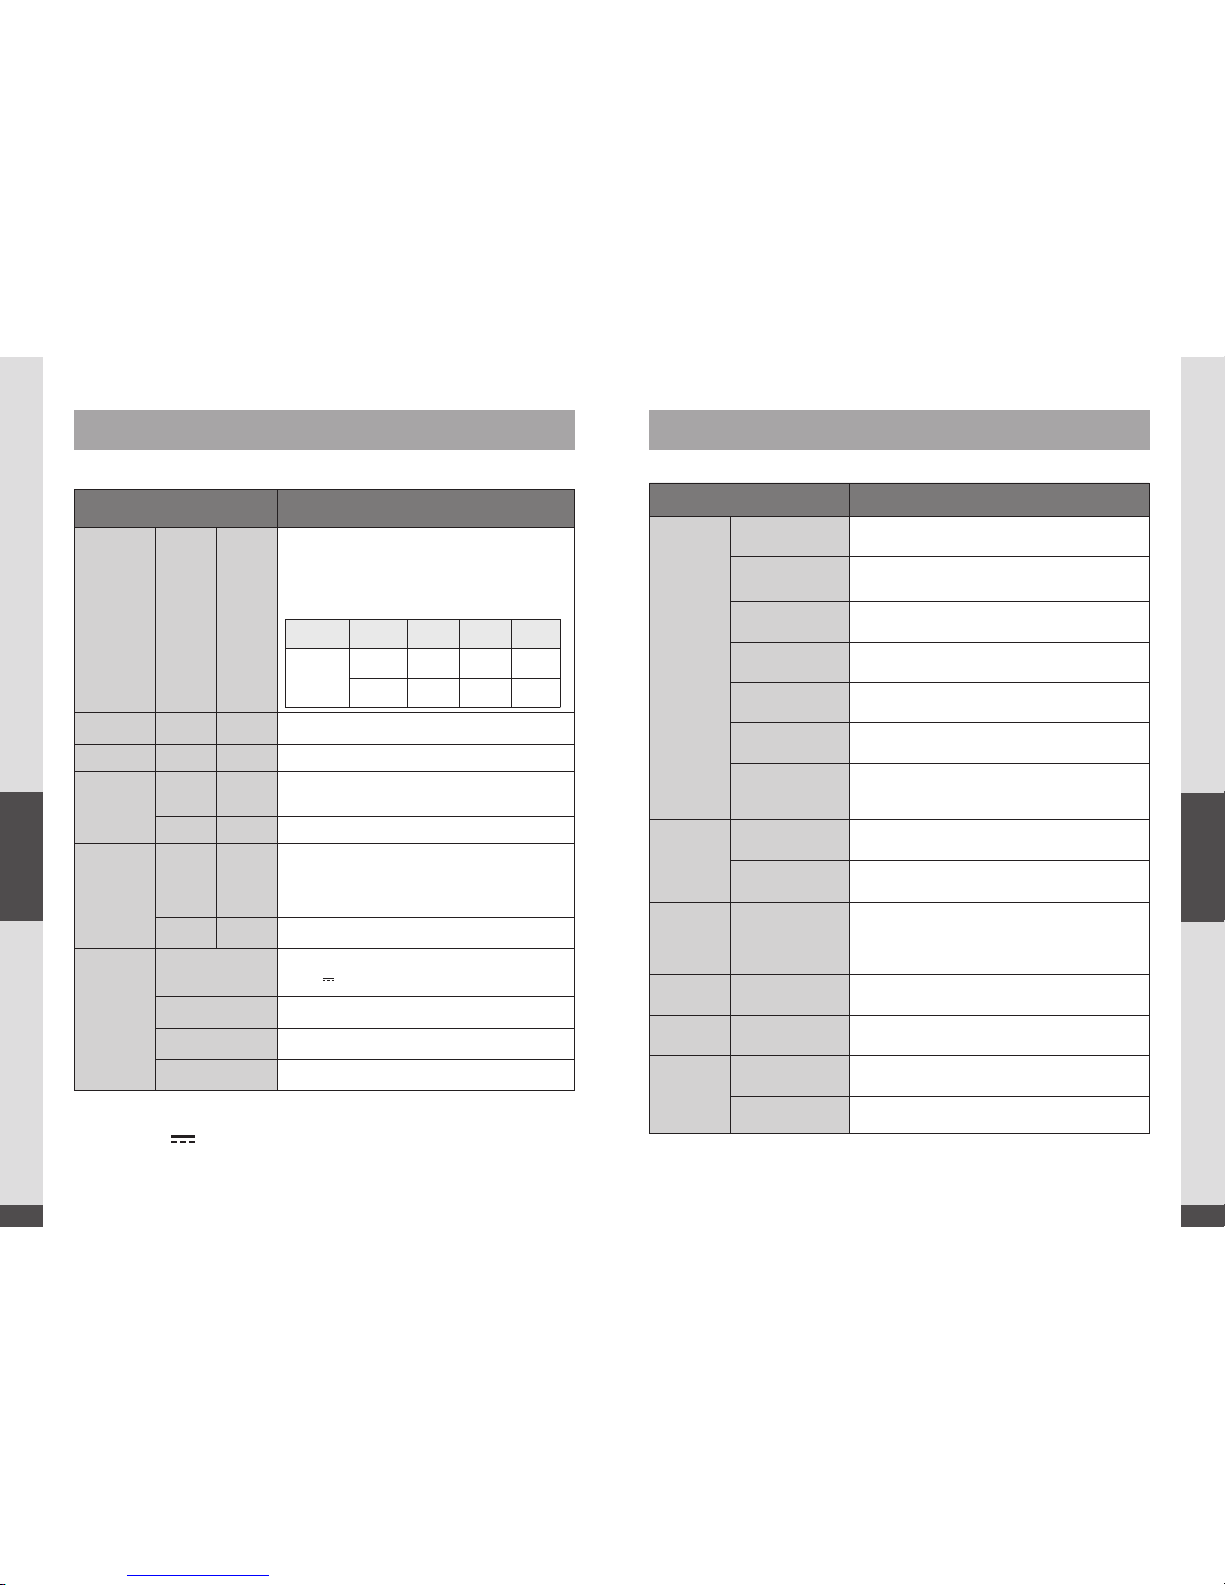
Specications(H/W)
NOTE : This specication may change for system enhancement without prior notice.
ITEM Spec
Video Output HDMI 4EA
Resolution: (Up to 2160p60)
- 2160p50/60, 2160p30, 2160p24/25, 1080p50/60, 1080p30,
1080p24/25, 1080i50/60, 720p50/60, 576p50/60, 576i50/60, 80p50/60
- When 2160p50/60 is selected RGB mode is not supported and xed to
YCbCr mode.
Resolution
Refresh Rate
(Hz)
RGB
YCbCr
4:4:4
YCbCr
4:2:0
3840 X 2160
24/25/30 O O -
50/60 - - O
Audio Output Digital 4EA
Using HDMI ports
Storage HDD 1 EA
Built-in 2.5” 320GB / 500GB SATA HDD
External
Interface
USB 3 EA
1 x USB 2.0 (Front)
2 x USB 2.0 (Rear)
Support Flash Memory Stick and External HDD Storage
Ethernet 1 EA
100/1000 Mbps (RJ45)
User
Interface
FRONT /
TOP
1 EA
- 9 Tact Switch :
Power, Menu, Video, Enter, Direction(U/D/L/R), Play/Pause
- 13 LED Status Indicator
Power on/o, LAN, Play, Refresh Rate (24/30/50/60), FHD, UHD,
S1, S2, S3, S4
RCU 1 EA
IR Remote Control Unit (IR extension Receiver included)
General
Power / DC Adapter
AC : 100V-240V ~ 50/60Hz, 1.2A
DC : 12V 3A (Max. 42Watts)
Weight
1kg
Dimension
215x215x70(mm)(W x D x H)
Operating
Temperature
Ambient 0°C ~ 45°C
Specications(S/W)
ITEM Spec
4K
Format
MPEG-TS, MPEG-2 TS (File ex tension: ts, tp, m2ts),
MP4 (File extension: mp4)
Video Codec
MPEG2, MP@HL, 8bit, 40Mbps, 30Hz
MPEG4.10(H.264), [email protected], 8bit, 50Mbps, 30Hz
HEVC(H.265), [email protected], 8/10bit, 80Mbps, 60Hz(4:2:0)
Audio Codec
MPEG 1 layer I, II & III
MPEG 4 AAC-LC Stereo & 5.1
Audio Pass-thru
DTS & DTS-HD
Dolby Digital Stereo & AC3 5.1/7.1
Media
USB, Local network ( LAN )
Image
JPEG, PNG
List
Multi play list, Selection for Copy media or Deletion,
Check /Uncheck , Move Up/Down
Stream &
Firmware
Update
Media
USB, Network
Yes
Auto Update available
Settings Yes
Date & Time, Reservation On/O , RGB Level, Auto changing
refresh-rate, Network information, Server IP, Slide Show Time
for JPEG
Remote
(RS232)
Yes
Control play list
Play control from remote devices
Network
Protocol
Yes
Samba
Recovery
Media
Built in Flash memory
Yes
Rescue Mode available from user input
NOTE : This specication may change for system enhancement without prior notice.
Direct current
To indicate on the rating plate that the equipment is suitable for direct current only.
To identify relevant terminals.
Page 22
42
04. ETC
UHD Stream Generator
User’s Manual
43
04. ETC
UHD Stream Generator
User’s Manual
Important Safety Instructions
. Read these instruc tions.
. Keep these instruc tions.
. Heed all warnings.
. Follow all instructions.
. Do not use this apparatus near water.
. Clean only with dry clot h.
. Do not block any ventilation openings, Install in accordance with th e manufact urer’s instruc tions.
. D o not install near any heat sources such as registers, stoves, or o ther apparatus (including
ampliers) that produce heat.
. Do not defeat the safety purpose of the p olarized or grounding-type plug; a polarized plug
has two blades with on e wider than the other. A grounding type plug has t wo blades and a third
grounding prong. Th e wide blade or the third prong are provided for you r safety, if the provided
plug does not t into your outle t, consult an electrician for replacement of the o bsolete outlet.
. Protect the power cord from being walked on or pinched particular ly at plugs, convenience
receptacles, and the p oint where they exit from the apparatus.
. Only use attachment s/ accessories specied by the manufacture r.
. Use only with the cart, stand, tripod, bracket, or table specied by the manufacture r, or
sold with the apparatus. When a cart is us ed. Use caution when moving the cart/apparat us
combination to avoid injury fro m tip-over.
. Unplug this apparatus during light ing storms or when unused for long periods of t ime
. Refer all servicing to qualied ser vice personnel. Servicing is required when the apparatus has
been damaged in any way, such as power-supply cord or plug is damaged, liquid has been spilled
or obje cts have fal len into the apparatus, the apparatus has been exposed to rain or moisture,
does not operate norm ally, o r has been dropped.
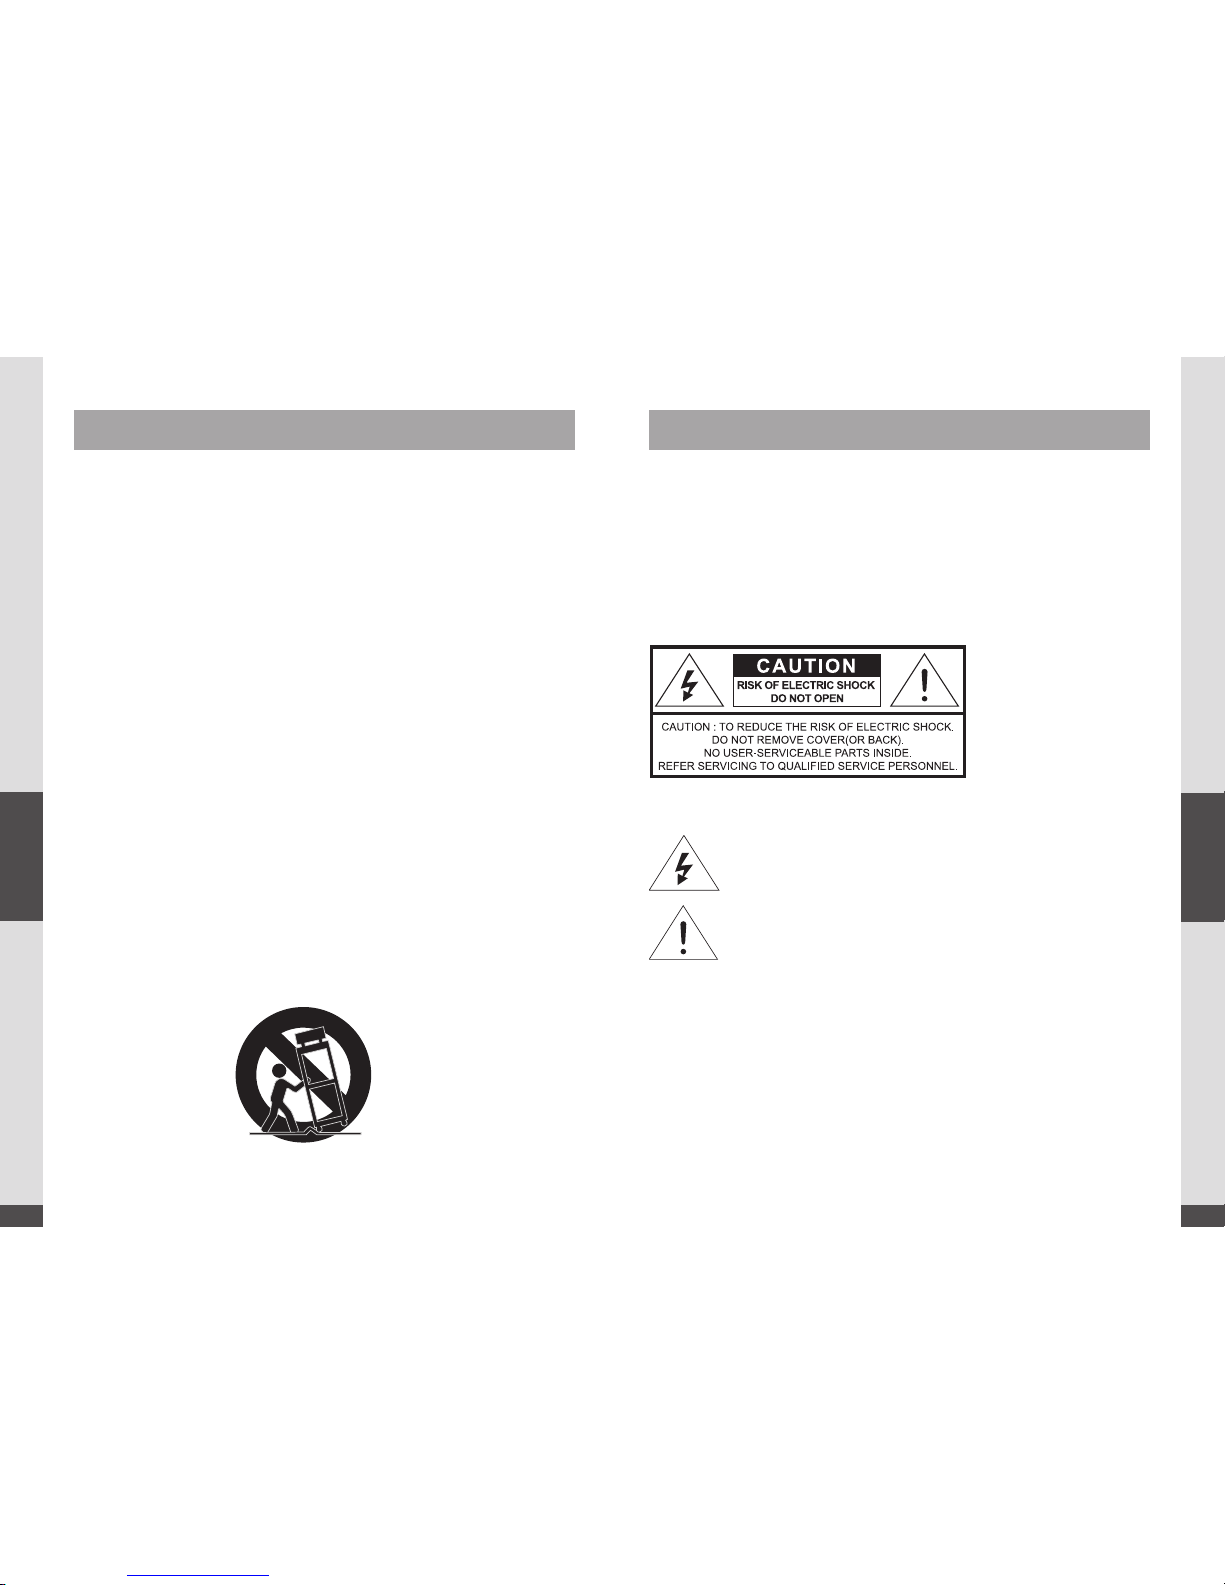
Safety Instruction
CAUTION
EXPLANATION OF GRAPHICAL SYMBOLS
WARNING
To reduce the risk of re or elec tric shock, do not expose this product to rain or moisture. Do n ot
insert any metallic obj ect through the ventilation grills or other openn ings on the equipment.
Apparatus shall not be exp osed to dripping or splashing and that no objects filled with liquids,
such as vases, shall be placed o n the apparatus
Class I construction
An apparatus with CLASS I cons truction shall be connected to a MAINS soc ket outlet with a
protective ear thling connection.
Battery
Batteries(bat tery pack or batteries installed) sha ll not be exposed to excessive heat such as
sunshine, fire or the like.
(CAUTION) Danger of expl osion if battery is incorrectly rep laced.
Replace only with the sam e or equivalent type.
The lightning ash with arrowhead symb ol, within an equil ateral triangle, is
intended to alert the user to the presence of “dangerous voltage” within the
product’s enclosure that may be of sucient magnit ude to constitute a risk of
electric shock to p ersons.
The exclamation point within an equilateral triangle is intended to alert the user to
the presence of important operating and mainten ance (servicing) instruc tions in
the literature accompanying the p roduct.
Safety Instruction
Page 23
44
04. ETC
UHD Stream Generator
User’s Manual
Disconnection Device
Disconnect the main plug from the apparatus, if it’s defected. And please call a repair man in
your location.
When used outside of the U.S., it may be used HAR code with fittings of an approved
agency is employed.
CAUTION
These servicing instructions are for use by qualified service personnel only.
To reduce the risk of electric shock do not perform any servicing other than that contained
in the operating instructions unless you are qualified to do so.
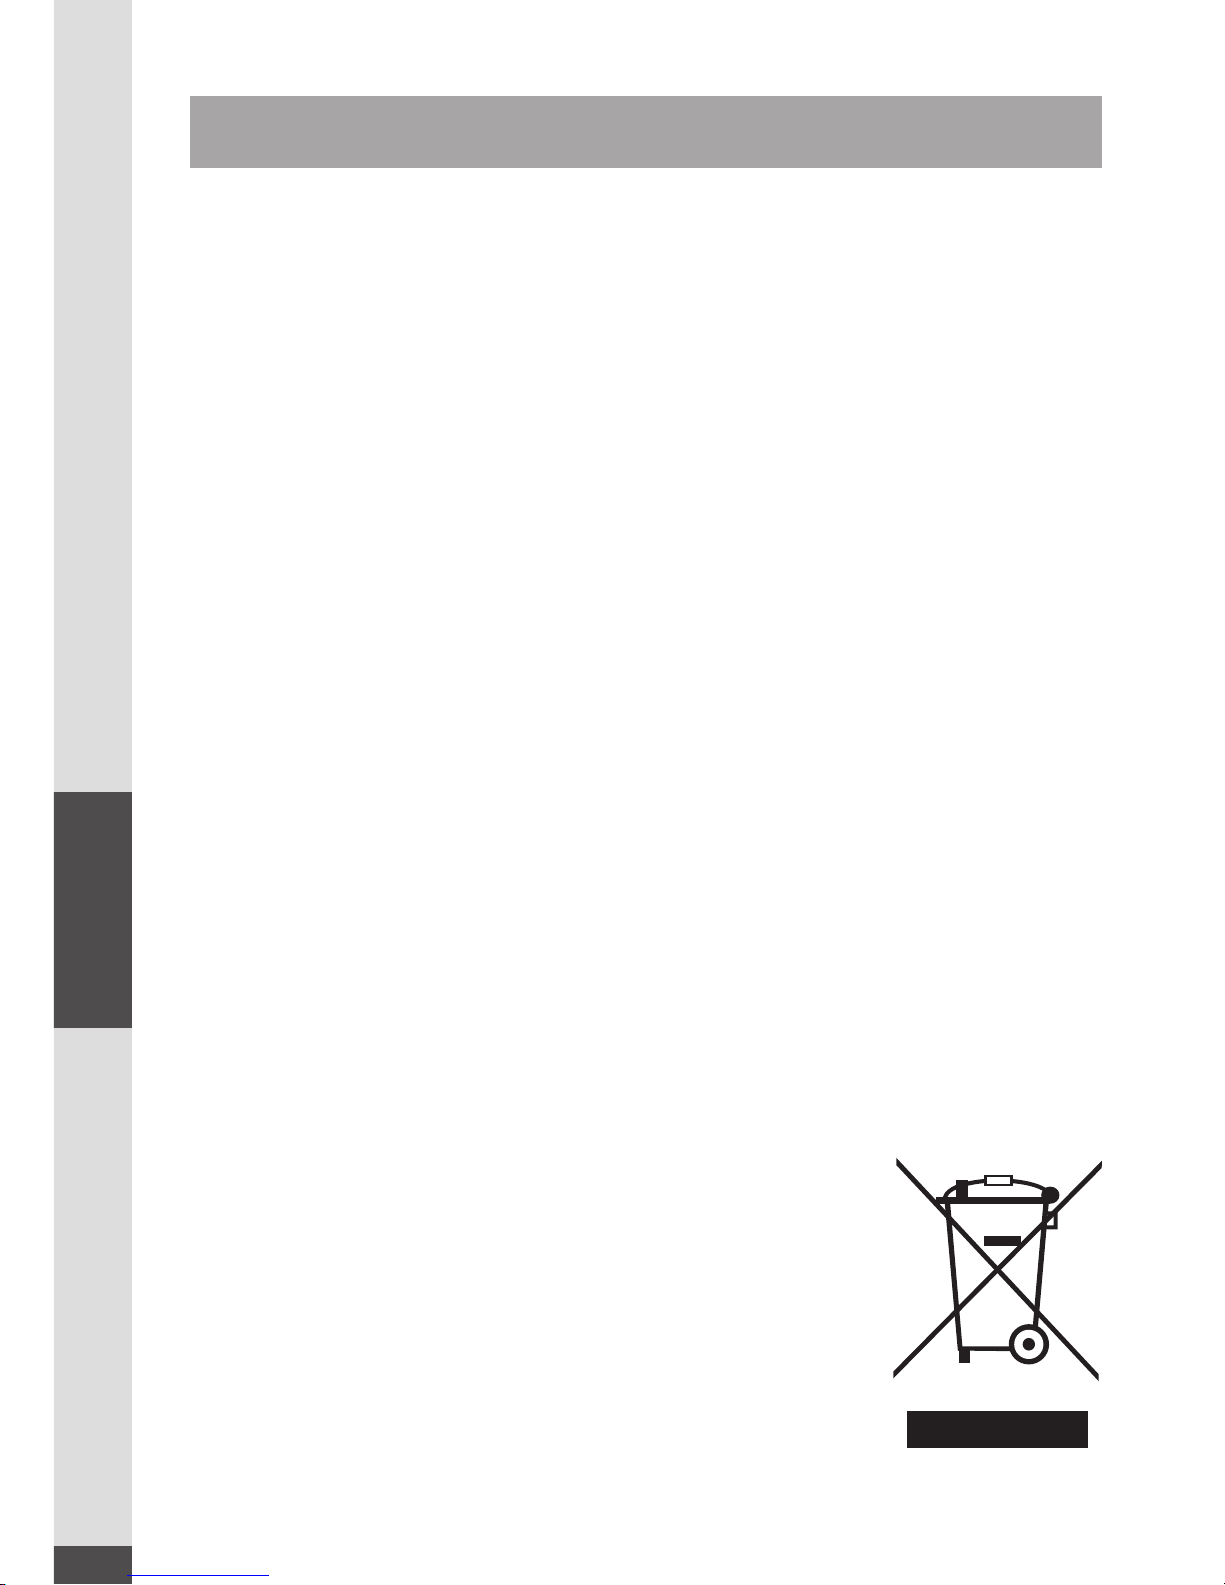
NOTE ON RECYCLING (for EUROPE)
This product’s packaging materials are recyclable and can be reused. Please
dispose of any materials in accordance with the local recycling regulations.
When discarding the unit, comply with local rules or regulations.
Batteries should never be thrown away or incinerated but disposed of in
accordance with the local regulations concerning chemical waste.
This product and the accessories packed together constitute the applicable product according to the WEEE directive except battery.
※ Product labels located in the bottom parts of products.
FCC Information (for U.S.A)
Note: This equipment has been tested and found to comply with the limits for a Class A digital
device, pursuant to part 15 of the FCC Rules. These limits are designed to provide reasonable
protection against harmful interference when the equipment is operated in a commercial
environment.
This equipment generates, uses, and can radiate radio frequency energy and, if not installed
and used in accordance with the instruction manual, may cause harmful interference to radio
communications. Operation of this equipment in a residential area is likely to cause harmful
interference in which case the user will be required to correct the interference at his own
expense.
Changes or modifications not expressly approved by the party responsible for compliance
could void the user’s authority to operate the equipment under FCC rules.
Safety Instruction
 Loading...