

Page 1
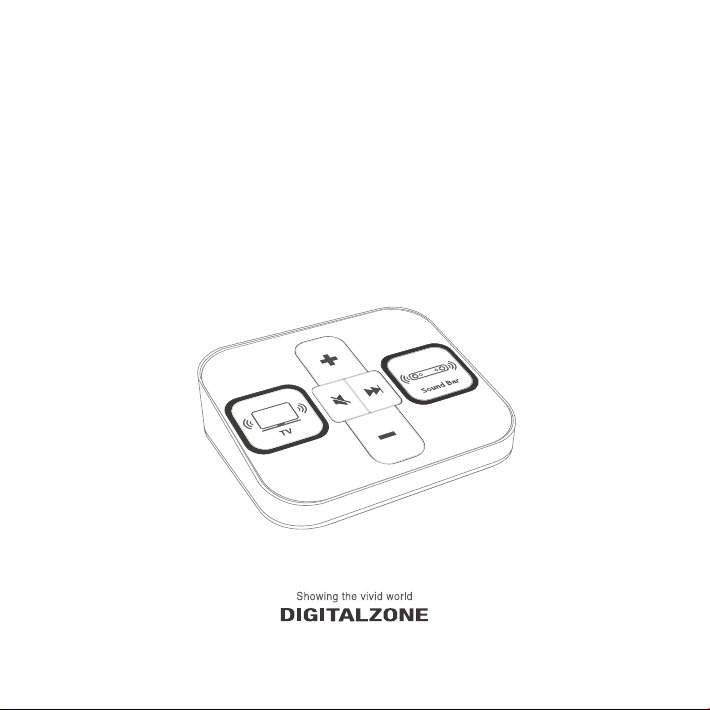
Sound Switcher
Installation Guide
Installation Guide
Please read carefully this Installation Guide before use.
Page 2
Sound Switcher
Page 3

Contents
Included items
TV Setting
Sound Bar Setting
How to Connect
How to Use
H/W Specification
How to Update Contents
Important Safety Instructions
3
4
5
9
10
13
14
15
- 3 -
Page 4
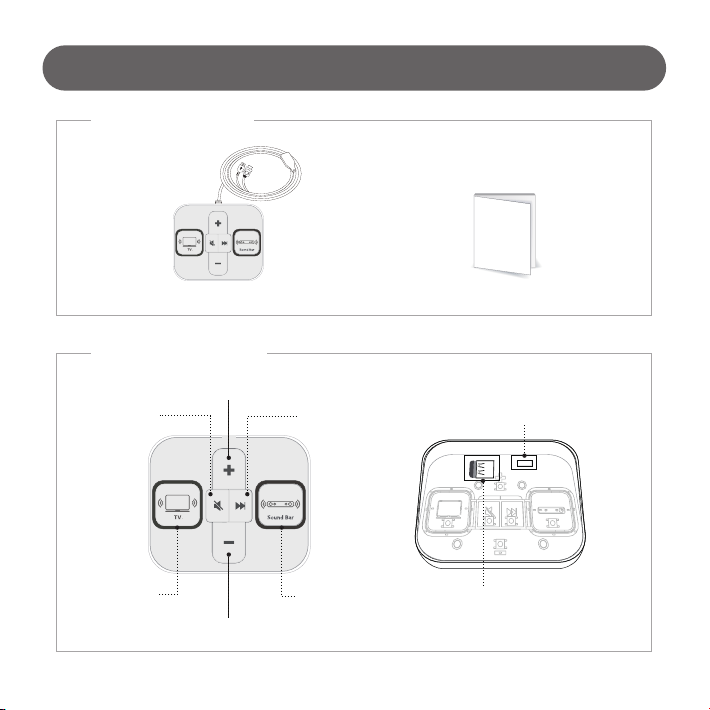
1) Package Contents
Sound Switcher Installation Guide
2) Guide to Each Parts
Included items
Mute
TV Sound
Output
Volume Up
Volume Down
Play the next file
(Skip function)
Sound Bar
Sound Output
- 4 -
Switch Input
(Complex Cable Connection)
USB
Built-in USB Memory
(APP + Content)
Page 5
TV Setting
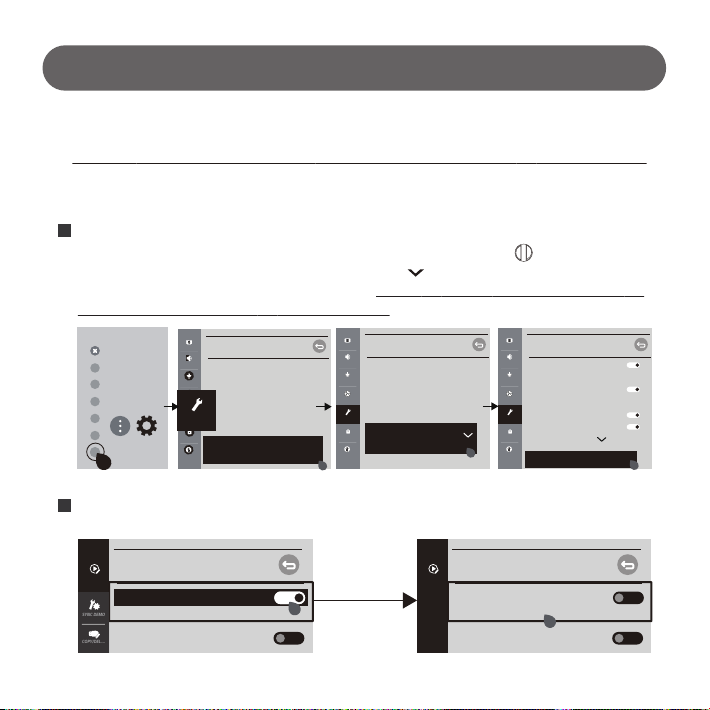
1) Setting Store Mode.
TTV will be “Store Mode” set it up manually as follow.
Setting → General → Additional Settings → Home/Store Mode (Store Mode) → Store Mode Settings
2) Built-in Video Dactivation.
Select “Demo Options” in Setting menu
1
There’s pop up menu in left or right bottom of screen if pressing “wheel button ( )” of Magic remote or
“OK” button of General Remote . Press “down direction key ( )” and enter “Demo Options” menu.
If no pop menu, enter the process manually as follow “ Setting → General → Additional Settings →
Home/Store Mode (Store Mode) → Store Mode Settings”
Picture
GENERAL
Sound
Location
Time & Date
Channels
Timers
Network
AI Servic
Account Management
General
General
(
)
Eco Mode
Safety
All Settings
2
Deactivate “In-store USB/Built-in Video” mode.
About This TV
Additional Settings
Accessibility
Picture
ADDITIONAL SETTINGS
GENERAL /
Sound
Quich Start+
Advertising Cookies
Channels
Standby Light
Network
LG Wireless Keyboard
Settings Help
General
No Signal Image
Home/Store Mode
Safety
Store Mode
Accessibility
Store Mode Settings
If this setting is not changed, although you connect Sound Bar Rack well, Built-in video or USB video will be playing.
Picture
ADDITIONAL SETTINGS
GENERAL /
Sound
Quich Start+
Advertising Cookies
Channels
Standby Light
Network
LG Wireless Keyboard
Settings Help
General
No Signal Image
Safety
Home/Store Mode
Store Mode
Accessibility
Store Mode Settings
DEMO OPTIONS
DEMO OPTI...
In-store USB/Built-in Video
SYNC DEMO
Notifications
COPY/DEL....
- 5 -
DEMO OPTIONS
DEMO OPTI...
In-store USB/Built-in Video
SYNC DEMO
Notifications
COPY/DEL....
Page 6
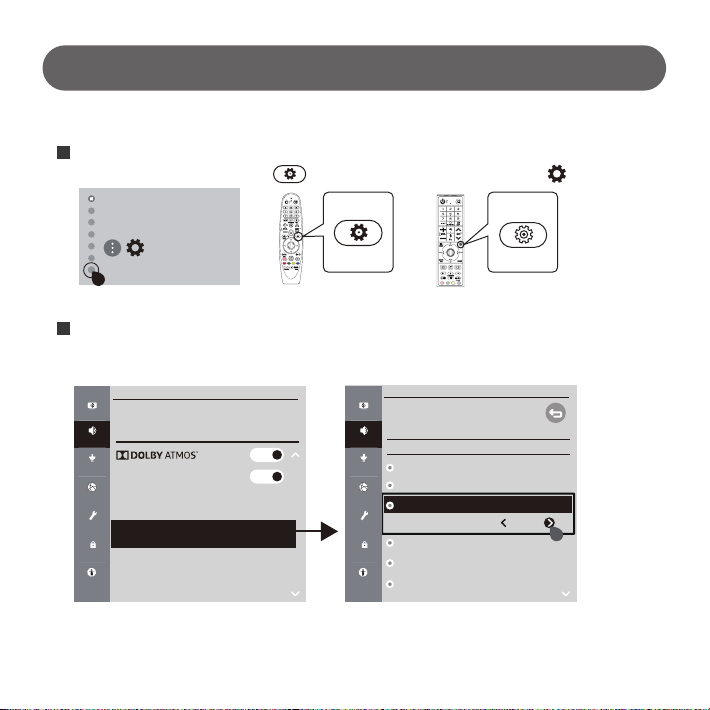
Sound Bar Setting
1) Setting SOUND OUT.
1
Select “Demo Option” menu in setting.
After activating menu by pressing (Setting) of TV remote control and select (All Settings)
(
)
All Settings
2
Select Sound → Sound Out (Optical/HDMI ARC)
Digital Sound Out : Auto, SIMPLINK (HDMI-CEC) : Set it “ON”
Make sure if sound is well out from connected sound bar after set up.
Magic Remote General Remote
Picture
SOUND OUT
Sound /
Sound
Channels
Adaptive Sound Control
Network
Sound Mode Settings
Cinema
General
Sound Out
Internal TV Speaker + Optical
Safety
One Touch Sound Tuning
Off
Accessibility
Volume Mode
Make sure if corrected sound is output when you switch the TV Speaker and Sound bar button on Sound Switcher.
#
# If you can switch TV Speaker and Sound Bar but output is not normal, check. connecting products again.
Picture
SOUND OUT
Sound /
Sound
Single Sound Out
Channels
Internal TV Speaker
Optical
Network
HDMI ARC
Digital Sound Out Auto
General
Bluetooth
Safety
Audio Out (Line Out)
Accessibility
Wired Headphones
- 6 -
Page 7
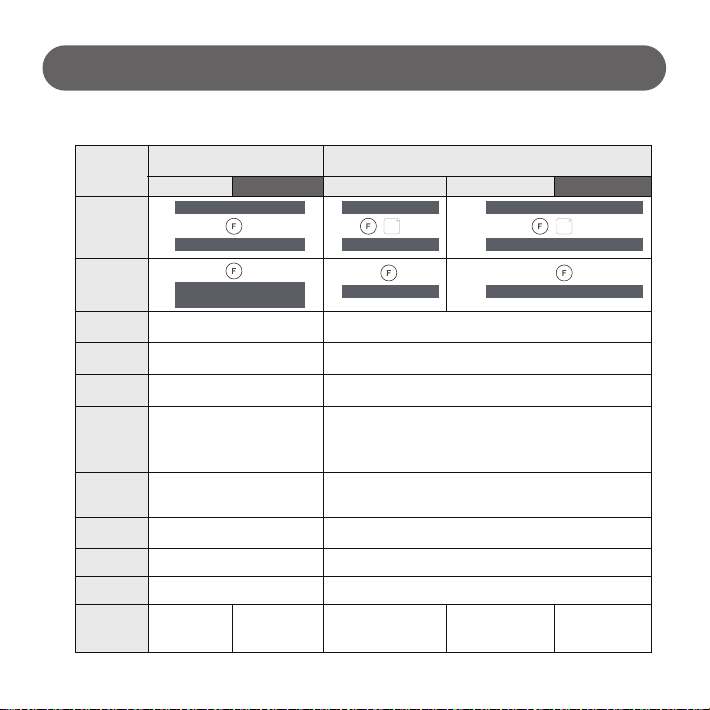
Sound Bar Setting
2) Check how to enter demo mode of sound bar.
Sound bar
Item
Entering
demo mode
Cancel
Demo mode
Entry mode
Mode change
Internal source
Control range
Volume
APD Entering
Initialize
CIC Guide
Applied model
(Internal source play mode)
‘18 ‘19 `18 (SK5 Only) `18 `19
1.
2.
3.
1.
2.
remove Power Cord
Power On
Long press(5sec)
Single press or
1.
2.
3.
Long press(5sec)
1.
2.
Long press(5sec)
Power On
All mode [Internal source play]
BT, LG TV, USB Auto change
1 or 2 songs (1min) [After play, stop]
Power Key, Volume Key,
F Key (Pause + Skip)
[Work Front Key only
(N/A remote control)]
[Automatic return after 90sec]
20
Cancel demo Cancel demo
SK10Y, SK9Y,
SK8/8Y, SK6/6Y,
SK5/5Y/5R
SL9YG, SL8YG,
SL7Y, SL6Y,
SL5Y
SK5/5Y/5R
- 7 -
Sound bar
(Shop mode)
Remote
ASC
control
1.
2.
3.
1.
2.
Power On
SOUND
EFFECT
Long press(5sec)
Long press(5sec)
OPT/ARC, PORT, HDMI IN [Fixed entry mode]
OPT/ARC, PORT ,HDMI IN [Fixed entry mode]
X
Volume Key, F Key(Pause)
20 or previous level (SK10Y/SK9Y is 24)
[Automatic return after 90sec]
XX
OX
SK10Y, SK9Y,
SK8/8Y, SK6/6Y
SL9YG, SL8YG, SL7Y,
Remote
control
SL6Y, SL5Y
Page 8
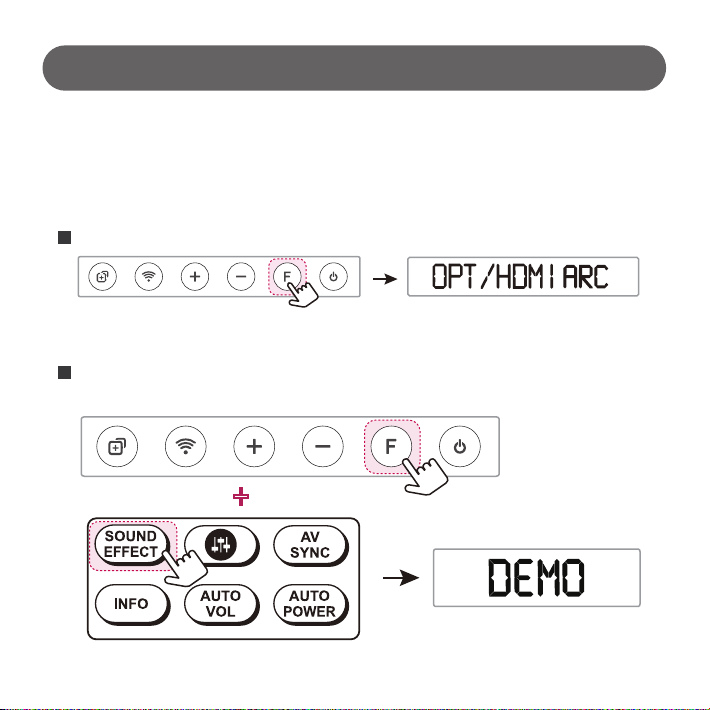
Sound Bar Setting
3) Sound bar Function Settings.
If you don’t set up Sound bar Demo Mode, sound bar will be turned off automatically after certain time.
Then, Sound Switcher is not working well.
Select “OPT/HDMI ARC” function by pressing “F” button on remote controller or Sound bar.
1
With pressing “F” button of Sound bar, long pressing “Sound effect key” of remote control.
2
Once you can see “Demo” Mode, release pressed button to complete settings.
- 8 -
Page 9
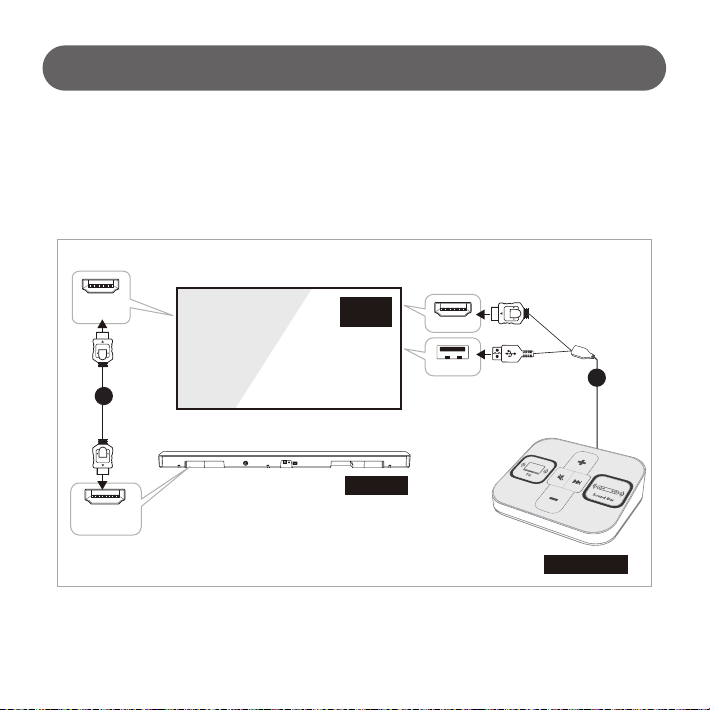
How to connect
1) Connect Sound Switcher and TV.
Connect USB port and HDMI port of TV by using Sound Switcher Complex Cable.
2) Connect TV and Sound Bar.
Connect HDMI 2(ARC) of TV and HDMI output(TV ARC) of Sound Bar by using HDMI cable.
HDMI 2
(ARC)
TV
HDMI 1
USB
2
Sound Bar
(TV ARC)
HDMI OUT
Sound Switcher
# Available to use immediately after connect complex cable to TV. (no boot time)
# APP in built-in USB will start automatically.
- 9 -
1
Page 10
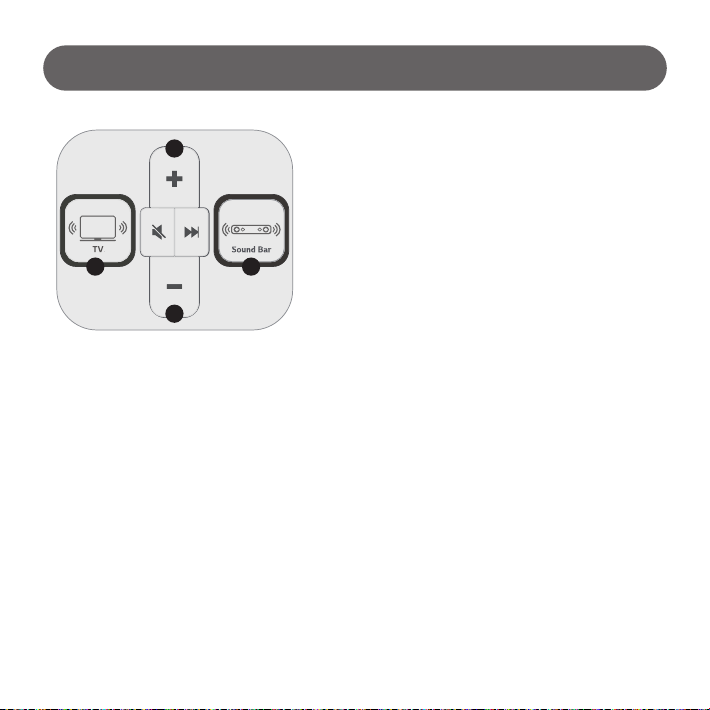
How to Use
2
1) Select speakers to sound
Select TV(①)
- Sound output : TV Speaker (Keep lighting LED ON )
- Default Volume : 30 (User changeable)
1 6
5
Select Sound Bar(⑥)
- Sound output : Sound Bar (Keep lighting LED ON )
- Default Volume : 30 (SL model only, User changeable)
- TV Volume : Mute
2) Volume Control
Select TV(①) and press Volume button(②,⑤)
- Short Press : TV volume Up/Down. (LED ON when pressing)
- Long Press : TV volume continuous Up/Down. (Keep lighting LED ON during pressing)
Select Sound Bar(⑥) and press Volume button(②,⑤)
- Short Press : Sound Bar volume Up/Down. (LED ON when pressing)
- Long Press : Sound Bar volume continuous Up/Down. (Keep lighting LED ON during pressing)
2-1) Default volume setting
TV Default volume setting
- Select TV(①) and set preferred volume.
- Long pressing TV(①) button over 5 seconds. (until TV button LED blinking)
- 10 -
Page 11
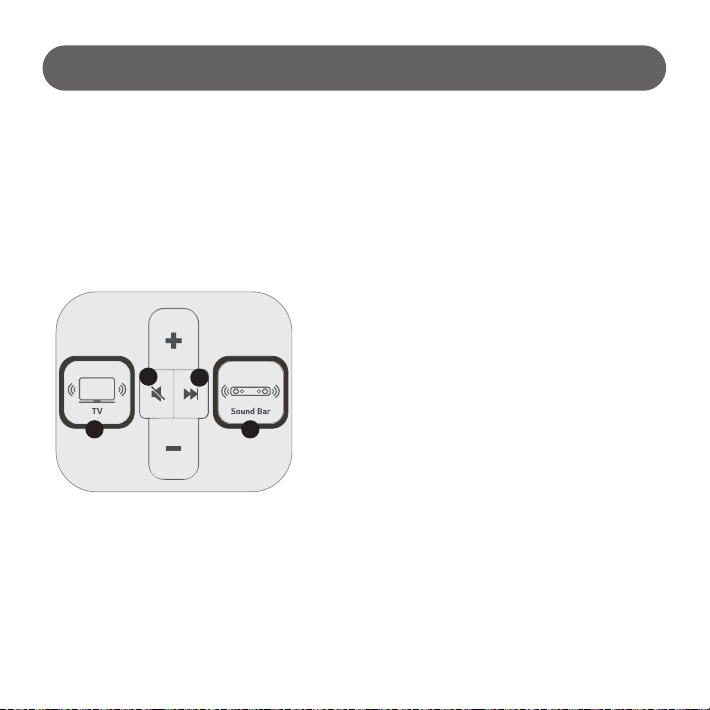
How to Use
2-1) Default volume setting
SB Default volume setting (SL model only)
- Long pressing Sound Bar(⑥) button over 5 seconds. (until SB button LED blinking)
- Set preferred Sound Bar volume.
- Long pressing Sound Bar(⑥) button over 5 seconds to complete setting. (until SB button LED blinking)
3) Mute
Select TV(①) and press Mute button(③)
3
4
- TV Mute (Button LED ON, Mute sign will be displayed on TV screen)
- Unmute : Press volume or Mute button to unmute.
1 6
4) Play Next Content
Press Next button(④)
- Play next one of currently playing file.
Select Sound Bar(⑥) and press Mute button(③)
- Sound Bar Mute.
(Button LED ON, Mute sign will be displayed on TV screen and SB LCD)
- Unmute : Press volume or Mute button to unmute.
- 11 -
Page 12
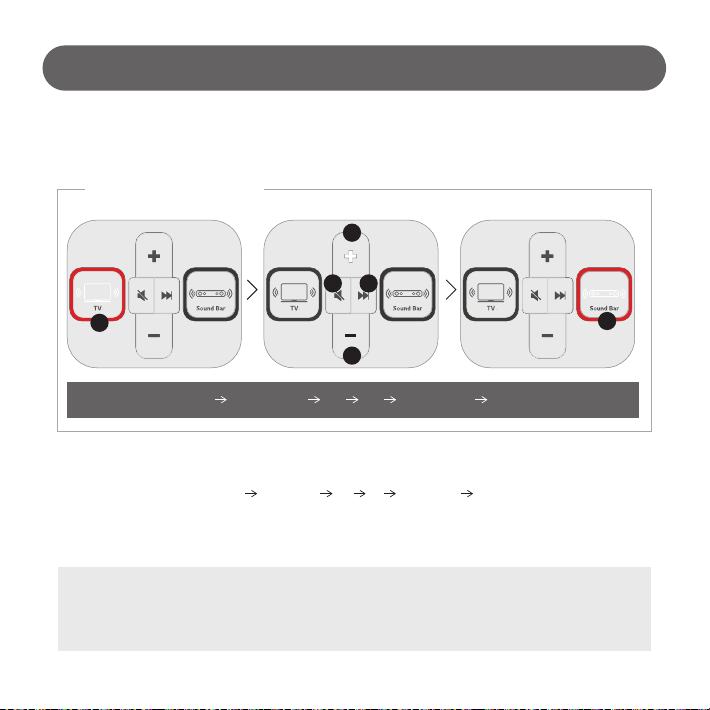
How to Use
5) IDLE state
In IDLE state, Sound Switcher button LED turns on sequentially.
LED lighting sequence
2
3 4
1
5
6
① ②③④⑤ ⑥ ① ②③④⑤ …
Return to IDLE
- Return idle state after4 min 30 sminute unless user input.
- LED turns on sequentially. (① ②③④⑤ ⑥ ① ②③④⑤ …)
- TV Volume is changed to ‘0’.
- Sound Bar volume is returned to default. (Available SL model only)
- The same applies when muted.
# TV volume is changed to ‘0’ when the state returns to IDLE :
- In the IDLE state, TV and Sound Bar do not output sound.
- Prevent sudden sound out from muted TV. (Muted TV will be unmuted after 5 minutes unless user input)
- Sound out to default volume by pressing TV / Sound Bar / ‘+’ button
- 12 -
Page 13
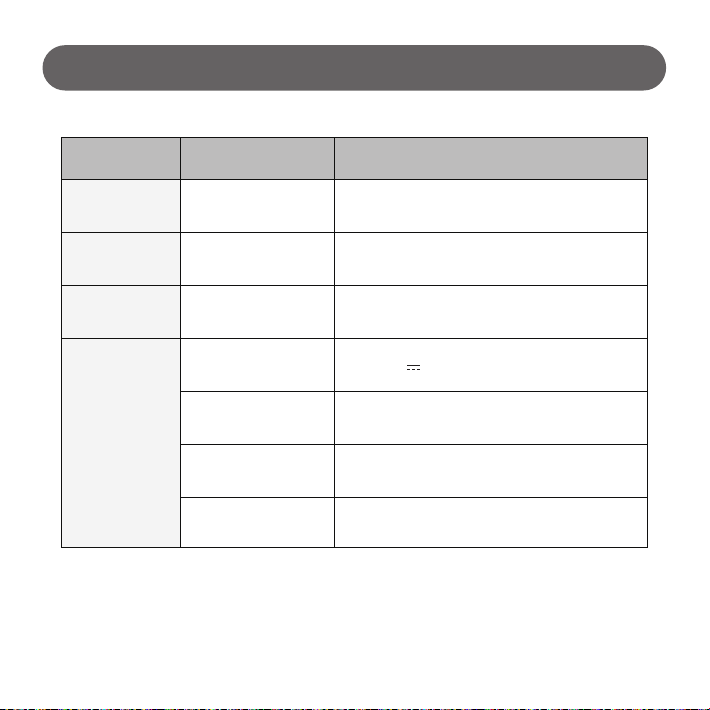
H/W Specification
Item
Input
Output
Firmware
Upgrade
GENERAL
Type
6EA Switch Input, USB Memory
2EA
NO
POWER
WEIGHT
DIMENSION
OPERATING
TEMPERATURE
USB HID Value, CEC Command
DC : 5V 0.5A (USB2.0)
240g
120 x 100 x 35(mm)
Ambient 0°C ~ 45°C
- 13 -
Details & Usage
Page 14
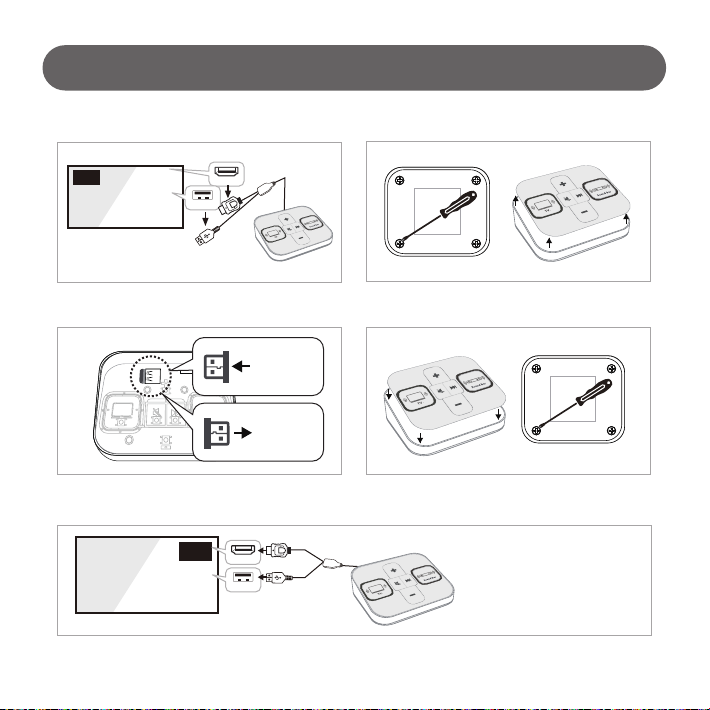
How to Update Contents
How to update contents : Replace the mounted USB of Sound Switcher
TV
HDMI 1
USB
1. Remove complex cable. 2. Unscrew to open top case.
USB
3. Replace the mounted USB.
TV
Remove USB
USB insert
HDMI 1
USB
4. Assemble top case.
5. Connect complex cable
if it works automatically.
- 14 -
to TV and check
Page 15

Important Safety Instructions
WARNING
TO REDUCE THE RISK OF FIRE OR ELECTRIC SHOCK, DO NOT EXPOSE THIS PROCUCT TO RAIN OR MOISTURE. DO NOT
INSERT ANY METALLIC OBJECT THROUGH THE VENTILATION GRILLS OR OTHER OPENNINGS ON THE EQUIPMENT.
NOTE ON RECYCLING (for EUROPE)
This product’s packaging materials are recyclable and can be reused. Please dispose of any
materials in accordance with the local recycling regulations. When discarding the unit, comply
with local rules or regulations. Batteries should never be thrown away or incinerated but
disposed of in accordance with the local regulations concerning chemical waste. This product
and the accessories packed together constitute the applicable product according to the WEEE
directive except batteries.
FCC Information (for U.S.A)
Note: This equipment has been tested and found to comply with the limits for a Class A digital device,
pursuant to part 15 of the FCC Rules. These limits are designed to provide reasonable protection against
harmful interference when the equipment is operated in a commercial environment.
This equipment generates, uses, and can radiate radio frequency energy and, if not installed and used
in accordance with the instruction manual, may cause harmful interference to radio communications.
Operation of this equipment in a residential area is likely to cause harmful interference in which case the
user will be required to correct the interference at his own expense.
Changes or modications not expressly approved by the party responsible for compliance could void the
user’s authority to operate the equipment under FCC rules.
This device complies with part 15 of the FCC Rules. Operation is subject to the following two conditions; (1) this
device may not cause harmful interference, and (2) this device must accept any interference received, including
interference that may cause undesired operation.
- 15 -
Page 16
(Guro-dong, E&C VENTURE DREAM TOWER2), #1001, 55, Digital-ro33-gil,
Sound Switcher
Guro-gu, Seoul, KOREA, 08367
TEL : +82-2-6330-2358 FAX : +82-2-6330-2345
http://www.dzonei.com / [email protected]
 Loading...