

Page 1
Important Safety Instructions
1. Read these instructions.
2. Keep these instructions.
3. Heed all warnings.
4. Follow all instructions.
5. Do not use this apparatus near water.
6. Clean only with dry cloth.
7. Do not block any ventilation openings, Install in accordance with the
manufacturer’s instructions.
8. Do not install near any heat sour ces such as radiators, heat registers, stoves, or
other apparatus (including amplifiers) that produce heat.
9. Do not defeat the safety purpose of the polarized or grounding-type plug, A
polarized plug has two blades with one wider than the other. A grounding type plug
has two blades and a third grounding pro ng. The wide blade or the third prong are
provided for your safety, If the provided plug does not fit into your outlet, consult an
electrician for replacement of the obsolete outlet.
10. Protect the power cord from being walked on or pinched particularly at p lugs,
convenience receptacles, and the point where they exit from the apparatus .
11. Only us e attachments/ accessories specified by the manufacturer.
12. Use only with the cart, stand, tripod, bracket, or table
specified by the manufacturer, or sold with the apparatus. When
a cart is used. Use caution when moving the cart/ap paratus
combination to avoid injury from tip-ov e r.
13. Unplug this apparatus during lighting storms or when
unused for long periods of time
14. Refer all servicing to qualified service personnel. Servicing
is required when the apparatus has been damaged in any way, such as powersupply cord or plug is damaged, liqui d has been spilled or objects have fallen into
the apparatus, the apparatus has been ex posed to rain or moisture, does not
operate normally, or has been dropped.
Page 2
3
WARNING
TO REDUCE THE RISK OF FIRE OR ELECTRIC SHOCK, DO NOT EXPOSE THIS
PROCUCT TO RAIN OR MOISTURE. DO NOT INSERT ANY METALLIC OBJECT
THROUGH THE VENTILATION GRILLS OR OTHER OPENNINGS ON THE
EQUIPMENT.
Apparatus shall not be exposed to dri pping or splashing and that no objects filled with
liquids, such as vases, shall be placed on the apparatus
CAUTION
EXPLANATION OF GRAPHICAL SYMBOLS
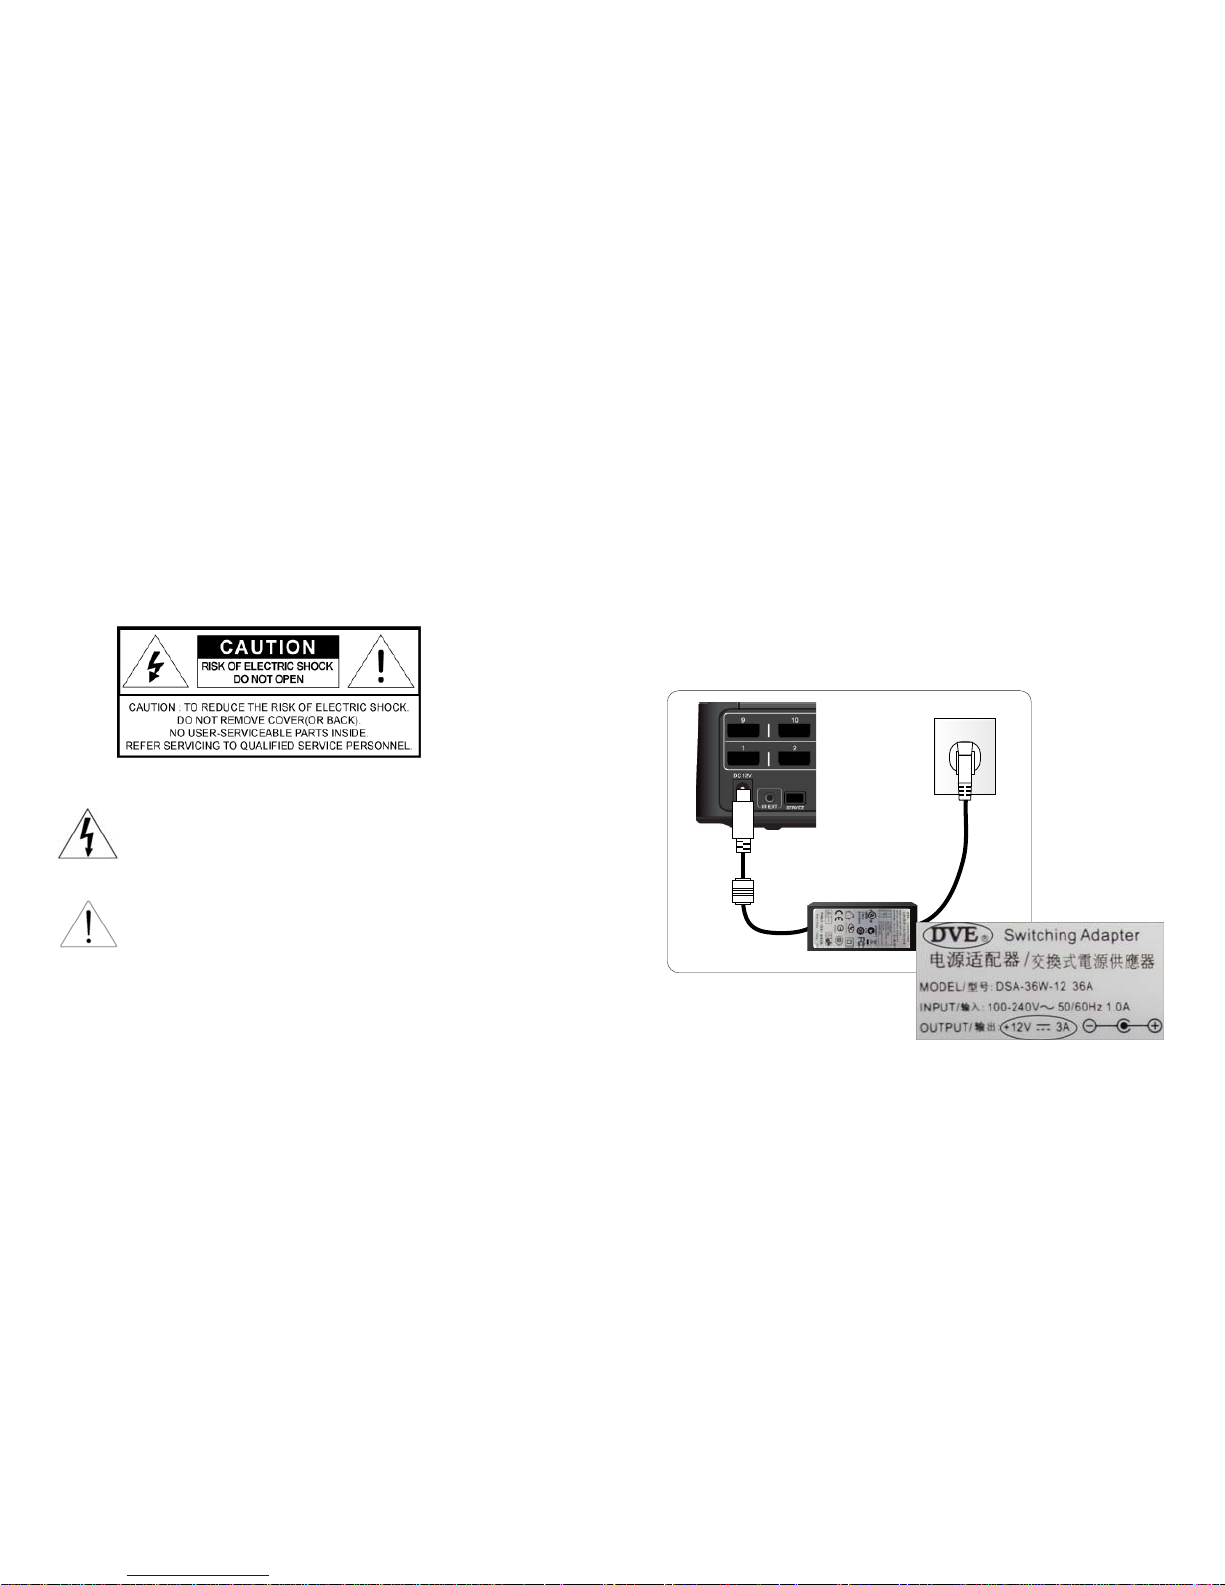
The lightning flash with arrowhead symbol, within an equilateral triangle, is
intended to alert the user to the pres ence of “dangerous voltage” within
the product’s enclosure that may be of sufficient magnit ude to constitute a
risk of electric shock to persons.
The exclamation point within an equilateral triangle is intended to alert the
user to the presence of important operating and maintenance (servicing)
instructions in the literature accompanying the product.
ClassⅠ construction
An apparatus with CLASSⅠ construction shall be connected to a M AI NS socket outlet
with a protective earthing connection.
Battery
Batteries(battery pack or batteries inst alled) shall not be exposed to excessive heat
such as sunshine, fire or the like.
4
Disconnection Device
Disconnect the main plug from the apparatus, if it’s defected. And please call a repair
man in your location.
When used outside of the U.S., it may be used HAR
code with fittings of an approved agency is employed.
CAUTION
These servicing instructions are for use by qualified service personnel only. To reduce the
risk of electric shock do not perform any servicing other than that contained in the
operating instructions unless you are qualified to do so
Apparatus shall not be exposed to dri pping or splashing and no o bjects filled
with liquids, such as vases, shall not be placed on the apparatus.
Where the MAIN plug or an appliance coupler is used as the disconnect device,
The disconnect device shall remai n readily operable.
Page 3
User’s Manual
5
FCC Information (for U.S.A)
Note: This equipment has been tested and found to comply with the limits for a Class A digital
device, pursuant to part 15 of the FCC Ru les. These limits are designed to pr ovide reasonable
protection against harmful interfe rence when the equipment is operated in a commercial
environment.
This equipment generates, uses, and can radiate radio frequency energy and, if not installed
and used in accordance with the instruction manual, may cause harmful interf erence to radio
communications. Operation of this equipment in a residential area is likely to cause harmful
interference in which case the user will be required to correct the interference at his own
expense.
Changes or modifications not expressly approved by the party responsible for compliance
could void the user's authority to operate the equipment under FCC rules.
NOTE ON RECYCLING (for EUROPE)
This product’s packaging materia ls are recyclable and can be reused.
Please dispose of any materials in acc ordance with the local recycling
regulations.
When discarding the unit, comply with local rules or regulations.
Batteries should never be thrown away or incinerated but disposed of in
accordance with the local regulations concerning chemical waste.
This product and the accessories packed together constitute the
applicable product according to the WEEE directive except batteries
NEXD HDMI Splitter
6
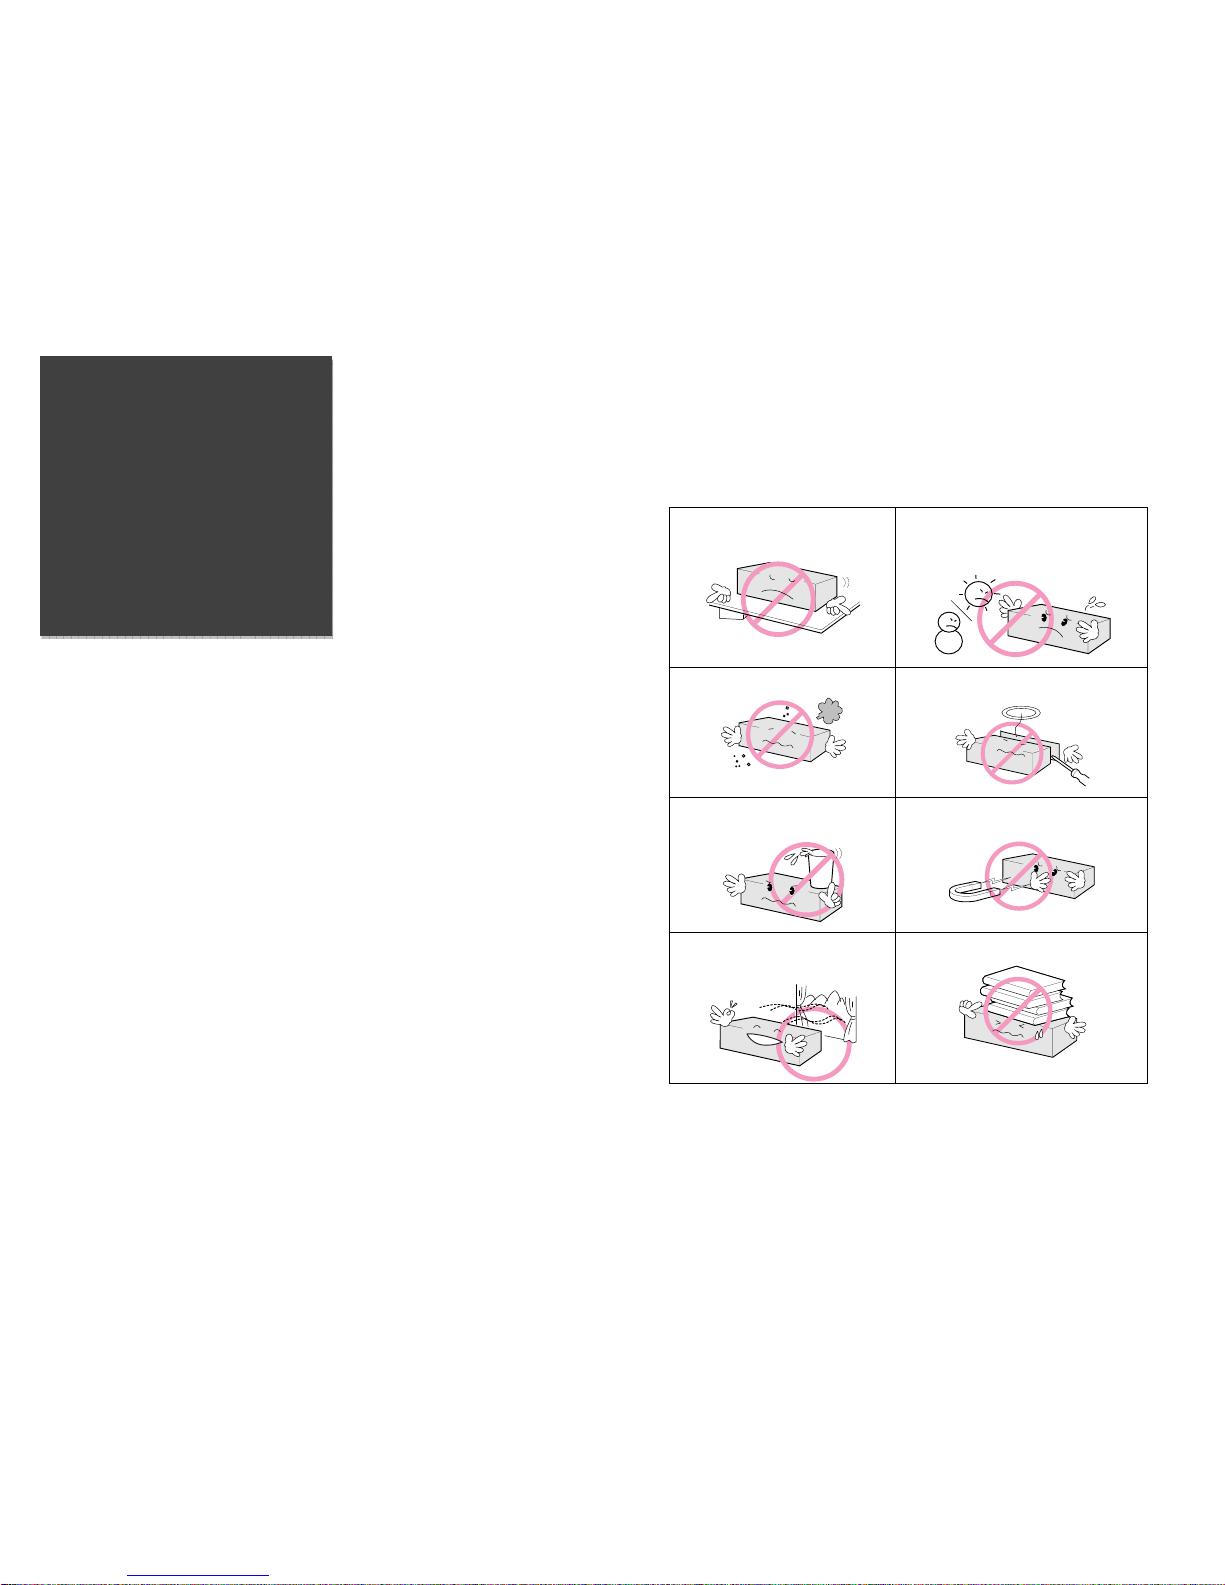
안전을 위한 주의사항
신체적 위험이나 재산상의 피 해를 막기 위한 내용으로 반드시 지켜 주시기 바랍니다.
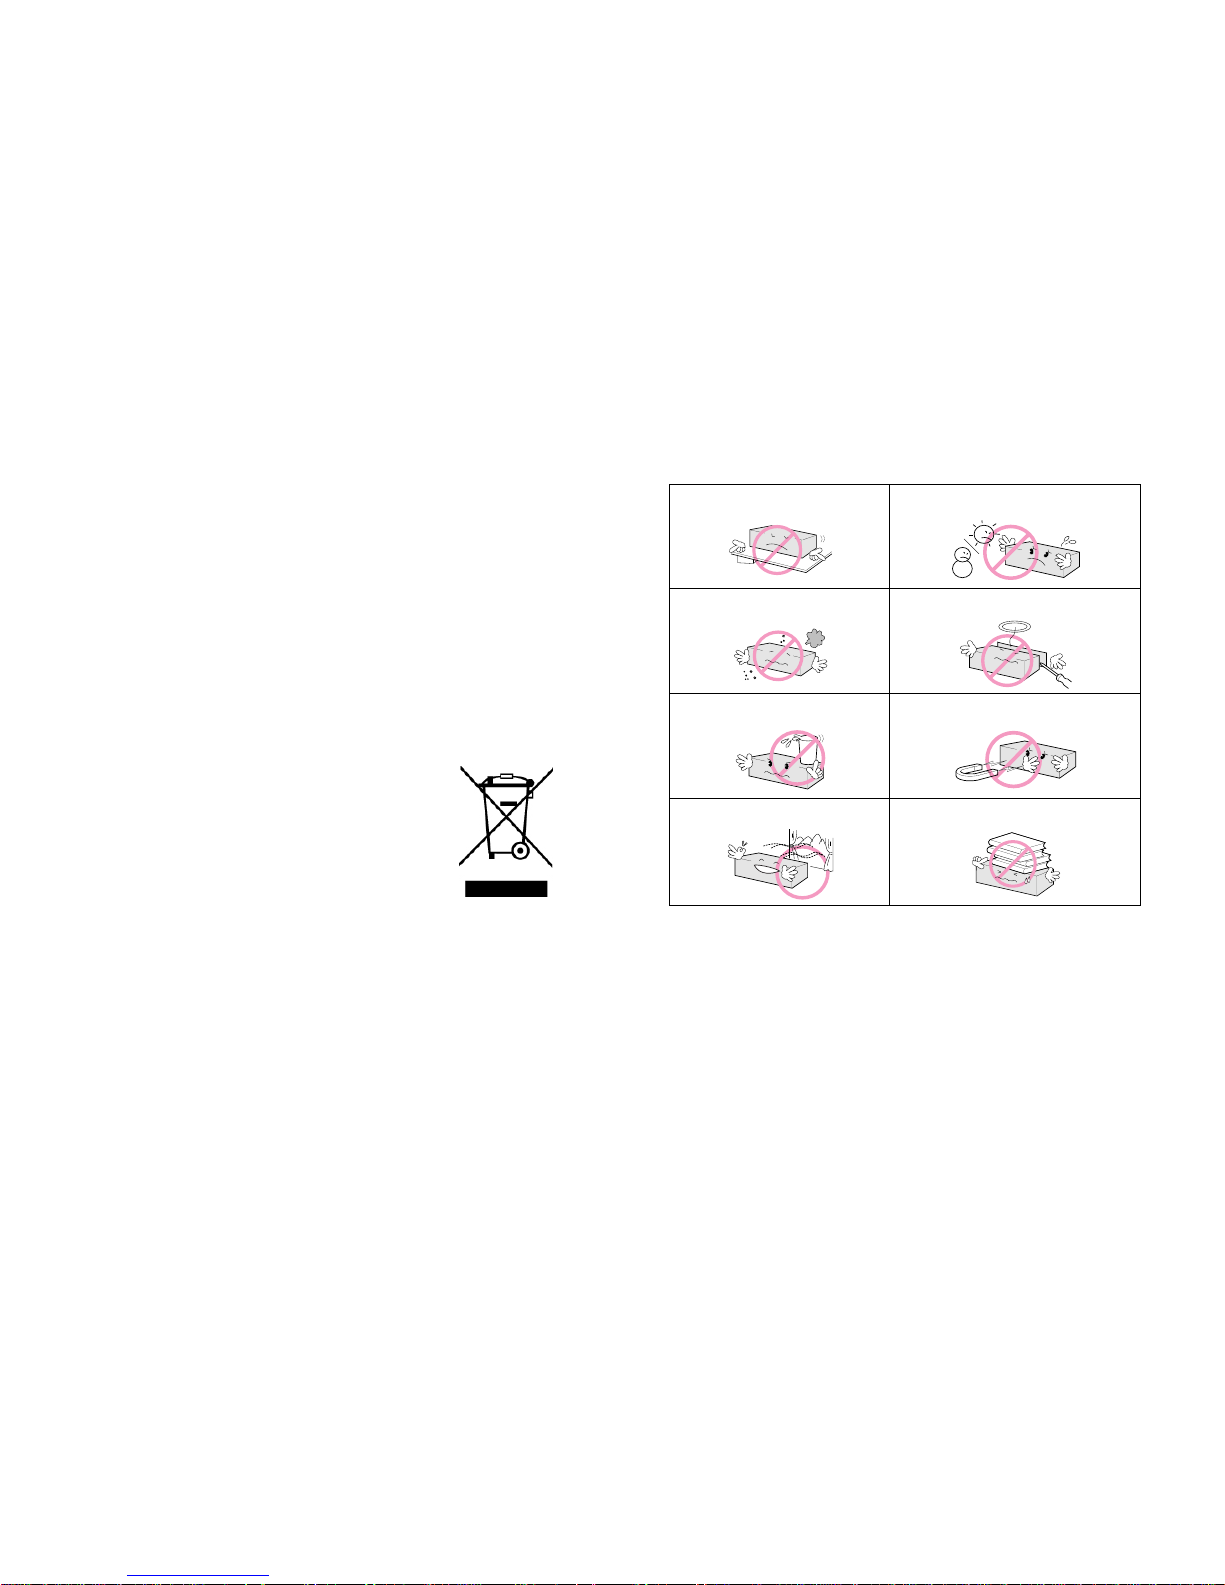
평평한 곳에 설치해주세요.
햇빛이 직접 비치거나 추운 곳에서 사용하지 마세요.
먼지나 물 등이 들어가지 않도록 하세요.
분해하거나 수리, 개조하지 마세요.
제품 위에 물컵 등을 얹어 놓지 마세요.
진동이 심한 곳이나 자석류가 있는 곳에서 멀리 놓아주세요.
통풍이 잘 되는 곳에 놓아주세요.
제품 위에 물건을 올려 놓지 마세요.
© Copyright 2011, ㈜디지털존. All rights reserved.
- 사용설명서의 내용 중 일부 또는 전부를 무단 복제하는 것은 금지되어 있습니다.
- 제품의 사양은 기능 향상을 위하여 예고 없이 변경될 수 있습니다.
- 디지털존 로고와 NEXD 는 ㈜디지털존의 등록상표입니다.
- 기타 명칭이나 상표는 각 소유자의 등록상표입니다.
- 이 기기는 업무용(A 급)으로 전자파적합등록을 한 기기이오니 판매자 또는 사용자는
이 점을 주의하시기 바라며, 가정외의 지역에서 사용하는 것을 목적으로 합니다.
- A/S 접수: 02-6330-2343
Page 4
User’s Manual
7
Contents
안전을 위한 주의사항 ······························································································· 6
목차 ······················································ ······································································ 7
각 부분의 이름 ·········································································································· 8
제품 구성물 ··················································· ·························································· 10
리모컨 버튼의 이름과 기능···················································································· 11
리모컨 건전지 삽입하기 ························································································· 11
연결하기 ··················································································································· 12
NEXD HDMI Splitter 사용법············································································· ······· 13
문제해결하기 ············································ ···································· ··························· 14
CEC, USB (펌웨어 업그레이드) & RS-232 (외부 컨트롤) ····································· 14
EDID Emulation Mode 선택 방법 ··········································································· 15
1. Dynamic mode ····································· ····················· ···················· ················· 15
2. Static mode ························································································ ············ 16
제품 규격 ················································································································· 17
Important Safety Instruction ··················································································· 19
Control & Connection options ·················································································· 20
Packages and accessories ······ ·············································································· 22
Remote control Unit ··························· ···································································· 23
Insert battery ············································································································ 23
Connection ··············································································································· 24
How to use NEXD HDMI Splitter ············································································· 25
Troubleshooting for no power ·················································································· 25
CEC, USB (Firmware upgrade) & RS-232 (Remote Control) ······························ 25
How to use EDID Emulation Mode ········································································ ·· 26
Dynamic mode ····································································································· 26
Static mode ·········································································································· 27
Specification·················································································· ···················· ······· 28
Chinese ·················································································································· 29
Japanese ········· ························· ···················· ···················· ····················· ················· 35
NEXD HDMI Splitter
8
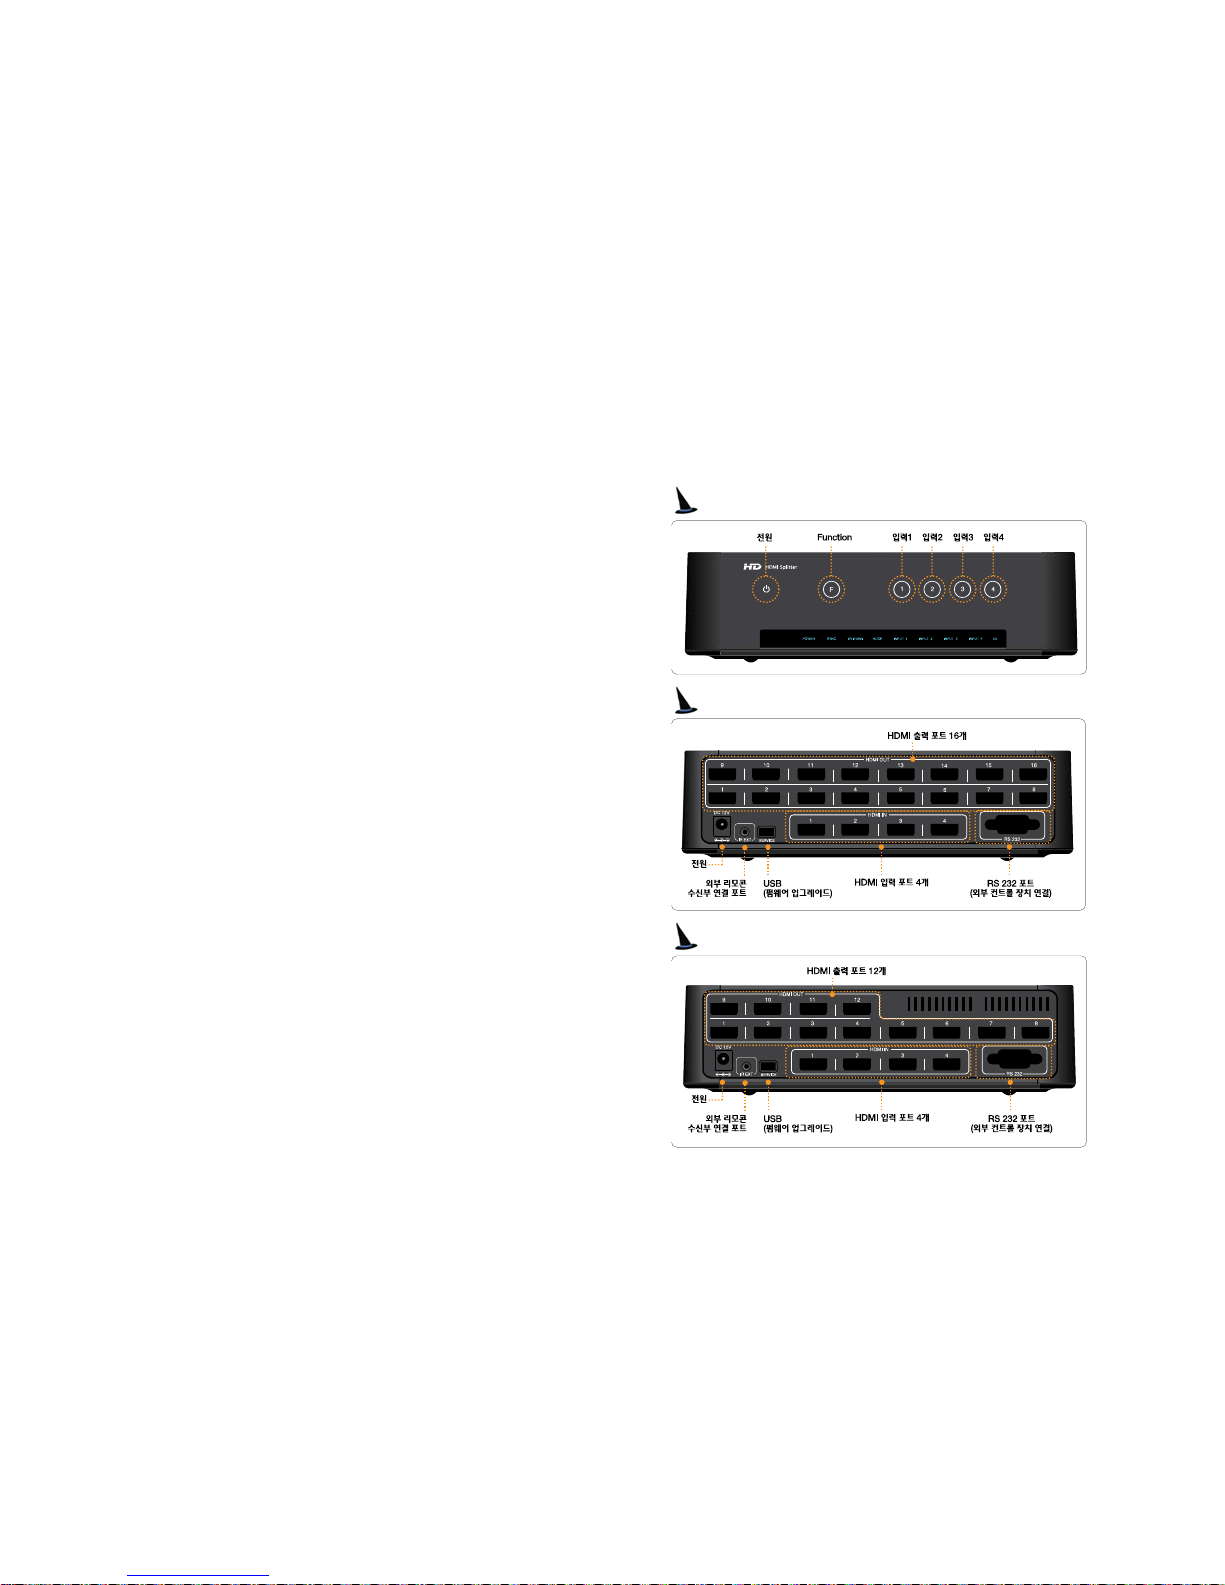
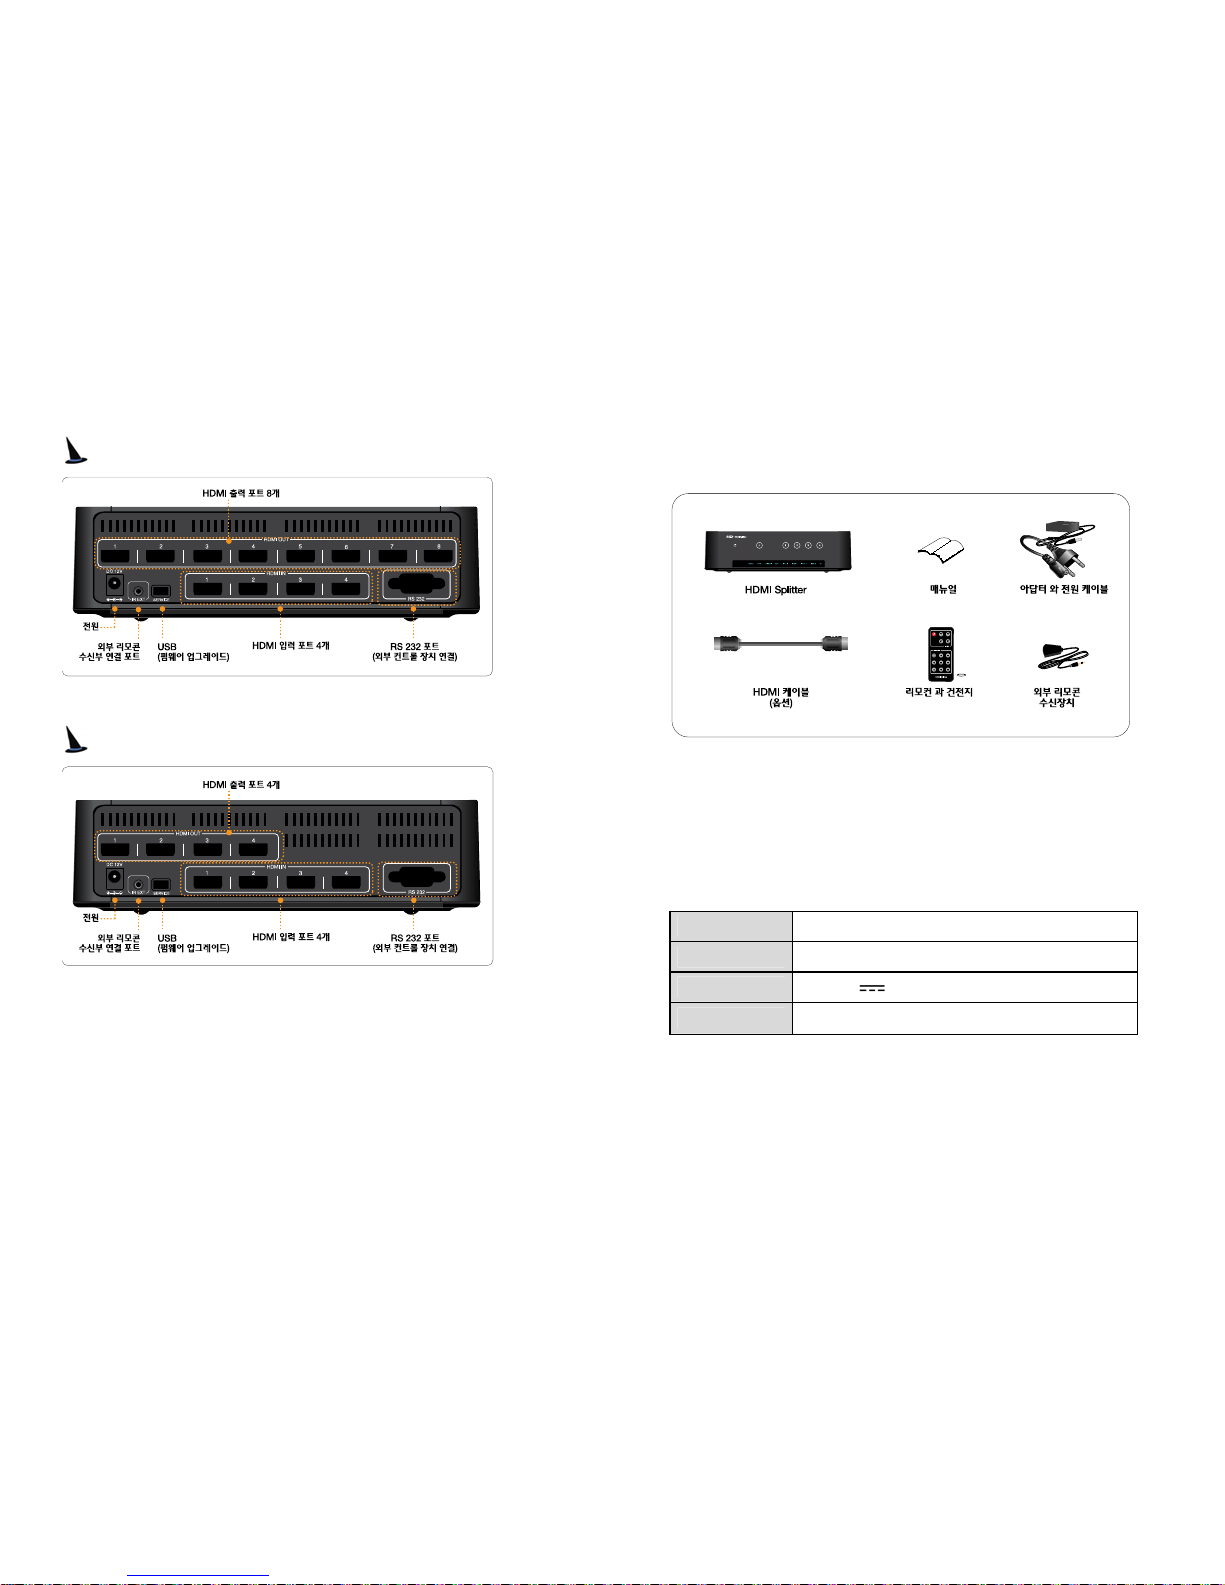
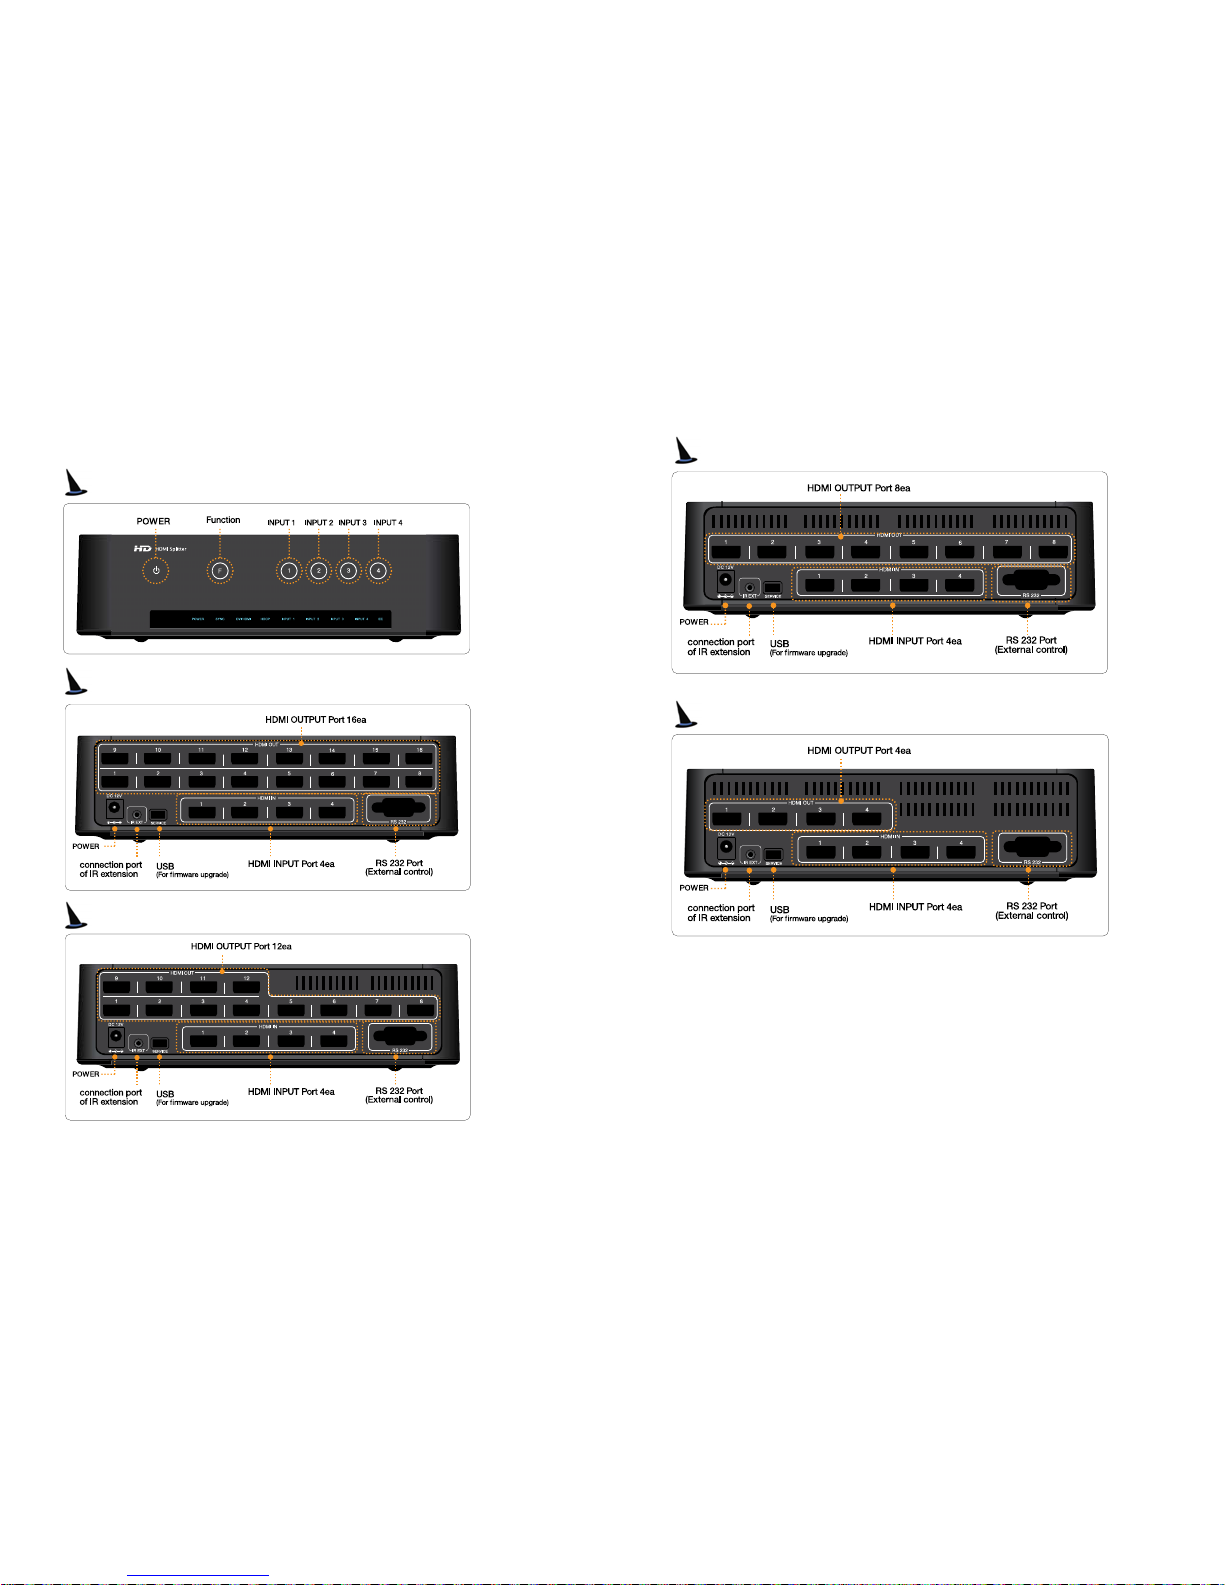
각 부분의 이름
앞면
뒷면 (416L)
뒷면 (412L)
Page 5
User’s Manual
9
뒷면 (408L)
뒷면 (404L)
NEXD HDMI Splitter
1
0
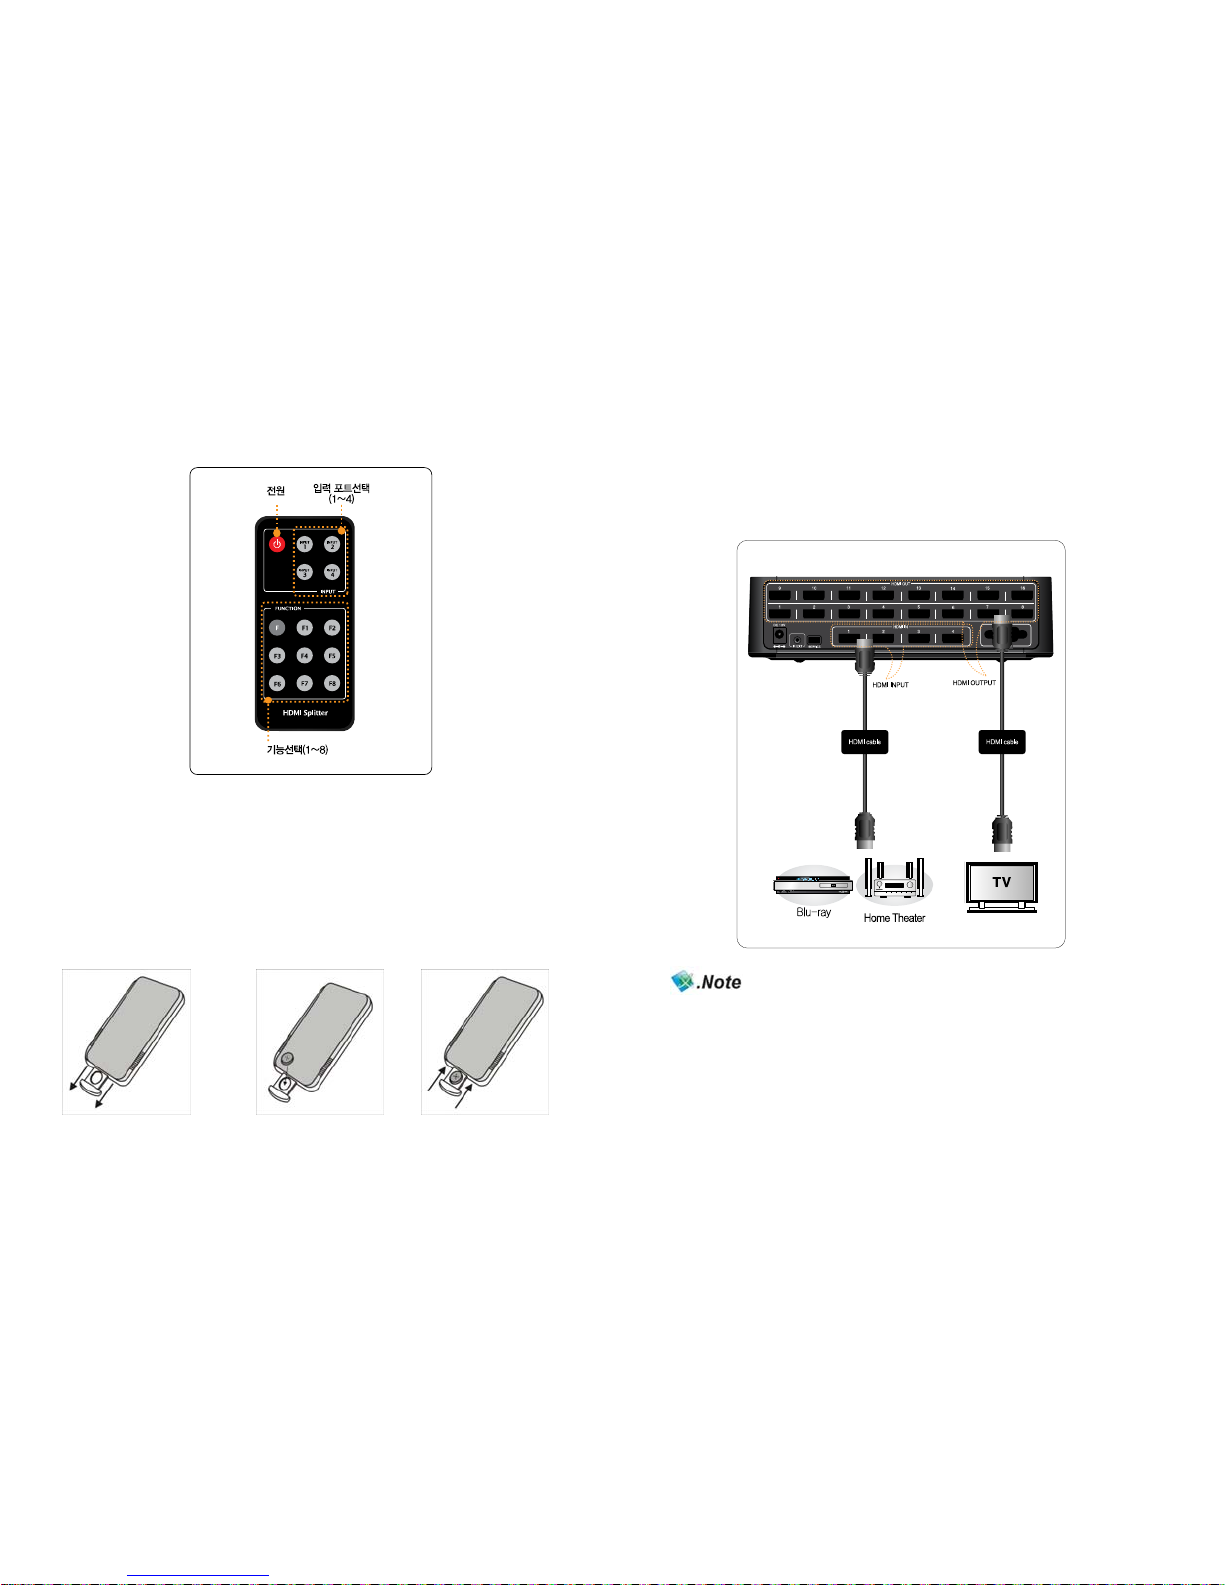
제품 구성물
사용 전에 내용물이 빠짐없이 들어있는지 확인하세요.
※ 제품구성은 사전에 공지 없이 변경될 수 있습니다.
※ 구성물 이외에 추가 물품은 별도로 구매 하시려면 제조사 또는 구매처에 문의 하시 기
바랍니다. (전화 02-6330-2338)
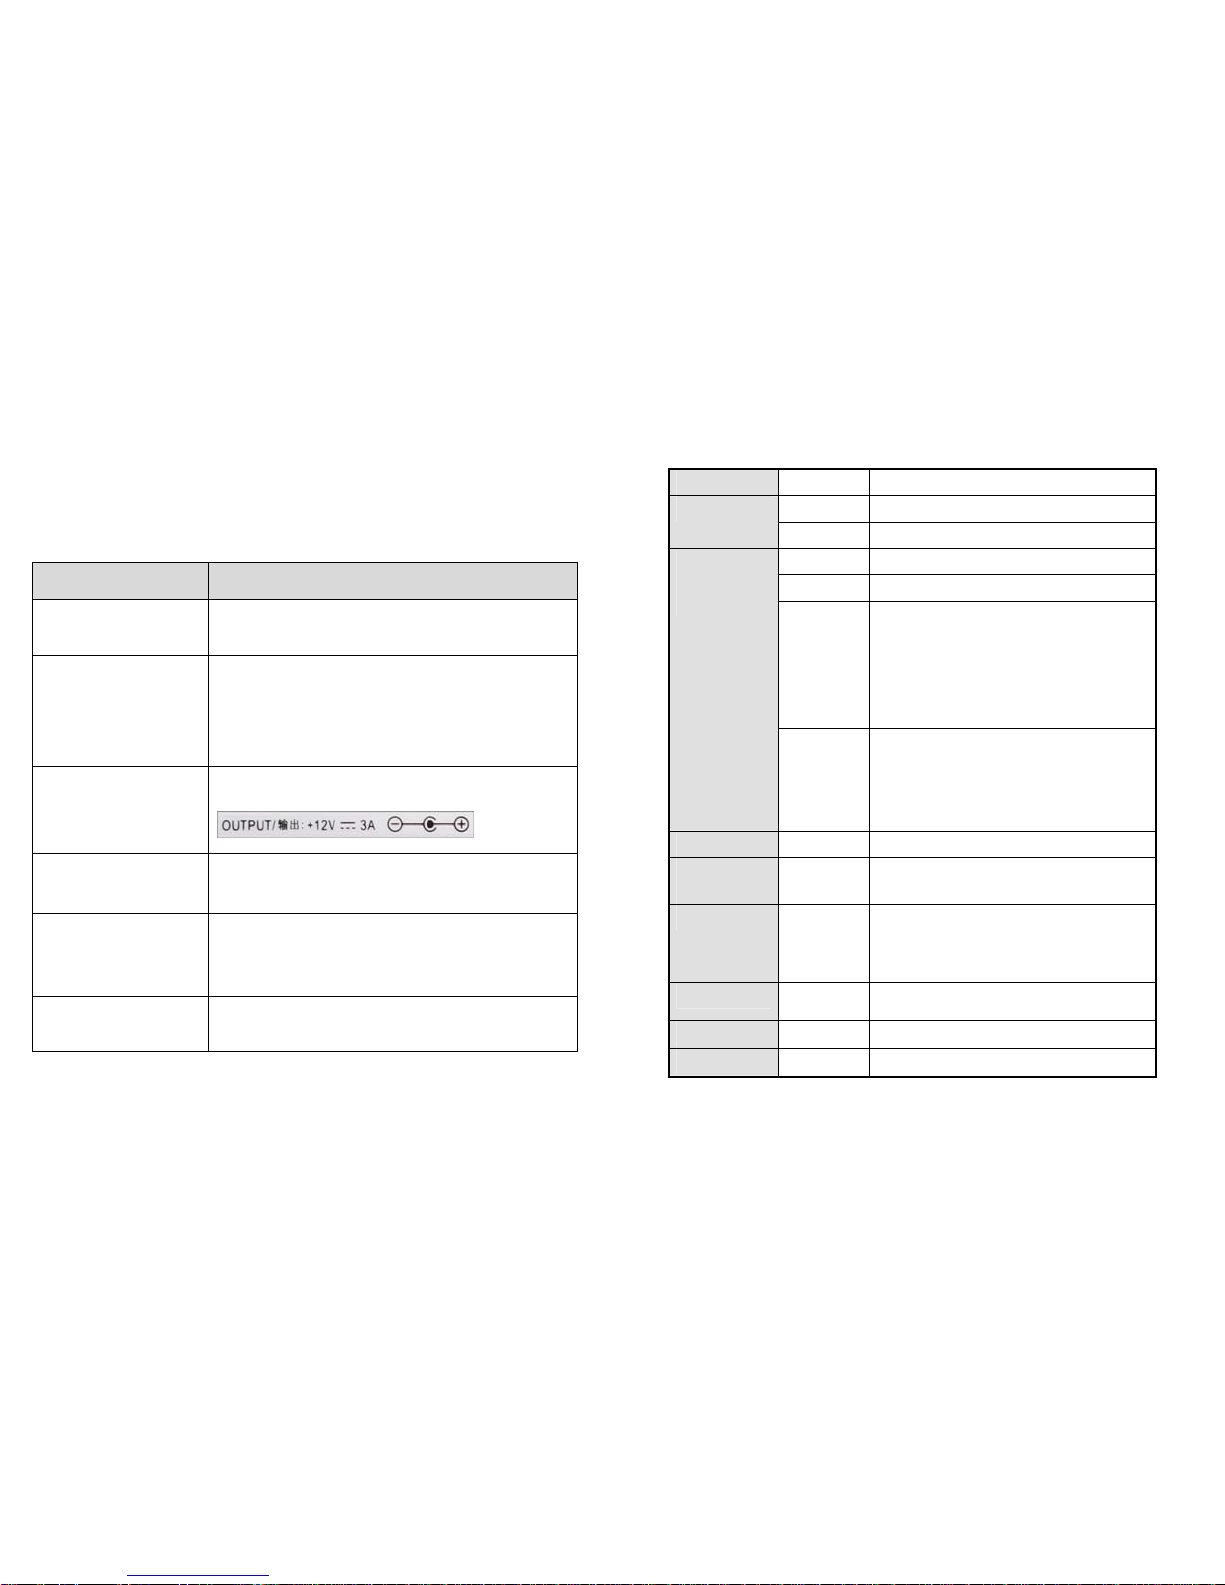
※ Adaptor Specification
Model DSA-36W-12 36A
Input AC 100-240V, 50/60Hz, 1.0A
Output DC 12V 3A
Manufacturer Dee Van Enterpri se Co., Ltd
Page 6
User’s Manual
11
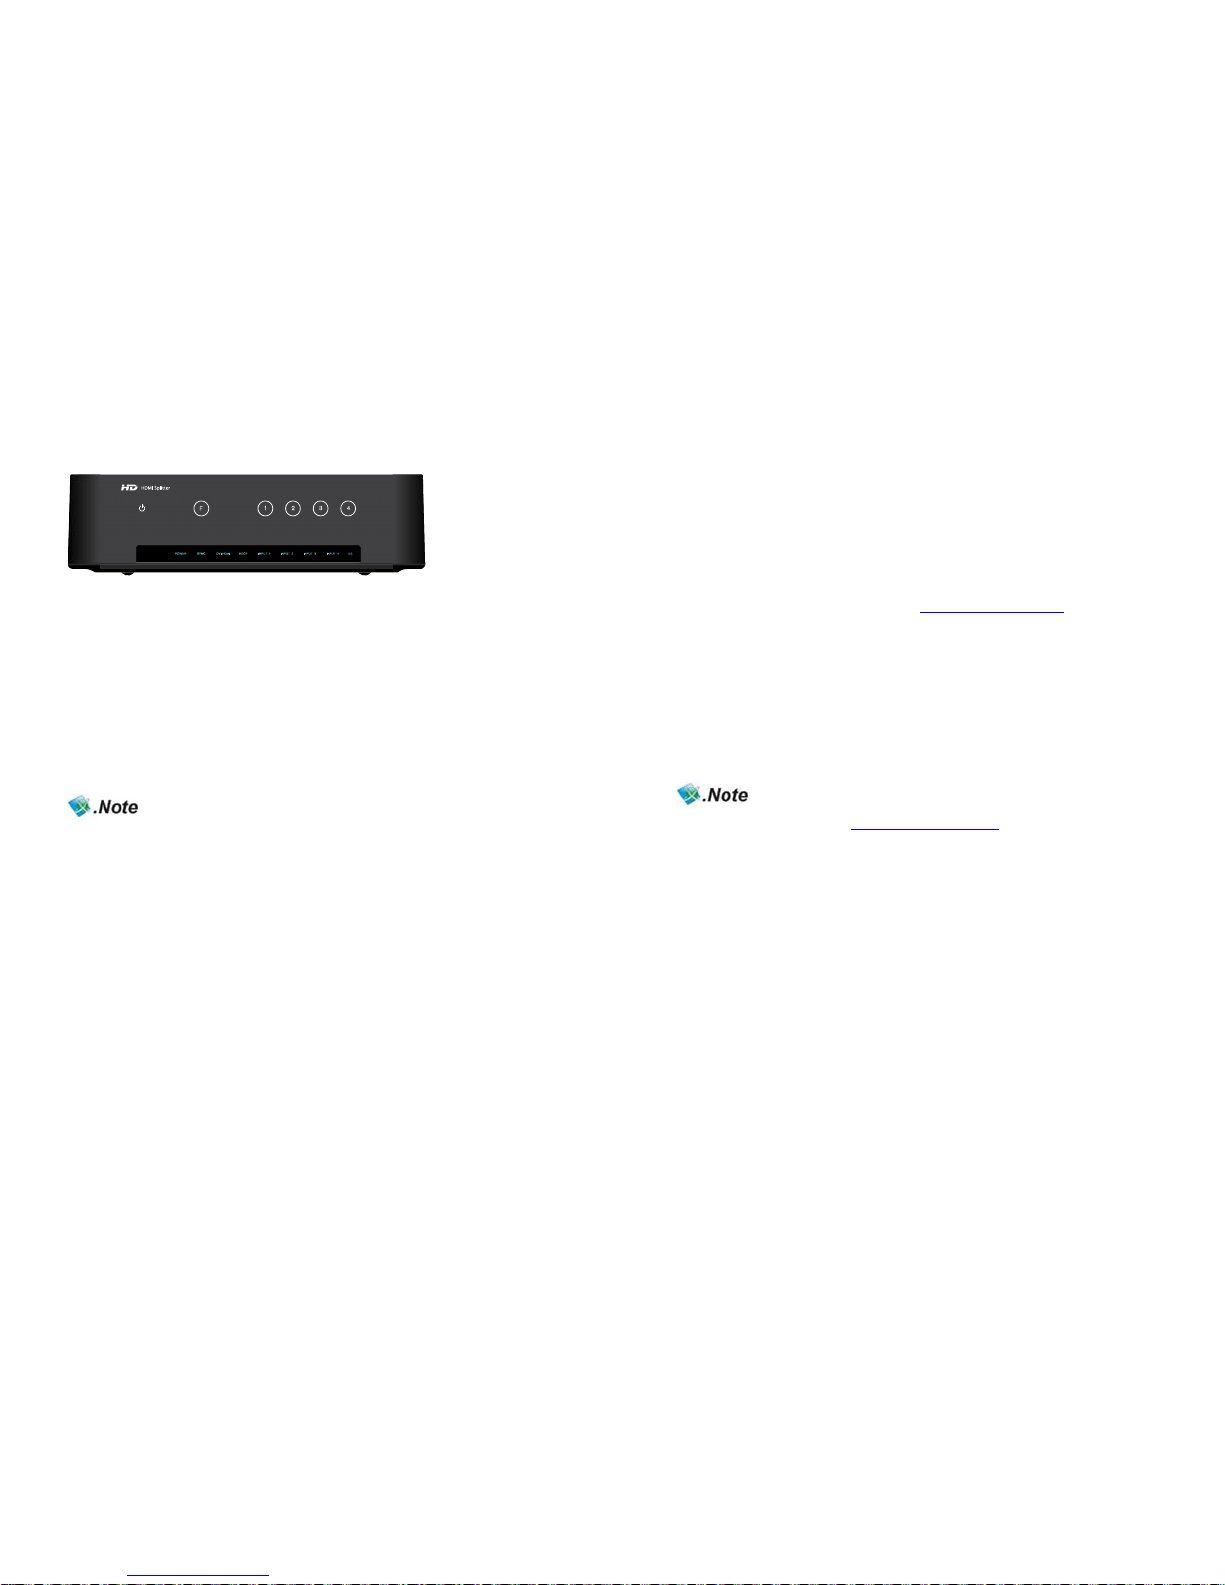
리모컨 버튼의 이름과 기능
※ 리모컨은 본체에서 3~5M 거리에 좌우상하 60도에서 작동합니다
※ 본체와 리모컨의 거리가 멀거나 다른 물체에 가려 사용이 불가능 할 경우 외부 리모컨
수신부를 이용하여 작동 시킬 수 있습니다.
- “외부 리모 컨 수신부” 삽입전에는 본체의 전원을 꺼 주세요.
리모컨 건전지 삽입하기
1. 건전지 삽입부를 당겨 뺍니다. 2. "+"극이 위로 향하게 삽입하세요. 3. 삽입부를 밀어
넣으세요.
NEXD HDMI Splitter
1
2
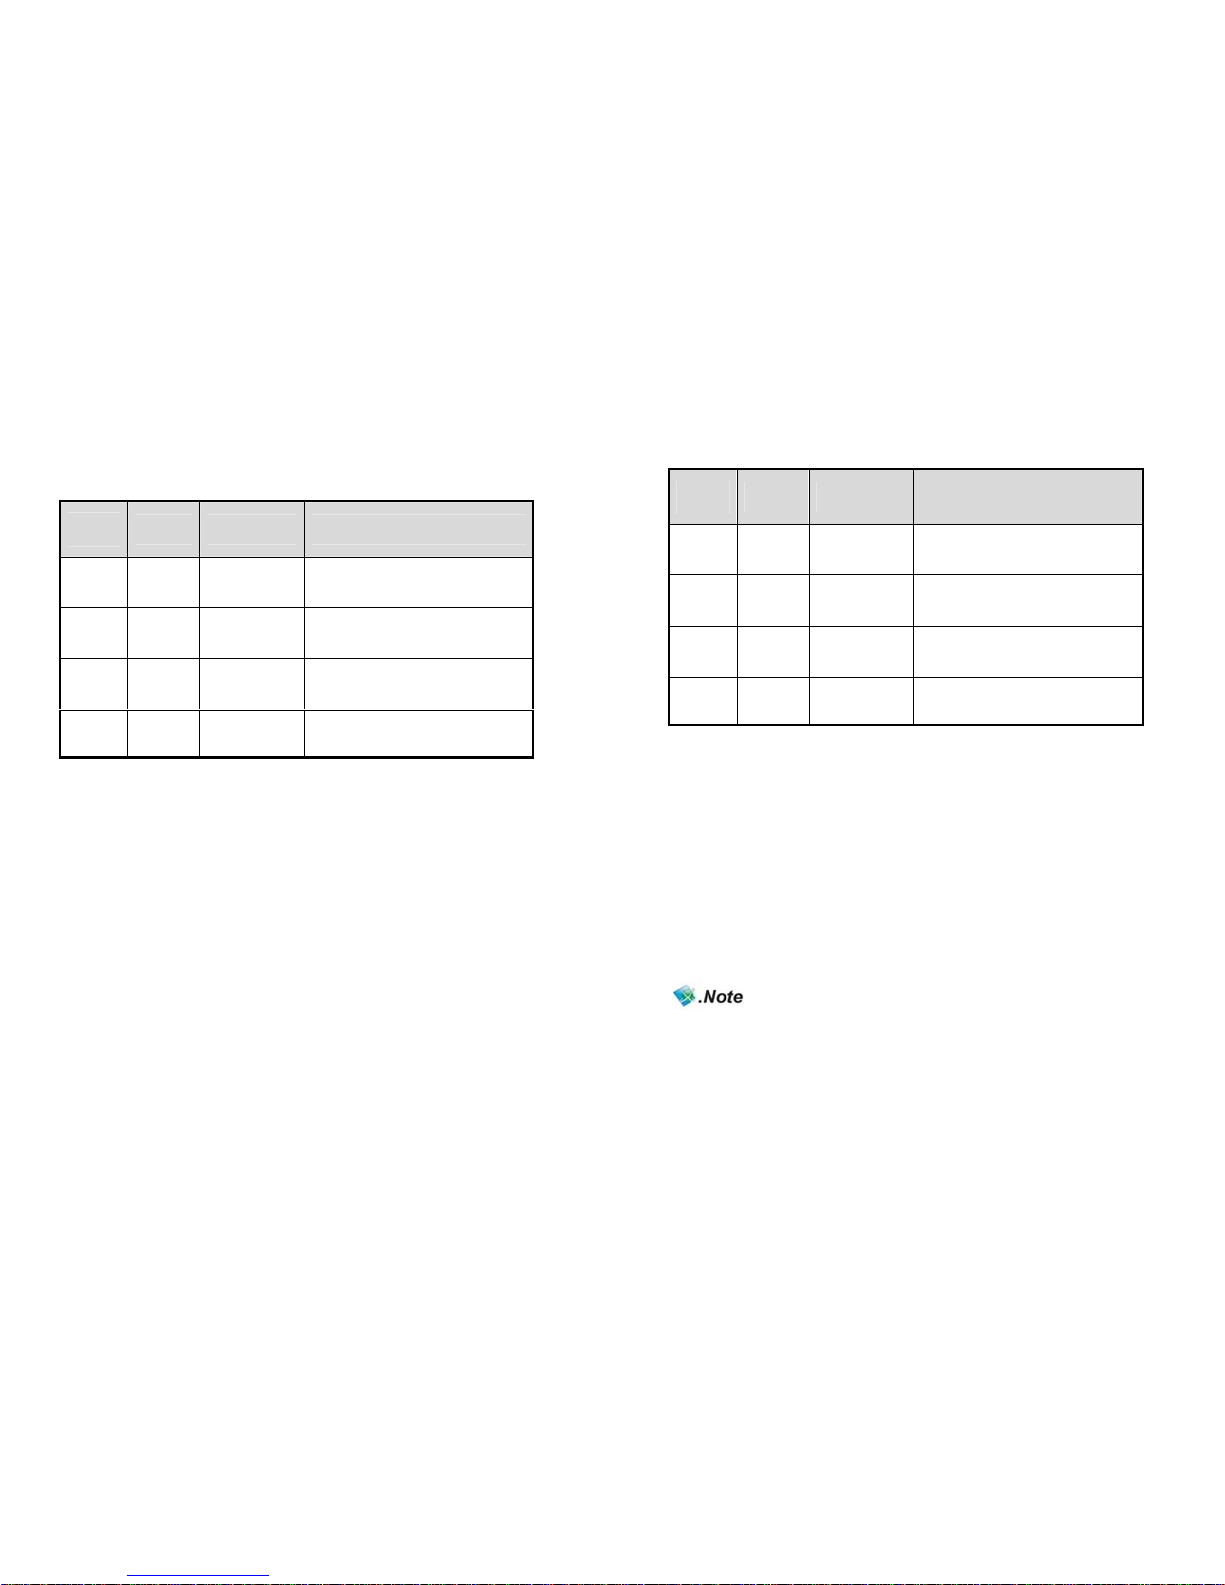
연결하기
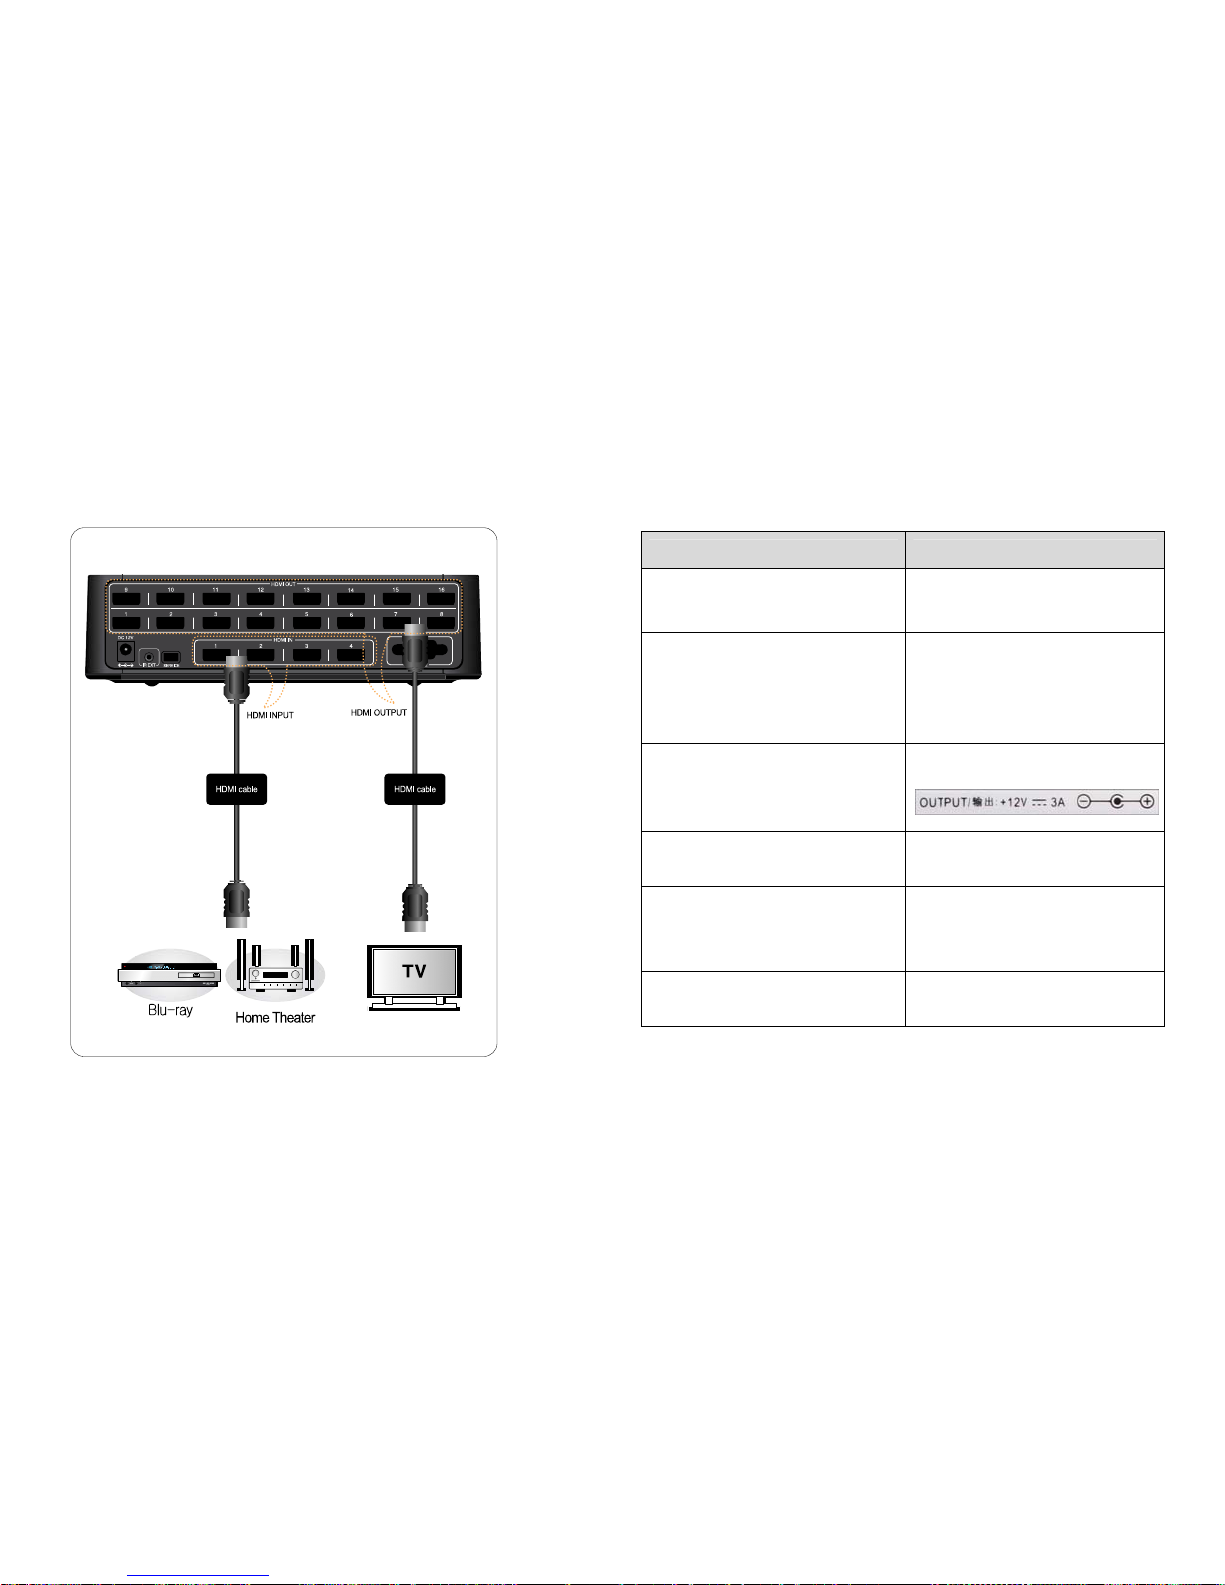
HD MI 케이블로 연결하는 방법입니다.
(ex. 입력: Blu-ray Player, HD Stream Generator, 출력: PDP, LCD TV)
※ 1080p/50~60Hz 이상의 해상도, 720p/1080i/50~60Hz/Deep Color,
720p/1080i/1080p/100~120Hz(High Refresh Rate) 를 지원하기 위해서는 High
sp ee d HD MI C ab le (V er si on 1 .3 )을 반드시 사용하시기 바랍니다.
※ 영상의 분배를 위해 별도의 케이블이 필요하시면 제조사 또는 구매처 에 문 의하시기
바랍니다.
Page 7
User’s Manual
13
NEXD HDMI Splitter 사용법
1. N EX D S pl itt er 의 전원 스위치를 켭니다.
2. 사용 하려는 영상입력기기( Bl u- ra y Pl ay er o r HD S et -t op b ox, e tc .) 의 전원을
켭니다.
3. 디스플레이 기기( LC D TV , PD P TV et c) 의 전원을 켭니다.
4. 사용 하려는 영상출력 기기와 연결된 입력 번호를 선택합니다.
NE XD H DM I Sp li tt er 전면부의 “I np ut 1~ In pu t4 ” 버튼을 누르면 됩니다.
HD(1080p)급의 고화질 영상 출력장비(Blu-ray Player, HD set-top box)를 연결하여
사용하는 경우 O ut pu t 단자와 연결된 디스플레이 기기는 H D급 고화질 T V의 H D급
입력 단자 이어야 합니다.
NEXD HDMI Splitter
1
4
문제해결하기
1. N EX D HD MI 전면부의 LE D 가 켜 져 있는지 확인 하시기 바랍니다.
2. N EX D HD MI 와 연결된 기기들의 전원 케이블이 제대로 연결되어 있는지 확인
합니다. 좀 더 자세한 사항은 ww w. di gi ta lz on e. co .k r 에서 확인 하시기 바랍니다.
CEC, USB
(펌웨어 업그레이드) & RS-232 (외부 컨트롤)
1. CEC : CEC 기능의 자세한 사항은 www.digitalzone.co.kr
에서 확인하시기 바랍니다.
2. USB : 펌웨어 업그레이드가 있다면, USB 를 통하여 손쉽게
업그레이드가 가능합니다.
3. RS-232 : 당사의 컨트롤 프로토콜이 제공하는 시리얼 포트를
통해 외부 컨트롤이 가능합니다.
SDK 는 당사 홈페이지 www.digitalzone.co.kr
을 통해 출시될
예정입니다. 다운로드와 사용법에 대한 좀 더 자세한 정보를
원하시면 www.digitalzone.co.kr 을 확인해 주시기 바랍니다.
Page 8
User’s Manual
15
EDID Emulation Mode 선택 방법
1. Dynamic mode
Function
Number
Mode
Summary
Description
F1 Normal
Safety
configuration
모든 출력 장치의 교집합을 취함
F2 MaxAudio Max audio
모든 출력 장치 중
Audio
부분은 최대
값을 취함
F3 Copy 1st HDMI Port 첫 번째
출력장치의
EDID를
사용함
F4 MaxAll
Max all
capability
모든 출력장치의 합집합을 취함
.
설정 방법
1.전면부의 F키를 2초 이상 누릅니다.
2.기존에 설정된 모드가 깜박인 후 input1~4까지 전체가 깜박입니다.
3.1~4번 중 선택합니다.
4.선택한 Function Number(input1~input4)LED가 깜박이며 설정이 됩니다
.
NEXD HDMI Splitter
1
6
2. Static mode
Function
Number
Mode
Summary
Description
F5 SD SD mode
Audio : 2Ch, PCM
Video : 480i,p/60Hz, 576i,p/50Hz
F6 720P Force 720p
Audio : 2Ch, PCM
Video : 720p/50,60Hz
F7 1080i Force 1080i
Audio : 2Ch, PCM
Video : 1080i/50,60Hz
F8 1080p Force 1080p
Audio : 2Ch, PCM
Video : 1080p/50,60Hz
설정 방법
1.전면부의 F키를 더블클릭 합니다
2.기존에 설정된 모드가 깜박인 후 input1~4까지 전체가 깜박입니다.
3.1~4번 중 선택합니다.
4.1번->F5번 2번->F6번 3번->F7번 4번->F8번으로 선택 됩니다.
5.선택한 Function Number(input1~input4)LED가 깜박이며 설정이 됩니다.
1. F1이외의 모드 선택 시 전면의 “EE” LED가 On됩니다.
2. 리모컨 사용시에는 F키를 누르고 F1~F8 Mode 중에서 선택합니다.
Page 9
User’s Manual
17
고장신고 전 확인 사항 (Splitter Trouble Shooting Guide)
- 서비스를 의뢰 하기 전에 아래 내용을 확인 부탁 드립니다.
상태 : TV화면이 보이지 않거나, TV화면이 깜박일 때.
확인사항 조치사항
제품과 HDMI Cable이 연결
되어 있습니까?
1) Cable을 재 연결 하세요.
2) Cable을 교체하여 연결 하세요.
제품 앞면에 “POWER,
SYNC, DVI/HDMI, INPUT,
EE LED” LED 불이 꺼져있
거나, 깜박 입니까?
1) 전원 어뎁터가 연결 되어있는지 확인 하세요.
2) 제품 전면에 있는 “Power”버튼을 눌러 주세요.
3) AC전원이 연결 되었는지 확인 하세요.
4) 아답터를 교체하세요.
당사가 지급한 어뎁터 입니
까?
1) 당사가 지급한 어뎁터만 사용하세요.
영상소스장비(Generator
Blu-Ray)가 켜져 있습니
까?
1)영상소스장비(Generator, Blu-Ray)와 TV을 직접 연결하여
정상 동작하는지 확인하세요.
Input 번호가 정확하게 선
택 되어 있습니까?
1) 소스영상이 1개라면 “Input1”에 연결하세요.
2) 소스영상이 “Input2”에 연결 할 경우, “,Input2”버튼을 강
제 선택 하세요.
Full HD TV, HD TV을 혼합
하여 데모 하고 계십니까?
1) EDID메뉴에서 해상도를 동일하게 낮춰주세요.
※ Spliiter 제품에 TV의 추가 연결 또는 연결 제거 시, EDID 초기화로 인해 TV화면에서
깜박임 발생 후 동작합니다.(깜박임이 발생 하여도 정상동작임)
NEXD HDMI Splitter
1
8
제품 규격
입력
(Input) 4조 HDMI Type A
출력
(Output) 16조 Default (Model: HDMI 416L)
12조,8조,4조 Optional (Model: HDMI 412L,408L,404L)
사용자
인터페이스
(User
Interface)
리모컨
IR
RS232 Remote PC/ Device
LED
표시등
POWER (전원) : On / Off 표시
SYNC : 입력 신호 유무 표시
HDMI : HDMI 혹은 DVI 입력 신호 유무 표시
HDCP : HDCP 사용 유무 표시
EE : EDID Emulation 사용 유무 표시
버튼
(Buttons)
터치 센서 사용
전원
(POWER)
입력
(Input 1 ~ input 4) 선택 가능
기능
(F1~F8) 선택 가능
전원
+12V/ 3A DC Jack
Firmware
Upgrade
지원
Mini-USB B type connector
HDMI Version 1.3 지원 Deep Color
Higher refresh rate (~120hz)
Colorimetry RGB / YCbCr / xvYCC
CEC
지원
Auto switching (자동 입력 소스 선택 기능)
Fast Switching Supporting faster input selection
EDID Emulation EDID Emulation mode supporting
Page 10
User’s Manual
19
English
NEXD HDMI Splitter
2
0
Important Safety Instructions
Please read following recommended safety instructions carefully.
Do not place this product on an uneven
surface.
Do not install on a surface where exposed to
direct sunlight, near heating .equipment or
heavy cold area.
Prevent water or dust from the product. Do not attempt to repair this product yourself.
Do not place glass contained of liquid
on the product.
Do not install this product near
any magnetic source.
Place the product at proper ventilation
area.
Do not place heavy items on the product.
© Copyright 2011, DigitalZone Co., Ltd. All rights reserved.
Read these operating instructions carefully before using the product.
Follow the safety instructions on the unit and the safety precautions listed in the
manual. Keep this manual handy for future reference.
Page 11
User’s Manual
21
Controls & Connection Options
Front
Rear (416L)
Rear (412L)
NEXD HDMI Splitter
2
2
Rear (408L)
Rear (404L)
Page 12
User’s Manual
23
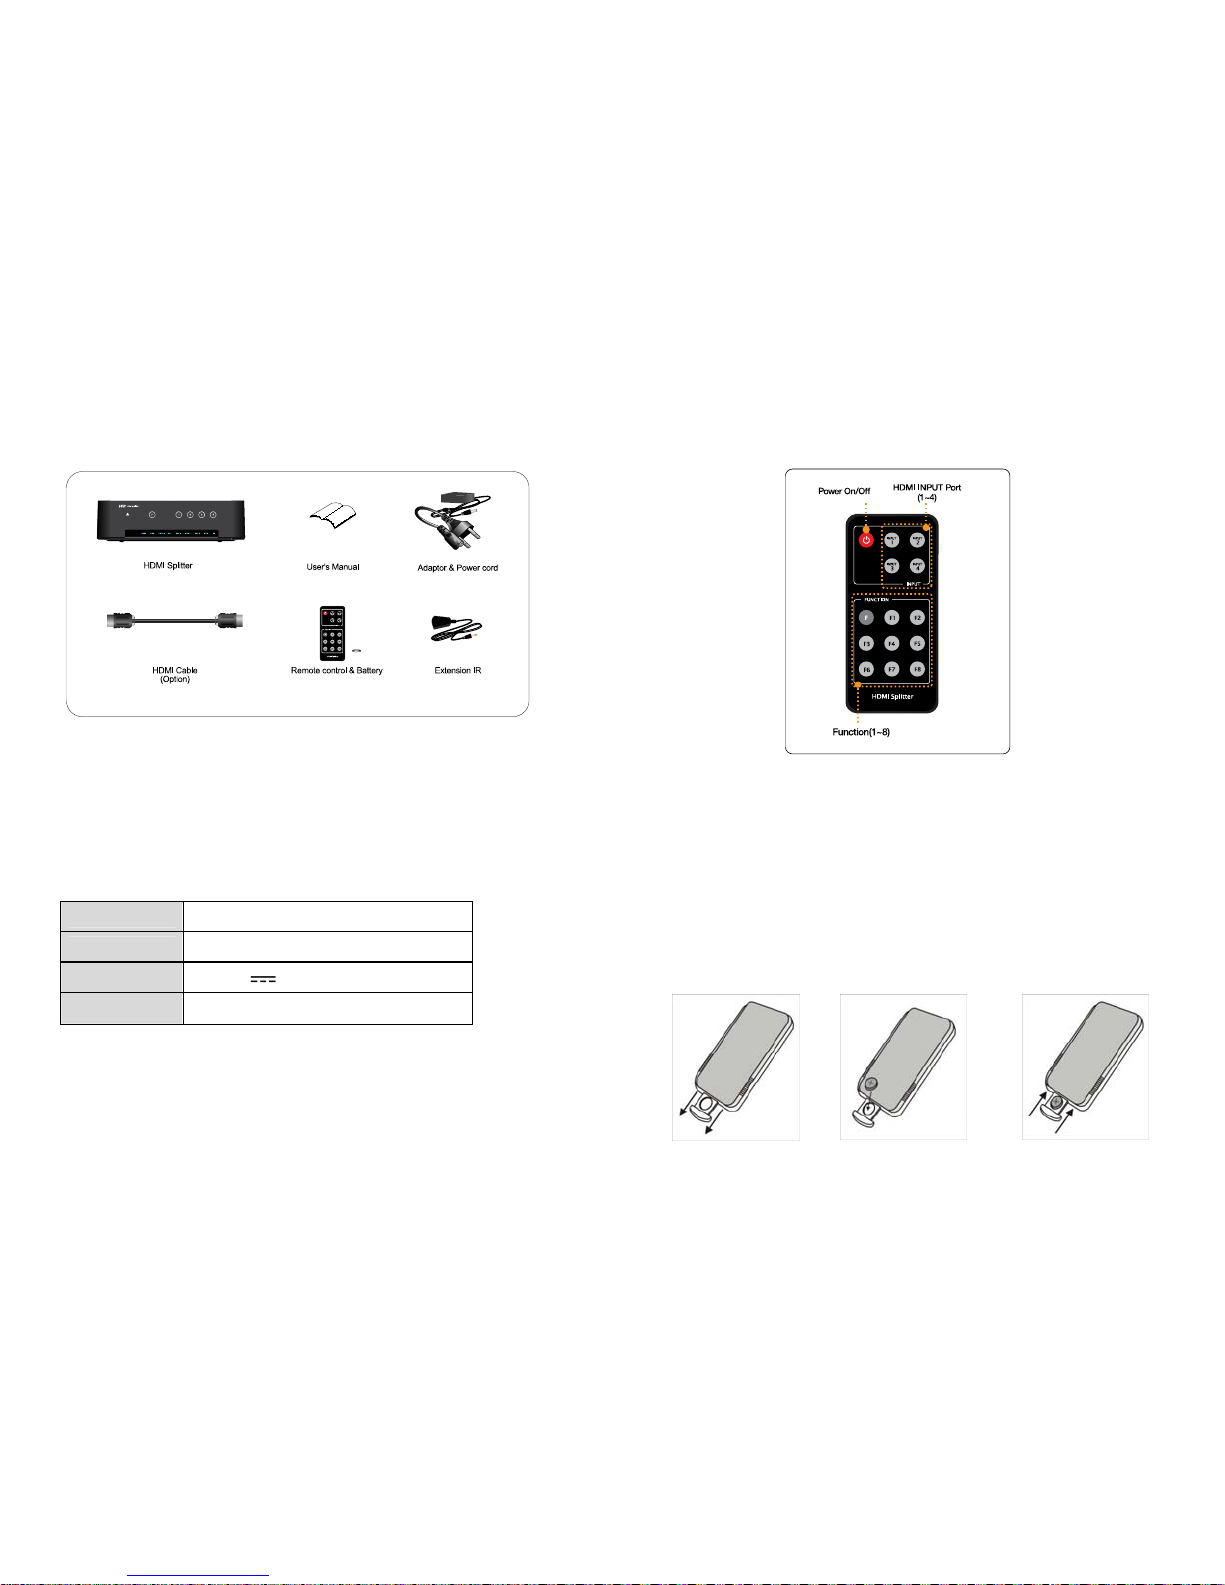
Packages and accessories
.
※ Contents are subject to change without prior notice.
※ Additional accessories should be purchased separately.
※ HDMI cable is optional accessories .
※ Adaptor Specification
Model DSA-36W-12 36A
Input AC 100-240V, 50/60Hz, 1.0A
Output DC 12V 3A
Manufacturer Dee Van Enterpri se Co., Ltd
NEXD HDMI Splitter
2
4
Remote Control Unit
※
It’s possible to use a remote controller within 3~5m, 60 degree of angle scope.
※
You can use an extension receiver for a remote controller if it’s far away from the
system.
The receiver in the system will not work when the extension reciever is connected.
- Turn the unit off before connecting the extension reciever.
Insert battery
1. Pull out the insert part. 2. Insert battery after checking. 3. Push in the insert part.
“+” polarity
Page 13
User’s Manual
25
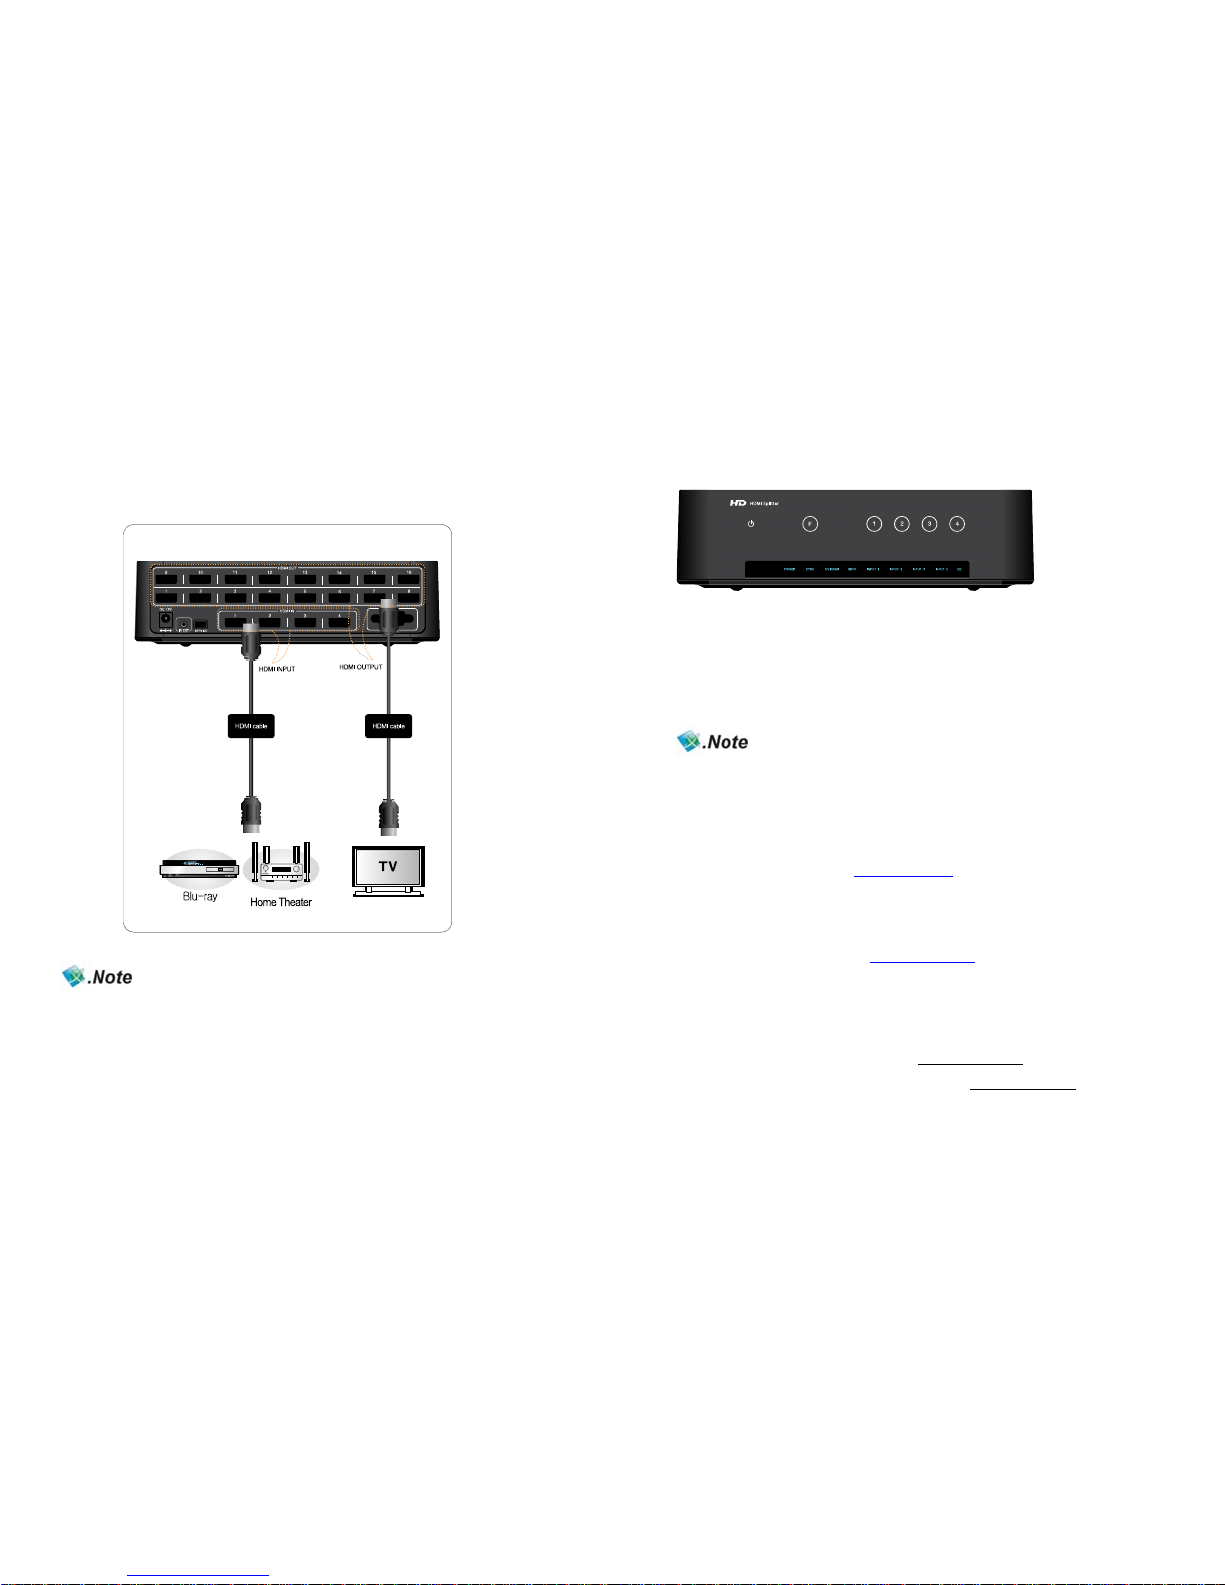
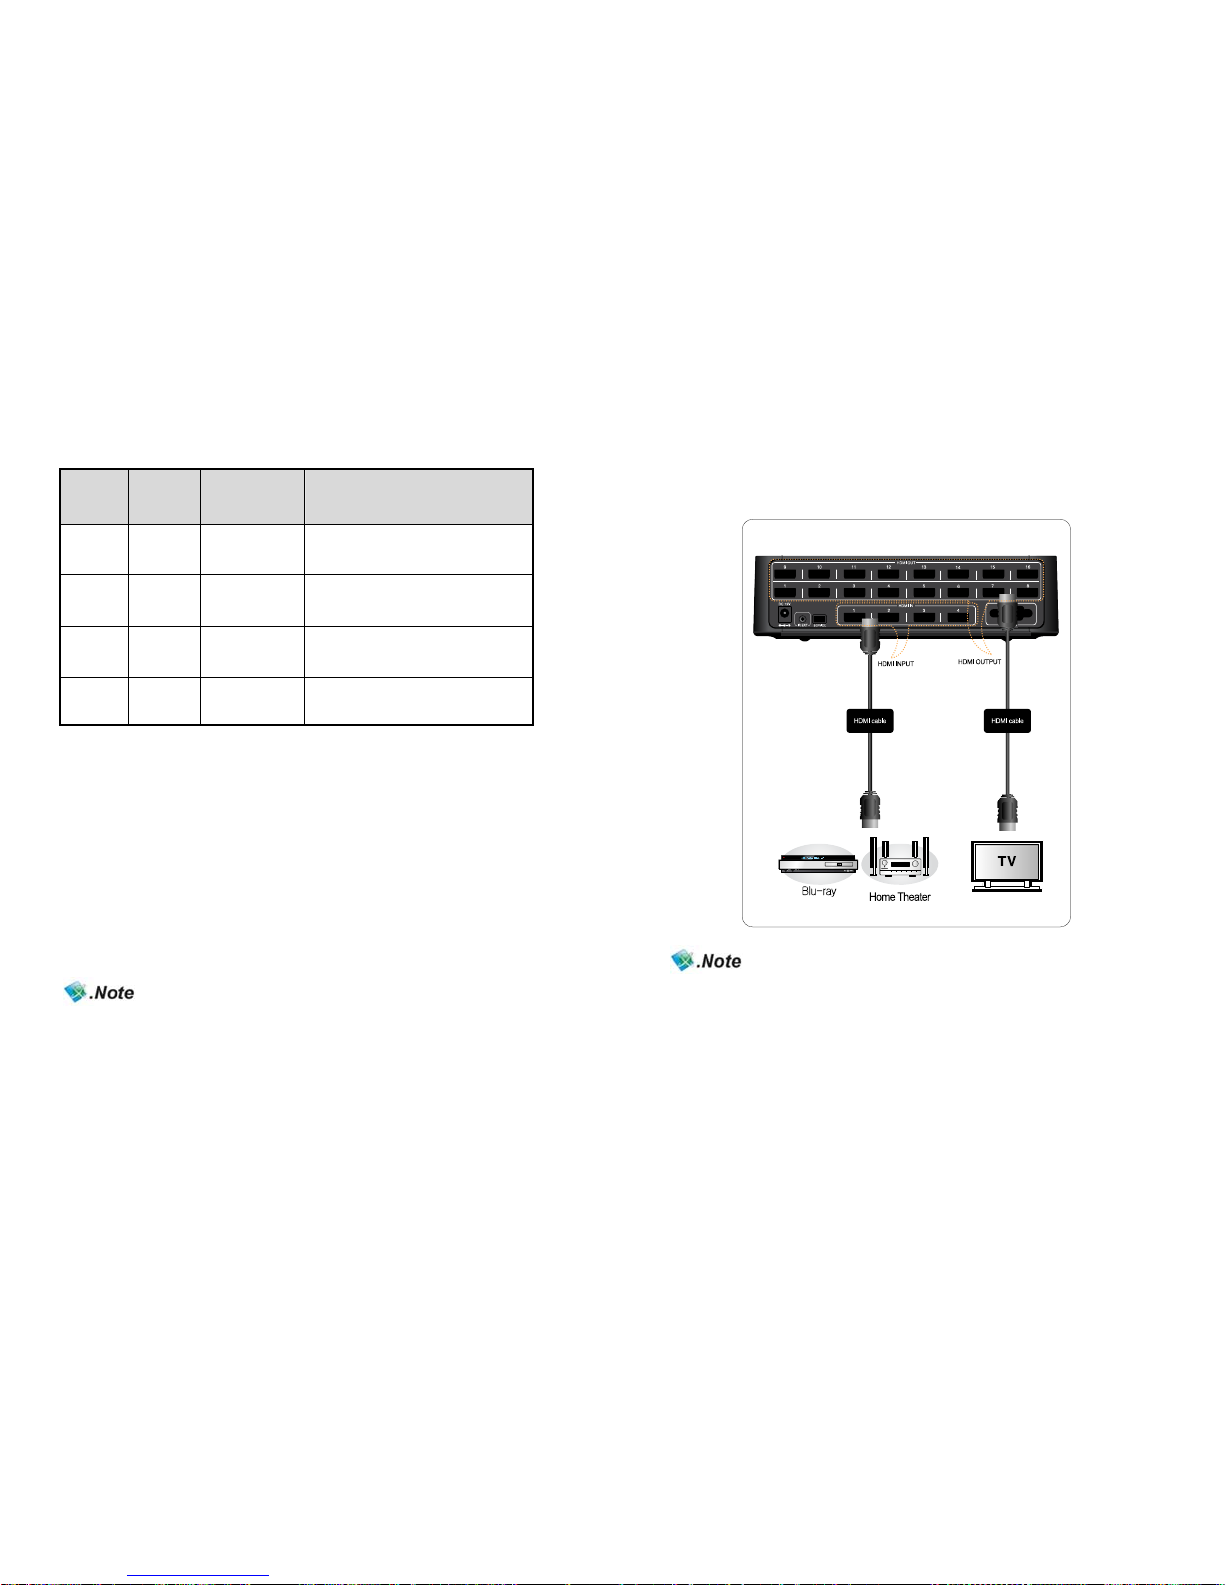
Connection
How to connect devices with splitter
(- Input: Blu-ray Player, HD Stream Generator -Output: PDP, LCD TV)
※ You must use High Speed HDMI cable supporting HDMI 1.3 if you like to use Deep
Color, High refresh rate and resolution above 1080p50~60hz.
(720p/1080i/50~60Hz/Deep Color, 720p/1080i/1080p/100~120Hz High Refresh Rate)
※ Please ask manufacturer or store you purchased, if you need additional HDMI cables
for more connection.
NEXD HDMI Splitter
2
6
How to use NEXD HDMI Splitter
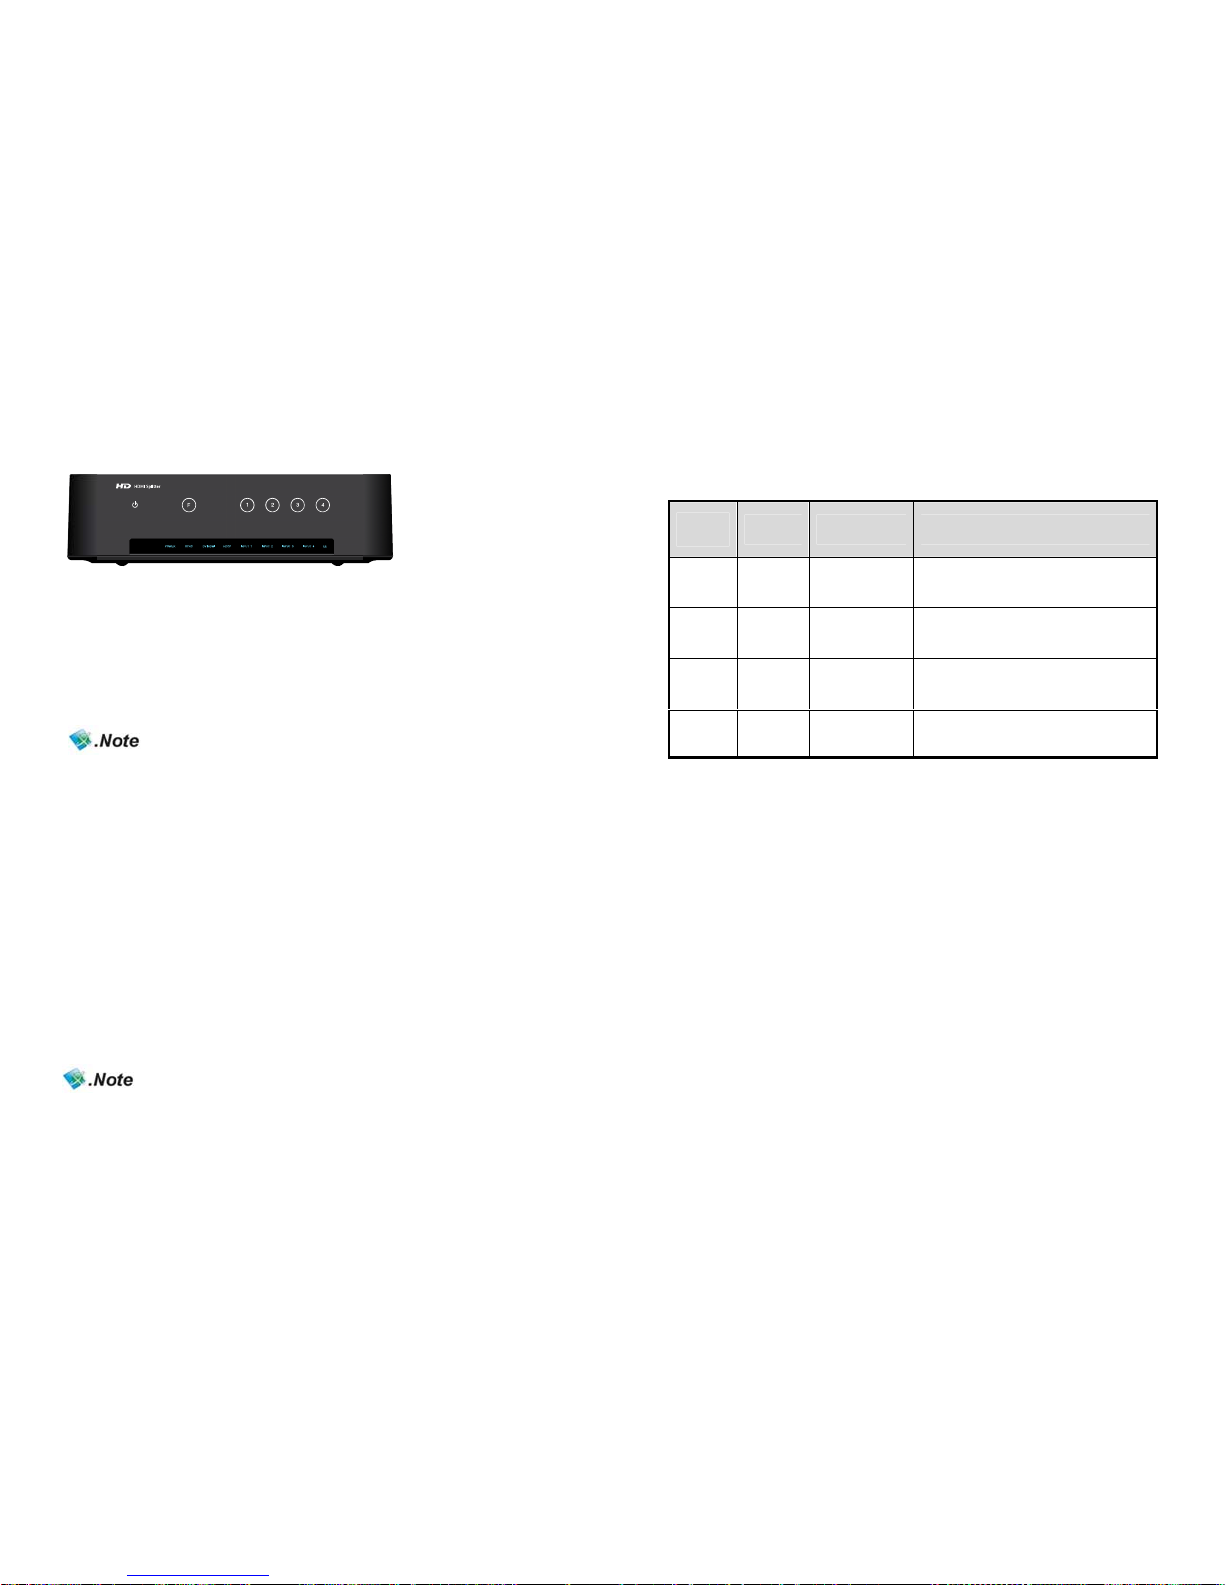
1. Power ON NEXD HDMI splitter.
2. Power on source players to use such as Blu-ray Player or HD Set-top box, etc
3. Power on display devices
4. Choose one of the input no. for the source player to use.
It’s possible to select the input number by touching the number button
in the front panel or by pressing the button in the remote control unit.
You must connect Full HD TV to use HD player supporting
1080p ( Blu-ray player, HD set top box)
Troubleshooting for no power
- Check if LED light on the front is turned on.
- Make sure the power cord connectors on both ends are firmly attached.
Please refer to the webpage, www.dzonei.com
for more detailed informatio n
for the troubleshooting
CEC, USB (Firmware upgrade) & RS-232 (Remote Control)
1. CEC : Refer to the webpage, www.dzonei.com for the information
of CEC function.
2. USB : You can upgrade firmware by USB easily when new firmware
is released.
3. RS-232 : RS-232 is capable of external control via serial port provided
control protocol by DigitalZone.
4. Remark: The SDK will be released in www.dzonei.com
.
Please check more detailed information in www.dzonei.com
regarding download and how to use.
Page 14
User’s Manual
27
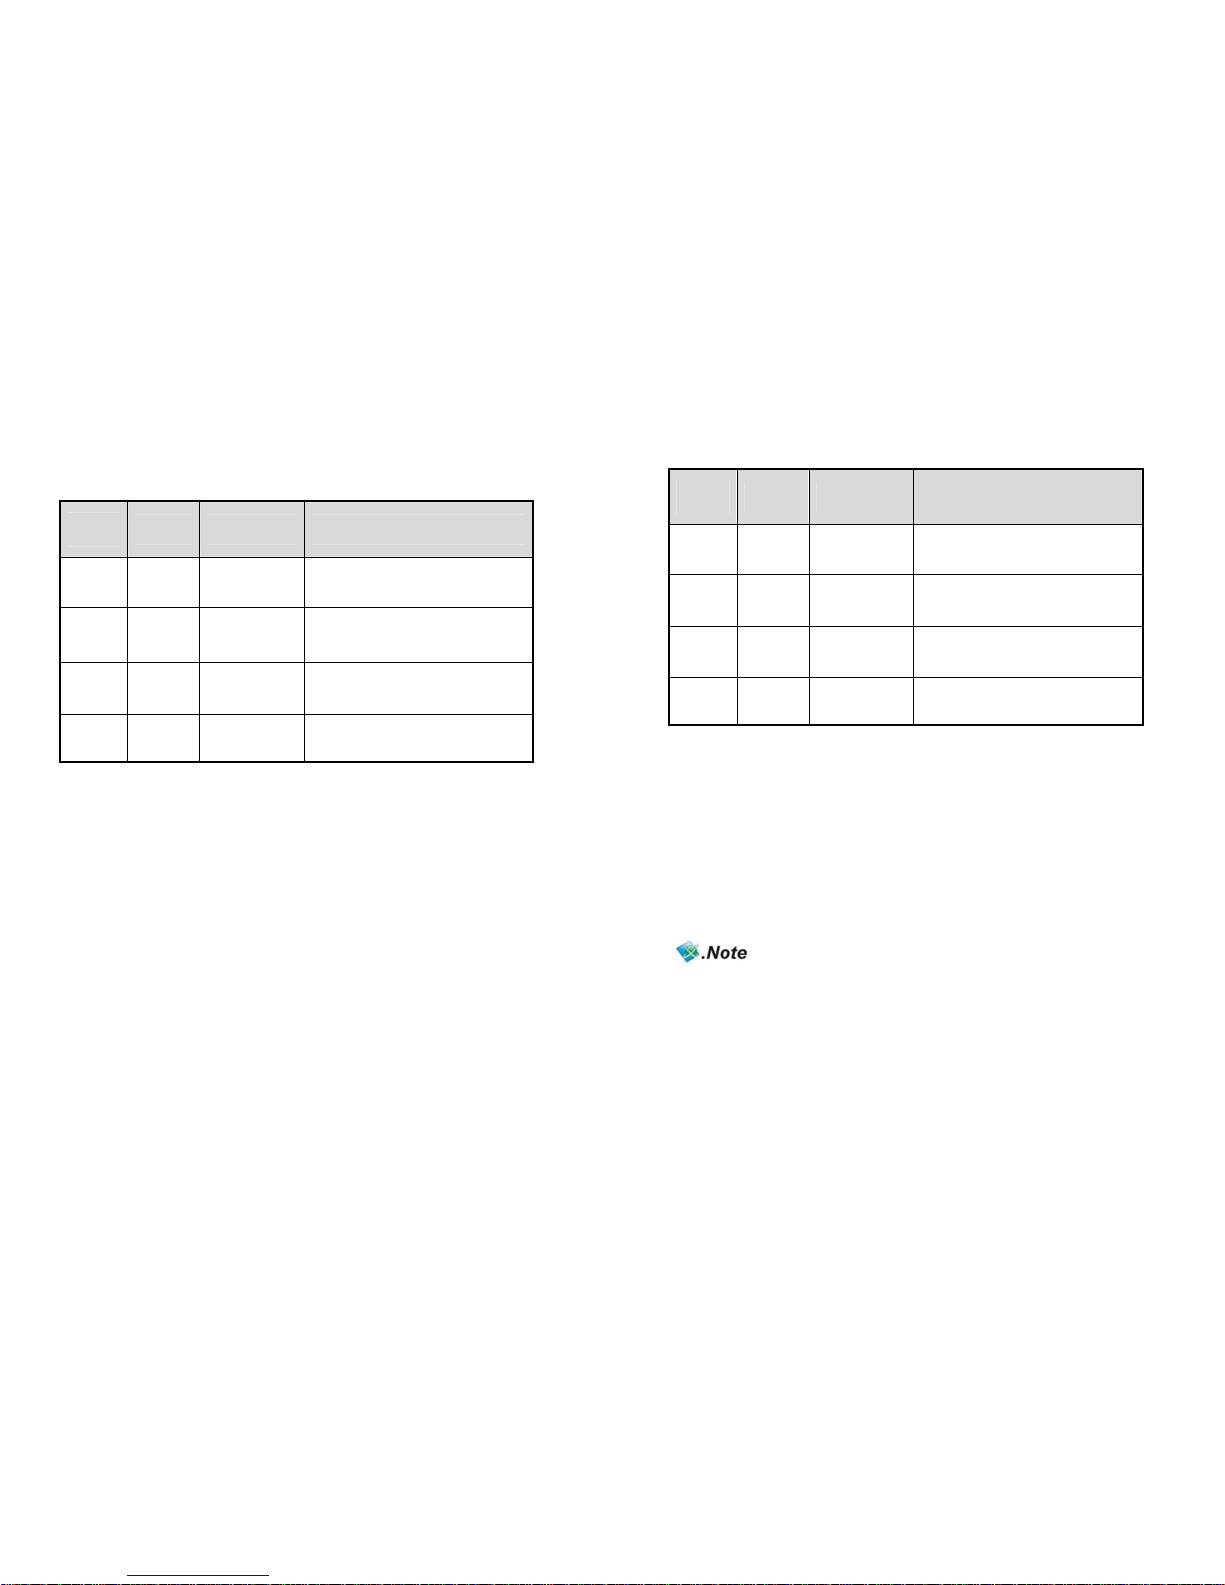
How to use EDID Emulation Mode
1. Dynamic mode
Function
Number
Mode
Summary
Description
F1 Normal
Safety
configuration
Intersection of all those display
devices
F2 MaxAudio Max audio
Video : Intersection of all those display
devices
Audio: it takes maximum value.
F3 Copy 1st HDMI Port
Follow EDID information of the display
device connected 1
st
HDMI output.
F4 MaxAll
Max all
capability
Joining EDID information of all those
display devices.
How to set Dynamic mode.
1. Keep touching “F” key on front over 2sec.
2. All LEDs of input1~4 are blinking after pre-registered mode LED blinking.
3. Select No. 1~4.
4. Selected LED function Number (input1~input4) is blinking and be set. .
NEXD HDMI Splitter
2
8
2. Static mode
Function
Number
Mode
Summary
Description
F5 SD SD mode
Audio : 2Ch, PCM
Video : 480i,p/60Hz, 576i,p/50Hz
F6 720P Force 720p
Audio : 2Ch, PCM
Video : 720p/50,60Hz
F7 1080i Force 1080i
Audio : 2Ch, PCM
Video : 1080i/50,60Hz
F8 1080p Force 1080p
Audio : 2Ch, PCM
Video : 1080p/50,60Hz
How to set Static mode.
1. Double-click “F” key.
2. All LEDs of input1~4 are blinking after pre-registered mode LED blinking.
3. Select No. 1~4.
4. No.1->F5 No.2->F6 No.3->F7 No.4->F8
5. Selected LED function Number (input1~input4) is blinking and be set. .
- When above functions are selected, “EE” LED will be ON except F1.
- In case of using remote control, select F1~F8 after pressing "F" key.
Page 15
User’s Manual
29
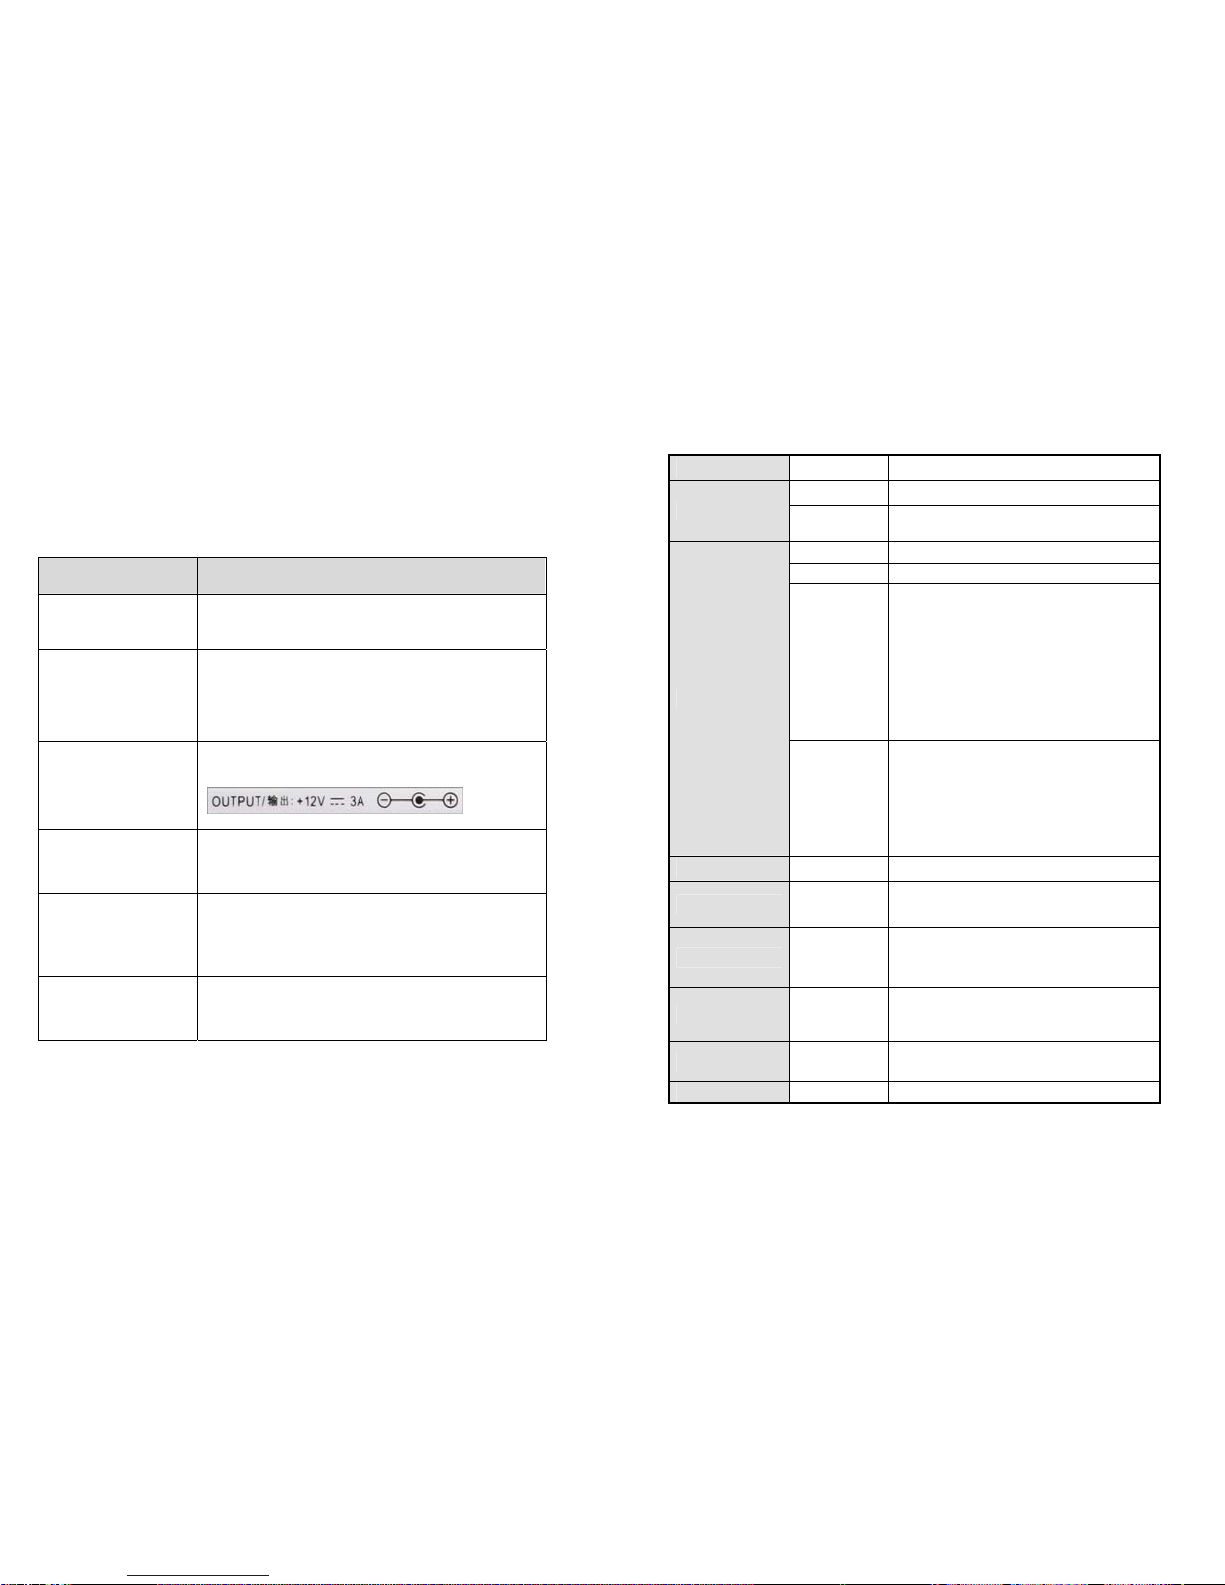
Troubleshooting Guide for Splitters
- Please check the following before contacting the Customer Center for service.
Status: When the TV screen does not show anything or is blinking
Check List Measures
Is the product connected to
the HDMI Cable properly?
1) Connect the product to the cable correctly .
2) Replace the cable and connect the new one.
Is the LED for “POWER,
SYNC, DVI/HDMI, INPUT,
EE LED” on the front blinking
or off?
1) Check if the power adapter is connected properly .
2) Press the “Power” button on the front.
3) Check if the AC power is connected properly.
4) Replace the adapter.
Is the adapter enclosed with
the product supplied by
DIGITALZONE?
1) Use an adapter supplied by DIGIT ALZONE only .
Are the video source
equipments (Generator and
Blu-Ray) turned on?
1) Directly connect the video source equipments (Generator and
Blu-Ray) to the TV to see if they work normally .
Has the Input number been
selected properly?
1) Select “Input1” for one vide o source.
2) If “Input2” is selected, press the “Input2” button on the front.
Are you displaying the Full
HD TV and the HD TV
together?
1) Decrease and set the same resoluti on from the EDID menu.
For example, change the resolution output to 1080i.
※
When additionally connecting or removing a TV to or from a splitter, the TV screen may blink for a few
seconds and then become normal due to the initialization of EDID. (This is not an error but a normal
operation.)
NEXD HDMI Splitter
3
0
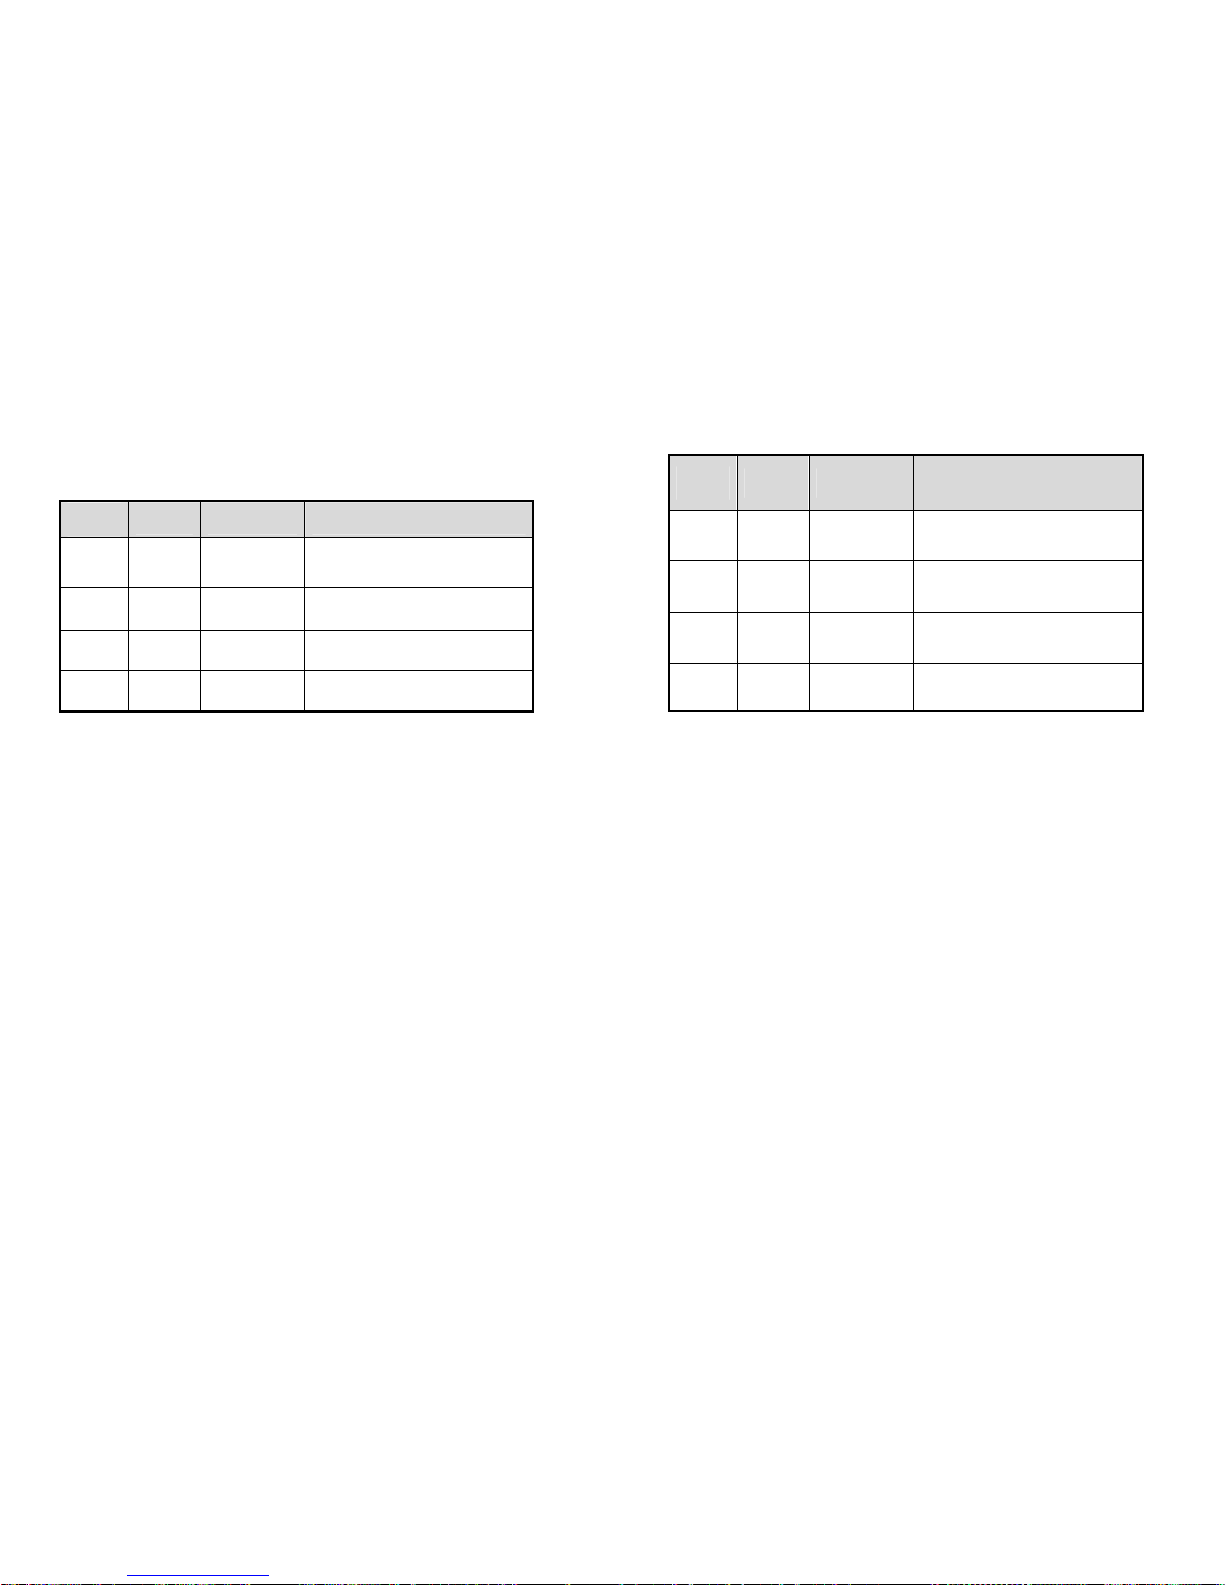
Specification
Input 4EA HDMI Type A
Output
16EA Default (Model: HDMI 416L)
12EA, 8EA, 4EA Optional (Model: HDMI 412L,408L,404L)
User Interface
Remote Control IR
RS232 Remote PC/ Device
LED
POWER : On / Off
SYNC : Indication of valid input signal
HDMI: Input signal is HDMI or DVI
HDCP: HDCP being used
EE : EDID Emulation being used.
Buttons
T ouch sensors
POWER
Selectable Input 1 ~ input 4
Selectable function F1~F8
Power +12V/ 3A DC Jack
Firmware Upgrade Yes Mini-USB B type connector
HDMI Version 1.3
Deep Color
Higher refresh rate (~120hz)
Colorimetry RGB / YCbCr / xvYCC
CEC Yes Auto switching
Fast Switching Supporting faster input selection
EDID Emulation E DID Emulation mode supportin g
Page 16

User’s Manual
31
Chinese
NEXD HDMI Splitter
3
2
NEXD HDMI
分配器手册
1. 跟NEXD HDMI
和播放器和电视用
HDMI
线连接
2.
开电视
3. 开NEXD NEXD HDMI Splitter.
4.
开播放器例如
Blu-ray
播放器HD机顶盒
.
5.
选择输入端子号码
为了选择输入号码按遥控器的输入号码或前面触屏钮
注意
:
※
为了连接
1080p
播放器得跟
Full HD
电视连接
※ 为了用 Deep Color(沈颜色)及高 Refresh Rate 及高分辨率得
1080p50~60hz 跟高速 HDMI 1.3 线连接(720p/1080i/50~60Hz/Deep Color,
720p/1080i/1080p/100~120Hz High Refresh Rate)
解决问题
1. 请确认 NEXD HDMI 前端的 LED是否打开;
2. 请确认连接于 NEXD HDMI 的机器的电源线是否连接正确。欲了解更多详情,
请在 www.dzonei.com 进行确认。
CEC, USB (
固定软件升级
) & RS-232 (
遥远控制)
1. CEC : 在 www.dzonei.com参考.
2. USB : 有新固定软件用USB升级
3. RS-232 : 跟DigitalZone提供议定命令语用RS-232遥远控制
※ 参考: 新固定软件及 RS-232议定命令语在 www.dzonei.com下载
Page 17
User’s Manual
33
EDID Emulation Mode
的选择方法
1. Dynamic mode
Function
Number
Mode
Summary
Description
F1 Normal
Safety
configuration
选择所有输出设备的交集
F2 MaxAudio Max audio
所有输出设备中
Audio
部分取最大值
F3 Copy 1st HDMI Port
使用第一个输出设备的
EDID
F4 MaxAll Max all capability
选择所有输出设备的集合
设置方法
1.
前端的F键按下2秒以上;
2.
现有已设定模块闪烁以后,直到
input1~4
全部闪烁;
3.从1~4键中进行选择;
4.所选 Function Number(input1~input4)LED
闪烁,设置到位。
NEXD HDMI Splitter
3
4
2. Static mode
Function
Number
Mode
Summary
Description
F5 SD SD mode
Audio : 2Ch, PCM
Video : 480i,p/60Hz, 576i,p/50Hz
F6 720P Force 720p
Audio : 2Ch, PCM
Video : 720p/50,60Hz
F7 1080i Force 1080i
Audio : 2Ch, PCM
Video : 1080i/50,60Hz
F8 1080p Force 1080p
Audio : 2Ch, PCM
Video : 1080p/50,60Hz
How to set Static mode.
1. 双击前端的F键;
2.
现有已设定模块闪烁以后,直到
input1~4
全部闪烁;
3. 从1~4
键中进行选择;
4.
依次选择1键
->F键 2键->F6键 3键->F7键 4键->F8
键
5. 所选
Function Number(input1~input4)LED
闪烁,设置到位。
** NOTE:
1.选择F1以外模块时,前端的“EE” LED会打开;
2.使用遥控器时,通过按F键从F1~F8 Mode中进行选择。
Page 18
User’s Manual
35
例如:连接
(-输入: Blu-Ray Player, HD Stream Generator - 输出: PDP, LCD TV)
NEXD HDMI Splitter
3
6
问题.对策(分流器故障分析指南
)
- 顾客朋友,在您申请服务之前,请先阅读以下须知事项。
状态:TV画面不能显示或者不停闪动时
确认事项
解决对策
请确认产品和
HDMI Cable(HDMI
线材)是否
连接完好。
1
)请将电线正确地再连接一次。
2
)换一根电线,重新连接一次。
请确认产品前方显示
“
POWER, SYNC, DVI/HDMI, INPUT, EE LE
D
(电源,同步,
DVI/HDMI
,输入,
EE LED
)
的
LED
灯是否关着,或者是否在闪烁。
1
)请确认电源适配器是否连接完好。
2
)请按一下产品前面的“电源”按钮。
3
)请确认AC电源是否连接完好。
4
)请换一个新的适配器。
请确认是不是我司配套提供的指定适配器。
1
)请务必使用我司提供的适配器
请确认影像设备(发电机,蓝光)是否有打
开?
1
)画像输入设备(发电机,蓝光)是否有和
T
V
直接连接好并正常工作。
是否正确选择了
Input
号码?
1
)影像源如果只有1个,请和“
Input1
”连
接。
2
)若影像源是和“
Input2
”连接,那么请选择
前台上的“
Input2”
是否同时选择了 Ful l H D T V 和 HD TV ?
1
)请在
EDID
菜单上,设置统一的分辨
率。例如:将输出分辨率调整为
1080i。
※在Splitter(分流器)产品上和电视附加连接或者切断连接时,由于
EDID(
扩展显示标识数据
)
的初始化,电视画面在出现几秒的闪烁之后会重新恢复正常。(闪烁的发生是很正常的现象)
Page 19
User’s Manual
37
NEXD HDMI Splitter 规格
Input
4EA HDMI Type A
Output
16EA Default (Model: HDMI 416L)
12, 8, 4EA Optional (Model: HDMI 412L, 408L, 404L)
User Interface
Remote Control IR
RS232 Remote PC/ Device
LED POWER : On / Off
SYNC : Indication of valid input signal
HDMI: Input signal is HDMI or DVI
HDCP: HDCP being used.
EE : EDID Emulation
表示是否使用
Buttons Touch sensors
POWER
可以选择输入
(Input 1 ~ input 4)
可以选择功能
(F1~F8)
Power
+12V/ 3A DC Jack
Firmware
Upgrade
Yes Mini-USB B type connector
HDMI Versio n
1.3 Deep Color
Higher refresh rate (~120hz)
Colorimetry RGB / YC bCr / xvYCC
CEC
Yes Auto switching
Fast Switching
Supporting f aster input selection
EDID Emulation
EDID Emulation mode supporting
NEXD HDMI Splitter
3
8
Japanese
Page 20
User’s Manual
39
NEXD HDMI Splitter 使用方法
1. NEXD HDMI 電源スイッチをつけます。
2. 使用したい映像入力機器(Blu-ray Player or HD Set-top box, etc.)
の電源をつけます。
3. ディスプレイ機器(TV or Plasma TV, etc.)の電源をつけます。
4. 使用したい映像出力機器と接続されている入力番号を選択します。
NEXD HDMI 前面部の“Input1~Input4”ボタンを押します。
HD(1080p)用の高画質映像出力機器(Blu-ray Player, HD set top
boxes)を接続して使用する場合、出力端子に接続されたディスプレイ
機器はHD用高画質テレビのHD 用入力端子でなければなりません。
問題解決
1. NEXD HDMI 前面部の LED がつけてあるかどうかご確認ください。
2. NEXD HDMI に接続されている機器の電源ケーブルが正しく接続されているかどう
かをご確認ください。詳しくは、www.dzonei.com でご確認ください。
CEC、USB
(ファームウェアアップグレード) &RS-232(外部コントロール)
1. CEC : CEC 機能の詳細は、www.dzonei.com でご確認ください。
2. USB : ファームウェアがリリースされると、USB を使って簡単にア
ップグレードできます。
3. RS-232 : 本社のコントロールプロトコルが提供するシリアルポー
トを通し外部コントロールができます。
SDK は本社のホームページ www.dzonei.com を通してリリース
される予定です。ダウンロードと使用方法につきましての詳細は、
www.dzonei.com をご確認ください。
NEXD HDMI Splitter
4
0
EDID Emulation Mode 選択方法
1. Dynamic mode
Function
Number
Mode
Summary
Description
F1 Normal
Safety
configuration
すべての出力装置の共通集合を取る。
F2 MaxAudio Max audio
すべての出力装置の中でオーディオ部分
は最大値を取る。
F3 Copy 1st HDMI Port 1番目出力装置のEDIDを使う。
F4 MaxAll
Max all
capability
すべての出力装置の全体集合を取る。
設定方法
1.前面部のFキーを2秒以上押します。
2.既存に設定されたモードがちらついた後、
input1~4まで全体がちらつきます。
3.1~4番の中で選択します。
4.選択したFunction Number(input1~input4)LEDがちらついて設定されます。
Page 21
User’s Manual
41
1. Static mode
Function
Number
Mode
Summary
Description
F5 SD SD mode
Audio : 2Ch, PCM
Video : 480i,p/60Hz, 576i,p/50Hz
F6 720P Force 720p
Audio : 2Ch, PCM
Video : 720p/50,60Hz
F7 1080i Force 1080i
Audio : 2Ch, PCM
Video : 1080i/50,60Hz
F8 1080p Force 1080p
Audio : 2Ch, PCM
Video : 1080p/50,60Hz
設定方法
1.前面部のFキーをダブルクリックします。
2.既存に設定されたモードがちらついた後、
input1~4まで全体がちらつきます。
3.1~4番の中で選択します。
4.1番->F5番 2番->F6番 3番->F7番 4番->F8番に選択されます。
5.選択したFunction Number(input1~input4)LEDがちらついて設定されます。
1. F1以外のモード選択時に前面の“EE” LEDがオンになります。
2. リモコン使用時にはFキーを押しF1~F8 Modeの中で選択します。
NEXD HDMI Splitter
4
2
接続
HDMI ケーブルで接続する方法です。
(ex 入力: Blu-ray Player, HD Stream Generator、出力: PDP, LCD TV)
※ 1080p/50~60Hz 以上の解像度、720p/1080i/50~60Hz/Deep
Color、720p/1080i/1080p/100~120Hz(High Refresh Rate)を支援するためには、High
Speed HDMI ケーブルを必ずお使いください。
※ 映像の分配のために別のケーブルが必要であれば、製造メーカーまたは購入先までお問
い合わせください。
Page 22
User’s Manual
43
問題解決(Splitter Trouble Shooting Guide)
・サービス依頼の前に次の内容を必ずご確認ください。
状態:テレビ画面が見えない場合やテレビ画面が点滅する場合
確認事項 措置事項
製品が HDMI Cable に接続
されていますか?
1) Ca bl e をもう一度正しく接続してください。
2) Cable を交換して接続してください。
製品の前面の「POWER,SYN
C,DVI/HDMI,INPUT,EE L
ED」の LED ライトが消えて
いたり、点滅しています
か?
1) 電源アダプタが接続されているか確認してください。
2) 製品の前面にある「Pow er」ボタンを押してください。
3) AC 電源が接続されているか確認してください。
4) アダプタを交換してください。
付属のアダプタですか?
1) 付属のアダプタを使用してください。
画像ソース装置(Generator
Blu-Ray)がオンになってい
ますか?
1) 画像ソース装置(Ge nerator,Bl u- Ra y)とテレビを直接接続して正
常に動作するか確認してください。
Input 番号が正確に選択さ
れていますか?
1) ソース画像が 1 つの場合は「Input1」に接続してください。
2) ソース画像が「Inp ut2」に接続されている場合は、フロントの
「Input2」ボタンを選択してください。
Full HD TV、HD TV を混合
して展示していますか?
1) EDID メニューで解像度を同一に下げてください。
例えば、解像度出力を 1080 i に変更してください。
※ S plit te r 製品にテレビを追加接続したり、テレビの接続を除去すると、EDID 初期化によりテレビ画面が
数秒間点滅して正常に戻ります(点滅しても正常動作です)
NEXD HDMI Splitter
4
4
製品規格
入力 (Input) 4組 HDMI Type A
出力 (Output)
16組 Default (Model: HDMI 416L)
12組,8組,4組 Optional (Model: HDMI 412L,408L,404L)
ユーザーインタ
ーフェース
(User
Interface)
リモコン IR
RS232 Remote PC/ Device
LED 表示灯
POWER (電源) : On / Off 表示
SYNC : 入力信号有無表示
HDMI : HDMIまたはDVI入力信号有無表示
HDCP : HDCP 使用有無表示
EE : EDID Emulation 使用有無表示
ボタン
(Buttons)
タッチセンサー使用
電源(POWER)
入力(Input 1 ~ input 4) 選択機能可能
機能(F1~F8) 選択可能
電源 +12V/ 3A DC Jack
Firmware
Upgrade
支援 Mini-USB B type connector
HDMI Version 1.3 支援
Deep Color
Higher refresh rate (~120hz)
Colorimetry RGB / YCbCr / xvYCC
CEC 支援 Auto switching (自動入力ソース選択可能)
Fast Switching Supporting faster input selection
EDID Emulation EDID Emulation mode supporting
Page 23

User’s Manual
45
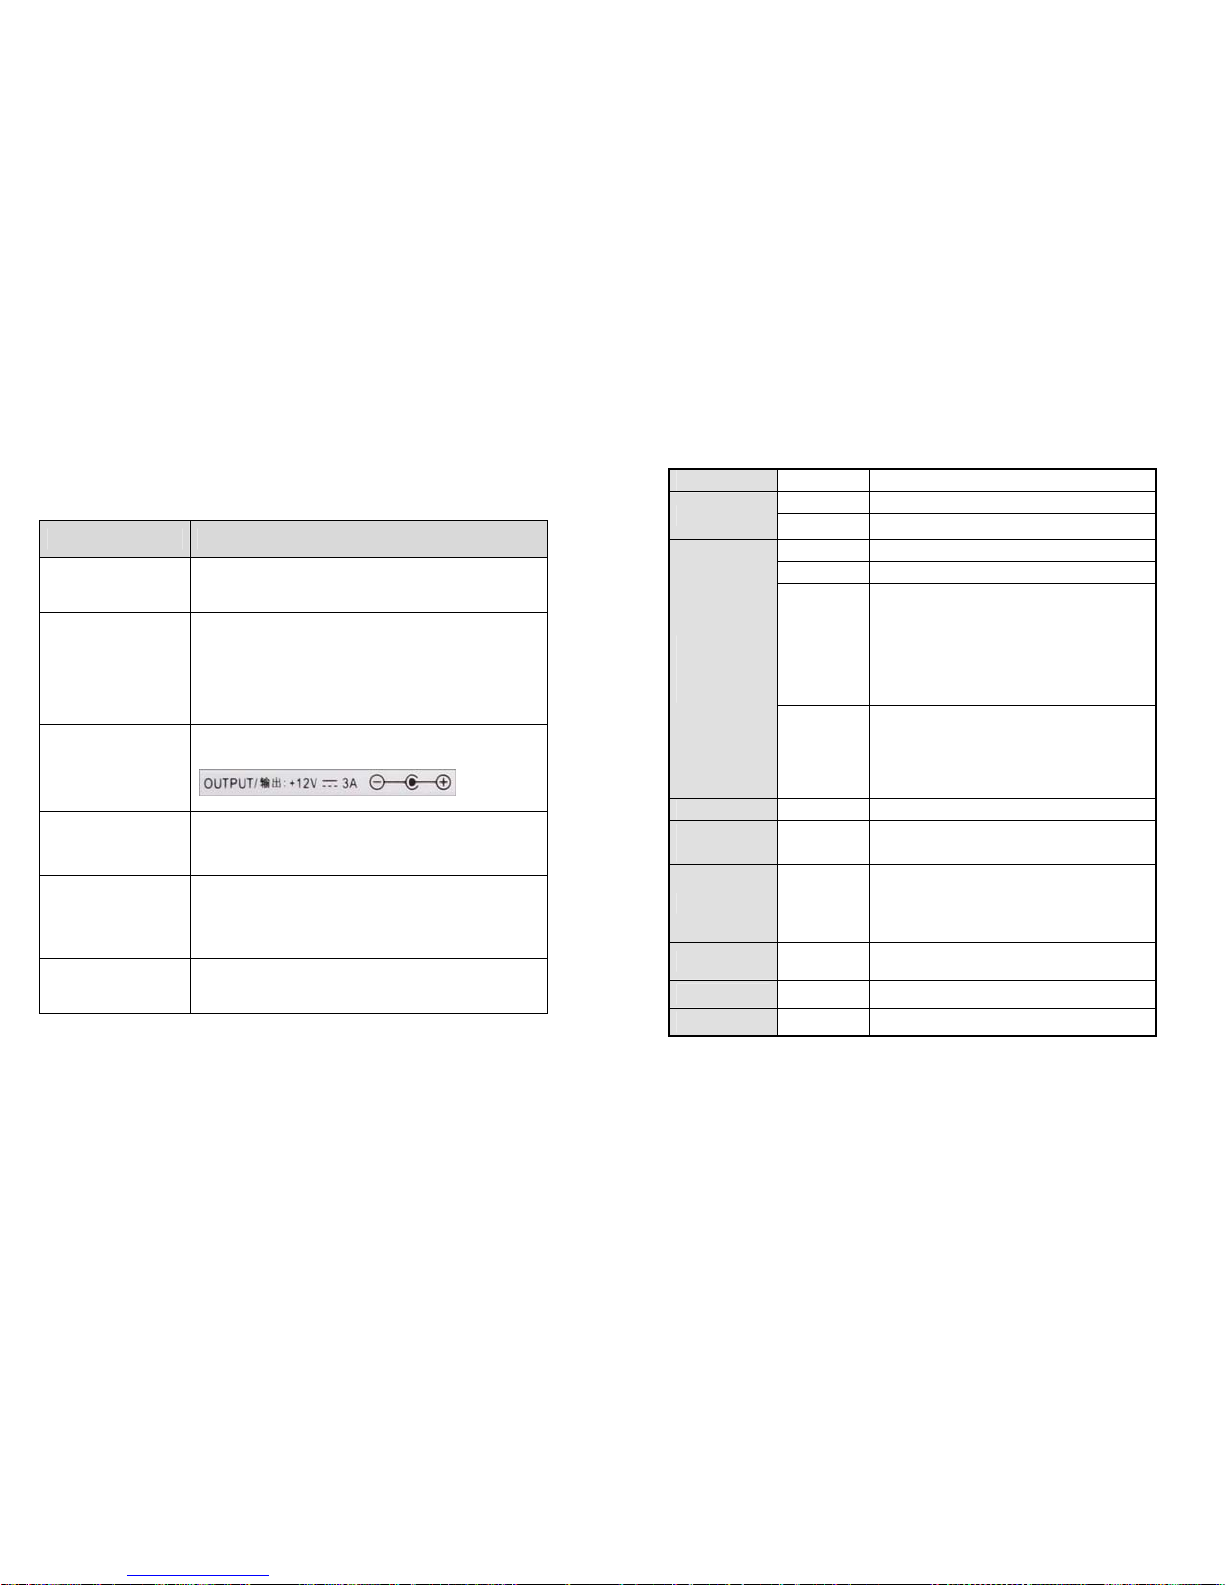
 Loading...