

Page 1

MPIO FY200 Users Manual
Product Specifications
Model Name MPIO FY200
Compression format MP3 (8 ~ 320 kbps), WMA (5 ~ 192 kbps), ASF
Built-in memory capacity 128/256/512 MB
FSTN type graphical 3-line LCD
LCD display
(Multi-color LED backlights – red, yellow green, orange)
Language support 36 languages
Display language English
File transfer rate Max. 4.5 Mbps
Earphone output 12 mW (R: 6 mW, L: 6 mW)
Signal-to-noise ratio 90 dB
Output frequency range 20 Hz ~ 20 KHz
Battery AAA alkaline battery
Continuous playback time Max. 14 hours (128 kbps MP3 file playback)
FM frequency range 76 ~ 108.0 MHz
FM output 10mW (R: 5 mW, L: 5 mW)
Signal-to-noise ratio of FM radio 45 dB
Dimensions/Weight
30(W) × 86.2(H) × 16(D)mm / 32g (Battery excluded)
Page 2

Getting Started
1. Install the MPIO Manager2 (provided with the FY200 Package CD) to your PC.
(For more information on installation, refer to page **.)
2. Insert battery to the FY200.
3. Press the
4. Connect the USB cable between PC and the FY200.
(Check the “USB connected” message on LCD.)
5. Run the Manager2 program by double-clicking the MPIO Manager2 icon on desktop.
(If you fail to connect the FY200 and PC, refer to page **)
6. Go to the folder with music f iles usi ng the PC's Explorer window a nd select the files to
download.
7. Disconnect the USB cable from the FY200.
8. After selecting track by pushing the Joy Stick key of the FY200, click the
shortly to playback the selected track.
Basics
1. Power on/ off
1) Press the
with MPIO Logo will appear.
Press any key again to skip the logo display.
2) Press the
button in the front panel for a few seconds to turn on the power.
button for a few seconds to turn on the power. The initial window
button for a few secon ds to turn off the power.
button
2. Volume Control
3) To increase the volume level: + button
4) To decrease the volume level: - button
! > Press the VOLUME Key for a few seconds to increase the volume fast.
3. Music Playback/Stop
5) After selecting the track by pushing the Joy Stick key, click the
playback it.
- Push the Joy Stick key to right/left to playback next track during playback.
The intro part of the track is played back when the key is pushed in 10 seconds
after playback.
The pervious track is played back when the key is pushed 10 seconds after
playback.
- Push the Joy Stick key to right/left for a few seconds to perform FF/REW during playback.
6) Press the
button to stop playback.
button to
Page 3

! > (Insert the figure of ‘no track’ icon!!!) When this icon appears, it indicates that
there is no the saved file. Download files using the MPIO Manager2.
4. Entering/Exiting Folder
7) Enter folder: After selecting the folder by pushing the Joy Stick key to right/left,
click the key.
8) Exiting folder: Click the REC key shortly to return to the parent folder.
5. Navigation
1) Push the Joy Stick key shortly during playback to switch to the Navigation mode.
9) After selecting the track by push the Joy Stick key to right/left, click the
shortly to playback it.
! > Available only in the Playback mode.
!> Press the REC key shortly to return to the playback screen from the Navigation
mode.
6. A-B Repeat
1) Press the REC key at the starting point of repeat during playback. The (B) icon will
start to blink. (Setting section A)
2) Press the REC key at the ending point of repeat. (Setting section B)
3) Press the REC key again to cancel repeat.
! > Available only in the Playback mode.
button
7. EQ Control
1) After entering the Menu mode by pushing the Joy Stick key for a few seconds, go
to the EQ menu by pushing the Key to right/left. The current EQ mode setting will
be highlighted.
Page 4
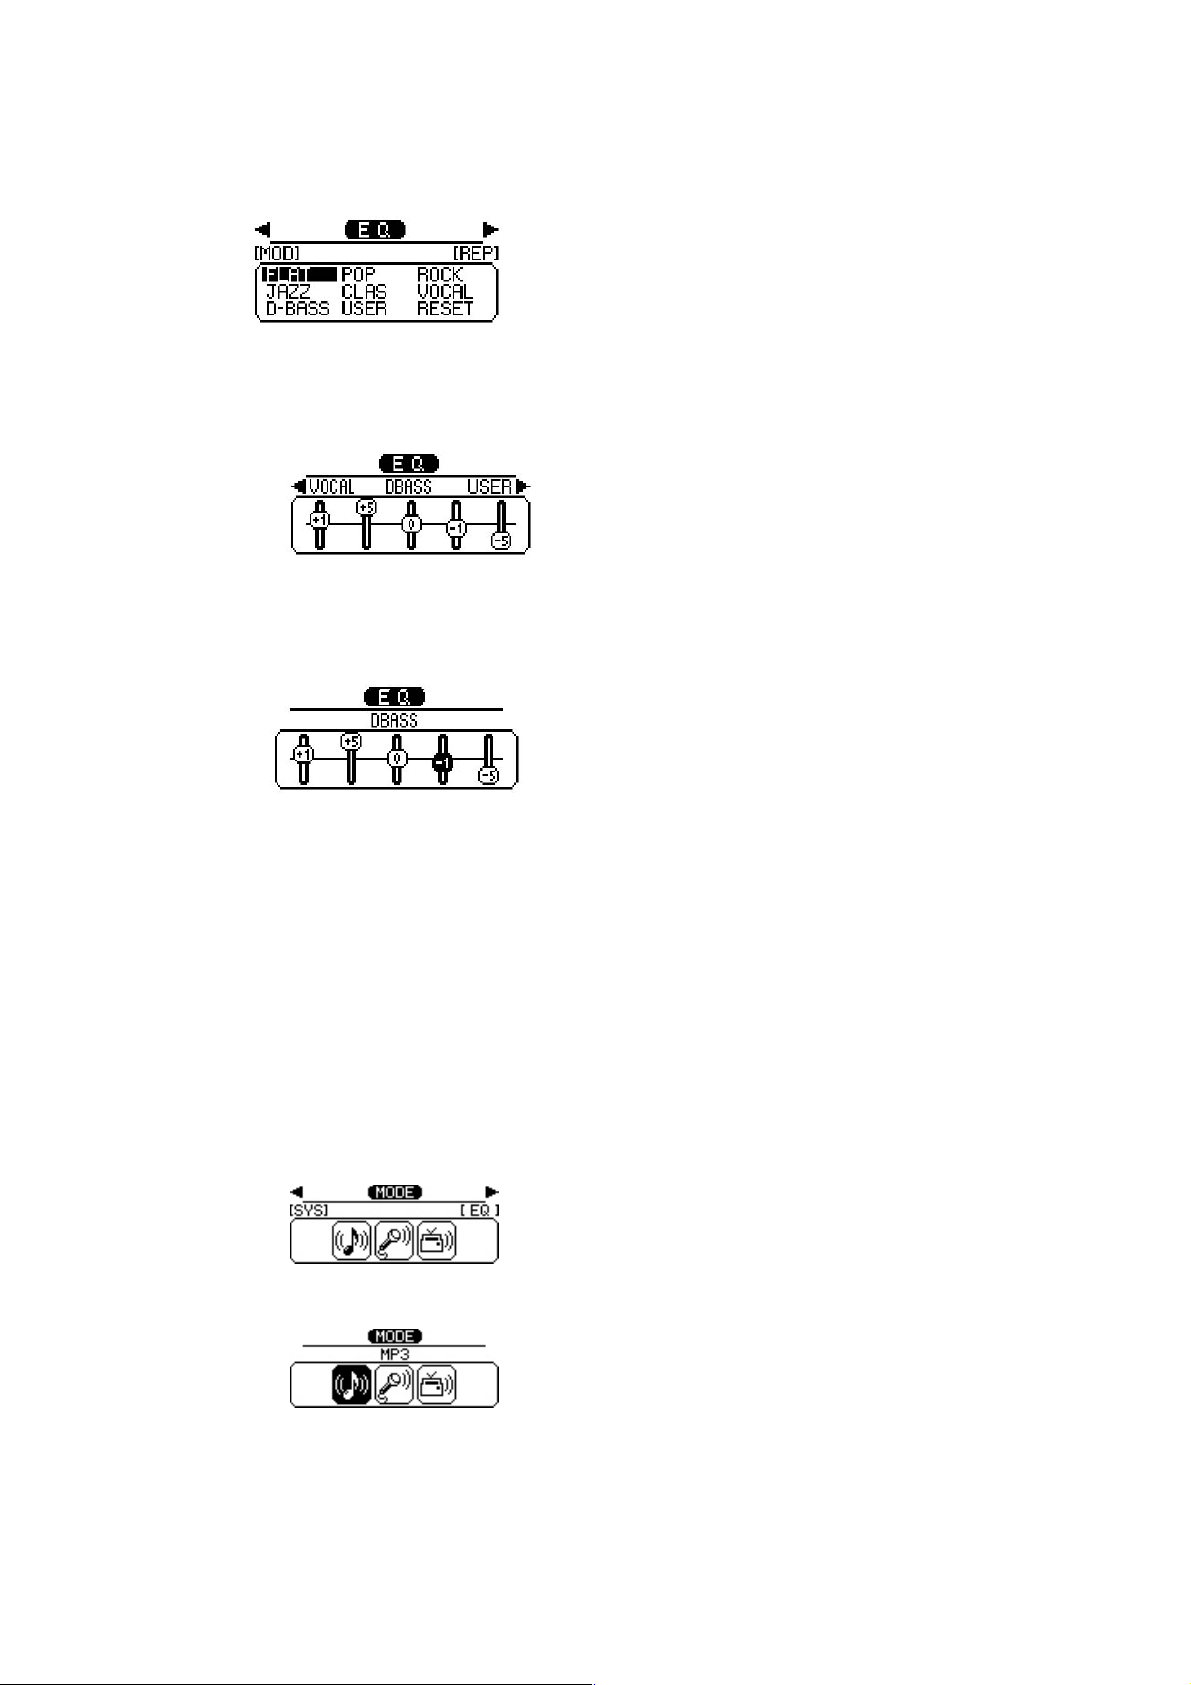
2) Click the Joy Stick key to move to the EQ selection screen. After selecting EQ by
pushing the Joy Stick key to right/left, click the Joy Stick key to control the EQ
band level.
3) After selecting the EQ frequency band (100Hz/500Hz/2KHz/7KHz/12KHz) by
pushing the Joy Stick key to right/left, move the Volume key to adjust each level of
frequency band.
4) Click the Joy Stick key to save the current settings.
! > Press the REC key to cancel the EQ settings.
! > Select the Reset menu to convert to default.
8. Switching the MP3/RECORD/FM RADIO Mode
Push the Joy Stick key for a few seconds to go to the Mode menu, which enables you
to switch modes.
Ex) Switching the MP3 mode to the Recording mode
- Push the Joy Stick key for a few seconds in the MP3 mode. The M ode menu
will appear.
- Push the Joy Stick key again to return to the Mode menu.
- After selecting the RECORD mode by pushing the Joy Stick key to right/left,
click the Joy Stick key.
Page 5

- The MP3 mode will be switched to the RECORD mode.
9. Voice Record
1) Go to the RECORD mode.
2) Press the REC key and select the Voice Recording. (Figure)
3) Press the REC key shortly. The Voice Recording will start.
4) Press the
5) Press the REC key again to finish recording.
! > The recorded voice files are saved in the voice folder as Voice001, Voice002….
! > You can listen to file during recording (onl y w hen AGC is set to off) and contro l the
volume with the Volume key.
10. Encoding
Connect the stereo cable between the FY200 earphone jack and the Line-out of audio
device. (When the Line-out does not exist, connect the cable to the e arphone jack.)
1) Go to the REC mode.
2) Press the REC key to select the Encoding function. (Figure)
3) Select track to record from audio device to the FY200 and playback it. Press the
FY200 REC key to start encoding.
button to pause recording and press the button again to resume it.
4) Press the
recording.
5) Press the REC key to finish encoding.
6) Encoded files are saved in the encoding folder of the REC mode as Encoding001,
Encoding002…
button to pause recording and press the button again to resume
Page 6
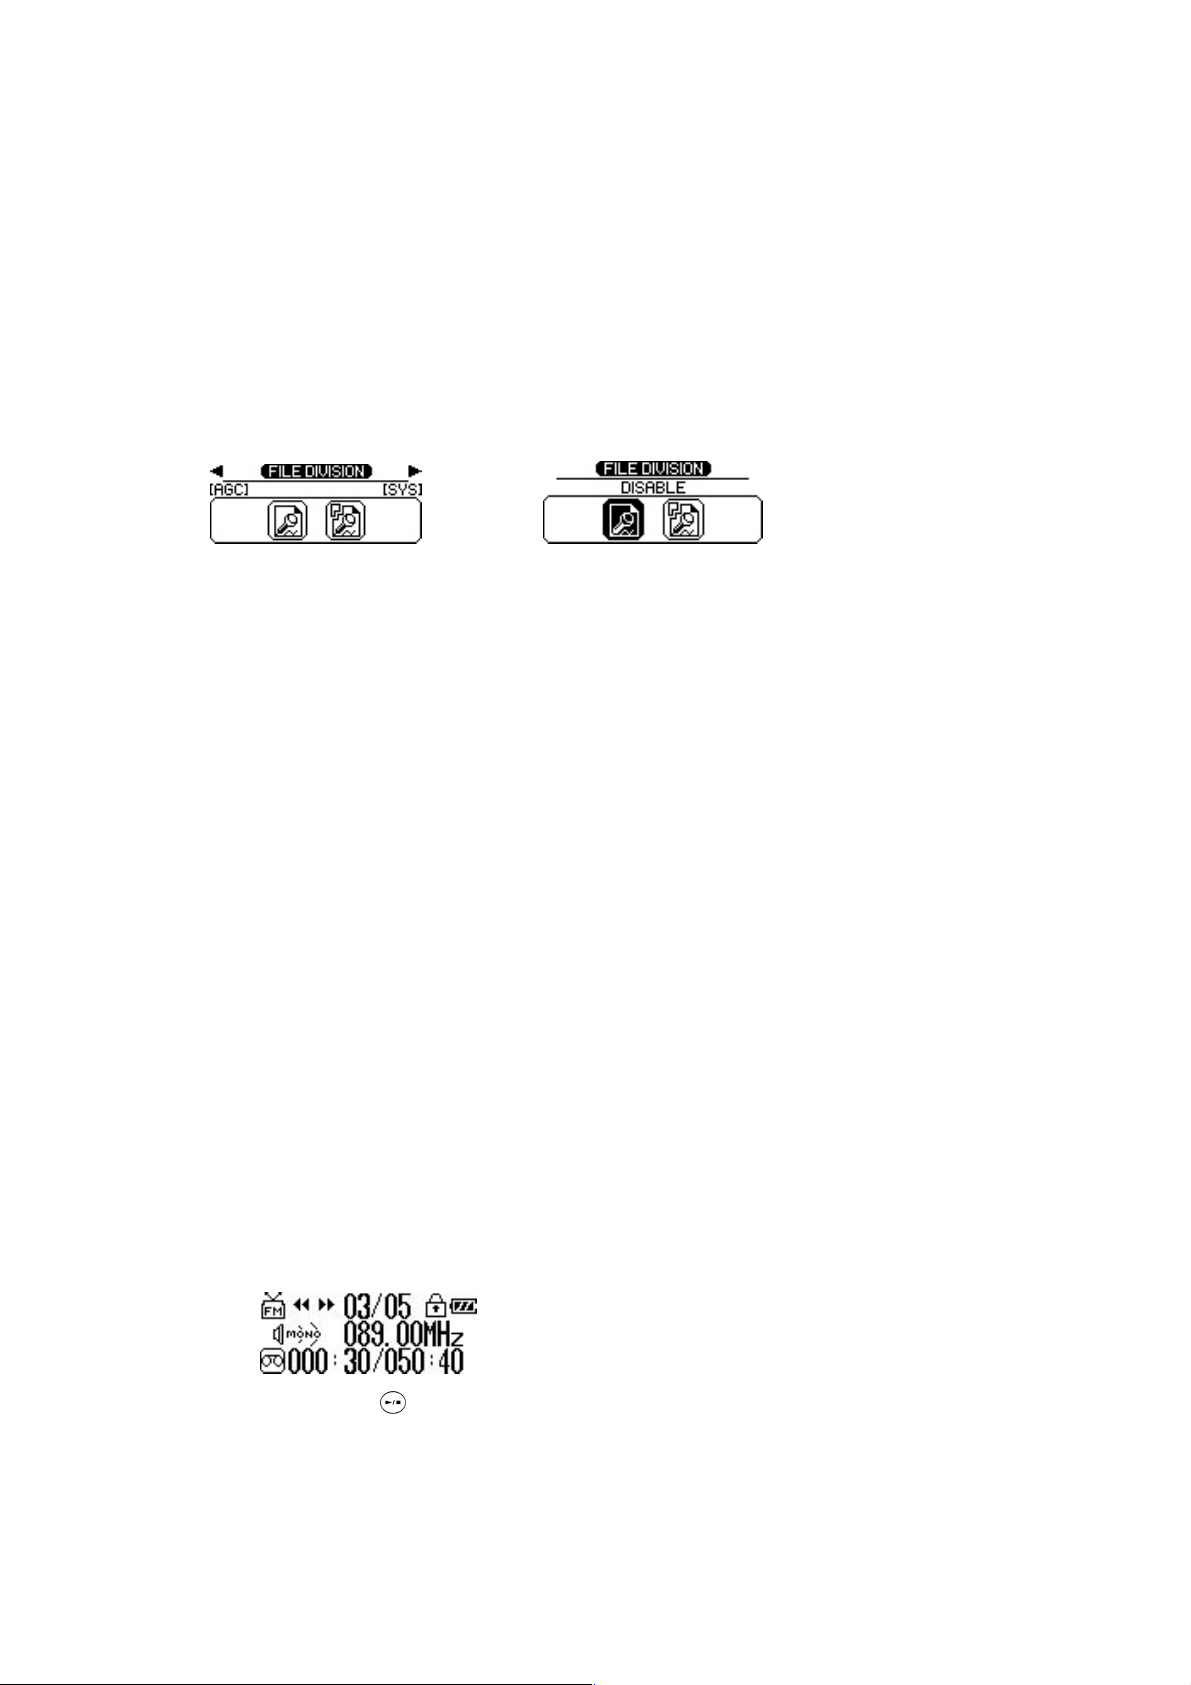
11. Dividing Voice/Recorded FM File
1) Go to the REC mode. (Figure)
2) Press the REC key and divide recording files. (Figure)
3) Divided files are saved right behind the original recording files.
! > Only when the REC KE Y OPT menu is set to the File Division, The file divisio n will
start.
->
12. FM RADIO
Go to the FM RADIO mode to listen to FM radio.
1) Channel Search mode
Push the Joy Stick key to the REW position to go to the lower channel.
Push the Joy Stick key to the FF position to go to the upper channel.
Push the Joy Stick key to the REW/FF position for a few seconds to search for the
mode/Station Search mode.
indicates that there is no saved station. In this case, the mode will be automatically
switched to the Channel Search mode.
13. FM Record
previous/next channel
2) Station Search mode
Push the Joy Stick key to the REW position to go to the previous station,
Push the Joy Stick key to the FF position to go to the next station.
! > Click the Joy Stick key shortly to switch the current mode to the Channel Search
! > When initiating the Station Search mode, the ‘No Station’ message will appe ar. It
1) Go to the FM mode.
2) Press the Recording button to record the FM while listening to FM radio
3) Press the
button to pause recording and press the button again to resume
recording.
4) Press the Recording button again to finish FM recording.
Page 7

! > Recorded FM files are saved in the FM folder of the REC mode as FM001, FM002…
Mode Details
1. MP3 Mode
1) Button Key Table
Short Key>: Indicates that pressing the Joy Stick key shortly.
Long Key>: Indicates that pressing the Joy Stick key for longer than 1 sec.
KEY
Names
Playback/
Pause
REW
Mode Go to folder Go to menu
FF Go to the next track
REC
Vol + Volume up
Vol - Volume down
Short Key Long Key Short Key Long Key
Playback Power off Pause Power off
Go to the previous
track
Go to the parent
folder
Pause Playback
Go to the previous
track continuously
Go to the next track
continuously
- A-B repeat
Increase the volume
continuously
Decrease the volume
continuously
Playback the previous
Fast Rewind
track
Go to the Navigation
Go to menu
mode
Playback the next
Fast Forward
track
PS + CS + Bass sound
on/off
Increase the volume
Volume up
continuously
Decrease the volume
Volume down
continuously
2) Menu Table
! > Press the REC button shortly to return to the parent menu.
MP3 Mode
Selects a mode.
MODE
(Figure)
MP3 Switches to the MP3 mode.
RECORD Switches to the RECORD mode.
FM RADIO Switches to the FM RADIO mode.
Page 8

Selects the EQ mode by music genre.
g
The EQ mode can be customized by user.
NORMAL Plays in the NORMAL mode.
POP Plays in the POP mode.
ROCK Plays in the ROCK mode.
JAZZ Plays in the JAZZ mo de.
CLASSIC Plays in the CLASSIC mode.
VOCAL Plays in the VOCAL mode.
DYNAMIC BA SS Plays in the DYNA MIC BASS mode.
EQ
(Figure)
SOUND EFFECT
USER Plays in the USER mode.
RESET Converts to the default EQ settings.
TIP>Default settings by EQ band
100Hz 500Hz 2 KHz 7 KHz 12 KHz
NORMAL 0 0 0 0 0
POP 1 2 1 2 1
ROCK 2 3 2 1 0
JAZZ 1 -2 2 0 0
CLASSIC 2 0 0 1 0
VOCAL -2 2 3 -2 0
DYNAMIC BASS
Selects sound effect.
! > Press the REC key for a few seconds to switch to the PS + CS + Bass Sound durin
playback.
OFF No sound effect
(Figure)
REPEAT
(Figure)
REPEAT FOLDER Selects playback of all tracks saved in memory/playback of tracks in the selected folder.
PURE STUDIO Sets to the Pure studio sound.
CONCERT STUDIO Sets to the Concert studio sound.
PS + CS + Bass (Name
Sets to the PS + CS + Bass sound.
undecided)
Selects the playback order.
NORMAL Plays in sequence.
REPEAT ONE Repeats the selected track.
REPEAT ALL Loop repeat in sequence
RANDOM Plays randomly
Page 9

g
T
(Figure)
g
g
g
g
Plays tracks saved in memory, re
ardless of folder
STUDY
(Figure)
OFF
ON
Sets the speed control for foreign language study and the Easy Finder.
! > The Study function cannot be saved after turning the power off.
! > The Speed control can function only in files where the samplin
KHz.
(50%, 63%, 75%, 88%) Plays back at a slow speed.
SPEED CONTROL
(Figure)
(125%, 150%, 175%, 200%) Plays back at a fast speed.
EASY FINDER
(Figure)
location when selecting the NORMAL/REPEA
ONE/REPEAT ALL/RANDOM function.
Plays tracks in the selected folder when selectin
NORMAL/REPEAT ONE/REPEAT ALL/RANDOM function.
rate is under 22.05
(100%) Plays back at a normal speed.
Off Disables the Easy Finder.
1 STEP
(5 SEC)
2 STEP
(10 SEC)
Pushing the Jog key skips 1 step for
5 seconds during playback.
Pushin
for 10 seconds during playback.
the Jog key skips 2 steps
the
VISUALIZATION
(Figure)
ERASE
(Figure)
SYSTEM
(Figure)
FILE INFO
STEREO IMAGE Displays stereo image visualization.
ERASE FILE Selects file(s) to erase.
ERASE FOLDER Selects folder(s) to erase.
ERASE ALL Erases all saved files.
BACKLIGHT
(Figure)
Selects the display mode of 3-line playback.
Displays format, bit rate and playback time/track
time.
WAVE Displays wave visualization.
STATUS Displays playback status.
Erases files saved in memory.
! > Available only in the Stop mode.
Selects backlight color.
COLOR
(Figure)
TIME Sets the backlight time when touching a button.
RED Sets the backlight color to red.
Sets the backli
YELLOW GREEN
green.
ht to yellow
Page 10

g
r
A
g
k
g
g
g
T
(Figure)
Sets the backlight time within
AUTO PLAYBACK
(Figure)
RESUME
(Figure)
OFF ~ 30 SEC
Selects the Auto Playback mode after turning the powe
on.
OFF
ON
When turning the power on, restores the saved files
INITIAL
STOPPED
the ran
(Default is set to 3 sec.)
fter turning the power on,
press the PLAYBACK button to
playback files.
When turnin
files are played bac
automatically.
which played last.
Restores the file which played
last from the initial.
Restores the file which played
last from the stopped track.
e of 0 ~ 30 seconds
the power on,
AUTO POWER OFF
(Figure)
SLEEP
(Figure)
FADE
(Figure)
DISPLAY
Sets the waiting time for automatic power off when no
buttons touches.
Sets the time within the
3 ~ 30 MIN
Sets the timer for automatic power off.
! > The SLEEP menu will not saved after turnin
power off.
OFF ~ 60 MIN
Increases the volume gradually during playback.
OFF Sounds with the volume preset.
ON
Selects file information to be displayed on the second
line of LCD.
ran
e of 0 ~ 30 minutes.
(Default is set to 3 min.)
Sets the timer within the
range of 0 ~ 60 minutes.
Sounds with the
increasing volume preset.
the
radually
(Figure)
AG INFO Displays ID3 TAG information.
FILE NAME Displays file name.
Page 11

g
g
Selects file transfer rate to be displayed on the second
SCROLL WIDTH
(Figure)
INFORMATION
(Figure)
2. RECORD (Voice Recording/Encoding) Mode
!> Download the firmware at our homepage to use encoding function.
1) Button Key Table
Short Key>: Indicates that pressing the Joy Stick key shortly.
Long Key>: Indicates that pressing the Joy Stick key for longer than 1 sec.
KEY
Names
Playback/Pause Playback Power off Pause Power off
REW
Short Key Long Key Short Key Long Key
Go to the
previous track
Pause Playback
Go to the previous
track continuously
line of LCD.
Selects the rate within the ran
2 ~ 128
of 2 ~ 128.
Displays the firmware version, total memories, remainin
memory information.
Playback the
Fast Rewind
previous track
e
Mode - Go to Menu - Go to Menu
FF
REC
Vol + Volume up
Vol - Volume down
2) Menu Table
! > Press the REC button shortly to return to the parent menu
Recording /
ENCODING
Go to the
next track
Voice
Go to the next track
continuously
-
Increase the volume
continuously
Decrease the volume
continuously
REC Mode
Playback the
Fast Forward
next track
Mark replay
/
File division
Increase the volume
Volume up
continuously
Decrease the volume
Volume down
continuously
Selects a mode. MODE
-
(Figure)
MP3 Switches to the MP3 mode.
Page 12

RECORD Switches to the RECORD mode.
g
FM RADIO Switches to the FM RADIO mode.
Selects the playback order.
REPEAT
(Figure)
ERASE
(Figure)
QUALITY
(Figure)
NORMAL Plays in sequence.
REPEAT ONE Repeats the selected track.
REPEAT ALL Loop repeat in sequence
RANDOM Plays randomly
Erases files saved in memory.
ERASE FILE Selects file(s) to erase.
ERASE ALL Erases all files.
Sets the quality of recording sound.
Sets the Standard quality.
SQ
HQ
SHQ
- Voice recording : 8 KHz (32Kbps)
- Encoding : 11.025 KHz (64Kbps)
Sets the High quality.
- Voice recording: 11.025 KHz (64Kbps)
- Encoding : 22.05 KHz (96Kbps)
Sets the Super High quality.
- Voice recording: 22.05 KHz (96Kbps)
VOR
(Figure)
AGC
(Figure)
- Encoding : 44.1 KHz (128Kbps)
VOR (Voice Operated Recording) function : Saves memory size and prevent unnecessary
recording by recording only when the sound is detecte d .
Ex> If you set it to the VOR 5, recordin
recording will resume when the sound level exceeds 5.
! > The VOR function switches to ‘off’ whenever the power is turned off.
! > It's recommended that you do not use the VOR for material recording.
OFF (Default) ~ 10 Sets the sound level within the range of off ~10.
AGC (Automatic Gain Control)
– Automatic adjustment of amplification level for input signal to be target level
OFF
ON
will stop when the sound level is b elow 5 and the
Disables the AGC
(You can listen to the recorded sound during
recording.)
Enables the AGC
(You cannot listen to the recorded sound during
recording.)
Page 13

Selects the REC key function.
g
g
REC KEY OPT
(Figure)
STUDY
(Figure)
Press the REC key to use the A-B Repeat during
MARK REPLAY
Press the REC key to use the File Division during
FILE DIVISION
Sets the speed control for foreign language study and the Easy Finder
! > Study function cannot be saved after turning the power off.
! > The speed control can function only in files where the sampling rate is under 22.05 KHz.
(50%, 63%, 75%, 88%) Plays at a slow speed.
SPEED CONTROL
(125%, 150%, 175%, 200%) Plays at a fast speed.
EASY FINDER
100% Plays at a normal speed.
OFF Disables the Easy Finder
1 step
(5 sec)
2 step
(10 sec)
Selects the display mode of 3-line playback.
Pushing the Jog key skips 1 step for 5
seconds during playback.
Pushin
seconds during playback.
playback.
playback.
the Jog key skips 2 steps for 10
VISUALIZATI
ON
(Figure)
SYSTEM
(Figure)
STEREO IMAGE STEREO IMAGE
BACKLIGHT
(Figure)
RESUME
(Figure)
FILE INFO FILE INFO
WAVE Displays wave visualization.
STATUS Displays playback status.
Selects backlight color.
COLOR
TIME
When turning the power on, restores the saved file which played
RED Sets the backlight to red.
YELLOW GREEN Sets the backlight to yellow green.
Sets the backlight time when touching a button.
OFF ~ 30 SEC
Sets the time within the ran
seconds. (Default is set to 3 sec.)
last.
Restores the file which played last from
INITIAL
the initial.
Restores the file which played last from
STOPPED
the stopped track.
e of 0 ~ 30
AUTO POWER OFF
(Figure)
Sets the waiting time for automatic power off when no buttons
touches.
Page 14

g
3 ~ 30 MIN
Sets the timer for automatic power off.
Sets the time within the range of 0 ~ 30
minutes. (Default is set to 3 min.)
3. FM RADIO Mode
1) Button Key Table
Short Key>: Indicates that pressing the Joy Stick key shortly.
Long Key>: Indicates that pressing the Joy Stick key for longer than 1 sec.
KEY
Names
Playback/
Pause
Go to lower level
REW
SLEEP
(Figure)
INFORMATION
(Figure)
Channel Search Mode Station Search Mode
Short Key Long Key Short Key Long Key
- Power off - Power off
Go to the previous
channel
channel continuously
! > The SLEEP menu will not saved after turning the power off.
Sets the timer within the ran
OFF ~ 60 MIN
minutes.
Displays the firmware version, total memories and remaining
memory information.
Go to the previous
Previous Station
channel continuously
e of 0 ~ 60
Mode
FF
REC Start FM recording - Start FM recording -
Vol + Volume up
Vol - Volume down
Station Search
Mode shift
Go to upper level
channel
2) Menu Table
! > Press the REC button shortly to return to the parent menu.
MODE Selects a mode.
Go to menu
Auto search for the
next channel
Increase the volume
continuously
Decrease the volume
continuously
FM Mode
Channel Search
Go to menu
Mode shift
Continue to go to
Next Station
upper level station
Increase the volume
Volume up
continuously
Decrease the volume
Volume down
continuously
Page 15

(Figure)
g
SAVE CHANNEL
(Figure)
MP3 Switches to the MP3 mode.
RECORD Switches to the RECORD mode.
FM RADIO Switches to the FM RADIO mode.
Saves channel while listening to FM radio.
After selecting the station number, click the Joy Stick key.
! > Maximum 20 stations can be stored.
Selects the FM sound while listening to FM radio.
SOUND
FM band
AUTO PRESET
MONO
STEREO
Selects the FM receiver band. (Standard Korean frequency band extends bet ween 87.5
US/EU/KR/CN (87.5~108 MHz) Receives the sound within 87.5~108 KHz.
JAPAN (76~92 MHz) Receives the sound within 76~92 MHz.
WIORL WIDE (76~108 MHz) Receives the sound within 76~108 MHz.
Ignores the existing saved stations and search channels in the band within
87.5~108Khz to save the c hannels i n the stat ion. If th e Auto Sea rch and Save r uns, up
to 20 stations will be saved.
! > Note that saved stations shall be deleted while runnin
function.
No Disables the Auto Search and Save.
Yes Enables the Auto Search and Save.
Sets the sound to mono while listening to FM
radio.
Sets the sound stereo while listening to FM
radio.
~108 KHz.)
the Auto Search and Save
SEEK STEP
Pushes the Joy Stick key to select channel movement unit in the Channel Search mode.
100 KHz Moves the FM channel with 100KH unit.
50 KHz Moves the FM channel with 100KH unit.
Sets the quality of FM recording sound. QUALITY
Sets the Standard quality.
SQ
- Voice recording: 8 KHz (32Kbps)
- Encoding : 11.025 KHz (64Kbps)
Page 16

g
g
Sets the High quality.
SYSTEM
BACKLIGHT
(Figure)
SLEEP
(Figure)
INFORMATION
HQ
SHQ
COLOR
TIME
- Voice recording: 11.025 KHz (64Kbps)
- Encoding : 22.05 KHz (96Kbps)
Sets the Super High quality.
- Voice recording: 22.05 KHz (96Kbps)
- Encoding : 44.1 KHz (128Kbps)
Selects backlight color.
RED Sets the backlight to red.
YELLOW GREEN Sets the backlight to yellow green.
Sets the backlight time when touching a button.
OFF ~ 30 SEC
Sets the time within the ran
30 seconds. (Default is set to 3 sec.)
Sets the timer for automatic power off.
! > The SLEEP menu will not saved after turning the power off.
Sets the timer within the ran
OFF ~ 60 MIN
60 minutes.
Displays the firmware version, total memories, available memory
e of 0 ~
e of 0 ~
(Figure)
NOTE: This equipment has been tested and found to comply with the limits for a Class B
digital device, pursuant to part 15 of the FCC Rules. These limits are designed to
provide reasonable protection aga inst harmful interf erence in a res idential installation.
This equipment generates, uses and can radiate radio frequency energy and, if not
installed and used in accor dance with th e instruct ions, m ay cause harm ful interfer ence
to radio communications. However, there is no guarantee that interference will not
occur in a particular installation. If this equipm ent does c ause harmf ul interferenc e to
radio or television reception, which can be determined by turning the equipment of
and on, the user is encour aged to tr y to correct the in terference by one or more of the
following measures:
- Reorient or relocate the receiving antenna.
- Increase the separation between the equipment and receiver.
- Connect the equipm ent into an outlet on a circuit different from that to which the receiver is
connected.
- Consult the dealer or an experienced radio/TV technician for help.
NOTE: The manufacturer is not responsible for any radio or TV interference caused by
unauthorized modifications to this equipment. Such modifications could void the
user’s authority to operate the equipment.
information.
Page 17

Note :
This device complies with part 15 of the FCC Rules.
Operation is subject to the following two conditions:
(1)This device may not cause harmful interference, and
(2)This device must accept any interference received,
including interference that may cause undesired operation.
 Loading...