

Page 1
DWC-MB72I4V
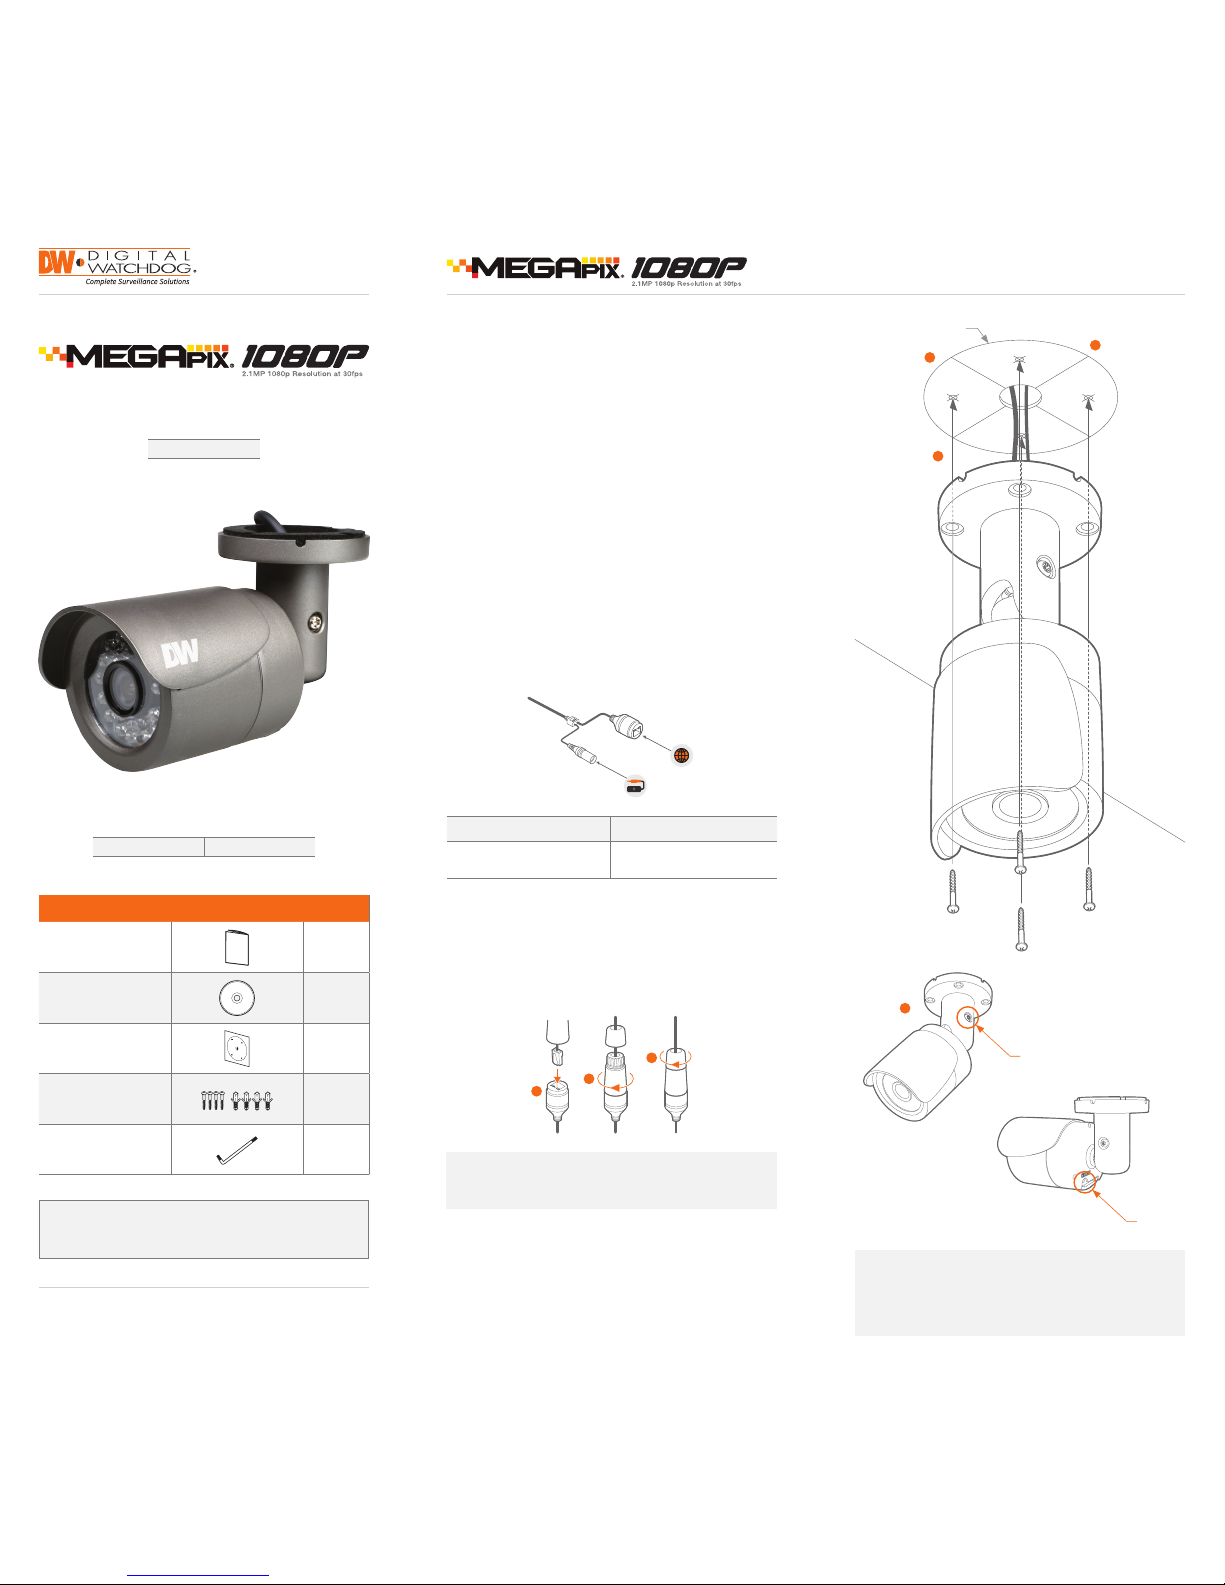
Step 1 – PREPARING TO MOUNT THE CAMERA
Step 3 – INSTALLING THE CAMERA
Step 2 – CABLING THE CAMERA TO EXTERNAL
DEVICES
1. The mountin g surface mu st bear ve time s the weight of your
camera.
2. Do not let the cable s get caught in imp roper places o r the electri c
line cover to be damag ed. This may caus e a breakdown or r e.
3. Using the mou nting template she et or the camera i tself, mark and
drill the nec essary h oles in the wall o r ceiling.
5. To use the camera’s water proof wir ing:
(1)
. Install the LAN cab le into (a).
(2)
. (b) will be assemb led to (a) with a 1/4 turn.
(3)
. Thread (c) tightly to (b).
6. Before mountin g the camera, lo osen the pan /tilt screw on th e side
of the camera’s bracket. Th is will make adjus tment after mo unting
the camera easier.
7. Fix t he camera on to th e mounting sur face using the screws
included with the camera.
8. Adjust the cam era’s pan and tilt. Tig hten the pan/til t screw on the
camera’s bracket until i t is secured prop erly.
4. Pass the wire s through the mo unt bracket and m ake all necess ary
connections.
a. NE TWORK C ONNECTION S – If you are using a PoE S witch,
connect the c amera using a n Ethernet cab le for both data and
power.
b. NET WORK CONN ECTIONS – If you ar e using a non-PoE
switch, connect t he camera to the sw itch using an Ethe rnet
cable for data tra nsmission a nd use a power adapte r to power
the camera.
NETWORK
CONNECTION
POWER
1
2
3
Template
Sheet
Quick Start Guide
Quick Start Guide
Username: admin Password: admin
Attenti on: This document is i ntended to serve a s a quick reference pag e for
initial set- up. It is recommende d that the user read th e entire instruc tion
manual for c omplete and proper c amera usage.
Tel: 866-4 46-3595 / 813- 888-955 5
Technical Support Hours:
9:00AM – 8:0 0PM EST, Monday thru Friday
digital-watchdog .com
WHAT’S IN THE BOX
QSG Manua l 1 Set
Manual CD 1 Set
Template Sheet 1 Set
Screw & Pla stic Anchor – 4p cs 1 Set
Tor x Wren ch 1 Set
Note: To ensure moisture s eal, make sure the o-r ing is in place
between (a) and (b). In extr eme environm ents use of an
outdoor rated sealer is recommended.
Resetting the camera: To reset the camera, use the ti p of
a paper clip or a pe ncil and press t he reset butto n. Pressing
the button for ve (5) seconds will in itiate a camera-wi de reset
of all the settin gs, including n etwork set tings.
a
b
c
Pan/Tilt
Screw
8
Power Requirements Power Consumption
DC 12 V
PoE IEEE 802.3a tPoE+ / PoE Class 2
LED Off: 1.92W, 160mA
LED On: 2.7W, 230mA (IR m odels only)
Reset
Button
Page 2

Step 5 – WEB VIEWER
Once the cam era’s network set tings have bee n setup proper ly,
you can access t he camera’s web viewer u sing the DW IP Fin der™.
To open the camera’s web viewer:
1. Find the came ra using the DW IP Fi nder™.
2. Dou ble-click on th e camera’s view in the res ults table.
3. Press t he ‘View Cam era Website’. The camera’s web viewer
will open up in you r default web browse r.
4. Enter th e camera’s userna me and passwo rd (default are
admin / admin).
5. If you a re accessing t he camera for th e rst time, install t he
VLC les in order to view v ideo from the ca mera.
4. The camera’s default network information is:
Network Setup
1. Run the CD included wit h the camera a nd click on the DW IP F inder
™
le.
2. T he soft ware will scan you r network for a ll suppor ted cameras a nd display the res ults in the tabl e. Allow up to 5 seconds for t he IP Finder to n d the camera
on the network.
3. Se lect a camera f rom the list by doub le-clickin g on the camera’s imag e or clicking o n the ‘Click’ bu tton under t he IP Conf. column. T he camera’s networ k
information will appear. If necessary, you can adjust the camera’s network type.
Select DH CP if the internet serv ice is dynamic IP. This will allow the c amera to receive its IP ad dress from the DHCP ser ver.
Select STATIC to manua lly enter the camera’s IP addre ss, subnet mask, Gate way and DNS information.
Contact your network administrator for more information.
Default TCP/IP information
• IP: 192.168.1.80
• Subnet Mask: 255.255.255.0
• G ate way: 192.1 68.1.1
• D NS: 168.12 6.6 3.1
6. To save the cha nges made to the c amera’s settings, in put the ID
and PW of the cam era for authent ication and cli ck ‘Save’.
7. If the camera n eeds to be rebooted af ter the setti ngs were
changed, press t he ‘Reboot’ b utton. The ca mera will cycle p ower
and will appe ar back in the sea rch results onc e the reboot is
complete.
5. To view the ca mera’s web viewer, click on ‘Vi ew Camera Website’.
‘Port For warding’ has to be set in your ne twork’s router for
external a ccess to the camera.
Default ID / PW : a dmin / admin
Rev Date: 8/15 © 2015 Digital Wa tchdog. All r ights rese rved.
Note: Please se e the full produ ct manual for web v iewer setup,
functions and camera settings options.
Step 4 – DW IP FINDER
™
Use the DW IP Finde r™ included in th e camera’s accesso ry CD to scan th e network a nd detect all MEGA pix® cameras, set the c amera’s network s ettings,
perform rmware upgra de or access th e camera’s web client.
DWCMF10M28T
DWCMF21M4TIR
DWCMF10M28T
DWCMF21M4TIR
Firmware Upgr ade Open Camera's IP
Conguration Screen
Camera Uptime
Camera Name,
Model, IP Addr ess,
and MAC Addre ss
Camera's Firmwar e
Search for
Cameras
View Camer a's
Thumbnail View
Camera's Network Settings
Filter Search
Results
Quick Start Guide
 Loading...