

Page 1
USER’S MANUAL
iV3377WD / iV3377WTIR 1 / 60
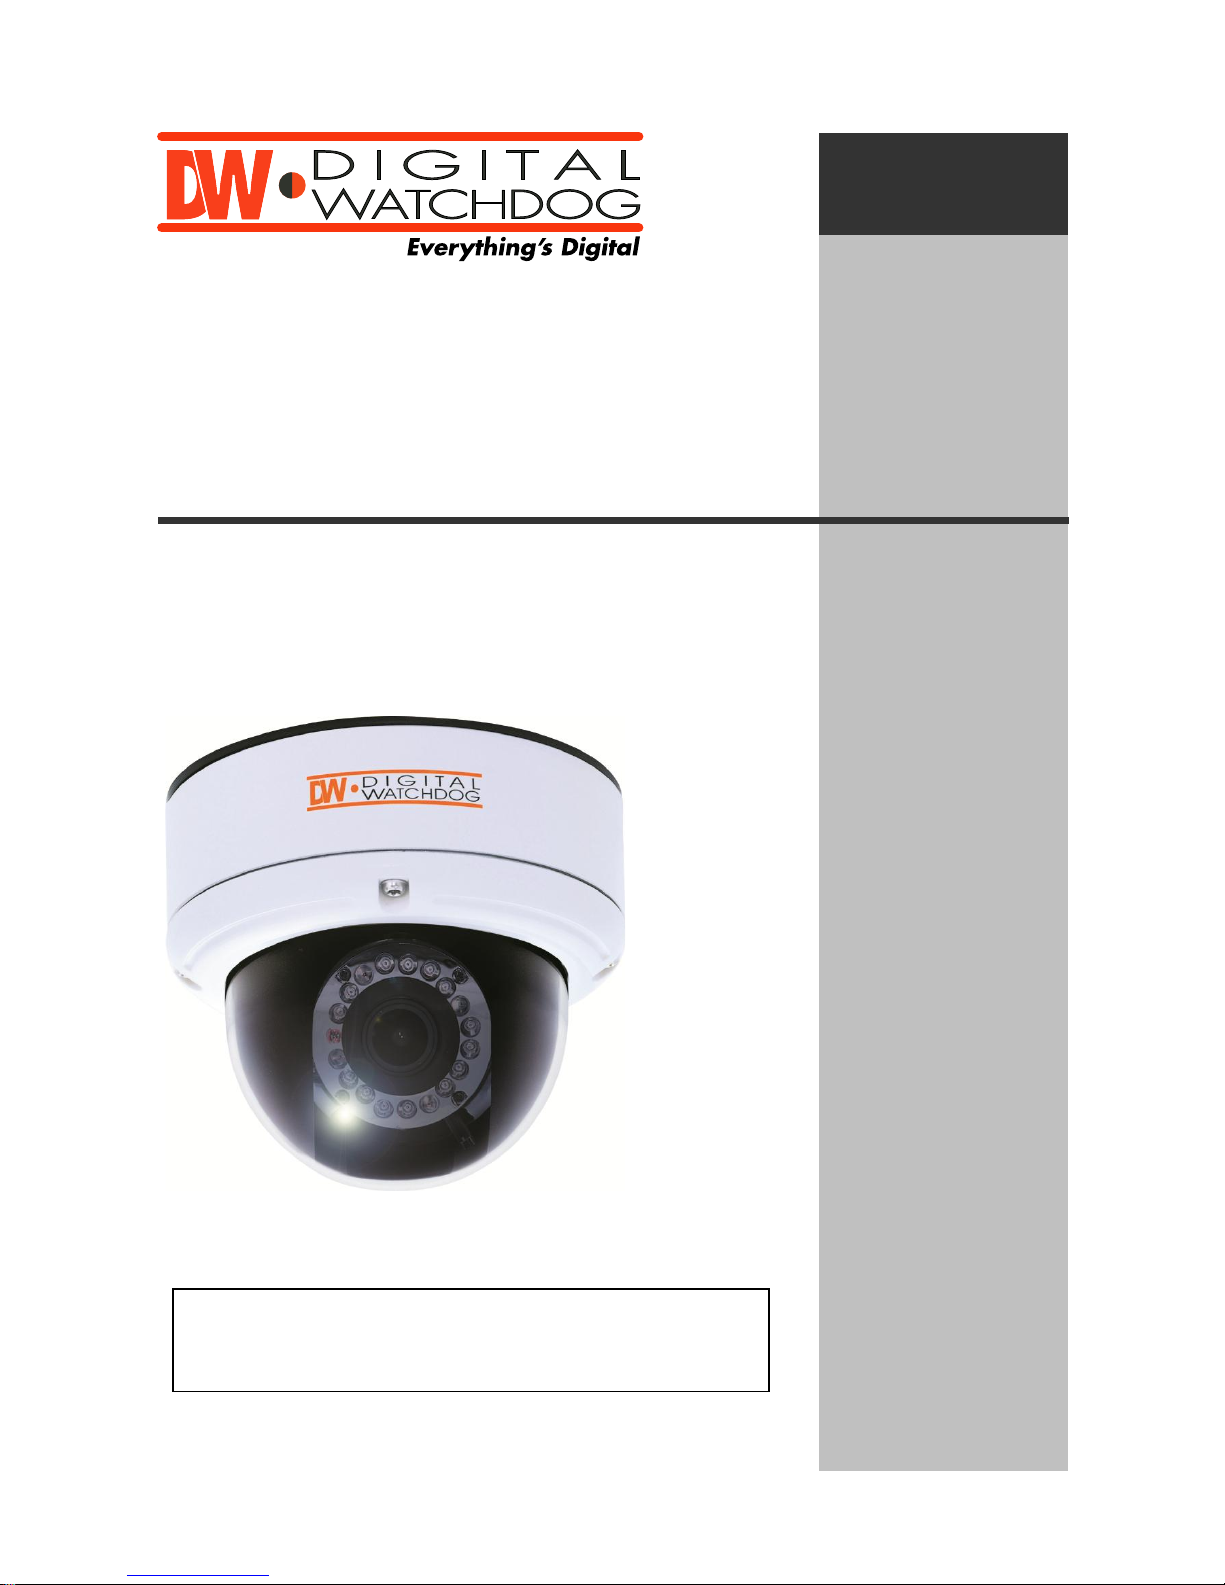
i V 3 3 7 7 W D , i V 3 3 7 7 W T I R
Vandal Pro o f IP D o m e Cam e r a
US E R ’S MANUAL
Network Camera
User’s Guide
iV3377WD /
iV3377WTIR
20101209
Before installing and using the camera, please read this
manual carefully.
Be sure to keep it handy for future reference.
Page 2

USER’S MANUAL
iV3377WD / iV3377WTIR 2 / 60
1/3‖ Sony Super HAD II CCD
560 TV Line
OMNI-Focus 2.9~8.5mm, 3X Motorized Zoom, Auto Iris
Easy Icon Driven OSD Menu with Built-in Joystick
Power over Ethernet [PoE] IEEE802.3af
70ft Range IR with Intelligent Camera Sync iV3377WTIR Only
3D-DNR (3D Digital Noise Reduction)
EWDR (Electronic Wide Dynamic Range)
Star-Light (Super Low Light Technology)
Electronic Day and Night iV3377WD Only
TDN (True Day and Night / IR Cut Filter) iV3377WTIR Only
HME (Highlight Masking Exposure)
Produces Negative Image
Secondary Video-BNC Output for Easy Installation
Auto Sensing 12VDC / 24VAC with Line Lock
Zoom and OSD Control by IR Remote Controller
3X Digital Zoom
AGC (Auto Gain Control)
BLC (Back Light Compensation)
AWB (Auto White Balance)
Mirror Image Control
Programmable Privacy Zone (6) & Motion Detection
Sharpness Control
FEATURES
Page 3

USER’S MANUAL
iV3377WD / iV3377WTIR 3 / 60
H.264 Video Compression Based Linux Embedded
Up to 30fps (D1, 4CIF, VGA, CIF, QVGA)
Interactive 2-Way Audio Communication
Variable Bandwidth Control
Web-Server Built-in / Free DDNS / No Additional Software Required
SW Functions Remotely Upgradable
Auto IP and UPnP Support
Static and Dynamic IP (ADSL, DHCP, and DDNS) Support
Event Notification by Email on Sensor and Motion Detection Trigger
Multiple Levels of Password Protection
PDA: WinCE & WinCE.NET Mobile Manager
Integrated to DW-Hybrid DVR, NV5200, DW 9000VMS, DW-NEXUS
FEATURES OF NETWORK
Page 4

USER’S MANUAL
iV3377WD / iV3377WTIR 4 / 60
Do not open or modify.
Do not open the case except during maintenance and installation, as it may be dangerous and
cause damages.
Do not put objects inside the unit.
Make sure that no metal objects or flammable substances get inside the camera. It could cause
fire, short-circuits or damages.
Be careful when handling the unit.
To prevent damage, do not drop the camera or subject it to strong shock or vibration.
Install away from electric or magnetic fields.
Protect from humidity and dust.
Protect from high temperature.
Be careful when installing close to the ceiling or in a kitchen or boiler room, as the temperature
may rise to high levels.
Cleaning
Dirt can be removed from the case only by wiping it with a soft cloth moistened with a soft
detergent solution.
Mounting Surface
The mounting surface material must be strong enough to support the camera.
PRECAUTIONS
Page 5

USER’S MANUAL
iV3377WD / iV3377WTIR 5 / 60
Before sending the camera out for repair, check the items below.
If the problem persists after checking these items, contact your service center.
▲ If no image appears
Is the LAN cable attached securely?
Are the power and voltage normal?
Has the iris of the lens inside the camera been adjusted correctly with the level volume?
Is there adequate illumination?
▲ If the image is unclear
Is the lens in focus?
Is the lens dirty?
Dirt or fingerprints on the lens can adversely affect the images.
Gently wipe any dirt or fingerprints off the lens with a soft cloth or lens cleaning paper and
cleaning fluid (commercially available).
Is the monitor adjusted correctly?
TROUBLESHOOTING
WARNING:
TO PREVENT THE RISK OF FIRE OR ELECTRIC SHOCK,
DO NOT EXPOSE THIS APPLIANCE TO RAIN OR MOISTURE.
Page 6
USER’S MANUAL
iV3377WD / iV3377WTIR 6 / 60
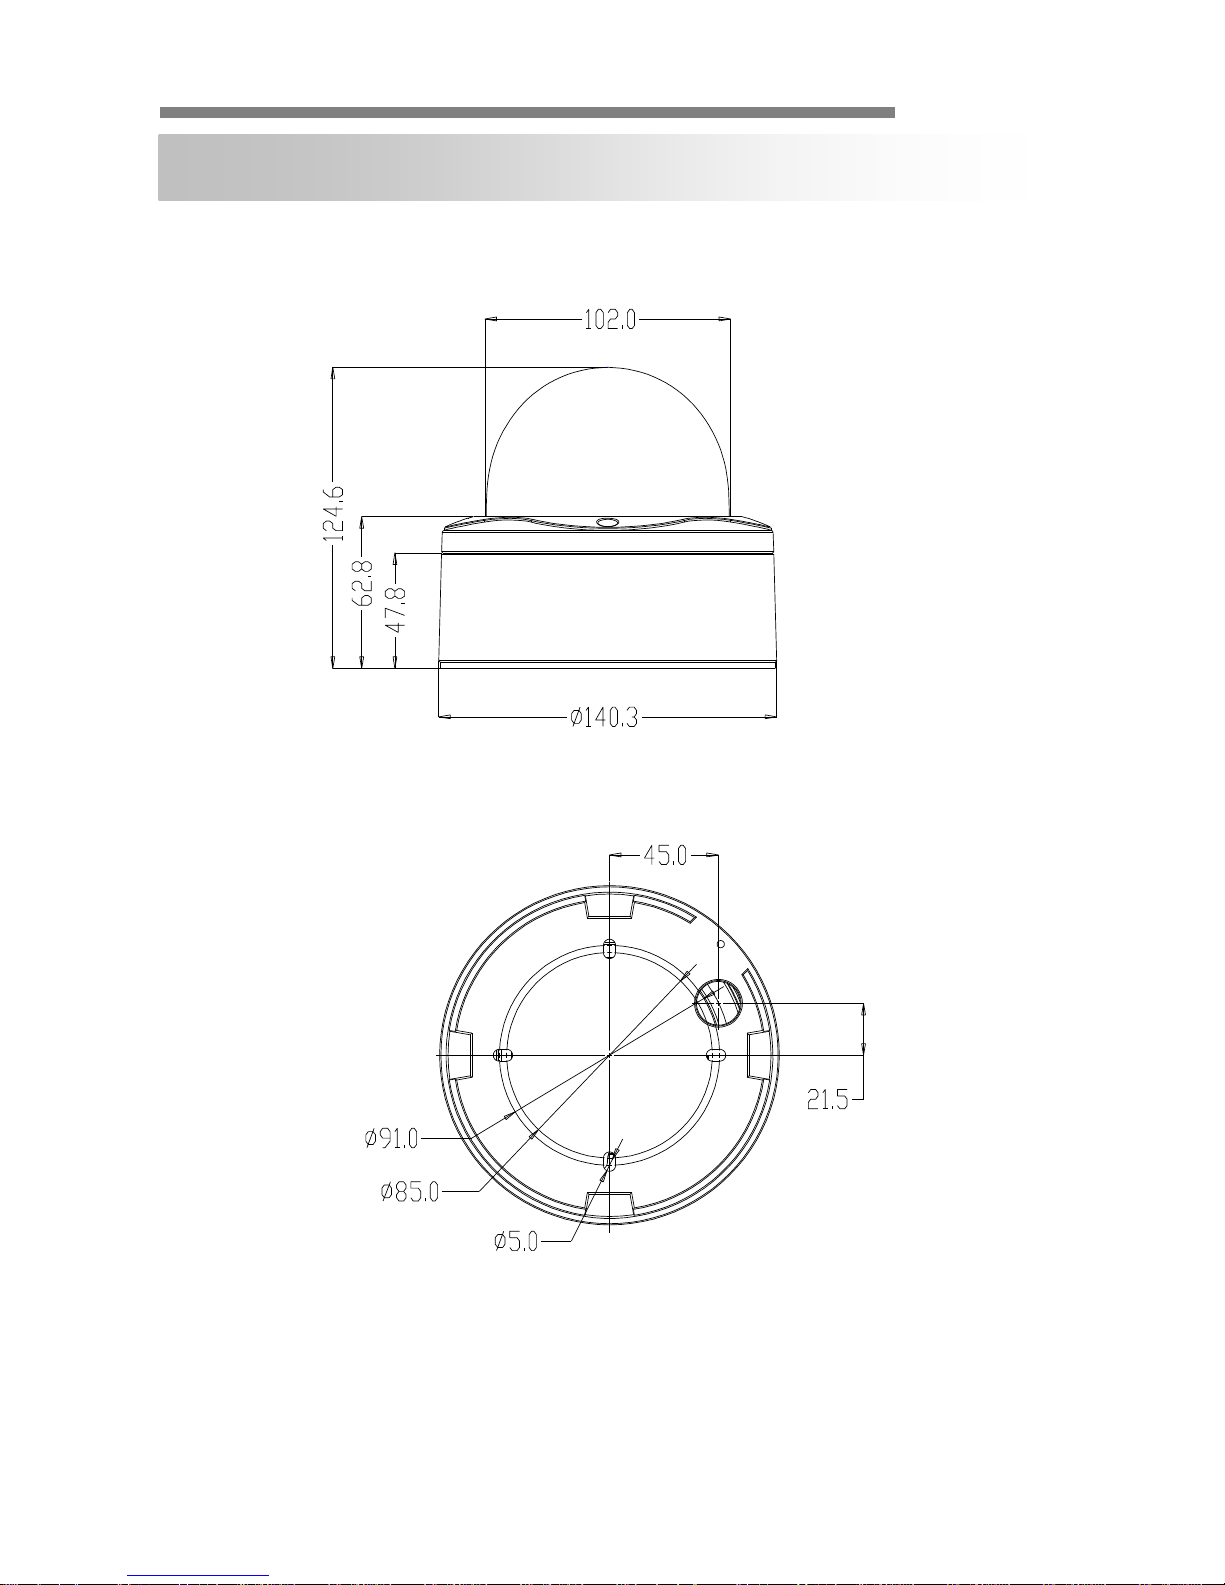
DIMENSION (mm)
Page 7
USER’S MANUAL
iV3377WD / iV3377WTIR 7 / 60
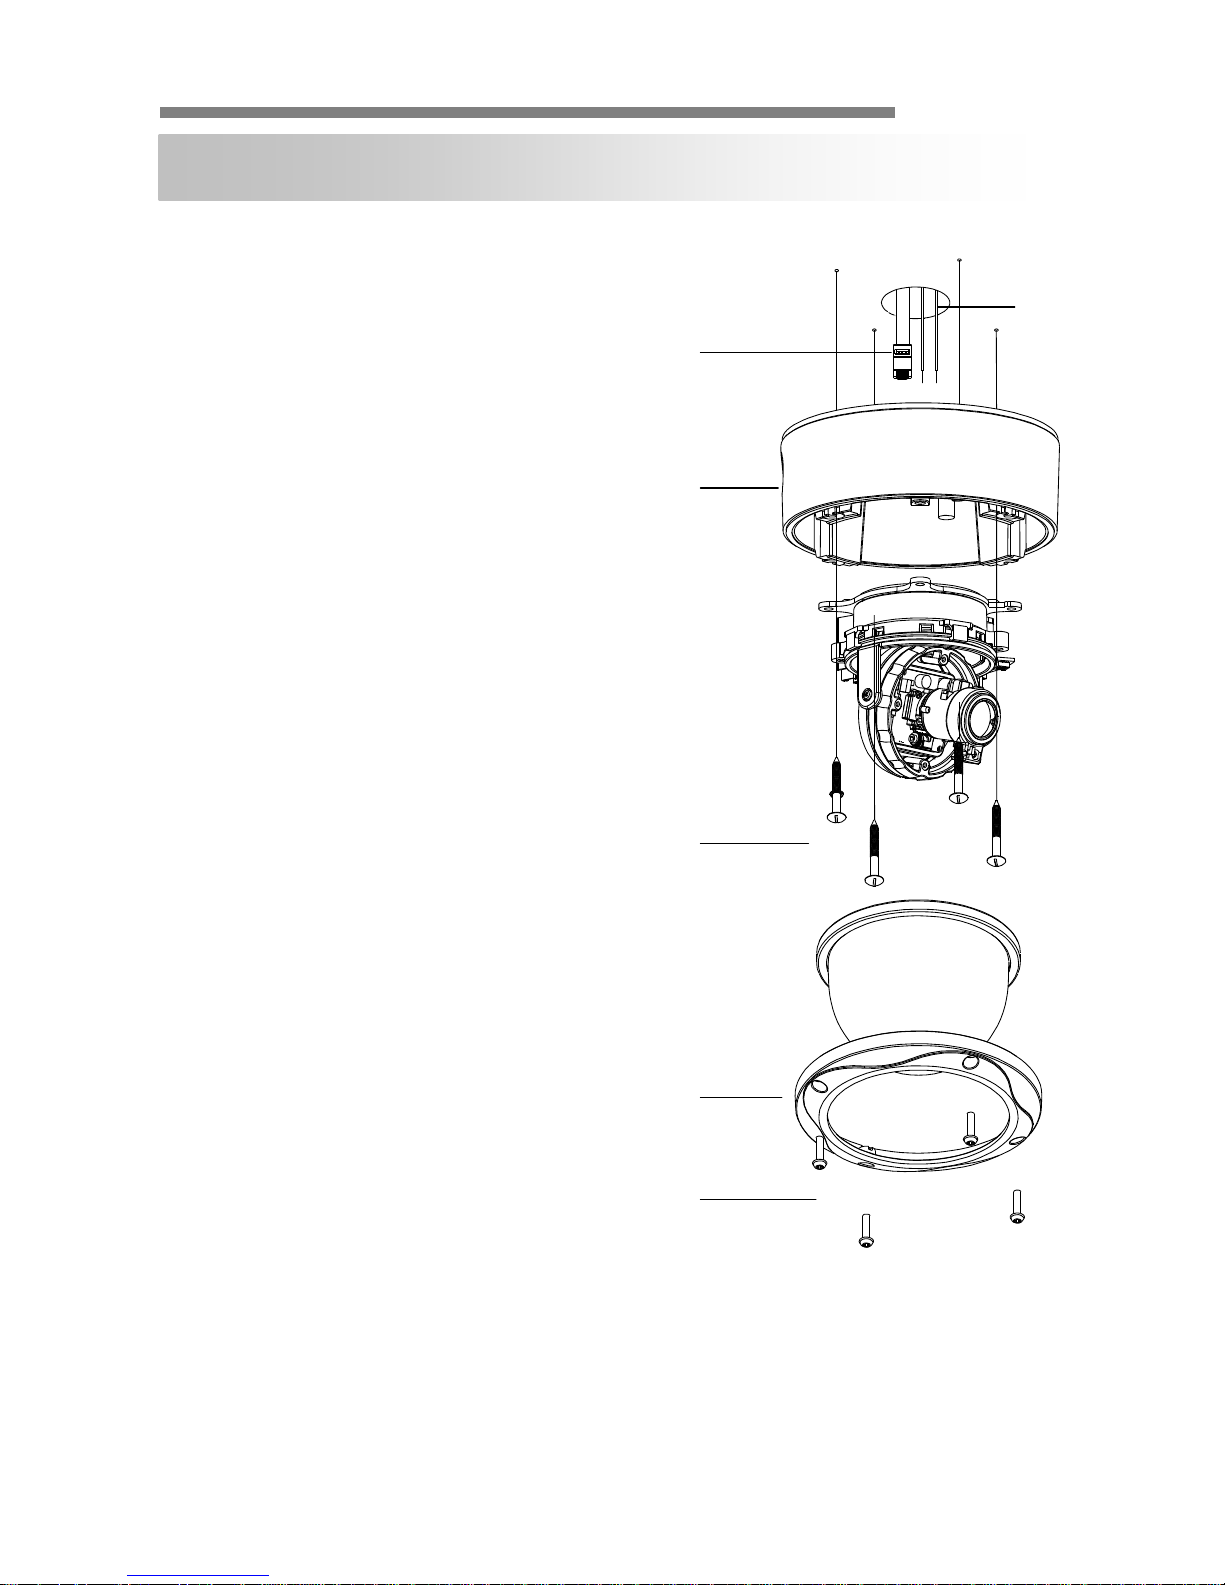
INSTALLATION
D
A
F
B
E
C
1. Use the supplied L-wrench to remove the four
fixing screws (B) of dome cover (A).
2. Align the camera unit with the surface of the
ceiling; make marks on the ceiling in the places
where the screw holes are to be drilled; and
then drill the four holes.
3. Cut a hole (diameter 2.9in/0.73mm) in the
ceiling for routing the cables.
4. Pass the power cable (E) and LEN cable (F)
from the camera unit through the cable hole in
the ceiling.
5. Align the four screw holes in the camera unit
(D) with the screw holes in the ceiling, and then
secure the camera in place by tightening the
four or more screws (C) through the washers.
6. Carry out the settings and adjustments for the
camera.
7. Secure the dome cover (A) by tightening the
screws (B).
Page 8
USER’S MANUAL
iV3377WD / iV3377WTIR 8 / 60
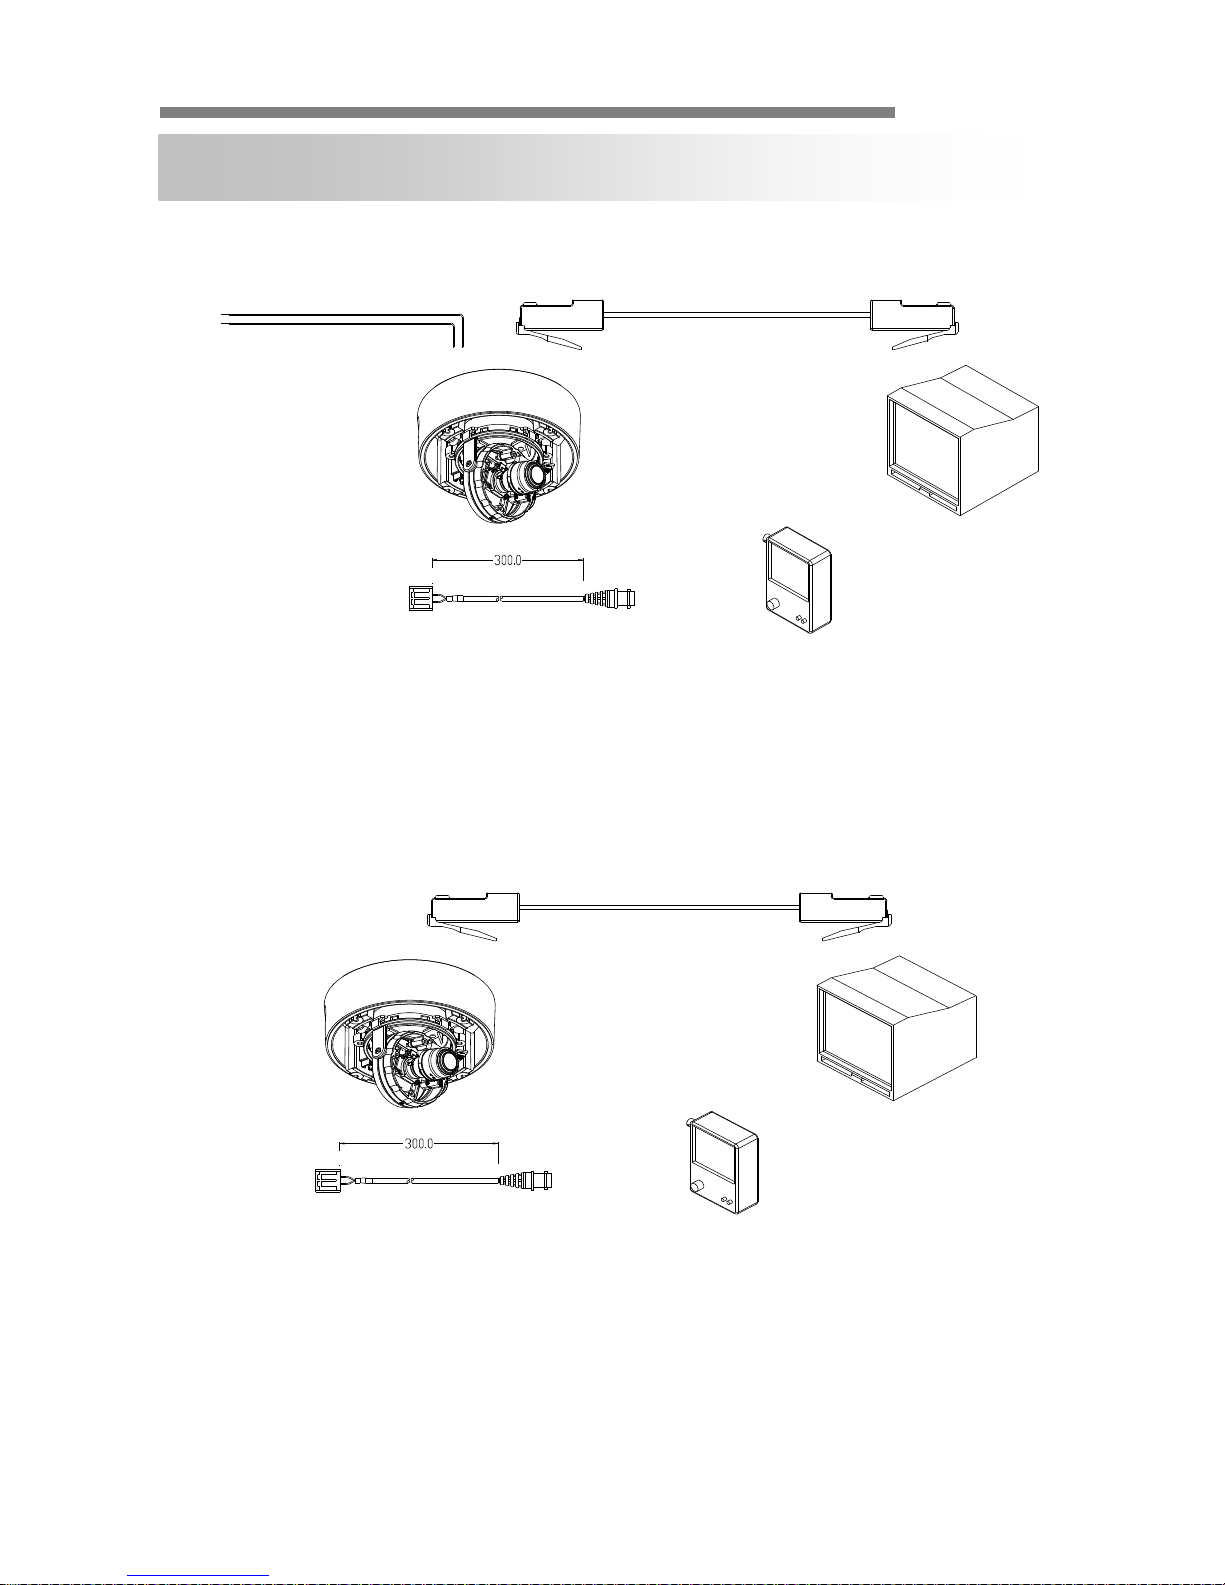
▲ CONNECTION (Ⅰ)
▲ CONNECTION (Ⅱ)
CONNECTION
DC12V / AC24V
LAN (RJ45)
Second VIDEO
CAUTION:
Check for polarity when using a DC voltage.
LAN (PoE)
Second VIDEO
CAUTION:
Check for polarity when using a POE (Power of Ethernet) power supply.
Power Requirement:
12VDC @ 2A
24VAC @ 1A
Page 9
USER’S MANUAL
iV3377WD / iV3377WTIR 9 / 60
▲ ETHERNET CONNECTION
Connect Ethernet Cable to the network.
Page 10
USER’S MANUAL
iV3377WD / iV3377WTIR 10 / 60
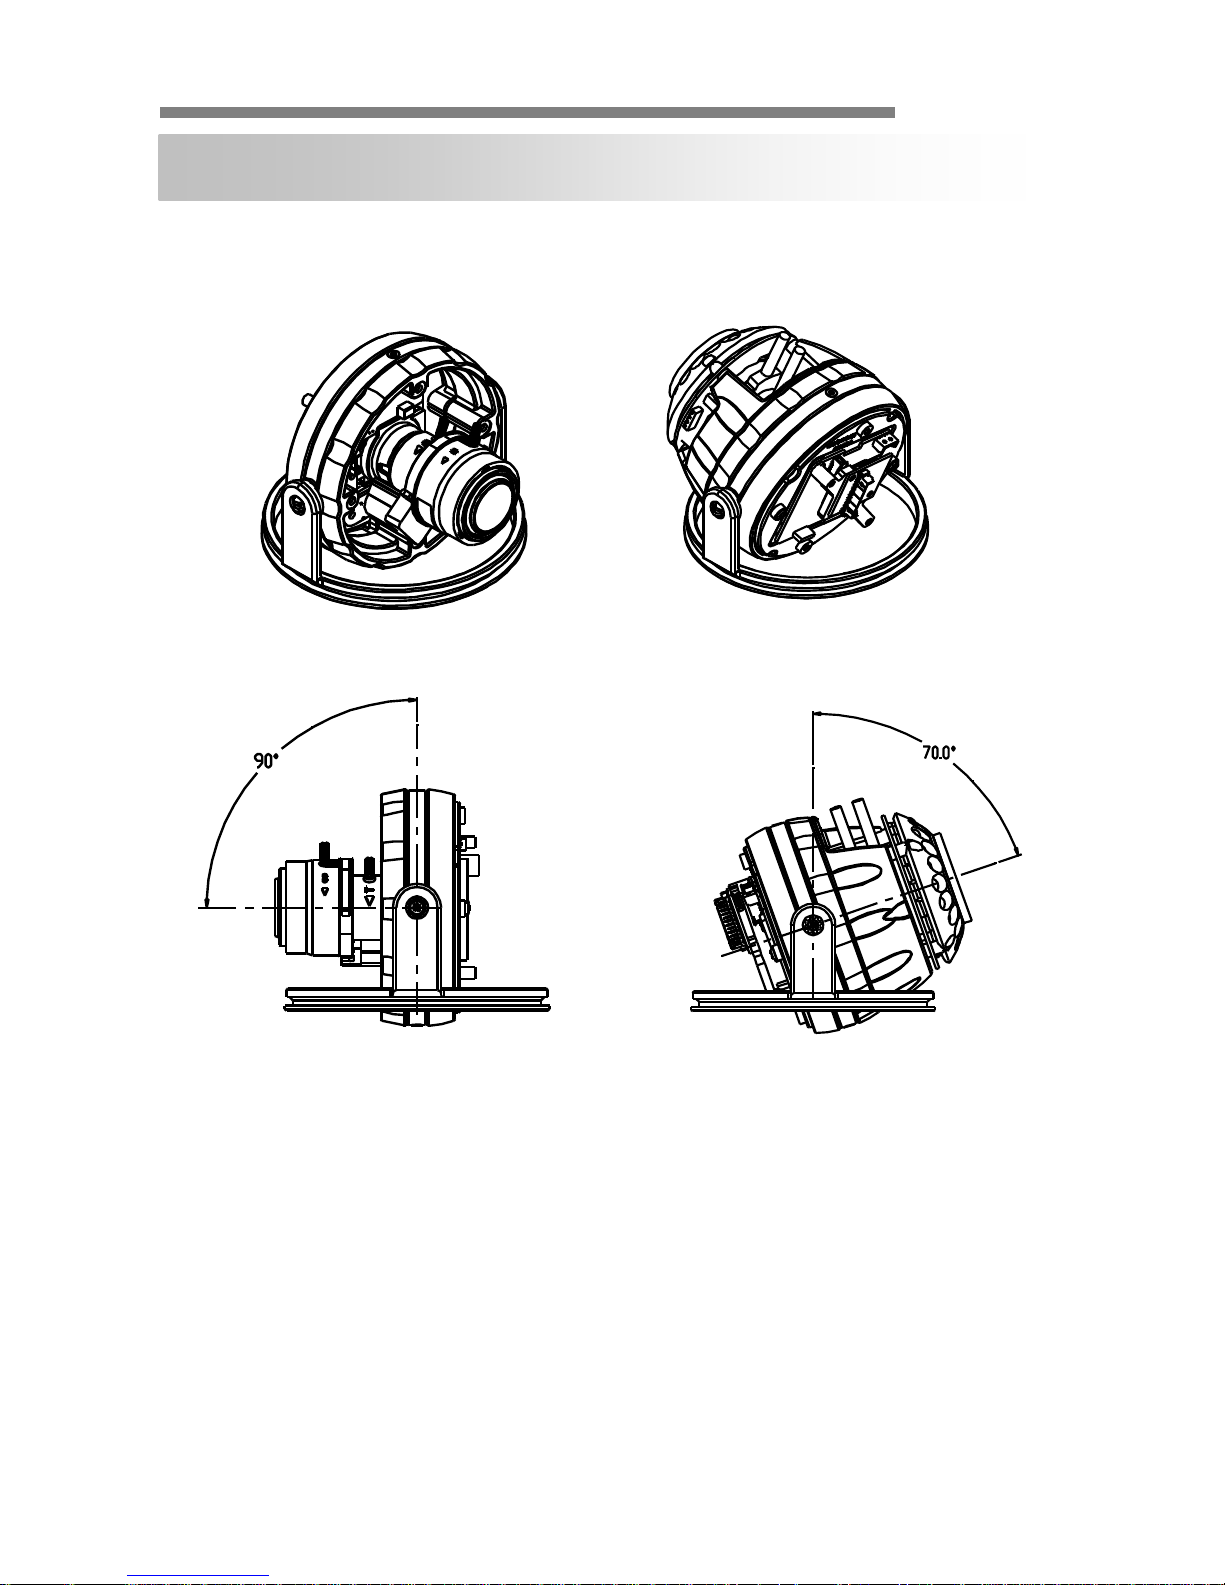
▲ LENS ADJUSTMENT & GIMBAL ADJUSTMENT
1. Adjust the panning (360˚) and tilt (90˚) position. (DV LENS TYPE)
Adjust the panning (360˚) and tilt (70˚) position. (DV LENS & IR LED TYPE)
2. Set the zoom lever as desired position by moving Zoom lever.
3. Set the Focus lever as the image is focused by moving Focus lever.
CAMERA SETTING
<DV LENS TYPE>
<DV LENS & IR LED TYPE>
Page 11
USER’S MANUAL
iV3377WD / iV3377WTIR 11 / 60
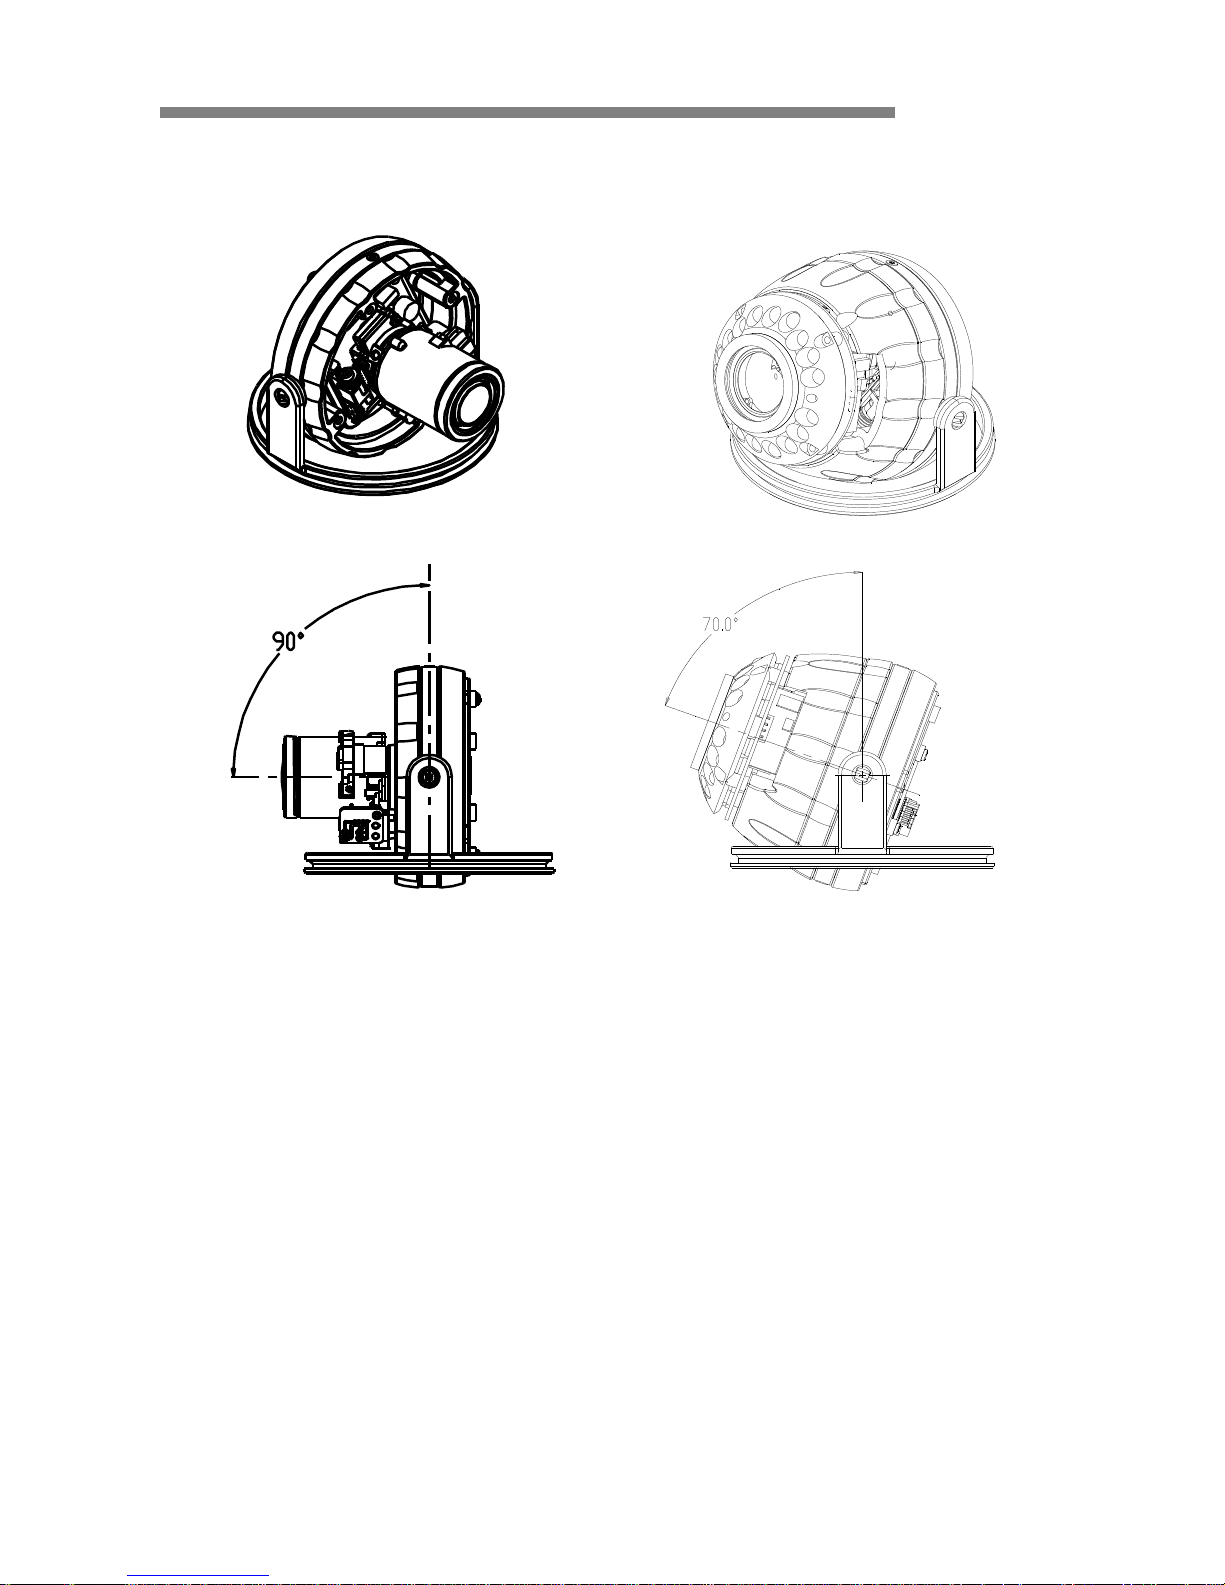
▲ GIMBAL ADJUSTMENT
1. Adjust the panning (360˚) and tilt (90˚) position.
(OMNI-FOCUS LENS TYPE)
2. Adjust the panning (360˚) and tilt (70˚) position.
(OMNI-FOCUS LENS & IR LED TYPE)
Page 12

USER’S MANUAL
iV3377WD / iV3377WTIR 12 / 60
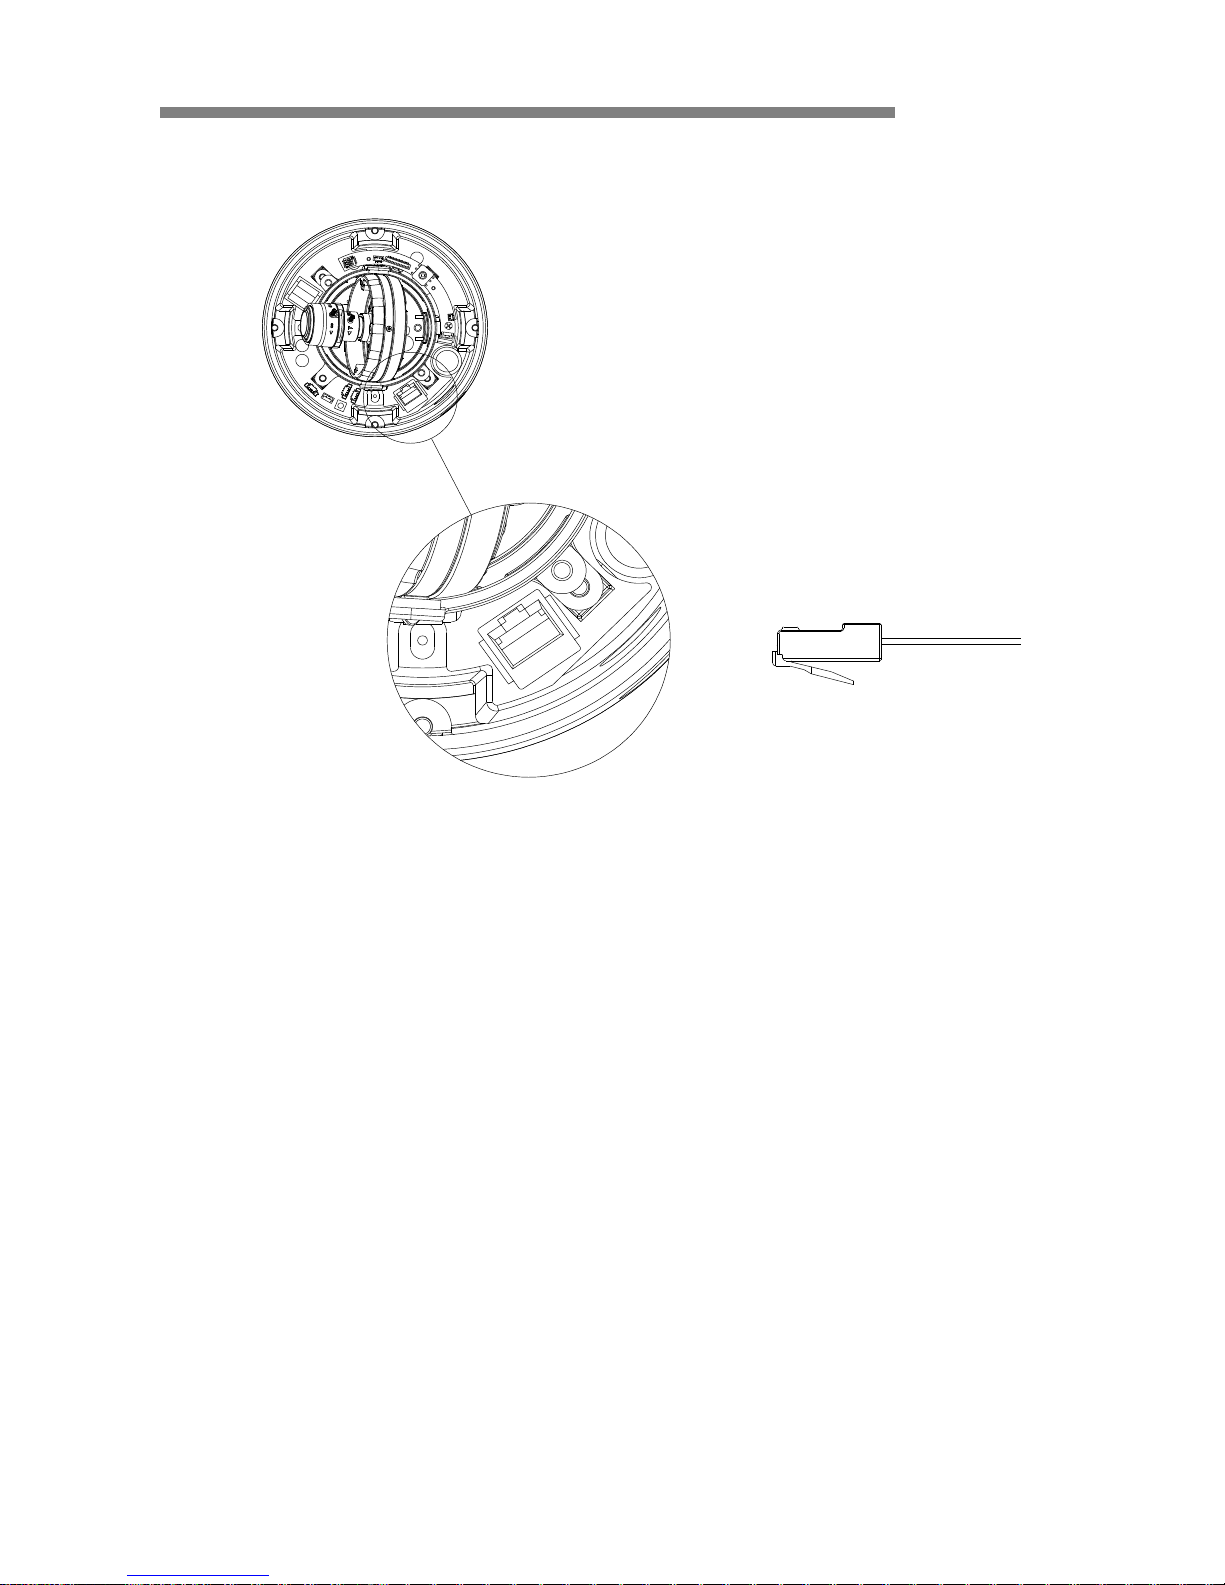
▲ CAMERA SETTING FOR SIDE OSD CONTROL BOARD
FUNCTIONAL OF CONTROL BOARD
[1] Functional control of O.S.D (On Screen Display) (SW2)
[2] Functional of VIDEO OUT (2ND) (CON1)
[3] Functional when using PAN FOCUS LENS [OPTION]
a) You push SW1 for 2 seconds.
Then the function of SW2 changes from OSD control key to zooming control key.
b) You press SW1 again for 2 seconds.
c) At this time, the SW2 function switches from zooming control key to OSD control
key.
*User can control OSD controller on the web setting page via network.
(Refer to the page 42)
SW1
CON1
SW2
Page 13
USER’S MANUAL
iV3377WD / iV3377WTIR 13 / 60
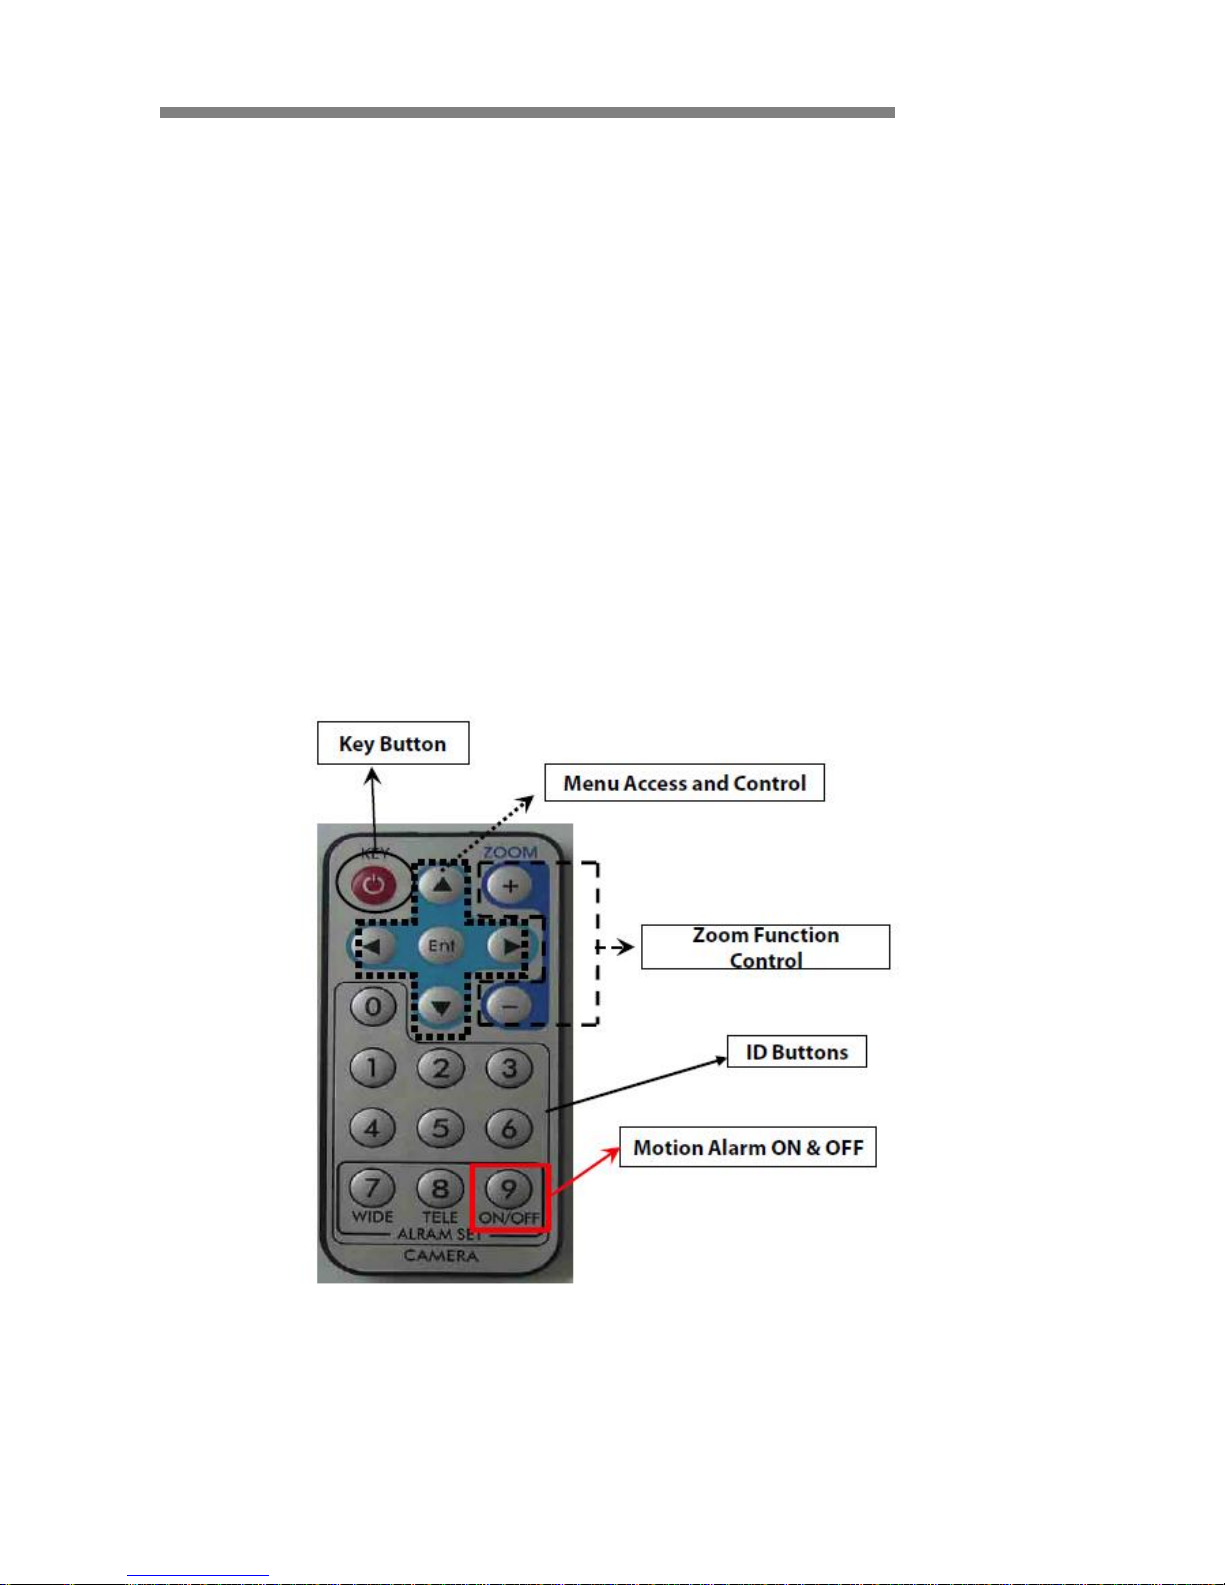
▲ REMOTE CONTROL Instructions:
1) Press [KEY] button + [ID].
Default is ―001‖ for ID=1.
2) Point the remote control towards the camera, then press and hold [0] until the Red
LED light starts flashing.
3) Press and hold the [KEY] button, until LED turns a solid Red color.
4) Press the [+] button to ZOOM IN, and [-] button to ZOOM OUT.
5) Press the [Ent] button to access the Menu and press [KEY] button to exit.
6) Press the [9] button to turn the Alarm ON or OFF.
*Note: Turning the Alarm ON disables the zoom function.
Page 14

USER’S MANUAL
iV3377WD / iV3377WTIR 14 / 60
▲ OSD MENU SETTINGS - iV3377WD, iV3377WTIR Series
EXPOSURE
LENS
DC (0-100) / MANUAL / VIDEO
DC Lens is recommended.
SHUTTER
1/160 / 1/100 / FLC / 1/250~10000 / SENS-UP x2~250
BLC
Back Light
Compensation
OFF / ON
AGC
Auto Gain Control
HIGH / MIDDLE / LOW / OFF
MAX-DR
Electronic Wide
Dynamic Range
OFF / ON (0~20)
STAR-LIGHT
AUTO (x2~x250) / OFF
x32 is recommended.
EXIT JUMP
EXIT / SAVE&EXIT / FACTORY RESET
COLOR
WB MODE
AWC / ATW / MANUAL / PUSH LOCK
R-Y GAIN
0~100
B-Y GAIN
0~100
DAY & NIGHT
DAY & NIGHT MODE
AUTO / COLOR / BW / EX-CONT
COLOR --) BW: Switching from Color to BW. If the number is higher, the camera will only switch
during a super low light condition.
BW --) COLOR: Switching from BW to Color. This number should always be lower than COLOR --)
BW.
Read Time: Time interval to switch from Color to BW
BW: BURST (OFF / ON)
When the BURST is OFF, the camera will make less noise.
C-SUP
Color Suppression: Color will be reduced at low illumination, if the C-SUP level is higher.
0~100 (Not available when 3D-DNR is ON.)
A-SUP
Aperture Suppression: The sharpness of the edges will be reduced at low illumination, if A-SUP
level is higher.
0~100 (Not available when 3D-DNR is ON.)
EXIT JUMP
EXIT / SAVE&EXIT / FACTORY SET
FUNCTION
MIRROR
OFF / MIRROR / V-FLIP / ROTATE
SHARPNESS
0~31
GAMMA
0.05~1.00 / USER
FREEZE
OFF / ON
NEGATIVE
OFF / ON
3D-DNR
3D Digital Noise
Reduction
OFF / LOW / MIDDLE / HIGH
D-ZOOM
OFF / ON (x1.0~x32 PTZ)
SLC
Side Light
Compensation
OFF / ON
HME
Highlight Masking
Exposure
OFF / ON
DIS
Digital Image Stabilizer
OFF / ON
EXIT JUMP
EXIT / SAVE&EXIT / FACTORY SET
Page 15

USER’S MANUAL
iV3377WD / iV3377WTIR 15 / 60
MOTION
MOTION
OFF / ON
SET WINDOW
ALL SET (Set the Entire Screen)
ALL CLEAR (Clear the Entire Screen)
SENSITIVITY (1~120)
SHOW INDICATOR (OFF / ICON / TRACE)
DELAY OUT (1~15)
Motion Alarm Zoom-In Delay
EXIT JUMP
EXIT / SAVE&EXIT / FACTORY SET
SYNC
SYNC
INTERNAL / AUTO
V-PHASE
0~199
EXIT JUMP
EXIT / SAVE&EXIT / FAVTORY SET
EXIT
EXIT
Exit the menu.
SAVE&EXIT
Exit the menu and save the settings.
FACTORY SET
Reset the menu setting to factory default.
Page 16
USER’S MANUAL
iV3377WD / iV3377W TIR 16 / 60
▲ INSTALLATION PROCESS
1. Connecting power supply, LAN, and audio cables to an iV3377WD
(iV3377WTIR).
DC 12V - Power (Adapter, DC 12V/1000mA)
ETHERNET - LAN cable (RJ45 Jack)
A client PC or a network device is connected to the iV3377WD/iV3377WTIR.
AUDIO - Audio IN/OUT
cable
IN: Input from a microphone (RCA)
OUT: Output to a speaker (RCA)
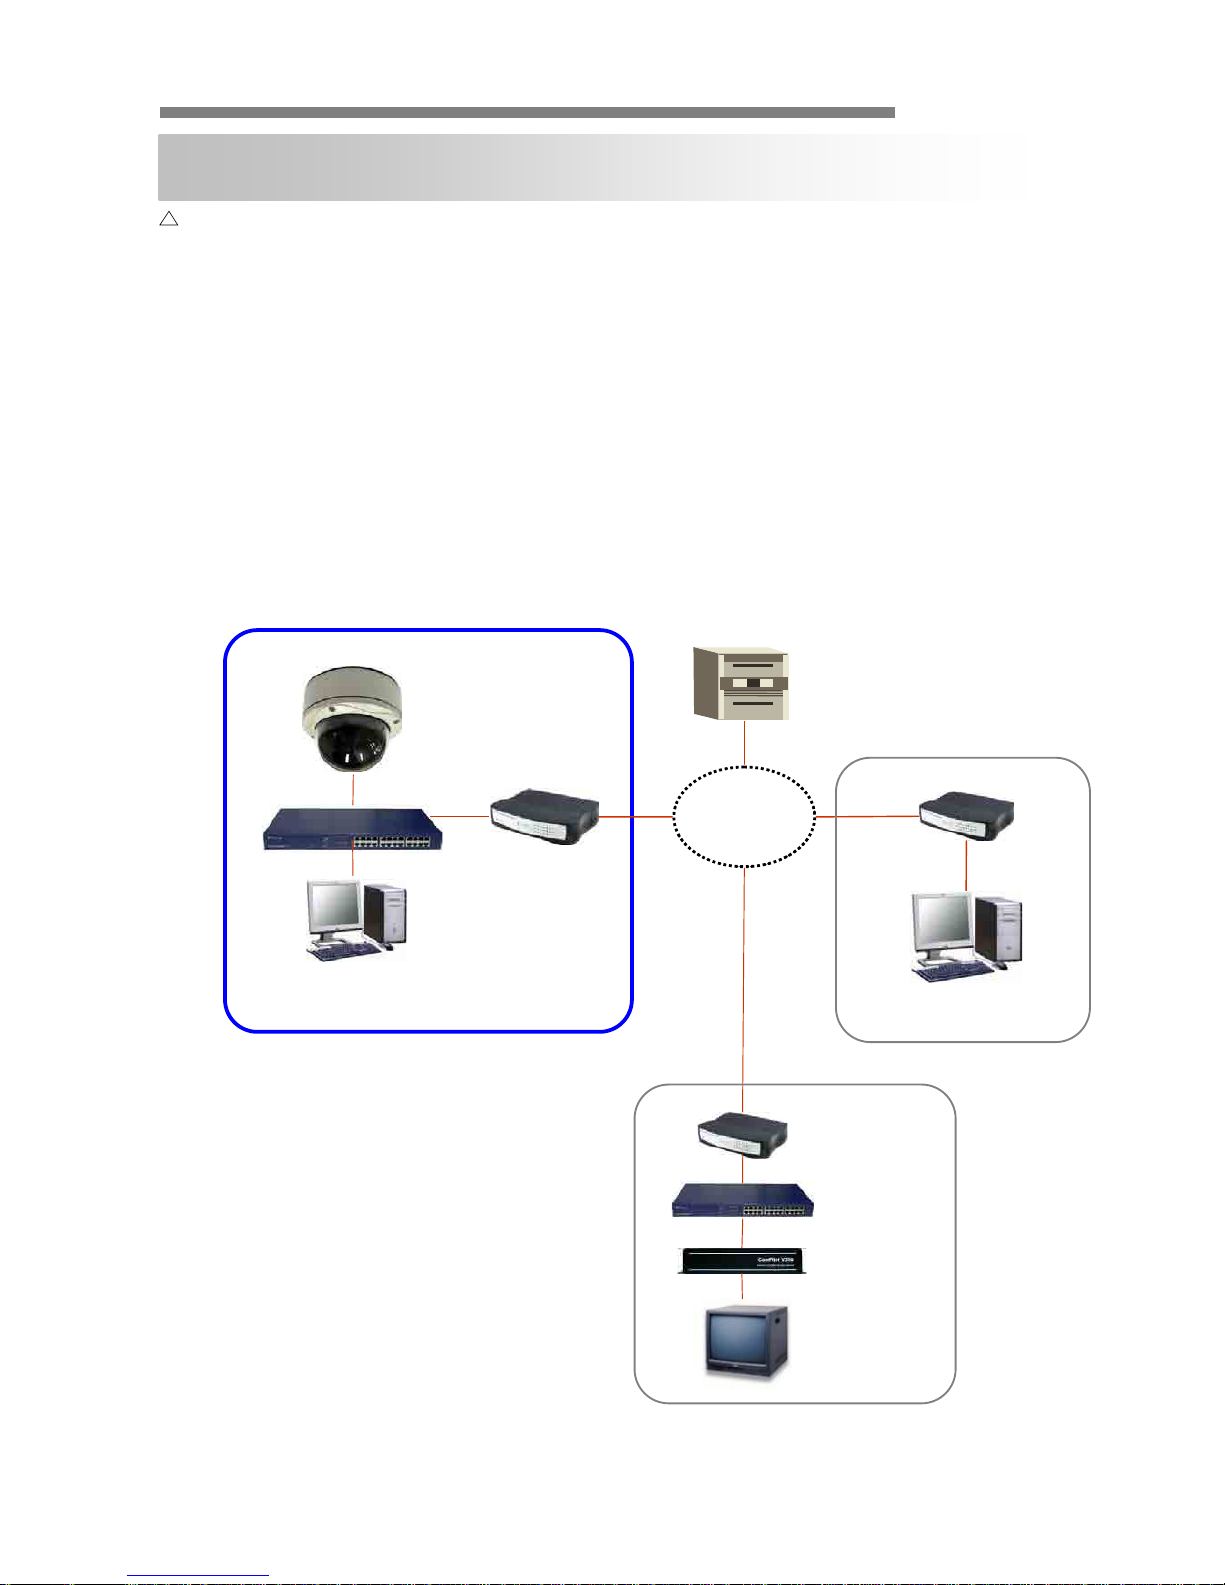
※ Network Configuration Example
NETWORK CONFIGURATION
Hub
Local Monitoring
Router
Router
DDNS Server
iV3377WD
(iV3377WTIR)
Hub
Router
Monitor
/ DVR
/ Matrix
IP Decoder
Center Monitoring
Network
Page 17
USER’S MANUAL
iV3377WD / iV3377WTIR 17 / 60
2. Executing NVR program Installation on PC (Ex: NVS 4.1 Installation)
On each installing process, click [Yes] or [Next] to install by default.
The programs like ENCP, NDC Manager, and NDC Viewer are installed after the
entire process.
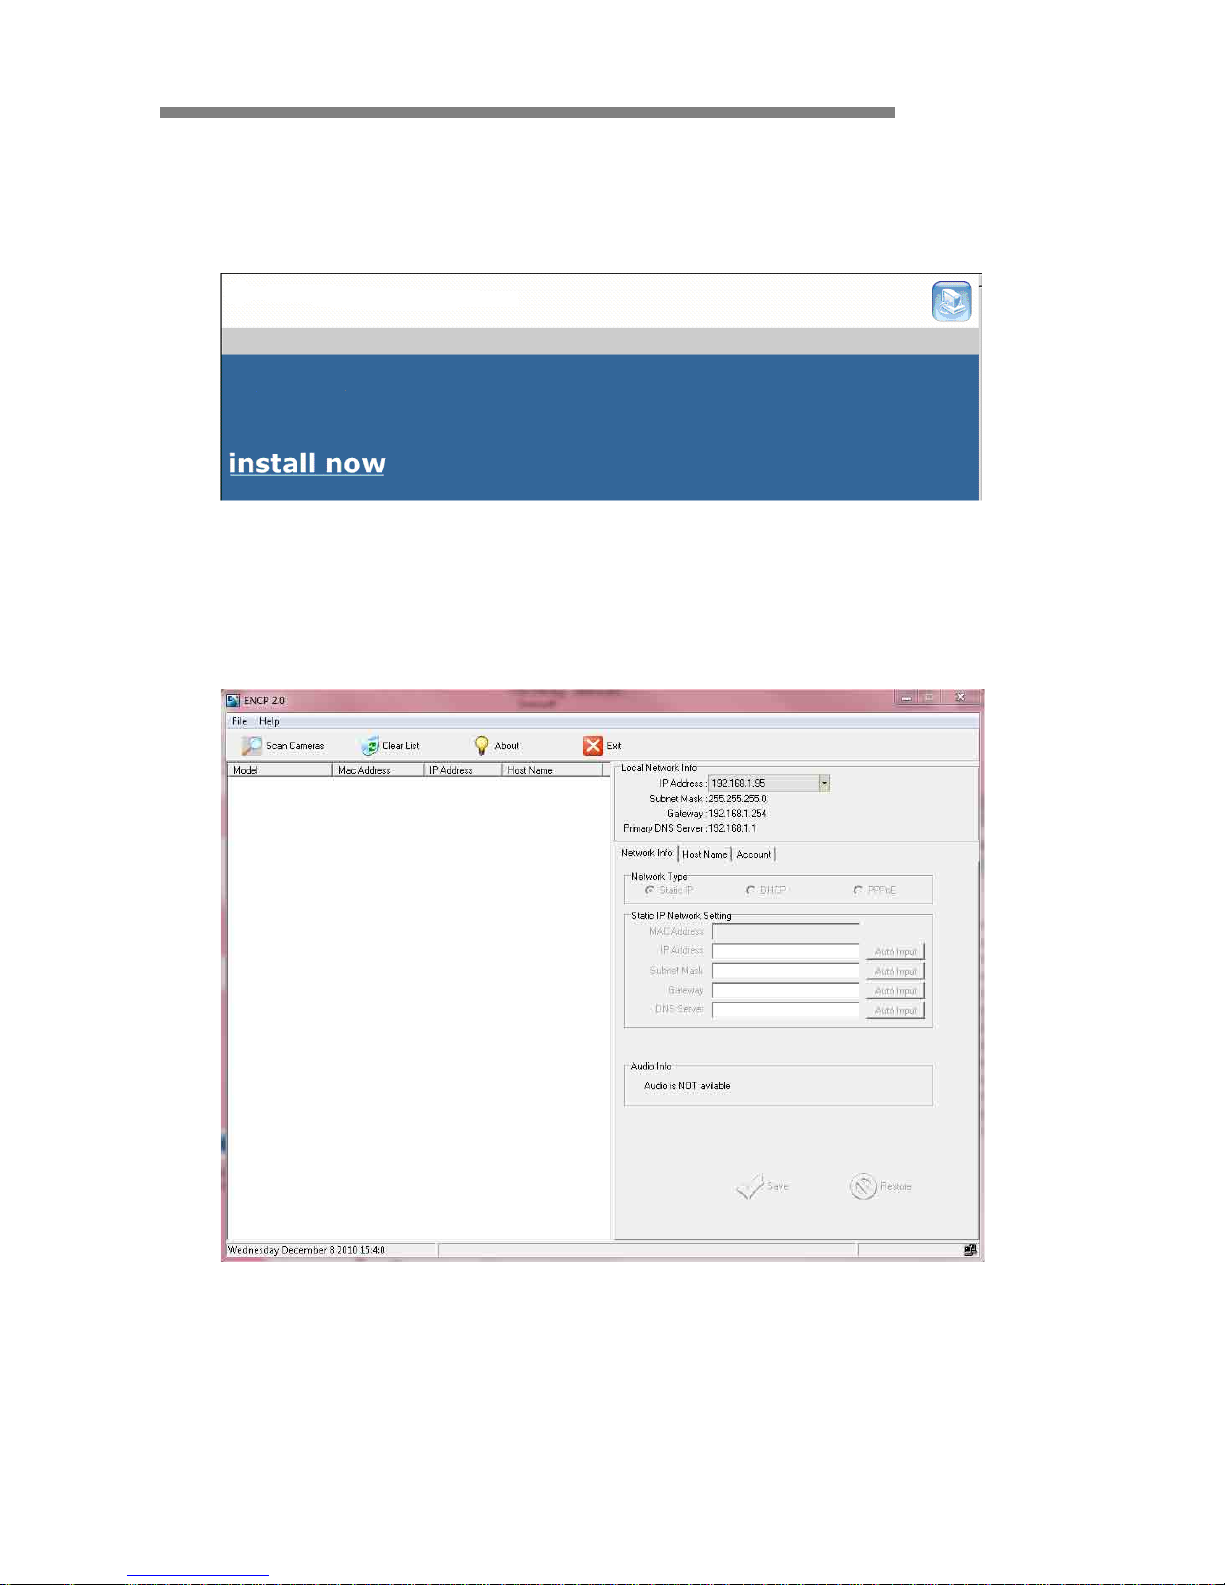
3. Assigning an IP address to the iV3377WD/iV3377WTIR.
Assign an IP address with ENCP 2.0
Running Start > Program > NVS 4.1 > ENCP 2.0
▶
NVS 4.1
Installation
▶
ENCP 2.0
Page 18
USER’S MANUAL
iV3377WD / iV3377WTIR 18 / 60
4. Scan iV3377WD/iV3377WTIR and network configuration
Click [Scan Cameras] button to search iV3377WD/iV3377WTIR Network Video
Streamer on the local network where ENCP runs.
The Camera List displays the basic information of the searched
iV3377WD/iV3377WTIR on the local network.
Default IP address is 192.168.1.2
Select an iV3377WD/iV3377WTIR and change the network setup appropriately.
After the setup, click [Save] button.
Refer to ―ENCP 2.0‖ manual for details.
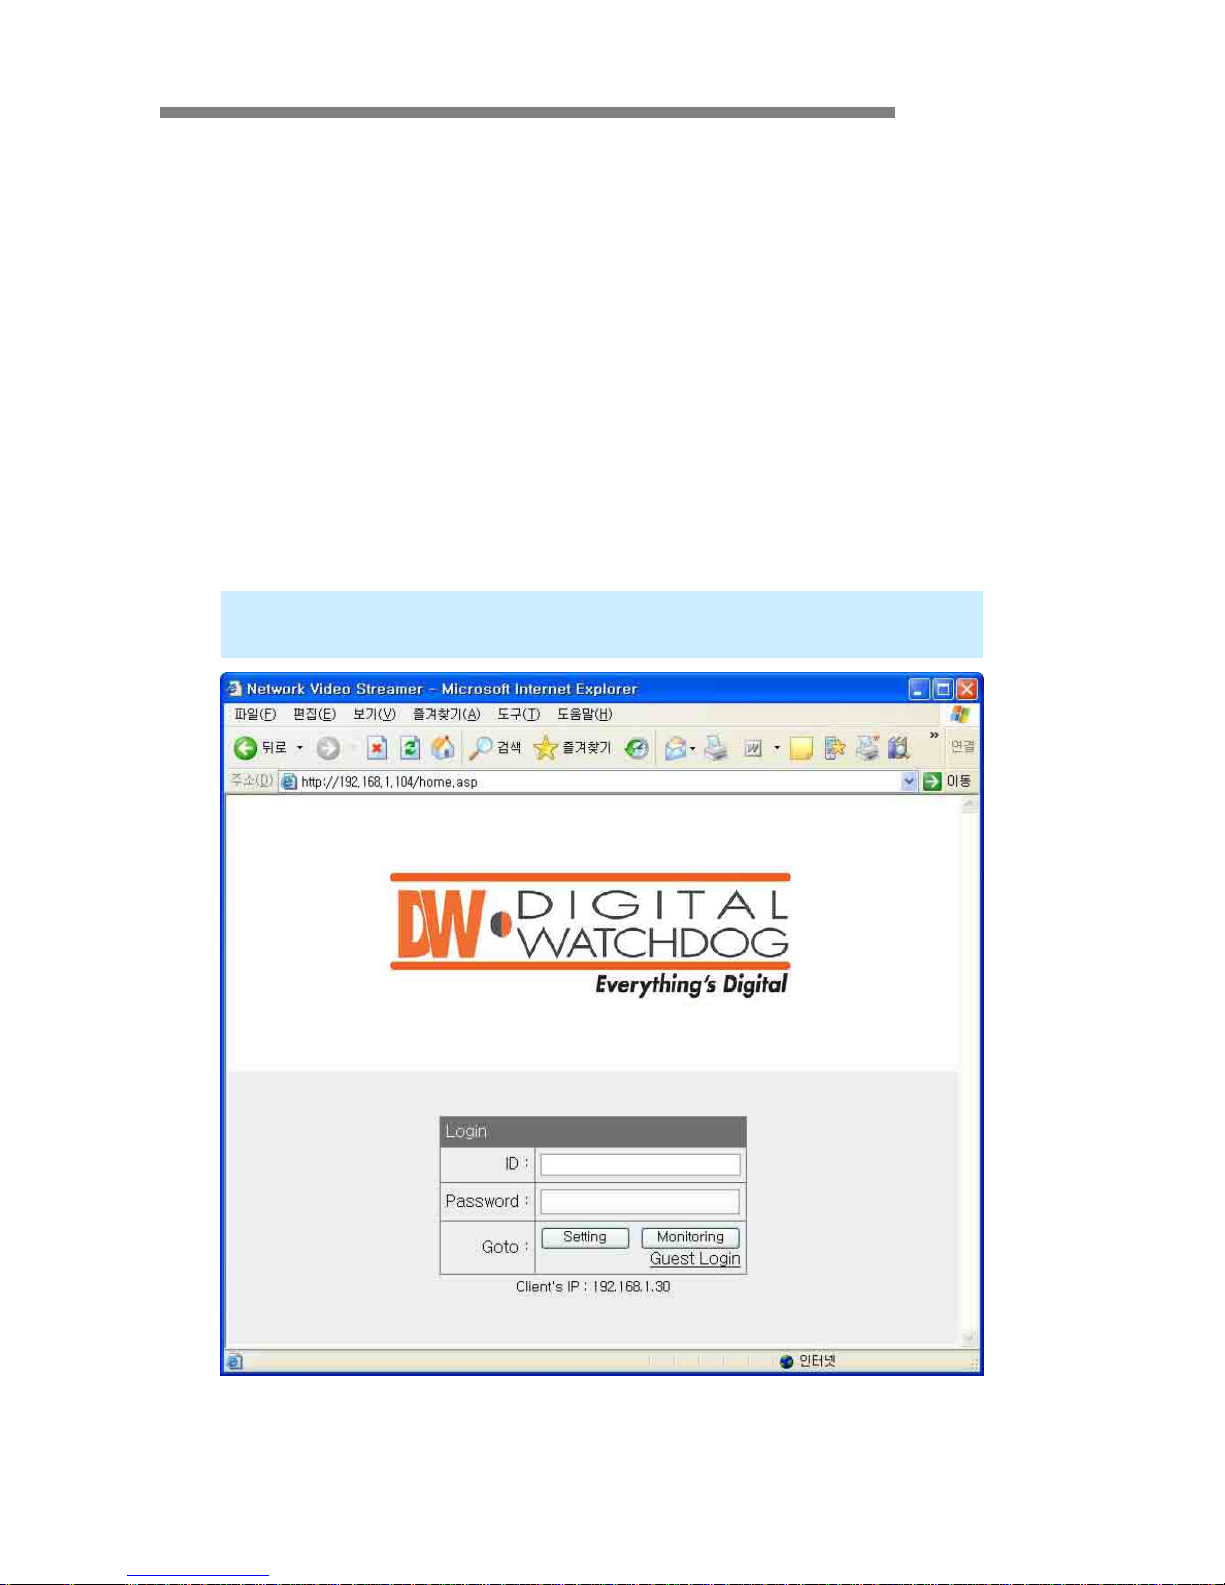
5. Accessing to iV3377WD/iV3377WTIR with a web browser
Open a web browser on PC and enter the IP address assigned to a
iV3377WD/iV3377WTIR in the following format.
http:// 192.168.1.2/
▶
Login Page
Page 19

USER’S MANUAL
iV3377WD / iV3377WTIR 19 / 60
▲ OVERVIEW
User can monitor the video and audio data and manage iV3377WD/iV3377WTIR
through a web browser over internet.
User can select a type between encoder mode and decoder mode through a web
browser.
Basic Functions:
Monitoring the video and audio data from an iV3377WD/iV3377WTIR.
Changing the setup related to monitoring
Resolution, Info. Display, D/O (Digital Output), Bit Rate, Audio, PTZ, etc.
Confirming the status of a iV3377WD/iV3377WTIR
Network Status, Model Info, Connection List, Log
Changing the basic setting (Network, Video, Audio, Event, Date/Time, OSD)
Changing the expert setting (RS485, RS232, Port, Security Level, Account, DDNS,
UPnP, Motion Detect, Firmware Update)
Using Web Browser
Monitoring
Managing
▶
Login Page
Page 20
USER’S MANUAL
iV3377WD / iV3377WTIR 20 / 60
▲ CONNECTION
To connect to an iV3377WD/iV3377WTIR, type the IP address that is given to the
iV3377WD/iV3377WTIR on the address window of a web browser as below.
(Refer to ―ENCP 2.0‖ program manual to set IP address of the iV3377WD/iV3377WTIR.)
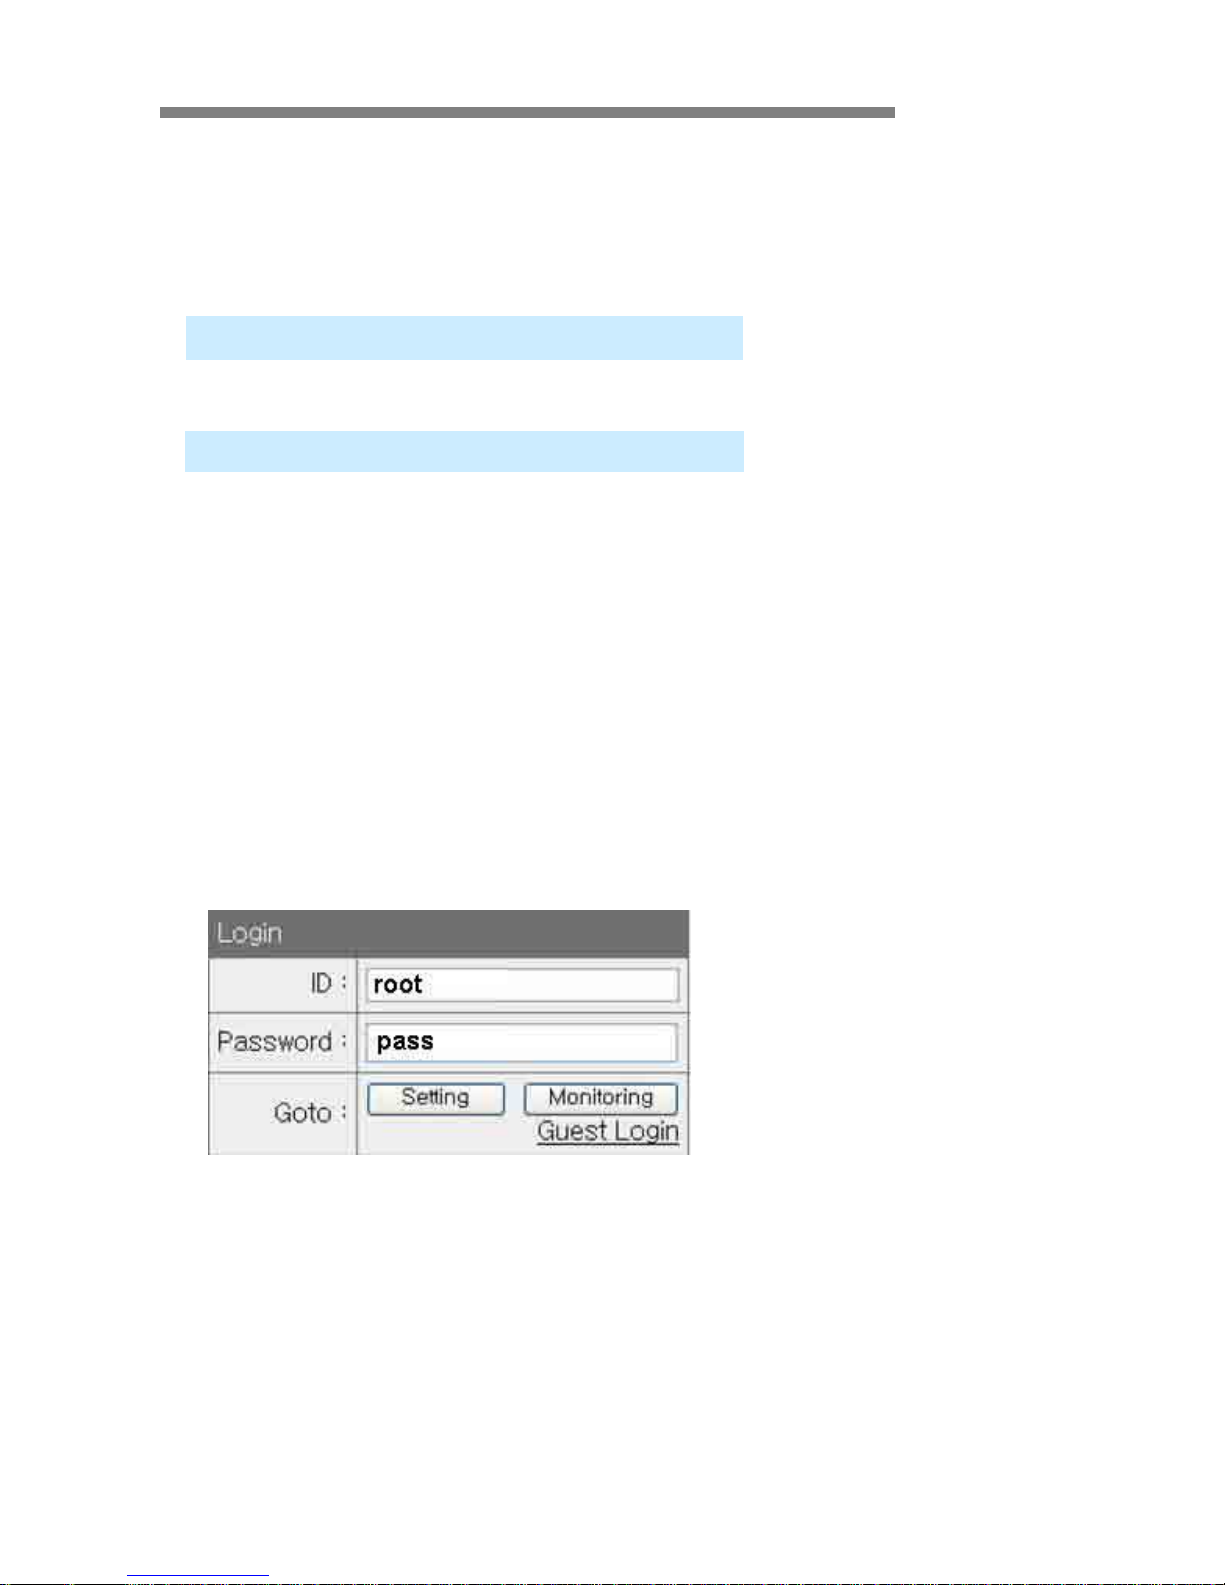
• Connection and Accounts
① Administrator Account
It is available to monitor and manage an iV3377WD/iV3377WTIR.
Default ID / Password of the administrator is root / pass.
Only the password is changeable. (Administrator’s ID is fixed.)
② Guest Account
It is available to use only the functions that are permitted limitedly on monitoring.
It is shown as inactivated for the limited functions on monitoring page.
Setting page login
: Type the ID and Password of the administrator and click ―Setting‖ button.
Monitoring page login
: Type the ID and Password of the administrator and click ―Monitoring‖ button
Guest login
: Click ―Guest Login‖ to enter the monitoring page of guest account
http://(iV3377D/iV3377TIR IP Address)
http://192.168.1.2
► Type on the address window of a web browser and enter
► Example (Default IP Address)
► Login window
Page 21

USER’S MANUAL
iV3377WD / iV3377WTIR 21 / 60
Client’s IP
: Displays the IP address of the connected PC.
► Monitoring Page
► Server Setting Page
Page 22

USER’S MANUAL
iV3377WD / iV3377WTIR 22 / 60
• Note for Monitoring Page
When first connecting to the monitoring page, click [Yes] to download ActiveX if
―Security warning‖ window appears. (CASE ①)
Click the yellow information bar to download ActiveX control.
User can download and install ActiveX Setup manually if the information bar does
not appear. (CASE ②)
②
①
Page 23

USER’S MANUAL
iV3377WD / iV3377WTIR 23 / 60
Click [Run] button to install ActiveX file manually (NVSOCX.exe)
► ActiveX Setup window
Page 24

USER’S MANUAL
iV3377WD / iV3377WTIR 24 / 60
▲ MONITORING
1st / 2nd / 3rd Stream
Select a Stream to monitor
If the stream button is inactivated, check the video setting of ―server setting
page.‖
Snapshot
Capture a JPEG Image of current video stream (JPG file creation route: C:/root)
REC
Record the video of current video stream (AVI file creation route: C:/root)
Monitoring Page
Page 25

USER’S MANUAL
iV3377WD / iV3377WTIR 25 / 60
Full
Extend the image of current video stream to fit monitor size.
Resolution
Display a current resolution.
User can select other resolution.
If iV3377WD/iV3377WTIR is rebooted, the resolution on the monitoring page is
initialized to the designated value of ―server setting page‖.
Changing the resolution is not available on a guest account.
Info.
Shows the information of the transferred data from the iV3377WD/iV3377WTIR
on the upper of the image.
FPS / Camera (Channel) Name / Resolution
Event Status: Motion Detect (red) / Digital IN (blue) / Video Signal (green)
Resolution
QQVGA
QCIF
QVGA
CIF
VGA
4CIF
D1
NTSC
160X112
176X112
320X240
352X240
640X480
704X480
720X480
PAL
160X112
176X144
320X240
352X288
640X480
704X576
720X576
Detect Video Signal
Detect Motion Event
Detect Sensor Input (Digital IN)
FPS of Current Video Stream
Resolution of Current Image
Channel Name
Page 26

USER’S MANUAL
iV3377WD / iV3377WTIR 26 / 60
D/O
Digital Out - This controls the device that is connected to the
iV3377WD/iV3377WTIR.
Bit Rate
Display the bit rate of current video stream.
User can select other bit rate. If iV3377WD/iV3377WTIR is rebooted, the bit rate
on the monitoring page is initialized to the designated value of ―server setting
page‖.
Changing the bit rate is not available on a guest account.
Enable Audio
If the box is checked the iV3377WD/iV3377WTIR sends the audio data with the
video data.
PTZ Control
User can control PTZ camera or receiver through RS485.
• Z (Zoom): zoom in (+) / zoom out (-)
• Pan/Tilt: iV3377WD/iV3377WTIR does not support Pan/Tilt function
• F (Focus): focus in (+) / focus out (-)
• PTZ control is not supported on a guest account.
Page 27

USER’S MANUAL
iV3377WD / iV3377WTIR 27 / 60
▲ SERVER SETTING
To apply the changed setting, reboot iV3377WD/iV3377WTIR.
(Click Reboot on the menu)
Network Status
This is the initial page of Server Setting.
This shows network status, model information, network traffic status, connection
list, and system log.
Page 28

USER’S MANUAL
iV3377WD / iV3377WTIR 28 / 60
Network Status
MAC Address: Media Access Control Address of iV3377WD/iV3377WTIR;
this is unchangeable.
IP Address: the assigned IP Address of iV3377WD/iV3377WTIR
Subnet Mask: where the Sub-network of the IP address belongs to.
(Use the value to fit the network environment)
Gateway: Gateway Address
(Use the value to fit the network environment)
Default DNS: IP Address of Default DNS server
Connection List
User can check the number of connected clients and IP addresses.
Log
―Log‖ displays the logs of general events of iV3377WD/iV3377WTIR.
Page 29

USER’S MANUAL
iV3377WD / iV3377WTIR 29 / 60
Basic Configuration > Network
User can set Network Information of iV3377WD/iV3377WTIR—IP Address, Subnet
Mask, Gateway, and Default DNS
① Static IP
IP Address: Ask network administrator for an appropriate address.
Subnet Mask / Gateway / Default DNS: Ask network administrator.
After setting, click [OK] button.
Click [Reboot] to apply the setting to iV3377WD/iV3377WTIR.
Page 30

USER’S MANUAL
iV3377WD / iV3377WTIR 30 / 60
② Dynamic IP
If DHCP server is on the local network and you intend to allocate IP address
dynamically, use this method.
Select Dynamic IP tab; click [OK] button; and reboot iV3377WD/iV3377WTIR.
If you want to select Dynamic IP, set Dynamic DNS to access
iV3377WD/iV3377WTIR.
Page 31

USER’S MANUAL
iV3377WD / iV3377WTIR 31 / 60
③ PPPoE
Use in case the network supports PPPoE like xDSL.
Ask ISP (Internet Service Provider) for details.
User ID: xDSL User ID
User Password: xDSL User Password
Service Name: Service Name of ISP
MTU: Maximum Transmission Unit of Data
IP address of DNS sever can be set to create automatically.
If your xDSL does not use static IP type, you should use Dynamic DNS setting like
DHCP.
Page 32

USER’S MANUAL
iV3377WD / iV3377WTIR 32 / 60
Basic Configuration > Video
User can select video streaming type (Encoder or Decoder Mode).
iV3377WD/iV3377WTIR supports only an Encoder mode.
① Encoder Mode
Page 33

USER’S MANUAL
iV3377WD / iV3377WTIR 33 / 60
Video Setting
Preview: User can check the current video setting through the preview images.
(First / Second / Third Stream Selectable)
Video Compressed Type: H.264 / MJPEG
(Compression Type of Third Stream: MPEG4)
Resolution: QQVGA / QCIF / QVGA / CIF / VGA / 4CIF / D1
(Resolution of Third Stream: QCIF Fixed)
Bit Rate Type : CBR / VBR
• Constant Bit Rate : 8M / 7M / 6M / 5M / 4M / 2M / 1.5M / 1M / 750K / 500K / 384K
/ 256K / 128K / 64K / 32K
• Variable Bit Rate: 1~6 (The highest quality is ―1.‖)
Frame per Sec: 1 ~ 30 (NTSC) / 1~25 (PAL)
Group Size: 1~200 (NTSC / PAL)
Port: Video and Audio Streaming Port (Each stream must use a different port.)
Video Type: NTSC / PAL
Video Color: Auto / Color / B&W
Aperture: 0~15 (Maximum Emphasis Value is ―15.‖)
Brightness / Contrast / Saturation / Hue: 0~255
X / Y Offset 1~21
JPEG Capture
Enable: Send JPEG Image via HTTP Protocol (1fps fixed)
Resolution: Select a Resolution (QQVGA~D1)
Quality: High / One / Two / Three / Four / Low
▶ Jpeg Capture
Page 34
USER’S MANUAL
iV3377WD / iV3377WTIR 34 / 60
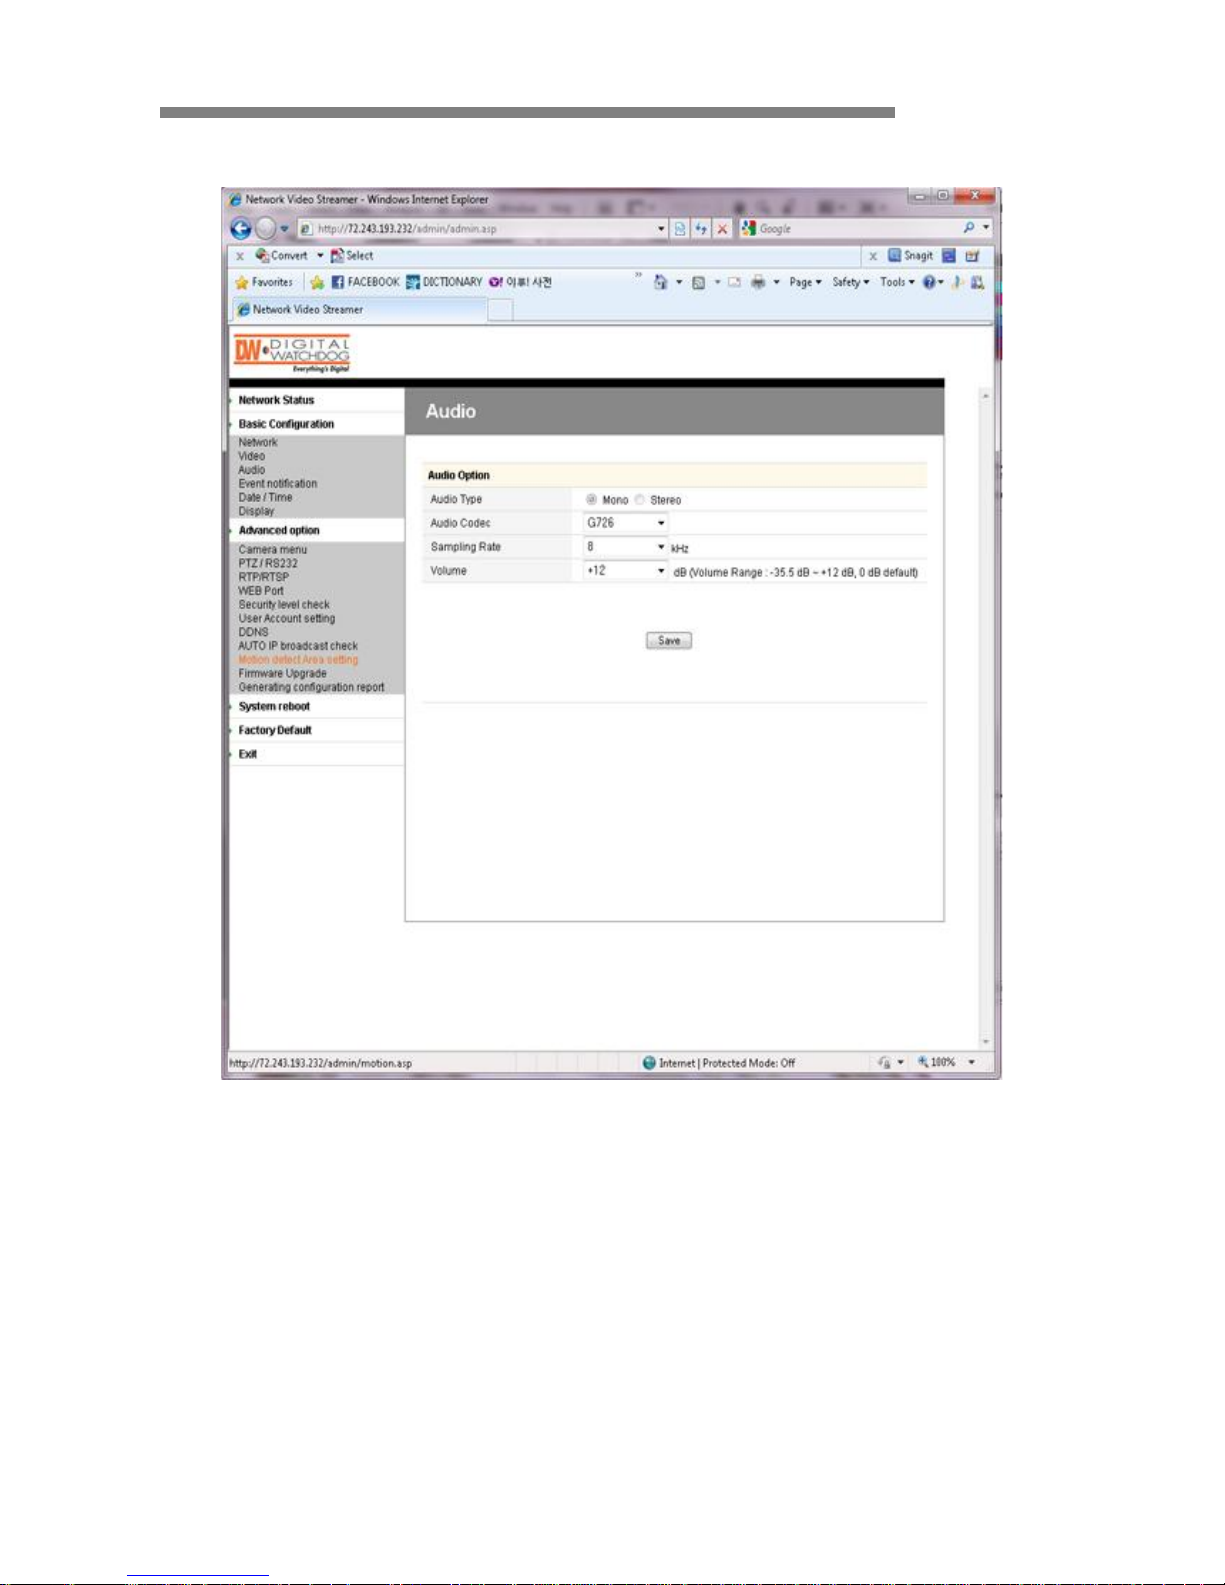
• Basic Configuration > Audio
Server to PC Audio Option
Audio Type: Mono (Fixed)
Audio Codec: G.711 / G.726
Sampling Rate: 8 kHz/ 32kHz
Volume: -34.5~12dB
Page 35

USER’S MANUAL
iV3377WD / iV3377WTIR 35 / 60
Basic Configuration > Event notification
① Digital Input
Page 36

USER’S MANUAL
iV3377WD / iV3377WTIR 36 / 60
Common
Sensor Type: Select a type out of two types
Preset
Preset Enable: Enables the iV3377WD/iV3377WTIR to send the preset signal to the
connected camera which supports preset function
Preset Number: Preset number that assigned to the camera which supports preset
function
Digital Output
Digital Output Enable: Enables the iV3377WD/iV3377WTIR to send the digital signal
to the connected device
Digital Output Time: Adjusts the time for the iV3377WD/iV3377WTIR to send the
signal (unit: sec)
FTP
Enable: Enables the iV3377WD/iV3377WTIR to send captured image to FTP server
(Assuming JPEG Capture is enabled on the video setting page.)
Server: IP Address of FTP server
Port: FTP Server Port
User: Account of FTP Server
Password: Password of FTP Server
Image name: File name of Captured Image
(Time information will be added with the image name.)
SMTP (E-mail)
Enable: Enables the iV3377WD/iV3377WTIR to send captured image via e-mail.
Outgoing Mail Server: SMTP Server
To e-mail address: E-mail Address of Receiver
From E-mail Address: E-mail Address of Sender
Subject: User can specify e-mail title.
Body: User can specify e-mail message.
Page 37

USER’S MANUAL
iV3377WD / iV3377WTIR 37 / 60
② Motion Detection
Preset: Same as ―Digital Input‖ Setting
Digital Output: Same as ―Digital Input‖ Setting
FTP: Same as ―Digital Input‖ Setting
SMTP (E-mail): Same as ―Digital Input‖ Setting
Page 38

USER’S MANUAL
iV3377WD / iV3377WTIR 38 / 60
③ Periodic Timer
Common
Periodic Timer Enable: Enables the iV3377WD/iV3377WTIR to send the signal to the
client PC periodically.
Time Interval: Period (in seconds)
Preset: Same as ―Digital Input‖ Setting Form
Digital Output: Same as ―Digital Input‖ Setting Form
FTP: Same as ―Digital Input‖ Setting Form
SMTP (E-mail): Same as ―Digital Input‖ Setting
Page 39
USER’S MANUAL
iV3377WD / iV3377WTIR 39 / 60
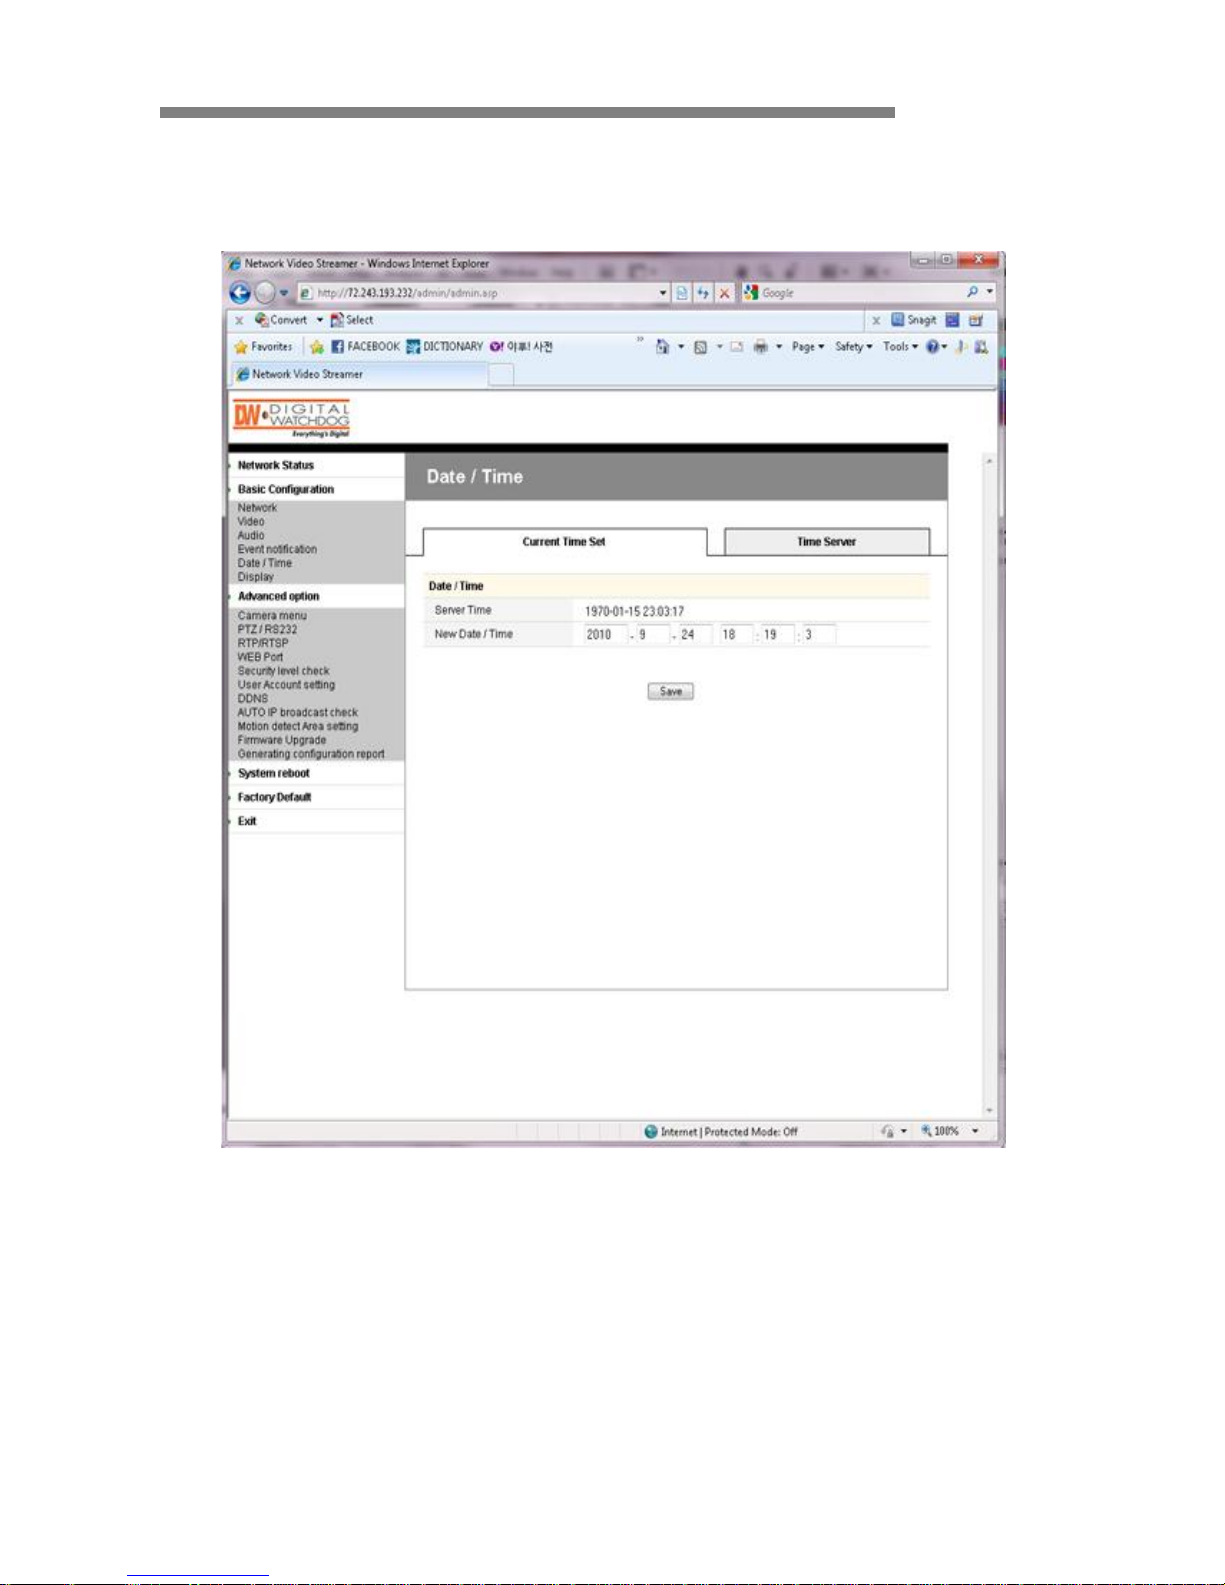
Basic Configuration > Date / Time
① Current Time Set
Date / Time
Server Time: Time that the iV3377WD/iV3377WTIR keeps internally
New Date / Time: User can assign the specific time voluntarily
Page 40

USER’S MANUAL
iV3377WD / iV3377WTIR 40 / 60
② Time Server
Time Server
Enable: Enables time of iV3377WD/iV3377WTIR to synchronize with time server
periodically
Interval: Period (in seconds)
Time Zone: User can select a time zone
Daylight Saving Time: Check this box in using daylight saving time
Time Server: User can assign a Time Server to apply the current time to
iV3377WD/iV3377WTIR
After setting, click the [OK] button and reboot Camera.
Page 41
USER’S MANUAL
iV3377WD / iV3377WTIR 41 / 60
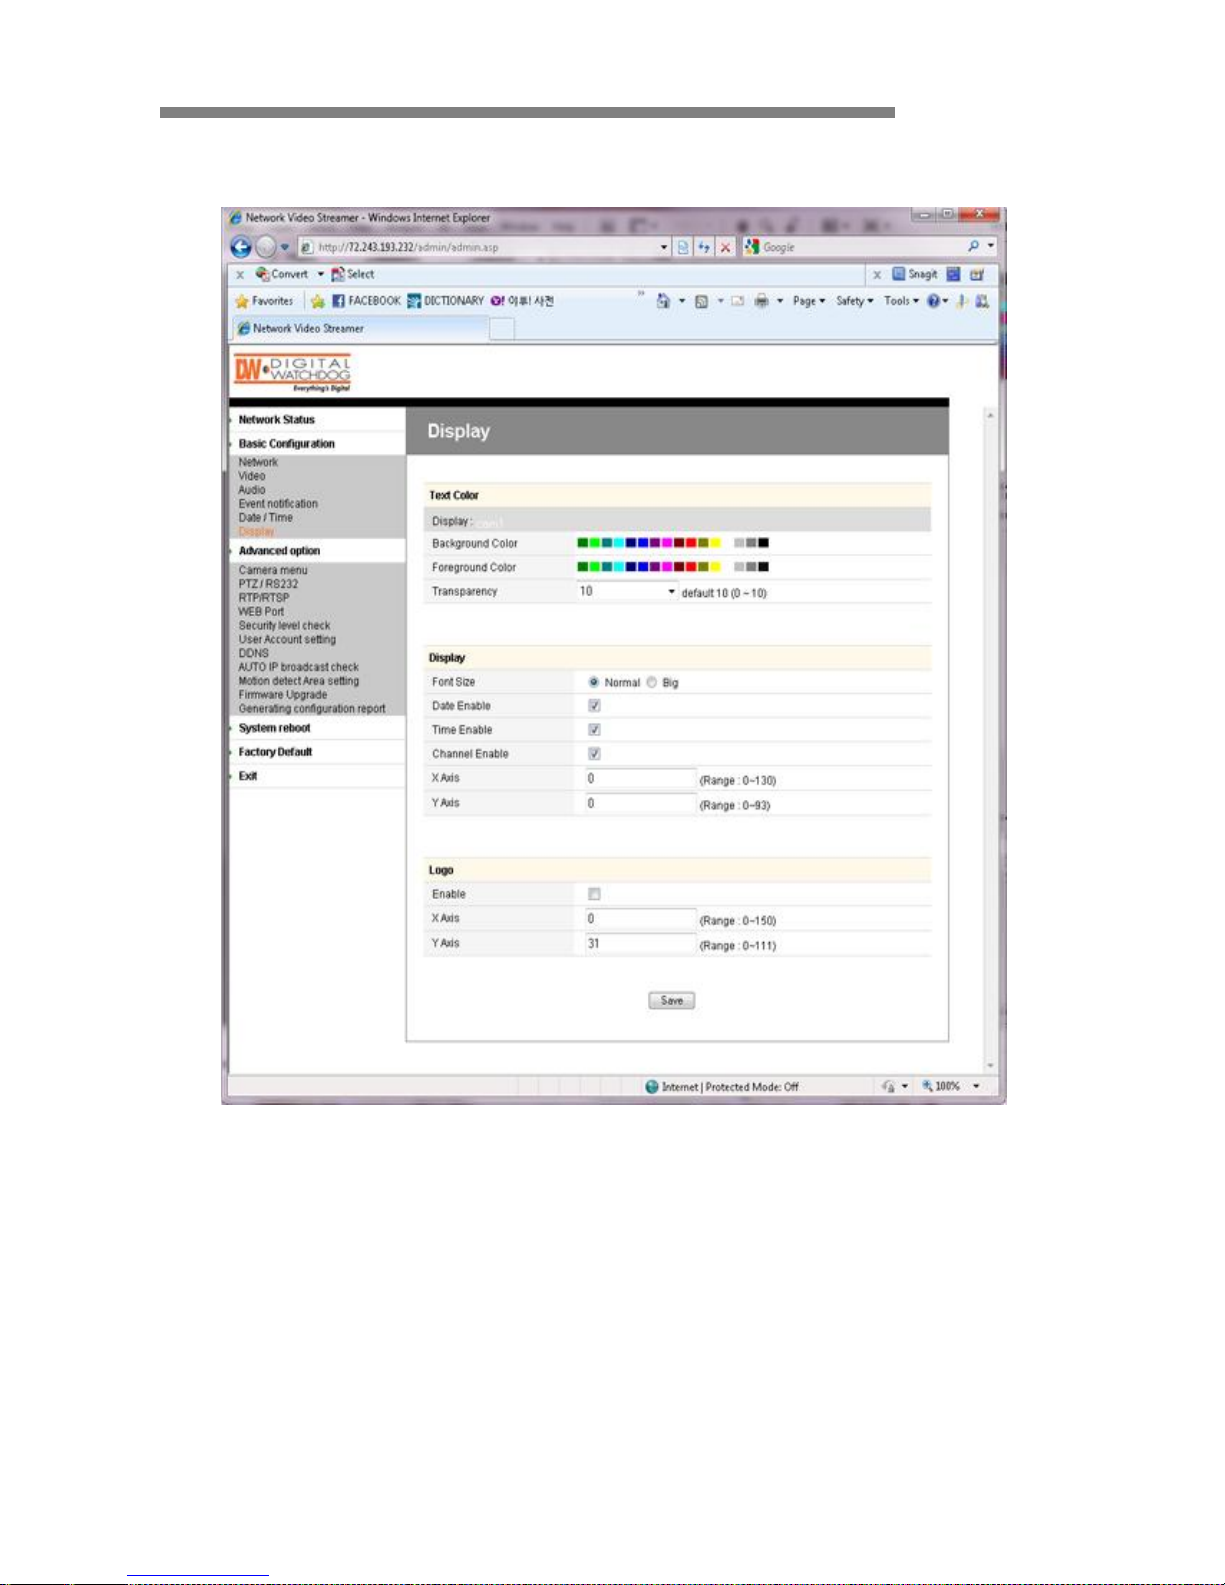
Basic Configuration > Display
Text Color
Background Color: Select a color for the background
Foreground Color: Select a color for the text
Transparency: 0~10
Page 42

USER’S MANUAL
iV3377WD / iV3377WTIR 42 / 60
OSD
Font Size: Normal / Big
Date Enable: Display Date
Time Enable: Display Time
Channel Enable: Display Channel Name
X Axis: Input a Point on the Coordinate
Y Axis: Input a Point on the Coordinate
Logo
This is the image that is displayed on the transferred image.
First, upload the logo image on ―Expert/Firmware Update/OSD Logo Upload‖ (BMP
File)
Enable: Check the box to display the image
X Axis: Input a Point on the Coordinate
Y Axis: Input a Point on the Coordinate
Date / Time / Channel
OSD Logo
Page 43
USER’S MANUAL
iV3377WD / iV3377WTIR 43 / 60
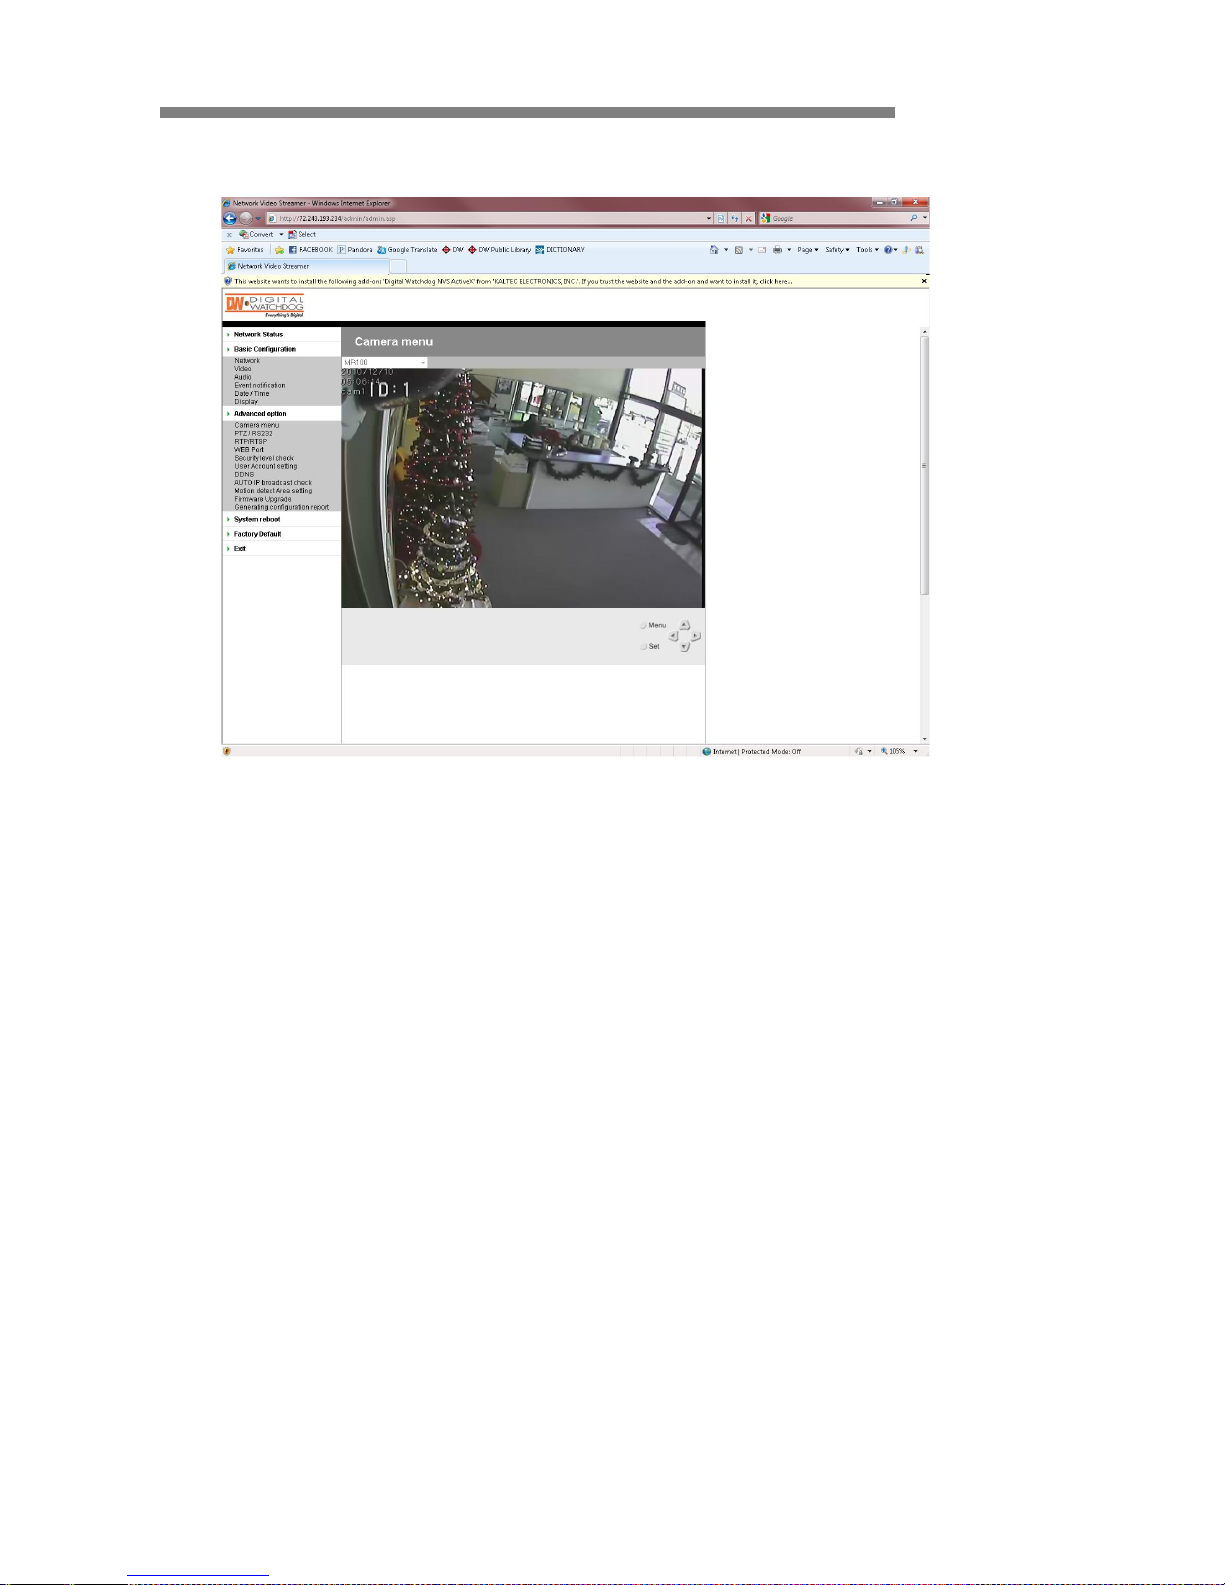
Advanced Option > Camera Setting
Menu
Access to the OSD menu of iV3377WD, iV3377WTIR Series
Direction Keys
Operate the OSD setting menu of iV3377WD, iV3377WTIR Series
Set
Select a value on the OSD setting menu of iV3377WD, iV3377WTIR Series
※ For detail setting values, refer to page 13.
(OSD MENU SETTINGS - iV3377WD, iV3377WTIR Series)
Page 44
USER’S MANUAL
iV3377WD / iV3377WTIR 44 / 60
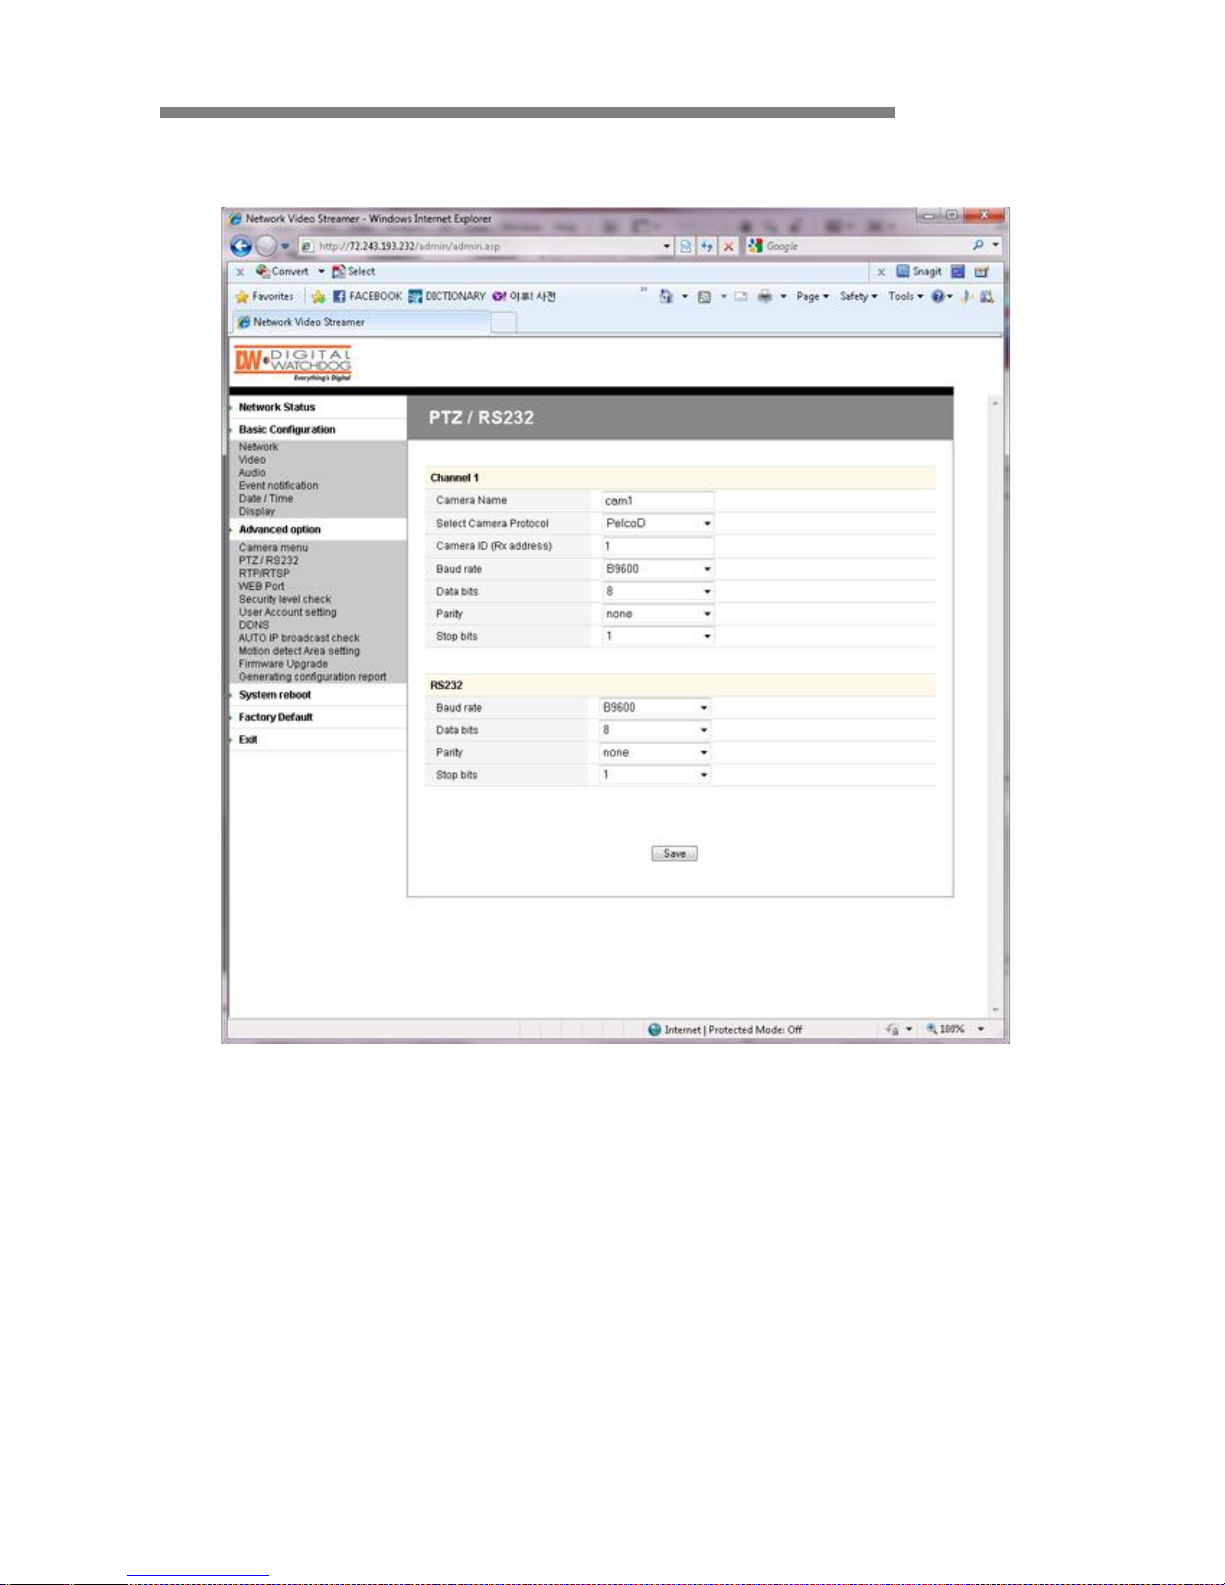
Advanced Option > PTZ / RS232
iV3377WD/iV3377WTIR does not support PTZ and RS232 function.
Channel 1
Channel Name: Channel Name of OSD
Camera Protocol Type
Camera ID
: The Rx address of the connected PTZ camera or receiver.
Camera Baud Rate / Data Bits / Parity / Stop Bits
: Select the value properly by the receiver type.
RS232
Baud Rate / Data Bits / Parity / Stop Bits
: Aelect the value properly by the receiver type.
Page 45
USER’S MANUAL
iV3377WD / iV3377WTIR 45 / 60
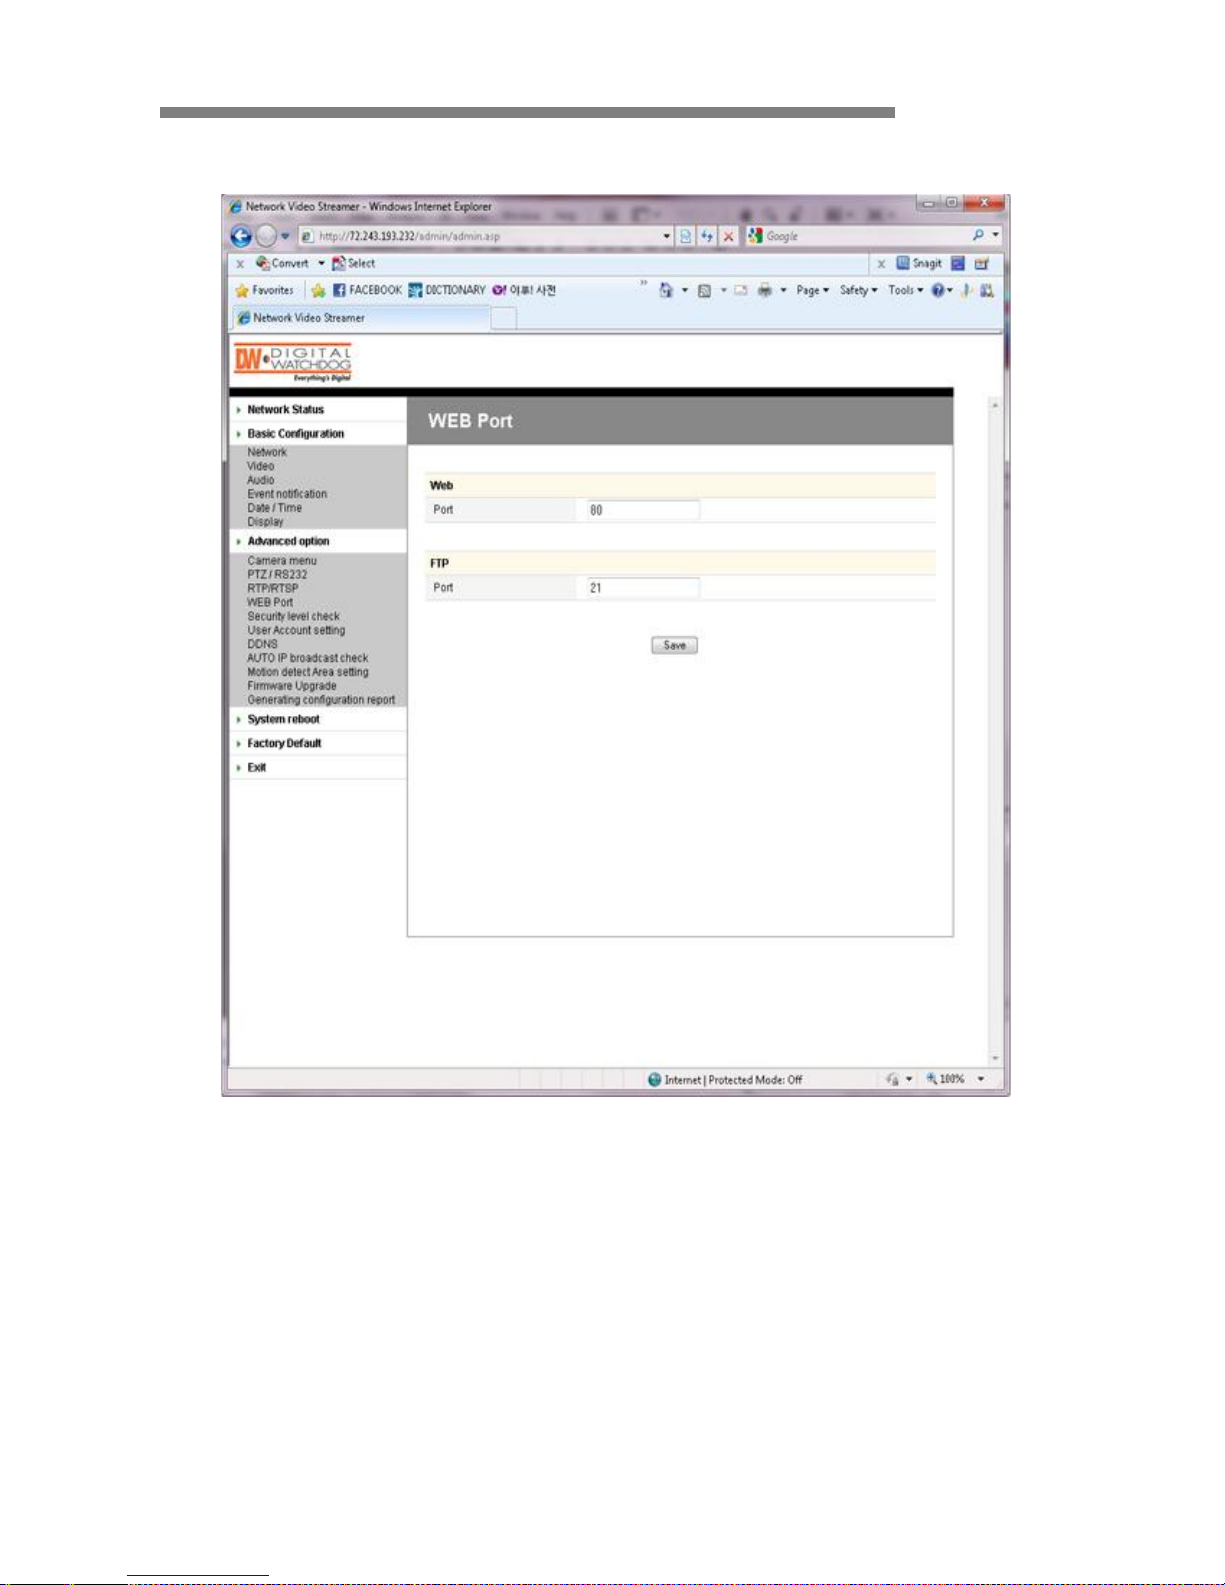
• Advanced Option > WEB Port
Web
Web Port: Default is 80
Page 46

USER’S MANUAL
iV3377WD / iV3377WTIR 46 / 60
• Advanced Option > Security level check
Security Level
HIGH
: Only connections from the local area are permitted.
MEDIUM
: Video and Audio connections from any place and setting from the local area
permitted.
LOW
: All connections from any place permitted
Page 47

USER’S MANUAL
iV3377WD / iV3377WTIR 47 / 60
Advanced Option > User Account setting
Account
The password amendment of administrator account is available.
The administrator can add up to 5 users and modify the properties.
Guest Permission
This is to determine the guest permission for access to the iV3377WD/iV3377WTIR.
At guest account, video and audio monitoring is permitted.
Max Client Limit
The administrator can restrict the number of simultaneous access (1~20)
Page 48

USER’S MANUAL
iV3377WD / iV3377WTIR 48 / 60
Advanced Option > DDNS
DDNS is the function that matches an IP address and a host name.
If an iV3377WD/iV3377WTIR has the dynamic IP address, the host name by DDNS
(Dynamic Domain Name Service) must be used instead of the IP address for the
credibility of the network connection.
IPv4 DDNS
Check the ―Enable‖ box and select a service out of two.
Both are required to register some items on each service site.
► Using ―ddns.nu‖
Page 49

USER’S MANUAL
iV3377WD / iV3377WTIR 49 / 60
DynDNS
For use of ―ddns.nu‖, register at www.dyndns.com.
Type the registered DDNS ID, DDNS Password, Host Na me, and Interval for updating
and click [OK] button and reboot the iV3377WD/iV3377WTIR.
▶ Main page of ―DynDNS‖
Page 50

USER’S MANUAL
iV3377WD / iV3377WTIR 50 / 60
ddns.nu
For use of ―ddns.nu‖, register at www.ddns.nu.
Type the registered DDNS ID, DDNS Password, and DDNS Handle and click [OK]
button. Reboot the iV3377WD/iV3377WTIR.
ProutDNS
ProutDNS is a set of PHP scripts to create your own Dynamic DNS service.
Type the DDNS server, the registered DDNS ID, DDNS Password, Host Name, and
Interval for updating. Click [OK] button and reboot the iV3377WD/iV3377WTIR.
※ For details, please refer to ―DDNS setup‖ User’s Guide.
▶ Main page of ―ddns.nu‖
▶Main page of “ProutDNS”
Page 51

USER’S MANUAL
iV3377WD / iV3377WTIR 51 / 60
Advanced Option > AUTO IP Broadcast Check
Auto IP broadcast check
Enable: Check the box to use UPnP (Universal Plug and Play) of
iV3377WD/iV3377WTIR.
Friendly name: User can change the friendly name of iV3377WD/iV3377WTIR.
Page 52

USER’S MANUAL
iV3377WD / iV3377WTIR 52 / 60
Advanced Option > Motion Detect Area Setting
Input Setting
Check ―Enable‖ box for use of motion detection.
Detect Area: If the detection area is selected, the selected area turns green.
(User can check preview image assuming JPEG Capture is enabled on the video setting
page.)
Sensitivity: 1~30 (Maximum sensitivity is ―1‖.)
Page 53

USER’S MANUAL
iV3377WD / iV3377WTIR 53 / 60
Advanced Option > Firmware Upgrade
Page 54

USER’S MANUAL
iV3377WD / iV3377WTIR 54 / 60
Language
Language Select: Select a language file
(After that, it is required to refresh the web browser. Please push F5 button.)
Language File: Add a language file
Firmware Upgrade
Uploads the new firmware after clicking the browsing button and finding a new
firmware.
Logo Upload
Changes the logo image file.
The process is the same as ―Firmware Upgrade.‖
Use GIF file (Maximum size: 567x175)
OSD Logo Upload
Changes the logo image on OSD.
The process is the same as ―Firmware Upgrade.‖
User has to use file name by ―osd_logo.bmp‖
(Maximum size: 120x38)
Control Protocol Upload
Add a camera control protocol.
iV3377WD/iV3377WTIR does not support PTZ control function.
Page 55
USER’S MANUAL
iV3377WD / iV3377WTIR 55 / 60
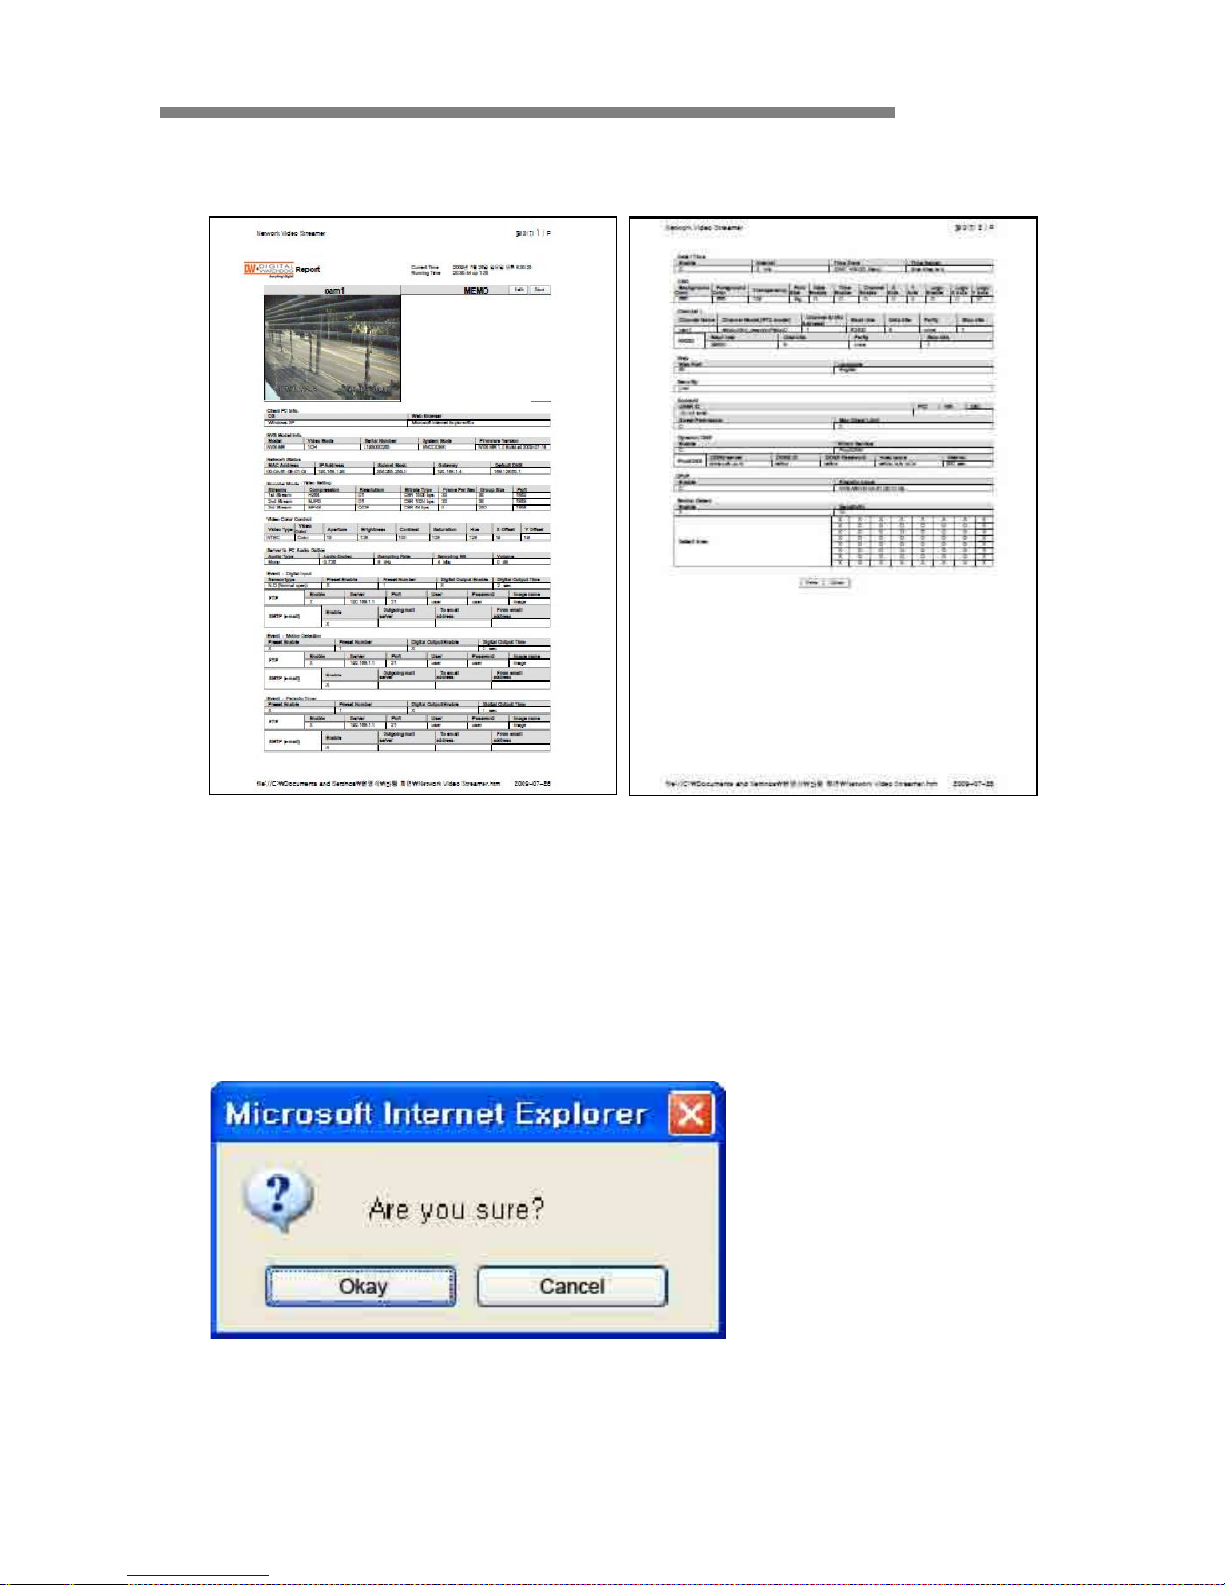
Advanced Option > Generating configuration report
Report
User can check all of the settings for iV3377WD/iV3377WTIR.
User or installer can memo on the report page.
User or installer can print out the pages and use them for various usages
Reboot
To apply the changed settings, reboot iV3377WD/iV3377WTIR.
Logout
Back to the initial connection page
► Confirmation Dialog
Page 56

USER’S MANUAL
iV3377WD / iV3377WTIR 56 / 60
Model
iV3377WD, iV3377WTIR Series
Camera Type
Color/BW
Anti-Vandal 18IR-LED Day/Night Digital Dome Camera
Mount
Surface
Image
Device
Super HAD II CCD
Size
1/3‖
Pixels-Total
811 (H) x 508 (V)
Pixels-Effective
768 (H) x 494 (V)
Scanning
System
525 Line, 2:1 Interlace
Horizontal Frequency
15,734 Hz
Vertical Frequency
59.94 Hz
Min Scene Illumination
IR-LED On
0 Lux
Functions
BLC
ON / OFF
MAX-DR
ON / OFF
STARLIGHT
OFF ~ x256
MIRROR
ON / OFF
FREEZE
ON / OFF
3D-DNR
ON / OFF
D_ZOOM
x1.0 ~ x3.0
SLC
ON / OFF
HME
ON / OFF
DIS
ON / OFF
MOTION DETECTION
ON / OFF (Area / Sensitivity)
PRIVACY ZONE
6 Programmable Zone / Size
Lens
Focal Length
3.3 ~ 12mm (3.6x Optical)
Resolution
Horizontal
540 TV Lines
Video Output
VBS 1.0Vp-p
VBS 1.0Vp-p (75 Load)
S/N Ratio
S/N Ratio
50dB
OSD
OSD MENU
Available
Environmental
Conditons
Operating Temperature
-10oC ~ +55oC (14oF ~ 131oF)
Humidity
Less than 90%
Power
Power Consumption
DC 12V: 4.4W / AC 24V: 4.4W
DC 12V: 7.5W / AC 24V: 7.3W (LED ON)
Physical Specification
Dimensions
140.3 x 124.6mm
IP Rating
IP66
Certified
CAMERA SPECIFICATION
Page 57

USER’S MANUAL
iV3377WD / iV3377WTIR 57 / 60
Model
iV3377WD, iV3377WTIR
Video
Streaming
Compression Type
H.264 / MJPEG / MPEG-4
Resolutions
D1 ~ QQVGA
Bit Rate
32Kbps ~ 8Mbps
Frame Rate
30/25fps (NTSC/PAL) in All Resolutions
Streaming
H.264 Dual Stream or Simultaneous H.264 and MJPEG
Audio
Streaming
Bi-Directional Audio
Two-Way, Full Duplex
Audio Input Compression
G.711 / G.726
Audio Line Input
1Ch (Line Level Input)
Audio Output Compression
G.711 / G.726
Audio Line Output
1Ch (Line Level Output)
External I/O
Sensor Input
1Ch (Dry Contact N.O/N.C)
Alarm Output
1Ch (Relay Switching – Nominal Voltage 5VDC, 1A)
Factory Default Button
Restore to Default Settings (Network, Passwords, etc)
RS485
N/A
OSD Menu
Camera Menu Settings
Network
Ethernet
Ethernet (10/1000 Based-T) RJ-45 Connector
Protocol
TCP, IP, HTTP, DHCP, RTSP, PPPoE, FTP, DN, DDNS, NTP, ICMP, SMTPE, UPnP
Software
Web Browser
IE 5.5 or Above
Security
MD5 Password / Iptables (Firewall)
Physical
Operation Temperature
-10oC ~ +55oC
In Storage Temperature
-20oC ~ +75oC
Operation Humidity
Under 90% (Non-Condensing)
Case
Aluminum
Weight
1000g (With IR LED)
Power
Power Requirement
DC 12V: 10~16[V] / AC24V: 20~28[V] / PoE
Power Consumption
LED OFF: Max 4.4W (DC12V), Max 4.4W (AC24V)
LED ON: Max 7.5W (DC12V), Max 7.3W (AC24V)
NETWORK SPECIFICATION
Page 58

USER’S MANUAL
iV3377WD / iV3377WTIR 58 / 60
Item
Specification
Network
10/100 Base-T LAN (Dedicated IP Line, xDSL, Cable Modem)
Client PC
Processor
Pentium Dual Core or Above
RAM
2GB or Above
Graphic Card
512MB or Above
OS
Windows 2003 / XP / Vista / Windows 7
Monitor
1024 x 768 Pixels or Above
RECOMMENDED SPECIFICATION FOR EXTERNAL DEVICES
Page 59

USER’S MANUAL
iV3377WD / iV3377WTIR 59 / 60
Digital Watchdog (referred to as ―the Warrantor‖) warrants the Digital Camera
against defects in materials or workmanship as follows.
LABOR: For the initial five (5) years and one (1) year on IR LED from the date of
original purchase, if the Digital Camera is determined to be defective, the Warrantor will
repair or replace the unit with new or refurbished product at its option at no charge.
PARTS: In addition, the Warrantor will supply replacement parts for the initial five (5)
Years and one (1) year on IR LED.
To obtain warranty or out of warranty service, please contact an RMA department
Representative at 1-866-446-3595 option #5 Monday through Friday from 9:00 AM to 5:00
PM Eastern or visit our website at www.Digital-Watchdog.com.
A purchase receipt or other proof of the original purchase date is required before warranty
service is rendered. This warranty only covers failures due to defects in materials and
workmanship, which arise during normal use. This warranty does not cover damage which
occurs in shipment or failures which are caused by products not supplied by the Warrantor
or failures which result from accident, misuse, abuse, neglect, mishandling, misapplication,
alteration, modification, faulty installation, set-up adjustments, improper antenna,
inadequate signal pickup, maladjustment of consumer controls, improper operation, power
line surge, improper voltage supply, lightning damage, and rental use of the product or
service by anyone other than a Digital Camera authorized repair facility or damage that is
attributable to acts of God.
WARRANTY INFORMATION
Page 60

USER’S MANUAL
iV3377WD / iV3377WTIR 60 / 60
There are no express warranties except as listed above. The Warrantor will not be liable
for incidental or consequential damages (including without limitation damage to recording
media), resulting from the use of these products or arising out of any breach of the
warranty.
All express and implied warranties, including the warranties of merchantability and fitness
for particular purpose, are limited to the applicable warranty period set forth above.
Some states do not allow the exclusion or limitation of incidental or consequential
damages, or limitations on how long an implied warranty last, so the above exclusions or
limitations may not apply to you. This warranty gives you specific legal rights and you may
have other rights that vary from state to state.
If the problem is not handled to your satisfaction, then write to the Address below.
Service calls which do not involve defective materials or workmanship as determined by
the Warrantor, in its sole discretion, are not covered. Costs of such service calls are the
responsibility of the purchaser.
5436 W Crenshaw Street
Tampa, FL 33634
www.Digital-Watchdog.com
LIMITS AND EXCLUSIONS
 Loading...