

Page 1
DW-MAX
Quick Setup Guide
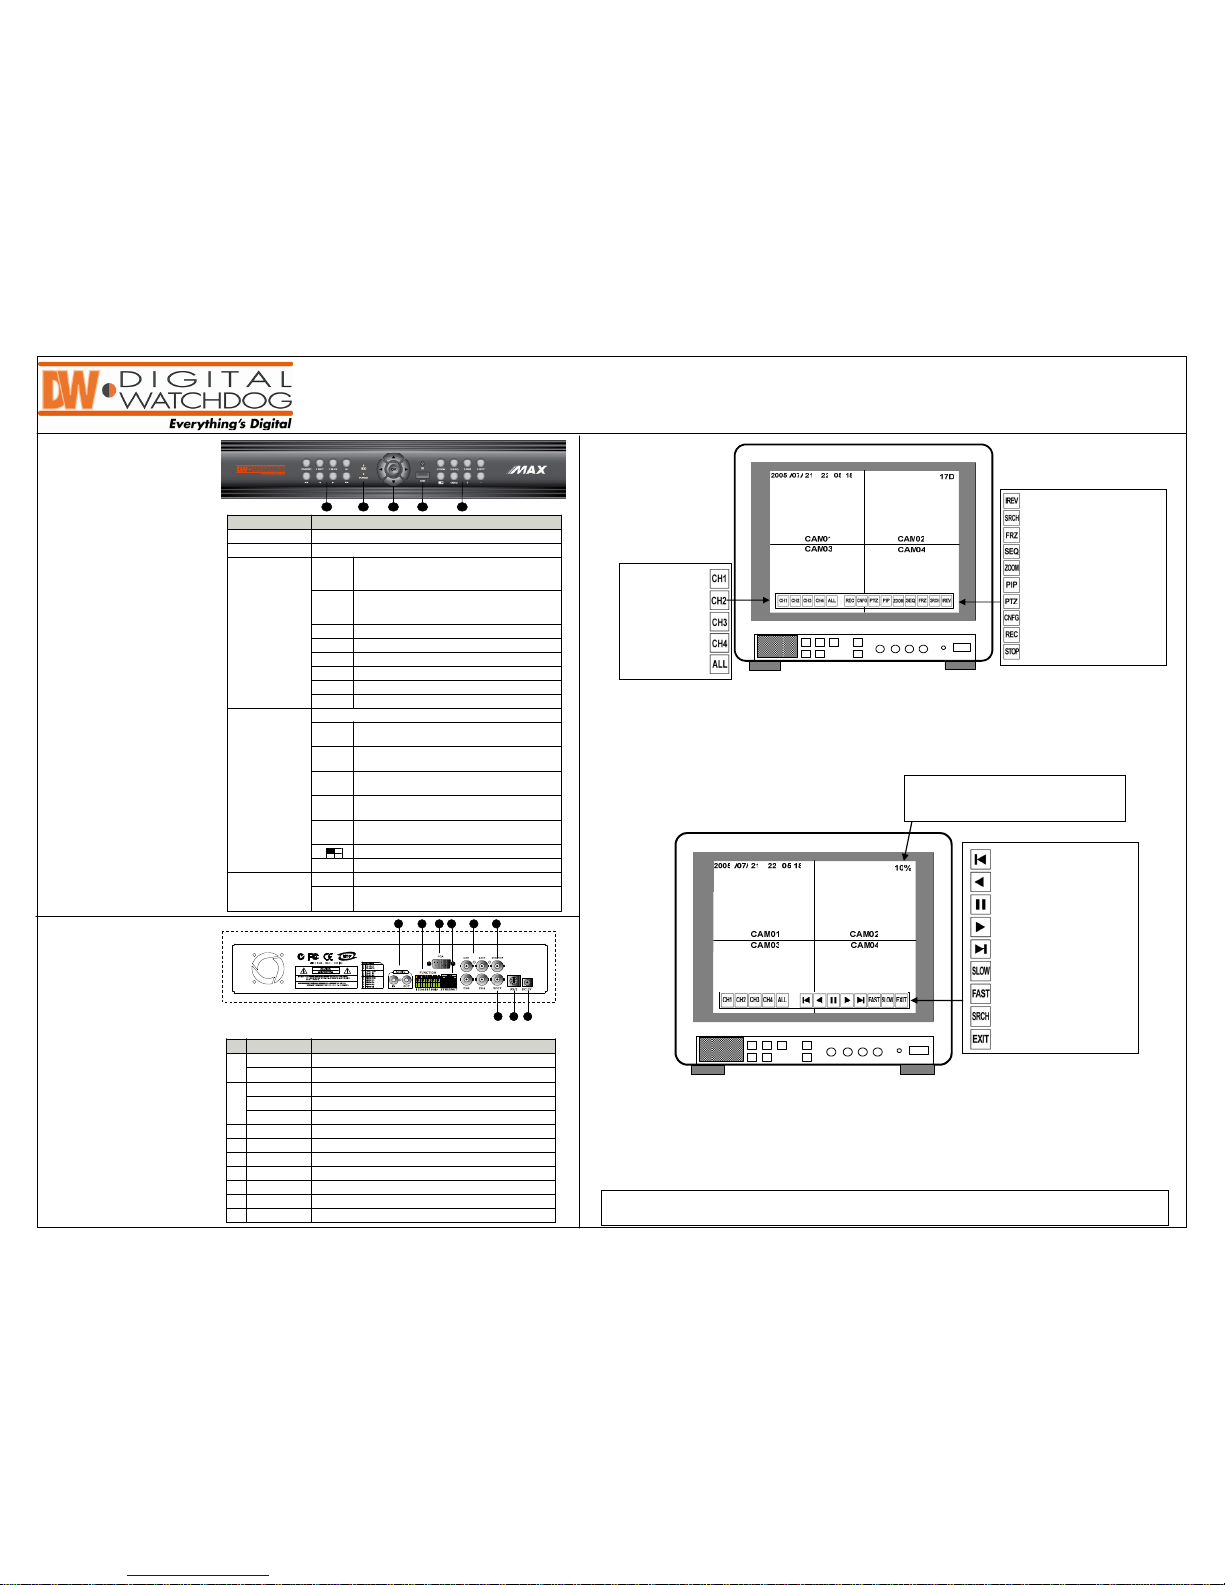
Activates emergency recording mode or stops record ing at
live mode.
Gets back to live model from playback mode.
EMERG
Timer function for EMERG Rec. (During EMERG Rec.)
By pressing I.REC button, 1/2/3/4/5min long timer and
I.REC off (Timer off) is selected.
I.REC
Name Function
① USB HOST Used for data backup & firmware upgrade.
② LED Lamps Displays current operation status.
③ Record/playback
I.PLAY Backward playback from the latest recorded data
◀◀ Increases playback speed
◀ Backward playback
ⅡⅡⅡⅡ Pause
▶ Forward playback
▶▶ Decreases playback speed
④ Operation buttons Double-key : ‘short press’ or ‘press & hold’.
CH1 /
ZOOM
Short press : selects channel no. 1.
Press & hold : goes to ZOOM function mode.
CH2 /
SEQ
Short press : selects channel no. 2.
Press & hold : goes to sequence function.
CH3 /
PIP
Short press : goes to PIP (picture in picture) mode.
Press & hold : selects channel no. 3.
CH4 /
PTZ
Short press : selects channel no. 4.
Press & hold : goes to PTZ operation mode.
MENU Short press : goes to system menu setup mode.
Press & hold : Menu off
Selects 4-split display or one channel display.
+ - Increase or decrease each value. PTZ ZOOM control
⑤ Arrow buttons ▲▼◀▶ Moves a mouse cursor at system menu / PTZ control
OK Works like mouse clicking.
Selects each category at system menu setup mode.
123 5 4
Name Function
1 Audio input 1ch audio input
Audio output 1ch audio output
2 RS 485 Connection with PTZ camera or other external device using R S 485
Relay output Relay out term inal
Sensor input Sensor input terminal
3 VGA Connection to VGA monitor (CRT or TFT LCD monitor)
4 Ethernet Connection to Ethernet device
5 Camera input 4ch camera input (NTSC/ PAL)
6 Monitor output 1ch composite monitor output (NTSC/PAL)
7
Spot monitor output
1ch spot monitor output (NTSC/ PAL)
8 PS/2 Connection to PS/2 Mouse
9 DC power DC 12V
2 3 5 6
7 8 9
41
Live Display
Instant Reverse
Search
Freeze
Sequence
Zoom
Picture in Picture
Pan Tilt Zoom
Menu
Emergency recording start
Emergency recording stop
Ch No.1 single display
Ch No.2 single display
Ch No.3 single display
Ch No.4 single display
4 - split display
Playback Display
Move to the beginning
Backward play
Pause
Forward play
Move to the end
Decrease
playback speed
Increase playback speed
Search
Exit
HDD space display
(Location of the current playback image in HDD)
Button Controls
Device connections
Mouse Controls
Technical Support: 1-866-446-3595 Ext 241 or 242
Page 2
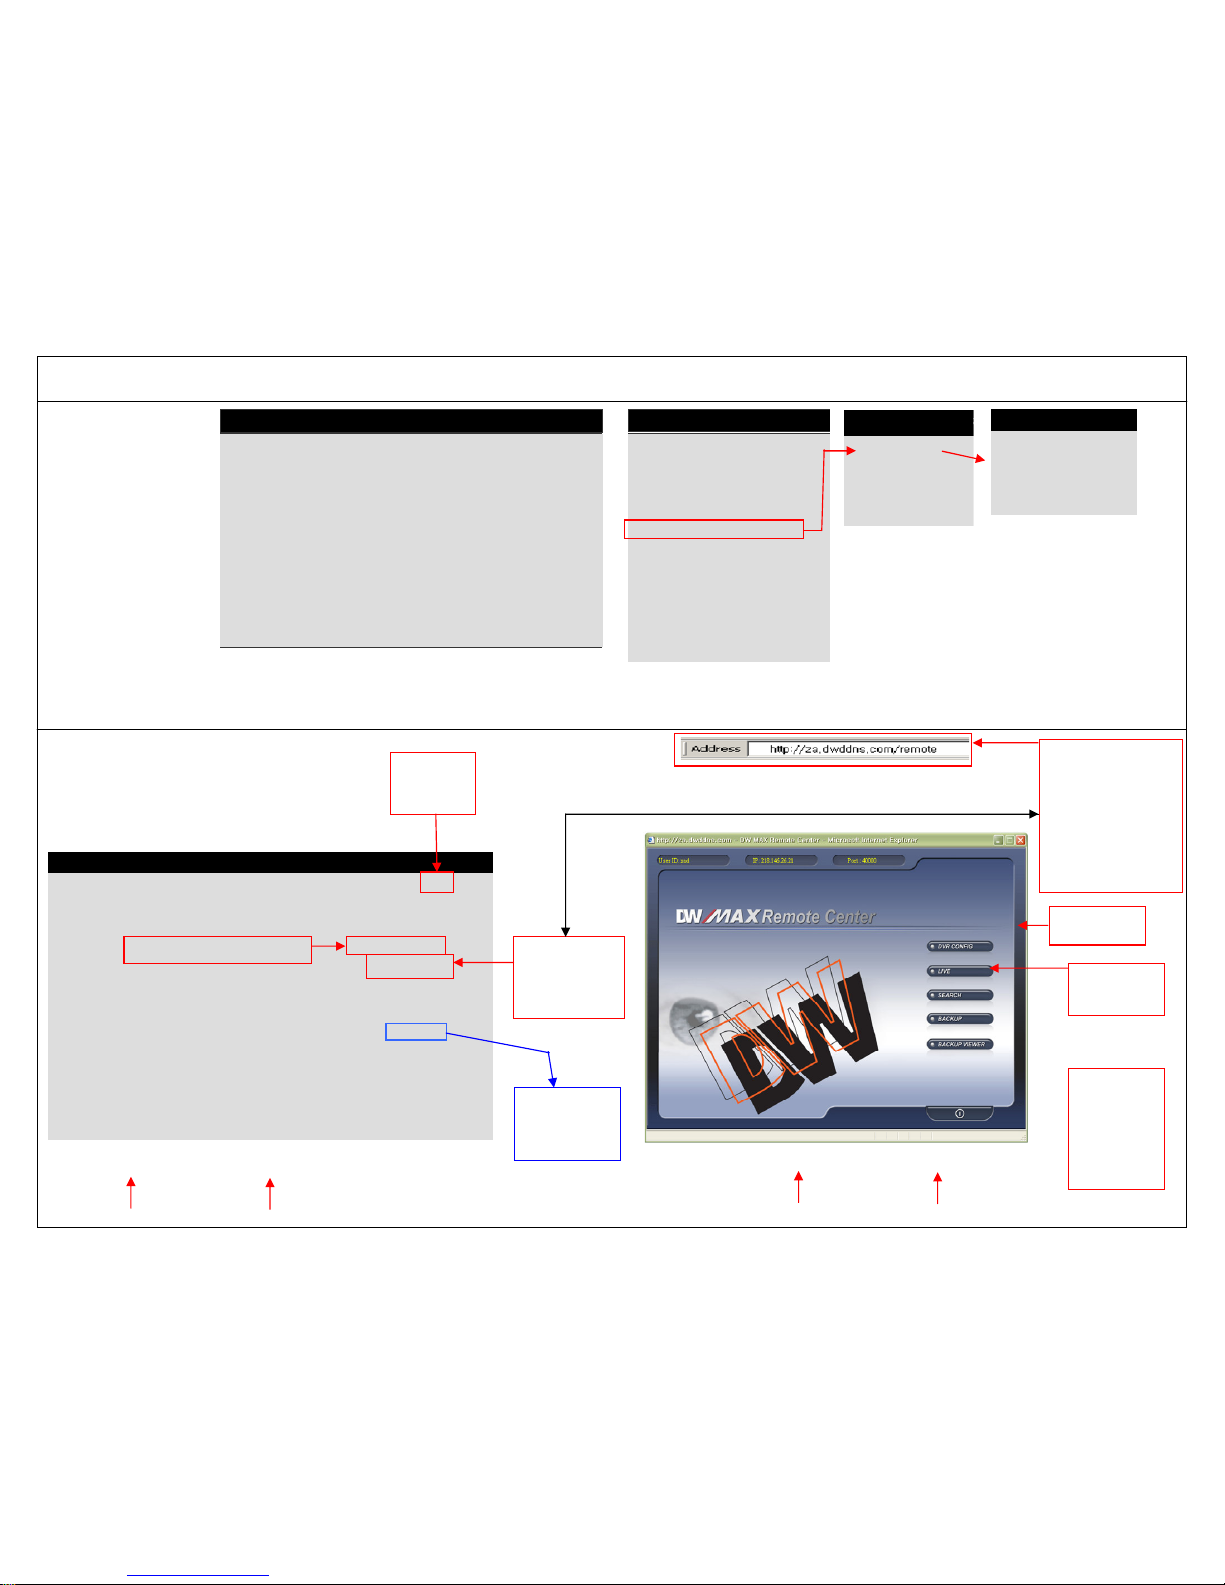
※※※※ If you are using a router, you n eed to do
If you are using a router, you need to do If you are using a router, you need to do
If you are using a router, you need to do ““““port forwarding
port forwardingport forwarding
port forwarding”””” or
or or
or ““““DMZ setting
DMZ settingDMZ setting
DMZ setting””””....
DDNS SETUP
DDNS ENABLE ON
DNS SERVER 72.243.193.254
INTERVAL D-00 H-00 M-20
REGISTER
USER ID REMOTE
DDNS STATUS REGISTER OK
IP ADDRESS 192.168.001.160
IP PORT 50000
REMAIN TIME D-00 H-00 M-20
LAST REGISTRATION DATE
> WED. 12 JUL 2006 09 : 21 : 36 GMT
SUCCESS TO REGISTER DVR INFO
DVR LOG-IN
USER ID ADMIN
USER PW ________
1 2 3 4 5 6 7 8 9
ENTER EXIT
MAIN MENU
DISPLAY SETUP
RECORD
CONFIGURATION
EXTERNAL DEVICE
BACK-UP
FIRMWARE UPGRADE
FACTORY DEFAULT
LANGUAGE ENGLISH
EXTERNAL DEVICE
EXTERNAL DEVICEEXTERNAL DEVICE
EXTERNAL DEVICE
TCP/IP SETUP
PAN/TILT SETUP
MOUSE SETUP
AUDIO SETUP
EXTERNAL DEVICE
EXTERNAL DEVICEEXTERNAL DEVICE
EXTERNAL DEVICE
TCP/IP SETUP
PAN/TILT SETUP
MOUSE SETUP
AUDIO SETUP
Click the CNFG button or push the menu button.
The above screen will appear. If you have assigned a password click the
numbers or push the buttons on the front of the DVR to enter your password
if no password has been assigned then just click Enter.
TCP/IP SETUP
IP SETUP
DDNS SETUP
BAUD RATE
Click here
to turn
DDNS on.
1
Enter the name
you want to use
here. It must be a
minimum of 7
characters.
2
Click here to register the DVR.
3
Open Internet Explorer
and type in the address
as seen here in the
address bar. In this
example we used
“remote” as the user
ID. Use the same name
that you used in DDNS
SETUP. Then push
enter or click go.
You should
see this screen
Click here to
access the
viewer.
Once you
have accessed
the viewer
click the
connect button
and live video
will appear.
How to set up your DVR for remote access from the Internet using DDNS (Dynamic Domain Name Service)
You can change
the port number
to suit your
needs
Simple
DDNS Registration
Accessing
DDNS
Setup
*follow steps 1
-3*
1
2
3
4
*follow steps 1
-4*
 Loading...