

Digital Watchdog DW-BJS1U24T-LX, DW-BJS1U9T-LX, DW-BJS1U6T-LX, DW-BJS1U3T-LX, DW-BJS1U18T-LX Quick Start Guide
...Page 1
Quick Start Guide
TM
Servers Powered by DW SpectrumTM IPVMS
State of the art hyper-optimized video management platform designed for ease, speed and efciency.
Blackjack™ S-RACK — Up to 16 2.1MP Cameras (1080p True HD Resolution)
S-RACK
DW-BJS1U3T-L X DW-BJS1U6T-LX DW-BJS1U9T-L X DW-BJS1U12T- L X DW-BJS1U18T-LX DW-BJS1U24T-LX
DW-BJS1U3T-LX
DW-BJS1U6T-LX
DW-BJS1U9T-LX
DW-BJS1U12T-LX
DW-BJS1U18T-LX
DW-BJS1U24T-LX
NOTE Download All Your Support Materials and Tools in One Place
1. Go to: http://www.digital-watchdog.com/support-download/
2. Search your product by entering the part number in the ‘Search by Product’ search bar. Results for applicable part numbers will
populate automatically based on the part number you enter.
3. Click ‘Search’. All supported materials, including manuals, Quick Start Guides (QSG), software and rmware will appear in the results.
Attention: This document is intended to serve as a quick reference for initial set-up. See the DW Spectrum full manual for more information on features and functionality.
Tel: +1 (866) 446-3595 / (813) 888-9555
Technical Support Hours: 9:00AM – 8:00PM EST, Monday thru Friday
digital-watchdog.com
Page 2
TM
Servers Powered by DW SpectrumTM IPVMS
BLACKJACK S-RACK HARDWARE
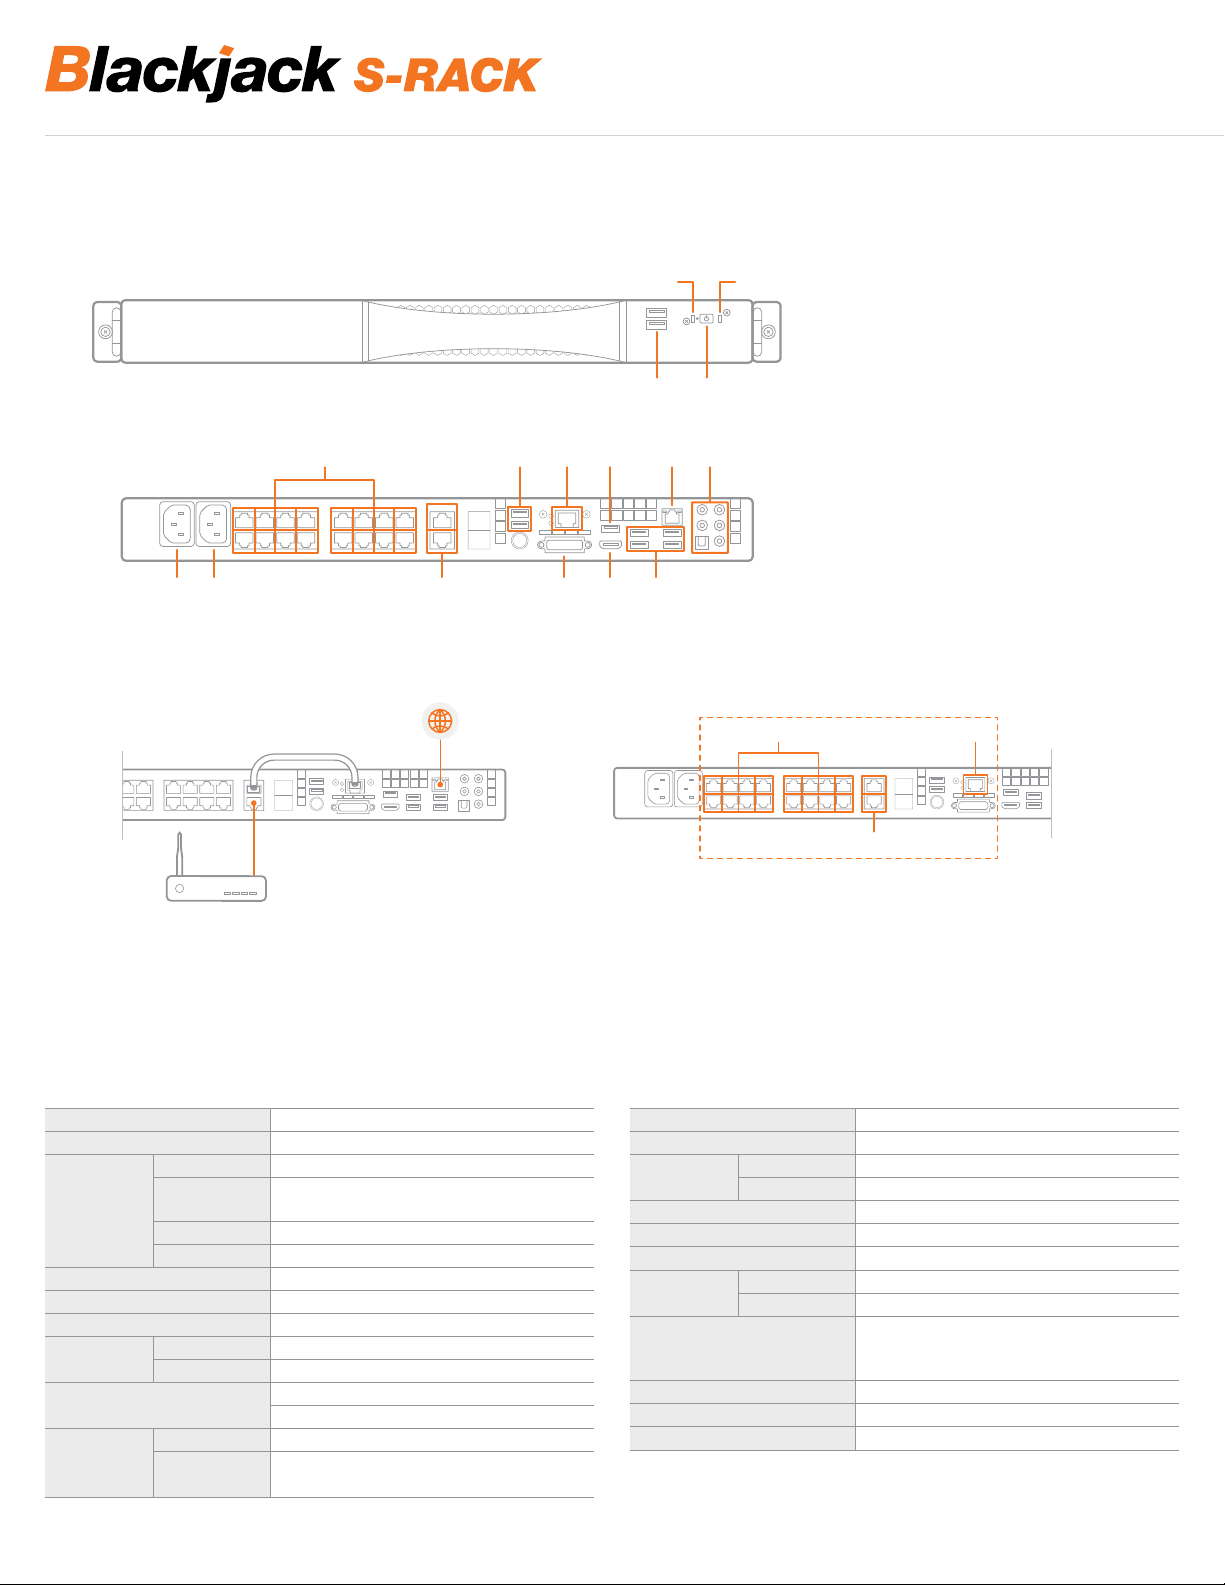
Front
Back
B1 B2 B4 B10 B11 B12
Network Cable Connection
B3
B4 to B6
B8
MAIN LOCAL
NETWORK /
INTERNET
F2 F4
F1 F3
B8B6B5 B9B7
F1 USB 2.0 Ports
F2 Power Status LED
F3 Power Button
F4 HDD Status LED
B1 System Power Port
B2 PoE Switch Power Port
B3 10/100Mbps PoE Ports
(Max 15.4W per Port)
B4 1Gigabit Uplink Ports
(Non-PoE Ports)
B5 USB 2.0 Ports
B6 NIC 1 (1Gigabit Ethernet Port)
B7 Display Port
B8 NIC 2 (1Gigabit Ethernet Port)
B9 Audio Ports
B10 DVI-D Output
B11 True HD Output
B12 USB 3.0 Ports
B3 B6
B4
ROUTER / DHCP SERVER
1. Connect B8 to main local network and internet
2. Connect/Uplink B4 upper port and B6
3. Connect B4 lower por t to router or DHCP server (No internet access through B4)
NOTE: B3, B4 and B6 por ts should be used for the camera network only.
SPECIFICATIONS S-RACK
Model Blackjack S-Rack 1U
Operating System Linux® Ubuntu® 14.0 4
IP Cameras Max 16 IP Cameras
Communication
System
Max HD D Internal Bay 4 (1 x SSD for OS; 3 x HDD for Data)
Max Data Storage 24TB
Video-In IP Megapixel Cameras
Video-Out
Recording Modes
Playback
& Search
Protocol
Max Throughput 80Mbps
Recording Speed 1080p: 480fps
Monitor True HD Output, DVI, Display Por t
Resolution 1080p
Speed x1, x2, x4, x8, x16
Function
®
ONVIF
Contin uous, Mot ion, Motion + Low Res A lways Rec ording
Pre and Pos t Alarm R ecording, Quick Backu p
Intelli -Searc h Time Ba r, Smart Motion Sear ch, Cale ndar
Search, Thumbnail Search, Panoramic Search
B4
Ports to be used for
the camera network only
CPU Intel® Quad Co re N3150 Proces sor
Memory 4GB
Ethernet Ports
Numbe r of PoE Ports 16 (Class3; 15.4W per Ports)
Remote Software DW Spectrum™ IPVMS Suite
Backup Device Local Backup by US B, File Up load to NAS
Power
Operating Temperature and Humidity
(Recommended for Installation
Environment)
Rail Ki t Optional
Dimen sions ( W x D x H) 438mm x 528mm x 41mm (17.25" x 20.8" x 1.625")
Certication & Compliance UL, CE, FCC, Ro HS
System 2 x Gigabit Ports
PoE Switch 16 x 10/100Mbp s PoE Port s + 2 x Gigabit Uplin k Ports
System 300W
PoE Switch U p to 270W
10°C – 35°C (50°F – 95°F )
NOTE: Maximum supported IP Cameras must be equal to max throughput information.
2
Page 3
SETTING UP THE S-RACK
Windows 7
STEP 1: When setting up the Blackjack S-Rack, make sure the following are in the box:
•
S-Rack Server
•
Keyboard and Mouse
•
Power Cable (x2)
NOTE Monitor and network cables are not included.
STEP 2: 1. Connect a monitor, mouse, keyboard, power cables, and network cables (not included).
2. Connect the server to an appropriate power source. (UPS is strongly recommended)
STEP 3: Desktop View
The server’s Network Setup Window and DW Spectrum
To relaunch, double click on each of the desktop icons.
•
QSG
•
OS Recovery USB (Emergency Recovery)
™
software will launch automatically when the server boots up.
Quick Start Guide
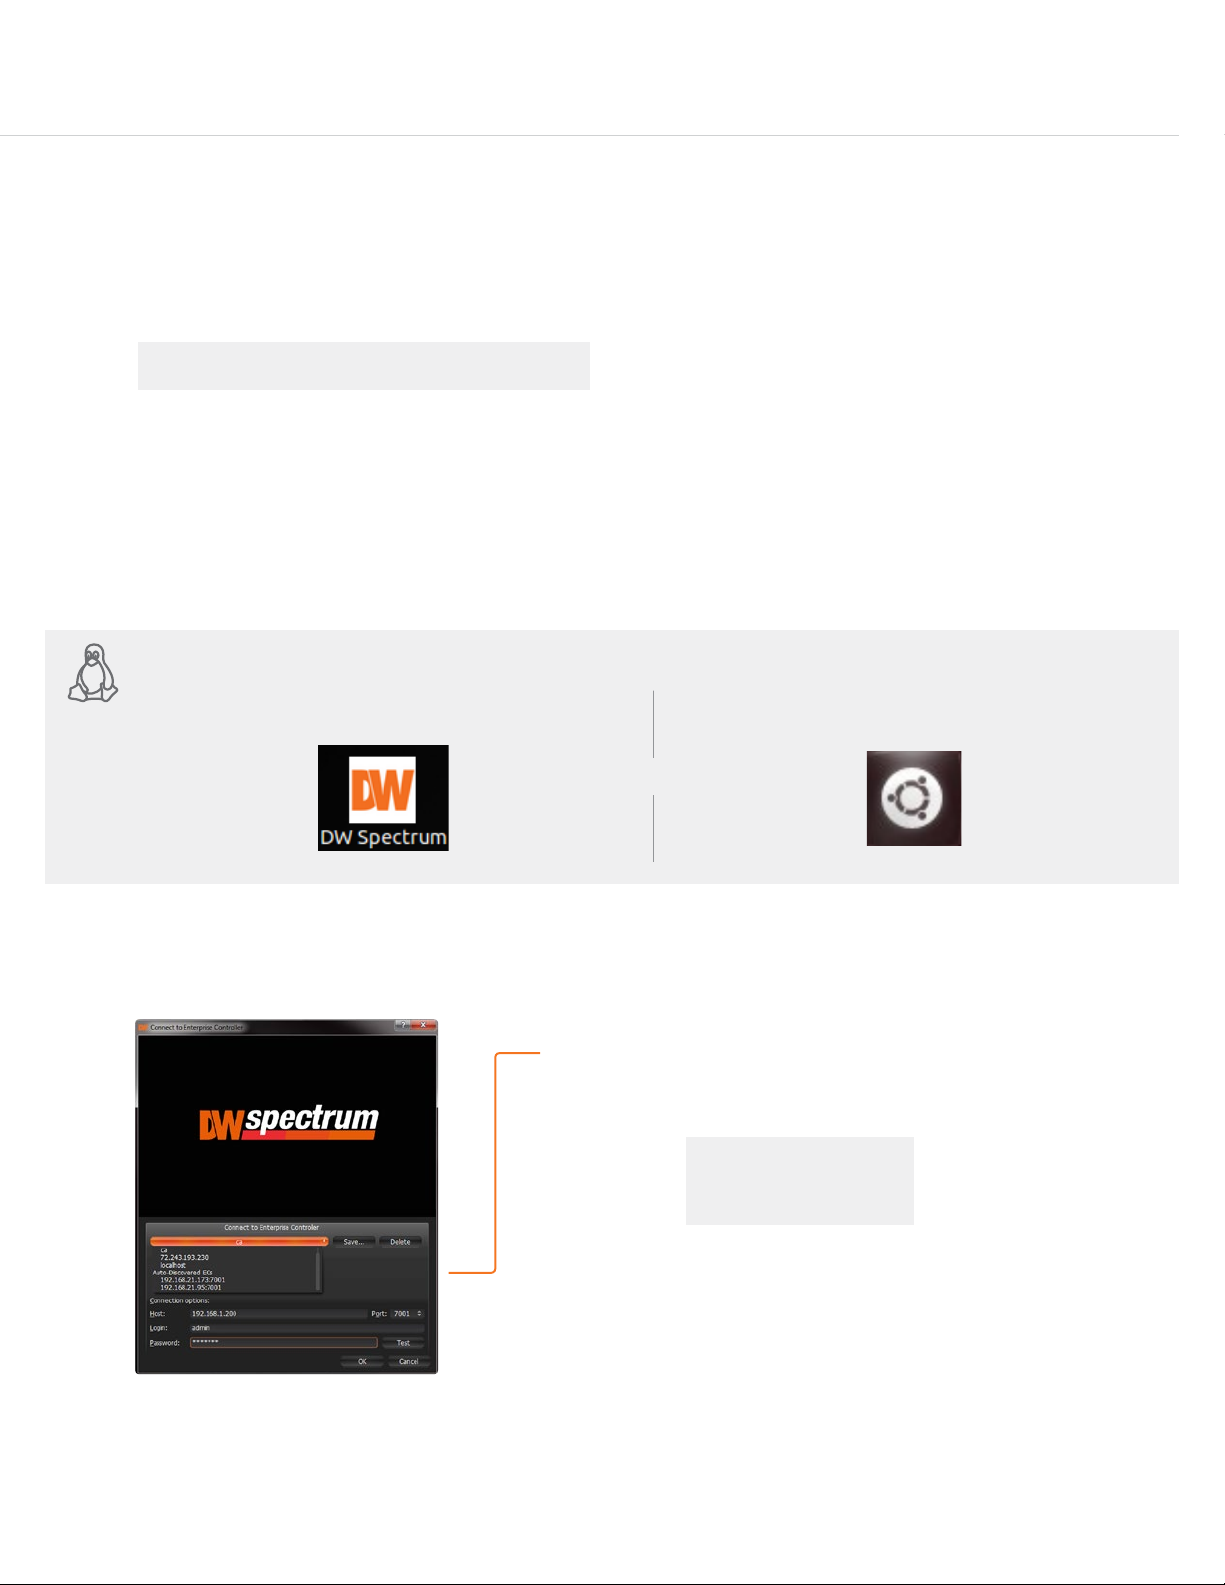
LINUX-BASED SOFTWARE MANUAL LAUNCH To launch the DW Spectrum
OP TION 1: Double-click the DW Spectrum
Linux OS
STEP 4: Logging to Server
™
Software on the Linux-Based S-Rack:
™
desktop icon. OPTION 2: Go to the dashboard on the top left side.
Search ‘DW’. Click the DW icon.
OR
The DW Spectrum™ client will automatically load the local server’s credentials
in the host information. Enter the server’s username and password. By default,
the server’s credentials are:
Server IP : 127.0.0.1
USER : admin
PW : admin
After logging in, all supported cameras on the network will automatically
populate in the client’s Display Tree.
3
Page 4

Windows 7
TM
Servers Powered by DW SpectrumTM IPVMS
STEP 5: Network Conguration - Linux System
The S-Rack’s Network Setup window will open automatically upon boot up.
Linux OS
NOTE The Blackjack S-Rack’s network settings are set by default to DHCP.
To change the server’s network settings to Static IP, follow the instructions below.
1. Go to Network Settings from the desktop button.
2. Select ‘Wired’ from the list and click ‘Options’ at the bottom of the window.
3. Click on the ‘IPv4 Settings’ tab.
4. From the drop-down menu, select connection type: DHCP or Manual (static).
5. If ‘Manual’ is selected, click ‘Add’ next to Addresses.
6. Enter IP Address, Netmask, and Gateway according to network requirements. Contact your network administrator for more information.
7. Add a DNS server address.
8. Click ‘Save’ to save the settings or ‘Cancel’ to return to the Network setup page.
NOTE Contact your Network Administrator and ISP for proper setup.
9. In the Network Settings main page, make sure the Wired Status is marked as “Connected”.
1
2
3
4
6
5
7
8
NOTE If you are not connecting to the Blackjack™ from within the same network, you may be required to perform port forwarding on your
router to access the server. Contact your Network Administrator or Installer for additional information.
4
Page 5

UPGRADING THE DW SPECTRUM IPVMS SOFTWARE ON
Windows 7
Quick Start Guide
Linux OS
When installing or upgrading the DW Spectrum™ software, each component of the software
must be installed separately.
To download the software, go to www.digital-watchdog.com, and search for ‘DW Spectrum’
to access the product page, documentation and software downloads.
To install the software:
NOTE Internet connection is necessary to complete the software installation properly.
1. Right-click the installation le and select “Run using Ubuntu Software Center”.
2. Enter the admin password (Default: admin).
3. Enter the following information as requested:
•
Server Address: Enter ‘localhost’ to use the current server’s IP address.
•
Username & Password: Username and password for the server. Default: admin / admin.
•
Port: Main port associated with the server. Default port: 7001.
4. Repeat for all other software components.
NOTE When the upgrade process is complete, it is recommended to restart the server.
LINUX S-RACK MODELS
SOFTWARE REMOTE UPGRADE
DW Spectrum provides powerful and convenient way to upgrade the whole system in one click.
If a new version ofDW Spectrum is released, the notication pops up. You can select to start the upgrade or cancel. You can also upgrade
the software later by going to the Main Menu>System Administration(CTRL+ALT+A) >Updatestab.
The latest available version is displayed next toAvailableUpdate.
•
To upgrade to the latest version clickUpdate.Theupdateprocess will start and will apply to all servers found in the Servers list.
•
To upgrade to a custom version, click ‘Get a specic build’ and enter the build number followed by the password (provided in the release
notes or by support team).
5
Page 6

TM
Servers Powered by DW SpectrumTM IPVMS
USER INTERFACE OVERVIEW
Layout Management
Main Menu Button
Server / Camera
Display Tree
Help Menu
Login to Server
Screen Recording Controls
Popup Notications
Server Health
Monitoring
Calendar Search
Playback Controls
Camera Popup Preview
Camera Options
Time Navigation Bar Zoom
LICENSE REGISTRATION
The Blackjack Servers come with complimentary eight (8) recording licenses. In addition,
any licenses purchased with the hardware will be found at the bottom of the Server’s
hardware, as a sixteen- digit code that needs to be activated.
OP TION 1: If your server has internet access—
1. Go to DW Menu Button > System Administrator > Licenses.
2. Select ‘Automatic Activation via Internet’ from the drop-down options.
3. Input your sixteen-digit license key.
4. Press ‘Activate License’. The system will notify you if the activation was successful.
5. If your licenses have been registered successfully, they will appear under the Active
Licenses table.
OPTION 2: If you do NOT have internet access—
1. Go to DW Menu Button > System Administrator > Licenses.
2. Select ‘Manual Activation’ from the drop-down options.
3. Copy your hardware ID. This information will be lled out automatically by your server.
4. E-mail your Hardware ID and your License Key to licenses@dwcc.tv. Please allow
up to 48 hours for Digital Watchdog to reply.
5. Once provided with an Activation Key, Enter this information without altering it in the
Activation Key space and press ‘Activate Licenses’.
Audio Controls
Thumbnail Toggle Button
Live / Playback
6
Page 7

MANUALLY ADDING CAMERAS
Cameras can also be manually added
by right-clicking on the server icon and
choosing the ‘Add camera(s)’ option
USER ACCOUNTS
1
Enter the camera’s IP address,
URL, or RTSP information
2
Check to select a range
5
Cameras will populate
the list automatically
6
Click to add all selected cameras
4
Click on the Scan button
3
Enter log-in information
Quick Start Guide
ADMIN
Administrator • • • • • •
Advanced • • • • •
Viewer • • •
Live Viewer •
CAMERA
SETTINGS
PTZ
CONTROLS
VIDEO
ARCHIVES
EXPORT
VIDEO
RECORDING SCHEDULE
Enable Cameras to Record
Select All
Click & Drag
Pre & Post Recording
(3 is recommended)
VIEW
LIVE VIDEO
Recording Menu
Motion Menu
Select cameras and go to
“Camera Settings”
Recording Type
Copy Recording Settings
to multiple cameras
7
Page 8

TROUBLESHOOTING TIPS
Windows 7
Problem Possible Solutions
My camera does
not auto-discover
Videos are slow 1. Are you accessing the same cameras from multiple clients? (LAN & WAN)
My camera
appears
disconnected
I can’t get
playback video
from my camera
I get an
‘unauthorized’
message on my
camera
1. Is the camera in the same LAN network as the Media Server?
2. Is your camera compatible with DW Spectrum? (Refer to our website for full list of supported cameras.)
3. Is the camera updated to its latest rmware?
4. If your camera is integrated with DW Spectrum via ONVIF, make sure ONVIF is enabled on your camera.
5. Try adding the camera manually.
6. Try rebooting the server after installation. Allow up to 30 seconds for the ser ver to map your network and detect all suppor ted
devices.
2. Do you have a Gigabit network? Check your network speed.
1. Under camera settings, make sure the user name and password are correct.
2. Under the camera settings, use the ‘Ping’ button to make sure the camera is connected to the network properly.
3. If you can connect to the camera’s web viewer, try rebooting the camera and/or restore it to factory default.
4. Make sure your camera is using the latest rmware available.
5. Make sure that the camera is connected to the same network as the server.
6. If you are connecting to a camera that is integrated with DW Spectrum via the ONVIF protocol (see list), make sure ONVIF is enabled.
7. Make sure your user has permissions to view that specic camera.
1. Do you have network connection between client and server (in case server and client are not on the same machine)?
2. Make sure your user has playback viewing permissions for the selected channel.
3. Make sure the camera is set to a recording mode that would provide recorded video for the selected time and environment.
4. On the server side, check the media server log to make sure the camera you are trying to watch has not been unexpectedly
disconnected.
1. Make sure the camera’s user name and password are properly entered in the camera’s general information under the camera
settings menu.
2. If necessar y, try rebooting the camera to apply the camera’s user name and password.
SYSTEM REQUIREMENTS
Recommended Specs for the Full Client
Windows 7
Processor Intel Core i3 Processor or Higher
Video Card
Resolution 1920 x 1080
RAM 4GB
NIC 10 / 100 / 1000 Base-T Ethernet
OS
AMD/Intel/NVIDIA HD Graphic
Chipset with Minimum 1GB Memory
Windows 7
Server 2008®, Windows Server
2012®, Ubuntu® 12.04
Linux OS
®
Windows 8®, Windows
Accessing DW Spectrum Log Files
From the DW Spectrum Client Software:
•
Right-click on the Server’s name and go to ‘Server Logs’.
•
You can adjust the number of entries in the log by changing
the value at the end of the URL stating ‘lines=1000’. For example,
‘lines=1’ will reduce the log report to a single line of data.
‘lines=400’ will display 400 lines of data.
Minimum Required UPS
•
APC S M C15 0 0
•
APC S M T15 0 0
•
Tripp Lite SMART1500LCDXL
•
CyberPower CPS1500AVR
•
Any 1500VA or higher grade UPS*
* Always better to have higher grade UPS than minimum required
Tel: +1 (866) 446-3595
Fax: (813) 888-9262
Rev Date: 9/16 Copyright © Dig ital Watch dog. All r ights re serve d. Speci catio ns and pr icing ar e subjec t to chang e withou t notice.
www.digital-watchdog.com
sales@dwcc.tv
 Loading...