

Digital Watchdog DW-BJCUBE16T-DL, DW-BJCUBE8T-DL, DW-BJCUBE4T-DL, DW-BJCUBE20T-DL, DW-BJCUBE12T-DL User Manual
Page 1

DW Spectrum 3.0
USER MANUAL
Page 2

DW Spectrum 3.0
DW SPECTRUM™ IPVMS END USER LICENSE AGREEMENT
SOFTWARE LICENSE AGREEMENT
Unpacking, installing and using this software indicates you have read and understood the Agreement below and that
you accept its terms. Should you be unable or unwilling to accept these terms, do not unpack, install or use this
software. You should contact Digital Watchdog if you wish to raise any questions regarding the terms of the Agreement
below before you unpack, install and use this software.
END USER LICENSE AGREEMENT
In consideration of the rights and restrictions included in this Agreement, and other good and valuable consideration,
the sufficiency of which is hereby acknowledged, you agree as follows:
1. OWNERSHIP.
Digital Watchdog retains all rights, title and interest in and to any attached software (including SDK) and accompanying
written documentation (together, the "Program"), including all intellectual property rights therein, subject to the rights
expressly granted below.
2. LICENSE.
Subject to the terms and conditions of this Agreement, Digital Watchdog hereby grants to you a non-exclusive license to
use the Program on one or more machines and to copy the Program onto any machine as a backup for the sole purpose
of supporting your use of the Program for archival purposes. You must reproduce and include the copyright at all times.
This Agreement is your proof of license to exercise the rights granted herein and must be retained by you. You may not
sublicense, rent, lease or assign the License or the Program to any third party. You may not translate or convert the
Program to another programming language, decompile, disassemble or otherwise attempt to reverse engineer the
Program, or export the Program from the country where the Program was provided to you without the appropriate
government licenses. You may only use, copy or transfer the Program, or any copy or merged portion, in whole or in part,
as expressly provided for in this Agreement.
3. COPYRIGHT.
The Program is a proprietary product of Digital Watchdog or its licensors and is protected by copyright laws and
international treaties. All copies of the Program, in whole or in part, remain the property of Digital Watchdog or its
licensors and are to be considered as part of the Program for the purpose of this Agreement. Subject to the license
expressly granted above, Digital Watchdog or its licensors retains all rights, title and interest in and to the Program.
You must treat the Program like any other copyrighted material.
4. LIMITED WARRANTY.
The Program is provided "as is" without warranty of any kind, either express or implied, including but not limited to the
implied warranties of merchantability and fitness for a particular purpose and those arising by statute or otherwise in law
or from a course of dealing or usage of trade. The entire risk as to the quality and performance of the Program is with
you. Some states and provinces do not allow the exclusion of implied warranties so the above exclusion may not apply
to you.
Digital Watchdog does not warrant that the functions contained in the Program will meet your requirements or that the
operation of the Program will be uninterrupted or error free or that errors will be corrected.
5. NO SUPPORT
Except as expressly required by applicable law, nothing in this Agreement entitles you to any support, maintenance or
new versions of the Program. You may contact Digital Watchdog to determine the availability of support, maintenance,
and new versions, and the fees, terms and conditions that would apply.
Page 3

DW Spectrum 3.0
6. LIMITATION OF REMEDIES.
In no event will Digital Watchdog or its licensors be liable to you or any third party for any indirect, incidental or
consequential damages (including without limitation lost profits, lost savings or lost data) arising out of this Agreement or
use or inability to use the Program even if Digital Watchdog has been advised of the possibility of such damage or claim.
In no event will Digital Watchdog’s direct liability under or arising out of this Agreement, whether in contract or in tort,
exceed the amount paid by you for the Program. Some states and provinces do not allow the limitation or exclusion of
liability for incidental or consequential damages so the above limitation or exclusion may not apply to you.
7. TERM.
This Agreement is effective until terminated. Digital Watchdog may terminate this Agreement immediately if you fail to
comply with any material term of this Agreement. You may elect to terminate this Agreement at any time by giving written
notice to Digital Watchdog. In the event of termination of this Agreement, you agree to destroy all copies of the Program,
in whole or in part, provided or created under this Agreement that are in your possession, power or control. A signed
certification to this effect will be required.
8. THIRD PARTY LICENSES
The Program uses FFmpeg, qt and Ajax.org Cloud9 Editor (formerly Bespin) (together “Third Party Software”). Third
Party Software are being provided to you under the terms and conditions of GNU Lesser General Public License v2.1
(“LGPL”), which is available for you to review at:
http://www.gnu.org/licenses/old-licenses/lgpl-2.1.html.
You understand and agree that, although provided to you by Digital Watchdog with the Program, your use of Third Party
Software shall be and is governed by the LGPL. The ownership terms in the Agreement do not apply to Third Party
Software. You understand and acknowledge that under the LGPL, Third Party Software is being provided “AS IS”
WITHOUT ANY WARRANTY, INCLUDING BUT NOT LIMITED TO, THE IMPLIED WARRANTIES OF
MERCHANTABILITY OR FITNESS FOR A PARTICULAR PURPOSE. If there is a conflict
between the Agreement and LGPL with respect to Third Party Software, the provisions of the LGPL shall prevail.
You may obtain a complete copy of the source code for the above-mentioned free software, under the terms of the LGPL,
from Digital Watchdog, without charge, except for the cost of media, shipping, and handling, upon written request to
Digital Watchdog at the address set forth below:
16220 Bloomfield Ave. Cerritos,
California, USA 90703
9. WAIVER OF CONTRACTUAL RIGHT.
The failure of Digital Watchdog to enforce any provision of this Agreement shall not be construed as a waiver or limitation
of Digital Watchdog’s right to subsequently enforce and compel strict compliance with every provision of this Agreement.
10. GENERAL.
If any provision of this Agreement is found to be unlawful, void or unenforceable for any reason, then that provision shall
be deemed severed from this Agreement and shall not affect the validity and the enforceability of the remaining portions
of this Agreement. You acknowledge and agree that Digital Watchdog’s licensor is a third party beneficiary of this
Agreement and the provisions of this Agreement are made expressly for the benefit of, and are enforceable by, such
licensor. This Agreement is the complete and exclusive statement of the agreement between Digital Watchdog and you
and supersedes any proposal or prior agreement, oral or written, and any other communications between Digital
Watchdog and you relating to the subject matter hereof. This Agreement is governed by the laws of the State of Florida
without regard to conflict of law principles. The United Nations Convention On Contracts for the International Sale Of
Goods, 1980, and any successor thereto, shall not apply. The Federal and State courts within the State of Florida shall
have exclusive jurisdiction to adjudicate all disputes and claims arising out of or related to this Agreement.
Page 4

Spectrum Licenses
DW Spectrum Professional License
DW-SPECTRUMLSC001
Single DW Spectrum IPVMS License / No Annual Renewal, No Upgrade
Required
DW-SPECTRUMLSC004
4 DW Spectrum IPVMS License / No Annual Renewal, No Upgrade Required
DW-SPECTRUMLSC010
10 DW Spectrum IPVMS License / No Annual Renewal, No Upgrade Required
DW-SPECTRUMLSC020
20 DW Spectrum IPVMS License / No Annual Renewal, No Upgrade Required
DW-SPECTRUMLSC050
50 DW Spectrum IPVMS License / No Annual Renewal, No Upgrade Required
DW-SPECTRUMLSC100
100 DW Spectrum IPVMS License / No Annual Renewal, No Upgrade Required
DW Spectrum Encoder License
DW-SPCP04LSC004
4 Channel Encoder License - allows up to 4-channels of recording when used
with DW-CPUHD16, DW-CP04 and DW-CP16 / No Annual Renewal, No
Upgrade Required
DW-SPCP16LSC016
16 Channel Encoder License - allows up to 16-channels of recording when used
with DW-CPUHD16 and DW-CP16 / No Annual Renewal, No Upgrade Required
DW Spectrum I/O Module License
DW-SPIOLSC001
IP I/O Module License - Like all supported devices IP I/O Modules are
automatically discovered and can be used to trigger system events, actions,
and alerts. Compatible with the Axis P8221,which also allows for audio
recording by schedule, and the Advantech ADAM-6052
DW Spectrum Video Wall License
DW-SPVWALL1X2
Single DW Spectrum IPVMS Video Wall License - 1 operator / 2 monitors / No
Annual Renewal, No Upgrade Required
DW Spectrum 3.0
Rev. 072017 Page | 4
Page 5

Spectrum 3.0 Cloud and Webpage Limitations
Spectrum 3.0 – Cloud
1. Usage and Benefits
a. Manage multiple servers
- Check server status online
- Share and assign permission with other users without providing server information
b. No need to assign static IP address to the server
c. No need to setup DDNS for non-static public IP address
d. No need to create port forwarding rule in the router (some limitations may apply)
2. Limitations
a. No data will be stored online
b. Only works in single router configuration (both server and client)
c. Does not work in Symmetric NAT environment
DW Spectrum 3.0
d. Does not work in more than one dynamic NAT environment (multiple routers)
- If the server is behind multiple routers, only one router should have dynamic NAT configuration
- Applies to both server and client
e. Does not work in VLAN environment.
f. OS or Network with outbound(egress) firewall rules.
- TCP Ports 80, 443 and 3345 must be unblocked on the outbound(egress) rule
3. Disabling Cloud
a. Tech support can run script to disable the Cloud connection on the server
- Reenableing script is also available from Tech Support.
4. Reference
https://en.wikipedia.org/wiki/UDP_hole_punching
https://en.wikipedia.org/wiki/Network_address_translation#Types_of_NAT
https://www.think-like-a-computer.com/2011/09/19/symmetric-nat/
https://www.think-like-a-computer.com/2011/09/16/types-of-nat/
Spectrum 3.0 – Webpage
1. Limitations
a. Does not work with website with pop-ups
b. Does not work with website that require ActiveX , Chrome extensions, or Plug ins.
c. Does not work with Video and Audio streaming website
d. Not able to download files from website
e. Does not save cookies
Rev. 072017 Page | 5
Page 6

DW Spectrum 3.0
Table of Contents
Working with DW Spectrum ........................................................................................................................................... 10
Opening and Closing DW Spectrum Client .................................................................................................................. 10
Connecting to DW Spectrum via Web-Client .............................................................................................................. 11
Connecting to DW Spectrum via Mobile Client .......................................................................................................... 11
Connecting to System and Working Offline ................................................................................................................ 11
Connecting as Cloud User ....................................................................................................................................... 12
Connecting to Specific Server ................................................................................................................................. 12
Launching DW Spectrum in Compatibility Mode ........................................................................................................ 14
Introducing User Roles ................................................................................................................................................ 15
DW Spectrum User Interface Overview ...................................................................................................................... 16
Main Menu .............................................................................................................................................................. 16
Showing and Hiding Side Panels ............................................................................................................................. 17
Tabs and Layouts ..................................................................................................................................................... 17
Context Menu ......................................................................................................................................................... 18
Items on Layouts and Scene ................................................................................................................................... 19
Working with Resource Tree and Renaming Resources ......................................................................................... 21
Search ...................................................................................................................................................................... 23
Playback Panel ........................................................................................................................................................ 24
Full Screen and Window Mode ............................................................................................................................... 24
Getting Context Help .............................................................................................................................................. 25
Customizing Look and Feel of DW Spectrum .............................................................................................................. 25
Run DW Spectrum when computer boots up ............................................................................................................. 25
DW Spectrum Quick Start ........................................................................................................................................... 25
Connecting System to Cloud Account ......................................................................................................................... 26
Obtaining and Activating DW Spectrum Licenses ....................................................................................................... 27
System-Wide Configurations ...................................................................................................................................... 29
Obtaining and Configuring Server’s Additional Settings (Admin Only)....................................................................... 29
Rev. 072017 Page | 6
Page 7

DW Spectrum 3.0
Configuring Server Storage/NAS ............................................................................................................................. 30
Configuring Redundant Storage (Storage Backup) ................................................................................................. 32
Analyzing and Anticipating Storage Usage.............................................................................................................. 34
Deleting Server ........................................................................................................................................................ 35
Monitoring Servers ................................................................................................................................................. 35
Using Server's Web Interface .................................................................................................................................. 36
Configuring Multi-Server Environment (Admin Only)................................................................................................. 37
Understanding Multi-Server Architecture and Basics ............................................................................................. 37
Joining and Splitting Servers ................................................................................................................................... 37
Configuring Failover ................................................................................................................................................ 39
Configuring Routing within Multi-Server Environment .......................................................................................... 40
Configuring Time Synchronization within Multi-Server Environment .................................................................... 40
Cameras, Encoders and I/O Modules Management ................................................................................................... 40
Viewing Full Device List ........................................................................................................................................... 41
Adding Devices (Cameras, Encoders and I/O Modules) .......................................................................................... 42
Setting Up Devices .................................................................................................................................................. 45
Setting Same Parameters for Multiple Devices ...................................................................................................... 70
Swapping Devices between Servers (Admin Only) ................................................................................................. 70
Deleting Devices (Admin Only) ............................................................................................................................... 71
Configuring Events and Actions (Admin Only) ............................................................................................................ 71
Tracked Events ........................................................................................................................................................ 74
Actions that DW Spectrum Can Do ......................................................................................................................... 86
Default Rules ......................................................................................................................................................... 107
Viewing Events Log ............................................................................................................................................... 107
User and Roles Management .................................................................................................................................... 109
User Management Form ....................................................................................................................................... 110
Roles Management ............................................................................................................................................... 111
Creating New User (Admin Only) .......................................................................................................................... 112
Rev. 072017 Page | 7
Page 8

DW Spectrum 3.0
Changing User Settings ......................................................................................................................................... 112
Disabling/Enabling Users (Admin Only) ................................................................................................................ 113
Deleting User (Admin Only) .................................................................................................................................. 113
Adding Users from LDAP Server (Admin Only) ..................................................................................................... 114
Viewing Users' Actions Log (Audit Trail) ............................................................................................................... 116
Layout Management ................................................................................................................................................. 117
Creating New Layout ............................................................................................................................................. 118
Setting up Layouts ................................................................................................................................................. 118
Assigning Layouts to Users (Admin Only) ............................................................................................................. 130
Deleting Layouts (Admin Only) ............................................................................................................................. 130
Opening and Closing Saved Layouts ..................................................................................................................... 131
Backing up and Restoring DW Spectrum Database .................................................................................................. 131
Video Wall Management (Windows Only) ............................................................................................................... 132
Video Wall Architecture ........................................................................................................................................ 132
Configuring Video Walls ........................................................................................................................................ 134
Controlling Video Wall .......................................................................................................................................... 139
Playback in DW Spectrum ......................................................................................................................................... 141
Watching Cameras in DW Spectrum ..................................................................................................................... 141
Playing Back Local Files in DW Spectrum .............................................................................................................. 155
Forensic Analysis ................................................................................................................................................... 157
Using 2-Way Audio ................................................................................................................................................ 165
Exporting ............................................................................................................................................................... 165
Adjusting Volume .................................................................................................................................................. 174
Tours ..................................................................................................................................................................... 175
Using DW Spectrum as Web Browser ....................................................................................................................... 175
Screen Recording (Windows Only) ........................................................................................................................... 176
Setting up Screen Recording ................................................................................................................................. 176
Performing Screen Recording ............................................................................................................................... 177
Rev. 072017 Page | 8
Page 9

DW Spectrum 3.0
Upgrading DW Spectrum .......................................................................................................................................... 177
Troubleshooting and Contacting Support ..................................................................................................................... 179
Diagnosing Offline Devices........................................................................................................................................ 179
Double Buffering ....................................................................................................................................................... 181
Restoring Broken Archive.......................................................................................................................................... 181
Providing Remote Access .......................................................................................................................................... 182
Recording Issue ......................................................................................................................................................... 182
Collecting Logs .......................................................................................................................................................... 183
Collecting Additional Information ............................................................................................................................. 183
Sending Anonymous Usage and Crash Statistics ...................................................................................................... 184
Glossary ......................................................................................................................................................................... 189
Rev. 072017 Page | 9
Page 10

DW Spectrum 3.0
Working with DW Spectrum
Opening and Closing DW Spectrum Client
A few different ways are available to launch the application:
Windows
From desktop: DW Spectrum shortcut icon.
From Start Menu: Start –> Programs –> Digital Watchdog –> DW Spectrum.
Directly from the installed folder:
For x86 default is C:\Program Files(x86)\Digital Watchdog\DW Spectrum\Client\<VERSION>\DW
Spectrum Launcher.exe
For x64 default is C:\Program Files\Digital Watchdog\DW Spectrum\Client\<VERSION>\DW
Spectrum Launcher.exe
Linux
Using DW Spectrum shortcut icon.
Directly from the installed folder:
/opt/<%NAMESPACE.MINOR%>/<%NAMESPACE.ADDITIONAL%>/Client/<VERSION>/DW Spectrum
MAC
Using DW Spectrum shortcut icon located in Applications or Launchpad.
Directly from the installed folder: /Applications/DW Spectrum/Contents/MacOS/DW Spectrum
To close DW Spectrum Client:
Click on the "X" button located in the top right corner
Go to Main Menu –> Exit (or press ALT+F4).
It is possible to set up DW Spectrum Client to launch at startup (WIndows/Linux only). To proceed:
1. Open Main Menu and go to Local Settings.
2. Select Run Application when PC boots up (see Misc section).
3. Click OK when done or Cancel to discard changes.
IMPORTANT. In order to display video and graphics properly, it is important to have most current video drivers
installed. If video drivers are not installed, the warning will be displayed.
Finally, DW Spectrum Client can detect PC configuration automatically. If CPU and/or graphic adapter are insufficient
to render all graphics, the configuration mode will be activated.
This mode restricts the following functionality:
Only one video can be viewed at the same time
No notifications in Client (see Notifications)
All animations are turned off.
Rev. 072017 Page | 10
Page 11
Connecting to DW Spectrum via Web-Client
Web Client allows users to do the following:
view Live streams from Cameras
search through archive
change resolution to save bandwidth
To open Web Client:
1. Open Server's Web Interface and log in using user name and password (or cloud credentials).
2. Go to the Web Client tab.
See also "Connecting to DW Spectrum via Mobile Client".
Connecting to DW Spectrum via Mobile Client
Mobile Client allows users to do the following:
view Live streams from Cameras
DW Spectrum 3.0
search through archive
change resolution to save bandwidth.
Mobile client is available for Android and iOS platforms.
There are 2 different mobile clients available:
New Mobile clients. Provide much better user experience and enhanced interface. Allows connecting to versions
2.5 and higher. Requires iOS 8.1+ and Android 4.1+.
Old Mobile clients. Allow connecting to any version of DW Spectrum. Remains available for better compatibility.
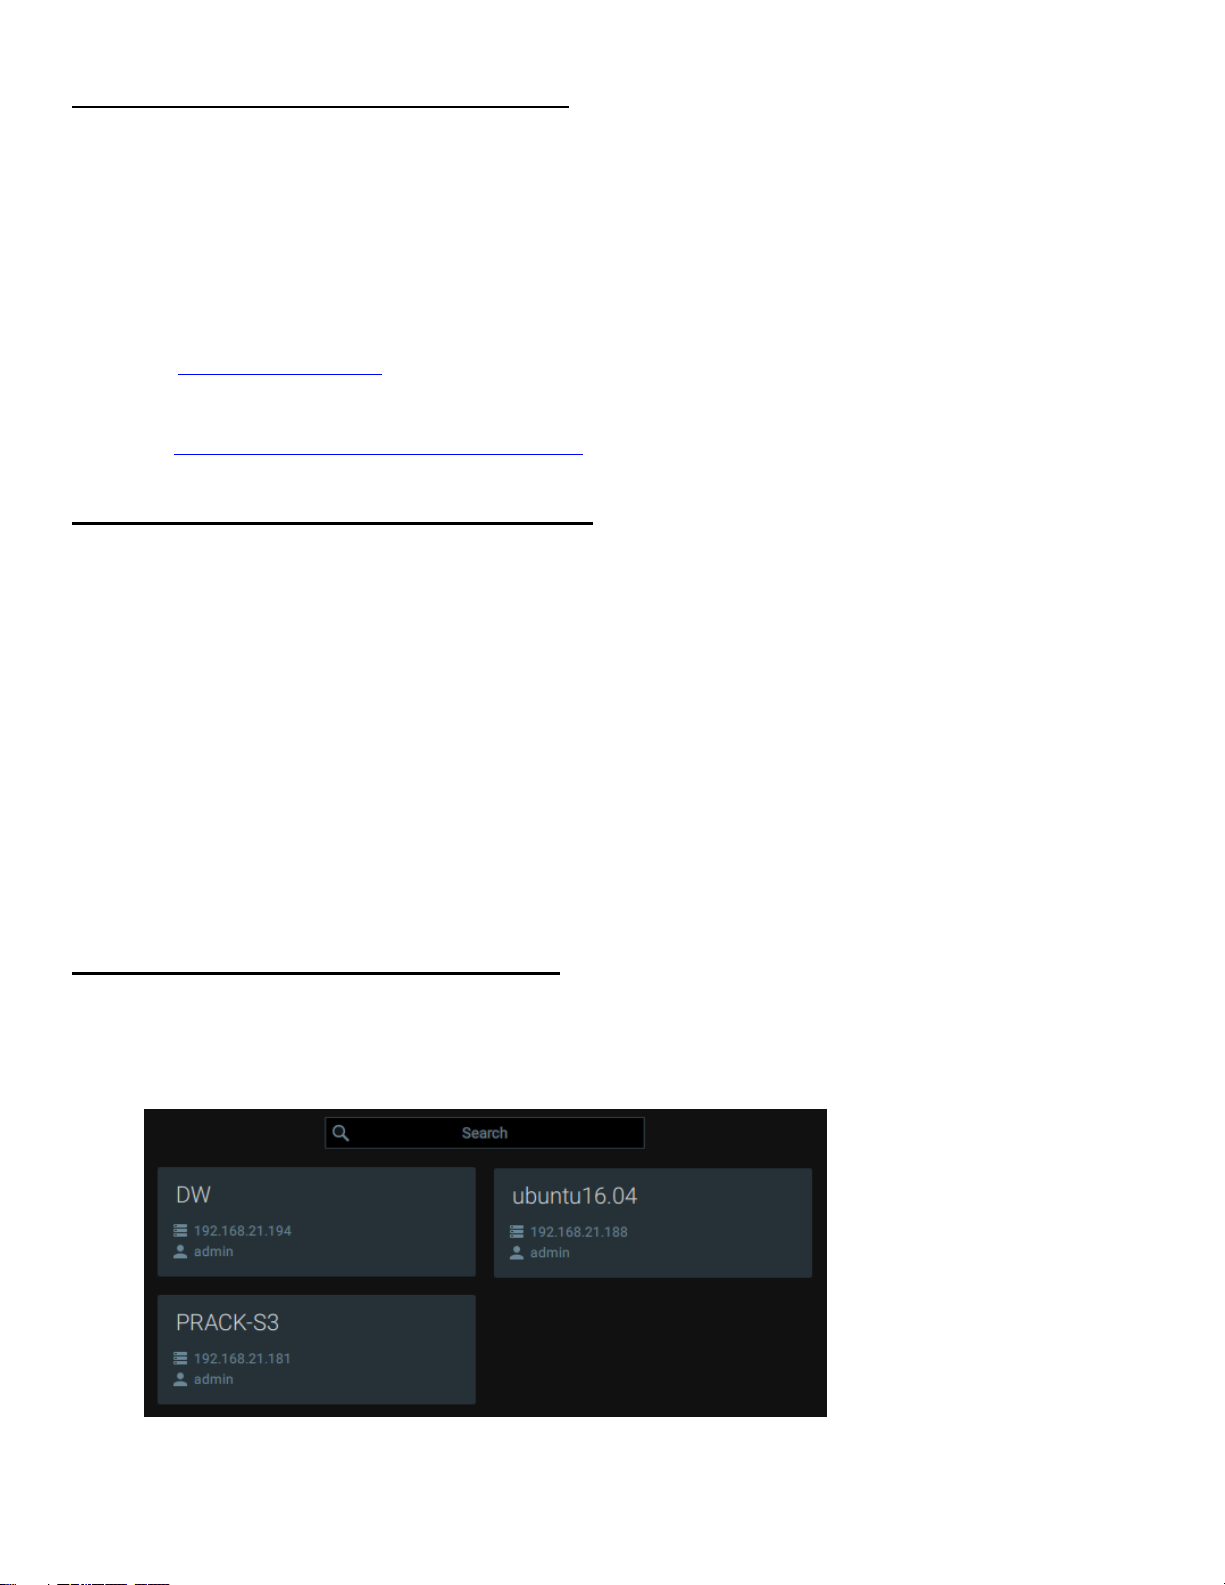
Connecting to System and Working Offline
In order to gain access to Cameras, User must be connected to System. System may consist of one or more Servers.
When DW Spectrum Client is launched for the first time, it displays the list of available Systems on the welcome page:
Rev. 072017 Page | 11
Page 12

DW Spectrum 3.0
DW Spectrum automatically detects and displays the Systems in local networks. Also it displays Systems that have
been recently accessed. Those Systems are called Local and can be accessed by username and password.
DW Spectrum Client can connect to Systems that have different version. If System is incompatible with Client, then its
version is displayed in yellow. See "Launching DW Spectrum in Compatibility Mode" for details.
Finally, if User is logged into DW Cloud Account (see "Connecting as Cloud User"), it displays Cloud Systems as well. No
login credentials are needed in this case.
Systems that are unavailable at the moment, are marked grey and can be deleted.
To search the specific System, use the search bar. To scroll Systems, use navigation arrows.
If System is not displayed in the welcome screen, it is possible to connect to a specific Server using its IP address. See
"Connecting to Specific Server".
IMPORTANT. Compatible hardware supports Safe Mode Booting. The hardware boots up in Safe Mode if
something has happened during a previous boot. In this case it is possible to connect to Server, but it is not allowed
to perform any configurations.
If User is not connected to System, he can use Client as Media Player (see "Playing Back Local Files in DW Spectrum")
and Screen Recorder (see "Screen Recording (Windows Only)").
Connecting as Cloud User
To connect to DW Cloud, click the cloud icon at the top. Cloud connection dialog will open up.
It allows to:
Create DW Cloud account. This will open up Cloud Portal and redirect user to the registration form
Connect to DW Cloud using cloud username (Email address) and password
Restore password.
Once connected, User will be able to see and access the System connected to the Cloud that are either owned or
shared to this Cloud Account (see "Connecting System to Cloud Account").
* Not all the System/Server can be connected to due to the restriction and limitation of network configurations.
Also the cloud icon at the top will open up Cloud Menu that can redirect user to Cloud Portal.
To disable login using the cloud account, click the cloud icon at the top and choose Log out from DW Cloud.
Note that each Cloud System is still accessible in a standard way (username and password).
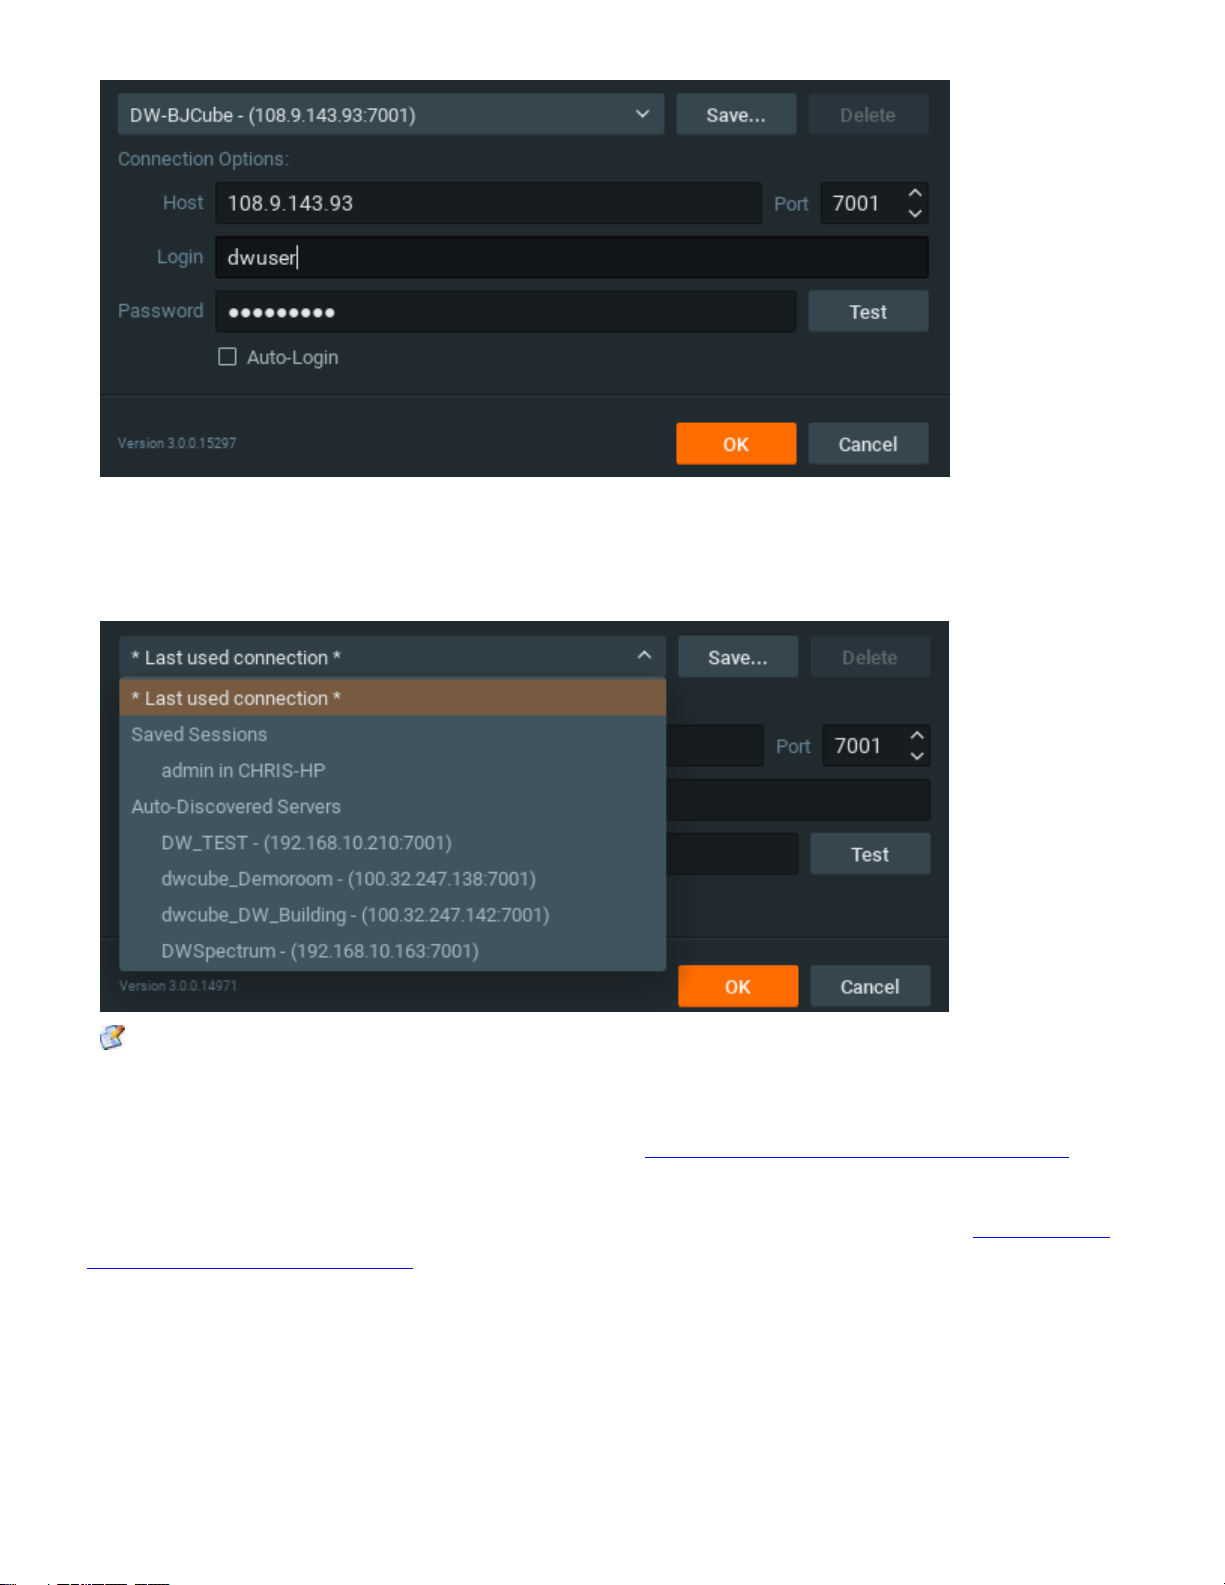
Connecting to Specific Server
To connect to specific Server, open Main Menu and choose Connect to (Another) Server...
The connection dialog is displayed as follows:
Rev. 072017 Page | 12
Page 13
DW Spectrum 3.0
DW Spectrum provides a powerful mechanism that can auto-discover Servers in local network. The easiest way to is to
use one of the auto-discovered Servers.
To use predefined connections, click on the drop-down list. By default ,*Last Used Connection* is recommended:
Note: the computer Server is installed on may have several network interfaces. In this case, a random one is
displayed on the Auto-Discovered Servers list.
Note that Servers with different versions are discovered automatically as well. However, they will be displayed in red.
It is possible to connect to them in a compatibility mode (see "Launching DW Spectrum in Compatibility Mode").
System name is displayed in before the Server's IP address. In case of multi-server environment several servers with
the same System Name can be discovered. In this case it is possible to connect to any Server. See "Understanding
Multi-Server Architecture and Basics" for details.
Connection details can also be entered manually. The following values are required:
Host – IP Address or name of the computer Server is installed on (localhost or 127.0.0.1 for All-in-One
installation).
Port – IP Port for access to Server (7001 by default).
Rev. 072017 Page | 13
Page 14

DW Spectrum 3.0
Login and Password to connect to Server. If connecting for the first time, "admin" should be used as a login name.
Use the same password that was set up during the initial installation.
To check connectivity to Server, press Test. The following may cause connection errors:
Server is not available:
specified IP Address is incorrect or inaccessible
specified port is incorrect
Server is stopped
login and/or password are incorrect
Server and Client are incompatible with each other (different versions). In this case the compatibility mode will be
suggested (see "Launching DW Spectrum in Compatibility Mode").
Server and Client are incompatible with each other (different customizations).
To save login details, select the Auto-Login option on the bottom. When Client is launched again, it will connect to the
Server automatically through the pre-established login and password combination.
To save and restore connection details:
If current connection details are used, press Save and create a connection name to store, which will appear in the
drop-down list next time a user logs in.
To delete details of a stored connection, select it from the drop-down list and press Delete.
If the last connection was not properly saved, the software will use its connection data from the next launch (* Last
Used Connection *).
Note: passwords are not stored in saved connection details unless the Auto-Login option is enabled.
To log out, go to Main Menu and choose Disconnect from Server.
If Client is not connected to Server, a user can only access Local Files (see “Playing Back Local Files in DW Spectrum”).
To connect to a different Server under a different user, open the login window and enter new Server coordinates or
login credentials. If canceled, the current user will still be connected to Server.
Launching DW Spectrum in Compatibility Mode
It is necessary sometimes to connect to Server with different versions. A good example would be when DW Spectrum
is installed at multiple sites (home, work, etc.) and only one installation is upgraded. In this particular case, Systems
will have different versions and one Client should connect to another System (Client at home connects to System at
work). Systems of different versions are highlighted in red in login dialog and in yellow in the main page.
In this case, the following message will appear:
You are about to connect to Server which has a different version.
Would you like to restart client in compatibility mode?
By clicking OK, the application will restart in compatibility mode.
In some instances, it may be necessary to download additional files for compatibility pack. In this particular instance,
the following message will be displayed:
Rev. 072017 Page | 14
Page 15

DW Spectrum 3.0
PERMANENT
VIDEO WALL
CAM SETTINGS
ACTIONS
(PTZ, 2WAY)
ARCHIVE
EXPORT
LIVE
Admin √ √ √ √ √ √
√
Administrator
√ √ √ √ √ √ Adv. Viewer
√
√ √ √
√
Viewer
√ √ √
Live Viewer
√
You are about to connect to Server which has a different version.
Client version X is required to connect ti this Server
Download version 2.2?
Once download is completed, restart is suggested.
IMPORTANT. If some of the components of the Multi-Server System such as Server or Client have different versions
installed, it may cause potential issues. When Client is connected to Server, all component versions are checked. The
warning will appear if the component versions differ from one another.
It is recommended to have the same version installed on all system components. See Upgrading DW Spectrum.
Introducing User Roles
There are several predefined types of user roles in DW Spectrum:
Owner (user with "admin" login). Unlimited control. This user cannot be deleted.
Administrator. Full control, except:
Change Owner (admin) settings
Delete or change own role
Viewers (Live Viewer, Viewer, Advanced Viewer). Limited control. A viewer cannot:
Manage users (except for changing their own password).
See servers and all connected devices. Only the devices assigned by the administrator are visible.
Change predefined layouts (layouts can be changed, but cannot be saved); however, it is possible to configure
and save own layouts based on available resources (assigned devices and local files).
Additional permissions can be assigned to users to be able to operate with available devices (assigned by
Administrator):
View archive, perform search and forensic analysis
Perform export from archives
Set up devices
Perform various actions on Cameras and devices (Control PTZ, trigger outputs, use 2-way audio)
Create, modify and delete Video Walls.
If none of these permissions are assigned, a user can only view live videos on available cameras.
Additionally it is possible to create Custom Roles and then assign it to Users. Custom Roles can include permissions for
Cameras and Layouts. See "Roles Management" for details.
Rev. 072017 Page | 15
Page 16

DW Spectrum 3.0
IMPORTANT. If any action or graphical element described in this document is not available to a specific user level,
the following will apply (Admin only). If the action described in this document is unavailable to certain roles, it will be
indicated in the corresponding topic.
Usually Administrators create and configure layouts for Viewers. Viewers log into DW Spectrum and can only work
with assigned layouts and devices.
DW Spectrum User Interface Overview
DW Spectrum User Interface (UI) includes the following main controls:
Scene (main view). Displays video items from cameras or local files.
Tab Navigator (top Panel). It contains Main Menu, Tabs and the following buttons:
Cloud Connect Button. This button indicates the current cloud connection status and allows to
connect/disconnect to Cloud and open Cloud Portal.
Help Button. Invokes this help.
Window Buttons (go/exit fullscreen, minimize, close window)
Playback Panel (located on the bottom Panel). Used for playing back local videos and live streams.
Resource Tree (left Panel). Contains all servers, devices, local files, users and layouts available to the current user.
Search Tab. Function to search Video Files, Image Files, Live Cameras or from All types.
Notifications (right Panel). Contains notifications about system events.
Scene represents space for video Items can be placed on. DW Spectrum allows viewing streams from Cameras as well
as Local Video Files.
Items are placed on Scene and can be saved as Layouts.
If several Tabs are opened, then each Tab contains its own Layout with Items.
Main Menu
Main Menu allows users to gain access to various DW Spectrum features quickly and intuitively. Main Menu can be
opened by clicking on the at the upper left corner and contains the following items:
Connect to (Another) Server – allows connecting/disconnecting to/from Server (see "Connecting to System and
Working Offline")
Disconnect from Server – drop connection to a current Server and go offline
New:
Tab – creates an empty tab in Tab Navigator (see "Tabs")
Window – opens a new window of DW Spectrum (see "Working with Multiple DW Spectrum Windows")
User – creates a new user (see "User and Roles Management")
Video Wall – create new Video Wall (see "Video Wall Management")
Rev. 072017 Page | 16
Page 17

DW Spectrum 3.0
Web Page – open a new web page on Scene (see "Using DW Spectrum as Web Browser").
Open – opens and plays back Local Files (see "Playing Back Local Files in DW Spectrum"):
File – opens Local Video File
Folder – opens all Local Video Files in the selected folder and plays them back simultaneously (max 24 files for
x86 and max 64 files for x64).
Web Client – opens Web Client and connects to the current Server. See "Connecting to DW Spectrum via
Web-Client".
Start/Stop Screen recording (see "Screen Recording (Windows Only)").
System Administration – opens up system-related settings (see "System-Wide Configurations").
User and Roles Management – allows managing Users and its roles from a single dialog (see "User and Roles
Management Form").
Local Settings – opens up client-related settings (see "Customizing Look and Feel of DW Spectrum").
Audit Trail – invokes the form that provides information about storage statistics (see "Analyzing and Anticipating
Storage Usage").
Bookmark Search – opens the list of Bookmarks (see "Search using Bookmarks").
Merge Systems – allows merging multi-server systems (see "").
About – opens information about the system (see "Collecting Additional Information").
Exit.
Showing and Hiding Side Panels
Side Panels are extremely useful, though may be hidden by a user if needed. The ">" buttons show/hide Panels as well
as Hide Panel Context Menu item.
If an item is expanded to fullscreen (see "Expanding Items to Fullscreen"), all Panels slide off the screen and disappear.
To bring Panel back, click on ">".
Additionally, both left and right sliding menu panels can be pinned:
If Pinned: side Panels are always visible. If a panel is hidden manually, it will not reappear automatically.
If Unpinned: Panel is only visible when the cursor is on. As soon as a user clicks off the Panel, the panel will
disappear. Panel can reappear if a user points or clicks on ">".
F11 hides all Panels. To undo, press F11 again or use Esc.
Tabs and Layouts
Tabs are used to make layout navigation easier. Each Tab hosts a separate Layout. Tabs function very similar to any
Internet browser.
The following actions can be performed with Tabs:
Rev. 072017 Page | 17
Page 18
DW Spectrum 3.0
Open a new tab:
Tab Navigator’s Context Menu –> New Tab (Ctrl+T)
Main Menu –> New –> Tab
"+" icon on the right of layout tabs
Close a specific Tab: Tab’s Context Menu –> Close (Ctrl+W)
Keep one Tab open – Tab’s Context Menu –> Close All but This
Change the tab order – switch position by dragging and dropping a tab in the desired order.
IMPORTANT: A warning message will appear every time Tab is modified, suggesting to the user to save changes.
See “Saving Layouts”.
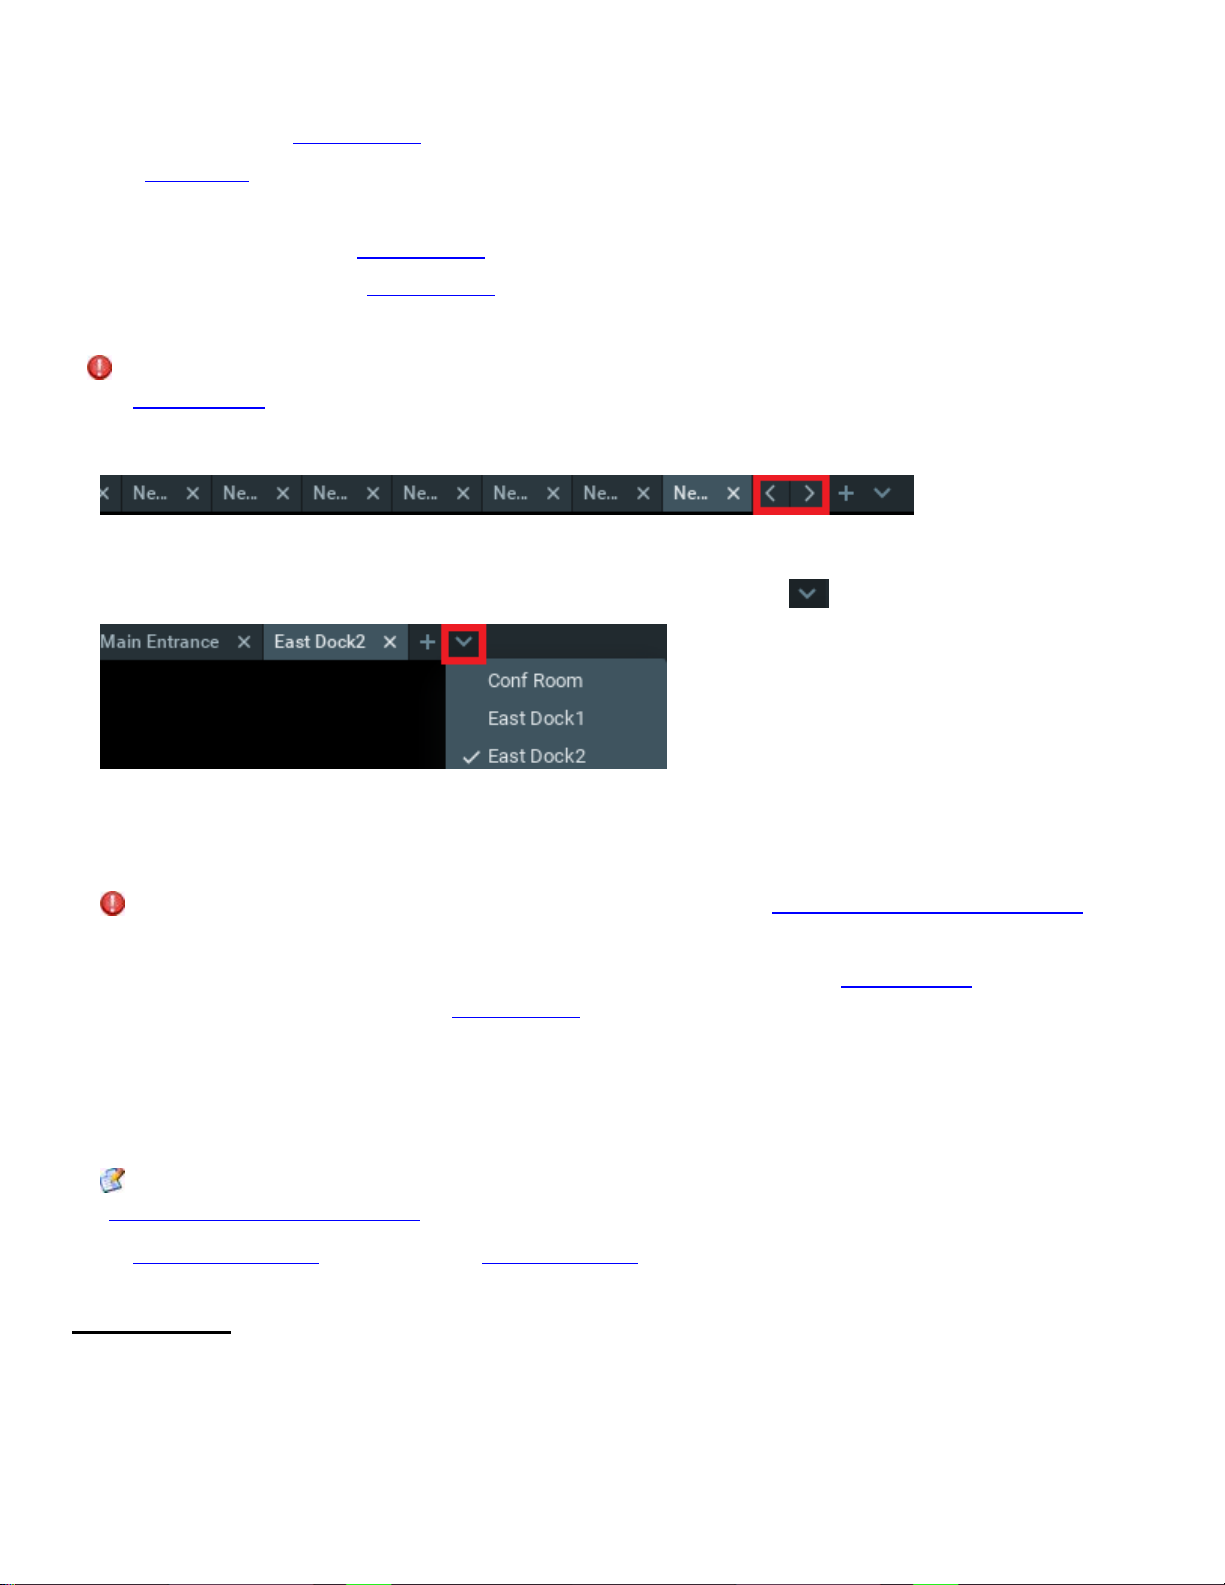
If too many Tabs are opened at the same time, scrolling arrows will appear:
These arrows can be used to scroll Tabs left and right.
To navigate to a specific Tab or open a saved layout, use the following button located at the end of the Tab bar
Initially, no Layouts are configured in the system. An empty default Tab is shown (“New Layout”). If User tries to
configure Layout in this Tab, asterisk will automatically be added to the caption (indicating a Layout change). The
Layout will remain local.
IMPORTANT. Sometimes Alarm Layout may pop up if configured. See "Showing Cameras on Alarm Layout" for
details.
The layout information is automatically passed to Server once Layout is saved (See “Saving Layouts”). If Layout is
saved successfully, it will be displayed in Resource Tree under the current User.
When closing all Layouts, the default blank Tab will still appear. If the current Layout is saved as “New Layout”, the
blank Tab located next to it will be renamed “New Layout 1” automatically.
Any saved Layouts that were previously opened, will appear automatically once User logs in.
Note: If Alarm Monitoring is configured, Alarm Layout will show up when the corresponding event occurs. See
"Showing Cameras on Alarm Layout" for details.
See "Layout Management" and specifically "Setting up Layout" sections for more details.
Context Menu
Context Menu displays all available actions as they relate to the selected element. Context Menu will appear by
right-clicking on the desired element (or on empty space).
Rev. 072017 Page | 18
Page 19
DW Spectrum 3.0
Items on Layouts and Scene
Video Item represents video recorded by a camera that can be played back within DW Spectrum.
Items displayed on Scene offer total video manipulation, a variety of features, streaming data and other related
information.
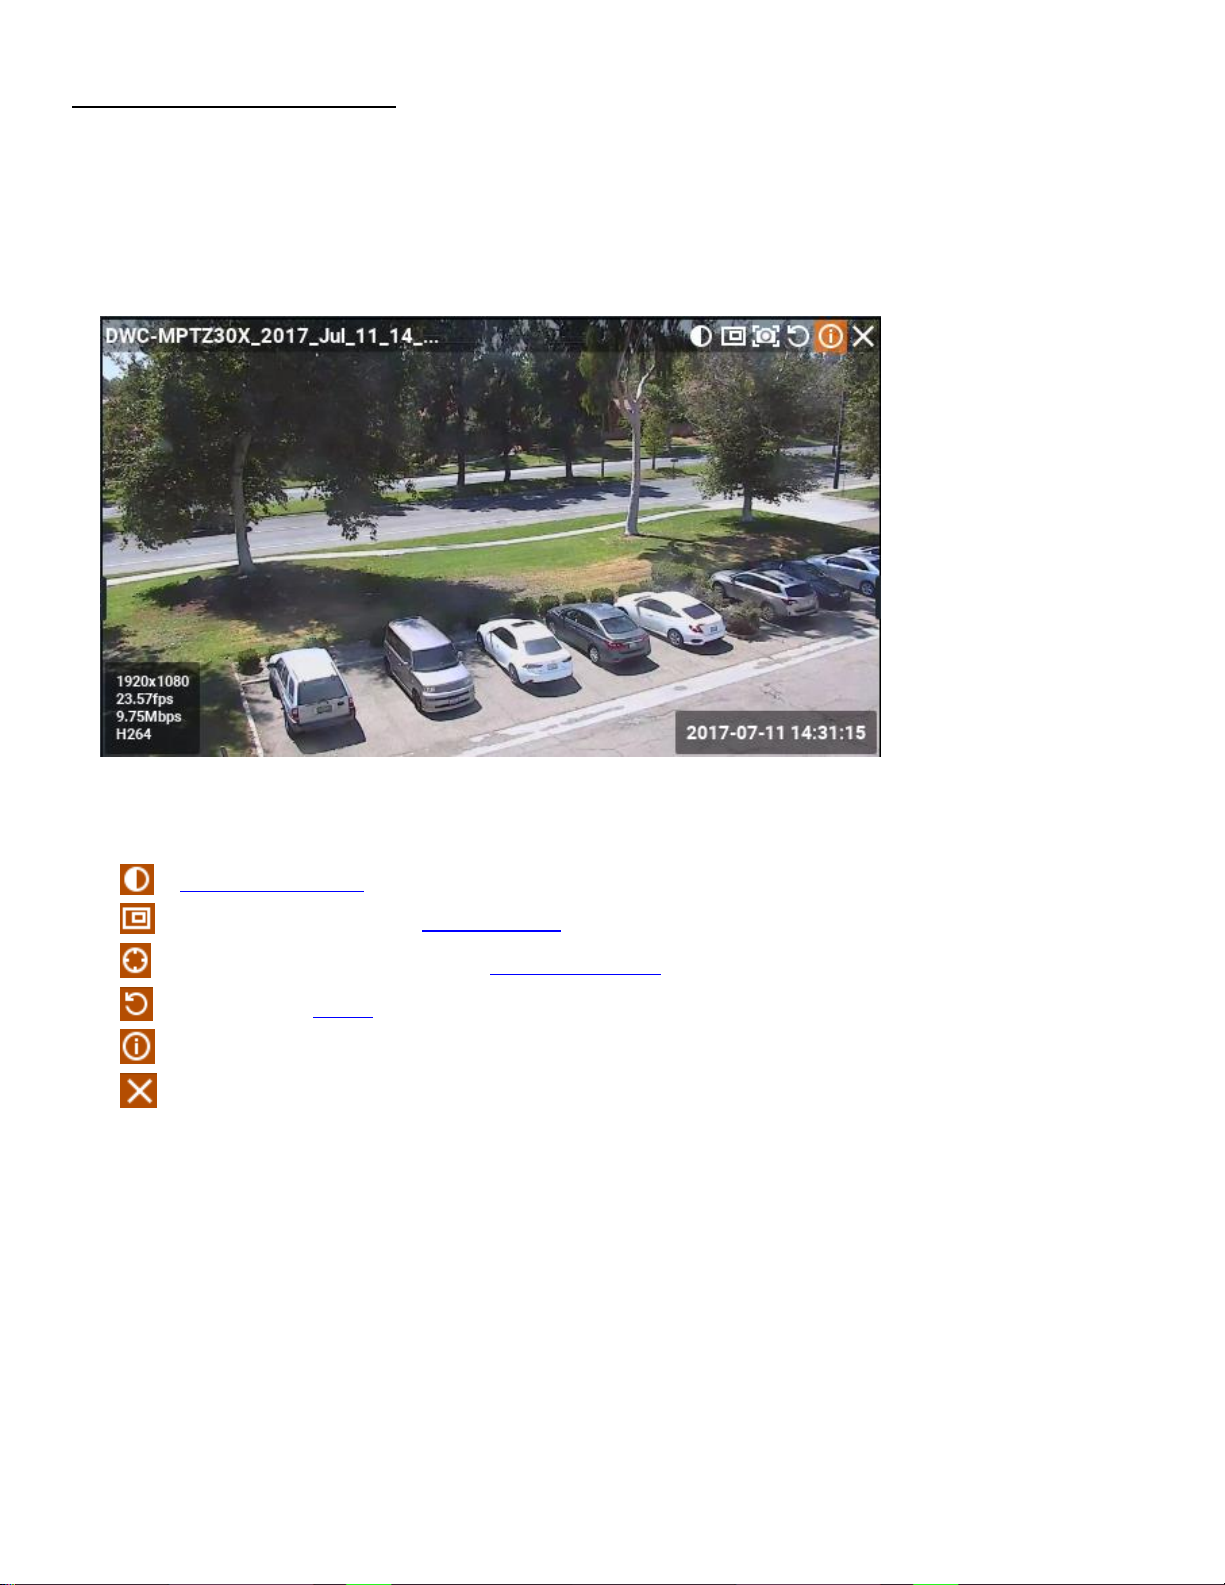
Local videos are displayed as follows:
The file name is displayed in the upper left corner of Local Video Item.
The following buttons are displayed in the upper right corner of Local Video Item:
– Image Enhancement
– create Zoom Window (see Zoom Windows)
– take screenshot fron the item (see Taking Screenshots)
– Rotation (see "Rotate")
– Information: displays additional information about the current stream (see below)
Streams from cameras are displayed as follows:
– Close (removes the item from the current layout).
Rev. 072017 Page | 19
Page 20
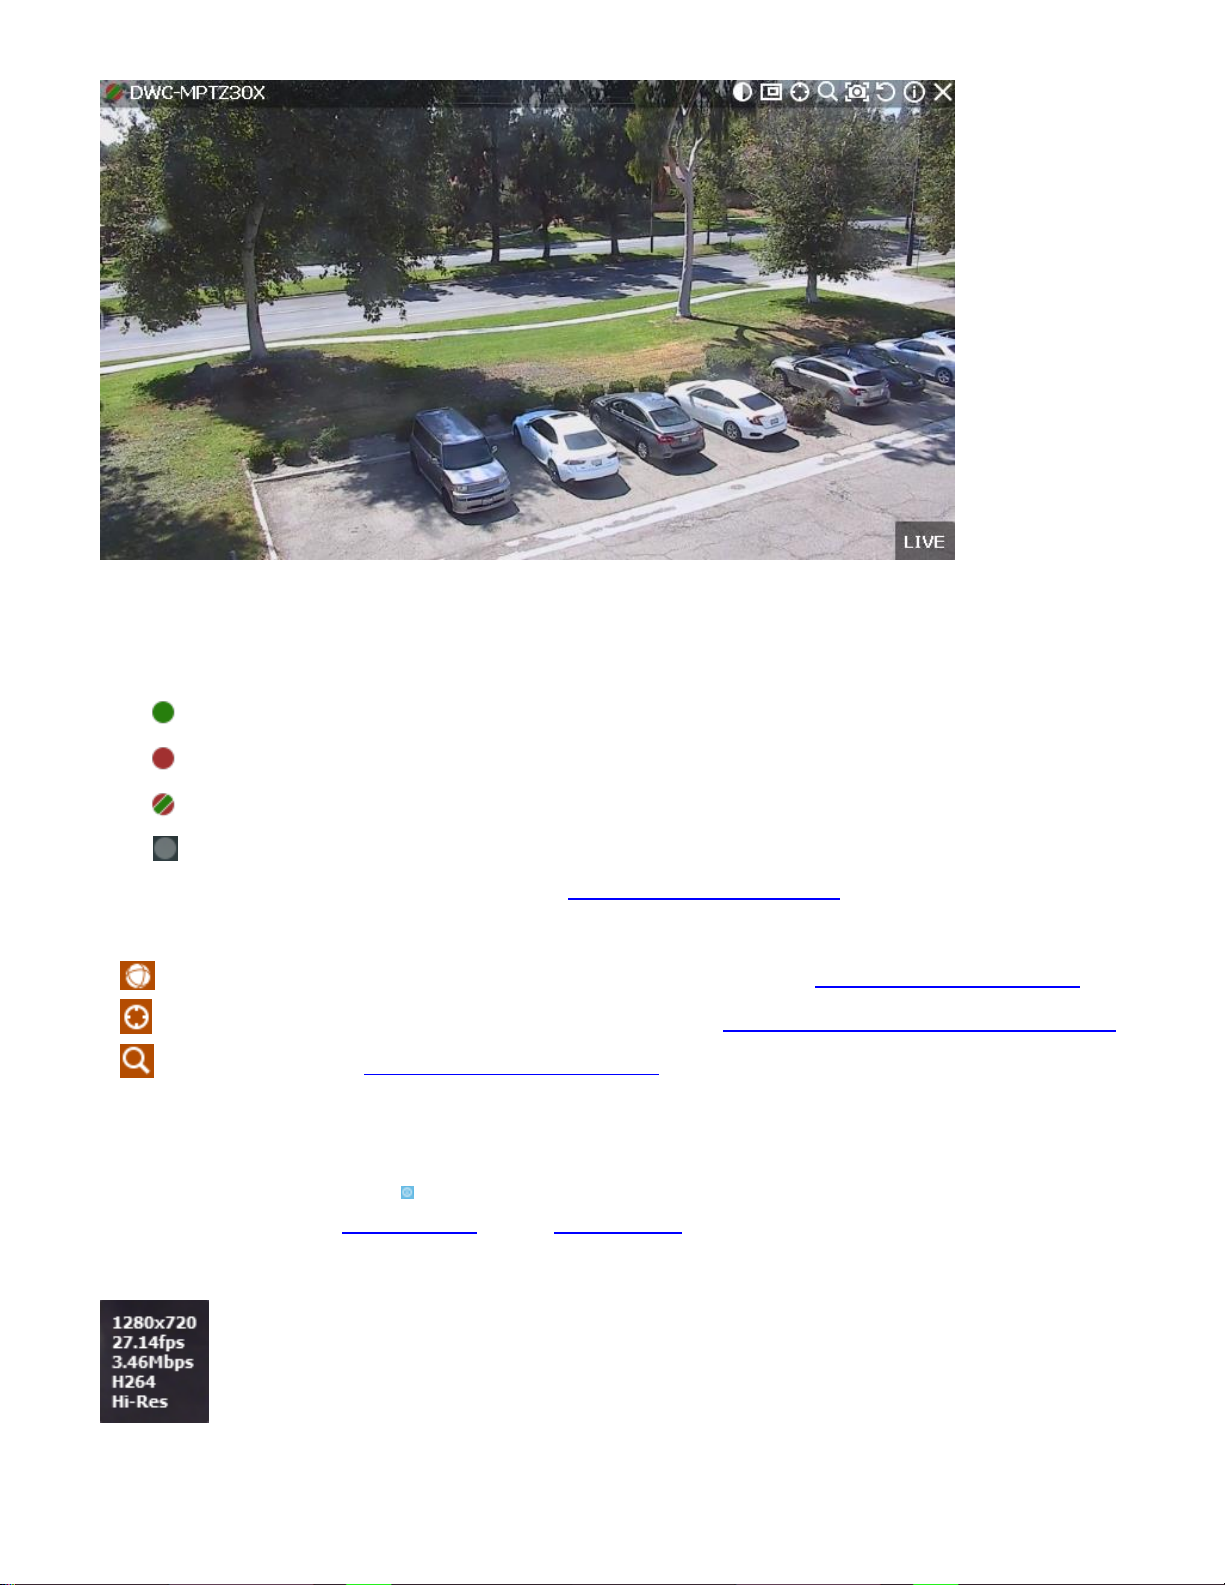
The following information is displayed in the upper left corner of the camera item:
DW Spectrum 3.0
Device Name
Current Recording Mode (Device may be recording differently depending on its schedule):
– Recording Always (green circle)
– Motion Recording (red circle)
– Low Resolution - always, High Resolution - only while in motion (red circle crossed green)
Not Recording (grey circle).
For more information on recording settings, see "Setting up Recording Schedule".
The following buttons are displayed in the upper right corner of Device in addition to those displayed for local video:
– applies de-warping (is displayed if this is a fish-eye lens camera) – see "De-warping Fish-Eye Cameras"
– PTZ , motorized zoom, auto focus(if camera supports) – see "Setting up PTZ on PTZ and Fish-Eye Cameras"
– Smart Search – see "Performing Smart Motion Search".
The following information can be useful during camera setup to help adjust to the desired FPS and bitrate. It may also
be useful for monitoring local files.
To view item information, click on located in the top right corner of the item. To view information on multiple items
at a time, select Items (see "Selecting Items"), open Context Menu and choose Show Info (Alt+i).
The following data will appear on the bottom:
Current Resolution of the stream
Rev. 072017 Page | 20
Page 21

DW Spectrum 3.0
Current FPS of the stream
Current Bitrate
Current stream Codec (H264 or MJPEG)
Current Resolution (if Dual-Streaming is enabled for the camera): Hi-Res or Lo-Res
Current Time of video playback or LIVE if viewing live from a camera
Additionally, the following messages may appear for camera items:
NO SIGNAL – no connectivity with camera. It is possible to diagnose camera or network in this case (see
"Diagnosing Offline Devices").
NO DATA – no recorded data. No data available.
Loading... – awaiting data from Server
Unauthorized – incorrect or missing credential for the camera
On the right-hand side the following information and controls are displayed:
Current playback mode:
LIVE – if watching a camera in live mode
Date/Time – if watching archive or local file.
– 2-way audio button. Displayed if watching an Axis device with firmware 5.x or higher. See "Using 2-Way
Audio"
Working with Resource Tree and Renaming Resources
Resource Tree is a convenient tool to display, search and manage available resources within the application. The
format of Resource Tree depends on the current user's permission level.
It is displayed on the left Panel. It can be resized by dragging the right edge to the left or right.
Depending on a user level (see "Introducing User Roles") it may contain different elements. For Administrators,
Resource Tree is displayed as follows:
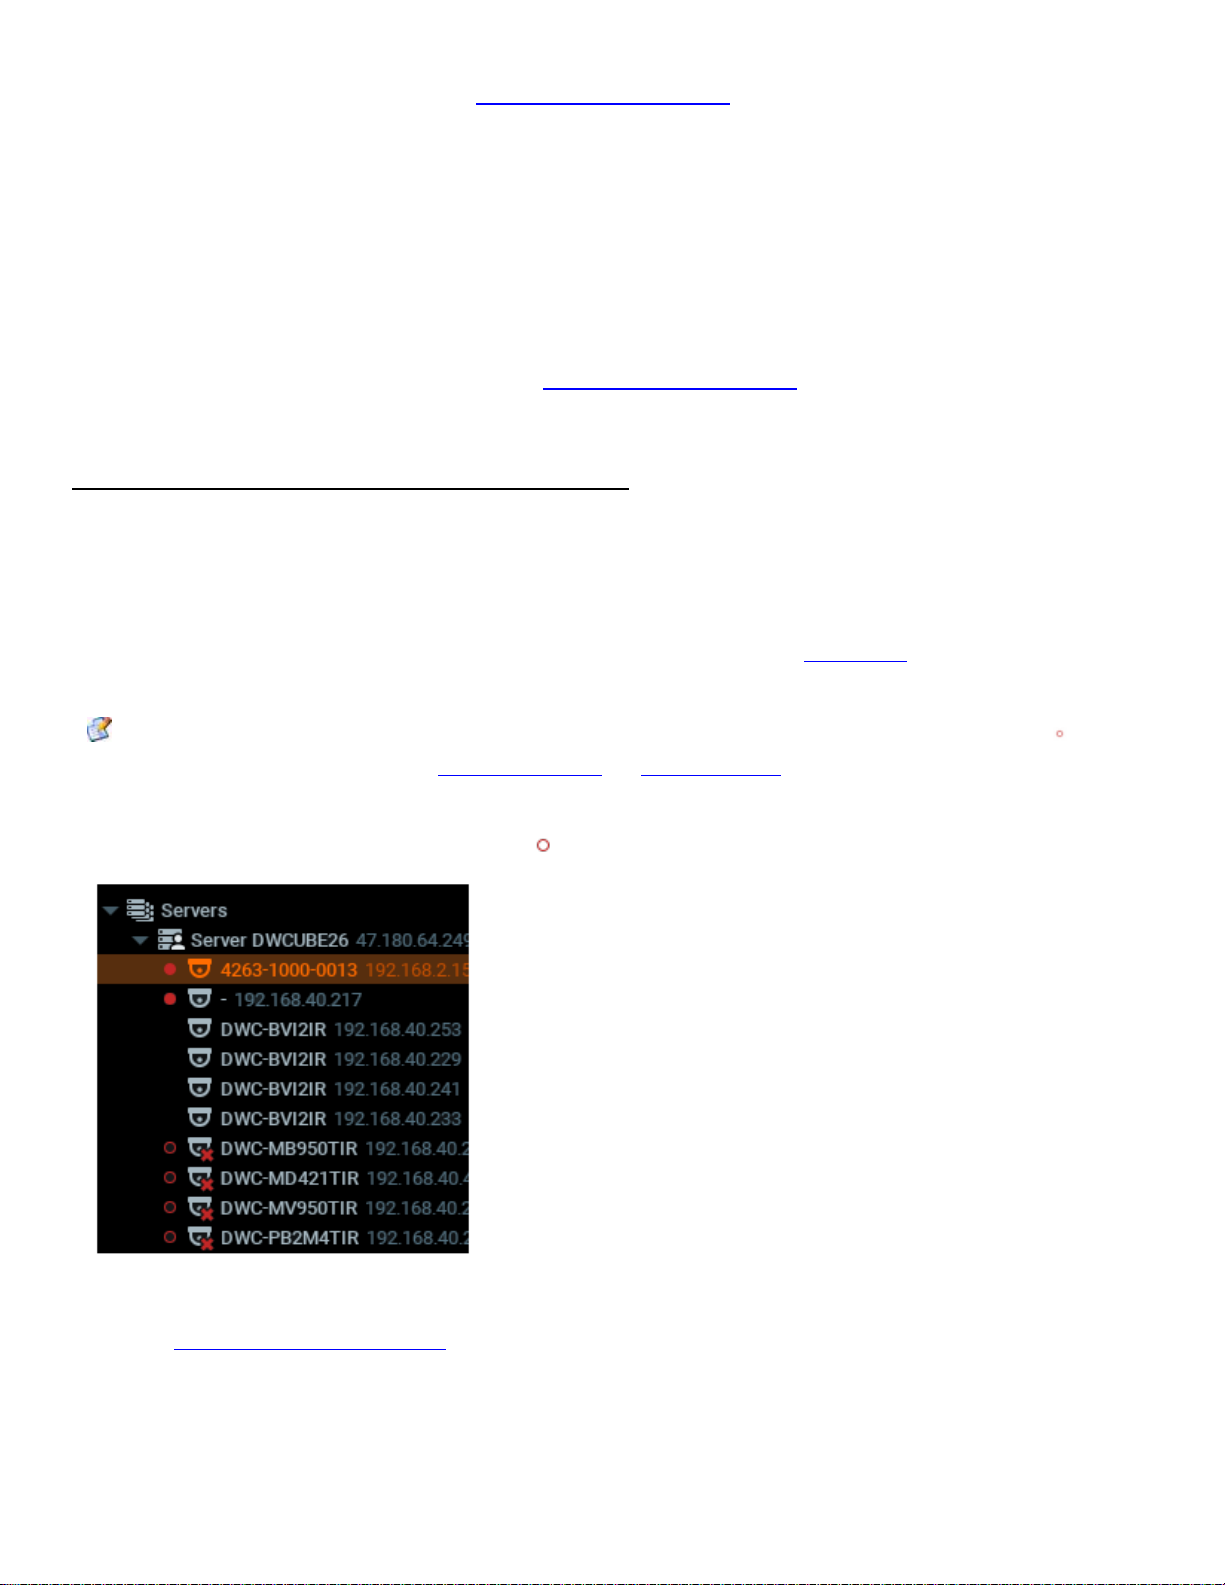
– Servers (admin only) – a list of servers registered in the system. Server IP addresses are also displayed (if the
corresponding setting is enabled).
Note: Server can have several network interfaces, so different IP addresses may be displayed.
Servers can have additional statuses:
– indicates Server the client is connected to.
– Server is offline for various reasons.
– Server is incompatible. This means the system is not fully updated and update is recommended. See
"Upgrading DW Spectrum".
– unauthorized Server. This means the password for user "admin" does not coincide with other servers so
this server is not able connect to this system.
Rev. 072017 Page | 21
Page 22

DW Spectrum 3.0
and – Cameras and I/O Modules (Devices). Displayed under Servers (admin only) and Layouts. If Device
appears on more than one saved layout, the device will be listed multiple times in Resource Tree.
Devices can have additional statuses:
or – Device is offline for various reasons (see "Diagnosing Offline Devices").
or – unauthorized Device (see "Configuring Device's Authentication").
The following indicators are displayed on the left:
– Device is in recording mode
– recording is set up for Device, but not recording at the moment.
Additionally Devices' IP addresses are displayed (if the setting is enabled, see below).
If Device is experiencing network issues over the past minute, "!" is displayed on the right. See "Device
Disconnection/Malfunction" for details.
When hovering over Camera with a mouse cursor, a thumbnail of a frame taken from the Camera will appear.
– Recorders (admin only). Displayed under Servers and contain several channels (represented as Cameras).
– Video Walls (admin only). See "Video Wall Management" for details.
– Layouts. Contains resources (devices and local files). Owned by users and displayed under each user. Locked
layouts are dilspayed like this: (see "Locking Layouts").
– Web Pages. See "Locking Layouts".
– Users (Administrator can view several users in Resource Tree).
– Other Systems – Servers in local network that belong to different systems. See "Configuring Multi-Server
Environment (Admin Only)".
– Local Files. Contains the following:
Local Video files
Exported Video Files (see “Exporting”)
Exported Multi-Video Files and their contents: Cameras, or Local Files (see “Exporting the Layout in Multi-Video
Format"
Screen Recordings (see “Screen Recording”)
Images
Screenshots (see “Taking a Screenshot”).
Items that are currently placed on Scene are highlighted in bold in Resource Tree. A selected (focused) Item it has
the“>” mark in both Server and Layout sections.
To enable/disable displaying IP addresses in Resource Tree:
1. Open Main Menu and go to Local Settings
2. Select/clear the flag in Show IP in Tree option (Look and Feel section).
Viewer's Resource Tree contains only Layouts, Devices and Local Files.
If Client is not connected to Server, only Local Files and Other Systems are visible.
The following actions can be performed in Resource Tree:
Rev. 072017 Page | 22
Page 23

DW Spectrum 3.0
Expanding/collapsing a tree node (+/- on keypad)
Scrolling (if the tree contains multiple elements)
Multi-Selection. Shift to select multiple items and hold Ctrl to select/deselect items individually.
Drag and drop. An efficient way to organize and configure resources in the tree. The following chapters will further
explain the drag and drop capabilities.
Search.
Almost any resource (except Local Files) can be renamed by Administrator in Resource Tree. To rename a resource,
simply select it and:
Left-Click on it again (like Windows Explorer).
Right-Click for Context Menu and choose Rename (or press F2).
Search
DW Spectrum provides fast, powerful and flexible search engine that enables users to quickly locate the desired items
on demand. To perform search, click on the Search tab in Resource Tree next to Resources.
IMPORTANT: Search results will appear on Scene immediately. If the search comes back with a high number of
found items, only the first 24 will be displayed for x86 architecture and 64 results - for x64 architecture. Search results
are automatically added to the current scene.
Type any three consecutive characters from a resource name, MAC or IP into the box to activate search. Search results
are displayed as follows:
To refine search, use the following tips:
Specify the resource type: Any Type, Video Files, Image Files or Live Cameras.
Use special symbols to combine several search criteria:
“+” – to add a new criteria to the search. Example, “out” + “100” will pull in all files containing “out” or “100”
in file description.
“\” – to avoid files containing certain characters. Example, “out \hdtv” will pull in all files containing “out”, but
no “hdtv”.
For instance, search string "254 + 00-" shows the following results:
Cameras, recorders and local files that contain "00-" or "254",
Cameras and recorders that contain "00-" in their MAC Addresses,
Cameras and recorders that contain "254" in their IP Addresses.
All results will disappear from the scene once all characters are removed from the search box.
Note: It is not possible to rename resources in the Search tab.
Rev. 072017 Page | 23
Page 24
DW Spectrum 3.0
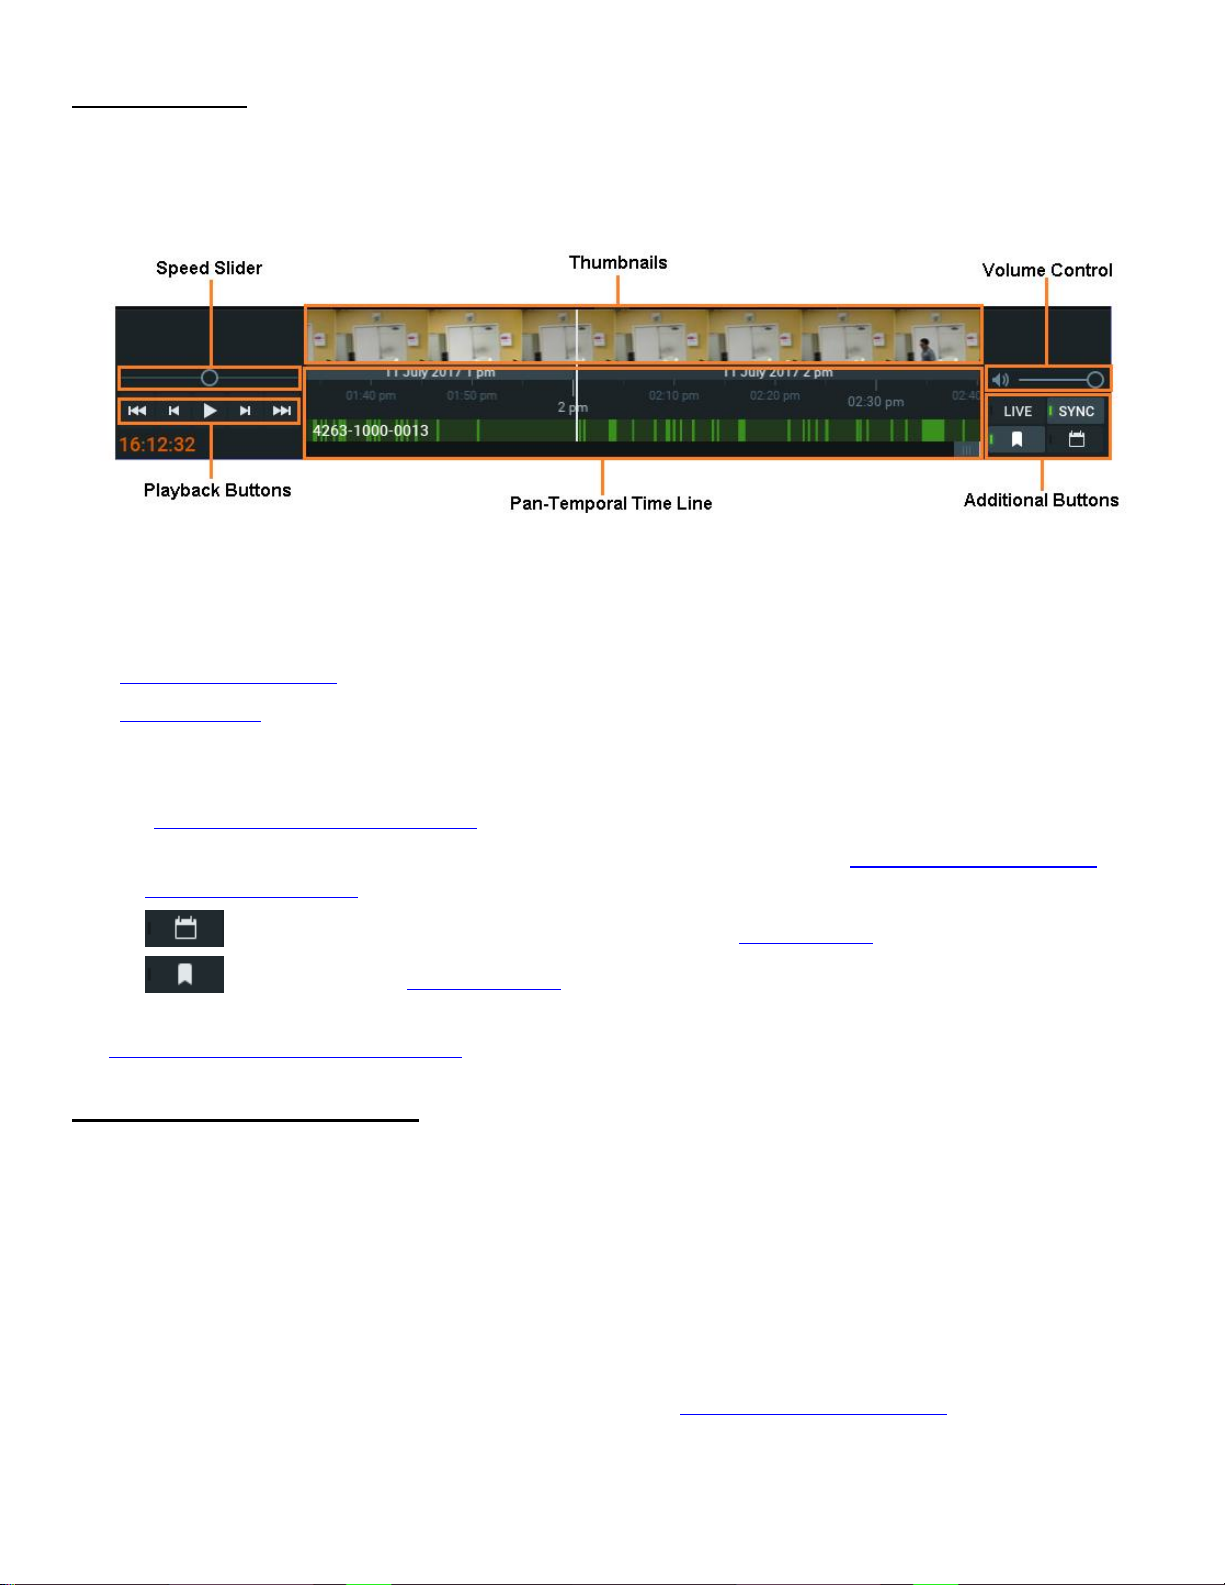
Playback Panel
DW Spectrum provides powerful and intuitive playback system. It includes seamless transition from live to archived
footage, smooth archive playback, extensive search capabilities, local files playback, etc. All playback operations can be
performed within the Playback Panel:
The following elements are displayed:
Playback Buttons – used for playing back selected Item(s)
Speed Slider – controls the playback speed of selected Item(s)
Pan-Temporal Time Line – represents the archived data for selected Item(s)
Volume Control – used to adjust volume for the selected Item
Additional Buttons:
LIVE – switches selected camera(s) to a live playback mode or indicates that they are playing live. See
"Navigating through Archive and Live"
SYNC – performs time synchronization of all cameras displayed on Scene. See "Navigating through Several
Cameras Synchronously"
– opens calendar to help navigate through archive (see "Using Calendar")
– Bookmarks. See "Using Bookmarks".
Time Line can be expanded by dragging upper edge and will show small previews called Thumbnails if expanded. See
"Using Thumbnails for Better Navigation".
Full Screen and Window Mode
DW Spectrum is recommended to be operated in full screen. To toggle full screen or bring the application to a window
mode:
Fullscreen button on top
Double-click on Tab Navigator
Alt + Enter
F11 (all side panels will be hidden).
Moreover it is possible to expand a single item on fullscreen. See "Expanding Items to Fullscreen".
Rev. 072017 Page | 24
Page 25

DW Spectrum 3.0
Getting Context Help
DW Spectrum provides intuitive context help system on each interface element.
To invoke help:
1. Press "?" button on Tab Navigator.
2. Left-Click on the desired interface elements.
Context Help contains links to other topics that can be useful as well.
Customizing Look and Feel of DW Spectrum
DW Spectrum provides a number of ways to customize user interface. To start, open Main Menu, choose Local
Settings, then switch to Look and Feel...
The following settings can be changed:
Language – interface localization
Time mode – display time when viewing recorded footage (Server Time or Local Time). It affects Timeline and
timestamps in Event Logs, Audit Trail and Bookmarks
Show additional info in tree – display IP device and recorder addresses in Resource Tree
Tour cycle – time between cycling items in Tour Mode (see "Tours")
Background Image. Click Browse... to select a graphic file and set Mode (Stretch, Fit or Crop) and Intensity
(transparency).
Click OK when done or Cancel to discard changes. If the changes require restart, the corresponding warning will be
displayed.
Run DW Spectrum when computer boots up
It is possible to automatically launch DW Spectrum if a computer boots up. To do so, open Main Menu, choose Local
Settings (General tab), and set the "Run Application when PC Boots".
DW Spectrum Quick Start
This section provides recommendations on system settings for DW Spectrum to be configured properly.
Once the system is installed, it is necessary to perform a few steps to get it ready to work.
First, new System will be displayed as follows:
Rev. 072017 Page | 25
Page 26

DW Spectrum 3.0
It is possible to connect to it without login credentials. Then the setup wizard will open up:
Setup New System – specify System Name, owner password. The following advanced settings are available:
device setting optimization (see "Preventing DW Spectrum from Changing Camera Streaming Settings (Admin
Only)")
device auto discovery (see "Automatic Device Discovery")
sending usage statistics and crash reports.
Add to Existing System – if System contains multiple Servers (see "Configuring Multi-Server Environment"). Specify:
system URL (it can be auto-discovered). If not, URL looks like Error! Hyperlink reference not valid., where
<host> is the name or IP address of Server and <port> is the Server port (usually 7001)
Login and Password for this system.
If it is a new System, a sufficient number of Licenses should be obtained and activated (see “Obtaining and Activating
DW Spectrum Licenses (Admin Only)”).
No matter is it a new System or Server is connected to an existing-one, the following additional settings will be
required:
Storage on each Server should be configured (see “Configuring Server Storage/NAS”).
All Devices should be properly set up (see “Cameras, Encoders and I/O Modules Management”). Same with
Recording Settings (see “Setting up Recording Schedule (Admin Only)”).
Once completed, it becomes possible to create multiple Users, configure Layouts for them and more.
Connecting System to Cloud Account
DW Cloud allows users to have access to all their Systems from a single place. Once connected to DW Cloud, user gains
access to all Systems that are connected to Cloud Account. Learn more in "Connecting to System and Working Offline".
The following operations are possible:
Connect to any System without entering login credentials
Invite Users to Cloud Account
Share Systems with Users and granting custom privileges.
Rev. 072017 Page | 26
Page 27
DW Spectrum 3.0
To connect System to Cloud Account, open System-Wide Configurations and go to the Users tab.
Create Account – opens up Cloud Portal and redirects to registration form
Connect System to Cloud Account... – opens up the authentication form. Enter Cloud Account login and password
to bind System to Cloud account.
Once connected, System will be displayed in Cloud Portal and will be accessible without credentials. Sharing can be
done within the cloud portal.
Note that each Cloud System is still accessible in a standard way (username and password).
To disconnect System from Cloud Account, open System-Wide Configurations and go to the Users tab, then click
Disconnect System from Cloud Account. Note that all users, System is shared with, will lose their access.
Obtaining and Activating DW Spectrum Licenses
DW Spectrum’s license policy is quite simple. Each Device requires License. The application has no device count
restrictions.
The License allows viewing and recording of a single Device. Cameras can be viewed live without Licenses allowing for
an unlimited number of Cameras to be connected and viewed live at no charge. I/O Module requires the specific
License.
Note: If recording is enabled for Device License is considered used even if recording is not performed ( icon in
Tree). Recording is required to capture Motion Detection and Input Detection events on Device.
For instance, the following screenshot illustrates the situation that Cameras are offline and not recording. However
recording is enabled on four Cameras (marked by ):
In this case 4 Licenses are being used.
See also "Setting up Recording Schedule".
Additionally there are Video Wall Licenses. Each one allows controlling video wall from a single computer (one
session) or extend Video Wall on 2 displays. For instance 4 licenses allow user to display Video Wall on 8 monitors and
control it from 4 clients concurrently.
Rev. 072017 Page | 27
Page 28
DW Spectrum 3.0
DW Spectrum comes with four Trial Licenses automatically (do not allow Video Wall feature). Trial Licenses are active
30 days only.
IMPORTANT: In Multi Server System Licenses are activated on a certain Server (the one Client is currently
connected to - icon). If this server is offline, those licenses will be invalidated until the server is back online. If
licenses are activated on different servers, they will be combined if those servers are merged into a single system.
To activate Trial Licenses:
1. Open Main Menu –> System Administration (CTRL+ALT+A).
2. Go to Licenses tab.
3. Click Activate Trial License.
If Trial License is about to expire, the corresponding warning will appear.
To get additional Licenses, contact Digital Watchdog at Sales Department.
To activate License Key over the Internet:
1. Note Server the client is connected to (License Key will be bound to it). See the icon in Resource Tree. If it is
necessary to activate License Key on a different Server, disconnect and connect to a desired one.
2. Select the Licenses tab in System Administration.
3. Automatic activation via Internet must be selected.
4. Enter License Key and click Activate License.
If DW Spectrum is not connected to the Internet, then licenses can be activated offline.
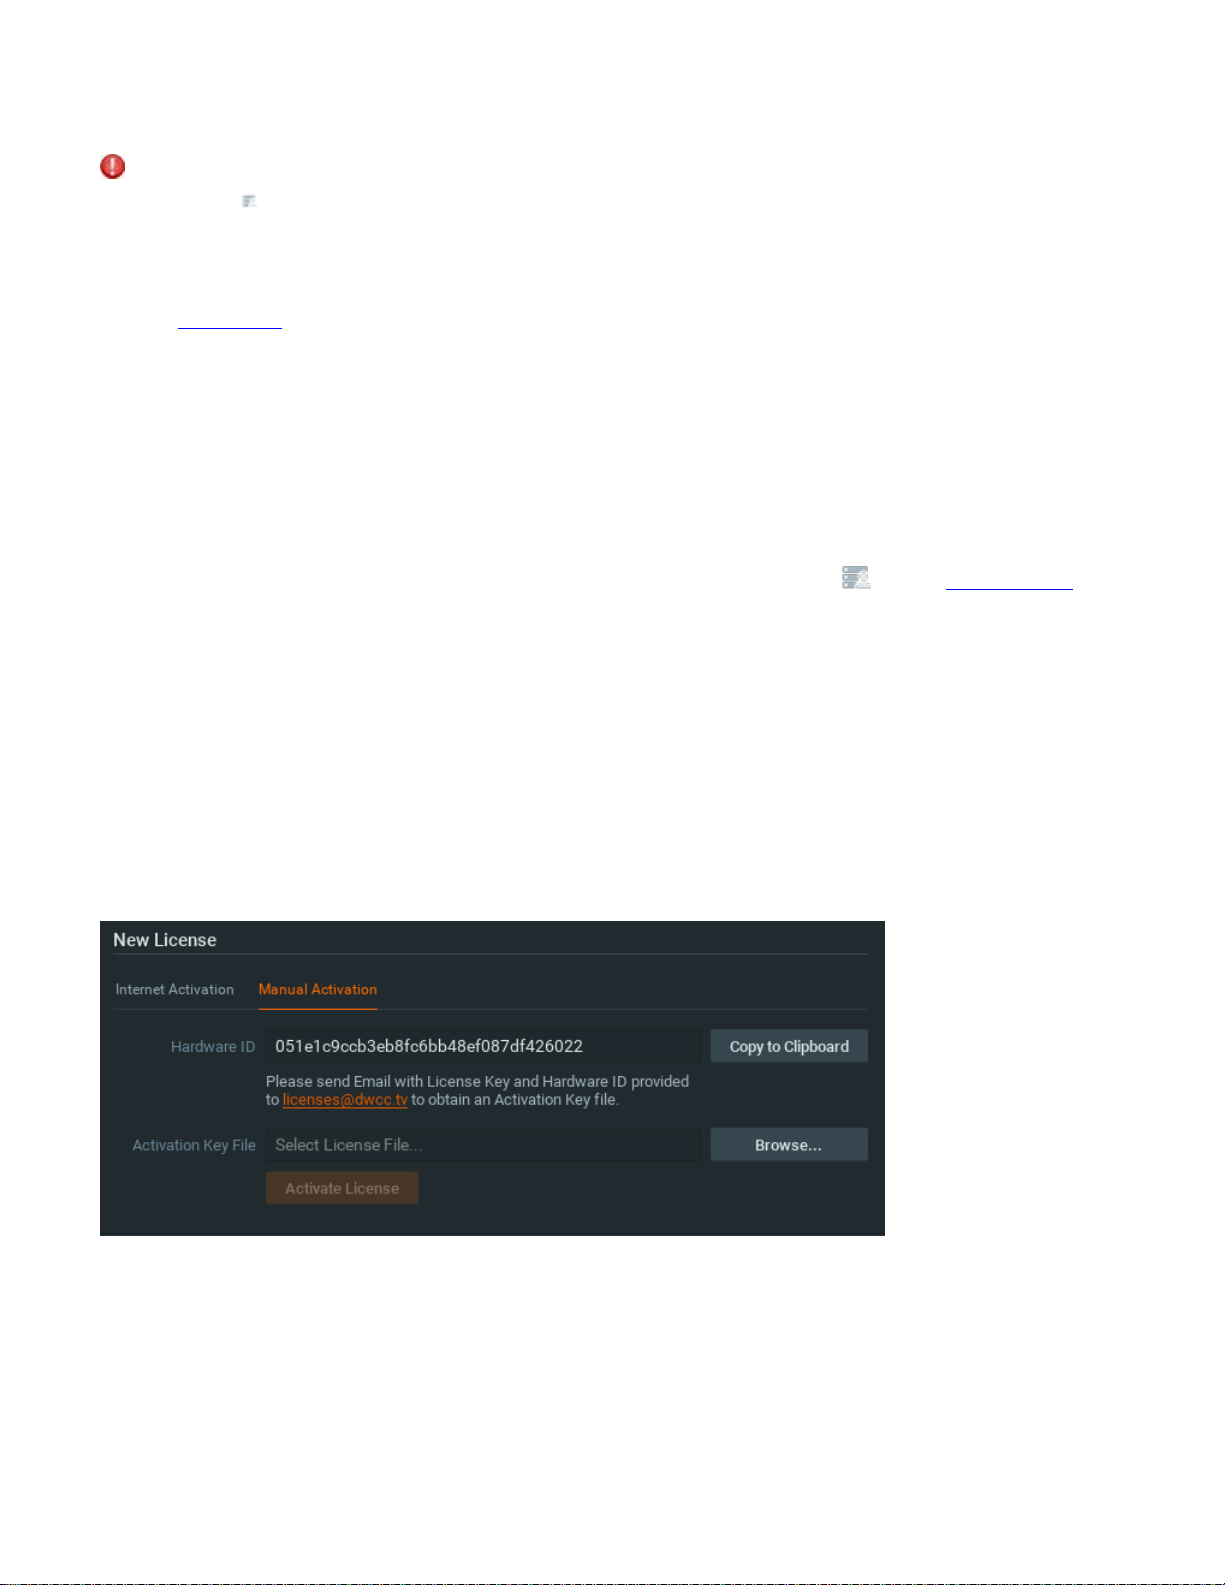
To activate License (trial or commercial) offline:
1. Go to Licenses tab in System Administration.
2. Click Manual Activation.
3. Copy Hardware ID and email to license @dwcc.tv
License Key: enter License key received from reseller.
Hardware ID: click Copy to Clipboard next to the Hardware ID and paste.
An activation Key File will be provided.
4. As soon as the activation key is received, save it as a text file (i.e. key.txt), move to the target computer,
browse the file and click OK.
Rev. 072017 Page | 28
Page 29

DW Spectrum 3.0
5. Click Activate License
It is also possible to delete an expired or invalid License Key. To do so:
1. Go to Licenses tab in System Administration.
2. Select the desired licenses (should be marked in red) and click Remove (or press DEL).
Finally, it is possible to export the list of licenses in a file. It may be necessary, for instance, if re-activation is needed.
To do so, click on Export and select the target file. Currently, CSV and HTML formats are supported.
Note: database backup contains information about licenses, so they may be backed up and restored as well. See
"Backing up and Restoring DW Spectrum Database" for details.
System-Wide Configurations
All system related settings are combined in the single dialog. That makes system administration much more simple.
This dialog can be opened by clicking on Main Menu –> System Administration (CTRL+ALT+A).
The dialog contains the following sections (tabs):
General:
Alarm/Event Rules – invokes the dialog when Event/Actions can be configured
Event Log – opens up the list of events that occurred (Viewing Events Log)
Device List – opens up the list of devices in the system
Audit Trail – opens up the list of users' actions. Can be enabled and disabled
Health Monitoring – opens Layout and shows health information for all servers.
Bookmarks – invokes Bookmark Search (the list of all Bookmarks)
Other system settings – ability to Disable Automatic Discovery and Preventing DW Spectrum from Changing
Camera Streaming Settings etc.
Backing up and Restoring DW Spectrum Database
Licenses – see "Obtaining and Activating DW Spectrum Licenses"
E-Mail – ability to Configure Mail Server for E-Mail Notifications
Updates – see "Upgrading DW Spectrum"
User and Roles Management Form
Routing Management
Time Synchronization
DW Cloud.
Obtaining and Configuring Server’s Additional Settings (Admin Only)
In addition to the basic Server settings that are setup initial configuration, Administrators can also do the following:
Server Status Check (Ping). If Server is not responding for some reason this can help to check availability of the
computer Server is hosted on
Rev. 072017 Page | 29
Page 30

DW Spectrum 3.0
Rename
Failover Setup (see "Configuring Failover")
Storage Configuration
To configure Server parameters, open the desired Server in Resource Tree, then open Context Menu and choose
Server Settings.
The following Server parameters can be checked and configured:
Name – can be changed here or in Resource Tree
IP Address – cannot be changed. Displayed in Resource Tree as well if the corresponding setting is enabled (see
"Working with Resource Tree and Renaming Resources")
Port – can be changed from web-client
Ping – check availability of the computer Server is hosted on
Failover (see "Configuring Failover")
Storage Management – see "Configuring Server Storage/NAS"
Backup (Redundancy) – see "Configuring Redundant Storage (Storage Backup)"
Rebuild Archive Index – restore recorded footage if moved. See "Restoring Broken Archive"
Storage Analytics – see "Analyzing and Anticipating Storage Usage".
Configuring Server Storage/NAS
DW Spectrum provides an easy and flexible storage management policy. Each Server can use an unlimited number of
local and network storage paths. If more than one storage location is used the Media Server will automatically balance
the space consumption. The more free space the storage has, the higher the usage intensity will be.
Storage is considered to be a separate hard disk partition. If a partition has more than 100 Gb of free space, DW
Spectrum uses it automatically.
Additionally it is possible to add network storage locations (NAS).
To configure Server Storage:
1. Open the Server Settings.
2. Go to Storage Management tab:
Rev. 072017 Page | 30
Page 31

DW Spectrum 3.0
As displayed above, the computer has 3 partitions and only disks D and E are used for storage because disk C has
less than 100 Gb of free space. Disk D is configured as Backup Storage (see "Configuring Redundant Storage
(Storage Backup)").
3. To select Storage to be used click the switch
4. To add NAS/External Storage, click Add and enter the storage path (URL), Login and Password, for instance:
IMPORTANT. Make sure NAS is available and accessible through network from the computer Server is installed
on.
5. Click OK. At this point, all Storage will be checked for validity and confirm ability to write to that storage location. If
the drive has insufficient space, a warning will appear.
Due to different bitrate streams from Cameras may occupy different amount of space in Storage. DW Spectrum uses
special algorithm to keep the same amount of time stored for different Cameras. However a user can set minimum or
maximum amount of data that can be stored for specific camera(s). See "Configuring Maximum and Minimum
Recording Time for Camera".
To configure redundant storage see "Configuring Redundant Storage (Storage Backup)".
To view detailed storage statistics see "Analyzing and Predicting Storage Usage".
The Storage structure on the partition is as follows:
<drive>/DW Spectrum Media/[Resolution]/[MAC or UUID]/[YYYY]/[MM]/[DD]/[HH]:
Rev. 072017 Page | 31
Page 32

DW Spectrum 3.0
Resolution:
hi_quality – full resolution streams
lo_quality – low resolution streams
MAC or UUID– MAC address of the recorded device
YYYY – Recorded Year
MM – Recorded Month
DD – Day
HH – Hour
IMPORTANT. 10-30 GB of free space is always preserved on Storage. For NAS storages this amount vary between
50 and 100 Gb (depending on the storage size). If only one system partition (where OS is installed) is present, then DW
Spectrum will use this partition for recording. If any other disk is added and an extended partition is created, then the
system partition will be disabled for recording and DW Spectrum will record data to the extended partition(s).
Configuring Redundant Storage (Storage Backup)
DW Spectrum provides the ability to make the storage redundant. That means, even if the server the recording is
performed on, goes offline, the archive will still be available. This is especially useful in multi-server environments.
The following scenarios are most commonly used:
Servers record and back up the archive to a NAS device.
Servers back up to each other.
The following options are available:
Backing up footage from specific Cameras
Backing up specific streams (Hi-res or Low-res) if necessary
Different backup modes.
To set up storage as a backup one click Use as backup storage. If at lease one storage is set for backup, the additional
settings will be available. To return storage in a regular mode click Use as main storage.
IMPORTANT. It is necessary to have at least one active main storage.
Servers record and back up the archive to a NAS device.
To setup such scenario:
1. Make sure NAS is available and accessible through network from the computer Server is installed on.
2. Add NAS to Server (see "Configuring Server Storage/NAS").
3. Click Use as backup storage.
4. Setup backup parameters (described below).
5. Repeat the above steps on remaining servers.
Servers back up to each other.
To setup such scenario:
1. Make sure each server is available and accessible through network.
Rev. 072017 Page | 32
Page 33

DW Spectrum 3.0
2. Create a shared folder on each Server and make sure \\server\share is accessible through the network.
3. Go to Server Settings and add all shared folders as NAS devices (see "Configuring Server Storage/NAS").
4. Click Use as backup storage on each one added.
5. Setup backup parameters (described below).
6. Repeat the above steps on all servers.
Therefore, each server will be backing up the footage to all other servers in the system. This will reduce the overall
amount of stored footage but increase redundancy.
The backup options are active if at least one storage is used as backup:
Backup Archive From – select Cameras to backup footage from. By default all devices are being backed up.
Backup Quality – select specific streams (Hi-res or Low-res) if bandwidth saving is necessary
Server Backup Settings provides several different backup modes:
Real-Time – backup will be performed immediately: the footage will be written to the main and backup
immediately and simultaneously. If there is insufficient bandwidth to write to a network location, user will see the
corresponding warning. Previous data is not backed up in this case.
By Schedule – backup will be performed on specific days of week and specific hours. Only previous data is backed
up in this case. Note that the footage will be backed up since the last time backup finished (or since the very
beginning if this is the first time backup occurs). If the network bandwidth is insufficient, the backup may not be
fully completed within the time frame given. For instance, if backup is performed once a week for 1 hour and tries
to back up footage from 100 cameras, it will be able to backup only several hours. The date and time of the footage
that is backed up will be clearly indicated on the bottom part (Archive backup complete until...).
On Demand – backup occurs only if User presses Start Backup Now and continues until completion (that means all
previous data is backed up) or until it's canceled. Only previous data is backed up in this case.
When archive Backup is finished, the corresponding Event is triggered. See "Archive Backup Finished".
Rev. 072017 Page | 33
Page 34

DW Spectrum 3.0
Analyzing and Anticipating Storage Usage
DW Spectrum provides a way to estimate and predict storage usage. This feature allows users to plan their systems
and store recorded data more accurately.
This data is displayed per Server and broken down by individual camera.
Some common ways this information can be used:
Identify camera(s) that stream at extremely high bitrates
Estimate amount of time that Server can store recording (Days and Hours)
Understand the storage space that each camera consumes
Predict the amount of time that Server can store recording if add X terabytes.
To access Storage Statistics for a Server:
1. Open the Server Settings.
2. Click on Storage Analytics:
Camera – Camera Name
Space – the amount of storage consumed by recordings from this Camera
Calendar Days – the amount of recorded data that is available for this Camera. DW Spectrum uses special
algorithm to keep the same amount of time stored for different Cameras. However a user can set minimum or
maximum storage duration in days for individual cameras. See "Configuring Maximum and Minimum Recording
Time for Camera".
Bitrate for the Last Recorded – the average bitrate of the camera. It is possible to specify the amount of time the
average bitrate is calculated for, by specifying it in the upper-right dropdown list (i.e last 5 minutes or last day).
Rev. 072017 Page | 34
Page 35

DW Spectrum 3.0
To anticipate the storage capacity it is necessary to check the Forecast for full storage(s) usage box and select the
amount of storage to be added (in the screenshot above 37.9 Gb is considered to be added). The software will display
the amount of time Camera(s) will be recorded with the added capacity (notice Calendar Days and Space).
The data might have been changed since the form is opened. To update it click Refresh.
Deleting Server
In some instances, it may be necessary to delete Server from the system.
Note: Server can only be deleted when offline.
To delete Server , locate it in Resource Tree, Right-Click for Context Menu and select Delete.
IMPORTANT. All devices that are hosted on this specific server will be deleted as well. Recorded data will be kept in
server’s Storage.
Server will automatically discover all Devices and start operating once it is back online. The deleted camera's archive
will remain available. It will be required to perform all storage settings and configure all discovered Devices again.
Monitoring Servers
DW Spectrum enables users to perform health monitoring of Servers in the real-time mode. To proceed, perform one
of the following:
Drag Server from Resource Tree to Scene
Open Server 's Context Menu and choose Monitor (Monitor in a New Tab or Window).
The information is displayed as follows:
Uptime (the time since the server is started)
CPU Load
Memory Usage (RAM)
Rev. 072017 Page | 35
Page 36

DW Spectrum 3.0
Hard disk partitions usage (C: and D: in this case)
Network Interfaces Usage
To enable/disable graphs check/uncheck them. If hover with a mouse cursor on a check, the corresponding graph will
be clearly visible, the rest-ones will be faded.
User can perform standard manipulations with Monitoring Item: move, resize, swap, duplicate etc (see "Items on
Layouts").
To stop monitoring, remove the corresponding item from Scene.
Multiple Server s can be monitored simultaneously.
Additionally it is possible to monitor all Servers on a single Layout. To do so open Main Menu, choose System
Administration (CTRL+ALT+A), then click Health Monitoring.
Using Server's Web Interface
DW Spectrum provides simple and convenient way to control Servers remotely through Server's Web Interface.
To access it from a browser enter the following address: Error! Hyperlink reference not valid., then login and
password.
<ip> – IP address of Server (the current computer should be able to connect to this Server)
<port> – network port of Server (default 7001).
To access it from DW Spectrum Client:
1. Connect to a desired Server via Client.
2. Right-click on System, invoke Context Menu and choose Open Web Client.
Note: If System contains multiple Servers, Web Interface will control Server Client is connected to (note the icon
in Resource Tree).
Web Interface provides the following features:
Obtaining list of Servers in System and ability to connect to them (click corresponding links at the bottom of the
Settings page) – Adimin only
Merging/Splitting Systems (see "Configuring Multi-Server Environment") – Adimin only
Connecting/disconnecting System to/from Cloud (see Connecting System to Cloud Account) – Adimin only
Changing Server's Port – Adimin only
Restarting Server (Restart button on Settings) – Adimin only
Ability to control the compatible hardware: reboot and restore factory defaults – Adimin only
Gathering Server Information (Information tab): version, Storage, health monitoring, server logs
Web client
Developer Resources (Server API and Device Integration SDK)
A variety of useful links (Support, Mobile Apps). See the Help tab.
Rev. 072017 Page | 36
Page 37

DW Spectrum 3.0
Configuring Multi-Server Environment (Admin Only)
DW Spectrum is a very scalable solution and it allows many Servers to work together in a single System.
This section describes how to manage multi-server environment to maintain maximum system reliability and
performance:
Understanding Multi-Server Architecture and Basics
Joining and Splitting Servers
Configuring Failover
Configuring Routing within Multi-Server Environment
Configuring Time Synchronization within Multi-Server Environment.
Understanding Multi-Server Architecture and Basics
DW Spectrum implements the unique hive architecture that enables high redundancy and performance and provides
almost unlimited scalability. Servers can be located in a local network, behind NAT or even in different locations – they
will act as a single cluster allowing users to view cameras and control the whole system from a single workstation.
If several Servers are working together, they should somehow connect to each other. To do so servers have the unique
identifier – System Name, that allows server to group together. If Server discovers another Server with the identical
System Name in a local network, they merges automatically. If System names are different, Server will display other
one in Resource Tree under Other Systems.
If Servers are in different subnets, it is necessary to specify other Server's IP to make them merge in separate networks
(behind NAT or over the Internet).
When Servers are merged, they are constantly synchronizing all data between each other so it doesn't matter what
server Client is connected to. If a video is requested from a remote Server, the one Client is connected to will be
proxying the video traffic. Licenses are combined as well: if 4 licenses were activated on server 1 and 10 – on Server
2, System will have 14 Licenses total after the servers are merged.
Thus, the only thing Administrator should do to merge systems, is to assign the same system names to all Servers.
Opposite, to split Systems Administrator needs to assign different system names.
Joining and Splitting Servers
There is several ways to join and split servers:
Join Server from Different System to Current-One
Split Server to Different System
Merge all Servers to Another System.
Join Server from Different System to Current-One
This action can be useful if there is a single Server in a different System in local network. To join such server to the
current system it is possible to use DW Spectrum Client or Server's Web Interface.
Rev. 072017 Page | 37
Page 38

DW Spectrum 3.0
Client:
1. Expand Other Systems under Resource Tree and locate the desired System
2. Expand the desired System and locate Server to connect to the current System.
3. Open Context Menu and choose Merge to Currently Connected System...
4. Enter the admin password of the other System.
Web Interface:
1. Log in to web-interface of Server that should be connected to the current System
2. Change System Name to the desired value and click Save.
After some time the desired Server will be joined.
If it is necessary to connect several Servers in a different System to the current-one, this method may not be an option.
Also, this method won't work if the server that should be joined, is outside local network. Merge all Servers to Another
System should be used for these purposes.
IMPORTANT. Backup the database prior to merging the systems. Unmerging(splitting) from the system requires
the server to be reset to factory default.
Split Server to Different System
This action can be useful if it is necessary to isolate Server from current System. This is pretty rare operation.
Note: If Licenses have been previously activated on this server, they will be gone from the current System.
To split Server to another System use Server's Web Interface:
1. Log in to web-interface of Server that should be split off the current System
2. Click Restore factory defaults.
Merge all Servers to Another System
This operation can be useful if there is System A that contains several Servers and all of them should be joined to
another System B. Also this method should be used to join remote server(s) to a current System.
IMPORTANT. It is not possible to merge Cloud and non-Cloud systems.
To merge Systems:
1. Launch DW Spectrum Client and connect to any Server in system A.
2. Right-click on System, invoke Context Menu and choose Merge Systems.
Rev. 072017 Page | 38
Page 39

DW Spectrum 3.0
3. Enter Server URL (any server of System B or remote Server). To find Systems in local network use drop-down
menu. For Remote Server type Error! Hyperlink reference not valid.:
<ip> – IP address of Server (the current computer should be able to connect to this Server)
<port> – network port of Server (default 7001).
4. Enter Password to System B (or to remote Server) and click Find System.
5. Select the new System Name (System A or System B).
System A – System B will be merged to System A
System B – System A will be merged to System B
6. Click Merge with <System Name>.
Configuring Failover
DW Spectrum can automatically manage failover in multi-server environment. If Server goes down, all devices are
transferred to other Servers and Client is being reconnected to other Servers as well. The archive playback will remain
seamless, however this may be a 30 seconds gap in recording during the transfer.
Failover should be configured on backup servers. For instance if System contains Server A and Server B it should
configure Server A to take over Devices from Server B and vice versa.
IMPORTANT. To be able to do failover, both server should be able to access devices.
To configure Failover:
1. Find Server B in Resource Tree, open Context Menu and choose Server Settings.
2. Click Enable Failover.
3. Enter the number of Devices the server can handle.
4. Click OK. Now If Server A goes down, all devices will be transferred to Server B.
5. To make Server A handle the devices from Server B, make the same on Server A.
IMPORTANT. To be able to do failover, Server should be able to handle double amount of devices.
It is possible to set up Failover Priorities. This means if some cameras are more important, it can be failed over first.
There are the following priorities:
High – these cameras will be failed over at first.
Medium and Low – these cameras will be failed over only if there is a server to host them.
Never – these cameras won't be failed over.
1. To configure Failover Priorities find any Server in Resource Tree, open Context Menu and choose Server Settings.
2. Click Failover Priority. The list of Servers and Cameras will be displayed.
3. Select Cameras and click a button on the bottom to set the desired Priority.
4. Repeat this for all cameras that should be prioritized.
5. Click OK to apply changes.
Rev. 072017 Page | 39
Page 40

DW Spectrum 3.0
Configuring Routing within Multi-Server Environment
DW Spectrum provides built-in automatic routing mechanism that enables users to seamlessly work with the large
sites as a single cluster. However there may be custom network configurations that may require custom routing
settings. For instance, Servers may have several IP addresses (Public and Private) and it may be necessary to allow or
restrict traffic flow for some of them.
Initially DW Spectrum tries to discover all available IP addresses of servers (including Public ones). However it is not
possible in some network environments.
To setup routing open Main Menu –> System Administration (CTRL+ALT+A) and go to Routing Management tab.
On the left all Servers are displayed. If click on Server all available interfaces are displayed in the right hand side.
To add an address manually click "+" and add URL like Error! Hyperlink reference not valid.:
<ip> – the desired IP address of Server (i.e. Public IP)
<port> – network port Server is listening on (default 7001).
To allow/deny traffic to go through the specific network interface click In Use to set/release checkbox.
For instance, Server can have Public IP address and is connected to the Internet via 100 Mbit network and local NIC
with local IP address (1Gbit). If it is not necessary to provide public access to this server it may be useful to restrict
traffic flow through Public IP.
Configuring Time Synchronization within Multi-Server Environment
DW Spectrum provides built-in time synchronization mechanism. However this mechanism synchronizes the time with
the Internet and it no Internet connection available, it may be necessary to configure time settings manually. Even in
this case DW Spectrum tries to synchronize time across servers. Manual settings are needed if it is necessary to specify
Master Time Server: the one all other Servers will synchronize to.
To do so open Main Menu –> System Administration (CTRL+ALT+A) and go to Time Synchronization tab.
Initially DW Spectrum tries to discover all available IP addresses of servers (including Public ones). However it is not
possible in some network environments.
To go to routing setup open Main Menu –> System Administration (CTRL+ALT+A) and go to Routing Management tab.
The table shows all Servers that are currently online, current time and offset from Internet time or master server time.
To specify Master Time Server tick it in the table and click OK.
Cameras, Encoders and I/O Modules Management
The following types of Devices are supported in DW Spectrum:
Cameras
Encoders/DVRs
I/O Modules
Rev. 072017 Page | 40
Page 41

DW Spectrum 3.0
The following Device Settings are crucial for the application to function properly:
Recording schedule (see "Setting up Recording Schedule")
Authentication (the default password has been changed for devices). See "Configuring Device Authentication".
IMPORTANT. Most device parameters can only be configured by Advanced Viewer (permission level is required). A
basic viewer can access configuration, but cannot make any changes. See the "User and Roles Management" section
for more.
The section describes the following functions related to devices:
Viewing Full Device List
Adding Devices (Cameras, Encoders and I/O Modules)
Setting Up Devices
Setting Same Parameters for Multiple Devices
Swapping Devices between Servers (Admin Only)
Deleting Devices (Admin Only)
Viewing Full Device List
All Devices registered in DW Spectrum are displayed in Resource Tree. It may be problematic to find a particular device
when too many Devices appear in Tree. It is possible to use Search to locate Cameras on Scene.
To use a more organized list, open System Administration dialog and select Device List(Cameras List)... (or press CTRL +
M).
The information is broken down by the following columns:
Recording – recording type of Device (Not recording, Continuous, Motion only, Motion + Lo-Res). See "Setting up
Recording Schedule".
Note: this is not an indication on how Device is being recorded.
Name – Device name.
Vendor – Device's manufacturer/maker. When interacting with a 3rd party Devices via Onvif protocol,
OnvifDevice is displayed.
Model of Device.
Firmware – the current firmware version.
IP/Name – Device's IP address.
Rev. 072017 Page | 41
Page 42

DW Spectrum 3.0
MAC Address – Device's MAC address. It is not possible at times to determine the MAC address. In this instance, a
unique identifier is shown (i.e. urn_uuid_207f19b2-d5a6-407f-8fec-6265a311058b)
Server – the Server where Device is hosted on.
The following tools are available to manage Device List:
Sort data by column. Left Click on column's header.
Filter data. Type the filter sub-string into the Search String field (on the top). The results will be refresh as typing.
To disable filtering, clear the sub-string.
Select several rows from the table. Drag the mouse, use CTRL + Click, or Shift + Click. Use CTRL + A to select all
Devices.
Open one or several Devices. Select the desired Devices, open Context Menu and choose Open, Open in New Tab,
Open in New Window.
Rename Devices. Select Device, open Context Menu and choose Rename.
Viewing Device's event history. Select Device, open Context Menu and choose Check Device Issues... Event History
form will open and filtering against the selected Device will apply.
Delete one or multiple Devices. Select the desired Devices, open Context Menu and choose Delete.
Go to Device Settings. Select the desired Devices, open Context Menu and choose Device Settings...
Export data from one or multiple Devices to an external file. Select the desired Devices, open Context Menu and
choose Export Selected to File... Select file name and format. The following formats are supported:
HTML File
CSV file (text file with delimiters). This file type can easily be imported into Microsoft Excel.
Copy one or several rows to clipboard. Select the desired rows, open Context Menu and choose Copy Selection to
Clipboard. The data can be pasted into any text editor or Microsoft Excel.
Adding Devices (Cameras, Encoders and I/O Modules)
This section provides information on how to add various devices (Cameras, encoders, I/O Modules) to the DW
Spectrum resource list.
Choose one of the following methods:
Automatic Device Discovery
Disabling Automatic Discovery (Admin Only)
Adding Devices Manually (Admin Only)
Adding RTSP or HTTP Streams as Cameras (Admin Only).
Automatic Device Discovery
DW Spectrum provides a powerful and easy-to-use mechanism for automatic device discovery. It is required that a
device should be accessible via Broadcast.
As soon as Server is started and connected to Server, it automatically performs device discovery in its network. Once
a device is discovered, its parameters will be displayed in Resource Tree automatically.
Rev. 072017 Page | 42
Page 43

DW Spectrum 3.0
If a device does not transmit media data, it is marked as Offline.
If Server is offline, all Devices the server is hosting are switched to the offline status automatically.
Once Device is discovered, DW Spectrum tries to configure the following settings on Camera: the best possible image
settings for the main video stream (best possible resolution and FPS) and optimal ones for the secondary stream (240p
to 320p, 2 to 7 FPS). To disable this feature, see "Preventing DW Spectrum from Changing Camera Streaming Settings".
If Device was deleted (see "Deleting Devices (Admin Only)") and connected again, it will be re-discovered. Disable this
feature to avoid auto device discovery. See "Disabling Automatic Discovery (Admin Only)".
Disabling Automatic Discovery (Admin Only)
Once Device is discovered, the only way to delete it is to unplug it from the network (see "Deleting Devices (Admin
Only)"). However, if Device is plugged back again, it will be re-discovered. To avoid this it is possible to disable this
feature:
1. Open Main Menu –> System Administration (CTRL+ALT+A) –> General tab.
2. Uncheck Enable devices and servers auto discovery in the Device Management section.
3. When finished, press OK to apply or Cancel to discard settings.
IMPORTANT. Once the feature is disabled, new devices will no longer be auto-discovered, only added manually.
Adding Devices Manually (Admin Only)
If Device is not accessible via broadcast (usually if it is located in a different network), it will not be discovered
automatically. In this case DW Spectrum provides an ability to add Device manually. For instance, it can be useful if
Device is located in a different network or can even be accessed via Internet only. It is also possible to add several
Devices simultaneously by scanning a range of IP addresses.
To add one or more Devices:
1. Right-Click on server in Resource Tree and open Context Menu.
2. Choose Add Device(s)... The following view will appear:
3. Choose one of the following:
To add a single Device, enter device's Address (IP or Host Name the Device can be resolved on)
Rev. 072017 Page | 43
Page 44

DW Spectrum 3.0
IMPORTANT.DW Spectrum allows adding Devices by IP Address, Host Name or Generic RTSP/HTTP Link
(advanced). See "Adding RTSP or HTTP Streams as Cameras (Admin Only)".
To add several Devices at once, select Subnet Scan:
4. Enter the desired IP range to start scanning. By default, addresses 0-255 of the same subnet are suggested. As a
result, the entire specified network will get scanned for Devices. (Only scan C-Class subnet)
6. Specify authentication parameters in Login and Password fields (if needed).
7. Specify Discovery Port if needed. Most Devices are discovered on port 80, so it is better to leave on Auto setting.
8. Press Scan to initiate search. This can take a lengthy period of time (especially if IP Range is being scanned).
9. If Devices are located, they will be displayed in order.
If Device is already registered (manually or automatically), the selection checkbox is disabled and cannot be
selected for addition:
10. Select desired devices and click Add selected.
Devices should be added to Resource Tree.
Adding RTSP or HTTP Streams as Cameras (Admin Only)
Some camera models are not fully compatible with Onvif Profile S; therefore, will not work properly in DW Spectrum.
However, if such Cameras can provide streams by RTSP or HTTP, they can still be viewed and recorded.
Note: to add, it is important to check if a particular camera model supports this option plus know the exact
RTSP/HTTP URL of the stream. This information can be found in camera's guide or by contacting the manufacturer.
To add the stream use the standard manual addition procedure (see "Adding Devices Manually (Admin Only)").
Rev. 072017 Page | 44
Page 45

First, Make sure Subnet Scan is unchecked, then enter RTSP or HTTP URL (i.e. rtsp://<camera
IP>:554/hi_stream) instead of Camera IP.
Once added, Camera will be displayed in Resource Tree as follows:
It can now be configured as any regular IP Camera (see "Setting Up Devices").
DW Spectrum 3.0
Note: only one stream can be added per Camera, so Dual-Streaming benefits will not be available (see "Dual
Stream Recording Specifics (RADASS)"). Lastly, if resolution is greater than 720*576, software motion detection will
not be available.
Setting Up Devices
It is possible to configure Devices for Administrators and Viewers that have the appropriate access Permission.
Administrators can configure all cameras and Viewers can only use the ones that are assigned to them by
Administrators.
A user can locate Device Settings from Device's Context Menu that can be invoked from Resource Tree or From Scene
The following actions can be performed when configuring Device Parameters:
Setting Up I/O Modules
Renaming Devices
Obtaining Device’s IP, MAC, Firmware and Model
Configuring Audio on Device
Configuring Device's Authentication
Forcing Aspect Ratio for Cameras
Setting up Camera Orientation
Setting up PTZ on PTZ and Fish-Eye Cameras
Setting Up Fish-Eye Cameras
Setting up Recording Schedule
Setting up Motion Mask and Motion Sensitivity
Rev. 072017 Page | 45
Page 46

DW Spectrum 3.0
Configuring Proprietary Device Parameters
Working Around Device Issues (Expert Settings).
Additionally, there is some specifics while working with Analog Encoders and Cameras. See "Setting up Analog
Cameras" for details.
Setting up Analog Cameras
Typically, Analog Cameras are connected via Analog Recorders. Each Recorder has a number of channels that indicates
the number of Analog Cameras it can handle. If Recorder is plugged into the network, it can either be discovered
automatically or added manually (see "Adding Devices (Cameras, Encoders and I/O Modules)").
The following types of Analog Cameras are supported:
Analog Cameras plugged into Encoder. Those cameras act like regular Cameras: it is possible to configure
Recording Schedule for them as well as Motion Detection.
Analog Cameras plugged into Recorder. Those cameras are recorded somewhere else so DW Spectrum only pulls
the desired stream from the recorder. It is not possible to configure Recording Scheduleand Motion Detection for
those Cameras.
Setting Up I/O Modules
DW Spectrum considers I/O devices as regular ones (Cameras), but provides some specific functionality. First of all, DW
Spectrum discovers I/O Modules exactly as all other devices: automatically or with the user's help. Afterward I/O
Modules are displayed in Resource Tree.
To start working with I/O Module it is necessary to obtain and configure I/O Module License, otherwise the "Module is
disabled" message will be displayed. See "Obtaining and Activating DW Spectrum Licenses" for details.
It is possible to configure I/O Devices for Administrators and Viewers that have the appropriate access Permission.
Administrators can configure all cameras and Viewers can only use the ones that are assigned to them by
Administrators. See "Introducing User Roles" for details.
After the license is activated the module will be displayed in the following way:
Rev. 072017 Page | 46
Page 47

DW Spectrum 3.0
To get I/O Module working it is necessary to perform additional setup:
1. Open Device Settings and go to IO Ports.
2. Set Up the following I/O Connectors' configuration and apply the changes:
Type – Input or Output
Default State – Open or Grounded (depending on I/O Module)
Name of the port
Pulse time (output only) – the amount of time the signal will be generated for (in milliseconds)
After the I/O module is configured, it will be displayed as following:
Rev. 072017 Page | 47
Page 48

DW Spectrum 3.0
The following actions can be performed:
Record Audio from I/O Module (if a microphone is connected). See Setting up Recording Schedule for details.
Playback Audio Archive Recorded from I/O Module (if a microphone is connected). This is similar to viewing
archive from Cameras (see "Navigating through Archive and Live")
View Inputs State. When the circuit is grounded, the appropriate sensor turns green
Trigger Output. For this purpose click the corresponding button (B1-B4 on the picture above). The output signal is
being sent for the amount of time specified in Pulse Time setting.
Create Rules (see "Configuring Events and Actions (Admin Only)") using the device's Input/Output ports:
Input Signal on Device
Trigger Output on Device.
Renaming Devices (Admin Only)
If a device is discovered automatically (see "Automatic Device Discovery"), it is displayed in Resource Tree as a
predefined sequence ("model"or "manufacturer + model"). For instance, 10005 for Arecont Vision cameras or
DWC-MD421D for Digital Watchdog.
Note: It is possible to configure Devices for Administrators and Viewers with an appropriate permission level.
It is recommended to rename same device models for easier identification. Devices can be renamed directly from
Resource Tree using Context Menu (or F2), or in device settings (General -> Name).
IP-addresses are added to a device name automatically and are non-editable. It is possible to deactivate displaying IP
addresses in Resource Tree.
Obtaining Device’s IP, MAC, Firmware and Model
To obtain Device's IP and MAC, open Camera settings and go to General. They will be displayed and are non-editable.
Rev. 072017 Page | 48
Page 49

DW Spectrum 3.0
Note: this information is available for Administrators and Viewers with an appropriate permission level.
It may be useful to go to Device's web page by clicking on the appropriate hyperlink to check or set up Device's
parameters. See "Configuring Proprietary Device Parameters" for details.
It is possible to check if a device is accessible by pressing the Ping button.
Configuring Audio on Device
DW Spectrum allows to record audio from Devices (if device has this feature and the microphone is connected to it).
To set up audio recording for the device open device settings and go to General, then enable or disable the
corresponding flag. The settings are applied right after Apply or OK are clicked.
It may be useful to go to Device's web page by clicking on the hyperlink. See "Configuring Proprietary Device
Parameters" for details.
Note: it is possible to configure audio for multiple devices at a time. See “Setting Same Parameters for Multiple
Devices”.
Configuring Device Authentication
All Devices come with a predefined login and password combination. During the discovery process, DW Spectrum
attempts to use manufacturer’s default credentials to access a device.
However, default login and passwords may vary between models/lines or can be changed deliberately, which prevents
DW Spectrum from accessing Devices and acquiring media streams. As a result, Device is shown as Unauthorized ( ) in
Resource Tree. The following message will appear if a user attempts to view a live stream:
UNAUTHORIZED
Please check authentication information in device settings.
Note: It is possible to configure Devices for Administrators and Viewers that have the appropriate permission
level.
To get Device working it is necessary to setup Authorization Parameters:
1. Open Device Settings -> General.
2. Enter Login and Password in the Authentication section and click Apply or OK. To discard changes, click Cancel.
Note: it is possible to configure same authentication credentials for several devices simultaneously. See “Setting
Same Parameters for Multiple Devices”.
Forcing Aspect Ratio for Cameras
Occasionally, Cameras report an incorrect Aspect Ratio. In such instance, DW Spectrum automatically corrects Aspect
Ratio for Cameras.
Note: this correction will require transcoding if exporting videos from Camera. See "Exporting Recorded Region
from Single Camera".
Rev. 072017 Page | 49
Page 50

DW Spectrum 3.0
To specify Aspect Ratio:
1. Open Camera Settings and go to General.
2. Enable Force aspect ratio flag and select the desired ratio. The following AR are available: 1:1, 4:3, 16:9.
3. Disable the flag to restore the original Aspect Ratio.
4. The settings are applied once Apply or OK are clicked.
Setting up Camera Orientation
Sometimes Cameras can be mounted rotated by 90 degrees or upside down. In such instance, DW Spectrum can
display proper orientation.
Note: this correction will require transcoding if exporting videos from Camera. See "Exporting Recorded Region
from Single Camera".
To specify Orientation:
1. Open Camera Settings and go to General.
2. Enable Default Rotation flag and select the desired orientation.
3. Disable the flag to restore the original orientation.
Rev. 072017 Page | 50
Page 51

DW Spectrum 3.0
Setting Up Fish-Eye Cameras
DW Spectrum provides advanced capabilities to operate with fish-eye cameras. Such cameras use a specific type of
lens that can cover a much larger viewing area. This particular type of lens warps a picture and a de-warping algorithm
must be enabled to display the picture correctly:
Note: It is possible to configure Cameras for Administrators and Viewers with an appropriate permission level.
In order for DW Spectrum to distinguish cameras with fish-eye lens, the following configuration must be performed:
1. Open Camera Settings and go to General.
2. Check This is a fish-eye lens camera to activate the Fisheye tab:
Rev. 072017 Page | 51
Page 52

3. Go to the Fisheye tab to select the following parameters:
DW Spectrum 3.0
Camera's orientation - type of de-warping algorithms based on orientation.
Calibration - to avoid de-warping artifacts, it is important to position the calibration circle within the Camera's
view as accurately as possible. First, try Auto Calibration, then manually adjust the viewing range (if needed):
Use scrollers to move the circle horizontally or vertically (or drag it with a mouse)
Use the botton scroller to specify the shape of the lens (panamorph lens support)
Use a mouse wheel to resize the circle
Camera's view angle.
Note: It is recommended to keep Camera on Scene to monitor any image changes while adjusting settings.
4. Click Apply or OK when finished. To discard changes, click Cancel.
Once Camera is established as a fish-eye camera, de-warping can be performed. See "De-warping Fish-Eye Cameras"
for details.
Setting up and Controlling PTZ on PTZ and Fish-Eye Cameras
DW Spectrum provides a smart and intuitive way for setting up PTZ on Cameras, in addition to easy controls for PTZ on
Fish-Eye Cameras and Screenshots (see "De-warping Fish-Eye Cameras").
PTZ on PTZ Cameras can be set by either Administrator or Viewer (a corresponding permission level is required – see
"User and Roles Management"). PTZ on Fish-Eye Cameras/Screenshots is accessible to all users.
Rev. 072017 Page | 52
Page 53

This feature is available for PTZ Cameras if:
It is supported by the Camera model (Onvif Cameras only)
Camera is in Live mode
If the requirements are met, clicking will display PTZ control on the corresponding camera.
These restrictions do not apply to Fish-Eye Cameras and Screenshots.
The following PTZ modes are available:
Simple (Zoom only). Refer to the following image:
DW Spectrum 3.0
Use + and - buttons to zoom in/out.
Regular (Zoom and Point). Refer to the following image:
Use + and - buttons to zoom in/out. Left-Click on the center circle, Hold Left Mouse Button and move the cursor
to move Camera to the desired position.
Additionally, if Camera supports Absolute Move, the following features will be available:
Save and restore PTZ positions
Setting Up PTZ Tours
Rev. 072017 Page | 53
Page 54

DW Spectrum 3.0
Setting Up Home Positions or Tours (see "Home Positions and Tours for PTZ and Fish-Eye Cameras")
Extended (Zoom, Point and additional features). Requires the support for Absolute Move from Camera and
custom integration:
In this case Camera allows moving and zooming as in previous case, plus:
Move to a certain position – Left Click to the desired position
Zoom to a certain range – Hold Left Mouse Button and draw the rectangle to zoom into (see the above picture)
Full Zoom Out – Double Click.
Fish-Eye Cameras/Screenshots support full PTZ functionality.
After all settings are configured press once again to hide PTZ controls.
Saving and Restoring PTZ Positions
In addition to standard PTZ controls, DW Spectrum allows for managing of predefined PTZ positions. It is basically
possible to set up several points, tilt and zoom presets and restore them with only two clicks or one hot key.
Then PTZ presets can be used for composing PTZ Tours (see "Setting Up PTZ Tours") or serve as a Home Position (see
"Home Positions and Tours for PTZ and Fish-Eye Cameras"). Finally, a specific position can be restored if an event
occurs. See "Execute PTZ Preset".
Note: It is possible to configure PTZ on Cameras for Administrators and Viewers with the appropriate permission
level.
The following is possible:
Saving PTZ positions (simple):
Rev. 072017 Page | 54
Page 55

DW Spectrum 3.0
1. Set up a desired PTZ Position on Camera using PTZ Controls (see "Setting up and Controlling PTZ on PTZ and
Fish-Eye Cameras")
2. Open Context Menu by right –click on the PTZ icon
3. Type a desired preset name.
4. If needed, select a hot key for preset (0-9).
Saving and Editing PTZ positions (advanced):
1. Open Context Menu right –click on the PTZ icon
and select PTZ... -> Save Current Position...
and select PTZ... -> Manage. The following form will appear:
2. Move the form aside, so that the item and its PTZ controls are fully accessible.
3. Set up a desired PTZ Position on Camera using PTZ Controls (see "Setting up and Controlling PTZ on PTZ and
Fish-Eye Cameras").
4. Click Save Current Position.
5. To edit positions set Hotkey and Name if necessary.
6. Set Home Position if necessary (see "Home Positions and Tours for PTZ and Fish-Eye Cameras")
7. Click Apply or OK when finished. To discard changes, click Cancel.
Restoring PTZ positions:
Open Context Menu and choose PTZ... -> Go to Position... -> <Desired position> or press the predefined hot key (0-9).
It is also possible to restore PTZ Positions in Manage PTZ window (Go to Position):
Deleting PTZ positions:
1. Open Context Menu and select PTZ... -> Manage ...
2. Select a desired preset and Click Delete.
IMPORTANT. If Position is included in Tour, the deletion may make this Tour invalid.
3. Click Apply or OK when finished. To discard changes, click Cancel.
Rev. 072017 Page | 55
Page 56

DW Spectrum 3.0
Setting Up PTZ Tours
DW Spectrum allows to create PTZ Tours. PTZ Tour is a sequence of PTZ Positions. It may be useful to move from one
position to another automatically in a cycle to observe large locations by a single Camera.
The following parameters can be configured for PTZ Tours:
Positions. Tour can contain an unlimited number of PTZ Positions.
Stay Time - the duration of time for Camera to stay on PTZ Positions.
Speed - the speed of Camera moving between PTZ Positions.
To configure PTZ Tours:
1. Open Context Menu and select PTZ... -> Manage. The following window will appear:
2. Move the form aside, so that the item and its PTZ controls are fully accessible.
3. Make sure the list of positions contains a minimum of two positions.
4. Click Create Tour. A new item will appear in the bottom section:
Rev. 072017 Page | 56
Page 57

DW Spectrum 3.0
5. Select PTZ Positions to include in Tour:
To add Position click on "+" button
To change, click on the desired Position and select another one:
To change the order of Positions, select desired Position and use arrows on the right to move it up and down
the list.
To delete Position select the desired Position and click on "-" button.
Note: the following restrictions are applied to Tours:
Tour should contain at least two Positions.
It is not recommended to use the same Positions in a row or select the same ones for the first and last Position.
Warning appears if Tour has two or more identical positions.
Warning appears if Tour has only one positions.
Rev. 072017 Page | 57
Page 58

DW Spectrum 3.0
6. Set Stay Time and Speed for each Position.
7. Test Tour by clicking Start Tour in the upper table.
8. Rename Tour if necessary (in the upper table) or set it as Home Tour (see "Home Positions and Tours for PTZ and
Fish-Eye Cameras").
9. Click Apply or OK when finished. To discard changes, click Cancel.
Home Positions and Tours for PTZ and Fish-Eye Cameras
DW Spectrum allows setting Home Position or Tour for any PTZ or Fisheye Camera. Home Position or Tour will be
activated on Camera automatically in the following cases:
If there is no active PTZ Tour
If PTZ Position is not changed for Camera for 2 minutes.
To set up Home Position or Tour for Camera:
1. Configure the desired Position (see "Saving and Restoring PTZ Positions") or Tour (see "Setting Up PTZ Tours").
2. Open PTZ Positions and Tours management dialog:
3. Choose the desired Position or Tour on top and check Home.
Note: only one Home Position or Tour can be active.
4. Click Apply or OK when finished. To discard changes, click Cancel.
Setting up Recording Schedule
To record Camera, Recording Schedule must be set up first.
Note: It is possible to configure Cameras for Administrators and Viewers with an appropriate permission level.
Note: To record one camera, License is required. See “Obtaining and Activating DW Spectrum Licenses (Admin
Only)”. Even if recording is not performed immediately, the License will still be considered as used.
The recording schedule specifies the following recording parameters:
Recording Type:
Record Always
Motion Only – records only when motion occurs. Motion recording may require for the camera to support
motion detection.
Motion + Lo-Res Always – by default, a camera is set to record at low resolution unless motion occurs, at which
point it switches recording to high resolution automatically. High resolution recording requires dual streaming (if
supported by camera). See "Dual Stream Recording Specifics (RADASS)"
Motion Mask and Motion Sensitivity may need to be configured as well (see "Setting up Motion Mask and Motion
Sensitivity").
Rev. 072017 Page | 58
Page 59

DW Spectrum 3.0
FPS
Quality
Note: FPS and Quality recording settings will affect live stream viewing as well. For example, if 1 FPS and Low
Quality are set in the recording schedule, DW Spectrum will stream live as per selected settings even if the camera is
capable of more. If recording is not set, DW Spectrum will stream live at Maximum FPS and Quality.
Those settings are applied to Recording Schedule. See "Modifying Recording Schedule" for details.
It is possible to record I/O Modules as well (see "Setting Up I/O Modules"). In this case audio will be recorded, if a
microphone is connected to the module. To enable recording it is necessary to setup Recording Schedule for I/O
Module. It is similar to Camera Recording Schedule except Quality/FPS settings.
See also "Analyzing and Anticipating Storage Usage".
Dual Stream Recording Specifics (RADASS)
Some Recording Parameters may need Motion to be supported by the Camera. Motion + Low Quality Always
recording requires Dual-Streaming to be supported by Camera.
If Dual-Streaming is supported, the second stream settings are set automatically based on the main recording settings:
2 to 7 FPS
320p to 480p
Not only is the second stream used for recording, it is also used for Software Motion Detection and bandwidth and
CPU saving during playback. See "Setting up Motion Mask and Motion Sensitivity" and "CPU and Bandwidth Saving
during Playback (RADASS)".
If primary stream is 480p or less, it can be used for Software Motion Detection as well.
Modifying Recording Schedule
DW Spectrum provides a powerful and flexible schedule for configuring recording parameters.
A specific date and time can be set in the recording schedule as well.
Examples:
Workdays 8AM-8PM – record Always, 24 FPS, high quality
Weekends and Workdays 8PM-8AM – record motion only, 10 fps, low quality
The cameras recorded by Server s are marked with a small red circle in Resource Tree:
– camera in recording mode
– camera recording is setup, though not recording at the moment (a license is still being used)
Note: It is possible to configure Cameras for Administrators and Viewers that have appropriate permissions.To set
up Recording Schedule:
Rev. 072017 Page | 59
Page 60

DW Spectrum 3.0
1. Select the desired Camera(s) in Resource Tree (use SHIFT or CTRL to select several) or on Scene, open Camera
Settings and go to Recording:
IMPORTANT. If Server and Client are in different time zones the schedule displays Server Time.
2. Click
to enable. (
: enabled) .
Check the number of licenses used. If the number is insufficient, click Get More Licenses and proceed with
activation.
Click on Display FPS on Grid and Display Quality on Grid to show/or hide FPS and quality in grid cells.Select
Recording Mode:
Record Always
Motion Only – recording will start if motion occurs. To specify a range for motion recording, use Record before
motion and Record after motion selectors. Motion detection must be supported by the camera (Software or
Hardware) and requires secondary(sub) stream.
Motion + Low Quality Always – low quality stream is recorded always and is switched to high quality streaming
once in case of any motion. To use this recording setting, make sure the camera supports dual-streaming.
If not, the following will be displayed:
Dual-Streaming and Motion Detection is not available for this camera.
Do not Record
3. Select Recording Quality
4. Select FPS
IMPORTANT. If making any changes to image parameters for Camera is prohibited for DW Spectrum, then FPS
and Recording Quality changes will not take effect. See "Preventing DW Spectrum from Changing Camera Streaming
Settings (Admin Only)" for details.
6. As soon as all the parameters are selected, click on Schedule Grid:
Click and Drag to select multiple cells
Click on hour to select an entire column
Click on weekday to select an entire row
Click Schedule Grid's top left corner to select all cells
Note: to select same values, hold Alt and click on the cell to choose a recording mode, FPS and values.
7. Repeat to set another recording for different cells
Rev. 072017 Page | 60
Page 61

DW Spectrum 3.0
8. If Motion Recording is set, it is possible to adjust Pre-recording and Post-Recording intervals (the time range
between the start and end of motion recording).
9. Click Apply or OK when finished. To discard changes, click Cancel.
In case of insufficient licenses, the following warning will appear:
License limit exceeded (X of Y used). Your schedule will be saved, but will not take efect
Enable Recording flag will be disabled; however, all schedule settings will be saved.
Example:
Workdays 8AM-8PM – Record Always, 24 FPS, High
Workdays 8PM-8AM – Motion + Low Quality Always, 24 FPS, Medium
Weekends – record motion only, 10 fps, Low
IMPORTANT. Make sure to apply all recording selections to the schedule once selected (recording type, FPS and
quality).
Copying Recording Schedule between Cameras
If Recording Schedule is already set up on Camera it may be needed to copy the settings to a different one. For
instance, if a new camera is plugged in it is much more convenient than set up a schedule separately.
To copy Recording Schedule:
1. Open Camera the schedule should be copied from, go to Camera Settings -> Recording:
2. Click on the Copy Schedule button. The following form will be opened:
Rev. 072017 Page | 61
Page 62

DW Spectrum 3.0
3. Check desired Cameras the schedule should be copied to. To select all Cameras on specific Server check it. To filter
search use the Filter box. Filter criteria is the same as search (see "Search"). If hover with a mouse cursor on
Camera, the actual picture from this Camera will be displayed on the right.
Note: additional Licenses may be needed. See "Obtaining and Activating DW Spectrum Licenses" for details.
4. Click Apply or OK when finished. To discard changes, click Cancel.
Configuring Maximum and Minimum Recording Days for Camera
Some governmental regulations require the footage to be stored for a specific length of days. DW Spectrum supports
the ability to set up maximum and minimum recording days.
IMPORTANT. Be careful with minimum days. These settings do not guarantee this to be kept, they just set the
priority. So, in case of insufficient space DW Spectrum will delete the records on cameras that do not have minimum
amount of footage. However if there is no space to store such amount of data, no other cameras will be recorded.
To specify minimum and maximum amounts:
1. Select the desired Camera(s) in Resource Tree (use SHIFT or CTRL to select several) or on Scene, open Camera
Settings and go to Recording.
2. Set Min. Days and Max. Days.
Setting up Motion Mask and Motion Sensitivity
In order to detect motion more properly and accurately, DW Spectrum provides a powerful and flexible Motion
Detection configuration. For example, if a camera is pointed at a parking lot, motion mask can be set on all the
surrounding areas that are not targeted for recording. In this case, any motion appearing in the areas surrounding the
main target area, will not trigger motion detection and recording.
Rev. 072017 Page | 62
Page 63

DW Spectrum 3.0
IMPORTANT. This particular feature in DW Spectrum works only if the selected camera supports Motion
Detection.
The following Motion Detection types are supported:
Hardware Motion Detection – implemented on Cameras directly. In this case only motion mask can be configured.
To configure additional parameters it may be necessary to go to Camera Settings web page (see "Configuring
Proprietary Device Parameters").
Software Motion Detection is performed on Server . It consumes more resources, though it provides better and
more flexible motion detection. In this case, it is possible to set up unlimited number of motion regions and adjust
its sensitivity. Software Motion Detection requires Dual-Streaming supported by Camera. If supported, Software
Motion Detection is set automatically (excluding Arecont Vision cameras). If primary stream is 480p or less, it can
be used for Software Motion Detection as well.
IMPORTANT. Software motion detection is performed on Server side. Server analyzes secondary stream from
Camera and detects motion. For this purpose it needs to perform decoding. Thus, if the secondary stream is
high-resolution one, it may consume all the Server CPU. To fine tune this, see "Forcing Software Motion Detection
on Specific Stream".
To set up Motion Detection:
1. Open Camera Settings and go to Motion:
If red zones appear on the grid during motion, Motion Detection is supported. Red cells indicate the level of
motion (the higher the motion level, the brighter the cells).
2. Select the type of motion detection (Hardware or Software). If none are active, the camera does not support
Motion Detection at all.
3. Select Sensitivity on the slider. 0 is motion mask (minimal sensitivity, motion will not be detected on the selected
region); 9 is the highest sensitivity.
4. Select the desired regions the sensitivity will be applied to:
Click and Drag to select a single region
Ctrl + Click and Drag to add another region
Click on a region to fill it with desired sensitivity
To set Motion Mask just Click and Drag. There is no need to adjust Motion Sensitivity.
5. Repeat for each desired sensitivity. Use Reset Motion Regions to start over.
Rev. 072017 Page | 63
Page 64

The above picture illustrates the following:
the area marked in grey will not capture motion (Motion Mask)
the green area will capture motion with very low sensitivity
DW Spectrum 3.0
top right and bottom left corners will capture motion with standard sensitivity
for other regions, the sensitivity will be high.
6. Click Apply or OK when finished. To discard any changes, click Cancel.
It is possible to set up motion directly from camera’s web page. For this purpose, use Camera Web Page link on the
Motion tab.
Configuring Proprietary Device Parameters
DW Spectrum allows configuring basic image settings inside the software. These settings are available for
Onvif-compliant devices only.
Additionally, DW Spectrum allows displaying native device web page inside the software (approved models only).
Note: It is possible to configure Devices for Administrators and for Viewers that have the appropriate permissions.
To go to proprietary device settings:
1. Open Device settings and select Advanced.
2. Configure desired Device Parameters:
Rev. 072017 Page | 64
Page 65

DW Spectrum 3.0
If DW Spectrum supports the specific Device, it displays Device Web Page inside this tab.
Rev. 072017 Page | 65
Page 66

DW Spectrum 3.0
Note: If the list is empty, Device does not support configuring (not Onvif-Compliant).
Other proprietary device parameters such as Authorization, Network Settings etc. can be configured directly from
device’s web page.
1. Open Camera settings and select General tab.
2. Enter Authentication Parameters if the device requires authentication (Admin only).
3. Click on Web Page. The browser will open device’s web page.
Web page may be inaccessible because it can be located on a different network. To check device accessibility, press
the Ping button prior to opening the web page.
Additionally, the following can also be performed:
Resetting Camera
Upgrading Camera's Firmware.
Resetting Camera
DW Spectrum allows for cameras to be reset to factory defaults. These settings are available for Onvif-compliant
cameras only.
Note: It is possible to configure Cameras for Administrators and Viewers with an appropriate permission level.
To go to proprietary camera settings:
1. Open Camera settings and select Advanced.
2. Go to Maintenance.
Note: If the list is empty, Camera does not support configuring (not Onvif-Compliant).
3. Choose one of the following:
System Reboot – reboot Camera and save settings
Soft System Factory Default – reboot Camera and restore all settings related to the image
Hard System Factory Default – reboot Camera and restore all settings (Network, Authorization, etc).
The reboot is performed instantly once selected.
It is also possible to reboot Camera from its Web Page. See "Configuring Proprietary Device Parameters".
Upgrading Camera's Firmware
DW Spectrum allows for Cameras Firmware upgrade from within the application. These settings are available for
supported Digital Watchdog cameras only.
Note: It is possible to configure Cameras for Administrators and Viewers with an appropriate permission level.
IMPORTANT. To enable this feature, Camera must have Internet Access.
To go to proprietary camera settings:
1. Open Camera settings and select Advanced
Rev. 072017 Page | 66
Page 67

DW Spectrum 3.0
2. Go to Maintenance –> Firmware Upgrade
Note: If the list is empty, Camera does not support configuring (not Onvif-Compliant).
3. Click on Check Upgrade. The coordinates of Digital Watchdog FTP Server (Address, Port, Login and Password) are
predefined.
4. If a camera has Internet access, the application will check for any available upgrades automatically.
5. If a newer version of firmware is found, click OK to run upgrades. The application will automatically reboot once
upgrades are completed.
It is possible to upgrade Camera Firmware from its Web Page. See "Configuring Proprietary Device Parameters" for
details.
Working Around Device Issues (Expert Settings)
DW Spectrum provides expert settings that can work around some issues on device side.
IMPORTANT. These are expert settings. Improper configuration may lead to serious System malfunction!
Preventing DW Spectrum from Changing Camera Streaming Settings (Admin Only)
Setting Up Camera Transport Protocol
Forcing Software Motion Detection on Specific Stream
Adjustiung Average Bitrate on Device
Disabling Recording of Primary/Secondary Stream
Adjusting Secondary Stream Quality.
Preventing DW Spectrum from Changing Camera Streaming Settings (Admin Only)
Once Camera is discovered, DW Spectrum attempts to configure the following settings on Camera: the best possible
image quality for the main video stream (best possible resolution and FPS) and optimal quality for the secondary
stream.
In some cases it may be necessary to set up custom stream settings on Cameras. DW Spectrum allows this as well.
IMPORTANT. In this case DW Spectrum can record Camera with specified settings only. It will not be possible to
set up FPS and Quality when configuring Recording Schedule (see "Modifying Recording Schedule").
To disable automatic adjustment for one or multiple Cameras:
1. Stop recording of the desired Cameras and close them.
2. Select one or multiple Cameras, then open Camera Settings and go to Expert.
3. Check I have read the manual and understand the risks.
4. Check Keep camera streams' and profiles' settings.
5. Click Apply or OK when finished. To discard changes, click Cancel.
Afterward it is necessary to open Web Page and set all desired image settings (FPS, quality and resolution) for High
quality and low quality streams. Those settings won't be adjusted by DW Spectrum. Those steps are necessary for each
Camera that needs to be configured manually.
Rev. 072017 Page | 67
Page 68

DW Spectrum 3.0
To disable automatic adjustment for all Cameras:
1. Disable recording for all cameras and close them (if opened for viewing).
2. For each Camera go to its Web Page and set desired image settings.
3. Open Main Menu and go to System Administration –> General tab.
4. Remove Allow system to optimize cameras settings flag.
5. Click OK when done or Cancel to discard changes.
This setting influences on the following ones:
Adjustiung Average Bitrate on Device
Adjusting Secondary Stream Quality.
Setting Up Camera Transport Protocol
Some cameras stream data in a different way. Usually 2 protocols are used for streaming: UDP (faster, but less
reliable) and TCP (more reliable, but slower). DW Spectrum tries to determine the best protocol for the camera.
However, sometimes camera may have issues when streaming via the chosen protocol. In this case setting the
protocol manually may help.
To do so:
1. Open Camera Settings and go to Expert.
2. Check I have read the manual and understand the risks.
3. Choose RTP Transport and click OK or Apply.
4. Restart the camera.
5. If the changes do not help, choose a different protocol and restart once more.
Forcing Software Motion Detection on Specific Stream
DW Spectrum provides the Software Motion Detection feature. It is performed on the Server side. Server analyzes
secondary stream from Camera and detects motion. For this purpose it needs to perform decoding. Thus, if the
secondary stream is high-resolution one, it may consume all the Server CPU.
Sometimes specific cameras report their configuration incorrectly and swap primary and secondary streams. Server
considers Hi-Res stream as a secondary-one and tries to decode it, resulting in high CPU load. To avoid this, it is
possible to force Software Motion Detection on Specific Stream.
To do so:
1. Open Camera Settings and go to Expert.
2. Check I have read the manual and understand the risks.
3. Choose Force motion detection for stream (Primary or Secondary).
4. Restart the camera.
IMPORTANT. Adjusting these settings may seriously affect the Server performance!
Rev. 072017 Page | 68
Page 69

DW Spectrum 3.0
Adjusting Average Bitrate on Device
When the software tries to configure target bitrate on some camera models it can be set up incorrectly. This may
result in poor image quality.
To workaround this issue it is possible to adjust Average Bitrate on Device:
1. Open Camera Settings and go to Expert.
2. Check I have read the manual and understand the risks.
3. Choose Calculate Bitrate per GOP instead of bitrate per second.
4. Restart the camera.
IMPORTANT. If this option is set by mistake, this will significantly increase bitrate! Use it only if the picture quality
is noticeably poor.
This setting is ignored if DW Spectrum is configured to not change Camera Streaming Settings.
Disabling Recording of Primary/Secondary Stream
For some reasons it may be necessary to disable recording of primary or secondary streams. For instance:
Primary – to save space. Instead it is recommended to set "Motion + LQ" recording type
Secondary – if secondary stream's bitrate is too high. In this case DW Spectrum server will still do software motion
detection (by decoding a secondary stream for this purpose), but won't record it.
To disable recording of primary or secondary streams
1. Open Camera Settings and go to Expert.
2. Check I have read the manual and understand the risks.
3. Tick Do not archive primary stream or Do not archive primary stream.
Adjusting Secondary Stream Quality
DW Spectrum's architecture provides significant CPU and network bandwidth savings by acquiring multiple streams
from a single camera: High Resolution (regular) and Low Resolution (approximately x10 less bandwidth). The second
stream is always decoded by Server and is used for the following:
Software Motion Detection
CPU and Bandwidth Saving during Playback (RADASS)
The quality of the second stream is set automatically, however, it is possible for User to adjust the quality of the
stream.
IMPORTANT. Higher quality of the second stream provides for a much better look and feel (especially on larger
monitors), but can significantly increase CPU load on Server . It is not recommended to change these settings.
To adjust the quality of the second stream:
1. Open Camera Settings and go to Expert.
2. Check I have read the manual and understand the risks.
Rev. 072017 Page | 69
Page 70

DW Spectrum 3.0
3. Click Override secondary stream quality.
4. Use slider to adjust quality.
4. Click Apply or OK when finished. To discard changes, click Cancel.
Note: If Camera does not support dual-streaming, the above settings are unavailable.
This setting is ignored if DW Spectrum is configured to not change Camera Streaming Settings.
Setting Same Parameters for Multiple Devices
In order to simplify the configuration process, DW Spectrum enables users to apply same parameters to more than one
device at a time.
The following can be performed as a batch:
Authentication setup
Schedule configuration
To set the same parameters for multiple Devices:
1. Use Multi-Selection to select desired devices:
In Resource Tree, hold Ctrl or Shift and Click
On Scene – use Ctrl and Click
2. Open Context Menu and go to Device Settings.
If the selected devices share the same Authentication Credentials, they will be displayed.
If the selected devices share the same Recording Settings, they will be displayed.
If the selected devices have different Enable recording field values, the field will be displayed as follows:
3. Set the desired parameters and click Apply.
If needed, a user can add a device to the selection by holding the Ctrl button and clicking on the desired device
in Resource Tree.
To set up another device, select the desired device in Resource Tree. It is not necessary to close the settings
dialog.
If the changes are not applied, the warning message will appear.
4. When finished, press OK to apply or Cancel to discard settings.
Swapping Devices between Servers (Admin Only)
If too many devices are used on the network, it may be helpful to set up an additional server for load balancing and
redundancy purposes. If several servers are set up on the same network, it is possible to perform manual
load-balancing.
IMPORTANT. When moving Device from one Server to another, recording will be restarted automatically (with
predefined parameters). Also, Archive is seamlessly combined from all servers.
Rev. 072017 Page | 70
Page 71

DW Spectrum 3.0
Events:
Actions:
Setting up Schedule for Tracking EventsX
Motion on Camera
Device Disconnected
Storage Failure
Network Issue
Camera IP Conflict
Server Failure
Notifications
Visual Event Indication
Mail Notifications
Start Recording on Camera
Start Panic Recording
Trigger Output on Device
To move device(s) from one server to another:
1. Hold Ctrl or Shift to select the desired devices in Resource Tree
2. Drag and drop the selected devices to the desired server
IMPORTANT. In order to be able to see video from Device on a new Server, the devices must be accessible and
discovered by this server. Otherwise it will be displayed offline.
Also devices may be swapped automatically during failover. If Server failure occurs, all Cameras can be moved to other
Servers automatically. See "Configuring Failover".
Deleting Devices (Admin Only)
To delete Device(s):
1. Expand the Server hosting the desired server in Resource Tree.
2. Find and select Device.
3. Right-Click for Context Menu and choose Delete (or the Del button on a keyboard).
4. Click Yes to confirm.
Note: If Device is online it will be auto-discovered again in some time (this doesn't apply to devices that have
been added manually). To avoid this either unplug the device or disable automatic device discovery.
If Device is back online, it will start working immediately. Recorded archive will be available as well; however, a user
will need to reconfigure Device as its settings have been erased. To prevent this from happening, User must disable
automatic discovery. See "Disabling Automatic Discovery (Admin Only)" for details.
If Camera is disconnected, then the archived footage on this Camera becomes unavailable. However it can be restored.
See "Viewing Archive from Deleted Cameras".
Configuring Events and Actions (Admin Only)
DW Spectrum provides powerful and flexible event bus than can be used for simple and intuitive programming of any
algorithm.
Algorithms are a set of Rules. Each Rule is a combination of Event-Action. As soon as Event is fired up, DW Spectrum
triggers the appropriate Action.
The following events and actions are supported:
Rev. 072017 Page | 71
Page 72

DW Spectrum 3.0
Servers Conflict
Server Connection LostX
License Issue
E-mail address is not set(Sys)
E-Mail Server is not Set(SYS)
Error while Sending E-Mail
Storage is not Configured
Server Started
Archive Backup Finished
Generic Event.
Play Sound
Speak
Notifications
Visual Event Indication
Showing Cameras on Alarm Layout
Mail Notifications
Configuring Mail Server for E-Mail Notifications
Start Recording on Camera
Start Panic Recording
Create Bookmark
Trigger Output on Device
Play Sound
Repeat Sound
Speak
Execute PTZ Preset
Display text on Cameras
Perform HTTP Request
Write to Log.
Every Event that has occurred is automatically saved in system's Event Log. If no Rules are active, only system issues
will be saved. See "Viewing Events Log" for details.
IMPORTANT. Some default Rules are already configured. See "Default Rules" for details. It is possible to reset all
Rules configurations to default settings. To reset, click on Restore all Rules to Default and Apply or OK. All
previously configured Rules will be discarded.
To configure Rules:
1. Do one of the following:
To configure Global Rules: open System Administration and press Alarm/Event Rules button on the General tab
(or press CTRL + E). It is possible to configure Rules for specific Device(s). To proceed, type the desired Device
name, IP or MAC address into the Filter box. Only Rules that are applied to a corresponding Device will be
displayed.
To configure Rules for a single Device: open Device's Context Menu and select Device Rules or open Device
Settings, then click Device Rules...
The following dialog will open:
Rev. 072017 Page | 72
Page 73

DW Spectrum 3.0
2. To add a new Rule, click Add. To delete an existing-one, click Delete.
3. Once added, Rule should be configured.
Select Event on the left-hand side that needs to be monitored. See "Tracked Events" for more information
Select Action on the right-hand side that needs to be performed once Event occurs. Refer to "Actions" for
details
Specify basic parameters for Event and Action. Click on Source or Target column in the Rule row and choose the
desired value.
IMPORTANT. If some fields are missing or incorrect, Rule is considered invalid. In this case, it will turn red:
Set Aggregation period. Once set, all Actions will be executed once per the specified period. If not, Actions will
be executed every time Events occur. Applies to Notifications, Mail Notifications, Play Sound, Speak.
If any additional configuration is needed, click Advanced... The advanced settings will be displayed on the
bottom. Those settings differ from each other depending on Events/Actions that are being configured. See this
chapter for more information on a specific Event/Action.
Add Comments for Rule if needed.
4. Set or clear the flag (on the left-hand side of each Rule) to enable or disable it.
5. As soon as all configurations are done, click Apply to accept changes or Cancel to discard. Click OK to apply changes
and close the form.
IMPORTANT. If any Rule is considered invalid, the warning displayed below will appear. If apply the changes,
incorrect Rules will be disabled.
Rev. 072017 Page | 73
Page 74

DW Spectrum 3.0
Tracked Events
DW Spectrum can react as soon as a particular Event occurs.
There are 2 types of Events:
Continuous – occur continuously (for instance, Motion)
Instant – occur once (for instance, Server Failure or Network Issue).
Depending of Event Types there are different algorithms to handle them. Certain Actions can be bound to a certain
types of Events. Every tracked event may have its own parameters. Refer to the particular Event description for more
information:
Continuous
Motion on Camera
Generic Event
Input Signal on Device
Instant
Device Disconnection/Malfunction
Storage Failure
Network Issue
Camera IP Conflict
Input Signal on Device
Server Failure
Server s Conflict
Server Connection Lost
Licenses are not Configured
E-mail is not Set for Users
E-Mail Server is not Configured
Storage is not Configured
Server Started
Archive Backup Finished.
As soon as Event occurs, the Action can be performed. See "Actions".
Additionally, Events can be tracked based on the schedule. For instance, Motion can be tracked only on weekends and
Input Signal – at 8PM-8AM. See "Setting up Schedule for Tracking Events" for details.
Finally, all Events are recorded in Log. See "Viewing Events Log" and "Write to Log".
Rev. 072017 Page | 74
Page 75

DW Spectrum 3.0
Setting up Schedule for Tracking Events
Events can be tracked based on the schedule. For instance, Motion can be tracked only on weekends and Input Signal
– at 8PM-8AM.
The schedule can be configured as advanced parameters for the desired Event:
1. Open Event Advanced Parameters by clicking on Advanced on the Alarm/Event Rules form. The advanced settings
will be displayed on the bottom.
2. Click on Schedule... The following form will be displayed:
3. Select On or Off to enable/disable monitoring in particular cells.
4. Click on Schedule Grid:
Click and Drag to select multiple cells
Click on hour to select an entire column
Click on weekday to select an entire row
Click Schedule Grid's top left corner to select all cells
The above example shows that the event is tracked on workdays (Sun-Fri) since 8AM till 8PM.
By default, events are always tracked.
Motion on Camera
Occurs if motion is detected on Camera(s).
Basic Parameters
Camera(s) motion is detected on. To specify:
Rev. 072017 Page | 75
Page 76

DW Spectrum 3.0
1. Click on Any Camera at the desired row on the Alarm/Event Rules form (see "Configuring Events and Actions
(Admin Only)"). The following form will appear:
2. Check the cameras to detect motion, then click OK (Cancel will discard changes).
To select all Cameras on a specific Server, set the flag on it. To filter search, use the Filter box. Filter criterias are
the same as search (see "Search"). It is possible to Drag'n'Drop the selected Cameras from Resource Tree onto the
Event's advanced settings form.
IMPORTANT. To detect motion, recording must be enabled on Camera. Refer to "Modifying Recording
Schedule" for information on how to enable recording. If the selected Camera is not being recorded, then the
corresponding message will be displayed (see above).
If cameras are not specified, motion will be detected on all the cameras that support it.
Advanced Parameters
Schedule (see "Setting up Schedule for Tracking Events").
Starts/Stops. Available only for instant actions (Send Mail, Show Notification, Camera Output). If no motion occurs for
3 seconds, the current motion Event is considered stopped. When motion occurs again, a new motion Event is
generated.
May result in
Camera Recording.
Panic Recording.
These actions are performed while motion is taking place on at least one camera out of the selected.
Rev. 072017 Page | 76
Page 77

Send Mail.
Show Notification.
Camera Output.
These actions will be performed if motion is detected on at least one camera out of the selected.
Why Event may work incorrectly
Recording is disabled for Camera(s) that are being monitored. Refer to "Modifying Recording Schedule" for
information on how to enable recording for Camera.
Motion Mask is not set properly. See "Setting up Motion Mask and Motion Sensitivity".
Too many Cameras are monitored and too many Events occur.
Cameras that are monitored are offline.
Action is not configured properly. See the Action's description for details.
Notifications for this type of Event is hidden in system settings. See "Notifications" for more details.
Device Disconnection/Malfunction
DW Spectrum 3.0
Occurs if Device(s) is/are disconnected for whatever reason (network, Device malfunction etc.). Device is considered
disconnected if no data is received for 10 seconds. Once data is received from Device, the status is automatically
changed back to Online.
If Device is experiencing network issues over a minute, then appears within Resource Tree.
Additional Events may occur as well and may help to investigate the issue:
Network Issue. This means that network is unable to transfer data between Device and Server , which may be the
reason why a device goes offline.
Server Failure. If Server is down, all hosted Devices drop offline.
Camera IP Conflict. If another Camera with the same IP enters the network, one of these two Cameras will go
offline.
Server s Conflict. If a new Server is connected to another Server on the same network and pulls data from the
same Cameras, then some Cameras may drop offline because they may not provide several streams
simultaneously.
Basic Parameters
Device(s). To specify:
1. Click on Any Device at the desired row on the Alarm/Event Rules form (see "Configuring Events and Actions
(Admin Only)"). The following form will appear:
Rev. 072017 Page | 77
Page 78

DW Spectrum 3.0
2. Check the devices to track, then click OK (Cancel will discard changes).
To select all Devices on a specific Server, set the flag on it. To filter search, use the Filter box. Filter criteria are the
same as search (see "Search"). It is possible to Drag'n'Drop the selected Devices from Resource Tree onto the Event's
advanced settings form.
If Devices are not specified, all Devices will be monitored.
Advanced Parameters
Schedule (see "Setting up Schedule for Tracking Events").
May result in
Send Mail.
Show Notification.
Device Output.
Why Event may work incorrectly
Too many Devices are monitored and too many Events occur.
Devices being monitored are offline.
Action is not configured properly. See the Action's description for details.
Notifications for this type of Event is hidden in system settings. See "Notifications" for more details.
Rev. 072017 Page | 78
Page 79

DW Spectrum 3.0
Storage Failure
Occurs if Server is unable to write data on one or more Storage. This may be caused by the following:
Hard disk malfunction.
Insufficient rights. The permission to write on disk or recorded folder may be restricted by the computer
Administrator.
Hard disk is too slow: too many cameras are recorded and hard disk cannot record on such speed. It may be useful
to add another hard disk drive.
Disk is full. By default, Server writes data to disk in a circular pattern: as soon as free disk space falls below 5 Gb,
oldest data will erase automatically. However, if the disk is full by any foreign data and free space is less than 5 Gb,
Server writes data on disk and erases it immediately. In this particular case, the following Event occurs.
If no Storage are selected to write to, Storage is not Configured is fired up.
Basic Parameters
None
Advanced Parameters
Schedule (see "Setting up Schedule for Tracking Events").
Why Event may work incorrectly
Notifications for this type of Event is hidden in system settings. See "Notifications" for more details.
Network Issue
Occurs if network is unable to transfer data between Device and Server and packet loss is detected. That may cause
for frame rate to drop on Device(s). If no frames are received from Device for 10 seconds, Device is considered offline.
Camera Disconnected event is then generated in this particular case.
Basic Parameters
None
Advanced Parameters
Schedule (see "Setting up Schedule for Tracking Events").
Why Event may work incorrectly
Notifications for this type of Event is hidden in system settings. See "Notifications" for more details.
Device IP Conflict
Occurs If another Device with the same IP has entered the network, resulting in one of these two Devices to go offline.
Camera Disconnected event is then generated in this particular case.
Basic Parameters
Rev. 072017 Page | 79
Page 80

DW Spectrum 3.0
None
Advanced Parameters
Schedule (see "Setting up Schedule for Tracking Events").
Why Event may work incorrectly
Notifications for this type of Event is hidden in system settings. See "Notifications" for more details.
Input Signal on Device
Occurs if input signal is detected on Device(s). DW Spectrum may detect input signals on the following Devices:
ONVIF-compliant (input support via ONVIF may vary from Device to Device)
Axis.
Basic Parameters
Device(s) the input signal is detected on. To specify:
1. Click on Any Device at the desired row on the Alarm/Event Rules form (see "Configuring Events and Actions
(Admin Only)").:
Note: Devices that do not support input, are highlighted in red.
2. Check the Devices to detect input, then click OK (Cancel will discard changes).
Rev. 072017 Page | 80
Page 81

DW Spectrum 3.0
To select all Devices on a specific Server, click on the check box. To filter search, use the Filter box. Filter criteria are
the same as search (see "Search"). It is possible to Drag'n'Drop the selected Devices from Resource Tree onto the
Event's advanced settings form.
IMPORTANT. To detect input signals, input must be supported on Device. If the selected Device does not
support input, then the corresponding message will be displayed (see above).
If the particular Devices are not specified, then input signal will be detected on all the Devices that support input.
Advanced Parameters
Schedule (see "Setting up Schedule for Tracking Events").
Starts/Stops. Available only for instant actions (Send Mail, Show Notification, Device Output etc).
Input ID – I/O Module port to take signal from (see Setting Up I/O Moduless).
May result in
Camera Recording.
Panic Recording.
These actions will be performed while input signal is taking place on at least one Device out of the selected.
Send Mail.
Show Notification.
Device Output.
These actions will be performed once input signal is detected on at least one Device out of the selected.
Why Event may work incorrectly
Too many Devices are monitored and too many Events occur.
Devices that are being monitored are offline.
Action is not configured properly. See the Action's description for details.
Notifications for this type of Event is hidden in system settings. See "Notifications" for more details.
Server Failure
Occurs if Server is down (either hardware/software issue or manual shutdown). In this case, all Devices hosted on
Server are dropped offline.
Basic Parameters
None
Advanced Parameters
Schedule (see "Setting up Schedule for Tracking Events").
Why Event may work incorrectly
Notifications for this type of Event is hidden in system settings. See "Notifications" for more details.
Rev. 072017 Page | 81
Page 82

DW Spectrum 3.0
Servers Conflict
Occurs if a new Server is connected to another Server on the same network and pulls data from same Devices. In
this case, some Devices may drop offline because they may not provide several streams simultaneously. This results in
Device Disconnection/Malfunction Event. Message contains the specific list of devices that are used by both servers.
Basic Parameters
None
Advanced Parameters
Schedule (see "Setting up Schedule for Tracking Events").
Why Event may work incorrectly
Notifications for this type of Event is hidden in system settings. See "Notifications" for more details.
Server Connection Lost
Occurs if connection to Server is lost for whatever reason (network issue or Server is down). In this case Client tries to
connect to another Server (if in multi-server environment) or reconnect to the current Server.
If User clicks on the notification, then login dialog will automatically open. See "Connecting to System and Working
Offline".
This notification will hide automatically as soon as the connection is restored.
Why Event may work incorrectly
Notifications for this type of Event is hidden in system settings. See "Notifications" for more details.
Licenses are not Configured
Occurs if no Licenses are activated. In this case, Notification is displayed.
In this case, it is not possible to record Cameras and view Analog Cameras.
If User clicks on the notification, then license dialog will automatically open. See "Obtaining and Activating DW
Spectrum Licenses".
This notification will hide automatically as soon as one License is activated.
Why Event may work incorrectly
Notifications for this type of Event is hidden in system settings. See "Notifications" for more details.
License Issue
Occurs if Server Licenses are activated on, went offline. In this case, Notification is displayed every 30 seconds.
In this case, it is not possible to record Cameras and view Analog Cameras.
Rev. 072017 Page | 82
Page 83

DW Spectrum 3.0
If User clicks on the notification, then license dialog will automatically open. See "Obtaining and Activating DW
Spectrum Licenses".
This notification will hide automatically as soon as one License is activated.
Why Event may work incorrectly
Notifications for this type of Event is hidden in system settings. See "Notifications" for more details.
E-mail is not Set for Users
Occurs if E-Mail address is not set up:
Viewer is notified if an email address is not configured.
Administrator is notified if a User does not have an email address specified.
In this case, Notification will be displayed.
If click on the notification, User's mail settings dialog will open. See "Changing User Settings".
If User does not have an e-mail address, that user is unable to receive mail notifications.
This notification will hide automatically as soon as all email addresses are configured (for Admin) or individual email
address is set (Viewer).
Mail Notifications may not work if E-Mail Server is not configured. In this case, Error while Sending E-Mail notification
will appear.
Why Event may work incorrectly
Notifications for this type of Event is hidden in system settings. See "Notifications" for more details.
E-Mail Server is not Configured
Occurs if E-Mail Server is not configured. In this case, Notification is displayed.
If E-Mail Server is not configured, mail notifications cannot not be sent.
If click on the notification, Mail Server settings dialog will open. See "Mail Notifications" for details.
This notification will hide automatically as soon as all E-Mail Server parameters are configured.
Mail Notifications may not work if E-mail is not Set for Users. In this case, Error while Sending E-Mail notification will
appear.
Why Event may work incorrectly
Notifications for this type of Event is hidden in system settings. See "Notifications" for more details.
Error while Sending E-Mail
Occurs when E-Mail Notification fails. In this case, Notification is displayed.
Rev. 072017 Page | 83
Page 84

If click on the notification, Mail Server settings dialog will open. See "Mail Notifications" for details.
Storage is not Configured
Occurs if no Storage are selected (recording flag might have been removed accidentally).
In this case, Notification is displayed.
If Storage are not configured, it is not possible to record Cameras.
If click on the notification, storage configuration dialog will open. See "Configuring Server Storage/NAS".
This notification will hide automatically once Storage has a recording flag set up.
Why Event may work incorrectly
Notifications for this type of Event is hidden in system settings. See "Notifications" for more details.
Server Started
DW Spectrum 3.0
Occurs when any Server registered in the system has started.
Basic Parameters
None
Advanced Parameters
Schedule (see "Setting up Schedule for Tracking Events").
Why Event may work incorrectly
Notifications for this type of Event are hidden in system settings. See "Notifications" for more details.
Archive Backup Finished
Occurs when Archive Backup is done. Does not occur if Archive Backup is set up to perform in Real-Time. See
"Configuring Redundant Storage (Storage Backup)" for details.
Basic Parameters
None
Advanced Parameters
Schedule (see "Setting up Schedule for Tracking Events").
Why Event may work incorrectly
Notifications for this type of Event are hidden in system settings. See "Notifications" for more details
Backup is set up to Real-Time mode.
Rev. 072017 Page | 84
Page 85

DW Spectrum 3.0
Generic Event
Occurs when Server receives a special HTTP Request from an external system. For instance, it may be access control
system or alarm/monitoring system. Each request contains the following fields:
Source
Caption
Description.
Also HTTP Request may contain the "State" field. If specified, the event is considered as continuous. For instance, it is
possible to set up the following Rule: while Generic Event occurs, Camera 1 is recording. In this case, if Server receives
Generic Event that contains State=Start ,Camera 1 will start recording and will be recorded until Server receives
Generic Event that contains State=Stop.
If there is no "State" field in HTTP request, Generic Event is considered as instant. If any of continuous actions (Camera
Recording, Camera Output, Panic Recording or Repeat Sound) is bound to this Event, the Rule will not work.
See "Tracked Events" for more information about continuous and instant Events.
The format of HTTP requests is documented in API that available on the Server's web page (see Using Server's Web
Interface).
DW Spectrum can also send the HTTP request if an event occurs. See "Perform HTTP Request".
Basic Parameters
Source
Caption
Description.
The fields in HTTP request should match the corresponding fields in Event settings (case matters). If a string is empty,
the field always matches. For instance, Event may be configured in the following way:
Source – "foo"
Caption – "bar"
Description – "" (empty).
In this case HTTP Request with the following data will trigger Generic Event:
Source – "foo12345" (contains "foo")
Caption – "bartender" (contains bar)
Description – "Lorem ipsum dolor sit amet" (empty string makes all values match).
HTTP Request with the following data will NOT trigger Generic Event:
Source – "Foo12345" (contains "Foo" instead of "foo")
Caption – "batender" (does not contain "bar")
Description – "Lorem ipsum dolor sit amet" (empty string makes all values match).
Advanced Parameters
Rev. 072017 Page | 85
Page 86

DW Spectrum 3.0
Schedule (see "Setting up Schedule for Tracking Events").
Why Event may work incorrectly
HTTP request is malformed. Check Server API
Request is filtered out. Try to clear all fields (Source, Caption, Description) and trigger HTTP request once more
HTTP Request does not contains the "State" field and a continuous type of Action is bound to it (Camera Recording,
Camera Output, Panic Recording or Repeat Sound)
Notifications for this type of Event are hidden in system settings. See "Notifications" for more details.
Actions that DW Spectrum Can Do
DW Spectrum reacts differently to each Event. The result is called Action. Each Action that is fired up by the software
may have its own parameters. Refer to the particular Action description for more information:
Actions that DW Spectrum Can Do
Notifications
Visual Event Indication
Showing Cameras on Alarm Layout
Mail Notifications
Start Recording on Camera
Start Panic Recording
Create Bookmark
Trigger Output on Device
Play Sound
Repeat Sound
Speak
Execute PTZ Preset
Display text on Cameras
Perform HTTP Request
Write to Log.
See "Tracked Events" for detailed information on Events.
Rev. 072017 Page | 86
Page 87

DW Spectrum 3.0
DW Spectrum provides a powerful notification mechanism for
notifying Users of Events that occur. When Event occurs, right Panel
starts blinking (the color varies depending on the importance of the
notification). Notification Types:
System Messages (red) – something is not properly configured.
Can be fixed.
Warnings (orange) – critical event (Device disconnected, Server
failure, etc).
Notifications (green) – non-critical events (motion, input signal,
etc).
If a user opens the panel, the following will be displayed (on the right):
Notifications
It is possible to perform the following:
Obtain additional information by hovering over the notification with a mouse cursor. The information will appear
on the left:
Motion Detection and Input Signals – the frame from Camera the Event occurred at and additional information.
Click on the notification or additional information to open Camera to view its archive for event specifics.
Network Issue on Device – the last frame received from Device and additional information. Click on the
notification or additional information to open Device Settings.
Issues related to System Messages – additional information. Click on the notification to go to the appropriate
dialog.
When clicking on notification or detailed information, the corresponding action will be performed:
Motion or Input on Camera – Camera will be opened in a new Tab.
Device IP Conflict – Device's Web Page will be opened in a browser
Device Network Issue – Device's Settings form will be opened
Server Failure or Storage Issue – Server Settings form will be opened
E-Mail Issue – E-Mail Server Settings form will be opened
Rev. 072017 Page | 87
Page 88

DW Spectrum 3.0
License Issue – License Form will be opened
Connection is Lost – connection dialog will be opened
Server Conflict – no action
Generic Event – no action
Close the notification. Either Right Click or hover over with a mouse cursor to obtain additional information and
click on the cross sign in the top right corner. Green and yellow notifications will eventually disappear.
View Event Log. Click on .
Go to Event Settings. Click on .
Show/Hide notifications of this particular type. Click on or Open Main Menu and go to Local Settings –>
Notifications:
Select notifications types that should be displayed. Click Apply or OK when finished. To discard changes, click
Cancel.
Basic Parameters
Rev. 072017 Page | 88
Page 89

DW Spectrum 3.0
Type of Users notifications are displayed to:
All users
Administrators only.
Advanced Parameters
Aggregation (Interval of action): no more than once per certain amount of time (to reduce the amount of events), or
instant.
May be caused by
All Events.
Why Action may work incorrectly
Some notifications are disabled.
Event is not configured properly. See Event description for details
Too long interval of action is set. Try "instant".
Visual Event Indication
If too many Devices are opened at the same time, it becomes very difficult to locate a specific Device when Event
occurs. DW Spectrum provides a powerful and intuitive way to highlight a specific object on Scene if Event occurs:
The following Events are indicated:
Motion on Camera, Network Issue and Input Signal on Device – visualization on Camera
Server Issue – visualization on Server Monitoring Widget if Server is being monitored (see "Monitoring Server s
(Admin Only)").
The action is always enabled and does not require configuration.
See also "Showing Cameras on Alarm Layouts".
Rev. 072017 Page | 89
Page 90

DW Spectrum 3.0
Showing Cameras on Alarm Layout
DW Spectrum provides the ability to dynamically create Alarm Layouts. They allow bringing specific Cameras to User's
attention when a specific Event occurs. In this case a dynamic layout is created and the corresponding cameras are
placed on it. This layout is displayed in the following way:
For instance, Rule can be configured as follows: if motion occurs on cameras 1 or 2, cameras 2, 3 and 4 will be placed
on Alarm Layout.
Basic Parameters
Camera(s) to show on Alarm Layout. To specify:
1. Click on Select at least one camera in the desired row on the Alarm/Event Rules form (see "Configuring Events
and Actions (Admin Only)"). The following form will appear:
2. Check the cameras to display, then click OK (Cancel will discard changes).
To select all Cameras on a specific Server, check the corresponding box. To filter search, use the Filter box. Filter
criteria is the same as search (see "Search"). It is possible to Drag'n'Drop the selected Cameras from Resource Tree
onto the Action's advanced settings form.
Advanced Parameters
Rev. 072017 Page | 90
Page 91

DW Spectrum 3.0
Aggregation (Interval of action): no more than once per certain amount of time (to reduce the amount of events), or
instant.
Users to show alarm to – it is possible to show Alarm Layout to certain Users. If several Events are configured to show
different Cameras on alarm layout for the same User, the corresponding Cameras will be added upon the Event
occurrence. If several Events are configured to show different Cameras on alarm layout for different Users, each User
will see the separate Alarm Layout.
Force Alarm Layout opening – if checked, when Event occurs Alarm Layout will show up immediately. If not, the
Alarm Layout will be created, but the user will still be watching the current layout and will be able to switch to Alarm
Layout.
Also show source camera – available only if Event is bound to Cameras. If checked, when Event occurs Alarm Layout
will contain camera that created Event. For instance, if Rule is set up to show Cameras 2 and 3 and if motion occurs
on Camera 1, Alarm Layout will contain Cameras 1, 2 and 3. If unchecked, it will contain only Cameras 2 and 3.
May be caused by
All Events.
Why Action may work incorrectly
Alarm Layout is not showing to a certain User
Event is not configured properly. See the Event description for details
Too long interval of action is set. Try "instant".
Mail Notifications
DW Spectrum can send E-mails to Users or to additional addresses when Events occur.
IMPORTANT. E-Mails cannot be sent if E-Mail Server is not configured. In this case, E-Mail Server is not
Configured notification is shown up. See "Configuring Mail Server for E-Mail Notifications" for more details.
Basic Parameters
Users the E-Mails should be sent to:
To filter search, use the Filter box. Filter criteria is the same as search (see "Search"). It is possible to Drag'n'Drop
selected Users from Resource Tree onto Action's advanced settings form.
IMPORTANT. E-Mails will be sent to Users' E-Mail addresses. If E-Mail address is not configured for User, then the
user cannot receive E-Mails (see above). E-mail is not Set for Users notification is generated in this case. See
"Changing User Settings" for information on how to set up E-Mail for User.
Note: To send E-Mails to additional addresses, see advanced parameters.
Advanced Parameters
Rev. 072017 Page | 91
Page 92

DW Spectrum 3.0
Additional Recipients – additional E-Mail addresses to send notifications to. Several recipients must be separated
by the ";" symbol.
Aggregation (Interval of action): no more than once per certain amount of time (to reduce the amount of events), or
instant.
Note: Click on Global Email Settings to configure E-Mail Server parameters.
As soon as event occurs, a mail notification is sent as follows:
May be caused by
All Events.
Why Action may work incorrectly
E-Mail Server is not configured. In this case, E-Mail Server is not Configured notification will appear. See "Configuring
Mail Server for E-Mail Notifications" for more details.
Event is not configured properly. See Event description for details
Too long interval of action is set. Try "instant".
Rev. 072017 Page | 92
Page 93

DW Spectrum 3.0
Configuring Mail Server for E-Mail Notifications
In order to send Mail Notifications on Events, E-Mail Server should be configured. To configure E-Mail Server:
1. Open Main Menu –> System Administration (CTRL+ALT+A) and swith to the Email tab.
2. Choose quick or advanced E-Mail Server setup (see below for reference).
3. When finished, press OK to apply or Cancel to discard settings.
Quick E-Mail Server Setup
E-Mail/Password – address and password of the mail account, which will be used for outgoing mail. DW
Spectrum will handle the rest.
Note: click Test to ensure that the settings are correct. If test fails:
If the result is "Cannot test such parameters", the domain name is not supported. It is necessary to switch to
Advanced mode and set up the server manually.
If the result is different, the error message will be displayed:
Advanced E-Mail Server Setup
Rev. 072017 Page | 93
Page 94

The parameters are the same as in Simple Setup plus:
DW Spectrum 3.0
SMTP Server: E-Mail server address
Port – SMTP Port
Connection type: (Secure (TLS), Secure (SSL), Unsecure).
Note: click Test to ensure that the settings are correct. If test fails:
Try a different SMTP Port
Try a different connection type.
Start Recording on Camera
Starts recording on Camera(s) when Event occurs. For instance, if Motion is detected on Cameras 1, 2 or 4, recording
on Cameras 4, 5 and 6 will start.
Basic Parameters
Camera(s) to record. To specify:
1. Click on Select at least one camera in the desired row on the Alarm/Event Rules form (see "Configuring Events
and Actions (Admin Only)"). The following form will appear:
Rev. 072017 Page | 94
Page 95

2. Check the cameras to record, then click OK (Cancel will discard changes).
DW Spectrum 3.0
To select all Cameras on a specific Server, check the corresponding box. To filter search, use the Filter box. Filter
criteria is the same as search (see "Search"). It is possible to Drag'n'Drop the selected Cameras from Resource Tree
onto the Action's advanced settings form.
IMPORTANT. To record Camera on Event, recording must be enabled on Camera. Refer to "Modifying
Recording Schedule" for information on how to enable recording. If the "Recording" flag is not set on the selected
Camera, the following message will be displayed (see above).
Advanced Parameters
Quality and fps – target recording parameters for Camera(s). If Camera's maximum FPS is lower than specified,
maximum FPS will be acquired.
Post-recording – the time it takes for the recording to be performed after the event is f complete.
May be caused by
Motion on Camera
Input Signal on Device
Generic Event.
Rev. 072017 Page | 95
Page 96

DW Spectrum 3.0
Why Action may work incorrectly
Recording is not enabled on Camera. Refer to "Modifying Recording Schedule" for information on how to enable
recording.
Event is not configured properly. See the Event description for details.
Start Panic Recording
Starts Panic Recording when Event occurs.
Panic Recording mode switches Recording Settings for all Cameras to maximum FPS and Quality.
Note: if Recording is not enabled for Camera, Panic Recording will not be activated.
Current Panic Recording status can be viewed:
in Recording Schedule (see "Modifying Recording Schedule")
in server's settings (see "Obtaining and Configuring Server ’s Additional Settings (Admin Only)").
Basic Parameters
None.
Advanced Parameters
None.
May be caused by
Motion on Camera
Input Signal on Device
Generic Event.
Why Action may work incorrectly
Event is not configured properly. See Event description for details.
Create Bookmark
Creates Bookmark in the archive of one or several Cameras when Event occurs. See "Using Bookmarks". Bookmark is
the footage in archive that is specially marked.
Note: To be able to set Bookmarks, recording should be enabled on Camera.
Bookmark will be named automatically in the following way: <Event> on <Device>.
Basic Parameters
Camera(s) to set Bookmarks on. To specify:
1. Click on Select at least one camera in the desired row on the Alarm/Event Rules form (see "Configuring Events
and Actions (Admin Only)"). The following form will appear:
Rev. 072017 Page | 96
Page 97

DW Spectrum 3.0
2. Check the cameras to record, then click OK (Cancel will discard changes).
Advanced Parameters
Fixed Duration – the duration of the bookmark. If checked, Pre-Recording can be set as well. It specifies the amount
of time to bookmark before the event. Can be unchecked for the following continuous events: Motion on Camera,
Input Signal on Device, Generic Event. If unchecked, Bookmark will continue until the event stops. Additionally
Pre-Recording and Post-Recording can be set. They specify the amount of time to bookmark before and after the
event.
Tags that will be added to Bookmark.
May be caused by
All Events.
Why Action may work incorrectly
Recording is not enabled on Camera that is used for bookmarking. Refer to "Modifying Recording Schedule" for
information on how to enable recording
Event is not configured properly. See Event description for details.
Trigger Output on Device
It is possible to generate output via two different methods:
Output – generates output on Device(s) while Event occurs and stops when Event ends.
Device output for 30 seconds – generates output on Device(s) when Event occurs and stops output in 30 seconds.
Basic Parameters
Device(s) output is triggered on. To specify:
Rev. 072017 Page | 97
Page 98

DW Spectrum 3.0
1. Click on Select at least one Device in the desired row on the Alarm/Event Rules form (see "Configuring Events
and Actions (Admin Only)"). The following form will appear:
2. Check the Devices to trigger output, then click OK (Cancel will discard changes).
To select all Devices on a specific Server, check the corresponding box. To filter search, use the Filter box. Filter
criteria is the same as search (see "Search"). It is possible to Drag'n'Drop the selected Devices from Resource Tree
onto the Action's advanced settings form.
IMPORTANT. To trigger output signals, output must be supported on Device. If the selected Device does not
support output, then the corresponding message will be displayed (see above).
Advanced Parameters
Output ID – I/O Module port to route signal (see Setting Up I/O Modules).
Auto-reset in (sec) – if checked, the output will be reset automatically after the specified period of time.
May be caused by
Any events – Device output for 30 seconds.
Motion on Camera, Generic Event and Input Signal on Device – synchronous output. Output stops when motion or
input are stopped.
Why Action may work incorrectly
Output is not supported on some Devices.
Output and Device output for 30 seconds are slightly different.
Rev. 072017 Page | 98
Page 99

DW Spectrum 3.0
Event is not configured properly. See Event description for details.
Play Sound
Plays the specific sound when Event occurs.
Basic Parameters
Sound to be played. It is possible to select any sound from the available options:
Camera to play the sound on. Camera should support 2-way audio. Right now 2-way audio is supported on Axis
devices with firmware 5.x or higher. See "Using 2-Way Audio".
Play to user. If checked, the sound will be played in client application.
IMPORTANT. Either Play to user should be checked or Camera for 2-way audio should be selected. Otherwise
the rule will be considered invalid.
Advanced Parameters
Volume
Aggregation (Interval of action): no more than once per certain amount of time (to reduce the amount of events), or
instant.
Sound library customization: adding, editing or removing sounds.
To view the sound library, go to Advanced Parameters and click Manage...
The following dialog will appear:
Rev. 072017 Page | 99
Page 100

To add sound:
1. Click Add... and select the desired audio file.
DW Spectrum 3.0
2. Choose the duration and set it to Clip sound up to. The audio file will be cut to the specified duration.
3. Choose Custom Title for the selected sound. If not specified, the file name will be used as the title by default.
4. Click Open to add the sound or Cancel to discard changes.
To rename the selected sound, click Rename... and enter a new title
To test the chosen sample, click Play...
To delete the selected sample, click Delete...
Click Open to add the sound or Cancel to discard changes.
May be caused by
All Events.
Why Action may work incorrectly
Event is not configured properly. See Event description for details.
Sound is muted. Open any item on Scene and check if the sound is muted. Volume settings are applied globally. See
"Adjusting Volume"
Rev. 072017 Page | 100
 Loading...