

Digital Watchdog DW-708N Series, DW-716N Series, DW-916N Series, DW-908N Series User Manual
Page 1
!"#$ %
& ' ( )
DIGITAL
RECORDING SYSTEM
DW-708N/716N/908N/916N
Series
Page 2
DW--
DW
If you require additional copies of this manual, please print the
manual contained in the CD provided with your purchase.
6/7 Series Manual
6/7 Series Manual
Page 3

Thank you for purchasing this product.
This DVR is produced by the most advanced technology and its quality is
guaranteed by strict reliability and compatibility testing.
This product manual provides necessary information for the correct use of this
product and also contains some useful tips.
Please read this manual thoroughly before using in order to prevent possible
breakdown due to any mishandling.
3
3
Page 4

Please be aware of the following precautions before installing the DVR.
• Avoid positioning the DW-6/7 series in any place where the unit may come into
contact with moisture, dust, or soot.
• Avoid placing in direct sunlight or near heating appliances.
• Keep the product away from electric shock or magnetic substances.
• Avoid temperature extremes (recommended operation temperature is between
0*C and ~40*C).
• Do not place any conductive material through the ventilation grills.
• Keep the system turned off before installation.
• Ensure enough space is left for cable connections.
• Place the system on a solid surface with sufficient air ventilation. Avoid any
surface that vibrates.
• Placing the system near electronic devices such as radio or TV may cause
breakdown to the product.
• Do not place any heavy object on the system.
4
4
Page 5
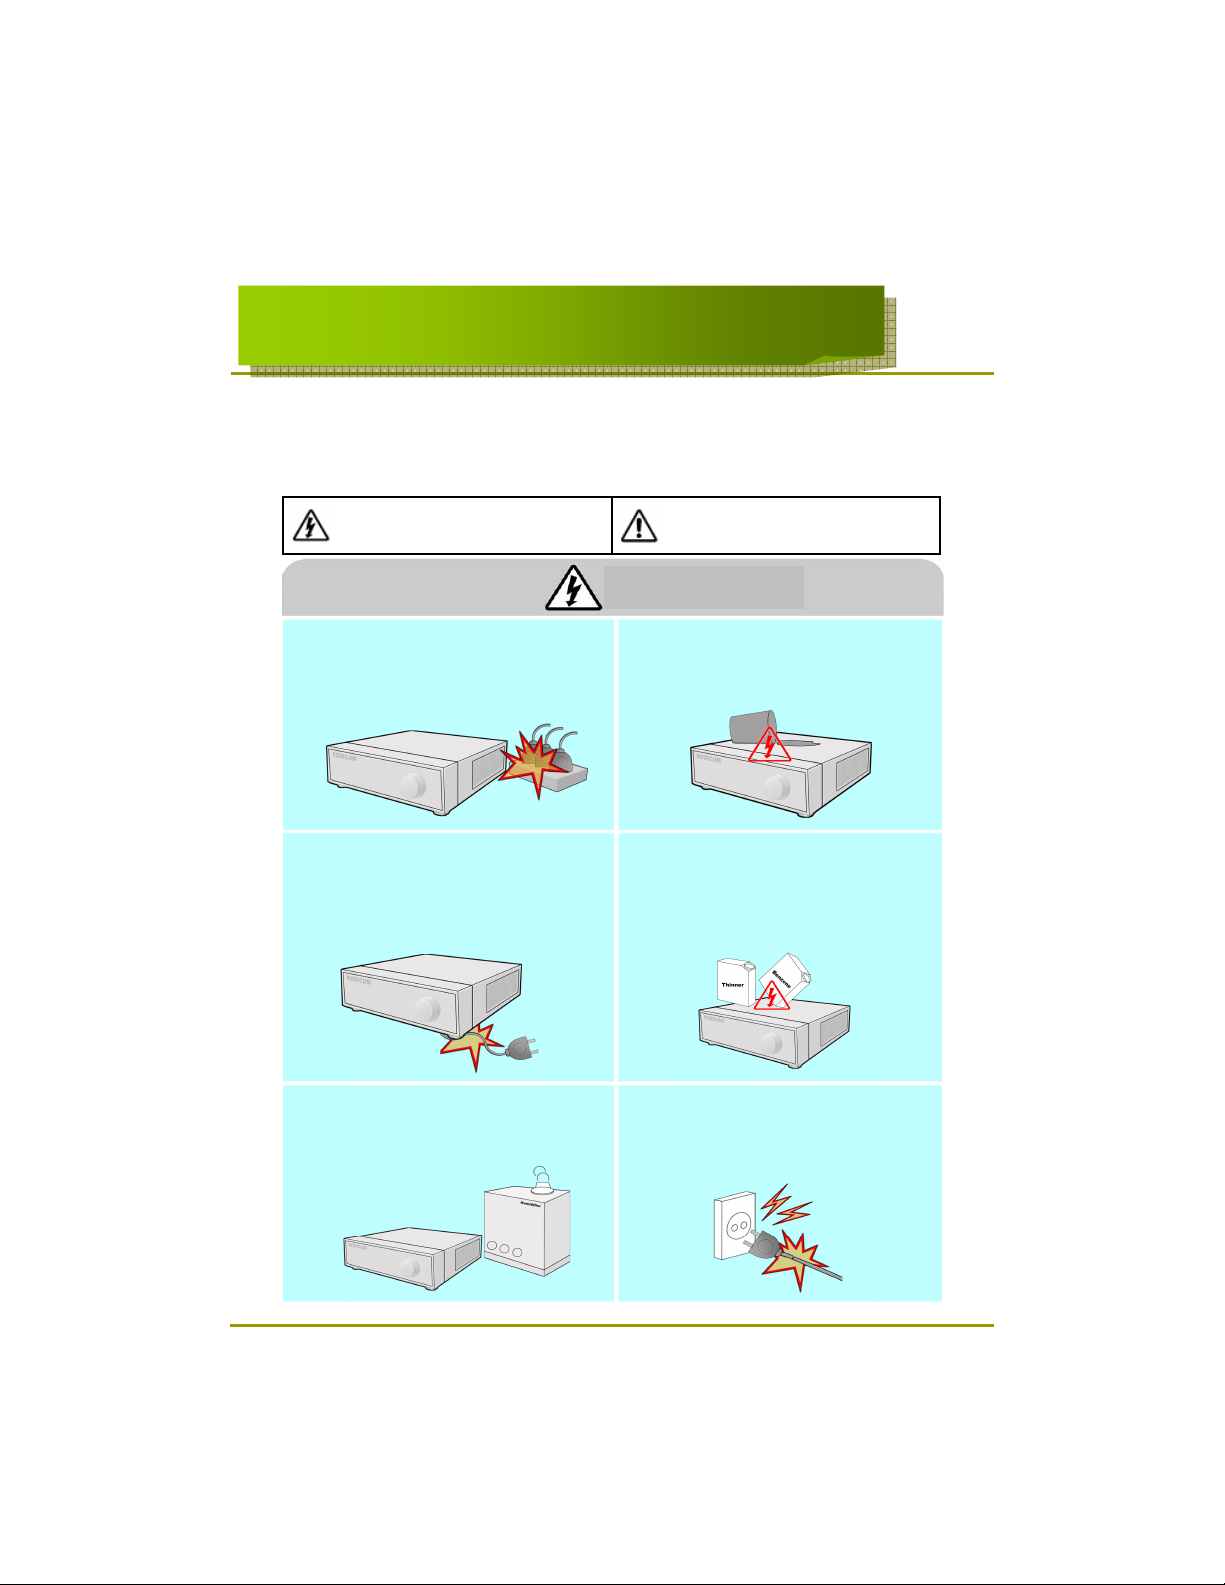
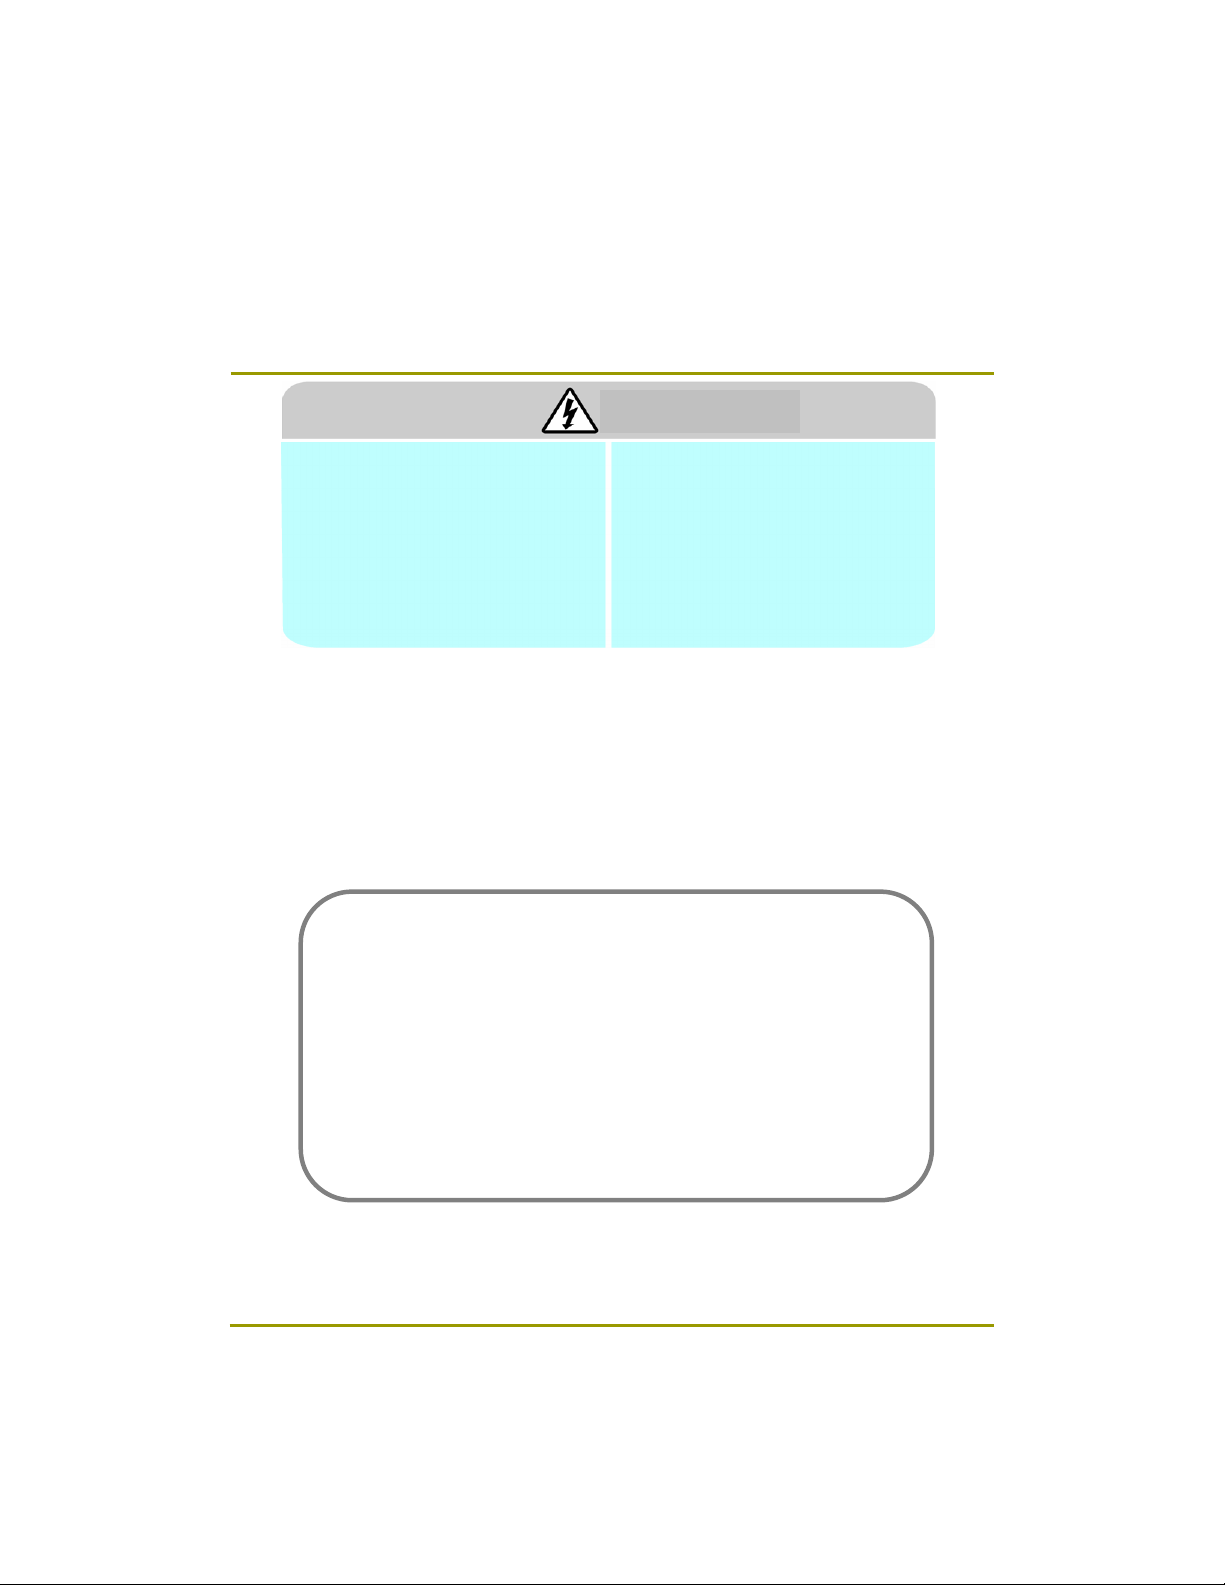
The following are warnings and cautions for the safety of the users and for
the prevention of any property damage. Please read below thoroughly.
Warning and Caution signs
Warning
If you are not aware of this
warning, you may be seriously
injured or be killed.
Caution
If you are not aware of this
caution, you may be injured
or cause property loss.
Warning
Turn off the system before installing the system.
Do not plug in several electric devices to the
same outlet.
This may cause heating, fire, or electric shock.
Prevent power cable from being severely bent or
pressed by a heavy object.
• This may cause fire.
Avoid any place with moisture, dust, or soot.
• This can cause fire or electric shock.
Do not place any liquid container on the system,
such as water, coffee, or beverage.
• If liquid is poured onto the system, it can cause
a system breakdown or cause fire.
Clean the dust around the system on regular
basis. When cleaning the system, always use dry
cloth. Do not use wet cloth or other organic
solvents.
• This may damage the surface of the system and
can cause system breakdown or electric shock.
When pulling the power cable from the plug, do
so gently. Do not touch the plug with wet hands
and avoid using the plug if the holes on the outlet
are too loose.
• This may cause fire or electric shock.
5
5
Page 6
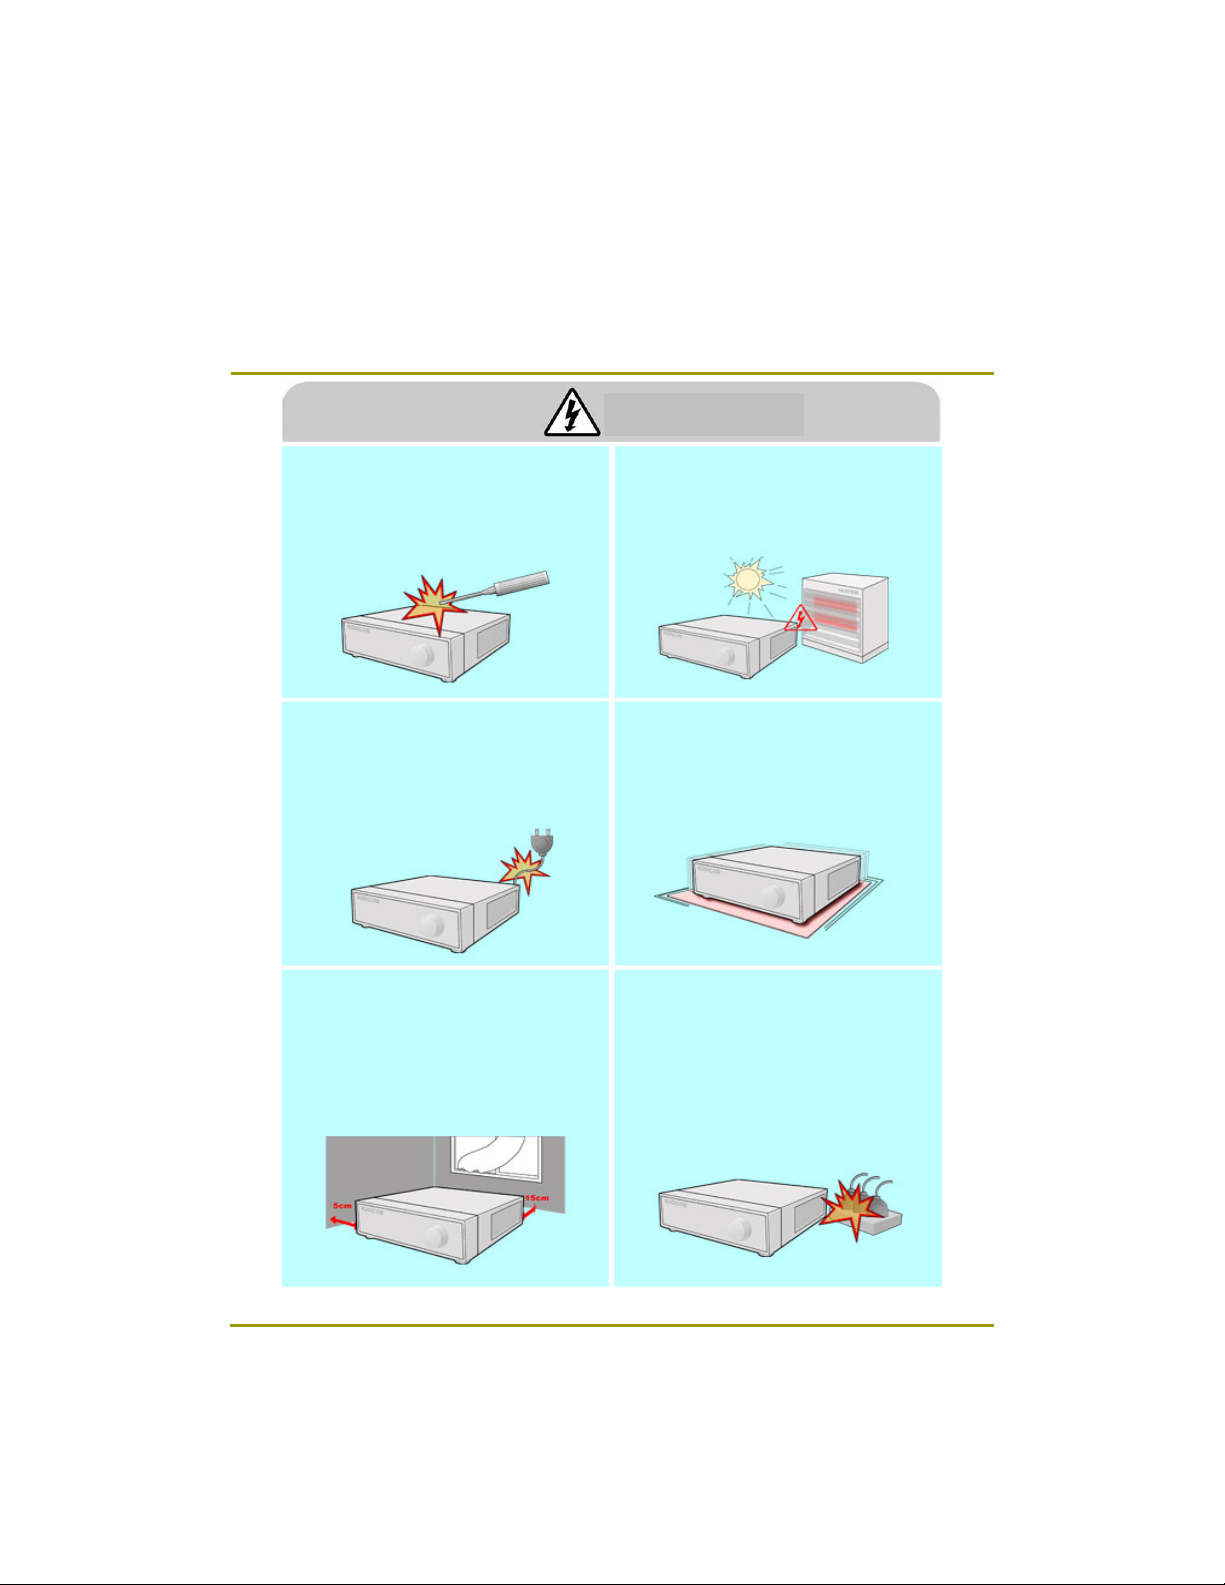
Warning
Do not attempt to disassemble, repair, or modify
the system on your own. It is extremely dangerous
due to high voltage running through the system.
• This may cause fire, electric shock, or serious
injuries.
Check for any danger signs such as moist floor,
loosened or damaged power cable, or unstable
surface. If you encounter any problems, ask for
assistance from your dealer.
• This may cause fire or electric shock.
Keep at least 15cm between the back of the
system and a wall for the cables connected into
the system. Otherwise, cables may be bent,
damaged, or cut.
• This may cause fire, electric shock, or injuries.
Install the system in a cool place without direct
sunlight and always maintain room temperature.
Avoid candle light and heat-generating devices
such as heater. Keep the system away from
places where many people pass.
• This may cause fire.
Install the system on a plain surface with sufficient
air ventilation. Do not place the system on
elevated surface.
• This may cause system breakdown or serious
injuries.
The power outlet must be placed on a ground,
and the voltage range must be within 10% of the
voltage rate. Do not use the same outlet with a
hair dryer, iron, refrigerator, or any heating
appliances.
• This may cause fire, heating, an electric shock.
6
6
Page 7
Warning
When the system’s battery is depleted, you must
change it with the same or equivalent type of
battery specified by the manufacturer. Depleted
batteries should be discarded according to
manufacturer’s instructions.
• This may cause an explosion.
If the system’s HDD has exceeded its life span,
you may not be able to recover any data stored
inside the HDD. If the video on the system screen
appears ‘damaged’ while playing a recording
stored inside the system’s HDD, it must be
replaced with a new one. Ask for an engineer’s
assistance for HDD replacement from your dealer.
• Provider is not responsible for deleted data
caused by user’s mishandling.
CALIFORINIA USA ONLY
This Perchlorate warning applies only to primary CR
(Manganese Dioxide) Lithium coin cells in the
product sold or distributed ONLY in California USA.
“Perchlorate Material - special handing may apply,
See www.dtsc.ca.gov/hazardouswaste/perchlorate.”
7
7
Page 8
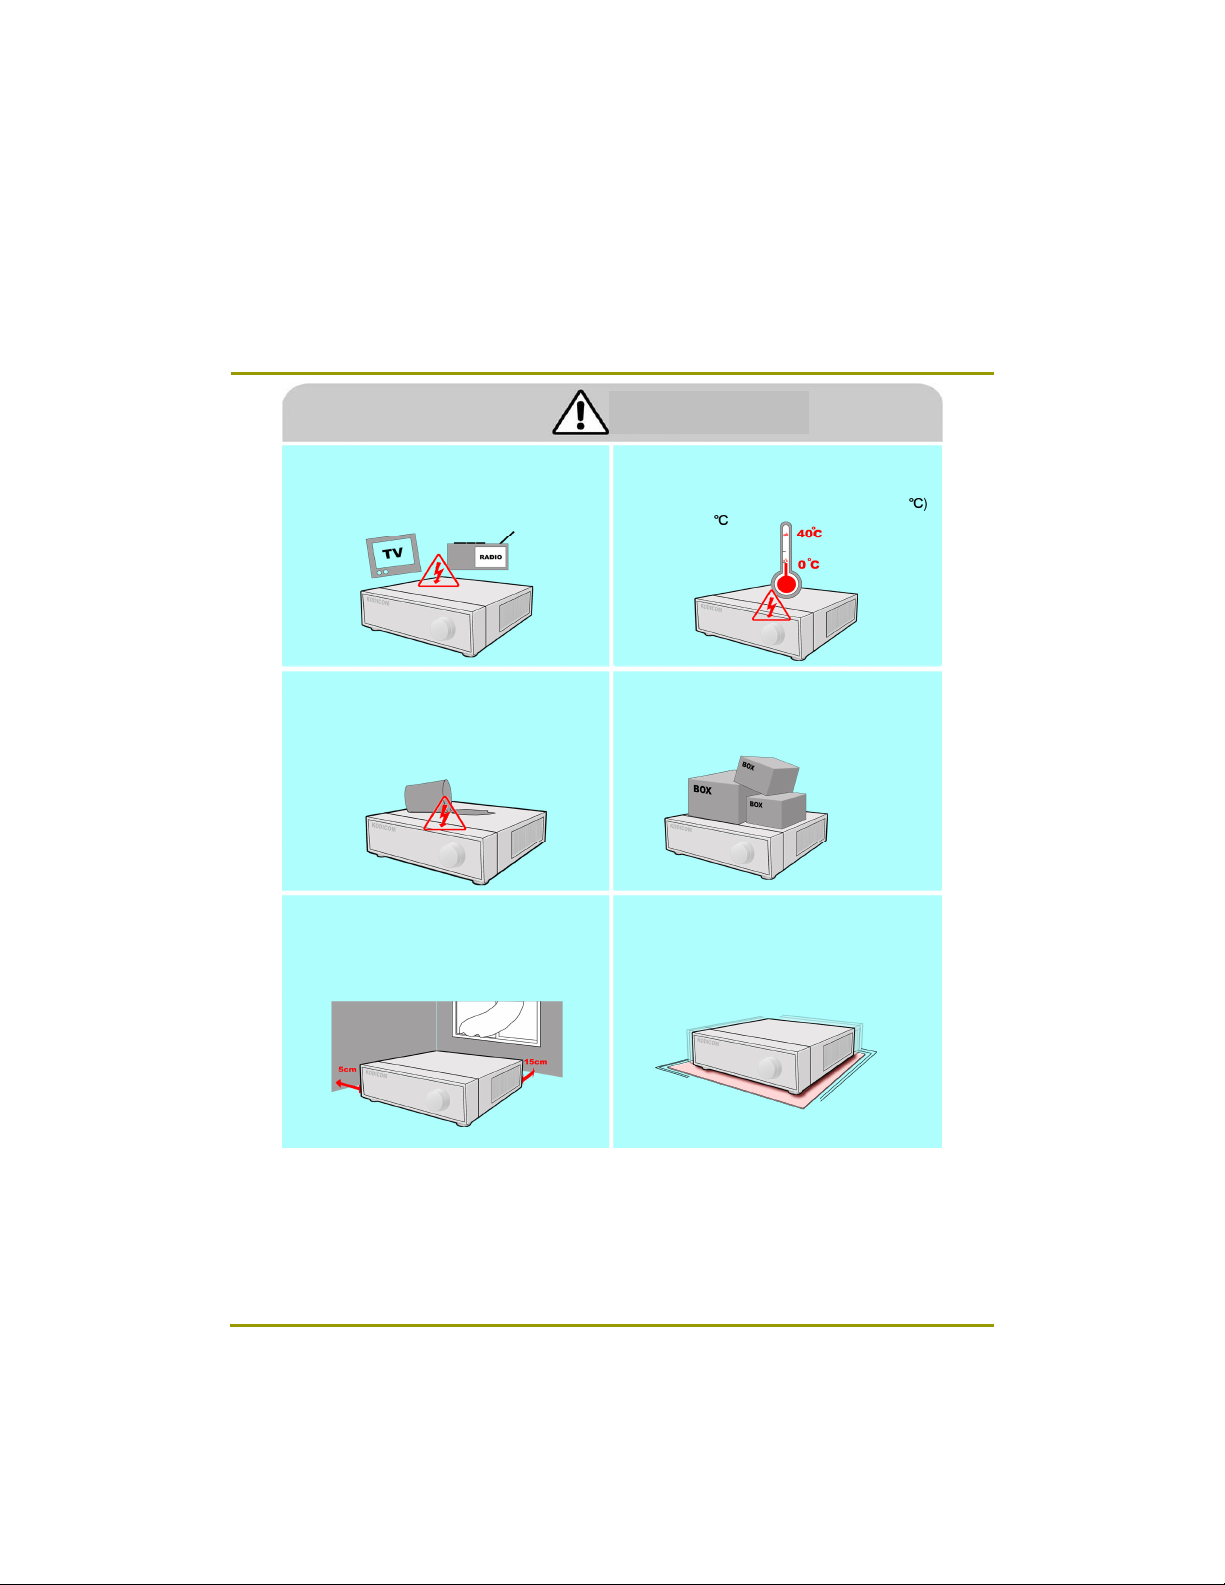
Caution
Do not install the system in a place with high
magnetic, electric wave, or wireless devices such
as radio or TV.
• Install the system in a place without magnetic
objects, electric frequencies, or vibration.
Prevent any substances from being inserted into
the system.
• This may cause system breakdown.
Install the system in a place with sufficient air
ventilation.
• Keep at least 15cm distance between the back
of the system and a wall, and at least 5cm
distance between the side of the system and a
wall.
Install the system in a place with appropriate
moisture and temperature level.
• Avoid installing the system with high (over 40+)
or low (under 0+) temperature.
Do not place any heavy object on the system.
• This may cause system breakdown.
Install the system on a stable and leveled surface..
• The system may not operate properly.
8
8
Page 9
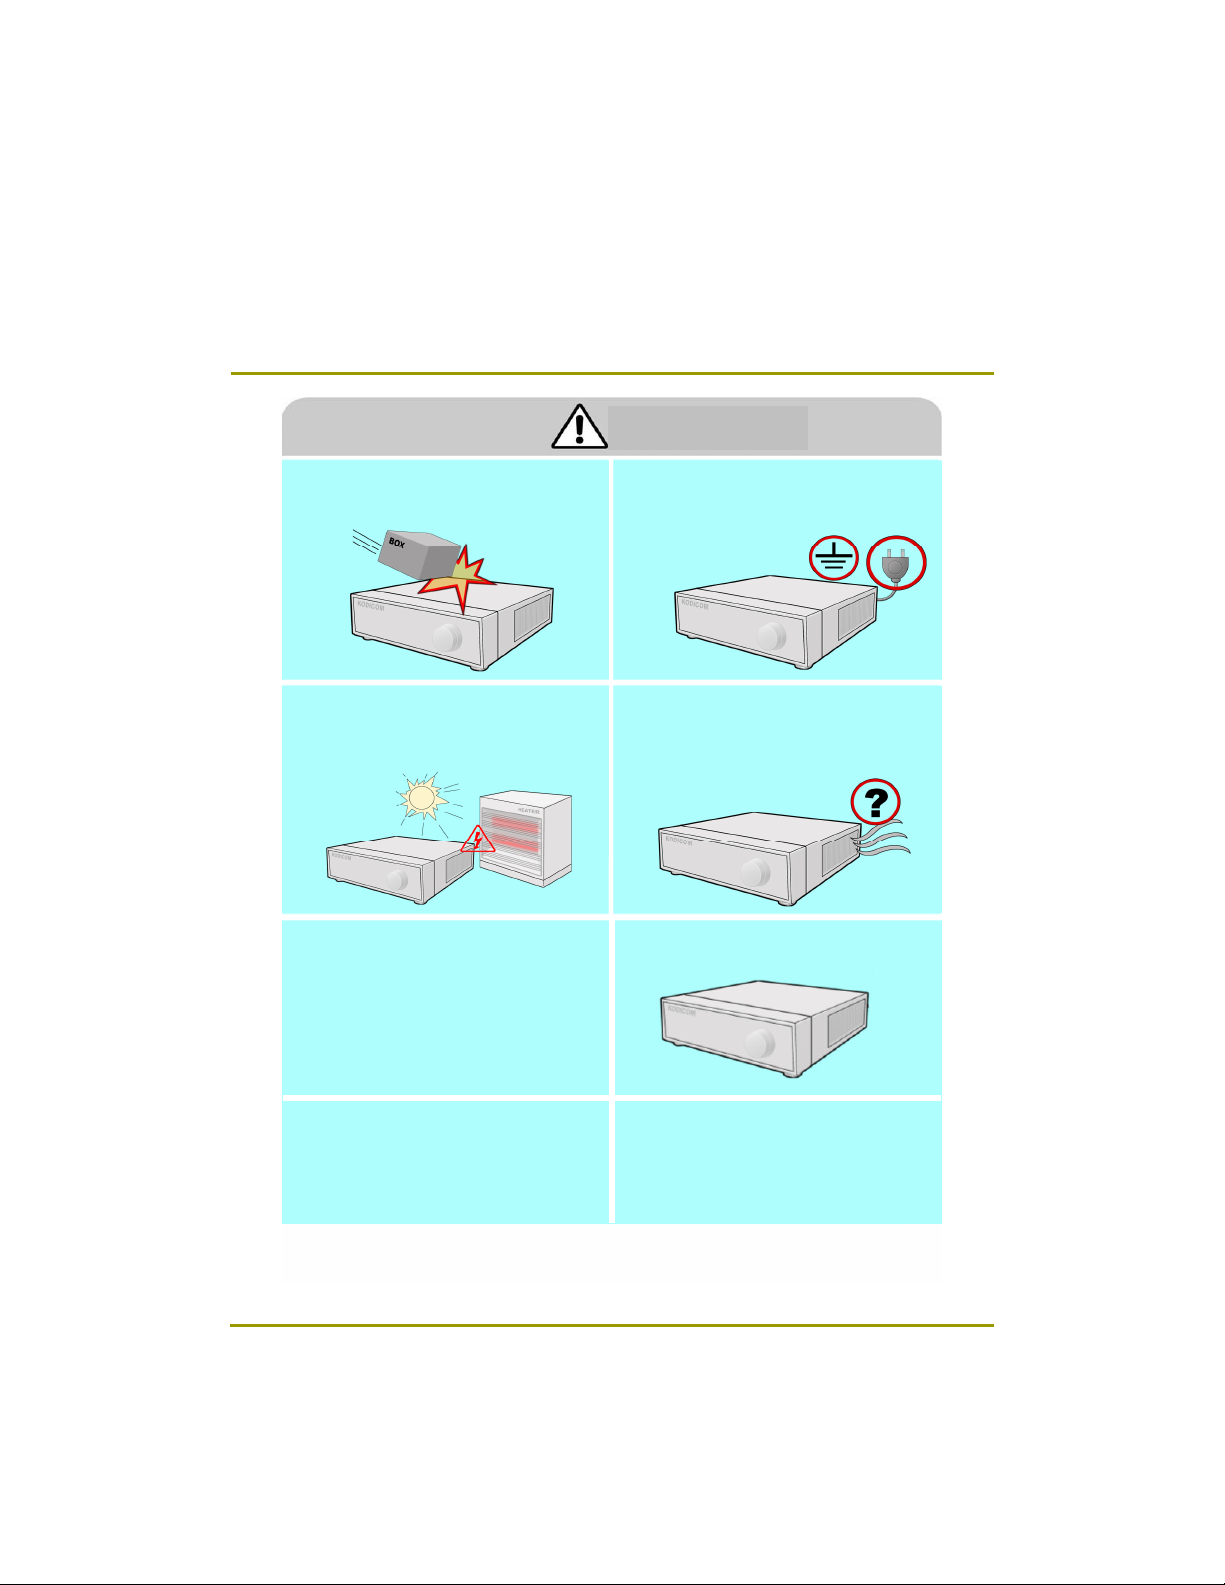
Caution
The system can be damaged from a strong impact
or vibration. Avoid throwing objects within the
vicinity of the system.
Avoid direct sunlight or any heating appliances.
Ventilate the air inside the system operation room,
and tighten the system cover firmly.
• System breakdown may be cause by
inappropriate environment.
The outlet must be placed on the ground.
If there is strange sound or smell, unplug the
power cable immediately and contact the service
Center.
• This may cause fire or electric shock.
Do not overturn the product under use.
It is recommended to use AVR (Automatic Voltage
Regulator) for stable power supply.
It is recommended to coil the core-ferrite around
the connector of the system to avoid
electromagnetic interference.
In order to maintain stable system performance,
have your system checked regularly by the
service Center.
• Provider is not held responsible for system
breakdown caused by user’s mishandling.
9
9
Page 10

Please check to make sure the following equipment are included when you
purchased DVR. If any items are missing, contact your dealer.
(The user manual will be included either inside the product software CD or a quick
Manual including important contents.)
CD
(Manual/Software)
Remote Controller
Manual (Site/Center)
Power Cable
HDD Screws
10
10
Audio Cable
Mouse
Page 11

Chapter 1. Introducing your real time DVR
1.1 Front Panel………………………………………..……………………………………………………………………15
1.2 Rea r Panel… ……… ……… ……………………… ………. .………… …………………………………………18
1.3 Description of the Remote Controller…......……………………………………………………………………23
Chapter 2. Installation
2.1 Checking install environment……………………………………………………………………………………24
2.2 Pan/Tilt Connection………………………………………………………………………………………..………26
2.3 KEYB OARD Co ntroller… …………… ……….…………… ……………………………………………………27
2.4 Connecting LAN/PSTN Communication Lines………………………………………………….……………28
2. 4.1 LA N a nd De dicat ed Lin e Conn ectio n…… …… …………… …. .…… …… ……………… ……… 28
2.4.2 P STN (teleph one line ) Connec tion (op tional) ……… ……… …………………………… …………2 9
2.5 External Alarm In Connection (Input)………………………………………...…………………………………30
2.6 Alarm Out Port Connection (Output)………………………………………..…………………………………31
Chapter 3. Live
3.1 Screen layout ……………………………………………...………………………………………………………33
3.2 Enabl ing full scree n and sequence mode……………………………………………………………………34
3.3 POP-UP MENU…………………………..……………………………………………………………………………35
3.4 Pan/Tilt Camera…………………………..…………… …………………… ………………………………………37
3.4.1 Switching to Pan/Tilt control mode………………………………………….…………………………………37
3.4.2 Pan/Tilt Camera Control………………….………………………………….…………………………………38
3.4.3 Supported Pan/Tilt Camera List………………….……………………….…………………………………39
3.5 ALAR M OUT – Manual Control……………………………………………………………..…………………40
3.5.1 Switching to Alarm Out mode……………………….…..………………………………………………………40
Chapter 4. System setup
4.1 Accessing Setup mode……………………………………………………………………………………………42
4.2 Recording menu… …………… ……………………… …….……………… …………… …………………… …42
4.2.1 Mo tion detection ………… …………… ……………..…… ………… …..…………………………… ……43
4. 2.2 Sc hedul e………… ……… ……… ……… ……..……………………………… ……… …………………45
4. 2.3 Qual ity /Reso lutio n…… …… ……… …… ….……… …………… …..……………… ……… ……… …46
4.2.3 .1 Normal REC Setting……….………………………..…………………..…………………………………46
4.2.3 .2 Alarm REC Setting…………….… ……………..…………………………………………………………47
4.2.3 .3 Network REC Setting……………..……………..…………………………………………………………48
4.2.3 .4 Alarm REC Time…………………….…………..…………………………………………………………49
4.2.4 Property………….…………..…………..…………….………………………..…………………………………50
4. 3 Came ra men u……………… ……… ……… ……… ……. ………………………… ……… ……… …………51
4.3.1 Channel Setting…………………………...………………..…………………..…………………………………51
4.3.2 Alarm In Setting………………………………………..…………………………………………………………52
4.3.3 Alarm In Out link………..…………………………….………………………..…………………………………53
4.3.4 Alarm In Camera link…………………………………..…………………………………………………………53
4.3.5 Spot Out Cam era link………..…..….…………….………………………..…………………………………54
11
11
Page 12

4 .4 Net wo rk… … …… …… ……… …… ……… …… ….… …… ……… ……… …… …… …… …… …… …5 5
4.4.1 DDNS Setup…………………………...………………..…………………..…………………………………55
4.4.2 Network Setup………………………… ……………..…………………………………………………………56
4.4.3 Network Test………..…..…………….…………….………………………..…………………………………57
4.4.4 NTP Setup………………………………………..…..…………………………………………………………58
4.4.5 Emergency Notification………..…..……………….………………………..…………………………………60
4. 5 S yst em Setu p……………… ……… ……… ……… ……. ………………………… ……… ……… …………63
4.5.1 User Management………………………………………..…………………..…………………………………63
4.5.1.1 Password Setup………………..………………………..………………………………..…………………64
4.5.1.2 User Addition Setup…………………………………….………………………………..…………….……64
4.5.1.3 Group Setup …………..............………………………..………………………………..…………………65
4.5 .2 Site Setup………………………………………..……..……………… ………………………………………66
4.5.2 .1 Regional Setting………………..……………………..………………………………..…………………66
4.5.2 .2 OSD Dwell Time…………………………………….………………………………..…………….……68
4.5.2 .3 Remote Control ID …………... ...........……………..………………………………..…………………69
4.5.2 .4 Beep Setup..…………………………………………..………………………………..…………………69
4.5.2 .5 Live Audio..…………………………………………….………………………………..…………………70
4.5 .3 Software Upgrade………..…..…….…………….………………………..…………………………………71
4. 5.4 Sc hedul e………… …………… …………. .… ..… …… …………… ……… ……… ……… ……………72
4.5.4.1 Backup Schedule………………..………………………..………………………………..…………………72
4.5.4.1.1 Adding Backup schedule…………………………….……………………………..…………….……...73
4.5.4.1.2 Deleting Backup schedule…………………………….……………………………..…………….……74
4.5 .4.2 System Restart………..…..………………… .………………………..…………………………………74
4.5.5 Storage………………………………..………………..…………………………………………………………75
4.5.5.1 External Storages………………………………………..………………………………..…………………...75
4.5.5.2 Hard Disk Format……………………..…………….………………………………..…...………….……….76
4.6 System Info………………………………………….………..………………..………………………………………78
4.6.1 Log Info……………..……………………………………..………………………………..………………………78
4.6.2 Factory Default…………….…….…..………..…………………………………………..…………….………...81
4.6.3 System Shutdown/Restart ………….....................…………………………..……………..…………………81
Chapter 5. Search
5.1 Accessing Search Mode ………………………………………………………………………………………83
5. 2 Se arc h mod e di splay…………… ……… ….. ………………………… ……… ……… ……… ……………83
5.3 Sel ect ing date and time ……………… ……… ….. ……… ………………… ……… ……… ……… ……84
5.4 Sel ecting cam eras and changing search bar line………. …………… ……………………… ………85
5 .5 Aud i o O u tp ut… …… … …… …… …… …… ……… …… ……… …… ……… …… ..… …… …… …… 86
5 . 6 P la yba c k… ……… …… ……… ..… …… …… ……… …… ……… …… ……… …… ……… …… …87
5 .7 E ve nt S ea rc h… ……… …… …… … .. ……… …… ……… …… …… …… …… …… …… …… … …8 8
12
12
Page 13

Chapter 6. Backup
6.1 Vid eo Backu p ……… …………………………………… ……………………… ………………..……………90
6.2 Sti ll I mag e Bac kup ……… ………………..…………………………………………… …………..…………91
6. 3 M edi a F orm at …………… ……….… …………..… …………… …………… …………… …… ..……… …92
Appendix
1. KDB Viewer……………………………………… …………………… ………….……… ……………………………94
1.1 How to run Viewer………………………………..……………….…………..…………………………………94
1.2 View er main screen……………………………………………....……………………………………………97
2. WebDVR………………..………………………………………………………………………………………………100
3. Watermark Checker………………………………………….………………………………………………………104
4. Ad ding HDD………………………………………………………………………………….………………………106
4.1 Installing new HDD………………………………..… ……….…………. .…………………… ……………106
4.2 Checking HDD Database ………………………………………..……………………………………………107
5. Specifications…………………… ……………………………………………………………………………………108
6. FA Q…… …… …………… …………… …………… …………… ………………… ……………………………1 10
13
13
Page 14

1. Introducing your real
1. Introducing your real
time DVR
time DVR
Page 15
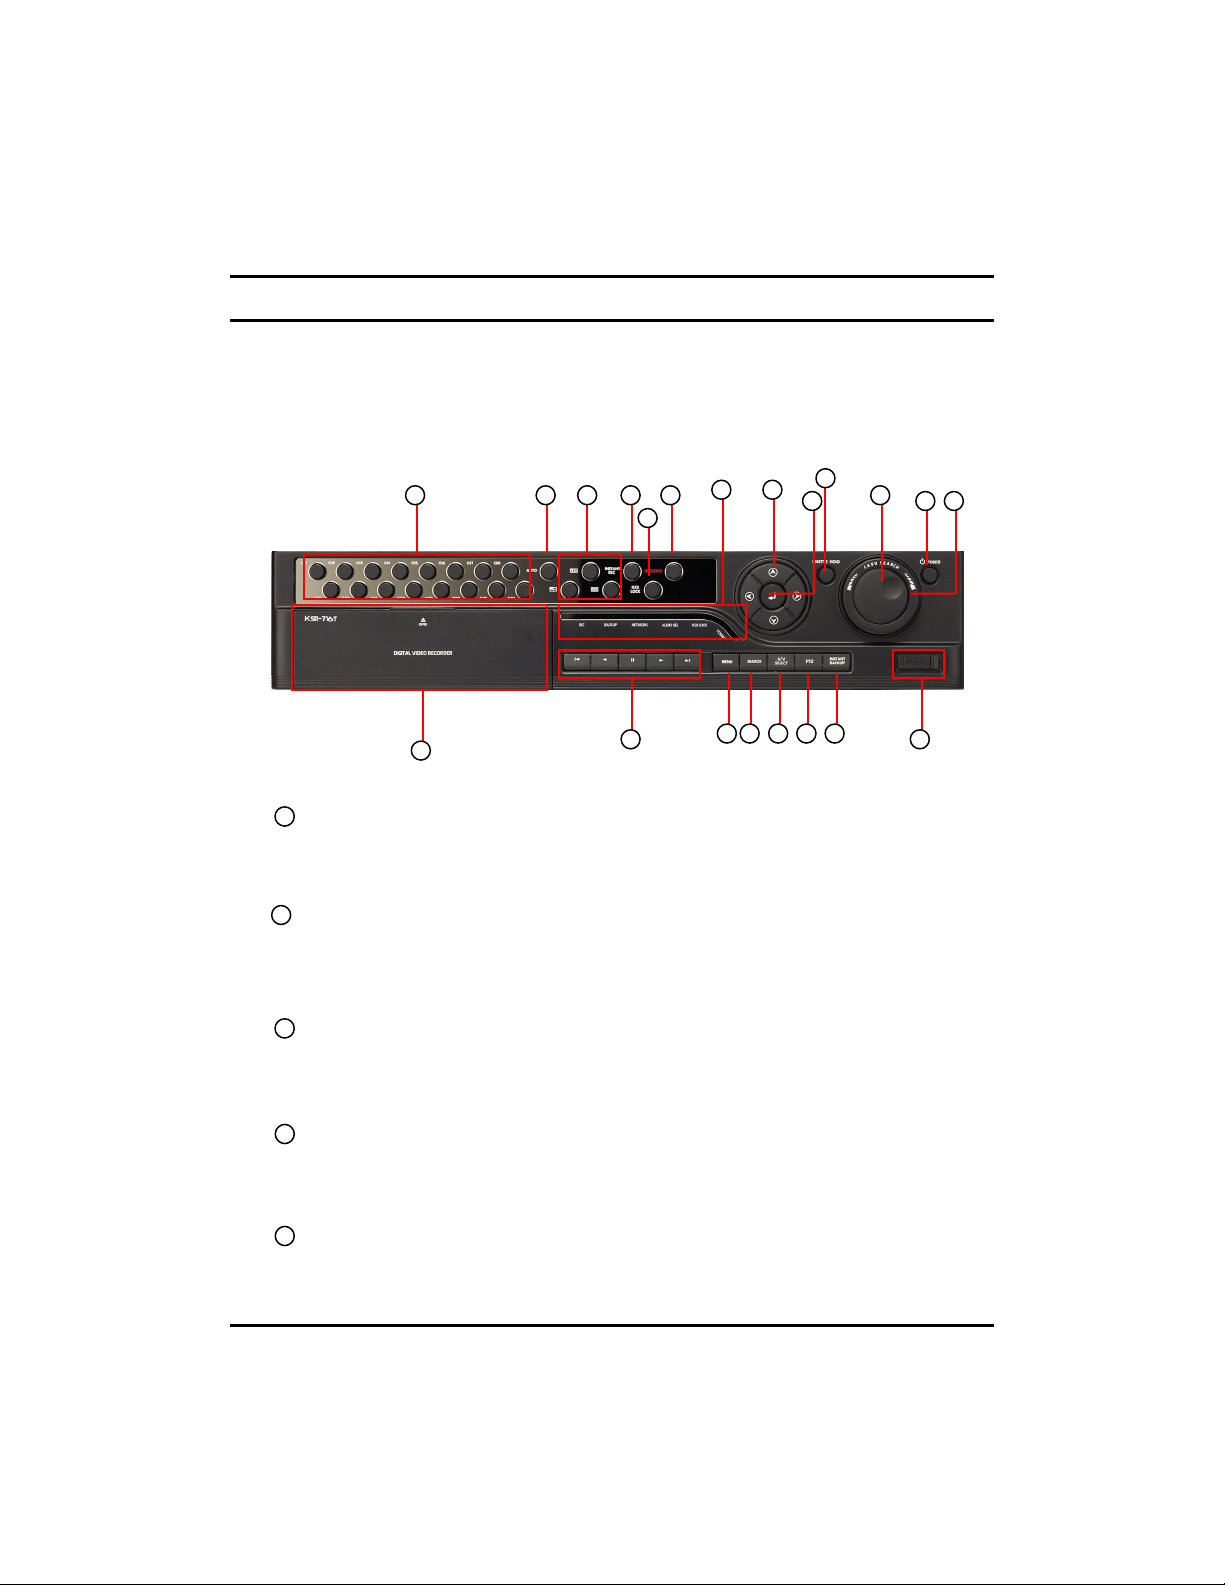
1.1 Front panel
1.1 Front panel
The following describes the keys and ports on the front of the system and their functions:
7 8 9 101112
14
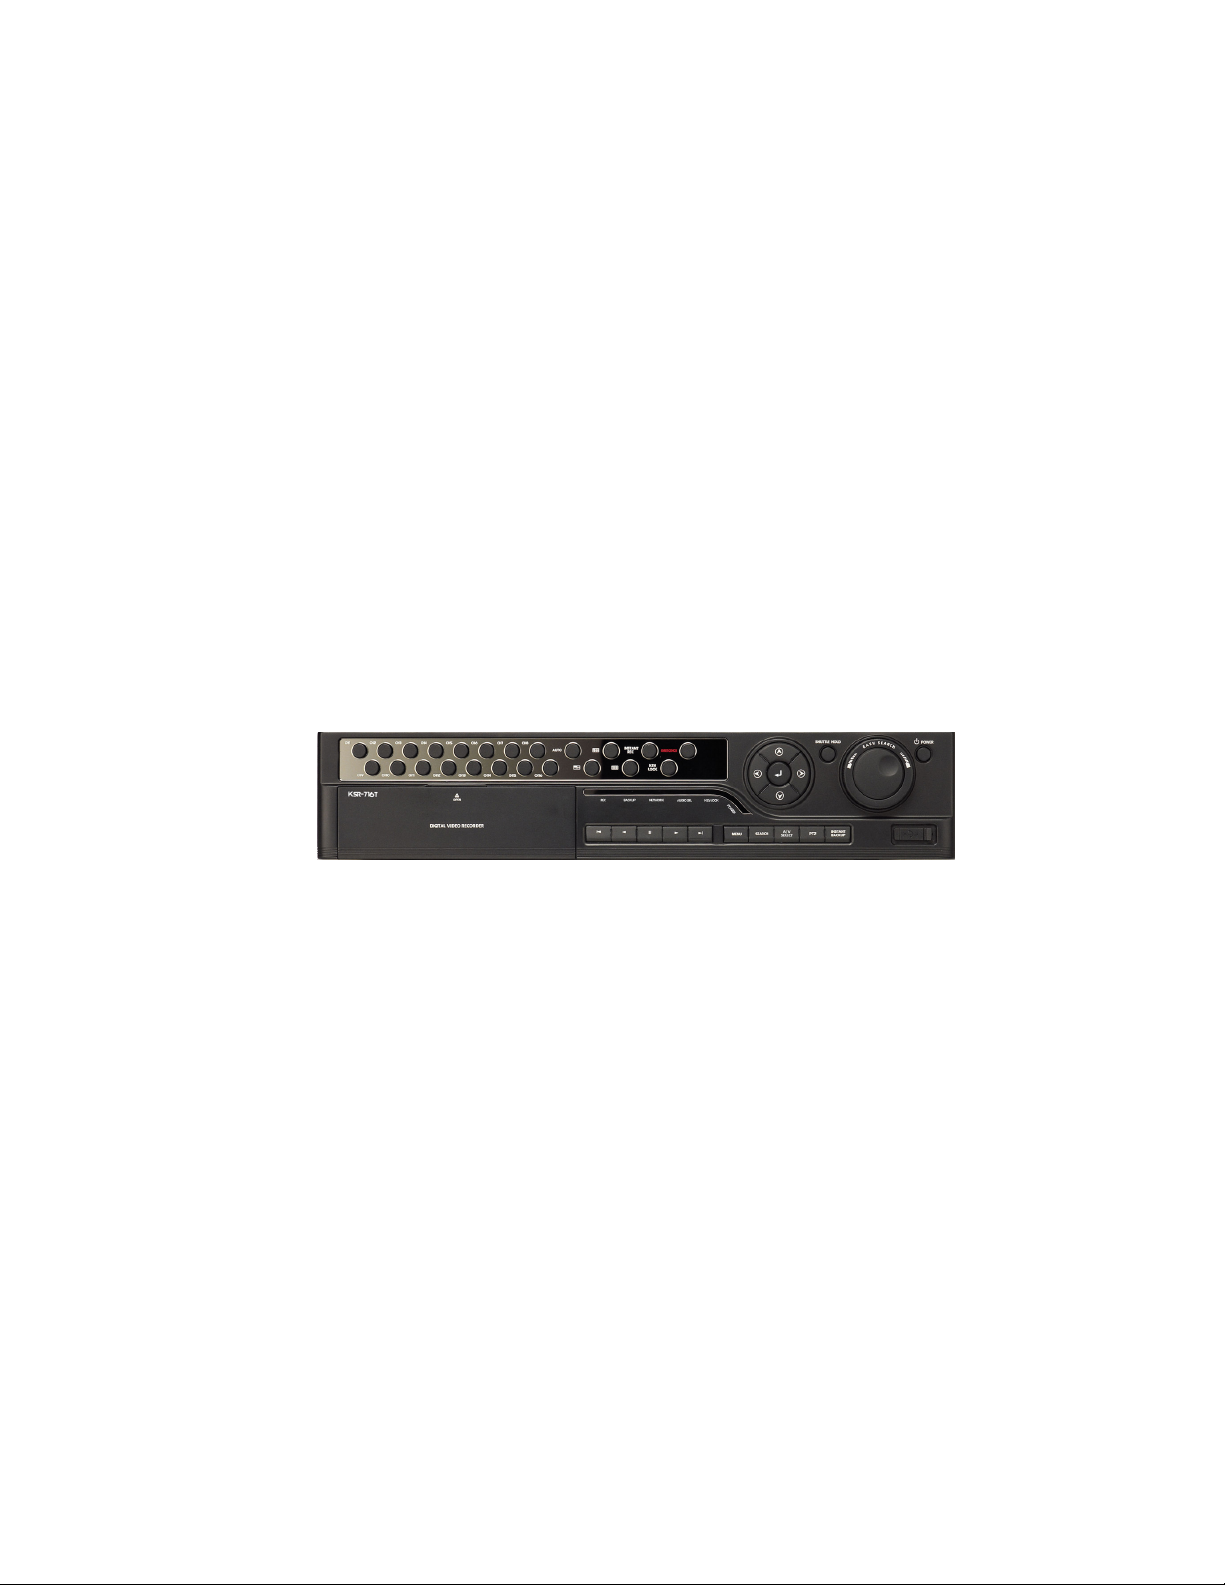
[Figure 1-1. System front view(DW-716T)]
[Power]
1
- Use this button to shutdown the DVR.
- When the button is pressed a password menu will pop-up and password details should be
entered click [OK] and the DVR will turn off.
2
[Jog (Inner dial)]
- Rotate to view recordings, in Search mode, forwards or backwards one frame at a time.
Rotate to change the value of options one unit at a time in Setup mode.
When controlling P/T/Z camera, rotate to shift camera lens focus.
[Shuttle (outer dial)]
3
- Rotate to play the recordings, in Search mode, forward or backward.
- Rotate to change the value of options continuously in Setup mode.
- When controlling P/T/Z camera. rotate to zoom in or out.
15
13 6
4
5
2
1213
2019181716
4
[HOLD]
- When using the Shuttle dial you can press the [HOLD] button to maintain the present shuttle
speed.
- Press the [HOLD] button again to deactivate the feature.
5
[Enter Key]
- Use to select option in Setup or Search mode. Use to directly go to Control setup mode from
the Surveillance mode.
15
15
Page 16

[Directional keys]
6
- Use to move through the menu options in Setup or Search mode.
- When controlling P/T/Z camera, press the directional keys to move the camera.
- When searching recorded image, you can adjust the size of the image using up and down
directional key.
,
,
[Note] OSD Position Control Function
- It is possible to control OSD position by Up/Down/Left/Right button on 16 division
screen.
[Camera/Number keys]
7
- In Surveillance mode, press for full screen display of that camera.
- In Search mode, press for full screen display of that camera recording during playback.
- Press the keys enter correct numeric password when accessing Setup or Search modes.
8
[AUTO]
- Press [AUTO] to begin automatic channel sequence in full screen mode.
[Split screen buttons]
9
- On Surveillance or Search modes, press to select 4-splitscreen, 9-splitscreen or 16-split screen.
[INSTANT REC]
10
- In the case of an emergency or an emergency night happen press the [INSTANT REC] button.
- Use the [INSTANT REC] button to record video data from all cameras regardless of the recording
schedule.
[KEY LOCK]
11
- The [KEY LOCK] button can be used lock the buttons on the front of the DVR system.
- When activating and deactivating the key lock function a password menu will pop-up and password
details should be entered to switch between modes.
12
[EMERGENCY]
- Use the [EMERGENCY] button to transmit video data to a remote location in the case of
emergency.
11
16
16
Page 17
13
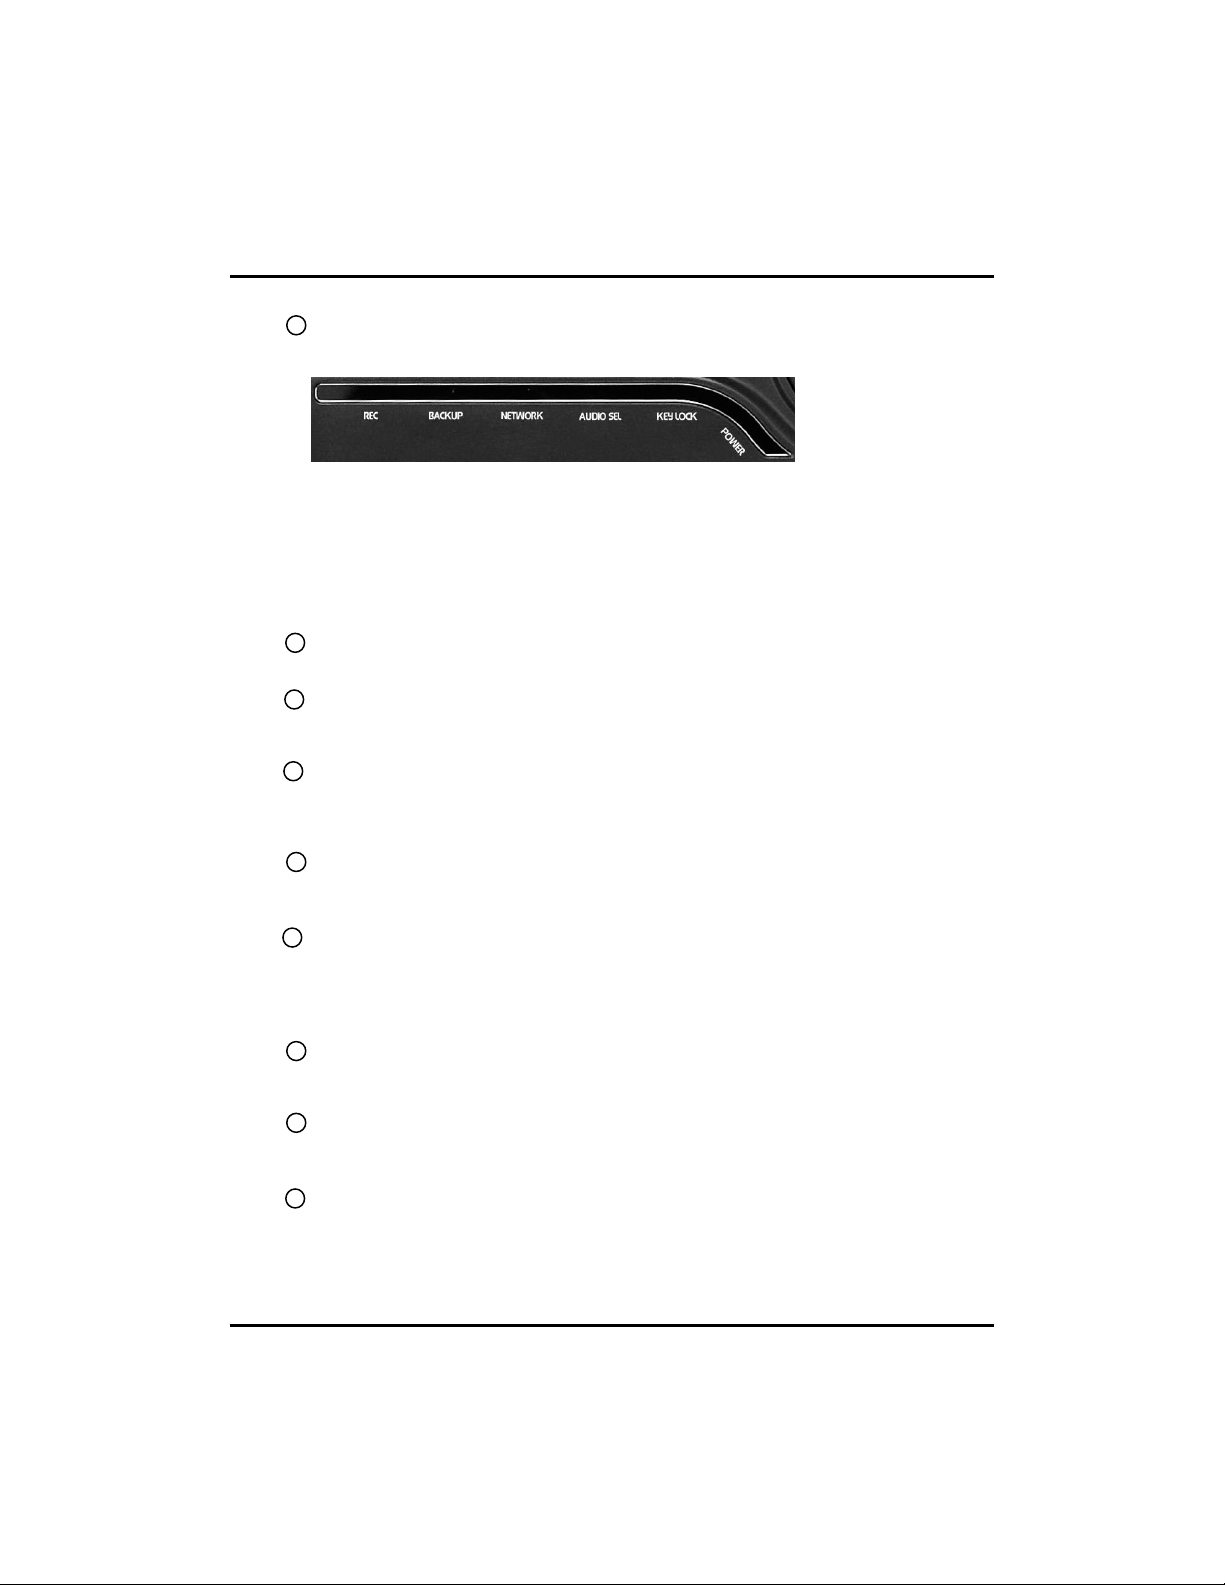
[LED Status Panel]
-The LED Status Panel displays the current operation state of the DVR.
REC : The light indicates that the DVR is recording.
BACKUP : The light indicates when a backup is in progress.
NETWORK : The light indicates that a client is connected remotely.
AUDIO SEL : The light indicates when the audio select function is active.
REMOTE : The light indicates that a button has been pressed on the remote controller.
KEYLOCK : The light indicates when the key lock function is active.
POWER : The light indicates that the power is on.
14
[CD/DVD-RW]
- The CD-RW/DVD-RW is used to backup video data.
[Search mode control Keys]
15
- In Search mode, use these keys to view the recording from either the first or last recorded
image, to play the recording either forwards or backwards, and pause the recording.
16
[MENU]
- To go to the system configuration window, press the [MENU] button. You will then be
asked to enter the user ID and password. To exit the current menu or to close the
configuration window, press [MENU] button.
17
[SEARCH]
- To go to the search window, press the [SEARCH] button. You will then be asked to enter the
ID and password.
18
[A/V SELECT]
- The [A/V SELECT] Button can be used to select and hear audio in the surveillance screen
mode.
- Press [A/V SELECT] button to activate the live audio select mode then press the Channel
button you wish to listen.
[REVERSE PLAYBACK]
19
- USB the [REVERSE PLAYBACK] button to playback a selected channel in surveillance
mode.
20
[INSTANT BACKUP]
- The [INSTANT ACKUP] button once pressed automaitcally makes a back-up of all channels
for the 5 minutes prior to the button being pressed to the USB port.
[USB Port]
21
- You can connect a portable disk drive to USB port to save backup of recorded video.
- You can update your system software with an upgrade package through the USB port.
- You can control screen menu with connecting USB type mouse.
17
17
Page 18
1.2 Rear panel
1.2 Rear panel
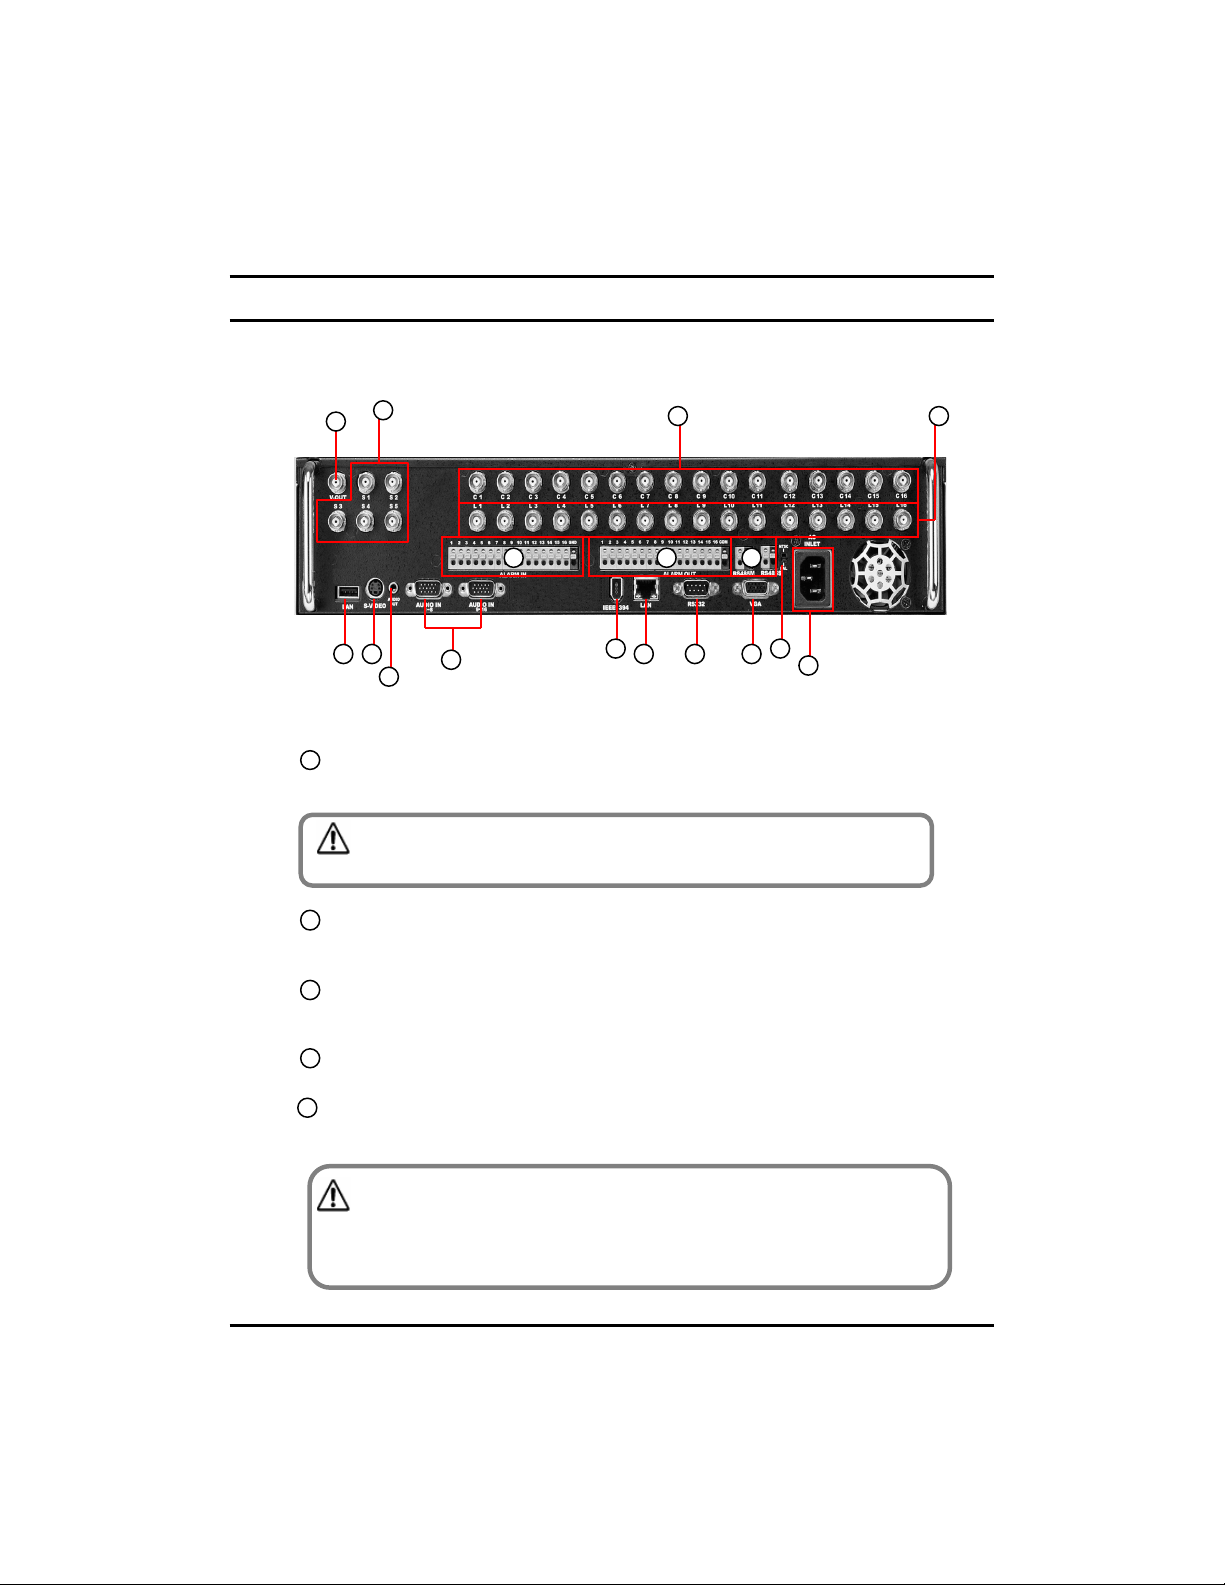
The following describes keys and ports on the rear part of the system and their functions.
5
4
6
109
11
1
[Power Connector]
• Power cable input, 110V ~ 220V, for system main power supply.
[Caution]
• Be careful of electrocution. Please read [Safety Warnings and Cautions].
[Camera Video Input BNC]
2
•Connecting cameras to DVR, input the video signal coaxial cable to the BNC input on the DVR.
[Loop Through Output]
3
- Video output ports for camera loop through to view images on another monitor or device.
- The system supports both NTSC and PAL.
[V-Output Port]
4
- Video output for connecting with CVBS monitor.
[SPOT Monitor Output]
5
- Spot monitor output for video output connection to a external Spot monitor.
12
[Figure 1-2. System rear view(DW-716T)]
13
2 3
87
17
16
1514
1
[Caution]
• Dependant on the grounding status of the power supply electric current that can cause an
electric shock may flow in the video line (coaxial cable). Turn off the system before
connecting the video line to the BNC port.
18
18
Page 19
[ALARM IN Port]
6
• This is the input port for sensor devices.
•The system supports NC(Normal Close) and NO(Normal Open) sensor types.
[ALARM OUT Port]
7
• This is the output port for alarm out devices .
• The system supports NC(Normal Close) and NO(Normal Open) control types.
[Caution]
• Since control devices use output in a contact point format without polarity at
the control output port, do not connect AC 110V ~ 220V of the power cable or supply
DC power.
• When controlling DC power, it is recommended that you cut the (-ve) line.
8
[RS485 M/RS485S]
- RS-485M output for controlling PTZ cameras.
- RS-485S input for external devices such as keyboard controller or POS system.
- If a device is connected to the RS-485 input then the RS-232 port does not work.
[USB]
9
- You can connect a portable disk drive to USB port to save backup of recorded video.
- You can update your system software with an upgrade package through the USB port.
- You can control screen menu with connecting USB type mouse.
10
[S-VIDEO]
- S-Video output for connecting with SVGA monitor.
[AUDIO OUT]
11
- Connect speakers to the Audio Out port in order to output Audio data.
,
,
[Note]
The DVR is not equipped with an audio output amplifier. Thus, user are advised to
purchase separate amplifiers and speakers or speakers with a built-in amplifier.
12
[AUDIO IN]
- Input speaker into the audio in ports.
- Supports recording of up audio channels.
Audio
Channels
19
19
DW-716TDW-708TDW-616TDW-608TDW-604TModel
16CH8CH8CH8CH4CH
Page 20

13
[IEEE 1394]
- To use an IEEE1394 external storage as the ‘Recording device’ or ‘Backup device’.
14
[LAN]
- Ethernet 10/100 connection port for connection the system through network.
- To access the network through the network hub, connect the network cable to the
LAN port.
- You can remotely monitor, search, and control data on the network.
[External modem terminal] NO AVAILABLE IN EUROPEAN MODELS
15
- Provide a connection to the external modem for a remote access.
- You can remotely monitor, search, and control data through modem access.
- If the RS-232 port is used then the RS-485 S will not function.
[VGA]
16
- Connect the VGA monitor to the VGA port.
- Displays the DVR system on the monitor.
17
[NTSC/PAL Setup]
- The DVR supports both NTSC and PAL formats. Before turning on the DVR,
select the NTSC or PAL video format.
20
20
Page 21
,
,
[Note] Removable Disk
The table below lists compatible USB disks. If you want to use other removable disk, it
should be compatible with Linux 2.6.0 or over. Other USB disk may not work properly.
It is recommended that you confirm through the manufacturer the Linux compatibility
of the removal disk you wish to purchase.
The USB disk should be formatted as FAT 32. DVR does not supports NTFS or other
file system.
W hen the memory of the portable USB disk is partitioned, or a password has been
set, the system will not recognize the disk. Combine partitions in the memory and
unlock the password before connecting the disk to the system.
Since some USB HDDs do not generate power at all or generate only low-voltage
power, a separate power source is required for such USB HDDs to enable the system
to recognize them.
Only when the memory of the USB HDD is formatted as the main partition will the
system recognize the USB HDD. If it is formatted as an extension partition, however,
the system will not recognize the USB HDD.
* Removable Disk support
No.
1
3
USB VersionCompanyName
Ver 1.1AL-techAnyDrive
Ver 1.1KMITUnidrive2
Ver 1.1JUNGSOFTNextdrive
Ver 1.1SHELLGINOSHELLGINO N44
Ver 1.1TRANSCENDTRANSCEND JF A 128M5
Ver 2.0TRANSCENDJetFlash6
Ver 2.0FM SemiconMemoRive 2.0 Pro7
Ver 2.0SANDISKSANDISK8
Ver 2.0SELF I&FSELF I&C9
Ver 2.0TRUTIONTRUTION-512MB10
Ver 2.0IOCELL CELLDISK 2.011
Ver 2.0DAOSIMBADDA 2.012
Ver 2.0SAROTECHFIEX 2.013
Ver 2.0IMATIONiflashEX 2.014
Ver 2.0TWINMOSMobile Disk Z4 2.015
Ver 2.0CELLINKHCC-713C16
Ver 2.0TRANSCENDTRANSCEND JF 11017
Ver 2.0SONYMicro Vault18
Ver 2.0ZIBENE-D900-03-225619
Ver 2.0MEMORETTEFMR-memorette(B)20
Ver 2.0IMATIONIMN-IC21
Ver 2.0ILIADBLS-ITCC-BO 1A22
21
21
Page 22
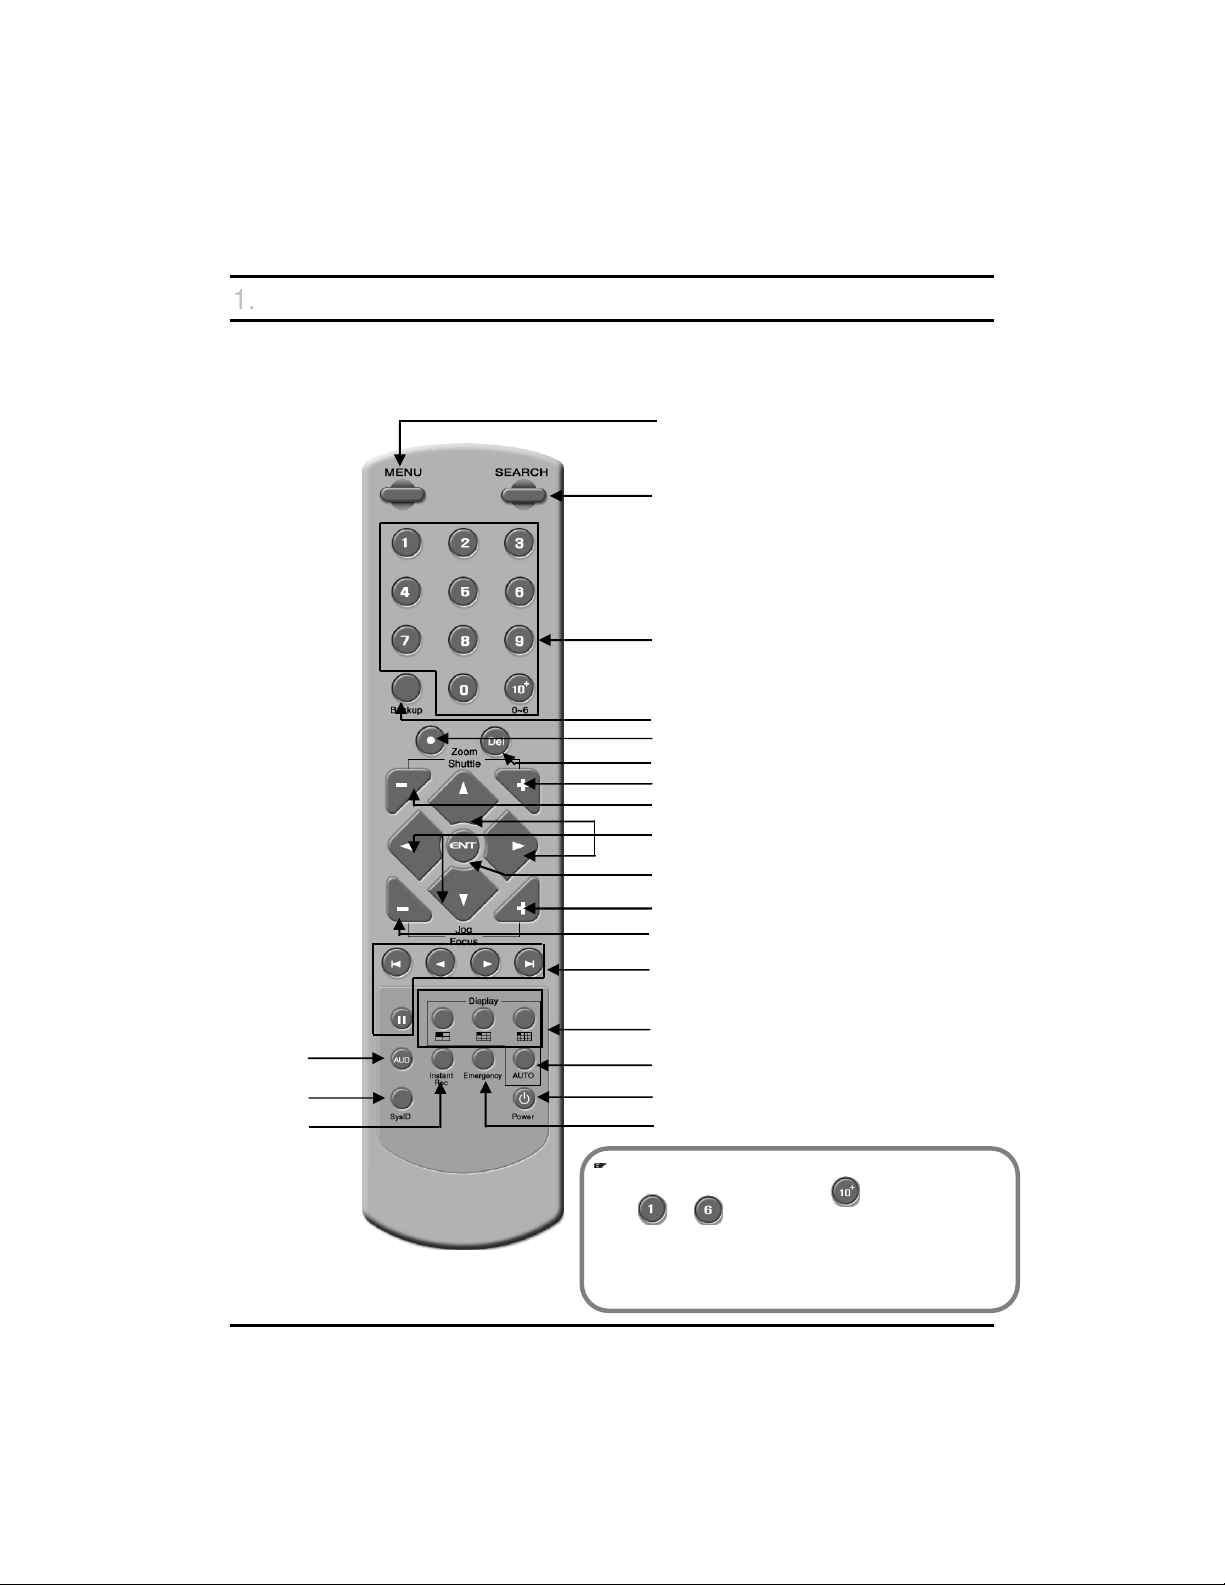
1.3 Description of the Remote controller
1.3 Description of the Remote controller
The following describes the remote controller buttons, which have the same
functions as the buttons on the front panel of the system:
MENU
SEARCH
NUMBER
BACKUP
Dot
DEL
Shuttle(+)
Shuttle(-)
Directional Keys
Enter
Jog(+)
Audio
System ID
Instant REC
Jog(-)
Search mode control keys
Split screen buttons
Auto
Power
Emergency
,
,
[Note]
• To select camera 10~16, press button followed by the
~ + buttons.
• The [BACKUP] button is only enabled whilst searching. To
enter the backup screen, press the [BACKUP] button.
• [Sys ID] Set the ID of remote control using the [SysID] button.
Refer “System ID” on page 77 for more details.
22
22
Page 23

2. Installation
2. Installation
Page 24

2.1 Checking install environment
2.1 Checking install environment
You should pay attention to the following before you use the product.
• Do not use it outdoor.
• Do not place water or liquid near the connection part or the product.
• Do not impose excessive shock or force.
• Do not pull out the power cord unreasonably.
• Do not disassemble the product on you own.
• Do not exceed the rated input or output voltage range.
• Use the certified power cord only.
• For the product with an input ground, use a power plug with a ground pin.
CHECKING INSTALLATION ENVIRONMENT
Digital Video Recorder (hereinafter referred to “DVR”) is a high-tech security equipment that
contains a high-capacity HDD and top-notch circuits. High temperature inside or outside of
the product may reduce the product life, deteriorate performance (see the Figure 1 below; it
explains the correlation between temperature and product life), and lead to a malfunction.
Figure 1
24
24
Page 25
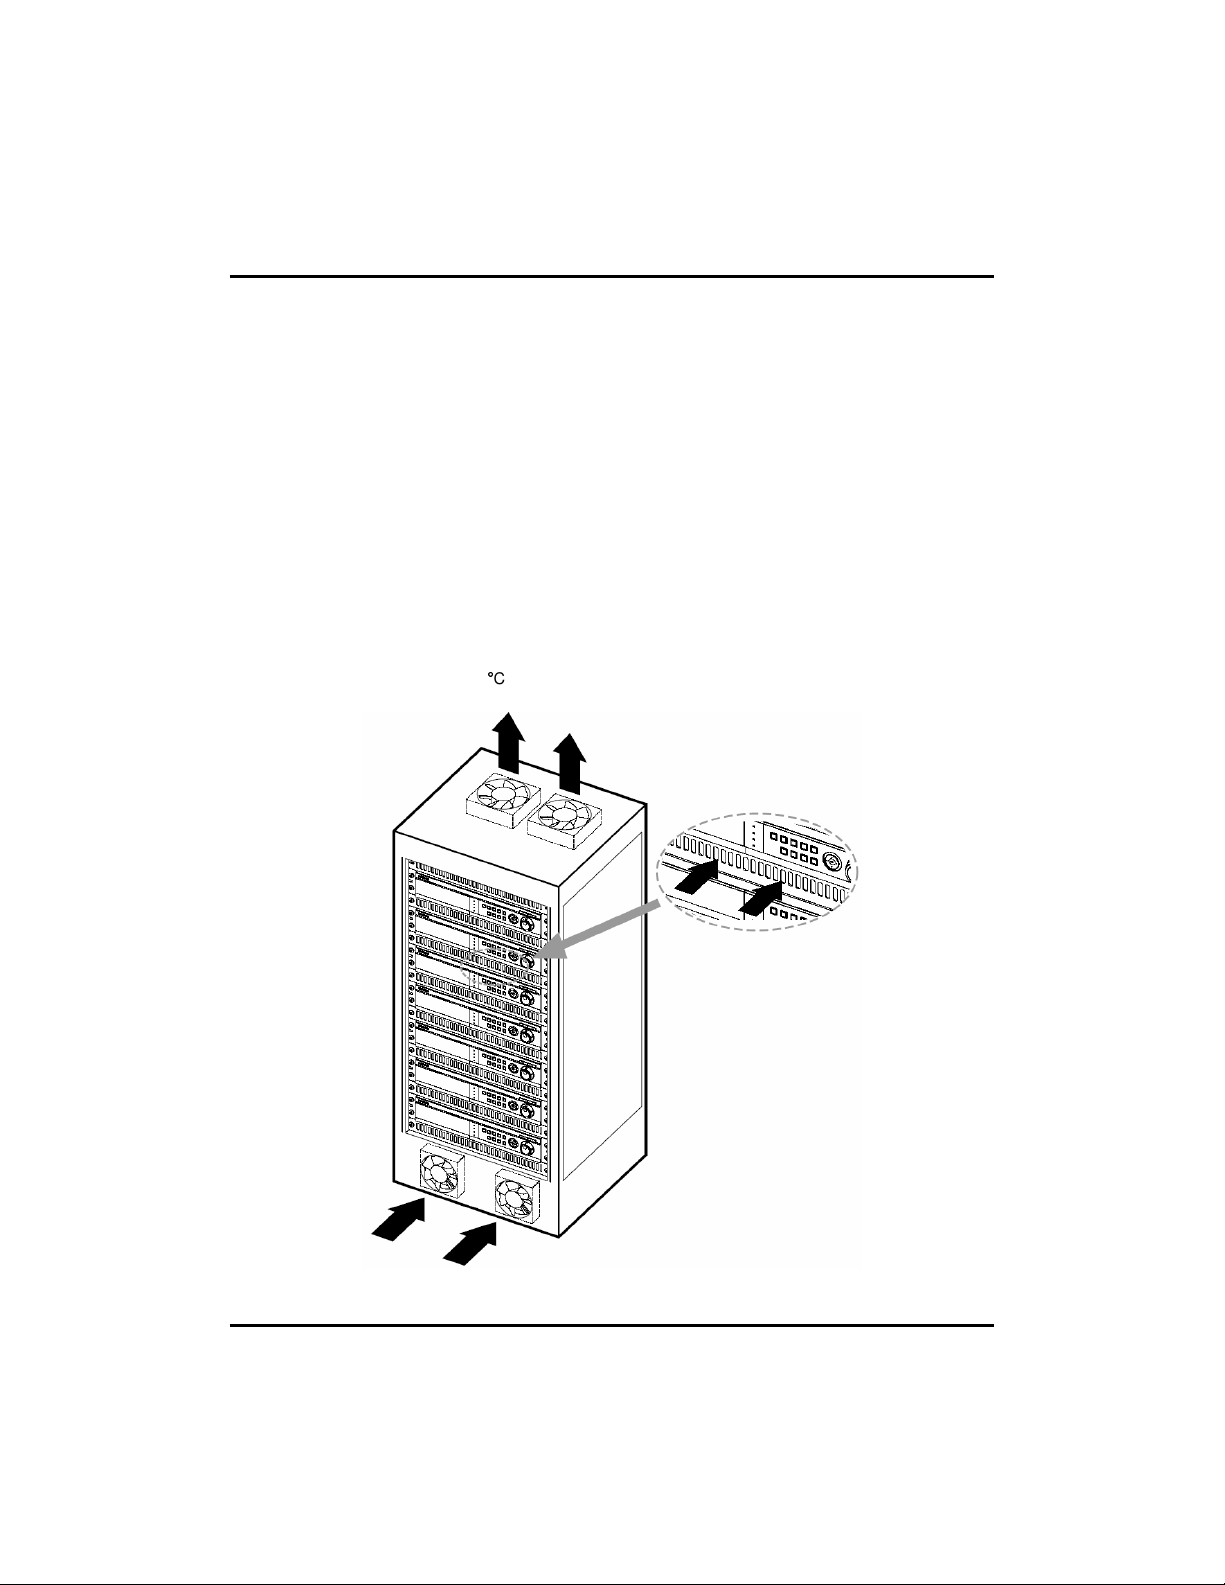
Please keep the following instructions for rack-mounting the DVRs to
proceed with the installation.
1. The rack on which the DVR is mounted should not be sealed off.
2. And it also can allow air circulation through the vent.
3. As shown in the Figure 2, we recommend you to heap the product with other DVR s or
use rack-mount devices at certain space, or install a vent system to accommodate
airflow.
4. For forming a natural convection, the air intake hole should be positional at the bottom
and the emission at the top.
5. We recommend you to install each of the air intake and emission holes with fan
motors for sufficient airflow. (The air intake fan should be equipped with a filter to prevent
possible inflow of dust and other impurities.)
6. As shown in the Figure 1, the temperature inside the rack and around the DVR should
maintain between 0 and 45-C.
Figure 2
25
25
Page 26
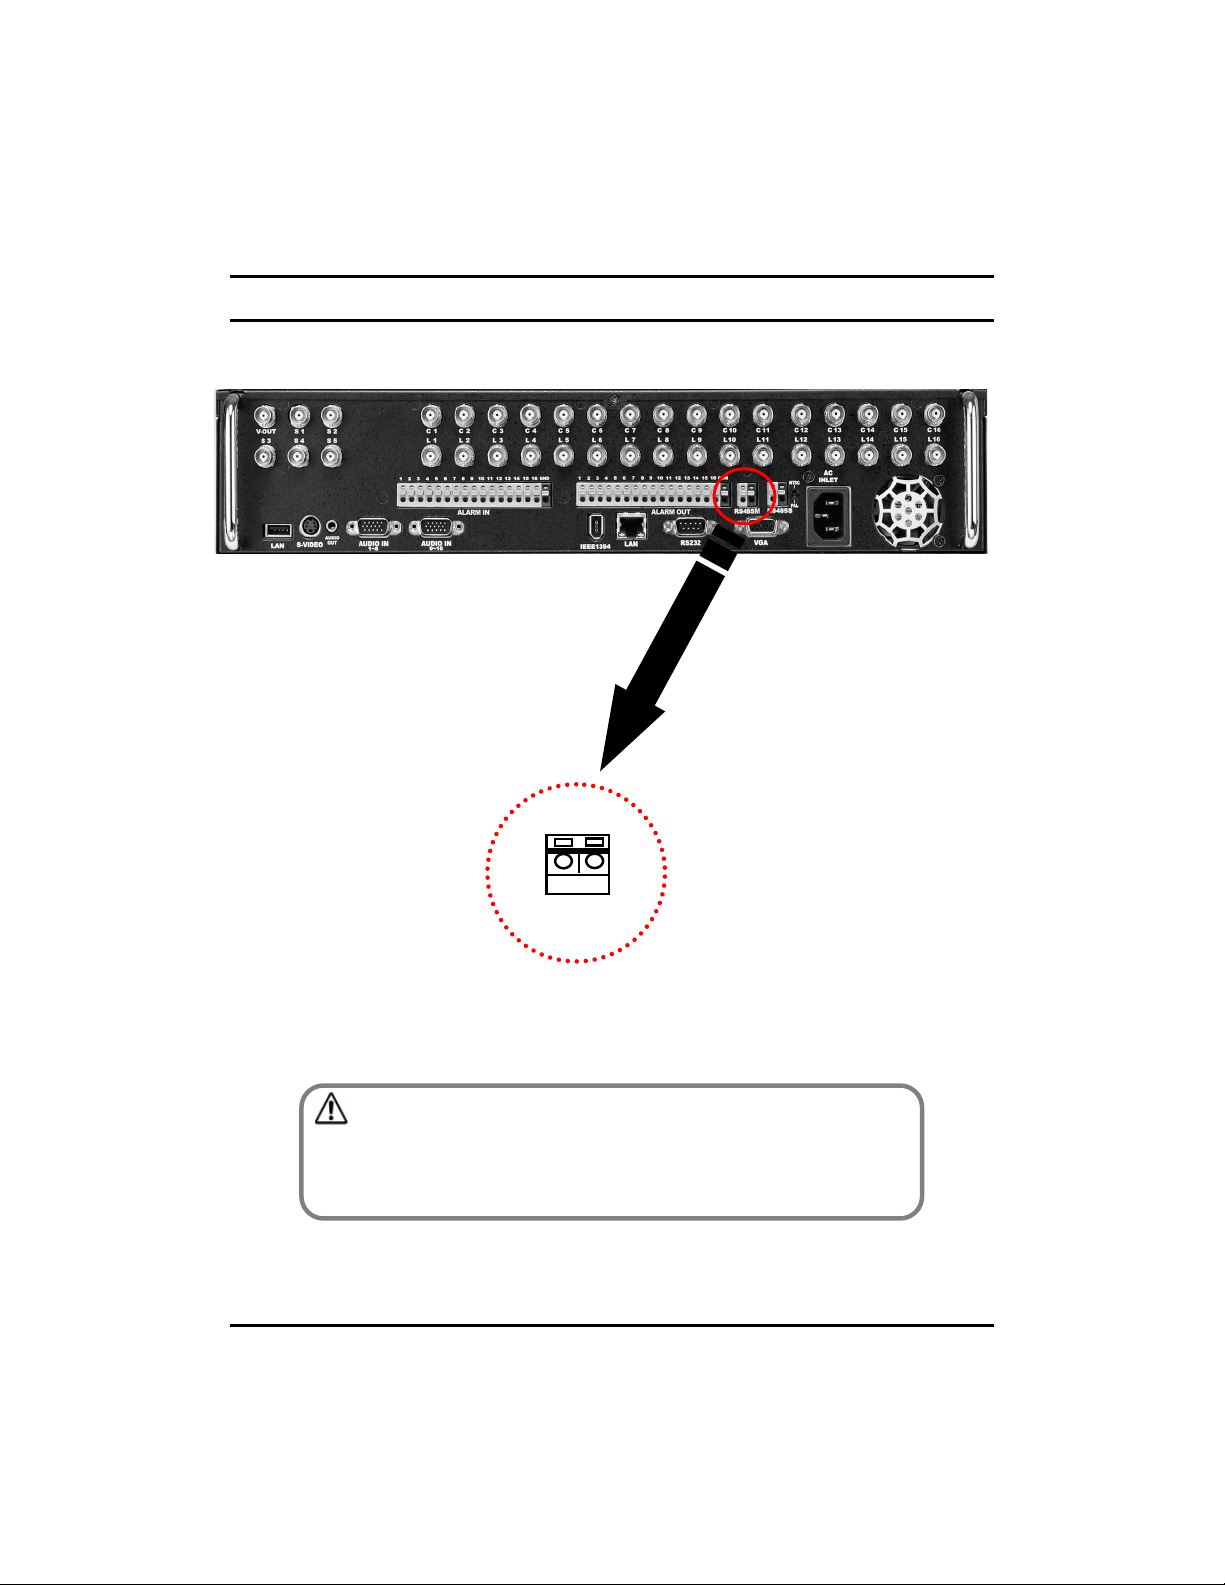
2.2 Pan/Tilt Connection
2.2 Pan/Tilt Connection
-
+
RS-485 Signal Cable Connection Port
(Used for connecting Speed Dome
camera and RX-Receiver)
[Caution]
• Please beware of (+ve) and (-ve) poles of the signal cable when connecting. A
wrong connection may cause malfunction of the system.
• If you wish to use an RX-receiver, please contact your dealer beforehand.
26
26
Page 27
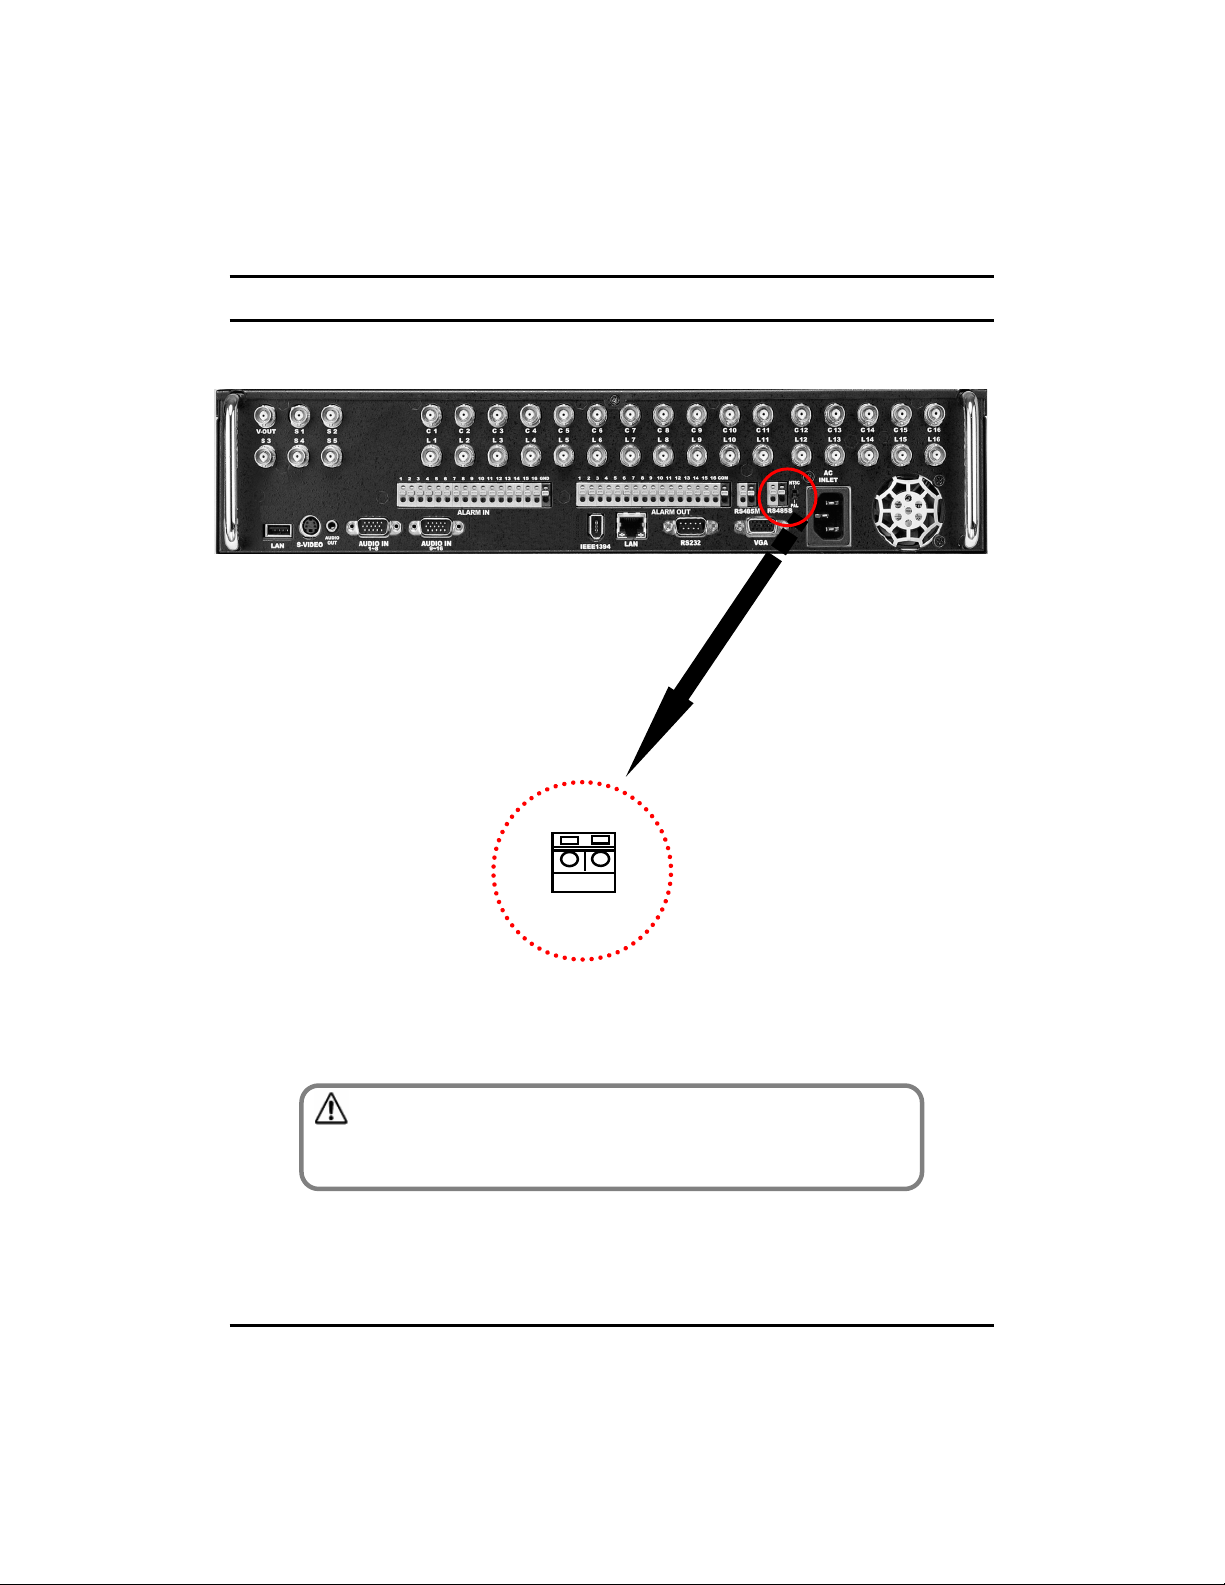
2.3 Keyboard Controller
2.3 Keyboard Controller
-
+
RS-485 Signal Cable Connection Port
(Used for connecting External devices
such as keyboard or POS system)
[Caution]
• Please beware of (+ve) and (-ve) poles of the signal cable when connecting. A
wrong connection may cause the system to malfunction.
27
27
Page 28
2.4 Connecting LAN/PSTN Communication Lines
2.4 Connecting LAN/PSTN Communication Lines
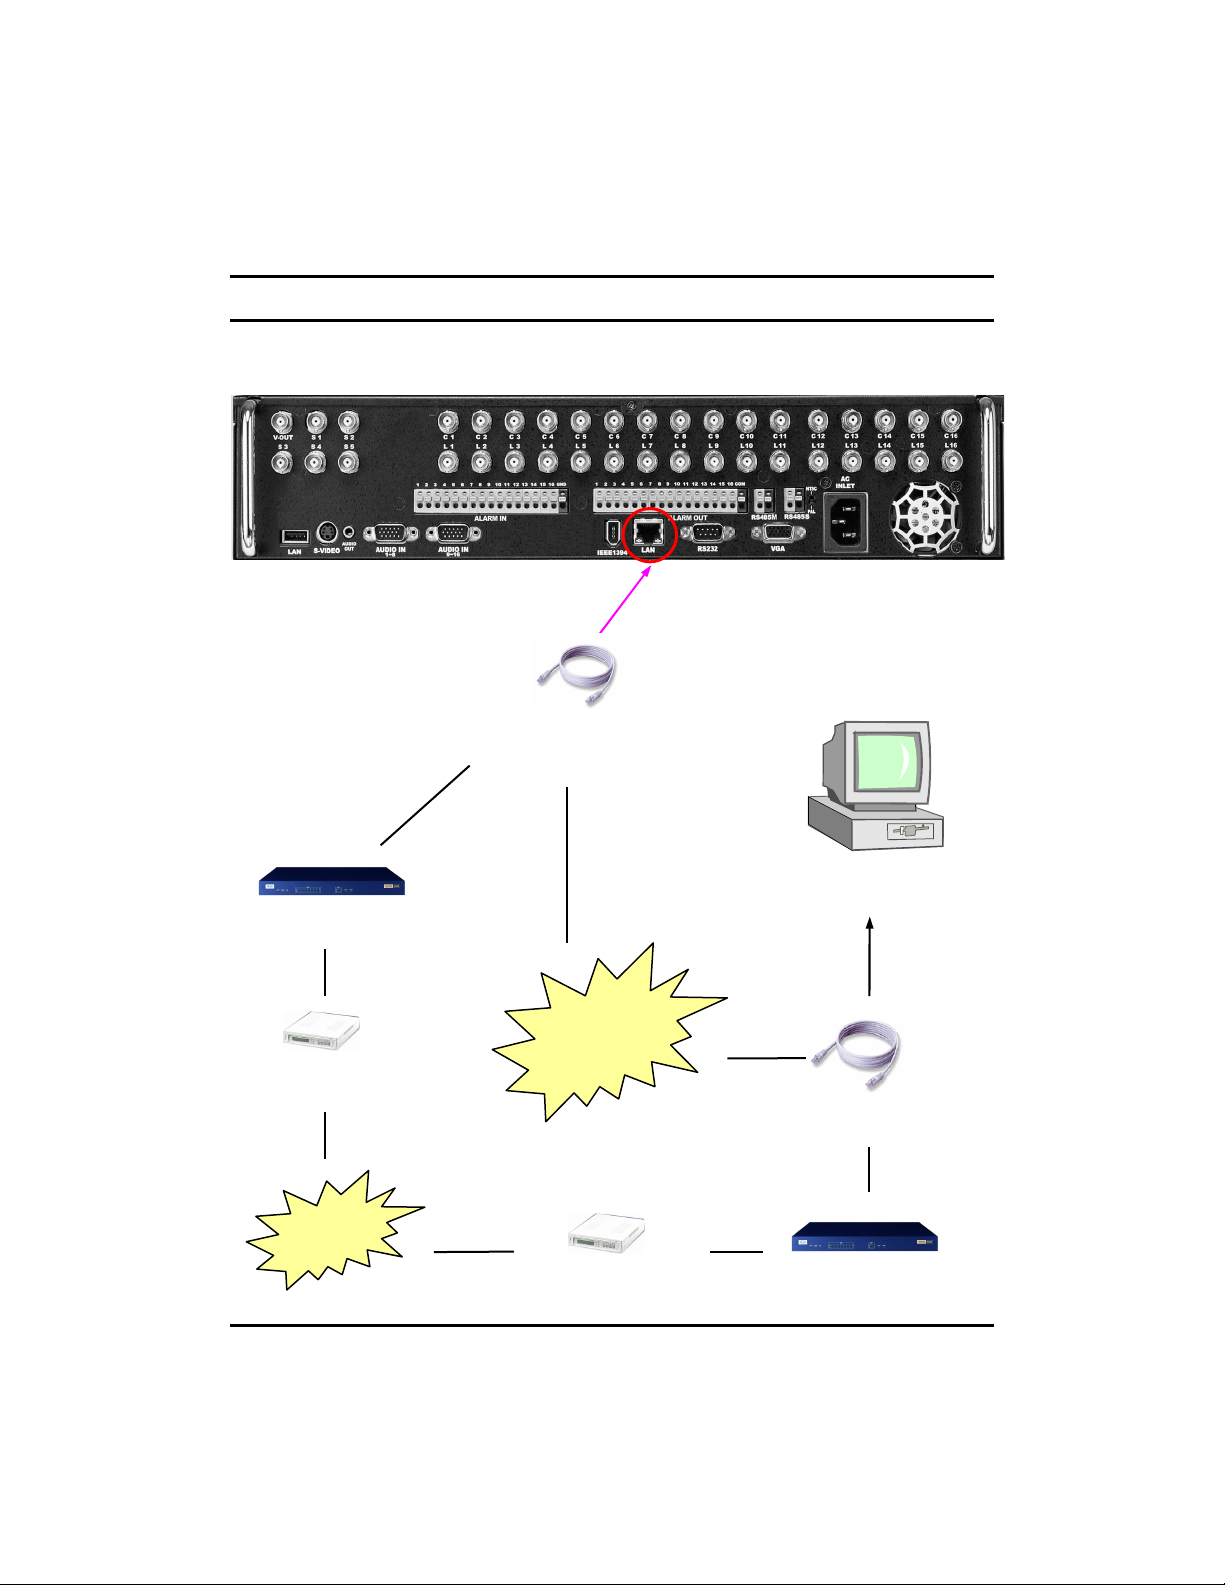
2.4.1 LAN and Dedicated Line Connection
Router
DSU
(Dedicated Modem)
Dedicated
Line
(Used for connecting to DW-6/7 series UTP port)
LAN
Internet Network
&
Local Intranet Network
(Used for connecting UTP port of the LAN Card)
DSU
(Dedicated Modem)
Center PC
LAN
Router
28
28
Page 29

2.4.2 PSTN (telephone line) Connection (options) (Not available in Europe)
(DW-6/7 series RS-232 connection)
MODEM
MODEM
29
29
Center PC
Page 30
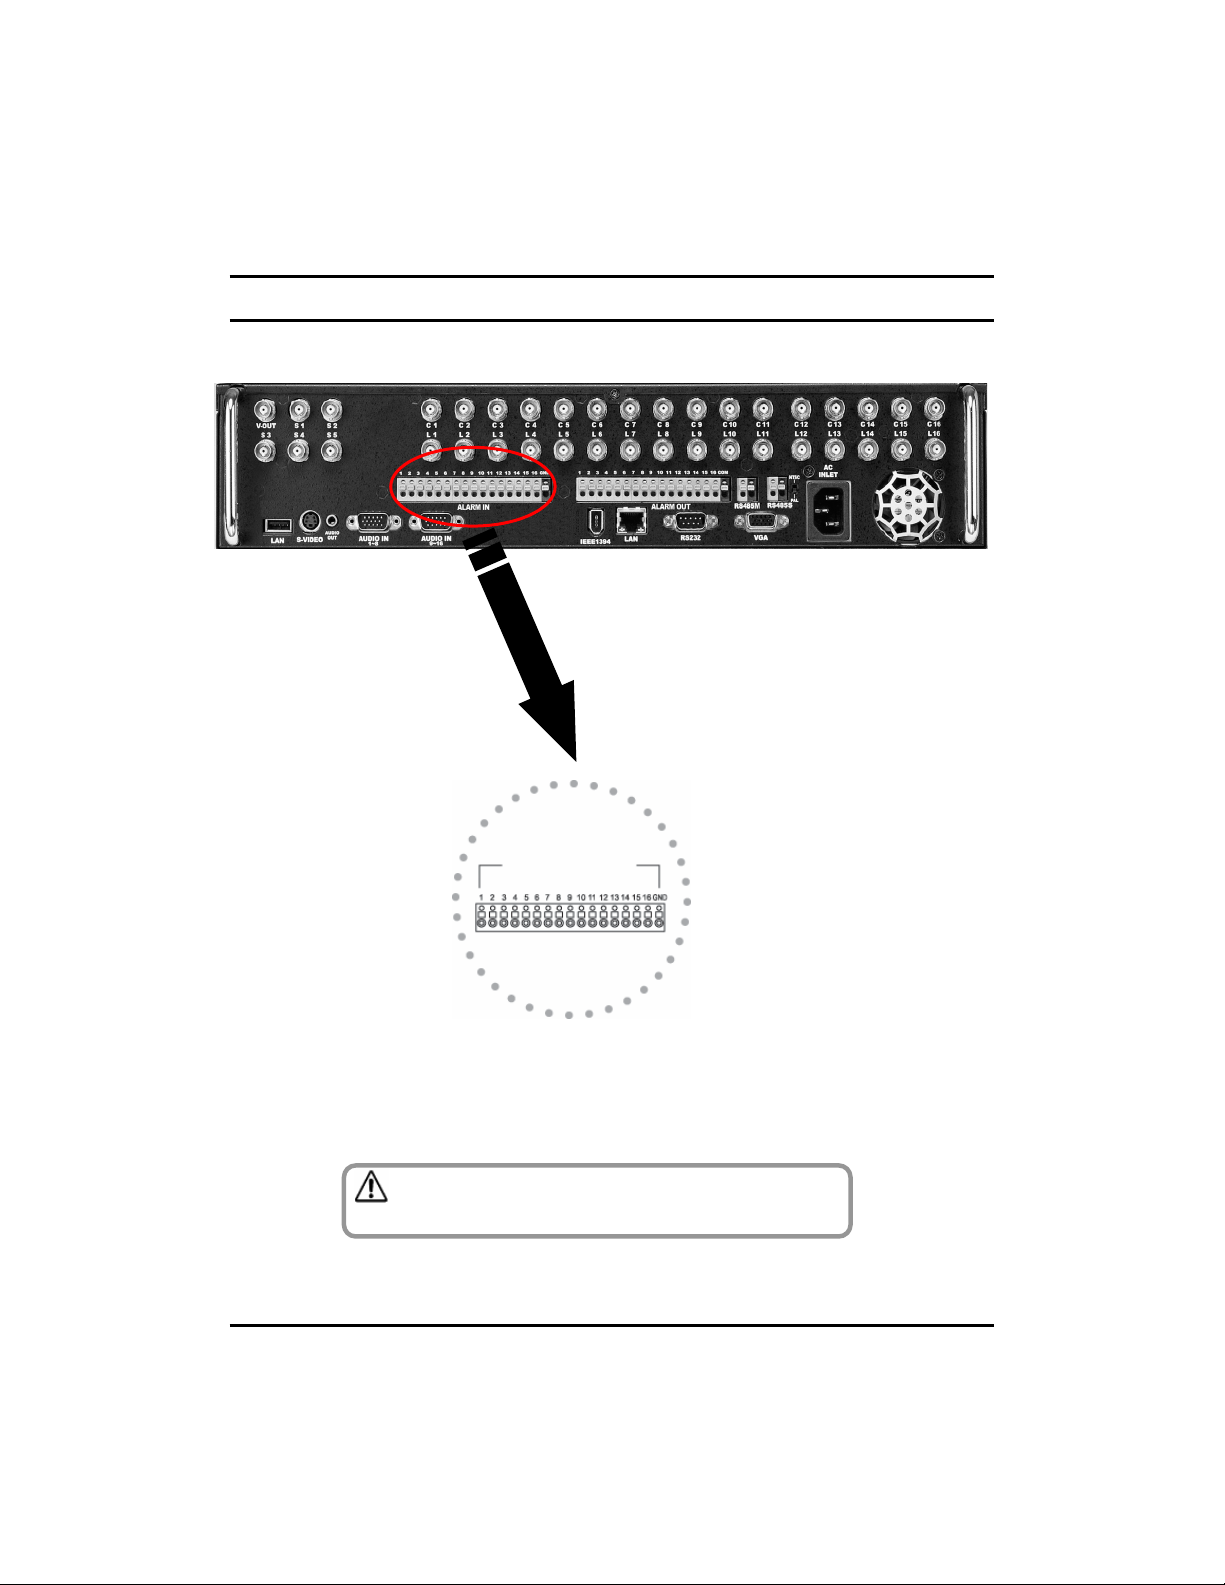
2.5 Alarm--
2.5 Alarm
In Port Connection (Input)
In Port Connection (Input)
Alarm In
Connect one of the two signal lines from the sensor (infrared sensor, magnetic) to COM
port, and connect the other signal line to the desired Alarm-In number.
[Caution]
Use a separate adapter to supply power to each sensor.
30
30
Page 31

2.6 Alarm--
2.6 Alarm
Out Port Connection (Output)
Out Port Connection (Output)
Alarm Out
(/)
Alarm Light, Amplification Siren,
External Relay, Etc.
• During automatic control of an external sensor, the Alarm-Out output port is “interworked” (the value set in
“Set Alarm-In/Alarm-Out” menu) and “COM” port is connected.
• In normal circumstances, the Alarm-Out output is kept in “NO” status.
• When Alarm-Out is triggered, the Alarm-Out output changes to “NC” status.
[Caution]
• The operating voltage should be maximum 12V, 300mA.
• When controlling lights and other devices operated by AC power, use a separate external relay.
External Power ( DC12V )
31
31
(.)
Page 32

3. Live
3. Live
Page 33

3.1 Screen layout
3.1 Screen layout
B
7
5
1 2
3
[Camera number]
1
Displays camera number.
[Camera name]
2
Displays camera name.
[Recording status]
3
Displays camera recording mode enabled.
[P/T/Z status]
4
• Displays Pan/Tilt camera status enabled.
• No recording
• C: Continuous Recording
• M: Motion Recording
• S: Alarm In Recording
• P: Pre-alarm Recording
• Continuous Recording
• Motion Recording
• Alarm In Recording
• Motion & Sensor Recording
• Motion & Pre-alarm Recording
• Alarm In & Pre-alarm Recording
• Motion & Alarm In & Pre-alarm Recording
4
HDD
6
50.0%
[Audio recording status]
5
• Shows audio recording enabled.
6
[HDD Capacity]
• Display HDD used by percentage.
[HDD Status]
7
• Shows when a Bad Sector appears on HDD.
Available Recording Modes and Screen DisplayRecording Mode
No Display
Red REC
Yellow REC
33
33
Page 34

3.2 Enabling full screen and sequence mode
3.2 Enabling full screen and sequence mode
[To Select 16 way split screen]
• Press the 16 way split screen button to view
all cameras on one screen (DW-616T/716T).
[To Select 9 way split screen]
• Press the 9-split screen button to select
display of cameras 1-9. Press again to move to
next 9 way screen.
34
34
[To Select Quad screen]
Press the 4-split screen button to select quad
display of cameras 1-4. Press again to move to
next quad screen.
[To Select Full Screen mode]
Press any key 1~16 on the system to enlarge
that camera channel and view in full screen.
[Sequence]
• When full screen is selected, press the Auto
key to view all camera channels in sequence.
The system will also sequence between quad
and 9 way displays. (OSD/Dwell Time for
details on changing Auto option).
Page 35

3.3 POP--
3.3 POP
• You can use this menu by pressing mouse-right button. Items shown on the pop-up menu are identical with
buttons at system’s front panel. The benefit of this menu is that user can operate DVR system by simply
using mouse.
UP MENU
UP MENU
1 2 3 4 5 6
7
8 9
1
2
3
4
5
6
7
8
9
10
11
12
10 11 12 13 14
button
Menu button
Alarm Out
button
Direction
button
Zoom In/Out
Focus In/Out
Auto button
Spit Screen
button
button
cancel button
Search return
button
FeaturesNamesNo.
• It start search mode. Search
• It switches system to setup mode.
• Users can use this menu to move from lower level menu to
upper level menu or when they exit from system setup mode.
• Button to enter Pan/Tilt control menu.PTZ button
• Click on “ALARM OUT” to go to Alarm Out menu.
• When using front panel, press Enter button.
• This button controls PTZ directions at PTZ mode.
• If user press Enter button, the pop-up menu will disappear.
• Zoom In/Out any supported Pan/Tilt or Speed Dome type
camera.
• Adjusts focus of the camera lens. (This function is not
supported on any auto focus)
• To start sequencing display mode, select single channel
screen.
• Press auto display icon to get auto rotation screen. Click to
view live image in single channel mode.
• You can get 4/9/16 channel display screen with clicking the
icon by mouse or pressing the front panel key.
• It start event search mode.Event Search
• It cancel backup process.Backup
• It switches to initial search screen during playing video
images.
35
35
Page 36

FeaturesNamesNo.
• It start search mode. Playback button
Mute button
• Adjust select MUTE if you do not wish to listen
to live audio.
36
36
Page 37

3.4 Pan/Tilt Camera
3.4 Pan/Tilt Camera
3.4.1 Switching to Pan/Tilt control mode
[Pan/Tilt camera control]
• Select the camera channel connected to the
P/T/Z camera by using the mouse or camera
number keys on the front panel. This will display
the channel in full screen mode.
• Once the channel is enlarged, press [Enter] to
access [P/T/Z control] mode. Pan/Tilt controls
may differ depending on the connected camera
model.
[Exiting P/T/Z control mode]
• When you have finished with this screen, click
[OK] button by mouse or press MENU on the
front panel to return to Surveillance mode.
37
37
Page 38

3.4.2 Pan/Tilt Camera Control
In P/T/Z menu, you can switch the P/T/Z camera controls to manual control, as well as changing
Zoom, Focus, and Auto Pan settings.
1
2
3
4
5
6
[Figure 4-3. P/T/Z menu]
1
[P/T/Z model]
Displays the P/T/Z camera model.
[P/T/Z function buttons]
2
You can enable or disable P/T/Z camera functions
by selecting the options you wish to use by using the
mouse or the [Directional] and [Enter] key on the front
panel.
Some functions may differ depending on the P/T/Z
camera model you are using.
3
[P/T speed]
• Use the directional keys on the system to set the
speed of the movement of the Speed Dome camera
when it is to be controlled manually.
• P/T Speed only applies if you are using a Speed
Dome camera.
4
[Z/F speed]
• Use the jog/shuttle on the system to set the
camera zoom/focus rate.
• Z/F Speed only applies if you are using a Speed
Dome camera.
[Preset]
5
• If you have a Speed Dome camera configured with
presets, selection of a numbered button will move the
camera to that preset position (see [Mode Select]
below).
• Preset selection only applies if you are using a
Speed Dome camera.
[Mode select]
6
• Mode button is used to set the Speed Dome camera
to a preset position.
• Select the [Cursor Mode] button using the
[Directional] keys, then press [Enter] to change to [P/T
Mode].
• To set the position of the Speed Dome camera to a
preset, change the [Cursor Mode] to [P/T Mode], then
move the camera position using the directional keys.
Once the camera is in the desired position, change the
[P/T Mode] back into [Cursor Mode].
38
38
Page 39

3.4.3 Supported Pan/Tilt Camera List
P/TModal NameManufact ureNo.
Speed
SAMSUNG6
Samsung PTZ
camera
FocusZoomP/T
Speed
PresetZ/F
Manual
Control
and
other
function
BPSIRIS
9600NOYESYESYESYESYESYESYESLG-MULTIXLG1
2400NOYESYESYESYESYESYESYESPELCO-SDPELCO2
2400NOYESNONOYESYESYESYESDRX-501ADONG-YANG3
9600NONONOYESYESYESNONOGC-755HONEYWELL4
19200NOYESYESYESYESYESYESYESZC-SD622JFTOA5
9600NONOYESYESYESYESYESYES
9600NOYESYESNOYESYESYESYESTechwinSAMSUNG7
2400NOYESNONOYESYESNOYESKRE-303 ORION8
9600NOYESNONOYESYESNOYESKRE-305ORION9
39
39
Page 40

3.5 ALARM OUT ––
3.5 ALARM OUT
Manual Control
Manual Control
3.5.1 Switching to Alarm Out Mode
If you wish to use the control devices manually, select the 16-splitscreen mode in Surveillance
mode, then press Enter key. You will then be able to select the control devices you wish to use
manually.
40
40
[Alarm Out]
• Use the mouse or the directional keys and
Enter key to select the control device numbers
you wish to control manually.
[Exiting Alarm Out mode]
• Press [Enter] button to return to Surveillance
mode.
Page 41

4. System setup
4. System setup
41
41
Page 42

4. System Setup
4. System Setup
4.1 Accessing Setup mode
To go to the system setup screen, click the [MENU] button on the front of the system. The login window will
then be displayed, enabling the inputting of login ID and password as shown below:
• Click the [Input] button to enter the desired login ID and password. (The admin account initially has no password).
• If you forget your password, you will not be able to access Setup mode, or change your password. W e strongly
recommend that you either write down your password and keep it safe or use a password that you are sure to
remember.
4.2 Recording menu
• The details of the recording menu are as follows:
42
42
Page 43

4.2.1 Motion detection
• Set the motion detection area, sensitivity and alarm for each camera video. Press the [Enter] button after
moving the cursor on the camera to be set.
[Motion Link Setting]
• You can set a motion-link recording for each camera.
• When the camera detects movement in the motion-detection area, the linked camera will begin
recording as well, regardless of its recording schedule.
• To use Motion-link recording, the camera detecting the movement must be set to MotionDetection recording in the schedule. If the camera’s schedule is set to Continuous Recording,
Motion Link will be disabled.
• In Surveillance mode, when the camera detects movement in its motion-detection area, the
linked camera channel will flash ‘REC’ and begin recording.
• To access Motion Link Setting, use the mouse or the directional keys to select [Setting].
[Motion Camera]
• Select the camera that will detect the movement in its motion-detection area by using the mouse
wheel or the jog/shuttle on the system.
[Link Camera]
• Select the cameras that will be linked to the [Motion Camera] by using the mouse or the
directional keys. You can link multiple cameras to the selected [Motion Camera].
43
43
Page 44

[Camera]
• Use the jog/shuttle on the system to select other cameras for set up.
[Full Motion]
• To set the whole channel screen to motion-detection area, switch the [Full Motion] option to “ON”. To
cancel the whole screen from motion-detection area, switch the option to “OFF”.
[Sensitivity]
• You can set the motion-detection sensitivity of each camera to “LOWEST”, “LOW”, “NORMAL”,
“HIGH” or “HIGHEST”.
[Beep]
• To hear a ‘beep’ warning sound when the system detects movement in motion-detection area, set the
[Beep] option to “ON”. To hear no warning sound, set the option to “OFF”
[Apply All]
• Click the [Apply All] button to apply the current camera setting to all cameras.
44
44
Page 45

4.2.2 Schedule
• Set the recording type for each camera over a 24 hour period.
[Camera]
• Use the mouse wheel or the Jog/Shuttle to select the camera to change its schedule.
[Time]
• Change the recording time in hourly intervals
• Use the mouse to toggle the time or use the jog and shuttle dials on the front of the DVR
[REC Option]
• You can select a recording mode for the selected camera by using the mouse or directional keys to
highlight the type of recording you wish to set.
• Available recording modes are listed on the table below. You can set none recording as an option.
[24 Hour setting]
• This setting applies the recording type to a camera for the whole 24 hour period.
• Select the type of recording using the mouse or jog and shuttle to toggle between the settings.
[Apply All]
• Click the [Apply All] button to apply the current camera setting to all cameras.
Schedule Setup Display
None
C
M
A
M: A
M: P
A: P
M: A: P
• C: Continuous Recording
• M: Motion Recording
• A: Alarm In Recording
• P: Pre-alarm Recording
Available Recording ModesRecording Mode
• No Recording
• Continuous Recording
• Motion Recording
• Alarm In Recording
• Motion & Sensor Recording
• Motion & Pre-alarm Recording
• Alarm In & Pre-alarm Recording
• Motion & Alarm In & Pre-alarm Recording
45
45
Page 46

4.2.3 Quality/Resolution
• The details of the Quality/Resolution menu are as follows:
4.2.3.1 Normal REC Setting
• You can set the recorded mode values for normal DVR recording.
[Resolution]
• Set the screen size for recording.
Source
[Camera]
• Select which channel to set up.
CIFHalf D1Full D1Video
352x240704x240704x480NTSC
352x288704x288704x576PAL
46
46
Page 47

[Quality]
• Select the recording video quality. Set between the option of LOW, NORMAL, HIGH and BEST.
[Frame]
• Select the number of frames for recording. The number of frames refers to the number of screens
recorded per second (fps).
[Bit Rate]
• Select bit rate to fit network bandwidth.
• VBR transfer high quality image to remote software, but network transfer speed can be slow.
• CBR transfer middle quality image to remote software, but network transfer speed can be fast.
[Audio]
• To recording sound with the selected camera. Select whether to save audio data or not for each camera.
[Apply All]
• Click the [Apply All] button to apply the current camera setting to all camera.
,
,
[Note]
• Recording frame rate may very depending on the number of installed camera or
system load.
4.2.3.2 Alarm REC Setting
• You can set the DVR recording mode values when a Alarm happens (Alarm In, Motion detection, Instant
recording ).
[Camera]
• Select which channel to set up.
[Quality]
• Select the recording video quality. Set between the option of LOW, NORMAL, HIGH and BEST.
[Frame]
• Select the number of frames for recording, The number of frames refers to the number of screens recorded
per second (fps).
47
47
Page 48

[Bit Rate]
• Select bit rate to fit network bandwidth.
• VBR transfer high quality image to remote software, but network transfer speed can be slow.
• CBR transfer middle quality image to remote software, but network transfer speed can be fast.
[Audio]
• To recording sound with the selected camera. Select whether to save audio data or not for each camera.
[Apply All]
• Click the [Apply All] button to apply the current camera setting to all camera.
4.2.3.3 Network REC Setting
• Set image values for network transmission.
[Resolution]
• Set image size transmitting.
Source
[Camera]
• Select which channel to setup.
[Quality]
• Select the image transmission quality. select between the options LOW, NORMAL, HIGH, BEST.
[Frame]
• Select the number of frames to transmit through network. This will be the number of frames transmitted for
every one second.
CIFHalf D1Full D1Video
352x240704x240704x480NTSC
352x288704x288704x576PAL
48
48
Page 49

[Bit Rate]
• Select bit rate to fit network bandwidth.
• VBR transfer high quality image to remote software, but network transfer speed can be slow.
• CBR transfer middle quality image to remote software, but network transfer speed can be fast.
[Apply All]
• Click the [Apply All] button to apply the current camera setting to all camera.
4.2.3.4 Alarm REC Time
• Set Pre-Alarm, Post-Alarm and whether buzzer occur or not on instant recording.
[Pre-Alarm Time]
• Setup Pre-Alarm recording start work-time.
[Alarm REC Post Time]
• Setup Post Alarm (Alarm In, Motion detection) recording time.
[Instant REC Post Time]
• Setup Instant Recording Time.
[Auto Deletion]
• You can setup the storage period of the recoded data, where by the stored data will be automatically deleted
from the hard disk after the specified number of days has passed.
• The default setup is [OFF].
[Instant REC Beep]
• Setup Beep sound working-time.
49
49
Page 50

4.2.4 Property
• Change the color, brightness and contrast for each camera.
[Camera]
• Select which channel to set up.
[Color/Bright/Contrast]
• You can set the color, brightness and contrast of the selected camera.
• The adjustment can be made from ‘0’ to ‘255’ using the jog/shuttle or mouse wheel.
[Default]
• Select [Default] button to set the color, brightness and contrast to their default value.
[Apply All]
• Click the [Apply All] button to apply the current camera setting to all camera.
50
50
Page 51

4.3 Camera menu
• The details of the camera menu are as follows:
4.3.1 Channel Setting
• Set camera status and name, add PTZ protocol to camera.
[Camera]
• Select the channel to set up the camera.
[Camera Available]
• Set the use of the selected camera between Enable/Disable and Secure using the mouse scroll wheel or
jog/shuttle.
51
51
Page 52

[Camera Name]
• The camera name of the selected channel can be set. A virtual keyboard appears if you press the Enter
button.
• Characters can be input one by moving the cursor. You can input up to 10 characters. If you press “Shift”,
you can input the uppercase letters and number keys.
[P/T/Z Model]
• Lets you select P/T/Z on the selected camera channel.
0000 1111 231 4
231 4657 89 :<; =?>@A A B =C
57 89 :<; =?>@A A B =C
231 4231 4
57 89 :<; =?>@A A B =C57 89 :<; =?>@A A B =C
• Configure Alarm In type Normally Open and Normally Close setting and beep option.
[Alarm In]
• Select the Alarm In number for configuration.
[Signal Type]
• The Alarm In type can be set to “Normally Open”, or “Normally Close”.
• Normally Closed type = If the door/object with the Alarm In installed is not closed, the Alarm In will trigger.
• Normally Open Type = If the door/object with the Alarm In installed is not opened, the Alarm In will trigger
[Beep]
• When Alarm In are triggered, the system will produce “Beep” alarm sound through its internal speakers.
Select “ON” to enable alarm, and select “OFF” to disable it.
52
52
Page 53

4.3.3 Alarm In Out Link
• Link Alarm In and Alarm Out devices, and activation time.
[Alarm In]
• Select the Alarm In number for configuration.
[Alarm Out]
• You can link a Alarm In with Alarm Out devices. When a Alarm In is triggered, the lined Alarm Out
device(s) will automatically activate.
[Dewll Time]
• You can set how long the Alarm Out devices will stay activated. The value can be changed in 10 seconds
segments up to maximum of 300 seconds.
• Set up continuous to keep Alarm Out put period.
,
,
[Note]
• Alarm In function means alarm control event. For example siren, emergency lamp.
4.3.4 Alarm In Camera link
• Link the Alarm In and camera recording.
53
53
Page 54

[Alarm In]
• Select the Alarm In number for configuration.
[Camera]
• Choose the cameras you wish to link with the selected Alarm In.
• When the Alarm In is trigged, the linked camera(s) will automatically begin recording.
4.3.5 Spot Out Camera Link
• When you have spot monitors, the Spot Out channel can be used for monitoring a specific channel on a
dedicated monitor.
[Spot Out Port]
• Select the spot output port to connect to the selected camera.
[Normal Dwell Time]
• 1~60 Seconds : Its sets the display duration of the current channel until the next channel is displayed.
[Event Dwell Time]
• Sets whether or not to run the Event Monitoring function for the Spot Out channel. It can be set to any of
off, 30 seconds, and Continue.
[Camera]
• Selecting with cameras to view on spot monitor output.
54
54
Page 55

4.4 Network
• The details of the network menu are as follows :
4.4.1 DDNS Setup
• DDNS Setup function allows you to use the dynamic IP address connected to the system as if it is a fixed
IP Address.
[ID]
• Input the user ID for the DDNS account. (DDNS accounts can be registered as this website
www.dnsdvr.com)
[Password]
• Input the Password for the DDNS account
[Restart]
• Refreshes the DDNS connection, should be used when entering a new or changing the DDNS account.
,
,
[Note]
• If you have a public DDNS address (dnsdvr.com), It may take 30 to 60 seconds until
the IP address of the host name (URL) can be updated on the DNS website.
55
55
Page 56

4.4.2 Network Setup
• Input Network connection details for remote access.
[Network]
• The system supports network connection using Static IP, as well as DHCP, ADSL connections. The other
option is to select no network when not networking the DVR.
[ID/Password]
• You can manually enter the ID/Password when ADSL is selected.
• When the main system is connected to the ADSL network, you need to enter user ID and password
provided by the ADSL carrier. The user ID and Password may be entered by using the virtual keyboard.
[Site IP]
• Sets the IP address for the system to be connected to the network, If the connection mode is set to
STATIC-IP, the user needs to enter the IP address directly in this location.
• If the connection mode is either by DHCP or ADSL, the IP address is provided by the DHCP server or
ADSL carrier and will be automatically set. If DHCP or ADSL connection attempt fails, 000.000.000.000 will
be displayed in the network management screen. In this case, turn off the system power and wait for a
while then turn back on for reconnection.
56
56
Page 57

[Subnet Mask]
• Input the subnet mask address for the system.
[Gateway]
• Input the gateway address for the system.
4.4.3 Network Test
• Check the DVR is connected to the network.
[Assigned IP]
• Assigned IP display the system’s IP address used for remote backup and remote monitoring.
[Connection Status]
• Connection Status indicates whether the current assigned IP address can be used to connect to the
internet. If it is possible, the system will display “OK” in the progress bar. Otherwise, the system will display
“Failed”.
[Restart DDNS]
• Receive a new DDNS authentication.
• DDNS authentication allows you to use Internet using the IP address (ADSL, DHCP).
57
57
Page 58

4.4.4 NTP Setup
• Synchronize time to a server with the NTP(Network Time Protocol).
[Primary Address] & [Secondary Address]
• Sets the NTP server address.
[Connection Status]
• To check the connection status with the NTP server in [Primary Address] or [Secondary Address] field,
click on “Test” button.
• When communication is possible with the NTP server, “Success” is displayed on the progress bar.
Otherwise, “Fail” is displayed.
[NTP Enable]
• The operator can decide whether to use NTP feature or not. To use the NTP feature, click on [NTP
Eanble] button.
,
,
[Note]
The operator cannot change the time in the Setup menu but can set the Time Zone while the
NTP feature is enabled.
The NTP server and the system are synchronized every hour.
In case that the system time of the DVR is later than the current standard time provided by the
NTP, and the system time is reset by the NTP, then the recording is stopped until the system
time passes the prior system time before the reset in order to prevent overwrite of the previous
record. That is recording will start again after the newly set system time passes the last old
system time.
58
58
Page 59

* NTP Server List
NTP Server AddressAreaISO
pool.ntp.orgWorldwide
Asia.pool.ntp.orgAsia
Europe.pool.ntp.orgEurope
North-america.pool.ntp.orgNorth America
Oceania.pool.ntp.orgOceania
South-america.pool.ntp.orgSouth America
at.pool.ntp.orgAustriaAT
au.pool.ntp.orgAustraliaAU
be.pool.ntp.orgBelgiumBE
ca.pool.ntp.orgCanadaCA
ch.pool.ntp.orgSwitzerlandCH
cl.pool.ntp.orgChileCL
de.pool.ntp.orgGermanyDE
dk.pool.ntp.orgDenmarkDK
es.pool.ntp.orgSpainES
fi.pool.ntp.orgFinlandFI
fr.pool.ntp.orgFranceFR
gt.pool.ntp.orgGuatemalaGT
ie.pool.ntp.orgIrelandIE
it.pool.ntp.orgItalyIT
jp.pool.ntp.orgJapanJP
mx.pool.ntp.orgMexicoMX
my.pool.ntp.orgMalaysiaMY
nl.pool.ntp.orgNetherlandsNL
no.pool.ntp.orgNorwayNO
nz.pool.ntp.orgNew ZealandNZ
ph.pool.ntp.orgPhilippinesPH
pl.pool.ntp.orgPolandPL
pt.pool.ntp.orgPortugalPT
ru.pool.ntp.orgRussiaRU
se.pool.ntp.orgSwedenSE
us.pool.ntp.orgUSAUS
59
59
Page 60

4.4.5 Emergency Notification
• When an emergency Alarm in event has occurred, the Emergency Notification either delivers the
emergency message and video to the IP address with the CMS or transmits an e-mail to a designated email address.
• Press the “CMS” button to set the Emergency Notification by CMS.
[Alarm In Enable/Disable]
• You can select/unselect the Alarm In to be used as an emergency Alarm In.
• In circumstance that a signal is generated in the emergency Alarm In, the images of the linked camera are
transmitted to a remote location address.
[CMS IP/Tel]
• Enter the IP address that CMS is executed. The following input screen will appear if the “Enter” button is
pressed.
[Transfer Time]
• Set the time that a emergency message is transmitted.
• Transmit in a until of 30, 60, 90, 120 or 150 seconds.
[Start On]
• To enable the Emergency Notification feature by Alarm In event, selected the “Alarm In” event field.
• To enable the Emergency Notification feature using the [Emergency] button on the front panel of the
system, select the “Emergency Button” event field.
60
60
Page 61

• Click the “E-mail” button to display the email transmission settings.
• To receive emergency notification via e-mail, set the SMTP address, sender’s e-mail address, recipient’s
mail address.
[Alarm In Enable/Disable]
• You can select/unselect the Alarm In to be used as an emergency Alarm In.
• In circumstance that a signal is generated in the emergency Alarm In, an event message of the linked
camera are transmitted to a e-mail address.
[From]
• Enter the user account name from which the e-mail message is sent. The following input screen will
appear if the “Enter” button is pressed.
61
61
Page 62

[To]
• Enter the user accounts to receive the e-mail message. The following screen will appear if the “Enter”
button is pressed.
• The virtual keyboard window appears by pressing the “New”, enter the recipient address. When registering
the address to the recipients list, press the after selecting the address from the address book list.
[Start On]
• To enable the Emergency Notification feature by Alarm In event, selected the “Alarm In” event field.
• To enable the Emergency Notification feature using the [Emergency] button on the front panel of the
system, select the “Emergency Button” event field.
[SMTP Server]
• Enter the SMTP server address, user ID and password.
62
62
Page 63

4.5 System Setup
• The details of the system setup menu are as follows :
4.5.1 User Management
• The details of the User Management menu are as follows:
63
63
Page 64

4.5.1.1 Password Setup
• Change the password for the administrator.
[Old Password]
• The default password is not designated first time. This must be used when changing the password.
[New Password]
• A virtual keyboard will appear if the “Enter” button is pressed. You can input characters one by one
up to 16 characters.
[Confirm Password]
• This is the menu for confirming the new password. You need to enter “New Password” first. If you enter
the “Confirm Password” first without entering the “New Password”, no response is made on the entry.
4.5.1.2 User Addition Setup
• Add new user and select the access level.
64
64
Page 65

[User Add]
Enter “User ID” and “Password” for the User. Then select the group that the user has permission, there are
three options “Group1”, “Group2”, and “Group3”.
• If you press “Add”, the entry is registered and displayed in the user list on the right.
• If you press “Clear”, then User ID and Password details entered on the left are deleted.
[User Delete]
• First select a User ID to be deleted from the user list on the right, select it by pressing the “Enter” button.
• If you press “Delete”, only the selected User ID is deleted from the list.
• If you press “Delete All”, all the User IDs registered to the list are deleted.
4.5.1.3 Group Setup
• Change the parameters set to each group.
[Group]
• There are 3 user group levels, so each group can be set with different permission for system set up and
search modes.
[Menu]
• Check “Recording” to enable set-up permission to Motion detection, Schedule, Quality/Resolution,
Property.
• Check “Camera” to enable set-up permission to Channel setting, Alarm In Setting, Alarm In/Alarm Out link,
Alarm In/Camera link, Spot Out/Camera link.
• Check “Network” to enable set-up permission to DDNS Setup, Network Setup, Network Test, NTP Setup,
Emergency Notification.
• Check “System Setup” to enable set-up permission to User Management, Site Setup, Software Upgrade,
Schedule, Storage.
• Check “System Info” to enable set-up permission to Log Info, Factory Default, System Shutdown/Restart.
[Search]
• Check “Playback” to enable search.
• Check “Backup” to set up the JPEG/BMP, KDB and SFX backup and remote backup for any image saved.
65
65
Page 66

4.5.2 Site Setup
• The details of the Site Setup menu are as follows:
4.5.2.1 Regional Setting
• The regional settings menu is for change the DVR time and date to fit the time zone and language to the
installation country. Also there is the option for changing the site code which is essential for network
connection.
[Language]
• Select the language you wish to use.
66
66
Page 67

[Site Code]
• Setup the ID code to the system, for identifying the system when multiple systems are connected through
network and to increase network security.
• The Site Code comprise 6 digits. W hen entering Site Code, you can enter a maximum of 6 digits.
[Date Type]
• It supports a total of 9 formats (such as Year-Month-Day/Day-Month-Year/Month-Day-Year).
[Time Setup]
• The following screen appears if the “Enter” button is pressed.
[Current Time]
• It shows a currently set time.
[Time Zone]
• You can change Time Zone setting to suit installation Time Zone location.
[Daylight Saving]
• Daylight Saving sets the clock one hour ahead or behind during the daylight saving period. If the time zone
supports daylight saving then there will be an option to turn off and on.
67
67
Page 68

4.5.2.2 OSD Dwell Time
• Configure the setup of the on screen display (OSD) and the dwell time for the camera sequencing.
• You can turn the display settings in Surveillance mode on or off, such as [OSD All], [Event Monitoring
Duration], [Camera Name], [Recording], [Audio], [P/T/Z], [Backup], [Data/Time], [HDD Space], [Dwell Time],
[Transparency] and [Bad Sector Dwell time] displays.
• Select [OSD All] to turn all screen displays using the mouse or jog and shuttle dial to switch on or all off.
[Event Monitoring Duration]
• Select to display when a event happened in watch mode for linked camera during event time period.
[HDD Space]
•Set whether to display HDD space on watch screen.
• You can set the channel sequence time from 1 second to 60 seconds by changing the value of [Dwell
Time] by using the mouse wheel or the jog/shuttle dial.
• Select [Transparency] to enable transparency function.
[Bad Sector Dwell Time]
•You can set on the watch screen the display time that the bad sector icon shows when Bad sector
happens.
Bad Sector Icon
68
68
Page 69

4.5.2.3 Remote Control ID
• In the situation where multiple DVR are using their own remote controller the Remote controller ID menu
allows configure each controller to have it’s own ID.
[Remote ID]
• In order to control the DVR with a remote controller, set the DVR and the remote control ID the same.
• Click the button to set a unique Remote control ID.
,
,
[Note]
• The Remote ID must be of four digit for example, When the Remote ID is ‘0’ input
‘0000’.
• By default, the Remote ID of the DVR is set to ‘0’. With the Remote ID set to ‘0’, you
can control the DVR without adjusting the remote controller.
• To change the remote controller ID, press [SysID] button, and input the ID of the
corresponding system. Then, press [SysID] button again.
• Setting the Remote IDs of several DVRs to ‘0’ lets you control all of them at once.
4.5.2.4 Beep Setup
• Select the delay time (sec) between video signal loss and beep alarm activation.
[Video loss Beep delay time]
• The delay time for the video loss alarm can be set. If you do not wish to use the video loss Beep then set
the menu to ‘off’ using the mouse or jog and shuttle dial.
69
69
Page 70

4.5.2.5 Live Audio
[Audio Live Channel]
• Select channel for live audio output.
• The units supports only one channel live audio output at a time.
[Mute]
• Check [Mute] button to disable audio output on audio channel.
70
70
Page 71

4.5.3 Software Upgrade
• View the current software and upgrade to new version.
[Package select]
• You can upgrade the system program by using a portable storage device to be recognized by DW-6/7
series. The upgrade package must be in a folder called “update”. Connect the storage device containing an
upgrade package to the USB port, then press [Select]. The system will display the number of packages
found.
[Upgraded Version]
• After a portable storage device is connected, you can select the [Upgrade Version] using the mouse wheel
or the jog/shuttle on the system.
[Current Version]
• You can view the current system program version.
Check to make sure the upgrade package version is higher than the current version, then select [Start] to
begin the upgrade.
[Caution]
• When upgrading is in progress, do not switch off the system or unplug the portable storage
device containing the upgrade package until the upgrade is complete. Otherwise the system
may malfunction.
71
71
Page 72

4.5.4 Schedule
• The details of the Schedule menu are as follows:
4.5.4.1 Backup Schedule
• You can set up a system backup schedule so that the system will automatically save backup copies of
specific recording times.
• Backup Schedule programs the system to save a backup copy of the recorded data to a designated
storage device set in the schedule.
• You can only schedule the system to save a backup copy of the recording that will be recorded in the
future. You cannot schedule the system to save a backup that bas been recorded before the current date.
To do this, you must access the search mode.
72
72
Page 73

4.5.4.1.1 Adding Backup schedule
[Add]
•To add a backup schedule to the list, select
[Add] button.
• To add a backup schedule, you must set the
[Start Time] and [End Time], [Target Drive], and
[Rotate] options.
73
73
[Backup Schedule List]
• You will see the added schedule on the
backup Schedule list. Select [OK] button to
accept the schedule and return to Setup menu.
Page 74

4.5.4.1.2 Deleting Backup Schedule
[Delete]
• To delete a schedule from the list, select the schedule you wish to delete by using the directional
keys and Enter key. Then select [Delete] button to delete the schedule.
4.5.4.2 System Restart
[System Restart Time]
• You can set a time when the system will automatically restart.
[System Restart Period]
• Use the mouse wheel or the jog/shuttle to select [System Restart Period]. You can assign the system to
automatically restart [On time only], [Daily], [Every 2 days], [Every 3 days], [Weekly], [Every 2 weeks],
[Every 3 weeks], or [Monthly].
• Restarting the system on regular basis may help stabilize the system performance.
74
74
Page 75

4.5.5 Storage
• The details of the Storage menu are as follows:
4.5.5.1 Backup Schedule
• Setup external storage for backup device or extended recording storage device.
[External Storage]
• Display external storage device type.
[Used as]
• External Storage can serve as a backup device or the recording device.
• Select ‘Backup Device’ to use the external storage as backup device, and ‘Recording Device’ as the
recording device, and click the [OK] button.
,
,
[Note]
• Do not disconnect the cable or turn off external storage during operation.
(May cause the DVR system to malfunction or damage the file system of the external
storage. In case of damage to the file system of the external storage , or recover
program)
75
75
Page 76

4.5.5.2 Hard Disk Format
• The table shows the system’s built-in HDD’s
and their information. You can install up to HDD
into the system.
• Form the table, you can select the HDD you
wish to format, then select [OK] button.
• The system will display a warning message.
To confirm and proceed with formatting the
selected HDD, press [Enter] button. To cancel
format and return to HDD table, select [Cancel]
button.
76
76
• You can view the HDD format progress
through the progress bar.
• The system will restart once the format is
complete.
,
,
[Caution]
• Because all data will be deleted when the
HDD formatting is executed, please proceed
with the initialization after backing up important
data to other place.
Page 77

,
,
[Caution]
Checking HDD Data
Please, pay attention to following information to minimize the change of losing HDD data.
• Remember that you should protect HDD from any impact or misuse as this may cause
damaged.
• The Manufacturer is not responsible for missing data or defects caused by the user’s
miss handling.
Note : Adding Extra HDD. Check in advance that the HDD is compatible with the
manufacturer’s DVR.
Example that can cause loss of data or damage HDD.
• Any outside impact on the case which could happen whilst disassembling or setting up
the DVR.
• Power cut or incorrect shutdown whilst the DVR is operating.
• Moving or causing any impact on the DVR during operation.
Please, back up events as soon as possible to minimize disappointment should HDD
data be lost.
77
77
Page 78

4.6 System Info
• The details of the System Info menu are as follows :
4.6.1 Log Info
• This function shows as series of logged tasks made in operating the DVR system and when the system
runs abnormally, it allows finding the error easily so that the problem can be fixed.
• Press the Enter button after moving the cursor on the desired log item.
: Move to the previous page.
: Move to the next page.
78
78
Page 79

[Time]
• If the [Time] button is pressed, the following screen appears.
• Select [Time] to change time to view log information recorded on different date/time.
• Change [Start Time] and [End Time] using the mouse and mouse wheel or the directional keys and the
jog/shuttle, then press [OK] button. The system will display the log information recorded during this period.
[REC]
• Displays the recording information according to the recording event and schedule.
[System]
• Displays the system start/stop, system access user and setup change information.
[Failure]
• Displays the error information that occurs due to the hardware failure.
[Search]
• Displays the time information between the entry and exit of the search mode.
[Network]
• Displays the time and IP address for the connected system through the remote software.
[Backup]
• Displays the backup information.
79
79
Page 80

* System Log List
• BACKUP
NETWORK DISCONNECTED
USB PROBLEM DETECTED
DescriptionLog DetailsLog Type
Continuous Recording Start/StopC(Channel) C REC START/STOP• REC
Alarm In Recording Start/EndC(Channel) A REC START/STOP
Motion Recording Start/EndC(Channel) M REC START/STOP
System Power ON/OFFSYSTEM START/STOP• System
System Time ChangeSYSTEM NET TIMESET
System TerminationSYSTEM SHUTDOWN
System Restart SYSTEM REBOOT
Menu mode Login/LogoutSETUP START/END
Weak Video Output SignalWEAK SIGNAL START CH
Video Output Signal RestorationWEAK SIGNAL STOP CH
HDD(Master) FormatHDD Format M
HDD(Slave) FormatHDD For mat S
Video Loss/RecoveryVIDEO LOSS START/STOP• Failure
Fan Failure/RecoveryFAN FAILURE/RECOVERY
HDD(Master) Smart Check FailureSMART ERROR HDD-M
HDD(Slave) Smart Search FailureSMART ERROR HDD-S
HDD(Master) Write Error CountHDD ERR COUNT M
HDD(Slave) Write Error CountHDD ERR COUNT S
Login/Logout with the Search ModeSEARCH IN/OUT• Search
Remote Software ConnectionNETWORK CONNECTED• Network
Disconnecting the Remote Software
Connection
AVI Backup Success/FailureBACKUP AVI-OK/FAILED
SDB Backup Success/FailureBACKUP SDB-OK/FAILED
SFX Backup Success/FailureBACKUP SFX-OK/FAILED
BMP Backup Success/FailureBAKCUP BMP-OK/FAILED
JPEG Backup Success/FailureBACKUP JPEG-OK/FAILED
Removing the Media While Backing up to a
USB Storage
CD Write FailureCD-ROM WRITE FAIL
No CD Space RemainedCD Media Size Full
No CD MediaCD Media Not Exist
80
80
Page 81

4.6.2 Factory Default
• Restore the all settings to the original default settings. It is also possible to input and export setting from
other DW-6/7 series.
[Factory Initialization]
• Returns all the settings back to the original default condition. Click on the OK button using the
mouse or directional buttons on the front to select the factory initialization.
[Profile Export]
• Creates a file with the System Profile that can be saved and used on other DW-6/7 series.
• Insert USB storage device into DW-6/7 series use mouse or Directional keys to select [OK] and
start Export. When complete OK message appears, If no storage is inserted message ‘No USB’
will appear or if drive is full or error happens fail message will appear.
[Profile Import]
• Import a system profile from another DW-6/7 series.
• Insert USB storage device with profile on into DW-6/7 se use mouse or Directional keys to select
[OK] and start Import. When complete OK message appears, if no storage is inserted massage
‘no USB” will appear or if drive is full or error happens fail message will appear.
4.6.3 System Shutdown/Restart
[Shut down]
• Shut down the system.
[Restart]
• Restart the system.
81
81
Page 82

5. Search
5. Search
Page 83

5. Search
5. Search
5.1 Accessing Search Mode
To go to the Search screen, click the [SEARCH] button shown in the front of the system screen. The
login window will then be displayed, enabling the inputting of login ID and password as shown below.
• Click the button to enter the desired login ID and password. (The admin account initially has no
password.)
• Enter the desired login ID and password and click the [OK] button. The search screen is then displayed as
shown below.
• If you forget your password, you will not be able to access Search mode, or change your password. We
strongly recommend that you either write down your password and keep it safe or use a password that you
are sure to remember. (See page 69 for instructions on how to change password.)
• To return to Surveillance mode, press [Search] button at anytime.
5.2 Search mode display
After you enter the correct password, the Search mode display will appear as shown below.
83
83
Page 84

5.3 Selecting date and time
• To select the date you wish to view, use the directional keys to select button, then press
Enter. This will display a calendar.
• Press the arrow buttons ( ) above the calendar to change year/month.
• Use the directional keys to select the date and press Enter.
• Dates containing recorded data are displayed in an orange color (see table 5-2 for color descriptions).
• Use the shuttle Dial on the system or the mouse wheel to change hour / minute / second.
• After selecting the date you wish to view, press the [OK] button to return to Search mode display. The
system will display the selected date’s recording in the time graph.
• Orange
• Red
• Black
• Green
• Blue
,
,
[Note] Jog and Shuttle Dial
Date Color
Description
Date with Recorded Data
Holidays/Weekends
Date without Data
Selected Date
Current Date
• Jog Dial: Changes hour/minute/second or any other setup value precisely.
• Shuttle Dial: Changes hour/minute/second or any other setup value quickly.
84
84
Page 85

5.4 Selecting cameras and changing search bar line
[Selecting cameras]
• You can select the cameras to be selected. After pressing the Camera1 to Camera16 buttons on the
front panel or moving the cursor to the channel to be selected, the cameras can be selected by
pressing the [Enter] button.
[Changing Search bar line]
• To shift the search bar line, use the jog or shuttle dial on the system or the mouse wheel. This will
shift the bar left or right. Shifting the search bar line will change the time of the recording you wish to
view.
[Time graph]
• Recorded data shown on the time graph will be displayed in different colors depending on the
recording type enabled.
Color
• Orange
• Blue
• Light Green
• Green
• Bluish Green
• Purple
Description
Continuous Recording
Motion-detection Recording
Pre-alarm Recording
Alarm In Recording
Audio Recording
Instant Recording
85
85
Page 86

5.5 Audio Output
• To select the date you wish to view, use the directional keys to select button, then press
Enter. This will display a calendar.
[Audio]
• The system can play the video with recorded audio, provided an audio recording device is
connected to that channel.
• To play the recording with sound, use the mouse or the directional keys on the system to select
the [AUDIO] button, then press [PLAY]. Once selected, you will listen to any recorded audio.
,
,
[Note]
• Only one camera channel can output audio data for replay.
• Audio data are outputted only during forward play, not during backward or fast replay.
86
86
Page 87

5.6 Playback
• If you press [Play] after selecting the channel and date to be searched, the video is played.
[Playback buttons ]
: Move to the first recorded image for that date.
: Reverse Play.
: Stop.
: Forward Play.
: Move to the last recorded image for that date.
[Fast Play]
• If you press the left or right button ( / ) while in playing, you can see the screen in
the reverse or forward direction with the 2-times speed, 3-times speed or 4-times speed.
[Full Screen]
• To enlarge a channel during playback, use the number keys 1~16 on the system to select the
channel you wish to enlarge.
• When a channel is selected, use
DFE
(zoom in/zoom out) keys to increase or decrease the
screen size.
[Conversion into the initial Search Screen or Monitoring Screen]
• To return to Search mode display, press the Enter button at anytime.
• To shift from the search screen to the surveillance screen press the [SEARCH/LIVE] button.
,
,
[Note]
• Recording frame rate might vary depending on the number of installed camera or
system load.
87
87
Page 88

5.7 Event Search
• Event search function can be used to search and display data recorded by motion, or alarm events.
•The following Event Search screen will appear if the [Event] button is pressed.
1
2
3
5
4
[Start Time] and [End Time]
1
• Set the Event search time.
• To change the [Start Time] and [End Time], use the mouse or the directional buttons to
highlight button, then click left mouse button or press Enter.
[Search]
2
• Click on the “Search “ button to start the event search.
[Camera]
3
• Select the camera or channel to search.
[Choose event items to search]
4
• Select the item which you want to search, choose either or both Motion and Alarm Events.
[Event List]
5
• This part is displays searched result. Choose the event from the list you want to playback and
click the [Play] button then event images will be played back.
88
88
Page 89

6. Backup
6. Backup
Page 90

• From Search screen display, select [BACKP] button to save a backup copy of the recording using USB
HDD, or a portable hard drive such as USB memory stick. The backup files can be saved as SFX, BMP,
JPEG, or KDB (Data Base) formats.
6.1 Video Backup
[Backup mode – Video]
• First select KDB, SFX Backup mode, use the mouse or the directional keys on the system to highlight
[Backup mode], then use the mouse wheel or the jog/shuttle to change the option.
[Start Time] and [End Time]
• Select the start time and end time of the recording you wish to save.
• To change the [Start Time] and [End Time], use the mouse or the directional buttons to highlight
button, then click left mouse button or press Enter.
[Select Media]
• Select the media to be used for saving backup.
• When selecting USB or IEEE1394, the [Format] button will be initialized. Push [Format] button when you
need to format the chosen media.
[Camera]
• Select the camera number that contains the recording you wish to save.
• When saving backup in KDB format, you can select multiple camera channels.
• When saving backup in SFX format, you can only select one camera channels.
• When saving backup in Video mode, you will see displayed on the corresponding camera
channels in Surveillance mode.
,
,
[Note]
• KDB (Data Base) backup enables backup of the video with audio data. However, the other
types of backup such as BMP, JPG do not include audio.
• When the is archived to USB in KDB format the viewer software will be copied automatically
to the USB.
• SFX file is backup file format include player in a file.(EXE)
• If double click backup SFX file, backup date will play automatically.
90
90
Page 91

6.2 Still Image Backup
• To back up still images, replay the recorded image first and press the Enter once you reach the scene that
you would like to back up. The initial search screen in then converted into the initial search screen.
[Backup mode – Still Image]
• First select KDB, SFX Backup mode, use the mouse or the directional keys on the system to highlight
[Backup mode], then use the mouse wheel or the jog/shuttle to change the option.
[Start Time] and [End Time]
• Select the start time and end time of the recording you wish to save.
• To change the [Start Time] and [End Time], use the mouse or the directional buttons to highlight
button, then click left mouse button or press Enter.
[Select Media]
• Select the media to be used for saving backup.
• When selecting USB or IEEE1394, the [Format] button will be initialized. Push [Format] button when you
need to format the chosen media.
[Camera]
• When Still Image mode is selected, only those cameras what selected in search mode will be saved.
Camera channels that do not contain any data will be disabled.
• Press [OK] button to begin backup. You will see the backup progress through the progress bar.
• One backup is complete, the system will return to search mode display.
91
91
Page 92

6.3 Media Format
• On Backup Mode to format external storage equipment (USB, IEEE1394) or set partition, select the media
(USB or IEEE1394) then click the [Format] button
[Format]
• Click [Format] button after selecting the storage equipment which you want to format on media list.
[Establishing partition ]
• Select the storage equipment which you want to establish partition(s).
• Check the [Partition Reset] button and set the partition quantity on [Total Partition Count]. And then push
[Format] button.
,
,
[Note]
• Media format function is not supported when external storage equipment (USB,
IEEE1394) is set on recording mode.
• Storage equipment format function is supported for only USB or IEEE1394.
• Please allow 5 seconds for the unit to recognize external storage after connecting.
• When entering the Media Format screen right after connecting, the related info may
not be displayed on list.
• [Total Partition Count] setting only works when the [Partition Reset] button has been
checked.
92
92
Page 93

6. Appendix
6. Appendix
Page 94

1. KDB Viewer
1. KDB Viewer
1.1 How to run Viewer
Connect or insert saved KDB type backup data media to computer, Double click [KDBViewer] Folder to
1
open.
2
Double click ‘Viewer.exe’ to run viewer application.
3
Click on next button.
94
94
Page 95

Check the box “I accepted this License Agreement” and click on [Next]3
4
Enter the path to install the CMS program, and click on [NEXT] button.
5
Installation will start.
95
95
Page 96

6
After the Center Program is completely installed, click on [FINISH] button.
On the desktop, “KDBViewer.exe”
7
96
96
Page 97

1.2 Viewer main screen
2
1
[Scroll button for camera]
1
• Scroll up or down to show camera buttons.
[Camera]
2
• Select camera number(s) you wish to search.
[Time indication bar]
3
• It indicates time of stored data.
• To enlarge the time scale, click on the time
indication bar.
[Indication of stored data]
4
• This function indicates recording type and stored
data in graphical colour form as below ;
- Pink bar indicates ‘Continuous recording’,
- Blue bar indicates ‘Motion recording’,
- Dark Yellow bar indicates ‘Sensor recording’,
- Green bar indicates ‘Pre-alarm recording’,
- No graphic bar where nothing was recorded.
3
4
5
6
7
8
[Search Line]
5
• This indicates time line for searching data.
• Move the line to the left or right to start searching.
6
[Split Screen setup]
• When you click the button, split mode from search
screen will automatically change according to the number
of cameras you choose in a form of 4, 9, or 16 (DW-6/7
series) split screen.
7
[SKIP]
• Move the slides to the right if you wish to increase
search speed.
• The number of images to be skipped are set by an
internal value of the DW Center software. The value is
not the number of images to be skipped.
[SPEED]
8
• Move the slides to the right to increase the speed of
replaying saved image.
97
97
Page 98

9 10
16
9
[Zoom]
Increases screen size by up to x4.
[Digital Zoom]
10
[Zoom In]
Click right mouse button to increase the
selected part of the image by up to x17 (when recorded
by high resolution).
[Zoom Out]
Click right mouse button to reduce zoom ratio.
[Move]
Click right mouse button and drag to “move
around inside” the stored image.
12
13
[Playback]
11
• Be sure to select the camera, time and date to
search.
• Adjust SKIP and SPEED ratio as you wish.
[Backup]
12
[Print]
13
15
14
11
17
Go to first saved image for selected date
Reverse play frame by frame
Reverse playback
Stop
Forward playback
Forward play frame by frame
Go to last saved image for the selected date
While you are searching recorded data,
select the image to backup and click .
The “Backup” window will appear.
Print the selected image.
It is possible to print BMP or JPEG images.
98
98
Page 99

14
[Audio Play Configuration]
• When you want to playback audio, select the channel with recorded
audio. (Audio recording and replay is supported for only one channel).
• When you click the ‘Audio Play’ icon , the audio play configuration
window appears as right.
• Check on “Enable”.
• Adjust the volume properly using ‘Volume control’.
15 [Adjustment of playback image]
• Image quality, such as brightness, contrast, colour,
sharpness, rotate, mirror, outline and twist function during
playback can be adjusted.
[Search Sheet]
16
• When you click the icon for searching the backup data, a window as below will appear.
• Select DW Series which contains backup data, then select the site you wish to search and click
‘Search’ to start.
[Quit]
• Exit the Viewer program.
99
99
Page 100

2. WebDVR
Connect WebDVR
Connect WebDVR
1. Input DVR IP address to connect on Web Browser (Internet Explorer) as blow picture.
G
G
[Note]
• To operate WebDVR without errors on Windows Vista, execute “Internet
Explorer” as an administrator. And then you can get the right the access to
download ActiveX program.
• To execute “Internet Explorer” as an administrator.
1. Click “Start” button.
2. If you have program lists, wave cursor “Internet Explorer” menu and click
right button on the mouse.
3. If you have pop-up menu, click “Run as Administrator” menu.
2. Select “Install ActiveX Control” on popup menu.
100
100
 Loading...