

Page 1
Network Attached Storage
Extended
Raid1
DW-BJ2NAS8T
DW-BJ2NASR4T
DW-BJ2NAS12T
DW-BJ2NASR6T
DW-BJ2NAS16T
DW-BJ2NASR8T
DW-BJ2NAS20T
DW-BJ2NASR10T
®
NAS™
Password : admin1234
Photo
Quantity
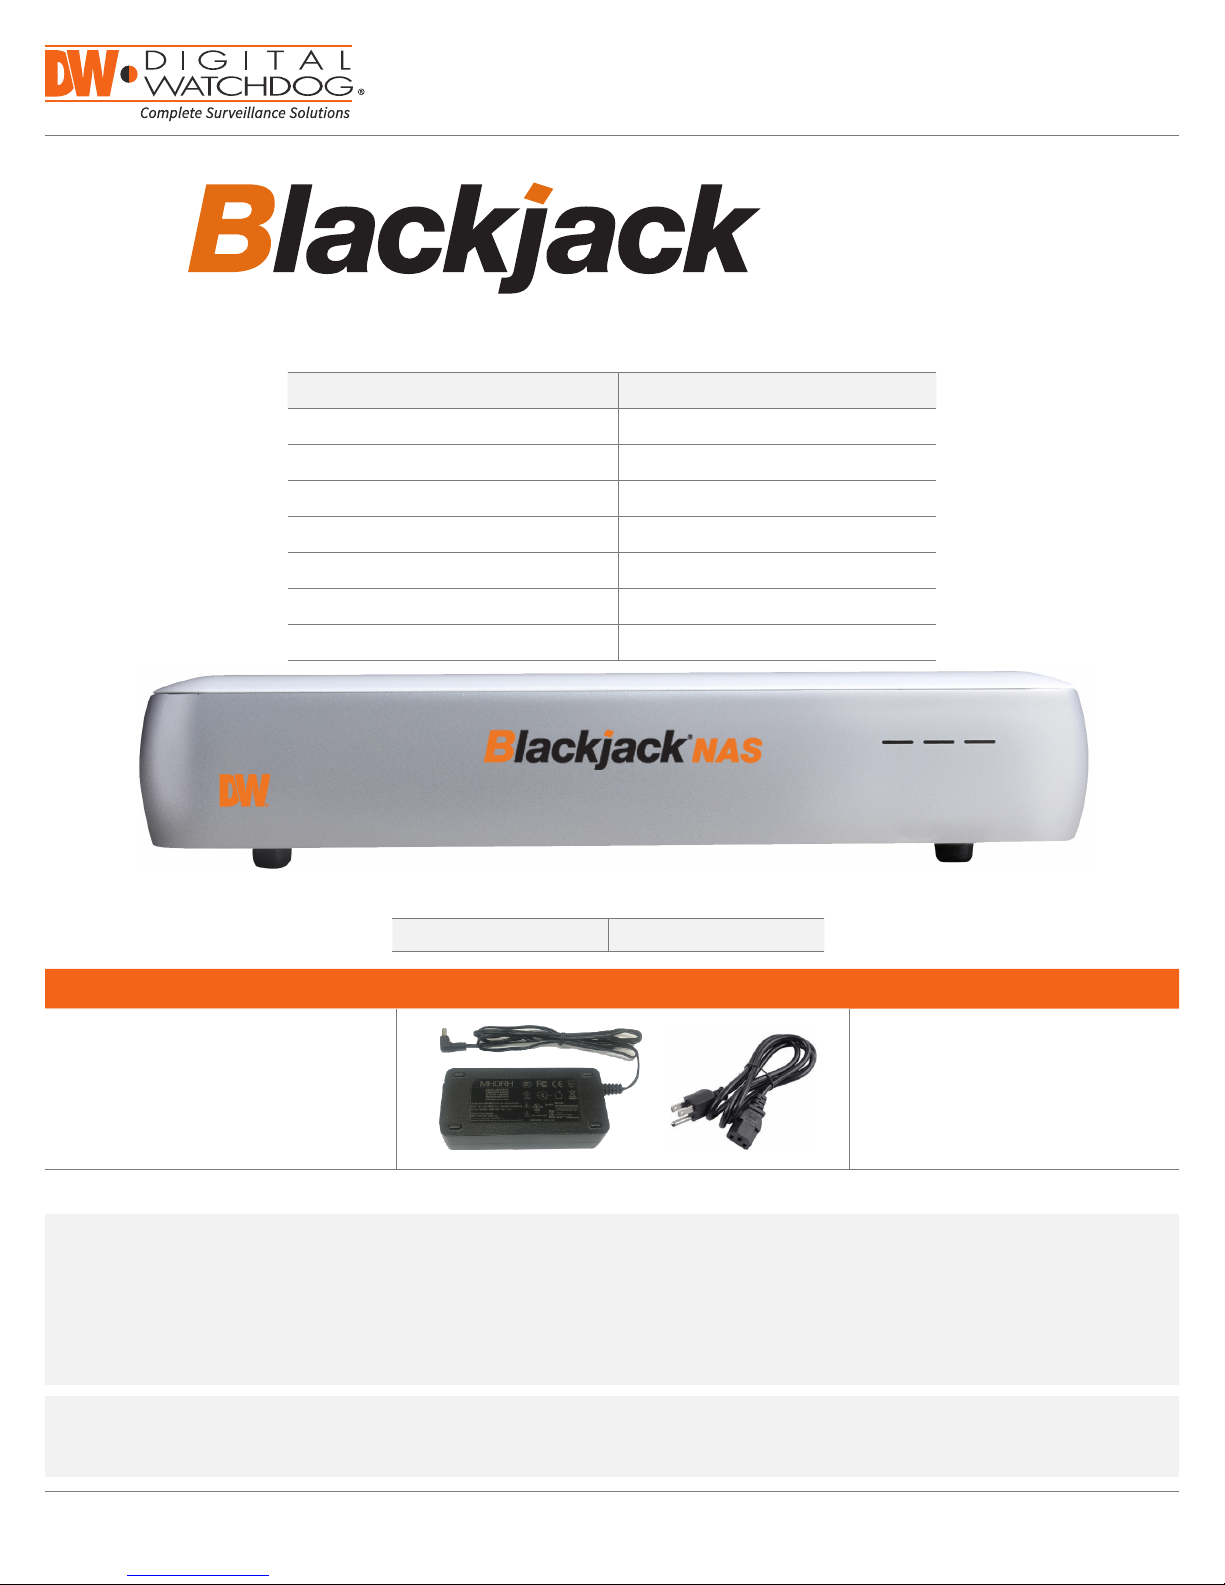
1 set
Non-RAID RAID1
DW-BJNAS4T DW-BJNAS8TR
DW-BJNAS6T DW-BJNAS12TR
DW-BJNAS8T DW-BJNAS16TR
DW-BJNAS10T DW-BJNAS20TR
DW-BJNAS12T
DW-BJNAS16T
DW-BJNAS20T
User Manual
®
NAS
Default login Information for Blackjack® NA S™
Username : admin Password : admin1234
WHAT’S IN THE BOX
12V DC Adapter &
Power Cable
NOTE: Download All Your Support Materials and Tools in One Place
1. Go to: http://www.digital-watchdog.com/support-download/
2. Search you product by entering the part number in the ‘Search by Product’ search bar. Results for applicable part numbers will populate automatically based on the part number you enter.
3. Click ‘Search’. All supported materials, including manuals, Quick Start Guide (QSG), software and rmware will appear in
the results.
Attention: This document is intended to serve as a quick reference for initial set-up.
See the DW Spectrum full manual for more information on features and functionality.
1 Set
Tel: +1 (866) 446-3595 / (813) 888-9555
Technical Support Hours: 9:00AM – 8:00PM EST, Monday thru Friday
digital-watchdog.com
1
Page 2

Important
Read Before System Operation. Follow these details to prevent material damage or personal injury.
Warning
1. Use the power cord, which is supplied or recommended by the supplier, or it may cause fire.
2. Do not disassemble or reassemble the product. It may cause malfunction or fire.
3. Enquire to your vendor for repair. It may cause electric shock or fire if the repair is not done properly.
4. Do not touch the product with wet hands. It may cause malfunction or electric shock.
5. Product installation must be ensured to a professional for product installation, or it may cause malfunction,
electric shock or fire.
6. Ground connection must not touch gas pipe, water pipe or telephone line. If grounding is not done properly, it
may cause electric shock.
7. Prevent metallic foreign substance from going inside the product. It may cause malfunction or electric shock.
8. Do not spray insecticide or flammable spray while driving. It may cause fire.
9. Place the system in an open place where air ventilation is guaranteed, or it may cause over-heating and seriously
damage the system to be fired.
10. Prevent water from instilling inside electrical parts. Clean with a dry towel or malfunction or electric shock
could result.
11. Must use the outlet of the grounding to connect the power cord, or it may cause fire.
12. Do not connect on the middle of power cord or use extension cord. It may generate heat or cause fire.
13. Do not touch the power cord with wet hands. It may cause electric shock.
14. Keep power cord dry and protect from humidity. It may generate heat or cause fire. The power cord is not
waterproof.
15. Hold the body of the plug while removing the power plug. Do not pull the power cord. Damage to the power
cord may generate heat or cause fire.
16. Check the power plug regularly. Humidity and moderation in smoking may cause fire.
17. Remove power cord from outlet when product is not used for a long time. It may cause short-circuit or electric
shock.
Cautions
1. Do not drop, give strong vibration, or shock to the product. It may cause malfunction.
2. Do not touch the product or the power cord when there is thunder. It may cause electric shock.
3. Do not install the product near or on top of heating source. The internal temperature of the product would be
greater than allowable and could cause malfunction or fire.
4. Do not install the product on inclined or unstable location or where vibration could be committed. It may cause
malfunction.
5. Do not cut off the power artificially, or give shock or vibration to unit while the hard disk is activating. It may
cause hard disk failure or loss of data.
Remarks
※ Pictures and buttons are subject to be changed or modified up to different models.
※ Function or configuration is subject to be changed or modified without prior notice for improvement of the
product.
Page 3

3
User manual
Table of Contents
1. Getting started................................................................................................................................. 4
1.1. Checking supplied items .............................................................................................................. 4
1.2. Blackjack® NAS hardware overview.............................................................................................. 4
2. Setup ............................................................................................................................................... 5
2.1. Setting up the Blackjack® NAS ...................................................................................................... 5
2.2. Add storage to DW Spectrum® IPVMS .......................................................................................... 6
3. Web manager .................................................................................................................................. 8
3.1. Web login ................................................................................................................................... 8
3.2. Storage management .................................................................................................................. 9
3.3. General management ............................................................................................................... 11
3.4. Network management .............................................................................................................. 12
3.5. SMTP (e-mail) management ...................................................................................................... 13
3.6. Date & time management ......................................................................................................... 13
3.7. Log management ...................................................................................................................... 14
Page 4
4
User manual
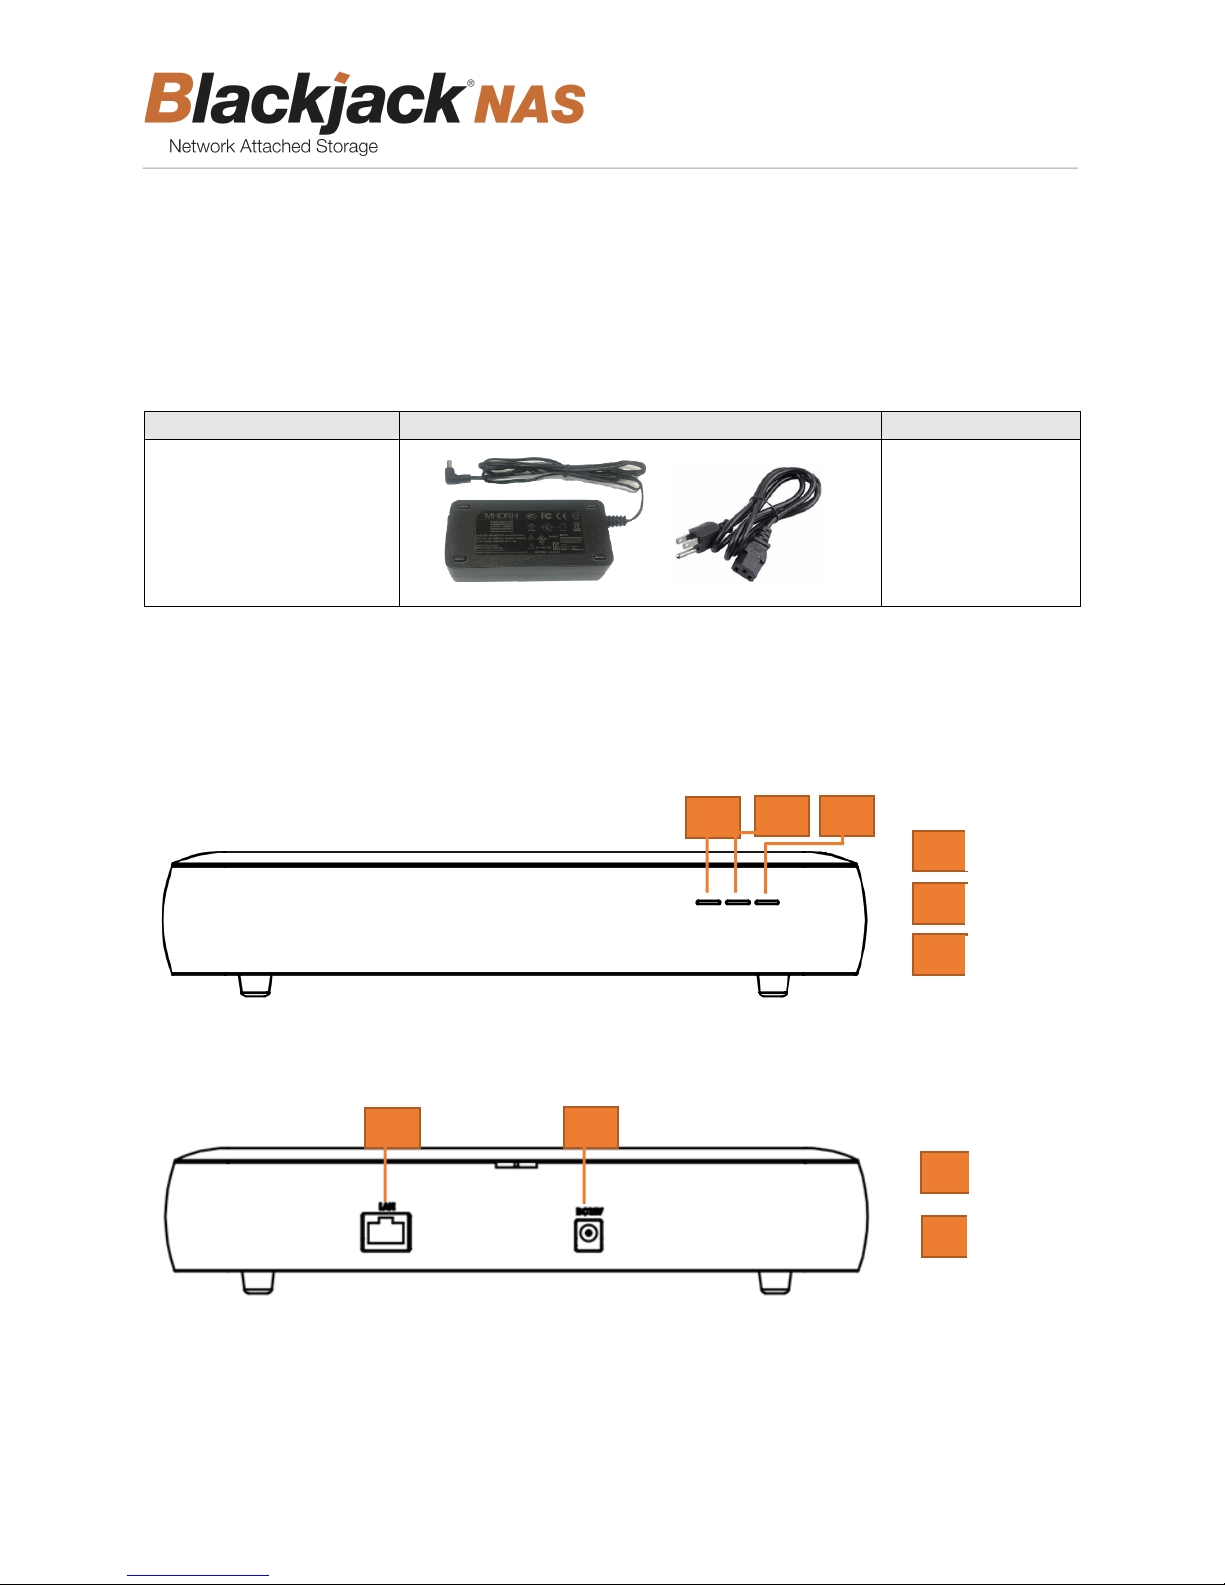
Items
Photo
Quantity
12V DC Adapter &
Power Cable
1 set
F1
F2
F3
F1
F2
F3
HDD 1 LED
HDD 2 LED
POWER LED
B1
B2
NETWORK PORT
(RJ- 45)
DC POWER PORT
(12V)
B1
B2
1. Getting started
1.1. Checking supplied items
Make sure that you have following items supplied. If any of these items are missing or damaged, notify
your vendor immediately. Keep the packing utilities for moving or storage purposes.
1.2. Blackjack® NAS hardware overview
Front-side
Back-side
Page 5
5
User manual
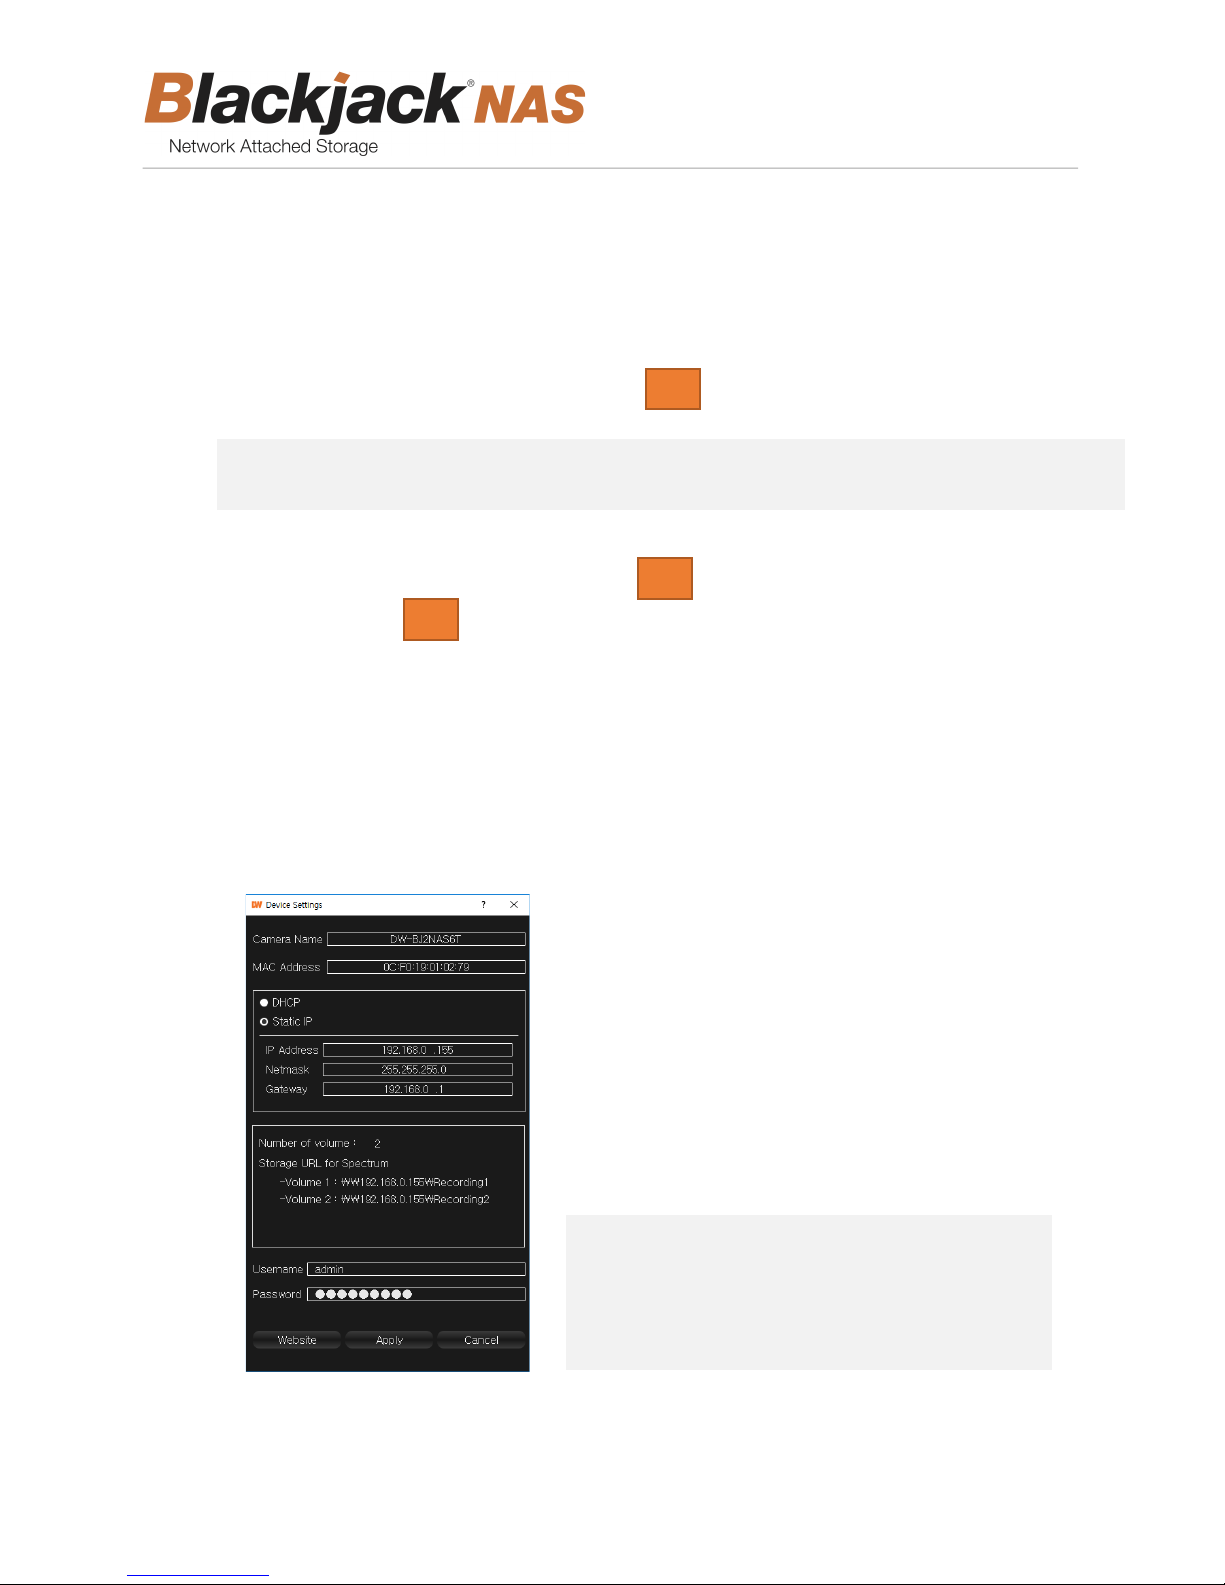
NOTE Initial network information
• Network type: Static
• IP Address: 192.168.1.200
• Netmask: 255.255.255.0
• Gateway : 192.168.1.1
NOTE It is recommended to use Gigabit switch for a stable storage performance.
B2
B1
F3
2. Setup
2.1. Setting up the Blackjack® NAS
STEP 1: Connecting the network cable.
1. Connect the network cable to the network port . and a network switch.
STEP 2: Connecting the power cable
1. Connect the power cable to the DC power port . The Blackjack
2. The front power LED will indicate whether the Blackjack® NAS is on.
STEP 3: Configure the network settings
On a computer in the same network as your Blackjack® NAS unit:
1. Go to: http://www.digital-watchdog.com
2. Search for ‘IP Finder’ on the quick search bar at the top of the page.
3. The latest IP Finder software will appear in the search results. Click on the link to download the
file to your computer.
4. The software will scan your network for all supported cameras and display the results in the
table. Allow up to 5 seconds for the IP Finder to find the camera on the network.
5. Find “Blackjack NAS” on the devices list, click on the “Click” button in the column of “IP Conf.”
®
NAS will turn on.
6. Enter the network information, username and password.
7. Click on the “Apply” button.
Page 6

6
User manual
2.2. Add storage to DW Spectrum® IPVMS
1. Open DW Spectrum® Client by double click on the DW Spectrum® icon .
2. Right click on the name of the server you want to assign the external storage to. The server’s
name will be listed on the resources panel. Click on “Server Settings”.
3. Click “Add External Storage”.
Page 7

7
User manual
4. Input the URL : \\ (Blackjack NAS IP Address) \Recording1
E.g. \\192.168.0.212\Recording1
NOTE Default login Information
Login name: admin, Password: admin1234
5. Input the login name and the password then click on the “OK” button.
6. If you are adding a Blackjack® NAS model with 2HDDs (DW-BJNAS12T, DW-BJNAS16T and
DW-BJNAS20T), add the second external storage by using the following URL:\\(Blackjack NAS
IP Address)\Recording2
E.g. \\192.168.0.212\Recording2
7. Click on the “OK” button.
Page 8

8
User manual
NOTE Web Viewer Address: HTTP://<EQUIPMENT IP ADDRESS>
(E.G.) HTTP://192.168.1.200
NOTE Default login Information
Login name: admin, Password: admin1234
3. Web manager
The Blackjack® NAS web manager allows you to check on the status of the unit and change settings
remotely with no need to install a separate application.
3.1. Web login
① Open a web browser and enter the address below in the address bar. The login screen below
will be displayed.
② Enter the user name and password. The user name is set to admin by default.
③ Click on the “LOGIN” button.
④ If using the default password “admin1234”, the following message will appear.
Page 9

9
User manual
3.2. Storage management
① To manage the storage setting, click on the “Storage” tab. You can view the storage mode,
usage, connection information and internal HDDs information.
② To format the HDDs, click on the “FORMAT” button. The storage format screen will pop up.
a. Select the storage mode
i. Basic: Make the mounted HDDs each volume. Blackjack® NAS uses all capacity of
the mounted HDDs.
ii. Mirroring: Data on the drives are mirrored, providing fault tolerance in case of
drive failure. It needs two HDDs.
b. Enter the administrator password.
c. Click on the “APPLY” button. Then all data stored on the HDD will be deleted, and reset
the storage mode.
③ To view the guide of connecting to DW Spectrum® IPVMS, click on the “SPECTRUM CONNECTION
GUIDE” button.
Page 10

10
User manual
④ To view the status of the SAMBA connections, click on the “SAMBA CONNECTION STATUS”
button.
⑤ To View the S.M.A.R.T. information of the HDD, click on the link of the health status in the
column of the “Health”.
Page 11

11
User manual
3.3. General management
① To manage the general setting, click on the “System” tab and then click on the “General”.
② To update a firmware, click on the “UPDATE” button.
a. Select the firmware update file.
b. Click on the “OK” button.
c. After updating the firmware, the Blackjack NAS will restart.
③ To restore Blackjack® NAS to default settings, click on the “FACTORY RESET” button. The
confirmation window below will pop up.
a. Enter the administrator password.
b. Click “APPLY”. All data stored on the HDD will be deleted and the entire system will be
restored to default settings, including network setting.
c.
④ To restart the Blackjack® NAS, click “RESTART”. The confirmation window below will pop up.
Click on the “OK” button, then the Blackjack® NAS will restart.
Page 12

12
User manual
3.4. Network management
① To manage the network setting, click on the “System” tab and then click on the “Network”.
a. Select the network type “Static” or “Dynamic”.
b. If you select the “Static” option, you need to manually enter the IP address, subnet mask
and default gateway information.
c. Click on the “APPLY” button to apply all changes.
Page 13

13
User manual
3.5. SMTP (e-mail) management
① To manage the SMTP (e-mail) settings, click on the “System” tab and then click on the “SMTP (e-
mail)”.
② To send a notification email to a designated email account when an event occurs, such as device
malfunction, check the “Use” in the SMTP Settings.
a. Enter the SMTP server address and the SMTP server port.
b. If the server uses the encrypted connection (TLS), check the box.
c. If the server use authentication to log in, check the box. Enter the user ID and the
password.
d. Enter the e-mail sender address and e-mail receiver address.
e. Click on the “APPLY” button.
3.6. Date & time management
① To manage the date & time setting, click on “System” tab, and then click on the “date & time”.
Page 14

14
User manual
a. To setup the time zone, select the time zone.
b. To setup time manually, check the “Manual” option and select date and time.
c. To synchronize with a time server (NTP), check the “synchronize with time sever (NTP)”
option and enter the address of the time server.
d. Click on the “APPLY” button.
3.7. Log management
① To manage the system log, click on the “System” tab, and then click on the “Log”.
② To delete all log data, click on the “DELETE” button and click on the “OK” button in the
confirmation window. Then all the log data will be deleted.
③ To download all log data, click on the “DOWNLOAD” button and click on the “OK” button in the
confirmation window. Then all the log data will download as a text file.
Page 15

15
User manual
East Coast Headquarters Office: 5436 W Crenshaw St, Tampa, FL 33634
West Coast
Headquarters Office:
PH: 866-446-35951 FAX: 813-888-9262
www.Digital-Watchdog.com
USA & Canada
International 1+ (813) 888-9555
French Canadian 1+
Support Hours: Monday-Friday 9:00am
16220 Bloomfield
Technical Su pport:
1+
(866) 446-3595
(514) 360-1309
Ave., Cerritos, CA 90703
to
8:00pm
EST
 Loading...