

Page 1
Quick Start Guide
Available from A1 Security Cameras
www.a1securitycameras.com email: [email protected]
State of the art hyper-optimized video management platform designed for ease, speed and efciency.
®
Blackjack
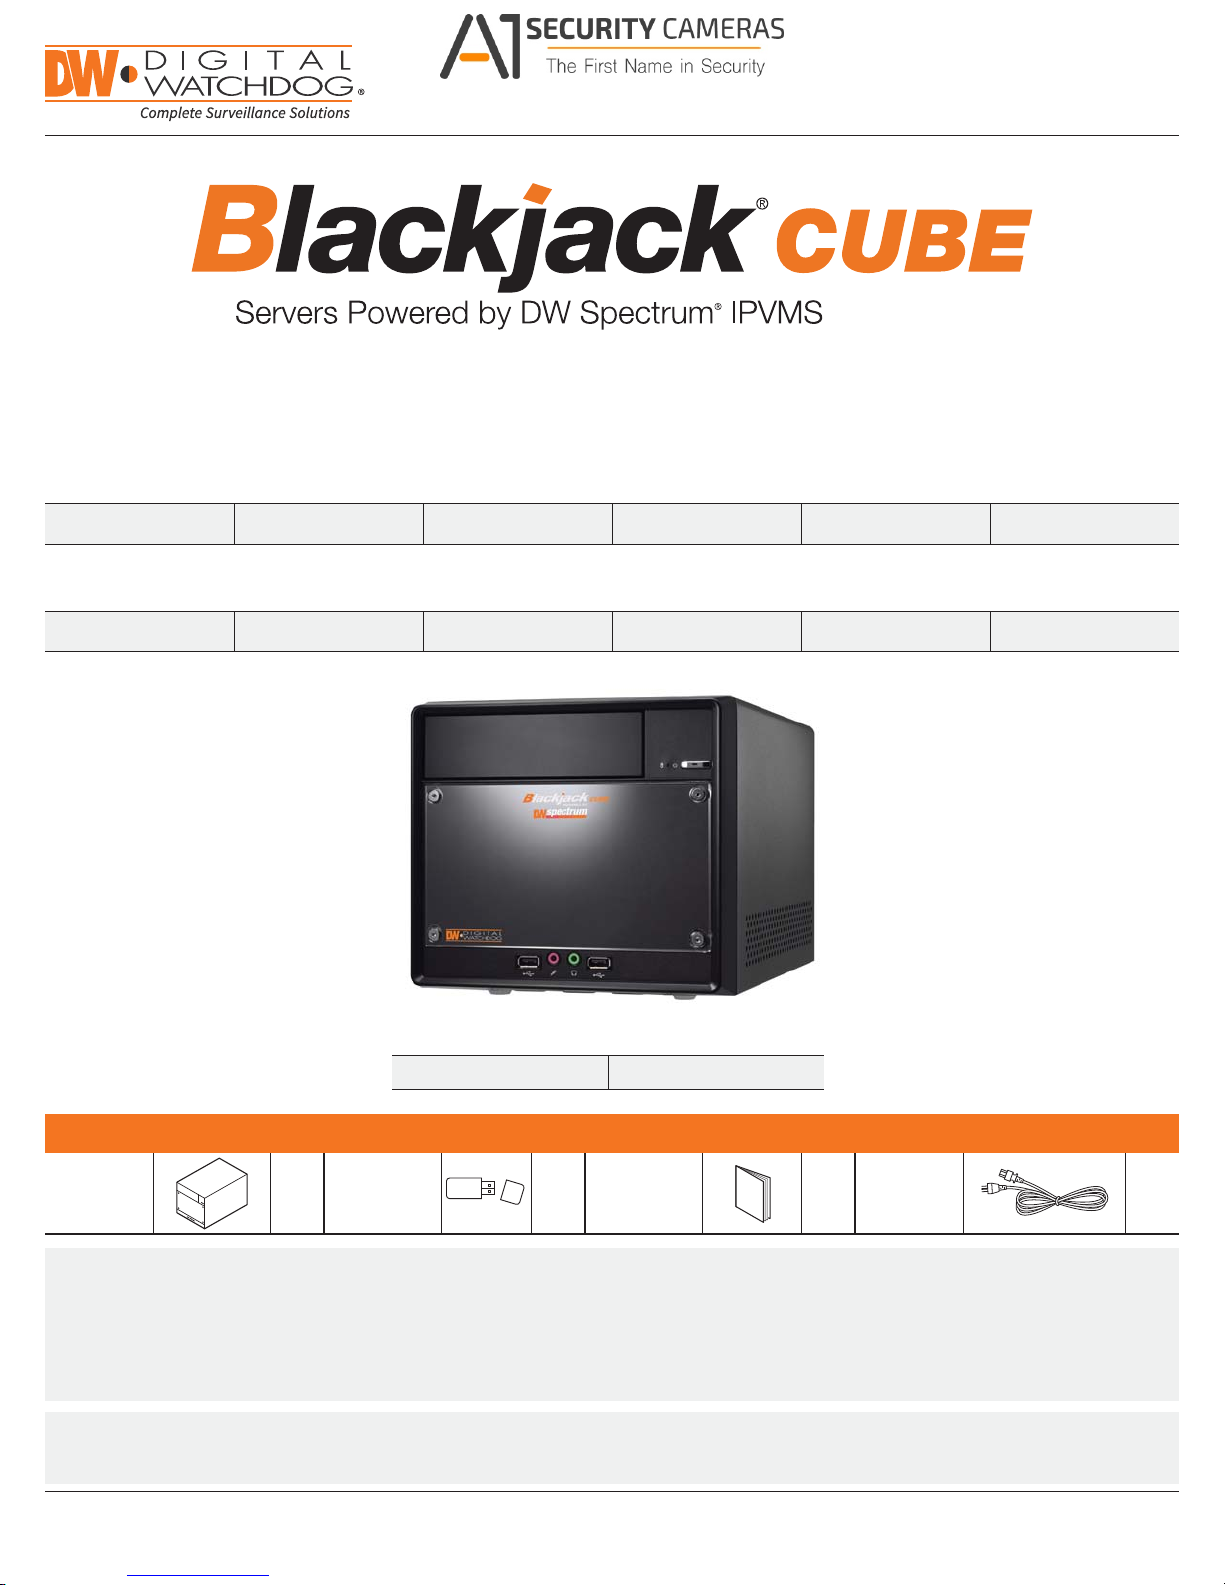
Cube — Up to 16 (Cube-LX) and 64 (Cube) 2.1MP Cameras (1080p True HD Resolution)
Blackjack Cube-LX
DW-BJCUBE6T-LX DW-BJCUBE9T-LX DW-BJCUBE12T-LX DW-BJCUBE18T-LX DW-BJCUBE2T-LX DW-BJCUBE4T-LX
Blackjack Cube
DW-BJCUBE6T DW-BJCUBE9T DW-BJCUBE12T DW-BJCUBE18T DW-BJCUBE3T DW-BJCUBE4T
Blackjack Cube-LX
Blackjack Cube
Default Login Information for DW Spectrum® IPVMS
Username: admin Password: admin1234
WHAT’S IN THE BOX
Cube Ser ver 1 Set Recovery USB 1 Set 1 Set Power Cable 1 Set
NOTE: Download All Your Support Materials and Tools in One Place
1. Go to: http://www.digital-watchdog.com/support-download/
2. Search your product by entering the part number in the ‘Search by Product’ search bar. Results for applicable part numbers will
populate automatically based on the part number you enter.
3. Click ‘Search’. All supported materials, including manuals, Quick Start Guides (QSG), software and rmware will appear in the results.
Quick Start
Guide
Attention: This document is intended to serve as a quick reference for initial set-up.
See the DW Spectrum full manual for more information on features and functionality.
Tel: +1 (866) 446-3595 / (813) 888-9555 digital-watchdog.com
Technical Support Hours: 9:00AM – 8:00PM EST, Monday thru Friday
Page 2
BLACKJACK CUBE HARDWARE
Available from A1 Security Cameras
www.a1securitycameras.com email: [email protected]
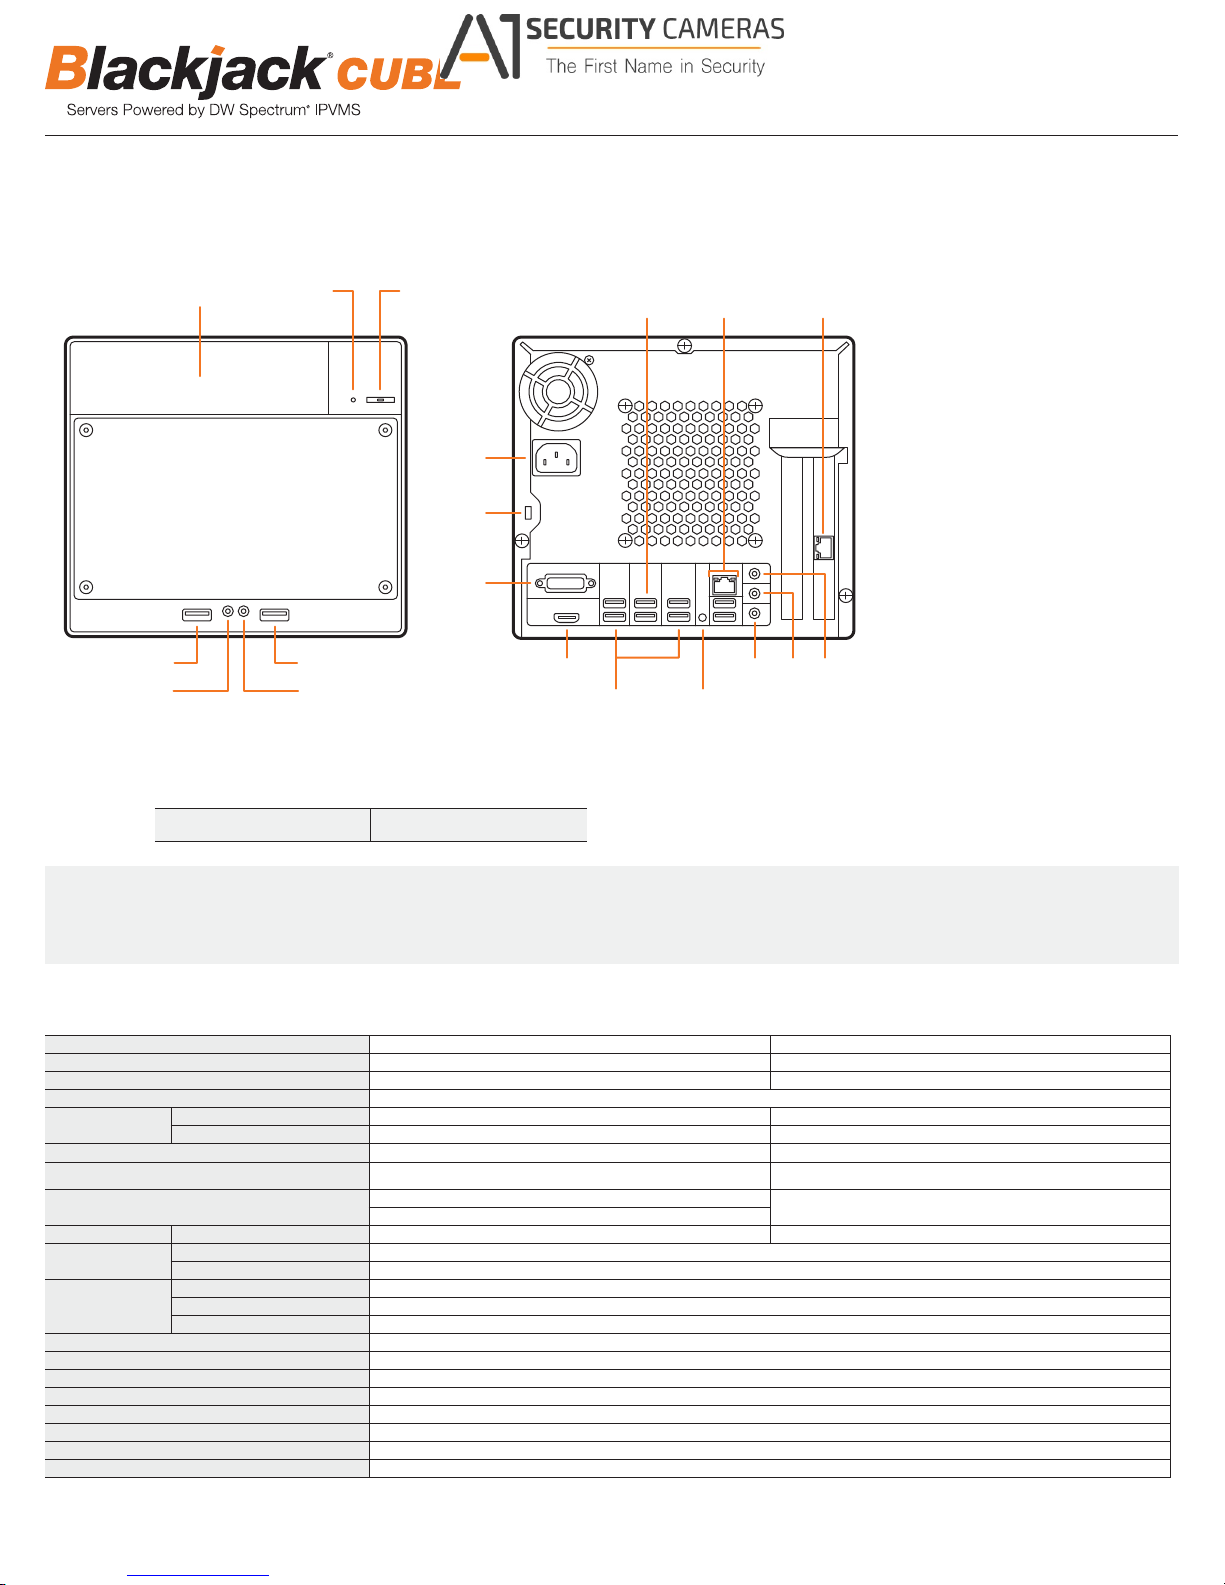
F3 F1 F2
Front
Back
B5 B9 B12
F1 HDD LED
F2 Power Button / Power LED
F3 5.25" Bay
F4 USB 2.0 Port
F5 Microphone Jack
F6 Headphone Jack
F7 USB 2.0 Port
B1
B1 AC Power Socket
B2 Kensington Lock
B2
B3 DVI-I Output
B4 HDMI HD Output
B5 USB 3.0 Ports
B6 Microphone Jack
B3
B7 Line-Out Jack
B8 Line-In Jack
B9 WAN & USB 2.0 Ports
(Onboard LAN –
F4 F7
F5 F6
B4 B8
B11
B10
B7B6
recommended for internet
connection use)
B10 Clear CMOS Button
B11 USB 2.0 Ports
B12 LAN
recommended for camera
Default Login Information for Pre-Installed DW Spectrum® IPVMS
connection use)
Username: admin Password: admin1234
WARN ING For an optimal system conguration, it is recommended that a UPS (Uninterruptible Power Supply) be used to power the setup.
Dual monitors are not recommended due to CPU performance. To connect two monitors to the Cube, go to the display setup to activate
the second monitor.
SPECIFICATIONS CUBE
(Second Card –
MODEL Blackjack CUBE-LX Blackjack CUBE
Maxi mum IP Cam eras 16 64
Included IP Licenses 4 4
Form Factor Desktop
Operating System
CPU Intel® i3® Proces sor Intel® i5® Processor
Memory 4GB 8GB
NIC
System Max Video S torage Ra te (Mbps) 80 Mbps 360 Mbp s
Storage
Video-Out
Pre-Loaded VMS S oftwa re DW Spectrum
Unlimited Remote Clients Cross Pl atform - W indows®, Linux® and Mac
Mobile Apps iOS® and And roid
Keyboard & Mouse Included
Power 300W **
Opera ting Tempera ture and Hu midit y 41°F~104°F / 20-90% RH
Dimension (WxDxH) (inches) 8.5" x 13" x 7.5"
Warran ty 5 Year Limite d
®
Windows
7 64 Bit --- DW-BJCU BEX T
Linux® Ubuntu
Maximum Hard Drives 3 x HDD
Maximum Storage 18TB
Outputs DVI-D or True HD O utput
Video Card Onboard Intel HD Graphics
Resolution HD 1080p
®
Option: DW- RME8 - Upg rade Mem ory to 8GB *
DW-BJCUBEX T-LX ---
2x Gigabit Ethernet (RJ45)
®
IPVMS
®
®
* Availab le at time of i nitial o rder onl y / ** UPS Re commen ded
2
2x Gigabit Ethernet (RJ45)
Page 3
SETTING UP THE CUBE
Available from A1 Security Cameras
www.a1securitycameras.com email: [email protected]
STEP 1: When setting up the Blackjack Cube, make sure the following are in the box:
•
Cube Server
•
Recovery USB
NOTE Monitor, keyboard & mouse are not included.
STEP 2: 1. Connect a monitor, USB mouse, and network cables (not included).
2. Connect the server to an appropriate power supply.
3. In the server’s login screen, enter username and password (admin / admin).
STEP 3: Desktop View
The server’s Network Setup Window and DW Spectrum
To relaunch, double click on each of the desktop icons.
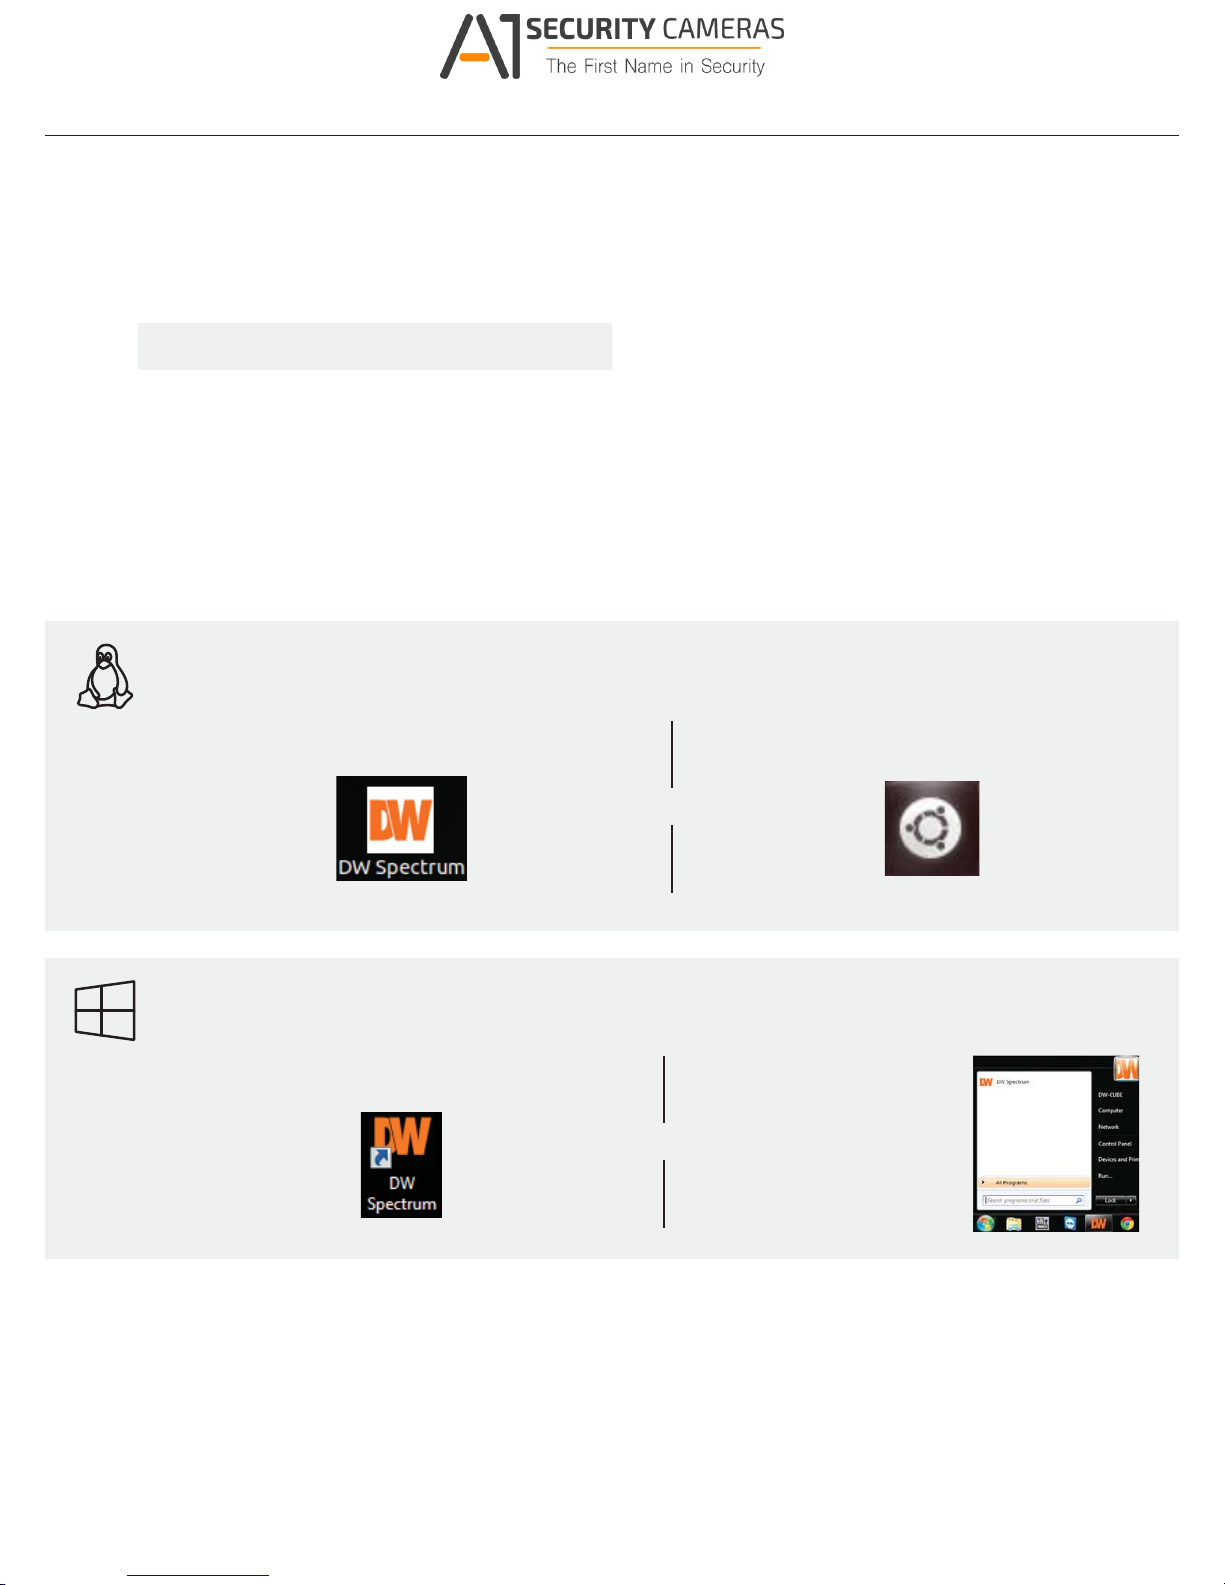
LINUX-BASED SOFTWARE MANUAL LAUNCH
To launch the DW Spectrum® Software on the Linux-Based Cube:
•
Quick Start Guide
•
Power Cable
®
software will launch automatically when the server boots up.
Quick Start Guide
Linux OS
Windows 7
OPTION 1: Double-click the DW Spectrum
®
desktop icon. OPTION 2: Go to the dashboard on the top left side.
Search ‘DW’. Click the DW icon.
OR
WINDOWS-BASED SOFTWARE MANUAL LAUNCH
To launch the DW Spectrum® Software on the Windows-Based Cube:
OPTION 1: Double-click the DW Spectrum® desktop icon. OPTION 2: Go to ‘Start’ on
the bottom left and select
®
from the
OR
DW Spectrum
Start Menu.
3
Page 4
SETTING UP DW SPECTRUM® MEDIA SERVER
Available from A1 Security Cameras
www.a1securitycameras.com email: [email protected]
Login : admin
Password : admin1234
®
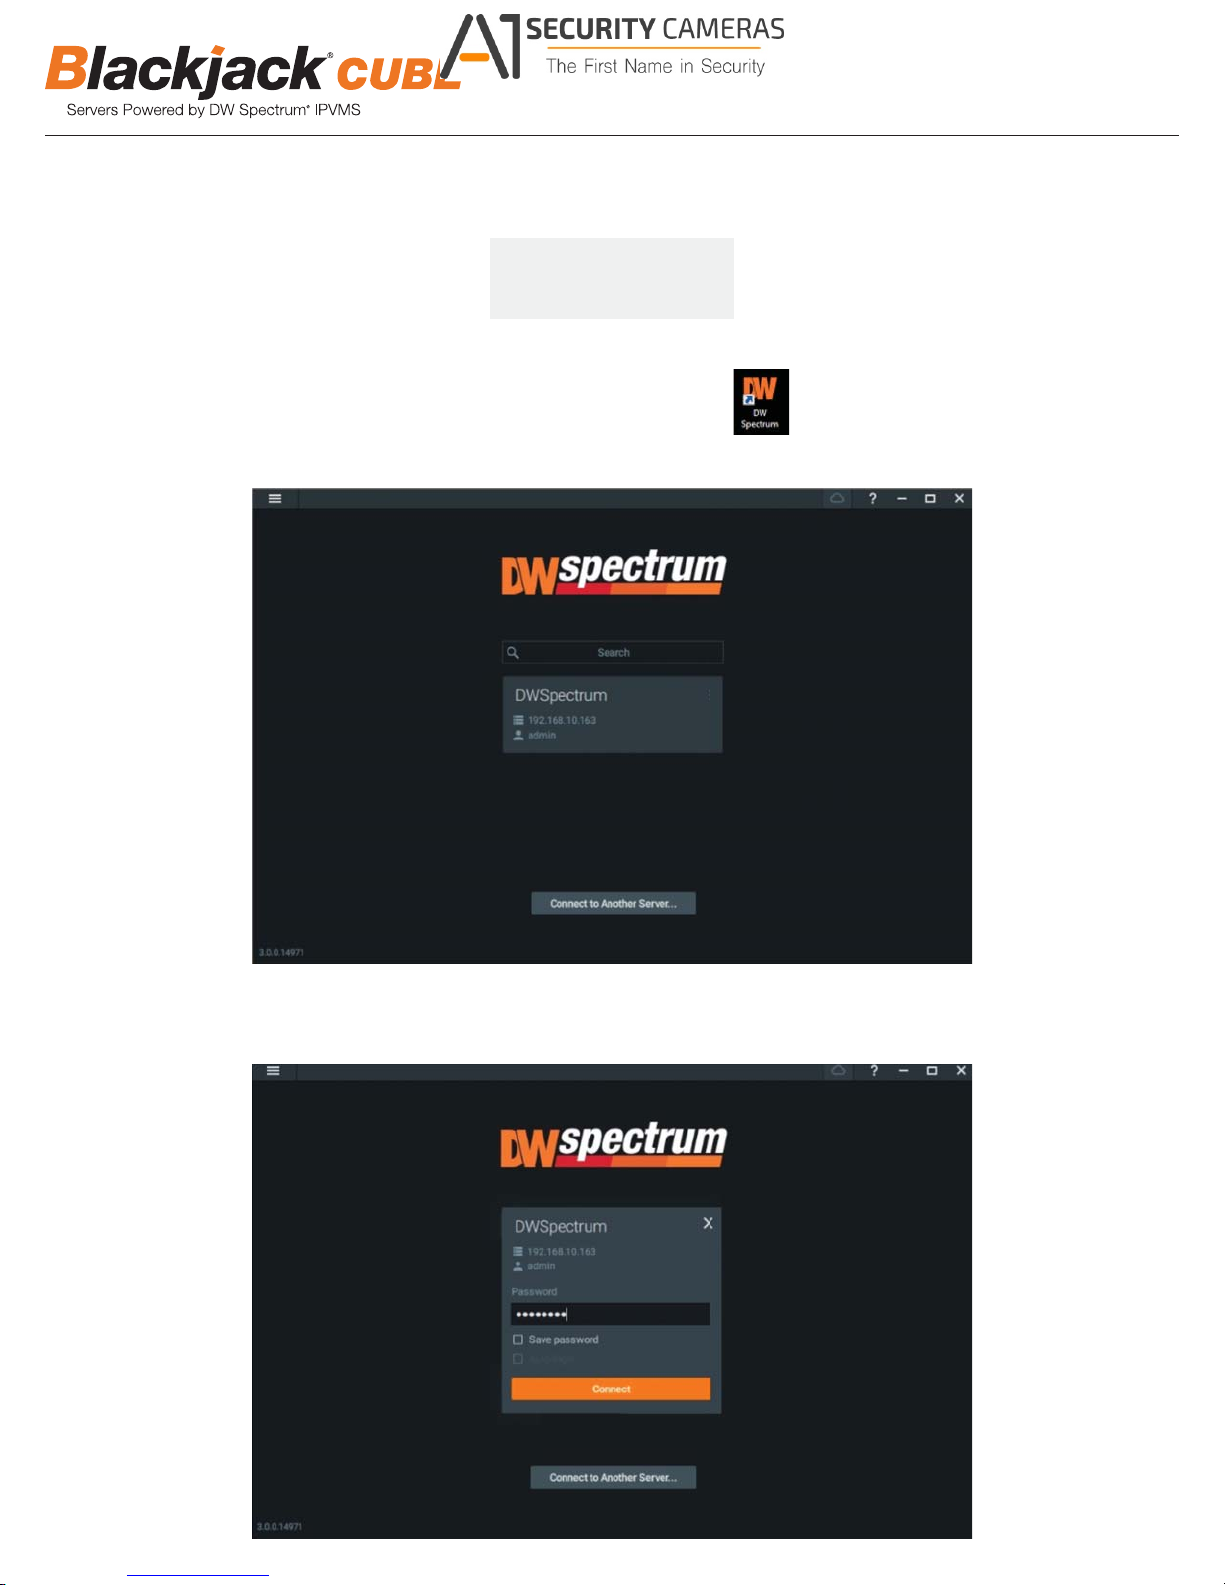
STEP 1: Initial run from Blackjack
1. Open DW Spectrum
2. Click on the precongured server.
server
®
Client by double click on the DW Spectrum icon
3. Enter password and click connect.
* Default password : admin1234 (case sensitive)
4
Page 5
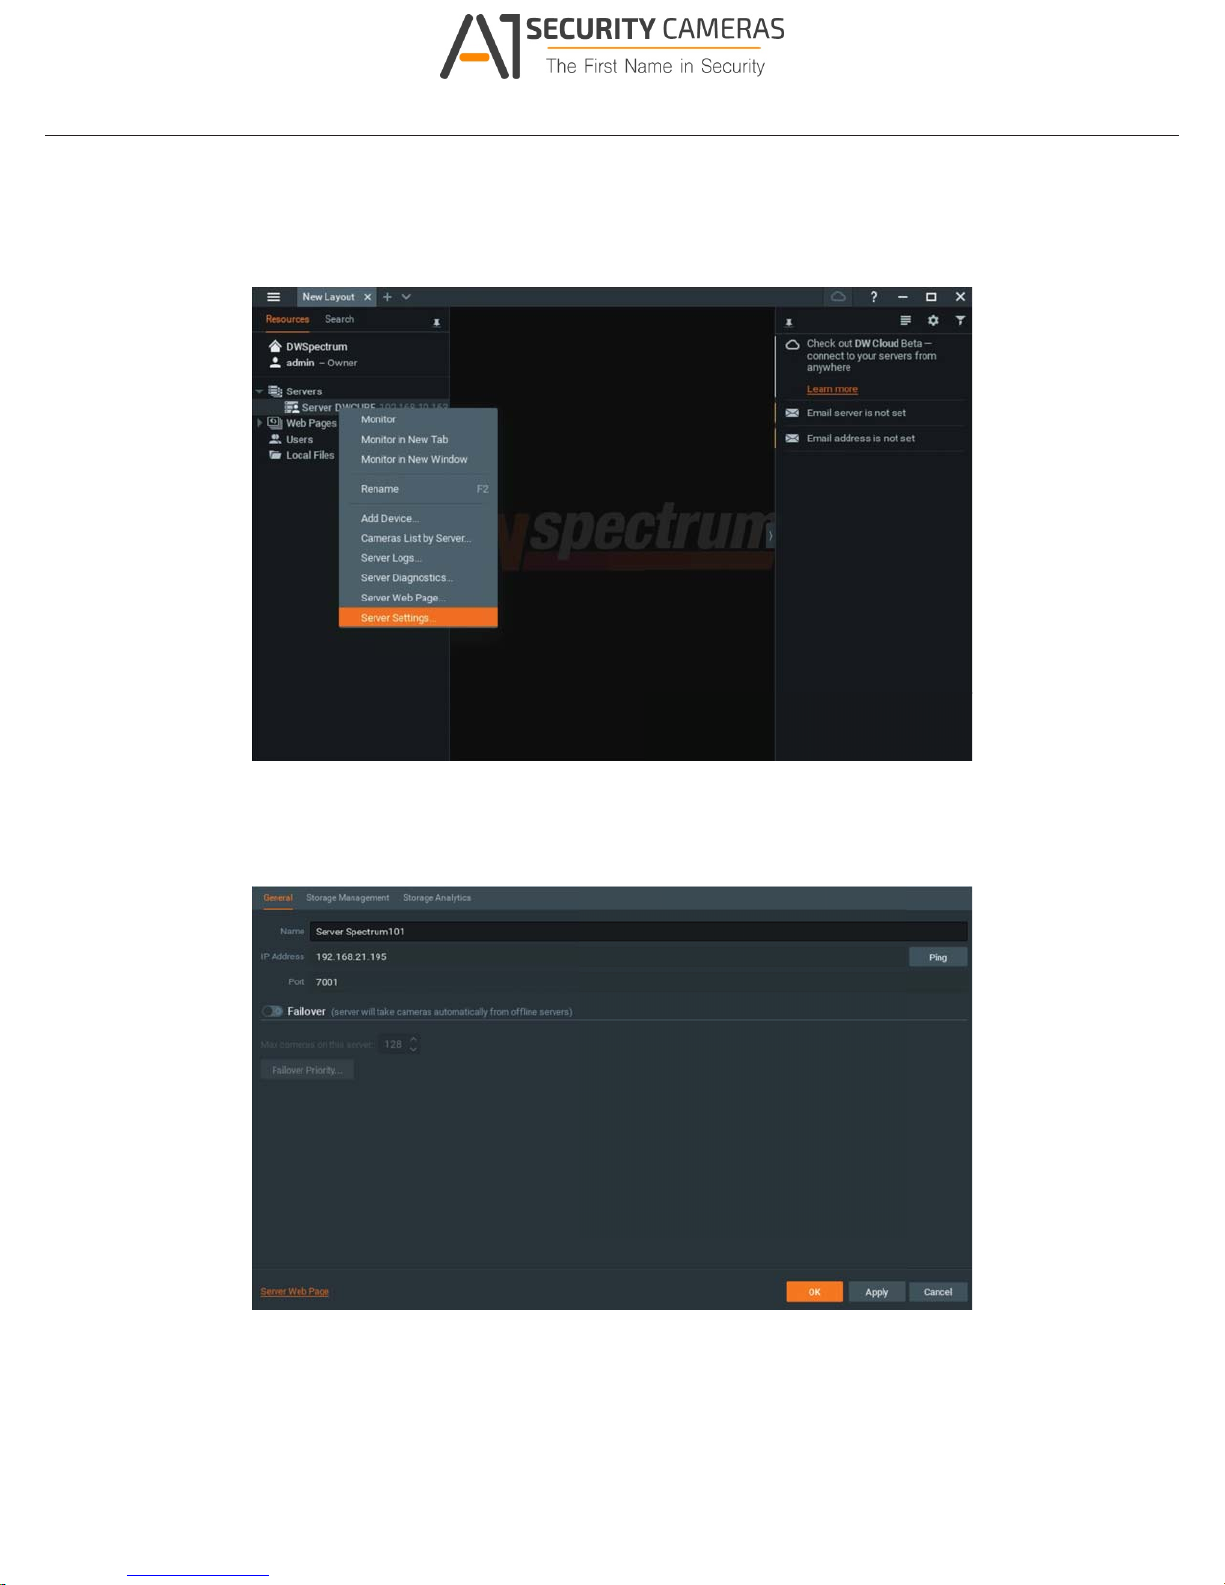
STEP 2: To rename the server
Available from A1 Security Cameras
www.a1securitycameras.com email: [email protected]
1. Right click on the server name listed on the Resources then click Server Settings.
Quick Start Guide
2. Go to General tab, then type in the new server name in the Name eld and click OK.
5
Page 6
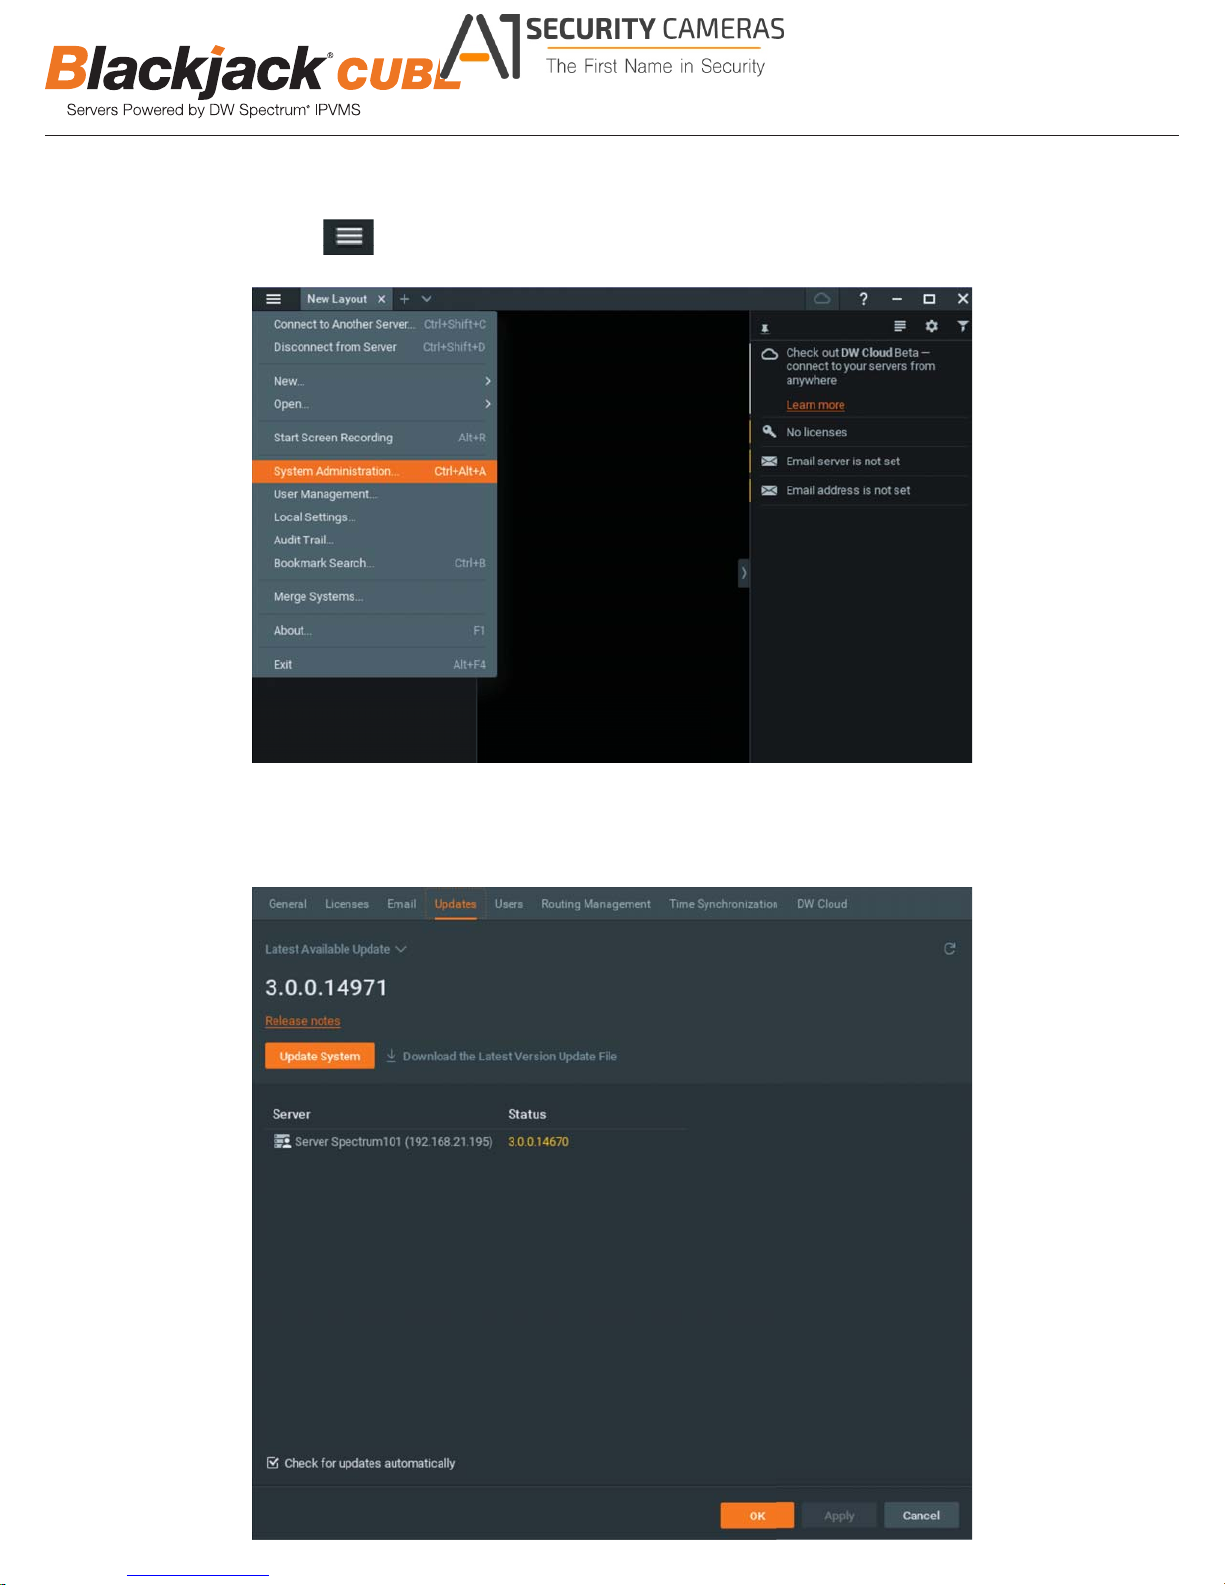
STEP 3: To check for update
Available from A1 Security Cameras
www.a1securitycameras.com email: [email protected]
1. Click on the menu then click System Administration.
2. Go to Updates tab. Click Update System if turned orange.
6
Page 7
Quick Start Guide
Available from A1 Security Cameras
www.a1securitycameras.com email: [email protected]
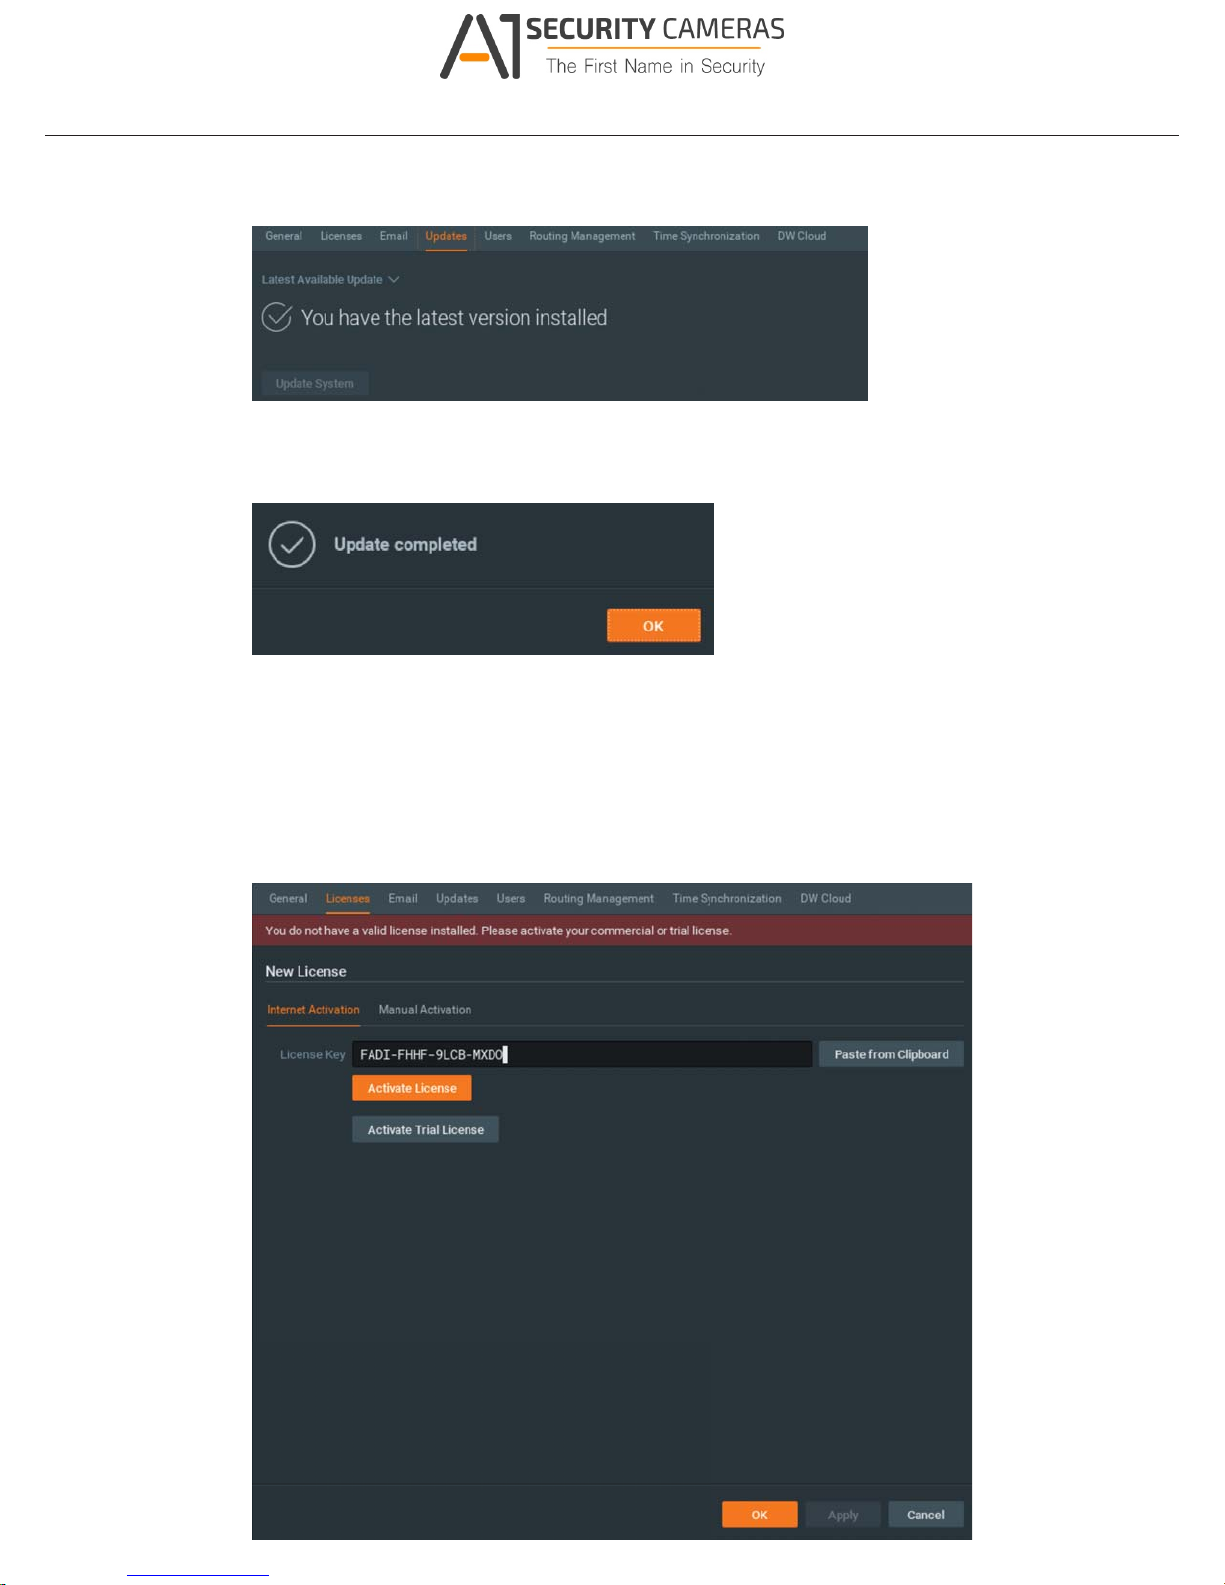
* If you are on the latest version, it will say “You have the latest version installed” and the Update System button will be greyed out.
3. Click OK when update is completed.
STEP 4: Enter License
1. Go to System Administration then click License tab.
2. Enter License Key then click Activate License button. (Internet connection required)
* Click on Activate Trial License if you have not purchased the valid license.
7
Page 8
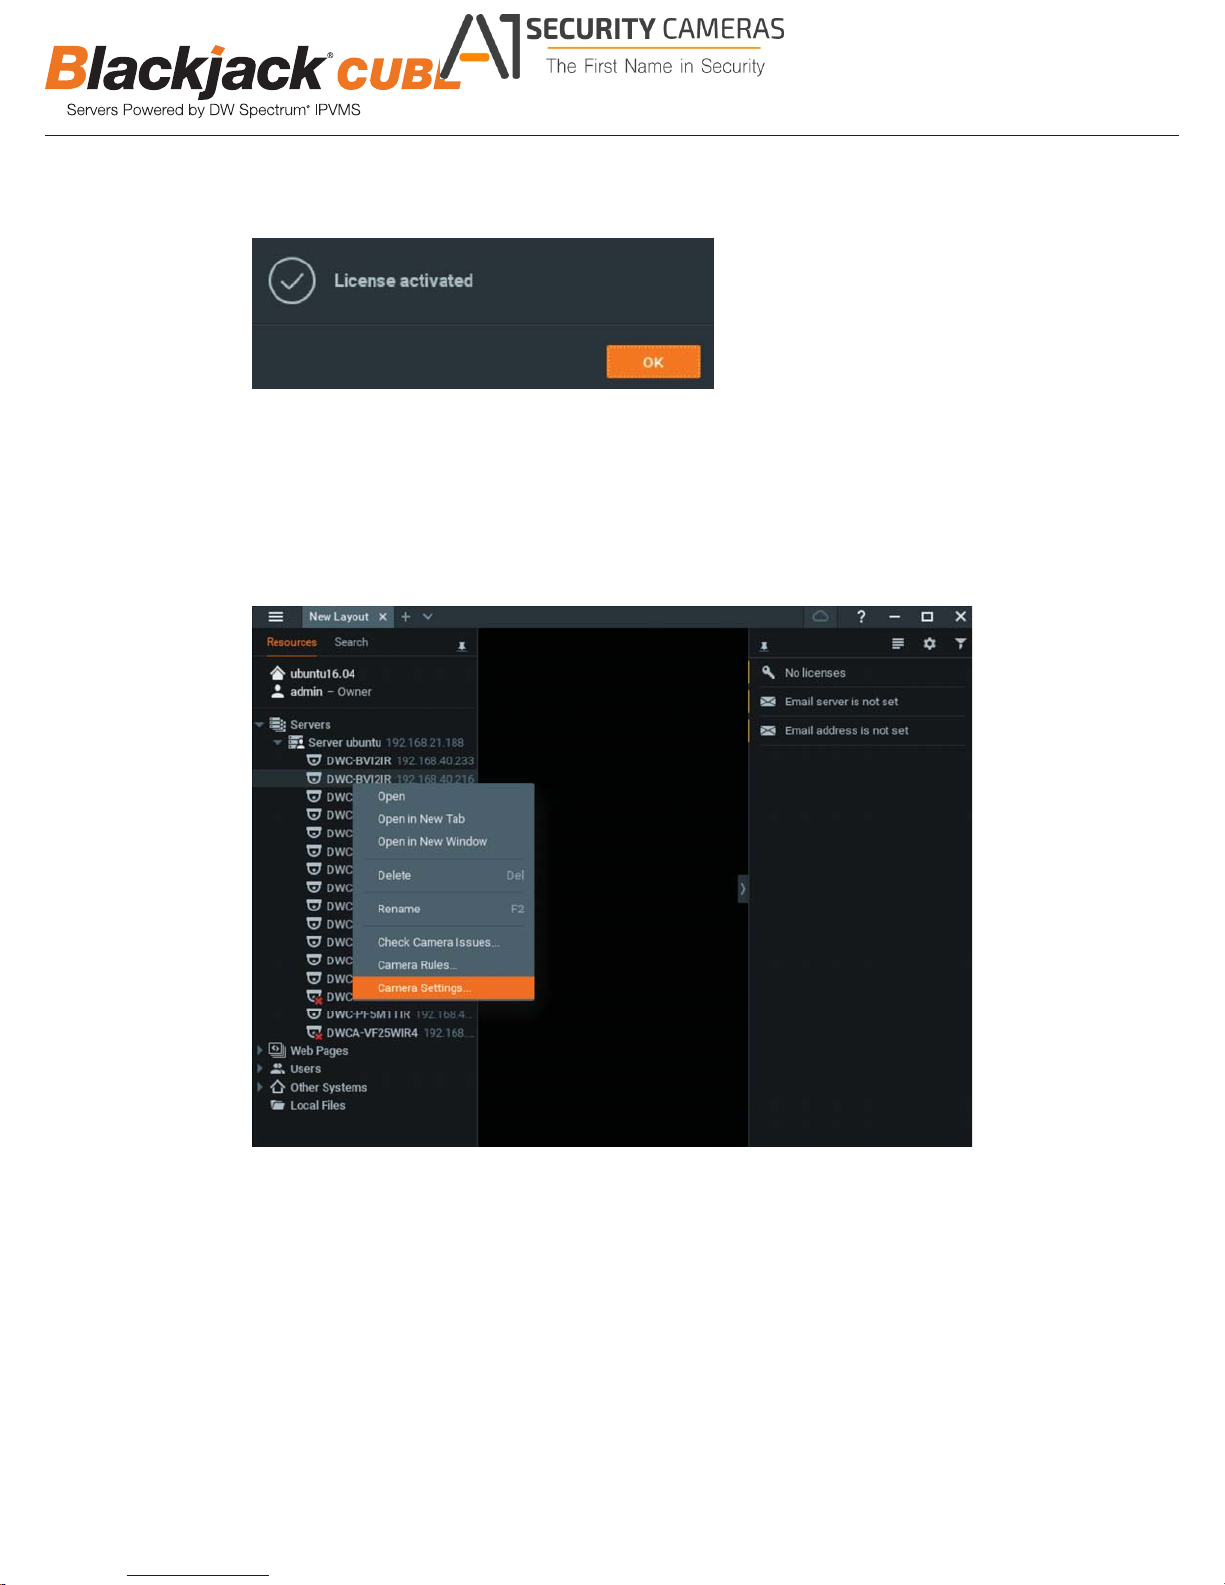
3. Click OK to when the License is activated.
Available from A1 Security Cameras
www.a1securitycameras.com email: [email protected]
STEP 5: Congure recording
1. Right click on the camera to setup recording, then click Camera Settings.
8
Page 9
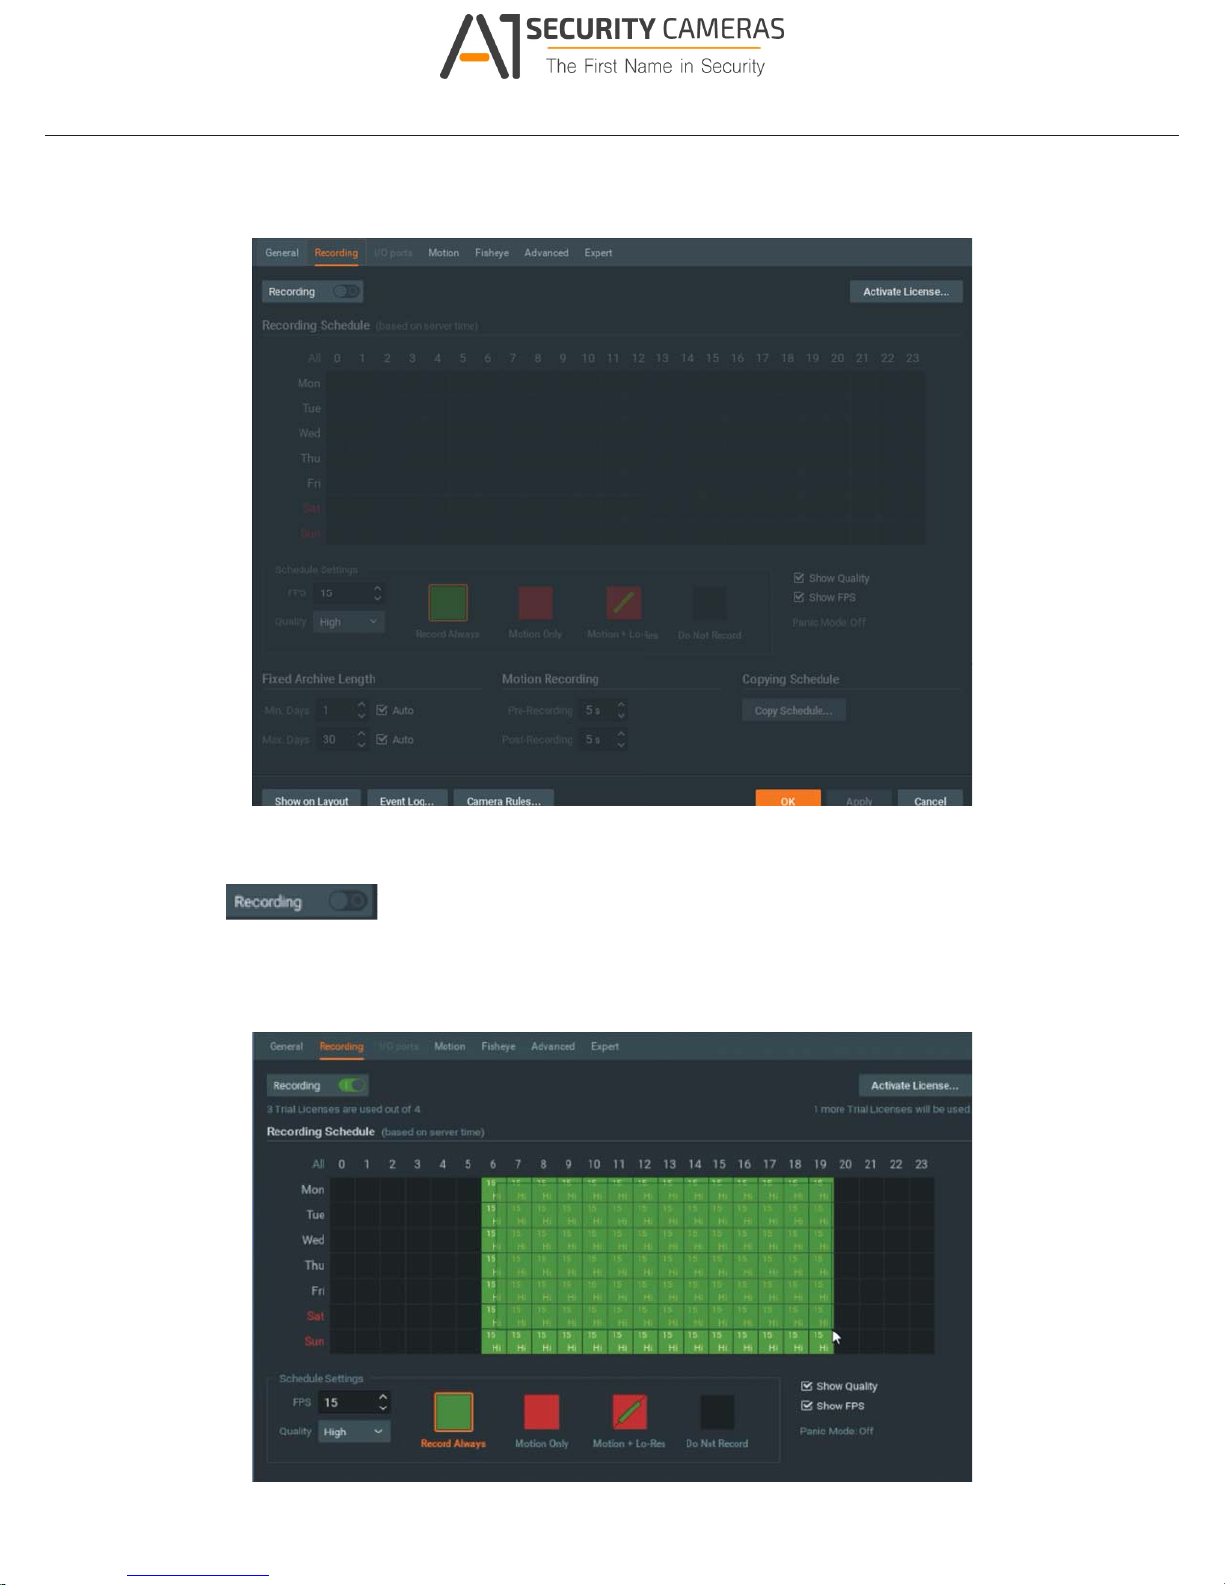
2. Go to Recordings tab.
Available from A1 Security Cameras
www.a1securitycameras.com email: [email protected]
Quick Start Guide
3. Click to turn on recording.
4. Congure Schedule Settings for Quality, FPS and Recording Type.
5. Click and drag mouse over the Recording Schedule to assign the recording setting.
9
Page 10
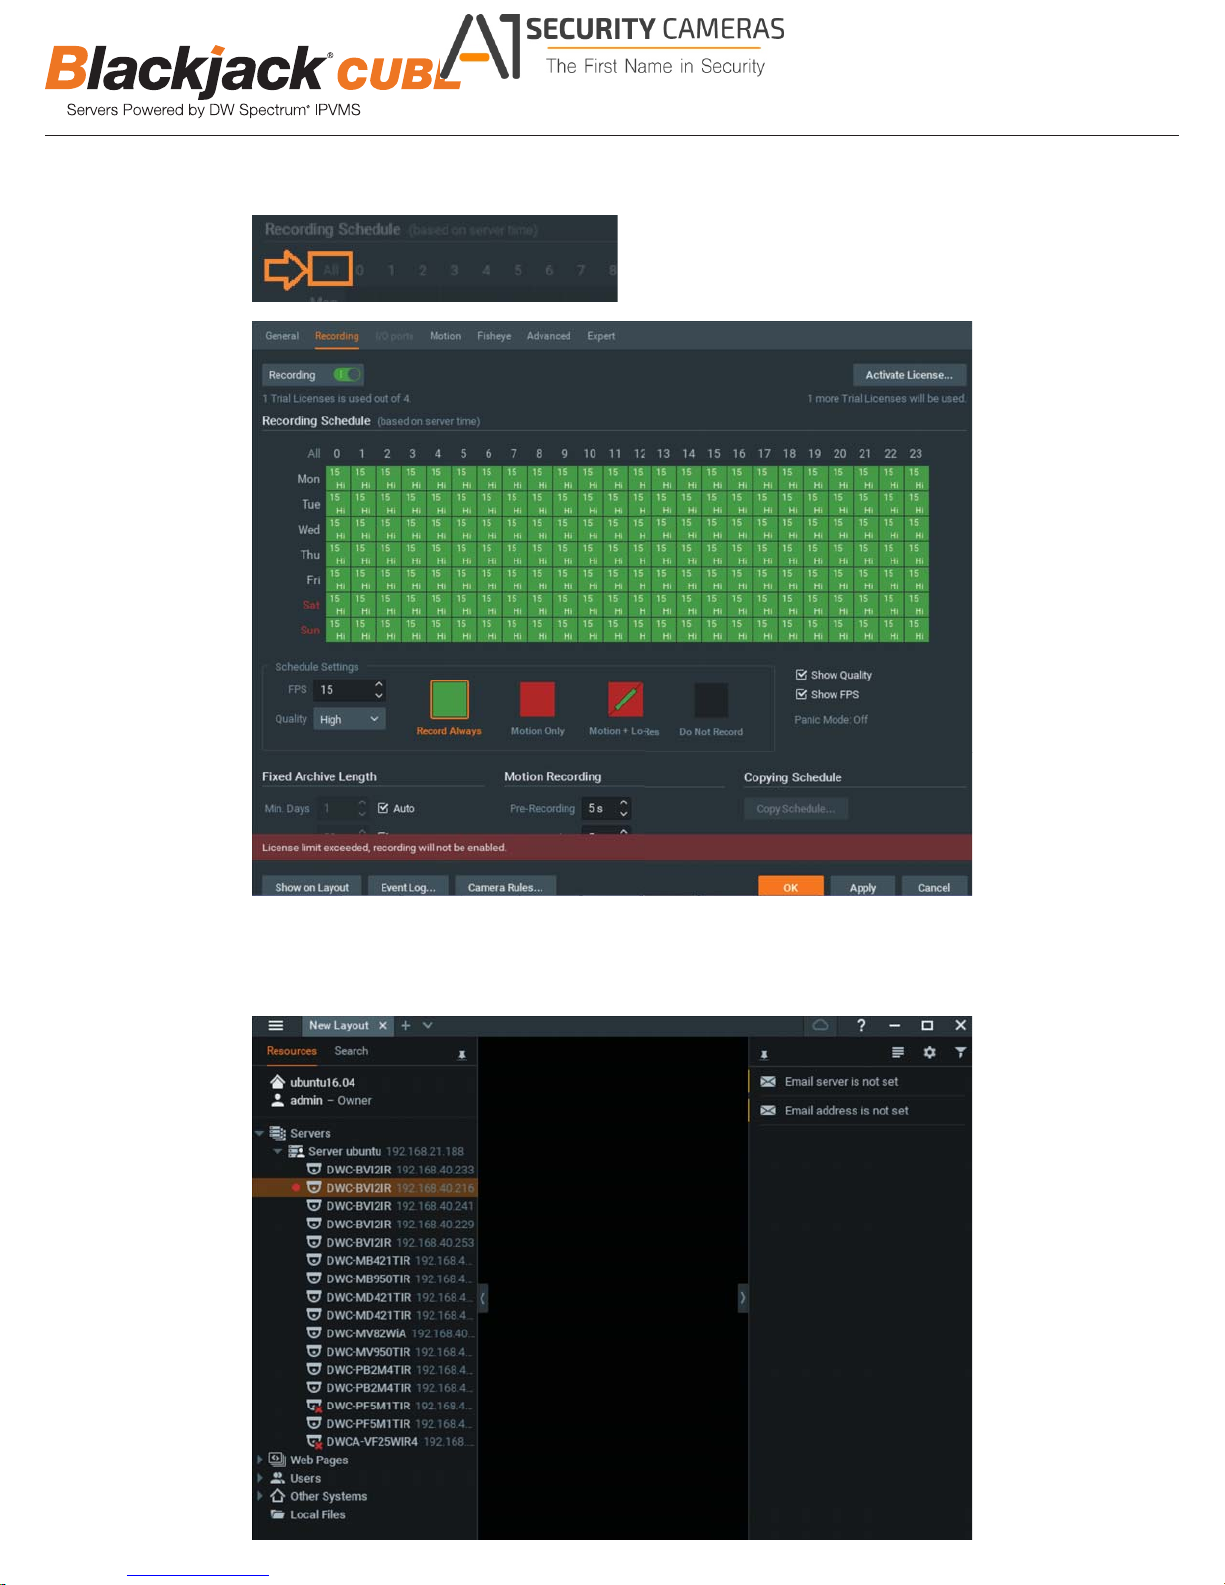
* Click on All to apply to the all schedules.
Available from A1 Security Cameras
www.a1securitycameras.com email: [email protected]
6. Red dot will appear next to the camera when the recording is started.
10
Page 11
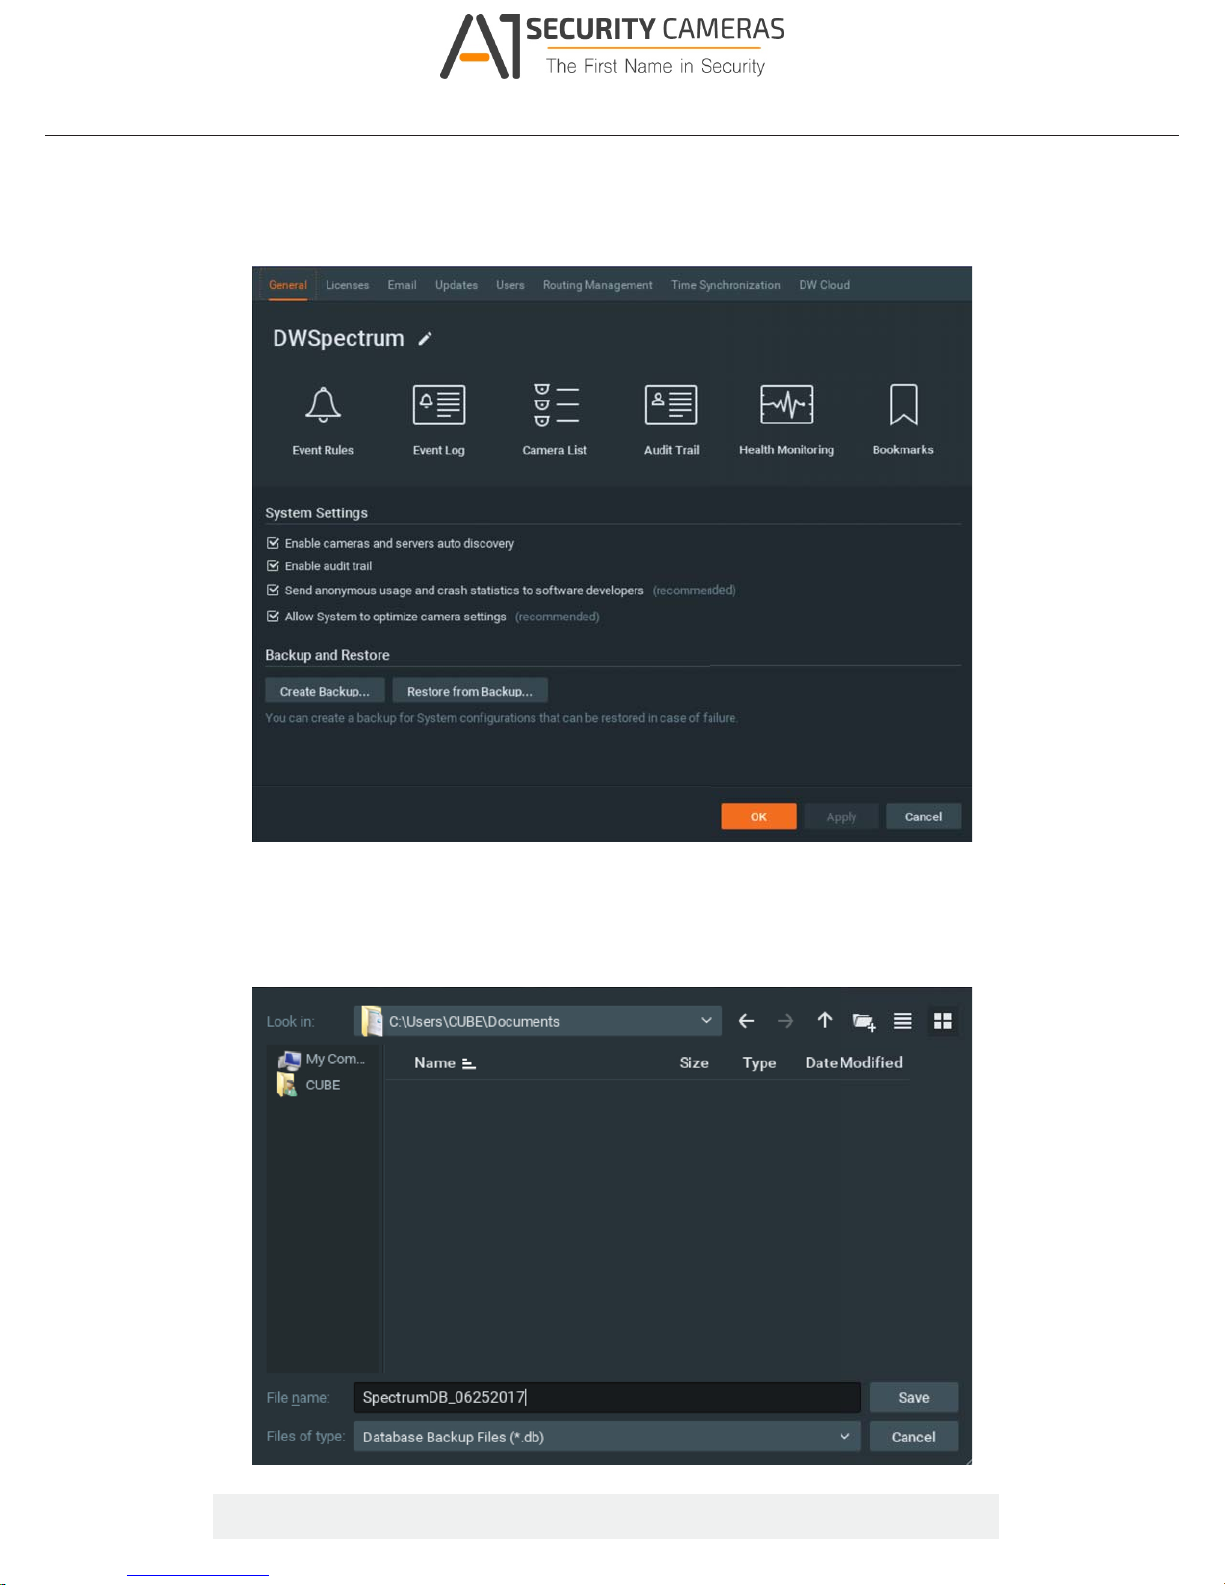
STEP 6: Backuping Database
Available from A1 Security Cameras
www.a1securitycameras.com email: [email protected]
1. Go to System Administration and click General tab.
Quick Start Guide
2. Click Create Backup… button.
3. Navigate to the folder where to save and enter name of the backup le then click save.
* Strongly recommend to also backup to the external storage media.
NOTE: More information and instructions are available in the Spectrum 3.0 Manual.
11
Page 12
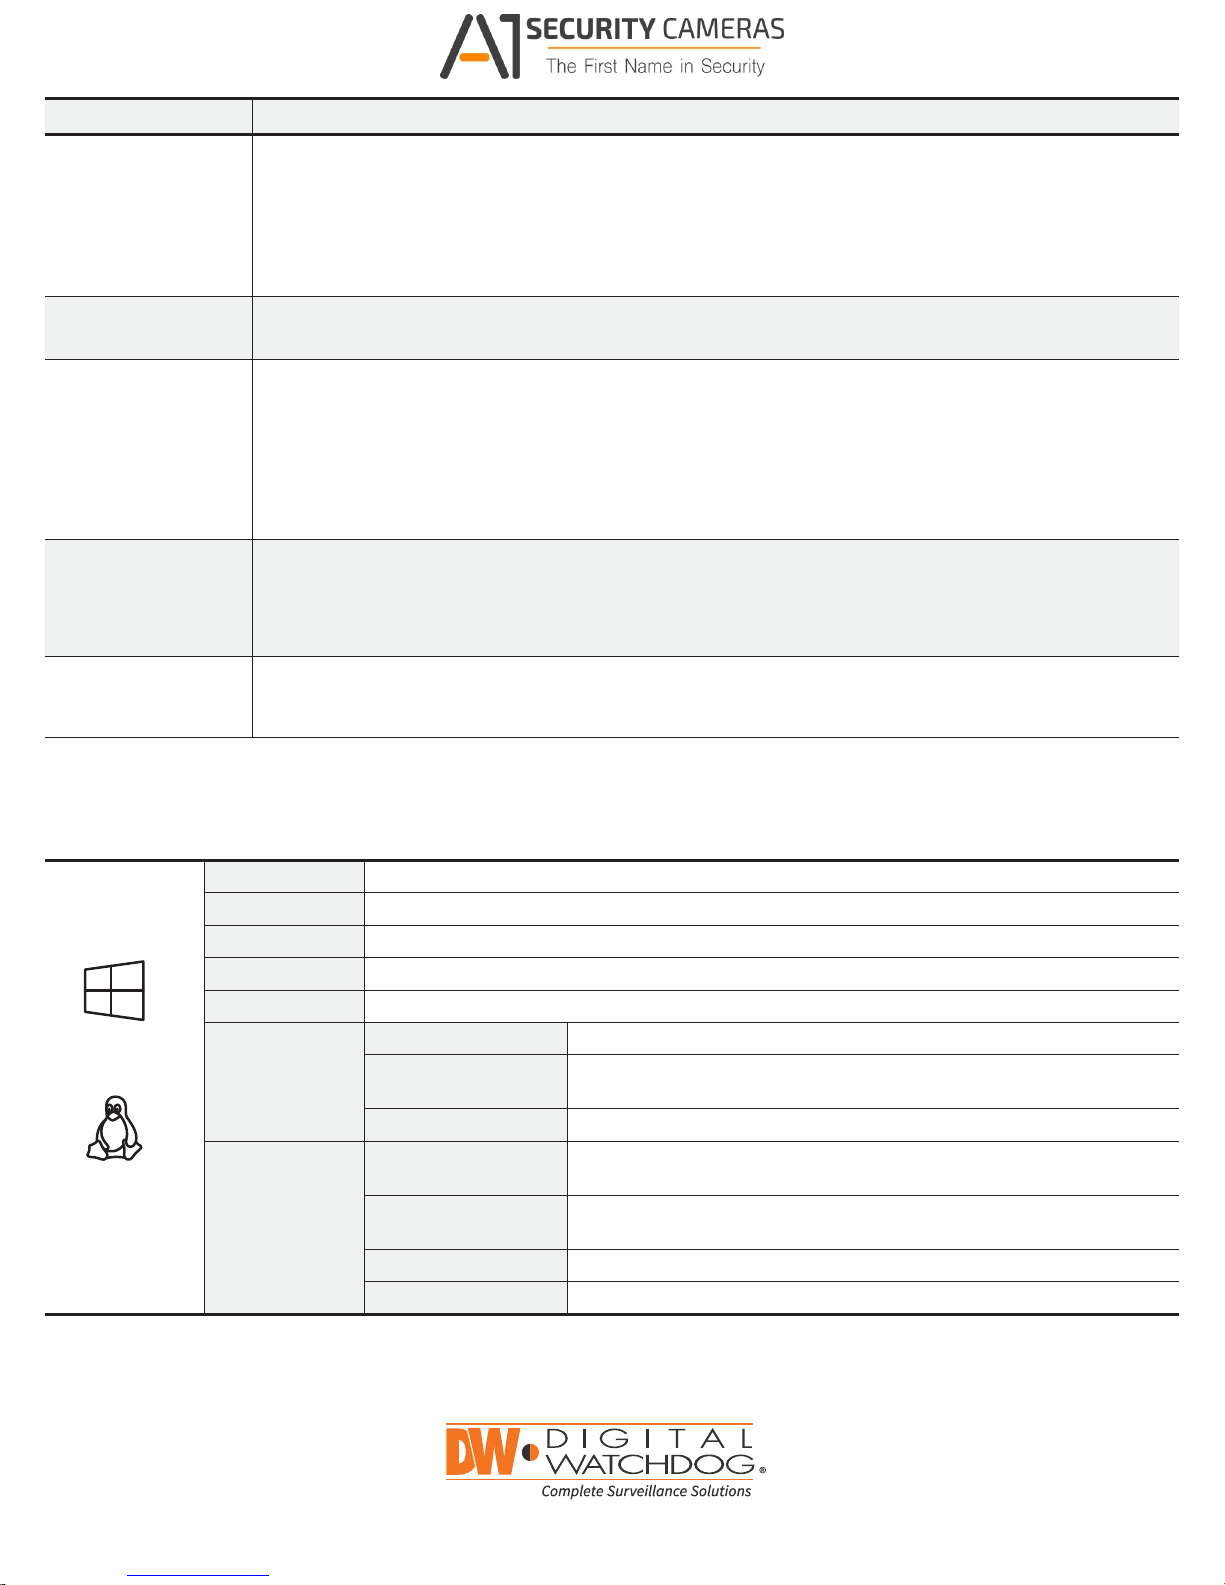
TROUBLESHOOTING TIPS
Available from A1 Security Cameras
www.a1securitycameras.com email: [email protected]
Problem Possible Solutions
My camera does not
auto-discover
Videos are slow
My camera appears
disconnected
I can’t get playback
video from my camera
I get an ‘unauthorized’
message on my camera
1. Is the camera in the same LAN network as the Media Server?
2. Is your camera compatible with DW Spectrum? (Refer to our website for full list of supported cameras.)
3. Is the camera updated to its latest rmware?
4. If your camera is integrated with DW Spectrum via ONVIF, make sure ONVIF is enabled on your camera.
5. Try adding the camera manually.
6. Try rebooting the server after installation. Allow up to 2 minutes for the server to map your network and detect all supported
devices.
1. Are you accessing the same cameras from multiple clients? (LAN & WAN)
2. Do you have a Gigabit network? Check your network speed.
1. Under camera settings, make sure the user name and password are correct.
2. Under the camera settings, use the ‘Ping’ button to make sure the camera is connected to the network properly.
3. If you can connect to the camera’s web viewer, try rebooting the camera and/or restore it to factory default.
4. Make sure your camera is using the latest rmware available.
5. Make sure that the camera is connected to the same network as the server.
6. If you are connecting to a camera that is integrated with DW Spectrum via the ONVIF protocol (see list), make sure ONVIF
is enabled.
7. Make sure your user has permissions to view that specic camera.
1. Do you have network connection between client and server (in case server and client are not on the same machine)?
2. Make sure your user has playback viewing permissions for the selected channel.
3. Make sure the camera is set to a recording mode that would provide recorded video for the selected time and environment.
4. On the server side, check the media server log to make sure the camera you are trying to watch has not been unexpectedly
disconnected.
1. Make sure the camera’s user name and password are properly entered in the camera’s general information under the
camera settings menu.
2. If necessary, try rebooting the camera to apply the camera’s user name and password.
SYSTEM REQUIREMENTS
Recommended Specs for the Full Client
Processor Intel Core i5 or greater
Video Card Intel HD Graphics 2500 (or higher) with 1GB Dedicated Memor y
Resolution 1920 x 1080
RAM 4GB
NIC 10 / 100 / 1000 Base-T Ethernet
Windows 7
OS Supported
– Media Server
Linux OS
OS Supported
– Client
* Except Storage Server version
** For Windows 10, recommend 6th Generation Intel i3/i5/i7 processors with 16GB RAM and video card with 1GB or higher RAM
Important: OS not listed will be not be suppor ted by DW
Windows 7 Standard, 7 Pro, 7 Ultimate, 8/8.1 Pro, 8.1 Enterprise, 10 Pro/Enterprise
Windows Servers*
Linux Ubuntu 14.04, Ubuntu 16.04
Windows
Windows Servers*
Linux Ubuntu 14.04, Ubuntu 16.04
Mac OSX 10.11, OSX 10.12
™
Tech Support
Any versions of 2008, any versions of 2008 R2, any versions of Server 2012,
any versions of Server 2012 R2
7 Home, 7 Standard, 7 Pro, 7 Ultimate, 8/8.1 Standard, 8/8.1 Pro, 8.1 Enterprise,
10 Home/Pro/Enterprise**
Any versions of 2008, any versions of 2008 R2, any versions of Server 2012,
any versions of Server 2012 R2
Tel: +1 (866) 446-3595 www.digital-watchdog.com
Fax: (813) 888-9262 [email protected]
Rev Date: 07/17 Speci cations and pri cing are subject to c hange wi thout notice.
Copyright © Dig ital Watchdog. All rights res erved.
 Loading...