

Page 1

VIDEO FLYER 10”
(VF-100W, VF-100W-OF)
USER GUIDE
Version 2.1
Page 2
Page 2 of 14
Revision History
Amendment Date
Version
May 2008
V1.0
Dec, 2009
V2.0
Feb, 2010
V2.1
Page 3

Page 3 of 14
Table of Contents
1 Introduction ................................................................................ 4
2 System ...................................................................................... 5
3 Instructions ................................................................................ 6
3.1 Preparation ......................................................................... 6
3.2 Compact Flash ..................................................................... 6
3.3 Powering On ....................................................................... 7
3.4 Autoplay / Manual Playback at power startup ........................... 7
3.5 Playback modes ................................................................... 7
3.6 Configuration mode .............................................................. 8
4 Touch Screen Operation ............................................................... 9
4.1 Touch segments .................................................................. 9
4.2 Configuration mode .............................................................. 9
5 Dimensions ................................................................................ 10
6 Specification .............................................................................. 12
Page 4

Page 4 of 14
1 Introduction
The Digital View 10” VideoFlyer is a self-contained LCD display and digital media
player for continuous (looped) play of video stored on a CF (Compact Flash)
memory card. The unit comprises a widescreen 10” color TFT LCD, a built in
speaker and optional touch screen. A range of other accessories and factory
installed customization options are also available, these are not be covered in this
manual.
Please note that a certain level technical knowledge and experience is assumed, if
you have difficulties please contact your sales representative or Digital View
support, contact details are available on www.digitalview.com/dv_contactus.php.
IMPORTANT USAGE NOTE
This equipment is for use by system developers and integrators. The
manufacturer accepts no liability for damage or injury caused by the use of this
product. It is the responsibility of the developer, integrators or other users of this
product to:
Ensure that all necessary and appropriate safety measures are taken.
Obtain suitable regulatory approvals as may be required.
Check power settings to all component parts before connection.
DISCLAIMER
There is no implied or expressed warranty regarding this material.
Page 5
Page 5 of 14
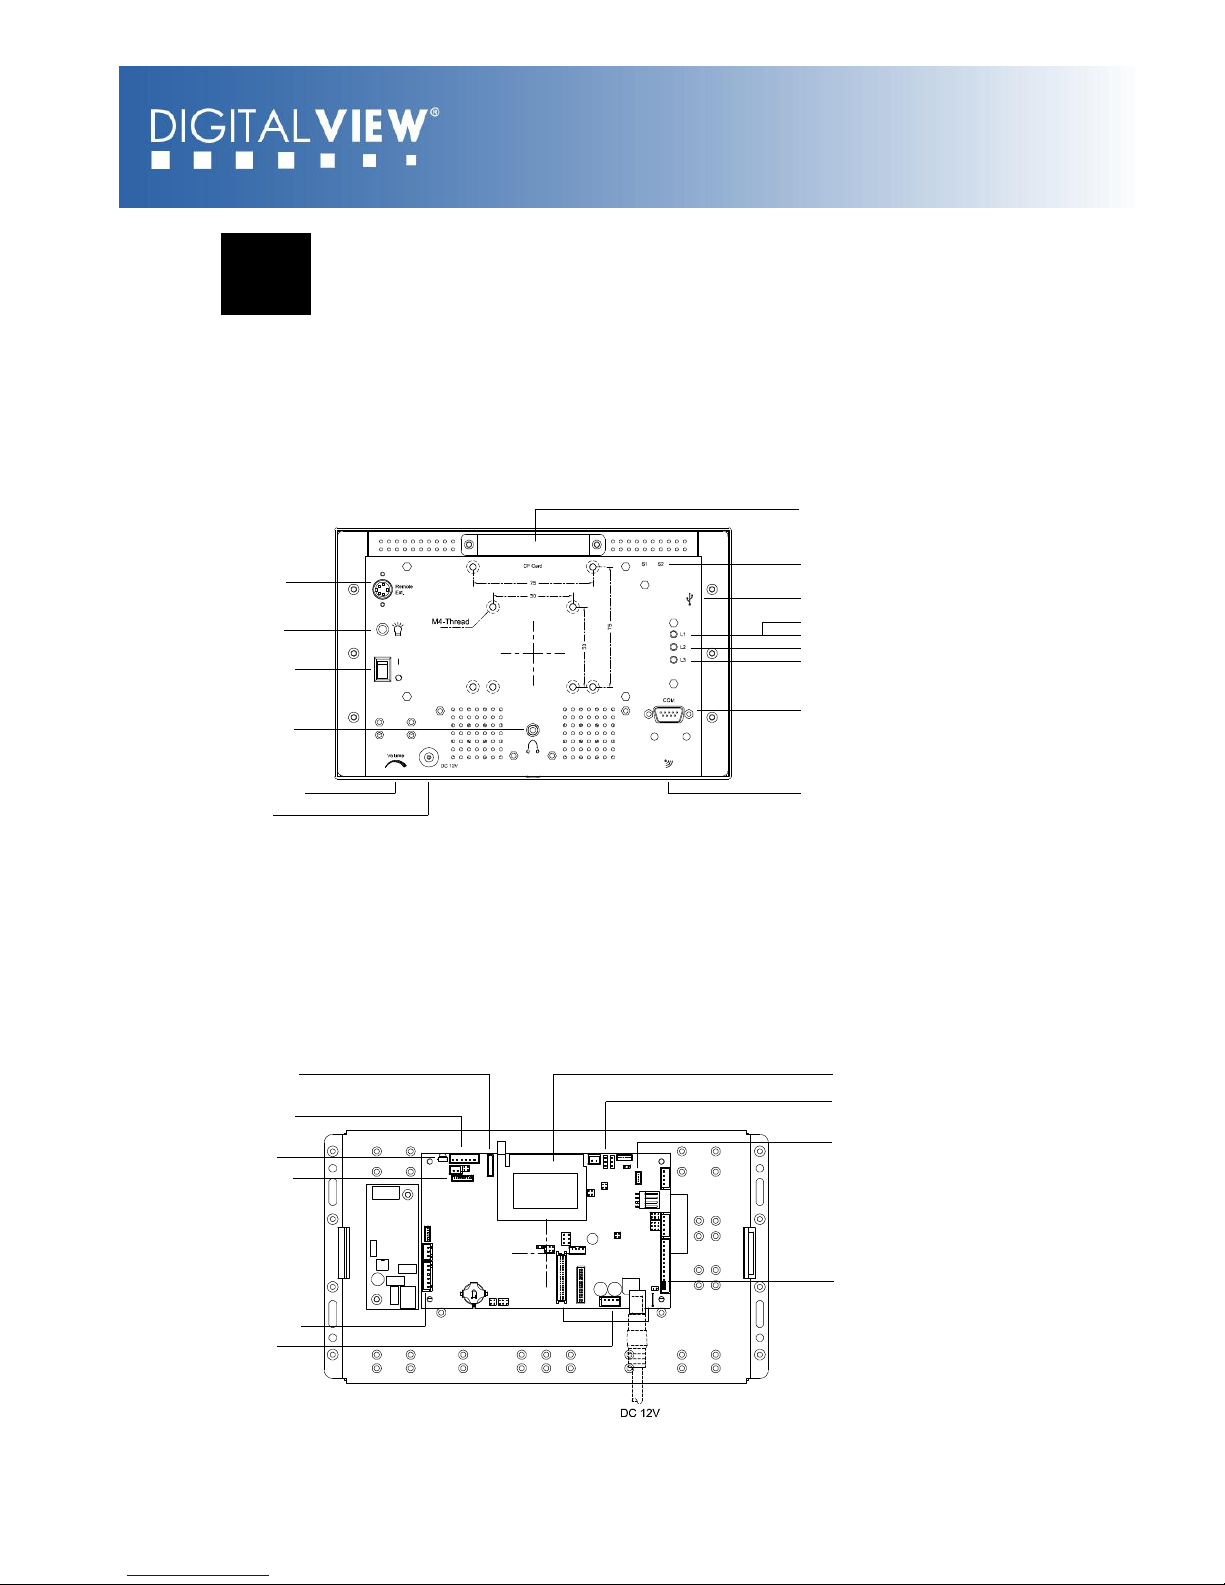
2 System
10” VideoFlyer (VF-100W)
A robust metal housing with powder coating:
CF Card compartment
USB port
RS-232 port
L1 (Button 8) + power up - Config menu
L1 (Button 8) - Select
L2 (Button 7) - + / Save and exit
L3 (Button 6) - - / Save and exit
Reserved (480p/720p)
Remote Ext.
(#1 - #8)
Power LED
On/Off switch
Stereo phone
jack
IR sensorVolume Control
Power in
(DC 12V)
10” VideoFlyer (VF-100W-OF)
Aluminum frame with mounting holes for mounting:
CF Card socket
USB connector
Power/Status LED
connectors
IR sensor
Botton/Touch
connector
(#1 - #8)
Botton/Touch
connector (#9 - #16)
RS-232 port
(for M3)
Serial port
(for controller)
OSD Control connector
Default set to “Auto Power on”
Pin1 & Pin 2: Close (Power on)
Pin1 & Pin 2: Open (Power off)
Speaker
out (L/R)
Page 6

Page 6 of 14
3 Instructions
CAUTION: Never connect or disconnect parts of the system when the system is
powered up as this may cause serious damage.
3.1 Preparation
Digital View VideoFlyers are designed to be as plug and play as possible requiring
the minimum of setup for use. The following describes the operation of the
standard version, there are however a number of options available and these may
affect the preparation required.
Main components:
VideoFlyer unit
AC power supply
Compact Flash card – see following note
3.2 Compact Flash
The Digital View VideoFlyer uses standard Compact Flash cards to store the
media (video, still images, audio) for playback. The following are key points to
note:
The format of the digital media stored on the Compact Flash needs to
meet certain standards as per the specifications for this device as
summarized in section 6.
Media files can be stored on the Compact Flash in two ways:
o Playlist mode: Using Digital View’s DV Studio software which
enables creation of a playlist with a number of options for
controlling media playback.
o Simple play mode: Using a PC copy function to transfer files onto
the Compact Flash.
All content files must be stored within a folder name MEDIA. (i.e. /Media/)
Additional notes regarding the playback modes are shown below.
Page 7

Page 7 of 14
3.3 Powering On
Install the Compact Flash card, however to reduce the risk of errors it is
advised to have the power off when removing or installing a Compact
Flash card.
Connect the provided external AC power supply unit.
Power on the unit using the on/off switch, the power LED should come on.
(Note: In Openframe version (VF-100W-OF), the power is default to “Auto on”.)
See the following section for Power On options.
3.4 Autoplay / Manual Playback at power startup
The Digital View VideoFlyer supports AutoPlay or manual playback modes at
power startup
AutoPlay: This is the default mode for the unit. This means that upon power-on
video will start playing in accordance with a playlist (if DV Studio was used to
transfer the media files to the Compact Flash card) or in alpha-numeric order (if
the media files were simply copied to the Compact Flash card).
Manual Playback: Only available as a setting in DV Studio. In Manual Playback
mode, after power up press any button and the first track in the Playlist set in DV
Studio will play.
3.5 Playback modes
Playlist mode, i.e. using DV Studio:
When operating in playlist mode, both project file (*.prj) and playlist file
(*.pll) must be present on the Compact Flash card. These are used to
control the sequence for all video tracks. If playback does not run as
expected please check that these files are present on the Compact Flash
card.
The project and playlist file are created using DV Studio software. Using
this software, you can set simple sequences or complex sequences
including “jump track“ or “next track” actions. The software can also
program buttons with different functions like “play”, “stop”, “pause”,
“mute”, “previous”, “next” and “volume”.
Page 8
Page 8 of 14
Simple play mode, i.e. files copied to Compact Flash without using DV Studio:
In simple play mode, the user just copies all video files (.mpg) or JPEG
files (.jpg) onto the Compact Flash card. The VideoFlyer will play these
files in alphabetical sequence.
For JPEG files, the play time is determined by the last digit of the filename.
(For example: APPLE5.mpg, where “5” means the track will be displayed
for 5 seconds.) Note: Do not use the same filename on both MPEG and
JPEG.
Note: Make sure all capital letters in a filename defined in playlist are consistent
with the filename on CompactFlash card. All filenames should be in 8+3 format
(i.e. xxxxxxxx.xxx) and avoid using any characters like “~”, “_”, “-“, etc. All
content files must be stored within a folder name MEDIA. (i.e. /Media/)
3.6 Configuration mode
In Configuration mode, you may set Master volume level, Unit ID, Date, Time and
options for Datalog/OSD, etc.
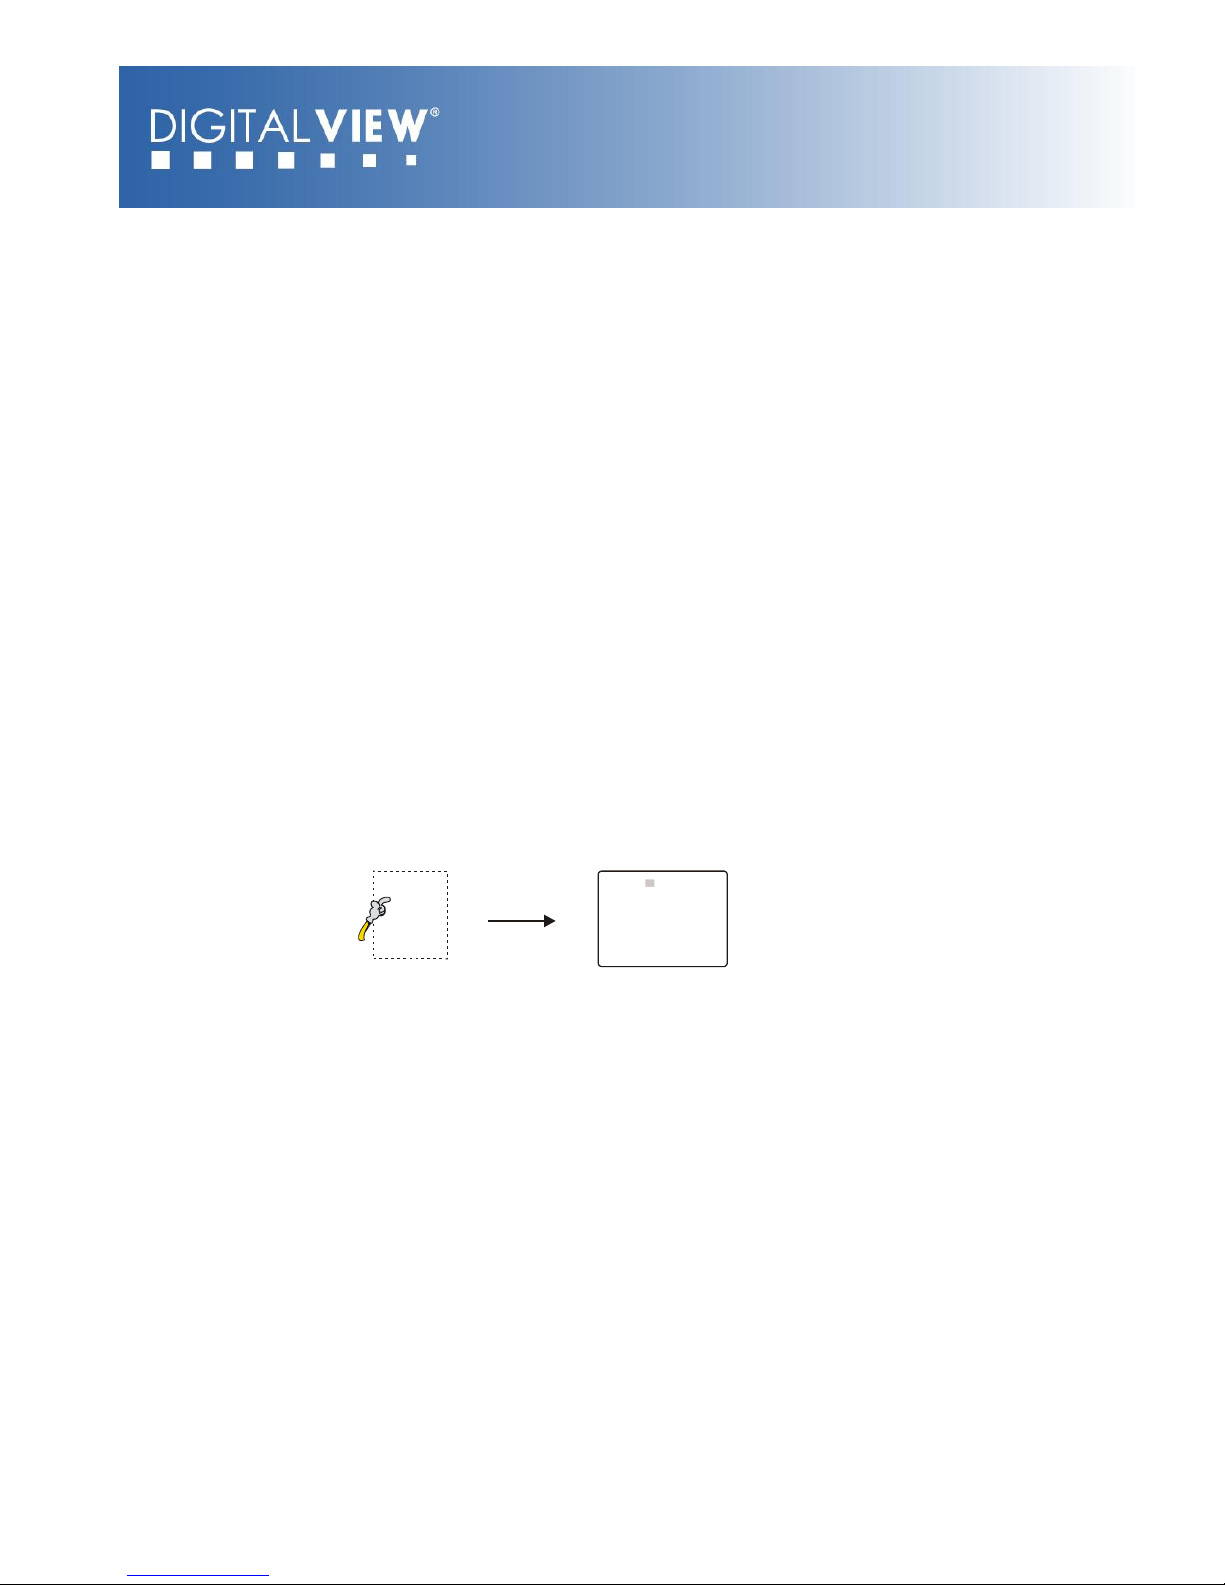
To enter the Configuration Mode, holding L1 key and power up.
The volume setting can be adjusted when the configuration mode is enabled.
Press L1 key + power up : Config. mode enable.
Press L1 key : Select
Press L2 key : Increase / Save and Exit
Press L3 key : Decrease / Save and Exit
VO LUM E 14 V ER 4 .10
Y M D H M S
200 4 . 10 .12 1 5 : 4 8 : 44
ID N O : 0 712
DATA LO GG IN G: ON
OS D: O N
SAV E A ND E XIT
Bu tto n 8
Pow e r on
Holding the button
Config. Mode menu
Page 9
Page 9 of 14
4 Touch Screen Operation
(only applicable in touch screen option)
4.1 Touch segments
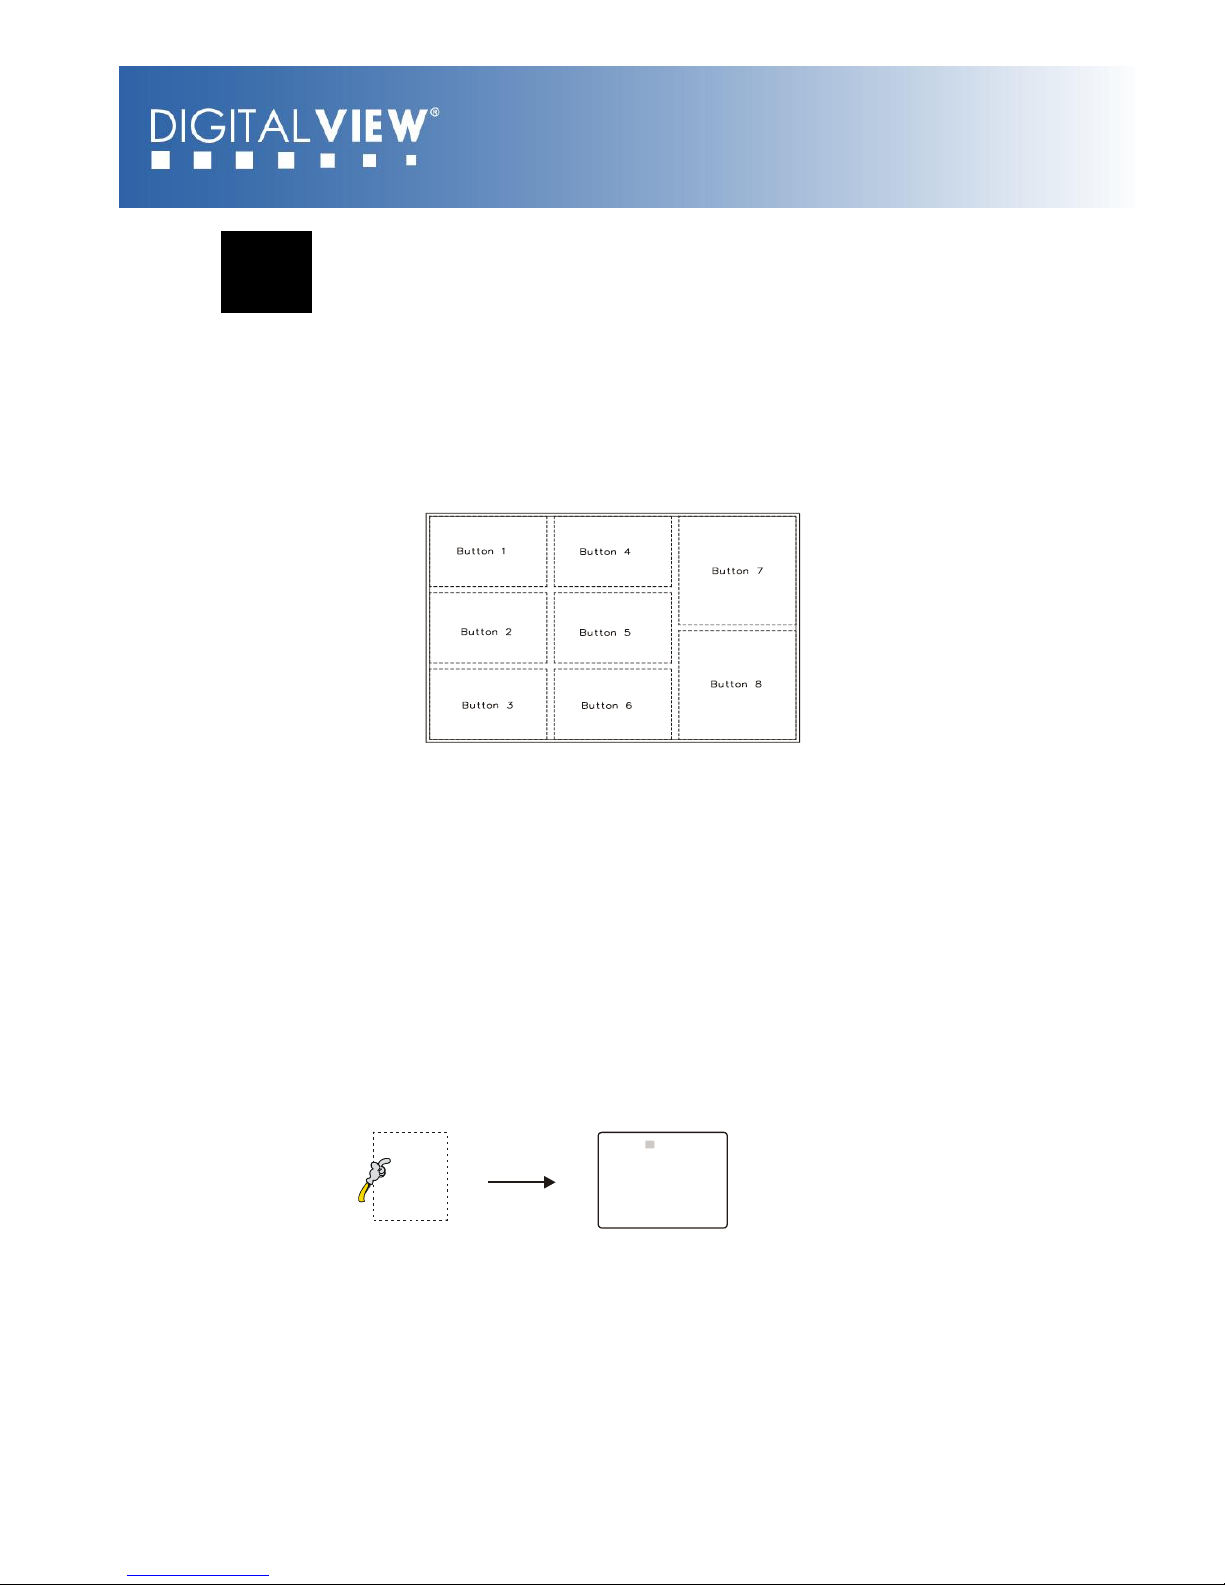
The VideoFlyer’s button control can be performed via touch screen for panel sizes
of 10” (Fig. 1)
Fig.1 8-buttons for LCD screen sizes 10”
Button function settings
Each button function can be programmed with the DV Studio software to perform
a DVD type player mode function or specific track select function.
The DV Studio software is available separately.
4.2 Configuration mode
To enter the Configuration Mode, holding the button 8 and power up.
The volume setting can be adjusted when the config. mode is enabled.
Press button 8 + power up : Configuration mode enable.
Press button 8 : Select
Press button 7 : Increase / Save and Exit
Press button 6 : Decrease / Save and Exit
VO LUM E 14 V ER 4 .10
Y M D H M S
200 4 . 10 .12 1 5 : 4 8 : 44
ID N O : 0 712
DATA LO GG IN G: ON
OS D: O N
SAV E A ND E XIT
Bu tto n 8
Pow e r on
Holding the button
Config. Mode menu
Page 10
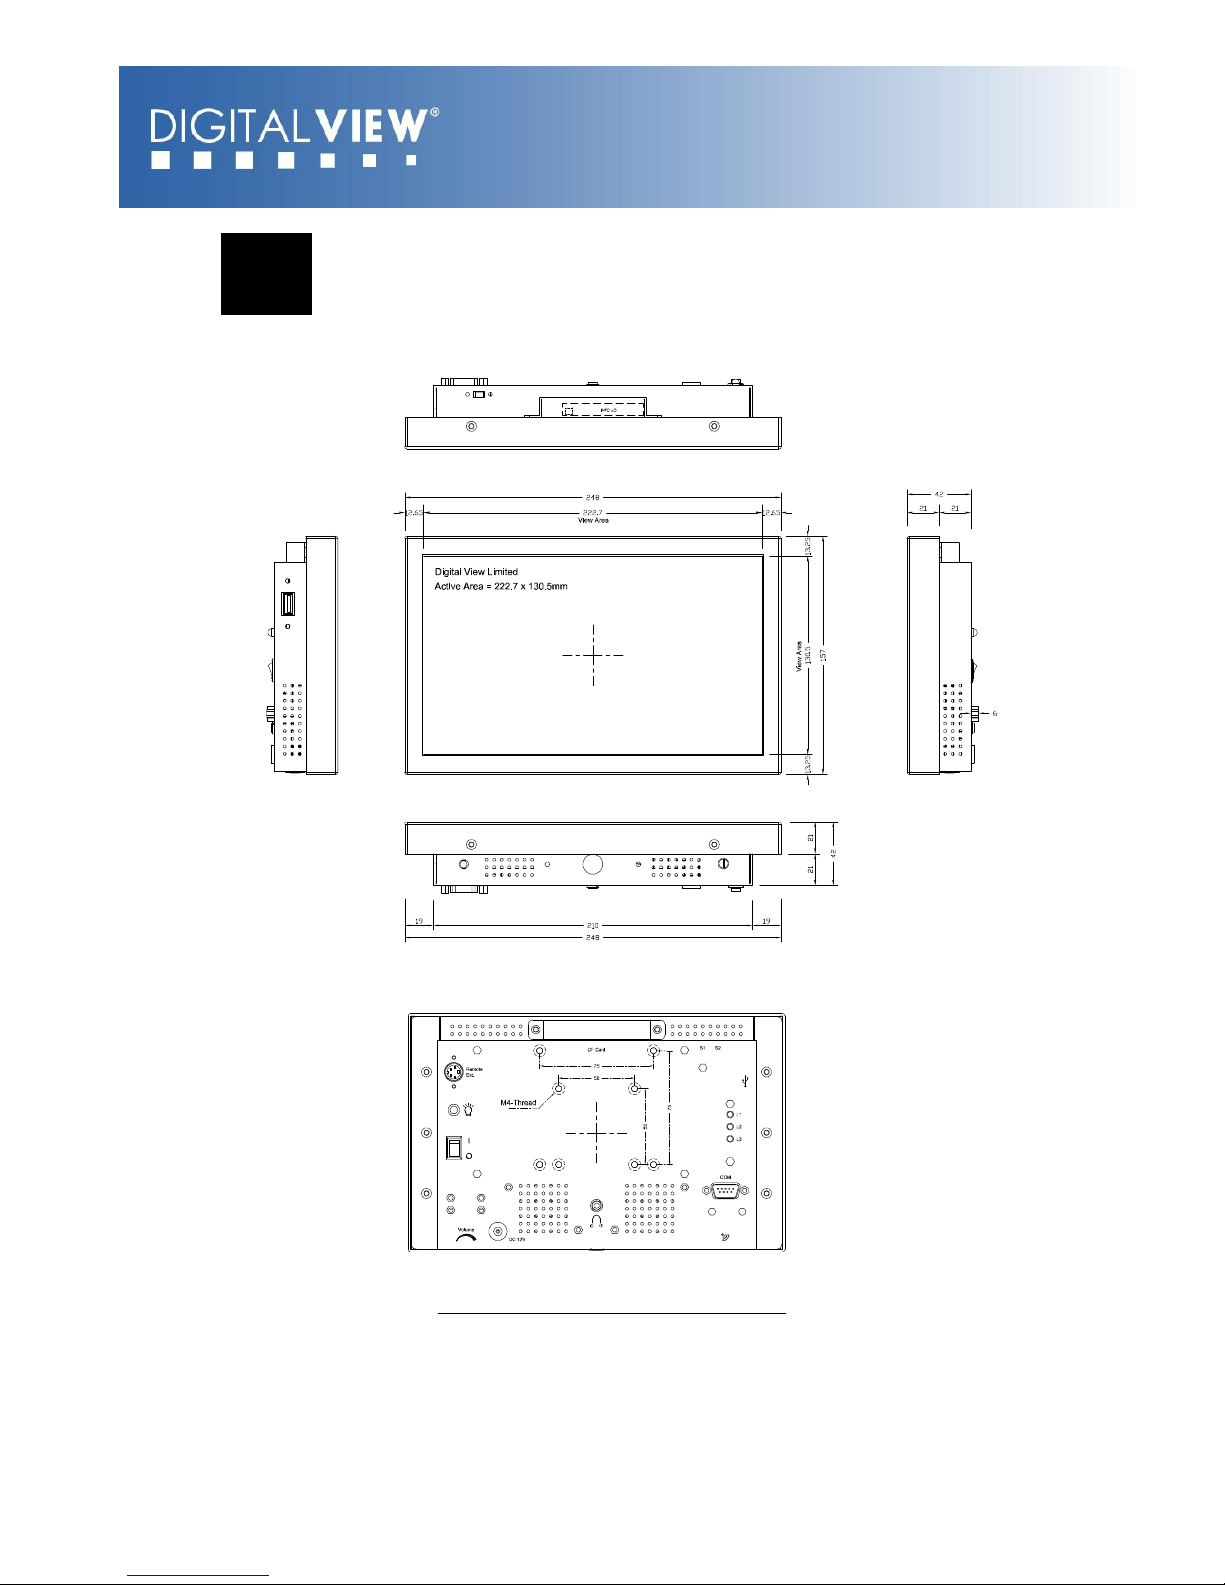
Page 10 of 14
5 Dimensions
VideoFlyer 10” (VF-100W)
Page 11
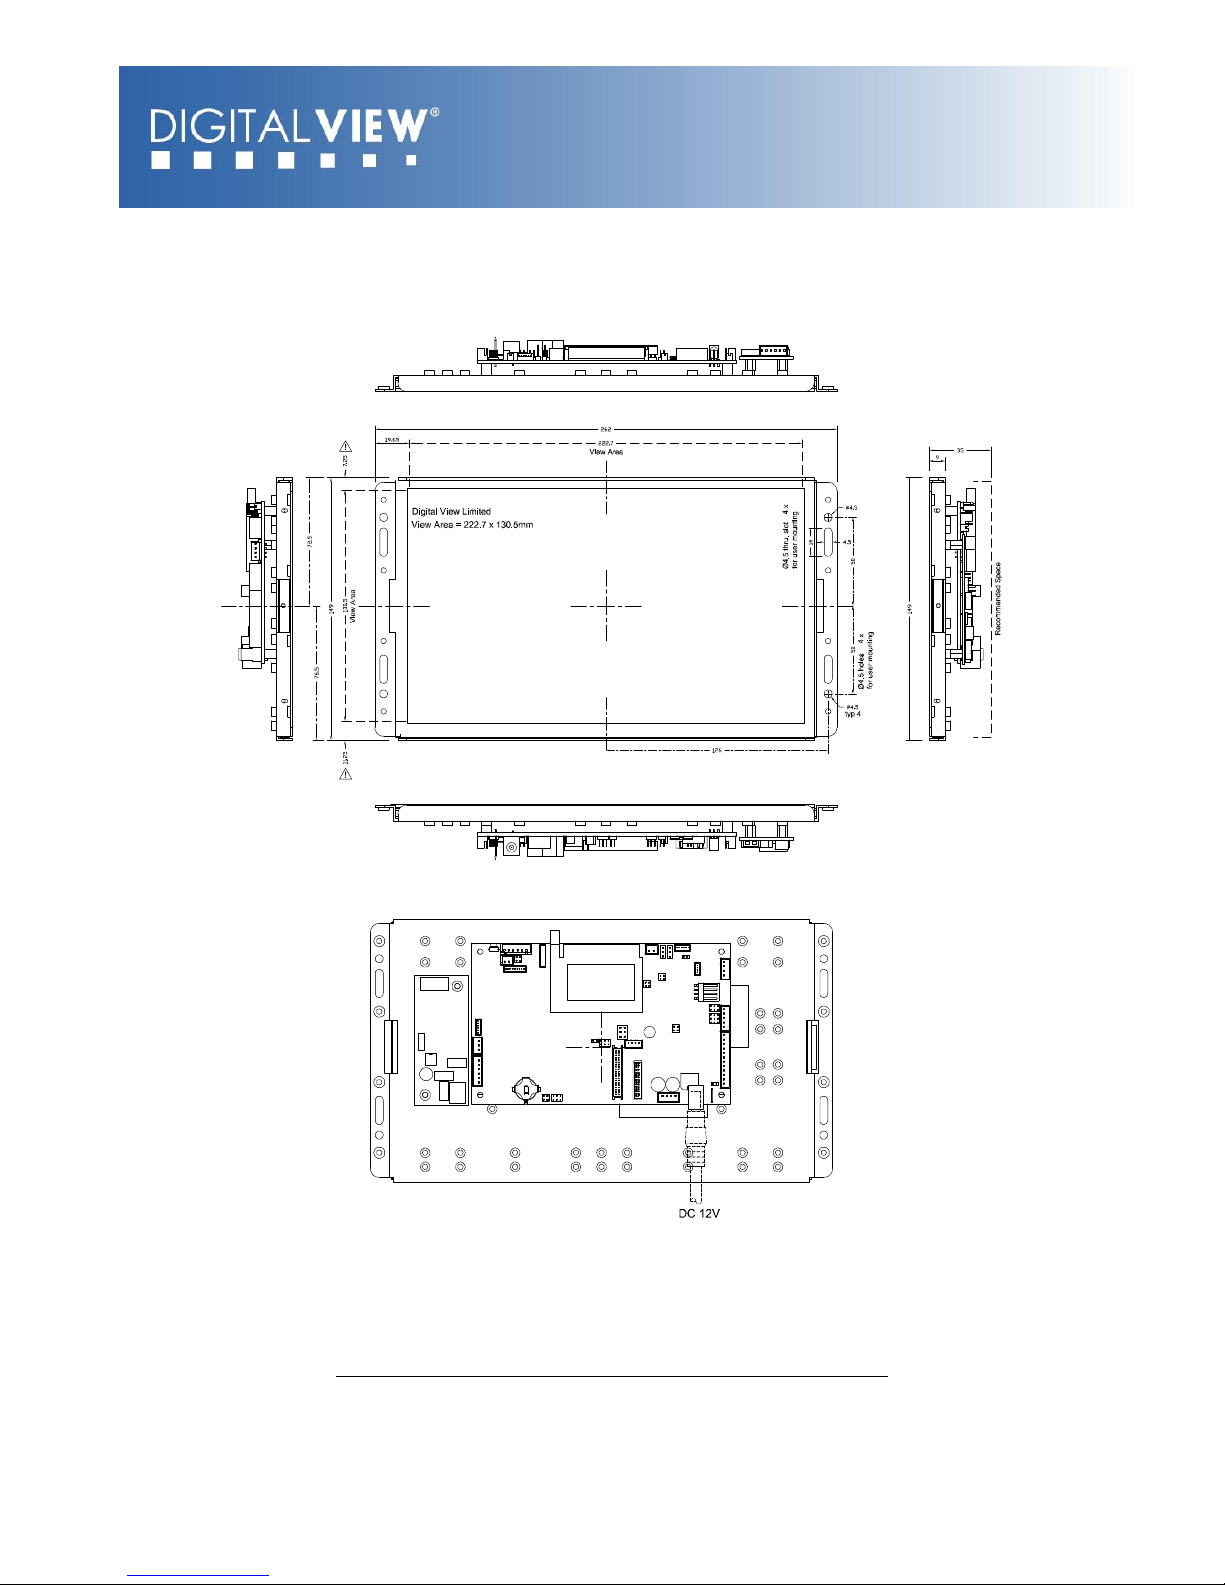
Page 11 of 14
VideoFlyer 10” Openframe (VF-100W-OF)
Page 12
Page 12 of 14
6 Specification
Playback video format
1. MPEG-1 video (Video-CD), MPEG-2 video (DVD),
MPEG-4 (DivX, XivD)
2. MPEG still picture, MP3 audio, JPEG picture
Video storage
CompactFlash memory cards
LCD display
Color TFT
Screen size
10.2” (Diagonal)
Screen active area
222.7(H) x 130.5(V) mm
Panel resolution
1024(H) x 600(V)
Brightness
220 cd/m2
Contrast ratio
400 : 1
Viewing angle
120/140 (Vertical/Horizontal)
Resolution
Low resolution : 352x288 pixels (PAL)
: 352x240 pixels (NTSC)
High resolution : 720x576 pixels (PAL)
: 720x480 pixels (NTSC)
Still picture : 704x576 pixels (PAL)
: 704x480 pixels (NTSC)
Audio output
Internal speakers x 2 (2W) [for VF-100W]
Stereo phone jack [for VF-100W]
Playback Functions
Standard playback : Play, Stop, Pause, Repeat,
Previous, Next Track, Volume
Programmable playback : Loop, Auto and Program
mode
I/O
USB port – Content update
RS-232 port – 9600, n81
IR remote control – Playback control
Remote Ext. – External button connection (#1 - #8)
Volume control
Power input
DC 12V
Dimensions
248(W) x 43(D) x 157(H) mm [for VF-100W]
262(W) x 35(D) x 149(H) mm [for VF-100W-OF]
Weight
2.5kg [for VF-100W]
1.1kg [for VF-100W-OF]
Environmental
Operating temperature : 0oC to 50oC
Relative humidity : 5%-95% relative humidity
(Non-condensing)
Page 13
Page 13 of 14
WARRANTY
The products are warranted against defects in workmanship and material for a period of one (1) year
from the date of purchase provided no modifications are made to it and it is operated under normal
conditions and in compliance with the instruction manual.
The warranty does not apply to:
Product that has been installed incorrectly, this specifically includes but is not limited to cases
where electrical short circuit is caused.
Product that has been altered or repaired except by the manufacturer (or with the
manufacturer’s consent).
Product that has subjected to misuse, accidents, abuse, negligence or unusual stress whether
physical or electrical.
Ordinary wear and tear.
Except for the above express warranties, the manufacturer disclaims all warranties on products
furnished hereunder, including all implied warranties of merchantability and fitness for a particular
application or purpose. The stated express warranties are in lieu of all obligations or liabilities on the
part of the manufacturer for damages, including but not limited to special, indirect consequential
damages arising out of or in connection with the use of or performance of the products.
CAUTION
Whilst care has been taken to provide as much detail as possible for use of this product it cannot be
relied upon as an exhaustive source of information. This product is for use by suitably qualified
persons who understand the nature of the work they are doing and are able to take suitable
precautions and design and produce a product that is safe and meets regulatory requirements.
SAFETY INSTRUCTION
Do not use this product near water, for example, near a bathtub, wash bowl, kitchen sink, laundry tub,
in a wet basement or near a swimming pool.
LIMITATION OF LIABILITY
The manufacturer’s liability for damages to customer or others resulting from the use of any product
supplied hereunder shall in no event exceed the purchase price of said product.
TRADEMARKS
The following are trademarks of Digital View Ltd:
Digital View
Video Flyer
Page 14
Page 14 of 14
CONTACT DETAILS
USA: Digital View Inc.
18440 Technology Drive
Building 130
Morgan Hill, CA 95037
Tel: (1) 408-782 7773 Fax: (1) 408-782 7883
Sales: [email protected]
EUROPE: Digital View Ltd
6 Marylebone Passage
London
W1W 8EX
UK
ASIA: Digital View Ltd
16th Floor Millennium City 3
370 Kwun Tong Road
Kwun Tong
Hong Kong
Specifications subject to change without notice
Document No. 9169900-10 © Digital View Ltd 2010
 Loading...