

Page 1
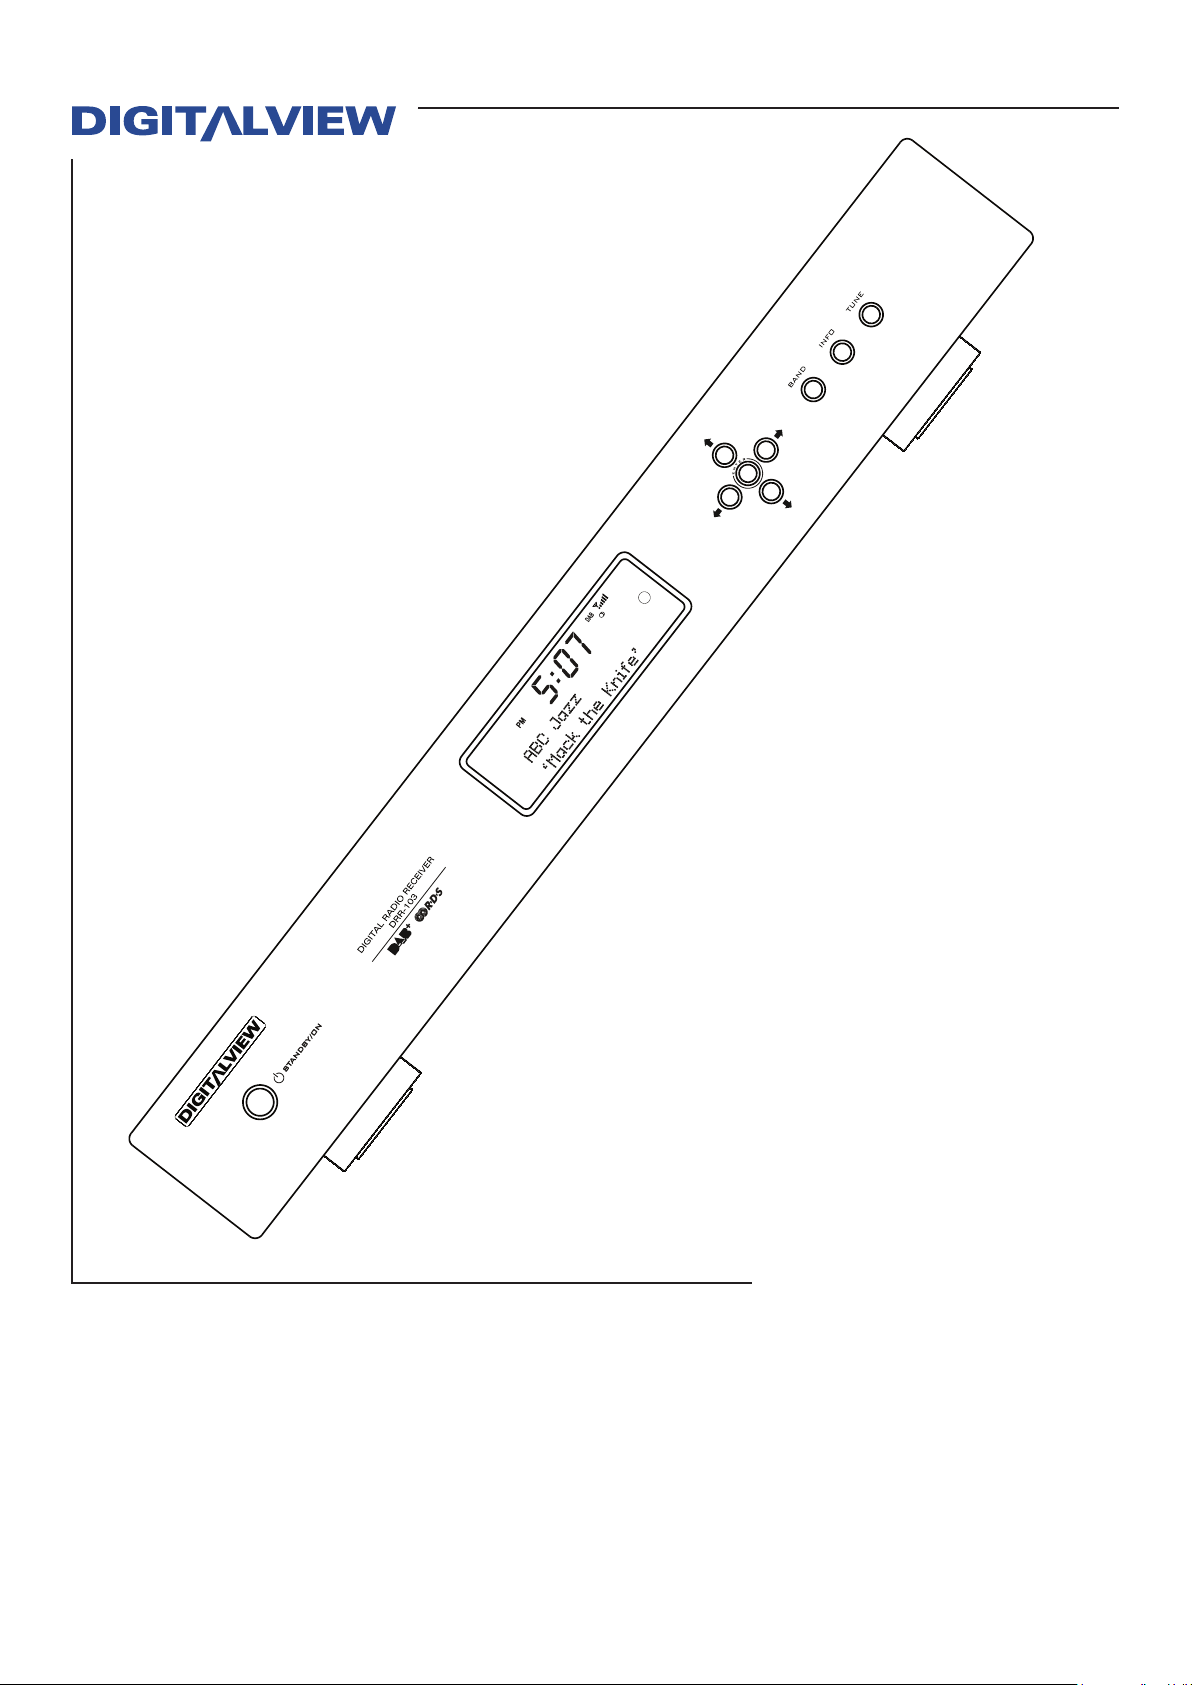
DRR-103
DAB+/FM Radio Tuner
©
2009-2010 Digitalview Australia
Owner’s Manual
Page 2

The DRR-103 has been designed and
manufactured to assure personal safety.
Improper use can result in electric shock or
fire hazard. The safeguards incorporated in
this unit will protect you if you observe the
following procedures for installation, use, and
servicing.
This unit does not contain any parts that can
be repaired by the user.
DO NOT REMOVE THE CHASSIS
COVER, OR YOU MAY BE
EXPOSED TO DANGEROUS
VOLTAGES. REFER SERVICING
TO QUALIFIED SERVICE
PERSONNEL ONLY.
1. Read these instructions. - All these
safety and operating instructions should
be read before the product is operated.
2. Keep these instructions. - The safety,
operating and use instructions should be
retained for future reference.
3. Heed all warnings. - All warnings on the
product and in the operating instructions
should be adhered to.
4. Follow all instructions. - All operating
and use instructions should be followed.
5. Do not use this apparatus near
water. – For example: near a bath tub,
wash bowl, kitchen sink, laundry tub, in
a wet basement; near a swimming pool;
etc.
IMPORTANT SAFETY INSTRUCTIONS
CAUTION: PLEASE READ AND OBSERVE ALL WARNINGS AND
INSTRUCTIONS IN THIS OWNERS MANUAL AND THOSE MARKED ON THE
UNIT. RETAIN THIS GUIDE FOR FUTURE REFERENCE.
6. Clean only with dry cloth. – Unplug
this product from the wall outlet before
cleaning. Do not use liquid cleaners.
7. Do not block any ventilation openings.
Install in accordance with these
instructions. Slots and openings in the
cabinet are provided for ventilation, to
ensure reliable operation of the product,
and to protect it from over-heating. The
openings should never be blocked by
placing the product on a bed, sofa, rug or
other similar surface. This product should
not be placed in a built-in installation
such as a bookcase or rack unless proper
ventilation is provided.
8. Do not install near any heat sources such
as radiators, heat registers, stoves, or
other apparatus (including amplifiers) that
produce heat.
9. Protect the power cord from being walked
on or pinched, particularly at plugs,
convenience receptacles, and the point
where they exit from the apparatus.
10. Only use attachments/accessories
specified by Digitalview.
11. Unplug the DRR-103 and antenna lead
during severe lightning storms or when
unused for long periods of time.
Page 3

Table of Contents
Introduction.....................................................................................................1
Features of the DRR-103................................................................................2
User Convenience Summary ........................................................................ 2
Technical Performance Summary.................................................................2
Package Contents ..........................................................................................3
Front Panel Overview..................................................................................... 4
Front Panel Display........................................................................................5
Standby Button .............................................................................................. 5
Front Panel LCD Display ...............................................................................5
Transport Controls and Navigation Buttons................................................6
Rear Panel Overview......................................................................................7
Remote Control Unit ......................................................................................8
Button Denitions 1 ....................................................................................... 8
Button Denitions 2 ....................................................................................... 9
Typical Connection Diagram Using the DRR-103......................................10
Connection using a Pre-amplier or Integrated Amplier .......................10
Operation....................................................................................................... 11
Selection Of The Antenna............................................................................ 11
Initial Setup................................................................................................... 11
Initial Tuning For DAB Reception............................................................... 11
Initial Tuning For FM Reception.................................................................. 11
RDS (Radio Data System Operation........................................................... 12
Presets .......................................................................................................... 12
Storing A Preset (DAB)................................................................................ 12
Storing A Preset FM)................................................................................... 13
Tuning To A Station Using A Stored Preset (DAB & FM) .......................... 13
Tuning To A DAB Station And Not Using The Stored Preset Function ... 13
Recalling/Selecting An FM Station And Not Using The Preset Function 13
Introduction To Live PAUSE ....................................................................... 13
Activating The Live PAUSE Mode............................................................... 14
Live Pause Playback Navigation ................................................................ 14
Factory Default ............................................................................................. 14
Version Number............................................................................................ 14
Troubleshooting........................................................................................... 14
Intermittent, Distorted DAB Reception ...................................................... 14
Antennas....................................................................................................... 14
Specication .................................................................................................15
Page 4
Introduction 1
Thank you for purchasing the Digitalview DRR-103 DAB+/FM Radio Tuner. This
manual describes the setup and functional requirements of your DRR-103. Operational
control for the DRR-103 is accessed either by the front panel buttons or the Remote
Control Unit. Note that limited functionality is provided by the front panel buttons.
Please read this manual carefully to gain the most from your DRR-103 Receiver. If
you have any problems with setup or operation which cannot be resolved by referring
to this manual, please call Digitalview support directly.
Introduction
DAB/DAB+, RDS and all other trademarks that may appear in this manual are the property of their
respective owners.
For any on-going improvement of this product, the specification and/or contents are subject to
change without prior notice.
©2010 Control Dynamics Pty. Ltd. / Digitalview Australia. All rights reserved.
Page 5
2 Introduction
Introduction 3
Features of the DRR-103
User Convenience Summary
Compatibility
Designed specifically for integration into an existing Hi-Fi system.
Station Presets
Twenty user programmable presets for DAB+ and FM for quick radio station selection.
LCD Display
Large auto-scrolling LCD shows comphrensive program information and status
Single Function Remote Control Unit
Full function 32 key Remote Control Unit.
Pause Live Radio
Play, Fast Forward and Rewind for up to 4 Hours
Station and Program Data
DAB+ and FM RDS includes Station, Program and Format information, where applicable.
Control Interface Using 3.5mm IR Interface
IR control port is utilised for interfacing to popular Home Control and Automation Systems.
Standard “Hi-Fi” Component Size
430mm component width to suit most Hi-Fi installations.
Technical Performance Summary
Tuner Implementation
High sensitivity single tuner design for both DAB+ and FM modes.
Digital and Analog Audio Outputs
S/PDIF Optical and Coaxial for digital audio. RCA L&R connections for analog audio.
Low Power Consumption
In accordance with the MEPS recommendations for Standby power of 0.5W.
Page 6
Introduction 3
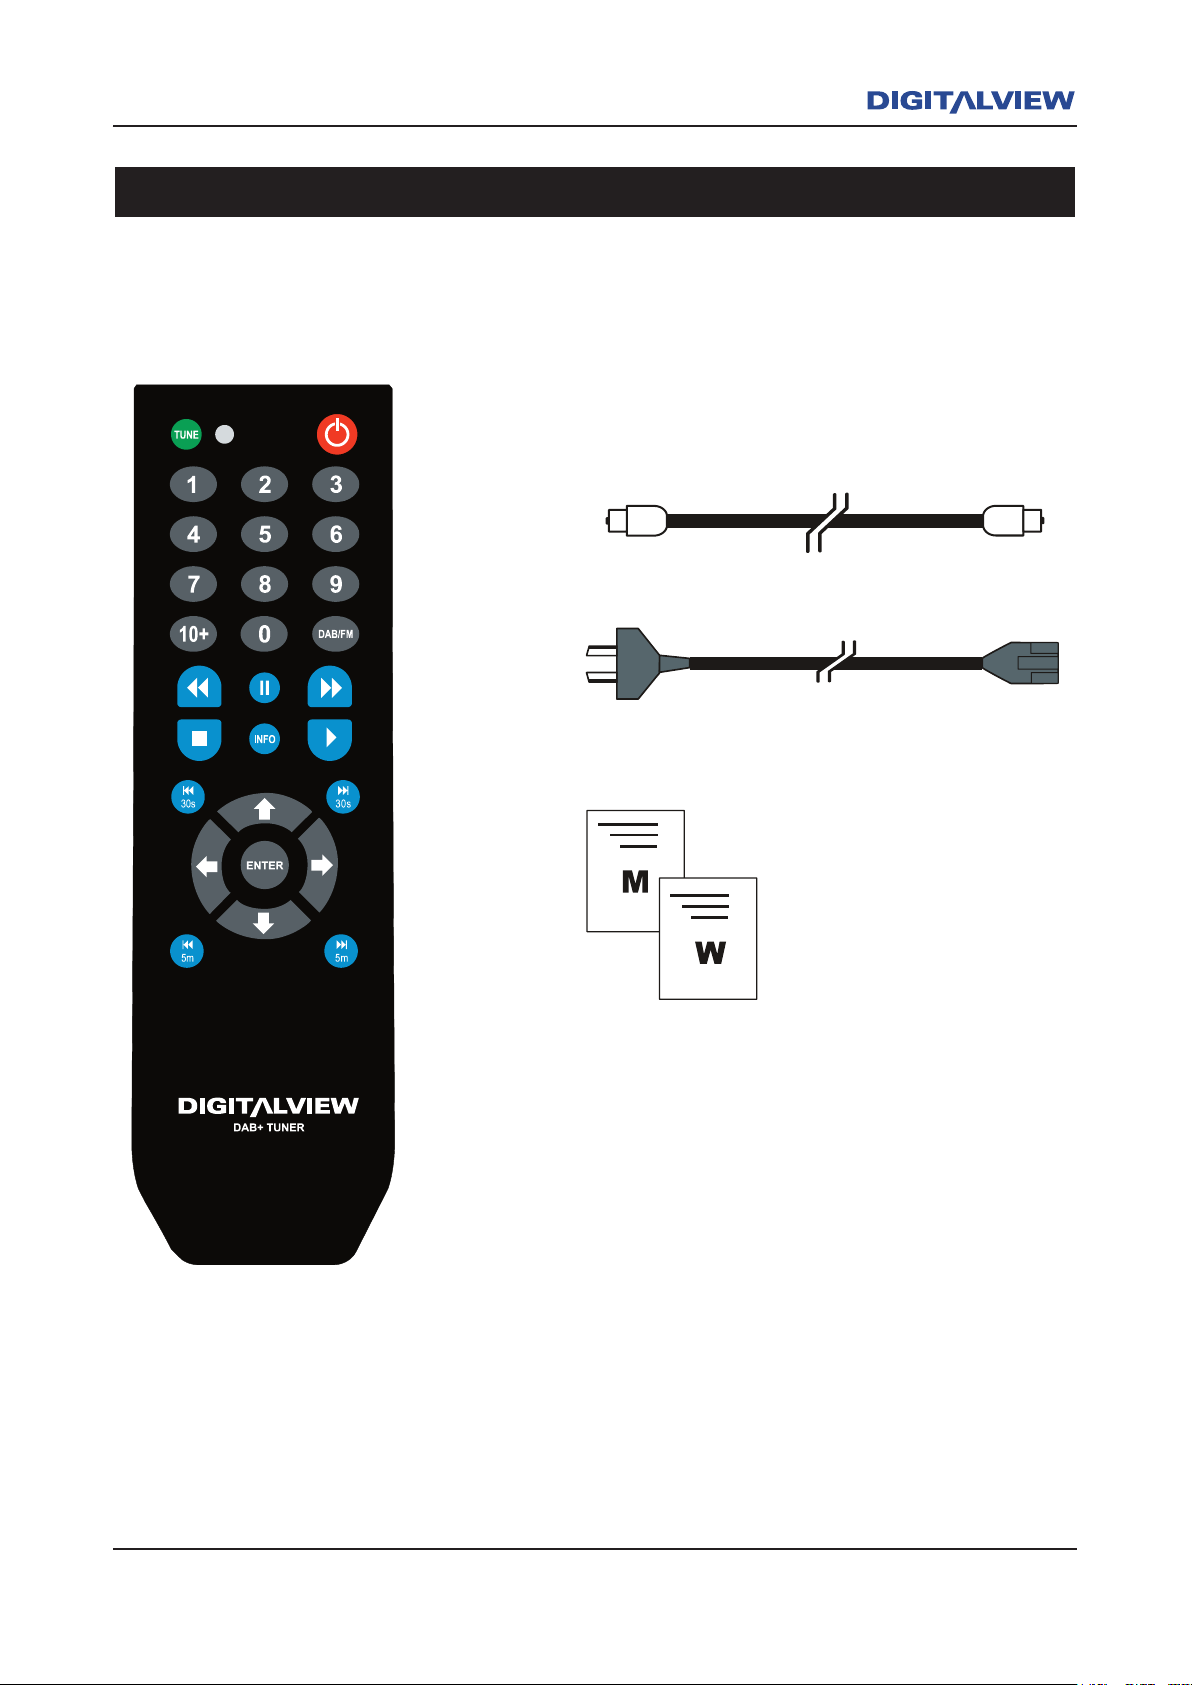
Package Contents
Toslink Optical Cable
Power Cable
Remote Control Unit
Owners Manual
Warranty Registration Card
The following items are included with your DRR-103.
Page 7
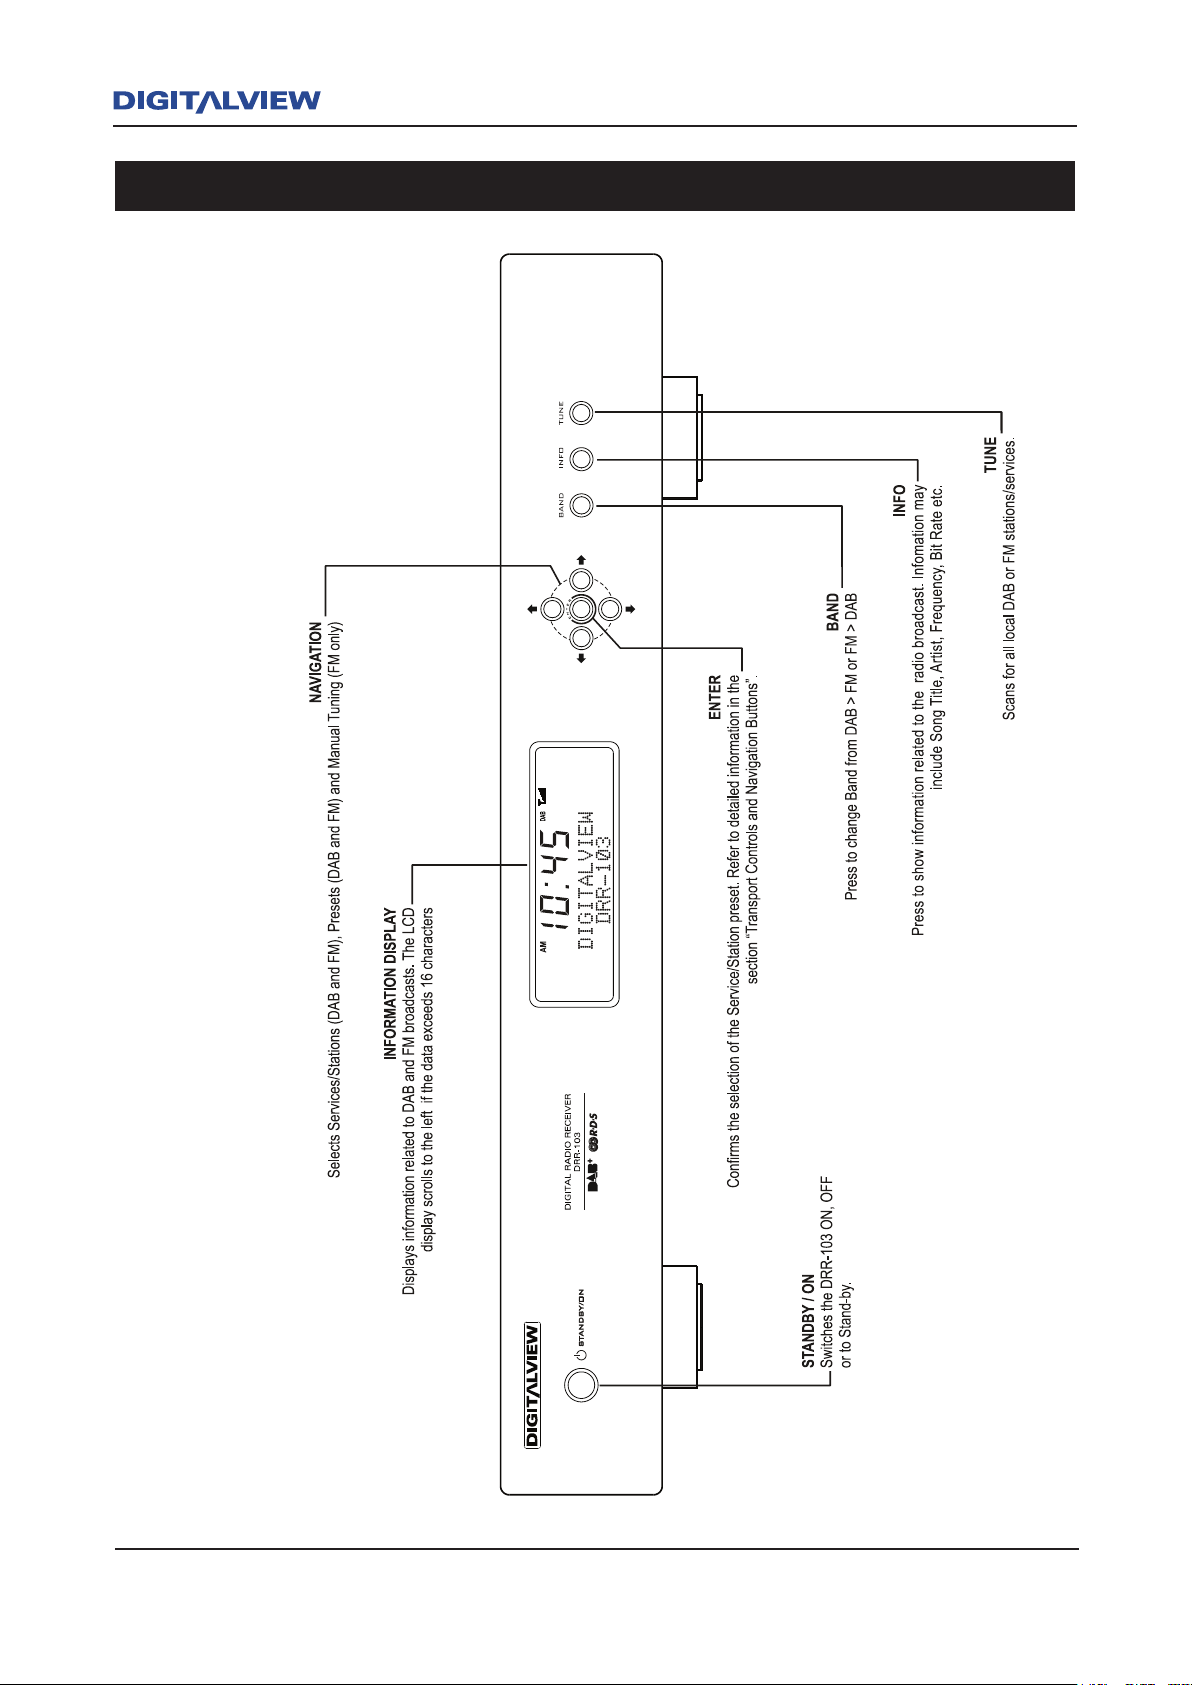
4 DRR-103 Front and Rear Panel
DRR-103 Front and Rear Panel 5
Front Panel Overview
Page 8
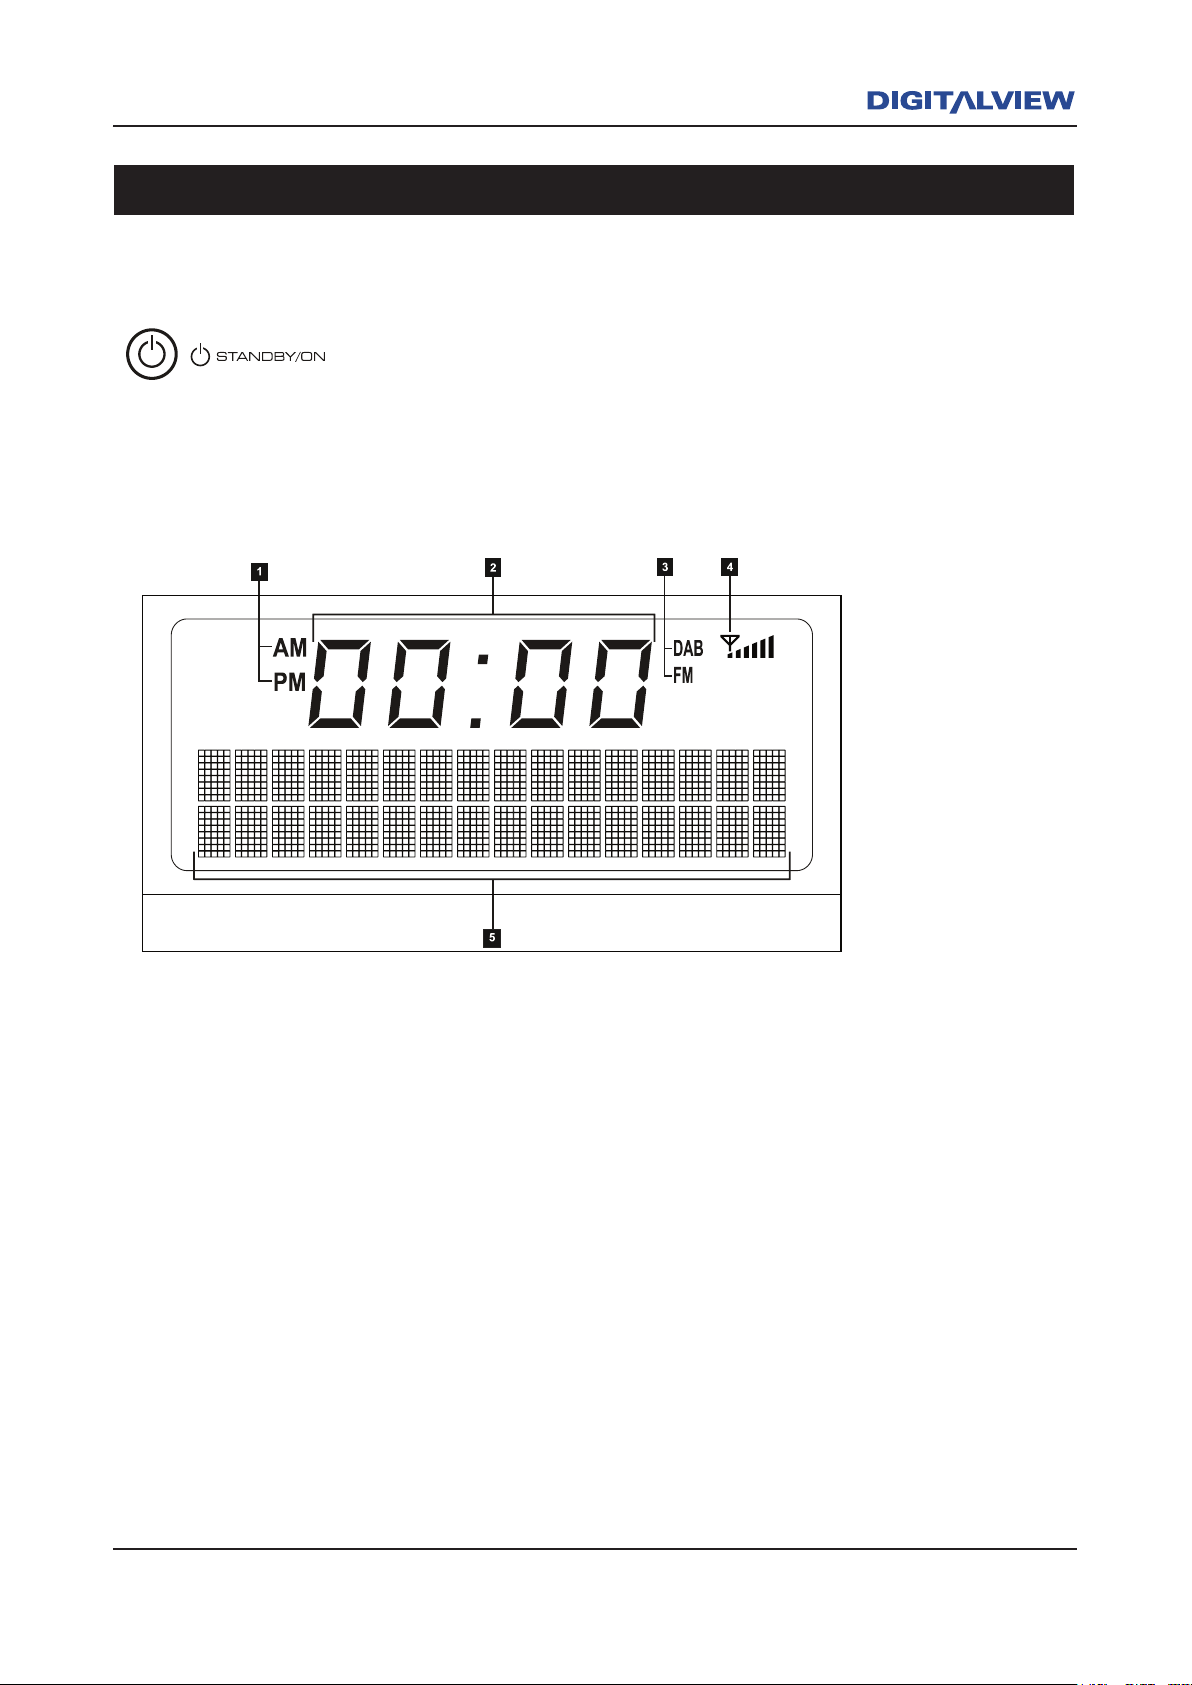
DRR-103 Front and Rear Panel 5
1. AM / PM Indicator.
2. 12 Hour Clock
3. DAB / FM Mode Indicator
4. Signal Strength Indicator
5. Alpha-numeric character display shows information relevant to Digital Radio and FM/RDS
reception including Pause Live Radio functions.
Front Panel Display
When the Standby / ON button is pressed two modes of operation are
possible. Illuminates Blue when switched ON. Illuminates Red when
switched OFF.
Standby Button
Front Panel LCD Display
Page 9
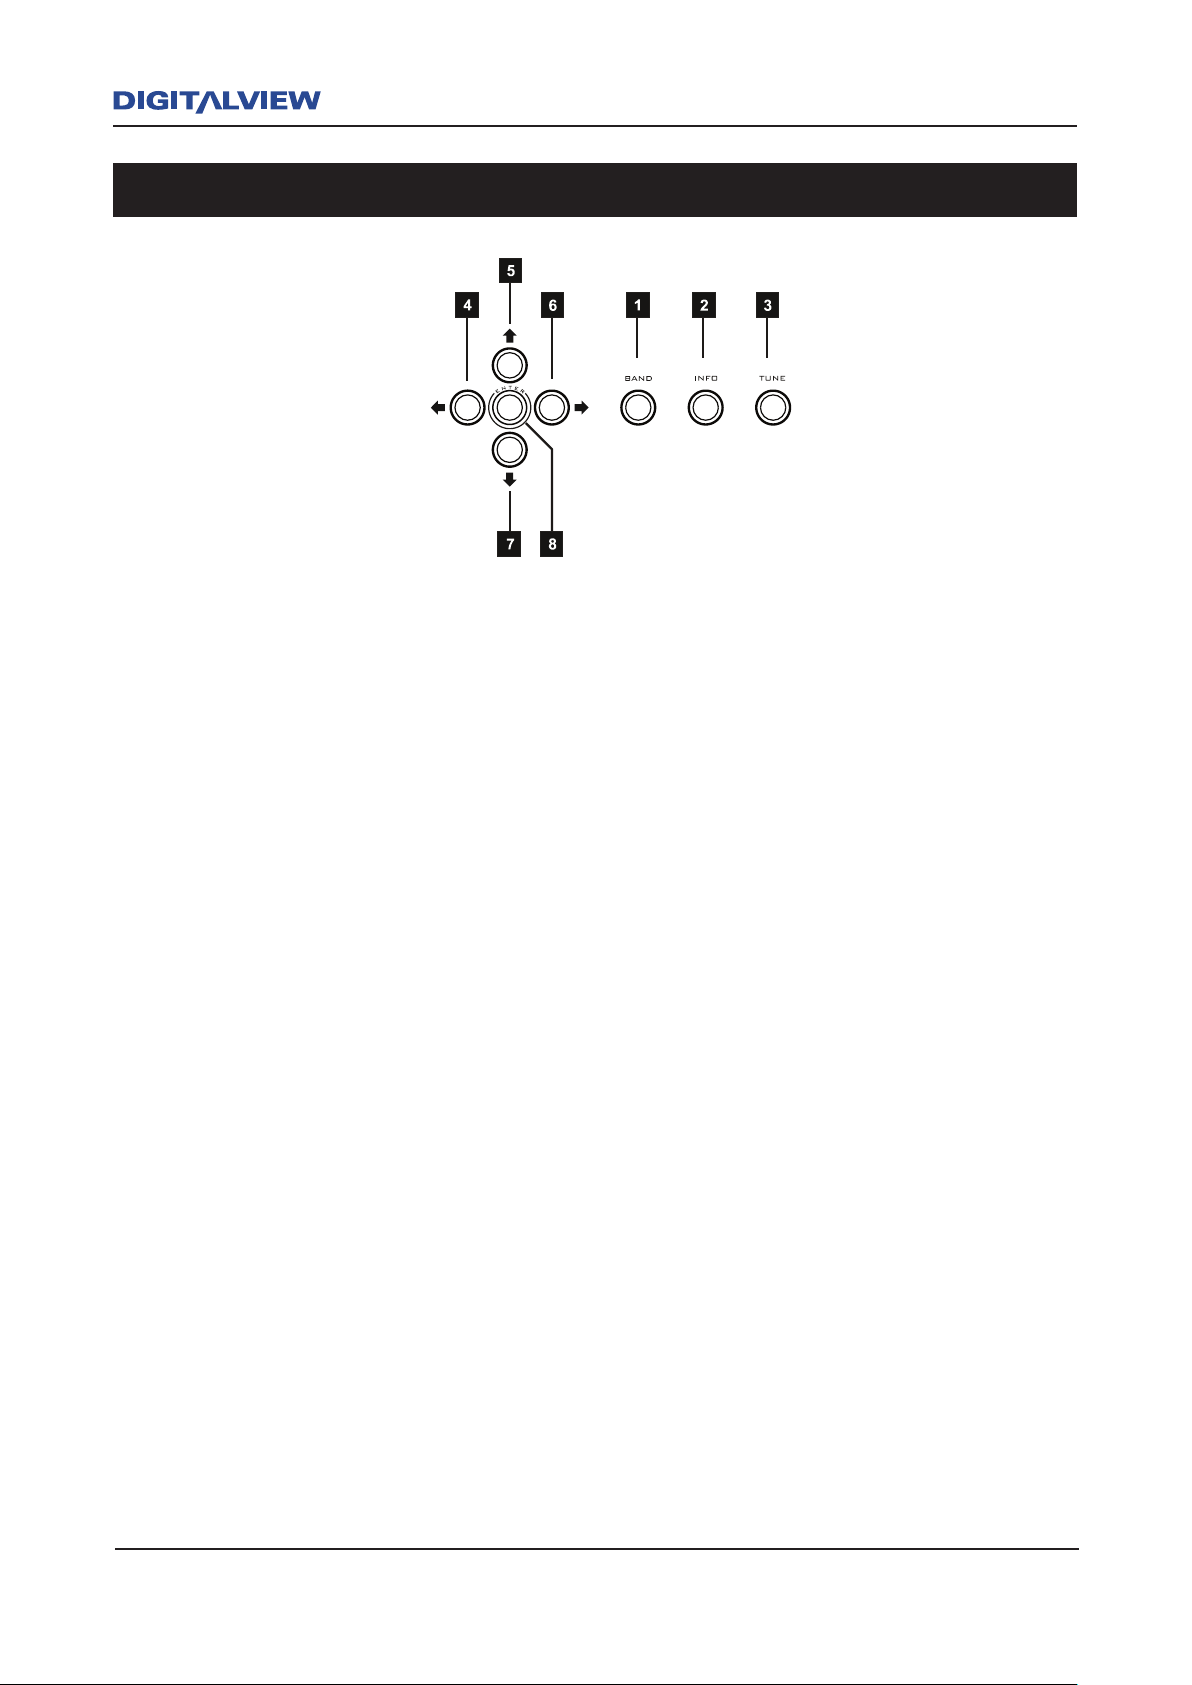
6 DRR-103 Front and Rear Panel
DRR-103 Front and Rear Panel 7
1. BAND - Press to select DAB or FM operation.
2. INFO - Press repeatedly to display Information related to the current broadcast. (Title,
Time, Date, Artist, Stereo, Ensemble, etc.). Pressing and holding the INFO + TUNE
buttons will initially activate the SYSTEM RESET option. Press and hold the INFO button
to display the current Firmware Version Number.
3. TUNE - DAB Mode: When pressed, scans for all DAB stations*.
FM Mode: When pressed, increments the FM frequency until it finds the next valid
station.
* Please Note: The term “station/s” will be used in this manual to dene a specic Service/s
(DAB) or Frequency/Frequencies (FM) and is associated with digital/analog radio broadcasting.
4 & 6 LEFT & RIGHT CURSOR NAVIGATION - DAB & FM mode. The Å or Æ button is used
to select or set one of 20 DAB or FM Preset locations. Presets are used as a quick means
of accessing your favourite stations. Pressing and holding the Å or Æ button quickly
scrolls through all Presets. Pressing the Å or Æ button with a slight pause between
presses, will slowly increment each Preset.
5 & 7 UP & DOWN CURSOR NAVIGATION - The Ç or È buttons are used to select the DAB
or FM station directly. Pressing and holding the Ç or È button will quickly scroll through
all stations. Pressing the Ç or È button with a slight pause between presses will slowly
increment each station. For manual tuning in FM mode, each button press increments the
frequency in 50kHz steps.
8. ENTER - In DAB or FM, the ENTER button is used to store the selected preset. Press and
hold the ENTER button to save the selected station as a Preset.
Transport Controls and Navigation Buttons
Page 10
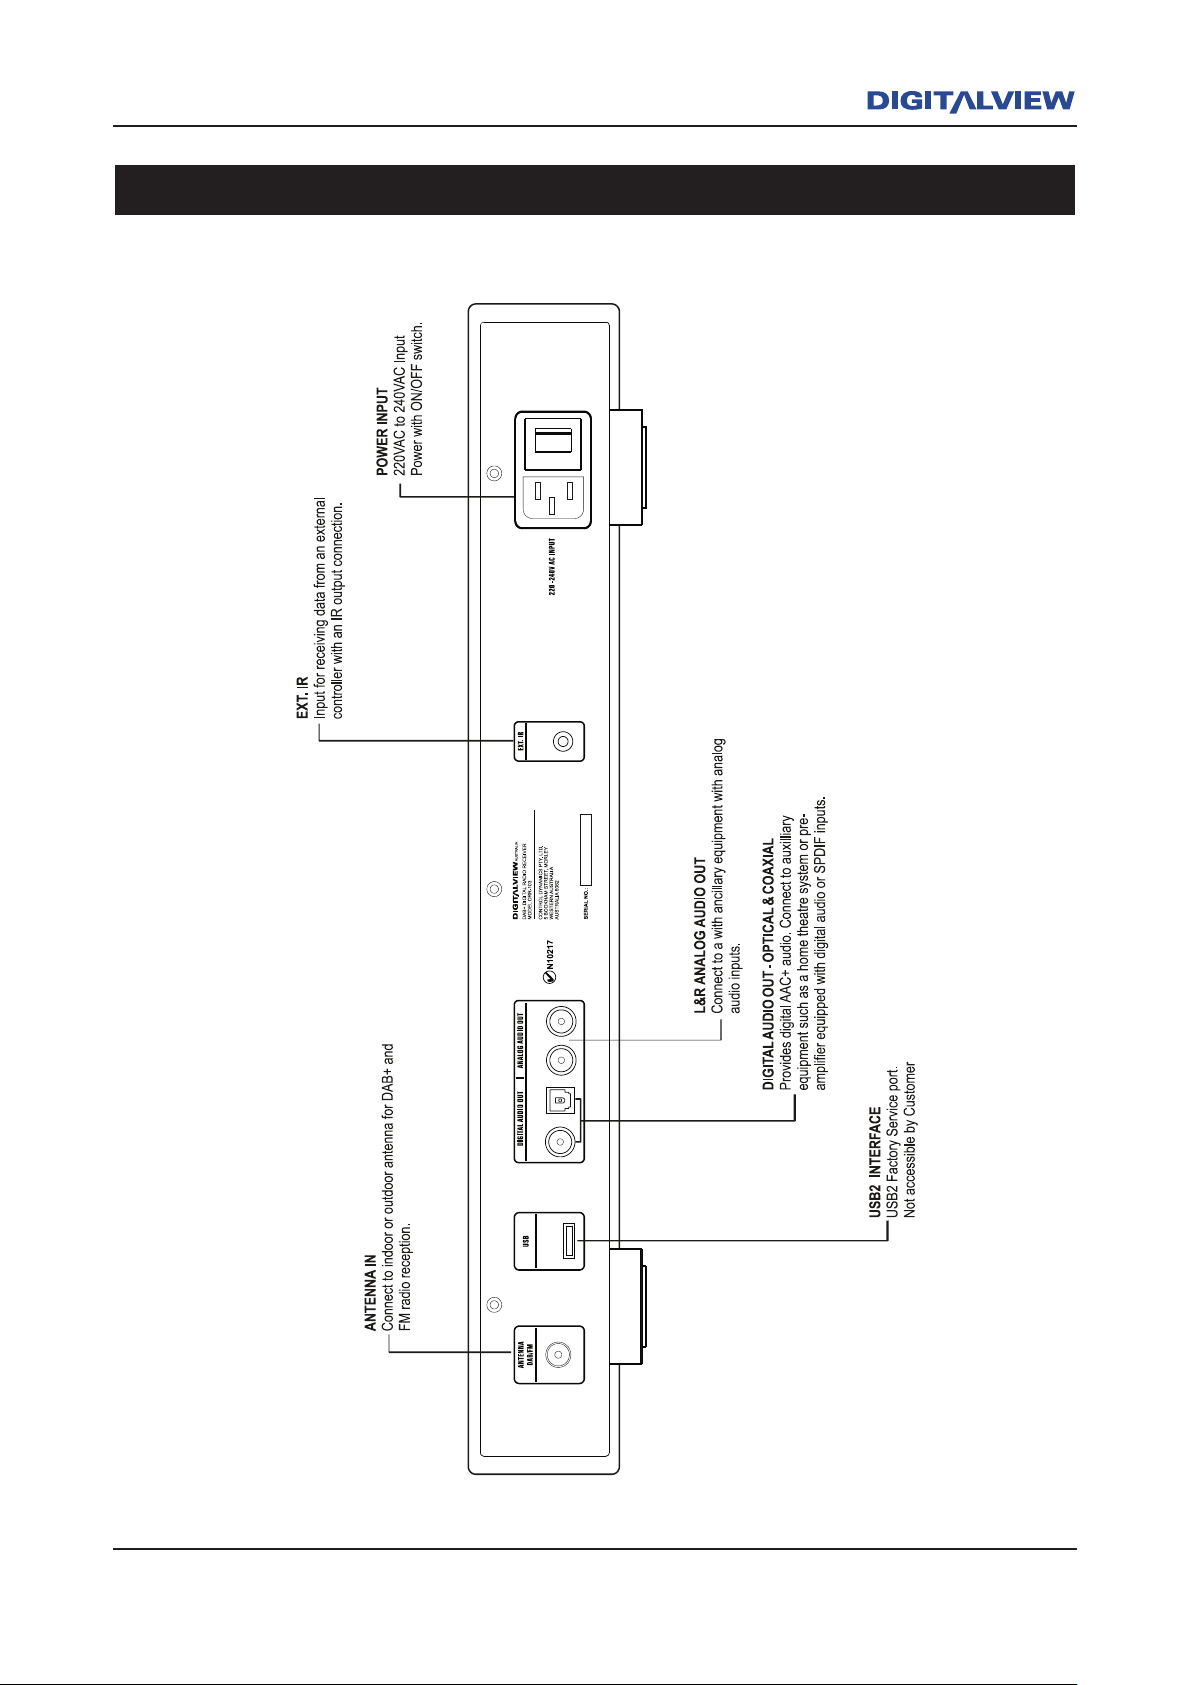
DRR-103 Front and Rear Panel 7
Rear Panel Overview
Page 11
8 Remote Control Unit
Remote Control Unit 9
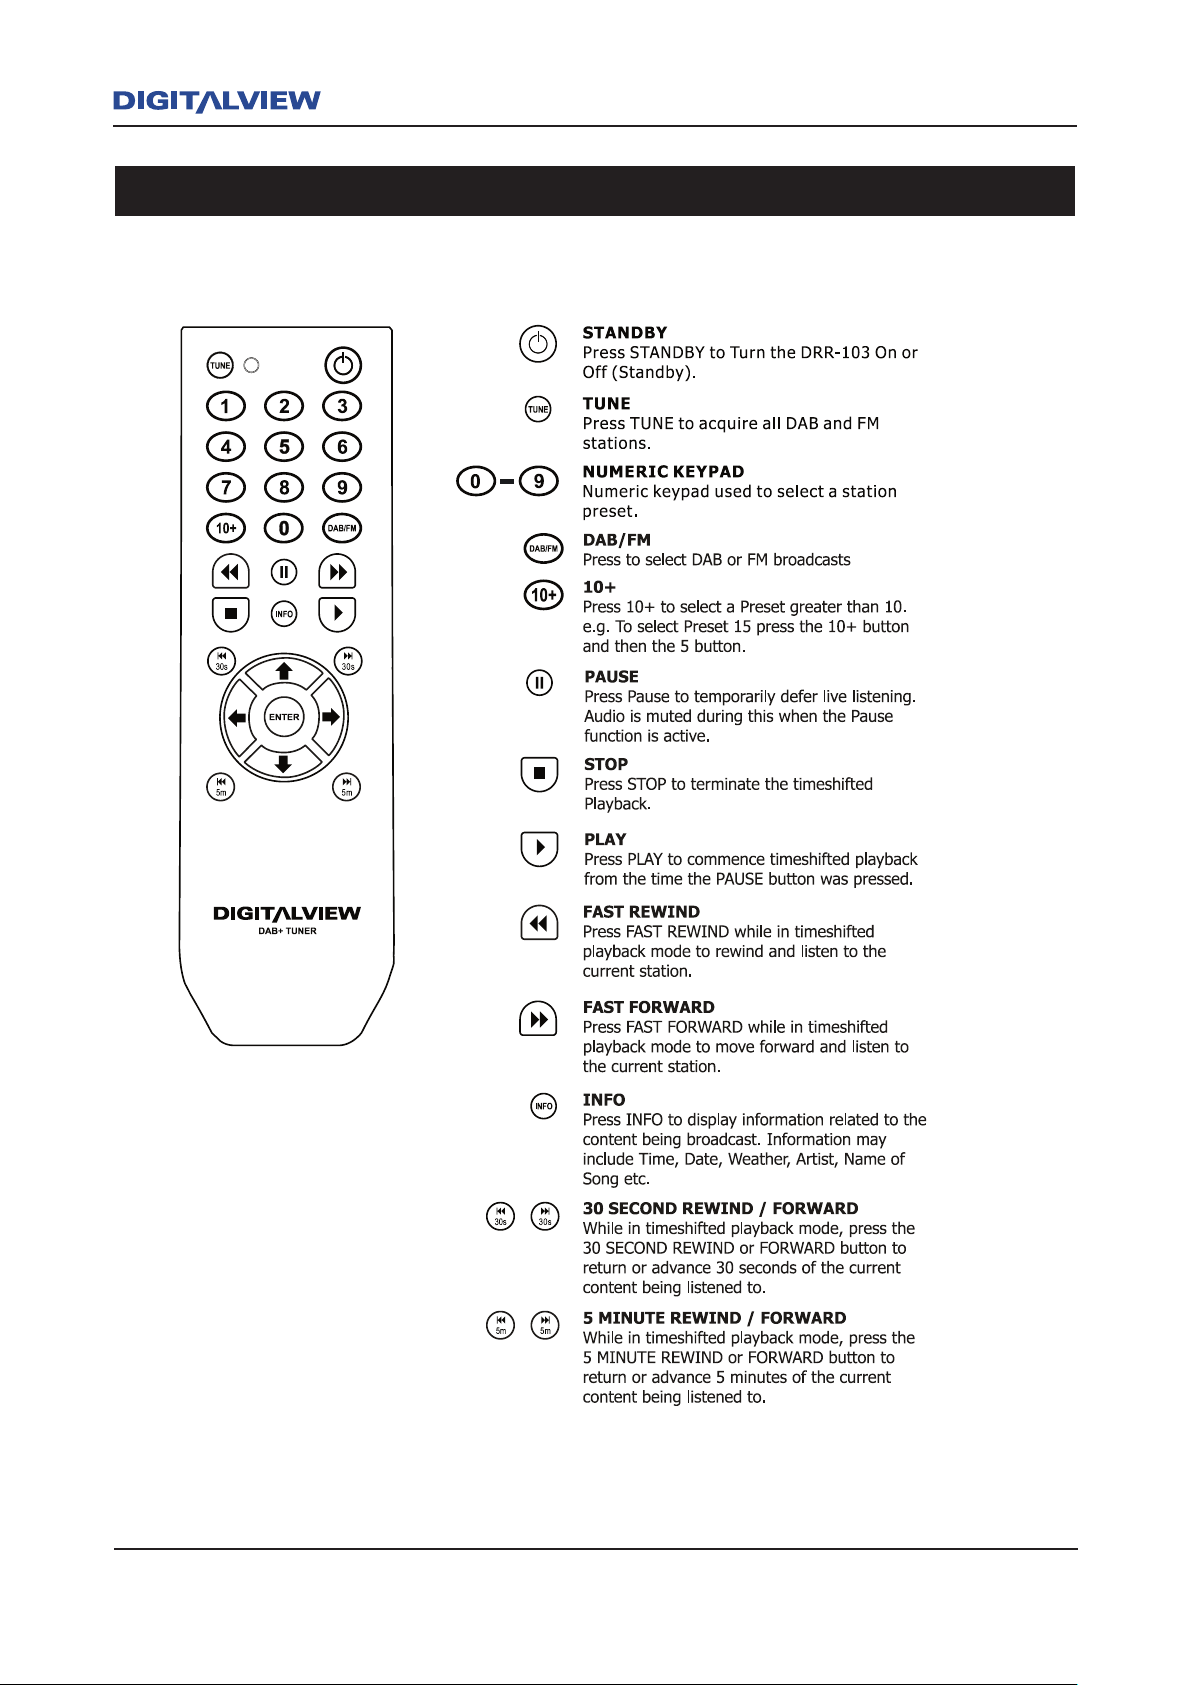
Remote Control Unit
Button Definitions 1
Page 12
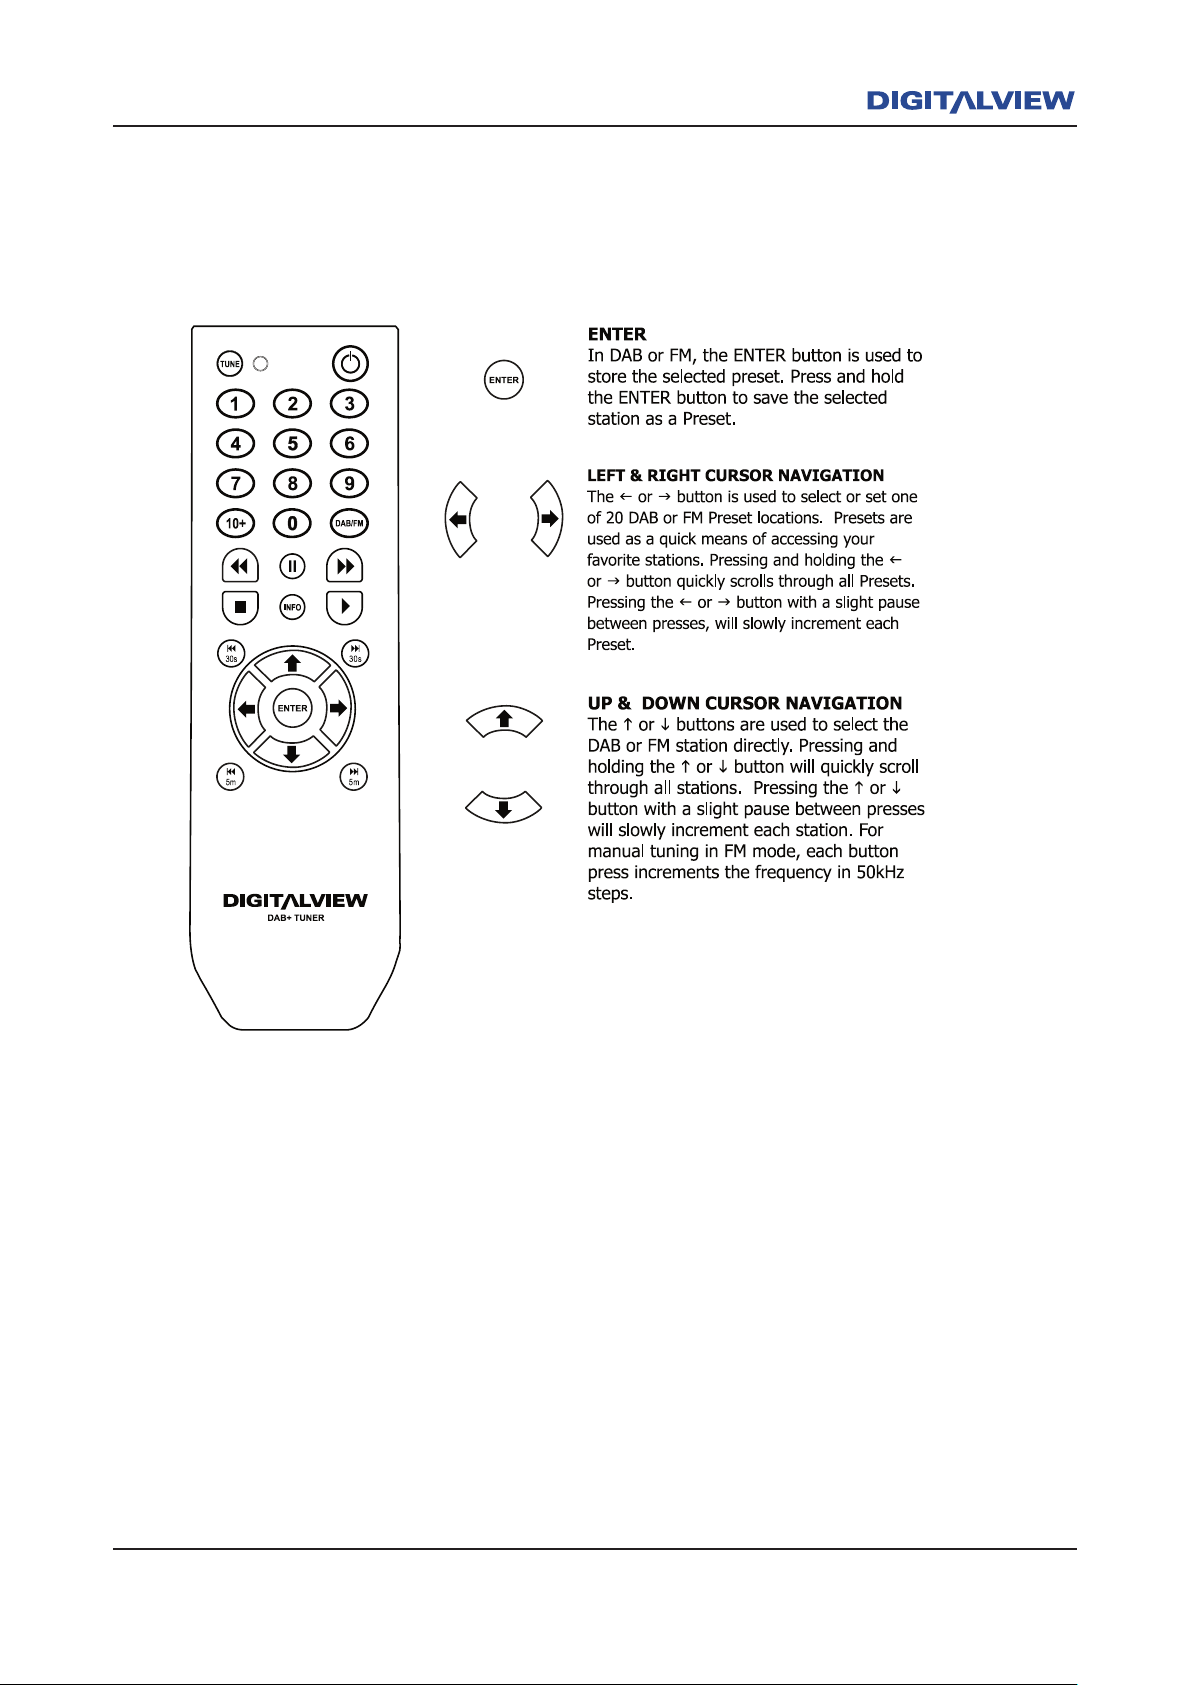
Remote Control Unit 9
Button Definitions 2
Page 13
10 Installation and Setup Operation 11
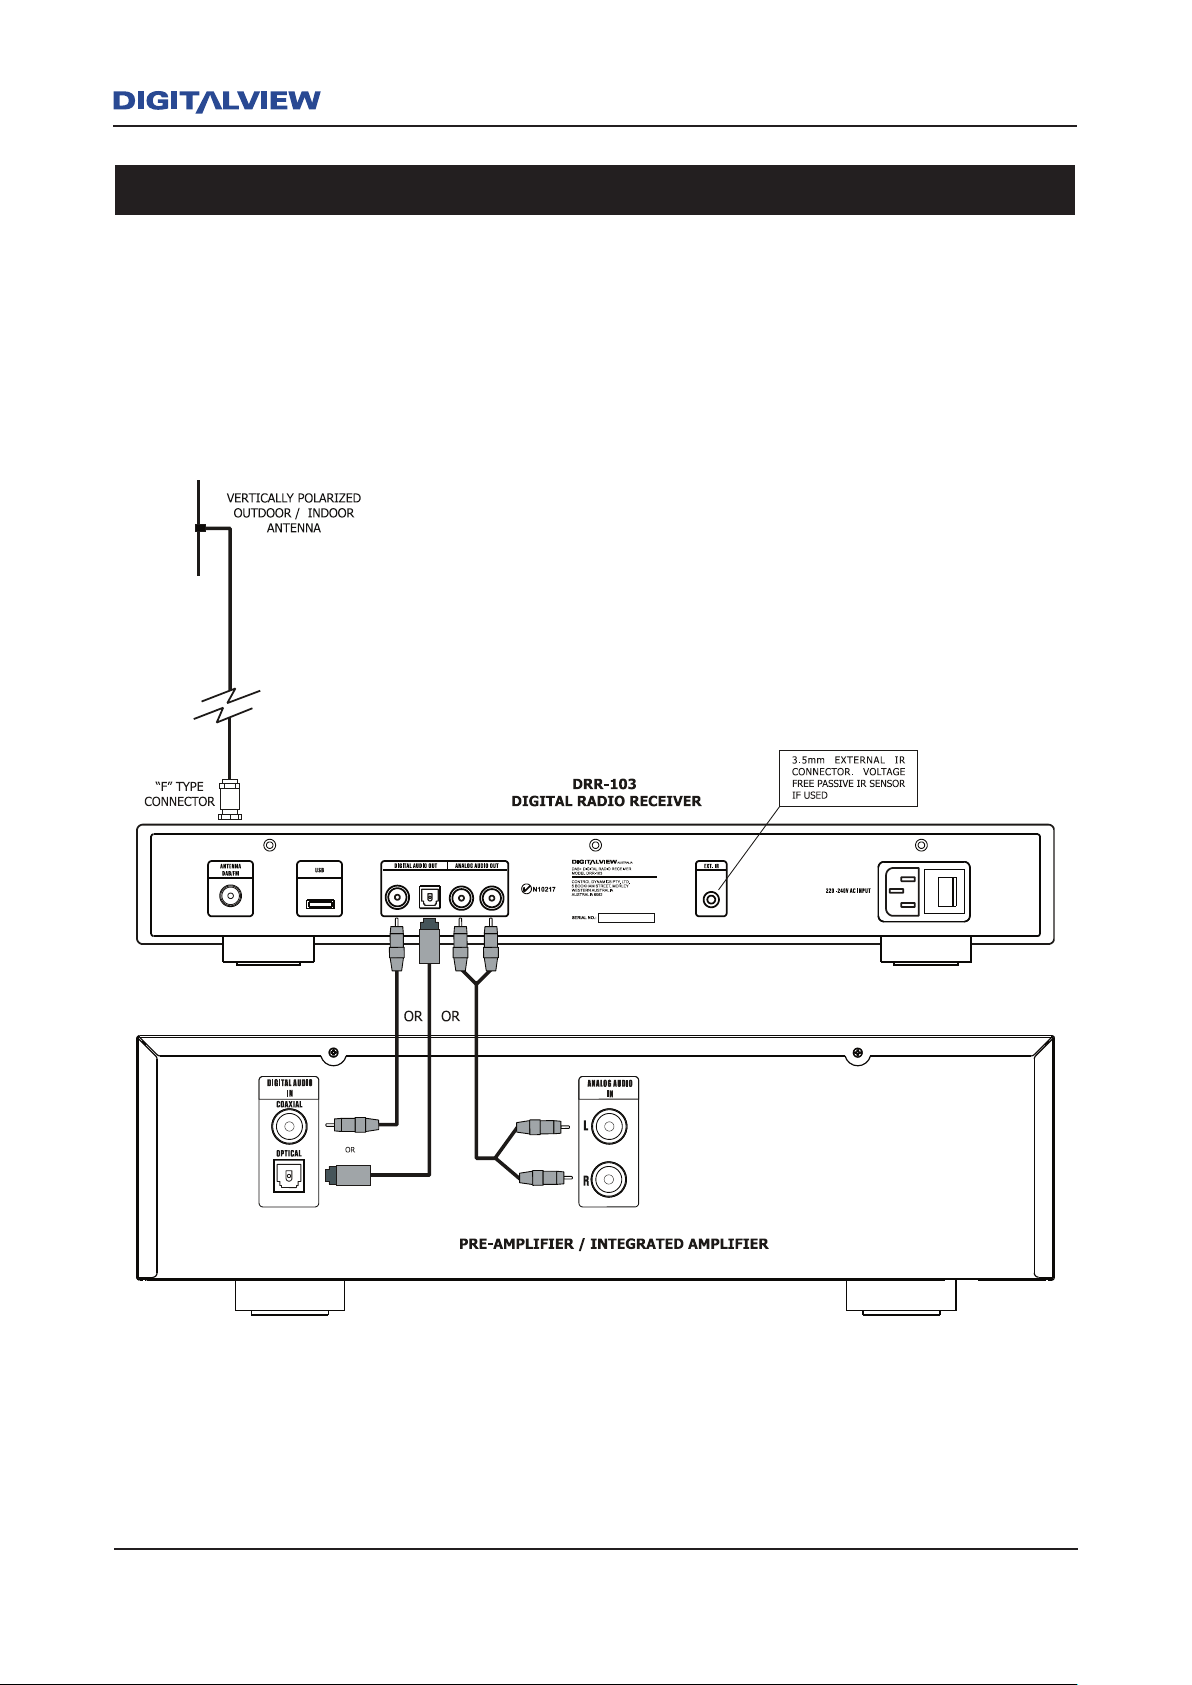
Connection using a Pre-amplifier or Integrated Amplifier
The connection diagram shows a typical pre-amplifer connected to the DRR-103. Use the digital
audio output with the provided optical (Toslink) cable or use the analog audio output with stereo RCA
cables (not supplied). Alternatively you can also use the coaxial output for digital audio. Ensure that
power to both the DRR-103 and Pre-amplifier is OFF before any connections are made.
Typical Connection Diagram Using the DRR-103
Page 14
Operation
Selection Of The Antenna
When installing your DRR-103 digital tuner, it
is important to verify the quality and physical
condition of your existing antenna. If you
are considering using your existing TV or
indoor antenna it may not be suitable for DAB
reception.
Ideally DAB requires the use of a “vertically
polarized” external antenna. This ensures
good reception quality. A competent antenna
installer can advise you on the specific antenna
requirement for both DAB and FM reception. Also
where possible, keep the DRR-103 away from
potential sources of RF noise such as computers,
televisions, etc. This will minimize the possibility
of any interruption in audio performance.
Initial Setup
It is highly recommended that reception and
equipment inter-connection utilize high quality
cabling. Also ensure that all connections are
reliably secured before turning the DRR-103 On.
Initial Tuning For DAB Reception
As a precaution, reduce the volume level on
the attached pre-amplifier/amplifier. This is to
keep the volume at a safe level and minimizes
the possibility of inadvertent high volume levels
damaging the attached speakers.
When the DRR-103 is powered ON for the first
time, it will automatically perform a “Quick Scan”
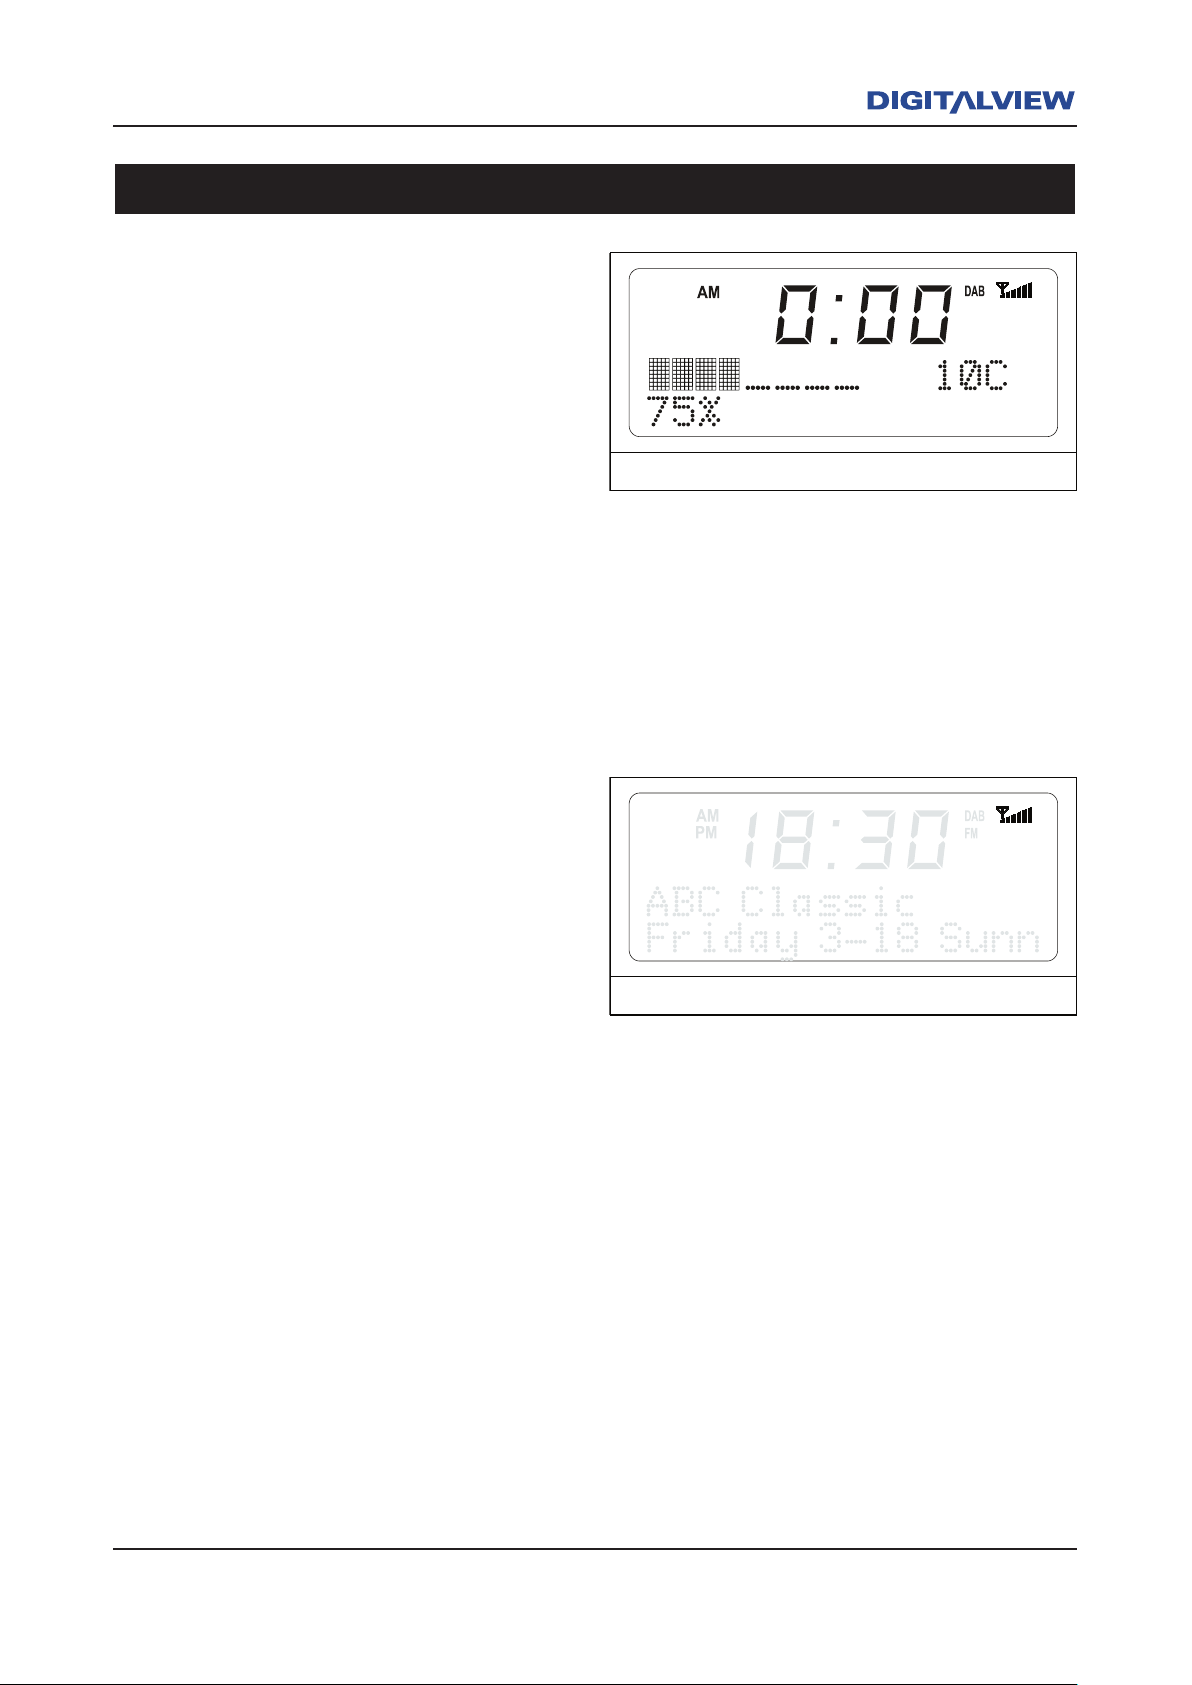
for all local Band III DAB services. A bargraph
indicator showing the tuning progress is displayed
on the front panel LCD. A DAB station list is
created and stored in alpha-numeric order. On
completion of the Quick Scan, the DRR-103 will
lock to a known DAB station. Audio for that station
should be heard.
If no stations are found, check and verify that all
wiring and connections associated with the antenna
are working and is correctly terminated.
To confirm the signal strength of a station, refer to
the six “stepped” vertical line segment indicator.
This indicator displays the relative strength of
signal being received. Maximum signal strength
is when all line segments are active.
The next consideration is that all or some of the
DAB stations be stored as Presets. Refer to the
section on Storing A Preset and Tuning to a
Station Using A Stored Preset.
Initial Tuning For FM Reception
1. Select the FM mode by pressing the BAND
button on the front panel or the DAB/FM
button on the remote control unit.
2. Press the TUNE button.
3. The DRR-103 begins to incrementally
search forward from the lowest to highest
frequency. An incremental search means
that once a valid frequency/station is found
the user must again push the TUNE button
Page 15
12 Operation
Operation 13
to search for the next valid frequency/
station.
However, before pressing the TUNE
button to search for the next incremental
frequency/station, it is recommended that
you consider setting the current station
as a PRESET. Refer to the sections on
Storing A Preset and Tuning to a
Station Using A Stored Preset.
RDS (Radio Data System Operation
RDS is digital data embedded within the analog
FM radio broadcast. This data may include Genre,
Artist, Time, Station ID, etc. When tuned to a
station containing RDS data, the DRR-103 will
automatically display the relevant information
on the front panel LCD. Note: Broadcasting RDS
data is an option that radio stations may or may
not transmit.
Presets
A Preset for the DRR-103 is defined as an individual
DAB or FM station which is stored for quick and
later recall. Presets are assigned by the user and
are recalled by way of the numeric buttons on the
remote control unit or front panel controls.
Storing A Preset (DAB)
There are two ways to store a DAB Preset using
the Remote Control Unit or front panel controls.
To store a DAB Preset using the Remote Control
Unit or Front Panel controls do the following:
1. Press the Ç or È navigation buttons to
select the station that you want to store as
a Preset.
2. Press the Å or Æ to select one of twenty
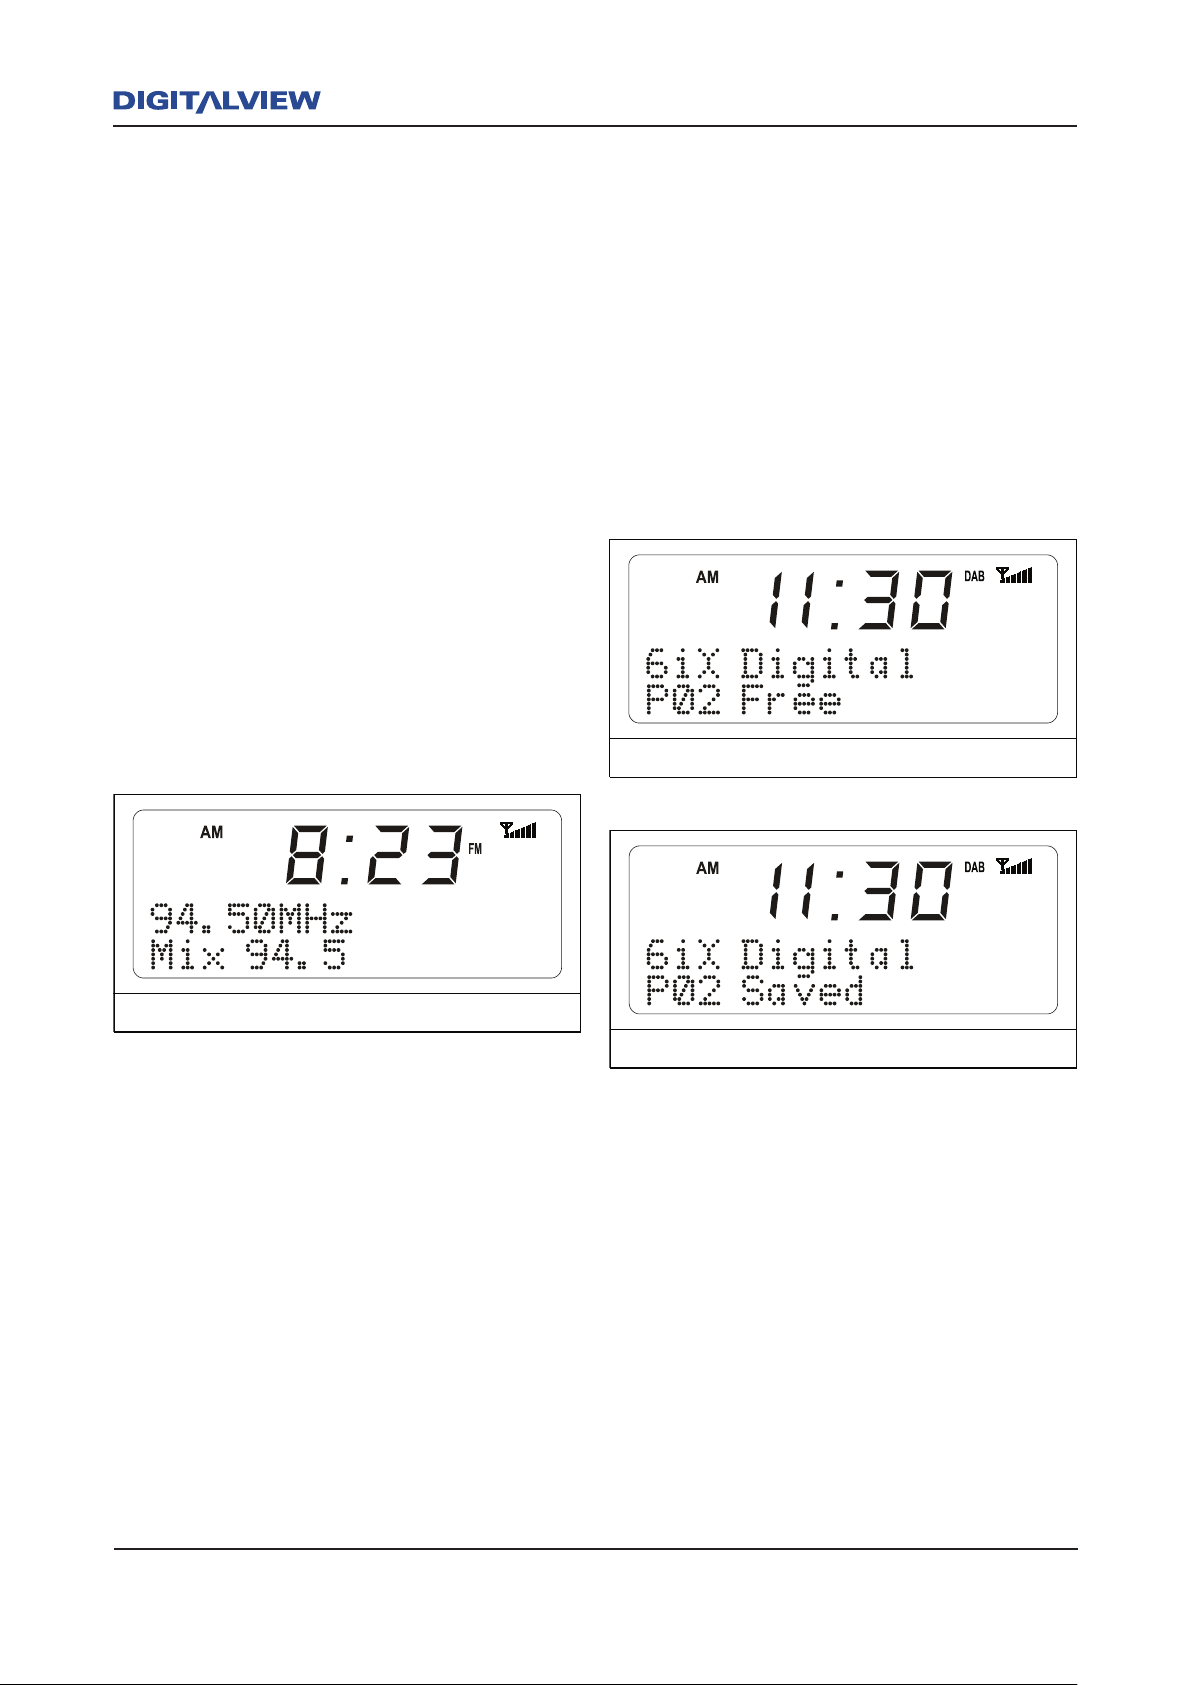
preset locations displayed. If the Preset
is not programmed, the display shows
"Pxx FREE", (xx is the Preset Number).
While the "Pxx FREE" is flashing, press the
ENTER button to store it as a Preset. The
message "Pxx SAVED" is displayed.
Use any FREE Preset to save up to one of twenty
DAB stations. If the currently selected Preset is
already allocated, but is no longer required, it can
be “overwritten” with a new Preset.
An alternative means of storing a Preset and
using the Remote Control Unit only, uses the
following method. Note that the Preset number
is not displayed before you store a Preset
1. For Preset locations between 1 and 10
– Press and hold the appropriate number
between 1 and 0 (i.e. 1,2,3,4,5,6,7,8,9 0.
0 is Preset 10). These are the first preset
group of ten locations where Presets can
be stored. For Preset Locations between
11 and 20 - Press the 10+ button to
select locations 11-20, as shown on
the front panel LCD. This is the second
preset group of ten locations where
Presets can be stored. Next, press the
Page 16

Operation 13
appropriate number between 1 and 0 (i.e.
1=11,2=12,3=13,4=14, etc.. 0 is Preset
20).
2. The LCD will display the message Pxx
Saved, once the Preset is stored, (xx is the
Preset Number).
Storing A Preset FM)
To store a FM Preset using the Remote Control
Unit or front panel controls do the following:
1. Press the TUNE button. The DRR-103 will
tune to an FM station.
2. Press the Å or Æ navigation buttons
to select a FREE Preset location. If the
currently selected Preset is already
allocated, but is no longer required, it can
be “overwritten” with a new Preset.
3. Press the Å or Æ to select one of twenty
preset locations displayed. If the Preset
is not programmed, the display shows
"Pxx FREE", (xx is the Preset Number).
While the "Pxx FREE" is flashing, press
the ENTER button to store it as a Preset.
The message "Pxx SAVED" is displayed.
If the currently selected Preset is already
allocated, but is no longer required, it can
be “overwritten” with a new Preset.
Tuning To A Station Using A Stored Preset
(DAB & FM)
You can tune to any station using a stored Preset
in either DAB or FM modes. Twenty presets are
available for each mode.
1. Press the Å or Æ buttons. This will step
through each Preset. The LCD will show
the Station ID associated with the preset
number. Alternatively, pressing and
holding the Å or Æ buttons will quickly
scroll through all Presets. Releasing the
button selects the required Preset.
2. An alternative means of selecting a Preset
by directly entering the Preset number
using the Remote Control Unit is as
follows.
3. There are two Preset Groups, 1-10 and
11-20., To select a stored Preset within
the first Preset Group (1-10), press the
required Preset number between 1 and 0
- i.e. 1,2,3,4,5,6,7,8,9 0. 0 is Preset 10.
4. To select a stored Preset within the
second Preset Group (11-20), press the
10+ button. The Preset Group 11-20 is
shown on the front panel LCD. To select a
preset between 11-20 press the required
Preset number between 1 and 0 (i.e.
1=11,2=12,3=13,4=14, etc.. 0 is Preset
20).
Tuning To A DAB Station And Not Using The
Stored Preset Function
To tune to a Station without using the stored
Preset:
1. Press the Ç or È navigation buttons on
the front panel or remote control unit.
The next valid station is then automatically
selected.
Recalling/Selecting An FM Station And Not
Using The Preset Function
1. To select an FM station and not use the
Preset function, press the TUNE button
on the front panel or remote control unit.
The next valid station is then automatically
selected.
Introduction To Live PAUSE
The DRR-103 provides an extended feature which
allows “temporary recording” of the current
program you are listening to. This is referred to
as Live PAUSE. Live PAUSE is typically used if
the listener needs or wants to defer the current
listening of a program. Once activated, Live
PAUSE then allows the user to resume listening
to the program from the time it was paused.
The maximum recording period for Live PAUSE
is four hours with the total active duration of
twelve hours. The active duration is automatically
terminated after twelve hours unless the STOP
<
button is otherwise pressed.
Page 17
14 Operation Specifications 15
Activating The Live PAUSE Mode
1. To commence Live Pause press the PAUSE
; button. Audio is muted for the duration
of the Live PAUSE period or until Live
PAUSE Playback is invoked.
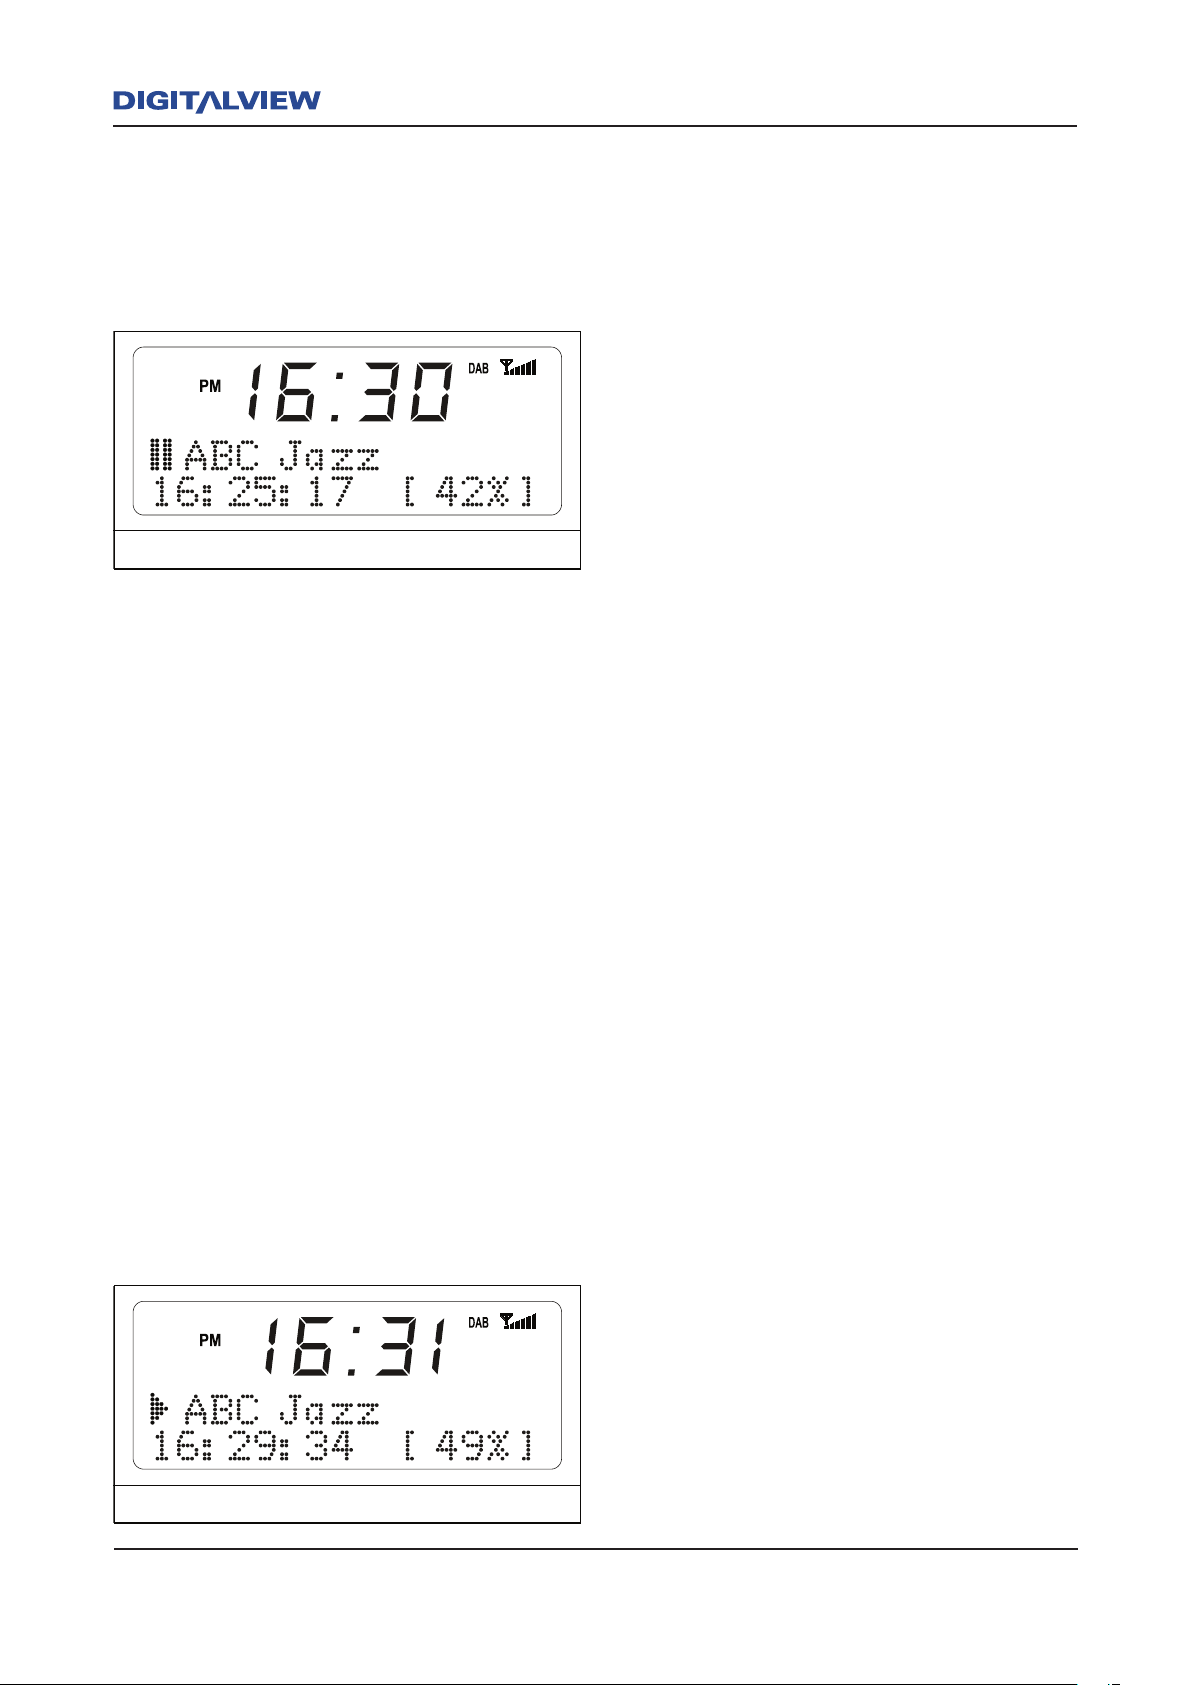
2. When Live PAUSE is activated the status
is displayed which includes the Pause
symbol, Station ID, the time Live Pause
was activated and the percentage of
recorded time.
Live Pause Playback Navigation
At any time during Live PAUSE, playback can be
initiated by pressing the PLAY4 button. Audio
is heard from where Live PAUSE was initially
activated and the real time indicator will start to
increment.
During program playback you can Fast Forward or
Rewind at twice the playback speed by continually
pressing either the 8 or 7 buttons. For minor
incremental program skipping of 30 seconds
use the 30s9 or :30s buttons. For major
incremental program skipping of 5 minutes use
the 5m9 or :5m buttons.
To end Live PAUSE press the STOP< button.
Factory Default
The Factory Default option clears all parameters
related to both DAB and FM modes, including any
programmed Presets. The DRR-103 will need to
be retuned after applying a Factory Default.
Version Number.
To display the current software Version Number for
the DRR-103, press and hold the INFO button.
Troubleshooting
Most problems associated with DAB or FM
reception are due to an inappropriate antenna
being used, RF interference, location and/or
mounting.
Intermittent, Distorted DAB Reception
If you are experiencing intermittent audio break,
total loss of audio or unintelligible audio with
DAB, this is in most cases due to weak signal
reception.
Antennas
If using a telescopic type indoor antenna make
sure that the rod elements are fully extended.
When using an indoor ribbon antenna, make sure
that both ribbon elements are fully extended. Also
it is preferred that the ribbon elements be secured
vertically to a wall or any other electrically nonconductive structure.
Where possible keep the antenna away from
any equipment that may produce unacceptable
levels of RF interference, i.e. computers, lighting
dimmers etc.
If you still can’t get good reception with an indoor
antenna, you will require an outdoor antenna. This
should ideally be mounted on the roof though it
may also be possible to get good results in the
roof cavity.
Page 18
Specication
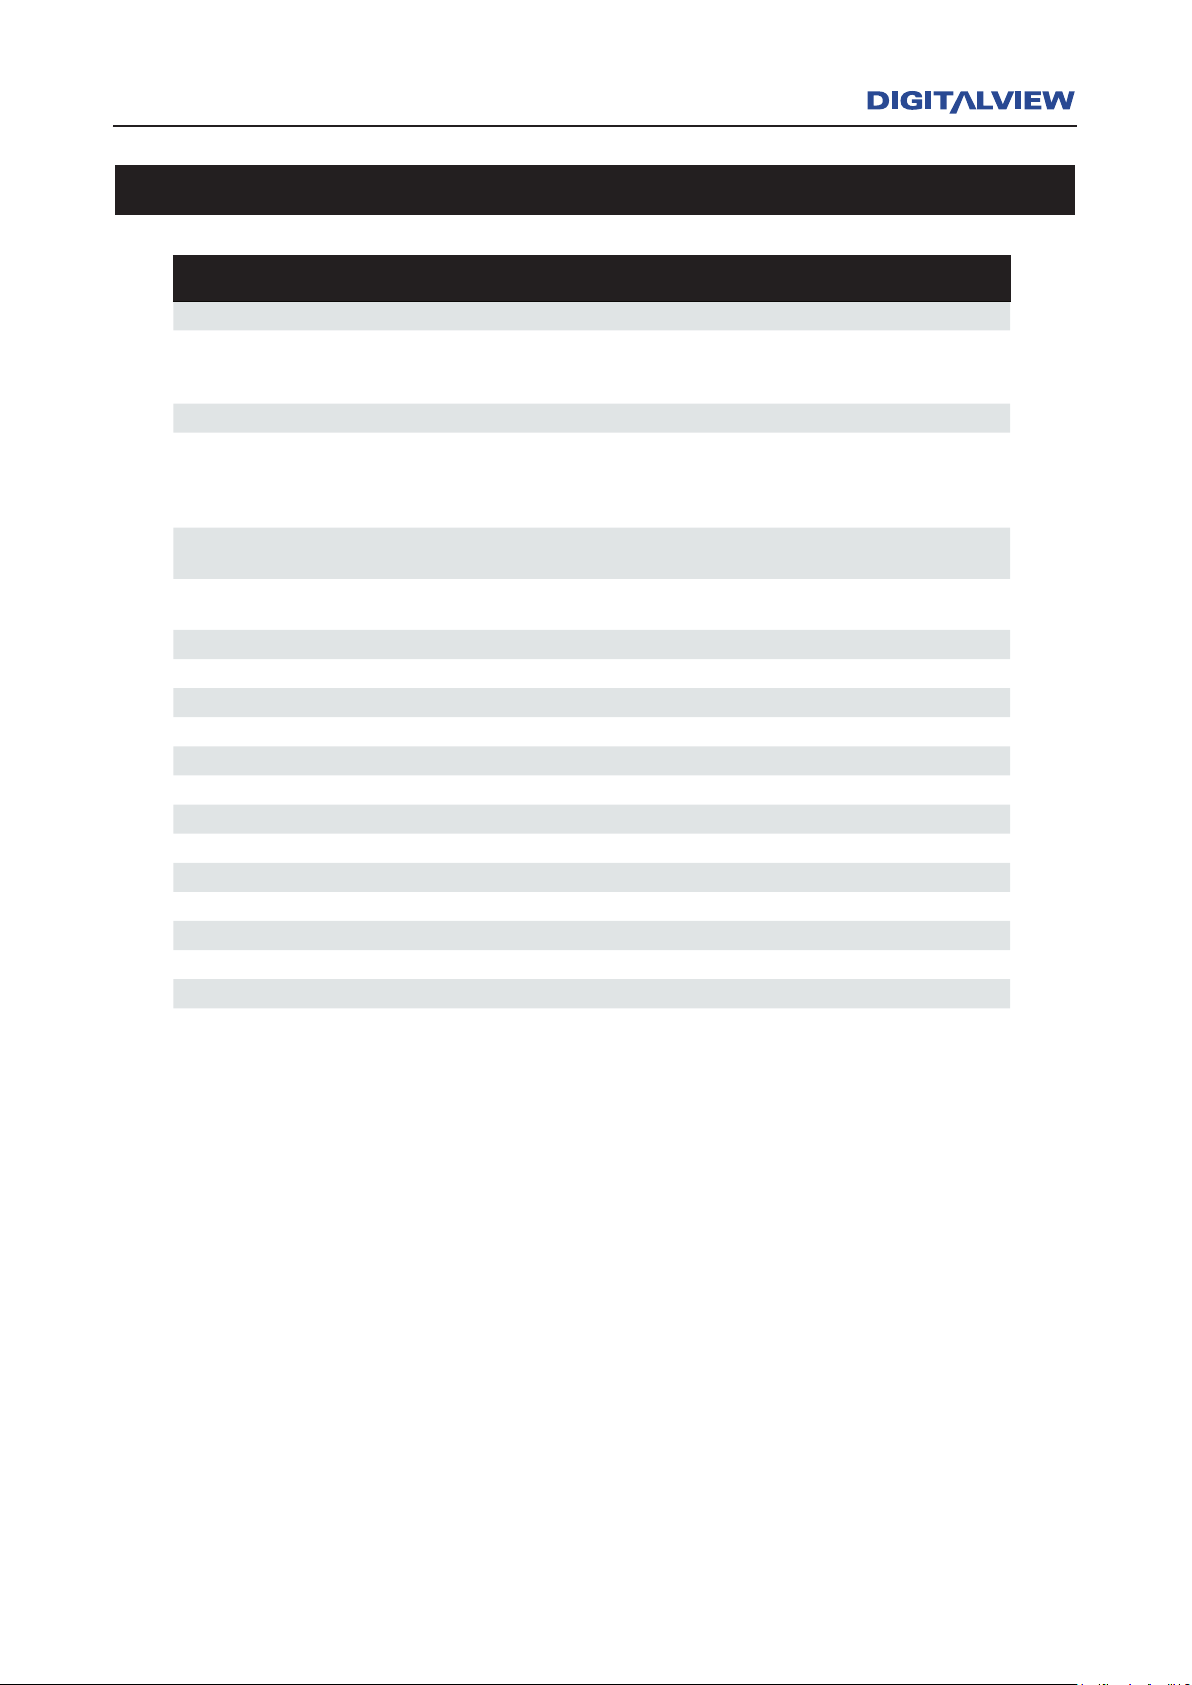
DRR-103 Specication
Type: Digital / Analog Radio Receiver (DAB+/FM)
Frequecy Range FM: 87.50MHz to 108MHz
DAB Band 3: 174.928MHz to 239.20MHz
L-Band: 1452.960MHz - 1490.624MHz
Supported Audio Formats AAC+
Frequency Response FM: Typically 20Hz - 12.5kHz @ -3db
DAB: Typically 20Hz - 20kHz and only limited by
broadcast
Analog Audio O/P: 20Hz - 20KHz
Sensitivity FM -108dbm typical
DAB and L-Band - 97dbm typical
Signal to Noise FM 50dbA typical
DAB 99dbA typical
THD Distortion (Analog Output) 0.01% typical
Signal to Noise (Analog Output) 97db typical
Antenna Input Impedance - DAB, DAB+, FM 75 ohm
Digital Audio Output/s S/PDIF - Optical and Coaxial
Analog Audio Output L & R Channels (RCA)
Pause Live Radio Duration 160 minutes playback duration for a 12 hour period.
Control Interface Discrete IR (3.5mm ring/tip socket)
Input Voltage / Frequency 180 - 265VAC / 47-60Hz
Power Consumption (max.) <5W
Power in Standby 1W
Operating Temperature 0 - 50oC / 5% -90% Non-condensing
Dimensions (max.) 430mm(W) x 207mm(D) x 66mm(H)
Warranty One Year
Page 19

Digitalview (Australia), 5 Bookham Street, Morley, Western Australia, Australia, 6062
Tel: 08-9275-9700 Fax: 08-9275-9717 www.digitalview.com.au
Digitalview is a business unit of Control Dynamics Pty. Ltd www. controldynamics.com.au.
Pub. CDHG22805.V1.1
 Loading...