

DIGITAL UNDERDOG DW-BJCUBE2T-LX, DW-BJCUBE6T-LX, DW-BJCUBE4T-LX, DW-BJCUBE9T-LX, DW-BJCUBE12T-LX Quick Start Manual
...Page 1
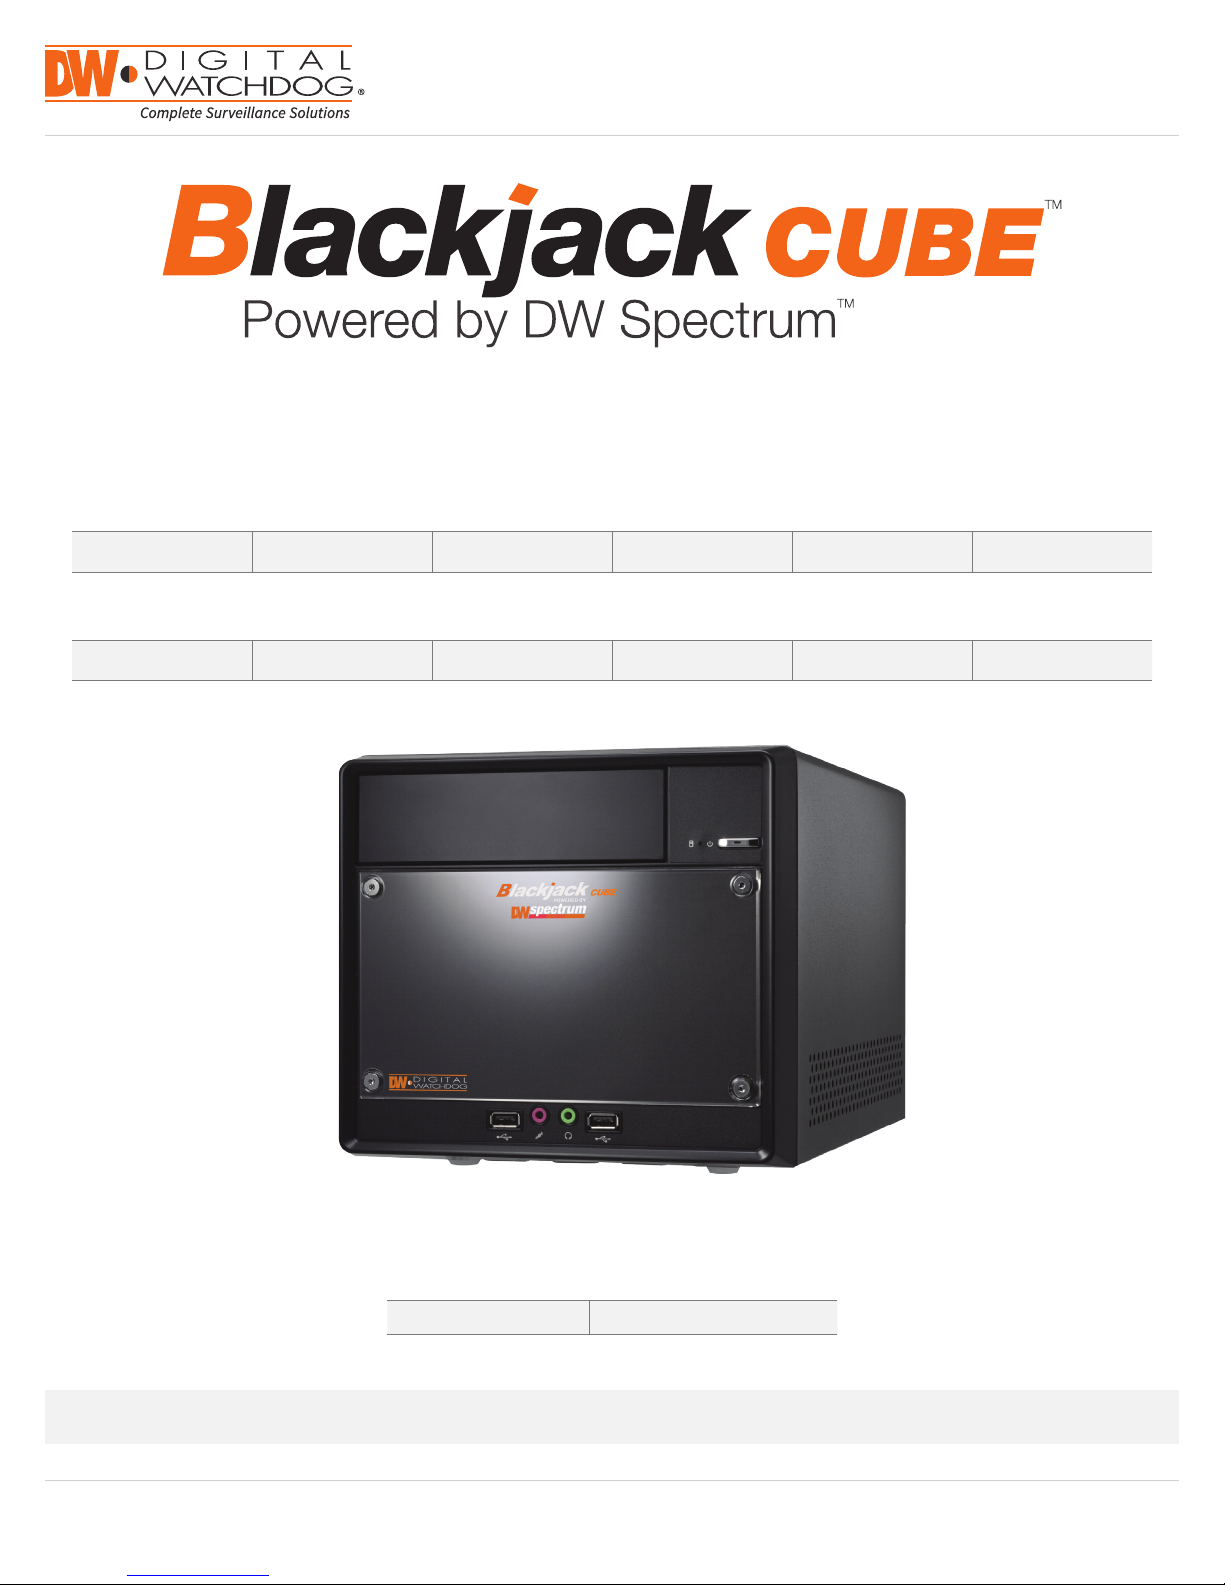
Quick Start Guide
State of the art hyper-optimized video management platform designed for ease, speed and efciency.
™
Blackjack
DW-BJCUBE2T-LX DW-BJCUBE4T-LX DW-BJCUBE6T-LX DW-BJCUBE9T-LX DW-BJCUBE12T-LX DW-BJCUBE18T-LX
DW-BJCUBE3T DW-BJCUBE4T DW-BJCUBE6T DW-BJCUBE9T DW-BJCUBE12T DW-BJCUBE18T
Cube — Up to 16 (Cube-LX) and 64 (Cube) 2.1MP Cameras (1080p True HD Resolution)
Blackjack Cube-LX
Blackjack Cube
Attention: This document is intended to serve as a quick reference page for initial set-up. See the DW Spectrum full manual for more information on features and functionality.
Tel: 866-446 -3595 / 813-88 8-9555
Technical Support Hours: 9:00AM – 8:00PM EST, Monday thru Friday
Blackjack Cube-LX
Blackjack Cube
Username: admin Password: admin
digital-watchdog.com
Page 2
BLACKJACK CUBE HARDWARE
F3
Front
F1 F2
Back
B5
B9
B12
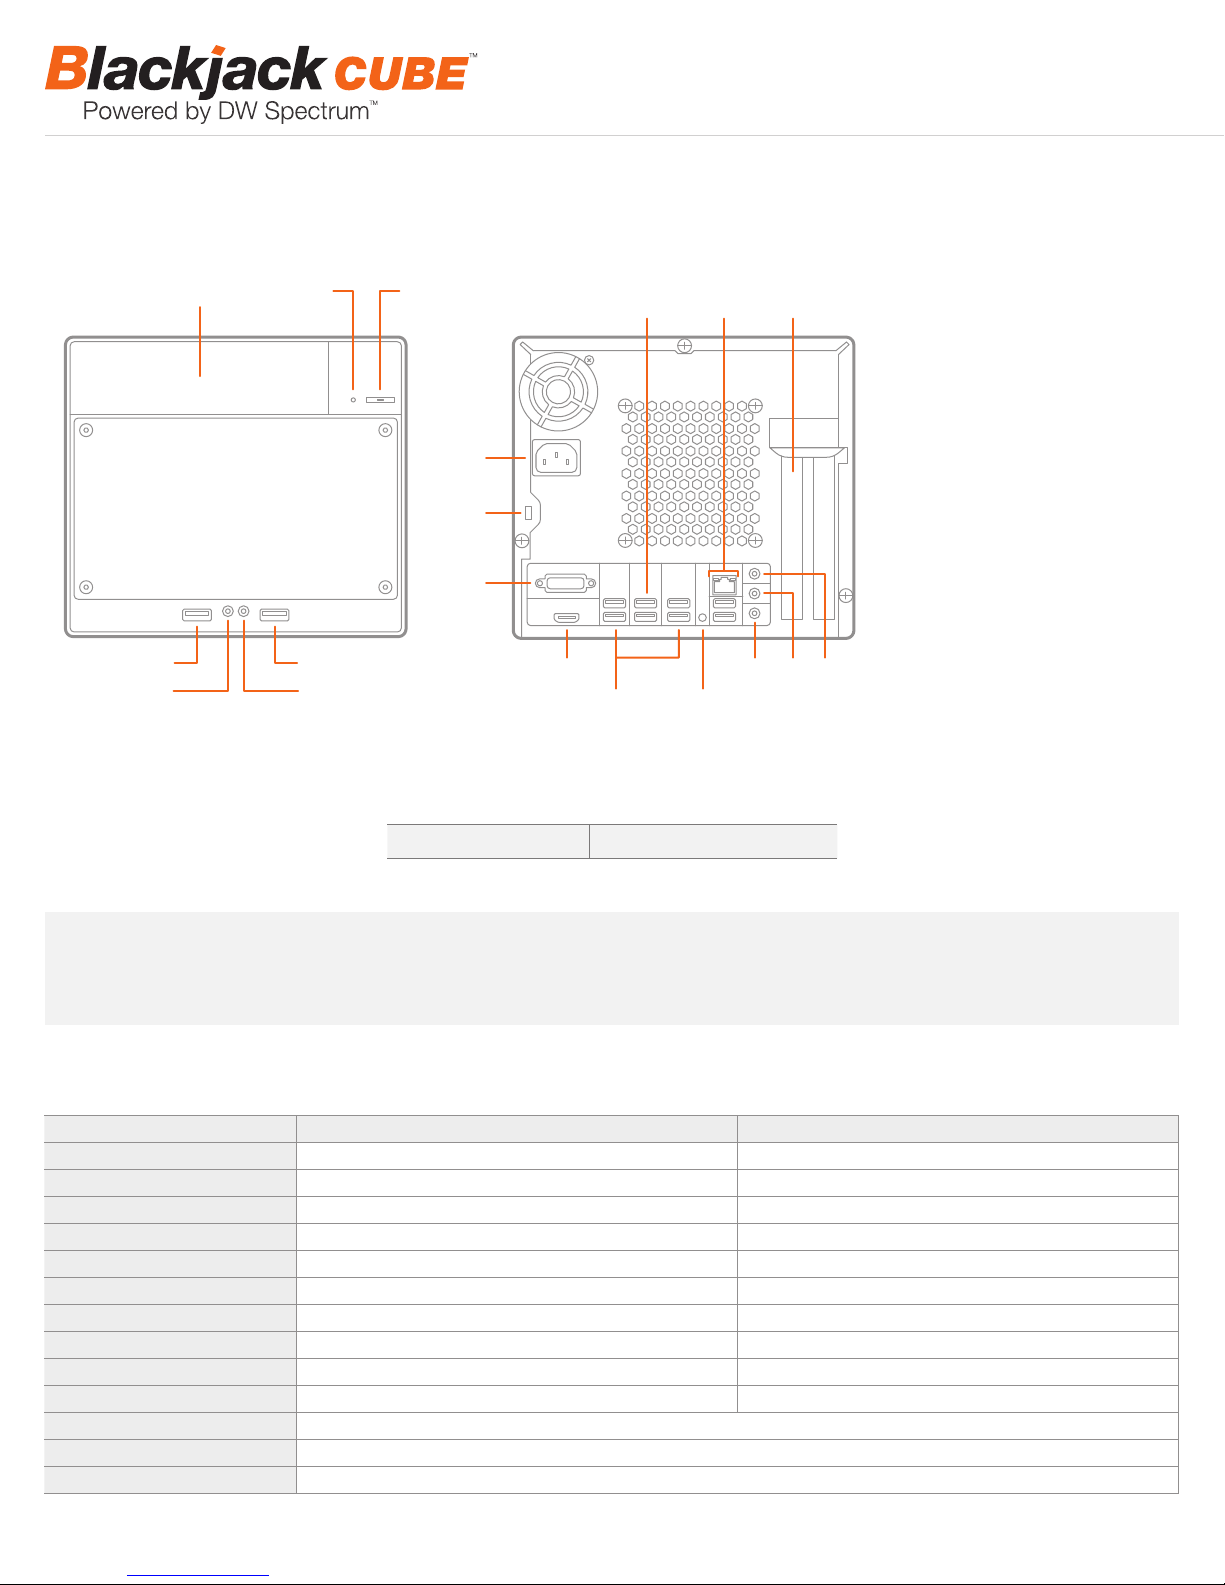
F1 HDD LED
F2 Power Button / Power LED
F3 5.25" Bay
F4 USB 2.0 Port
F5 Microphone Jack
F6 Headphone Jack
F7 USB 2.0 Port
B1
B1 AC Power Socket
B2 Kensington Lock
B2
B3 DVI-I Output
B4 HDMI HD Output
B5 USB 3.0 Ports
B6 Microphone Jack
B3
B7 Line-Out Jack
B8 Line-In Jack
B9 WAN & USB 2.0 Ports
(Onboard LAN –
F4
F5
F7
F6
B11
B10
B7B4 B6
B8
B10 Clear CMOS Button
recommended for internet
connection use)
B11 USB 2.0 Ports
B12 LAN (Second Card –
recommended for camera
connection use)
Default Login Information
Username: admin Password: admin
WARNING For an optimal system conguration, it is recommended that a UPS (Uninterruptable power Supply) be used to power the setup.
Dual monitors are not recommended due to CPU performance. To connect two monitors to the Cube, go to the display setup to
activate the second monitor.
SPECIFICATIONS CUBE
Linux Model Windows Model
®
Operating System Linux
IP Cameras Max 16 IP Cameras Max 64 IP Cameras
Max Throughput 80Mbps 360Mbps
Recording Speed 1080p: 480fps 1080p: 1920fps
Screen Mode Unlimited Layouts Unlimited Layouts
Max. HDD Bays 3x SATA HDDs 3x SATA HDDs
Video Out DVI-I, HDMI DVI-I, HDMI
Recording Resolution 1080p 1080p
CPU Intel
Memory 4GB 8GB
LAN 2x Gigabit Ethernet (RJ45)
Power 100VAC: 250W, 2.5 Amps
Dimensions 325mm L x 216mm W x 190mm H
2
Ubuntu® 14.04 Windows® 7 64 Bit
®
i3® Processor Intel® i5® Processor
Page 3
SETTING UP THE CUBE
Windows 7
STEP 1: When setting up the Blackjack Cube, make sure the following are in the box:
•
Cube Server
•
Recovery CD
•
Quick Start Guide
NOTE Monitor, keyboard & mouse are not included.
STEP 2: 1. Connect a monitor, USB mouse, and network cables (not included).
2. Connect the server to an appropriate power supply.
3. In the server’s login screen, enter username and password (admin | admin).
STEP 3: Desktop View
The server’s Network Setup Window and DW Spectrum
To relaunch, double click on each of the desktop icons.
•
Power Cable
•
Accessory CD (Including Manual)
™
software will launch automatically when the server boots up.
Quick Start Guide
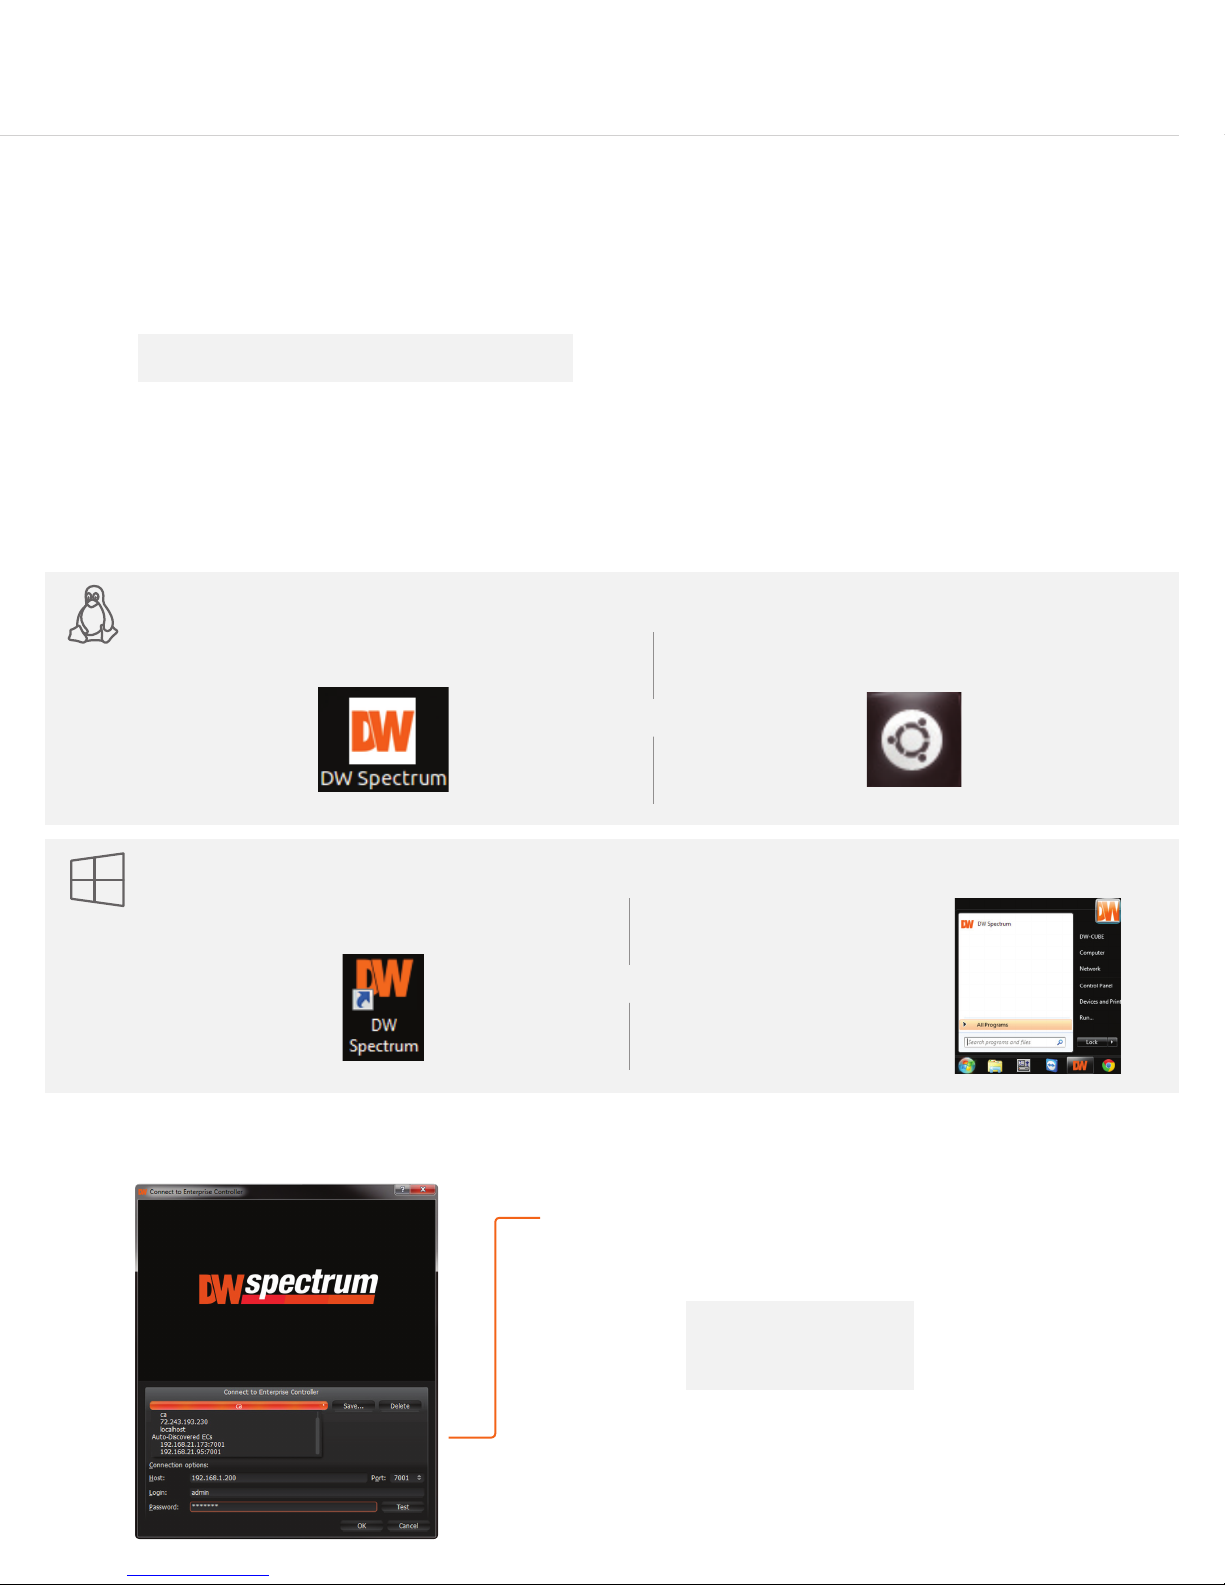
LINUX-BASED SOFTWARE MANUAL LAUNCH To launch the DW Spectrum
OPTION 1: Double-click the DW Spectrum
Linux OS
WINDOWS-BASED SOFTWARE MANUAL LAUNCH To launch the DW Spectrum
OPTION 1: Double-click the DW Spectrum™ desktop icon. OPTION 2: Go to ‘Start’ on
Windows 7
STEP 4: Logging to Server
™
desktop icon. OPTION 2: Go to the dashboard on the top left side.
(Onboard LAN –
recommend for Internet
connection use)
OR
™
Software on the Linux-Based Cube:
Search ‘DW’. Click the DW icon.
OR
the bottom left and select DW
Spectrum
Menu.
™
from the Start
™
Software on the Windows-Based Cube:
The DW Spectrum™ client will automatically load the local server’s credentials
in the host information. Enter the server’s username and password. By default,
the server’s credentials are:
Server IP : 127.0.0.1
USER : admin
PW : admin
After logging in, all supported cameras on the network will automatically
populate in the client’s Display Tree.
3
Page 4
STEP 5: Network Conguration - Linux System
Windows 7
The Cube’s Network Setup window will open automatically upon
Linux OS
boot up.
NOTE The Blackjack Cube’s network settings are set by default to DHCP.
To change the server’s network settings to Static IP, follow the instructions below.
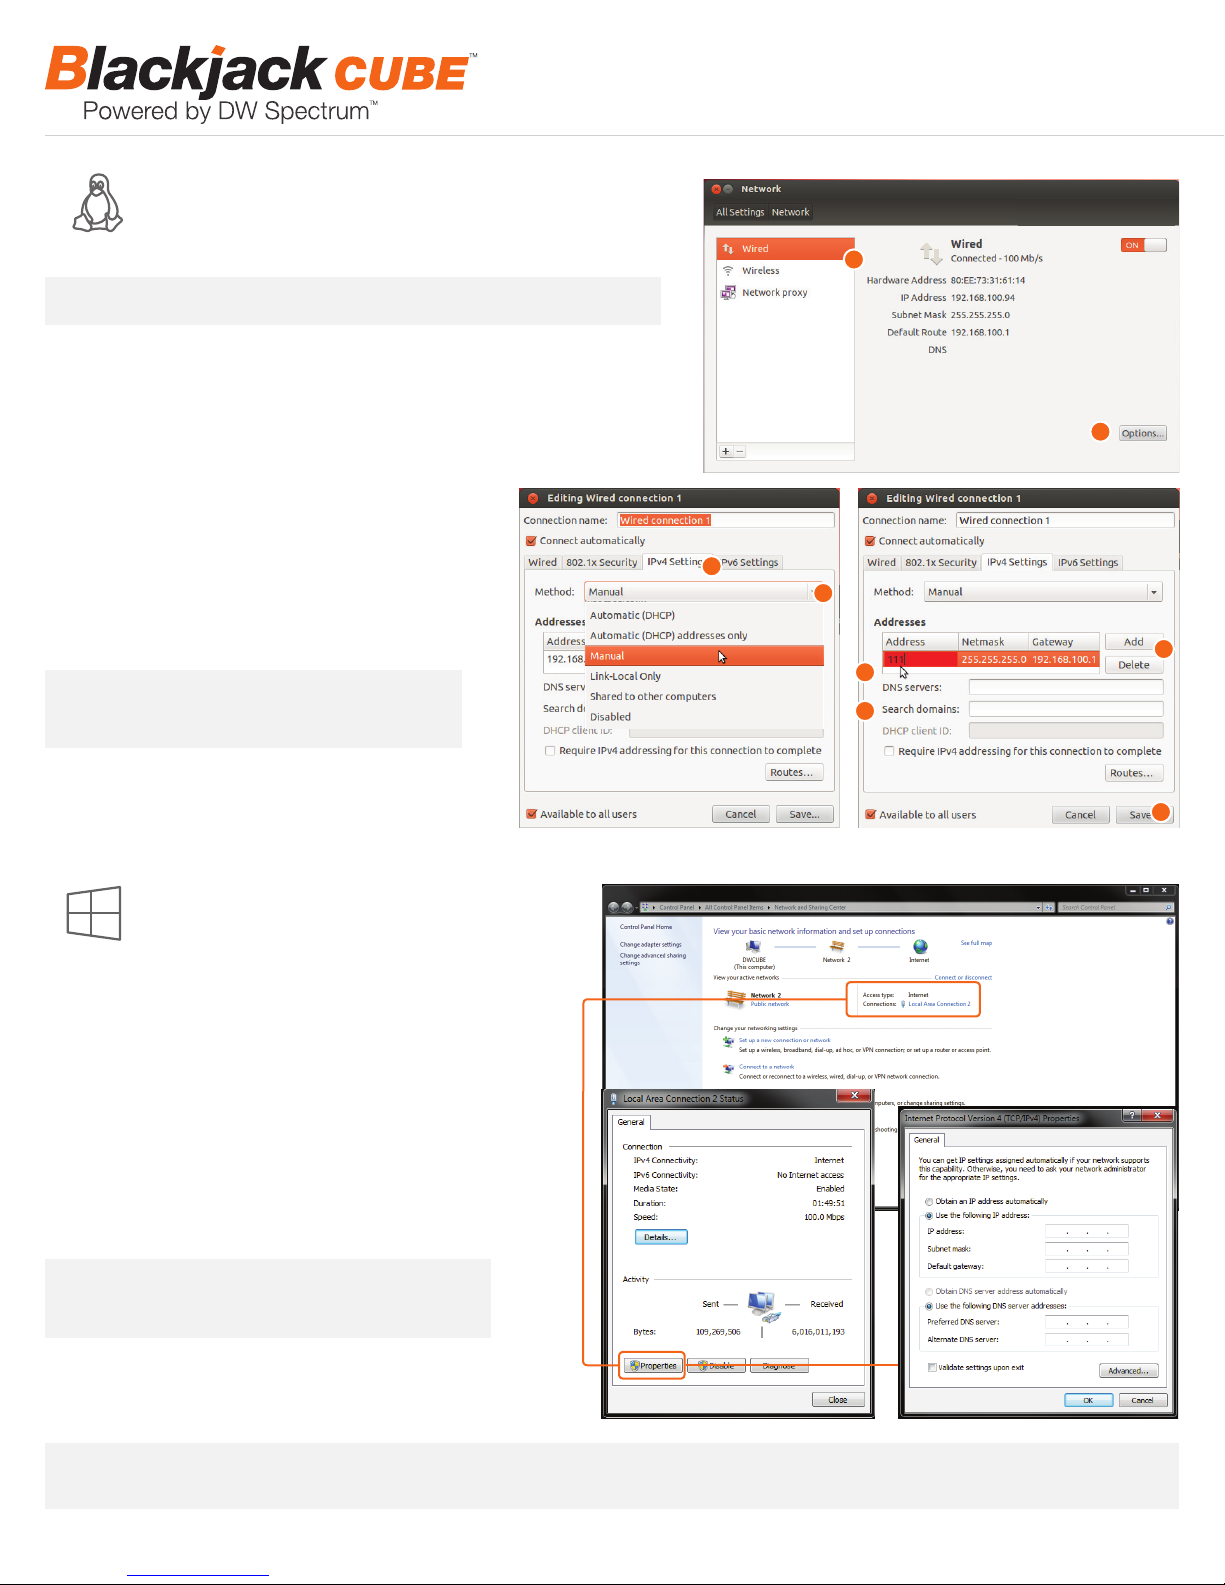
1. Go to Network Settings from the desktop button.
2. Select ‘Wired’ from the list and click ‘Options’ at the bottom of the window.
3. Click on the ‘IPv4 Settings’ tab.
4. From the drop-down menu, select connection type: DHCP or Manual (static).
5. If ‘Manual’ is selected, click ‘Add’ next to Addresses.
6. Enter IP Address, Netmask, and Gateway according to
network requirements.
Contact your network administrator for more
information.
7. Add a DNS server address.
8. Click ‘Save’ to save the settings or ‘Cancel’ to return
to the Network setup page.
NOTE Contact your Network Administrator and
ISP for proper setup.
1
2
3
4
5
6
7
9. In the Network Settings main page, make sure the
Wired Status is marked as “Connected”.
STEP 5: Network Conguration - Windows
System
Windows 7
The Cube supports dual network cards so you
may setup one for external connection and one for
internal connection to the cameras to balance the bandwidth. To
change the server’s network settings to static:
1. Go to ‘Start’ and select ‘Network’ from the Windows Start
menu.
2. All connected network cards will appear in this page.
3. Click Local Area Connection and select ‘Properties’ from the
new popup window.
4. Double-Click the ‘Internet Protocol Version 4’ option.
5. Check the box next to ‘Use the following IP address’
6. Enter the new IP Address, Netmask, and Gateway according
to network requirements.
NOTE Contact your Network Administrator and ISP
for proper setup.
8
7. Add a DNS server address.
8. Click ‘OK’ to save the settings or ‘Cancel’ to return to the
Network setup page.
NOTE If you are not connecting to the Blackjack™ from within the same network, you may be required to perform port forwarding on your router
to access the server. Contact your Network Administrator or Installer for additional information.
4
Page 5
Quick Start Guide
Windows 7
UPGRADING THE DW SPECTRUM IPVMS SOFTWARE ON
Linux OS
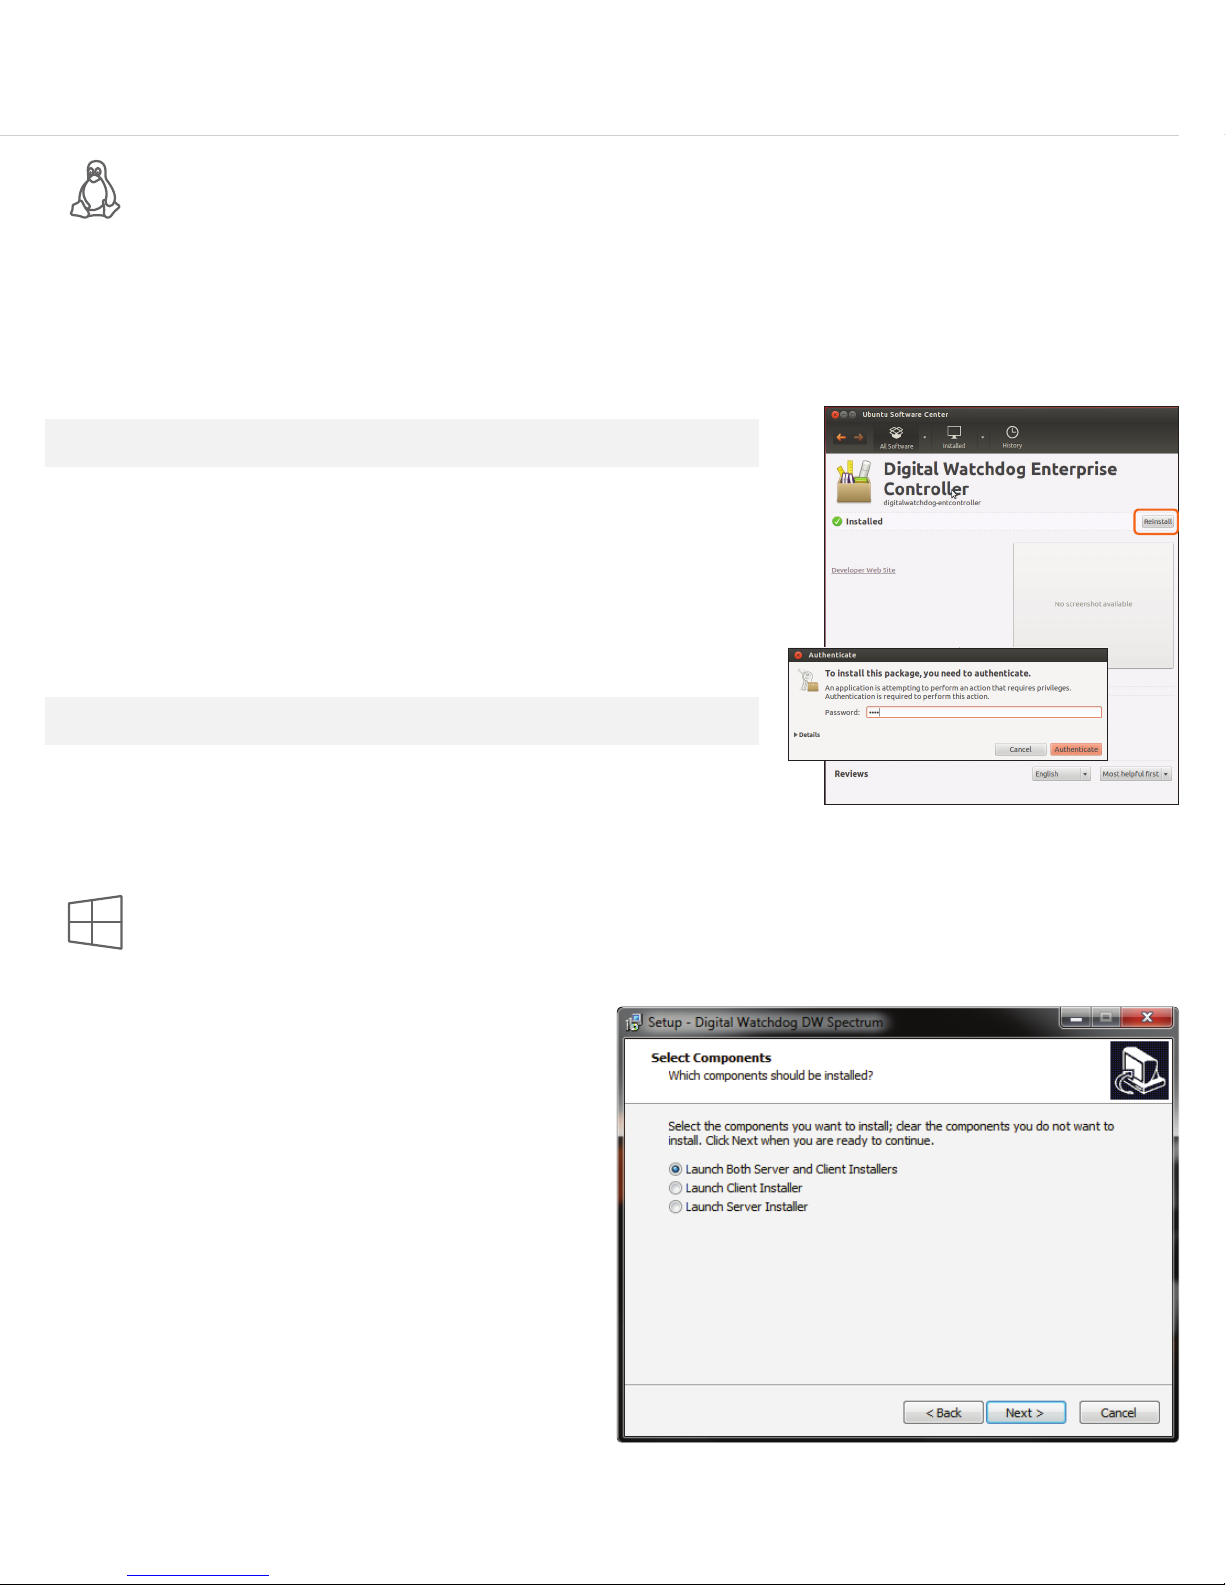
When installing or upgrading the DW Spectrum™ software, each component of the software must be installed separately.
To download the software, go to www.digital-watchdog.com, and search for ‘DW Spectrum’ to access the product page, documentation and
software downloads.
To install the software:
NOTE Internet connection is necessary to complete the software installation properly.
1. Right-click the installation le and select “Run using Ubuntu Software Center”.
2. Enter the admin password (Default: admin).
3. Enter the following information as requested:
•
Server Address: Enter ‘localhost’ to use the current server’s IP address.
•
Username & Password: Username and password for the server. Default: admin / admin.
•
Port: Main port associated with the server. Default port: 7001.
4. Repeat for all other software components.
LINUX CUBE MODELS
(Onboard LAN –
recommend for Internet
connection use)
NOTE When the upgrade process is complete, it is recommended to restart the server.
UPGRADING THE DW SPECTRUM IPVMS SOFTWARE ON
Windows 7
To install the DW Spectrum
1. Go to www.digital-watchdog.com and download the latest
software version.
2. Double-click on the installation le to run the installation wizard.
3. Select the installation option:
a. Launch Both Server and Client Installers.
b. Launch Client Installer only.
c. Launch Server Installer only.
4. Follow the installation wizard’s instructions to complete the
installation.
WINDOWS CUBE MODELS
™
full software package:
5
Page 6
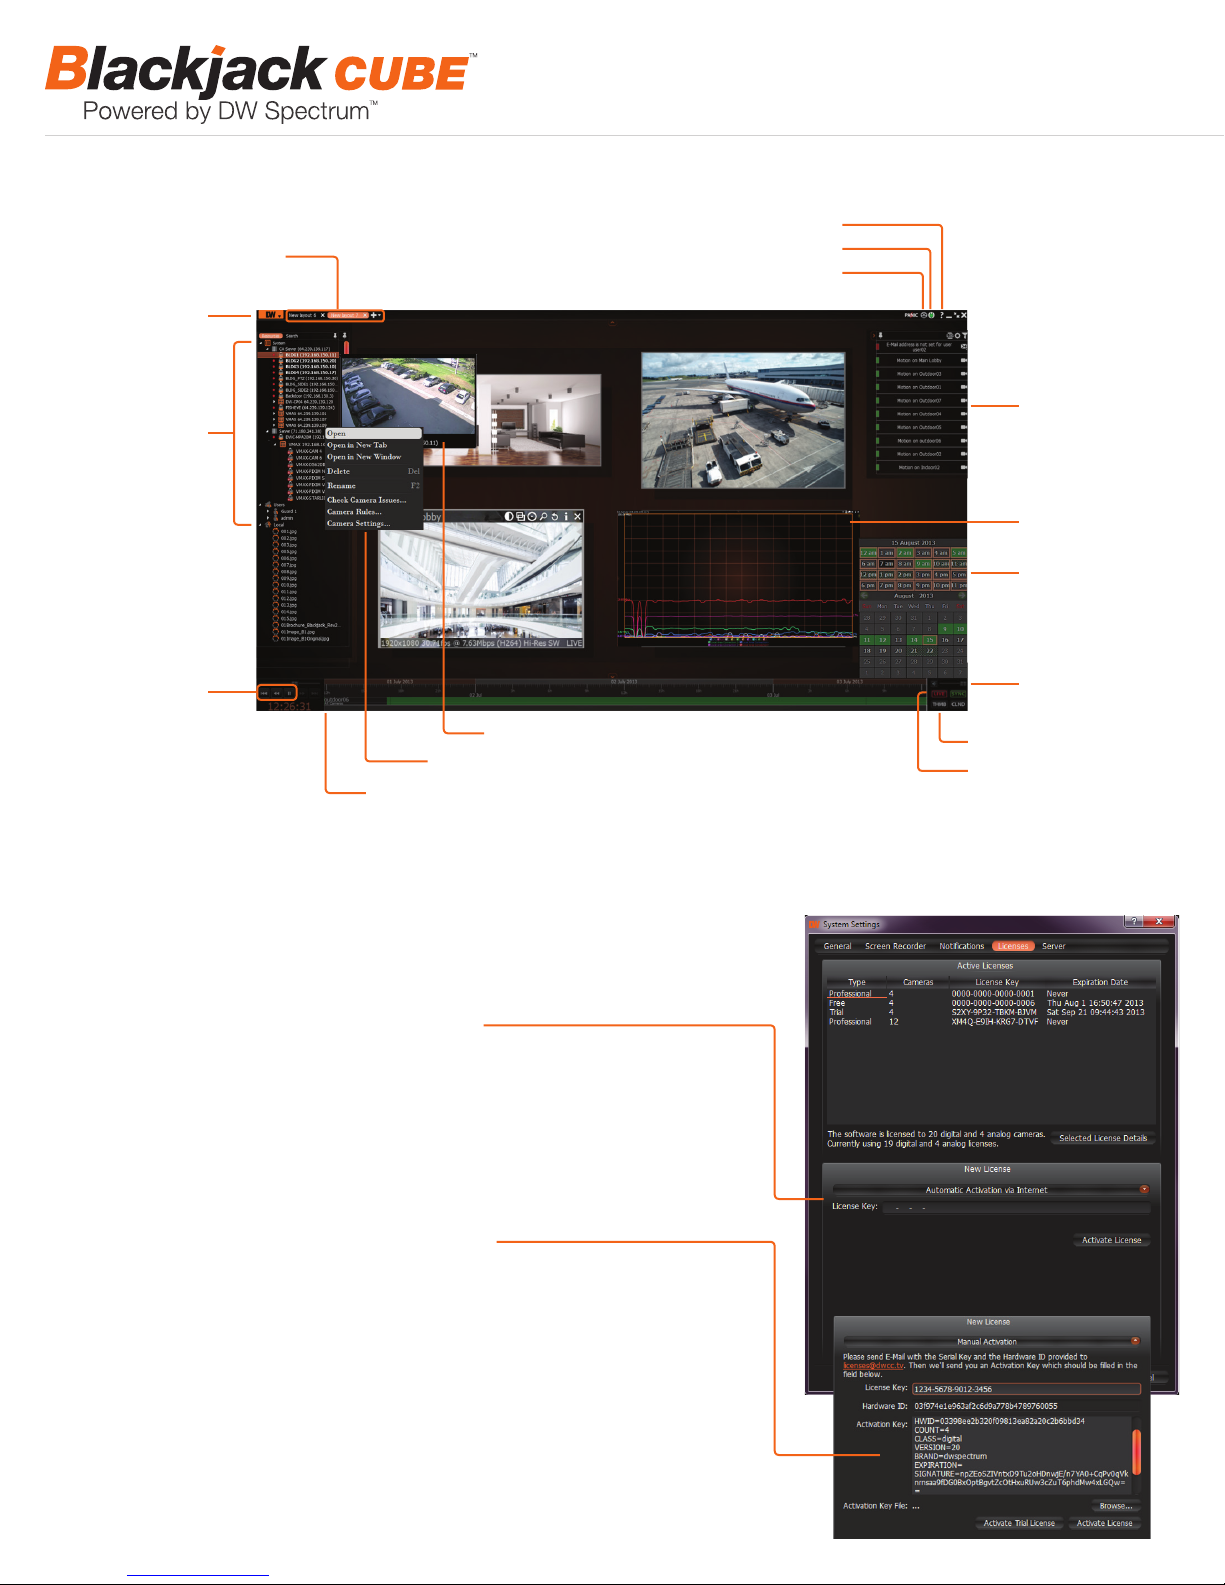
USER INTERFACE OVERVIEW
Layout Management
Main Menu Button
Server / Camera
Display Tree
Help Menu
Login to Server
Screen Recording Controls
Popup Notications
Server Health
Monitoring
Calendar Search
Playback Controls
Camera Popup Preview
Camera Options
Time Navigation Bar Zoom
LICENSE REGISTRATION
The Blackjack Servers come with complimentary eight (8) recording licenses. In addition,
any licenses purchased with the hardware will be found at the bottom of the Server’s
hardware, as a sixteen- digit code that needs to be activated.
OP TION 1: If your server has internet access—
1. Go to DW Menu Button > System Administrator > Licenses.
2. Select ‘Automatic Activation via Internet’ from the drop-down options.
3. Input your sixteen-digit license key.
4. Press ‘Activate License’. The system will notify you if the activation was successful.
5. If your licenses have been registered successfully, they will appear under the Active
Licenses table.
OPTION 2: If you do NOT have internet access—
1. Go to DW Menu Button > System Administrator > Licenses.
2. Select ‘Manual Activation’ from the drop-down options.
3. Copy your hardware ID. This information will be lled out automatically by your server.
to 48 hours for Digital Watchdog to reply.
5. Once provided with an Activation Key, Enter this information without altering it in the
Activation Key space and press ‘Activate Licenses’.
Audio Controls
Thumbnail Toggle Button
Live / Playback
6
Page 7
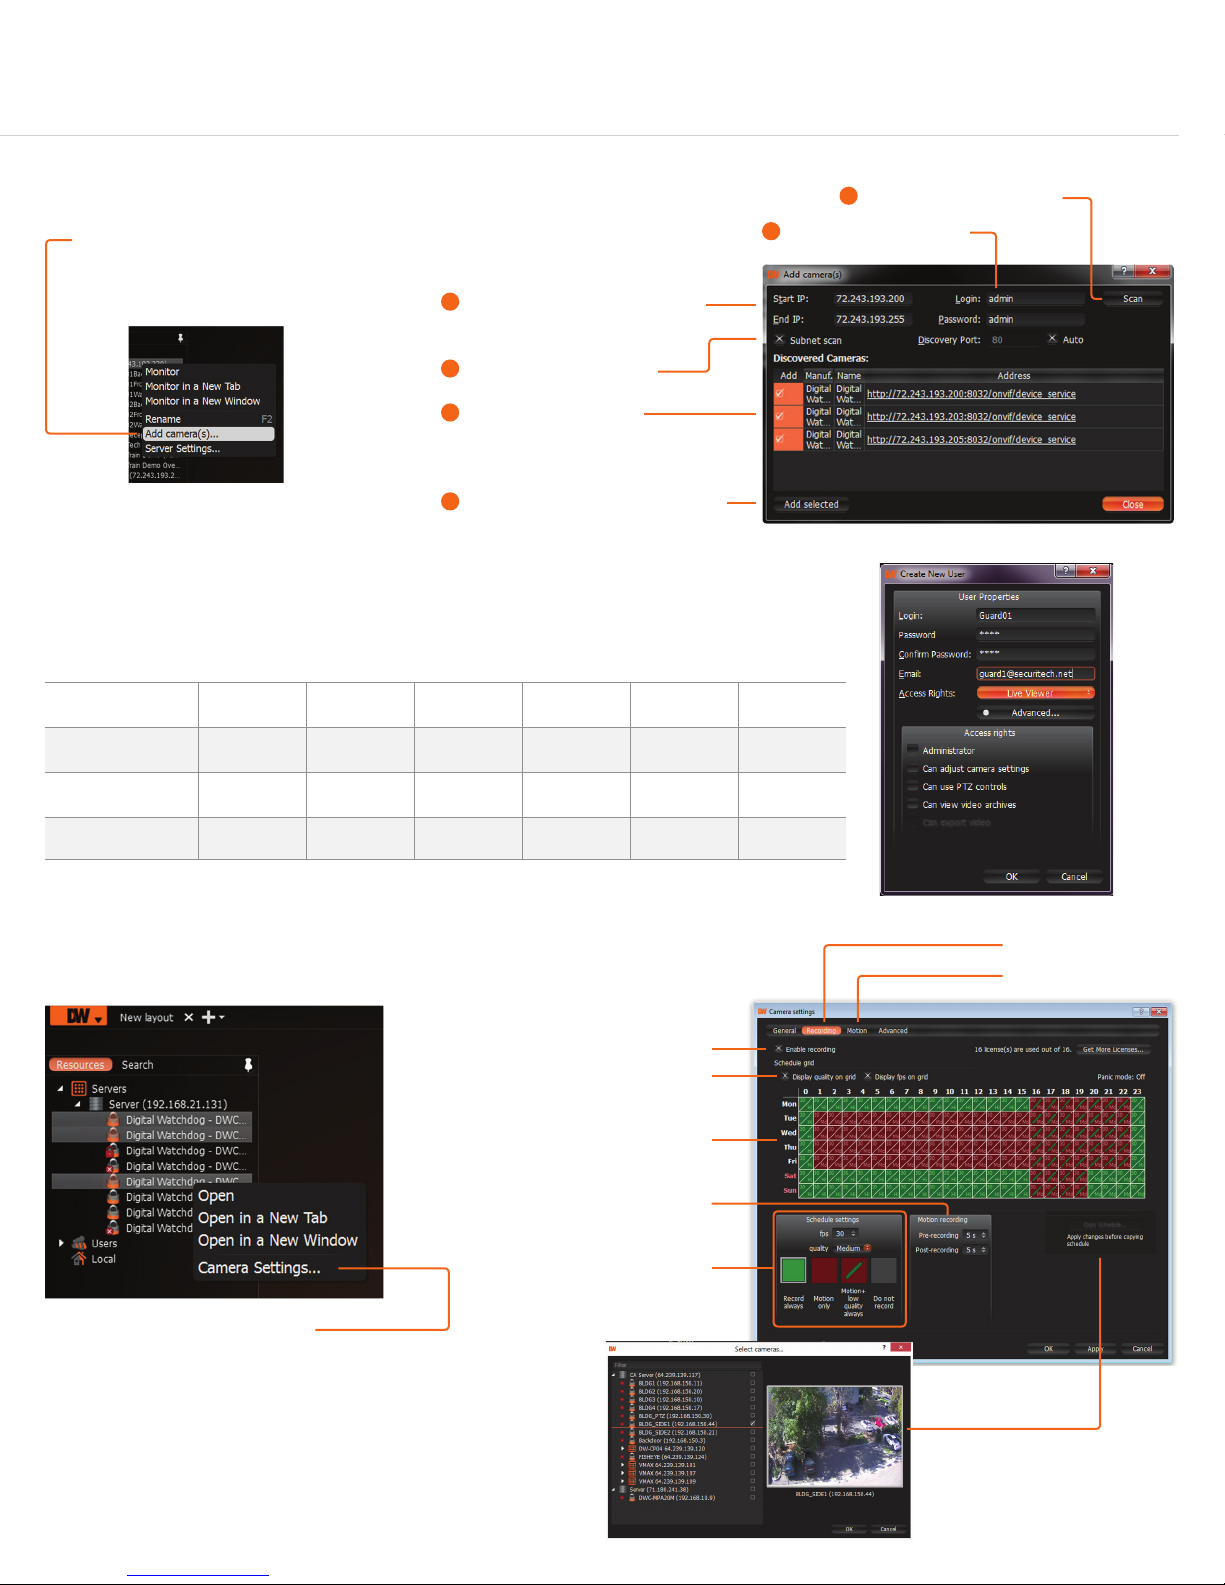
MANUALLY ADDING CAMERAS
Cameras can also be manually added
by right-clicking on the server icon and
choosing the ‘Add camera(s)’ option
USER ACCOUNTS
1
Enter the camera’s IP address,
URL, or RTSP information
2
Check to select a range
5
Cameras will populate
the list automatically
6
Click to add all selected cameras
4
Click on the Scan button
3
Enter log-in information
Quick Start Guide
ADMIN
Administrator • • • • • •
Advanced • • • • •
Viewer • • •
Live Viewer •
CAMERA
SETTINGS
PTZ
CONTROLS
VIDEO
ARCHIVES
EXPORT
VIDEO
RECORDING SCHEDULE
Enable Cameras to Record
Select All
Click & Drag
Pre & Post Recording
(3 is recommended)
VIEW
LIVE VIDEO
Recording Menu
Motion Menu
Select cameras and go to
“Camera Settings”
Recording Type
Copy Recording Settings
to multiple cameras
7
Page 8
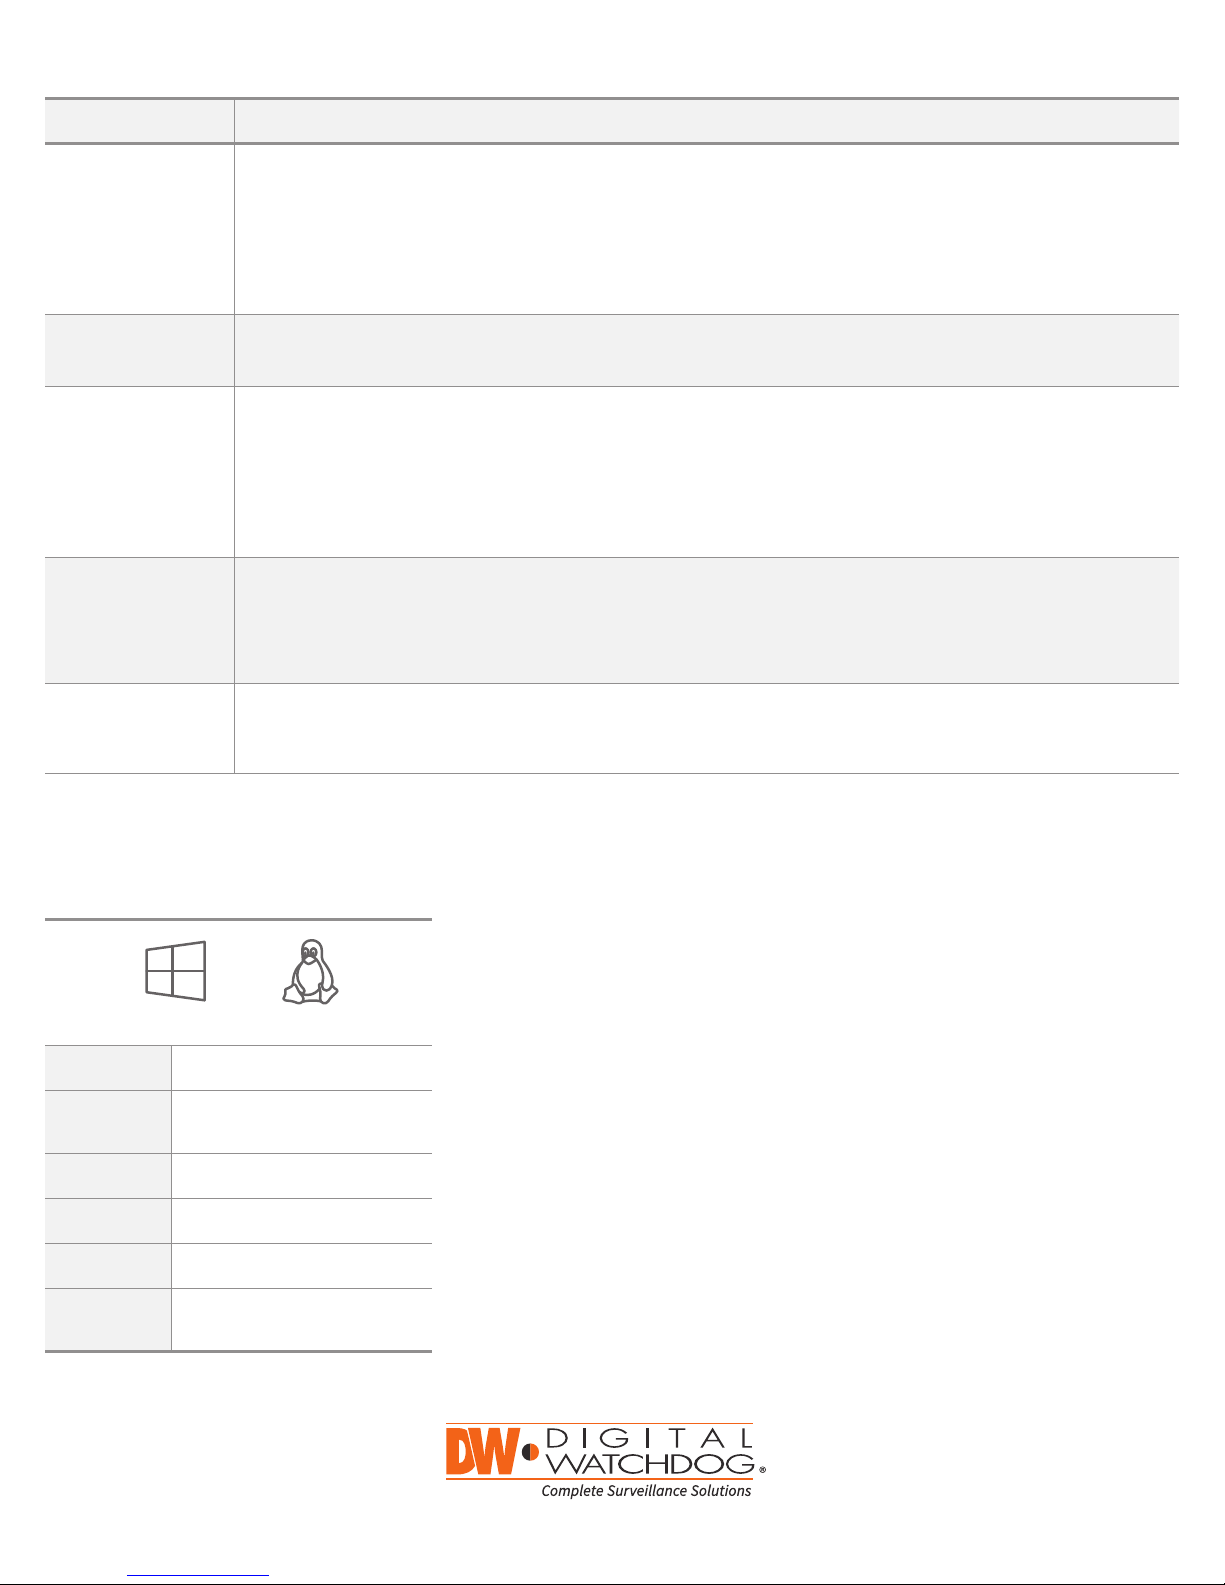
TROUBLESHOOTING TIPS
Windows 7
Problem Possible Solutions
My camera does not
auto-discover
Videos are slow 1. Are you accessing the same cameras from multiple clients? (LAN & WAN)
My camera appears
disconnected
I can’t get playback
video from my camera
I get an ‘unauthorized’
message on my
camera
1. Is the camera in the same LAN network as the Media Server?
2. Is your camera compatible with DW Spectrum? (Refer to our website for full list of supported cameras.)
3. Is the camera updated to its latest rmware?
4. If your camera is integrated with DW Spectrum via ONVIF, make sure ONVIF is enabled on your camera.
5. Try adding the camera manually.
6. Try rebooting the server after installation. Allow up to 30 seconds for the ser ver to map your network and detect all supported
devices.
2. Do you have a Gigabit network? Check your network speed.
1. Under camera settings, make sure the user name and password are correct.
2. Under the camera settings, use the ‘Ping’ button to make sure the camera is connected to the network properly.
3. If you can connect to the camera’s web viewer, try rebooting the camera and/or restore it to factory default.
4. Make sure your camera is using the latest rmware available.
5. Make sure that the camera is connected to the same network as the server.
6. If you are connecting to a camera that is integrated with DW Spectrum via the ONVIF protocol (see list), make sure ONVIF is enabled.
7. Make sure your user has permissions to view that specic camera.
1. Do you have network connection between client and server (in case server and client are not on the same machine)?
2. Make sure your user has playback viewing permissions for the selected channel.
3. Make sure the camera is set to a recording mode that would provide recorded video for the selected time and environment.
4. On the server side, check the media server log to make sure the camera you are trying to watch has not been unexpectedly
disconnected.
1. Make sure the camera’s user name and password are properly entered in the camera’s general information under the camera
settings menu.
2. If necessary, try rebooting the camera to apply the camera’s user name and password.
SYSTEM REQUIREMENTS
Recommended Specs for the Full Client
Windows 7
Processor Intel Core i5 or greater
Video Card
Resolution 1920 x 1080
RAM 4GB
NIC 10 / 100 / 1000 Base-T Ethernet
OS
Intel HD Graphics 2500 (or higher)
with 1GB Dedicated Memory
Windows 7, Server 2008, Vista,
Ubuntu 12.04 LTS or Newer
Linux OS
Accessing DW Spectrum Log Files
From the DW Spectrum Client Software:
•
Right-click on the Server’s name and go to ‘Server Logs’.
•
You can adjust the number of entries in the log by changing the value
at the end of the URL stating ‘lines=1000’. For example, ‘lines=1’ will
reduce the log report to a single line of data. ‘lines=400’ will display
400 lines of data.
Tel: 866-446-3595
Fax: 813-888-9262
Rev Date: 1 2/15 © 2015 Digit al Watchdog. A ll rights re served .
www.digital-watchdog.com
[email protected]
 Loading...