

Page 1
User’s
Instructions
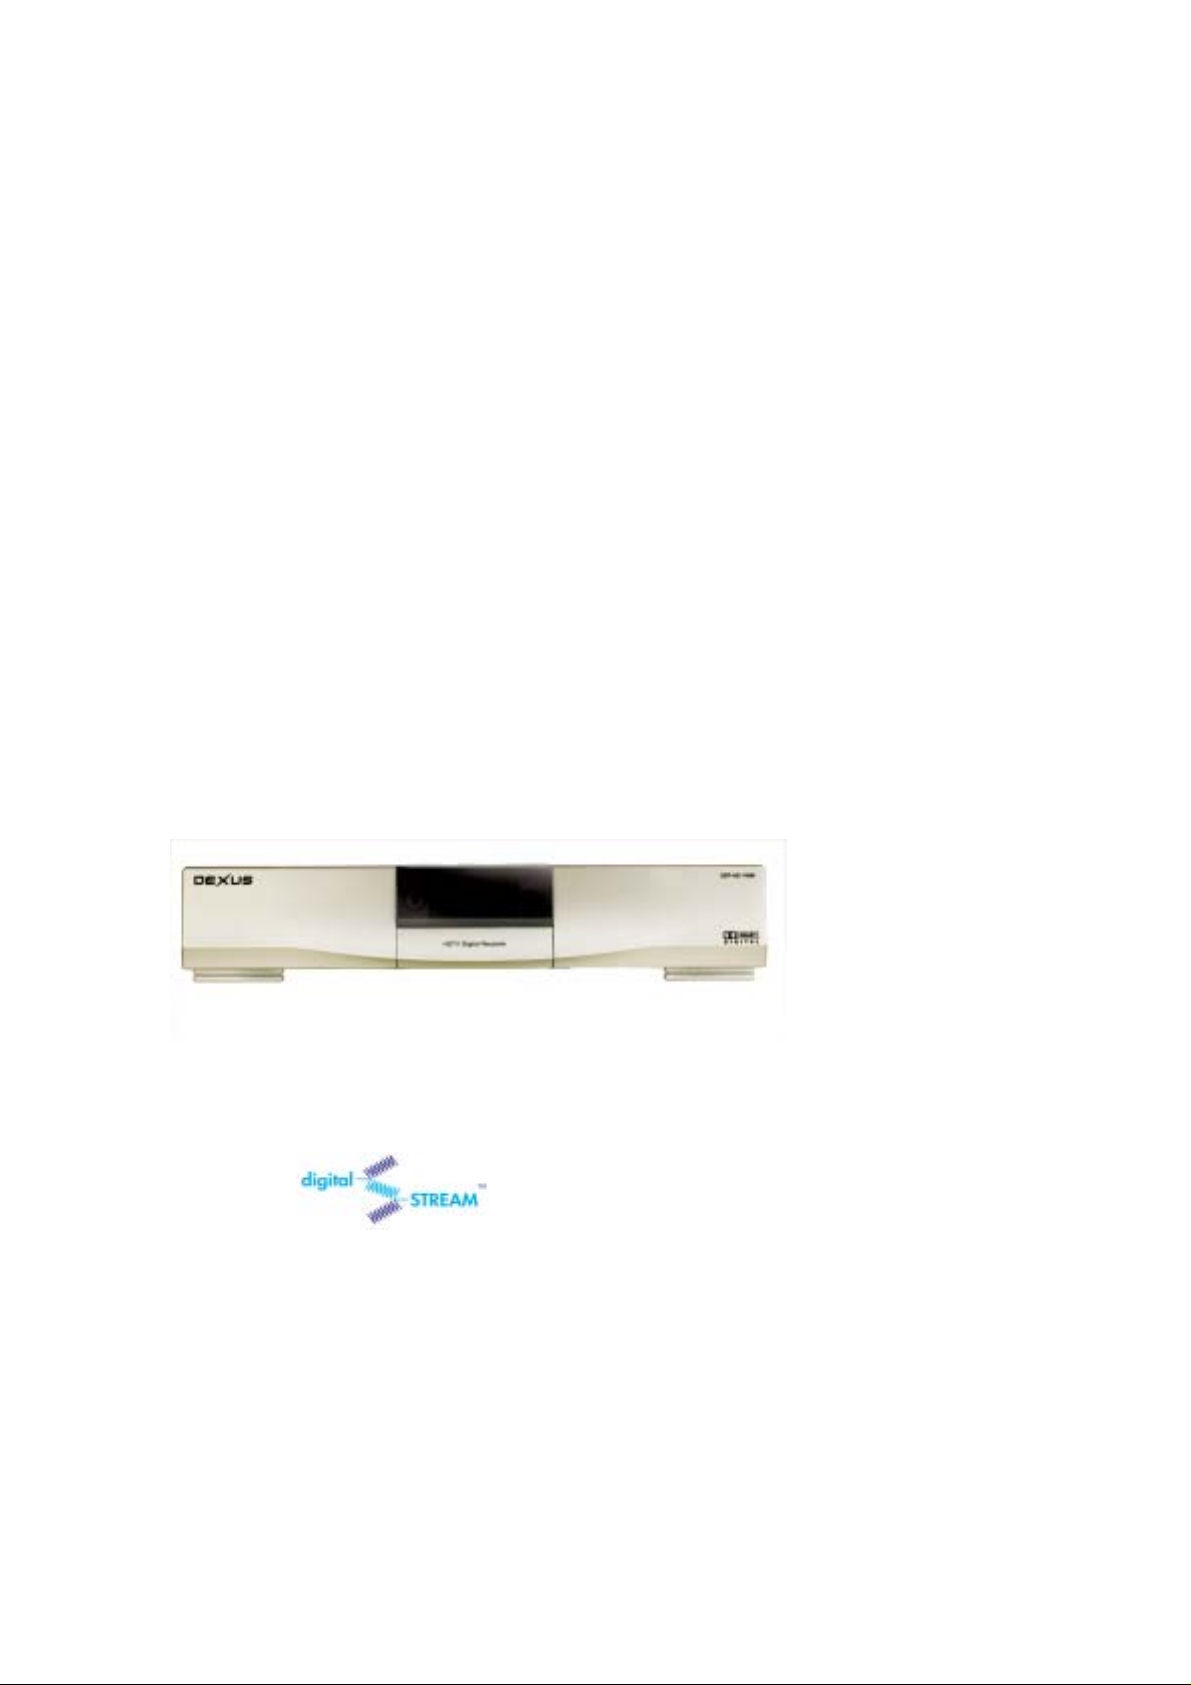
HDTV DIGITAL RECEIVER
DST-HD1100E
Digital STREAM Technology, Inc.
Keumbok BLDG. 45-2 Songpa-ku Bangee-dong
Seoul, Korea
Tel : + 82 2 415 6500 Fax: + 82 2 415 6540
e-mail : sales@dstreamtech.com
© Copyright Digital STREAM Technology, Inc. 2002
Page 2

DST-HD1100E HDTV DIGITAL RECEIVER
WARNING:
TO REDUCE THE RISK OF ELECTRONIC SHOCK DO NOT
REMOVE COVER ( OR BACK ).
THE LIGHTNING FLASH WITH ARROWHEAD SYMBOL, WITHIN AN EQUILATEARL
TRIAAGLE, IS INTENDED TO ALERT THE USER TO THE PRESENCE OF
UNINSULATED ”DANGEROUS VOLTAGE” WITHIN THE PRODUCT’S ENCLOSURE
THAT MAY BE OF SUFFICIENT MAGNITUDE TO CONSTITUTE A RISK OF E L E CTR I C
SHOCK TO PRESONS.
THE EXCLAMATION POINT WITHIN AN EQUILATERAL TRIANGLE IS INTENDED TO
NO USER SERVICEABLE PARTS INSIDE.
REFER TO QUALIF IED SERVICE PERSONNEL.
ALERT THE USER TO THE PRESENCE OF IMPORTANT OPERATING AND
MAINTENANCE (SERVICING) INSTRUCTIONS IN THE LITERATURE
ACCOMPANYING THE APPLIANCE.
Disclaimer - Every eff ort has been made to ensure the correctness and completen ess of the
material in this document. No company shall be liable for errors contained herein. The
information in this document is subject to change without notice. No warranty of any kind is
made with regard to this material, including, but not limited to, the implied warranties of
merchantability and fitness for a particular purpose.
Dolby® Information - Manufactured under license from Dolby Laboratories. "Dolby" and the
double-D symbol are trademarks of Dolby Laboratories.
Digital STREAM Technology, Inc. is not for any direct, indirect, incidental or consequential
damages in connection with the use of this material.
th
9
FL, Keumbok BLDG. 45-2, Bang - Dong, Songpa - Ku, Seoul, Korea
Tel. + 82 - 2 - 415 - 6500 Fax. + 82 - 2 - 418 - 3735
E-mail : tech@dstreamtech.com
Homepage : http://www.dstreamtech.com
This manual is made by sample purpose only. Not for general consumers.
2
Page 3

DST-HD1100E HDTV DIGITAL RECEIVER
TABLE OF CONTENTS
1. DST HD 1100E: HDTV Digital Receiver ............................. 4
1.1 Front Panel Controls and LEDs ............................................................................. 4
1.2 Rear Panel Jacks...................................................................................................5
2. The Remote Control.......................................................... 7
2.1 Reviewing the Remote Control .............................................................................. 7
3. Operation .......................................................................... 9
3.1 The On-Screen Menu System................................................................................9
3.2 Viewing the Display................................................................................................9
3.3 Using the EPG (Electronic Program Guide)......................................................... 10
3.4 Changing the Screen Format............................................................................... 12
3.5 Choosing a Digital Sound Format
3.6 Setting Up Captions (On-screen Text Messages)................................................ 17
3.7 Choosing a Sound “Multitrack”............................................................................. 17
3.8 Selecting “Input Type”(Air or Cable).....................................................................18
3.9 Memorizing Channels........................................................................................... 20
3.10 Adding and Deleting Channels............................................................................. 22
3.11 Setting Your Favorite Channels............................................................................ 24
3.12 Changing Channels.............................................................................................. 26
3.13 Checking Digital-Signal Reception....................................................................... 27
3.14 Fine Tune ............................................................................................................. 29
3.15 Setting Up Time and Date.................................................................................... 30
3.16 Using the Auto Turn-On........................................................................................32
3.17 Using the Auto Turn-Off........................................................................................34
3.18 Using the Sleep Timer..........................................................................................36
3.19 Setting Up the Time Zone..................................................................................... 37
3.20 Using the Daylight Saving.................................................................................... 38
3.21 Setting Up the OSD Transparency....................................................................... 39
(Dolby Digital or PCM)....................................15
3.22 Setting Up the V-chip Lock................................................................................... 41
3.23 Setting Up the Rating Control .............................................................................. 44
3.24 Changing PIN....................................................................................................... 47
4. Specifications................................................................. 49
3
Page 4
DST-HD1100E HDTV DIGITAL RECEIVER
1. DST HD 1100E: HDTV Digital Receiver
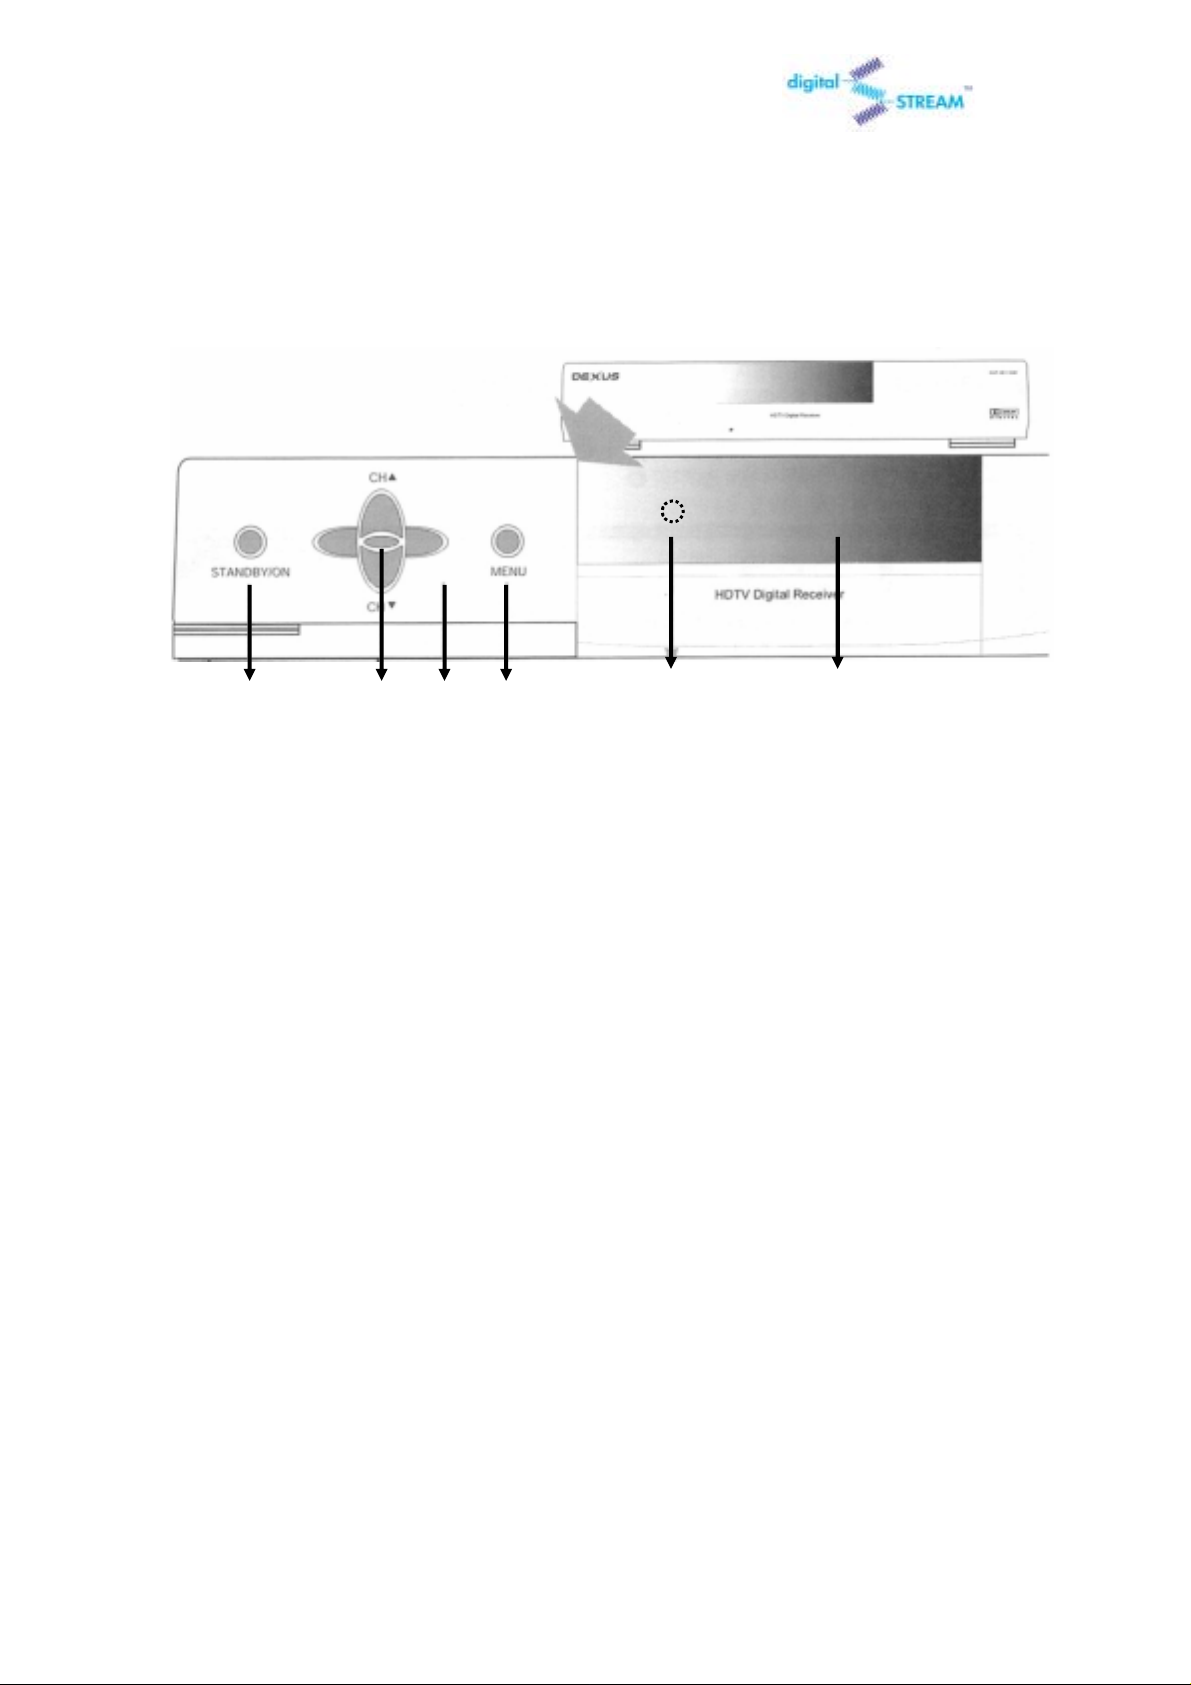
1.1 Front Panel Controls and LEDs
① ② ③ ④ ⑤ ⑥
①STANDBY/ON
Press to turn the power on or off.
②SEL
Press to make a selection when using the on-screen menus.
③Left/Right/Up/Down
Use to change channels or to move on-screen menus.
④MENU
Press to display the OSD(on-screen display).
⑤LED
When the receiver is powered on, the LED indicator lights green. Otherwise, it lights red.
⑥Channel Display
When you are watching digital channel, it display s ‘d’ with its channel nu mber.
When you are watching analog channel, it displays, ‘A’ with its channel number.
4
Page 5
DST-HD1100E HDTV DIGITAL RECEIVER
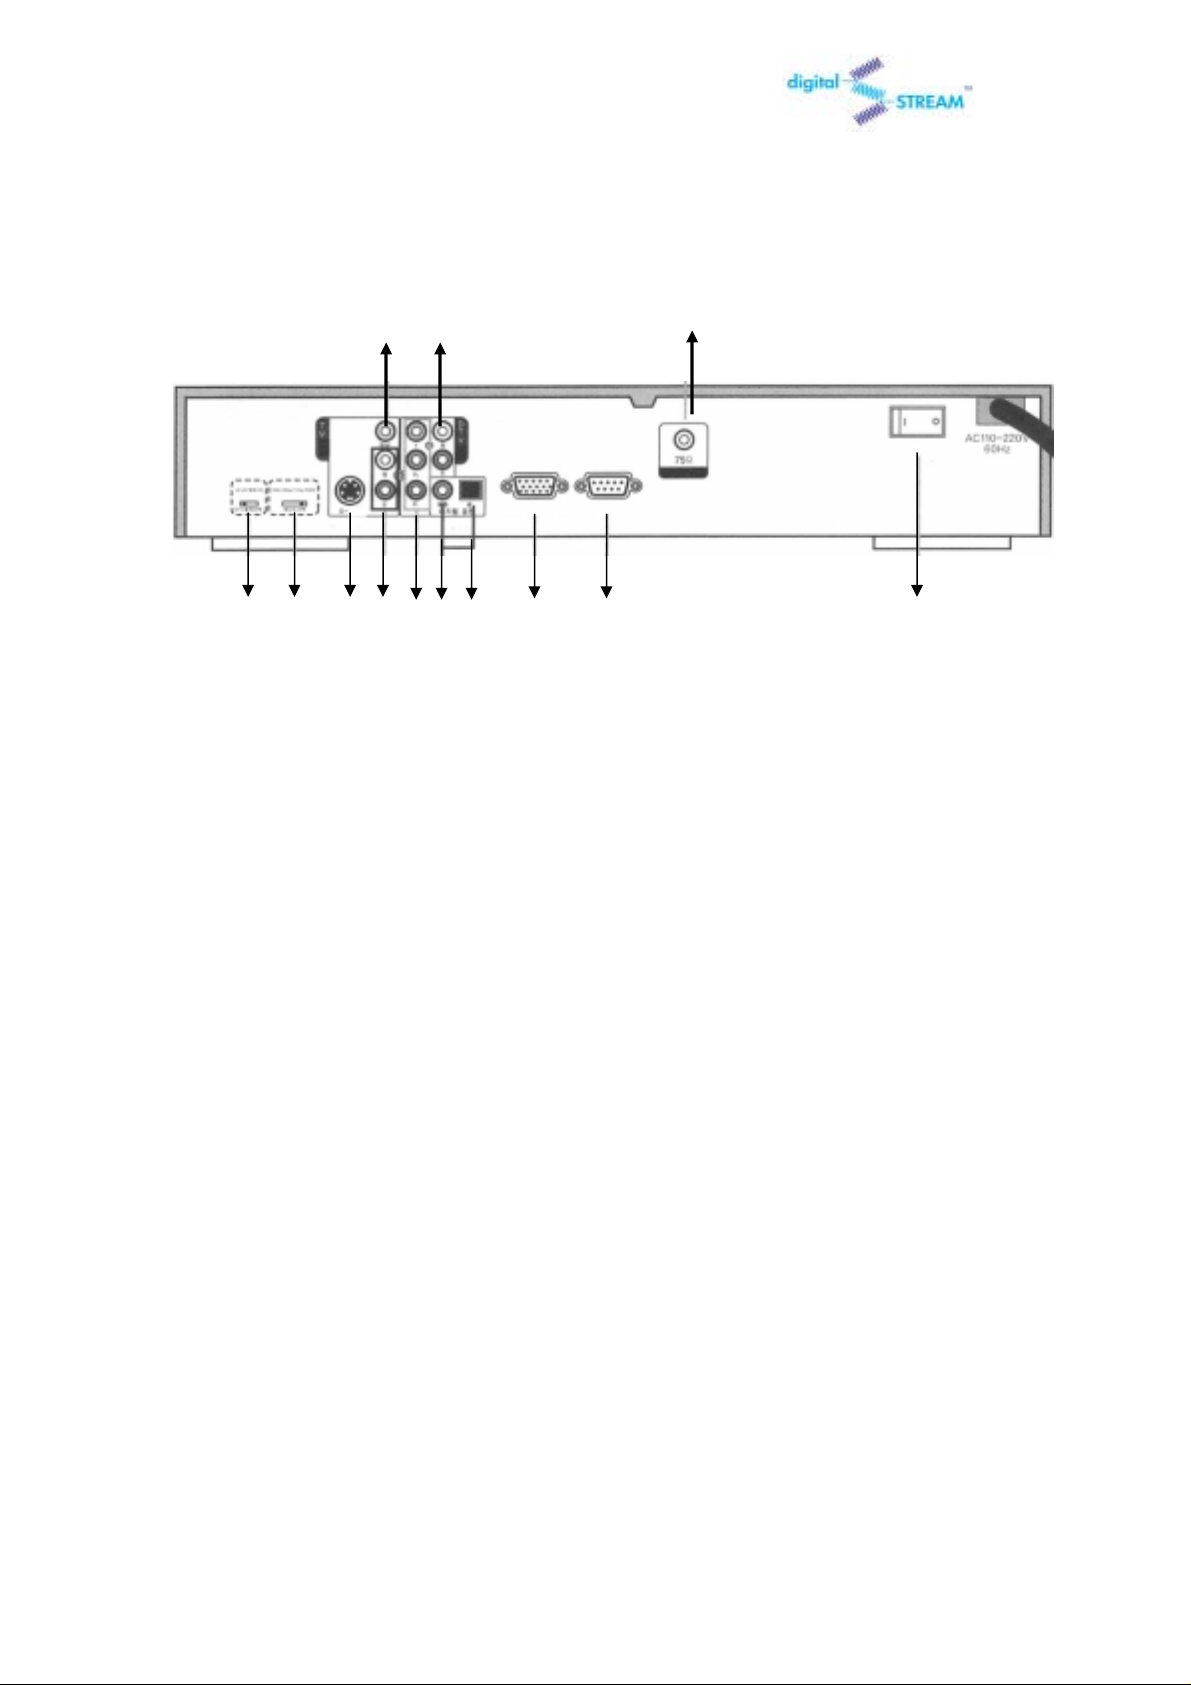
1.2 Rear Panel Jacks
①
②
⑬ ④ ⑤ ⑥ ⑦ ⑧⑨ ⑩ ⑪ ⑫
① VIDEO OUT
③
If your TV or monitor has Audio/Video capability, connect this jack to the AV Input jack on your TV or
monitor using an Audio/Video cable.
② Left/Right ANALOG-AUDIO OUTPUTS(with Digital Video Output)
Connect these terminals to the analog audio inputs of a TV set (i.e., to a TV that has jacks for L/R inputs).
Or, connect these terminals to the L/R inputs of a separate audio component. Recommended to use these
terminals when you use YPbPr or RGB for video.
③ RF INPUT (75 Ohm)
Connect the antenna here
④
DTV Output Selector(Monitor/Y, PB, PR)
Connect to the Y-PB-PR/RGB digital video input of a digital-compatible TV set (or the Y-PB-PR/RBG inputs of
some other video component).
⑤ Display Format Selector
Switches between 1080i (interlaced scanning), 720p (progressive scanning), 480p (progressive scanning),
and 480i (interlaced scanning) formats. (For HDTV broadcasts, 1080i is usually the best setting.)
⑥ S-VIDEO OUTPUT
If your TV or monitor has S-Video capability, use this jack along with the Audio/Video jacks to connect the
HDTV Digital Receiver to your receiver.
5
Page 6

DST-HD1100E HDTV DIGITAL RECEIVER
⑦ Left/Right ANALOG-AUDIO OUTPUTS(with Analog Video Output)
Connect these terminals to the analog audio inputs of a TV set (i.e., to a TV that has jacks for L/R inputs).
Or, connect these terminals to the L/R inputs of a separate audio component. Recommended to use these
terminals when you use analog for video.
⑧ DTV OUT COMPONENT (Y, PB, PR format)
Connect to the Y-PB-PR digital video input of a digital compatible TV set (or the Y-PB-PR inputs of some other
video component).
⑨ SPDIF Output(Coaxial)
Connect this terminal to the digital audio input of a TV set.
⑩ SPDIF Output(Fiber optic connector)
Connect this terminal to the digital audio input of a TV set (i.e., to a TV set that has a fiber-optic connector
for digital audio). Or, connect this terminal to the digital audio input of a separate component (i.e., Dolby
Digital-AMP..).
⑪ PC Monitor Output (R,G,B FORMAT)
Connect to the R, G, B inputs of a TV set, computer monitor, or some other video component.
⑫ Upgrade Port (RS232C)
It is used for firmware upgrade. DO NOT USE THIS PORT AT ANY TIME!
⑬ Power Switch
Press the switch to turn the power on or off
6
Page 7

DST-HD1100E HDTV DIGITAL RECEIVER
2. The Remote Control
2.1 Reviewing the Remote Control
The HDTV Digital Receiver remote control and on-screen menu system work together to make
operating the HDTV Digital Receiver as simple as possible.
POWER
Press to turn the power on or off.
MUTE
Press to temporarily cut off the sound.
CAPTION
When a digital signal is received, only available languages can
be selected. Currently the HDTV Digital Receiver supports
English caption.
Channel-Number Buttons
Press to directly tune to a particular channel.
MTS (Multitrack Sound)
Press to SEL among the available “multitracks” (for example,
depending on the particular broadcast, one or more foreignlanguage translations might be available).
P-MODE(Picture Displa y Mode)
Press to SEL picture display mode for best view. Picture display
modes consist of full (no aspect ratio conversion), zoom and
wide.
FAV-CH (Favorite Channel
Press to switch among your favorite channels.
FREEZE
Press to freeze the current picture. Press again to resume
motion.
Previous Channel( )
Press to alternate between the current channel and the last
channel that was displayed.
Program Guide( )
Press to display the on-screen, Electronic Program Guide
(EPG).
7
Page 8
DST-HD1100E HDTV DIGITAL RECEIVER
CH+, CH- (Channel Up and Down)
Press to change channels.
Minor Channel UP/DOWN( , )
Press to increase or decrease the minor.
SEL
While using the on-screen menus, press to activate (or change)
a particular item. Otherwise press SEL to display information
about the current box settings and program: Channel number,
Time, Program title, Program duration, Caption, Digital picture
grade, and MTS language.
ESC
Press to exit the current on-screen menus and go to previous
menu.
MENU
Press to display the on-screen menus, or to switch back to the
previous menu-screen that was displayed.
HELP
Currently the HDTV Digital Receiver does not support this
function.
DRF(Digital TV Radio Frequency Channel)
Press DRF and DTV RF channel number to watch un-scanned
DTV stations.
SLEEP(Sleep Timer)
Press to set the turn off time.
CH-ADD(Channel Add)
Press to add the current channel.
CH-DEL(Channel Delete)
Press to delete the current channel.
8
Page 9

DST-HD1100E HDTV DIGITAL RECEIVER
3. Operation
3.1 The On-Screen Menu System
The seven menu controls are located in the center of the remote control: MENU, UP(Channel
Up), DOWN(Channel Down), LEFT, RIGHT, SEL(SEL), ESC(Previous Menu).
3.2 Viewing the Display
You can quickly check the status of many of the HDTV Digital Receiver
features and options by pressing the SEL button.
The Display shows:
• The major channel number and the minor channel number if you are viewing a digital channel.
• The current time and date.
• Program title.
• Program duration.
• The status of closed captions if the broadcast includes them.
• The digital picture grade, such as HD (High Definition) or SD (Standard Definition).
• The audio track language.
• The signal strength.
To view the Display:
Press SEL on the remote control.
To hide the Display:
Press ESC or wait 4 seconds and the display will disappear.
9
Page 10
DST-HD1100E HDTV DIGITAL RECEIVER
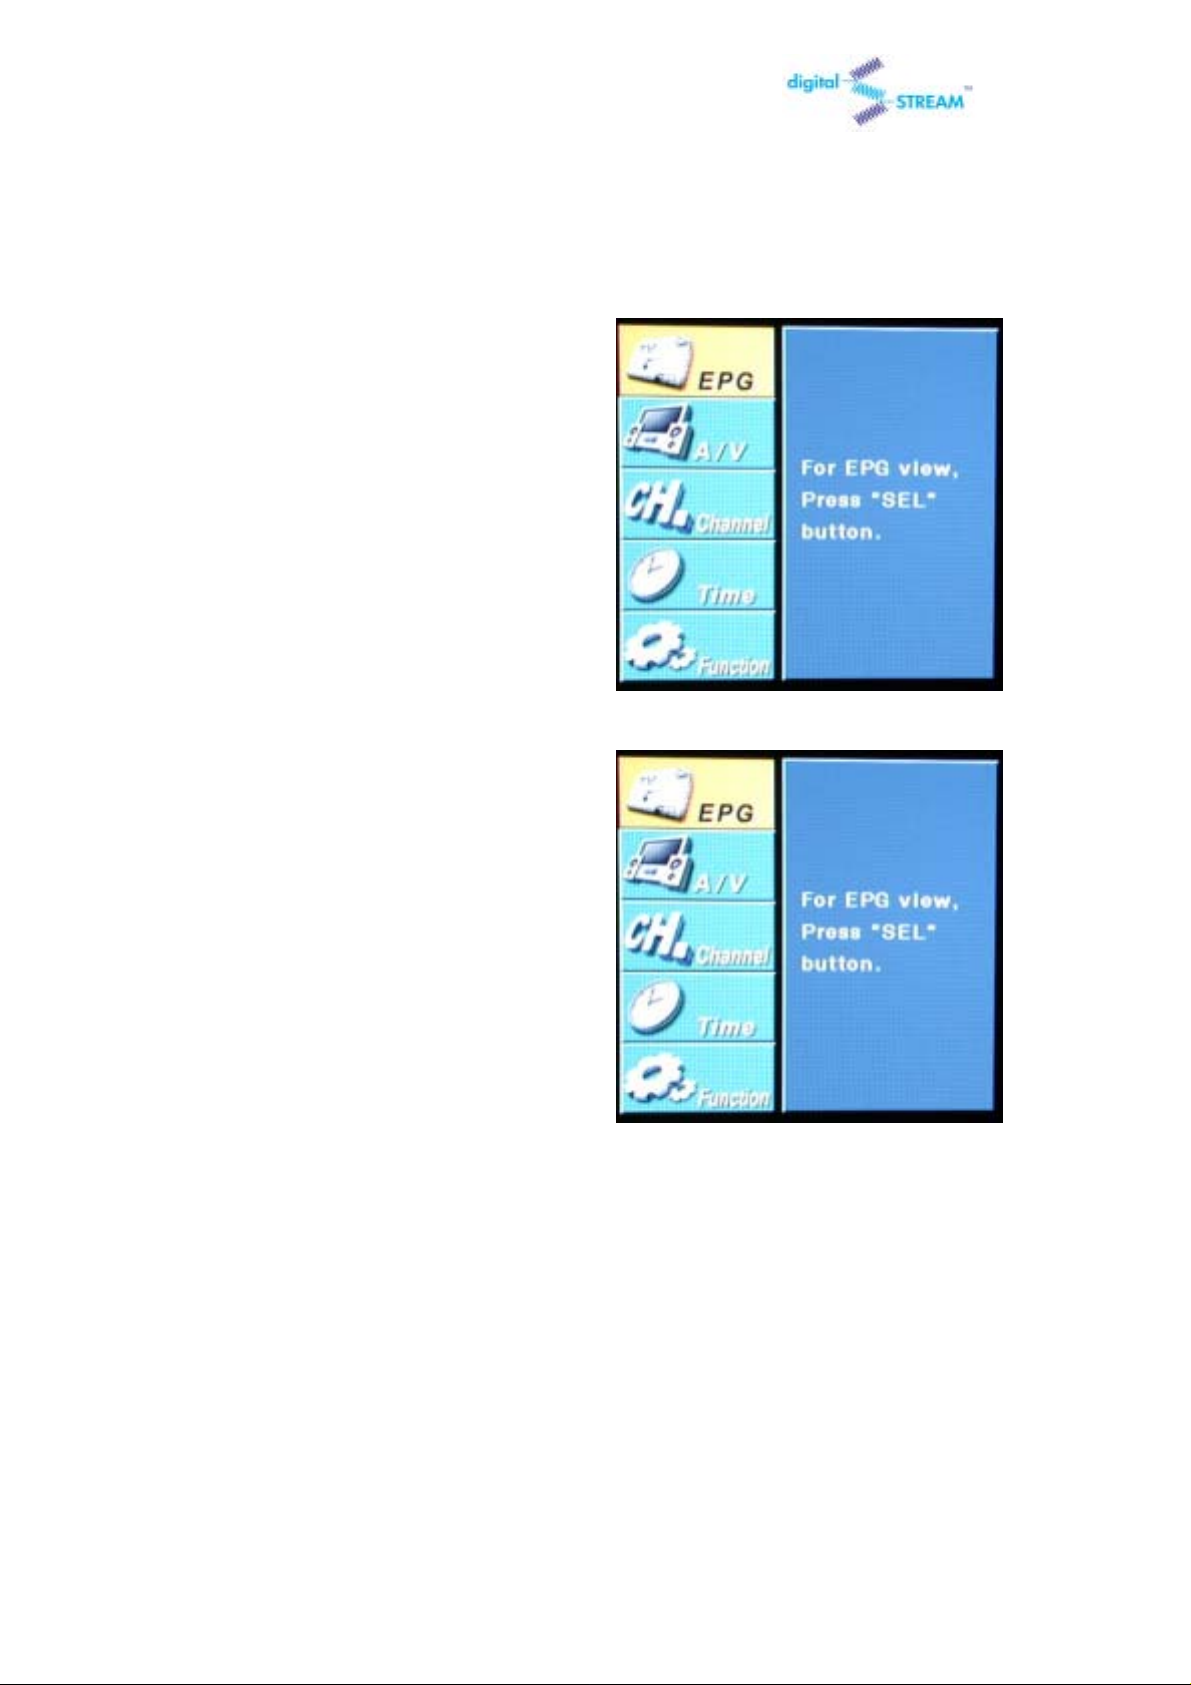
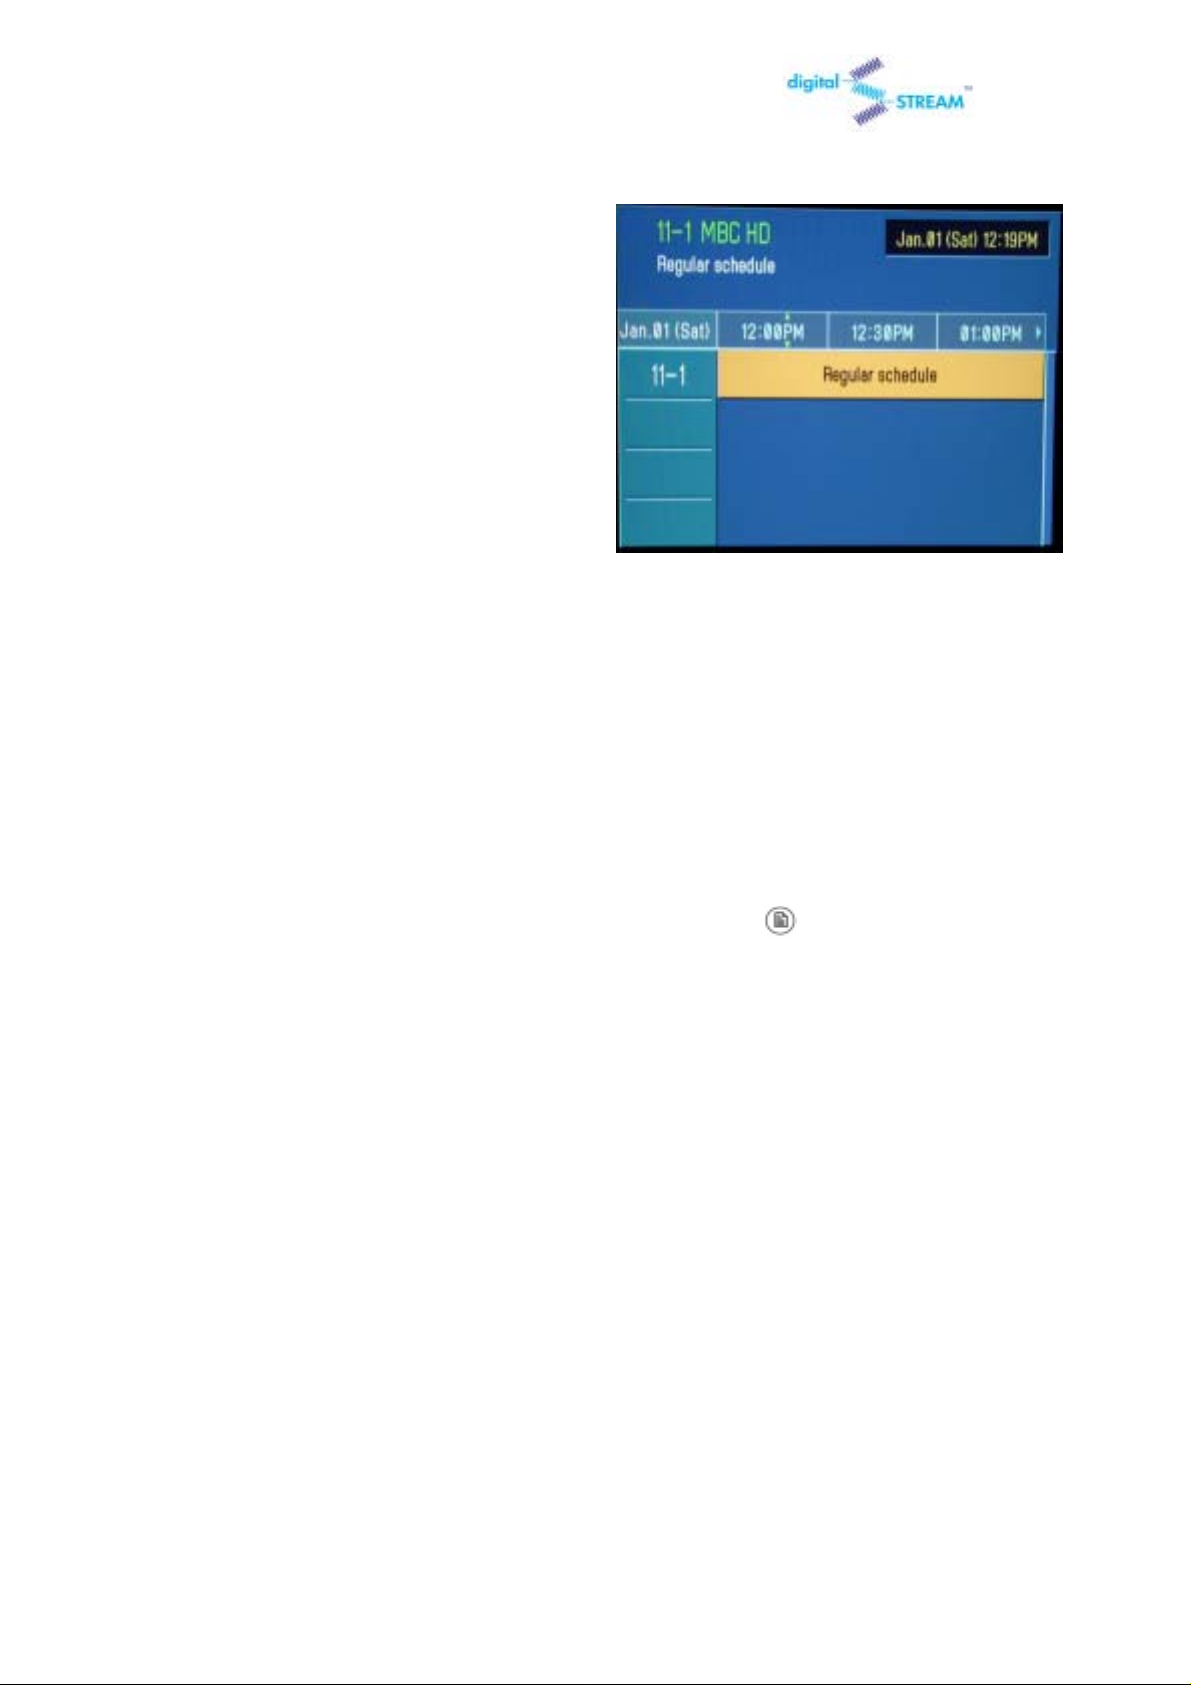
3.3 Using the EPG (Electronic Program Guide)
1 Press the MENU on the remote control.
2 Press the UP or DO WN on the remote
control to highlight t he “EPG” icon and pres s
SEL.
10
Page 11
DST-HD1100E HDTV DIGITAL RECEIVER
3 Press the Arro w buttons on the remote
control repeatedly to move to the channel
with program information.
4 You may now:
• Obtain additional program details: By pressing the UP, DOWN, RIGHT or LEFT button to
highlight a program title and press SEL.
NOTES
You can quickly switch to a GUIDE mode by pressing the “Program Guide( )” button on the remote
control.
11
Page 12
DST-HD1100E HDTV DIGITAL RECEIVER
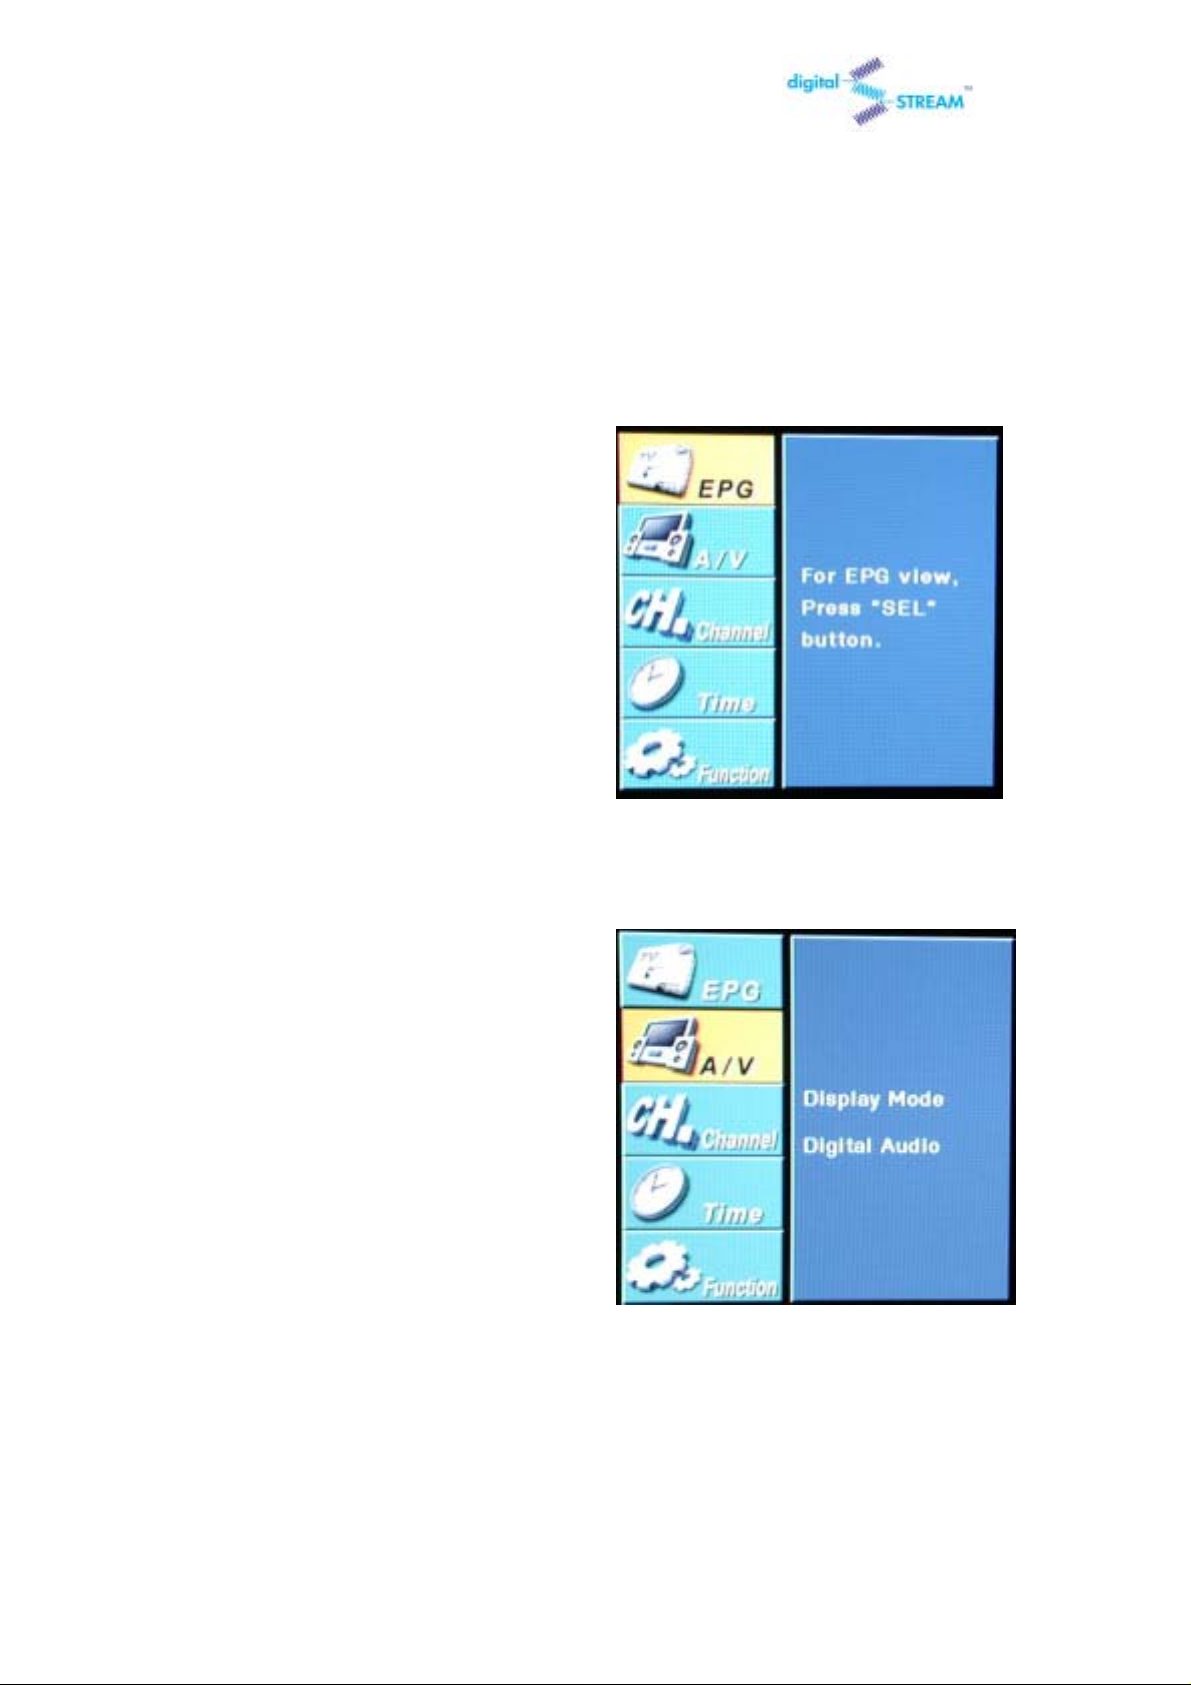
3.4 Changing the Screen Format
Your selection in the Screen Format menu depends on the type of TV or monitor you are
using with your HDTV Digital Receiver.
1 Press the MENU button on the remote
control.
2 Press the UP or DOWN button on the
remote control to highlight the “A/V” icon and
press SEL.
12
Page 13

DST-HD1100E HDTV DIGITAL RECEIVER
3 Press the UP or DOWN button on the
remote control to highlight the “Display Mode”
icon and press SEL.
4 Press the UP or DOW N button on the
remote control to select your Monitor Type
either 4:3 or 16:9 and press the RIGHT
button to highlight “Display Mode”
5 Press the UP or DOW N button on the
remote control to select a “Display Mode”
among ‘Normal’,’ Wide’ or ‘Zoom’.
13
Page 14

DST-HD1100E HDTV DIGITAL RECEIVER
With a 4:3 Ratio TV or Monitor
If you are using a 4:3 ratio TV or monitor and receive an image with a 16:9 ratio, you
need to specify how the image is displayed.
Wide(Letter box)
Choose this when receiving a 16:9 im age and you wan t to see the origin al wid e for mat.
Letter boxing shrinks the picture so the entire image will fit on the screen. Blank panels
appear at the top and bottom of the screen.
Normal
Choose this when you want the television to adjust the 16:9 image vertically so it fills your
4:3 screen. No blank panels will be added, and the image is horizontally unaltered.
Zoom
Choose this when receiving a 16:9 image and you want the wide movie format to fill the
entire screen. Left and right portions of the picture are cropped, or cut.
With a 16:9 Ratio TV or Monitor
If you are using a 16:9 ratio TV or monitor and receive an image with a 4:3 aspect ratio,
the image will be displayed at the 4:3 ratio on your monitor unless you specify otherwise.
The Screen Format menu allows you to adjust the image through the following options:
Wide(Side bar)
Choose this when receiving a 4:3 image and you want the on-screen appearance of the
video to be a centered picture with blank panels on the right and left sides.
Normal
Choose this when you want the television to adjust the 4:3 image horizontally so it fills
your 16:9 screen. No blank panels will be added, and the image is vertically unaltered.
This setting is especially useful for viewing 4:3 formatted DVDs.
Zoom
Choose this when receiving a 4:3 image and you want to maintain the correct image proportion.
Top and bottom portions of the picture are cropped, or cut.
NOTE
The availability of the Changing the Screen Format feature depends on the Resolution
Select and current broadcasting signal format.
14
Page 15
DST-HD1100E HDTV DIGITAL RECEIVER
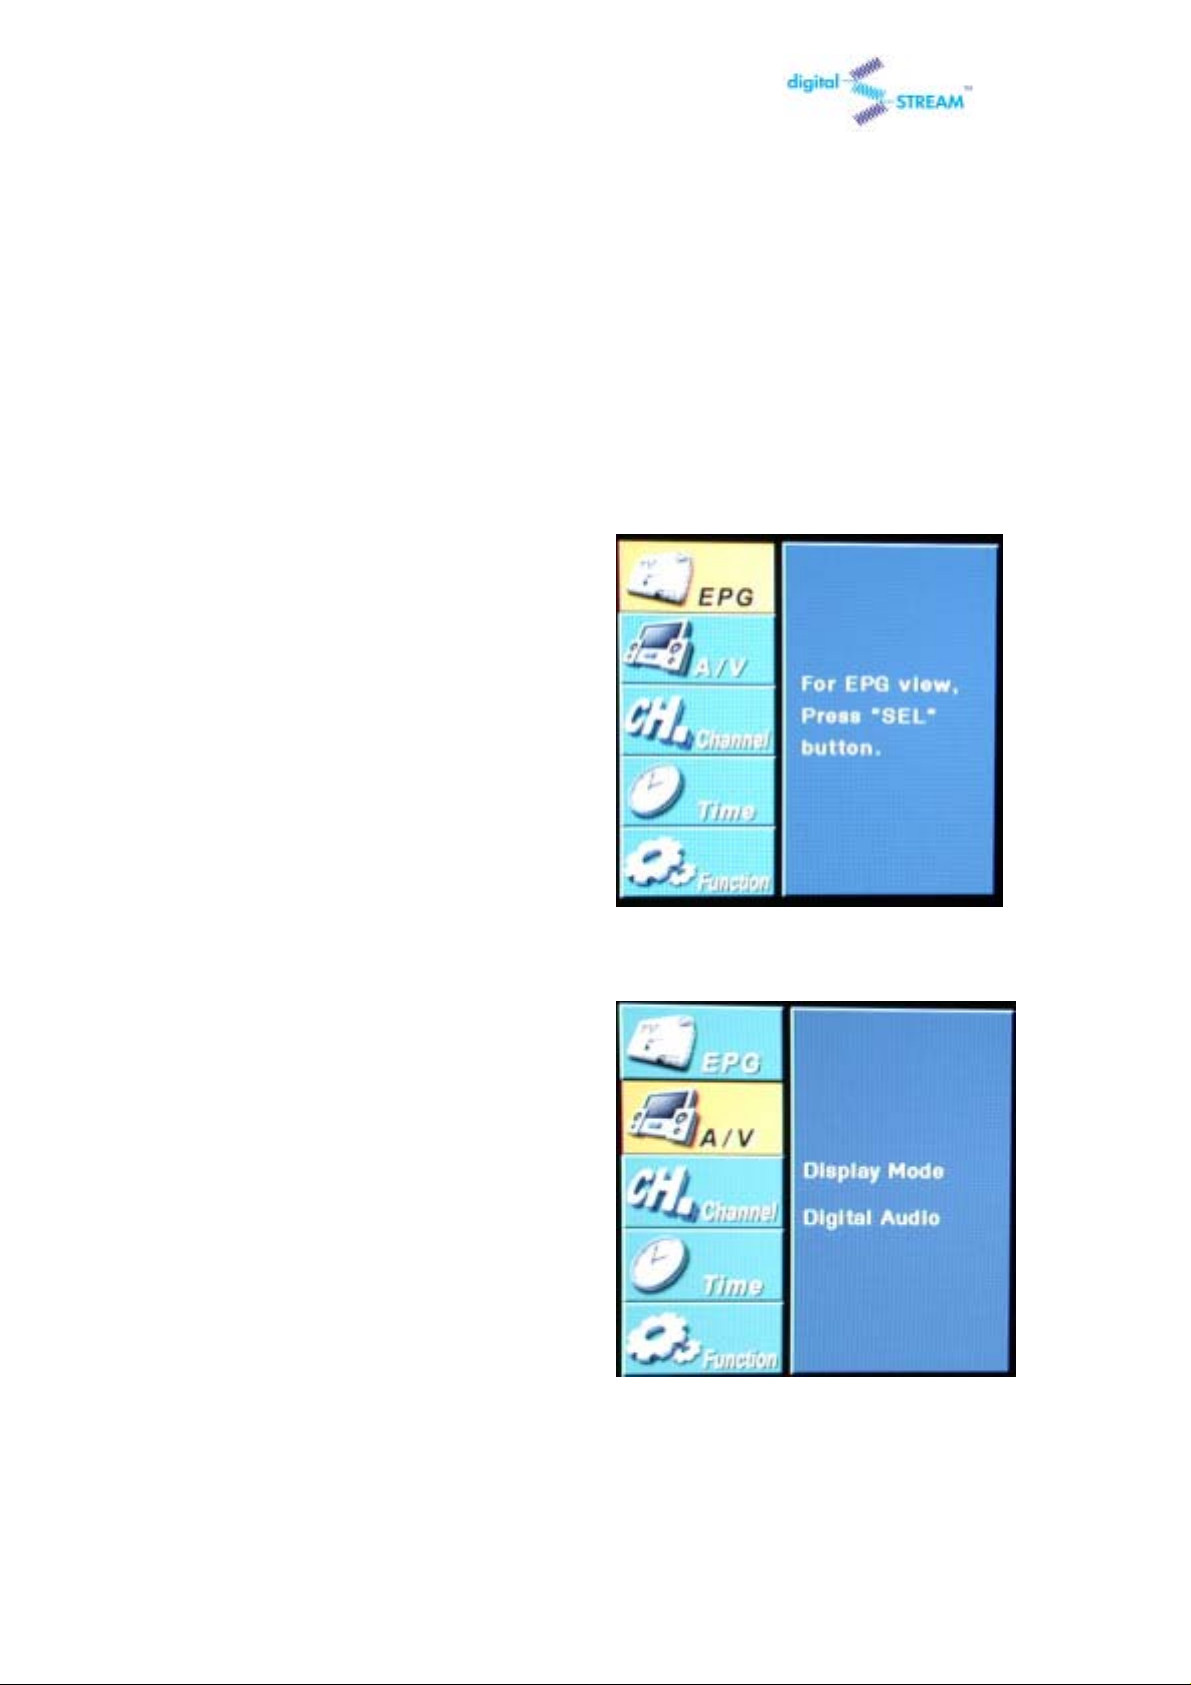
3.5 Choosing a Digital Sound Format (Dolby Digital
or PCM)
Both audio and digital sound are available from the rear-panel connectors of the HDTV Digital
Receiver. The digital audio output is an optical connector labeled “SPDIF Output.”
After connecting the optical digital-audio component, you must specify the transmission format
(PCM or Dolby Digital, as appropriate to your particular equipment).
1 Press the MENU button on the remote
control.
2 Press the UP or DOWN button on the
remote control to highlight the “A/V” icon
and press SEL.
15
Page 16

DST-HD1100E HDTV DIGITAL RECEIVER
3 Press the UP or DOWN button on the
remote control to highlight the “Digital Audio”
icon and press SEL.
4 Press the UP or DOWN button on the
remote control to highlight “Dolby Digital” or
“PCM” and press SEL to save the format.
16
Page 17

DST-HD1100E HDTV DIGITAL RECEIVER
3.6 Setting Up Captions (On-screen Text
Messages)
How to Activate or Deactivate the On-screen Captions
1 Press the CC button on the remote control.
2 Press the CC button repeatedly to alternate between “English” and “Off”.
* The current HDTV Digital Receiver supports ‘English’ only.
(Note: Availability of captions depends on the particular program being broadcast.)
3.7 Choosing a Sound “Multitrack”
1 Press the MTS button on the remote control.
2 Press the MTS button repeatedly until the appropriate language appears
(The available languages will vary, depending on the particular program).
17
Page 18

DST-HD1100E HDTV DIGITAL RECEIVER
3.8 Selecting “Input Type”(Air or Cable)
You can select 'Air' for terrestrial broadcast and 'Cable' for cable.
1 Press the MENU button on the remote
control.
2 Press the UP or DOWN button on the
remote control to highlight the “Channel” icon
and press SEL.
18
Page 19

DST-HD1100E HDTV DIGITAL RECEIVER
3 Press the UP or DOW N button on the
remote control to h ighlight the “Input Select”
icon and press SEL.
4 Press the UP or DOWN button on the
remote control to highlight “Air” or “Cable”
and press SEL to save the type.
19
Page 20

DST-HD1100E HDTV DIGITAL RECEIVER
3.9 Memorizing Channels
Before you can use any of the special channel buttons (CH+,CH-, FAV-CH), the available
channels must first be scanned and memorized. To memorize channels:
1 Press the MENU button on the remote
control.
Press the UP or DOWN button on the
2
remote control to highlight the “Channel” icon
and press SEL.
20
Page 21

DST-HD1100E HDTV DIGITAL RECEIVER
3 Press the UP or DOWN button on the
remote control to highlight the “Auto Scan”
icon and press SEL then “Scan” icon will be
highlighted.
4 Press the SEL button on the remote
control then HDTV Dig ital Receiver will scan
and store all of the digital (DTV) channels
that are available in your local area
automatically.
NOTES
The HDTV Digital Receiver MUST be connected to an antenna in order to receive digital TV
signals.
Even if a particular channel is deleted from the memory, you can always tune to that channel
directly by pressing the NUMBER buttons on the remote control.
21
Page 22

DST-HD1100E HDTV DIGITAL RECEIVER
3.10 Adding and Deleting Channels
To add channels that were not memorized (or to delete unwanted channels from the memory):
1 Press the MENU button on the remote
control.
2 Press the UP or DOWN button on the
remote control to highlight the “Channel” icon
and press SEL.
3 Press the UP or DOWN button on the
remote control to highlight the “Channel Edit”
and press SEL then Chann el Edit wind ow will
appear.
22
Page 23

DST-HD1100E HDTV DIGITAL RECEIVER
4 Press the Arrow buttons repeatedly to
change a highlighted channel. If you want to
delete a highlighted channel then press the
CH-DEL button. Press the CH-ADD button
when you want to restore deleted channels.
23
Page 24

DST-HD1100E HDTV DIGITAL RECEIVER
3.11 Setting Your Favorite Channels
This menu item helps to memorize your favorite channel into the memory and to select the
channel quickly. "Auto Scan" is needed before using this function.
1 Press the MENU button on the remote
control.
2 Press the UP or DOW N button on the
remote control to highlight the “Channel” icon
and press SEL.
24
Page 25

DST-HD1100E HDTV DIGITAL RECEIVER
3 Press the UP or DOW N button on the
remote control to highlight the “Favorite
Channel” and press SEL then Favorite
Channel window that is located in the right
side of OSD(On-Screen Display) will be
shown.
that you want to delete and press SEL.
4 Press the UP or DOWN button on the
remote control to highlight the channel that
you want to add and press SEL then the
channel will be saved in “Favorite Channel”
list. Or if you want to delete the channel in
“Favorite Channel” list, press the RIGHT
button to highlight the channel that was
saved in “Favorite Channel” and press the
UP or DOWN button to highlight the channel
5 You can now jump from one favorite channel to another by pressing the FAV-CH button.
25
Page 26

DST-HD1100E HDTV DIGITAL RECEIVER
3.12 Changing Channels
Number buttons
Press the number buttons (0 – 9) to enter channel numbers.
NOTES 1
Press the SEL button after you select the channel to search “minor” channels then,
the list of the minor channels will be displayed on the screen. To select one of
them, press Left/Right buttons and press SEL.
NOTE 2
You can also select minor channels by pressing minor channel buttons( , ) on the remote
control.
Previous Channel button( )
Press to return to the previous channel you viewed. For example,
if the box is tuned to channel 55 and then you change to channel
56, pressing PRE-CH will return to channel 55.
FAV-CH button( )
Press to switch among your favorite channels.
26
Page 27

DST-HD1100E HDTV DIGITAL RECEIVER
3.13 Checking Digital-Signal Reception
1 Press the MENU button on the remote
control.
2 Press the UP or DOWN button on the
remote control to highlight the “Channel” icon
and press SEL.
3 Press the UP or DOWN button on the
remote control to highlight the “Signal
Strength” icon. The signal strength meter will
appear when the “Signal Strength” icon is
highlighted
27
Page 28

DST-HD1100E HDTV DIGITAL RECEIVER
4 If the signal strength meter indicates “weak”(in red color), physically adjust your antenna to
increase the signal strength. Continue to adjust the antenna until you find the best position with
the strongest signal.
28
Page 29

DST-HD1100E HDTV DIGITAL RECEIVER
3.14 Fine Tune
This function is for analog channels only.
1 Press the MENU button on the remote
control.
2 Press the UP or DOWN button on the
remote control to highlight the “Channel” icon
and press SEL.
3 Press the UP or DOW N button on the
remote control to highlight the “Fine Tune”
icon and press SEL. Pressing the RIGHT or
LEFT button repeatedly until you find the best
watching conditions.
29
Page 30

DST-HD1100E HDTV DIGITAL RECEIVER
3.15 Setting Up Time and Date
You can set current time and date in this menu. Only when you are watching a digital
channel and time information is being transmitted by TV station, you can select "Auto".
1 Press the MENU button on the remote
control.
2 Press the UP or DOW N button on the
remote control to highlight the “Time” icon
and press SEL.
30
Page 31

DST-HD1100E HDTV DIGITAL RECEIVER
3 Press the UP or DOWN button on the
remote control to highlight the “Date/Time”
icon and press SEL.
*Select “Auto” b y pressing the UP or DOW N
button, and press SEL then both date and
time will be set up automatically. To enable
this function, you need to s et your time zone
first in the “Time Zone” menu.
*You set your t ime manually in the “Manua l”
mode. Select “Manual” by pres sing the U P or
DOWN button, and pres s SEL then you can
edit time and date b y pressing the NUMBER
buttons.
31
Page 32

DST-HD1100E HDTV DIGITAL RECEIVER
3.16 Using the Auto Turn-On
1 Press the MENU button on the remote
control.
2 Press the UP or DOWN button on the
remote control to highlight the “Time” icon
and press SEL.
3 Press the UP or DOWN button on the
remote control to highlight the “Auto Turn-On”
icon and press SEL.
32
Page 33

DST-HD1100E HDTV DIGITAL RECEIVER
*In case of not using “Auto Turn-On”, select
‘Off’.
*Select ’Everyday’ or ‘Once’ by pressing the
UP or DOWN button, and press the RIGHT
button to set up the time by pressing the
NUMBER buttons. You must press SEL
before exit to save the setting.
33
Page 34

DST-HD1100E HDTV DIGITAL RECEIVER
3.17 Using the Auto Turn-Off
1 Press the MENU button on the remote
control.
2 Press the UP or DOWN button on the
remote control to highlight the “Time” icon
and press SEL.
34
Page 35

DST-HD1100E HDTV DIGITAL RECEIVER
3 Press the UP or DOWN button on the
remote control to highlight the “Auto TurnOff ” icon and press SEL.
*In case of not using “Auto Turn-Off”, select
‘Off’.
*Select ’Everyday’ or ‘Once’ by pressing the
UP or DOWN button, and press the RIGHT
button to set up the time by pressing the
NUMBER buttons. You must press SEL
before exit to save the setting.
35
Page 36

DST-HD1100E HDTV DIGITAL RECEIVER
3.18 Using the Sleep Timer
1 Press the MENU button on the remote
control.
2 Press the UP or DOWN button on the
remote control to highlight the “Time” and
press SEL.
3 Press the UP or DOWN button on the
remote control to highlight the “Sleep Timer ”
icon and press SEL. Select any time on the
menu and press SEL to save the setting.
*In case of not using “Sleep Timer”, select
‘Off’.
36
Page 37

DST-HD1100E HDTV DIGITAL RECEIVER
3.19 Setting Up the Time Zone
1 Press the MENU button on the remote
control.
2 Press the UP or DOWN button on the
remote control to highlight the “Time” icon
and press SEL.
3 Press the UP or DOWN button on the
remote control to highlight the “Time Zone ”
icon and press SEL. By pressing the UP or
DOWN button, you can select the region
where you live. Pr es s S EL to s a ve the setting.
37
Page 38

DST-HD1100E HDTV DIGITAL RECEIVER
3.20 Using the Daylight Saving
1 Press the MENU button on the remote
control.
2 Press the UP or DOWN button on the
remote control to highlight the “Time” icon
and press SEL.
3 Press the UP or DOW N button on the
remote control to highlight the “Daylight
Saving ” icon a nd pres s S E L. B y pres s in g t he
UP or DOWN button, you can select either
‘On’ or ‘Off’. Press SEL to save the setting.
38
Page 39

DST-HD1100E HDTV DIGITAL RECEIVER
3.21 Setting Up the OSD Transparency
1 Press the MENU button on the remote
control.
2 Press the UP or DOWN button on the
remote control to highlight the “Function” icon
and press SEL.
3 Press the UP or DOWN button on the
remote control to highlight the “OSD
Transparency” icon and pres s SEL.
39
Page 40

DST-HD1100E HDTV DIGITAL RECEIVER
4 Press the UP or DOWN button to
highlight your favor ite OSD trans parency and
press SEL
40
Page 41

DST-HD1100E HDTV DIGITAL RECEIVER
3.22 Setting Up the V-chip Lock
This menu item can lock or unlock the programs according to MPAA ratings and TV parental
guidelines.
1 Press the MENU button on the remote
control.
2 Press the UP or DOWN button on the
remote control to highlight the “Function” icon
and press SEL.
41
Page 42

DST-HD1100E HDTV DIGITAL RECEIVER
3 Press the UP or DOWN button on the
remote control to highlight the “V-Chip” icon
and press SEL then Enter PIN window will
appear.
(*PIN =Personal Identification Number)
4 Enter your PIN number by pressing the
NUMBER buttons on the remote control and
press SEL
5 Press the UP or DOWN button on the
remote control to highlight the “V-Chip Lock”
icon and press SEL.
42
Page 43

DST-HD1100E HDTV DIGITAL RECEIVER
6 If you want to unlock the rating controls
temporarily, select “Unlock”. Select “Lock”
when you want to return to pre-stored rating
controls.
43
Page 44

DST-HD1100E HDTV DIGITAL RECEIVER
3.23 Setting Up the Rating Control
This menu item helps you set the detailed control of MPAA ratings and TV parental guidelines.
1 Press the MENU button on the remote
control.
2 Press the UP or DOWN button on the
remote control to highlight the “Function” icon
and press SEL.
44
Page 45

DST-HD1100E HDTV DIGITAL RECEIVER
3 Press the UP or DOWN button on the
remote control to highlight the “V-Chip” icon
and press SEL then Enter PIN window will
appear.
4 Enter your PIN number by pressing the
NUMBER buttons on the remote control and
press SEL
5 Press the UP or DOWN button on the
remote control to highlight the “Rating
Control” icon and press SEL. then Rating
Control Setting window will appe ar .
6 Press the Arrow buttons on the remote
control to highlight the item that you want to
lock or unlock and press SEL repeatedly until
you get your own selection.
45
Page 46

MPAA Ratings :
G All ages admitted
PG Some material may not be suitable for children
PG-13 Some material may be inappropriate for children under 13
R Under 17 requires accompanying parents or adult guardian
NC-17 No one 17 and under admitted
X Adults only
TV Guidelines
TV-Y This program is designed to be appropriate for all children.
TV-Y7 This program is designed for children age 7 and above. For those programs where
fantasy violence m ay be more intens e or m ore combativ e than other program s in this categ ory,
such programs will be designated TV-Y7-FV.
TV-G Most parents would find th is program suitable f or all ages. Althou gh this rating does not
signify a program designed specifically for children, most parents may let younger children
watch this program unatten ded. It contains little or no violence, no s trong language an d little or
no sexual dialogue or situations.
TV-PG This program c ontains material that parents may find unsuitable for younger chil dren.
Many parents may want to watch it with their younger c hildren. The theme itself ma y call for
parental guidance and/or th e program contains on e or m ore of the f ollowing: moderate violence
(V), some sexual s ituations (S), infrequent coarse language (L), or some suggestive d ialogue
(D).
TV-14 This program contains some material that many parents would find unsuitable for
children under 14 years of age. Parents are strongly urged to exercise greater care in
monitoring this pro gram and are cautioned against letting children under the age of 14 watch
unattended. This program contains one or more of the following: int ense violence (V), intense
sexual situations (S), strong coarse language (L), or intensely suggestive dialogue (D).
TV-MA This program is specifically designed to be viewed by adults and therefore may be
unsuitable for children un der 17. This program contains one or m ore of the following: graphic
violence (V), explicit sexual activity (S), or crude indecent language (L)
Page 47

DST-HD1100E HDTV DIGITAL RECEIVER
3.24 Changing PIN
You can change your PIN in this menu item.
1 Press the MENU button on the remote
control.
2 Press the UP or DOWN button on the
remote control to highlight the “Function” icon
and press SEL.
3 Press the UP or DOWN button on the
remote control to highlight the “V-Chip” icon
and press SEL then Enter PIN window will
appear.
47
Page 48

DST-HD1100E HDTV DIGITAL RECEIVER
4 Enter your PIN number by pressing the
NUMBER buttons on the remote control and
press SEL
5 Press the UP or DOWN button on the
remote control to highlight the “Change PIN”
icon and press SEL. then Change PIN menu
will appear.
6 Enter and re-enter your new PIN by
pressing the NUMBER bu ttons on the
remote control continuously and press SEL
to save the new PIN.
48
Page 49

DST-HD1100E HDTV DIGITAL RECEIVER
4. Specifications
Model Name : DST- HD1100E
Coding Algorithm
Video
Decoding Format Supports all (18) ATSC formats
Display Format 1080i, 720p, 480p, 480i
Audio Coding Algorithm Dolby Digital
Band coverage
Functions
BroadCasting standard DTV (ATSC), NTSC
On Screen Display English
EPG Support
Display Format Selection 16:9/4:3, Wide/Normal/Zoom
MPEG-2 MP@HL (HDTV)
MPEG-2 MP@ML (SDTV)
Terrestrial : 2~69 channel
Cable : 1~125 channel
Input
Output
Terminals
Others
Antenna Input IEC 169-2, Female (F-type), 75 Ohms
Video Output 1 CVBS(Composite), 1 S-Video
DTV Output Component(Y/Pb/Pr, RGB), Lt, Rt
Digital Audio Output Fiber Optic, Coaxial
Firmware Upgrade RS- 232C
Speaker Out Left, Right
Remote Controller Unit 1 each, Needs DC1.5V AAAx2 battery
Power requirement 90~230 VAC, 47~63 Hz
Power Consumption <40 watts / In standby: <2 watts
Dimensions (W x D x H) 367mm x 266mm x 66mm
Weight 2.3 Kg
49
 Loading...