

Page 1
17811 Mitchell North
Irvine, Ca. 92614
www.dsicentral.com
User Manual
Page 2
Congratulations! You are the proud owner of a NuTouchtm Digital Frame. Boasting
high-quality image resolution the NuTouchtm is the perfect product for displaying your
favorite digital photos. With its ease of use and configuration, you can now display all
your favorite pictures, even with background music.
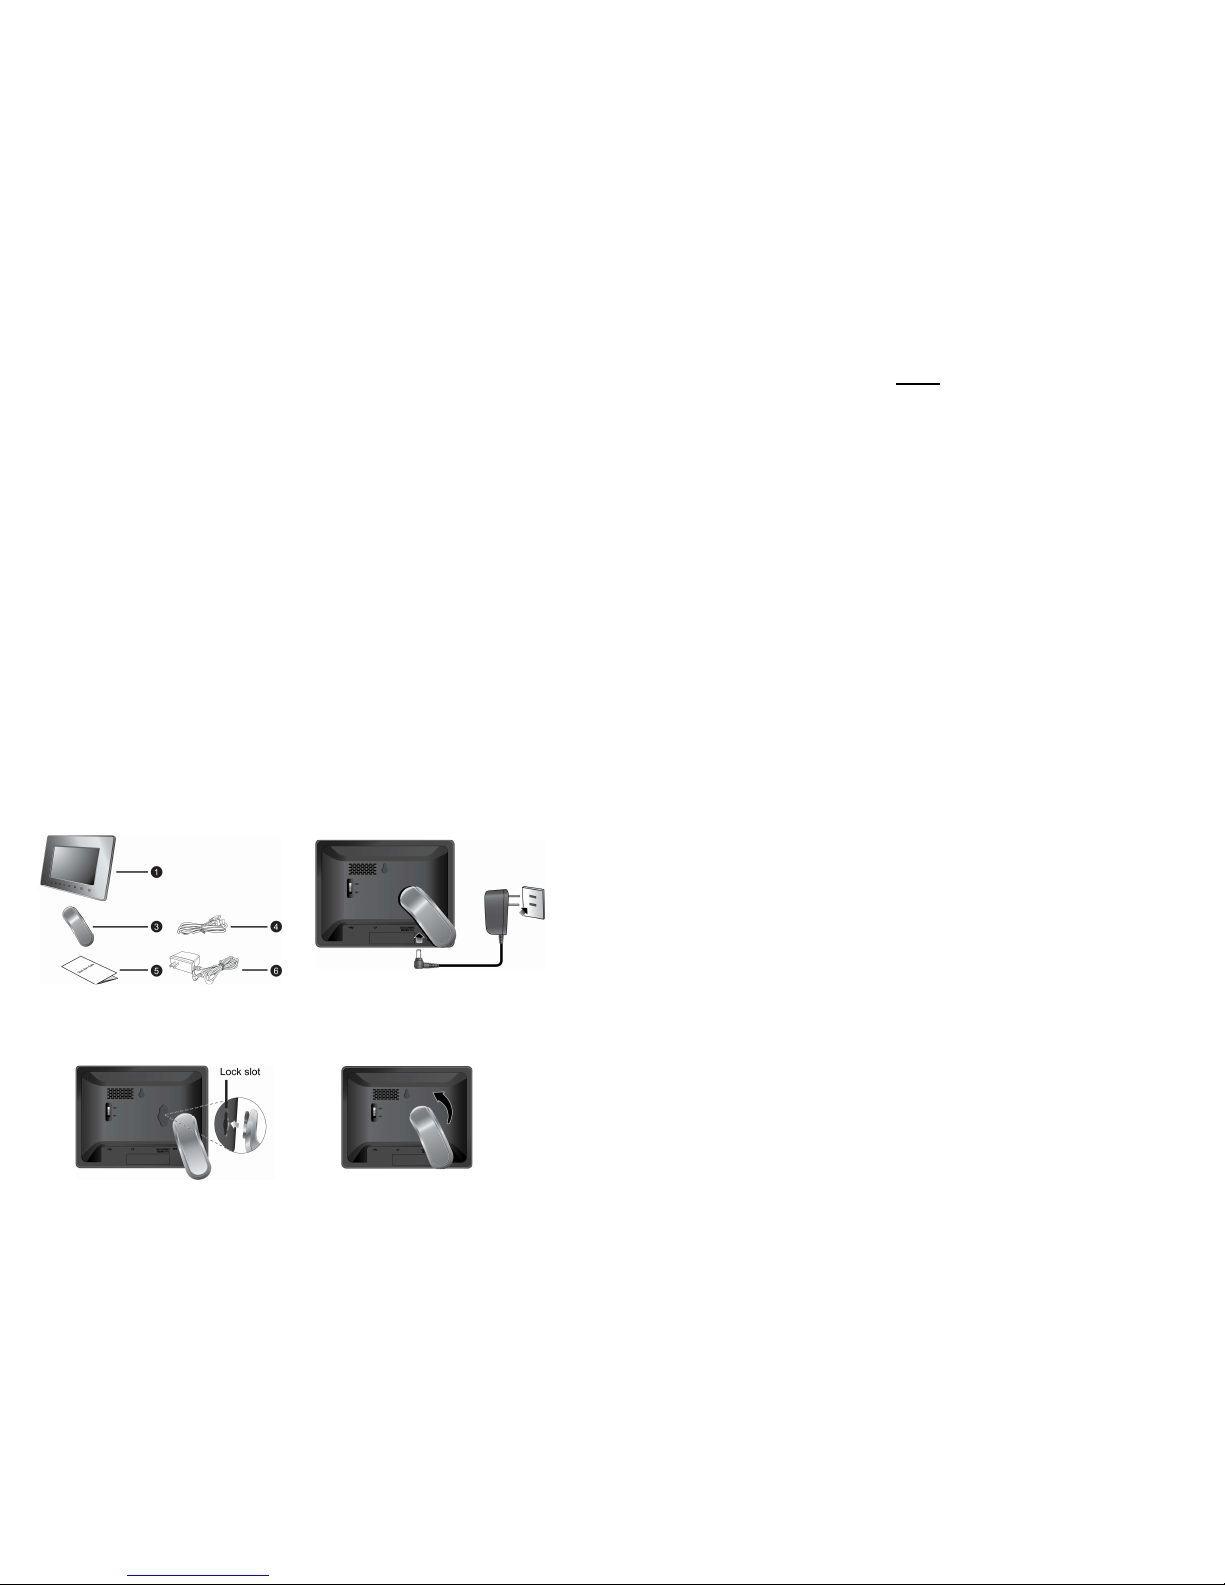
Package Contents
Before using the NuTouchtm, be sure to check all the accessories contained in the package.
NuTouch
tm
comes with the following items:
A. NuTouchtm unit with removable desktop stand
B. A.C. Power Adapter
C. USB Cable
D. User Manual
Features
High resolution 7” TFT display
Plays images in slideshow format
Plays audio
Plays Audio Slideshow
Built-in multi-format card reader CF/MMC/SD/XD/MS/MS Pro
Generous 128MB internal memory
USB Port for PC connection
Connections
Use the guide below for power connection and media insertion.
I
nstalling the Removable Desktop Stand
1. On the back of the unit, attach the foot stand to the lock slot.
2. Rotate the foot stand counter-clockwise until it is secured to the digital picture
frame.
Notes
Page 3
Notes
3. Place the whole unit either vertically or horizontally on a stable surface to avoid
possible movement.
4. Use the reverse procedure to remove the stand
Operating the NuTouchtm
1. Plug one end of the AC Adapter into the Digital Photo Frame and plug the
other end into a standard AC electrical outlet.
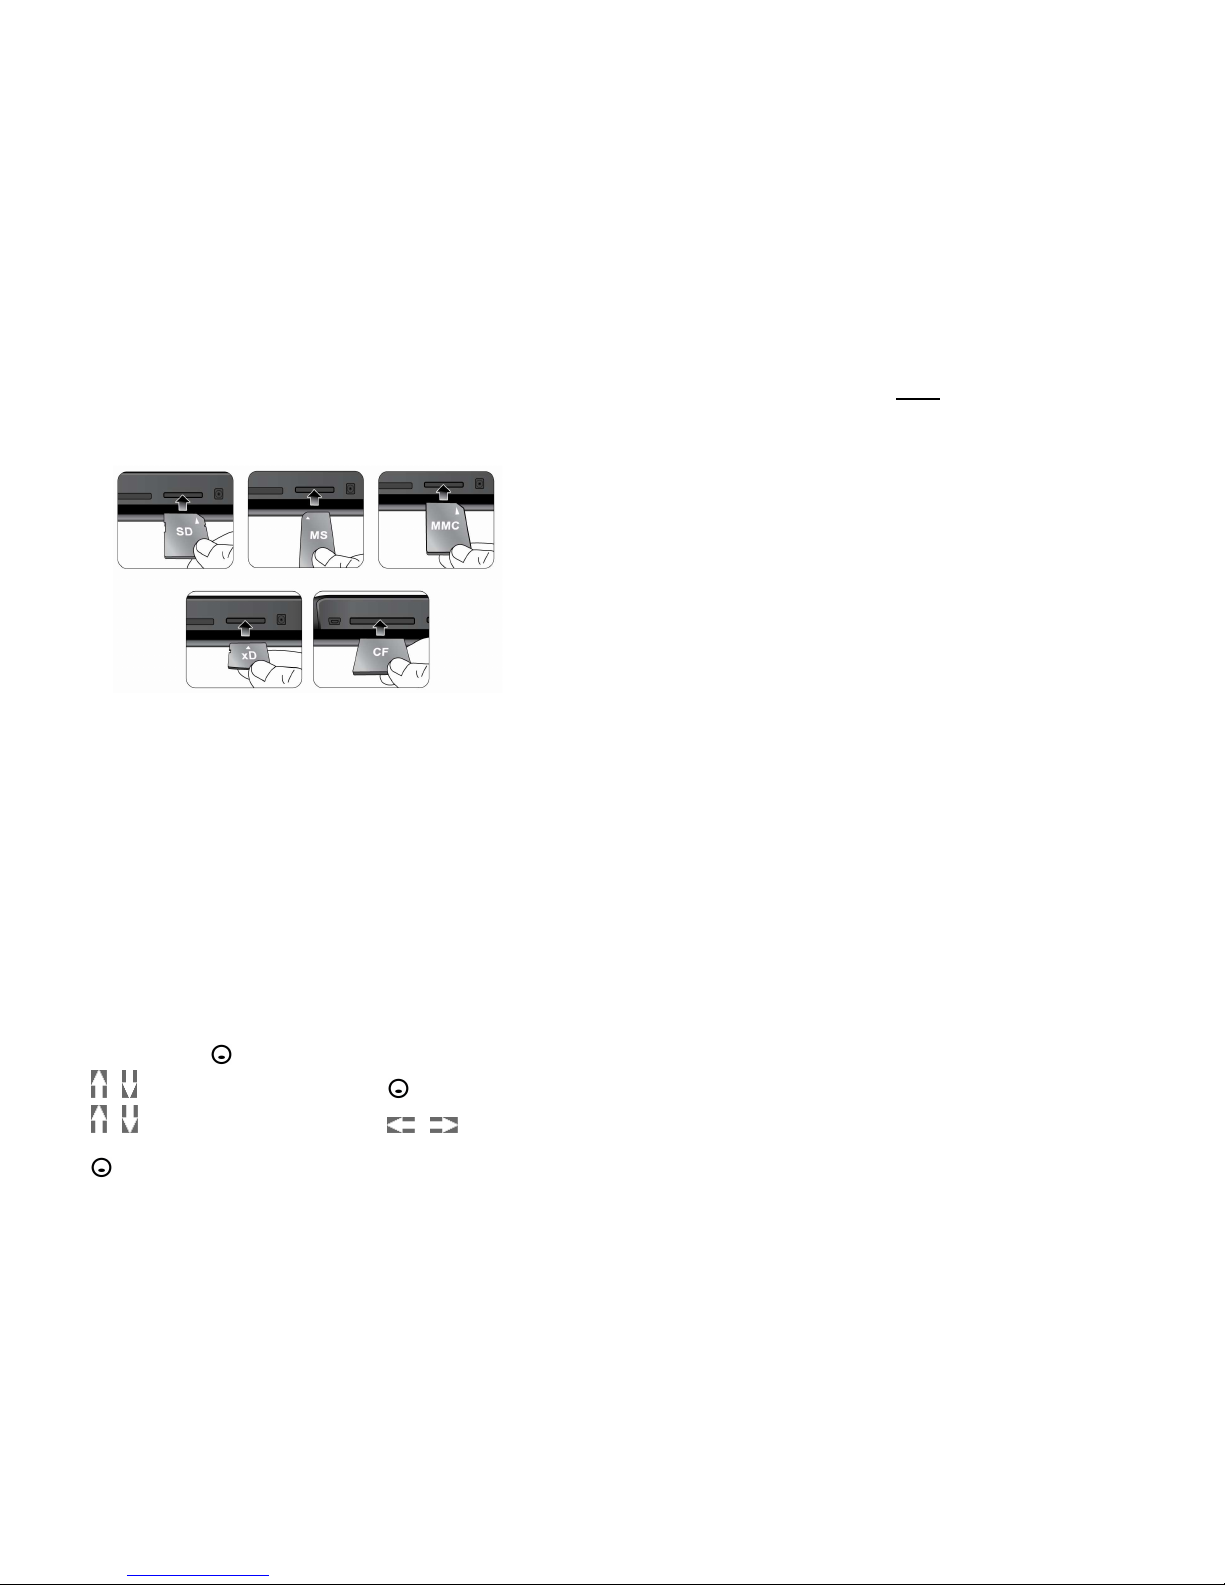
2. Insert a memory card into the appropriate slot .
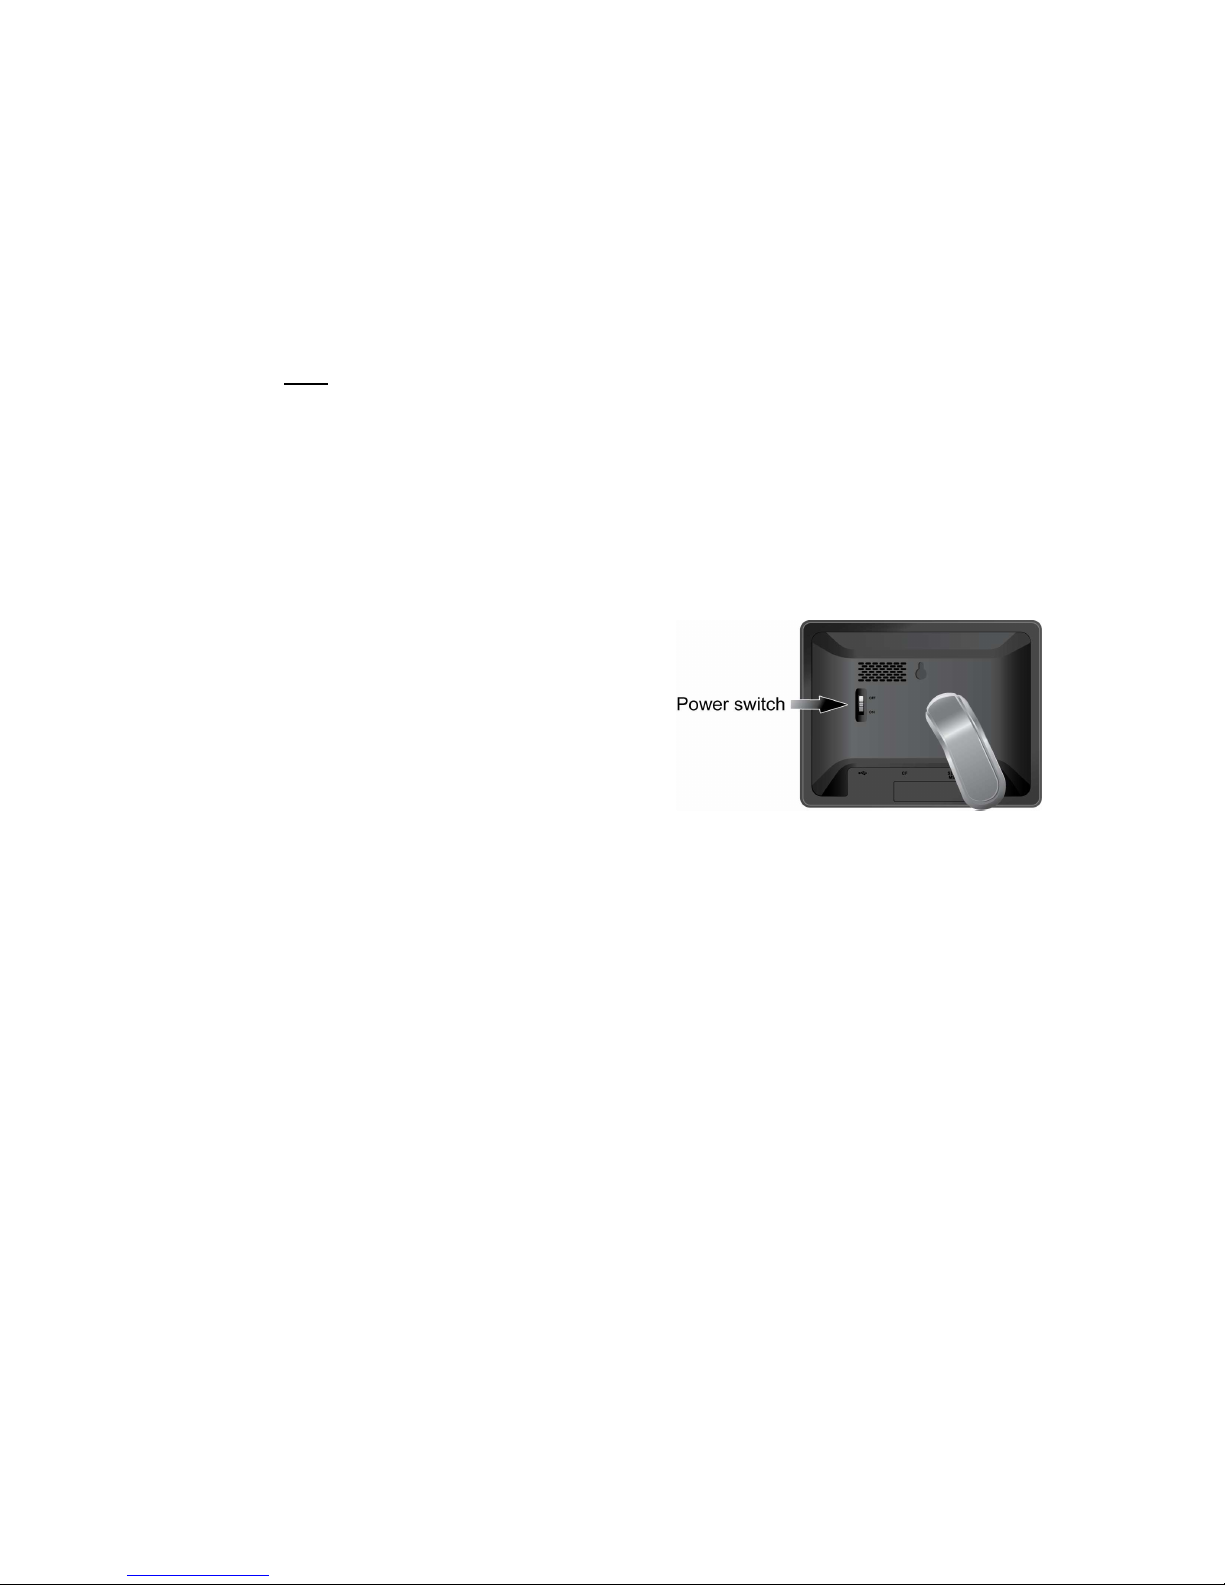
3. Slide the Power Switch to the ON position .
4. The Power-On sequence includes display information on the screen and
illumination of the touch sensor array. When complete, the frame will display the
first image. Use the Touch Sensor Array to play individual images, or slideshow
for continuous presentation of all images.
5. Keep the power connected for at least 4 hours to fully charge the battery.
Using the Built-in Internal Battery
• The built-in internal Li-Polymer battery is mainly designed for short-term use (for
example, during a short demo or power outage).
• Battery operating time is approximately 30 minutes (for photo display only).
• When the AC power is connected, the battery is always automatically charging. The
charging automatically stops when the battery is fully charged.
• When the internal battery is nearly drained, it is recommended to have it replaced at
your nearest service center to avoid possible data loss when AC power is temporarily
not available (for example, during a power outage).
Using USB to Computer
A USB Port is included so that content can be transferred to the NuTouchtm internal
memory directly from the computer. When USB is connected, the frame will halt the
slideshow in progress with the display indicating it is connected to the computer. On
your computer, the unit will appear as a drive letter representing the internal memory.
Use standard drag-n-drop techniques to copy content from the computer to the frame.
Page 4
Viewing Images and/or Listening to audio from Internal Memory
External Memory Card
The unit is preloaded with some demo images in the internal memory. On the back of
the unit, you can also choose to insert an SD/MS/MS Pro/MMC/xD card into the 5-in1 card slot or a CF card into the CF card slot.
1. It is recommended that you save the
audio files you would like to play on your
N
uTouch
tm
to the same memory card as the images.
2. It is also recommended that the frame be turned off before inserting/ejecting a
memory card
3. Although images on a memory card will be automatically resized to fit the LCD
screen, the original images on the memory card remain unaffected.
4. Both 5-in-1 and CF card slots supports hot-swap function.
5. If you insert two cards into both slots, the unit will only show images stored on
the second card inserted rather than the first one.
Auto Image Copying and Resizing
Automatically copies and resizes image files to the
internal memory when a memory
card is inserted. To do so, you must turn on the Auto Copy feature before inserting a
memory card.
To turn on Auto Copy:
1. In the Photo mode, press under Menu.
2. Press / to select System Setup, and then press under Select.
3. Press / to select Auto Copy, and then press / to make sure On
shows on the screen.
4. Press under Back twice to return to the Photo mode.
N
otes
Page 5
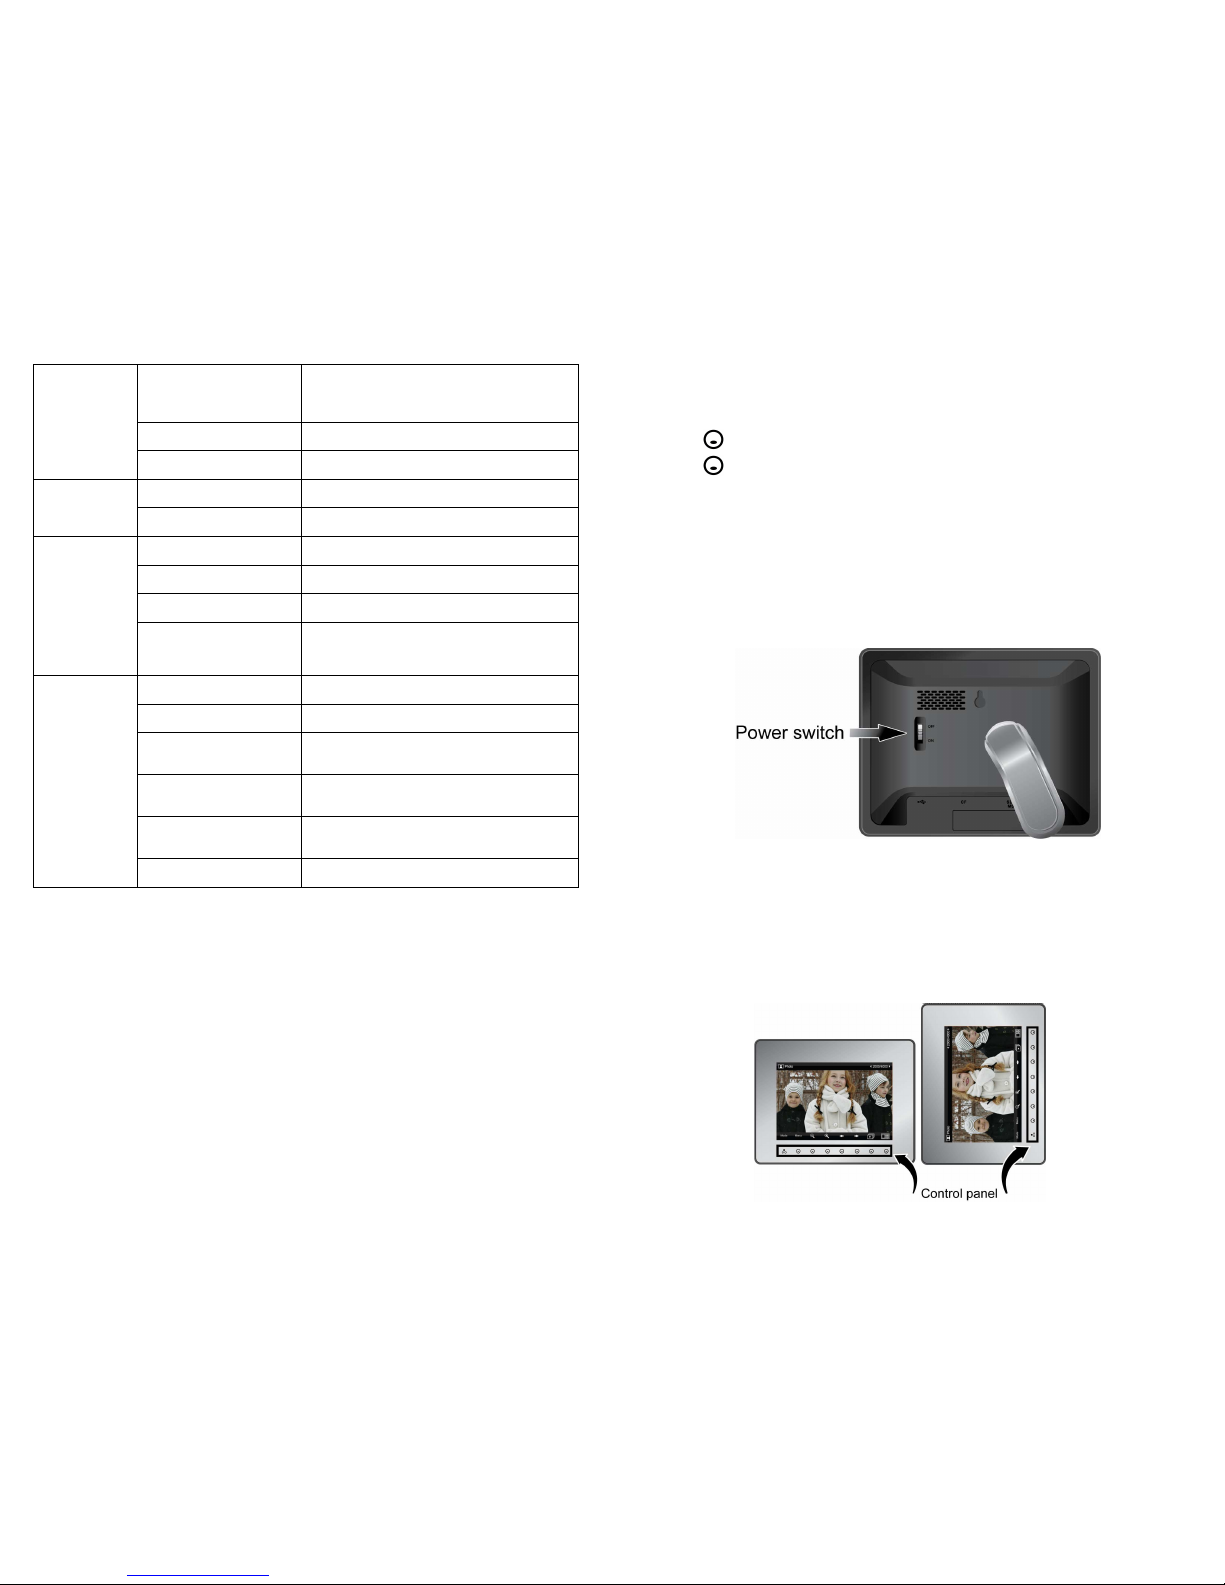
Photo Display
S
ingle
Picture/Thumbnails/Slideshow/Personalized
Frame
Supported Format JPEG, BMP
Photo Display
Display Orientation Portrait/Landscape
Music Player AudioPlayer / Slideshow background music
Music Player
Supported Format
Automatic File Copy Auto Download, Auto Resizing
Clock Yes
Calendar Yes
Other Features
Multi-language OSD
Support
English, French, and Spanish
Power Consumption 4.5 Watt (Operation)
Battery Type Built-in 1100 mAH Battery Cell (Li-Polymer)
Battery Charging Time
2 hours (Please charge at least 4 hours for first
time use.)
Dimensions (w/o foot
stand)
205.9 x 160.2 x 31.3 mm (Length x Width x
Height)
Dimensions (w/ foot stand)
205.9 x 160.2 x 95.7 mm (Length x Width x
Height)
General
Specifications
Weight 575 g
To use Auto Copy:
1. Insert a memory card. A message asking you whether to use Auto Copy shows.
2. Press under Copy to confirm the task.
3. Press under Done to start the copying process.
4. When the process completes, remove the memory card. All copied images will be
automatically resized to fit the screen. The file size of each copied image will be
automatically reduced to save space in the internal memory. By doing so, more
images can be stored in the internal memory.
Turning NuTouch
tm
On/Off
Sliding the power switch to ON turns on the unit, while sliding the power switch to
OFF turns off the unit.
Controls
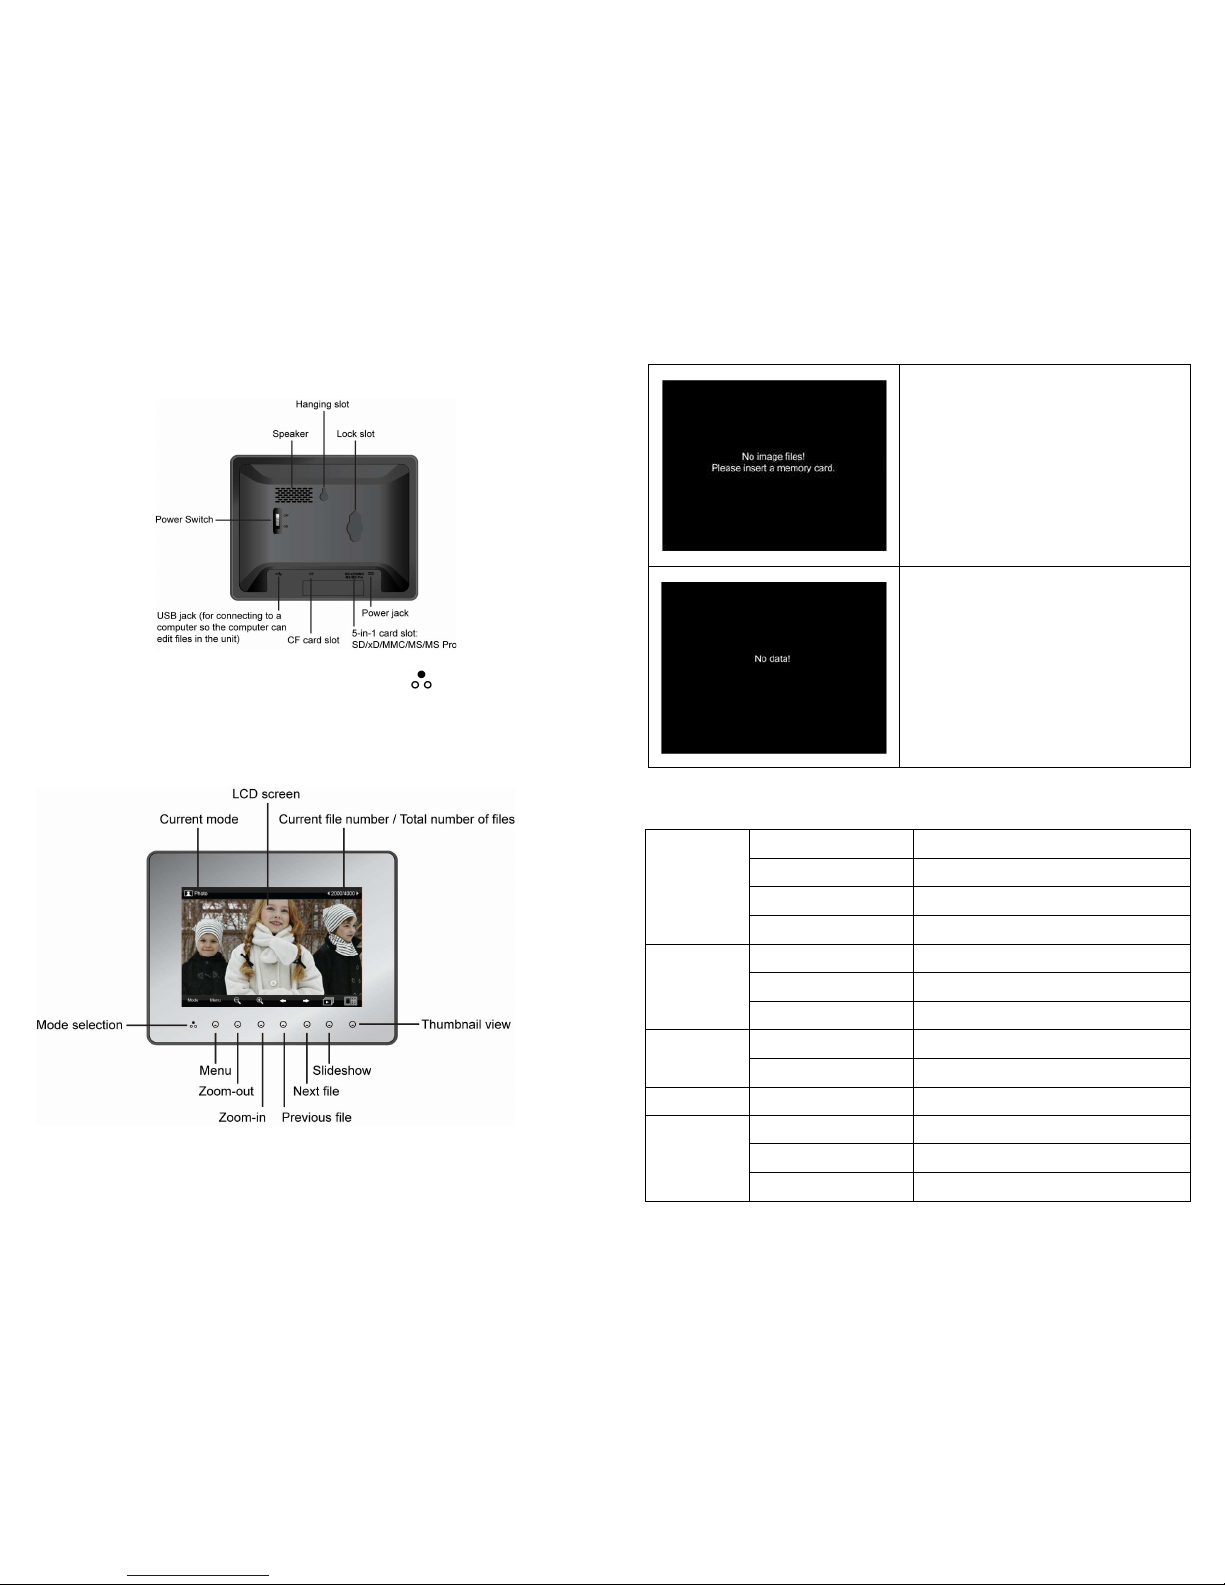
After the unit is turned on, available functions show on the screen and their
corresponding buttons light up on the control panel for a period of time.
Simply press the corresponding button below (if the unit is placed horizontally) or
beside (if the unit is placed vertically) the name indicating the function you want to
use.
Front View
Page 6
Rear View
To toggle among Photo, Calendar, and Music modes, press . If the control panel is
unused for a certain period of time, the backlight turns off automatically. To turn on
the backlight again, press anywhere on the control panel. Available functions vary
depending on the currently selected mode and/or screen.
Photo Mode
No images files are found in the Photo mode,
or the memory card you inserted does not
have any image files. Please insert another
card containing the image files you want to
display.
No files and/or data in all three modes. Please
insert a memory card containing the files
compatible with the unit. You can also
contact your nearest service center for
assistance.
Specifications
Display Size/Type 7” TFT LCD
Panel Resolution WVGA 800 x 480
Active Display Resolution 720 x 480
LCD Panel
Aspect 6:4
SDRAM 16 MB
NOR Flash 4 MB
System Memory
NAND Flash 128 MB
Power Switch Key x 1
Local Keys
Touch Sensor Key Control 8 keys
Audio
Speakers 1 x 1 W
USB Client 1
Card Reader CF, SD, MS, MS Pro, MMC, xD
Connectivity
DC Power In 1
Page 7
Error Message Indication
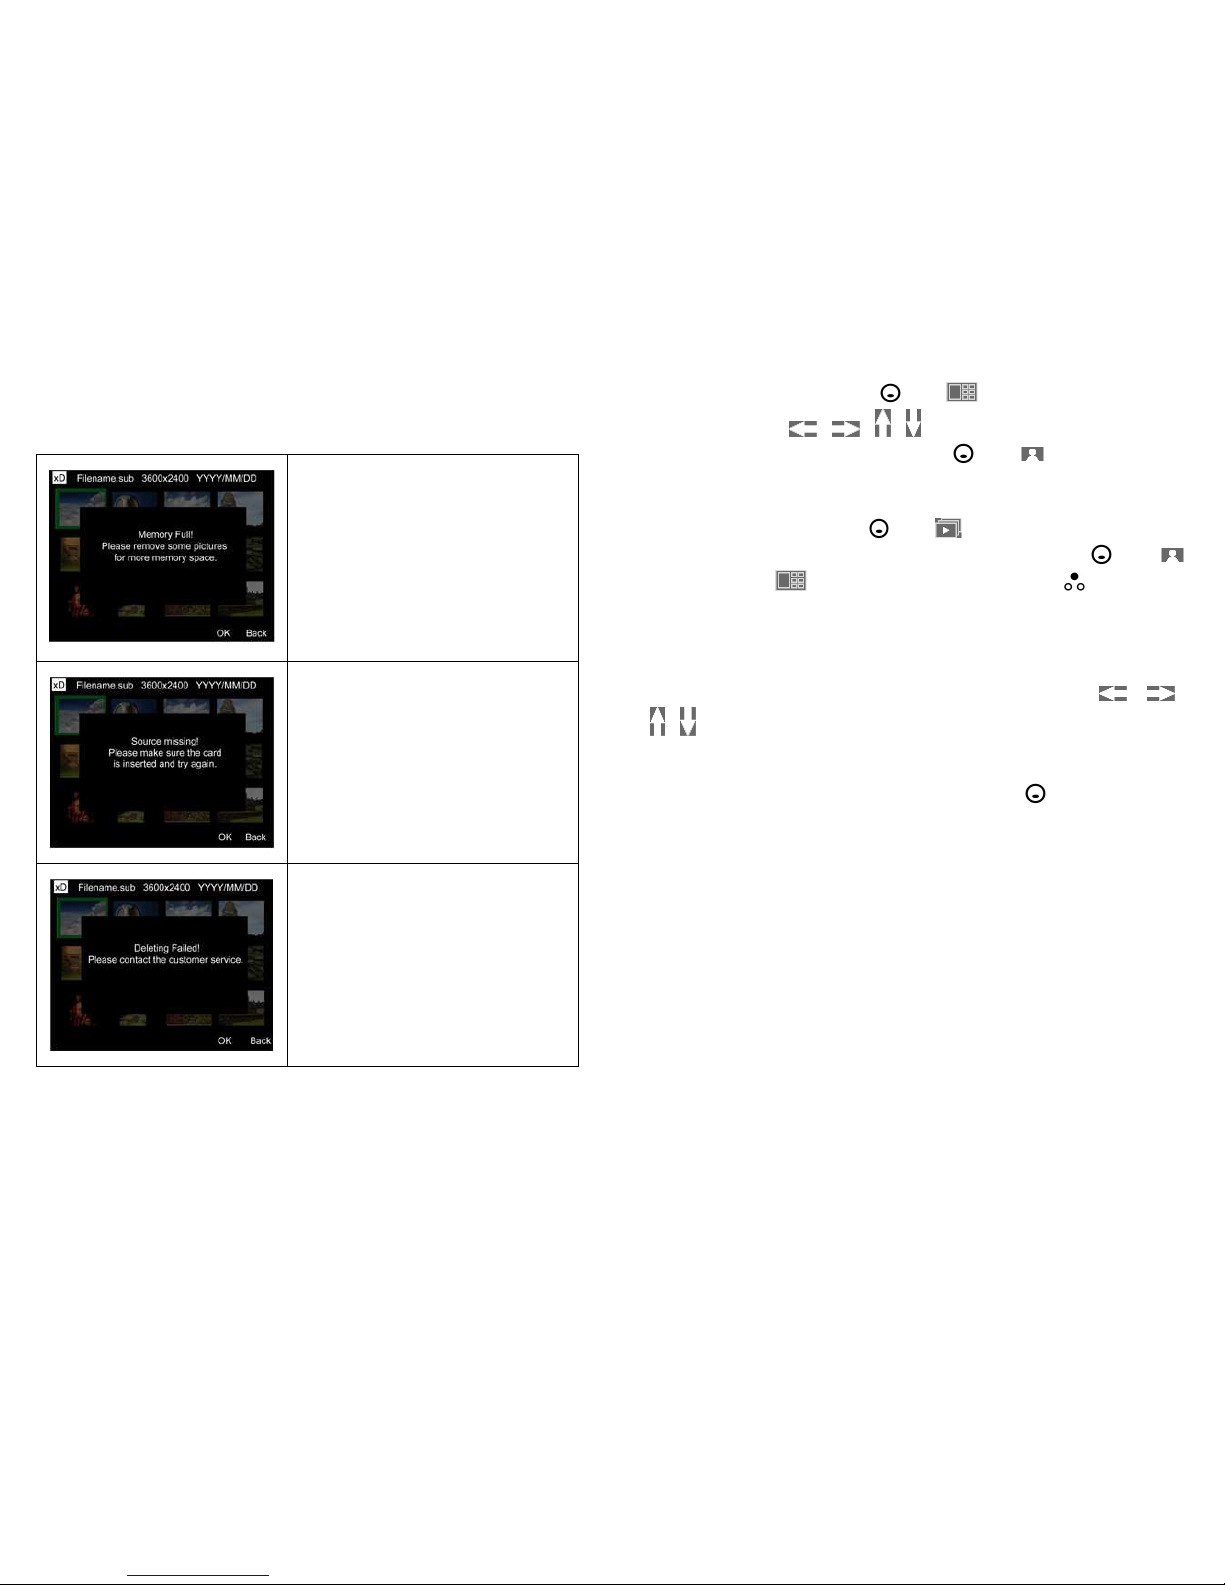
Below is the list of some error messages you might e
ncounter when using the unit.
Suggested solutions are also included.
The internal memory is full. Please remove
some images and/or audio files, so you can
copy new files to it again.
The memory card may not be inserted
properly. Please check the card and make
sure it is inserted properly.
The unit cannot delete files you selected.
Please contact your nearest service center for
assistance.
Selecting an Image
1
. After you turn on the unit, press under (Thumbnail view) and press the
navigation controls / / / to move to an image you want to see.
2. To see the selected image in full screen, press under (Single view).
Playing a Slideshow
1. After you turn on the unit, press
under (Slideshow).
2. The slideshow automatically starts. To stop the slideshow, press under
(Single view) or (Thumbnail view). You can also press under Mode to
switch to another mode.
Options in the Photo Mode
Pan
When an image is enlarged, you can use the navigation controls / /
/ to move to a particular area you want to see.
Edit Slideshow
Selects the images you want to see in the slideshow. Press under Select to select
or unselect an image. A ticked thumbnail means the image is selected. Similarly, an
unticked thumbnail means the image is not selected.
Copy to Memory
Copies selected images to the internal memory.
Delete
Removes the currently selected image from the internal memory.
Display Layout
Selects the number of thumbnails to display.
Rotate
Rotates the currently selected image (in the memory card) to another angle. The
rotation angle will be automatically reset to zero after you move to another image.
Display Clock
Selects whether to show the clock in the Photo mode.
Slideshow Setup
Setup for the background music, interval between images, transition effect, and the
sequence to show images.
Page 8
System Setup (also available in Calendar and Music m
odes)
Choose the LCD screen brightness, OSD (On-Screen Display) language, and whether
to turn on the Auto Copy feature (automatically copies image files from a memory
card to the internal memory) whenever inserting a memory card.
Calendar Mode
S
etting up Date and Time
1. After you turn on the unit, press under Mode to switch to the Calendar mode.
2. Press under Menu.
3. Select Date and Time, and then press under Select.
4. Use
/ to move to different fields and use / to adjust date and time.
5. Press under Done.
6. Press under Back.
Personalized Frame
Personalizing the frame’s background can be done while in Calendar Mode.
1. After you turn on the unit, press under (Thumbnail view) and press the
navigation controls / / / to move to an image you want to see.
2. To see the selected image in full screen, press under (Single view).
3. Press under Mode to switch to the Calendar mode and the selected image will
now be stored as the Calendar’s background.
Music Mode
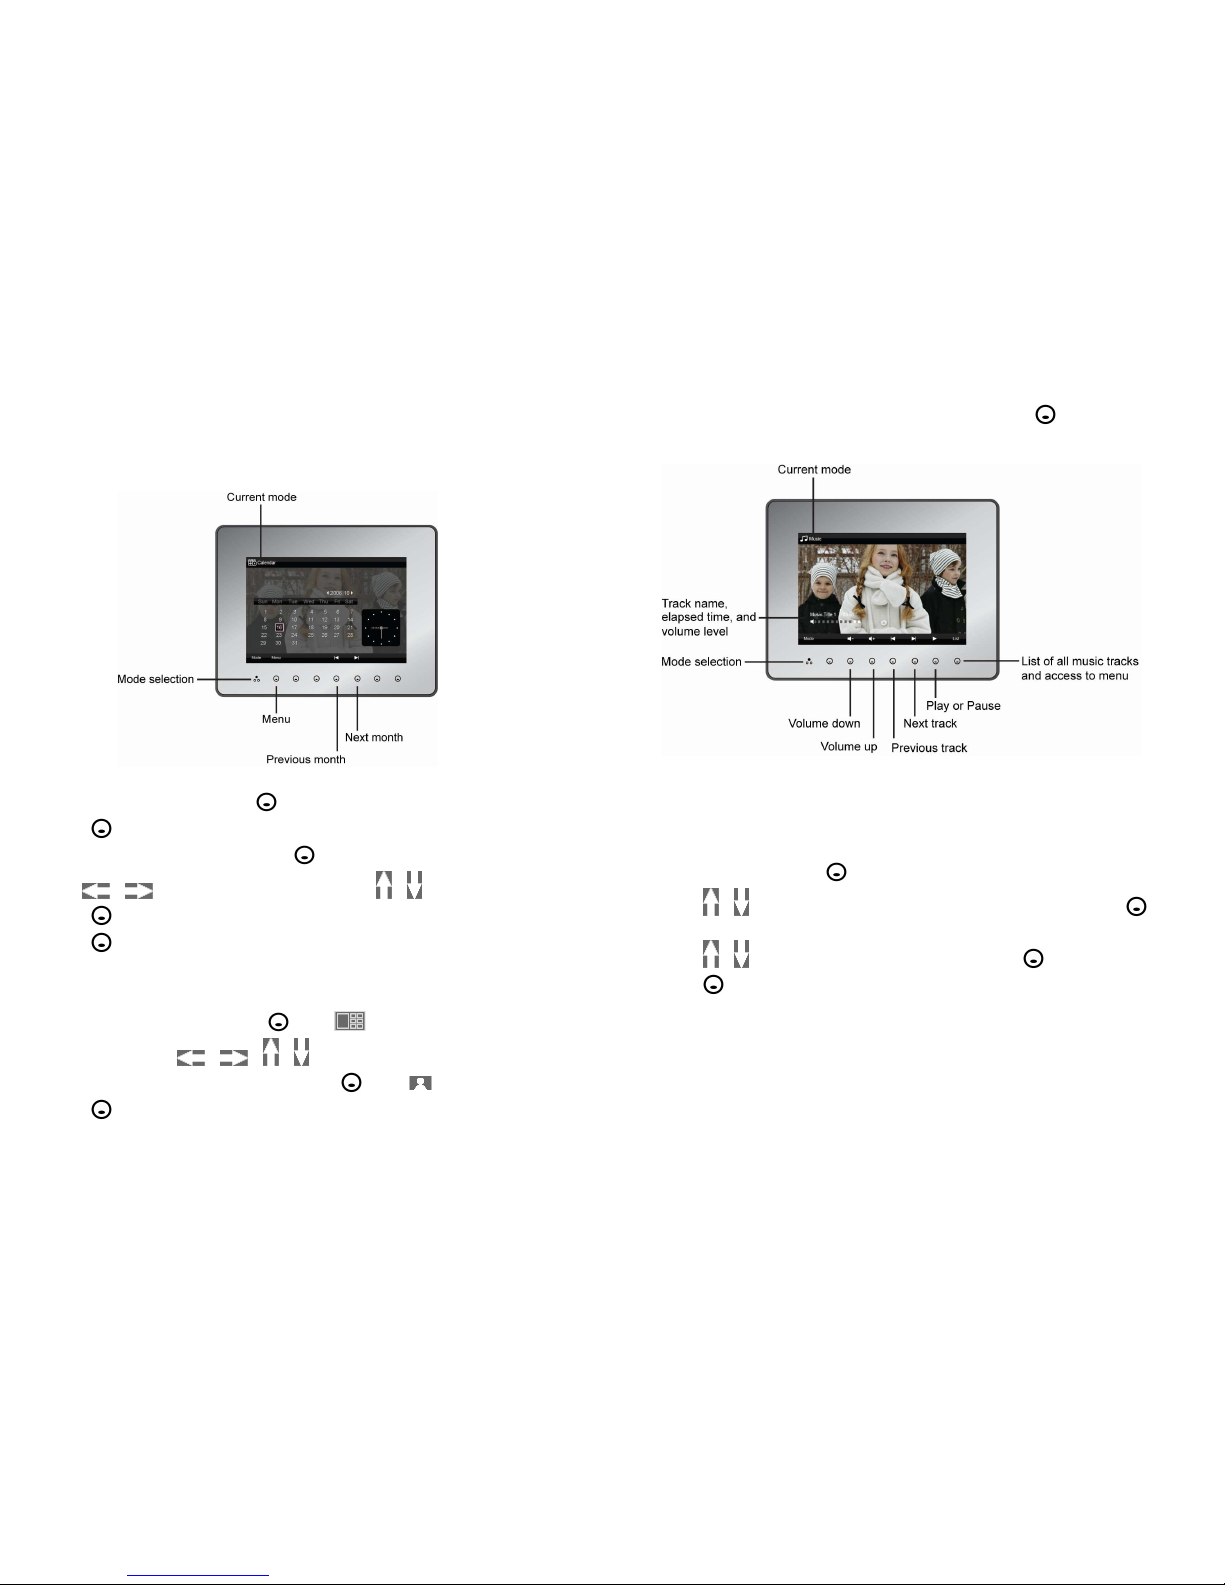
After you switch to the Music mode, the music automatically starts playing. You can
stop it or move to another track anytime. You can also press under List to do the
following:
View the full
audio file list.
D
elete an
audio file from the internal memory.
A
ccess System Setup as needed.
To Copy an
audio File to the Internal Memory:
1
. In the Music mode, press
under List.
2. Press
/ to select the audio file you want to copy, and then press under
Menu.
3. Press / to select Copy to Memory, and then press under Select.
4. Press under Copy to confirm the task.
5. When the process completes, remove the memory card.
 Loading...