

Page 1
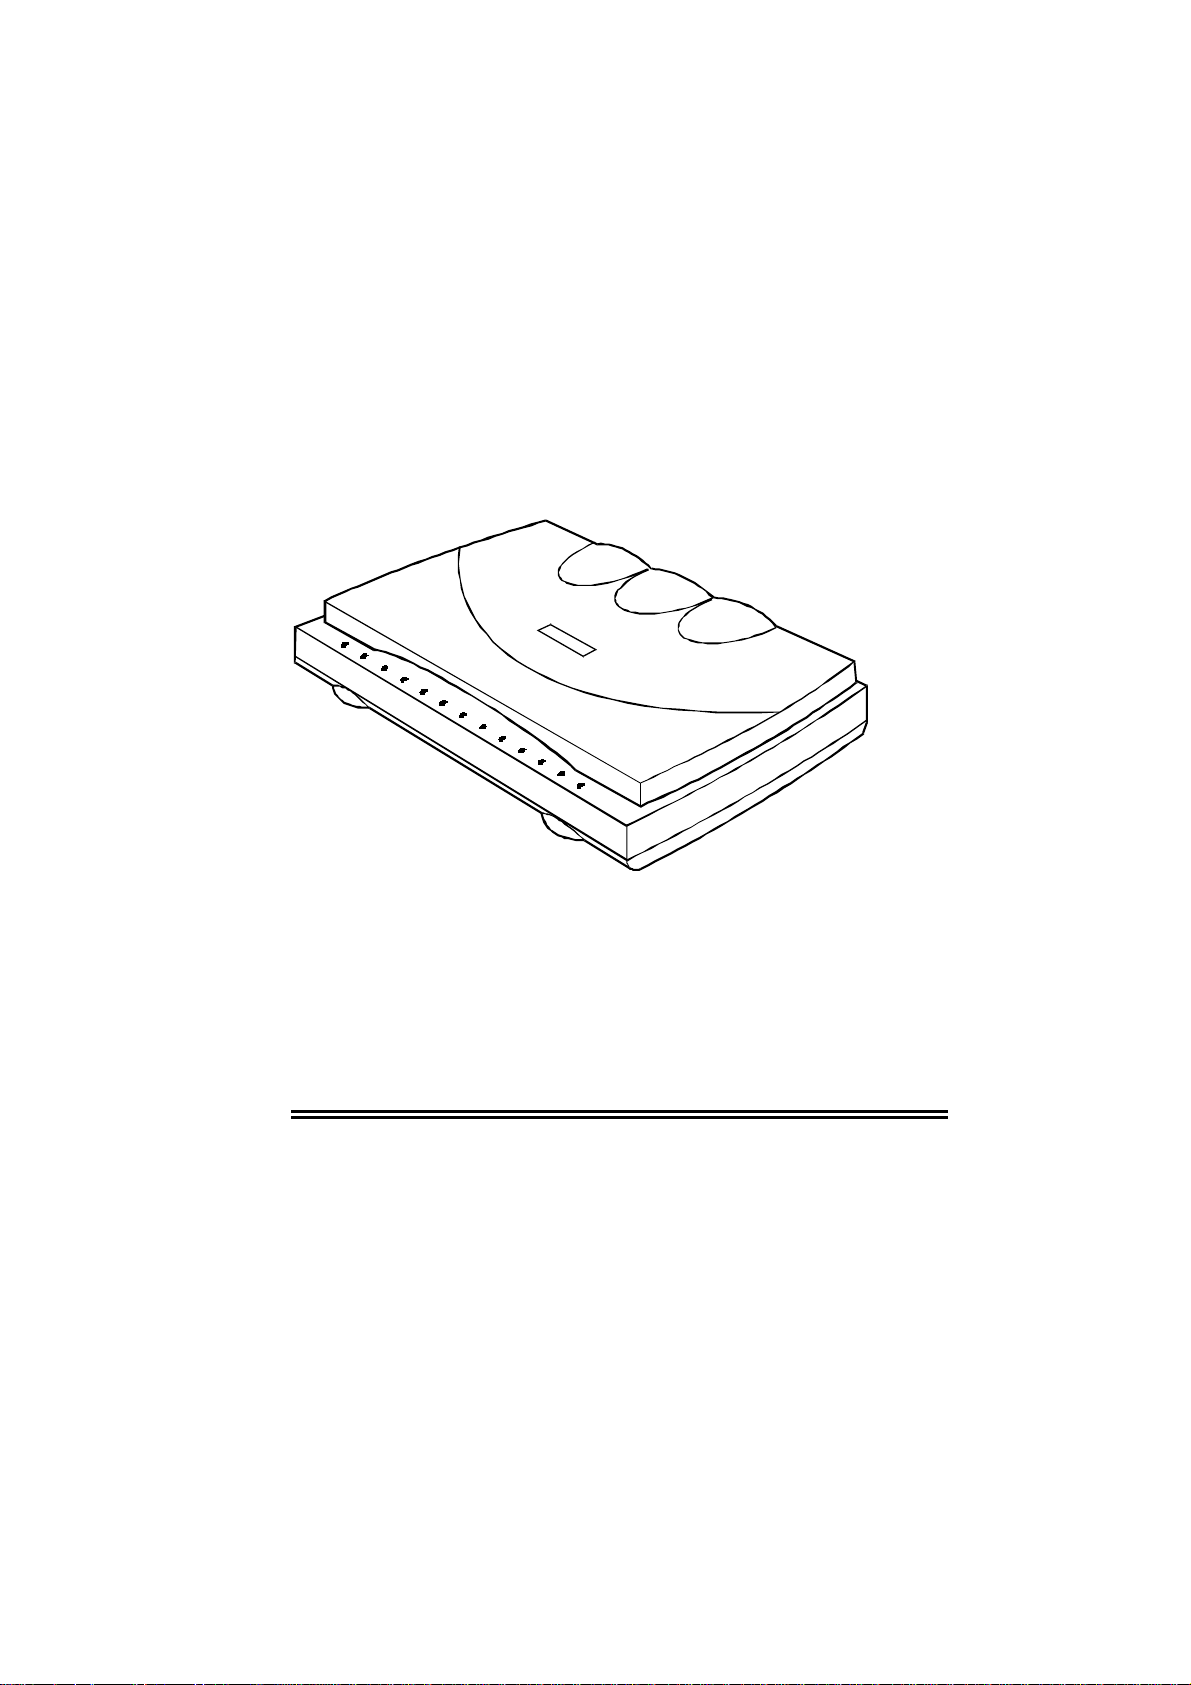
DRSCAN36EPPR
User’s Manual
Page 2

TABLE OF CONTENTS
Welcome.............................................................................................4
Chapter 1: Installing the Scanner ................................................5
What You Need...................................................................................5
Unpacking the Box...............................................................................6
The Hardware................................................................................6
The Software and the User s Guides............................................7
Setting Up the Scanner.......................................................................7
Plugging it in....................................................................................8
Installing the TWAIN Driver and ScanOffix Pro.................................9
Carriage Lock................................................................................... 10
Chapter 2: Scanning Items.......................................................... 11
The Easy TWAIN Module................................................................ 11
Scanning to Get the Best Image...................................................... 14
Image Resolution.............................................................................. 15
Image Mode...................................................................................... 15
Brightness and Contrast .................................................................. 16
Shadow and Highlight....................................................................... 17
The Descreen Button....................................................................... 19
2
Page 3

The Auto Levels................................................................................ 19
The Gamma Curve........................................................................... 19
The Auto Settings............................................................................. 20
The Control Panel............................................................................. 21
Managing Scan Jobs with the Job Manager................................... 22
Appendix A: Care and Maintenance.......................................... 25
Safety Precautions........................................................................... 25
Cleaning the Scanner....................................................................... 26
Appendix B: Frequently Asked Questions ............................. 27
Appendix C: Scanner Specifications....................................... 33
Glossary........................................................................................... 36
3
Page 4

Welcome
Congratulations on your new color scanner! We've designed this
scanner to be easy to install, fast-working, flexible and stylish, but at
the same time to provide you with all the powerful scanning
capabilities you need. You'll soon bring polish and crispness to all of
your reports, letters, presentations and e-mails with your new color
flatbed scanner. With 36 dazzling bits of color and high resolution,
your scanner delivers nothing but brilliance and clarity. 36-bit color
means that your scanner can see billions of colors, and with a
resolution of 600 x 1200 your scans will look as sharp as the real
thing. There's no limit to what you can scan, from faxes and
magazine articles to black & white or color photos.
This manual is intended to familiarize you with your scanner so that
you can take full advantage of its features. It will guide you through
setting up the scanner, installing the software, operating the
equipment and all the way to making brilliant scans. This manual is
primarily for the scanner itself and its TWAIN driver—the software
that controls the scanner. To learn more about operating ScanOffix
Pro, please see the ScanOffix.Pro manual included on this CDROM. And before you start, read through Appendix A of this manual
to acquaint yourself with important Safety Precautions.
To reach our technical support:
Digital Research Technologies
13801 Senlac Dr.
Dallas, TX 75234
Ph: 1-888-516-0200 (8:30 AM – 5:30 PM M-F CST)
www.dr-tech.com
4
Page 5

CHAPTER 1
Installing the Scanner
This chapter gives you step-by-step instructions on setting up your
scanner and installing the included image processing software suite,
ScanOffix Pro. Before going on with the installation, be sure to
familiarize yourself with the safety precautions in Appendix A of this
guide. To install your scanner and software, you will need to:
• Connect the scanner to your computer
• Install the TWAIN driver and the application software
(ScanOffix Pro), ScanOffix Pro is found on the CDROM, and the TWAIN driver is included on the floppy
disk that came with your scanner.
What You Need
To use the scanner and the included software, you must have the
following:
• IBM PC 486 compatible or higher.
• Windows 95, 98 or Windows NT.
5
Page 6

• CD-ROM player.
• 16 megabytes (MB) of internal memory (RAM) for the
scanner software.
• 130 MB of free hard-disk space for the ScanOffix Pro
image-processing software package.
• High (16-bit) or true (24-bit) color for included software
• A mouse or other pointing device.
• A floppy disk drive.
• An available enhanced parallel port.
• Optional: A laser, ink-jet, or dye-sublimation color printer.
! Note: The software included with this scanner works only in
true color (24-bit) or high color (16-bit) modes. To use this software
make sure your computer supports these modes by opening up the
Display control panels, clicking on the settings tab, and changing
your color mode in the color palette to 16 or 24-bit color.
Unpacking the box
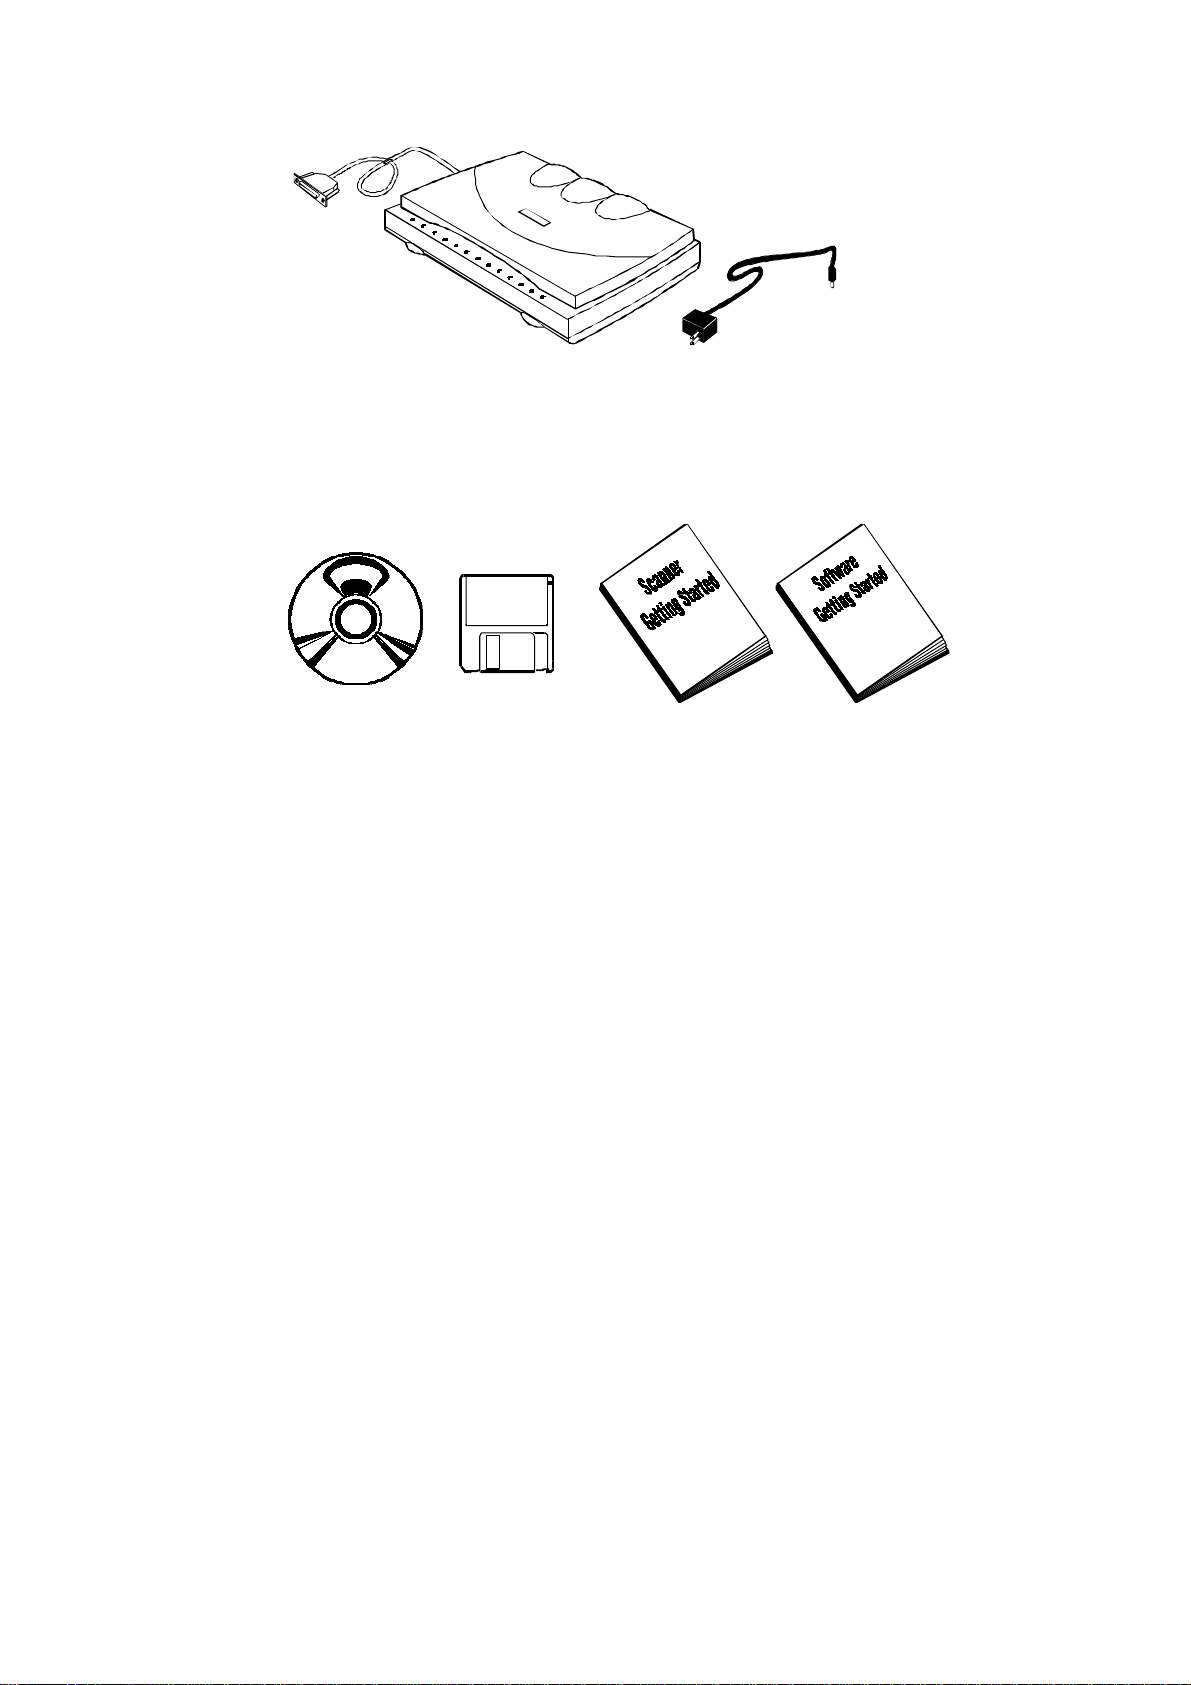
Before you begin setting up your scanner, carefully inspect the
contents of the box and compare what you find against the figures
below to make sure that all parts were included. If anything is
missing, please contact your supplier.
The Hardware
The parallel cable is attached directly to the scanner:
6
Page 7
The Software and the User’s Guides
The CD-ROM that came with your scanner contains many things:
the ScanOffix Pro software suite, for processing and manipulating
the images and texts that you scan; and a full version user's manual
for ScanOffix Pro, as well as this full version user's manual for the
scanner. The TWAIN driver that controls your scanner is included
in the floppy disk.
For those who only want a quick introduction to the scanner and
ScanOffix Pro, we've also provided condensed (printed) versions of
the user's manuals, called "Scanner Getting Started" and "ScanOffix
Pro Getting Started."
Setting up the Scanner
There are three easy things you need to do to get your new scanner
up and working. They are:
• Attaching the scanner to your computer
7
Page 8

• Installing the software
• Unlocking the carriage lock
Be sure to read this section carefully and you will be on the road to
scanning in no time.
Plugging it in
The scanner connects to any available enhanced parallel port
(EPP) on your computer. If you do not have an available parallel
port, then use the one that is currently being occupied by your
printer. Later, you can just plug the printer cable into the scanner
itself, as it offers an alternative printer port.
To connect the scanner to your computer, do the following:
1. Turn off the power to your computer.
2. If you have a printer and want to plug it into the scanner, make
sure the printer is turned off and unplugged from the computer.
3. Plug the scanner cable into an available parallel port (printer
port) on your computer.
8
Page 9

4. Plug your printer's cable into the printer port on the scanner (if
you wish).
5. Plug the scanner's power adapter into an AC (wall) outlet.
6. Plug the power cable into the power jack on the back of the
scanner.
The scanner driver, which is TWAIN-compatible, is the software
program that controls the scanner itself. ScanOffix Pro is a suite of
application programs for processing and manipulating further the
images that you've already scanned. Both need to be installed onto
your computer's hard disk before you can begin scanning. The
TWAIN driver is on the floppy disk included with your scanner, and
ScanOffix Pro is on the CD-ROM.
To install the TWAIN driver and ScanOffix Pro, do
the following:
1. Start up Microsoft Windows.
2. Insert the CD-ROM that came with your scanner into your CD-
ROM drive. The installation screen appears automatically.
Then follow the onscreen instruction.
9
Page 10

To install the TWAIN driver from the floppy disk:
UNLOC
K
1. Insert the TWAIN driver diskette into your floppy disk drive.
2. Click on the Windows Start button and choose Run from the list
commands.
3. Type A:\SETUP or B:\SETUP, depending on which disk drive
the diskette is in, and click OK.
4. When installation of the TWAIN driver is complete, click on
Finish.
Now whenever you want to scan, just open ScanOffix Pro.
The Carriage Lock
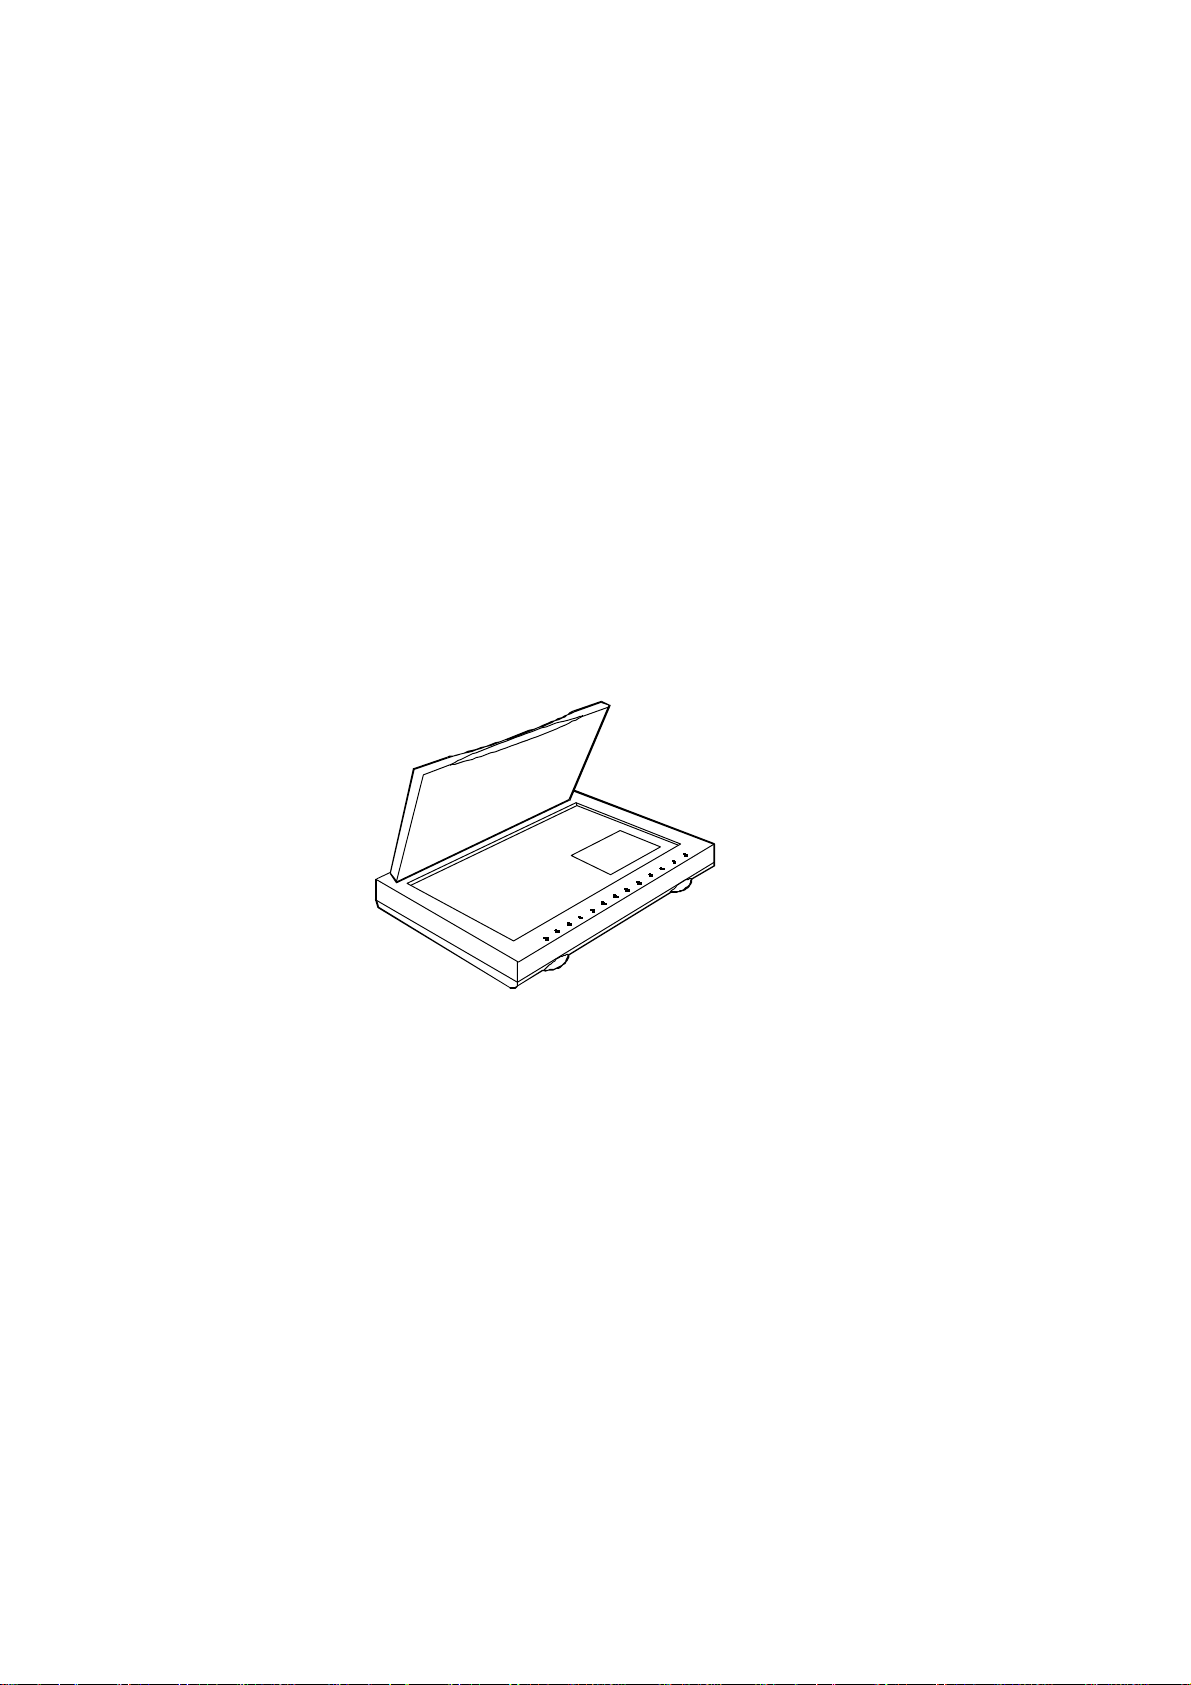
Before you can begin scanning, you need to release the carriage
lock, which protects the scanning head during shipment by
immobilizing it. The carriage lock is found underneath the scanner
inside one of the front feet. Slide the carriage lock in the direction
indicated to release it. Should you ever need to transport the
scanner, lock the carriage lock in place again.
LOCK
CarriageLock
10
Page 11

CHAPTER 2
Scanning Items
Now that you've set up your scanner and installed all the software,
you're ready to begin scanning. This chapter will explain how to
scan and how to adjust your scanning in order to get the best
possible image.
The Easy TWAIN Module
Before you can start scanning you will need to tell your scanner
some information about the document you wish to scan: How big is
it? How high do you want the quality to be? Is it color? Et cetera.
There are two ways to scan—the quick way (prescanning) involves
getting the basic image into the computer, and the other way
involves more tinkering, but of course makes for a better image.
We'll begin first by looking at the Easy TWAIN Module user
interface (hereafter referred to as "TWAIN screen"), which is where
you'll find possibilities for making very fine adjustments.
To access the TWAIN screen, do the following:
1. Start up Microsoft Windows.
2. Start ScanOffix Pro. You'll find ScanOffix Pro on the Windows
Programs menu next to all your other programs.
3. Choose Select Source from the File menu.
4. Select SF-1200CE+ 32
5. Click on Select
11
Page 12

! Note: Steps 3-5 only need to be performed the very first time
Auto Levels
you scan or if you install another scanner driver onto your hard
drive. After you select the source for the first time, every time you
want to access the TWAIN screen you can simply go through steps
1,2 and 6.
6. Choose the New Scan command from the File menu.
Alternatively you could click on the Scanner icon on the far left
of ScanOffix Pro’s Command bar.
The first thing you’ll see is a message telling you to allow the
scanner to warm up for at least thirty seconds. If you don’t wait, the
scan might be of poor quality. This only happens if the scanner
needs warming up. After you click OK, you will be presented with the
following screen, which looks like the cockpit of a racing car:
The following screen is displayed:
Basic Setting button
Brightness/Contrast
Setting button
Job Manager button
Shadow/Highlight
Setting button
Selection box Control
panel
Preview window
Gamma Curve button
Auto Settings button
Status Info button
About button
Descreen
Resolution readout
Scan buttonPreview button
12
Close button
Page 13
This is the Easy TWAIN Module user interface, or "TWAIN screen",
and this is where you'll find all the commands you need for scanning.
The scanning process is made up of three steps. The first step is
called prescanning. Prescanning is like making a "rough draft"
scan. The second step involves perfecting or altering the quality of
the prescanned image. The third step is called final scanning, or
simply scanning. We'll now take you through the first and third
steps, prescanning and scanning, and later we'll see how to adjust
settings in order to get the best possible image.
To scan, do the following:
1. Place a photograph onto the scanner's glass plate, lined up
with the front right-hand corner of the plate.
2. To prescan, click on the Preview button.
Shortly after you click on the Preview button, an image of the item
you've prescanned is displayed on the Preview window of the
TWAIN screen. If you cannot see the entire image, it may be that
you need to adjust the small blue tab on the left side of the Preview
window. Moving this tab changes the size of the area to be
prescanned or scanned. Slide the tab all the way to the bottom to
scan the largest area possible.
Notice the box in the Preview window made up of moving dotted
lines. This is the Selection box; only those parts of the preview
13
Page 14

image which are within the Selection box will be captured during the
final scan.
3. To change the size of the Selection box, click with the
mouse on one side of the box, hold down the mouse button,
and drag the side to the desired position. Or you can click
and drag outside of the Selection box to create an entirely
new Selection box.
4. To perform the final scan click on the Scan button.
As the scanner performs the final scan, you can watch the scanengine indicator on the body of the scanner to monitor the progress
of the scan sensor.
After the scanner performs the final scan, you will see your full
scanned image in a dialogue window where you may choose to
either Place the Scan on the ScanOffix Pro Desktop, or Abort. the
TWAIN screen closes automatically, and your scanned image is
placed onto the ScanOffix Pro desktop. Please refer to your
ScanOffix Pro User's Manual for information on how to process the
scanned image further.
5. To perform a new scan, repeat steps 2 - 4.
! NOTE: Prescanning is always optional. If you feel you don't
need to prescan, you can simply place your original on the scanner,
adjust the Selection box and other settings if you wish, and click on
the Scan button.
Scanning to Get the Best Image
Since you will be scanning different kinds of documents and images,
you should set the scanner according to the kind of original you're
working with and the kind of image you would like to produce. In this
section we will see how to set the image mode and resolution and
how to alter the quality of the tones (colors and shades) of the
14
Page 15

scanned image. All the instructions that follow assume that you've
already chosen the New Scan command from the ScanOffix Pro
File menu, and that you have the TWAIN screen in front of you.
Image Resolution
When you scan, the result is an image that is made up of dots (also
called pixels), like on a TV screen. Image resolution is measured in
dots per inch (dpi). A resolution of 600 dpi means that the scanned
image contains 600 pixels, or dots, for each inch of the original.
The recommended resolution when scanning a photograph or a text
document is 300 dpi. For a business card, however, you may need
400 dpi.
The Resolution readout is found on the TWAIN screen below the
Preview window. At any time before scanning you may change the
resolution by clicking on the digits with the mouse pointer. By
clicking with the left mouse button you can increase the resolution,
while the right mouse button decreases the resolution.
Image Mode
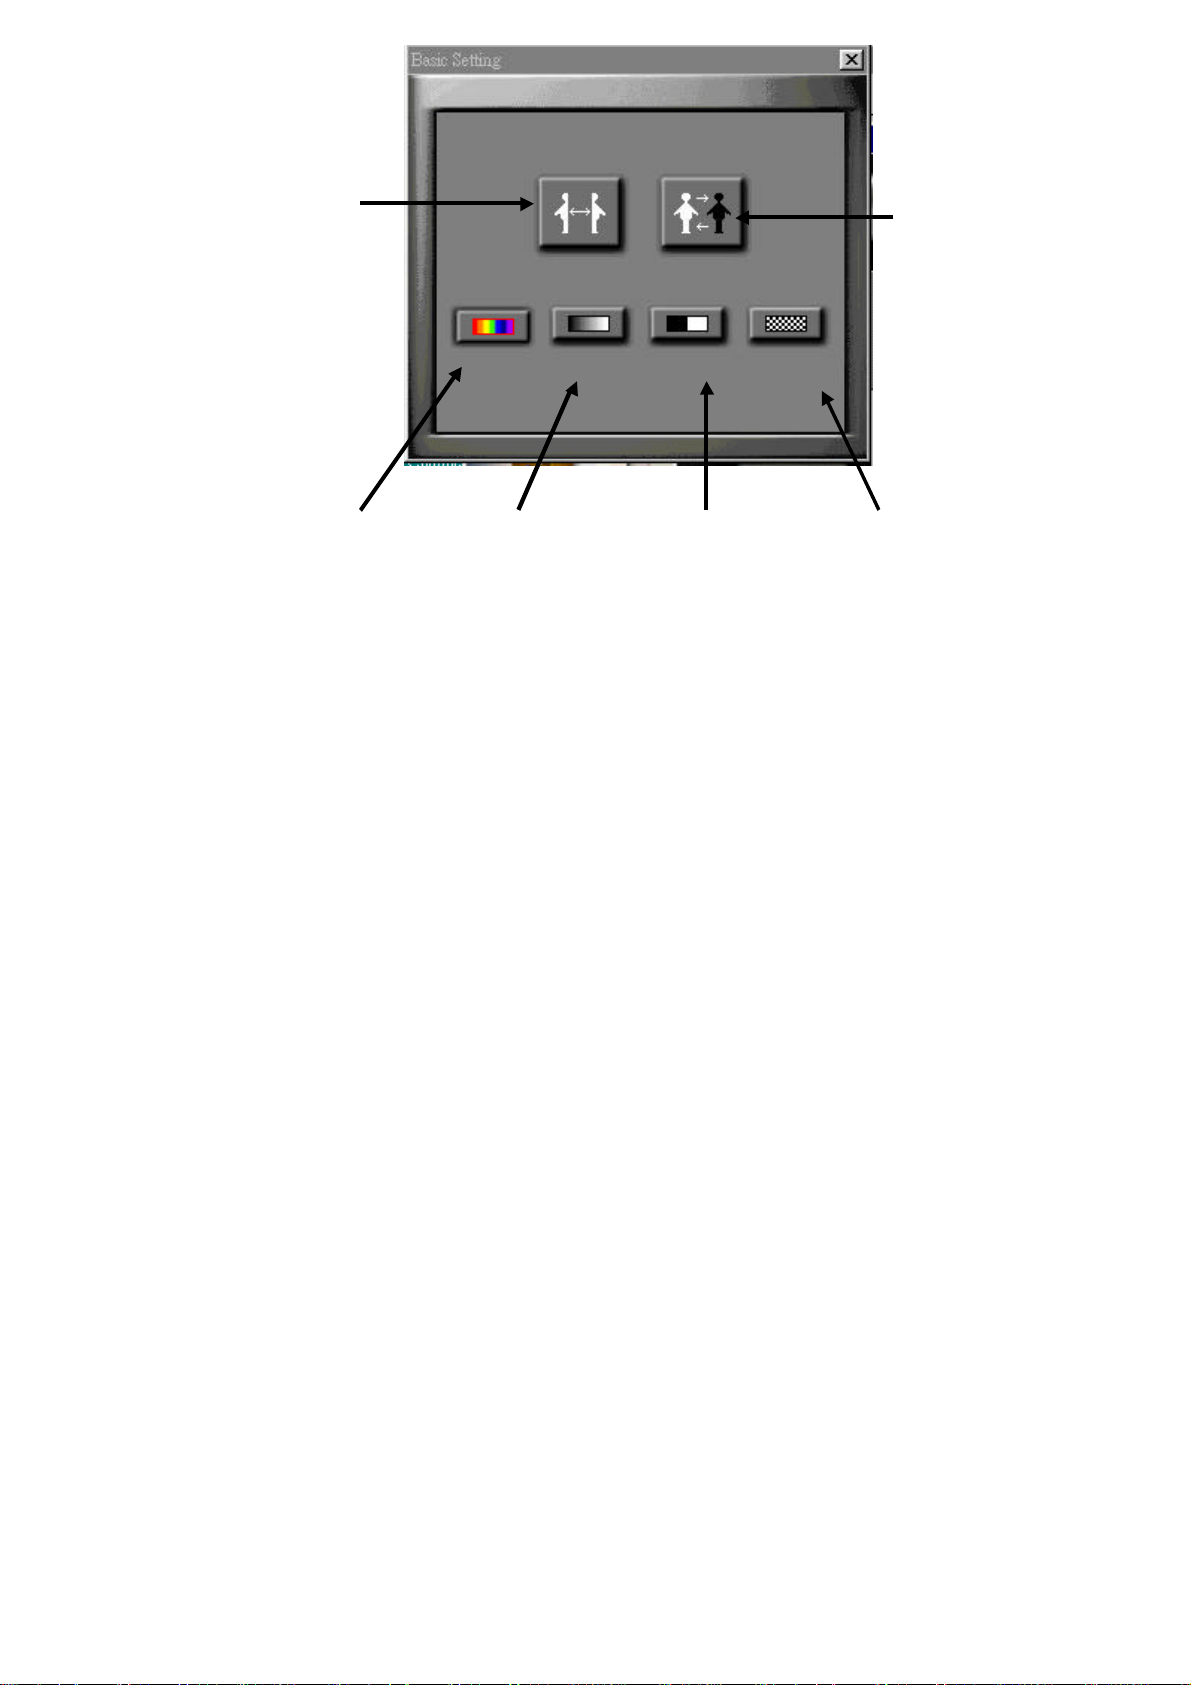
The next thing to do is choose one of the four possible image
modes, depending on what the item you're scanning is. Are you
scanning a color photo? A fax? A business card? Something else?
1. Click on the Basic Setting button to see the Basic Setting
screen.
15
Page 16
Flip button Invert button
Gray button
Color button
Line art button Halftone button
2. Click on the image mode button that corresponds to the
type of image you are scanning. You have four choices:
l Color - The Color button is only for scanning color images.
By clicking on this button before you prescan or scan, you
allow your scanner to reproduce the colors found in the
original, and the scanner can reproduce over a trillion colors!
l Gray - The Gray Scale button uses a 256-bit grayscale to
produce images like black & white photos.
l Line Art - The Line Art button is for producing images
containing only pure black and pure white. Use this button
when scanning text. If you use this button for scanning a
photograph, the scanned image will usually have a woodcut
effect.
l Halftone -Clicking on the Halftone button mixes different
patterns of black and white to give the appearance of
shading, like in newspaper photographs.
3. If you wish, click on the Flip button to create a mirror-image
of the item you are scanning, or click on the Invert button to
invert the colors of the image (e.g. black becomes white,
white becomes black, etc.).
Brightness and Contrast
By adjusting the brightness of the image before you carry out the
final scan, you can lighten or darken the image as a whole; by
changing the contrast of the image, you can increase or decrease
16
Page 17
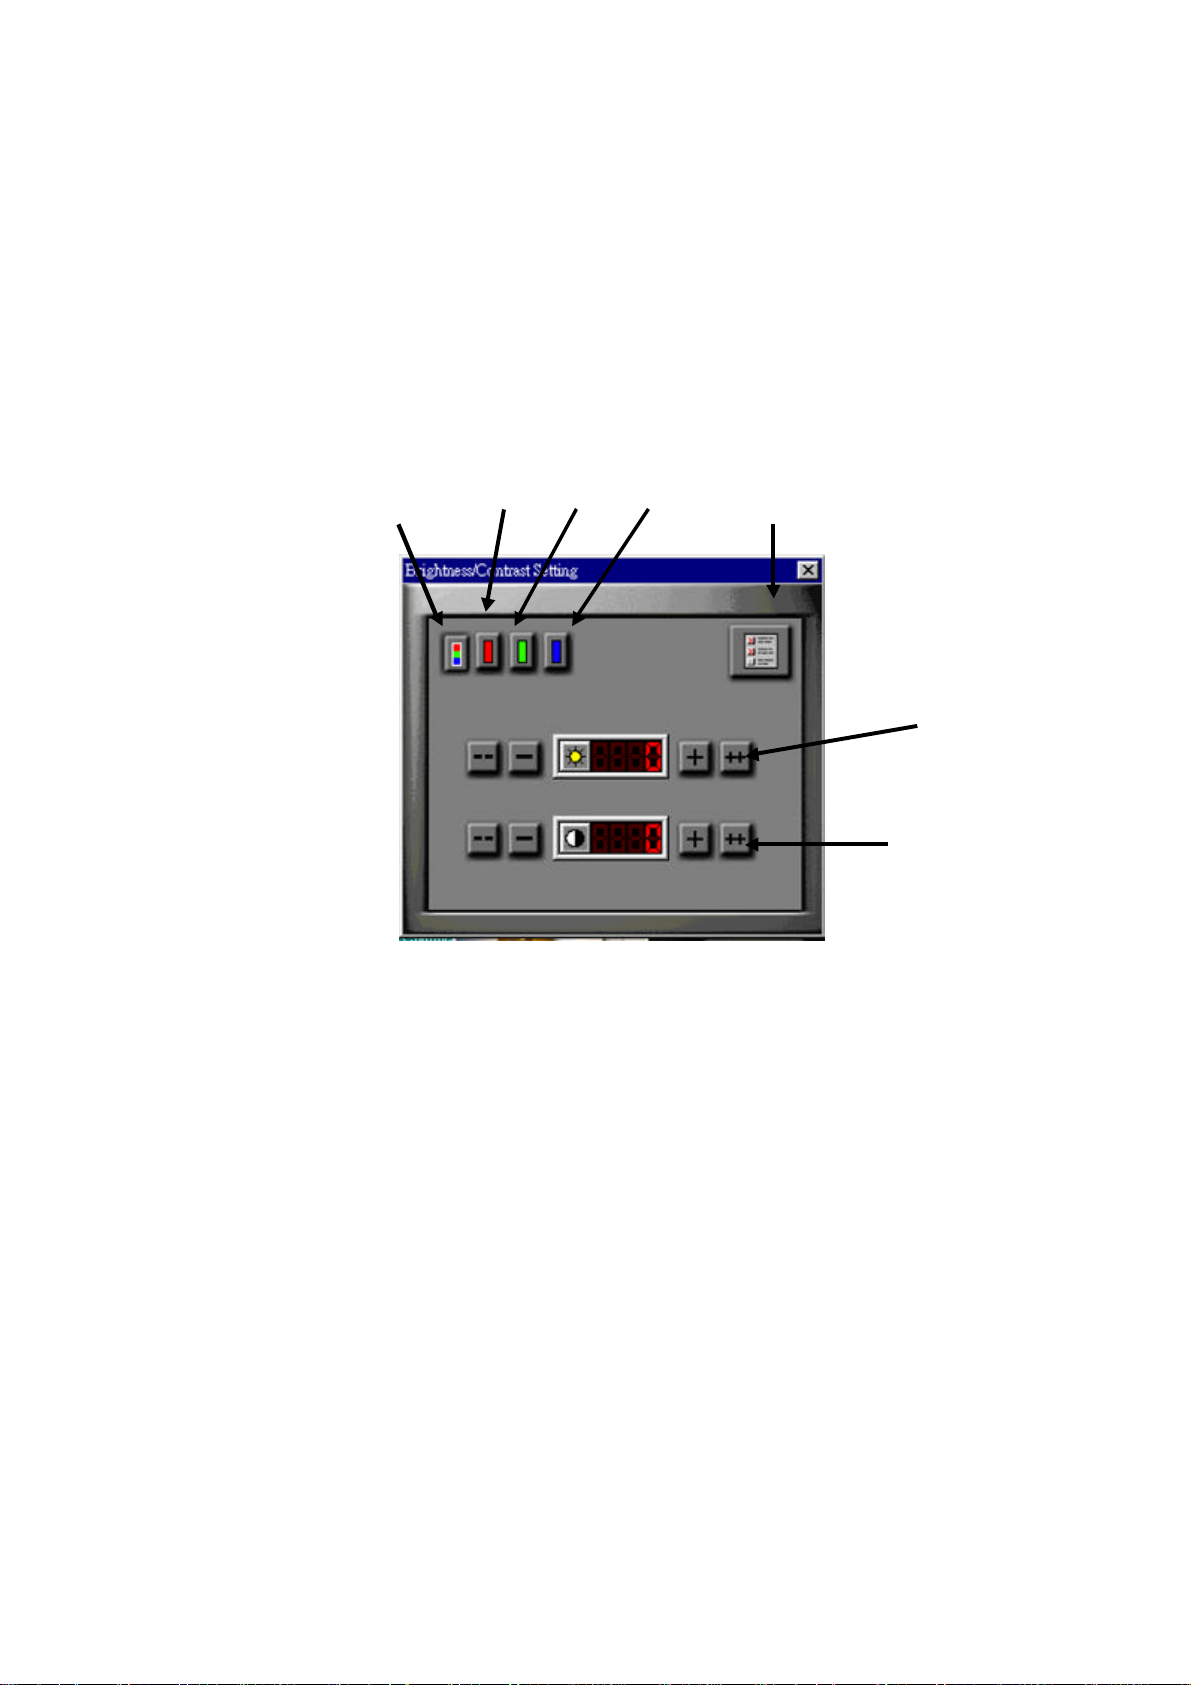
the difference between relatively dark and light portions of the
image.
To change the brightness or contrast, do the following:
1. After prescanning, click on the Brightness/Contrast
Setting button.
The Brightness/Contrast Setting screen is displayed.
Master
button
2. If you scanned a color image, select the color you wish to
Red
button
Green
button
Blue
button
Reset
button
Brightness readout
Contrast readout
change by clicking on the appropriately colored button (click
on the Red button to change red, click on the Blue button to
change blue, etc.).
3. Click on the Plus (+) or Minus (-) buttons until you reach
the desired value.
4. If you are working on a color image and wish to adjust a
different color, do steps 2 - 3 again.
5. If you want to bring the brightness and contrast settings back
to zero (no adjustment), click on the Reset button.
17
Page 18
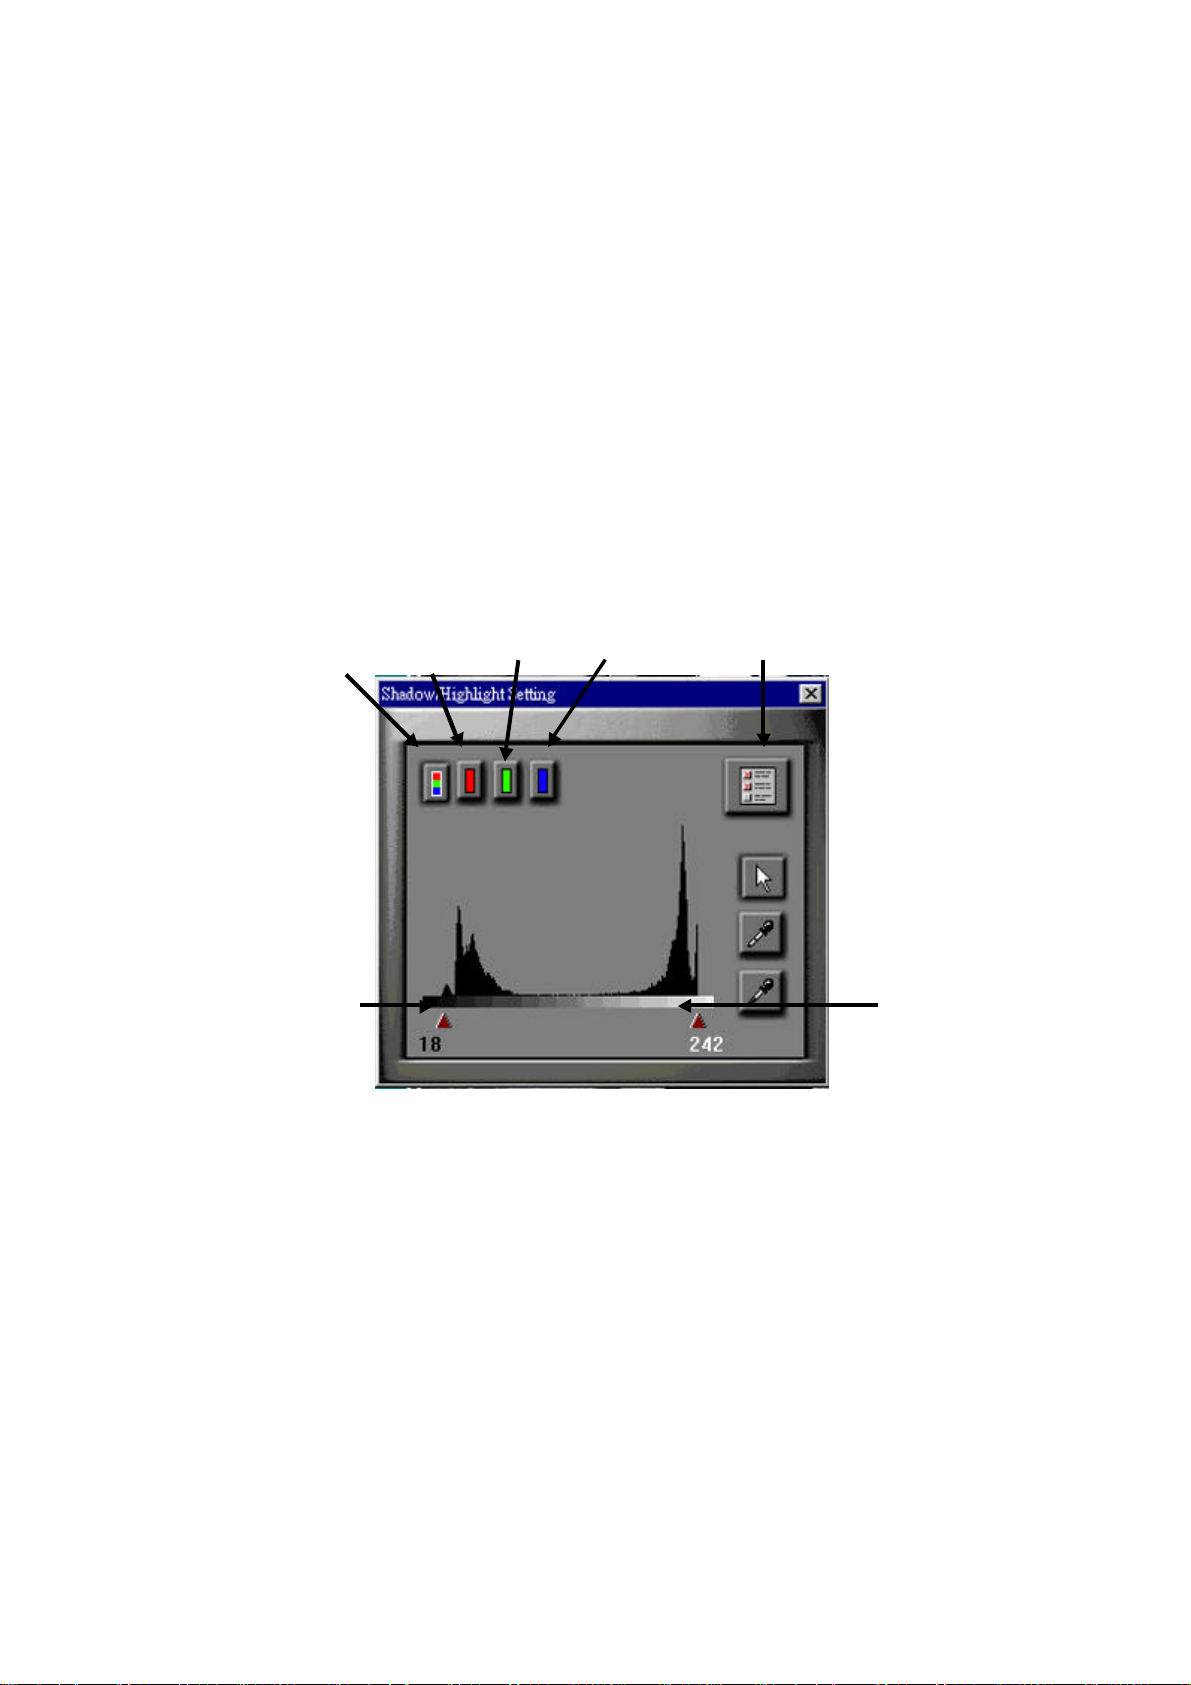
Shadow and Highlight
Using the Shadow/Highlight Setting, it is possible to make changes
to the image that will affect the brighter parts of the image without
influencing the darker parts, or conversely, affect the darker parts of
the image without influencing the brighter parts.
To change the shadow or highlight values of an image, do the
following:
2. After prescanning, click on the Shadow/Highlight Setting
button.
Reset
Master button
Red
button
Green
button
Blue
button
button
Shadow scroll
box
You will see a graph representing the intensity of the tones in the
image. Below the graph is a scroll bar with one scroll box at each
end. The box on the left is the Shadow scroll box; the one on the
right is the Highlight scroll box.
2. To make the darker parts of the image even darker, drag the
Highlight scroll
box
Shadow scroll box to the right. To make the lighter parts of
18
Page 19

the image even lighter, drag the Highlight scroll box to the
left.
3. To return to the original value (no adjustment), click on the
Reset button.
If you have scanned a color image, you may change the values for
each color separately by using the appropriately colored buttons at
the top of the screen.
The Descreen Button
The Descreen button, at the lower left hand corner of the Preview
Window, smooths scans and prevents a screen-like effect without
changing the resolution or increasing the image size.
To activate the Descreen button, click on it.
The Auto Levels Button
The Auto Levels button is at the bottom right hand corner of the
Preview Window. Clicking on the Auto Levels button changes the
settings to the document to the default settings your scanner
The Gamma Curve
When you adjust the gamma curve, you make adjustments to the
middle range of tones in the image, and the shadow and highlight
remain relatively unaffected.
19
Page 20
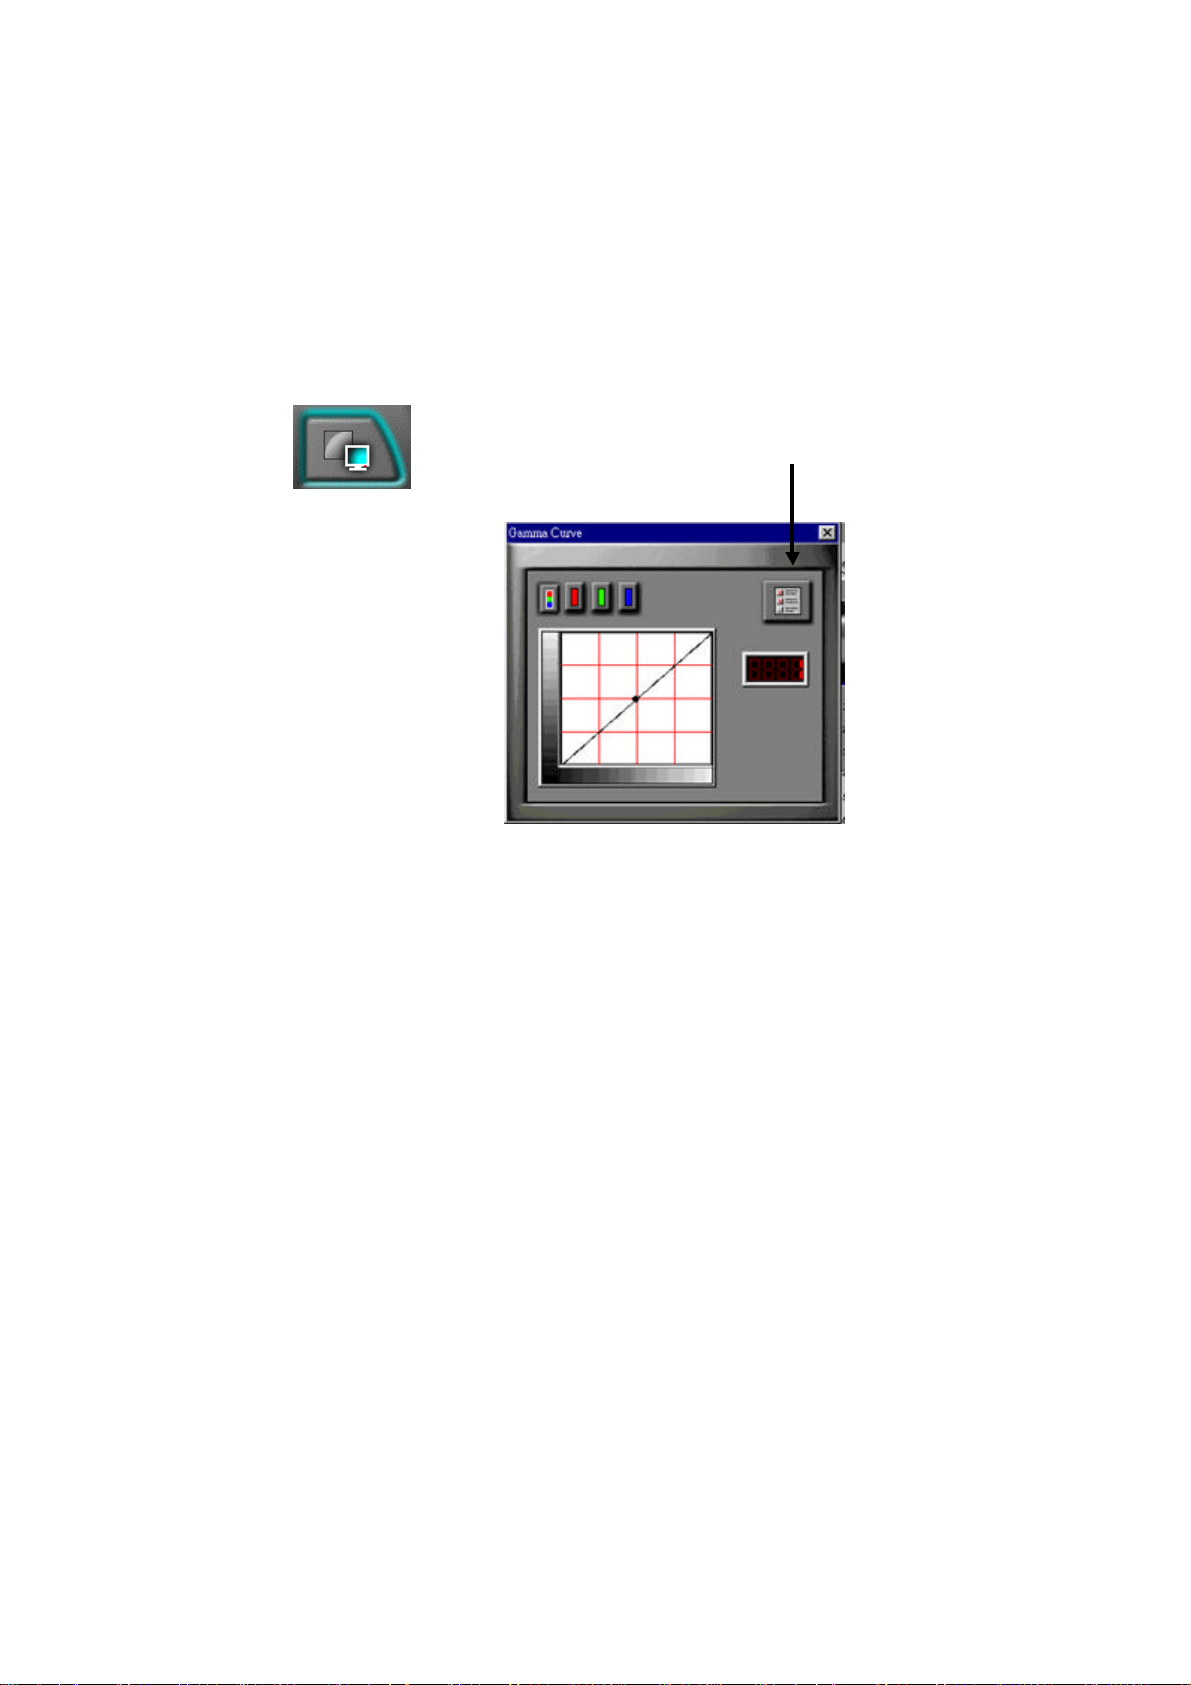
! NOTE: The Gamma Curve button is an option only if you
have chosen Color or Gray as your image mode.
To adjust the gamma curve, do the following:
2. After prescanning, click on the Gamma Curve button on the
TWAIN screen.
Reset button
A graphical mapping of the gamma curve is displayed.
3. To adjust the gamma value, first click on the color for which
you’d like to adjust the Gamma Value. You can adjust all the
colors at once by clicking the multi-color button, or the
individual colors by selecting their respective buttons.
4. Then click on the black dot in the center of the diagonal line.
As you drag this, you will see changes to your scanned
document. When you are satisfied with the changes, close
the window by clicking the box in the upper right hand corner.
The Auto Settings
20
Page 21
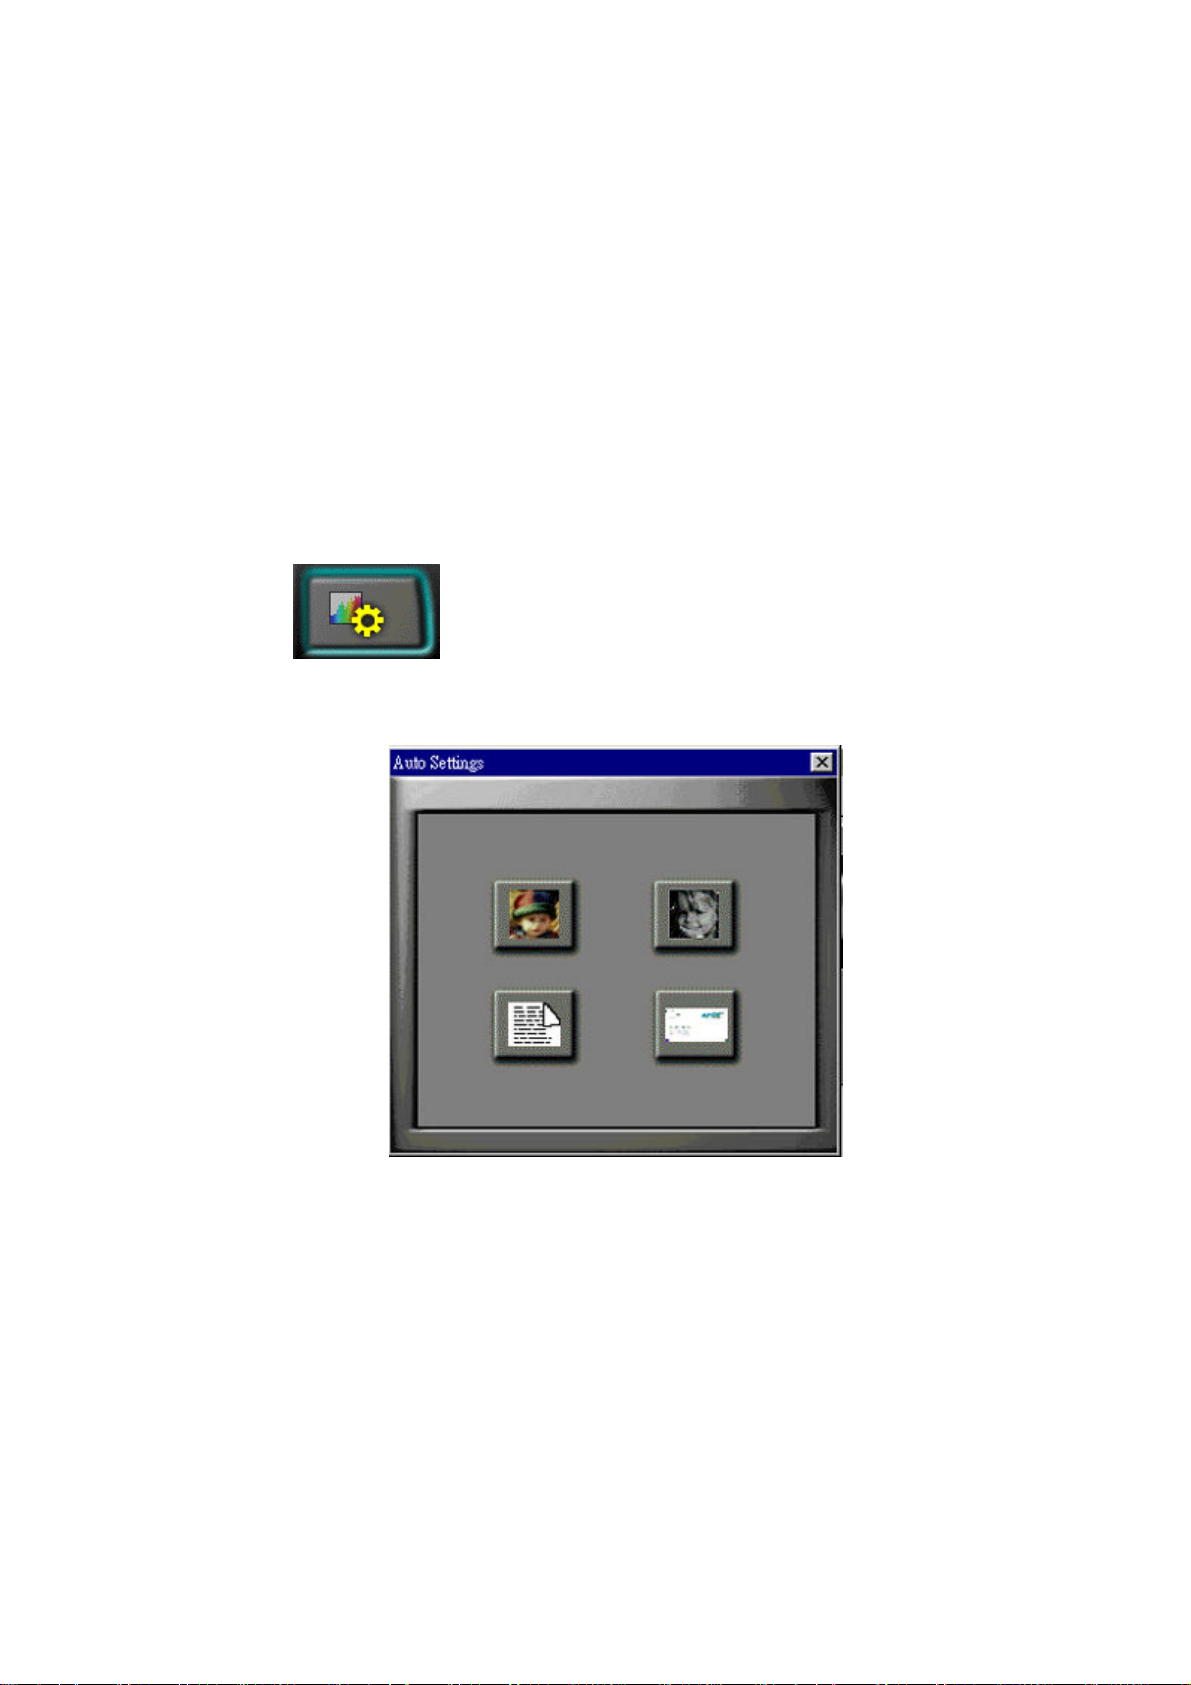
You can use the Auto Settings button to have the TWAIN screen
decide for you which settings are best for the document you will
scan. For example, if you are scanning a business card and click
on the Business Card Setting, the image mode will automatically
be set at Line Art (black & white) mode and the resolution will be set
at 400 dpi.
To use the Auto Settings, do the following:
1. Before prescanning, click on the Auto Settings button on the
TWAIN screen.
Text Document
Settings button
Color Photo Settings button
2. Click on the icon that corresponds to the item you are scanning.
3. Go through the normal steps of prescanning or scanning.
The Control Panel
On the TWAIN screen above the preview screen is the Control
Gray Photo Settings button
Business Card
Settings button
panel, which is a row of four buttons offering more adjustments.
21
Page 22
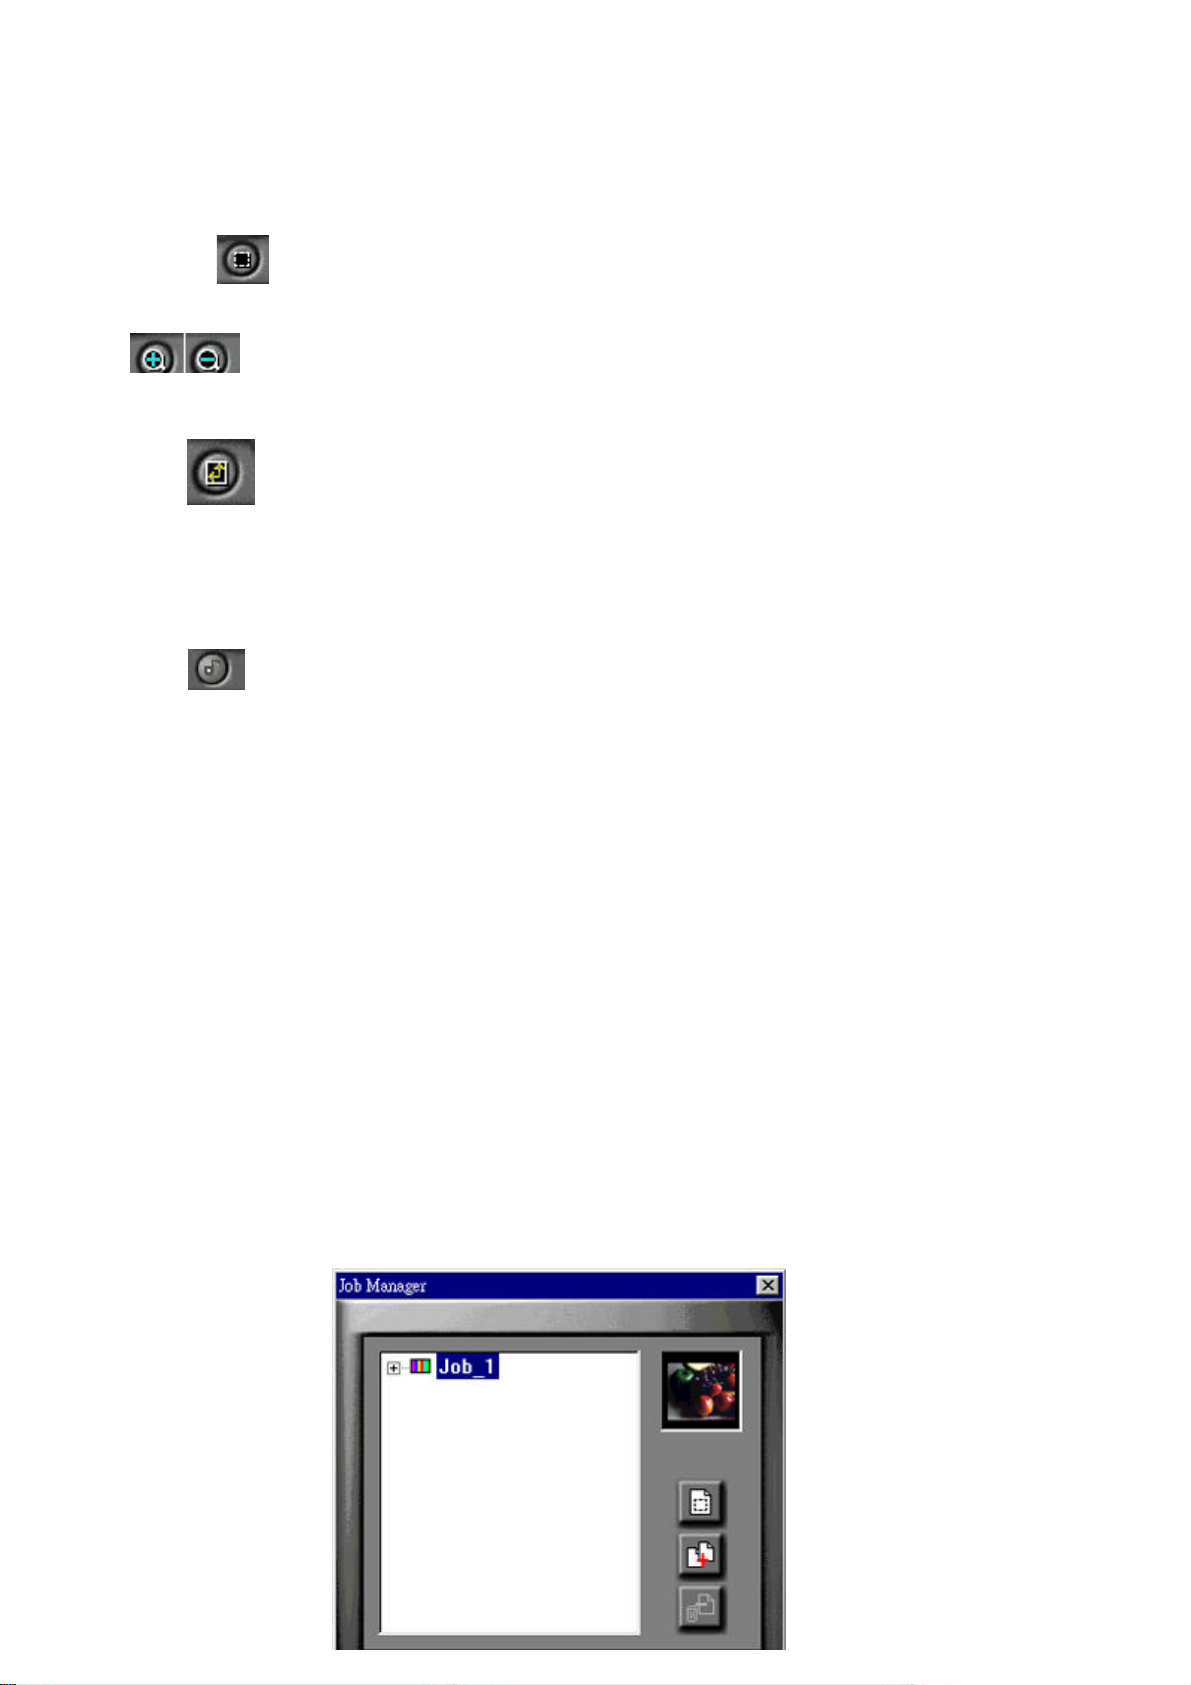
The buttons are (from left to right):
Delete current
• Frame - click on this button to adjust the size and location of the
Selection box (you only need to click on this button after having
used the Zoom In or Zoom Out button).
• Zoom In / Zoom Out - click on these buttons then click on the
preview image to reduce or increase its size.
• Select Paper Size - click on this button to change the size of the
Selection box (This can also be done by dragging the sides of
the Selection box.).
• Lock—Use this button if you plan to move or travel with the
scanner. It will lock the internal mechanism so that it won’t get
jarred during movement. This lock is functional for certain
models only. If the lock is grayed out then disregard it.
Managing Scan Jobs With the Job Manager
The Job Manager is a useful tool for performing multiple scans on
the same original. You can use the Job Manager to scan two or
more separate areas of the preview image, or use it to capture two
or more different versions of the same area.
To use the Job Manager to perform multiple scans, do the
following:
1. After prescanning and adjusting any settings that you wish (such
as moving and resizing the Selection box, adjusting resolution,
brightness, etc.), click on the Job Manager button.
Create a new job button
22
Duplicate current job button
Page 23

You will see a screen with Job 1 highlighted. Job 1 stands for the
current scan you are working on—thus any settings that you
changed in the TWAIN screen have been memorized by Job 1. You
now have two choices. You can duplicate your current job, which will
create another Selection box exactly where you've positioned the
first one; or you can create a new job, which will create a second,
distinct Selection box which you can resize and drag to a new place
on the preview image.
2. Click on the Create a new job button, or on the Duplicate
current job button.
On the Job Manager screen appears Job 2—another Selection
Box will be created in the Preview Window as well. To select the job
you want to work with, click on its title. It will become highlighted or its
Selection Box in the Preview Window. The Selection box with
moving lines signifies the Job that is currently selected.
3. Adjust any settings that you wish for Job 2 such as the Gamma
Settings, Color/B&W, or even resizing the selection box if you've
created a new job.
4. Repeat steps 2 - 3 as often as you like, creating as many new
or duplicate jobs as you wish.
5. To move from one job to another, click either on that job's
Selection box, or on the job's name.
23
Page 24

6. To delete a job, make sure it is the selected job by clicking on it,
then click on the Delete current job button.
7. When you are done making jobs, click on the scan button.
Once the scanner has scanned all the jobs, it sends them all to the
ScanOffix Pro desktop.
24
Page 25

APPENDIX A
Care and Maintenance
Safety Precautions
To ensure a long life of continuous use for your scanner, please be
sure to take the following precautions:
• Be sure to turn off and unplug the computer when plugging the
scanner cord into the printer port (parallel port). Failure to do so
can result in serious damage to the computer.
• Always keep the scanner on a firm, level surface.
• If you need to transport the scanner over long distances, make
sure and re-lock the carriage lock, and re-pack the scanner
carefully using the original packing materials.
• Before cleaning the scanner, unplug it from the computer, and
never spray directly onto the scanner or let any liquids enter the
scanner.
• Do not install the scanner in a humid or dusty place, nor in a
place where vibrations might occur.
• To ensure proper ventilation, allow at least two inches (5 cm)
free space around each side of the scanner, and four inches
(10 cm) at the back of the scanner.
• Do not attempt to perform any maintenance on the scanner
yourself. There are high-voltage and sensitive areas inside. All
25
Page 26

service and maintenance must be carried out by an authorized
dealer.
• Do not leave the original on the glass plate for too long, as the
warmth of the scanner could cause your original to deteriorate.
• Do not operate the scanner when the surrounding temperature
falls below 50° Fahrenheit (10° Celsius) or rises above 95°
Fahrenheit (35° Celsius).
• Do not operate the scanner when the surrounding humidity falls
below 20% or rises above 80%.
• Keep food and liquid away from the scanner.
Cleaning the Scanner
It is recommended that you keep the document cover closed
whenever you’re not using the scanner to prevent dust and other
particles from collecting on the glass plate.
To clean the Scanner:
Unplug the scanner from your computer.
Spray any household glass cleaner onto a soft, clean, lint-
free cloth and then gently wipe the glass window.
CAUTION: Do not spray directly onto any part of the scanner, as
the components inside could be harmed.
Wipe the body of the scanner with a moist towel and mild
detergent.
Dry the scanner with a lint-free cloth.
CAUTION: Do not used any abrasive or ammonia-based cleaning
products on the scanner.
26
Page 27

APPENDIX B
Frequently AskedFrequently Asked
QuestionsQuestions
Q: How can I use my printer when the scanner is
connected to my computer's parallel port?
A: The scanner features a D-25 port (marked TO PRINTER
on the rear of the scanner) which enables a printer to
be connected to the scanner. If your computer has only
one parallel port, simply connect your scanner to the
computer's parallel port, then connect the printer to the
scanner’s D-25 port.
Q: I’ve installed the software and connected my scanner to
the computer. Why doesn’t my scanner work?
A: Please check the following:
a) Check all the connections between your computer,
scanner and printer. Ensure they are properly connected
to the correct parallel port. Ensure scanner is plugged in
and the power is ON.
b) Change BIOS parallel mode setting on your computer to
27
Page 28

EPP mode. Read your computer’s manual for instructions
on how to enter SETUP/BIOS (Usually done by pressing
“delete” key during power up.)
c) Enter the TWAIN screen and access the scanner. Do a
test scan to ensure no error messages are received.
d) If error messages are received, or scanner still doesn’t
work. Change BIOS parallel mode setting on your
computer to ECP mode and repeat step c.
e) If you receive an error message or the scanner still
doesn’t work, call tech support for assistance.
Q: How do I change BIOS parallel mode setting to EPP or
ECP mode?
A: Since there are different BIOS models, the setting
method is different for different BIOS. We take the
AWARD BIOS as the example, if the BIOS of your
computer is not AWARD BIOS, please read the manual
of your computer or contact with the BIOS
manufacturer for instructions.
Please take the following steps to set the parallel mode
to EPP or ECP mode (the steps is for AWARD BIOS):
a) To start Setup, press the <Del> key during boot-up before
or while a message similar to this “Press DEL if you want
to enter SETUP” appears briefly at the bottom of the
screen.
b) When you invoke Setup, the CMOS SETUP UTILITY main
program screen will appear with several options. Please
select “CHIPSET FEATURES SETUP” option and press
28
Page 29

<Enter>.
c) Highlight the “Parallel Port Mode” option on the
“CHIPSET FEATURES SETUP” screen. Use <PageUp> key
or <PageDown> key to change the parallel mode setting
to EPP or ECP.
d) Press <Esc> key to return to the main screen.
e) Select “SAVE & EXIT SETUP” in the main screen.
f) Press <Y> key when the message “SAVE to CMOS and
EXIT (Y/N)?” appears.
g) The parallel mode has been changed to EPP or ECP mode
and the computer will boot-up automatically.
Q: I’ve finished my scan and the lamp is still on. How do I
turn it off?
A: The light will turn off after you close the TWAIN screen.
Q: Why doesn’t the printer work when I connect it to the
scanner?
A: Check all the connections between your computer,
scanner and printer. Ensure they are properly
connected to the correct parallel port. Ensure scanner
is plugged in and power is ON.
Q: How do I access the scanner’s TWAIN User Interface
(TWAIN screen) in ScanOffix Pro?
29
Page 30

A: From the main screen go to the File menu and choose
SELECT SOURCE. Then, select “SF-1200CE+ 32” and
click on SELECT. Now choose “New Scan” from the
File menu or click on the scanner icon in the command
bar. The UI will appear. In this manual we refer to the
TWAIN User Interface as the “TWAIN screen.”
Q: My scanner is a 36-bit scanner but the color depth of my
images is in a 24-bit file format. Why?
A: Your 36-bit scanner can produce 36 bit color images,
but most application software on the market today can
only support 24-bit data. A tone map in a 36-bit scanner
can convert the data from 36-bit to 24-bit. However,
your 36-bit scanner can see shadow detail better than a
24-bit scanner. A 36-bit scanner also provides improved
tonal transformations (such as gamma correction)
because more data is available.
Q: How can I get the latest versions of the scanner driver?
A: The latest versions of our scanner drivers are available
from our web site: http://www.spotinc.com
Q. How do I find and use the Optical Character
Recognition (OCR) function?
A. The OCR function is built into ScanOffix Pro. All you
need to do is drag a thumbnail of an image on the
ScanOffix Pro desktop to one of the text applications.
The OCR function will automatically convert your image
30
Page 31

into text and open the application for you. If you want
to perform OCR on a foreign language, you should first
choose OCR Setup from ScanOffix Pro’s File menu in
order to change dictionaries.
Q. Is there a proper way to close the TWAIN screen or
ScanOffix Pro?
A. Yes! To make sure your program doesn’t crash, be sure
to first close the TWAIN screen (a.k.a. Easy TWAIN
Module) and then close ScanOffix Pro.
Q. Why does the scanned image always look so dark?
A. You need to change the Gamma value. With the TWAIN
screen in front of you, click the Gamma curve button,
then click the Gamma value button. Drag the little black
square on the line curve to the left until the gamma
value is at about 1.80.
Q. When I try to scan the software freezes up, or the whole
thing crashes. What should I do?
A. First of all, try simply turning your computer off and on
again. If that doesn’t work, you may need to delete
some files. Go to your Windows directory and find the
file (not the folder!) Spot.ini, delete it, and re-start
Windows. If that doesn’t work then find the folder
C:\WINDOWS\TWAIN\SPOT\DATA and delete every file
inside that has the extension job (for example,
Spot00.job), and restart Windows.
31
Page 32

Q. Can I plug the scanner into a SCSI card?
A. No, you can only plug the scanner into your Enhanced
Parallel Port (printer port).
Q. Do I need to let the scanner warm up?
A. Yes, the scanner needs to warm up at least thirty
seconds before scanning, but you will always receive a
message advising you of this when it is necessary. If
you see no such message, then the scanner is already
warmed up.
32
Page 33

APPENDIX C
Scanner Specifications
Scanner type Color CCD line sensor
Scanning method Single pass flatbed type
Scan speed 19.5 ms per line
Brightness 200 levels in single-step
increments (software
definable)
Maximum scan size 216 mm x 297 mm (8.5 x
11.7 )
Interface Printer Port (EPP) with pass
through to printer function
Light Source Cold cathode fluorescent
lamp, 10,000 hours life
expectancy.
33
Page 34

Color 36-bit RGB
Gray scale 12-bit
B/W Single-bit line art or halftone
patterns
Optical resolution 600 (H) x 1200 dpi (V)
Scanning resolution Up to 9,600 dpi, with software
Operating
environment
Dimensions
(W x H x L)
enhancement
Temperature:
10° - 35° Celsius
(50 - 95° Fahrenheit)
Humidity: 20% - 80% RH
297 mm x 60 mm x 488 mm
(11.7 x 2.3 x 19.2 )
Weight 3.5 kg (7.7 lb.)
34
Page 35

Power consumption 12 W Maximum
Noise Under 55 dB (operating)
35
Page 36

Glossary
Italicized words in the definitions refer to other entries in the
glossary.
application program
auto settings Click on this button then choose the kind of original you’re
brightness
color image
A software program that carries out a specific task, for example,
Optical Character Recognition (OCR). The ScanOffix S.E.
software suite that came with your scanner contains many
different application programs.
scanning to have the scanner automatically adjust settings for
you (resolution, brightness, etc.).
The measure of the intensity of the tones of an image.
One of four possible image types. When you choose color as the
image type, your scanner can produce an image with over one
trillion colors. See also grayscale image, halftone image, line art
image.
contrast
dot
The degree of difference between tones in the scanned image.
see pixel.
36
Page 37

dots per inch (dpi)
the number of dots, or pixels, for each inch of the original that
you scanned. See also resolution.
driver
final scan The very last scan you make of the original after you have
gamma curve
grayscale image
the program that handles the basic operations of the scanner.
prescanned and adjusted other settings, such as brightness or
contrast.
The line that represents the value of the tones of the original
versus the value of the tones of the scanned image. A gamma
value of 1 means no adjustment – the scanned image will look
the same as the original. If you alter the gamma curve you can
affect the middle range of tones without drastically altering the
brightest or darkest parts of the image.
One of four possible image types. When you choose grayscale
as the image type, your scanner will produce an image
containing only shades of gray. Choose grayscale if the original
you are scanning is a black and white photo, or if you want the
scanned image to look like a black and white photo. See also
color image, halftone image, line art image.
halftone image
highlight the light areas of an image.
image type Refers to the kind of original you are scanning (e.g. text vs.
One of four possible image types. When you choose halftone
as the image type, your scanner will mix black and white to give
the illusion of tone, just as in a newspaper photo. See also color
image, halftone image, line art image.
photo) or to the type of image you would like to produce. See
color image, grayscale image, halftone image, line art image.
37
Page 38

line art image
One of four possible image types. When you choose line art as
the image type, your scanner will produce an image containing
only pure black and pure white. Choose line art if the original
you are scanning is a text document or a pen-and-ink drawing.
See also color image, grayscale image, halftone image.
main unit
Optical Character
Recognition (OCR)
original the document or photo that you place onto the scanner to be
pixel the smallest discrete unit of the scanned image. All scanned
The part of the personal computer that houses the motherboard
and usually also the disk drives.
An application program that can translate characters in a
scanned image of a printed page into machine-readable
characters which, for example, could be edited on a word
processor.
scanned.
images are made up of many pixels, each of which is one
particular color (or white, gray, or black). Also called dot.
prescan The first step in the scanning process. You prescan to quickly
capture a large area of an image, after which you can adjust
other settings in order to carry out the final scan.
preview image The image of the original that appears after you click the
preview button.
preview screen
primary color Each of the three colors – red, green, and blue – which your
The part of the user interface that shows you the preview
image.
scanner mixes to produce over one trillion different colors.
38
Page 39

resolution
scanner A device that samples documents and printed images and
The sharpness of an image, measured in dpi (dots per inch).
The higher the dpi, the greater the resolution.
converts them into digital form.
scanner driver
scanning frame A box made up of moving dotted lines that can be manipulated to
shadow the dark areas of an image.
tone the colors (red, green, and blue)and neutrals (white, gray, and
TWAIN TWAIN stands for Technology Without An Interesting Name. An
see driver.
specify the exact area of an image to be scanned.
black) in the image.
industry standard for scanners and image application
programs. Since your scanner conforms to the TWAIN
standard, you can use it with any image processing software
that also conforms to the TWAIN standard.
TWAIN driver
TWAIN Driver
screen
TWAIN driver user
interface
a scanner driver (like your scanner’s) which conforms to the
TWAIN standard.
See TWAIN driver user interface.
The mechanism that enables you to converse with your scanner;
a screen which looks like a compact disk player, where you find
all the buttons that tell your scanner what you want it to do. In
this user’s guide it’s called the TWAIN Driver screen for short.
39
Page 40

Copyright Information
Copyright 1998 The Manufacturer. All rights reserved.
The following are trademarks of their respective companies:
Windows of Microsoft Corporation. IBM, PC and AT of International
Business Machines Corp.
Other products or company names are trademarks or registered
trademarks of their respective holders.
Documents and pictures that you scan may be protected by the
copyright law. Even not expressed marked, documents and pictures
may be also protected under copyright law. The unauthorized use of
such documents could be a violation of the rights of the copyright
holder. The manufacturer is not liable for the unauthorized use of
copyrighted materials.
Notice
The Manufacturer makes no warranty of any kind with regard to this
material, including, but not limited to, the implied warranties of
merchantability and fitness for a particular purpose.
The manufacturer shall not be liable for incidental or consequential
damages of any nature resulting from the use of this material.
This document contains proprietary information which is protected by
copyright. All rights are reserved. No part of this document may
be copied, reproduced, or translated to another language without the
prior written consent of The manufacturer.
The information described in this document is subject to change
without any notice.
Safety Regulations
This scanner is designed to comply with UL1950-D3
UL Safety Statement
For your personal safety, besides the general maintenance mentioned
in the manual, do not try to remove any mechanical parts or any
electronic devices. If you need service, contact our dealer or
service offices near you.
FCC Radio Frequency Interference Statement
Note: This equipment has been tested and found to comply with the
limits for a Class B digital device, pursuant to Part 15 of FCC
rules. These limits are designed to provide reasonable protection
against harmful interference in a residential installation. This
equipment generates, uses, and can radiate radio frequency energy
and, if not installed and used in accordance with the instruction
manual, may cause harmful interference to radio communications.
However, there is no guarantee that interference will not occur in a
particular installation. If this equipment does cause harmful
interference to radio or television reception which can be
determined by turning the equipment off and on, the user is
encouraged to try to correct the interference by one or more of the
following measures:
receiver.
from that to which the receiver is connected.
help.
Reorient or relocate the receiving antenna.
Increase the separation between the equipment and the
Connect the equipment into an outlet on a circuit different
Consult the dealer or an experienced radio/TV technician for
40
 Loading...