

Page 1
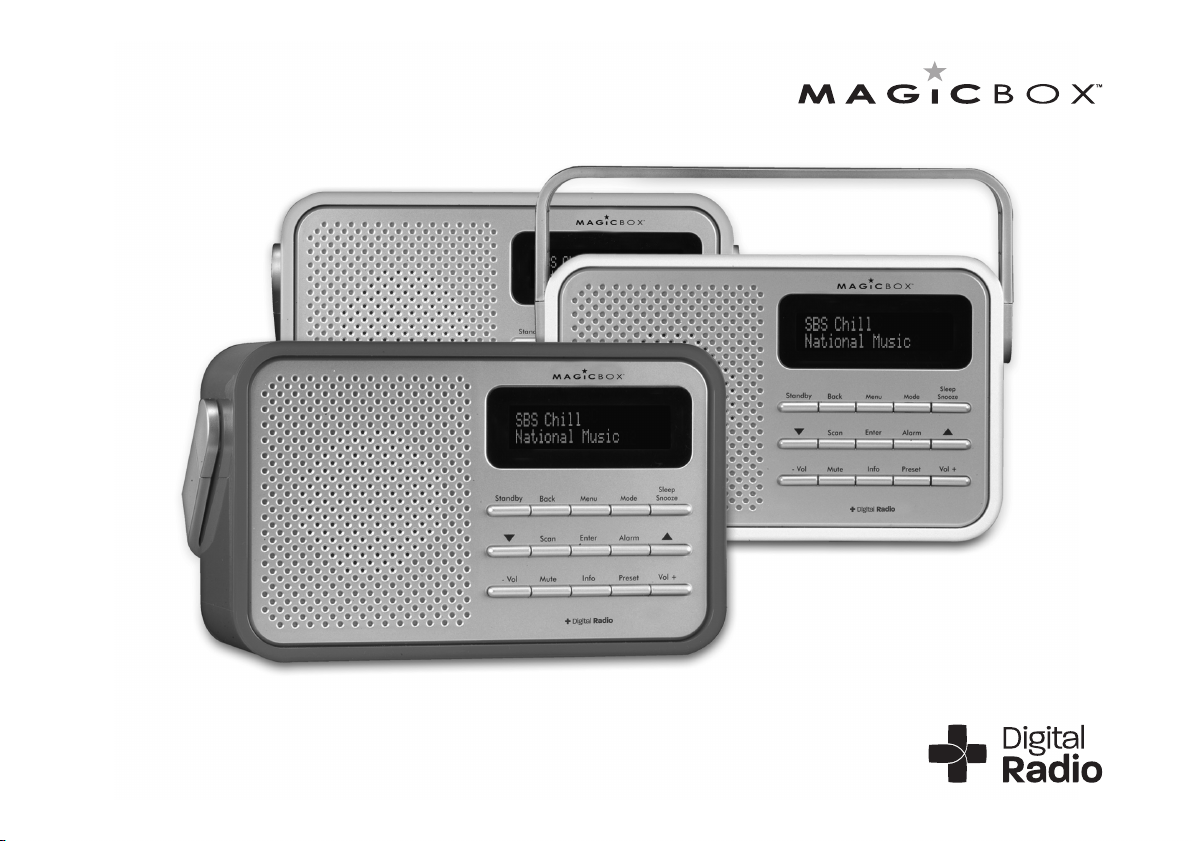
DAB+/FM Radio
Page 2

Contents
Where to put your radio . . . . . . . . . . . . . . . . . . . . . . . . . . . . . . . 3
Setting up . . . . . . . . . . . . . . . . . . . . . . . . . . . . . . . . . . . . . . . . . . . . 3
Using headphones . . . . . . . . . . . . . . . . . . . . . . . . . . . . . . . . . . . . 4
Your DAB+/FM radio . . . . . . . . . . . . . . . . . . . . . . . . . . . . . . . . . . 5
Using your DAB+ radio . . . . . . . . . . . . . . . . . . . . . . . . . . . . . . . . 6
Switch on . . . . . . . . . . . . . . . . . . . . . . . . . . . . . . . . . . . . . . . . . . . . . 6
Switch o . . . . . . . . . . . . . . . . . . . . . . . . . . . . . . . . . . . . . . . . . . . . . 6
Adjusting the volume . . . . . . . . . . . . . . . . . . . . . . . . . . . . . . . . . 6
Changing DAB+ stations . . . . . . . . . . . . . . . . . . . . . . . . . . . . . . 6
Scanning for DAB+ stations . . . . . . . . . . . . . . . . . . . . . . . . . . . 6
Prune DAB+ stations . . . . . . . . . . . . . . . . . . . . . . . . . . . . . . . . . . 7
Storing a DAB+ station preset . . . . . . . . . . . . . . . . . . . . . . . . . 7
Tune to a DAB+ preset station . . . . . . . . . . . . . . . . . . . . . . . . . 7
DAB+ display information . . . . . . . . . . . . . . . . . . . . . . . . . . . . 8
Dynamic range control . . . . . . . . . . . . . . . . . . . . . . . . . . . . . . . . 9
FM radio mode . . . . . . . . . . . . . . . . . . . . . . . . . . . . . . . . . . . . . . 10
Tuning to an FM station . . . . . . . . . . . . . . . . . . . . . . . . . . . . . . 10
Tune to an FM preset station . . . . . . . . . . . . . . . . . . . . . . . . . 11
FM display information . . . . . . . . . . . . . . . . . . . . . . . . . . . . . . . 12
Set the time and date . . . . . . . . . . . . . . . . . . . . . . . . . . . . . . . . 13
Setting the alarm . . . . . . . . . . . . . . . . . . . . . . . . . . . . . . . . . . . . 13
Stop the alarm . . . . . . . . . . . . . . . . . . . . . . . . . . . . . . . . . . . . . . . 14
Turn o the alarm . . . . . . . . . . . . . . . . . . . . . . . . . . . . . . . . . . . . 14
Snooze function . . . . . . . . . . . . . . . . . . . . . . . . . . . . . . . . . . . . . 14
Sleep timer . . . . . . . . . . . . . . . . . . . . . . . . . . . . . . . . . . . . . . . . . . 14
Menu options . . . . . . . . . . . . . . . . . . . . . . . . . . . . . . . . . . . . . . . . 15
Adjusting the display backlight . . . . . . . . . . . . . . . . . . . . . . 15
Language display . . . . . . . . . . . . . . . . . . . . . . . . . . . . . . . . . . . . 15
Factory reset . . . . . . . . . . . . . . . . . . . . . . . . . . . . . . . . . . . . . . . . . 15
Software version . . . . . . . . . . . . . . . . . . . . . . . . . . . . . . . . . . . . . 16
Technical information . . . . . . . . . . . . . . . . . . . . . . . . . . . . . . . . 17
Simple solutions . . . . . . . . . . . . . . . . . . . . . . . . . . . . . . . . . . . . . 18
Care and maintenance . . . . . . . . . . . . . . . . . . . . . . . . . . . . . . . 19
Consumer product warranty . . . . . . . . . . . . . . . . . . . . . . . . . 20
Changing the Scan setting . . . . . . . . . . . . . . . . . . . . . . . . . . . 10
Storing an FM station preset . . . . . . . . . . . . . . . . . . . . . . . . . . 11
22
Page 3

3
Product Set Up
Where to put your radio
It is important that you consider carefully in advance where
your radio will be situated and make sure that it is:
* on a at and stable surface
* within 1.5 metres of a power socket
* where you can fully extend the telescopic aerial
* away from bright sunlight or heat sources, such as a radiator
* not in a humid or very damp place such as a bathroom
Setting up
Step 1: Connect the mains power lead into the socket on
back of the radio and fully extend the aerial in a vertical
position to obtain the maximum signal strength.
Note: Only use the power supply provided. Using an
unauthorised power supply will invalidate your guarantee
and may damage your radio.
Step 2: Plug the power adaptor into the mains power wall
socket and switch on.
Step 3: When switching on for the rst time, slide the power
switch on the back of the radio, to ‘On’. ‘Welcome to Digital
Radio’ will be displayed and your radio will automatically
begin to scan for DAB+ radio stations. A progress bar will
show the progress of the scan and the number of stations
found during the scan will also be displayed.
When the scan is complete your radio will select the rst
available station and begin to play. Stations are listed in
numerical and then alphabetical order by default.
Note: The DAB+ radio station list is stored in the memory
and so the next time you switch your radio on, the station
search does not take place. It is possible to scan manually for
stations. Please see page 6.
Step 4: Inserting the batteries (optional). Before installing
the batteries (not included) please ensure that the DAB+
Radio is unplugged from the mains power supply.
On the back of the radio, push in the tab to remove the
battery compartment. Insert 4 x AA batteries, making sure
to note the ‘+’ and ‘-‘ markings and position the batteries the
correct way around. Replace the battery cover, making sure
it ‘clicks’ shut.
Page 4

If used continuously on battery power, your radio has an
approximate battery life of 10 hours when using good quality
batteries. When the battery power is low, ‘Battery Low’ will
appear in the display. Please switch o the radio and replace
the batteries.
Note: For battery operation, please switch o the mains
adaptor and remove the mains power plug from the back of
the radio.
Only use the recommended batteries or those of the same
•
equivalent type.
Do not mix old and new batteries or batteries of dierent
•
types.
Batteries are to be inserted with the correct polarity.
•
The supply terminals are not to be short-circuited.
•
Remove the batteries from the radio if they will not be
•
used for an extended period of time.
Do not attempt to recharge non-rechargeable batteries.
•
Dispose of old batteries carefully.
•
CAUTION: Danger of explosion if batteries are incorrectly
•
replaced. Replace only with the same or equivalent type.
Where the mains power plug or an appliance coupler is
•
used as the disconnect device, the disconnect device shall
remain readily operable.
Using headphones
You can connect headphones (not included) to your
radio. The stereo headphone socket can be found on the
back of the radio and when you have headphones connected
the radio speakers are switched o and all sound is via the
headphones.
Note: Headphones will need a 3.5mm stereo plug.
Never throw batteries in a re or attempt to open the outer
•
casing.
Batteries are harmful if swallowed, so keep away from
•
young children.
Batteries must not be exposed to excessive heat such as
•
sunshine or re.
4
Page 5
5
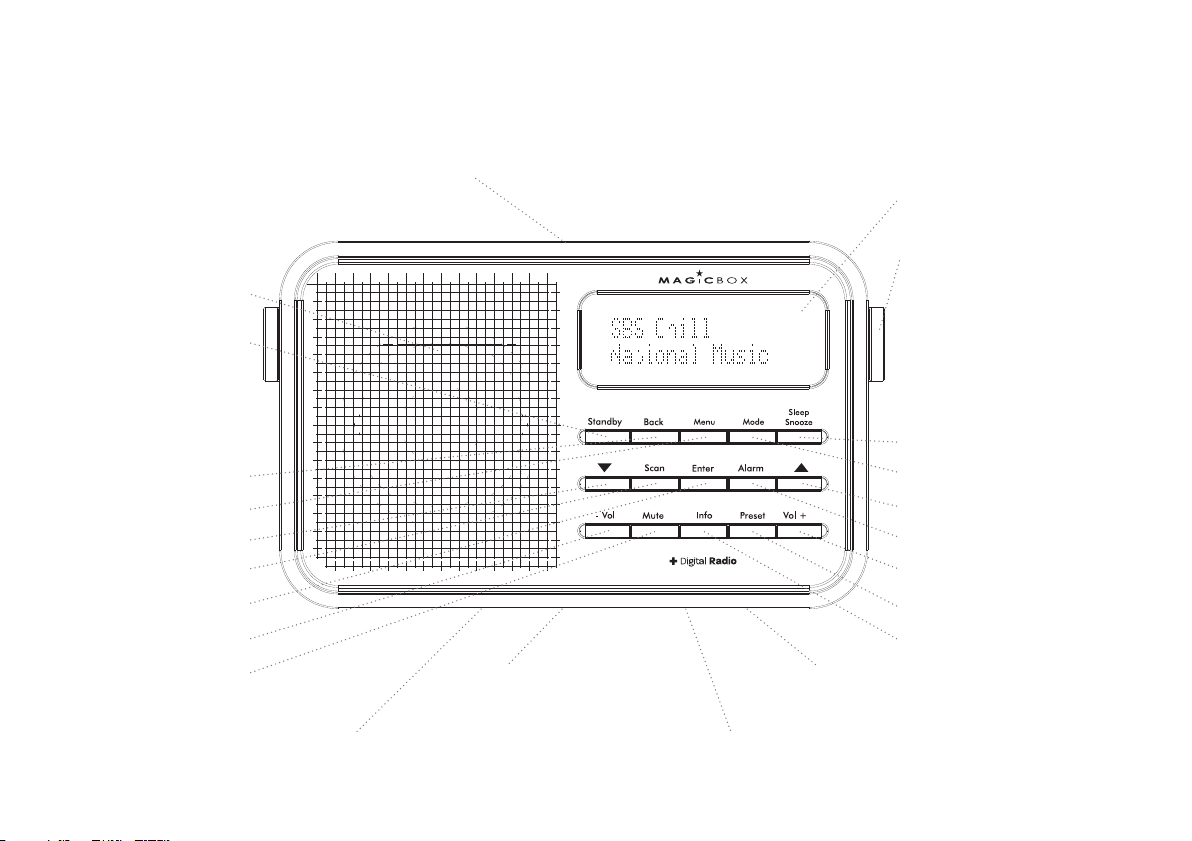
Your DAB+ / FM Radio
Telescopic aerial
Speaker
Standby
Back
Backlit display
Carry handle
Sleep/Snooze
DAB+/FM Mode
Menu
Scroll back
Scan
Enter
- Vol
Volume Mute
On/o switch
(at rear)
Mains power socket
(at rear)
Scroll forward
Alarm
Vol +
Preset
Info.
Stereo headphone socket
(at rear)
Battery compartment
(at rear)
Page 6

Using your DAB+ Radio
Switch on
Press the ‘Standby’ button on the front of the radio. The
display will switch on and your radio will return to the mode
that it was last used in (DAB+ or FM). If you were listening to
a DAB+ station before then this station will be automatically
selected.
Note: Always make sure that the aerial is fully extended and
adjusted (a vertical position is recommended), to ensure
the maximum signal strength and the best possible sound
quality.
Switch o
Press and hold the ‘Standby’ button on the front of the radio.
The radio will go into ‘Standby’ mode.
To completely switch o the radio and the display, slide the
switch on the back of the radio to ‘O’.
Adjusting the volume
Press the ‘- Vol’ button to decrease the volume and the ‘Vol+’
button to increase the volume.
Mute the volume
Press the ‘Mute’ button to temporarily mute the radio
volume. Press the ‘Mute’ button again to listen to the radio.
Changing DAB+ stations
1. If you are not already in DAB+ mode, briey press the ‘Mode’
button to go to DAB+ mode.
2. Use the or button on the front of the radio to scroll
through the station list. When the station that you would like
to listen to is displayed press the ‘Enter’ button. There will be
a short delay whilst your DAB+ radio tunes to your selected
station.
Scanning for DAB+ stations
With DAB+ radio, additional stations and services regularly
become available so it’s a good idea to carry out a manual
scan every now and then to make sure that you have the
most up to date station listing stored within the memory
of your radio. If you have moved your radio to another
location, e.g.: if you go on holiday, then it’s also a good idea
to carry out a manual scan.
6
Page 7
7
1. If you are not already in DAB+ mode, briey press the ‘Mode’
button to go to DAB+ mode.
2. Press the ‘Scan’ button to begin a local search for stations.
The display will change to ‘Scanning...’. A progress bar will
show the progress of the scan and the number of stations
found during the scan will also be displayed. A local scan
takes approximately 10 seconds.
3. Press the ‘Menu’ button, followed by the ‘Enter’ button to begin
a wider, national and local scan. The display will change to
‘Scanning...’. A progress bar will show the progress of the scan
and the number of stations found during the scan will also
be displayed. A national and local scan takes approximately 1
minute but can take up to 3 minutes.
Prune DAB+ stations
You can remove the DAB+ stations in the station list that
cannot be received in your area. These are listed with a ‘?’
prex.
1. Press the ‘Menu’ button and use the or button to scroll
to ‘Prune’. Press the ‘Enter’ button.
Storing a DAB+ station preset
Your radio can store up to 10 DAB+ stations in its preset
memories for instant access to your favourite stations.
Note: When you store DAB+ radio station presets, these do
not overwrite your FM station presets.
1. Tune your radio to the station that you wish to preset (see
changing DAB+ stations on page 6).
2. Press and hold the ‘Preset’ button on the front of your radio.
‘Preset Store 1 Empty’ is displayed if no previous station has
been stored.
3. Use the or button on the front of the radio to scroll
to the Preset location that you would like to store the radio
station to (1 - 10).
4. Press the ‘Enter’ button, the display will conrm ‘Preset X
stored’, where ‘X’ is the number of the preset (1-10).
Note: If there is already an existing DAB+ station stored
under a preset, it will be over written when you store the new
station.
Tune to a DAB+ preset station
2. ‘Prune <No> Yes’ is displayed. Use the or button to
scroll to ‘Yes’. Press the ‘Enter’ button to prune the station
list. Stations with a ‘?’ prex will now no longer be displayed.
Press the ‘Menu’ button to return to the station display.
In DAB+ mode:
1. Press the ‘Preset’ button. ‘Preset Recall 1’ is displayed and the
name or frequency of the station stored there, or ‘Empty’ if no
previous station has been stored.
Page 8

2. Use the or button on the front of the radio to scroll to
the Preset location and station that you would like to listen to
(1 - 10). Press the ‘Enter’ button. The radio will instantly tune
to that station and begin to play.
Note: If no DAB+ station has been stored under the preset
button, ‘Preset X empty’ will be displayed, where ‘X’ is the
number of the preset location, then the radio will revert to
the previously selected radio station after a few seconds.
DAB+ display information
Multiplex Name - displays the broadcasting area and
collection of radio stations on this frequency e.g.:
BBC National DAB+, Digital 1 Network.
Channel and Frequency - e.g.: 12B 225.648 MHz
Signal error - This is displayed as a number between 0-99. It
would not be possible to satisfactorily listen to a ratio station
with a signal error rate of 30 or above. Try adjusting the aerial
or relocating your radio to improve reception.
Time and date - supplied by the broadcaster.
When listening to a DAB+ station you can change the
information that will appear on the second line of the
display. There are seven dierent types of information that
are sent by the broadcaster.
Dynamic Label Segment (DLS) - this is scrolling text
information supplied by the broadcaster. Information could
be the name of an artist or music title, DJ’s name, contact
details for the radio station etc.
Signal Strength - An empty will appear on the second line
of the display to indicate the minimum signal strength for
acceptable listening. The row of solid rectangles indicate the
actual signal strength that you are receiving. The stronger
the signal, the further to the right the row of solid rectangles
will be.
Program Type (PTY) - such as ‘Rock’, ‘Pop‘, Talk’ or ‘News’
1. Repeatedly press the ‘Info’ button on the front of the radio to
cycle through the dierent information options.
8
Page 9

9
Dynamic range control (DRC)
1. Press the ‘Menu’ button.
In DAB+ mode:
The dynamic range for each radio programme is set by the
broadcaster for each radio station and may be dierent for
the types of programme broadcast, such as pop or classical
music or a chat show. The dynamic range control signal is
transmitted in parallel with the audio signal for each
programme and with your radio you can use this control
signal to expand or compress the dynamic range (the
dierence between the loudest and quietest sounds) of the
reproduced audio signal. Changing the dynamic range
can aect the ‘loudness’ and/or ‘quality of sound’ of the
programme that you hear so that it will be more suited to
your listening conditions and your own personal listening
requirements. e.g. in a noisy environment, where quiet
sounds might be swamped, setting the compression to
maximum will ‘boost’ the quiet sounds, whilst keeping the
loudest sounds at their original level.
There are 3 levels of compression:
DRC O - no compression. This is the default setting.
2. Use the or button to scroll to ‘DRC’ and press the ‘Enter’
button. The current DRC setting will have an ‘*’ next to it.
3. Use the or button to scroll through the 3 compression
level options available and press the ‘Enter’ button to select.
DRC Low - medium compression.
DRC High - maximum compression.
Page 10

Using the FM Radio
FM Radio Mode
When your radio is in FM mode it can receive Radio Data
System or ‘RDS’ information if this is being transmitted by the
broadcaster. RDS information will often include the station
name, detail about the programme and the current time.
If you were listening to an FM station when you switched the
radio o then this station will be automatically selected when
you switch the radio back on.
Telescopic aerial
Please make sure that the aerial on the back of the radio is
fully extended and adjusted before you attempt to tune to
an FM station (a vertical position is recommended). This will
ensure that the maximum signal strength is available when
the radio begins to scan. Extending the aerial also ensures
the best possible sound quality.
Tuning to an FM station
1. If you are not already in FM mode, press the ‘Mode’ button to
go to FM mode.
2. Press and release the ‘Scan’ button on the front of your radio
to scan up the frequency band. Press and hold ‘Scan’ to scan
down the frequency band. Your radio will search for the next
available station and then stop on that station.
3. Use the or button to ne tune each frequency in
0.05MHz steps.
The RDS information for each station will be displayed, if
available.
Note: If reception is still poor adjust the position of the aerial
or try moving the radio to another location.
Changing the Scan setting
In FM mode:
1. Press the ‘Menu’ button. ‘Scan setting’ is displayed. Press
‘Enter’. There are now two dierent options to choose from:
Strong stations - the scan will only stop when a strong
signal strength is received which should also result in a better
audio quality. It is possible that the station you are scanning
for may be missed using this option.
All stations - the scan will stop for every station it receives,
even if the signal strength is poor.
10
Page 11

11
2. Use the or button to scroll to Strong Stations or All
Stations and press the ‘Enter’ button to select.
Storing an FM station preset
Your radio can store up to 10 FM stations in its preset
memories for instant access to your favourite stations.
Note: When you store FM radio station presets, these do not
overwrite your DAB+ station presets.
1. Tune your radio to the station that you wish to preset (see
Tuning to an FM station on this page).
2. Press and hold the ‘Preset’ button on the front of your radio.
‘Preset Store 1 Empty’ is displayed if no previous station has
been stored.
3. Use the or button on the front of the radio to scroll
to the Preset location that you would like to store the radio
station to (1 - 10).
4. Press the ‘Enter’ button, the display will conrm ‘Preset X
stored’, where‘X’ is the number of the preset (1-10).
Note: If there is already an existing FM station stored under a
preset, it will be over written when you store the new station.
2. Use the or button on the front of the radio to scroll to
the Preset location and station that you would like to listen to
(1 - 10). Press the ‘Enter’ button. The radio will instantly tune
to that station and begin to play.
Note: If no FM station has been stored under the preset
button, ‘Preset X empty’ will be displayed, where ‘X’ is the
number of the preset location, then the radio will revert to
the previously selected radio station after a few seconds.
Tune to an FM preset station
In FM mode:
1. Press the ‘Preset’ button. ‘Preset Recall 1’ is displayed and the
name or frequency of the station stored there, or ‘Empty’ if no
previous station has been stored.
Page 12

FM display information
When listening to an FM station you can change the
information that will appear on the second line of the display.
There are several dierent types of information that are sent
by the broadcaster.
RDS Radio text - this is scrolling text information supplied by
the broadcaster. Information could be the name of an artist
or music title, DJ’s name, contact details for the radio station
etc.
Program Type - such as ‘Rock’, ‘Pop‘, Talk’ or ‘News’
Frequency - e.g.: 89.60 MHz
Signal information - Stereo and Mono, depending on the
quality of the signal being received.
Note: If you are using headphones you are able to listen in
Stereo.
Time and date - supplied by the broadcaster.
1. Repeatedly press the ‘Info’ button on the front of the radio to
cycle through the dierent information options.
12
Page 13
13
Set the Time and Date
Setting the time and date
The rst time you listen to DAB+ radio, the time and date
of your product will be synchronised automatically to that
broadcast by the DAB+ service in 24 hour mode; which is in
line with daylight saving, but you can set the time and date
manually.
1. Press the ‘Menu’ button on the front of the radio.
2. Use the or button on the front of the radio to scroll to
‘System’. Press ‘Enter’.
3. ‘Time’ is displayed. Press ‘Enter’. ‘Set Time/Date’ is displayed.
Press ‘Enter.
4. ‘Set time’ is displayed and the hour digits will ash. Use the
or button to scroll to the correct hour. Press ‘Enter’ to
conrm.
5. The minutes will now ash. Use the or to scroll to the
correct minutes. Press ‘Enter’ to conrm.
6. ‘Set date ’ is displayed and the day will ash. Use the or
button and the ‘Enter’ button to set the day, month and year,
using the same method as you did to set the time.
When you conrm the correct date, ‘Time Saved’ is displayed
and the display returns to ‘Set Time/Date’.
You can now use the same method as you did to set the time
and date to change the settings for:
- 12/24 hour clock display
- the date format, DD-MM-YYYY or MM-DD-YYYY
- to auto update the time from the DAB+ signal, FM signal,
DAB+ or FM signal or no update.
Setting the alarm
Note: Check that the radio has the correct time and date
before you set an alarm.
In DAB+ or FM mode:
1. Press the ‘Alarm’ button on the front of the radio, ‘Alarm 1
Setup’ is displayed. Press ‘Enter’.
Note: Press the ‘Alarm’ button twice to enter the Alarm 2
setup.
2. ‘Alarm 1 Wizard’ is displayed and the hour digits for the alarm
will ash.
3. Use the or button to scroll to the hour for the alarm.
Press ‘Enter’ to conrm.
4. Use the or button to scroll to the minutes for the alarm.
Press ‘Enter’ to conrm.
Page 14

5. Use the or button to scroll to the duration for the alarm.
You can choose from 15, 30, 45, 60 and 90 minutes. Press
‘Enter’ to conrm.
6. Use the or button to scroll to the sound source for the
alarm. You can choose from Buzzer, DAB+ or FM. Press ‘Enter’
to conrm.
7. Use the or button to scroll to the frequency for the
alarm. You can choose from Daily, Once, Weekends or
Weekdays. Press ‘Enter’ to conrm.
8. Use the or button to set the volume for your alarm.
Press ‘Enter’ to conrm.
Note: The alarm volume will increase progressively until it
reaches the alarm volume you have set.
9. ‘Alarm 1 Wizard’ is displayed again, together with ‘Alarm O
(or On)’. Use the or button to choose ‘Alarm On’ or ‘O’
and press ‘Enter’ to conrm. ‘Alarm Saved’ is displayed.
10. In Standby mode a bell symbol in the top right of the display
will conrm when an alarm has been set.
Turn o the Alarm
In Standby mode:
Briey press the ‘Alarm’ button repeatedly to turn Alarm 1
and Alarm 2 ‘On’ or ‘O’.
Snooze function
When the alarm sounds, you can press the ‘Snooze’ button on
the front of the radio. Repeatedly press the ‘Snooze’ button
to increase the Snooze time. Options of 5, 10, 15 and 30
minutes are available. ‘Snooze’ and the number of minutes
until the alarm sounds again will be displayed.
Note: You can press the ‘Standby’ button to stop the Snooze
function.
Sleep timer
You can set your radio to turn o automatically using the
sleep timer. You can choose from 15, 30, 45, 60 and 90
minutes or OFF.
Note: If the time is not set or has failed to update from the
radio signal, ‘Time is not set’ will be displayed when you try to
set the alarm. The radio will then prompt you to set the time.
An alarm can only be set after the time has been set.
Stop the Alarm
When the alarm sounds press the ‘Standby’ or ‘Alarm’ button
to stop the Alarm. ‘Alarm o’ will be displayed.
1. Press the ‘Sleep’ button on the front of the radio.
2. Use the or button to scroll to the sleep time you would
like (15, 30, 45, 60 or 90 minutes). Press ‘Enter’ to conrm.
3. You can press the ‘Sleep’ button to check the sleep time
remaining. Use the or button to modify or turn o the
sleep timer. Press ‘Enter’ to conrm.
14
Page 15

15
Menu Options
Adjusting the display backlight
You can adjust the timeout of the display backlight. There are
8 timeout options available.
1. Press the ‘Menu’ button on the front of the radio. Use the or
button to scroll to ‘System’ and press ‘Enter’.
2. ‘Time’ is displayed. Use the or button to scroll to
‘Backlight’ and press ‘Enter’.
3. Use the or button to scroll to ‘Timeout’, ‘On level’ or ‘Dim
level’ and press ‘Enter’.
4. Use the or button to scroll to your ideal setting and
press ‘Enter’ to conrm.
Language display
You can change the display language of your radio, there are
4 options available, English, French, German and Italian.
1. Press the ‘Menu’ button on the front of the radio. Use the or
button to scroll to ‘System’ and press ‘Enter’.
2. ‘Time’ is displayed. Use the or button to scroll to
‘Language’ and press ‘Enter’.
3. Use the or button to scroll to the language you want
and press ‘Enter’ to conrm.
Note: As soon as you select a dierent display language, all
of the display information will be in this new language.
Factory reset
You can reset your radio and restore all of the original factory
settings.
Note: If you reset your radio all of your DAB+ and FM station
presets will be deleted.
1. Press the ‘Menu’ button on the front of the radio. Use the or
button to scroll to ‘System’ and press ‘Enter’.
2. ‘Time’ is displayed. Use the or button to scroll to
‘Factory Reset’ and press ‘Enter’.
3. ‘Factory Reset? Yes No’ will be displayed. Use the or
button to scroll to ‘Yes’ and press ‘Enter’.
4. ‘Restarting...’ is displayed. After a few seconds the display will‘Restarting...’ is displayed. After a few seconds the display will
change to ‘Welcome to Digital Radio’ and then ‘Scanning...’
whilst it scans for DAB+ stations. Please extend the
telescopic aerial on the back of the radio.
Page 16

Software version
1. Press the ‘Menu’ button on the front of the radio. Use the
or button to scroll to ‘System’ and press ‘Enter’.
2. ‘Time’ is displayed. Use the or button to scroll to ‘SW
version’ and press ‘Enter’.
The software version will be displayed. You may wish to
make a note of it here.
.................................................................................................................
3. Press the ‘Back’ button repeatedly to return to the radio
display.
16
Page 17

17
Technical Information
Specication
Power adaptor: Output DC 5V 1A.
Input AC 100-240V
Batteries: 4 x AA (Optional, not supplied)
Output: 1 x 1W RMS
Frequency range:
DAB+ Band III, 174 MHz to 240 MHz
FM 87.5 MHz to 108 MHz
Page 18

Simple Solutions
If you are experiencing problems with your radio there
are some quick and easy checks that you can do, which
may help to solve the problem.
Radio reception is poor
- Please check that the aerial is FULLY extended for the
maximum signal strength and improved reception.
- Try moving your radio to an alternative location to see if
the reception improves. Please remember to scan for DAB+
stations again once you have moved your radio. See page 6.
- Check that you do not have other electrical equipment too
close to your radio, causing interference.
- Visit www.digitalradioplus.com.au for information about
DAB+ reception in your area.
No sound
- Adjust the volume using the ‘Vol+’ button.
- Check that the mains power lead is connected at the back of
the radio and the mains power wall socket is switched on.
- You may need to re-scan if the station you last listened to is
no longer available. See page 6.
The function buttons do not respond
- Check that the power lead is plugged into the back of the
radio and that the mains adaptor is plugged in and switched
on. Check that the switch on the back of the radio is set to
‘On’.
- If you are using batteries, they may be exhausted and
need to be replaced.
- Turn o the radio and unplug the mains power. Leave for one
minute and then reconnect your radio.
- Try a reset to factory defaults. See page 15.
- If you are using batteries, they may be exhausted and
need to be replaced.
18
Page 19

General Information
Care and Maintenance
Your radio is of superior design and manufacture and should
be treated with care. The suggestions below will help you to
enjoy this product and the benets it brings for many years.
- Keep the product and all its parts out of reach of small
children.
- Keep it dry. Avoid exposure to precipitation, humidity and
liquids which could all aect the product circuitry.
- Do not leave it in high temperatures as electronic devices
and plastic parts may warp in heat.
- Do not leave it in low temperatures as moisture can form
inside the product, which may damage the circuit board.
- Do not store in dusty or dirty areas.
- Do not use harsh chemicals, cleaning solvents or detergents
to clean the product. Wipe with a damp (not wet) soft cloth
to clean.
- Do not attempt to open the product. Unauthorised handling
of the device may damage it and will void your warranty.
- Only use the power supply that came with the product.
Using an unauthorised power supply will invalidate your
guarantee and may irrecoverably damage the radio.
19
Page 20

Consumer Product Warranty
Australia & New Zealand Standard Warranty
For Magicbox Products
Consumer Product Warranty (Warranty against Defects)
The purchase of a Magicbox product (hereinafter referred to
in this Standard Warranty as “good(s)”) includes coverage by
the Magicbox Standard Warranty. The Magicbox Standard
Warranty is provided by: Standard Radio Distributors trading
as Canohm (ABN 57 004 817 949), 3/200 Turner Street, Port
Melbourne, Victoria 3207 Australia. Ph: 03 9644 7888,
Email: [email protected]
Warranty terms and conditions
1.1 Our goods come with guarantees that cannot be excluded
under the Australian Consumer Law. You are entitled to a
replacement or refund for a major failure and compensation
for any other reasonably foreseeable loss or damage. You
are also entitled to have the goods repaired or replaced if
the goods fail to be of acceptable quality and the failure
does not amount to a major failure. The benets provided
in this Standard Warranty are in addition to other rights and
remedies you may have under law.
1.2 Subject to the above, as part of your Standard Warranty
Canohm agrees to repair or replace at Canohm’s cost the
goods (which includes a supplied Magicbox accessory)
purchased by you in Australia or New Zealand from a
Magicbox Authorised Dealer when the good does not
perform in accordance with the manufacturer’s specications
during the Warranty Term specied below, commencing from
the date of purchase.
1.3 Goods returned for repair may be modied or repaired with
refurbished parts of the same type. Replacement of the good
or a part does not extend or restart the Warranty Term.
1.4 In the case of a good presented for repair which is capable of
retaining user-generated data (e.g. internal memory), you are
advised that the repair process of the good may result in loss
of that data.
1.5 The good will be at the owner’s risk whilst in transit to
and from the Canohm Authorised Service Centre, unless
transported by Canohm or its Authorised representatives.
1.6 Transportation of the good to Canohm or its Service Centre
is at your cost. Canohm will not be liable for any damage
caused to the good whilst in transit.
20
Page 21

21
Consumer Product Warranty
1.7 The cost of repair or replacement of the good shall be at
Canohm’s cost but Canohm and its Authorised Service
Centres may seek reimbursement of any costs incurred by
them when the good is found to be in proper working order.
General exclusions and limitations
2.0 To the full extent permitted by law, but subject always to
clause 1.1, the Standard Warranty will not apply:
(a). If the good has not been installed, operated, maintained
or used in accordance with the manufacturer’s
instructions or specications provided with the good.
(b). If the serial number has been altered or removed from
the good.
(c). To damage as a result of malfunction or failure resulting
from alterations, accident, misuse, abuse, re, liquid
spillage, faulty or mis-adjustment of customer controls,
use on an incorrect voltage, voltage supply problems,
power surges and dips, thunderstorm activity, acts of
God, tampering or unauthorised repairs by any persons,
use of defective or incompatible accessories, the
operation of a computer virus of any kind, exposure to
conditions that are known to cause damage or entry by
any foreign object in the good.
(d). To damage arising out of or during transportation,
installation or while moving the good, or to any
transportation costs of the good or any parts thereof to
and from the owner, unless otherwise specied in these
warranty terms.
(e). To any third-party software or hardware not
contained in the good as originally congured by the
manufacturer.
(f). To any failure, to the extent that the failure is not a
failure of the good to perform in accordance with its
specications.
(g). To replacement or repair of any:
(I). consumables (including batteries and cables), or
(II). lost parts or accessories.
(h). To service of any good whilst it is outside Australia and
New Zealand.
(i). To any wear and tear if the good is used in commercial,
industrial, educational or rental applications.
Page 22

Consumer Product Warranty
(j). If DAB+ (Digital Radio) broadcast is not received:
(I). due to unreasonable/unusual environmental
factors such as in tunnels (e.g. rail or road),
underground, or in buildings or other structures
whose location or method of construction prevents
a DAB+ radio from receiving a DAB+ signal, or
(II). where the receivers are being used in areas which
are “not covered” by DAB+ broadcasts. (In Australia
refer to Commercial Radio Australia’s website
www.digitalradioplus.com.au for current reception
areas.)
3.0 To the full extent permitted by law but subject always to
clause 1.1:
(a). Canohm will not be liable for any loss, damage or
alterations to:
(I). third party hardware or software; or
(II). programs, data or information stored on any
media or any part of the good, no matter how
occurring; or for any loss or damage arising from
loss of use, loss of prots or revenue, or for any
resulting indirect or consequential loss or damage.
Making a Claim
4.0 To make a claim under the Standard Warranty you will need
to:
(a). Contact Canohm (contact details below) to notify your
claim and provide sucient details to enable Canohm to
assess the claim. In order to assist with this process you
may visit the Support section located on the Magicbox
website.
(b). Provide or make the good available to Canohm or a
Canohm Authorised Service Centre. If you are required
to return the good to a Canohm Authorised Service
Centre, Canohm will provide details of the centre to you.
(c). Provide proof of purchase of the good(s) (e.g. invoice
or purchase receipt) at the time of making your claim
(unless not required by law).
All Magicbox Products have a 1 year warranty.
22
Page 23

23
Consumer Product Warranty
For further details or to nd your nearest Magicbox
Authorised Service Centre please contact:
Page 24

Issue 1/Dec12
 Loading...