

Page 1
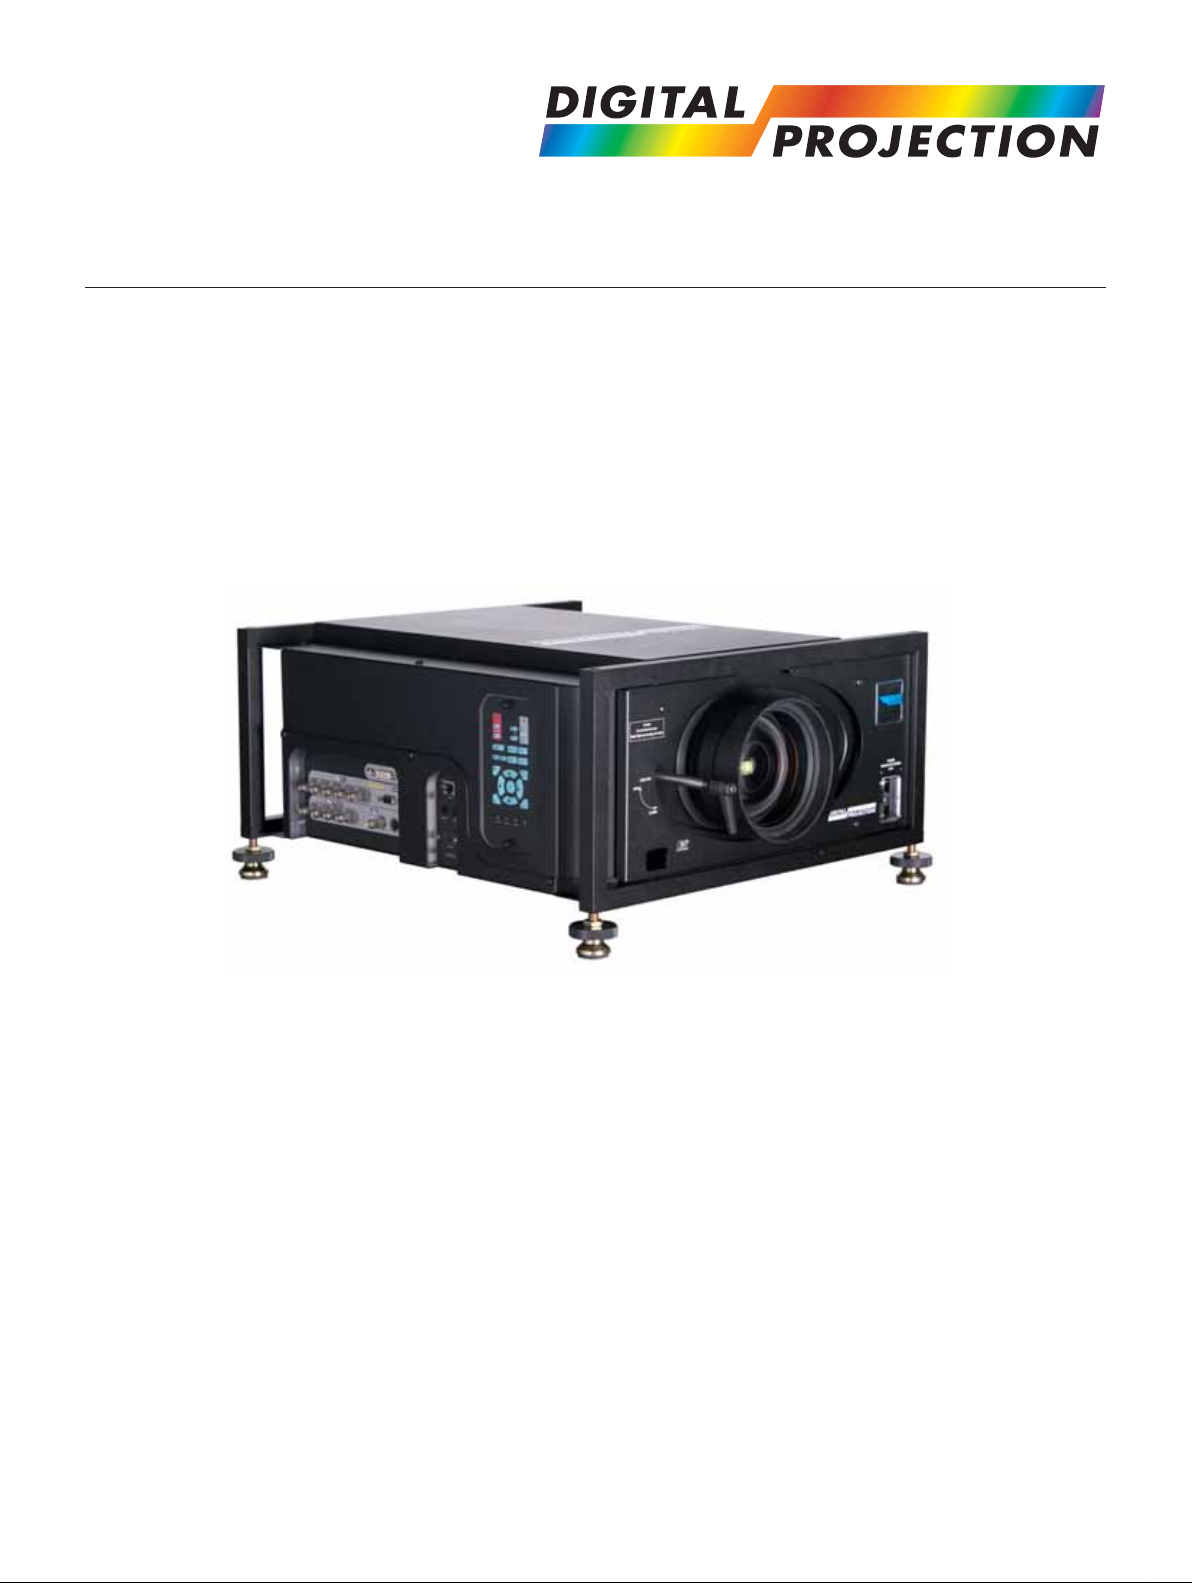
TITAN 1080p-600, Reference 1080p
High Brightness Digital Video Projector
16:9 widescreen display
User Manual
108-451A
Page 2

Digital Projection TITAN 1080p-600, Reference 1080p User Manual
Declaration of Conformity
Directives covered by this Declaration
2004/108/EC Electromagnetic Compatibility Directive.
2006/95/EC Low Voltage Equipment Directive.
Products covered by this Declaration
Large screen video projector type The CE mark was fi rst applied in:
TITAN Reference 1080p October 2007
Basis on which Conformity is being declared
The products identifi ed above comply with the protection requirements of the above EU directives, and the
manufacturer has applied the following standards.
EN 55022:1998 - Limits and Methods of Measurement of Radio Disturbance Characteristics of Information
Technology Equipment.
EN 55024:1998 - Limits and Methods of Measurement of Immunity Characteristics of Information Technology
Equipment.
EN 55103:1997 - Product family Standard for Audio, Video, Audio-Visual and Entertainment Lighting Control
apparatus for Professional Use.
EN 60950-1:2001 - Specifi cation for Safety of Information Technology Equipment, including Electrical Business
equipment.
The technical documentation required to demonstrate that the products meet the requirements of the Low Voltage
directive has been compiled by the signatory below and is available for inspection by the relevant enforcement
authorities.
Signed:
Authority: D.J. Quinn, Product Development Director
Date: 15 October 2007
Attention!
The attention of the specifi er, purchaser, installer, or user is drawn to special measures and limitations to use which
must be observed when these products are taken into service to maintain compliance with the above directives.
Details of these special measures are available on request, and are also contained in the product manuals.
Page 3

Digital Projection TITAN 1080p-600, Reference 1080p User Manual
Declaration of Conformity
Directives covered by this Declaration
2004/108/EC Electromagnetic Compatibility Directive.
2006/95/EC Low Voltage Equipment Directive.
Products covered by this Declaration
Large screen video projector type The CE mark was fi rst applied in:
TITAN 1080p-600 October 2007
Basis on which Conformity is being declared
The products identifi ed above comply with the protection requirements of the above EU directives, and the
manufacturer has applied the following standards.
EN 55022:1998 - Limits and Methods of Measurement of Radio Disturbance Characteristics of Information
Technology Equipment.
EN 55024:1998 - Limits and Methods of Measurement of Immunity Characteristics of Information Technology
Equipment.
EN 55103:1997 - Product family Standard for Audio, Video, Audio-Visual and Entertainment Lighting Control
apparatus for Professional Use.
EN 60950-1:2001 - Specifi cation for Safety of Information Technology Equipment, including Electrical Business
equipment.
The technical documentation required to demonstrate that the products meet the requirements of the Low Voltage
directive has been compiled by the signatory below and is available for inspection by the relevant enforcement
authorities.
Signed:
Authority: D.J. Quinn, Product Development Director
Date: 15 October 2007
Attention!
The attention of the specifi er, purchaser, installer, or user is drawn to special measures and limitations to use which
must be observed when these products are taken into service to maintain compliance with the above directives.
Details of these special measures are available on request, and are also contained in the product manuals.
Page 4

Digital Projection TITAN 1080p-600, Reference 1080p User Manual
Page 5
Important Information
Please read this user manual carefully before using the projector, and keep
the manual handy for future reference.
A serial number is located on the side of the projector. Record it here:
Symbols used in this guide
Warnings
ELECTRICAL WARNING: this symbol indicates that there is a danger of
electrical shock unless the instructions are closely followed.
WARNING: this symbol indicates that there is a danger of physical
injury to yourself and/or damage to the equipment unless the
instructions are closely followed.
NOTE: this symbol indicates that there is some important information that
you should read.
Trademarks
•
IBM is a registered trademark of International Business Machines Corporation.
•
Macintosh and PowerBook are registered trademarks of Apple Computer, Inc.
•
Other product and company names mentioned in this user’s manual may be the
trademarks of their respective holders.
Product revision
•
Because we at Digital Projection continually strive to improve our products, we
may change specifi cations and designs, and add new features without prior
notice. Projectors built prior to this revision of the User Manual may therefore not
include all the features described.
Manual revision
Date Description Revision
March 2008 Rev A
Rev A. March 2008 Page v
Page 6
Important Information Digital Projection TITAN 1080p-600, Reference 1080p User Manual
General precautions
Do not open the cabinet. There are no user serviceable parts inside.
Use only the power cable provided.
Ensure that the power outlet includes a Ground connection, as this
equipment MUST be earthed.
Take care to prevent small objects such as paper or wire from falling
into the projector. If this does happen, switch off immediately, and have
the objects removed by authorised service personnel.
Do not expose the projector to rain or moisture, and do not place any
liquids on top of the projector.
Unplug before cleaning, and use a damp, not wet, cloth.
Do not touch the power plug with wet hands.
Do not touch the power plug during a thunder storm.
Handle the power cable carefully and avoid sharp bends. Do not use a
damaged power cable.
There are no user-serviceable parts inside the lamp module. The whole
module should be replaced.
Notes
Take care when removing the lamp module.
NEVER touch the lamp or refl ector.
Take care not to touch the glass surface of the lamp module. If you
do accidentally touch the glass, it should be cleaned before use. (see
section 5. Maintenance.)
Do not use the lamp for more than 2000 hours, as this may cause
serious lamp failure, damage the lamp module and cause extra cost on
replacement.
HID lamps produce high intensity light. Do not look directly at the light
coming from the lamp housing, or the lens, or allow items such as
magnifying lenses to be placed in the light path. This could result in
serious eye damage.
Do not touch the ventilation outlets, as they will become hot in use.
Do not cover or obstruct the ventilation outlets or inlets.
Do not cover the lens whilst the projector is switched on. This could
cause a fi re
Always allow the projector to cool for 5 minutes before disconnecting
the power, moving the projector or changing the lamp.
Never use strong detergents or solvents such as alcohol or thinners to
clean the projector and lens.
Page vi Rev A. March 2008
Page 7
Digital Projection TITAN 1080p-600, Reference 1080p User Manual Important Information
Installation precautions
Connect the LAN cable only to a computer LAN connection. Other
similar connectors may have a dangerously high voltage source.
The projector must be installed only by suitably qualifi ed personnel, in
accordance with local building codes.
The projector should be installed as close to the power outlet as
possible.
The power connection should be easily accessible, so that it can be
disconnected in an emergency.
Ensure that there is at least 30cm (12in) of space between the
ventilation outlets and any wall, and 10cm (4in) on all other sides.
Do not install the projector close to anything that might be affected by
its operational heat, for instance, polystyrene ceiling tiles, curtains etc.
The projector weighs approximately 31 kg (68 lbs). Use safe handling
techniques when lifting the projector.
When stacking projectors, the stack MUST be vertical, to ensure that
the stresses are distributed to all frame couplings.
Before installation, make sure that the surface, ceiling or rigging that is
to support the projector is capable of supporting the combined weight
of the projector and lens (see specifi cation for exact weights).
Separate backup safety chains or wires should always be used for each
projector.
Notes
±12°
Do not place heavy objects on top of the projector chassis. Only the
chassis corners and the rigging frame are capable of withstanding the
weight of another projector.
Do not stack more than 3 projectors.
Do not drop or jarr the projector.
The lens release lever should always be set to the locked position to
prevent the lens from falling out.
Place the projector in a dry area away from sources of dust, moisture,
steam, smoke, sunlight or heat.
Do not tilt the projector more than ±12° in either direction when in use,
as this may cause serious lamp failure, damage the lamp module and
cause extra cost on replacement.
±12°
Rev A. March 2008 Page vii
Page 8
Important Information Digital Projection TITAN 1080p-600, Reference 1080p User Manual
Operation and confi guration precautions
Do not make changes to the networking confi guration unless you
understand what you are doing, or have taken advice from your
Network Manager. If you make a mistake, it is possible that you will lose
contact with the projector. Always double-check your settings before
pressing the APPLY button. Always keep a written note of the original
settings, and any changes you have made.
Software update should NOT be carried out except by, or with the
supervision of, Digital Projection Service personnel.
Compliance with international standards
Noise
GSGV Acoustic Noise Information Ordinance
The sound pressure level is less than 70 dB (A) according to ISO 3744 or ISO 7779.
RF Interference
FCC
The Federal Communications Commission does not allow any modifi cations or
changes to the unit EXCEPT those specifi ed by Digital Projection in this manual.
Failure to comply with this government regulation could void your right to operate
this equipment.
Notes
This equipment has been tested and found to comply with the limits for a Class A
digital device, pursuant with Part 15 of the FCC Rules. These limits are designed to
provide reasonable protection against harmful interference when the equipment is
operated in a commercial environment. This equipment generates, uses, and can
radiate radio frequency energy and, if not installed and used in accordance with
the instruction manual, may cause harmful interference to radio communications.
Operation of this equipment in a residential area may cause harmful interference, in
which case the user will be responsible for correcting any interference.
This equipment contains an FCC approved RF transmitter module with FCC ID:
R68WIPORT.
European Waste Electrical and Electronic Equipment
(WEEE) Directive
Digital Projection Ltd is fully committed to minimising Waste Electrical and
Electronic Equipment. Our products are designed with reuse, recycling
and recovery of all components in mind. To this end, at end of life, your
projector may be returned to Digital Projection Ltd or its agent so that the
environmental impact can be minimised.
Page viii Rev A. March 2008
Page 9

Digital Projection TITAN 1080p-600, Reference 1080p User Manual Important Information
Digital Projection Contact details
Digital Projection Limited,
Greenside Way, Middleton, Manchester M24 1XX, UK.
Registered in England No. 2207264, Registered Offi ce: as above
Tel +44 (0) 161 947 3300
Fax +44 (0) 161 684 7674
Email enquiries@digitalprojection.co.uk, service@digitalprojection.co.uk
Web Site www.digitalprojection.co.uk
Digital Projection Inc.
55 Chastain Road, Suite 115, Kennesaw, GA 30144. USA
Tel (USA) 770 420 1350
Fax (USA) 770 420 1360
Email powerinfo@digitalprojection.com
Notes
Web Site www.digitalprojection.com
Rev A. March 2008 Page ix
Page 10

Important Information Digital Projection TITAN 1080p-600, Reference 1080p User Manual
Page x Rev A. March 2008
Page 11

Titan 1080p-600 User Manual
Contents
Important Information
Symbols used in this guide ..................................................................................................................v
Warnings ..............................................................................................................................................v
Trademarks ..........................................................................................................................................v
Product revision ......................................................................................................................................v
Manual revision .......................................................................................................................................v
General precautions ..............................................................................................................................vi
Installation precautions ......................................................................................................................vii
Operation and confi guration precautions ..................................................................................... viii
Compliance with international standards ......................................................................................viii
Noise ................................................................................................................................................viii
RF Interference..................................................................................................................................viii
European Waste Electrical and Electronic Equipment (WEEE) Directive .................................................viii
Digital Projection Contact details ......................................................................................................ix
1. Introduction
What’s in the box? ..............................................................................................................................1.2
Key features of the projector ........................................................................................................... 1.3
Getting to know the projector .......................................................................................................... 1.4
Front panel, – lens and power ............................................................................................................ 1.4
Rear panel – lamp and air fi lter........................................................................................................... 1.4
Side panel – connection and control ................................................................................................... 1.5
2. Installation
Screen requirements ......................................................................................................................... 2.2
Aspect ratio ...................................................................................................................................... 2.2
Positioning the screen and projector ................................................................................................... 2.5
Choosing a lens .................................................................................................................................. 2.6
Choosing a lens using the lens charts ................................................................................................. 2.7
Choosing a lens by calculation ..........................................................................................................2.1 1
Useful lens calculations .................................................................................................................. 2.12
Fitting the lens ................................................................................................................................... 2.13
Shifting the image............................................................................................................................. 2.14
continued
Rev A. March 2008 Page xi
Page 12

Table of Contents Digital Projection TITAN 1080p-600, Reference 1080p User Manual
Mounting the projector .................................................................................................................... 2.15
Chassis adjustment ......................................................................................................................... 2.15
Fitting the optional rigging frame....................................................................................................... 2.15
Stacking projectors .......................................................................................................................... 2.17
Connecting the projector ................................................................................................................ 2.18
Signal Inputs .................................................................................................................................. 2.18
Control connection examples ........................................................................................................... 2.19
Power connection ........................................................................................................................... 2.20
3. Getting Started
Switching the projector on ............................................................................................................... 3.2
Selecting an input or test pattern ................................................................................................... 3.2
Input ................................................................................................................................................ 3.2
Test pattern ...................................................................................................................................... 3.2
Adjusting the lens............................................................................................................................... 3.3
Focus .............................................................................................................................................. 3.3
Zoom ............................................................................................................................................... 3.3
Shift ................................................................................................................................................. 3.3
Adjusting the projected image ........................................................................................................ 3.4
Picture settings ................................................................................................................................. 3.4
Geometry settings ............................................................................................................................. 3.4
Switching the projector off ............................................................................................................... 3.4
4. Controlling the projector
Overview ............................................................................................................................................... 4.4
Controlling the projector..................................................................................................................... 4.4
Input modes and settings ................................................................................................................... 4.5
Indicators .............................................................................................................................................. 4.7
Input status indicators ....................................................................................................................... 4.7
The control panel ................................................................................................................................ 4.8
Keypad layout................................................................................................................................... 4.8
Projector status indicators .................................................................................................................. 4.8
The remote control ............................................................................................................................. 4.9
Layout ............................................................................................................................................. 4.9
Timeout ............................................................................................................................................ 4.9
continued
Page xii Rev A. March 2008
Page 13

Digital Projection TITAN 1080p-600, Reference 1080p User Manual Table of Contents
Using the control keys .................................................................................................................... 4.10
Power ............................................................................................................................................ 4.10
Shutter ........................................................................................................................................... 4.10
On-Screen-Display .......................................................................................................................... 4.10
Focus ............................................................................................................................................ 4.10
Zoom ............................................................................................................................................. 4.10
Shift ............................................................................................................................................... 4.10
Auto-detect input mode ....................................................................................................................4.11
Source information ...........................................................................................................................4.11
Input ...............................................................................................................................................4.11
Input Presets .................................................................................................................................. 4.12
Red, Green and Blue....................................................................................................................... 4.13
Test pattern .................................................................................................................................... 4.13
Picture settings ............................................................................................................................... 4.13
Geometry settings ........................................................................................................................... 4.13
Magnify and pan ............................................................................................................................. 4.14
On-screen-display size .................................................................................................................... 4.14
Remote control address................................................................................................................... 4.14
Remote control backlight ................................................................................................................. 4.14
Using the menus ............................................................................................................................... 4.15
Navigating menus and submenus ..................................................................................................... 4.15
Menu controls ................................................................................................................................. 4.17
Input menu ......................................................................................................................................... 4.18
Input Source ................................................................................................................................... 4.18
Presets .......................................................................................................................................... 4.19
Picture menu ...................................................................................................................................... 4.21
Brightness ...................................................................................................................................... 4.21
Contrast ......................................................................................................................................... 4.21
Saturation ...................................................................................................................................... 4.21
Hue ............................................................................................................................................... 4.21
Gamma Correction .......................................................................................................................... 4.22
Parametric Gamma ......................................................................................................................... 4.22
Phase ............................................................................................................................................ 4.22
Aspect Ratio ................................................................................................................................... 4.23
Sharpness ...................................................................................................................................... 4.23
continued
Rev A. March 2008 Page xiii
Page 14

Table of Contents Digital Projection TITAN 1080p-600, Reference 1080p User Manual
Geometry menu ................................................................................................................................. 4.24
Horizontal Position .......................................................................................................................... 4.24
Vertical Position ..............................................................................................................................4.24
Aspect Ratio ................................................................................................................................... 4.24
User Horizontal Aspect Ratio ........................................................................................................... 4.25
User Vertical Aspect Ratio ............................................................................................................... 4.25
Keystone ........................................................................................................................................ 4.25
Phase ............................................................................................................................................ 4.25
Resolution ...................................................................................................................................... 4.26
Blanking ......................................................................................................................................... 4.27
Colour menu ...................................................................................................................................... 4.28
Colour Mode................................................................................................................................... 4.29
Colour Temperature ........................................................................................................................ 4.29
RGB Lift ......................................................................................................................................... 4.29
RGB Gain ...................................................................................................................................... 4.29
Component Type ............................................................................................................................ 4.29
Trim ...............................................................................................................................................4.30
Setup menu ........................................................................................................................................ 4.31
Projector ........................................................................................................................................ 4.32
Global Colourimetry ........................................................................................................................ 4.34
Lamp ............................................................................................................................................. 4.36
On Screen Display .......................................................................................................................... 4.38
Password ....................................................................................................................................... 4.39
Communication............................................................................................................................... 4.40
Network ......................................................................................................................................... 4.41
Restore Defaults ............................................................................................................................. 4.46
Information menu ............................................................................................................................. 4.47
Projector Information ....................................................................................................................... 4.47
Source Information .......................................................................................................................... 4.47
Digital Projection Information ........................................................................................................... 4.48
continued
Page xiv Rev A. March 2008
Page 15

Digital Projection TITAN 1080p-600, Reference 1080p User Manual Table of Contents
5. Userware
6. Maintenance
Changing the lamp module .............................................................................................................. 6.2
Changing the air fi lter ........................................................................................................................ 6.3
Cleaning ................................................................................................................................................ 6.4
Projector .......................................................................................................................................... 6.4
Lens ................................................................................................................................................ 6.4
Lamp module ................................................................................................................................... 6.4
7. Appendix
Troubleshooting .................................................................................................................................. 7.2
Specifi cations ...................................................................................................................................... 7.4
Part numbers .................................................................................................................................... 7.4
Optical ............................................................................................................................................. 7.4
Electrical .......................................................................................................................................... 7.5
Physical ........................................................................................................................................... 7.5
Lens Data ........................................................................................................................................ 7.6
Dimensions .......................................................................................................................................... 7.8
Input modes supported ..................................................................................................................... 7.9
Input connections ............................................................................................................................. 7.10
1. RGB1 input ................................................................................................................................. 7.10
2. RGB2 input ................................................................................................................................. 7.10
3. DVI-D input ..................................................................................................................................7.11
4. SDI input .................................................................................................................................... 7.12
5. Composite video input ................................................................................................................. 7.12
6. S-Video input .............................................................................................................................. 7.12
7. Component video input ................................................................................................................ 7.12
Control connections ........................................................................................................................ 7.13
Wired Remote control connection ..................................................................................................... 7.13
LAN connection .............................................................................................................................. 7.13
Serial control input .......................................................................................................................... 7.14
Remote communications protocol ............................................................................................... 7.15
Introduction .................................................................................................................................... 7.15
Message Structure .......................................................................................................................... 7.15
Operation Command examples ........................................................................................................ 7.18
Quick Reference chart ..................................................................................................................... 7.23
Rev A. March 2008 Page xv
Page 16

Table of Contents Digital Projection TITAN 1080p-600, Reference 1080p User Manual
Page xvi Rev A. March 2008
Page 17

1. Introduction
Contents
What’s in the box? ..............................................................................................................................1.2
Key features of the projector ........................................................................................................... 1.3
Getting to know the projector .......................................................................................................... 1.4
Front panel, – lens and power ............................................................................................................ 1.4
Rear panel – lamp and air fi lter........................................................................................................... 1.4
Side panel – connection and control ................................................................................................... 1.5
Rev A. March 2008 Page 1.1
Page 18
1. Introduction Digital Projection TITAN 1080p-600, Reference 1080p User Manual
What’s in the box?
Make sure your box contains everything listed. If any pieces are missing, contact
•
your dealer.
•
You should save the original box and packing materials, in case you ever need
to ship your Projector.
Projector
(1080p-600: 107-302, with SDI: 108 643
Reference 1080p: 107-973, with SDI 108 644)
Notes
Lenses are optional. Order
lenses from your Digital
Projection dealer.
For more detailed information
about lenses, see Choosing a
lens, in section 2. Installation.
Only one power cable -
dependent on the destination
territory - will be supplied with
the projector.
Power cable 10A
Europe
(102-163)
Remote control
(105-023)
4x AAA batteries
(105-922)
Power cable 13A
North America
(102-165)
Remote cable 5m
(102-162)
User manual on CD
Power cable 10A
United Kingdom
(102-180)
(105-923)
Important Information
(108-467)
Page 1.2 Rev A. March 2008
Page 19

Digital Projection TITAN 1080p-600, Reference 1080p User Manual 1. Introduction
Key features of the projector
Congratulations on your purchase of the Digital Projection Titan 1080p-600 or
Titan Reference 1080p projector.
Digital Projection International, Texas Instruments’ fi rst DLP™ partner and the
original innovator of the 3-chip DLP™ projector, proudly introduces the Titan 1080p.
Incredibly bright, high resolution and high in contrast, the Titan 1080p offers a
radically new electronics confi guration ideally suited for the staging and large-venue
permanent installation markets.
The Titan 1080p harnesses the power of the Texas Instruments’ 1920 x 1080 pixel
HPO DMD’s™. Alongside the LIGHTNING and HIGHlite Pro, the Titan 1080p is to
set new standards for Staging and is destined to be the fi rst choice of professionals
who stage prestigious events such as the Grammy® Awards and the Oscars®.
With a contrast of 2000:1 and awe-inspiring brightness of 10000 lumens, the Titan
1080p-600 is unmatched for applications as diverse as world class staged events,
commercial entertainment, major outdoor venues, large-scale simulation, gaming,
home theatre and houses of worship.
Key Features
High resolution, large venue projector
•
Applications: Large Screen; Fixed install and Rental
•
1080p-600: 10000 ANSI lumens ±10%
•
Reference 1080p: 4000 ANSI lumens ±10%
Notes
1080p-600: Contrast 2000:1 ±10%
•
Reference 1080p: Contrast 5000:1 ±10%
1920 x 1080 resolution
•
Precision mechanical design ensuring maximum amount of light from lamp
•
housing reaches optics, without any operator adjustment
850W single phase, 100-240VAC ±10%
•
Compact size, light weight - approximately 31 kg (68 lbs)
•
Motorised lens mount
•
Optional Rigging frame with Quick-lock stack system- 3 point pitch & roll
•
adjustment for accurate alignment
Ruggedised robust metal case
•
LAN & RS232 connection for network operation
•
Six/Seven selectable Digital and Analogue Video inputs for display of the latest
•
as well as legacy video standards.
DVI, SD and HD SDI, RGBHV, Component, S-Video, Composite all as standard.
(SDI not present on earlier models)
Wi-fi connection wireless remote control
•
IR/cable remote control for easy setup
•
LAN operation using control codes or Integrated Userware
•
Rev A. March 2008 Page 1.3
Page 20
1. Introduction Digital Projection TITAN 1080p-600, Reference 1080p User Manual
Getting to know the projector
Front panel, – lens and power
Air inlet -
around lens
Front Infra-red window
(remote control)
Lens
Notes
For more detailed information
about lenses, see
section 2. Installation
Power
connection
Rear panel – lamp and air fi lter
Screws
x 4
Rear door:
(access to
Lamp compartment
and Air fi lters)
Air outlet
For information about how to
change the lamp or the fi lter,
see section 6. Maintenance.
Air inlet
Rear Infra-red window
(remote control)
Page 1.4 Rev A. March 2008
Page 21

Digital Projection TITAN 1080p-600, Reference 1080p User Manual 1. Introduction
Side panel – connection and control
Control panel
Notes
For information about how
to connect the projector, see
Connecting the projector in
section 2. Installation, and
Connections in section 7.
Appendix.
For information about how
to use the control panel, see
section 4. Controlling the
projector.
Input
connections
Control
connections
Adjustable
foot
For information about how to
mount and stack projectors, see
section 2. Installation.
Rev A. March 2008 Page 1.5
Page 22

1. Introduction Digital Projection TITAN 1080p-600, Reference 1080p User Manual
Page 1.6 Rev A. March 2008
Page 23

2. Installation
Contents
Screen requirements ......................................................................................................................... 2.2
Aspect ratio ...................................................................................................................................... 2.2
Fitting the image to the DMD ............................................................................................................. 2.2
Images displayed full width ............................................................................................................... 2.2
Images displayed full height .............................................................................................................. 2.2
Diagonal screen sizes ..................................................................................................................... 2.3
Fitting the image to the screen ........................................................................................................... 2.4
Positioning the screen and projector ................................................................................................... 2.5
Choosing a lens .................................................................................................................................. 2.6
Choosing a lens using the lens charts ................................................................................................. 2.7
Full width images, including 2.35:1, 1.85:1 and 16:9 (native resolution) ....................................................... 2.7
example ....................................................................................................................................... 2.7
Full height image 1.66:1 (Vista) .......................................................................................................... 2.8
Full height image 4:3 ....................................................................................................................... 2.9
Full height image 5:4 ..................................................................................................................... 2.10
Choosing a lens by calculation ..........................................................................................................2.1 1
example ......................................................................................................................................2.11
Useful lens calculations .................................................................................................................. 2.12
Lens extension ............................................................................................................................. 2.12
Fitting the lens ................................................................................................................................... 2.13
Shifting the image............................................................................................................................. 2.14
Mounting the projector .................................................................................................................... 2.15
Chassis adjustment ......................................................................................................................... 2.15
Fitting the optional rigging frame....................................................................................................... 2.15
Adjusting the rigging frame .............................................................................................................. 2.16
Stacking projectors .......................................................................................................................... 2.17
Connecting the projector ................................................................................................................ 2.18
Signal Inputs .................................................................................................................................. 2.18
EDID handshaking on the DVI and RGB2 inputs .................................................................................. 2.18
Control connection examples ........................................................................................................... 2.19
LAN connection ............................................................................................................................ 2.19
RS232 connection ......................................................................................................................... 2.19
Power connection ........................................................................................................................... 2.20
Rev A. March 2008 Page 2.1
Page 24
2. Installation Digital Projection TITAN 1080p-600, Reference 1080p User Manual
Screen requirements
Aspect ratio
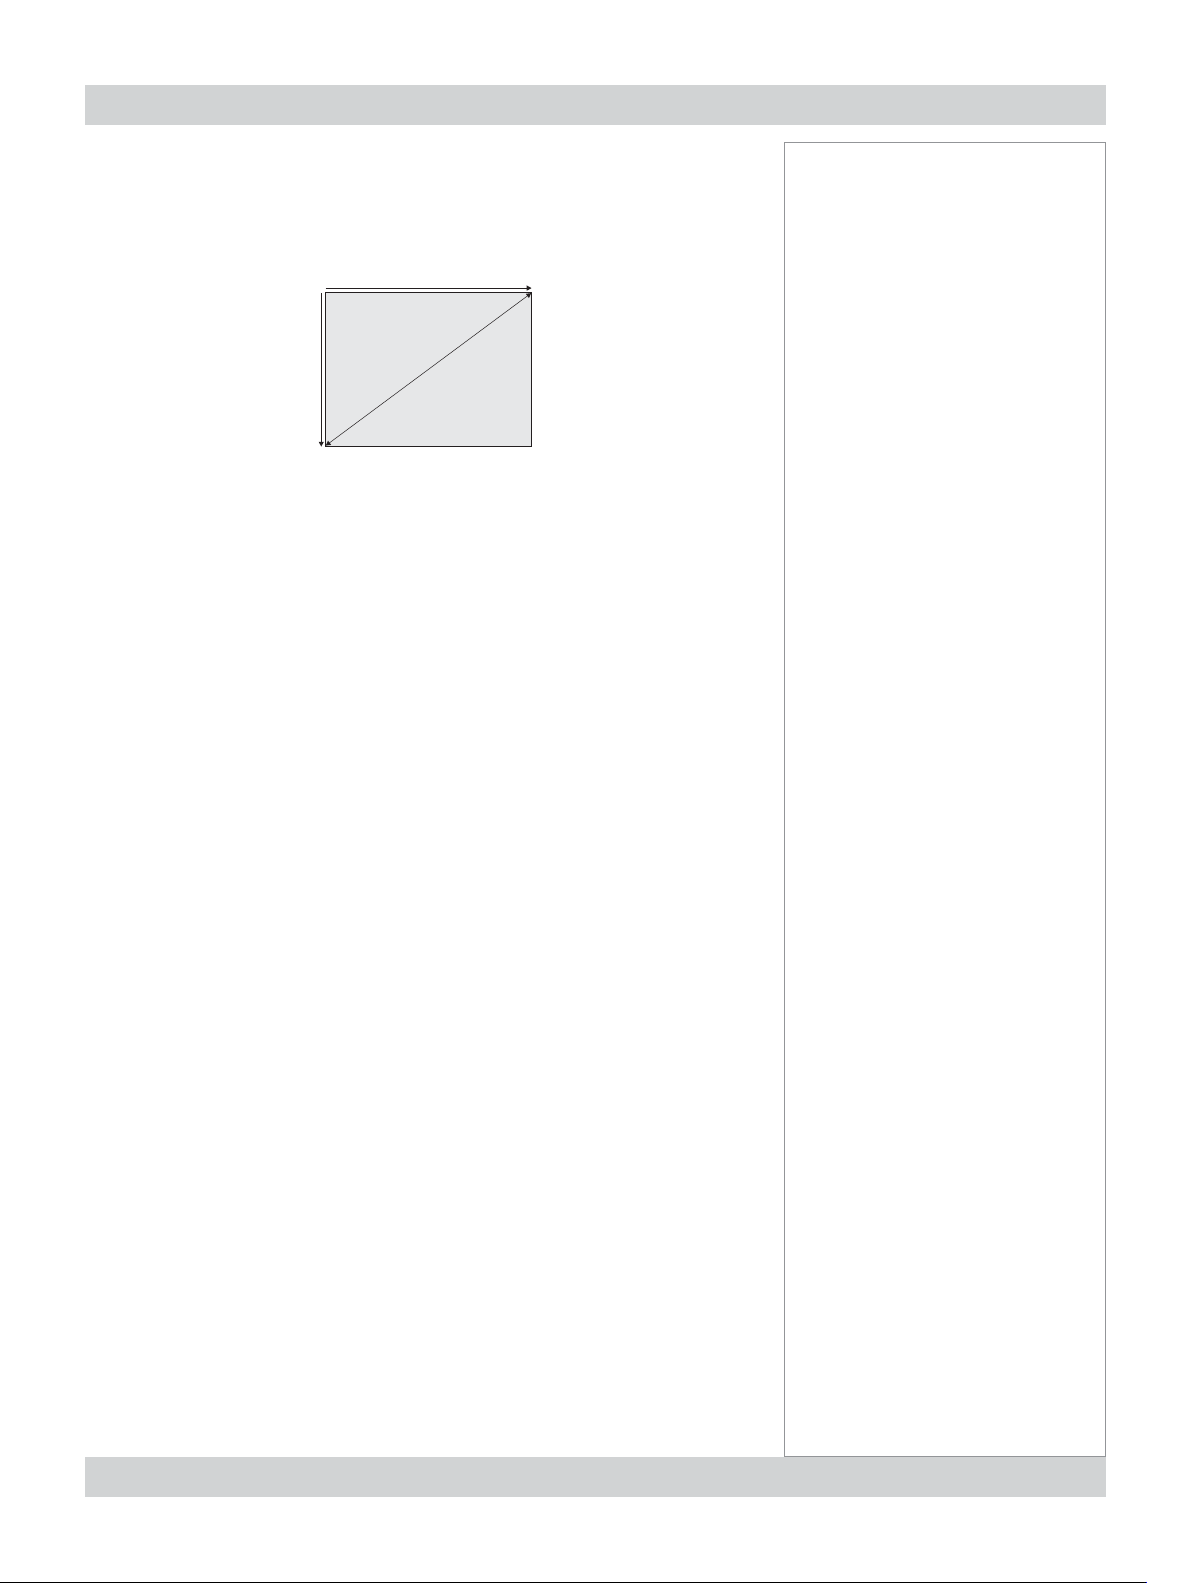
Fitting the image to the DMD
If the source image supplied to the projector is smaller than 1920 x 1080 pixels,
then the image will not fi ll the DMD. The following example shows how a number
of common formats may be displayed.
Images displayed full width
= 817 pixels
2.35:1(Scope)
full width = 1920 pixels
Notes
The images are shown here
scaled automatically by the
projector.
The image may be scaled
differently if the Aspect Ratio is
set differently in the Picture or
Geometry menus.
1.85:1
16:9 = 1.78:1
= 1037 pixels
= 1080 pixels
(native resolution)
Images displayed full height
5:4 = 1.25:1 = 1350 pixels
4:3 = 1.33:1 = 1440 pixels
1.66:2 (Vista) = 1792 pixels
16:9 = 1.78:1 = 1920 pixels
full height = 1080 pixels
(native resolution)
Page 2.2 Rev A. March 2008
Page 25
Digital Projection TITAN 1080p-600, Reference 1080p User Manual 2. Installation
Diagonal screen sizes
Screen sizes are sometimes specifi ed by their diagonal size (D) in inches. When
dealing with large screens and projection distances at different aspect ratios, it is
more convenient to measure screen width (W) and height (H).
W = width
H = height
D = diagonal (inches)
The example calculations below show how to convert diagonal sizes in inches into
width and height, at various aspect ratios.
2.35:1 (Scope)
W = D x 0.92in (D x .023m) H = D x 0.39in (D x .01m)
1.85:1
W = D x 0.88in (D x .022m) H = D x 0.47in (D x .012m)
16:9 = 1.78:1 (native aspect ratio)
W = D x 0.87in (D x .022m) H = D x 0.49in (D x .0125m)
Notes
1.66:1 (Vista)
W = D x 0.86in (D x .022m) H = D x 0.52in (D x .013m)
4:3 = 1.33:1
W = D x 0.8in (D x .02m) H = D x 0.6in (D x .015m)
5:4 = 1.25:1
W = D x 0.78in (D x .02m) H = D x 0.625in (D x .016m)
Rev A. March 2008 Page 2.3
Page 26
2. Installation Digital Projection TITAN 1080p-600, Reference 1080p User Manual
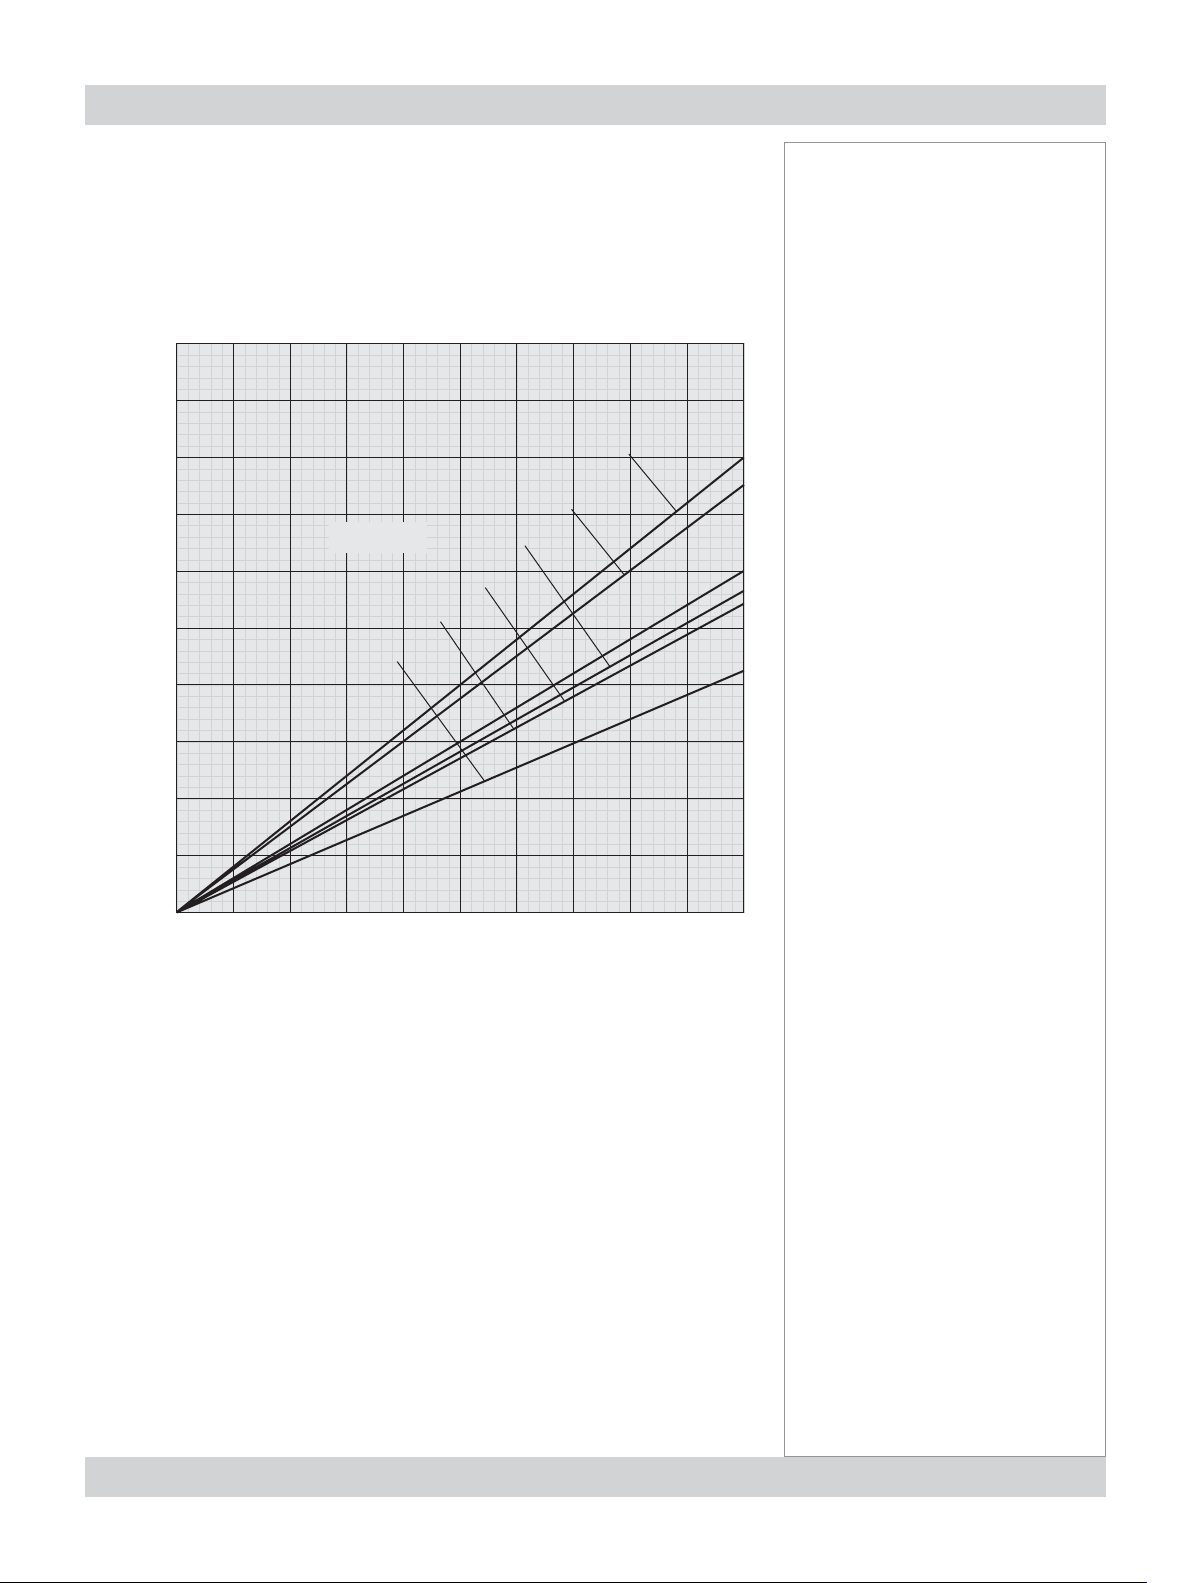
Fitting the image to the screen
It is important that your screen is of suffi cient height and width to display images at
all the aspect ratios you are planning to use.
Use the conversion chart, or the sample calculations below to check that you are
able to display the full image on your screen. If you have insuffi cient height or width,
you will have to reduce the overall image size in order to display the full image on
your screen.
10
9
8
7
6
5
Screen height
4
Aspect ratio
1.85:1
2.35:1
16:9
1.66:1
5:4
4:3
Notes
3
2
1
1 2 3 4 5 6 7 8 9 10
2.35:1 (Scope)
W = H x 2.35 H = W x 0.426
1.85:1
W = H x 1.85 H = W x 0.54
16:9 = 1.78:1 (native aspect ratio)
W = H x 1.78 H = W x 0.56
1.66:1 (Vista)
W = H x 1.66 H = W x 0.6
4:3 = 1.33:1
W = H x 1.33 H = W x 0.75
5:4 = 1.25:1
W = H x 1.25 H = W x 0.8
Screen width
Page 2.4 Rev A. March 2008
Page 27
Digital Projection TITAN 1080p-600, Reference 1080p User Manual 2. Installation
Positioning the screen and projector
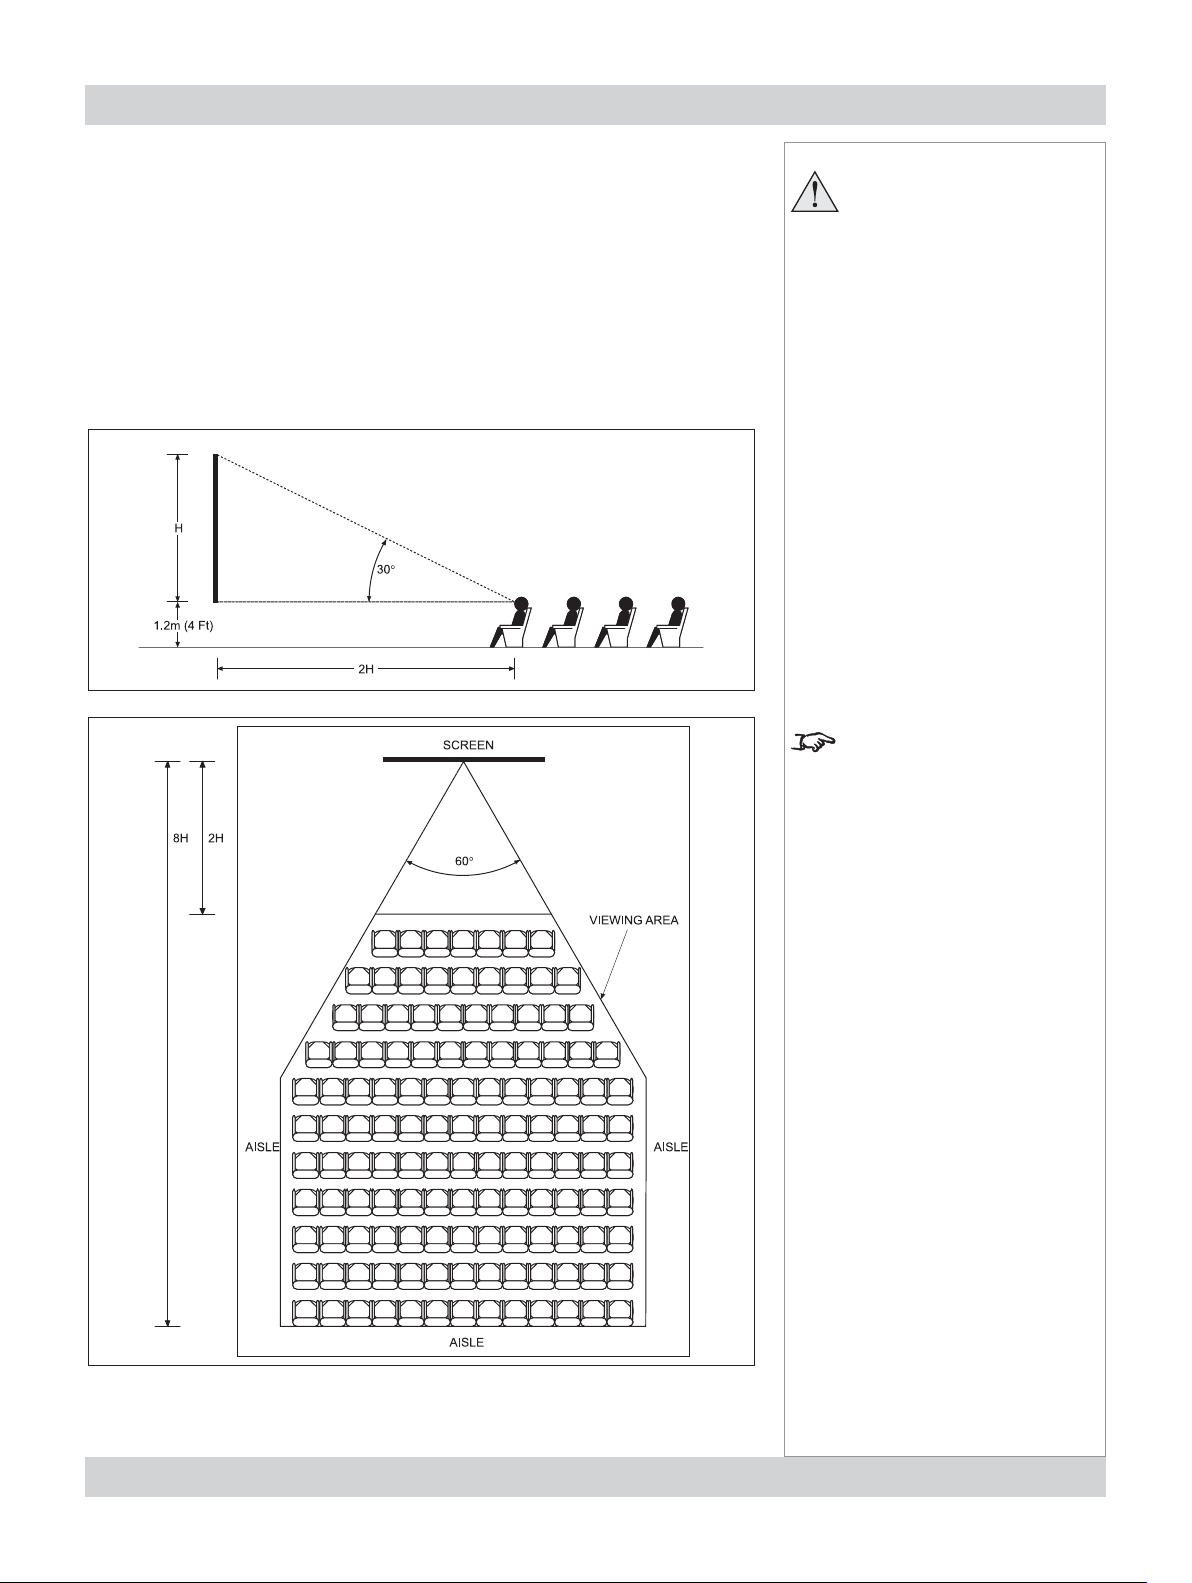
For optimum viewing, the screen should be a fl at surface perpendicular to the fl oor.
The bottom of the screen should be 1.2m (4 feet) above the fl oor and the front row
of the audience should not have to look up more than 30° to see the top of the
screen.
The distance between the front row of the audience and the screen should be at
least twice the screen height and the distance between the back row and the screen
should be a maximum of 8 times the screen height. The screen viewing area should
be within a 60° range from the face of the screen.
Notes
The projector should be
installed as close to the
power outlet as possible.
The power connection should
be easily accessible, so that
it can be disconnected in an
emergency.
Ensure that there is at least
30cm (12in) of space between
the ventilation outlets and
any wall, and 10cm (4in) on
all other sides.
Do not install the projector
close to anything that
might be affected by its
operational heat, for instance,
polystyrene ceiling tiles,
curtains etc.
The image can be fl ipped for
rear projection (see section
4. Using the menus, Image
menu) and displayed without
the need for extra mirrors or
equipment.
However, you must ensure
that there is suffi cient distance
behind the screen for the
projector to be correctly located.
Rear installation is generally
more complicated and advice
should be sought from your
local dealer before attempting it.
Rev A. March 2008 Page 2.5
Page 28

2. Installation Digital Projection TITAN 1080p-600, Reference 1080p User Manual
Choosing a lens
A number of lenses are available for use with the projector. Which lens you choose
will depend on the screen size, image aspect ratio, projection distance and light
output.
The lenses available and their part numbers are listed below:
High Brightness High Contrast
0.67 : 1 fi xed lens 105-607 107-195
1.12 : 1 fi xed lens (3 - 15m) 105-608 105-608
1.12 : 1 zoom lens (1.2 - 2m) 105-609 105-609
1.39 - 1.87 : 1 zoom lens 105-610 107-196
1.87 - 2.56 : 1 zoom lens 105-611 107-197
2.56 - 4.16 : 1 zoom lens 105-612 107-198
4.16 - 6.96 : 1 zoom lens 105-613 107-199
If you are simply connecting the output of a camera or computer directly to the
projector, then the image size (in pixels) may well be fi xed. If, however, you are
using commercially available image processing equipment, such as the Digital
Projection VIP1000, you may be able to resize the image to fi t the DMD.
If the image does not fi ll the full width of the DMD, this effectively increases the
throw ratio of the lens. This can be corrected for by applying a Throw ratio factor.
Notes
The High Brightness lenses
are recommended for the
1080p-600, for maximum light
output.
The High Contrast lenses
are recommended for the
Reference 1080p, for maximum
contrast.
Method one: using the lens charts
For the screen sizes listed below, use the charts on the following pages, to choose
the most suitable lens.
Full width images, including:
2.35:1 (Scope) 1920 x 817 pixels
1.85:1 1920 x 1037 pixels
16:9 = 1.78:1 1920 x 1080 pixels (native resolution)
Full height images
A Throw ratio factor (TRF) has been applied to the following charts:
1.66:1 (Vista) 1792 x 1080 pixels TRF = 1.07
4:3 = 1.33:1 1440 x 1080 pixels TRF = 1.33
5:4 = 1.25:1 1350 x 1080 pixels TRF = 1.42
Method two: by calculation
See the calculations, on the page immediately following the lens chart.
For more information about
Throw ratio factor (TRF), see
Useful lens calculations, later
in this section.
Page 2.6 Rev A. March 2008
Page 29
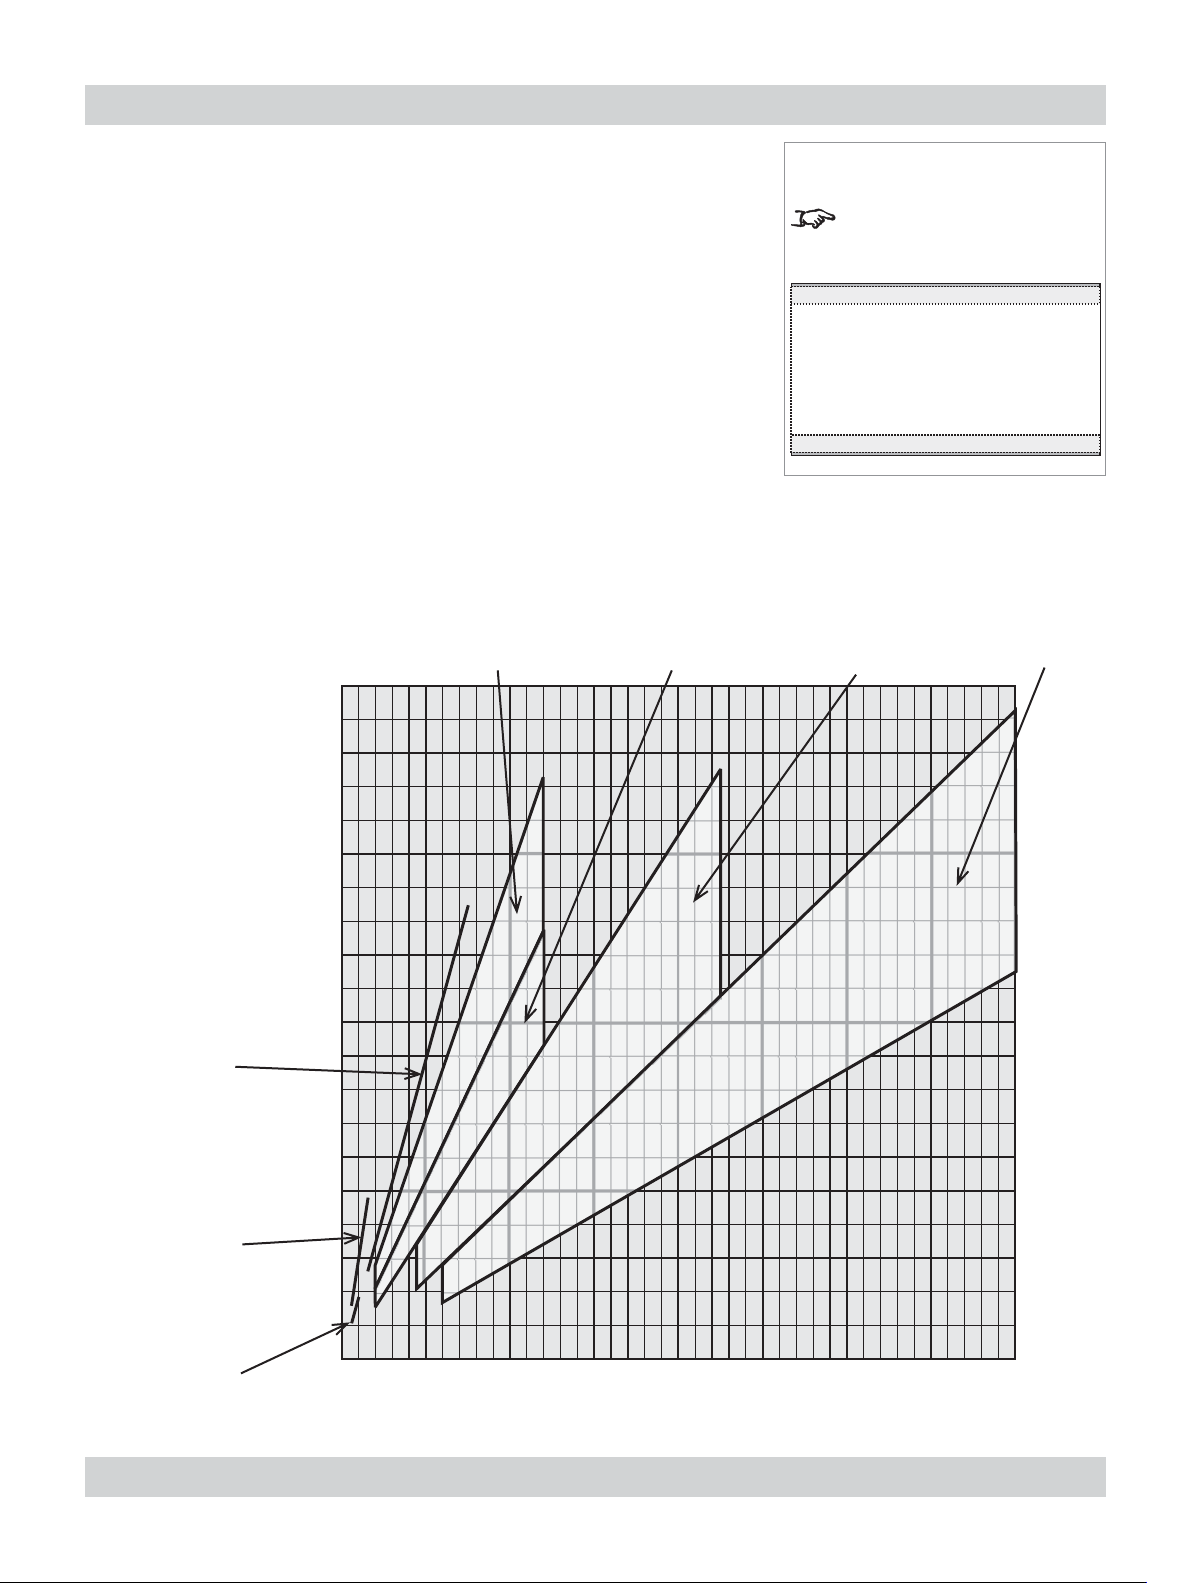
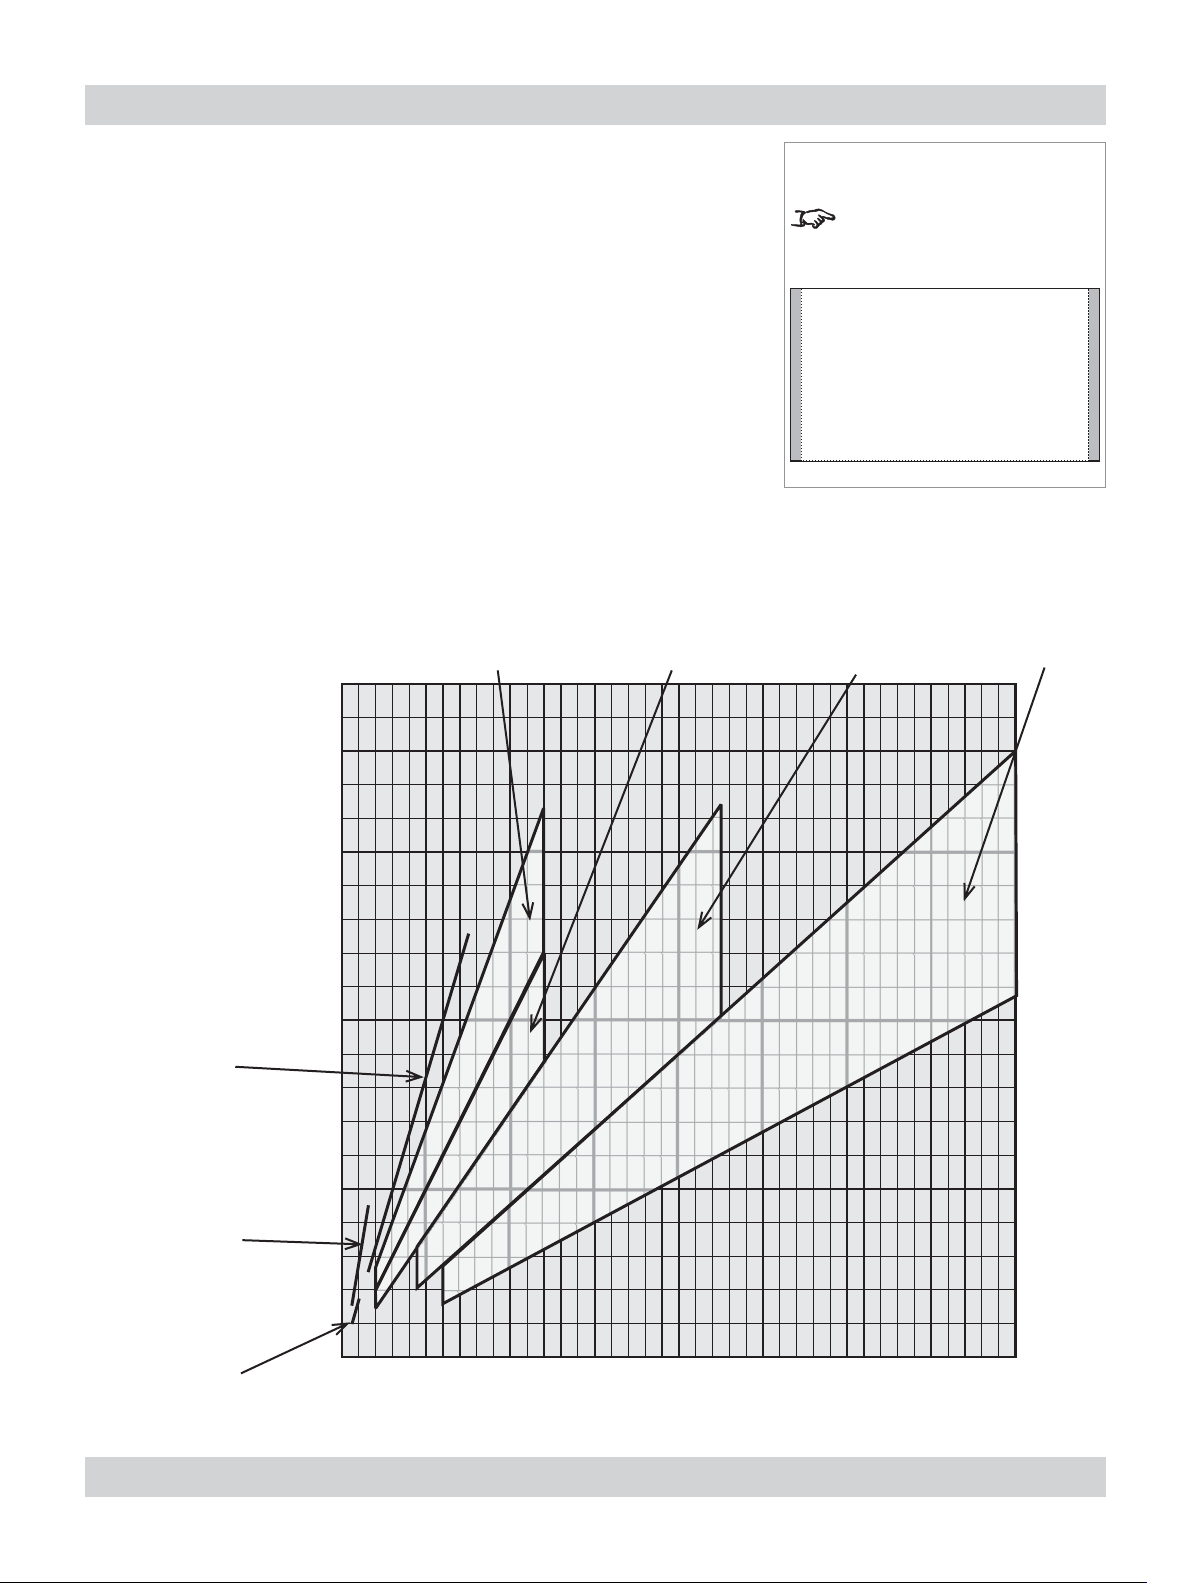
Digital Projection TITAN 1080p-600, Reference 1080p User Manual 2. Installation
Choosing a lens using the lens charts
Use the charts on this page and on the following pages to choose which lens best
suits your application.
Full width images, including 2.35:1, 1.85:1 and 16:9 (native resolution)
example
For a screen width of 10m at a distance of 30m, the 2.56- 4.16: 1 zoom lens
•
would be best suited.
For the same screen size at a distance of 50m, the 4.16 - 6.96: 1 zoom lens
•
would be best suited.
if you need to be more precise, then use the calculations on the page immediately
following the lens charts.
feet
66 20
metres
1.39 - 1.87 : 1
zoom lens
105-610
107-196
1.87 - 2.56 : 1
zoom lens
105-611
107-197
Notes
This chart has a TRF of 1.0, for
use with the following images:
2.35:1 (Scope),
1.85:1 and 16:9
2.56 - 4.16 : 1
zoom lens
105-612
107-198
4.16 - 6.96 : 1
zoom lens
105-613
107-199
1.12 : 1 fi xed lens
(3 - 15m)
105-608
105-608
1.12 : 1 fi xed lens
(1.2 - 2m)
105-609
105-609
0.67 : 1 fi xed lens
105-607
107-195
49 15
Screen width
33 10
16 5
10 20 30 40 50 60 70 80 metres
33 66 98 131 164 197 230 262 feet
Throw distance
Rev A. March 2008 Page 2.7
Page 30
2. Installation Digital Projection TITAN 1080p-600, Reference 1080p User Manual
Lens charts continued
Full height image 1.66:1 (Vista)
Use the chart below to choose which lens best suits your application.
if you need to be more precise, then use the calculations on the page immediately
following the lens charts.
feet
66 20
metres
1.39 - 1.87 : 1
zoom lens
105-610
107-196
1.87 - 2.56 : 1
zoom lens
105-611
107-197
Notes
This chart has a TRF of 1.07,
for use with the following
images:
1.66:1 (Vista)
2.56 - 4.16 : 1
zoom lens
105-612
107-198
4.16 - 6.96 : 1
zoom lens
105-613
107-199
1.12 : 1 fi xed lens
(3 - 15m)
105-608
105-608
1.12 : 1 fi xed lens
(1.2 - 2m)
105-609
105-609
0.67 : 1 fi xed lens
105-607
107-195
49 15
Screen width
33 10
16 5
10 20 30 40 50 60 70 80 metres
33 66 98 131 164 197 230 262 feet
Throw distance
Page 2.8 Rev A. March 2008
Page 31

Digital Projection TITAN 1080p-600, Reference 1080p User Manual 2. Installation
Lens charts continued
Full height image 4:3
Use the chart below to choose which lens best suits your application.
if you need to be more precise, then use the calculations on the page immediately
following the lens charts.
1.87 - 2.56 : 1
zoom lens
105-611
107-197
feet
66 20
metres
1.39 - 1.87 : 1
zoom lens
105-610
107-196
Notes
This chart has a TRF of 1.33,
for use with the following
images:
4:3 = 1.33
2.56 - 4.16 : 1
zoom lens
105-612
107-198
4.16 - 6.96 : 1
zoom lens
105-613
107-199
1.12 : 1 fi xed lens
(3 - 15m)
105-608
105-608
1.12 : 1 fi xed lens
(1.2 - 2m)
105-609
105-609
0.67 : 1 fi xed lens
105-607
107-195
49 15
Screen width
33 10
16 5
10 20 30 40 50 60 70 80 metres
33 66 98 131 164 197 230 262 feet
Throw distance
Rev A. March 2008 Page 2.9
Page 32

2. Installation Digital Projection TITAN 1080p-600, Reference 1080p User Manual
Lens charts continued
Full height image 5:4
Use the chart below to choose which lens best suits your application.
if you need to be more precise, then use the calculations on the page immediately
following the lens charts.
feet
66 20
metres
1.39 - 1.87 : 1
zoom lens
105-610
107-196
1.87 - 2.56 : 1
zoom lens
105-611
107-197
Notes
This chart has a TRF of 1.42,
for use with the following
images:
5:4 = 1.25
2.56 - 4.16 : 1
zoom lens
105-612
107-198
4.16 - 6.96 : 1
zoom lens
105-613
107-199
1.12 : 1 fi xed lens
(3 - 15m)
105-608
105-608
1.12 : 1 fi xed lens
(1.2 - 2m)
105-609
105-609
0.67 : 1 fi xed lens
105-607
107-195
49 15
Screen width
33 10
16 5
10 20 30 40 50 60 70 80 metres
33 66 98 131 164 197 230 262 feet
Throw distance
Page 2.10 Rev A. March 2008
Page 33

Digital Projection TITAN 1080p-600, Reference 1080p User Manual 2. Installation
Choosing a lens by calculation
For any screen size not listed above, or if you need to be more precise, then use the
calculations below.
Identify actual width of the image in pixels.
•
Calculate the Throw Ratio Factor: TRF = DMD width (1920)
•
Image width in pixels
Identify the screen width required.
•
Identify the throw distance required.
•
Throw distance calculations are based on the distance from the outer end of the
lens, which will vary from lens to lens. Once a lens has been chosen, the fi gures
can be checked using the lens extension values given on the next page.
Calculate the throw ratio required. Throw ratio = Throw distance
•
Screen width x TRF
Choose a lens with the required throw ratio from the list at the bottom of the
•
page.
Check from the list that the lens chosen will work at the throw distance required.
example
An image, 1024 x 768 pixels, screen width 6.5m, throw distance 18m from the
•
outer end of the lens.
Notes
The Throw ratio for a particular
lens is fi xed, and assumes that
the image fi lls the width of the
DMD.
For images that do not fi ll the
width of the DMD, the Throw
ratio is effectively increased. To
correct for this, a Throw Ratio
Factor (TRF) is used.
Throw Ratio Factor (TRF) = 1920 = 1.875
•
1024
Throw ratio required = 18 = 1.48
•
6.5 x 1.875
Choose the 1.39 - 1.87 zoom lens.
•
High Brightness High Contrast Throw distance range
0.67 : 1 fi xed lens 105-607 107-195 1.1 - 3.2m (3.6 - 10.5ft)
1.12 : 1 fi xed lens (3 - 15m) 105-608 105-608 3 - 15m (9.8 - 49.2ft)
1.12 : 1 fi xeed lens (1.2 - 2m) 105-609 105-609 1.2 - 2m (3.9 - 6.6ft)
1.39 - 1.87 : 1 zoom lens 105-610 107-196 4 - 24m (13.1 - 78.7ft)
1.87 - 2.56 : 1 zoom lens 105-611 107-197 4 - 24m (13.1 - 78.7ft)
2.56 - 4.16 : 1 zoom lens 105-612 107-198 9.1 - 45m (29.9 - 147.6ft)
4.16 - 6.96 : 1 zoom lens 105-613 107-199 12 - 80m (39.4 - 262.5ft)
Rev A. March 2008 Page 2.11
Page 34

2. Installation Digital Projection TITAN 1080p-600, Reference 1080p User Manual
Useful lens calculations
The following lens calculations may be useful:
Throw ratio = Throw distance
Screen width
Throw ratio factor (TRF) = DMD width in pixels = 1920
image width in pixels image width in pixels
Therefore:
Screen width = Throw distance
Throw ratio x TRF
Throw distance = Screen width x Throw ratio x TRF
Lens extension
The throw distance calculated above is to the outer end of the lens. For each lens,
the nominal distance between the front of the projector and the outer end of the lens
(lens extension) will be as listed below.
High Brightness/ Contrast Lens extension
0.67 : 1 fi xed lens 105-607 107-195 204 mm (8.0 in)
Notes
The Throw ratio for a particular
lens is fi xed, but assumes that
the image fi lls the width of the
DMD.
For images that do not fi ll the
width of the DMD, the Throw
ratio is effectively increased. To
correct for this, a Throw Ratio
Factor (TRF) is used.
1.12 : 1 fi xed lens (3 - 15m) 105-608 105-608 268 mm (10.6 in)
1.12 : 1 fi xeed lens (1.2 - 2m) 105-609 105-609 268 mm (10.6 in)
1.39 - 1.87 : 1 zoom lens 105-610 107-196 194 mm (7.6 in)
1.87 - 2.56 : 1 zoom lens 105-611 107-197 159 mm (6.3 in)
2.56 - 4.16 : 1 zoom lens 105-612 107-198 152 mm (6.0 in)
4.16 - 6.96 : 1 zoom lens 105-613 107-199 118 mm (4.6 in)
lens extension,
measured from front
of corner post
Lens extension is measured
when the lens is focused at
infi nity, and fully extended.
At other focus settings, the
extension could be up to 10mm
less
Page 2.12 Rev A. March 2008
Page 35

Digital Projection TITAN 1080p-600, Reference 1080p User Manual 2. Installation
Fitting the lens
Turn the lens release lever anti-clockwise so that it is pointing upwards, to open
•
the lock.
Remove the rear lens cap from the lens.
•
Insert the lens into the lens aperture, making sure that the plug on the drive
•
mechanism engages with the socket on the front of the projector, and that the
lens is pushed fi rmly into place.
Zoom drive connector
Lens release
lever, open
Notes
Make sure the rear lens cap is
removed, before fi tting the lens.
Make sure the front lens cap is
removed, before switching on
the projector.
Be careful not to scratch
the lens surfaces. If you do
accidentally touch a lens, then
clean the surface using a lens
paper.
Turn the lens release lever clockwise to lock the lens in place. When the lock is
•
fully closed, the lever should feel loose.
Lens release
lever, closed
The lens release lever should
always be set to the locked
position to prevent the lens
from falling out.
Rev A. March 2008 Page 2.13
Page 36

2. Installation Digital Projection TITAN 1080p-600, Reference 1080p User Manual
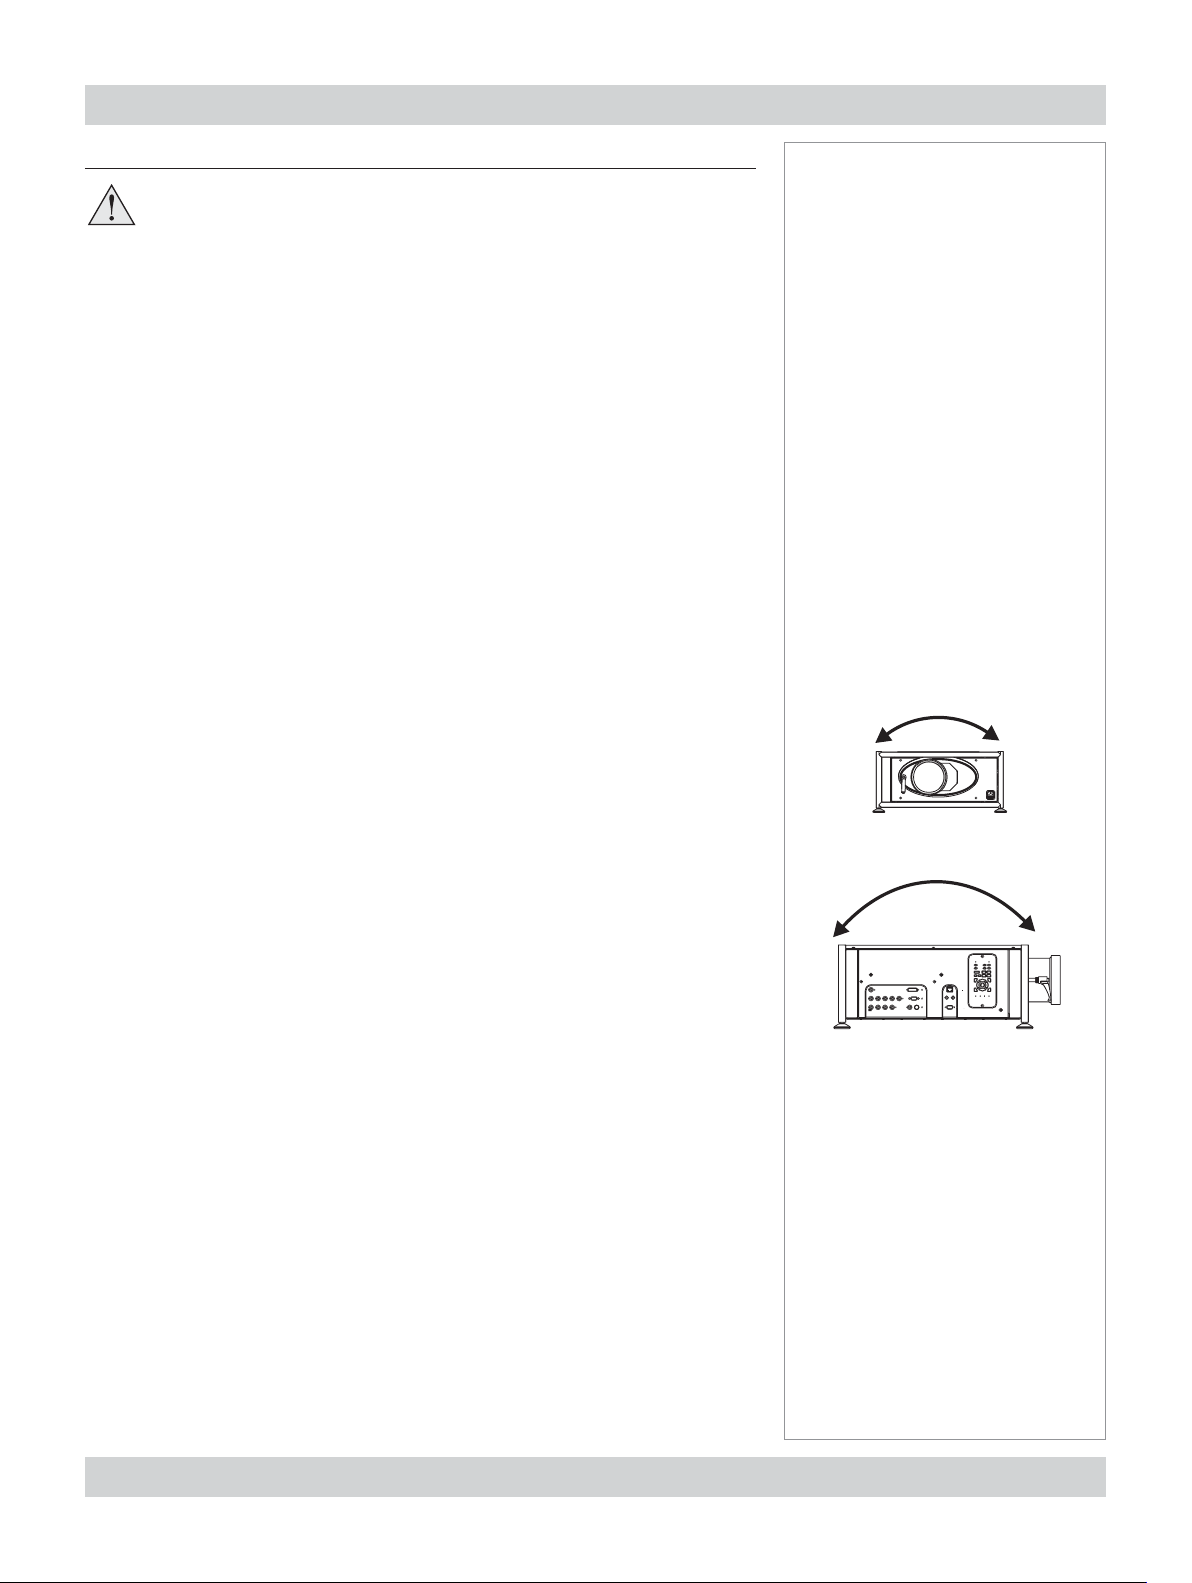
Shifting the image
The normal position for the projector is at the centre of the screen. However, you
can set the projector above or below the centre, or to one side, and adjust the image
using the Lens shift feature to maintain a geometrically correct image.
•
Any single adjustment outside the ranges specifi ed below may result in an
unacceptable level of distortion, paricularly at the corners of the image, due to
the image passing through the periphery of the lens optics.
•
If the lens is to be shifted in two directions combined, the maximum range
without distortion will be somewhat less, as can be seen in the diagrams to the
right.
The maximum range available with no distortion is dependent on which lens is used.
The tables below show the maximum range for images that fi ll the DMD. For images
which do not use the full height or width, extra shift will be possible, up to the limit of
the lens mount movement.
0.67 : 1 fi xed lens
vertical
(pixels)
± 108 ± 192 ± 0.1H ± 0.1W
horizontal
(pixels)
vertical
(vs DMD height)
horizontal
(vs DMD width)
Notes
For more information on using
the Lens shift feature, see
section 4. Using the menus,
Lens menu.
If the lens is to be shifted in
two directions combined, the
maximum range is somewhat
less, as can be seen below.
(zoom lens shift shown).
full horizontal and vertical shift
without distortion
1.12 : 1 fi xed lenses and all zoom lenses
vertical
(pixels)
+ 756
- 540
It is physically possible to shift the lens further than this, however there will be some
vignetting of the image beyond the ranges specifi ed above.
horizontal
(pixels)
± 345 + 0.7H
(vs DMD height)
- 0.5H
vertical
horizontal
(vs DMD width)
± 0.18W
combined shift without distortion
is reduced
Page 2.14 Rev A. March 2008
Page 37

Digital Projection TITAN 1080p-600, Reference 1080p User Manual 2. Installation
Mounting the projector
The projector is designed to be used on a fl at surface, but the optional rigging frame
will allow it to be suspended from a lighting truss or rigging. The four adjustable feet
under the chassis allow the projector to be lowered onto a fl at surface without any
danger of hands being trapped between the bottom frame and the surface.
Chassis adjustment
If the projector is to be operated from a fl at surface such as a projector table, then
adjustment of projector level should be made by turning the four feet under the
chassis.
Adjustable
foot
Notes
BEFORE INSTALLING THE
PROJECTOR, READ ALL THE
WARNINGS BELOW AND
ALL THOSE IN IMPORTANT
INFORMATION AT THE
FRONT OF THIS MANUAL.
The projector weighs
approximately 31 kg (68 lbs).
Use safe handling techniques
when lifting the projector.
Make sure that the surface,
ceiling or rigging that is
to support the projector
is capable of supporting
the combined weight of
the projector and lens (see
specifi cation for weights).
Backup safety chains or
wires should always be used.
Fitting the optional rigging frame
Before fi tting the rigging frame to the projector:
•
- remove the four feet;
- discard the bracket supplied for use with Titan 1080p-500/250 projectors;
- make sure that all the frame adjusters are set midway.
Secure the rigging frame to the projector using the screws supplied, as shown
•
in the pictures below. Three screws secure each of the adjuster brackets to its
corner post.
screws
Do not tilt the projector more
than ±12° in either direction
when in use, as this may
cause serious lamp failure,
damage the lamp module
and cause extra cost on
replacement.
±12°
±12°
Fixing
Rev A. March 2008 Page 2.15
Page 38

2. Installation Digital Projection TITAN 1080p-600, Reference 1080p User Manual
Adjusting the rigging frame
Coarse adjustment of projector level should be made by adjusting the length of
the supporting wires or chains, or by adjusting the position of the truss or rigging.
Once the initial coarse adjustment has been made, fi ne adjustment can be made by
turning the frame adjusters on the rigging frame:
To tilt the projector forwards and backwards (pitch adjustment),
•
turn either the front pair or the rear pair of vertical adjusters,
taking care to turn both adjusters by the same amount.
To tilt the projector from side to side (roll adjustment), turn either
•
the left pair or the right pair of vertical adjusters, taking care to
turn both adjusters by the same amount.
To rotate the projector around its vertical axis (yaw adjustment),
•
turn the single horizontal adjuster at the rear.
Notes
Before suspending the
projector, make sure that all the
frame adjusters are set midway.
Always make adjustments in
pairs - never make a single
adjustment - otherwise
the projector frame could
become distorted.
Vertical
adjusters
Horizontal
adjuster
Do not tilt the projector more
than ±12° in either direction
when in use, as this may
cause serious lamp failure,
damage the lamp module
and cause extra cost on
replacement.
±12°
±12°
Page 2.16 Rev A. March 2008
Page 39

Digital Projection TITAN 1080p-600, Reference 1080p User Manual 2. Installation
Stacking projectors
The rigging frame is capable of supporting the weight of up to two other projectors,
using the built-in frame couplings. The projectors can be stacked on top of each
other, or suspended below each other.
Carefully lower each projector down onto the top of the others, making sure that
•
all four frame couplings engage fully.
Fit a locking pin into each coupling. A ball in the end of the pin prevents the pin
•
from falling out – to insert or remove a locking pin, press the button on the end of
the pin to release the ball.
Locking
pin
Frame
couplings
Notes
When stacking projectors,
the stack MUST be vertical,
to ensure that the stresses
are distributed to all frame
couplings.
Make sure that the surface,
ceiling or rigging that is
to support the projector is
capable of supporting the
combined weight of all the
projectors and lenses (see
specifi cation for weights).
Do not place heavy objects
on top of the projector
chassis. Only the chassis
corners and the rigging frame
are capable of withstanding
the weight of another
projector.
Align the images from the projectors, following the instructions on the previous
•
page and those in section 3. Getting started, Adjusting the lens and
Adjusting the projected image.
Do not try to stack more than
3 projectors.
Separate backup safety
chains or wires should
always be used for each
projector.
Rev A. March 2008 Page 2.17
Page 40

2. Installation Digital Projection TITAN 1080p-600, Reference 1080p User Manual
Connecting the projector
Input
connection panel
Signal Inputs
The following inputs are available:
4. SDI
1. RGB1
Control
connection panel
3. DVI
2. RGB2
Notes
For more information on
selecting an input source, see
section 4. Overview, Using
the control keys, and Using
the menus.
SDI not present on earlier
models
7. Component
5. Composite Video
6. S-Video
EDID handshaking on the DVI and RGB2 inputs
If you are using a computer DVI card or other source that obeys the EDID
handshaking protocol, then the card or source will automatically confi gure itself to
suit the projector.
If not, then you should refer to the documentation supplied with the source to
manually set the resolution to 1920 x 1080 or the nearest suitable setting. Switch off
the source, connect to the projector, then switch the source back on again.
For more information about pin
connections and control codes
see section 7. Appendix.
For more information on
input modes see section
4. Overview.
Page 2.18 Rev A. March 2008
Page 41

Digital Projection TITAN 1080p-600, Reference 1080p User Manual 2. Installation
Control connection examples
LAN connection
All of the projector’s features can be controlled via a LAN connection, using a
standard internet browser package such as Internet Explorer.
Crossed
LAN cable
Computer
Un-crossed
LAN cables
Hub or
LAN
TITAN
Computer
Notes
For more information about pin
connections and control codes
see section 7. Appendix.
For more information about
using a browser to control the
projector see section 4. Using
the menus.
LAN
Wired
remote
RS232 connection
Computer
Null-modem
cable
TITAN
TITAN
TITAN
Serial
RS232
Rev A. March 2008 Page 2.19
Page 42

2. Installation Digital Projection TITAN 1080p-600, Reference 1080p User Manual
Power connection
When mains power is fi rst applied, the projector will perform a self-test, then go into
Standby mode.
The Power indicator on the control panel will show amber until the POWER
on the remote control or the keypad, is pressed for 3 seconds.
Notes
Use only the power cable
provided.
Ensure that the power
outlet includes a Ground
connection, as this
equipment MUST be earthed.
Handle the power cable
carefully and avoid sharp
bends. Do not use a damaged
power cable.
Power connection
Page 2.20 Rev A. March 2008
Page 43

3. Getting Started
Contents
Switching the projector on ............................................................................................................... 3.2
Selecting an input or test pattern ................................................................................................... 3.2
Input ................................................................................................................................................ 3.2
Test pattern ...................................................................................................................................... 3.2
Adjusting the lens............................................................................................................................... 3.3
Focus .............................................................................................................................................. 3.3
Zoom ............................................................................................................................................... 3.3
Shift ................................................................................................................................................. 3.3
Adjusting the projected image ........................................................................................................ 3.4
Picture settings ................................................................................................................................. 3.4
Geometry settings ............................................................................................................................. 3.4
Switching the projector off ............................................................................................................... 3.4
Rev A. March 2008 Page 3.1
Page 44

3. Getting Started Digital Projection TITAN 1080p-600, Reference 1080p User Manual
Switching the projector on
Connect the power cable between the mains supply and the projector.
•
Power
connection
Wait until the self-test has completed and the power indicator on the control
panel shows amber. The lamp will be off, the shutter closed, and the projector
will be in STANDBY mode.
Press POWER on the remote control or the keypad, and hold for about 3
•
seconds to switch the projector ON. The power indicator on the control panel will
show green, the lamp will light and the shutter will open.
Selecting an input or test pattern
Notes
For more information about
connecting the power cable,
see Power Connections, in
section 2. Installation.
Input
•
Press or to change to the next input up or down the following list:
1. RGB1
2. RGB2
3. DVI
4. SDI
5. Composite Video
6. S-Video
7. Component
•
Or press the numbered keys 1–7 to change directly to the input:
Test pattern
If you have no video source connected to the projector, then you can display a test
pattern as follows:
For more detailed information
about:
- using the control keys on the
remote control or keypad,
- using the menus,
see the next section:
Controlling the projector.
SDI not present on earlier
models
•
Press
on the remote control, to select a test pattern.
Page 3.2 Rev A. March 2008
Page 45

Digital Projection TITAN 1080p-600, Reference 1080p User Manual 3. Getting Started
Adjusting the lens
Focus
•
Press followed by and to adjust the focus.
When adjustment is fi nished, press
Zoom
•
Press followed by and to adjust the zoom.
When adjustment is fi nished, press
Shift
•
Press followed by , , or to shift the lens up, down, left or
right.
When adjustment is fi nished, press
.
.
.
Notes
For more detailed information
about:
- using the control keys on the
remote control or keypad,
- using the menus,
see the next section:
Controlling the projector.
When any of the three Lens
adjustment keys is pressed, the
blue Transmit indicator on the
remote control will light for 10
seconds:
- after 10 seconds, if no
adjustment has been made,
the indicator will go out and
the Lens adjustment key must
be pressed again to resume
adjustment.
- to end the adjustment before
10 seconds has elapsed, press
the
- all other adjustments will
be locked out until the Lens
adjustment is ended.
key.
Rev A. March 2008 Page 3.3
Page 46

3. Getting Started Digital Projection TITAN 1080p-600, Reference 1080p User Manual
Adjusting the projected image
Picture settings
Press a key, followed by and to adjust these picture settings:
•
Brightness
Contrast CON
Saturation
Phase PHASE
Aspect ratio ASPECT
Geometry settings
Press Keystone KEYST
•
followed by
•
Press Position
followed by
smaller than the DMD.
and to adjust the keystone correction.
, , and to adjust the picture position, for images
BRI
SAT
POS (for all inputs except DVI)
Notes
The Saturation control is
available for Composite, SVideo and Component inputs
only.
The Phase control is available
for RGB inputs only.
For more detailed information
about:
- using the control keys on the
remote control or keypad,
- using the menus,
see the next section:
Controlling the projector.
Switching the projector off
Press POWER on the remote control or keypad, and hold for 3 seconds,
•
to switch the projector OFF.
For all adjustments that require
more than one key to be
pressed:
- after 10 seconds, if no
adjustment has been made,
the indicator will go out and
the adjustment key must be
pressed again.
- to end the adjustment before
10 seconds has elapsed, press
a different adjustment key, or
press the Exit key.
Always allow the lamp to cool
for 5 minutes before:
- disconnecting the power
- moving the projector
- changing the lamp
Page 3.4 Rev A. March 2008
Page 47

4. Controlling the projector
Contents
Overview ............................................................................................................................................... 4.4
Controlling the projector..................................................................................................................... 4.4
Input modes and settings ................................................................................................................... 4.5
Input mode detection ....................................................................................................................... 4.5
Mode library and mode history ........................................................................................................... 4.5
Input presets .................................................................................................................................. 4.6
Indicators .............................................................................................................................................. 4.7
Input status indicators ....................................................................................................................... 4.7
The control panel ................................................................................................................................ 4.8
Keypad layout................................................................................................................................... 4.8
Projector status indicators .................................................................................................................. 4.8
The remote control ............................................................................................................................. 4.9
Layout ............................................................................................................................................. 4.9
Timeout ............................................................................................................................................ 4.9
Using the control keys .................................................................................................................... 4.10
Power ............................................................................................................................................ 4.10
Shutter ........................................................................................................................................... 4.10
On-Screen-Display .......................................................................................................................... 4.10
Focus ............................................................................................................................................ 4.10
Zoom ............................................................................................................................................. 4.10
Shift ............................................................................................................................................... 4.10
Auto-detect input mode ....................................................................................................................4.11
Source information ...........................................................................................................................4.11
Input ...............................................................................................................................................4.11
Input Presets .................................................................................................................................. 4.12
Recall ........................................................................................................................................ 4.12
Save .......................................................................................................................................... 4.12
Red, Green and Blue....................................................................................................................... 4.13
Test pattern .................................................................................................................................... 4.13
Picture settings ............................................................................................................................... 4.13
Geometry settings ........................................................................................................................... 4.13
Magnify and pan ............................................................................................................................. 4.14
On-screen-display size .................................................................................................................... 4.14
Remote control address................................................................................................................... 4.14
Remote control backlight ................................................................................................................. 4.14
continued
Rev A. March 2008 Page 4.1
Page 48

4. Controlling the projector Digital Projection TITAN 1080p-600, Reference 1080p User Manual
Using the menus ............................................................................................................................... 4.15
Navigating menus and submenus ..................................................................................................... 4.15
Menu controls ................................................................................................................................. 4.17
Input menu ......................................................................................................................................... 4.18
Input Source ................................................................................................................................... 4.18
Presets .......................................................................................................................................... 4.19
Recall Presets .............................................................................................................................. 4.19
Save Presets ............................................................................................................................... 4.20
Picture menu ...................................................................................................................................... 4.21
Brightness ...................................................................................................................................... 4.21
Contrast ......................................................................................................................................... 4.21
Saturation ...................................................................................................................................... 4.21
Hue ............................................................................................................................................... 4.21
Gamma Correction .......................................................................................................................... 4.22
Parametric Gamma ......................................................................................................................... 4.22
Phase ............................................................................................................................................ 4.22
Aspect Ratio ................................................................................................................................... 4.23
Sharpness ...................................................................................................................................... 4.23
Geometry menu ................................................................................................................................. 4.24
Horizontal Position .......................................................................................................................... 4.24
Vertical Position ..............................................................................................................................4.24
Aspect Ratio ................................................................................................................................... 4.24
User Horizontal Aspect Ratio ........................................................................................................... 4.25
User Vertical Aspect Ratio ............................................................................................................... 4.25
Keystone ........................................................................................................................................ 4.25
Phase ............................................................................................................................................ 4.25
Resolution ...................................................................................................................................... 4.26
Input Detection ............................................................................................................................. 4.26
Blanking ......................................................................................................................................... 4.27
Blanking On/Off ............................................................................................................................ 4.27
Blanking adjust ............................................................................................................................. 4.27
Colour menu ...................................................................................................................................... 4.28
Colour Mode................................................................................................................................... 4.29
Colour Temperature ........................................................................................................................ 4.29
RGB Lift ......................................................................................................................................... 4.29
RGB Gain ...................................................................................................................................... 4.29
Component Type ............................................................................................................................ 4.29
Trim ...............................................................................................................................................4.30
Trim RGB Lift and Gain .................................................................................................................. 4.30
Global Colourimetry ....................................................................................................................... 4.30
continued
Page 4.2 Rev A. March 2008
Page 49

Digital Projection TITAN 1080p-600, Reference 1080p User Manual 4. Controlling the projector
Setup menu ........................................................................................................................................ 4.31
Projector ........................................................................................................................................ 4.32
Orientation .................................................................................................................................. 4.32
Control Panel Backlight .................................................................................................................. 4.32
Component Video Sync .................................................................................................................. 4.32
Keystone .................................................................................................................................... 4.33
Test Pattern ................................................................................................................................. 4.33
Global Colourimetry ........................................................................................................................ 4.34
Colour Mode ................................................................................................................................ 4.35
Colour Temperature....................................................................................................................... 4.35
RGB Lift ..................................................................................................................................... 4.35
RGB Gain ................................................................................................................................... 4.35
Lamp ............................................................................................................................................. 4.36
Change Lamp Setting .................................................................................................................... 4.36
Lamp Power ................................................................................................................................ 4.37
Lamp Mode ................................................................................................................................. 4.37
OK ............................................................................................................................................ 4.37
Cancel ....................................................................................................................................... 4.37
On Screen Display .......................................................................................................................... 4.38
OSD Position ............................................................................................................................... 4.38
OSD Size .................................................................................................................................... 4.38
OSD Timeout ............................................................................................................................... 4.38
Password ....................................................................................................................................... 4.39
Communication............................................................................................................................... 4.40
Projector Address ......................................................................................................................... 4.40
Network ......................................................................................................................................... 4.41
LAN MAC Address ........................................................................................................................ 4.41
Connection .................................................................................................................................. 4.41
DHCP ........................................................................................................................................ 4.42
LAN IP Address ............................................................................................................................ 4.42
LAN Subnet Mask ......................................................................................................................... 4.43
LAN Gateway Mask ....................................................................................................................... 4.44
Channel ...................................................................................................................................... 4.45
SSID .......................................................................................................................................... 4.45
Restore Defaults ............................................................................................................................. 4.46
Information menu ............................................................................................................................. 4.47
Projector Information ....................................................................................................................... 4.47
Source Information .......................................................................................................................... 4.47
Digital Projection Information ........................................................................................................... 4.48
Rev A. March 2008 Page 4.3
Page 50

4. Controlling the projector Digital Projection TITAN 1080p-600, Reference 1080p User Manual
Overview
Controlling the projector
The projector can be controlled from:
the remote control
•
the keypad
•
the RS232 input
•
the Ethernet input
•
For more information about controlling the projector using the RS232 and
Ethernet inputs, see Remote communications protocol in section 7.
Appendix.
For information about how to connect the projector, see Connecting the
projector in section 2. Installation, and Connections in section 7. Appendix.
Many features are controlled from the menus using the menu navigation keys on
•
the remote control or keypad.
For more information about using the menus, see later in this section, Using the
menus.
Notes
Some of the menu features, for example brightness, contrast and input preset
•
operations, can be accessed directly using the control keys at the bottom of the
remote control.
Other features, eg zoom and focus, are controlled using the control keys at the
•
top of the remote control and keypad.
For more information about using the control keys, see later in this section,
Using the control keys.
Menu navigation keys
Control keys
Page 4.4 Rev A. March 2008
Page 51

Digital Projection TITAN 1080p-600, Reference 1080p User Manual 4. Controlling the projector
Input modes and settings
Input mode detection
The projector can automatically detect the following parameters from the incoming
video signal:
•
line frequency
•
frame rate
•
interlace / progressive
From these parameters the projector can determine input mode, for example:
•
input source horizontal vertical mode
•
composite 15.73KHz 60.0Hz = NTSC
•
RGB1 31.51KHz 60.0Hz = SDTV 480p
•
DVI 64.02KHz 60.0Hz = SXGA 60
When you select a new input source, the green LED near the input connector will
fl ash, and the searching message will be displayed.
Notes
For a full list of supported input
modes, see Input modes
supported, in section 7.
Appendix.
When the input mode has been detected, the LED will show continuously and the
auto detect message will be displayed, for example:
If the input mode cannot be detected, the LED will continue to fl ash, to show that the
input is still selected. However, the following message will be displayed:
Mode library and mode history
Once an input mode has been successfully determined for the fi rst time, a set of
default modal settings (picture, geometry and colour), will be copied from the mode
library to the mode history.
Mode
library
NTSC
SDTV
480p
HDTV
1080p
SVGA
defaults
defaults
defaults
defaults
mode
detected
Mode
history
Rev A. March 2008 Page 4.5
Page 52

4. Controlling the projector Digital Projection TITAN 1080p-600, Reference 1080p User Manual
Any subsequent changes that you make to the modal settings will be saved in the
mode history, with the input mode.
NTSC
SDTV
480p
HDTV
1080p
SVGA
Mode
library
defaults
defaults
defaults
defaults
NTSC
Mode
history
new
modal
settings
If a new signal is detected, the mode history for the previous signal will be saved in
the mode history, and the new mode added, along with a new set of default settings.
Thus the projector builds up a history of input modes, and the required settings for
each mode, depending on actual useage.
library
NTSC
SDTV
480p
HDTV
1080p
SVGA
Mode
defaults
defaults
defaults
defaults
new
mode
detected
history
NTSC
Mode
settings
Notes
In normal use, there should be
adequate memory to record
all likely modal settings in the
mode history.
However, in exceptional
circumstances, the least used
settings will be deleted, to allow
a new mode to be added.
Input presets
It may be the case that you need to save more than one set of modal settings for
the same input mode. For example you may have more than one video player or a
selection of fi lms with different characteristics.
In that case, the current input source and modal settings can be saved to any one of
16 input presets, for recall when the same input source is used again.
Mode
history
NTSC
SVGA
settings
settings
When you recell a preset, the projector switches to the saved input source, and
redetects the input mode before applying the saved modal settings.
2) mode
3) settings
redetected
applied
preset
saved
DVI
1) input
switched
A
B
C
D
SVGA
SDTV
SVGA
Input
presets
DVI
RGB
DVI
settings
settings
settings
A preset can be applied only to
the same mode for which it was
created. If the detected input
mode does not match, then
settings from the mode history
or mode library will be applied.
Page 4.6 Rev A. March 2008
Page 53

Digital Projection TITAN 1080p-600, Reference 1080p User Manual 4. Controlling the projector
Indicators
Input status indicators
4. SDI
The indicator next to each input connector on the input panel will light as follows:
off = input not selected
1. RGB1
7. Component
3. DVI
2. RGB2
6. S-Video
5. Composite Video
Notes
There are more indicators on
the Control panel, and these are
described on the next page.
SDI not present on earlier
models
green = input selected, signal detected and in range
fl ashing green = input selected, but signal not detected or out of range
Rev A. March 2008 Page 4.7
Page 54

4. Controlling the projector Digital Projection TITAN 1080p-600, Reference 1080p User Manual
The control panel
Keypad layout
The controls on the keypad are identical to those at the top of the remote control,
and are described on the following pages.
Notes
Many features are controlled
from the menus using the menu
navigation keys on the remote
control or keypad.
For more information about
using the menus, see later in
this section, Using the menus.
Some of the menu features, for
example brightness, contrast
and input preset operations, can
be accessed directly using the
control keys at the bottom of
the remote control.
Other features, eg zoom and
focus, are controlled using the
control keys at the top of the
remote control and keypad.
For more information about
using the control keys, see
later in this section, Using the
control keys.
Projector status indicators
The indicators on the control panel are as follows:
Power off = NO POWER
green = normal RUNNING mode amber = STANDBY mode
Shutter yellow = CLOSED green = OPEN
Error off = NO ERROR
fl ashing = ERROR (temperature) steady = ERROR (voltage)
IR blue fl ash = Remote control command received
Lamp 1 off = OFF
fl ashing red = LAMP ERROR green = ON (100%) amber = (80 - 99%)
fl ashing green/amber = LAMP COOL-DOWN or WARM-UP
Lamp 2 off = OFF
fl ashing red = LAMP ERROR green = ON (100%) amber = (80 - 99%)
fl ashing green/amber = LAMP COOL-DOWN or WARM-UP
Page 4.8 Rev A. March 2008
Page 55

Digital Projection TITAN 1080p-600, Reference 1080p User Manual 4. Controlling the projector
The remote control
Layout
Transmit
indicator
Menu
navigation
keys
Control keys
Notes
Many features are controlled
from the menus using the menu
navigation keys on the remote
control or keypad.
For more information about
using the menus, see later in
this section, Using the menus.
Some of the menu features, for
example brightness, contrast
and input preset operations, can
be accessed directly using the
control keys at the bottom of
the remote control.
Other features, eg zoom and
focus, are controlled using the
control keys at the top of the
remote control and keypad.
For more information about
using the control keys, see
later in this section, Using the
control keys.
The following keys are NOT
used on this projector:
CTRL
R P Y
FUNC
Remote control
backlight
ON/OFF
Timeout
There is a 10 second timeout for the three Lens adjustment keys (see note on next
page).
There is a separate, adjustable timeout for the On Screen Menus (see On Screen
Display, in Setup Menu, later in this section).
10+ (but N is used)
# (but R is used)
Note that plugging in the remote
control cable will disable the
infra-red.
Rev A. March 2008 Page 4.9
Page 56

4. Controlling the projector Digital Projection TITAN 1080p-600, Reference 1080p User Manual
Using the control keys
Power
Press POWER and hold for 3 seconds, to switch the projector ON.
•
Press POWER
•
Shutter
•
Press SHUTTER to OPEN the shutter.
•
Press SHUTTER
On-Screen-Display
•
Press OSD to switch the On-Screen-Display OFF.
This includes ALL menus, controls and on-screen messages.
•
Press OSD
and hold for 3 seconds, to switch the projector OFF.
to CLOSE the shutter.
to switch the On-Screen-Display ON.
Notes
Closing the shutter produces
a better black than simply
removing the signal, as the
light source will be completely
blocked by the shutter blade.
When the OSD is OFF:
- all menu navigation keys are
disabled.
- keys such as
(brightness) will still function,
but the slider bars will not be
visible on screen.
BRI
Focus
•
Press followed by and to adjust the focus.
When adjustment is fi nished, press
.
Zoom
Press followed by and to adjust the zoom.
•
When adjustment is fi nished, press
.
Shift
•
Press followed by , , or to shift the lens up, down, left or
right.
When adjustment is fi nished, press
.
When any of the three Lens
adjustment keys is pressed, the
blue Transmit indicator on the
remote control will light for 10
seconds:
- after 10 seconds, if no
adjustment has been made,
the indicator will go out and
the Lens adjustment key must
be pressed again to resume
adjustment.
- to end the adjustment before
10 seconds has elapsed, press
the
- all other adjustments will
be locked out until the Lens
adjustment is ended.
For more information about the
amount of lens shift available,
see section 2. Installation.
key.
Page 4.10 Rev A. March 2008
Page 57

Digital Projection TITAN 1080p-600, Reference 1080p User Manual 4. Controlling the projector
Auto-detect input mode
Press to force the projector to re-detect the input mode
•
(see Input modes and settings, earlier in this section).
Source information
Press to display the source information screen.
•
Input
Press or to change to the next input up or down the following list:
•
1. RGB1
2. RGB2
3. DVI
4. SDI
5. Composite Video
6. S-Video
7. Component
•
Or press the numbered keys 1–7 to change directly to the input:
Notes
For more information about
input mode detection, see
earlier in this section, Input
modes and settings.
SDI not present on earlier
models
Rev A. March 2008 Page 4.11
Page 58

4. Controlling the projector Digital Projection TITAN 1080p-600, Reference 1080p User Manual
Input Presets
Recall
To recall a set of modal settings that have been saved, press and hold ,
•
whilst pressing the lettered key
•
The projector will switch to the saved input source, and redetect the input mode
before applying the saved modal settings.
Save
•
To save the current input source, mode and modal settings, press and hold
, whilst pressing the lettered key A – S.
If this Preset has been used before, and the Input source has been changed,
then the following message will be displayed.
Press
•
Press
•
The modal settings will be saved to the selected preset, and the following
•
message will be displayed.
and to select either OK or Cancel.
to confi rm your selection.
A – S.
Notes
For more information about
input modes and input presets,
see earlier in this section, Input
modes and settings.
A preset can be applied only to
the same mode for which it was
created. If the detected input
mode does not match, then
settings from the mode history
or mode library will be applied.
For more information about
input modes, see Input modes
and settings. earlier in this
section.
Page 4.12 Rev A. March 2008
Page 59

Digital Projection TITAN 1080p-600, Reference 1080p User Manual 4. Controlling the projector
Red, Green and Blue
•
Press , or to switch the red, green or blue components OFF
or ON.
Test pattern
•
Press to select a test pattern.
Picture settings
•
Press a key, followed by and to adjust these picture settings:
Brightness
Contrast
Saturation
Phase
Aspect ratio
BRI
CON
SAT
PHASE
ASPECT
Notes
The red, green and blue keys
are disabled when the OSD is
switched OFF.
The Saturation control is
available for Composite, SVideo and Component inputs
only.
The Phase control is available
for RGB inputs only.
Geometry settings
Keystone adjustment is used to correct for distortion caused by the projector being
mounted higher or lower than the screen.
•
Press Keystone KEYST,
followed by
Press Position
•
followed by
smaller than the DMD:
and to adjust the keystone correction:
POS,
, , and to adjust the picture position, for images
For all adjustments on this page
that require more than one key
to be pressed:
- after 10 seconds, if no
adjustment has been made, the
key must be pressed again
to resume adjustment.
- to end the adjustment before
10 seconds has elapsed, press
a different adjustment key, or
press the
When the OSD is OFF:
- the keys will still function,
but the controls will not be
visible on screen.
key.
Rev A. March 2008 Page 4.13
Page 60

4. Controlling the projector Digital Projection TITAN 1080p-600, Reference 1080p User Manual
Magnify and pan
•
Press Magnify MAGNIFY
followed by
Press Pan
•
followed by
and to adjust the size of the picture.
, , and to adjust the position of the magnifi ed image.
PAN
Notes
The magnify feature utilises a
digital zoom. Used with the pan
control, this can be used to:
- enlarge a section of the image
- enable the use of multiple
projectors to construct a large
image from tiles.
The pan control is available
only when the image has been
magnifi ed.
On-screen-display size
Press Size SIZE
•
to switch the size of the OSD between large and small.
Remote control address
The projector and the remote control need to be set to matching addresses. Read
the note to the right on this page, and follow the instructions in the order shown
below:
1 Set the projector address as shown in Setup menu, later in this section.
2 Set the remote control address:
•
Press and hold
whilst pressing two numbered keys
to set the remote control address to any number between 00 and 99.
(leading zeros must be used for numbers less than 10)
0 – 9
If the OSD moves off screen
due to a change in image size,
then pressing the size key will
restore its readability.
When fresh batteries are
inserted in the remote control
it will default to address 00.
Remote control 00 is a master
control, able to control all
projectors.
If two or more projectors are set
to the same address, they can
be controlled from one remote
control, provided they are
connected by cable or in range
of the infra red.
Remote control backlight
Press to switch the backlight on and off.
•
Page 4.14 Rev A. March 2008
Page 61

Digital Projection TITAN 1080p-600, Reference 1080p User Manual 4. Controlling the projector
Using the menus
Navigating menus and submenus
When the menus are in use and the OSD is ON, the top level menu headings are
always visible to the left of the screen.
Each menu item can lead to a number of submenus, which are displayed in the
column to the right . The symbol indicates that a submenu is available.
Each submenu can lead to further submenus, up to a maximum of three levels.
•
To display the menus, press
•
The menus will always open at the same point they were last viewed. The
example below shows the fi rst menu display following power on – the item that is
currently selected (the Input menu) is highlighted in blue.
Input
Picture
Geometry
Colour
Setup
Information
1. RGB1
2. RGB2
3. DVI
4. SDI
5. Composite Video
6. S-Video
7. Component
Presets
on the remote control or the keypad.
Notes
Some menu controls can be
accessed directly using the
control keys (see earlier in this
section).
When the OSD is OFF, all menu
navigation keys will be disabled.
When the OSD is switched back
ON, the menus will remain OFF
until the
key is pressed
again. The menus will then
reopen at the same point they
were last viewed.
If a menu is opened, and no
other key is pressed within the
period set in the OSD Timeout
menu, then the menus will
disappear. When the key
is pressed again, the menus will
reopen at the same point they
were last viewed.
(see On Screen Display,
in Setup Menu, later in this
section).)
Main menu: Input
SDI not present on earlier
models
•
To select a menu, press
and , for example the Setup menu:
Main menu: Setup
Rev A. March 2008 Page 4.15
Page 62

4. Controlling the projector Digital Projection TITAN 1080p-600, Reference 1080p User Manual
•
Press to open the menu. The blue highlight moves to the fi rst item in the
menu, which may be submenu, for example the Projector Setup submenu.
•
To select a submenu, press
Press
to open the submenu. The submenu opens, with the title at the top.
and , for example the Lamp submenu.
Notes
Setup menu
Setup menu
Lamp
•
To close the submenu and return to the previous level, press
•
There may be up to three levels of submenu, so to return to the top level, you
may have to press
•
To close the menu display completely, press
up to three times.
.
.
Setup menu
Page 4.16 Rev A. March 2008
Page 63

Digital Projection TITAN 1080p-600, Reference 1080p User Manual 4. Controlling the projector
Menu controls
Some menus have controls, as shown in the examples below.
Input
Picture
Geometry
Colour
Setup
Information
1. RGB1
2. RGB2
3. DVI
4. SDI
5. Composite Video
6. S-Video
7. Component
Presets
Notes
Some menus items may be
greyed out - unavailable due to
the effect of settings made in
other menus, or due to the type
of input signal.
Slider bar
The highlighted slider bar shows which
control is active currently.
To adjust the slider press
Parameter selection
To select from a number of parameters,
(shown one at a time to the right),
press
and .
These two items are greyed out and
the values are blank, showing that they
are not available, due to the effect of
settings made in other menus, or due
to the type of input signal.
Parameter list
To select from a list of parameters,
press and .
and .
Rev A. March 2008 Page 4.17
Page 64

4. Controlling the projector Digital Projection TITAN 1080p-600, Reference 1080p User Manual
Input menu
To return to the main menu, press up to three times.
From the main menu:
Press
•
Press
the menu. The symbol shows which input is currently selected.
Input Source
Press and to select from:
•
1. RGB1
2. RGB2
3. DVI
4. SDI
5. Composite Video
6. S-Video
7. Component
and until Input is highlighted.
to open the Input menu. The blue highlight moves to the fi rst item in
Input
Picture
Geometry
Colour
Setup
Information
1. RGB1
2. RGB2
3. DVI
4. SDI
5. Composite Video
6. S-Video
7. Component
Presets
Notes
Some menu controls can be
accessed directly using the
control keys (see earlier in this
section).
When using the menus, press
OSD
reveal the On-Screen-Display.
or to hide or
Input Menu
SDI not present on earlier
models
For more information about
the input connections, see
section 2. Installation, and
section 7. Appendix.
When an input has been
selected, the projector will
automatically detect input mode
settings such as line rate and
resolution etc.
•
Press
to confi rm your selection.
To force the projector to re-
detect the input mode settings,
press
.
Page 4.18 Rev A. March 2008
Page 65

Digital Projection TITAN 1080p-600, Reference 1080p User Manual 4. Controlling the projector
Input menu continued
Presets
Sixteen sets of parameters can be saved and recalled (A – S). The parameters
saved for each Preset are:
all settings from the Picture menu,
all settings from the Input menu (1 – 7)
all settings from the Geometry menu, except Keystone
all settings from the Colour menu, except Global
•
Press
Press
and to select Presets.
to open the Presets submenu.
Notes
Some menu controls can be
accessed directly using the
control keys (see earlier in this
section).
For more information about
input modes and input presets,
see earlier in this section, Input
modes and settings.
Input Menu
Presets
Recall Presets
Press and to select Recall Preset.
•
Press
been saved are indicated by their description, for example D: in this example.
•
To recall a set of parameters that has been saved, press
one of the Presets.
For Presets J to S, select Recall Preset J ~ S then press
J~S submenu. Press
to open the Recal Presets A ~ H submenu. Any presets that have
and to select
to open the
and to select the Preset.
Input Menu
Presets
Recall Presets A ~ H
•
Press
The Preset parameters will be loaded.
to confi rm your selection.
Rev A. March 2008 Page 4.19
Page 66

4. Controlling the projector Digital Projection TITAN 1080p-600, Reference 1080p User Manual
Input menu continued
Save Presets
•
Press and to select Save Preset.
Press
To save the current set of parameters, press
•
Presets.
For Presets J to S, select Save Preset J ~ S then press
J~S submenu. Press
to open the Save Presets A ~ H submenu.
and to select the Preset.
Notes
Some menu controls can be
accessed directly using the
control keys (see earlier in this
section).
Input Menu
Presets
Save Presets A ~ H
and to select one of the
to open the
Press to confi rm your selection.
If this Preset has been used before, but only if the Input source has been
changed, then the following message will be displayed.
Press
Press to confi rm your selection.
The parameters will be saved to the selected preset, and the following message
will be displayed.
and to select either OK or Cancel.
Page 4.20 Rev A. March 2008
Page 67

Digital Projection TITAN 1080p-600, Reference 1080p User Manual 4. Controlling the projector
Picture menu
To return to the main menu, press up to three times.
From the main menu:
Press
•
Press
the menu.
Brightness
Press and to select Brightness.
•
and until Picture is highlighted.
to open the Picture menu. The blue highlight moves to the fi rst item in
Notes
Some menu controls can be
accessed directly using the
control keys (see earlier in this
section).
When using the menus, press
OSD
reveal the On-Screen-Display.
or to hide or
Picture Menu
Some menu items may be
greyed out - unavailable due to
the effect of settings made in
other menus, or due to the type
of input signal.
Press
and to adjust the slider (-128 to +127).
Contrast
•
Press and to select Contrast.
Press
and to adjust the slider (-128 to +127).
Saturation
Adjusts the saturation at white peak levels.
•
Press
Press
and to select Saturation.
and to adjust the slider (0 to 255).
Hue
Adjusts the color balance from green to blue, using the red level as a reference.
•
Press
Press
and to select Hue.
and to adjust the slider (0 to 255).
The Saturation slider is
available for Composite, SVideo and Component inputs
only.
The Hue slider is available for
NTSC inputs only.
Rev A. March 2008 Page 4.21
Page 68

4. Controlling the projector Digital Projection TITAN 1080p-600, Reference 1080p User Manual
Picture menu continued
Gamma Correction
Video recordings are often supplied with a gamma adjustment applied. The
projector’s gamma adjustment can be used to correct for this.
Press
•
Press
Parametric Enables the gamma slider
User download Applies the gamma settings made externally using the DP
Graphics Enhanced highlights and contrast
NTSC NTSC colour space, with a gamma of 2.2
PAL PAL colour space, with a gamma of 2.2
Linear gamma of 1.0
Punch Enhanced brightness and increased colour saturation for high
and to select Gamma.
and to select from:
Userware on a personal computer. (default gamma of 2.2)
ambient environments.
Parametric Gamma
Press and to select Parametric Gamma.
•
Press
and to adjust the slider (1.0 to 3.0 in 0.1 steps).
Notes
For more information about
User gamma settings, see
section 5. DP Userware.
Parametric Gamma adjustment
is available only when
Parametric is selected in
Gamma selection, above.
Phase
Phase should be set automatically by the projector, but can be adjusted manually to
correct for shimmering or poor quality defi nition on, for example, fi ne text.
•
Press
Press
and to select Phase.
and to adjust the slider (0 to 31).
Phase adjustment can be
found in both the Picture and
Geometry menus, and is
available for RGB1 and RGB2
inputs only.
Page 4.22 Rev A. March 2008
Page 69

Digital Projection TITAN 1080p-600, Reference 1080p User Manual 4. Controlling the projector
Picture menu continued
Aspect Ratio
Press and to select Aspect Ratio.
•
Press
Fill This will best fi t the incoming source to fi ll either the height or
User Aspect
1.33:1 (4:3)
1.78:1 (16:9)
2.35:1 (Scope)
1.66:1 (Vista)
1.85 (Flat)
Theaterscope Use with the TheaterScope Anamorphic System only. The
Native The image will be displayed pixel for pixel. The image will be
and to select from:
width without changing the aspect ratio of the source.
2.35:1 source image is displayed using the full area of the 16:9
DMD. This is then stretched to 2.35:1 by the lens.
centred, with a black border if smaller than 1920 x 1080 or
cropped if larger.
Notes
Aspect Ratio selection can be
found in both the Picture and
Geometry menus.
When User Aspect is selected,
the Aspect Ratio settings are
taken from the User H Aspect
and V Aspect settings made in
the Geometry menu.
Sharpness
Press and to select Sharpness.
•
Press
and to adjust the slider.
The Sharpness slider is
available for Composite,
S-Video and Component SD
inputs only.
Rev A. March 2008 Page 4.23
Page 70

4. Controlling the projector Digital Projection TITAN 1080p-600, Reference 1080p User Manual
Geometry menu
To return to the main menu, press up to three times.
From the main menu:
Press
•
Press
in the menu.
Horizontal Position
Press and to select H Position.
•
and until Geometry is highlighted.
to open the Geometry menu. The blue highlight moves to the fi rst item
Input
Picture
Geometry
Colour
Setup
Information
H Position
V Position
Aspect Ratio
User H Aspect
User V Aspect
Keystone
Phase
Resolution
Blanking
128
64
500
500
0
127
1.85:1 (Flat)
Notes
Some menu controls can be
accessed directly using the
control keys (see earlier in this
section).
When using the menus, press
OSD
or to hide or
reveal the On-Screen-Display.
Geometry Menu
Some menu items may be
greyed out - unavailable due to
the effect of settings made in
other menus, or due to the type
of input signal.
Press
and
to adjust the slider.
Vertical Position
Press and to select V Position.
•
Press
and
to adjust the slider.
Aspect Ratio
•
Press
Fill This will best fi t the incoming source to fi ll either the height or
User Aspect
1.33:1 (4:3)
1.78:1 (16:9)
2.35:1 (Scope)
1.66:1 (Vista)
1.85 (Flat)
Theaterscope Use with the TheaterScope Anamorphic System only. The
Native The image will be displayed pixel for pixel. The image will be
and
to select from:
width without changing the aspect ratio of the source.
2.35:1 source image is displayed using the full area of the 16:9
DMD. This is then stretched to 2.35:1 by the lens.
centred, with a black border if smaller than native resolution or
cropped if larger.
Aspect Ratio selection can be
found in both the Picture and
Geometry menus.
When User Aspect is selected,
the Aspect Ratio settings are
taken from the User H Aspect
and V Aspect settings (see
next page).
Page 4.24 Rev A. March 2008
Page 71

Digital Projection TITAN 1080p-600, Reference 1080p User Manual 4. Controlling the projector
Geometry menu continued
User Horizontal Aspect Ratio
•
Press and to select User H Aspect.
Press
and to adjust the slider (internal number – adjust to fi t).
User Vertical Aspect Ratio
•
Press and to select User V Aspect.
Press
and to adjust the slider (internal number – adjust to fi t).
Keystone
Used to correct for distortion caused by the projector being mounted higher or lower
than the screen.
•
Press
Press
and to select Keystone.
and to adjust the slider (-128 to +127).
Notes
Horizontal and Vertical
Aspect Ratio adjustments are
available only when User is
selected in Aspect Ratio, (see
previous page).
Keystone adjustment can be
found in both the Geometry and
Projector Setup menus.
Phase
Phase should be set automatically by the projector, but can be adjusted manually to
correct for shimmering or poor quality defi nition on, for example, fi ne text.
•
Press
Press
and to select Phase.
and to adjust the slider (0 to 32).
Phase adjustment can be
found in both the Picture and
Geometry menus, and is
available for graphics based
RGB sources only.
Rev A. March 2008 Page 4.25
Page 72

4. Controlling the projector Digital Projection TITAN 1080p-600, Reference 1080p User Manual
Geometry menu continued
Resolution
Press and to select Resolution.
•
Press
Input Detection
Press and to select from:
•
Automatic Allows the projector to automatically detect an appropriate
Manual Allows the user to select an appropriate input mode from a list
Custom Allows the user to completely customise the settings to suit the
to open the Resolution submenu.
Input
Picture
Geometry
Colour
Setup
Information
Input Detection
Input Standard
Total H Samples
Active H Samples
Active V Samples
V Offset
RESOLUTION
input mode for the signal.
of common standards.
incoming video signal.
Automatic
Notes
Geometry Menu
Resolution
Input Detection should
normally be set to Automatic.
However, if the incoming video
signal is non-standard, the
projector may not be able to
select an appropriate input
mode.
In this case, Input Detection
should be set to Manual or
Custom.
When Input Detection is set to Manual:
•
•
Press
Press
and to select Input Standard.
and to select from:
720p
XGA
XGA+
SXGASXGA
SXGA+
1080p
UXGA
VGA
NTSC
PAL
SVGA
Input Standard is available
only if Input Detection is set to
Manual.
Page 4.26 Rev A. March 2008
Page 73

Digital Projection TITAN 1080p-600, Reference 1080p User Manual 4. Controlling the projector
Geometry menu continued
When Input Detection is set to Custom:
•
Press
Press
and to select one of the adjustment sliders.
and to adjust the slider to match the resolution of the incoming
video signal.
Input
Picture
Geometry
Colour
Setup
Information
Input Detection
Input Standard
Total H Samples
Active H Samples
Active V Samples
V Offset
RESOLUTION
1300
1280
720
31
Blanking
Blanking curtains can be applied to each edge of the picture.
•
Press
and to select Blanking.
Notes
The adjustment sliders are
available only if Input Detection
is set to Custom.
Custom
Total H Samples is available
for RGB1 and RGB2 inputs
only.
V Offset is available for DVI
input only.
Press
to open the Blanking submenu.
Blanking On/Off
•
Press and to select from:
On
Off
Blanking adjust
•
Press and to select the edge to be Blanked.
Press
and to adjust the slider (0 to 200).
Geometry Menu
Blanking
The blanking curtains will not
applied until Blanking is turned
On.
The On Screen Display will
move to the centre of the DMD
when Blanking is turned On.
Set to zero for no blanking, eg
the top edge in this example.
Rev A. March 2008 Page 4.27
Page 74

4. Controlling the projector Digital Projection TITAN 1080p-600, Reference 1080p User Manual
Colour menu
To return to the main menu, press up to three times.
From the main menu:
•
Press
Press
the menu.
and until Colour is highlighted.
to open the Colour menu. The blue highlight moves to the fi rst item in
Notes
When using the menus, press
OSD
reveal the On-Screen-Display.
or to hide or
Colour Menu
Some menu items may be
greyed out - unavailable due to
the effect of settings made in
other menus, or due to the type
of input signal.
Notes on Colour and Global Colourimetry
Global Colourimetry menu (see later in this section, in Setup menu)
After a calibration check on the projector or venue, a set of Global colour settings
can be made in the Global Colourimetry menu. These settings are then available
to be copied at any time using the Colour Mode setting in the Colour menu, or
used as a starting point using the Trim feature in the Colour menu.
Colour menu (see this section).
The settings made in the Colour menu will be automatically saved in the Mode
History, or can be manually saved to one of the Input Presets (see Input modes
and settings earlier in this section).
The selections available in Colour Mode in the Colour menu are:
Global Copies the settings made in the Global Colourimetry menu
Temperature Set the colour temperature using the slider
User Set the Red, Green and Blue Lift and Gain using the sliders
Peak Preset high brightness setting
Read these notes on Colour
and Global Colourimetry
before making any settings in
the Colour menus.
Page 4.28 Rev A. March 2008
Page 75

Digital Projection TITAN 1080p-600, Reference 1080p User Manual 4. Controlling the projector
Colour menu continued
Colour Mode
Press and to select Colour Mode.
•
Press
Global
Temperature
User
Peak
and to select from:
Colour Temperature
Press and to select Temperature.
•
Press
and to adjust the slider (3,000K to 10,000K. in 100 steps).
RGB Lift
•
Press and to select the parameter to be adjusted.
Press
and to adjust the slider.
Notes
Read the notes on Colour and
Global Colourimetry earlier
in this section before making
any settings in the Colour
menus.
The Colour Temperature
slider is available only if
Temperature Mode is selected.
The RGB Lift and Gain sliders
are available only if User Mode
is selected.
RGB Gain
•
Press and to select the parameter to be adjusted.
Press
and to adjust the slider.
Component Type
•
Press and to select Component Type.
Press
RGB
YPrPb
and to select from:
The Component Type selection
is available for RGB1, RGB2
and Component inputs only.
Rev A. March 2008 Page 4.29
Page 76

4. Controlling the projector Digital Projection TITAN 1080p-600, Reference 1080p User Manual
Colour menu continued
Trim
Press and to select Trim.
•
Press
Trim RGB Lift and Gain
Press and to select the parameter to be adjusted.
•
Press
to open the Trim submenu.
and to adjust the slider (-128 to +127).
Notes
The Trim submenu is available
only if Global Colour Mode is
selected.
Colour Menu
Trim
Read the notes on Colour and
Global Colourimetry earlier
in this section before making
any settings in the Colour
menus.
Global Colourimetry
•
This is a shortcut to the Global Colourimetry submenu, described later in this
section, in Setup Menu.
Press
Press
and to select Global Colourimetry.
to open the Global Colourimetry submenu.
Page 4.30 Rev A. March 2008
Page 77

Digital Projection TITAN 1080p-600, Reference 1080p User Manual 4. Controlling the projector
Setup menu
To return to the main menu, press up to three times.
From the main menu:
•
Press
Press
the menu.
and until Setup is highlighted.
to open the Setup menu. The blue highlight moves to the fi rst item in
Notes
When using the menus, press
OSD
reveal the On-Screen-Display.
or to hide or
Setup Menu
Rev A. March 2008 Page 4.31
Page 78

4. Controlling the projector Digital Projection TITAN 1080p-600, Reference 1080p User Manual
Setup menu, continued
Projector
Press and to select Projector.
•
Press
Orientation
Press and to select Orientation.
•
Press
Desktop Front
Desktop Rear
Ceiling Front
Ceiling Rear
to open the Projector submenu.
and to select from:
Notes
Setup Menu
Projector
Control Panel Backlight
•
Press and to select Backlight.
Press
On
Off
and to select from:
Component Video Sync
Press and to select Component Video Sync.
•
Press
Sync On Green
Separate
and to select from:
Page 4.32 Rev A. March 2008
Page 79

Digital Projection TITAN 1080p-600, Reference 1080p User Manual 4. Controlling the projector
Setup menu, Projector continued
Keystone
Used to correct for distortion caused by the projector being mounted higher or lower
than the screen.
•
Press
Press
and to select Keystone.
and to adjust the slider (-128 to +127).
Test Pattern
Press and to select Test Pattern.
•
Press
to open the Test Pattern submenu.
Notes
Press
Off
Alignment Grid
Screen Layout (shows outlines of various aspect ratios)
Chequerboard
Colour Bars
0% Field (black)
20% Field
100% Field (white, affected by colour settings)
100% Field (Peak White) (white, unaffected by colour settings)
and to select from:
Setup Menu
Test Pattern
Rev A. March 2008 Page 4.33
Page 80

4. Controlling the projector Digital Projection TITAN 1080p-600, Reference 1080p User Manual
Setup menu continued
Global Colourimetry
•
Press and to select Global Colourimetry.
•
Press
Global Colourimetry menu (see this section)
After a calibration check on the projector or venue, a set of Global colour settings
can be made in the Global Colourimetry menu. These settings are then available
to be copied at any time using the Colour Mode setting in the Colour menu, or
used as a starting point using the Trim feature in the Colour menu.
to open the Global Colourimetry submenu.
Notes on Colour and Global Colourimetry
Notes
Setup Menu
Global Colourimetry
Some menu items may be
greyed out - unavailable due to
the effect of settings made in
other menus, or due to the type
of input signal.
Read these notes on Colour
and Global Colourimetry
before making any settings in
the Colour menus.
Colour menu (see earlier in this section).
The settings made in the Colour menu will be automatically saved in the Mode
History, or can be manually saved to one of the Input Presets (see Input modes
and settings earlier in this section).
The selections available in Colour Mode in the Colour menu are:
Global Copies the settings made in the Global Colourimetry menu
Temperature Set the colour temperature using the slider
User Set the Red, Green and Blue Lift and Gain using the sliders
Peak Preset high brightness setting
Page 4.34 Rev A. March 2008
Page 81

Digital Projection TITAN 1080p-600, Reference 1080p User Manual 4. Controlling the projector
Setup menu, Global Colourimetry continued
Colour Mode
•
Press and to select Colour Mode.
Press
Temperature
User
Peak
and to select from:
Colour Temperature
•
Press and to select Temperature.
Press
and to adjust the slider (3,000K to 10,000K. in 100 steps).
RGB Lift
Press and to select the parameter to be adjusted.
•
Press
and to adjust the slider.
Notes
Read the notes on Colour and
Global Colourimetry earlier
in this section before making
any settings in the Colour
menus.
The Colour Temperature
slider is available only if
Temperature Mode is selected.
The RGB Lift and Gain sliders
are available only if User Mode
is selected.
RGB Gain
Press and to select the parameter to be adjusted.
•
Press
and to adjust the slider.
Rev A. March 2008 Page 4.35
Page 82

4. Controlling the projector Digital Projection TITAN 1080p-600, Reference 1080p User Manual
Setup menu, continued
Lamp
Press and to select Lamp.
•
Press
The middle row shows the current lamp setting.
Change Lamp Setting
Press and to select Change Lamp Setting.
•
Press
to open the Lamp submenu.
to open the Lamp Setting control box.
Notes
Setup Menu
Lamp
continued
Page 4.36 Rev A. March 2008
Page 83

Digital Projection TITAN 1080p-600, Reference 1080p User Manual 4. Controlling the projector
Setup menu, Lamp continued
Lamp Power
Press and to select the Lamp Power setting.
•
Press
80 to 100% in 1% steps
and to adjust the Lamp Power from:
Lamp Mode
Press and to select Lamp Mode.
•
Press
single lamp modes
Lamp 1 lamp 1 only
Lamp 2 lamp 2 only
Alternate on power up, selects the lamp with the least hours used
dual lamp mode
and to select from:
Notes
In single lamp modes:
- if the running lamp fails, the
other lamp will automatically be
switched on.
Lamps 1 and 2 both lamps
OK
Press and to select OK.
•
Press to apply the new settings.
Cancel
Press and to select Cancel.
•
Press
The indicators on the control panel will show as follows:
Lamp 1 off = OFF
fl ashing red = LAMP ERROR green = ON (100%) amber = (80 - 99%)
fl ashing green/amber = LAMP COOL-DOWN or WARM-UP
Lamp 2 off = OFF
fl ashing red = LAMP ERROR green = ON (100%) amber = (80 - 99%)
or to exit without applying the new settings.
The selected lamp mode:
- will not be applied until OK is
selected
- will be applied gradually over a
period of 30 seconds
- will not be applied until the end
of any warm-up or cool-down
period that has already started.
fl ashing green/amber = LAMP COOL-DOWN or WARM-UP
Rev A. March 2008 Page 4.37
Page 84

4. Controlling the projector Digital Projection TITAN 1080p-600, Reference 1080p User Manual
Setup menu continued
On Screen Display
•
Press and to select On Screen Display.
Press
OSD Position
•
Press and to select OSD Position
Press
Upper Left
Upper Centre
Upper Right
Middle Left
Middle Centre
Middle Right
Lower Left
Lower Centre
Lower Right
to open the On Screen Display submenu.
and to select from:
Notes
Setup Menu
On Screen Display
The On Screen Display will
move to the centre of the DMD
when Blanking is turned On.
(see Geometry menu, earlier in
this section).
OSD Size
•
Press and to select OSD Size.
Press
Large
Small
OSD Timeout
•
Press and to select the length of the On Screen Display Timeout.
Press
0 to 255 in 1 second steps (when set to zero, the OSD never times out)
and to select from:
and to select from:
If a menu is opened, and no
other key is pressed within the
period set in the OSD Timeout
menu, then the menus will
disappear. When the key
is pressed again, the menus will
reopen at the same point they
were last viewed.
Page 4.38 Rev A. March 2008
Page 85

Digital Projection TITAN 1080p-600, Reference 1080p User Manual 4. Controlling the projector
Setup menu continued
Password
Entry to the password protected area is available to authorised service personel
only.
•
Press
Press
Press
•
Press
0 to 9
then move to the next digit.
Use and to select from
and to select Password.
to open the Password control box.
and to select each digit in turn.
and to adjust the digit from:
Notes
OK
Press to enter the password controlled area.
or Cancel
Press
or to exit without applying the password.
Rev A. March 2008 Page 4.39
Page 86

4. Controlling the projector Digital Projection TITAN 1080p-600, Reference 1080p User Manual
Setup menu continued
Communication
•
Press and to select Comunication.
Press
Projector Address
The projector and the remote control need to be set to matching addresses. Read
the note to the right on this page, and follow the instructions in the order shown
below:
1 Set the projector address:
Press
Press
to open the Comunication submenu.
to open the Projector address control box.
and to select the address setting.
Notes
Setup Menu
Comunication
When fresh batteries are
inserted in the remote control,
it will default to address 00.
Remote control 00 is a master
control, able to control all
projectors.
FIf two or more projectors are
set to the same address, they
can be controlled from one
remote control, provided they
are connected by cable or in
range of the infra red.
Press
00 to 99
Use and to select from
Apply
Press to apply the new Projector Address.
or Cancel
Press
2 Set the remote control address as shown in Using the control keys, earlier in
this section.
and to adjust the address from:
or to exit without making the change.
Page 4.40 Rev A. March 2008
Page 87

Digital Projection TITAN 1080p-600, Reference 1080p User Manual 4. Controlling the projector
Setup menu continued
Network
•
Press and to select Network.
Press
LAN MAC Address
•
Projector’s unique ID - for information only - cannot be changed.
to open the Network submenu.
Input
Picture
Geometry
Colour
Setup
Information
LAN MAC Address
Connection
DHCP
LAN IP Address
LAN Subnet
LAN Gateway
Channel
SSID
NETWORK
31-FE-A5-81-20-83
Wired
On
192.168.3.6
255.255.0.0
192.168.9.10
0
TITAN
Notes
Setup Menu
Network
Connection
•
Press and to select Connection
Press
Press
Wired
Wireless
Press
to open the Connection control box.
and to select from:
to apply the new Connection setting.
Some items may be greyed out
or not editable, due to the effect
of other settings made in the
Network submenu.
For example, if a Wired
Connection is selected:
Wifi , Channel and SSID will be
unavailable.
Rev A. March 2008 Page 4.41
Page 88

4. Controlling the projector Digital Projection TITAN 1080p-600, Reference 1080p User Manual
Setup menu, Network continued
DHCP
•
Press and to select DHCP
Press
Press
On
Off
Press
to open the DHCP control box.
and to select from:
to apply the new DHCP setting.
LAN IP Address
•
Press and to select LAN IP Address
Press
to open the LAN IP Address control box.
Notes
LAN IP Address cannot be
changed if DHCP is set to ON.
Use
Use
then move to the next number.
Use
Apply
Press
or Cancel
Press
and to select each number in turn.
and to adjust the number
and to select from
to apply the new LAN IP Address.
or to exit without making the change.
DHCP will set the the address,
which will be displayed for
information only.
Page 4.42 Rev A. March 2008
Page 89

Digital Projection TITAN 1080p-600, Reference 1080p User Manual 4. Controlling the projector
Setup menu, Network continued
LAN Subnet Mask
Press and to select LAN Subnet
•
Press
Press
Automatic
or one of the following:
Class C Masks
255.255.255.254
255.255.255.252
255.255.255.248
255.255.255.240
255.255.255.224
255.255.255.192
255.255.255.128
255.255.255.0 (selected when setting is Automatic and IP class is C )
Class B Masks
255.255.254.0
255.255.252.0
255.255.248.0
255.255.240.0
255.255.224.0
255.255.192.0
255.255.128.0
255.255.0.0 (selected when setting is Automatic and IP class is B)
Class A Masks
255.254.0.0
255.252.0.0
255.248.0.0
255.240.0.0
255.224.0.0
255.192.0.0
255.128.0.0
255.0.0.0 (selected when setting is Automatic and IP class is A)
to open the LAN Subnet control box.
and to select from:
Notes
LAN IP Subnet cannot be
changed if DHCP is set to ON.
DHCP will set the the subnet
mask, which will be displayed
for information only.
Use
Apply
Press
or Cancel
Press
and to select from
to apply the new LAN Subnet Mask.
or to exit without making the change.
Rev A. March 2008 Page 4.43
Page 90

4. Controlling the projector Digital Projection TITAN 1080p-600, Reference 1080p User Manual
Setup menu, Network continued
LAN Gateway Mask
•
Press and to select LAN Gateway
Press
Use
Use
then move to the next number.
Use and to select from
Apply
Cancel
Press
change.
to open the LAN IP Address control box.
and to select each number in turn.
and to adjust the number
to apply the new LAN Gateway Mask, or to exit without making the
Notes
LAN IP Gateway cannot be
changed if DHCP is set to ON.
DHCP will set the the gateway
mask, which will be displayed
for information only.
Page 4.44 Rev A. March 2008
Page 91

Digital Projection TITAN 1080p-600, Reference 1080p User Manual 4. Controlling the projector
Setup menu, Network continued
Channel
•
Press and to select Channel.
Press
Press and to select the channel number.
Use
0 to 14
Use
Apply
Press
or Cancel
to open the Channel control box.
and to adjust the channel number from:
and to select from
to apply the new Channel number.
Notes
The Channel setting is not
available if Connection is set to
Wired.
Press
or to exit without making the change.
SSID
Projector’s ID - for information only.
•
Rev A. March 2008 Page 4.45
Page 92

4. Controlling the projector Digital Projection TITAN 1080p-600, Reference 1080p User Manual
Setup menu, continued
Restore Defaults
Press and to select Restore Defaults.
•
Press
The following message will be displayed.
Press
Yes
Press
All settings will be restored to factory defaults.
•
or No
Press
.
and to select from:
to confi rm your that you really wish to restore all default settings.
or to exit without making the change.
Notes
Restore Defaults will restore
all settings to factory
defaults.
If you are not sure this is
what you want to do, then
either:
make a record of all settings
fi rst
or
select No, then press
Following a restore to factory
defaults, the projector will
perform a self-test and enter
Standby mode.
This process will take up to 10
seconds. During this time the
projector will not respond to any
commands.
.
When complete, all settings will
be restored to factory condition
and all user settings will be
removed except for downloaded
colour and gamma parameters.
Page 4.46 Rev A. March 2008
Page 93

Digital Projection TITAN 1080p-600, Reference 1080p User Manual 4. Controlling the projector
Information menu
To return to the main menu, press up to three times.
From the main menu:
Press and until Information is highlighted.
•
Press
item in the menu.
Projector Information
Press and to select Projector Information.
•
Press
to open the Information menu. The blue highlight moves to the fi rst
to open the Projector Information submenu.
Notes
When using the menus, press
OSD
reveal the On-Screen-Display.
or to hide or
Information Menu
Source Information
Press and to select Source Information.
•
Press
to open the Source Information submenu.
Input
Picture
Geometry
Colour
Setup
Information
Input: DVI
Standard: 720p 60
Frequency V: 60Hz H: 45.0KHz
SOURCE INFORMATION
Information Menu
Projector Information
Information Menu
Source Information
Rev A. March 2008 Page 4.47
Page 94

4. Controlling the projector Digital Projection TITAN 1080p-600, Reference 1080p User Manual
Information menu continued
Digital Projection Information
•
Press and to select Digital Projection.
Press
to see the DP Information screen.
Notes
When using the menus, press
OSD
reveal the On-Screen-Display.
or to hide or
Information Menu
DP Contact Information
Page 4.48 Rev A. March 2008
Page 95

5. Userware
Contents
Rev A. March 2008 Page 5.1
Page 96

5. Userware Digital Projection TITAN 1080p-600, Reference 1080p User Manual
Page 5.2 Rev A. March 2008
Page 97

6. Maintenance
Contents
Changing the lamp module .............................................................................................................. 6.2
Changing the air fi lter ........................................................................................................................ 6.3
Cleaning ................................................................................................................................................ 6.4
Projector .......................................................................................................................................... 6.4
Lens ................................................................................................................................................ 6.4
Lamp module ................................................................................................................................... 6.4
Rev A. March 2008 Page 6.1
Page 98

6. Maintenance Digital Projection TITAN 1080p-600, Reference 1080p User Manual
Changing the lamp module
Turn the power OFF and allow the lamp to cool for 5 minutes.
•
Unscrew the four captive fi nger screws securing the rear door - the door is
•
tethered, so cannot be removed completely.
Door
screws
Disconnect the control cable from the rear of the lamp assembly.
•
Unscrew the two captive fi nger screws securing the lamp assembly to the
•
projector, and pull out the whole lamp assembly.
Disconnect the timer cable from the lamp module to be changed.
•
Unscrew the four screws securing the lamp module to the assembly.
•
Notes
Always allow the lamp to cool
for 5 minutes before:
- disconnecting the power
- moving the projector
- changing the lamp
There are no user-serviceable
parts inside the lamp module.
The whole module should be
replaced.
At the end of life, the lamp
will not strike, and the Lamp
Indicator on the control panel
will show red. (Typical lamp life
is 2000 hours)
Do not use the lamp for more
than 2000 hours, as this may
cause serious lamp failure,
damage the lamp module
and cause extra cost on
replacement.
Lamp
Assembly
Power
connector
Lamp
Module
Module
screws
Fit a new lamp module, making sure that the plug on the top of the module
•
mates properly with the power socket on the assembly.
Tighten the four lamp module fi xing screws.
•
Reconnect the timer cable.
•
Re-fi t the lamp assembly, making sure that no cables are trapped.
•
Reconnect the control cable.
•
Re-fi t the rear door, making sure that the door tether is not trapped, and tighten
•
the four screws.
Assembly
screws
Control cable
connector
Timer cable
connector
Take care not to touch the
glass surface of the lamp
module. If you do accidentally
touch the glass, it should be
cleaned before use.
HID lamps produce high
intensity light. Do not look
directly at the light coming
from the lamp housing or the
lens.
The fi lter should be changed at
the same time as the lamp is
changed - see next page.
Opening the rear door will
switch the projector OFF.
The projector cannot be
operated until the door is fully
closed.
Page 6.2 Rev A. March 2008
Page 99

Digital Projection TITAN 1080p-600, Reference 1080p User Manual 6. Maintenance
Changing the air fi lter
Turn the power OFF and allow the lamp to cool for 5 minutes.
•
Unscrew the four captive fi nger screws securing the rear door - the door is
•
tethered, so cannot be removed completely.
Pull out both air fi lters.
•
Fit two new air fi lters, making sure that they are each the correct way around, as
•
shown below.
Foam
side
Filter
side
Re-fi t the rear door, making sure that the door tether is not trapped, and tighten
•
the four screws.
Foam
side
Notes
Always allow the lamp to cool
for 5 minutes before:
- disconnecting the power
- moving the projector
- changing the lamp
The air fi lter should be changed
regularly:
- In a clean environment such
as an offi ce, change after 2000
hours, at the same time as the
lamp is changed.
- In a dusty or smoky
environment such as a theatre
or public area, more frequent
changes may be necessary.
Opening the rear door will
switch the projector OFF.
The projector cannot be
operated until the door is fully
closed.
Rev A. March 2008 Page 6.3
Page 100

6. Maintenance Digital Projection TITAN 1080p-600, Reference 1080p User Manual
Cleaning
Turn the projector off before cleaning.
Projector
Clean the cabinet periodically with a damp cloth. If heavily soiled, use a mild
detergent.
Lens
Use a blower or lens paper to clean the lens, taking care not to scratch the glass.
Lamp module
Use a blower or lens paper to clean ONLY the glass window, taking care not to
scratch the glass.
Notes
Never use strong detergents
or solvents such as alcohol
or thinners to clean the
projector and lens.
NEVER touch the lamp or
refl ector.
Page 6.4 Rev A. March 2008
 Loading...