

Page 1

M-Vision Cine 3D series
High Brightness Digital Video Projector
16:9 widescreen display
OPERATING GUIDE
Rev A August 2011
112-022A
Page 2

Digital Projection M-Vision Cine 3D series CONTENTS Operating Guide
CONTENTS
About this Guide ........................................................................................... 1
Symbols used in this guide ..........................................................................1
Warnings .................................................................................................... 1
Notes .......................................................................................................... 1
Product revision ............................................................................................ 1
Using the Menus ........................................................................................... 2
Navigating the menus ................................................................................... 2
Submenus ...................................................................................................... 3
Selecting parameters .................................................................................... 4
Sliders ............................................................................................................ 5
Commands ..................................................................................................... 5
A Tour of the Menus ................................................................................... 6
Main Menu ...................................................................................................... 6
Aspect Ratio ............................................................................................... 6
Presets ....................................................................................................... 7
Brightness, Contrast, Saturation, Hue, Sharpness and Noise Reduction .. 8
Overscan .................................................................................................... 8
Input Select ................................................................................................ 8
Resync ....................................................................................................... 8
3D Settings ................................................................................................. 8
Advanced Menu ............................................................................................. 9
Color Space ............................................................................................... 9
Gamma, Color Temperature and Color Gamut .......................................... 9
Brilliant Color® and Adaptive Contrast ....................................................... 9
Fine Sync ................................................................................................... 9
RGB Adjust .................................................................................................9
System Menu ............................................................................................... 10
Language ................................................................................................. 10
Menu Position .......................................................................................... 10
Blank Screen ............................................................................................ 10
Auto Power Off ......................................................................................... 10
Auto Power On ......................................................................................... 10
Rear Projection ........................................................................................ 11
Ceiling Mode ............................................................................................ 11
Lamp Power ............................................................................................. 11
Control Menu ............................................................................................... 12
Keys 1 to 5 ............................................................................................... 12
Trigger 1 and 2 ......................................................................................... 12
Auto-Source ............................................................................................. 12
Service Menu ............................................................................................... 13
Information ............................................................................................... 13
Factory Reset ........................................................................................... 13
Blue Only .................................................................................................. 14
Test Patterns ............................................................................................ 14
Altitude ..................................................................................................... 14
Menu Map ........................................................................................................ 15
MAIN ............................................................................................................. 15
ADVANCED .................................................................................................. 15
SYSTEM........................................................................................................ 16
CONTROL ..................................................................................................... 16
SERVICE ....................................................................................................... 16
Rev A August 2011
Page 3
Digital Projection M-Vision Cine 3D series ABOUT THIS GUIDE Operating Guide
About this Guide
Please read this guide carefully before using the projector, and keep it handy for future reference.
A serial number is located on the side of the projector. Record it here:
Symbols used in this guide
Warnings
ELECTRICAL WARNING: this symbol indicates that there is a danger of electrical shock unless the instructions are closely
followed.
WARNING: this symbol indicates that there is a danger of physical injury to yourself and/or damage to the equipment unless
the instructions are closely followed.
Notes
NOTE: this symbol indicates that there is some important information that you should read.
Product revision
Because we at Digital Projection continually strive to improve our products, we may change specifications and designs, and add new features
without prior notice. Projectors built prior to this revision of the Operating Guide may therefore not include all the features described.
Page 1Rev A August 2011
Page 4
Digital Projection M-Vision Cine 3D series 1. USING THE MENUS Operating Guide
Using the Menus
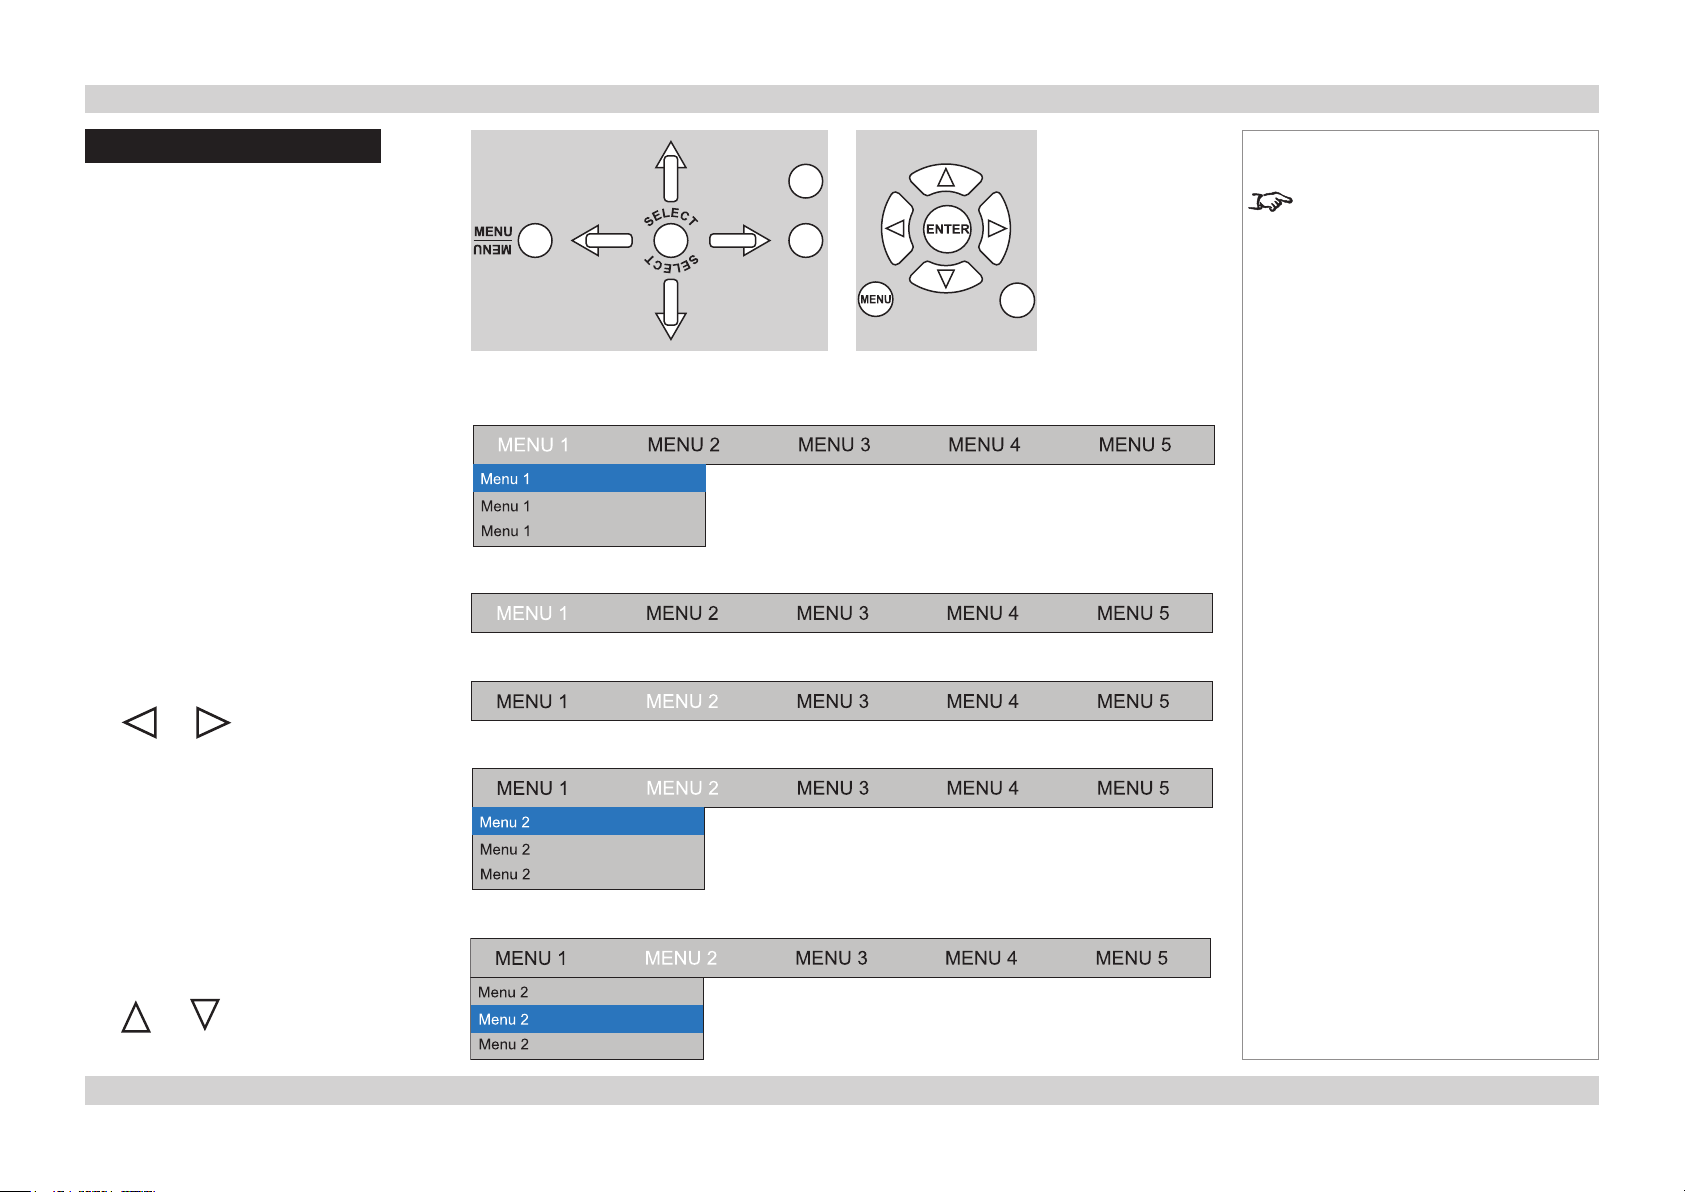
Use the buttons on the projector control
panel or on the remote control, to access the
menu system.
To open or close the on-screen display
•
(OSD), press MENU.
The first item in the menu is highlighted.
(When closing the OSD, you may need
to press MENU more than once if any
sub-menus are open.)
Navigating the menus
To open another menu, first close the
•
current menu by pressing MENU,
Select another menu using
•
and ,
Projector control panel
Notes
Some menu options and controls
may not be available due to settings
in other menus. These will be
shaded green on the actual menu.
Remote control
then press ENTER/SELECT.
•
The first item in the new menu is
highlighted.
Select an item in the menu using
•
and .
Page 2Rev A August 2011
Page 5
Digital Projection M-Vision Cine 3D series 1. USING THE MENUS Operating Guide
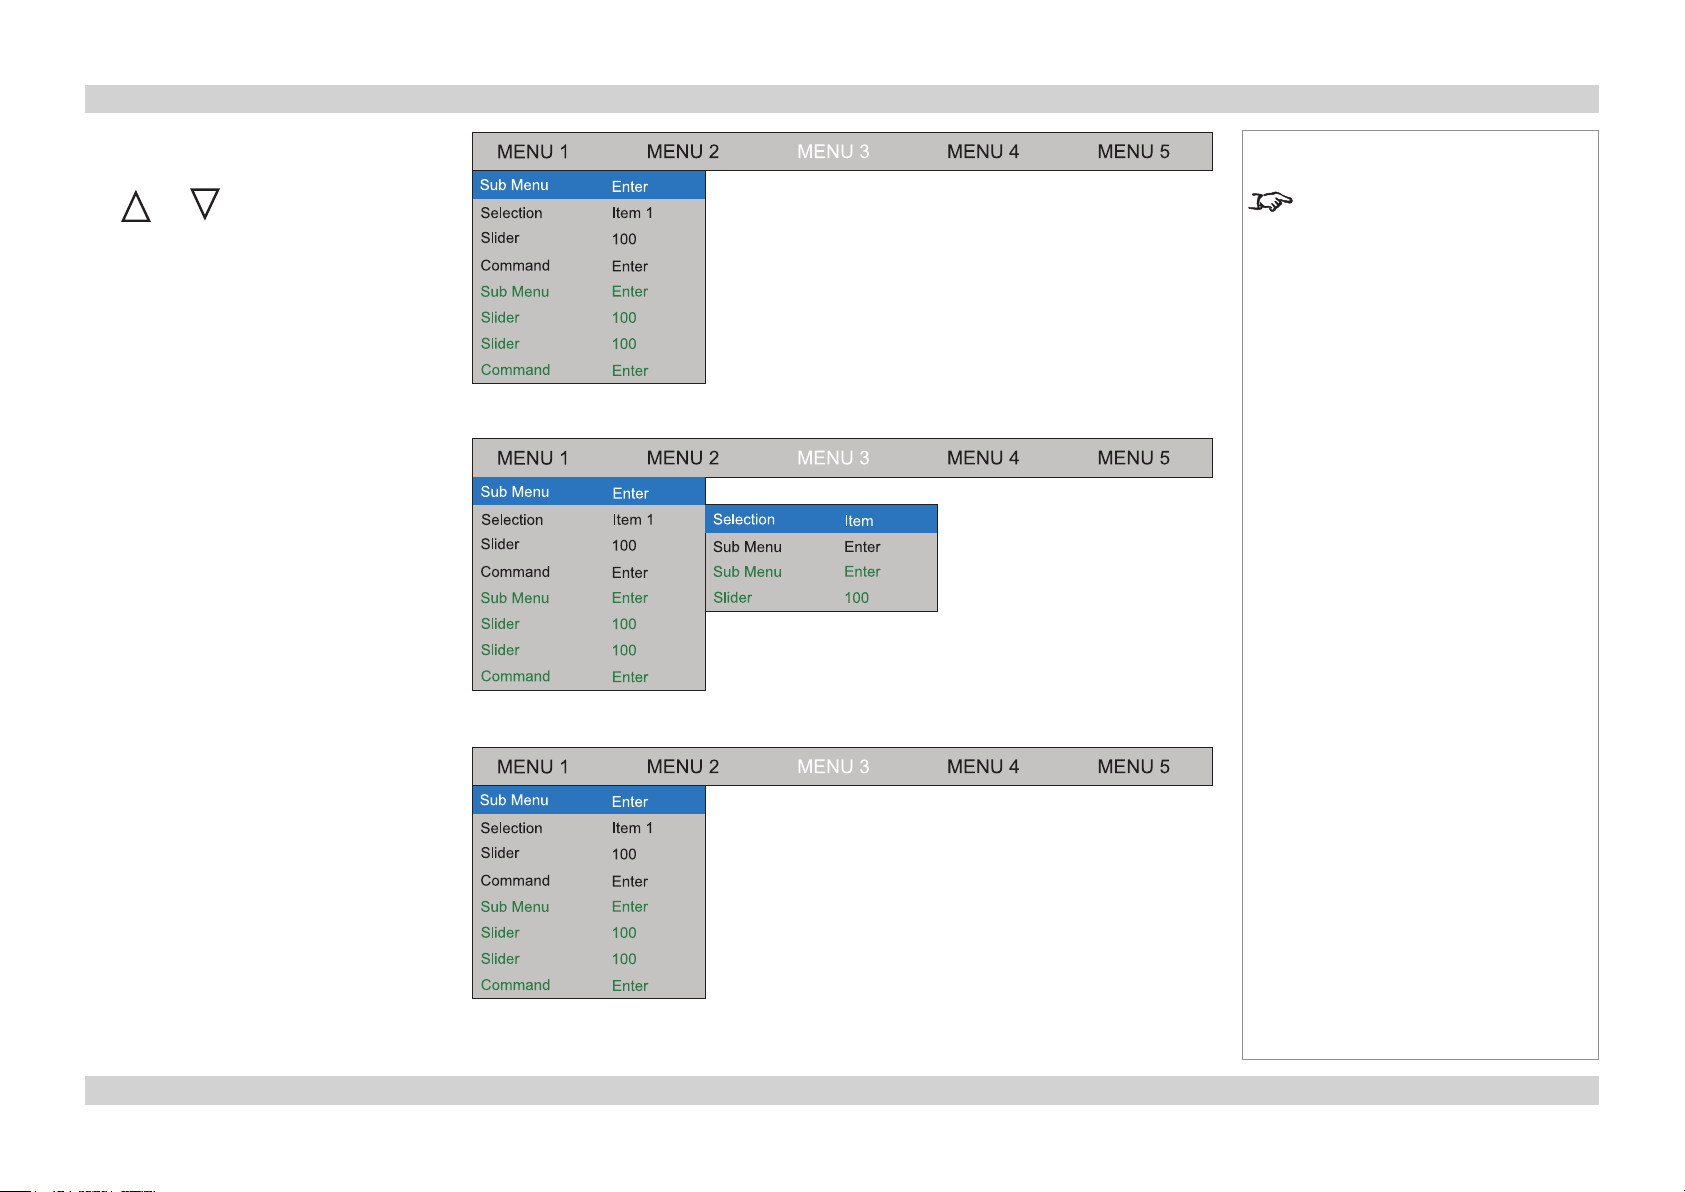
Submenus
Select a submenu using
•
and .
then press ENTER/SELECT.
•
The submenu opens, with the first item
•
highlighted.
Notes
Some menu options and controls
may not be available due to settings
in other menus. These will be
shaded green on the actual menu.
To close the submenu, press MENU.•
Page 3Rev A August 2011
Page 6
Digital Projection M-Vision Cine 3D series 1. USING THE MENUS Operating Guide
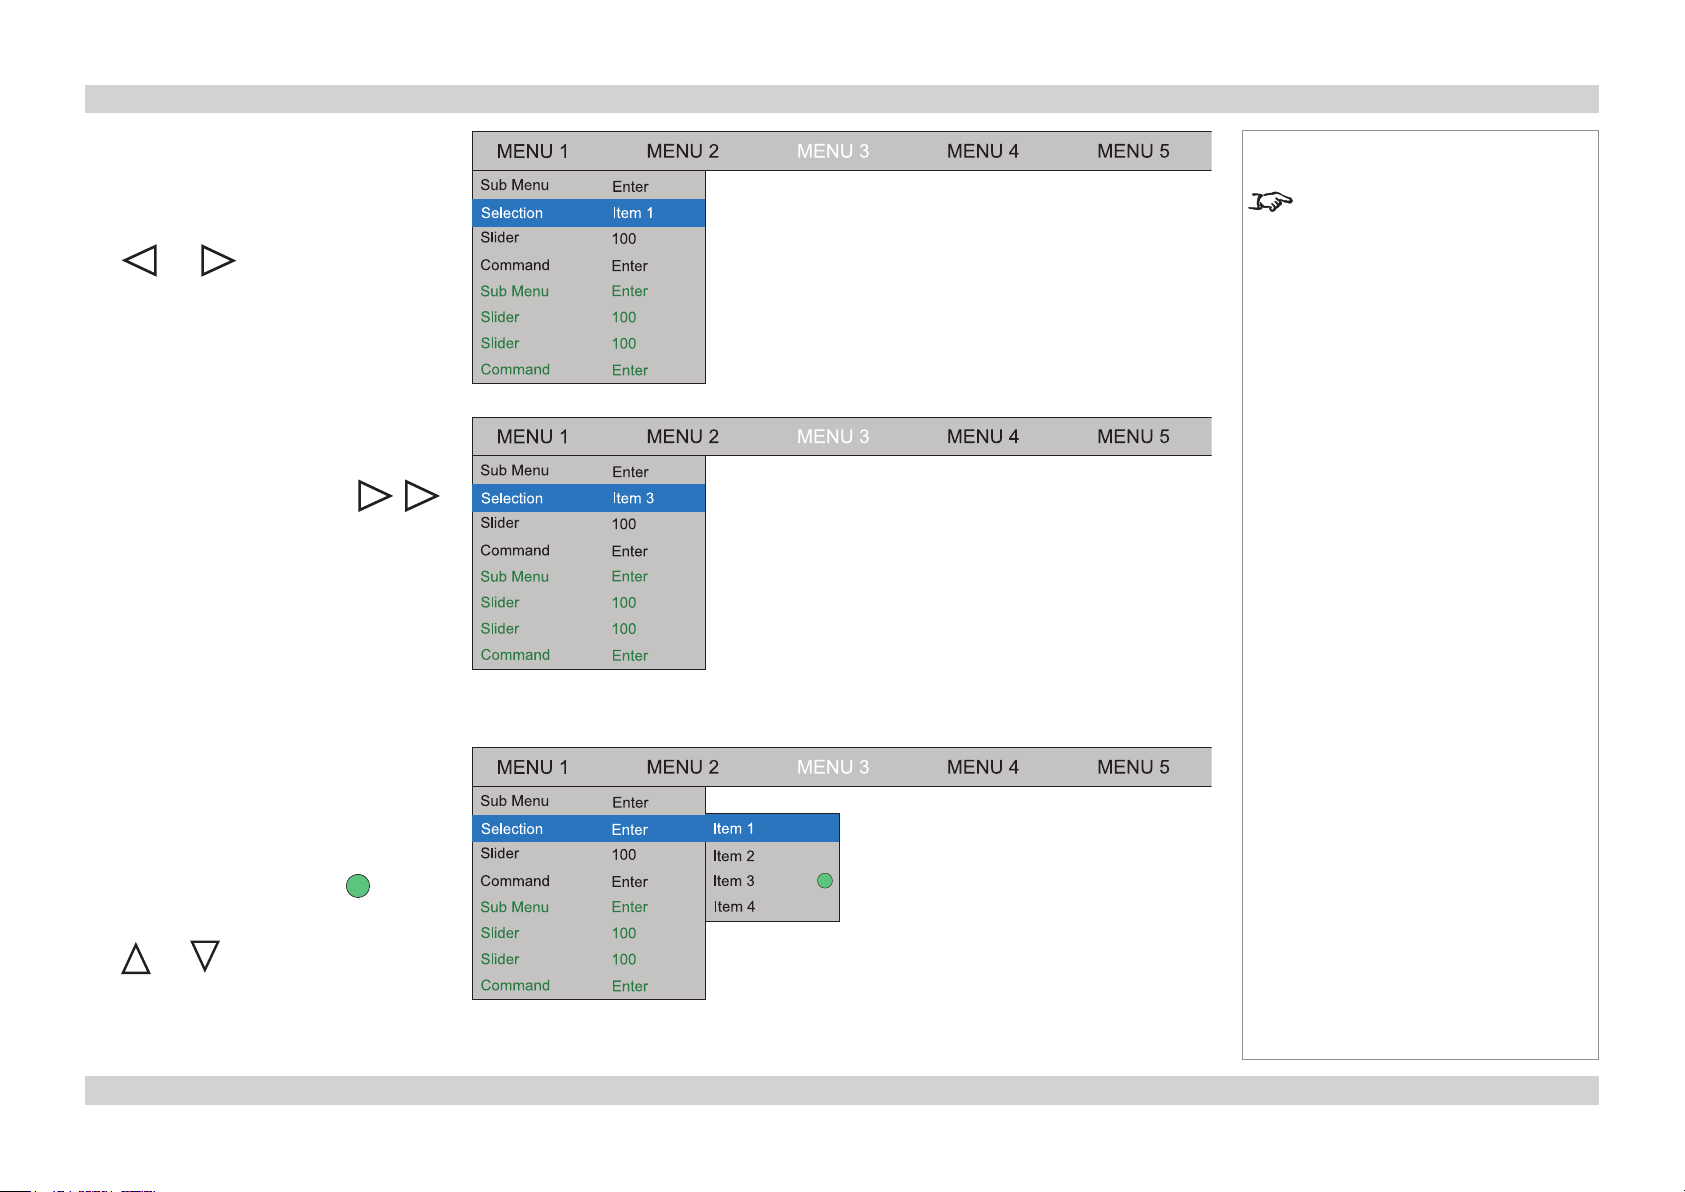
Selecting parameters
Most parameters are changed by selecting
from a list:
Select from the list using
•
and .
The change will be made immediately.
•
Notes
Some menu options and controls
may not be available due to settings
in other menus. These will be
shaded green on the actual menu.
Some parameters are changed by selecting
from a submenu.
Press ENTER/SELECT to open the
•
submenu.
The item that is currently selected is
•
highlighted with a green dot .
Select from the list using
•
and .
The change will be made when you
•
press ENTER/SELECT to confirm the
selection.
Page 4Rev A August 2011
Page 7

Digital Projection M-Vision Cine 3D series 1. USING THE MENUS Operating Guide
Sliders
Activate the slider by pressing
•
or .
Use or to adjust the value.
•
Press MENU or ENTER/SELECT to
•
accept the value.
Notes
Some menu options and controls
may not be available due to settings
in other menus. These will be
shaded green on the actual menu.
Commands
To use a command, press ENTER/
•
SELECT.
In the example below,
•
use or to select YES or NO,
then press ENTER/SELECT to confirm
your selection.
Page 5Rev A August 2011
Page 8

Digital Projection M-Vision Cine 3D series 2. A TOUR OF THE MENUS Operating Guide
A Tour of the Menus
Main Menu
Aspect Ratio
Use or to choose between 16:9, Theaterscope, 4:3, 4:3 Narrow and Native.
•
Examples
Notes
See also Using the Menus, earlier
in this guide and Menu Map, later in
this guide.
The Native image examples shown
here have far fewer pixels than
the 1920 x 1080 of the DMD. Your
image may be different.
16:9 image using Native setting 16:9 image using 16:9 setting
4:3 image using Native setting 4:3 image using 4:3 setting
When displaying a 16:9 image, DO
NOT use an anamorphic lens.
Page 6Rev A August 2011
Page 9

Digital Projection M-Vision Cine 3D series 2. A TOUR OF THE MENUS Operating Guide
Examples with anamorphic lens
2.35:1 image using 16:9 setting
without anamorphic lens
4:3 Narrow without anamorphic lens
Presets
The current image settings can be saved to one of four Presets. Any of the four Presets or the Default settings, can be recalled later.•
2.35:1 image using Theaterscope setting
without anamorphic lens
4:3 Narrow with anamorphic lens
2.35:1 image using Theaterscope setting
with anamorphic lens
Notes
See also Using the Menus, earlier
in this guide and Menu Map, later in
this guide.
An anamorphic lens is used
with the Theaterscope setting, to
ensure that for a 2.35:1 image, the
maximum area of the DMD is used,
giving maximum image brightness.
The 4:3 Narrow setting is used to
compensate for the distortion that an
anamorphic lens would cause to a
4:3 image.
When displaying a 16:9 image, DO
NOT use an anamorphic lens.
Main Menu
Presets
The following settings are saved:
•
From the Main menu:
Aspect Ratio Brightness
Contrast Saturation
Hue Sharpness
Noise Reduction Overscan
From the Advanced menu:
Color Space Gamma
Colour Temperature Color Gamut
RGB Offsets RGB Gains
Brilliant Color Adaptive Contrast
Presets A, B and C can also be
recalled using the USER MEMORY
keys on the remote control.
Note: Preset D is available only
through the Preset menu, not
through the remote control.
When Save Presets is selected,
the image settings for ONLY the
selected input are saved.
Page 7Rev A August 2011
Page 10

Digital Projection M-Vision Cine 3D series 2. A TOUR OF THE MENUS Operating Guide
Brightness, Contrast, Saturation, Hue, Sharpness and Noise Reduction
Adjust the sliders for these settings.
•
Overscan
Choose from Off, Crop or Zoom.
•
Input Select
Choose which input source to display.
•
Resync
Press ENTER/SELECT to force the projector to re-synchronise with the current input signal.
•
3D Settings
Press ENTER/SELECT to open the 3D settings sub-menu.
•
Notes
See also Using the Menus, earlier
in this guide and Menu Map, later in
this guide.
Overscan is used to compensate
for noisy or badly defined image
edges, by either:
- cropping the edges from the image
or
- increasing the size of the image, to
force the edges off-screen.
Main Menu
3D Settings
Set 3D Enable to On or Off.
•
Set 3D Type to suit the configuration of the 3D input signal.
•
Set DLP Link to On, if you are using 3D glasses that can utilise the DLP Link® signal embedded in the image.
•
If the 3D images are displayed in the wrong order, set L-R Swap to Swap.
•
3D video is not possible with all
inputs. See the Connection Guide
for more information.
3D Type can be set only when
3D Enable is Off.
DLP Link and L-R Swap can be set
only when 3D Enable is On.
Page 8Rev A August 2011
Page 11

Digital Projection M-Vision Cine 3D series 2. A TOUR OF THE MENUS Operating Guide
Advanced Menu
Color Space
Set this to Auto, except when the projector has problems selecting between YPbPr, YCbCr and RGB.
•
Gamma, Color Temperature and Color Gamut
Set this to suit the specification of the input source, or to improve the appearance of the projected image.
•
Brilliant Color® and Adaptive Contrast
Set these to suit your brightness and contrast requirements.
•
Fine Sync
Adjust these settings to suit the configuration of the input signal.
•
Notes
See also Using the Menus, earlier
in this guide and Menu Map, later in
this guide.
Brilliant Color® allows for
increased projector brightness
and improved color saturation by
enabling the yellow segments on the
colour wheel.
Adaptive Contrast expands
the light and dark portions of
the contrast curve of the image,
depending on the mean luminance
of the image.
Setting either of these two
parameters to On will affect any
image quality settings made in other
menus.
RGB Adjust
Adjust the RGB offset and gain settings to improve the colour balance of the projected image.
•
Advanced Menu
Fine Sync
Fine Sync and RGB Adjust affect
only RGB input sources.
Page 9Rev A August 2011
Page 12

Digital Projection M-Vision Cine 3D series 2. A TOUR OF THE MENUS Operating Guide
System Menu
Language
This product is available only in English at present.
•
Menu Position
Set this to determine the position of the menus on the screen.
•
Blank Screen
Set this to determine what appears on screen when the projector is searching for a valid input source.
•
Notes
See also Using the Menus, earlier
in this guide and Menu Map, later in
this guide.
Auto Power Off
Set this to On, if you want the projector to go into Standby mode when no input source is detected for 20 minutes.
•
Auto Power On
Set this to On, if you want the projector to start up imediately when the mains is connected.
•
Set this to Off, if you want the projector to go into Standby mode when the mains is connected. In this case, the projector will not start up
•
until the POWER button is pressed on the control panel or the remote control.
Page 10Rev A August 2011
Page 13

Digital Projection M-Vision Cine 3D series 2. A TOUR OF THE MENUS Operating Guide
Rear Projection
Set this to On to reverse the image from left to right, for use in Rear Projection Mode.
•
Ceiling Mode
Set this to On to reverse the image from top to bottom, for use in Ceiling Mode.
•
Lamp Power
Set this to Economy to run the lamp at reduced power.
•
Notes
See also Using the Menus, earlier
in this guide and Menu Map, later in
this guide.
System Menu
continued
Page 11Rev A August 2011
Page 14

Digital Projection M-Vision Cine 3D series 2. A TOUR OF THE MENUS Operating Guide
Control Menu
Keys 1 to 5
The to keys on the remote control can each be programmed to switch to one of the input sources.
•
Trigger 1 and 2
Choose from Screen, Aspect Ratio or RS232, to determine what will cause each Trigger output to activate.
•
Auto-Source
When this is set to On, the projector will search for an alternative input source when the current input source is disconnected
•
When this is set to Off, the projector will show a ‘blank’ screen when the current input source is disconnected.
•
Notes
See also Using the Menus, earlier
in this guide and Menu Map, later in
this guide.
The Trigger outputs can be
used to automatically control the
screen or screen shuttering. See
the Connection Guide for more
information.
To set what a ‘blank’ screen looks
like, use the Blank Screen setting
in the System menu.
Page 12Rev A August 2011
Page 15

Digital Projection M-Vision Cine 3D series 2. A TOUR OF THE MENUS Operating Guide
Service Menu
Information
Press ENTER/SELECT to view information about the projector, eg:
•
Factory Reset
Notes
See also Using the Menus, earlier
in this guide and Menu Map, later in
this guide.
Service Menu
Information
Service Menu
Factory Reset
Press ENTER/SELECT to restore all settings to their factory defaults.
•
When the warning message appears, use or to select YES or NO, then press ENTER/SELECT to confirm your selection.
•
Do NOT do this unless you are
sure that you want to restore ALL
the current settings to their factory
defaults.
Page 13Rev A August 2011
Page 16

Digital Projection M-Vision Cine 3D series 2. A TOUR OF THE MENUS Operating Guide
Blue Only
Set this to On to display only the blue component of the input signal, for calibration or test purposes.
•
Test Patterns
Use or to select from a range of test patterns.
•
Press MENU to return to the menu, or ENTER/SELECT to return to the currently selected input signal.
•
Altitude
When this is set to Auto, the internal fan will operate at Low speed, and rise to High speed automatically if the internal temperature rises.
•
When this is set to High, the fan will operate at High speed continuously, for use at high altitude locations.
•
Notes
See also Using the Menus, earlier
in this guide and Menu Map, later in
this guide.
Service Menu
continued
Page 14Rev A August 2011
Page 17

Digital Projection M-Vision Cine 3D series 3. MENU MAP Operating Guide
Menu Map
Menu Sub Menus and Controls
MAIN
Aspect Ratio 16:9, Theaterscope, 4:3, 4:3 Narrow, Native
Presets
Recall A, B, C, D, Default
Save A, B, C, D
Brightness
Contrast
Saturation
Hue
Sharpness
Noise Reduction
Overscan Off, Crop, Zoom
Input Select all available inputs
Resync Projector will re-synchronise with the current input signal
3D Settings
3D Enable Off, On
3D Type SBS Dual, L-R Dual
DLP Link Off, On
L-R Swap Normal, Swap
Notes
Some of the information in this menu
map is summarised. See the actual
menu on the projector for full detail.
Some menu options and controls
may not be available due to settings
in other menus. These will be
shaded green on the actual menu.
Where it would be helpful, some
menu options are described in more
detail earlier in this operating guide.
ADVANCED
Color Space Auto, YPbPr, YCbCr, RGB PC, RGB Video
Gamma Film, Video, Punch, Graphics, CRT
Color Temperature 5500K, 6500K, 7500K, 9300K, Native
Color Gamut Auto, REC709, SMPTE-C, EBU, Native
BrilliantColor On, Off
Adaptive Contrast On, Off
Fine Sync V Position, H Position, Phase, Tracking, Sync Level
RGB Adjust RGB Offset and Gain
Page 15Rev A August 2011
Page 18

Digital Projection M-Vision Cine 3D series 3. MENU MAP Operating Guide
Menu Sub Menus and Controls
SYSTEM
Language English only
Menu Position Top Left, Top Right, Bottom Left, Bottom Right, Centre
Blank Screen Logo, Black, Blue, White
Auto Power Off On, Off
Auto Power On On, Off
Rear Projection Off, On
Ceiling Mode Off, On
Lamp Power Standard, Economy
CONTROL
1 Key all available inputs
2 Key all available inputs
3 Key all available inputs
4 Key all available inputs
5 Key all available inputs
Trigger 1 Screen, 16:9, Theaterscope, 4:3, 4:3 Narrow, RS232
Trigger 2 Screen, 16:9, Theaterscope, 4:3, 4:3 Narrow, RS232
Auto Source On, Off
Notes
Some of the information in this menu
map is summarised. See the actual
menu on the projector for full detail.
Some menu options and controls
may not be available due to settings
in other menus. These will be
shaded green on the actual menu.
Where it would be helpful, some
menu options are described in more
detail earlier in this operating guide.
SERVICE
Information Model Name, Serial Number, Software Version, Active Source, Signal Format, Pixel Clock,
H⁄VRefreshRate,LampHours
Factory Reset Projector will ask for confirmation before restoring all settings to factory defaults
Blue Only Off, On
Test Patterns Off, White, Black, Red, Green, Blue, Cyan, Magenta, Yellow, Chequer Grid
Altitude Auto, High
Page 16Rev A August 2011
 Loading...