

Page 1
HIGHlite 660 series
High Brightness Digital Video Projector
16:9 widescreen display
OPERATING GUIDE
Rev A June 2011
111-9714A
Page 2

Digital Projection HIGHlite 660 series CONTENTS Operating Guide
CONTENTS
About this Guide ........................................................................................... 1
Symbols used in this guide ..........................................................................1
Warnings ............................................................................................... 1
Notes ..................................................................................................... 1
Product revision ............................................................................................ 1
Using the Menus ........................................................................................... 2
Menus and sub menus.................................................................................. 2
Drop-down lists ............................................................................................. 2
Sliders ............................................................................................................ 3
Commands ..................................................................................................... 3
Editing fields .................................................................................................. 4
A Tour of the Menus ................................................................................... 5
Main Menu ...................................................................................................... 5
Input Selection ......................................................................................5
Test Pattern ........................................................................................... 5
Global Settings ......................................................................................5
Input Settings ........................................................................................ 5
Information ............................................................................................ 5
Global Settings Menu .................................................................................... 6
Projector ................................................................................................ 6
Picture ................................................................................................... 7
Edge Blend............................................................................................ 8
PIP ........................................................................................................ 9
Advanced Geometry ...........................................................................10
Input Configuration .............................................................................. 11
Lamp ................................................................................................... 12
On Screen Display .............................................................................. 12
Network ............................................................................................... 13
Factory Defaults .................................................................................. 13
Input Settings Menu .................................................................................... 14
Picture ................................................................................................. 14
Colour.................................................................................................. 15
Geometry ............................................................................................16
Information Menu ........................................................................................ 17
Projector .............................................................................................. 17
Source ................................................................................................. 17
Digital Projection ................................................................................. 17
Menu Map ........................................................................................................ 18
Input Selection ............................................................................................. 18
Test Pattern .................................................................................................. 18
Global Settings ............................................................................................ 18
Input Settings .............................................................................................. 20
Information ................................................................................................... 20
Rev A June 2011
Page 3
Digital Projection HIGHlite 660 series ABOUT THIS GUIDE Operating Guide
About this Guide
Please read this guide carefully before using the projector, and keep it handy for future reference.
A serial number is located on the side of the projector. Record it here:
Symbols used in this guide
Warnings
ELECTRICAL WARNING: this symbol indicates that there is a danger of electrical shock unless the instructions are closely
followed.
WARNING: this symbol indicates that there is a danger of physical injury to yourself and/or damage to the equipment unless
the instructions are closely followed.
Notes
NOTE: this symbol indicates that there is some important information that you should read.
Product revision
Because we at Digital Projection continually strive to improve our products, we may change specifications and designs, and add new features
without prior notice. Projectors built prior to this revision of the Operating Guide may therefore not include all the features described.
Page 1Rev A June 2011
Page 4
Digital Projection HIGHlite 660 series 1. USING THE MENUS Operating Guide
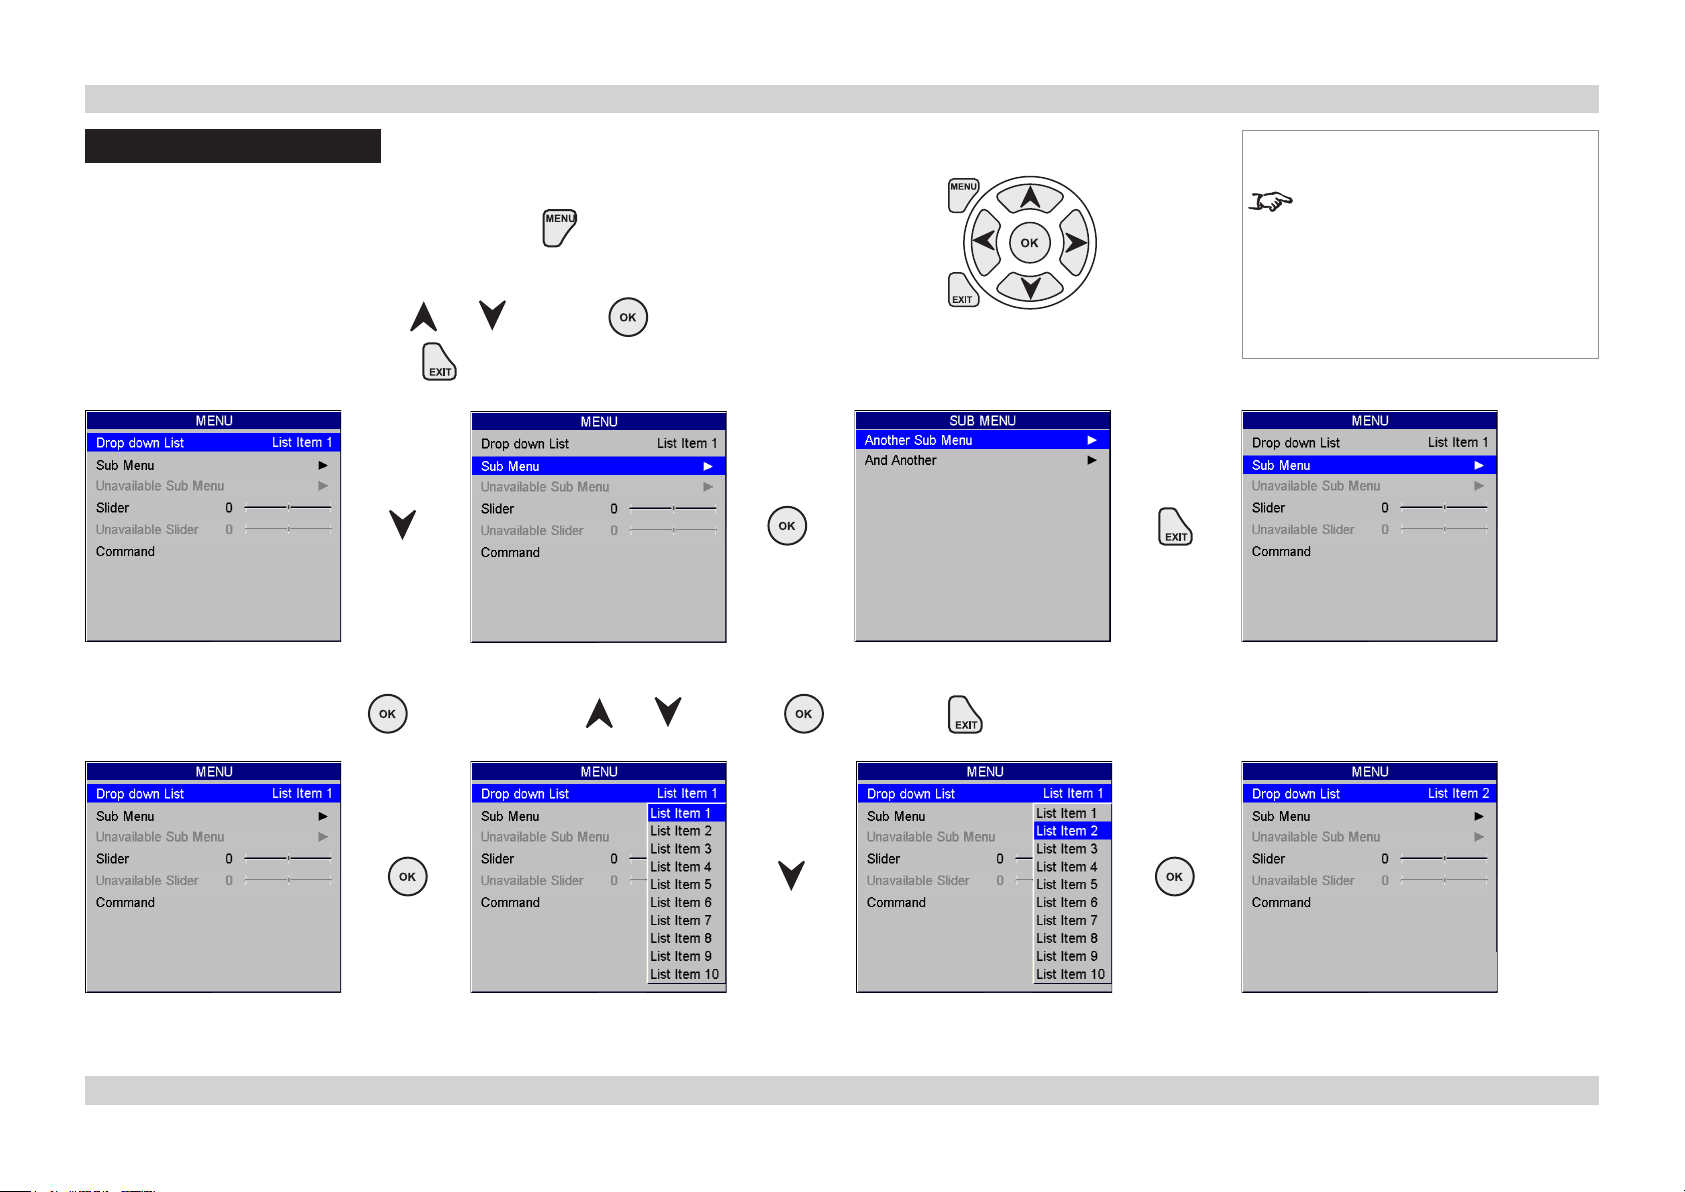
Using the Menus
Use the buttons on the projector control panel or on the remote control, to access the menu system.
To open or close the on-screen display (OSD), press .
•
Menus and sub menus
To open a sub menu, select it using and , then press .
•
To return to the previous menu, press .
•
Drop-down lists
To use a drop-down list, press , select an item using and , then press again or press to exit without
•
changing.
Notes
Some menu options and controls
may not be available due to settings
in other menus. These will be
greyed-out on the actual menu.
Page 2Rev A June 2011
Page 5
Digital Projection HIGHlite 660 series 1. USING THE MENUS Operating Guide
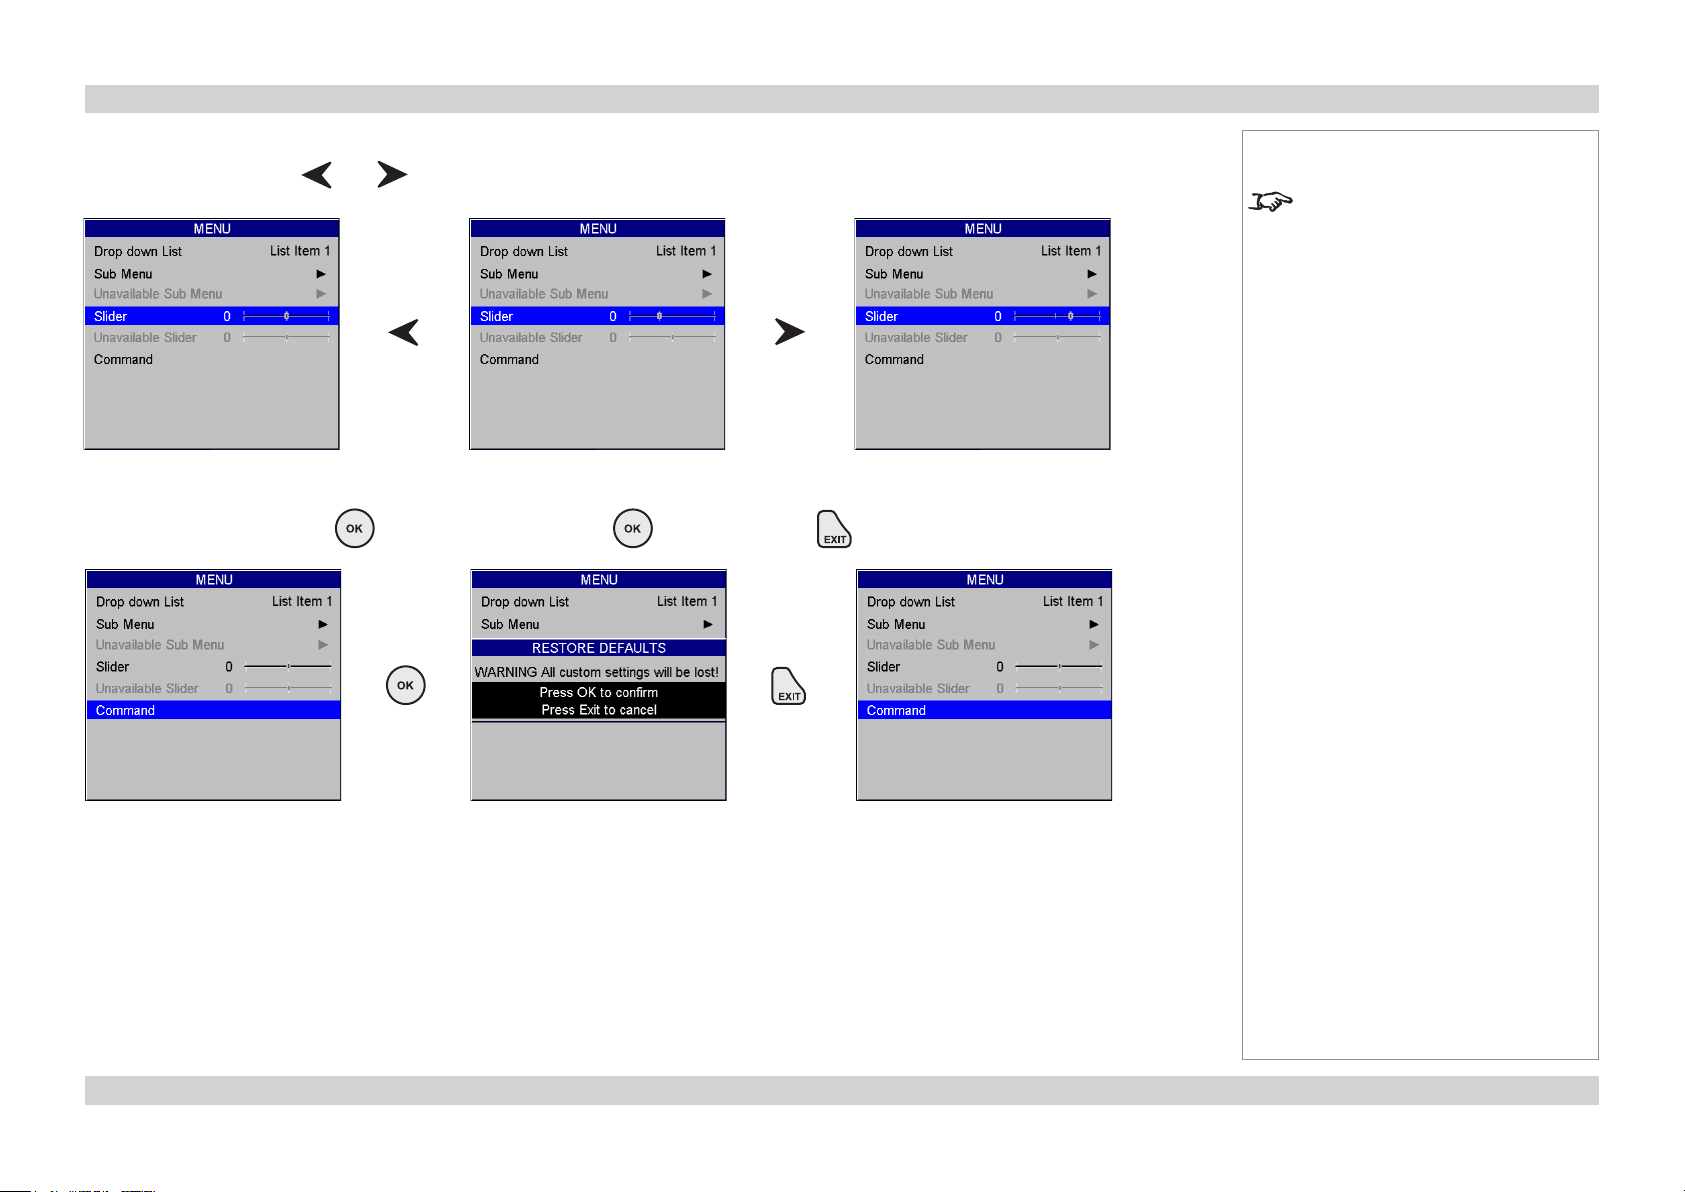
Sliders
To use a slider, press and to adjust it.
•
Commands
To use a command, press . In the example below, press to confirm, or press to cancel.
•
Notes
Some menu options and controls
may not be available due to settings
in other menus. These will be
greyed-out on the actual menu.
Page 3Rev A June 2011
Page 6
Digital Projection HIGHlite 660 series 1. USING THE MENUS Operating Guide
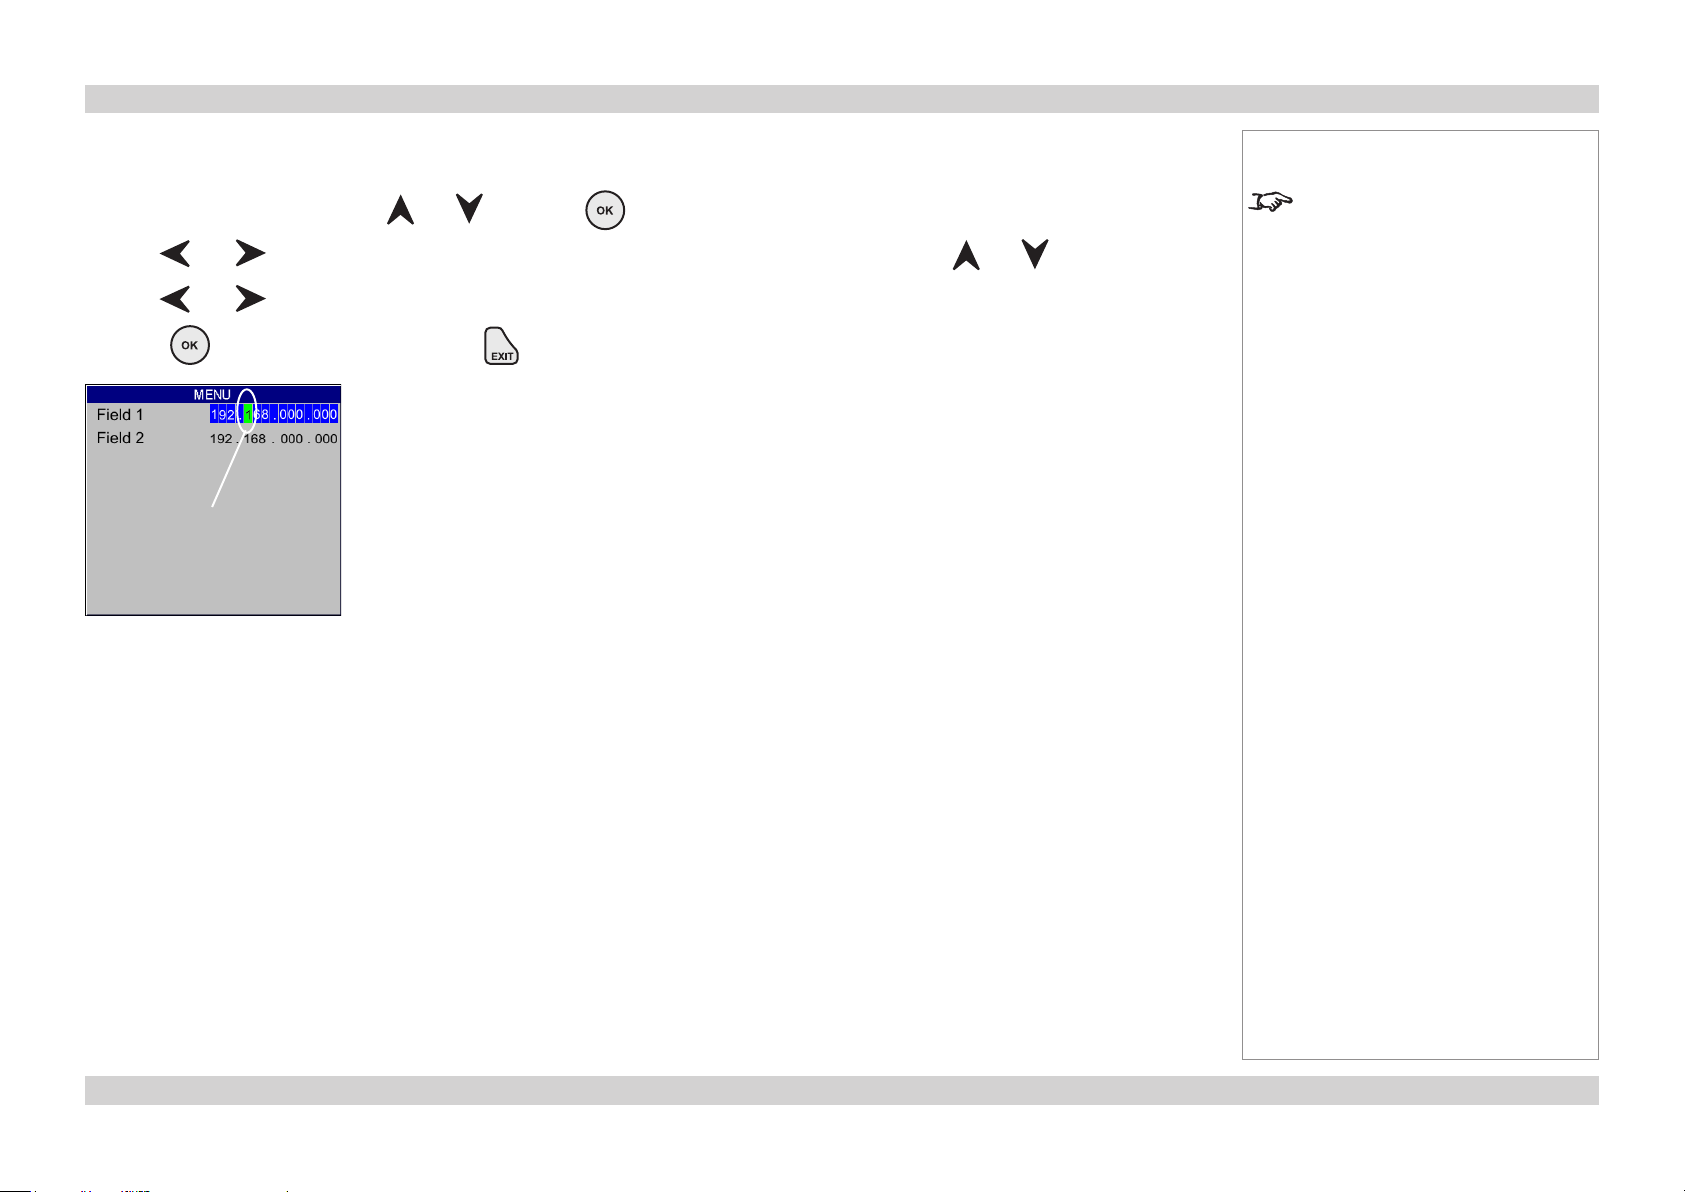
Editing elds
Some features require a text or numeric field to be edited.
To edit a field, first select it using and , then press .
•
Use and to move the green highlight to the digit or character which is to be changed, then use and , to adjust it.
•
Use and to select the next digit or character... etc.
•
Press to accept the new value, or press to exit without changing.
•
Editing
this digit
Notes
Some menu options and controls
may not be available due to settings
in other menus. These will be
greyed-out on the actual menu.
Page 4Rev A June 2011
Page 7
Digital Projection HIGHlite 660 series 2. A TOUR OF THE MENUS Operating Guide
A Tour of the Menus
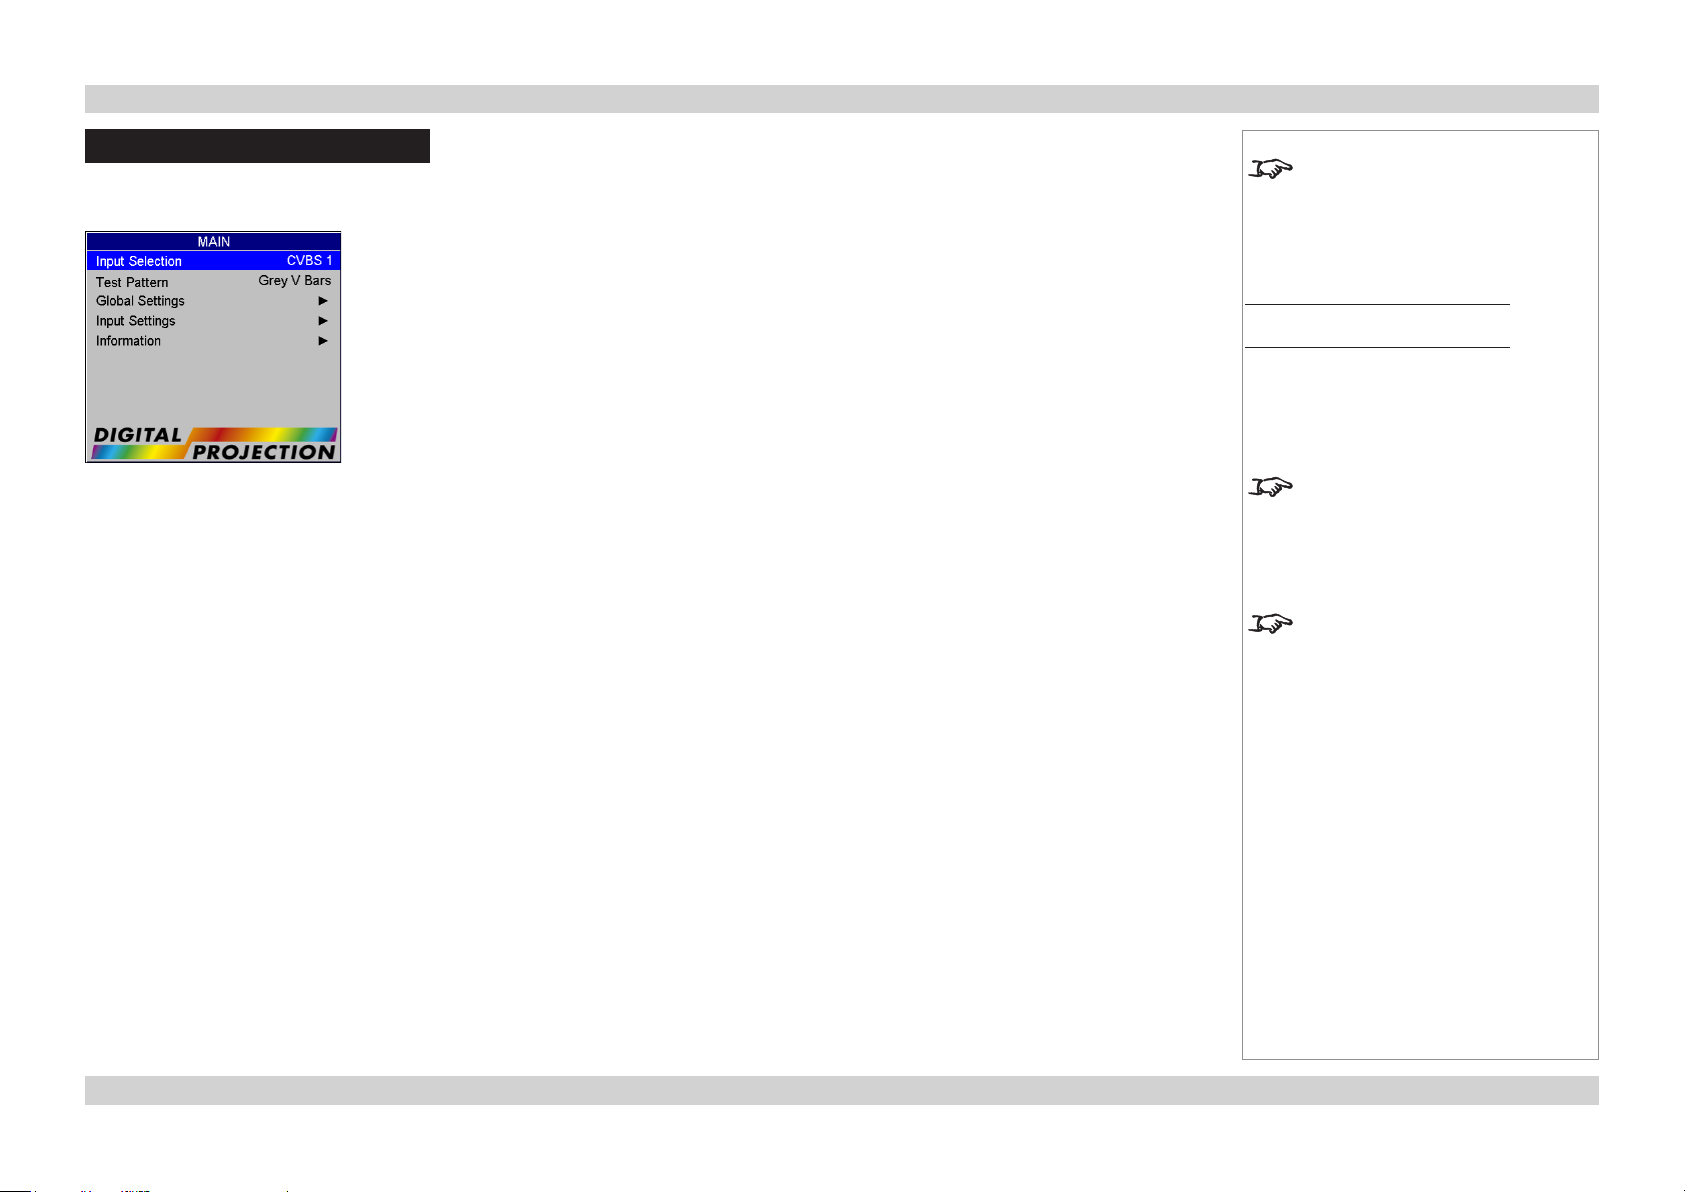
Main Menu
Input Selection
Select an input source from the drop-down list.
•
Test Pattern
Select a test pattern from the drop-down list.
•
Global Settings
Global Settings are those that affect the whole projector, regardless of which input is being used or what kind of image is being displayed.
More information about this menu can be found later in this section.
Notes
See also Using the Menus, earlier
in this guide and Menu Map, later in
this guide.
Main Menu
The Test Pattern will be not be
displayed until Test Pattern is
selected from the Input Selection
drop-down list.
Test Patterns are subject to image
controls, so brightness, contrast
etc. will affect their appearance on
screen.
Input Settings
The Input Settings are those that affect ONLY the input being displayed. When a new input mode (video or graphics standard) is detected, eg
NTSC, HDTV 1080p or SVGA, these settings are saved so that they can be recalled next time that input mode is displayed. In some cases
the mode may change for the same input. For example, a DVD player connected to the HDMI input could switch between 1080p24 and
1080i60. The projector is able to save and automatically recall different input settings for these different input modes.
More information about this menu can be found later in this section.
Information
Information about the projector, the current input source, and about Digital Projection.
More information about this menu can be found later in this section.
Page 5Rev A June 2011
Page 8

Digital Projection HIGHlite 660 series 2. A TOUR OF THE MENUS Operating Guide
Global Settings Menu
Global Settings are those that affect the whole projector, regardless of which input is being used or what signal type is being displayed.
Projector
Orientation
Depending on how the projector is mounted, select the appropriate setting from the drop-down list
•
Notes
See also Using the Menus, earlier
in this guide and Menu Map, later in
this guide.
Main Menu
Global Settings
Main Menu
Global Settings
Projector
Optimisation
Affects interlaced sources only. For fastest response, the Low Latency setting gives minimum frame delay. For improved performance with
films involving motion sequences, the Motion setting uses adaptive de-interlacing and interpolation, but takes longer to process.
Select the appropriate setting from the drop-down list.
•
Conguration
Select PIP, if the projector is to display two images at the same time, using PIP, PAP or POP mode. More information about this feature
•
can be found later in this section.
Select PIP, if this is a lone projector displaying a single image, but make sure that PIP Option is turned off.
•
Select Edge Blend if this projector is part of an array of projectors, each one showing a part of one large image. More information about
•
the Edge Blend feature can be found later in this section.
Switching from PIP to Edge Blend
will cause a short delay whilst the
projector reconfigures. No control
will be possible during this period.
PIP and Edge Blend are mutually
exclusive modes of operation. When
in PIP mode, Edge Blend is not
available, and vice versa.
Page 6Rev A June 2011
Page 9

Digital Projection HIGHlite 660 series 2. A TOUR OF THE MENUS Operating Guide
Picture
These settings in the Global Picture Menu affect all images, regardless of which input is being used or what signal type is being displayed.
Colour Mode
Select one of the preset Colour Modes from the drop-down list.
•
Gamma
Select a Gamma setting from the drop-down list.
•
Notes
See also Using the Menus, earlier
in this guide and Menu Map, later in
this guide.
Main Menu
Global Settings
Picture
There are two Picture menus – one
in the Global Menu, and one in the
Input Settings Menu.
Page 7Rev A June 2011
Page 10

Digital Projection HIGHlite 660 series 2. A TOUR OF THE MENUS Operating Guide
Edge Blend
When several projectors are used to create a large tiled image, the edges need to be blended to avoid the overlaps appearing brighter than
the rest of the image. The Edge Blend menu is available only when Conguration in the Projector menu is set to Edge Blend.
Array Width and Height
Set this to the total number of projectors in the array. None of the other options are available until one of these two settings is greater than
•
1. The maximum number of projectors is 4 x 4.
Array H Position and V Position
These two parameters need to be set correctly for each projector in the array, so that it can determine which edges are to be blended.
•
Sometimes only one edge overlaps, sometimes two, three or four.
Blending
Set this to Off for a lone projector, On to enable Edge Blending, or Align Pattern to help adjust the physical position of the projectors.
•
Segmentation
Set this to On, if you want the projector to divide up the image into tiles, or Off if you have external equipment to do this.
•
Notes
See also Using the Menus, earlier
in this guide and Menu Map, later in
this guide.
Main Menu
Global Settings
Edge Blend
This menu is available only when
Conguration in the Projector
menu is set to Edge Blend.
None of the other blend options are
available until either the Width or
Height setting is greater than 1.
Note that the position numbering
starts from zero:
So the top left projector is at position
H 0, V 0.
Blend Width
Use this to set the width of the blended
•
regions.
Black Level Uplift
Use this to correct for non-zero black
•
levels in the blended regions.
Reduce Black Level Uplift Width
Use this to correct for stray light from
•
the DMD’s non-addressable border.
Which settings are available in these
menus depends on:
- how many projectors there are in
the array
- the position of the projector in the
array
Page 8Rev A June 2011
Page 11

Digital Projection HIGHlite 660 series 2. A TOUR OF THE MENUS Operating Guide
PIP
Two images can be combined, in three different ways using this feature. The PIP menu is
available only when Conguration in the Projector menu is set to PIP.
Option
Select PIP, PAP, or POP mode from the drop-down list.
•
Input
Select an Input from the drop-down list. The inputs are divided into two groups – the
•
main image must be from one group, and the sub-image must be from the other group.
Group A: CVBS 1, CVBS 2, S-VIDEO and 3G-SDI
•
Group B: COMPONENT, VGA, DVI, HDMI and DVI-A
•
Size
Select a size for the sub-image from the drop-down list.
•
PIP: Picture In Picture
PAP: Picture And Picture
Notes
See also Using the Menus, earlier
in this guide and Menu Map, later in
this guide.
Main Menu
Global Settings
PIP
This menu is available only when
Conguration in the Projector
menu is set to PIP.
PIP, PAP and POP are NOT
possible when Input is set to Test
Pattern.
In these examples, the flower is the
main image, and the window is the
sub-image, shown at the Medium
size setting.
Position
Select one of the preset positions for the sub-image from the drop-down list.
•
Custom Position
If you have chosen Custom from the Position drop-down list, then you can use the
•
sliders to position the image manually.
The two images MUST be from
different Input groups.
The Position settings apply ONLY
to PIP mode. PAP and POP are
always as shown in these examples.
POP: Picture Opposite Picture
Page 9Rev A June 2011
Page 12

Digital Projection HIGHlite 660 series 2. A TOUR OF THE MENUS Operating Guide
Advanced Geometry
These settings in the Global Menu affect all images, regardless of which input is being used or what signal type is being displayed.
Mode
Select Keystone, Cornerstone, Rotation, Warp Map or Off from the Mode drop-down list.
•
Warp
Using an external Digital Projection computer application, up to eight customised warp maps can be created and uploaded to the
•
projector. If Warp Mode is selected, and any warp maps have been uploaded, you can select from the drop-down list.
Horizontal and Vertical Keystone
If Keystone Mode is selected, you can set these two sliders to correct for any distortion caused by the projector being in a different
•
horizontal or vertical plane to the screen.
Pincushion/Barrel
You can set this slider to correct for any distortion caused by the screen being concave or convex.
•
Notes
See also Using the Menus, earlier
in this guide and Menu Map, later in
this guide.
Main Menu
Global Settings
Advanced Geometry
See also Geometry in the Input
Settings menu, later in this guide.
Which settings are available in these
menus depends on:
- which Mode is selected in the first
drop-down list
- and the Pincushion/Barrel slider
can be used on its own, or in
conjunction with Keystone or
Rotation, but not with Cornerstone
or Warp.
Rotation
If Rotation Mode is selected, you can set this slider to rotate the image on the screen.
•
Cornerstone
If Cornerstone Mode is selected, you can use the sliders
•
to stretch the image from each of the four corners.
All of these modes may result in
some reduction in resolution. If it
is possible to correct the image by
repositioning the screen or projector,
then this is preferable.
Page 10Rev A June 2011
Page 13

Digital Projection HIGHlite 660 series 2. A TOUR OF THE MENUS Operating Guide
Input Conguration
These menus allow adjustment of various technical parameters specific to each of the signal inputs, regardless of which input is being used.
DVI/HDMI
Boost DVI EQ should normally be set
•
to Off, except when you are having
problems with a long DVI cable.
DVI/HDMI Colour Space should
•
normally be set to Auto, except when
the projector has problems identifying
the correct colour space.
DVI/HDMI Range should normally
•
be set to Auto, except when you are
having contrast problems with some DVI
sources.
Set DVI-I Port to choose between the
•
Analog and Digital signals from a DVI-I
source.
SDI
If two video streams are being
•
transmitted, use 3G Level B Stream to
choose between the two streams.
Component
Set Component Colour Space to
•
choose between RGB and YPbPr.
Component Sync Type should be set
•
to Auto, except when the projector has
problems selecting between 3 Wire
(RGsB) and 4 Wire (RGBS).
Notes
See also Using the Menus, earlier
in this guide and Menu Map, later in
this guide.
Main Menu
Global Settings
Input Conguration
All these settings will remain as set
in this menu, regardless of which
input is being used.
Page 11Rev A June 2011
Page 14

Digital Projection HIGHlite 660 series 2. A TOUR OF THE MENUS Operating Guide
Lamp
Set Lamp Mode to choose between Lamp 1, Lamp 2, and Lamp 1 + Lamp 2.
•
Set the slider to vary the lamp power between 85% and 100%.
•
On Screen Display
Notes
See also Using the Menus, earlier
in this guide and Menu Map, later in
this guide.
Main Menu
Global Settings
Lamp
Main Menu
Global Settings
On Screen Display
Select a display Language from the drop-down list.
•
The menus will disappear if no buttons are pressed within the Time selected from the drop-down list. If you want the menus to stay on
•
screen permanently, then select Innite.
Select a Position from the drop-down list.
•
If you do not want projector status messages to be displayed, for instance: , then set Messaging to Off.
•
Page 12Rev A June 2011
Page 15

Digital Projection HIGHlite 660 series 2. A TOUR OF THE MENUS Operating Guide
Network
The fields at the bottom of the menu show the current settings. Any new settings will not be effective until the projector has been turned off,
then back on again.
Set DHCP to On if the IP Address is to be assigned by a DHCP server, or Off if it is to be set here.
•
If DHCP is set to On:
•
It will not be possible to edit either IP Address or Subnet.
If DHCP is set to Off:
•
Edit IP Address to the correct value.
Edit the Subnet to the correct value.
Notes
See also Using the Menus, earlier
in this guide and Menu Map, later in
this guide.
Main Menu
Global Settings
Network
Any new settings will not be effective
until the projector has been turned
off, then back on again.
Factory Defaults
Press to restore all settings to their factory defaults. When the warning message appears, press to confirm, or press to
•
cancel.
Main Menu
Global Settings
Factory Defaults
Do NOT do this unless you are
sure that you want to restore ALL
the current settings to their factory
defaults.
Page 13Rev A June 2011
Page 16

Digital Projection HIGHlite 660 series 2. A TOUR OF THE MENUS Operating Guide
Input Settings Menu
The Input Settings are those that affect ONLY the input being displayed. When a new input mode (video or graphics standard) is detected, eg
NTSC, HDTV 1080p or SVGA, these settings are saved so that they can be recalled next time that input mode is displayed. In some cases
the mode may change for the same input. For example, a DVD player connected to the HDMI input could switch between 1080p24 and
1080i60. The projector is able to save and automatically recall different input settings for these different input modes.
Picture
Notes
See also Using the Menus, earlier
in this guide and Menu Map, later in
this guide.
Main Menu
Input Settings
When a new input mode is detected
(eg NTSC, HDTV 1080p, SVGA etc),
all the Input Settings are saved so
that they can be recalled next time
that input mode is displayed.
Main Menu
Input Settings
Picture
Main Menu
Input Settings
Picture
Video Filters
Brightness, Contrast, Gamma, Hue,
Saturation
Set the slider or select from the drop-
•
down list as required, to improve the
quality of the image.
There are two Picture menus – one
in the Global Menu, and one in the
Input Settings Menu.
Video Filters
Set the sliders or select from the drop-
•
down list as required, to improve the
quality of the image.
VGA Setup
Set the Phase slider to correct for
•
shimmering or poor quality definition on,
for example, fine text.
Set the Total H Samples slider to
•
match the resolution of the incoming
video signal,
or Use Auto Setup to allow the projector
to detect the appropriate settings
automatically.
Main Menu
Input Settings
Picture
VGA Setup
Hue applies only to NTSC signals.
Auto Setup will not function unless a
signal is present.
Page 14Rev A June 2011
Page 17

Digital Projection HIGHlite 660 series 2. A TOUR OF THE MENUS Operating Guide
Notes
See also Using the Menus, earlier
in this guide and Menu Map, later in
this guide.
When a new input mode is detected
Colour
Trim
Set the sliders as required.•
(eg NTSC, HDTV 1080p, SVGA etc),
all the Input Settings are saved so
that they can be recalled next time
that input mode is displayed.
Main Menu
Input Settings
Colour
Main Menu
Input Settings
Colour
Trim
Page 15Rev A June 2011
Page 18

Digital Projection HIGHlite 660 series 2. A TOUR OF THE MENUS Operating Guide
Geometry
Source: fills the DMD height
whilst maintaining the aspect ratio
Set the H Position and V Position sliders as required.
•
Set the Overscan slider to compensate for noisy or badly defined image edges.
•
Set Aspect Ratio to choose between Source, Fill, Fill & Crop and Anamorphic.
•
Some devices (eg certain DVD players) pack a 16:9 image into a 4:3 aspect ratio. In
such cases to display the image correctly, choose the Anamorphic aspect ratio.
<-- stretched ->
Fill: stretches the image to fill the
DMD
Fill & Crop: stretches the image
to fill the DMD width, but crops to
maintain the aspect ratio
Notes
See also Using the Menus, earlier
in this guide and Menu Map, later in
this guide.
Main Menu
Input Settings
Geometry
When a new input mode is detected
(eg NTSC, HDTV 1080p, SVGA etc),
all the Input Settings are saved so
that they can be recalled next time
that input mode is displayed.
See also Advanced Geometry in
the Global Settings menu, earlier
in this guide.
16:9 image packed into a
4:3 box
Pan/Scroll/Zoom
Set Enable to On or Off.
•
Use Setting to choose:
•
Global, in which case these settings will be applied to all input signals,
or Per Mode, in which case these settings will be applied only to the current input signal.
Set the Pan, Scroll and Zoom sliders as required.
•
When Aspect Lock is set to On, the Zoom V slider is disabled.
•
Select Reset and press to reset all the sliders to zero.
•
Anamorphic: stretched to display
the image correctly
Main Menu
Input Settings
Geometry
Pan/Scroll/Zoom
Page 16Rev A June 2011
Page 19

Digital Projection HIGHlite 660 series 2. A TOUR OF THE MENUS Operating Guide
Information Menu
The sub-menus give information about lamp operating times, software and hardware configurations, the input source and Digital Projection.
Projector
Source
Notes
See also Using the Menus, earlier
in this guide and Menu Map, later in
this guide.
Main Menu
Information
Projector
Main Menu
Information
Source
Digital Projection
Main Menu
Information
Digital Projection
Page 17Rev A June 2011
Page 20

Digital Projection HIGHlite 660 series 3. MENU MAP Operating Guide
Menu Map
Main Menu Sub Menus
Input Selection
CVBS 1, CVBS 2, S-Video, Component, VGA, HD-SDI, DVI, HDMI, Test Pattern
Test Pattern
Grey V Bars, Grey H Bars, Aspect Test, Alignment Grid, Warp Adjust, SMPTE, Chequerboard, White Field, Black
Field
Global Settings
Projector
Orientation Desktop Front, Ceiling Front, Desktop, Rear, Ceiling Rear
Optimization Low Latency, Motion
Configuration PIP, Edge Blend
Picture
Colour Mode Peak, HDTV, SDTV, Colour Temperature, User 1, User 2
Gamma 1.0 to 2.8
Edge Blend
Array Width
Array Height
Array H Position
Array V Position
Blending Off, On, Align Pattern
Segmentation Off, On
Blend Width Top, Bottom, Left, Right Blend Region
Black Level Uplift Unblended Region, Upper Left, Upper Middle, etc
Reduce Black Level Uplift Width Upper Left X, Y, Upper Right X, Y, etc
PIP
Option Off, PIP, PAP, POP
Input select from Group A or Group B
Size Small, Medium, Large
Position Top Left, Bottom Right etc
Custom H Position
Custom V Position
Notes
Some of the information in this menu
map is summarised. See the actual
menu on the projector for full detail.
Some menu options and controls
may not be available due to settings
in other menus. These will be
greyed-out on the actual menu.
Where it would be helpful, some
menu options are described in more
detail earlier in this operating guide.
There are two Picture menus – one
in the Global Menu, and one in the
Input Settings Menu.
PIP and Edge Blend are mutually
exclusive modes of operation. When
in PIP mode, Edge Blend is not
available, and vice versa.
Page 18Rev A June 2011
Page 21

Digital Projection HIGHlite 660 series 3. MENU MAP Operating Guide
Main Menu Sub Menus
Global Settings (continued)
Advanced Geometry
Mode Off, Keystone, Cornerstone, Rotation, Warp
Warp Map Off, 1 to 8, Reset
H Keystone
V Keystone
Pincushion/Barrel
Rotation
Cornerstone Upper Left X, Y, Upper Right X, Y, etc
Input Configuration
DVI/HDMI Boost DVI EQ, DVI/HDMI Colour Space, DVI/HDMI Range, DVI Port
SDI 3G Level B Stream
Component Colour Space, Sync Type
Lamp
Lamp Mode Lamp 1 + Lamp 2, Lamp 1, Lamp 2
Lamp Power 85% to 100%
On Screen Display
Language US English, UK English
Timeout Number of seconds, Infinite
Position Centre, Top Left, Top Right, Bottom Left, Bottom Right
Messaging Off, On
Network
DHCP Off, On
IP Address
Subnet
DHCP Status Information only:
IP Address
Subnet
MAC Address
Factory Defaults Projector will ask for confirmation before restoring all settings to factory defaults.
Notes
Some of the information in this menu
map is summarised. See the actual
menu on the projector for full detail.
Some menu options and controls
may not be available due to settings
in other menus. These will be
greyed-out on the actual menu.
Where it would be helpful, some
menu options are described in more
detail earlier in this operating guide.
Page 19Rev A June 2011
Page 22

Digital Projection HIGHlite 660 series 3. MENU MAP Operating Guide
Main Menu Sub Menus
Input Settings
Picture
Brightness
Contrast
Hue
Saturation
Video Filters Sharpness, Detail, Noise Reduction, Cross Colour Suppression
VGA Phase, Total H Samples, Auto setup
Colour
Trim RGB Lift and Gain
Geometry
H Position
V Position
Aspect Ratio Source, Fill, Fill & Crop, Anamorphic
Overscan
Pan/Scroll/Zoom Enable, Disable, Global, Per Mode, Pan, Scroll, Zoom H, Aspect Lock, Zoom V, Reset
Information
Projector Information only:
Lamps Hours, Strikes
Configuration Scaler, Interface, OSD, Hardware
Source Information only:
Input
Standard
Digital Projection Information only:
Contact Information
Notes
Some of the information in this menu
map is summarised. See the actual
menu on the projector for full detail.
Some menu options and controls
may not be available due to settings
in other menus. These will be
greyed-out on the actual menu.
Where it would be helpful, some
menu options are described in more
detail earlier in this operating guide.
There are two Picture menus – one
in the Global Menu, and one in the
Input Settings Menu.
Page 20Rev A June 2011
 Loading...