

Page 1
0
EN
Page 2

1
EN
Table of Contents
1. Introduction........................................................ 2
System Requirement..................................... 3
2. Preparation........................................................ 4
Component & Accessories............................. 4
Part Name......................................................5
3. Install.................................................................. 6
Take Out the Action Camera.......................... 6
Memory Card Install....................................... 9
Install the Action Camera............................... 9
Base Mount Install.......................................... 12
4. Charge............................................................... 13
5. Record............................................................... 15
Car Mode.......................................................15
Sporty Mode................................................... 18
6. Wireless............................................................. 21
Wireless On....................……....…………….. 21
Control via App............................................... 22
Wireless Off...................................................22
7. Download........................................................... 23
Download from Camera......................……… 23
Download from Card Reader......................… 24
8. Playback............................................................ 25
9. Appendix............................................................ 26
Specification................................................... 26
Waterproof Case Maintenance...................... 27
SMC (Smart Camera).................................... 30
Page 3

2
EN
1. Introduction
Welcome to the world of digital imaging. The following
information will help you to use your Action Camera
HD-160AW to its full capabilities.
Before you install and operate the product, please take
a few minutes to read through this manual. It provides
proper instructions for you to install and operate the
product.
The electron device may be affected by static electricity
interference. Please plug-in / out and wait a few
minutes to start this function.
Page 4

3
EN
System Requirement
PC System Requirements
Intel® Core2Duo 1.8G or AMD equivalent CPU
Hi-speed USB2.0 port
1 GB RAM internal memory minimum
500MB free hard disk space
800 x 600 pixel color monitor
nVIDIA GeForce MX440 or above, AMD (ATi)
Radeon 9200 or above
DirectX 9.0 or higher
Windows® XP (SP2 or higher) / Windows Vista™ /
Windows 7™, Windows 8™
Note: If your system is Windows XP Service Pack I, please go to
www.microsoft.com. It’s free to update your system to
Windows XP Service Pack II.
Mac System Requirements
Power PC G5 or Intel Core Duo processor
recommended
Free USB2.0 port
1 GB RAM internal memory minimum
500MB free hard disk space
800 x 600 color monitor
Mac OS 10.5 or above
Page 5
4
EN
2. Preparation
Component & Accessories
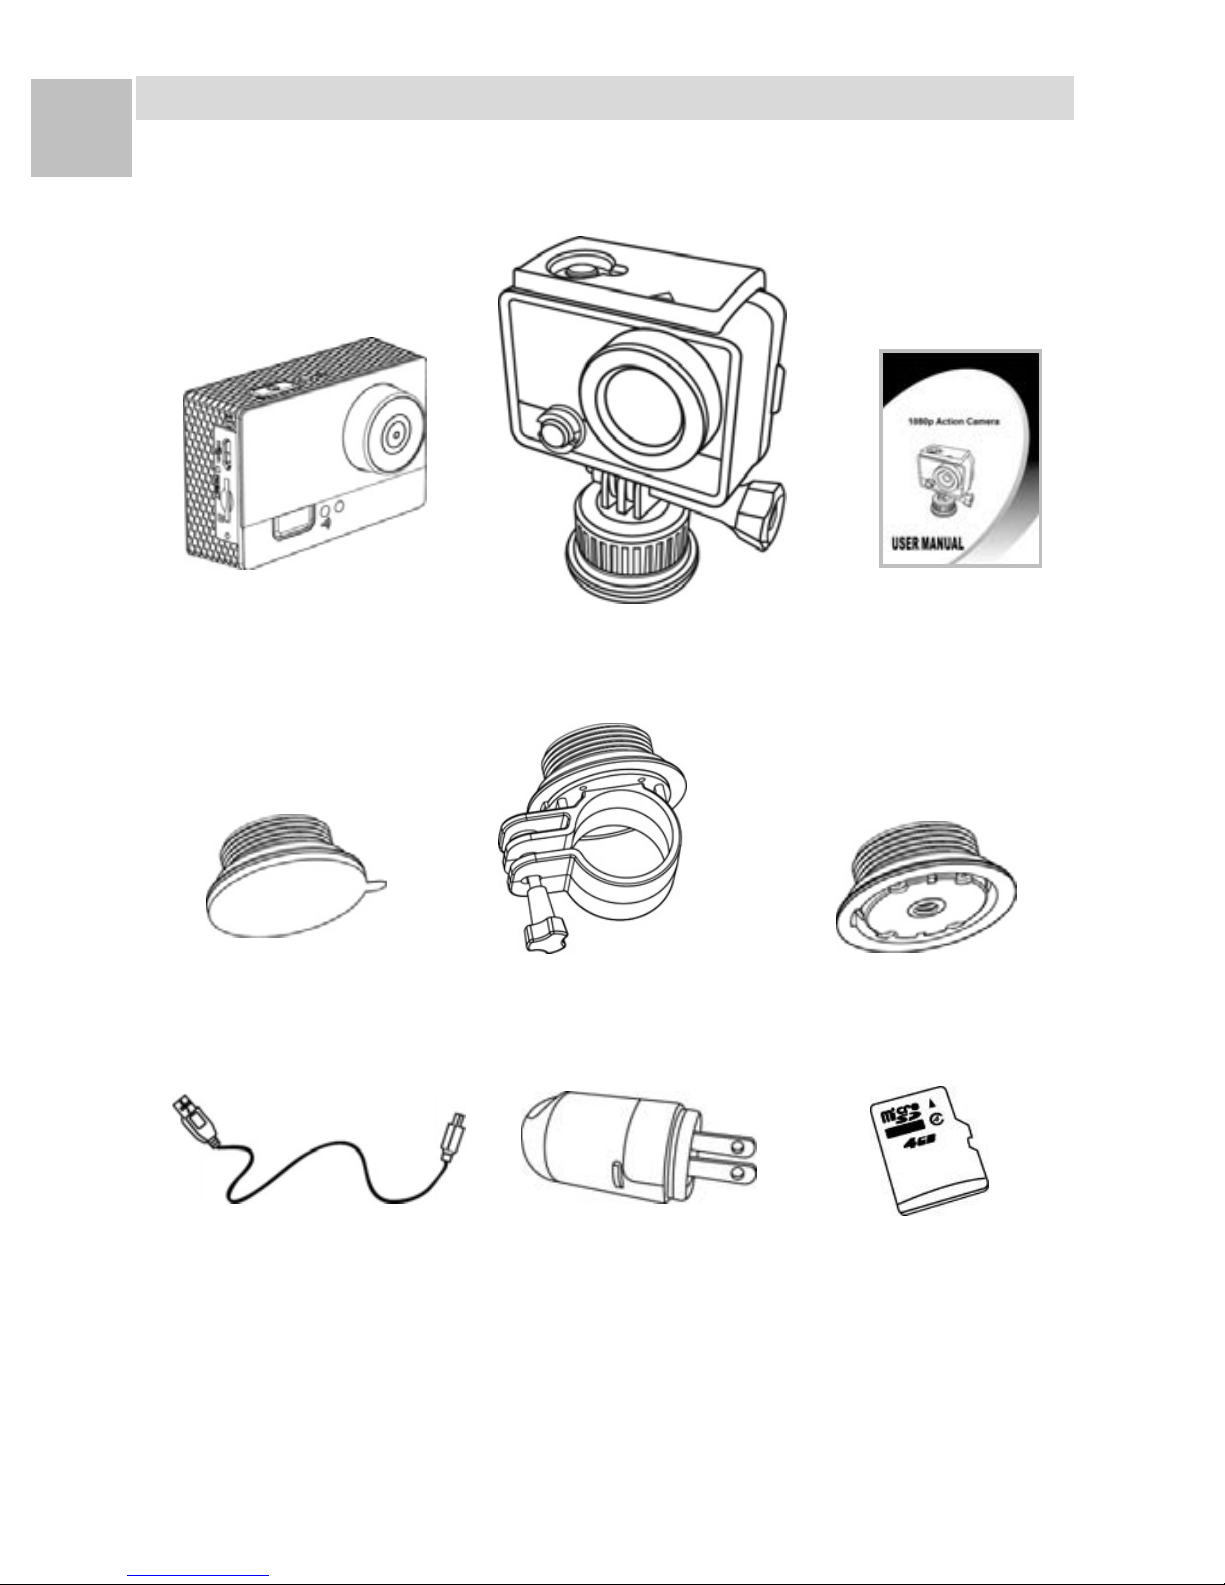
Action Camera Waterproof Case User Manual
Base Mount Bike Mount Tripod Mount
micro USB Cable AC Wall Adaptor micro SD Card
(Optional)
Page 6
5
EN
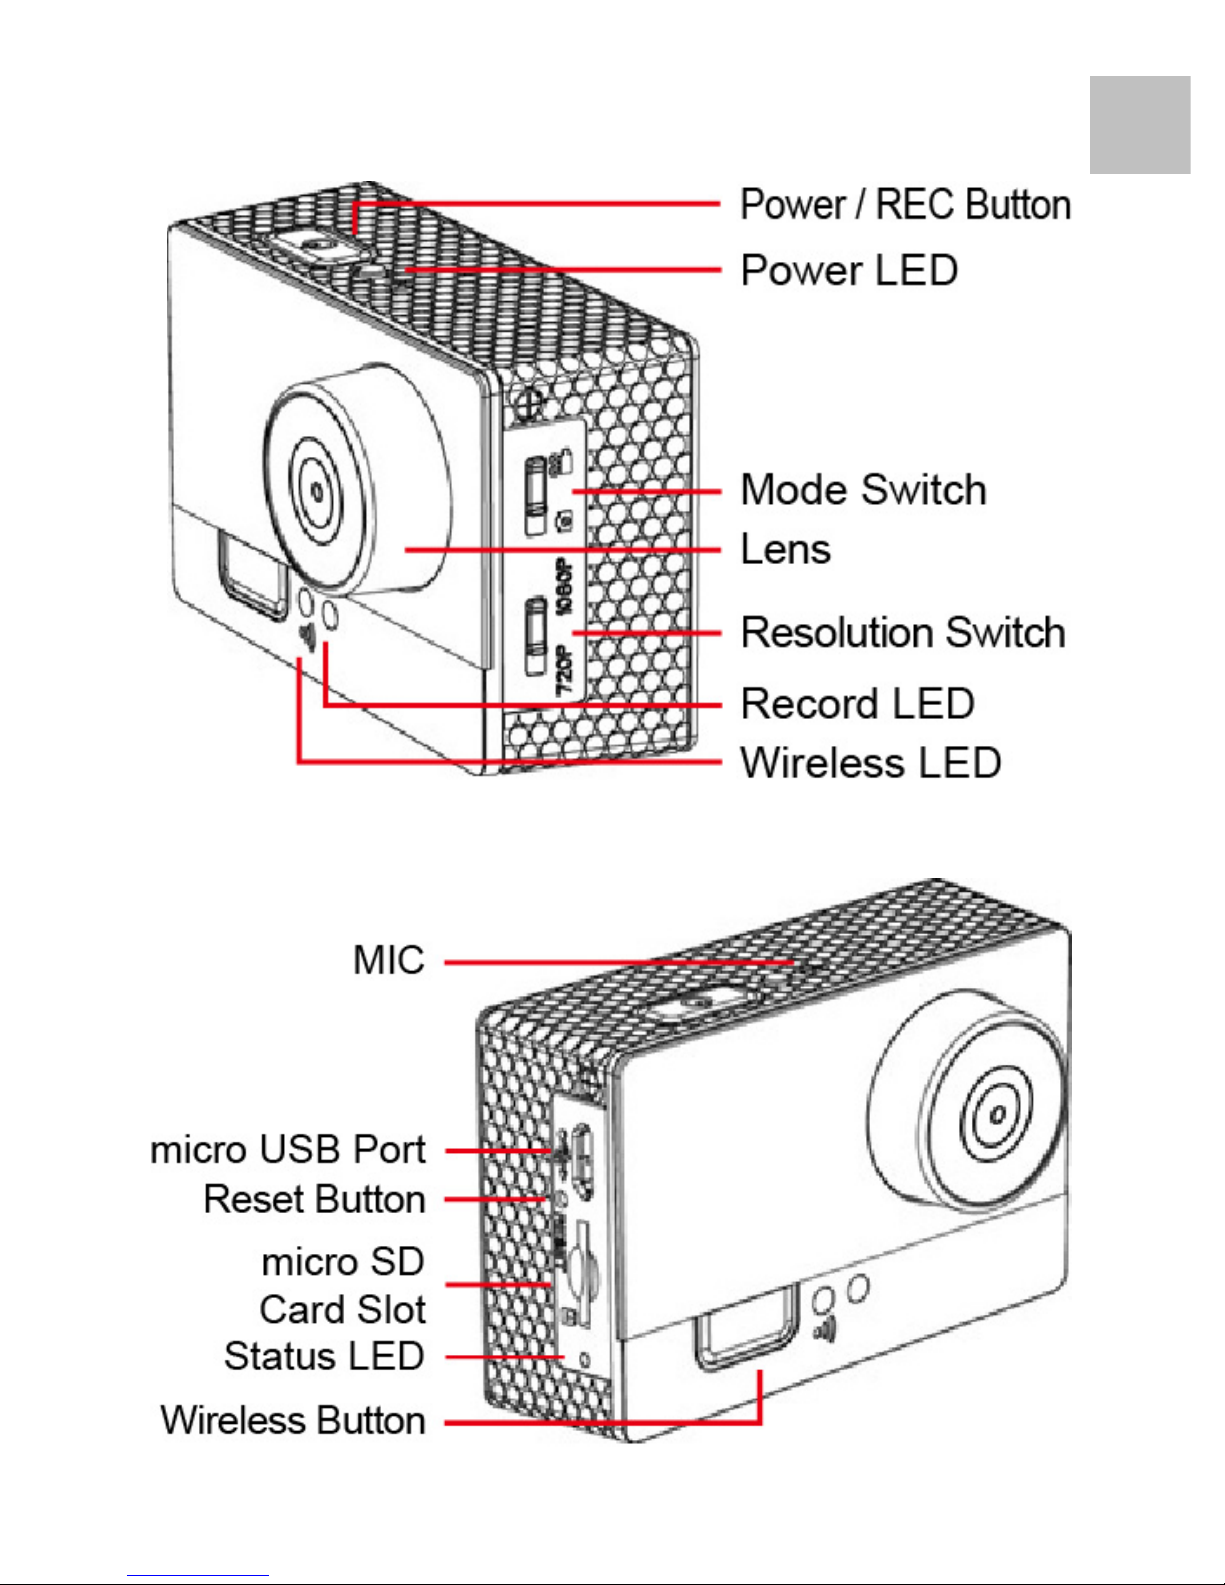
Part Name
Page 7
6
EN
3. Install
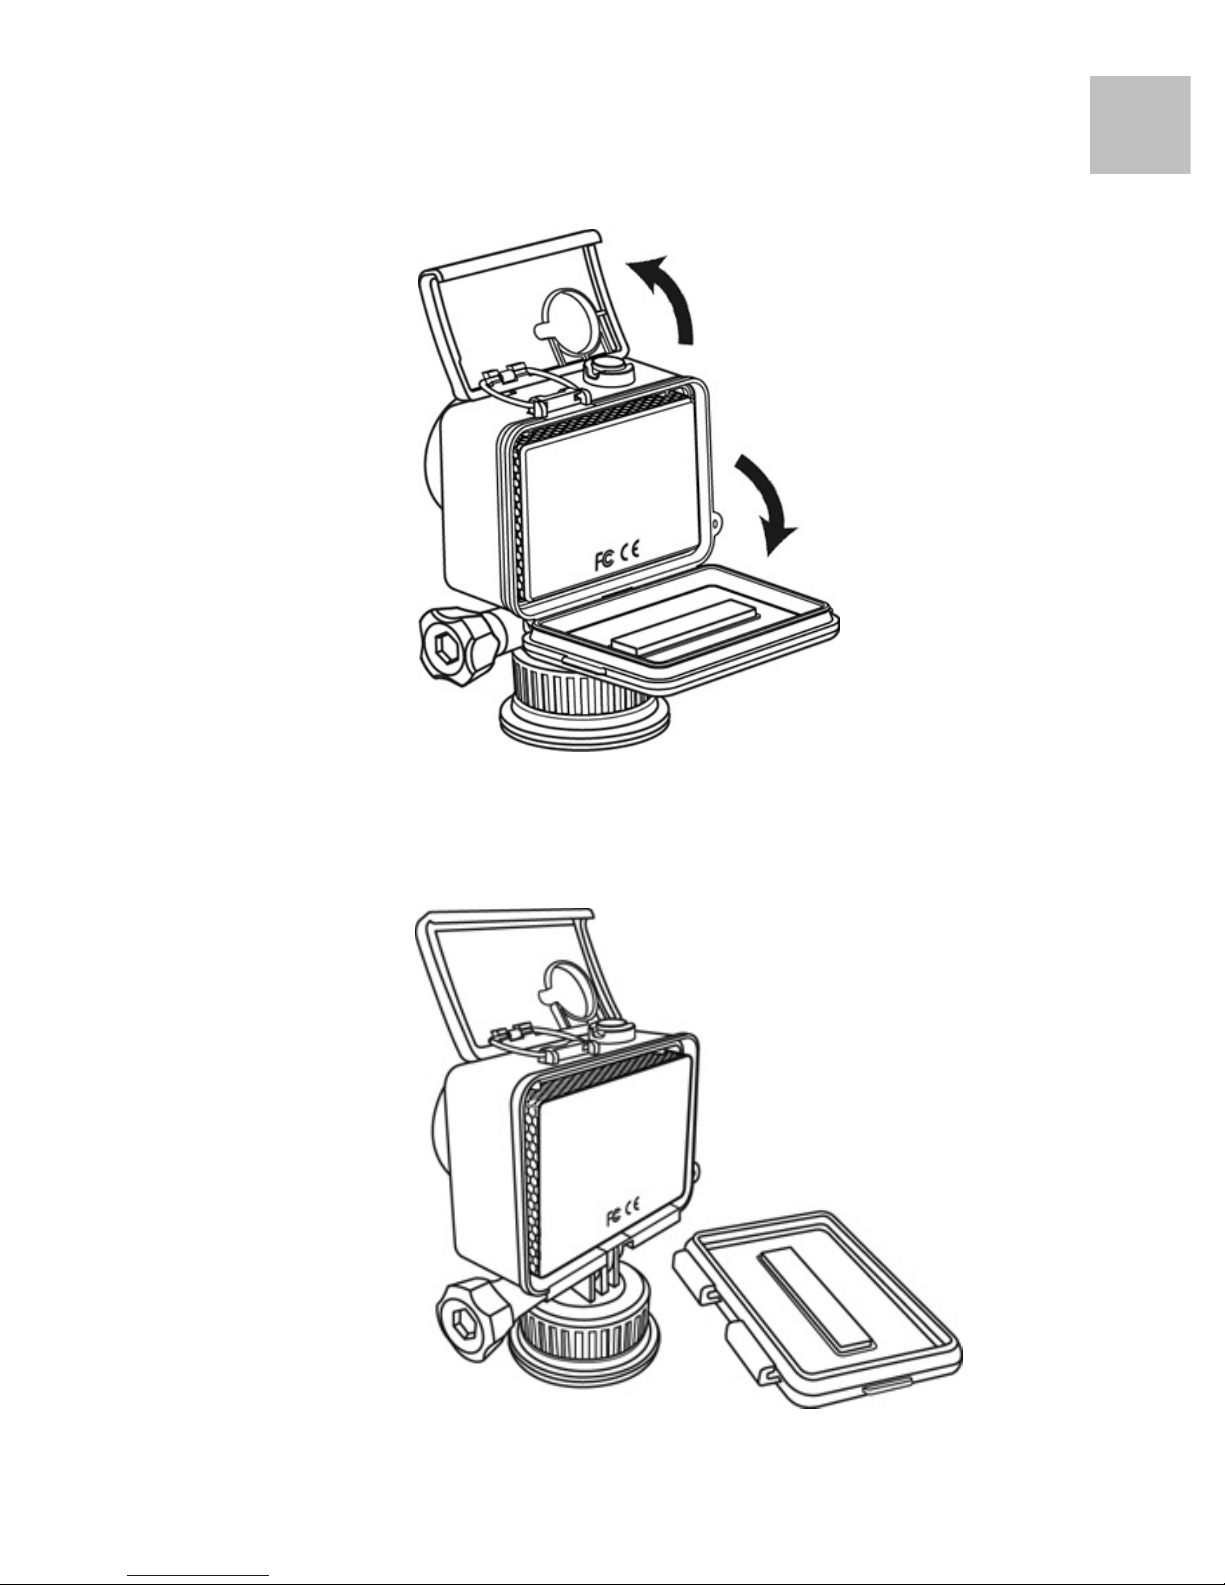
Take Out the Action Camera
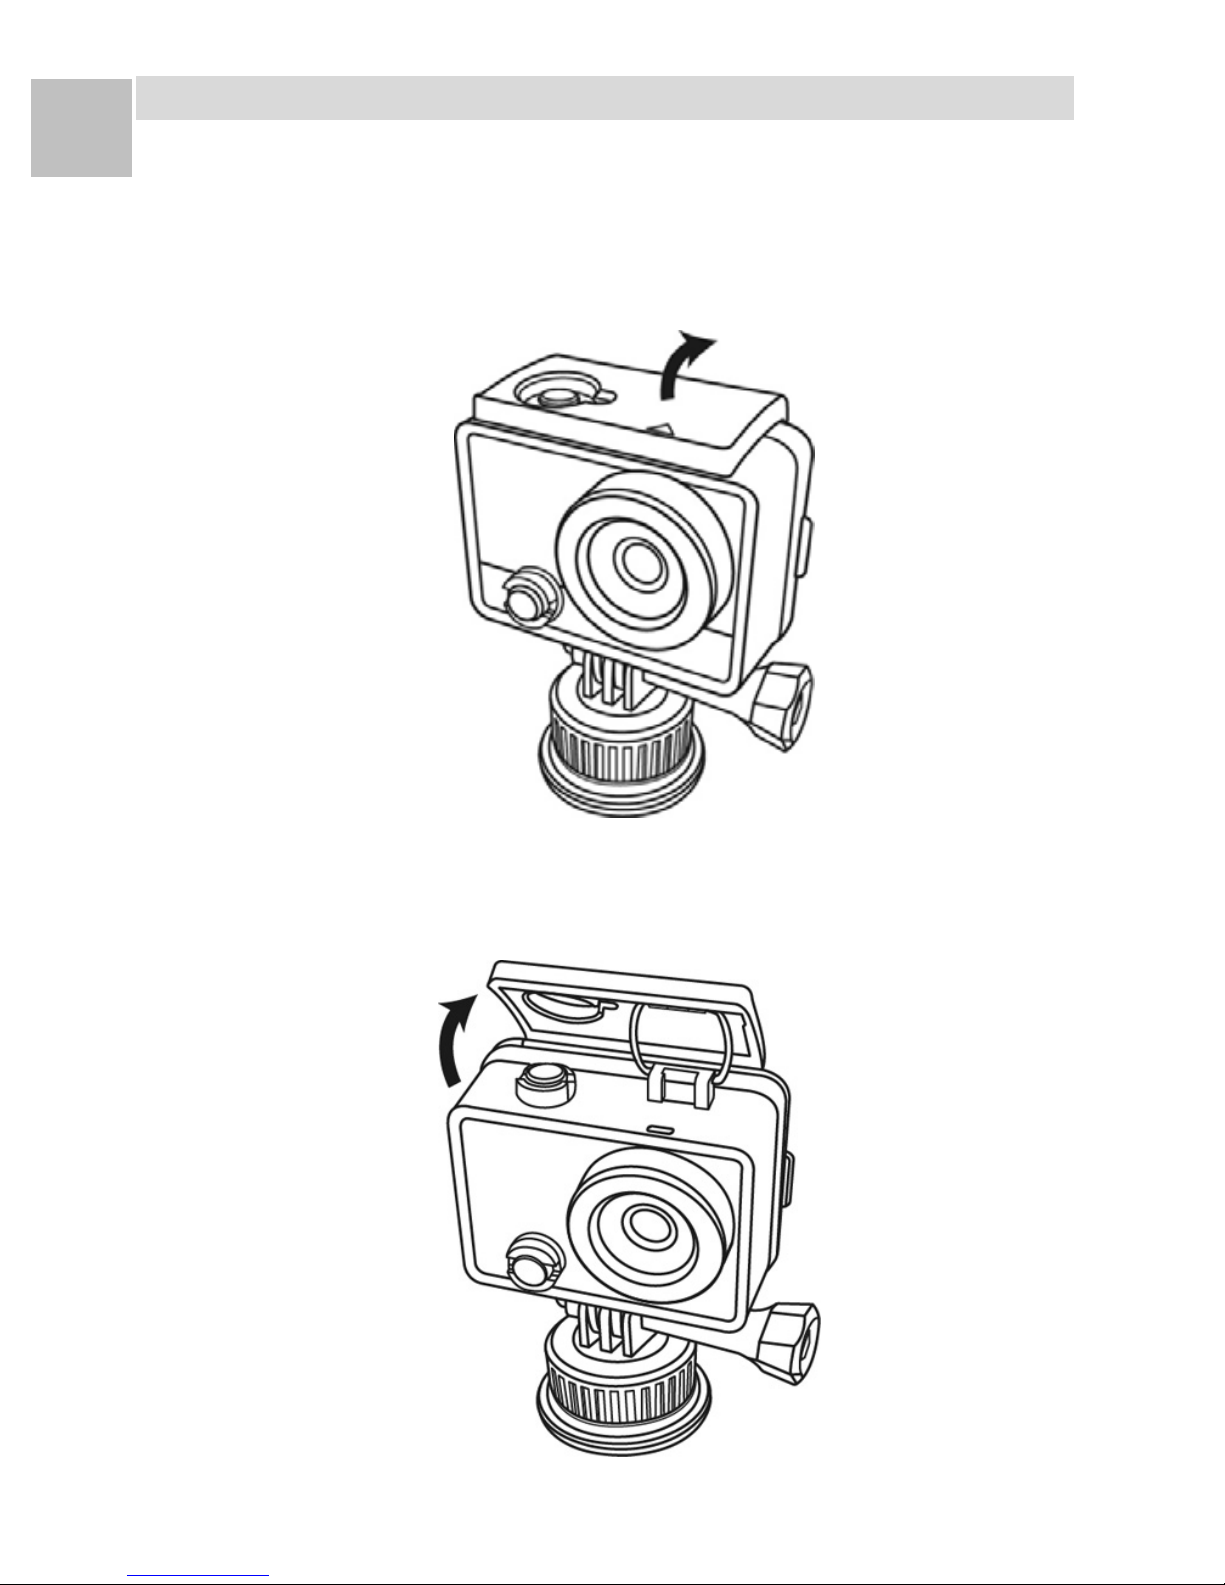
1. Release the latch of the Waterproof Case.
2. Open and push the latch to the end.
Page 8
7
EN
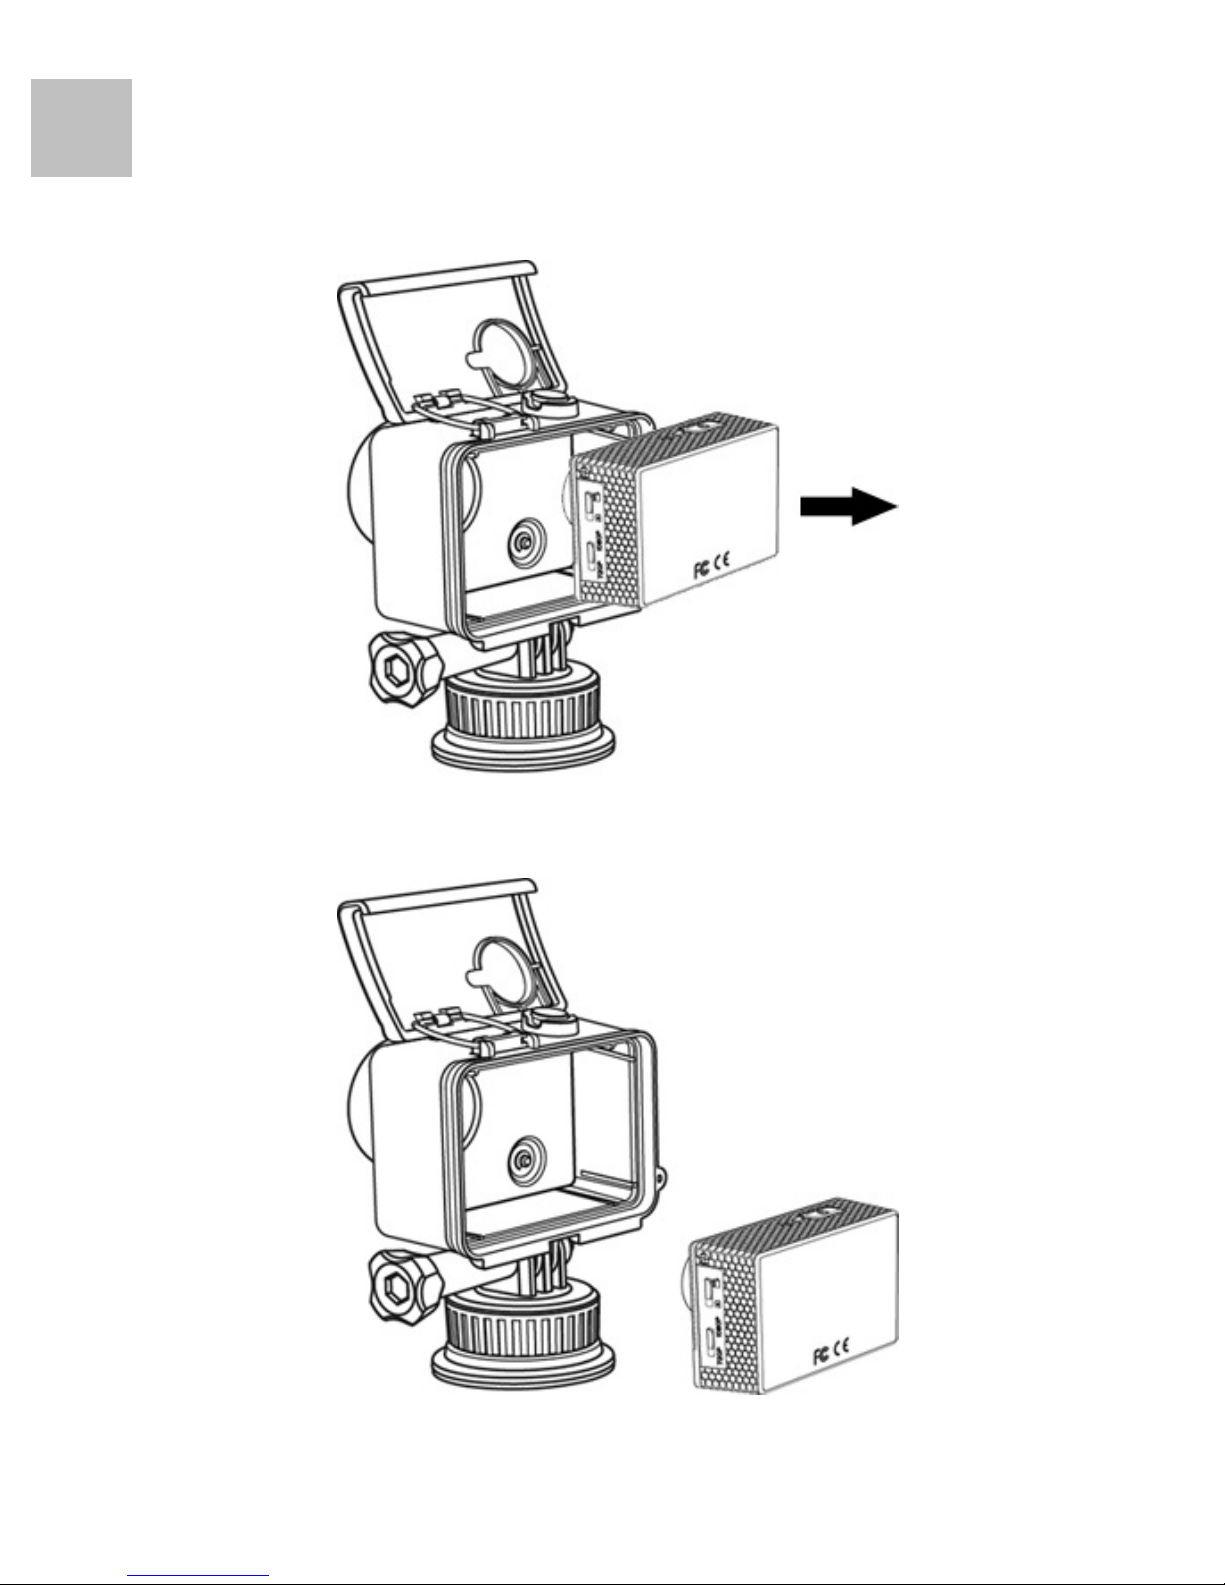
3. Release the hook of the latch and open the case
cover.
4. Dismount the case cover.
Page 9
8
EN
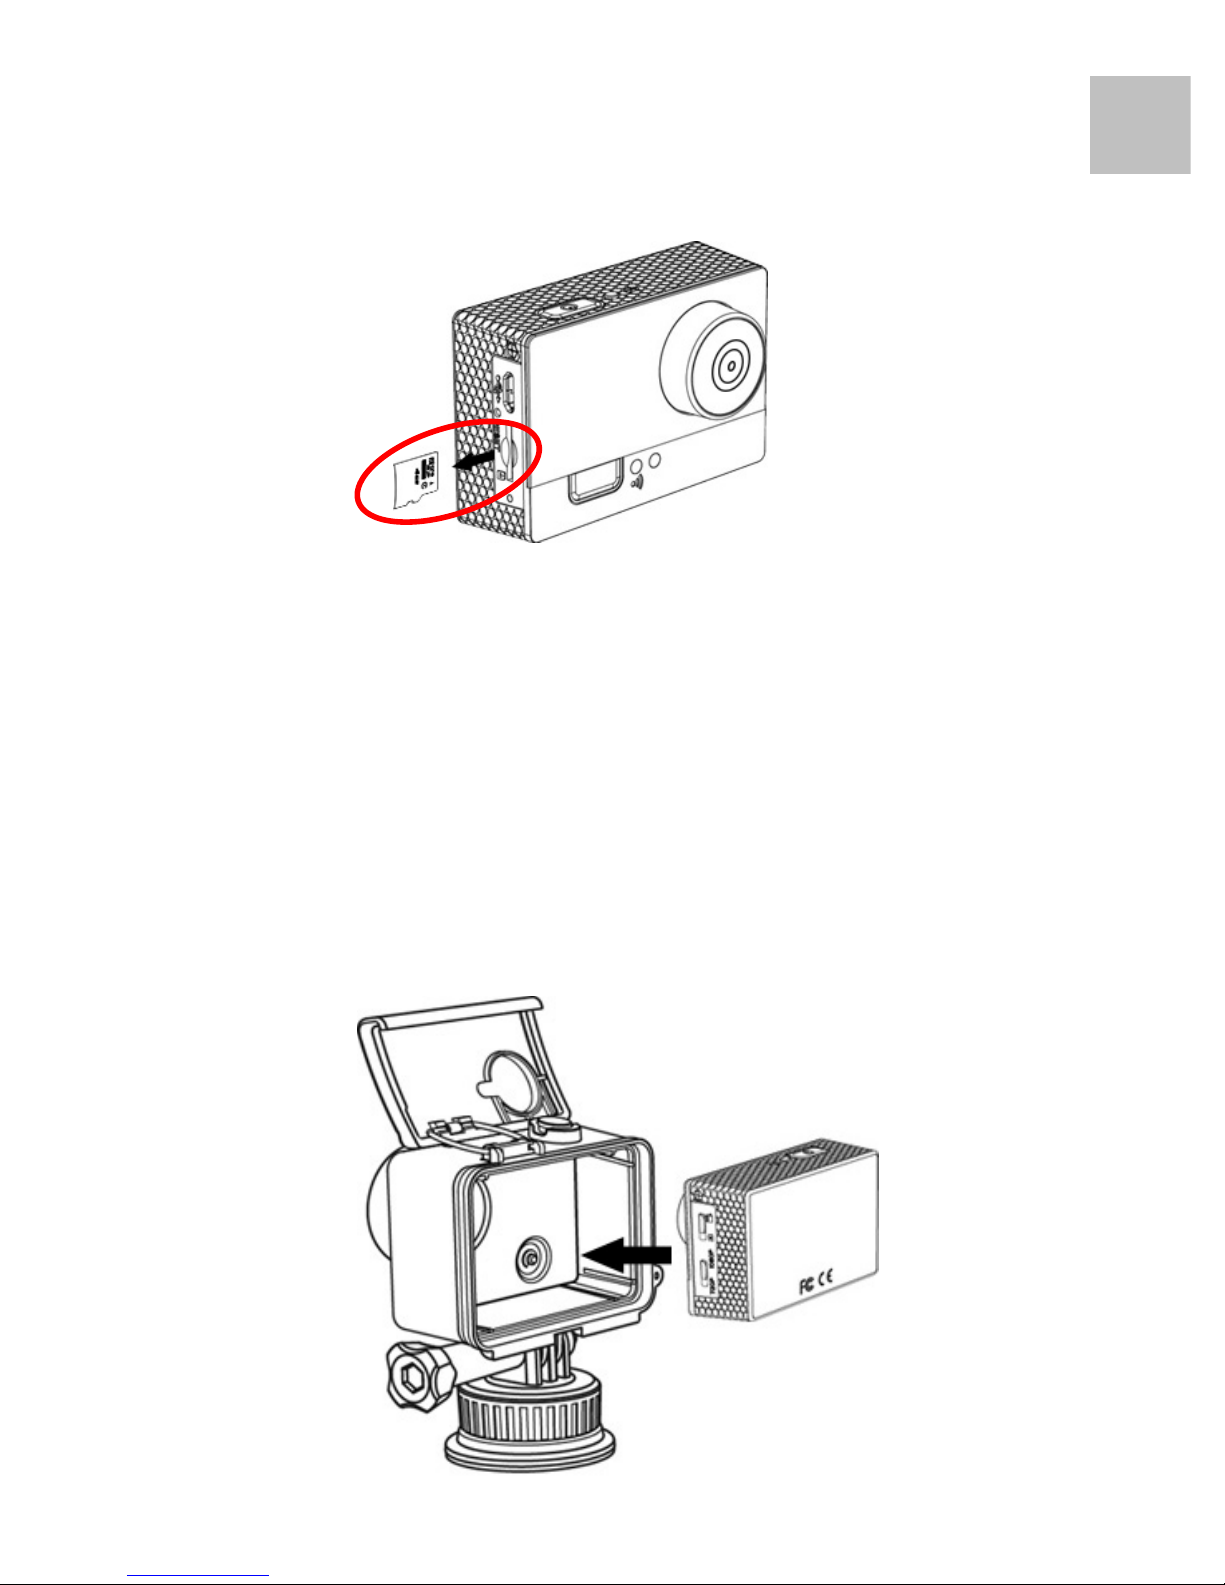
5. Take out the Action Camera from the Waterproof
Case.
Page 10
9
EN
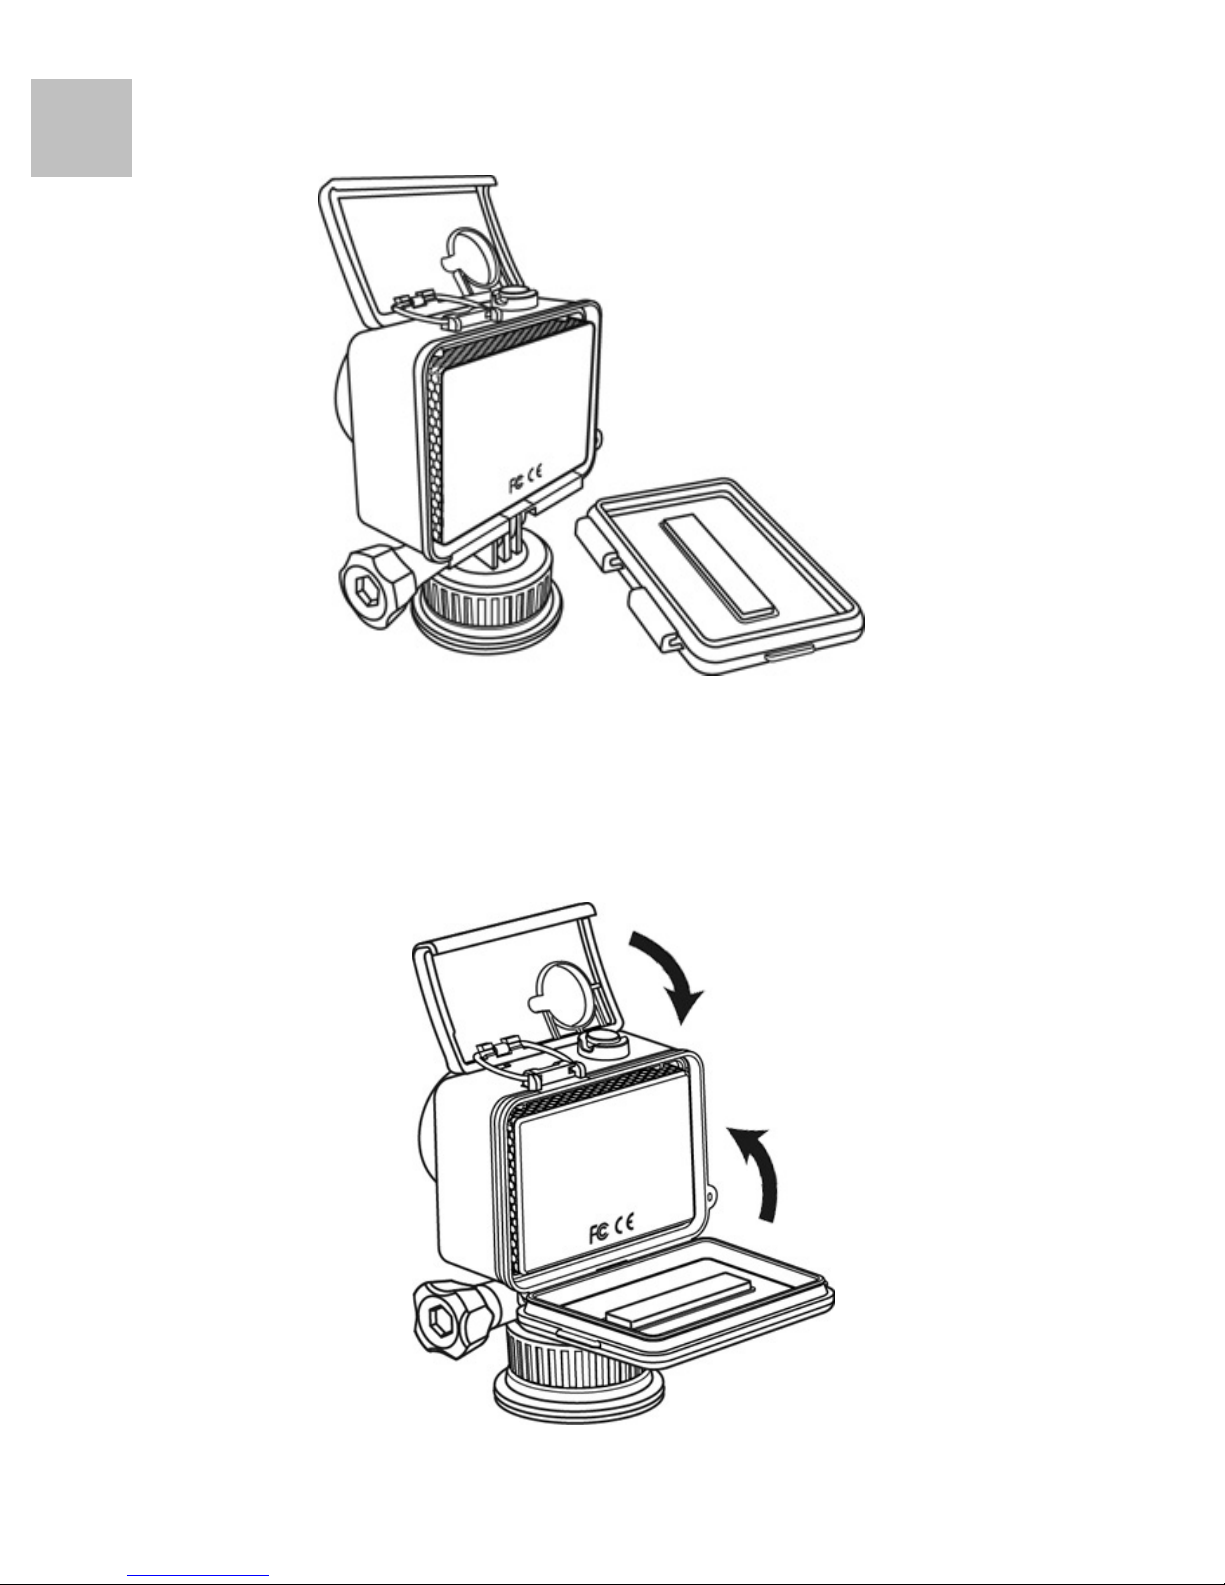
Memory Card Install
1. Make sure the Action Camera has powered off.
2. Insert a compatible micro SD card into the memory
card slot of the Action Camera.
Install the Action Camera
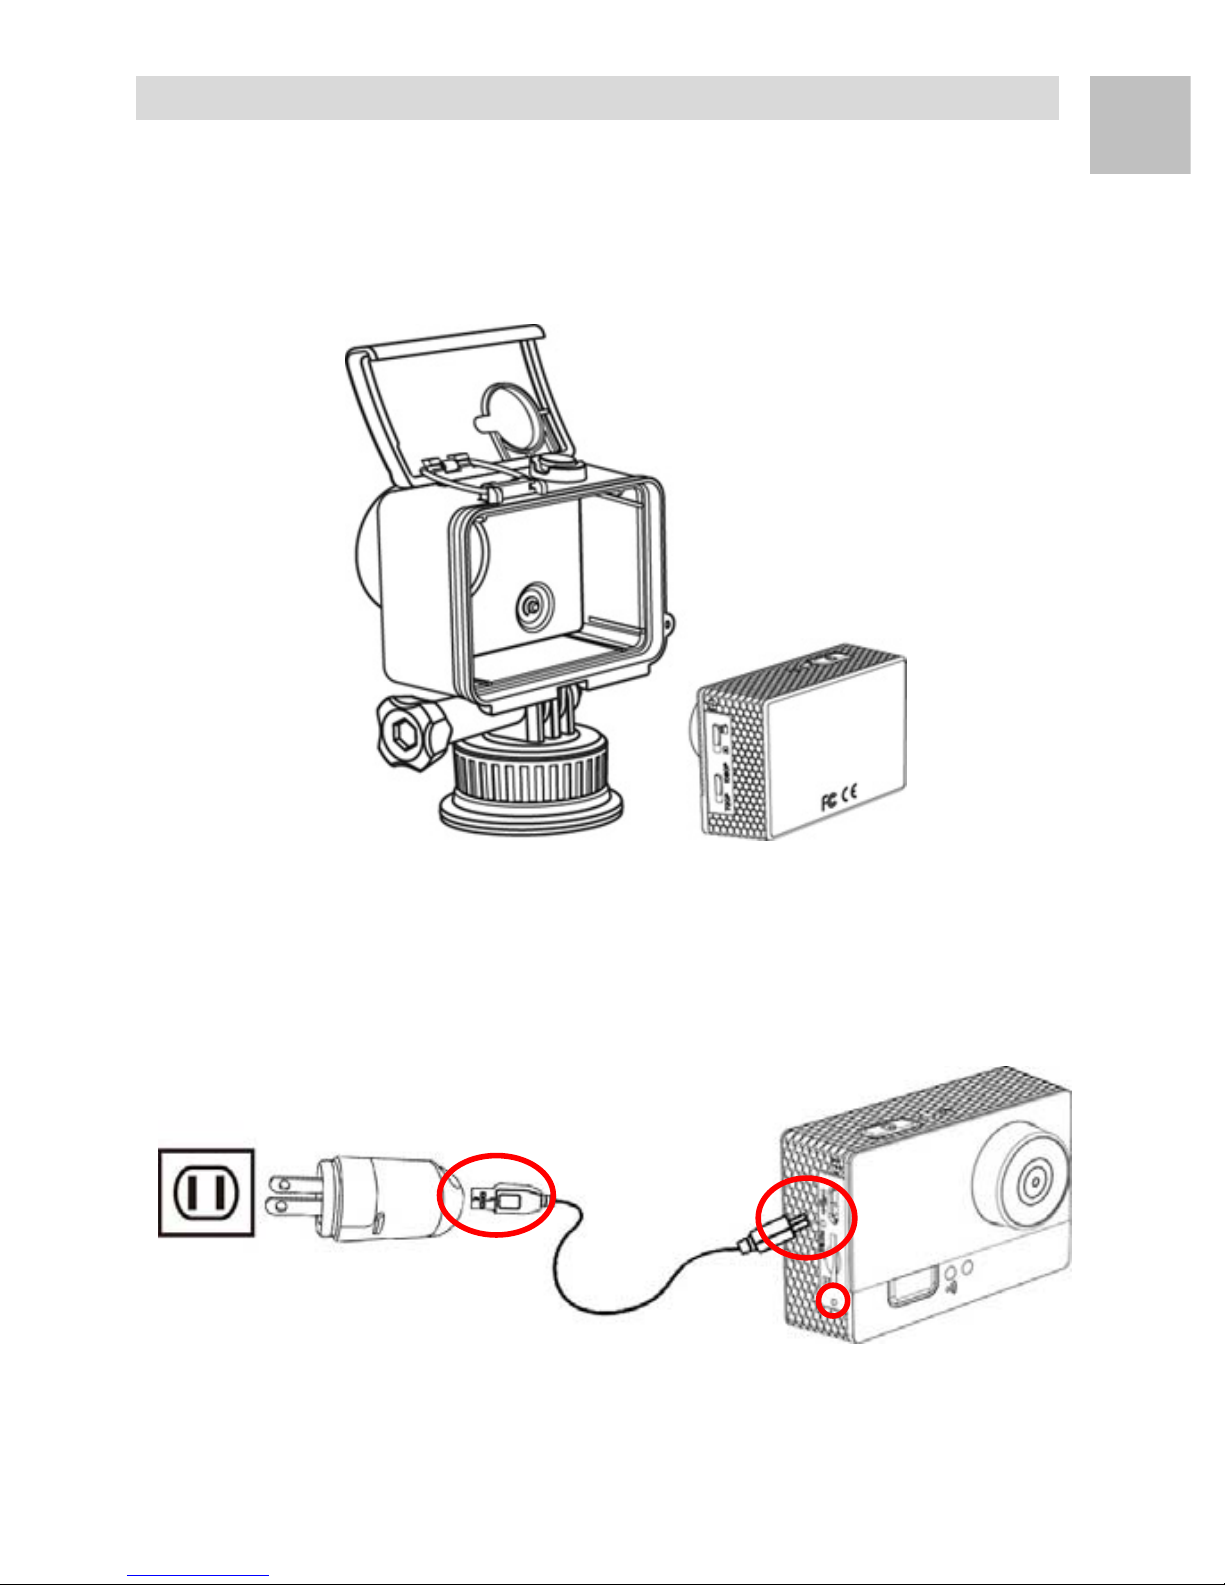
1. Put the Action Camera back in the Waterproof
Case.
Page 11
10
EN
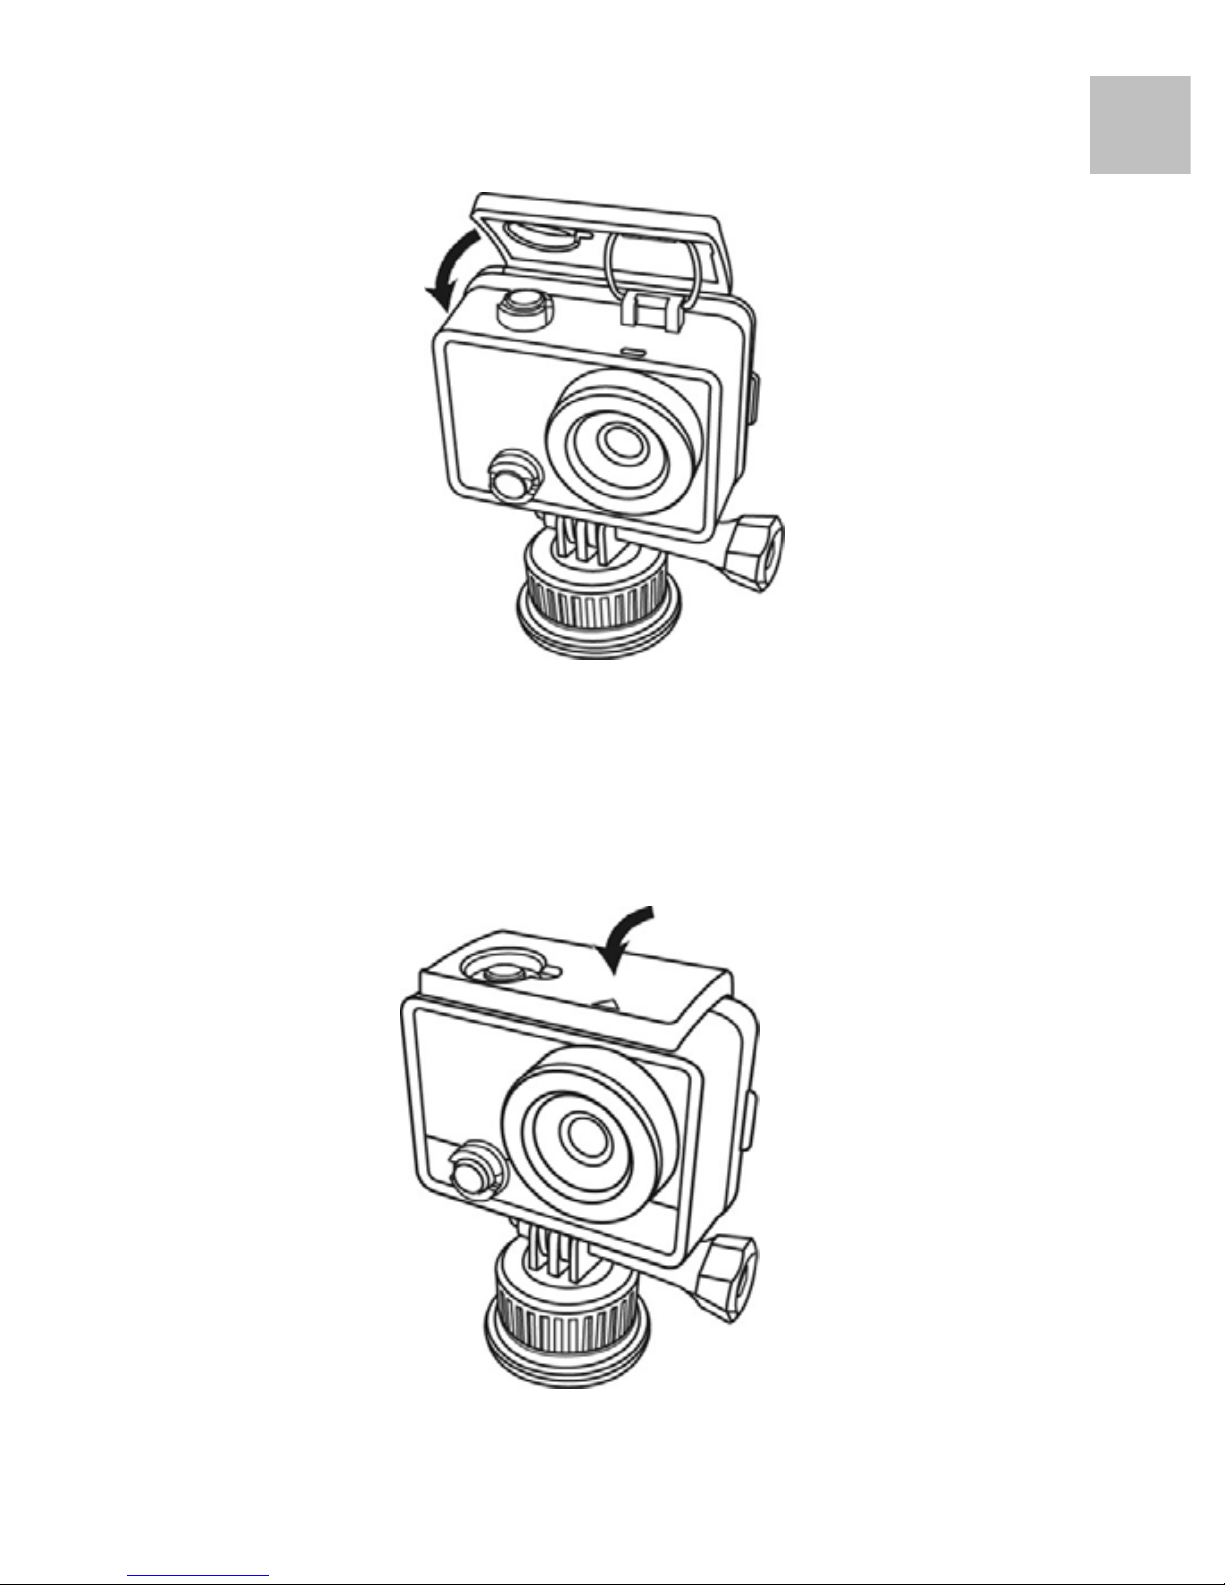
2. Push the Action Camera to the end of the case.
3. Hook up the case cover and close it then push the
latch down and lock the case cover.
Page 12
11
EN
4. Force the latch down to the end.
5. Make sure the latch has locked and the case cover
has closed completely.
Page 13

12
EN
Base Mount Install
1. Clean the flat surface where you want to fix the Base
Mount.
2. Remove the protected membrane of adhesive on the
Base Mount.
3. Put and compress the Base Mount on where you
want to install and keep it for at least 24 hours to
make sure the adhesive has firmly stuck on.
Page 14
13
EN
4. Charge
1. Open the Waterproof Case and take out the Action
Camera.
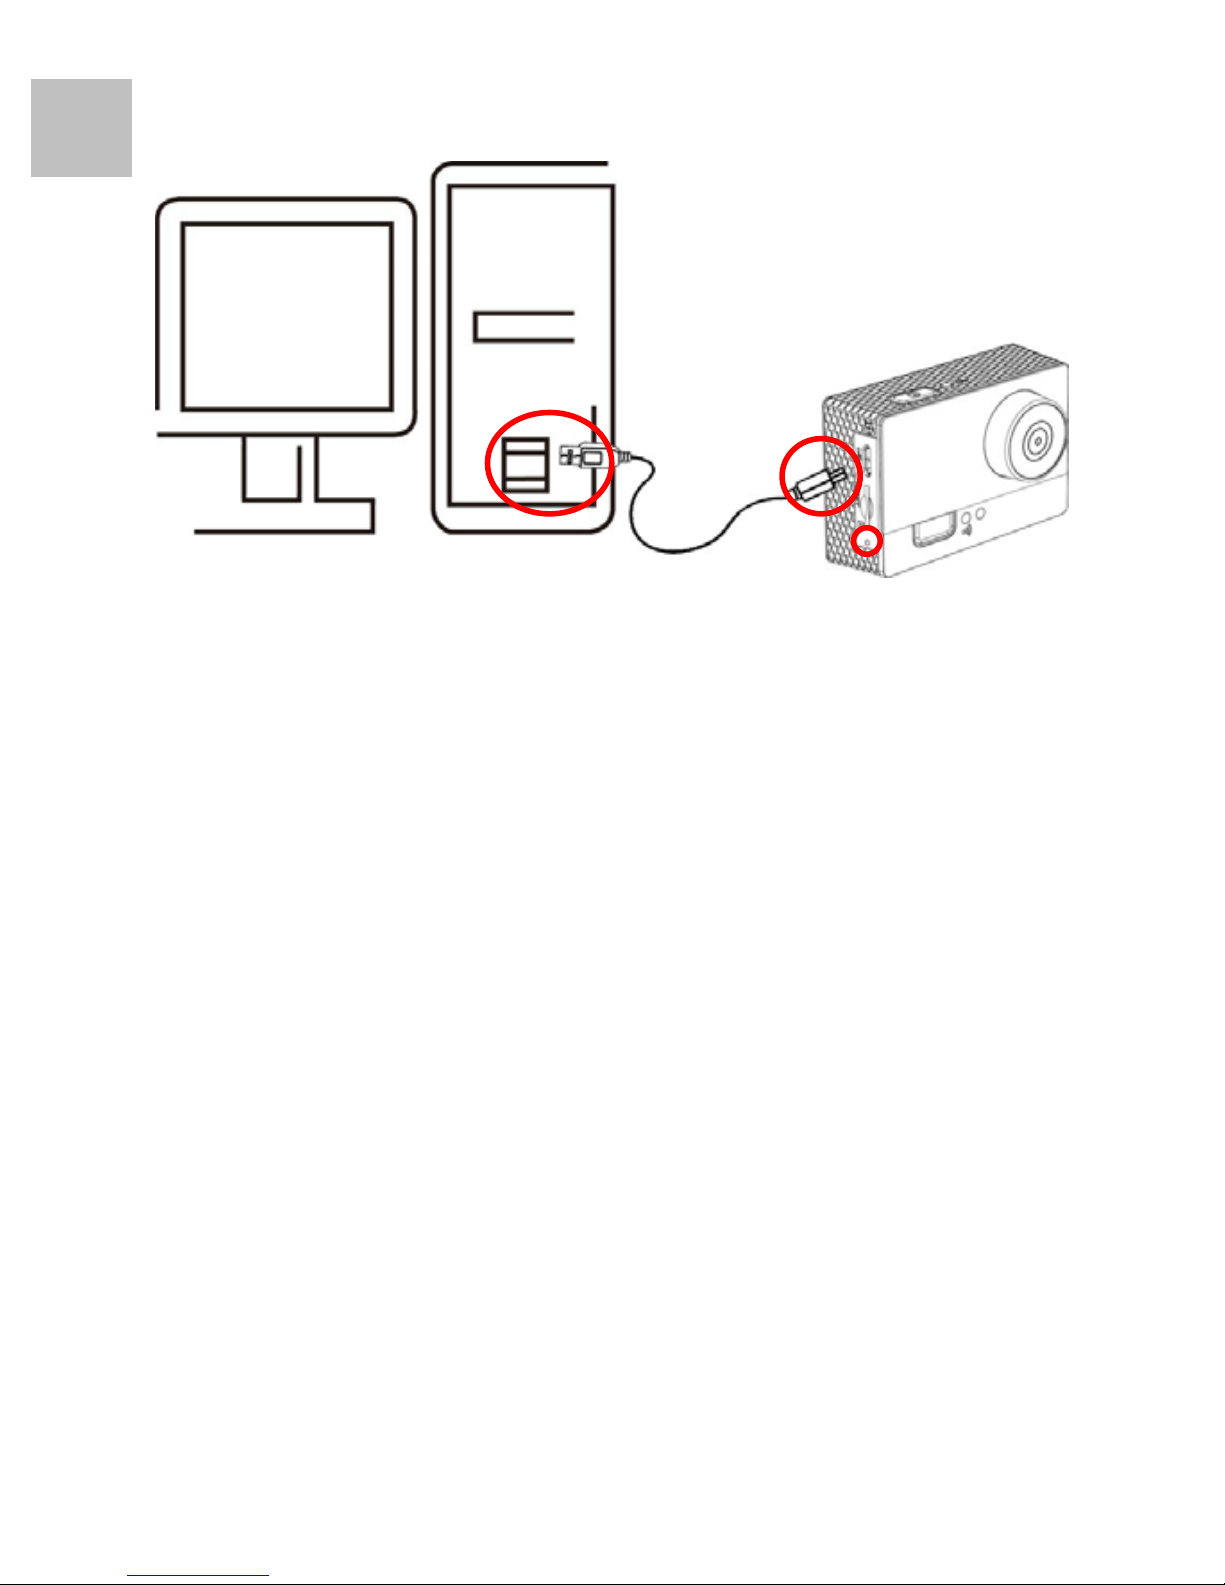
2. Plug the micro USB cable into the supplied AC Wall
Adaptor or a PC / Mac USB 2.0 port.
Page 15
14
EN
3. The Status LED at the left side of the Action
Camera light on in Green to tell you it’s charging.
When the Status LED turns off, the battery is full and
charge completely.
Note: The Action Camera vibrates 3 times and power off when
the battery power is low and need to recharge it.
Page 16
15
EN
5. Record
Car Mode
Circulated Recording
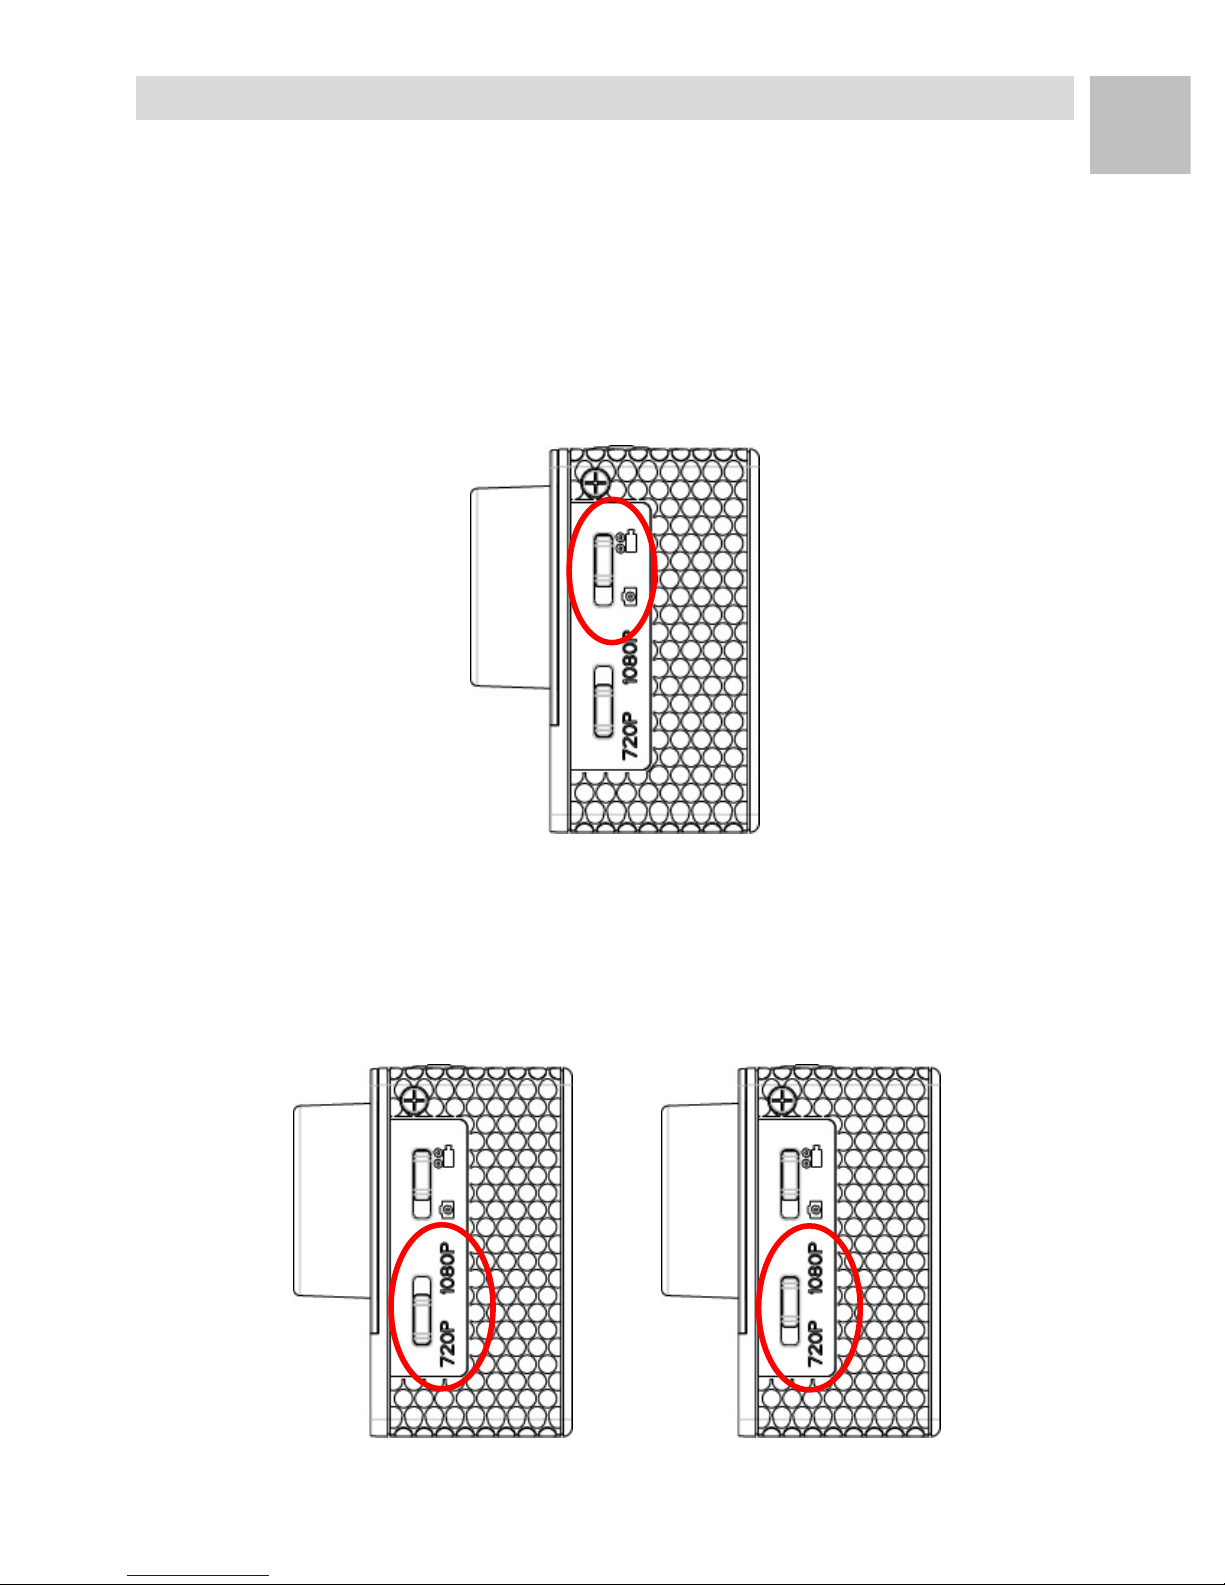
1. Slide the Mode Switch down to the Car Mode.
2. The Video Record supports 2 resolutions. Slide the
Resolution Switch up for Full HD 1080p and slide
down for HD 720p.
Page 17
16
EN
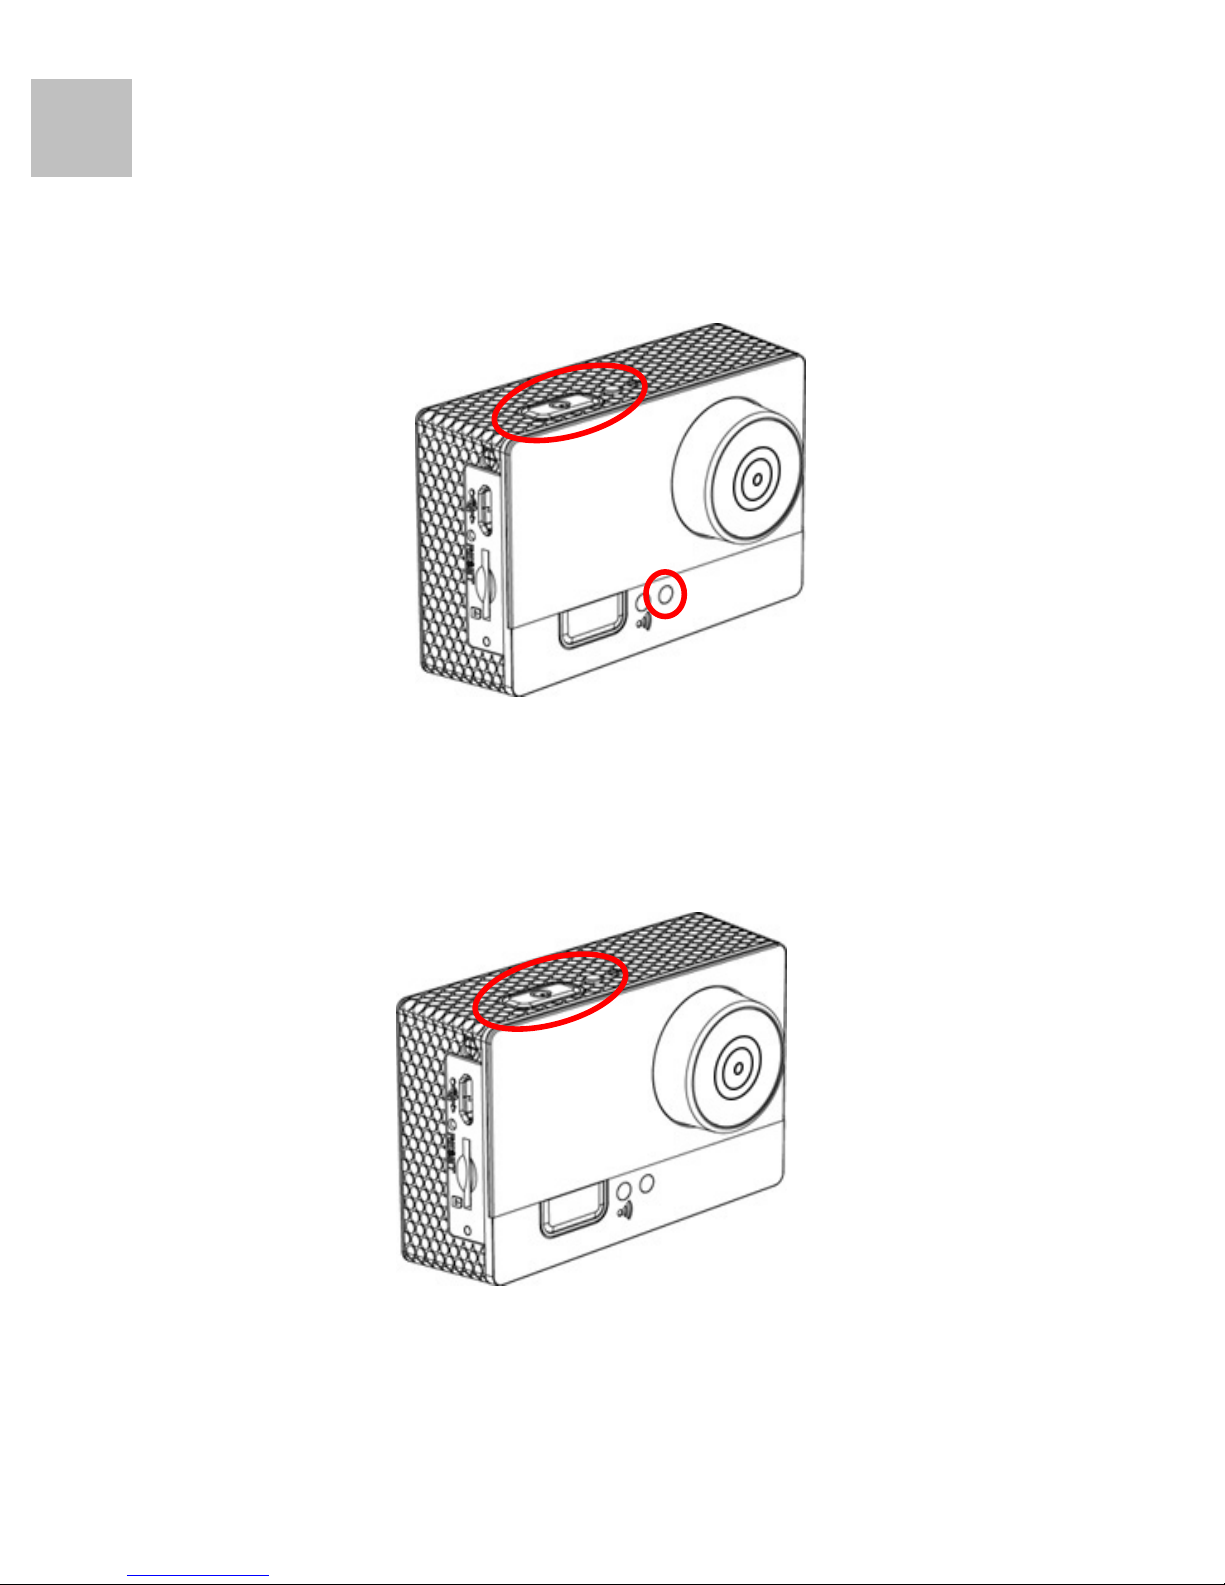
3. Press and hold the Power / REC Button for 3
seconds then release to turn on the Action Camera.
The Action Camera vibrates 3 times and the Power
LED light on in Blue. The Wireless Function
active at the same time.
4. The Action Camera vibrates 1 time and start recording
automatic. The Record LED light on in Red and The
Wireless LED light on in Blue when ready.
5. Press the Power / RED Button then release. The
Action Camera vibrates 1 time, stop record, turn off
the Record LED and save file.
Page 18

17
EN
6. Press and hold the Power / RED Button for 3 seconds
then release again. The Action Camera vibrates 3
times, the Power LED turn off and power off.
Note: 1. Don’t take out the micro SD card during the video record.
2. The Status LED will flash the RED if no microSD card
insert into the microSD card slot and power off after 10
seconds automatic.
3. In Circulate Record Mode, the camera circulate record
video and overwrite the oldest recorded file first.
4. The recorded file divides each 3 minutes per file.
5. The file name format is CAR_0001.MOV.
6. Always check the SD card space and make sure the car
has enough space to save new files.
7. The camera auto power on and record when plug-in the
micro USB cable with an external power supply.
8. The camera auto stop record, save file and power off when
the external power off from the micro USB port.
Accidental Record
The built-in 3-axis G-force Sensor always detects
strong forces from any directions. When a rapidly
variational force (like a collided accident) was be
detected during the video record. The current
recording file will be locked and can’t be overwritten
even the memory card is full.
Note: 1. Base on the situation of the traffic to adjust the sensitivity
of G-force Sensor. If the sensor is too sensitively that
will easy to create a locked file just a slight variation.
(Regarding how to adjust the sensitivity of G-force sensor,
please refer "SMC App".)
2. The file named format is SOS_0001.MOV.
3. Always check the SD card space and make sure the
camera has enough space to save new files.
Page 19
18
EN
Sporty Mode
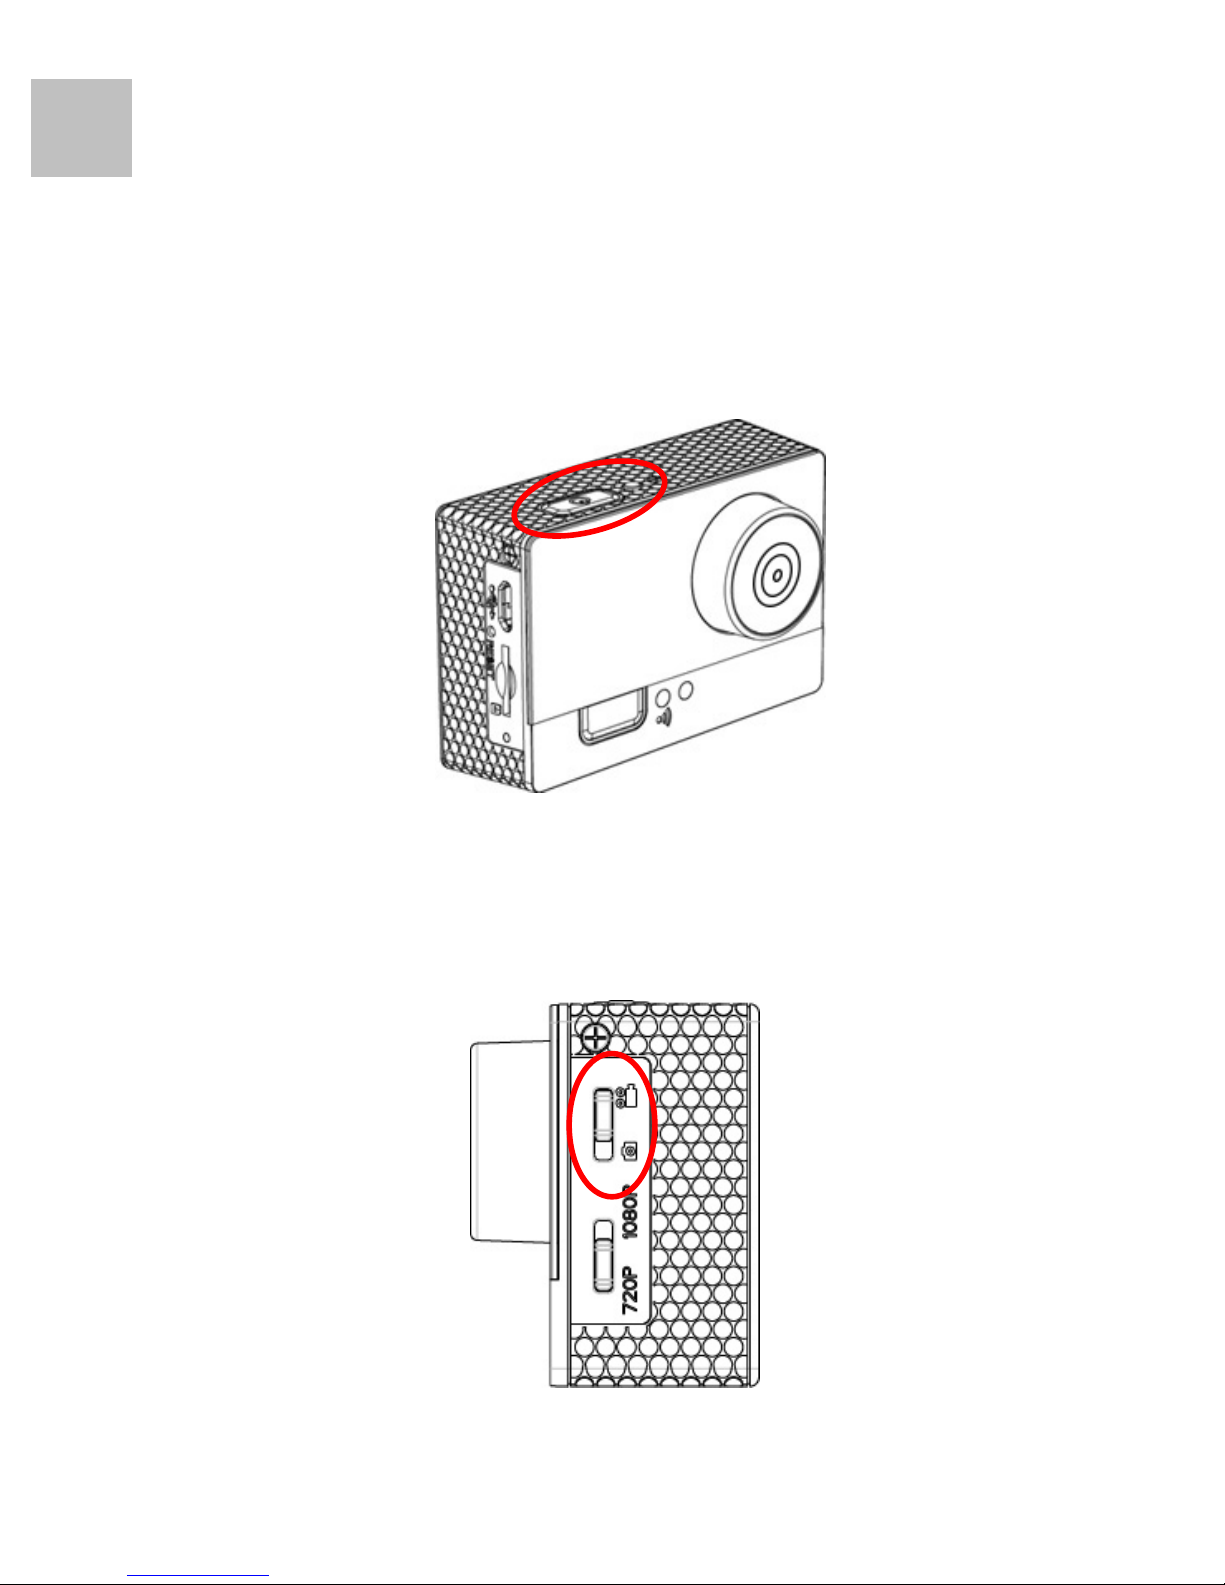
1. Press and hold the Power / REC Button for 3
seconds then release to turn on the Action Camera.
The Action Camera vibrates 3 times and the Power
LED light on in Blue.
2. Slide the Mode Switch up to the Sporty Mode.
Page 20
19
EN
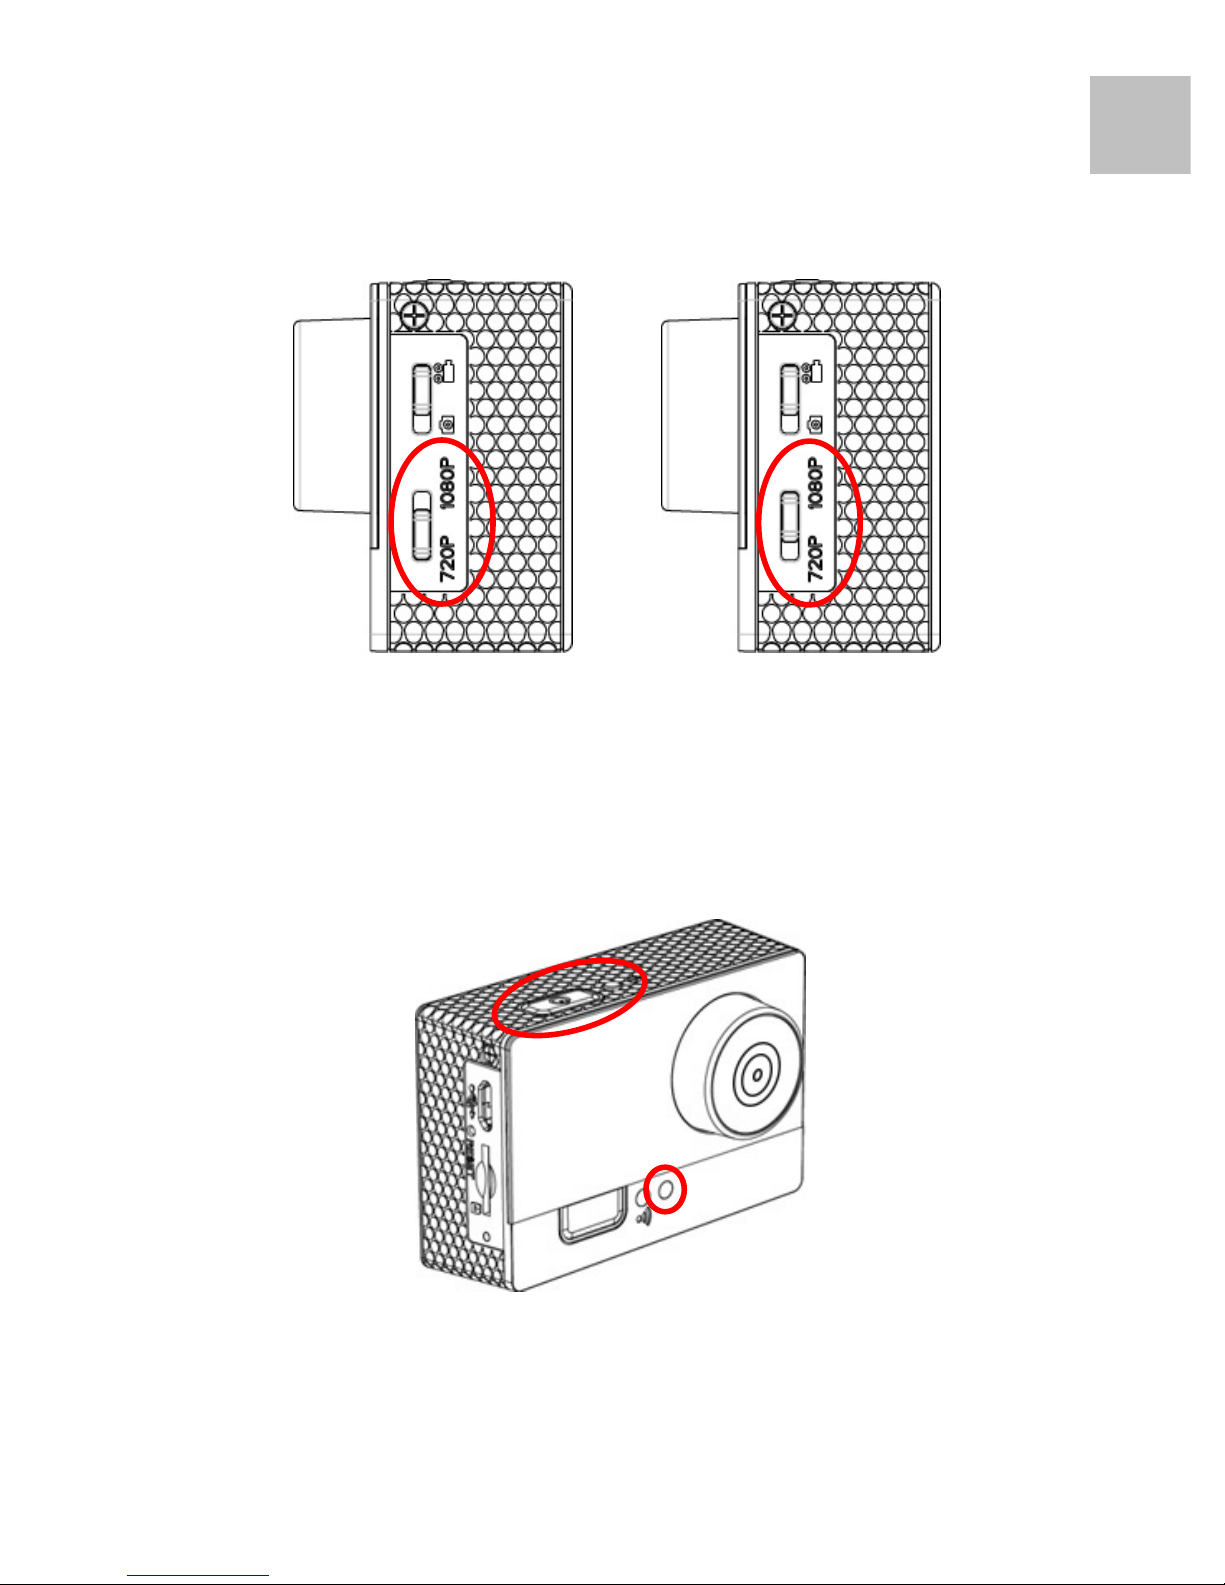
3. The Video Record supports 2 resolutions. Slide the
Resolution Switch up for Full HD 1080p and slide
down for HD 720p.
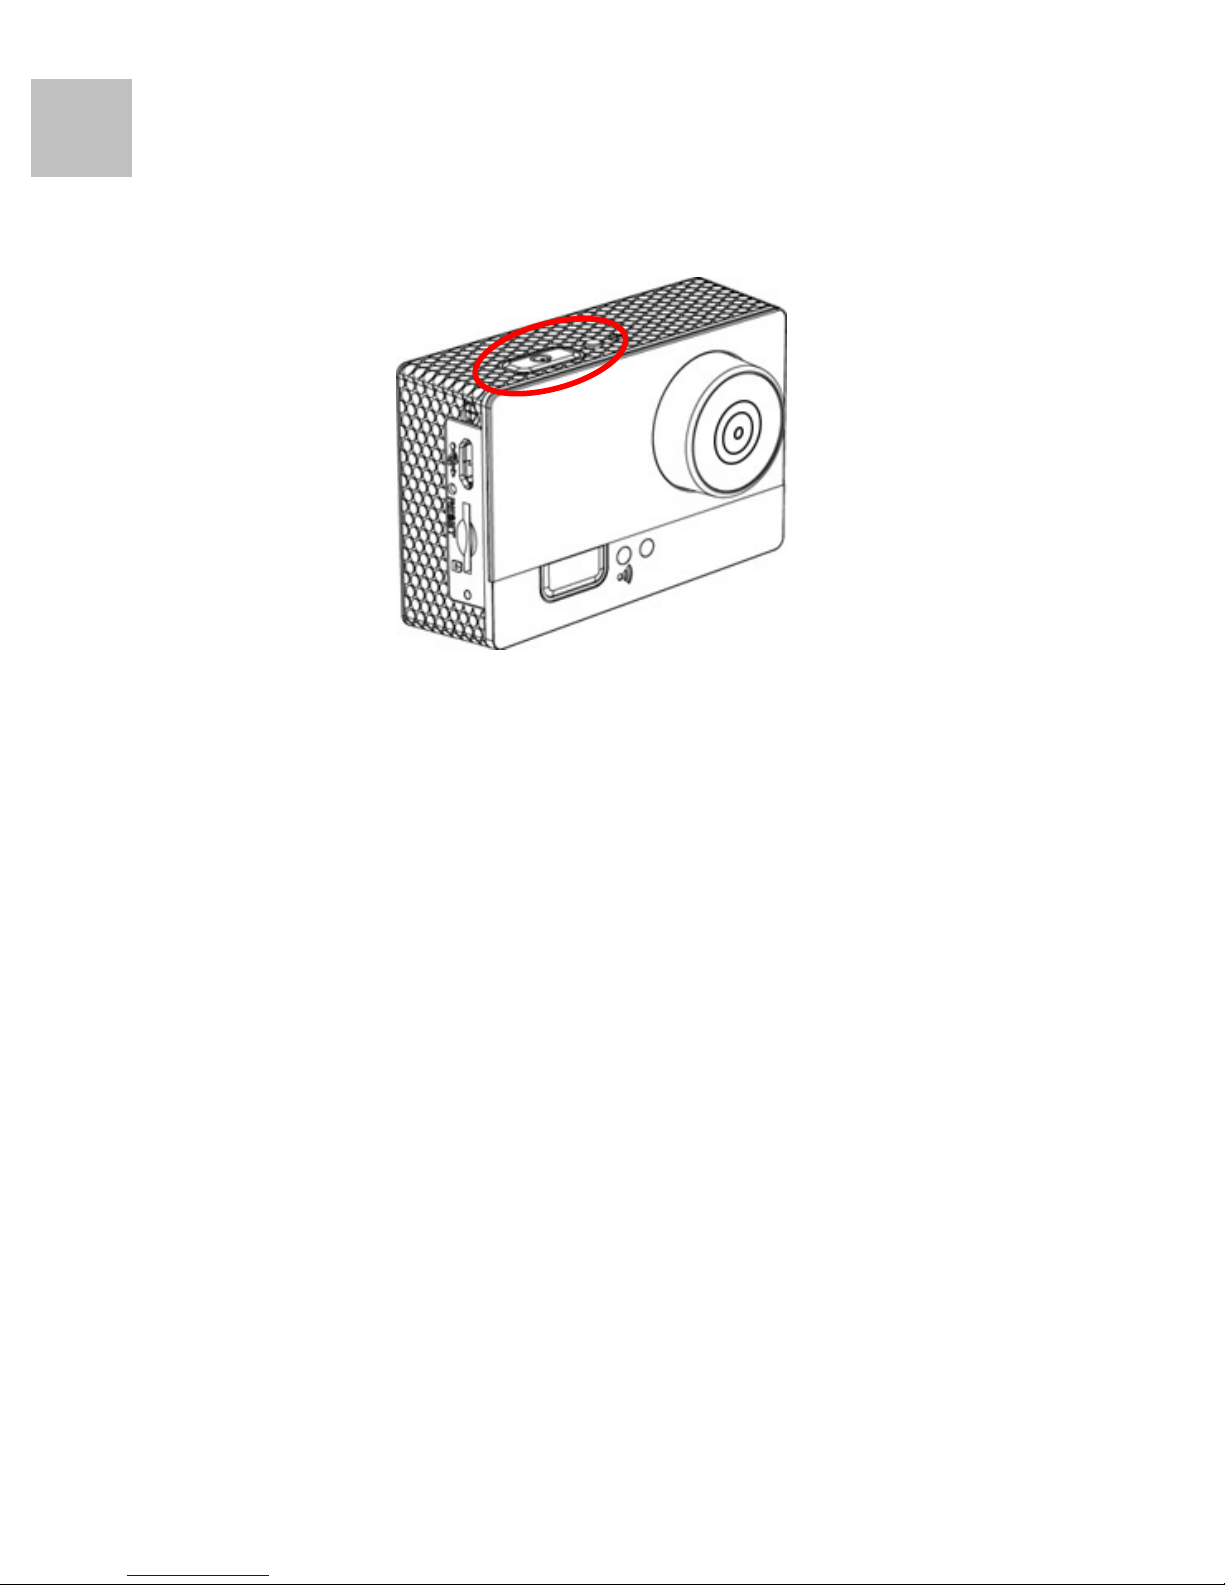
4. Press and release the Power / REC Button, the
Action Camera vibrates 1 time. The Record LED
light on in Red and start recording.
Page 21
20
EN
5. Press and release the Power / REC Button again,
the Action Camera vibrates 1 time. The Record
LED turns off then stops record and saves file.
6. Press and hold the Power / RED Button for 3 seconds
then release again. The Action Camera vibrates 3
times, the Power LED turn off and power off.
Note: 1. Don’t take out the micro SD card during the video record.
2. The Status LED will flash the RED if no microSD card
insert into the microSD card slot and power off after 10
seconds automatic.
3. The record function disable before wireless ready.
4. The file name format is MOV_0001.MOV.
5. Always check the SD card space and make sure the
camera has enough space to save new files.
6. The Sporty mode doesn’t support the "Accidental
Record" function.
7. In Sporty Mode, the camera doesn’t auto power on when
plug-in the micro USB cable with an external power supply.
Page 22
21
EN
6. Wireless
Wireless function enables user to remotely control the
Action Camera via Apps from iOS and Android
smartphones and tablets.
Wireless On
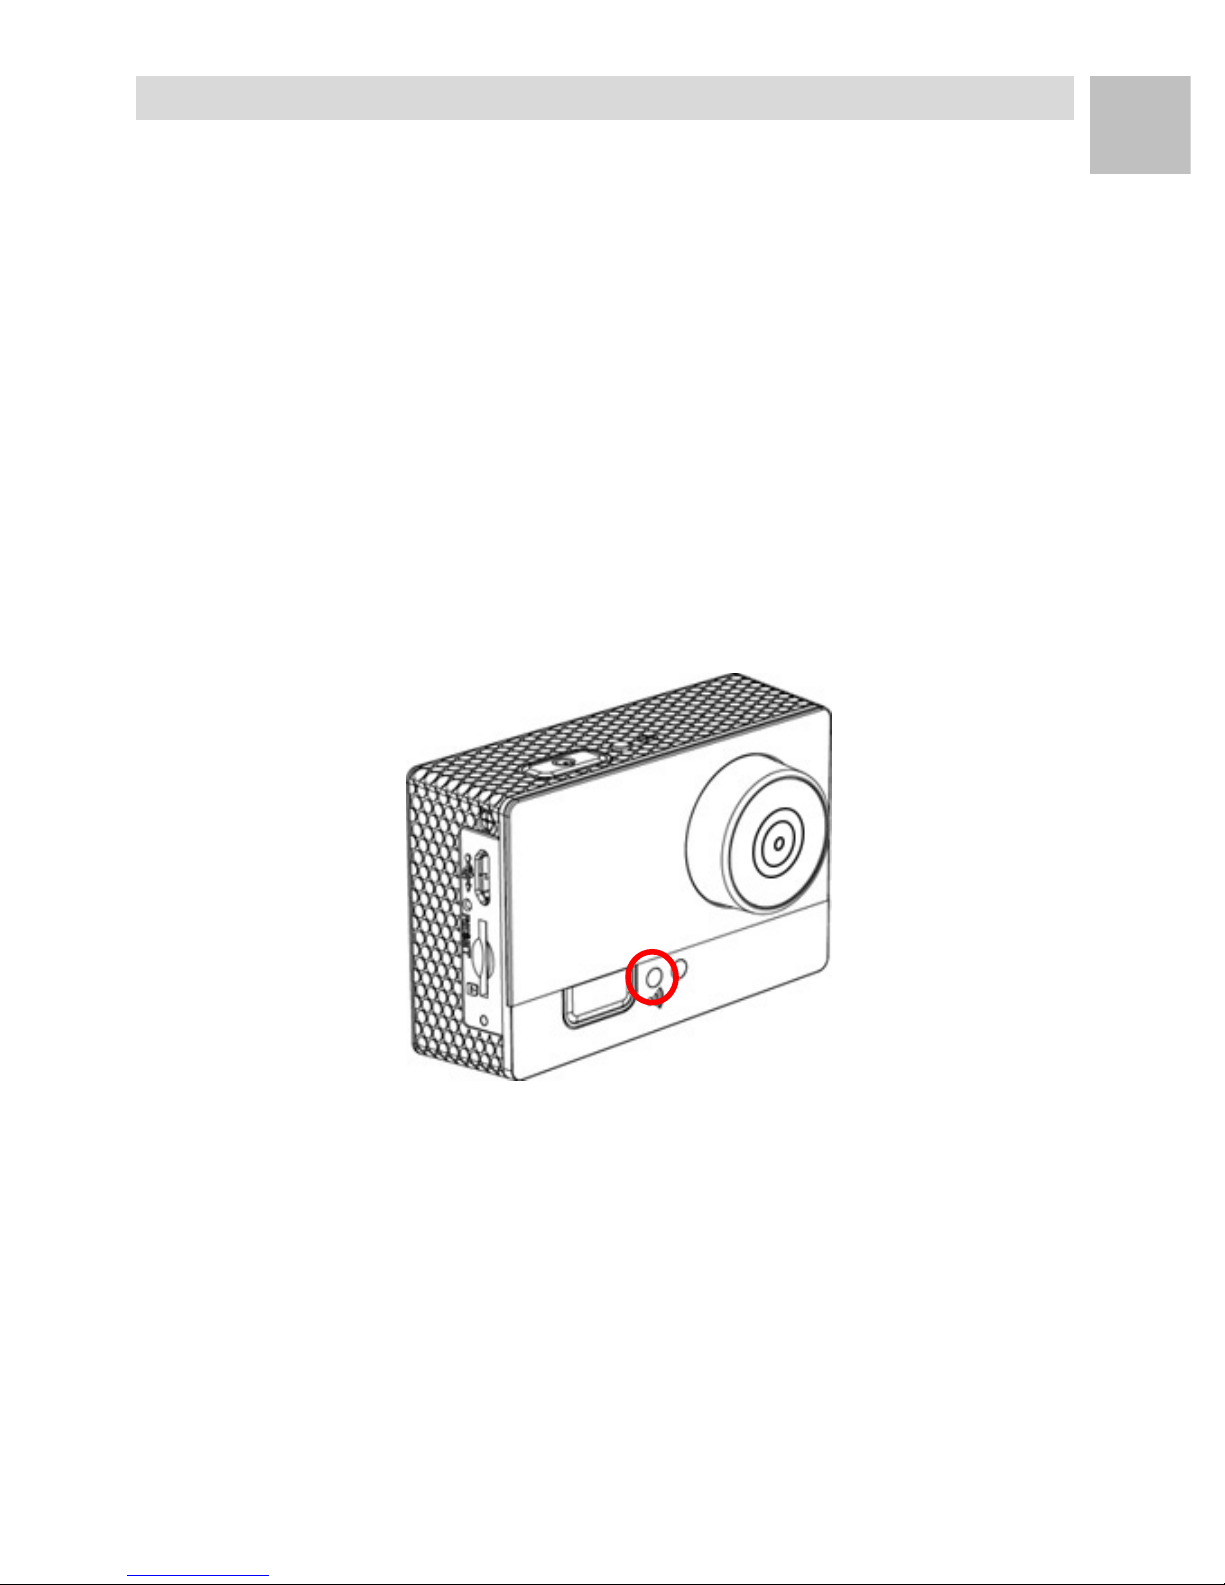
1. The wireless function actives automatic when the
Action Camera power on.
2. The Wireless LED lights on in Blue when wireless
function has ready.
Note: 1. Before use the Action Camera App to control camera,
make sure to connect your camera via WLAN setting in
your smartphone or tablet.
2. Default camera’s WLAN name is "HD160AWC” and the
password is “1234567890”.
3. The wireless function disable automatic if disconnect with
the App over 3 minutes.
Page 23
22
EN
Control via App
1. Download and install the App SMC (Smart Camera)
from App Store for iOS or Google Play for Android.
2. Remotely control the Action Camera via SMC
(Smart Camera) from iOS and Android smartphones
and tablets.
Wireless Off
1. The wireless turns off when the Action Camera
power off.
2. Or you can press the Wireless Button to turn on / off
wireless function manual.
Page 24
23
EN
7. Download
Download from Camera
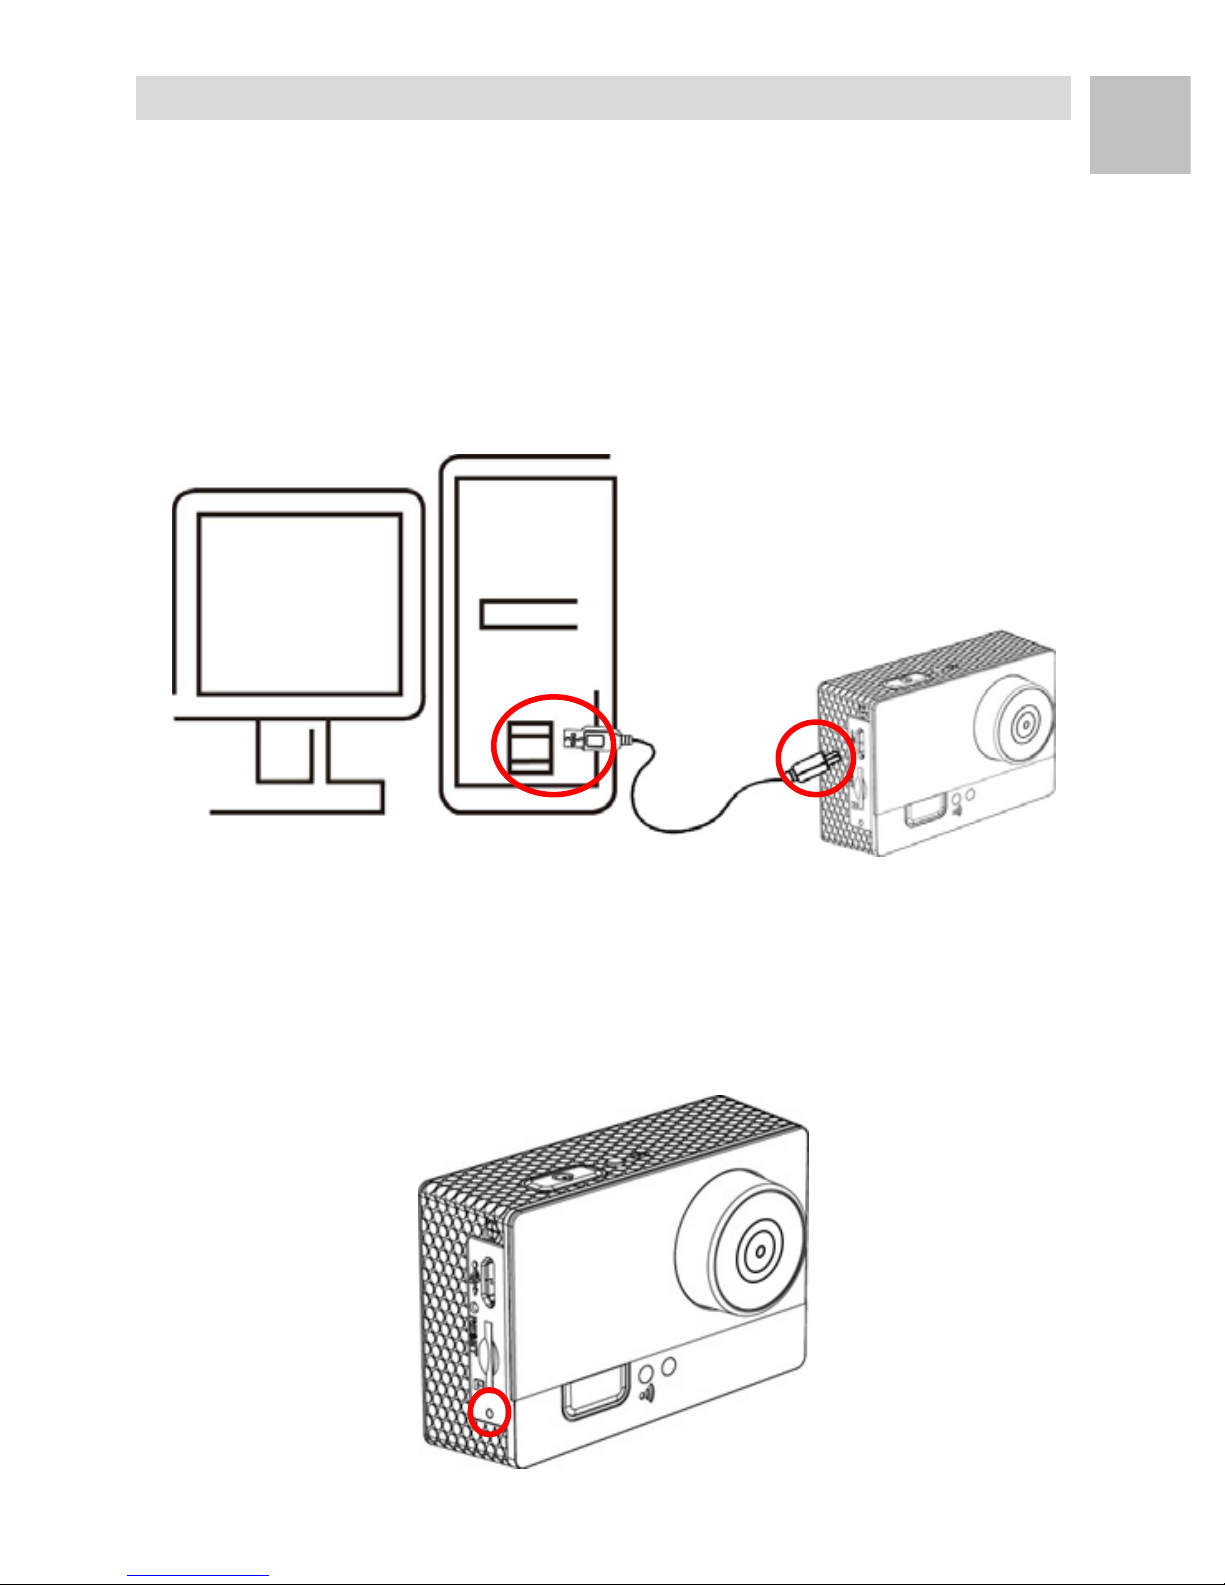
1. Connect the supplied mini USB cable into the micro
USB port of the Action Camera.
2. Plug the USB cable into a PC / Mac USB 2.0 port.
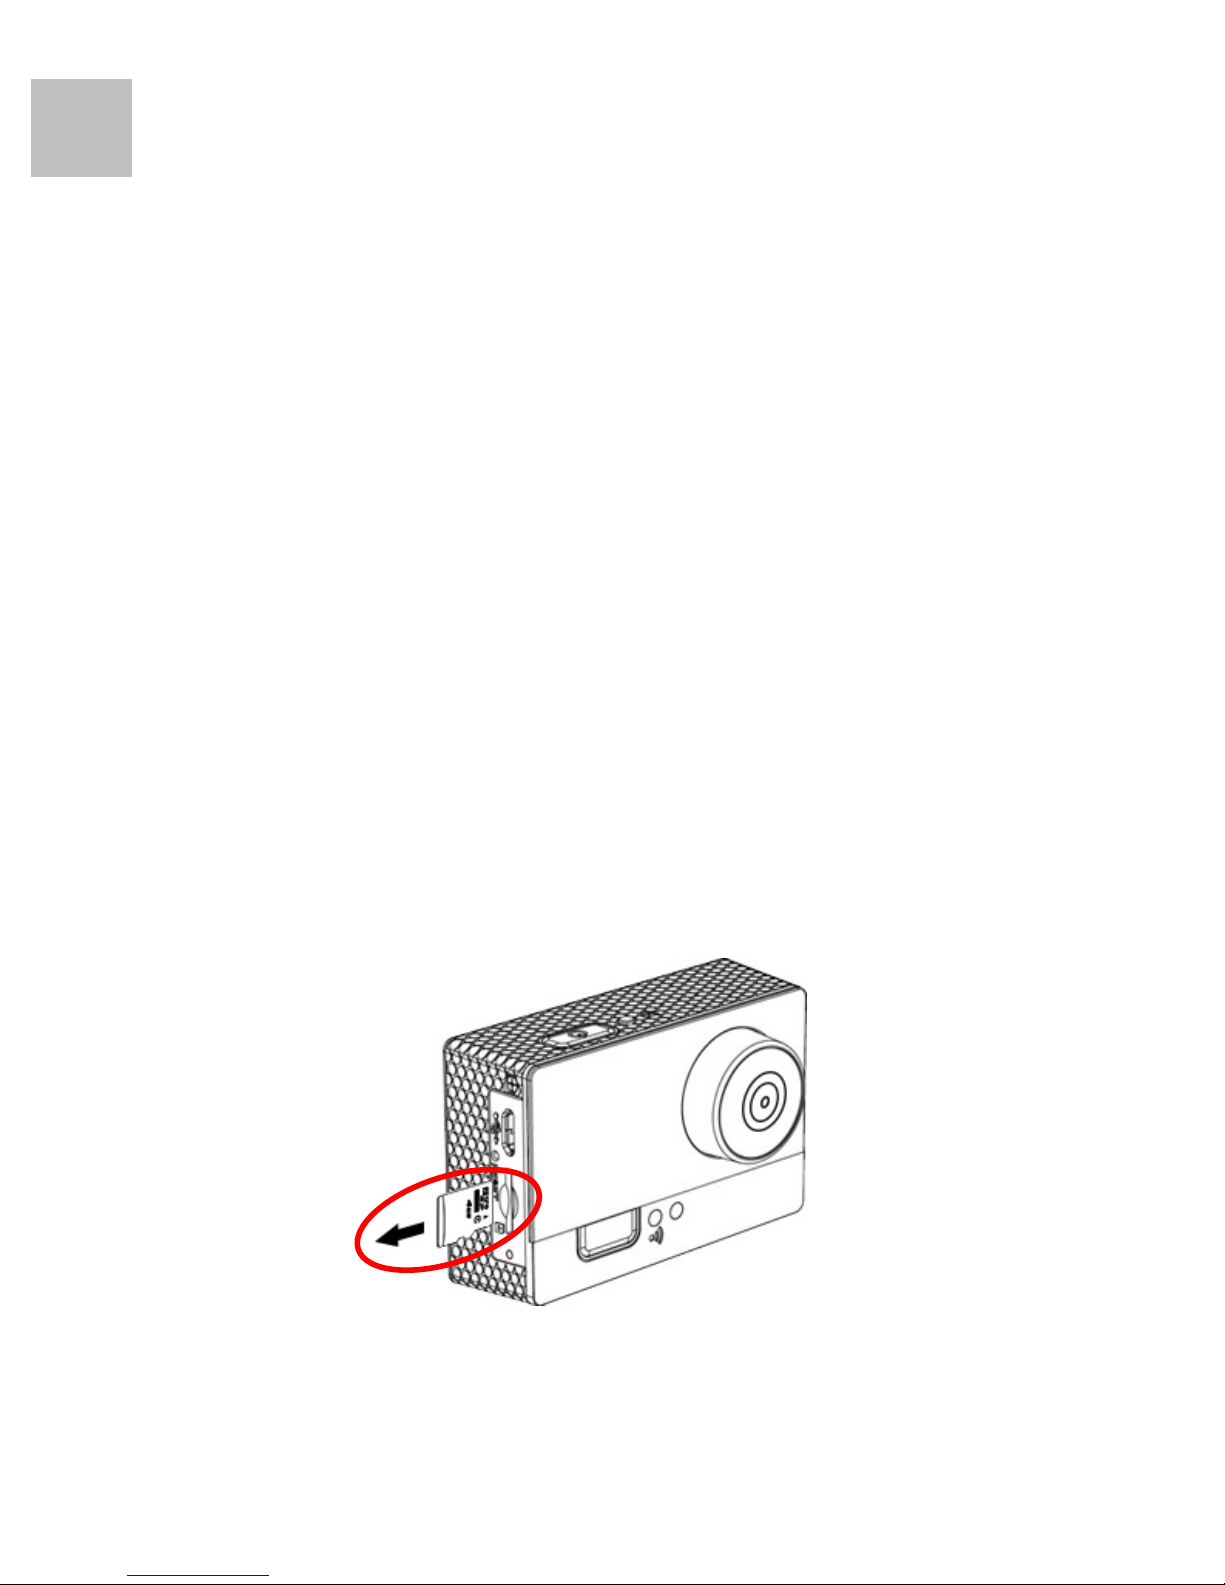
3. The Status LED at the left side of the Action
Camera light on in Green after power on.
Page 25
24
EN
4. On a PC / Mac, your Action Camera will mount to
your computer as a mass storage device in MSDC
mode.
5. You may download your video files from the
X:\DCIM\100__DSC folder created on the micro SD
card.
Note: 1. Always eject the device from PC / Mac.
2. The Action Camera auto power off when disconnect the
micro USB cable.
Download from Card Reader
1. Make sure the Action Camera has turned off.
2. Take the micro SD card out from the Action Camera
and use a SDHC compatible card reader to transfer
files to your computer.
3. You may download your video files from the
X:\DCIM\100__DSC folder created on the micro SD
card.
Page 26

25
EN
8. Playback
Playback from PC
The video file format is MOV which can be played by
QuickTime
TM
with PC / Mac.
Windows 7: The videos can be viewed by the
built-in Windows Media Player
TM
or QuickTime
TM
.
Windows XP: The videos can be viewed by the
Windows Media Player
TM
Ver. 11 or QuickTime
TM
.
Note: For PC version which can be downloaded from:
http://www.apple.com/quicktime/download/
Playback from Mac
Mac: Use the built-in QuickTime
TM
.
Page 27
26
EN
9. Appendix
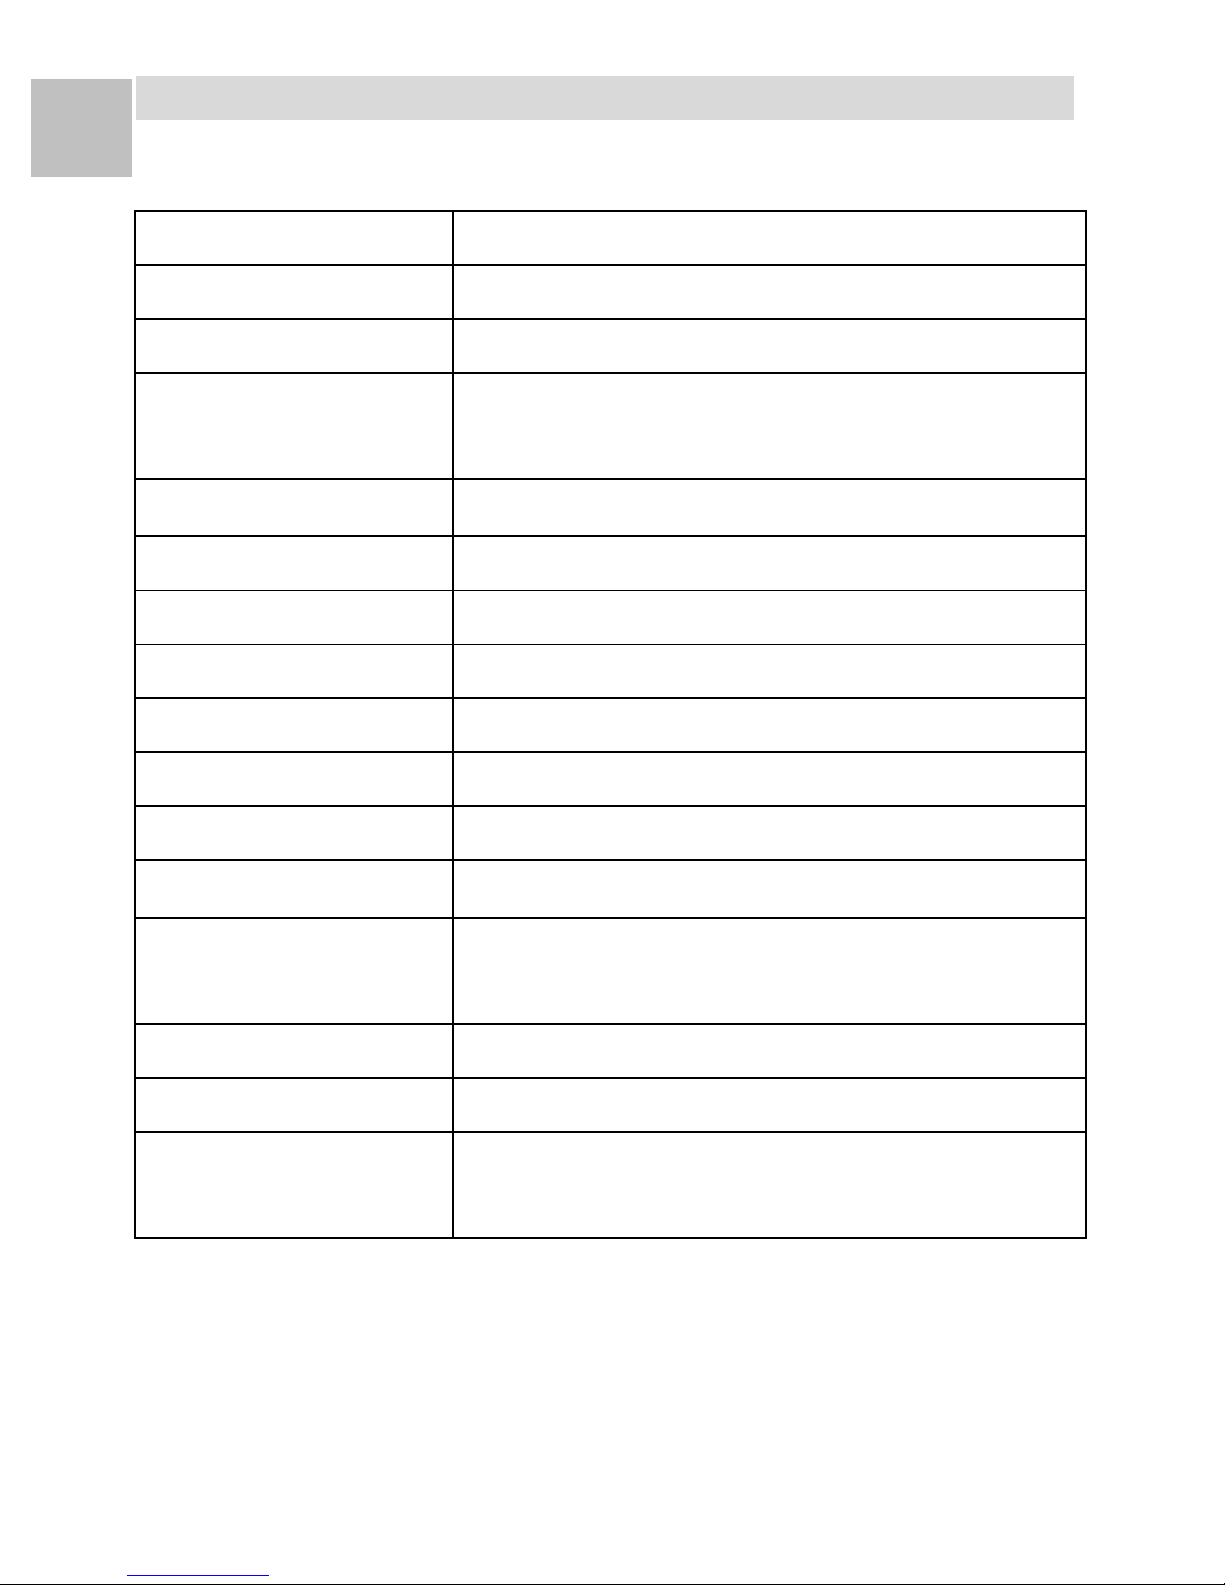
Specification
Sensor 5M (2592x1944) CMOS 1/3.2”
DSP AIT 8427
Lens 4G1P, F2.7, f3.16mm, Optical 132°
Video Resolution Full HD : 1080p (1920x1080) 30 fps
HD : 720p (1280x720) 60 fps
Video File Format MOV
White Balance Auto
Exposure Auto
Video Encoder H.264
Audio Encoder AAC and AC3 mono, sample rate 48K
Audio Input Built-in MIC
Wireless IEEE 802.11 b/g/n standards compliant
Water-Resistant IPX8 (Waterproof Case only)
Battery Internal Li-Ion Rechargeable Battery
3.6V / 2350 mAh
Storage micro SDHC up to 32GB
Connector USB 2.0, micro USB (5 pin)
Dimensions Camera Body : 64.0 x 43.4 x 35.2 mm
Waterproof Case : 77.2 x 73.2 x 43.3 mm
※Specifications are subject to change without prior notice.
Page 28

27
EN
Waterproof Case Maintenance
Maintenance
1. Inspect O-ring for damage prior to each use.
2. After extended storage, monitor initial use closely to
ensure seal in tight.
3. Dry outer housing before opening to avoid damage to
the seal.
4. Do not rinse outer housing. If dirty, wipe clean with
a soft damp cloth.
5. Keep O-ring clean. Dirt may damage the seal.
6. Do not use sharp objects to remove O-ring.
Storage
1. Remove the case cover when store the waterproof
case to avoid damage to O-ring.
2. Do not store in direct sunlight or at high
temperatures.
3. After use in salt water, soak the camera (closed and
tightened the case cover) in fresh water for 1 hr.
4. Activate power button several times while soaking.
Note: With each use, we recommend that you monitor initial
immersion in water to ensure your seal is tight.
Page 29

28
EN
Federal Communications Commission (FCC) Statement
15.21
You are cautioned that changes or modifications not
expressly approved by the part responsible for
compliance could void the user’s authority to operate
the equipment.
15.105(b)
This equipment has been tested and found to comply with the limits
for a Class B digital device, pursuant to part 15 of the FCC rules.
These limits are designed to provide reasonable protection against
harmful interference in a residential installation. This equipment
generates, uses and can radiate radio frequency energy and, if not
installed and used in accordance with the instructions, may cause
harmful interference to radio communications. However, there is no
guarantee that interference will not occur in a particular installation. If
this equipment does cause harmful interference to radio or television
reception, which can be determined by turning the equipment off and
on, the user is encouraged to try to correct the interference by one or
more of the following measures:
-Reorient or relocate the receiving antenna.
-Increase the separation between the equipment and receiver.
-Connect the equipment into an outlet on a circuit different from that
to which the receiver is connected.
-Consult the dealer or an experienced radio/TV technician for help.
This device complies with Part 15 of the FCC Rules. Operation is
subject to the following two conditions:
1) This device may not cause harmful interference and
2) This device must accept any interference received, including
interference that may cause undesired operation of the device.
FCC RF Radiation Exposure Statement:
1. This Transmitter must not be co-located or operating in conjunction
with any other antenna or transmitter.
2. This equipment complies with FCC RF radiation exposure limits set
forth for an uncontrolled environment. This equipment should be
installed and operated with a minimum distance of 20 centimeters
between the radiator and your body.
Page 30
29
EN
Trademark Information
QuickTime
TM
, MacTM, and iOSTM are trademarks of Apple Inc. or its
related companies.
Android
TM
is trademark of Google Inc. or its related companies.
Windows
®
, Windows XP®, Windows Vista®, Windows 7®, Windows 8®,
Windows Media Player
®
are trademarks of Microsoft® Corporation or its
related companies.
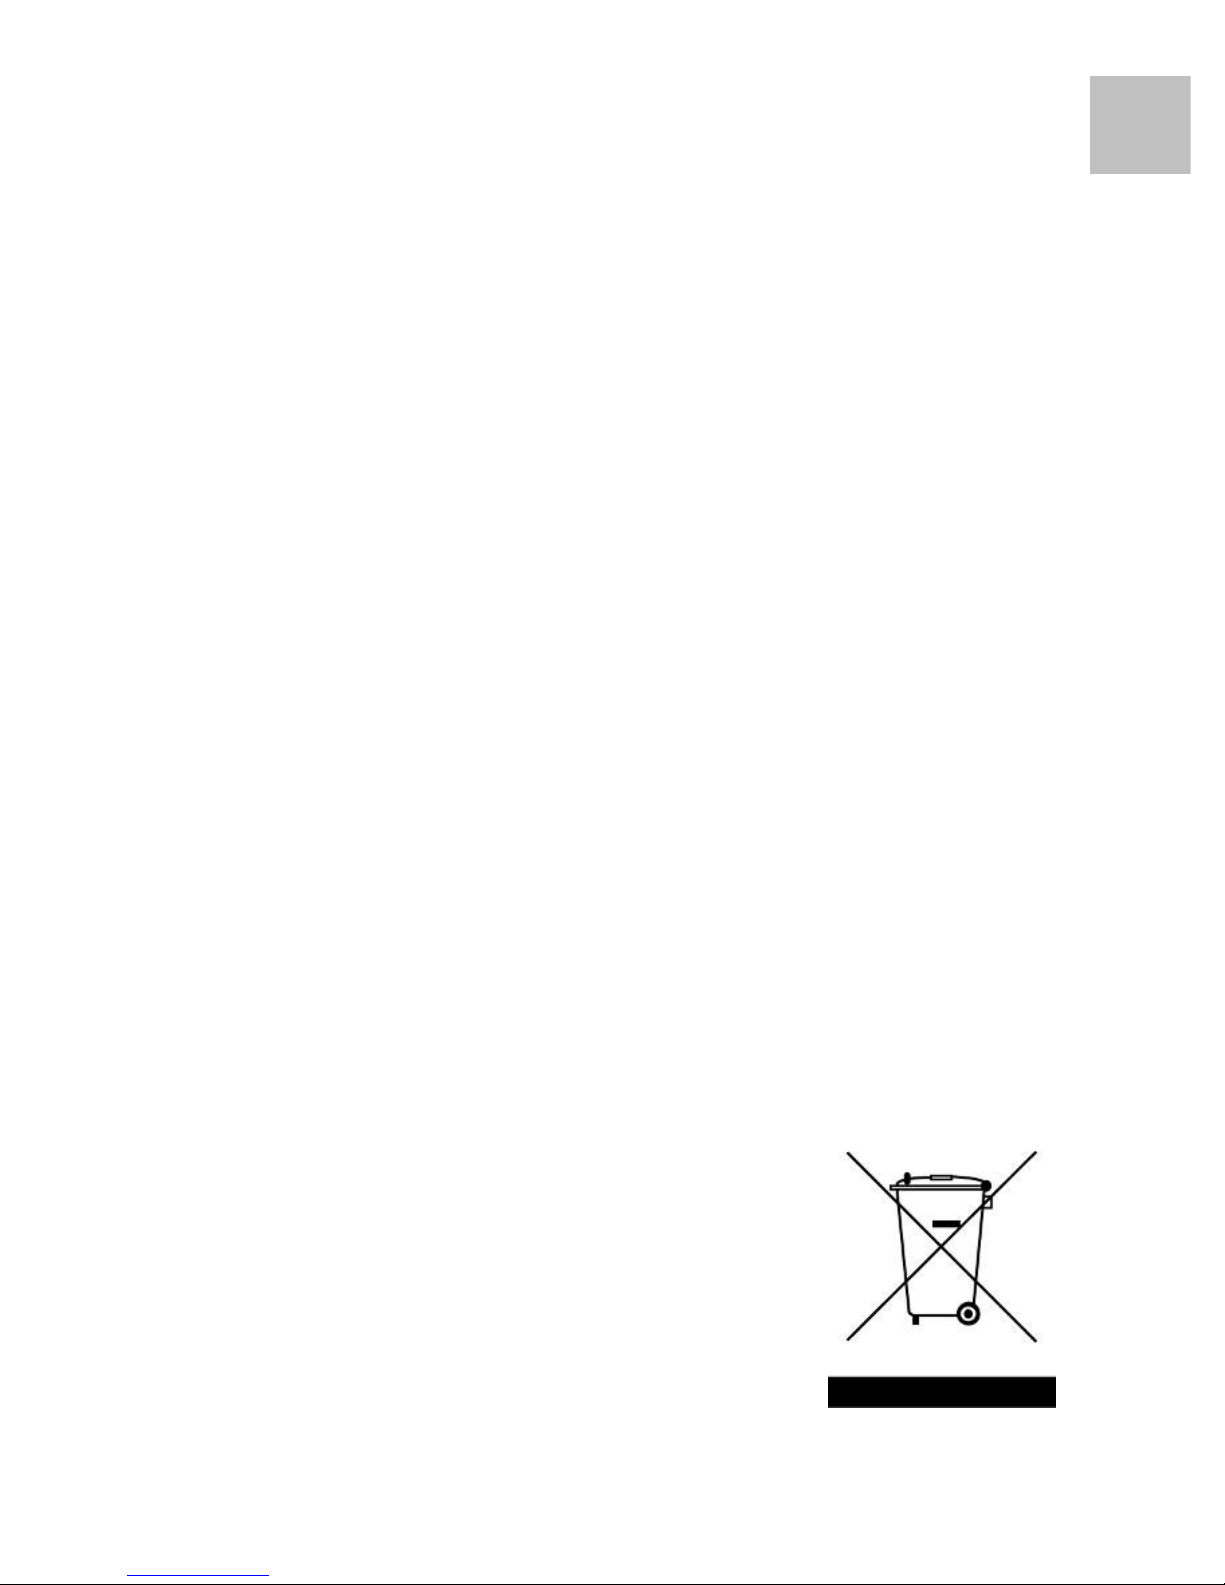
This symbol on the product or in the instructions
means that your electrical and electronic equipment
should be disposed at the end of its life separately
from your household waste. There are separate
collection systems for recycling in the EU.
For more information, please contact the local
authority or your retailer where you purchased the
product.
 Loading...