

Page 1

SYSTEM USER GUIDE
Page 2

SILENCING AN ALARM
When the alarm bell or siren is sounding, enter your user code or
If the alarm is valid, press NO to confirm the alarm and notify
the Emergency Monitoring Station that a real alarm is happening.
If it’s a false alarm, press YES to cancel the alarm and send
an abort message to the Emergency Monitoring Station.
present your keyfob to your keypad.
IS THIS A FALSE ALARM? YES NO displays.
REAL ALARM
Your security system remains armed.
FALSE ALARM
Your security system disarms.
Note: For area systems, the false alarm question only displays if the
entered user code has the authority to disarm the area.
Page 3

TABLE OF CONTENTS
Understanding the Home Screen ..................1
System Status Icons .......................................2
Weather ...............................................................3
Security Provider Logo ................................. 3
Power/Armed LED...........................................3
Proximity card Reader ...................................4
Interactive Shield .............................................4
Understanding the Keypad Screen ..............5
Command (CMD) .............................................6
Back Arrow ........................................................6
Select Areas ....................................................... 6
Entering Characters ........................................6
Arming Your System .......................................8
Arming ................................................................. 9
Instant Arming .................................................. 9
Touchless Arming ........................................... 9
Bypass Zones ....................................................9
Disarming Your System ................................10
When There’s an Alarm .................................11
Digital Monitoring Products, Inc. | XTLtouch System User Guide a
When You’re at Home ....................................11
When You’re Entering Through an Armed
Door ......................................................................11
Using the Carousel Menu ............................. 12
Panic* ..................................................................13
Chime ..................................................................13
Reset ....................................................................13
Favorites* ...........................................................13
Easy Exit .............................................................13
Options ...............................................................13
Keypad ................................................................13
User Codes* ......................................................13
Schedules* .........................................................14
Events* ................................................................14
Thermostats* ....................................................14
Doors* .................................................................14
Lights* .................................................................14
User Menu Options ....................................... 15
Accessing the User Menu ............................16
Sensor Reset .....................................................16
Page 4

Favorites .............................................................16
Z-Wave Setup...................................................16
Wi-Fi Setup .......................................................16
Bypass Zones ...................................................17
Zone Monitor ....................................................17
System Test .......................................................17
User Code ..........................................................17
Schedules...........................................................17
Time .....................................................................17
Display Events..................................................18
Request Service ..............................................18
Working with User Codes ............................ 19
What is a User Code? .................................. 20
Adding a User Code .................................... 20
Deleting a User Code ....................................21
Editing a User Code .......................................21
Home Automation Options .........................22
Adding a Z-Wave Device ............................23
Viewing a Z-Wave Device ...........................23
Removing a Z-Wave Device ......................23
Transferring Z-Wave
Device Information ........................................24
b XTLtouch System User Guide | Digital Monitoring Products, Inc.
Optimizing Z-Wave
Device Communication ...............................24
Using Favorites ..............................................25
Accessing Favorites ......................................26
Adding a Favorite ..........................................26
Editing a Favorite ..........................................27
Activating a Favorite ....................................27
Working with Schedules ..............................28
Adding a Permanent Schedule ................29
Extending a Schedule ..................................29
Adding a Schedule to
a Favorite ..........................................................29
Adding output schedules .......................... 30
Adding a Sunrise/Sunset Output Schedule
31
Additional Settings .......................................32
Turn O the Display When Inactive .......32
Change System Wi-Fi Password ..............32
Clean the Keypad ..........................................33
Evacuation Plan .............................................34
Page 5
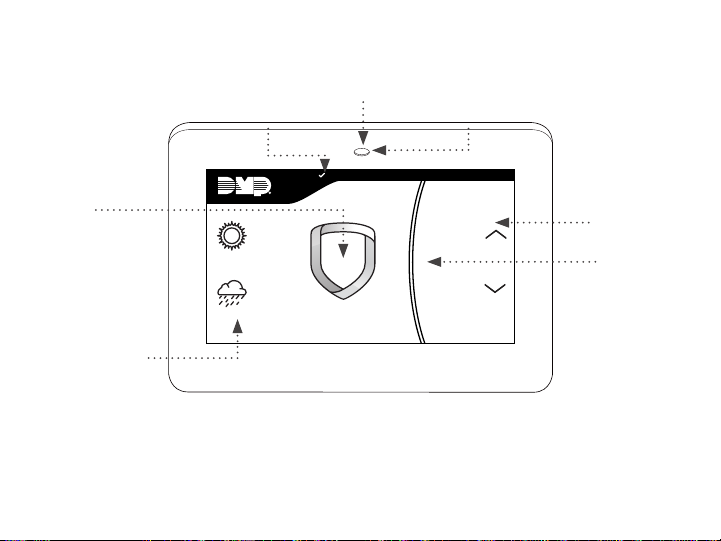
UNDERSTANDING THE HOME SCREEN
POWER/ARMED
SYSTEM STATUS
ICON
LED
PROXIMITY CARD
READER
INTERACTIVE
SHIELD
LOCAL
WEATHER
TODAY
TUESDAY
CURRENT
82
HI LO
98 77
HI LO
98 77
DISARMED
Panic
Chime
Reset
Favorites
NAVIGATION
ARROWS
CAROUSEL
MENU
This guide will help you learn to use your keypad to interact with your security system.
Your home screen is the display you will see the most. Below are
descriptions of each of the areas on your home screen.
Digital Monitoring Products, Inc. | XTLtouch System User Guide 1
Page 6
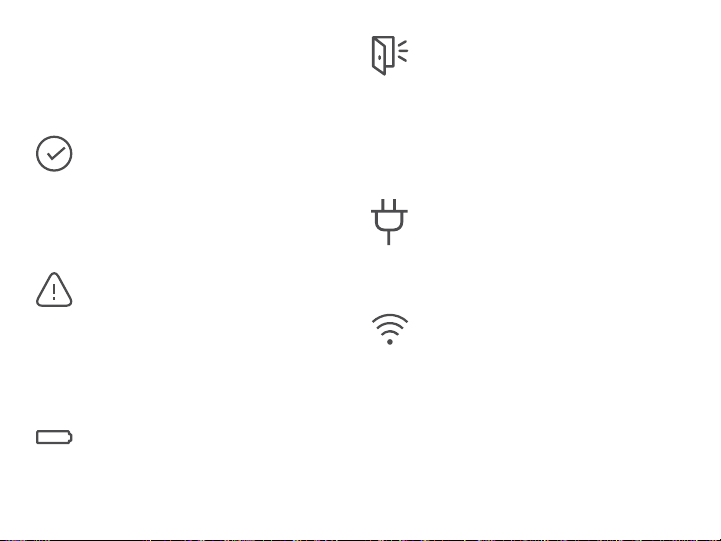
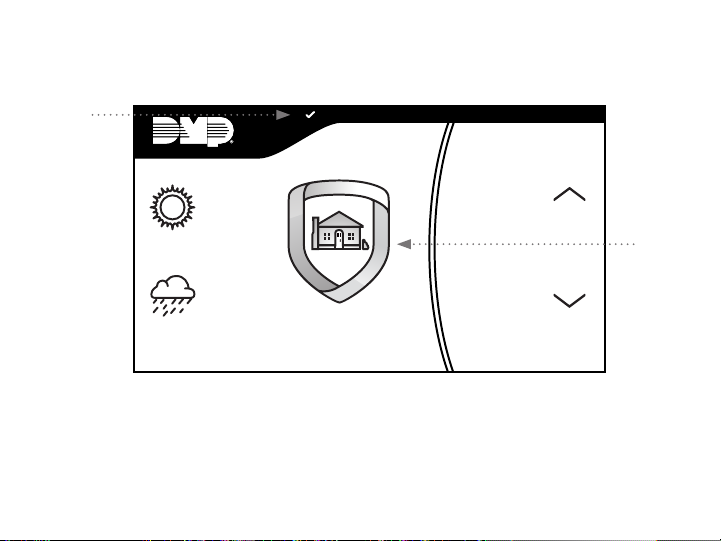
SYSTEM STATUS ICONS
System status icons are located at the top
of your home screen. The following icons
indicate the status of your system:
System Ready to Arm
The check mark indicates that
your system is ready to arm. If you
don’t see the check mark, a door or
window may be open.
Attention List
When pressed, the attention list icon
displays the type of event or trouble
message your system has recorded.
It also shows the name and number
of any aected zones.
Battery Trouble
If you see this icon, your system’s
battery is low or disconnected.
2 XTLtouch System User Guide | Digital Monitoring Products, Inc.
Chime On
This icon means your chime is
turned on. A tone will sound each
time a door or window is opened.
You can activate this feature in the
Chime section of the user menu.
AC Power Trouble
If you see this icon, your system’s
isn’t receiving AC power.
Wi-Fi Connection
If you see this icon, your system is
connected to a Wi-Fi network.
Page 7

WEATHER
Your system has been programmed to provide local weather information based on your ZIP
code. Current weather conditions and forecasted HI and LOW temperatures are available on
the home screen.
SECURITY PROVIDER LOGO
Press the logo at the top of the keypad to bring up your security provider’s contact
information.
POWER/ARMED LED
The LED at the top-center of the keypad indicates the keypad’s power status and your system’s
arming status. Depending on the status, the LED will be red or blue. See the table below for
more information.
COLOR AND ACTIVITY ARMED STATUS KEYPAD POWER STATUS
Blue Steady Disarmed AC Power OK, Battery OK
Blue Blinking Disarmed AC Power OK, Battery Trouble
No Light Disarmed AC Power Trouble, Battery OK
Red Steady Armed AC Power OK, Battery OK
Red/Blue Alternate Armed AC Power OK, Battery Trouble
Red Blinking Armed AC Power Trouble, Battery OK
Digital Monitoring Products, Inc. | XTLtouch System User Guide 3
Page 8
PROXIMITY CARD READER
Your keypad provides a built-in proximity
card reader located behind the power/armed
LED. Present your proximity card or keyfob
here to disarm your system.
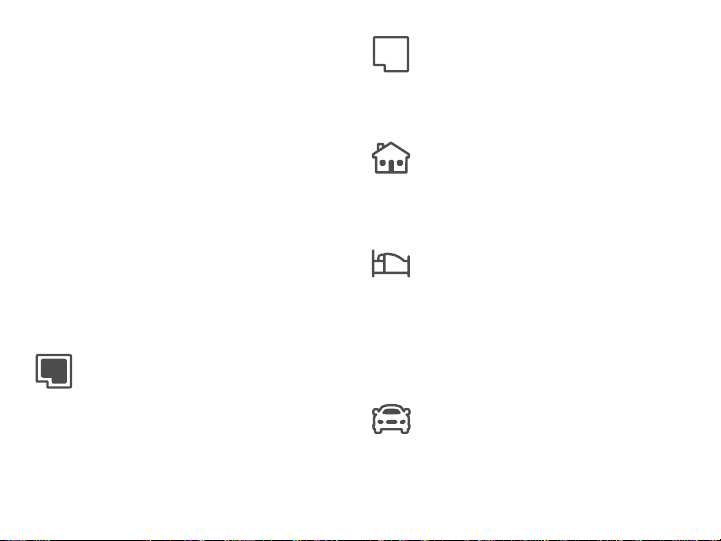
INTERACTIVE SHIELD
The interactive shield allows arming and
disarming from the home screen. Depending
Perimeter
This arming type arms just the perimeter
of your home. Use this when you are
staying home, but would like to arm your
exterior doors and windows.
Home
This arming type arms the perimeter of
your home. Use this when you are staying
home, but would like to arm your exterior
doors and windows.
on your system type, you will see either the
All/Perimeter or Home/Sleep/Away options
when you press the shield to arm your
system.
All
This arming type arms both the perimeter
and the interior of your home. Use this
when you are leaving the house and no
one will remain inside.
4 XTLtouch System User Guide | Digital Monitoring Products, Inc.
Sleep
This arming type arms the perimeter of
your home, as well as a portion of the
interior. Bedrooms and nighttime parts of
your home are left unarmed, allowing you
to access parts of your home during the
night. Other areas of the house that are
not used at night are armed.
Away
This arming type arms the perimeter,
interior, and bedrooms. Use this when
you are leaving the house and no one will
remain inside.
Page 9

UNDERSTANDING THE KEYPAD SCREEN
SELECT AREAS
BACK TO
HOME SCREEN
KEYPAD
DISPLAY
COMMAND
(CMD)
BACK
ARROW
You will see the keypad screen any time you access the user menu or enter your user code.
The keypad screen’s main features are described in the following section.
Digital Monitoring Products, Inc. | XTLtouch System User Guide 5
Page 10

COMMAND (CMD)
Use CMD to move forward through each
section of the user menu. You can also press
CMD to save information you have just
entered.
BACK ARROW
Use the back arrow to back up one step
while in the user menu. You can also press
the back arrow once to erase the last
character you entered.
SELECT AREAS
Your keypad has a top row of select areas.
Each time you press a select area, the
keypad displays a function or series of
options.
When there are more than four options
avail able, press CMD to display the
remaining options. Pressing the back arrow
allows you to review the previous four
choices.
6 XTLtouch System User Guide | Digital Monitoring Products, Inc.
ENTERING CHARACTERS
Number Pad
1. Choose a letter or symbol from the
table.
2. Identify the correlating number key
and enter it in the keypad.
3. Identify the select area for that
number and press that select area
on the keypad.
4. When your letter or symbol displays
on the keypad, return to Step 1 or
press CMD if you are finished.
Standard Keyboard
• Press ABC to enter uppercase
letters.
• Press abc to enter lowercase letters.
• Press !@# to enter symbols.
• Press 123 to enter numbers and to
return to the number pad. See the
screen to the right.
Page 11
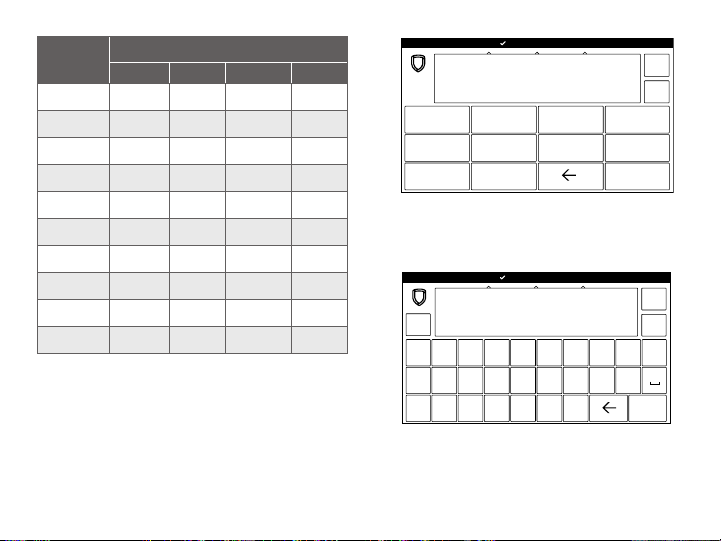
NUMBER
1 A B C ( [ {
2 D E F ) ] }
3 G H I ! ^ ~
4 J K L ? “ |
5 M N O / \ `
6 P Q R & $
7 S T U @ %
8 V W X , =
9 Y Z Space : _ ;
0 - + . ‘ * < # >
SELECT AREA
1 2 3 4
ARM
1 2 3 4
ABC DEF GHI JKL
MNO PQR STU VWX
5 6 7 8
9 0
YZ
DISARM
Number Pad
123
q w e r t y u i
a s d f g h j k l
x c v b n m CMD
z
ABC
!@#
CMD
ABC
!@#
o p
Standard Keyboard
Digital Monitoring Products, Inc. | XTLtouch System User Guide 7
Page 12
ARMING YOUR SYSTEM
STAT US
ICON
Panic
CURRENT
82
HI LO
98 77
98 77
TOD AY
HI LO
WEDNESDAY
85 68
ARMED
You can easily arm your system from your keypad’s home screen.
Choose to arm or instant arm, depending on your needs.
8 XTLtouch System User Guide | Digital Monitoring Products, Inc.
Chime
Reset
Favorites
ARMED
SHIELD
ICON
Page 13

ARMING
1. On the home screen, press the center
of the shield icon and release. This
displays the ARMING options screen.
2. Choose your arming type. The Exit
Timer screen displays and begins
counting down your programmed
exit time. If any zones are faulted or
bypassed, the system displays those
zones. See Bypass Zones.
Note: To cancel arming your system
press ENTER CODE TO CANCEL,
then enter your User Code.
3. When the exit timer ends, the keypad
home screen displays with the
ARMED shield. Your system is now
armed.
INSTANT ARMING
1. On the home screen, press and
release the shield icon to open the
ARMING options screen.
2. Press INSTANT. Instant arming
bypasses the exit timer and instantly
arms the system.
Digital Monitoring Products, Inc. | XTLtouch System User Guide 9
TOUCHLESS ARMING
Present a credential to the built-in reader
to automatically arm the system without
touching the keypad. After the arming delay
expires, All/Perimeter systems arm All.
Home/Sleep/Away and Home/Away systems
arm Away.
BYPASS ZONES
If a problem exists on any zones, the zone
name and a brief description are shown
followed by OK BYPASS STOP.
• Press OK to force arm the zone(s)
before arming.
• Press BYPASS to bypass the zone(s)
before arming.
• Press STOP to stop the system from
arming. Correct the zone problem(s)
and then press OK.
Note: Panic, emergency, fire, flood detector,
and temperature sensor zones cannot be
bypassed.
Page 14

STAT US
ICON
DISARMING YOUR SYSTEM
Panic
CURRENT
TOD AY
WEDNESDAY
82
HI LO
98 77
98 77
HI LO
85 68
DISARMED
Chime
Reset
Favorites
DISARMED
SHIELD
ICON
There are three main times when you will disarm your system: when your system is in alarm,
when you’re at home and already inside your house, and when you’re
entering your house through an armed door.
10 XTLtouch System User Guide | Digital Monitoring Products, Inc.
Page 15

WHEN THERE’S AN ALARM
When the alarm bell or siren is sounding,
enter your user code or present your keyfob
to your keypad. IS THIS A FALSE ALARM?
YES NO displays.
• REAL ALARM
If the alarm is valid, press NO to
confirm the alarm and notify the
Emergency Monitoring Station that
a real alarm is happening. Your
security system remains armed.
• FALSE ALARM
If it’s a false alarm, press YES to
cancel the alarm and send an
abort message to the Emergency
Monitoring Station. Your security
system disarms.
WHEN YOU’RE AT HOME
1. On the home screen, press and
release the shield icon.
2. The screen displays ENTER CODE.
Enter your user code or present a
keyfob to disarm the system.
Digital Monitoring Products, Inc. | XTLtouch System User Guide 11
3. You should see ALL SYSTEM OFF
displayed in the upper right corner
after the system disarms. The shield
outline indicates a disarmed status.
WHEN YOU’RE ENTERING THROUGH AN ARMED DOOR
1. When you open an armed door, the
prewarn tone sounds and the keypad
displays ENTER CODE. Enter your
user code or present a proximity
card or keyfob to disarm the system.
Only those areas authorized for your
user code will disarm.
2. Your system silences the tone as
soon as the first user code digit
is pressed. If a valid user code is
not entered within 5 seconds or
an invalid user code is entered, the
prewarn tone begins sounding again.
3. You should see ALL SYSTEM OFF
displayed in the upper right corner
after the system disarms. The shield
outline indicates a disarmed status.
Page 16

USING THE CAROUSEL MENU
Panic
CURRENT
TOD AY
WEDNESDAY
82
HI LO
98 77
98 77
HI LO
85 68
DISARMED
Chime
Reset
Favorites
CAROUSEL
MENU
OPTIONS
Use the navigation arrows or touch and drag to scroll through the carousel menu options.
This section includes brief descriptions of each carousel option.
12 XTLtouch System User Guide | Digital Monitoring Products, Inc.
Page 17

PANIC*
Select POLICE, EMERGENCY, or FIRE to
send a panic report to the Emergency
Monitoring Station.
CHIME
Select this option to turn the chime feature
on and o. If chime is on, the keypad will
sound an alert and display a notification
when external doors and windows (with
sensors installed) are opened.
RESET
Use the reset function to reset smoke
detectors, flood detectors, and temperature
sensors after an alarm.
EASY EXIT
When your system is armed, select this
option to allow you to leave through an
exit door without triggering the alarm or
needing to disarm and
re-arm your system.
OPTIONS
Select Options to display the Setting
Options screen. From here you can adjust
your keypad’s screen brightness, tone, and
volume.
KEYPAD
Displays a standard keypad. Use this option
to access the system user menu.
FAVORITES*
Favorites displays a list of your Z-Wave™
favorites. Select a Z-Wave favorite to
activate it.
Digital Monitoring Products, Inc. | XTLtouch System User Guide 13
USER CODES*
This option allows you to add, edit, and
delete user codes on your system. You will be
required to enter your user code to access
this feature.
Page 18

SCHEDULES*
This option allows you to add, edit, and
delete schedules. You can also use it to
assign schedules to outputs and favorites,
as well as auto-arming and auto-disarming
features.
EVENTS*
The Events option allows you to view up
to 200 past events that occurred on your
system over the last 45 days.
LIGHTS*
The Lights option displays the Z-Wave lights
screen. From here you can turn ON, turn
OFF, and DIM Z-Wave-equipped lights.
Some options are only available on the
*
carousel menu if they were enabled at
installation. Pressing the shield that
displays in the upper left corner of any of
the Carousel Menu screens will return you
to the home screen.
THERMOSTATS*
Select Thermostats to display the Z-Wave
thermostats screen. From here you can
adjust the temperature or select ON, OFF,
HEAT, COOL, or FAN .
DOORS*
Doors displays the Z-Wave doors screen.
From here you can lock or unlock Z-Waveequipped doors. You can also open and
close Z-Wave-equipped garage doors.
14 XTLtouch System User Guide | Digital Monitoring Products, Inc.
Page 19

USER MENU OPTIONS
ABC
ENTER CODE:
1 2 3 4
ABC DEF GHI JKL
MNO PQR STU VWX
5 6 7 8
9 0
YZ
Many of your system’s options have been put into a user menu that you can access from your
keypad. The options available are based on your authority level in the system. See the Working
Digital Monitoring Products, Inc. | XTLtouch System User Guide 15
with User Codes section for more information on user code authority levels.
!@#
CMD
Page 20

ACCESSING THE USER MENU
To access your user menu follow these steps:
1. Select Keypad from the carousel
menu and press CMD until MENU?
NO YES displays.
2. Select YES and enter your user
code. Then press CMD.
SENSOR RESET
Use the sensor reset function to reset smoke
detectors, flood detectors, and temperature
sensors after an alarm.
FAVORITES
You can create groups of up to 25 Z-Wave
devices per favorite. The 20 available
favorites can only be activated, not turned
on and o.
For example, turning the lights on and
unlocking the front door would be one
favorite. Turning the lights o and locking
the front door would be a separate favorite.
16 XTLtouch System User Guide | Digital Monitoring Products, Inc.
Z-WAVE SETUP
Allows you to program Z-Wave devices into
your system.
• ADD: Add up to 140 Z-Wave
devices to your system.
• LIST: Displays a list of Z-Wave
devices already added to your
system.
• REMOVE: Remove a Z-Wave device
from your system.
• FAV: Add, edit, or remove a favorite.
• XFER: Transfer Z-Wave device
information into your system
from a separate system.
• OPT: Optimize the communication
path Z-Wave devices use to interact
with your system.
WI-FI SETUP
Wi-Fi Setup allows you to add, remove, or
test Wi-Fi networks in your system.
• WPS: Automatically connect a
Wi-Fi network to your system.
Page 21

• LIST: Display a list of Wi-Fi
networks in range of your
system. The system will detect the
network’s security type and ask for
the wireless key.
• MANUAL: Enter the Wi-Fi network
name (SSID) you want your system
to connect to. The system will
detect the security type and ask for
the wireless key.
• TEST: Verify the your system is
connected to a Wi-Fi network.
BYPASS ZONES
Allows you to bypass a zone (e.g. an open
window or door) before arming the system.
Confirmation will be given when zone is
bypassed.
SYSTEM TEST
Use this feature to test the battery, alarm
system, and communication with the
Emergency Monitoring Station.
USER CODE
Allows you to add, edit, and delete user
codes on your system. You will be required
to enter your user code to access this
feature.
SCHEDULES
Allows you to add, edit, and delete
schedules. You can also use this option to
assign schedules to outputs and favorites,
as well as auto-arming and auto-disarming
features.
ZONE MONITOR
Zone Monitor and Chime provide the same
function. You can also enable this feature by
touching Chime on the carousel menu. See
the Using the Carousel Menu section for
more information.
Digital Monitoring Products, Inc. | XTLtouch System User Guide 17
TIME
Allows you to set or adjust the time and date
shown on your keypad.
Page 22

DISPLAY EVENTS
Allows you to view up to 200 past events
that occurred on your system over the last
45 days.
REQUEST SERVICE
Allows you to send a message to your
security provider requesting service on your
system.
18 XTLtouch System User Guide | Digital Monitoring Products, Inc.
Page 23

WORKING WITH USER CODES
USER CODES?
ADD DEL CHG
1 2 3 4
ABC DEF GHI JKL
MNO PQR STU VWX
5 6 7 8
9 0
YZ
A user code is a four-digit code that allows you to do several things from the keypad or app.
Digital Monitoring Products, Inc. | XTLtouch System User Guide 19
Every user on the system should be assigned a user code.
ABC
!@#
CMD
Page 24

WHAT IS A USER CODE?
A user code is made up of the following
elements:
• USER NUMBER: Each user on your
system is assigned a number (1–99).
This number identifies them to the
system and can be transmitted to the
Emergency Monitoring Station when
they arm or disarm the system.
• USER CODE: Each user also has a
four-digit user code. They enter this
code when they disarm the system
from the keypad or app.
• USER NAME: The user’s name.
• AUTHORITY LEVEL: A user’s
authority level determines which User
Menu options he or she can access.
A user code can be set to master or
standard. Master users can access
the entire User Menu. Standard users
can access everything except Z-Wave
Setup, Wi-Fi Setup, User Codes,
Schedules, Set Time, and Service
Request.
20 XTLtouch System User Guide | Digital Monitoring Products, Inc.
ADDING A USER CODE
1. From the home screen, access User
Codes from the carousel menu. Enter
your user code and press CMD, then
Press ADD.
2. Enter the new user number from
1–99, a four-digit user code, and the
new user name. Press CMD to cycle
through the system prompts.
3. At the CODE NO prompt, enter the
4-digit user code.
4. Enter the new user’s name.
5. At the MASTER screen, leave YES
selected to set the user’s authority
level to master or select NO to set it
to standard. If you selected NO, you
will see the TEMP CODE and ARM
ONLY options.
• If TEMP CODE displays, select
YES to assign a number of days
for the user code to be active
(1–250 days). At the end of this
period, the user code expires.
Page 25

• If ARM ONLY displays, select
YES to restrict the user to
arming only. Select NO to allow
the user to arm the system and
access standard level user menu
options.
6. At the IN LOCKS? screen, choose
whether or not to send the user code
to all of your system’s Z-Wave locks.
Note: This option is only available
for user codes 2-20. Once the user
code has been received by the lock,
entering it at the lock will lock the
door or unlock the door and disarm
the system depending on the user’s
privileges.
EDITING A USER CODE
1. From the home screen, access User
Codes from the carousel menu. Enter
your user code and press CMD, then
Press CHG.
2. Enter the user code number that you
would like to edit and press CMD.
3. Press CMD to cycle through the
dierent parts of the user code. Press
a select area to edit a the displayed
part of the user code.
DELETING A USER CODE
1. From the home screen, access User
Codes from the carousel menu. Enter
your user code and press CMD, then
Press DEL.
2. Enter the user code number you want
to delete and press CMD. The system
displays that the user code is deleted.
Digital Monitoring Products, Inc. | XTLtouch System User Guide 21
Page 26

HOME AUTOMATION OPTIONS
ZWAVE SETUP?
ADD LIST REMOVE
1 2 3 4
ABC DEF GHI JKL
MNO PQR STU VWX
5 6 7 8
9 0
YZ
Z-Wave technology adds home automation to your system. Using Z-Wave, you can control
lights, locks, small appliances, and thermostats from your keypad, computer (VirtualKeypad.
com), or smartphone (Virtual Keypad™ app). You can add up to 140 Z-Wave devices to your
22 XTLtouch System User Guide | Digital Monitoring Products, Inc.
system.
ABC
!@#
CMD
Page 27

ADDING A Z-WAVE DEVICE
1. Access the user menu and press CMD
until ZWAVE SETUP? appears, and
then press any select area.
2. Press ADD.
3. Press the Z-Wave button on the
device you are adding and wait for
your keypad to recognize it.
REMOVING A Z-WAVE DEVICE
1. Access the user menu and press CMD
until ZWAVE SETUP? appears, and
then press any select area.
2. Press REMOVE.
3. Press the Z-Wave button on the
device you are removing. Wait for
your keypad to display that the
device has been removed.
VIEWING A Z-WAVE DEVICE
1. Access the user menu and press CMD
until ZWAVE SETUP? appears, and
then press any select area.
2. Press LIST.
3. All of the Z-Wave devices that are
connected to your system will display
on the screen. Press CMD to cycle
through your devices, if needed.
Digital Monitoring Products, Inc. | XTLtouch System User Guide 23
Page 28

TRANSFERRING Z-WAVE DEVICE INFORMATION
Follow these steps to replace your Z-Wave
information with the information from
another system:
1. Access the user menu and press CMD
until ZWAVE SETUP? appears, and
then press any select area. Press CMD
to cycle through the Z-Wave options
and press XFER.
2. The system warns you that
transferring Z-Wave device
information deletes your existing
devices from the panel, and then asks
if you are sure you want to continue
the transfer. If you want to proceed,
press YES.
3. The system deletes your existing
Z-Wave devices from your panel and
searches for another system from
which to import Z-Wave information.
24 XTLtouch System User Guide | Digital Monitoring Products, Inc.
OPTIMIZING Z-WAVE DEVICE COMMUNICATION
If your Z-Wave devices aren’t functioning
properly, you may need to update the
communication path between your Z-Wave
devices and your system. Follow these steps
to optimize Z-Wave device communication:
1. Access the user menu and press CMD
until ZWAVE SETUP? appears, and
then press any select area. Press CMD
to cycle through the Z-Wave options
and press OPT.
2. The system displays the names of
your connected Z-Wave devices and
updates the communication.
3. When the update is complete the
system displays OPTIMIZE SUCCESS.
Page 29

USING FAVORITES
FAVORITES?
FAVORITE:-
1 2 3 4
ABC DEF GHI JKL
MNO PQR STU VWX
5 6 7 8
9 0
YZ
Favorites are preset combinations that allow you to quickly activate multiple Z-Wave devices
at once. For example, you could create a favorite that turns down your thermostat,
turns o your lights, and locks your front door and use it when you leave
your house. You can add up to 25 Z-Wave devices to each favorite
Digital Monitoring Products, Inc. | XTLtouch System User Guide 25
and you can have up to 20 favorites.
ABC
!@#
CMD
Page 30

ACCESSING FAVORITES
To add, edit, or activate a favorite, press
Favorites on the carousel menu, and then
press the pencil icon in the bottom-right
corner of the screen.
You can also access favorites by selecting
one of the following user menu options:
• Access the user menu, press CMD
until FAVORITES appears, and then
press any select area. This option is
only used to activate or deactivate
existing favorites. You cannot add
or edit favorites using this option.
• Access the user menu, press CMD
until ZWAVE SETUP? appears, and
then press any select area. Then,
press CMD to cycle through the
Z-Wave options and press FAV.
ADDING A FAVORITE
1. Access the FAVORITES option on
your keypad from the carousel menu
or ZWAVE SETUP?.
26 XTLtouch System User Guide | Digital Monitoring Products, Inc.
2. Enter a new number for the favorite
(1-20) and press CMD. The screen
displays that the favorite is unused.
3. Press UNUSED, enter a name for the
favorite, and then press CMD. The
screen displays your new favorite.
4. Press ADD to add your connected
Z-Wave devices to the favorite.
Follow any on-screen prompts that
may appear when adding Z-Wave
devices to the favorite.
EDITING A FAVORITE
1. Access the FAVORITES option on
your keypad from the carousel menu
or ZWAVE SETUP?.
2. Enter the number of the favorite you
want to edit and press CMD. The
screen displays the favorite along
with several options.
3. Press EDIT. The Z-Wave devices
associated with the favorite appear.
Press CMD to cycle through the
devices. Press the device name to
edit the device settings.
Page 31

4. To remove a device from a favorite,
return to the screen with the
favorite’s options, and then press
REMOVE. Select the device you
want to remove from the favorite.
The system asks you if you want to
remove the device. Press YES.
ACTIVATING A FAVORITE
1. Access the FAVORITES option on
your keypad from the carousel menu
or the user menu.
Note: If you use the carousel menu
option to activate a favorite, then do
not press the pencil icon.
2. If you are using the user menu option,
then enter the number of the favorite,
and then press CMD. The screen
displays that the favorite is activated.
3. If you are using the carousel menu
option, then a list of your favorites
appears on the screen. Press the
desired favorite to activate it.
Digital Monitoring Products, Inc. | XTLtouch System User Guide 27
Page 32

WORKING WITH SCHEDULES
SCHEDULES?
PRM EXT OUT FAV
1 2 3 4
ABC DEF GHI JKL
MNO PQR STU VWX
5 6 7 8
9 0
YZ
Schedules allow you to set recurring times when your system arms or disarms. You can also set
28 XTLtouch System User Guide | Digital Monitoring Products, Inc.
schedules for when you want your Z-Wave devices to turn on and o.
ABC
!@#
CMD
Page 33

ADDING A PERMANENT SCHEDULE
Permanent schedules are used for automatic
arming and disarming and always occur at
the same time until you change or delete
them.
1. Access the user menu and press CMD
until SCHEDULES? displays. Press
any select area.
2. SUN MON TUE WED displays. Press
CMD to display THU FRI SAT. Select
a day of the week you would like to
create a schedule for.
3. OPENING TIME? displays. Press CMD
and enter the time you want the
system disarmed. Use a 12-hour clock
only (12:00 to 11:59) and select AM
or PM.
4. CLOSING TIME? then displays. Press
CMD and enter the time you want the
system to arm.
Digital Monitoring Products, Inc. | XTLtouch System User Guide 29
EXTENDING A SCHEDULE
Allows you to extend today’s programmed
closing time schedule.
1. Access the user menu and press CMD
until SCHEDULES? displays. Press any
select key or area.
2. The keypad displays PRM EXT OUT
FAV. Select EXT.
3. The keypad displays – : AM PM.
Enter in the new time for the closing
schedule to expire.
ADDING A SCHEDULE TO A FAVORITE
1. Access the user menu and press CMD
until SCHEDULES? displays. Press any
select area.
2. Press FAV and enter the number of
the Z-Wave favorite you would like to
give a schedule to and press CMD.
Page 34

3. SUN MON TUE WED displays. Press
CMD to display THU FRI SAT. Select
a day of the week you would like to
create a schedule for.
4. Activate Time displays. Press CMD
and enter the time you want the
Z-Wave Favorite to activate.
Note: Remember, Z-Wave Favorites
are only activated, not turned on and
o.
ADDING OUTPUT SCHEDULES
The Schedules function allows you to create
a schedule for each of the eight outputs
connected to your system to turn ON and
OFF automatically.
1. Access the User Menu and press CMD
until SCHEDULES? displays. Press any
select key or area.
2. Select OUT when
displays.
3. Enter the OUTPUT NO: you want to
program and press CMD.
30 XTLtouch System User Guide | Digital Monitoring Products, Inc.
PRM EXT OUT FAV
4. The keypad displays SUN MON TUE
WED. Press CMD to display THU
FRI SAT. Select the day you want to
program.
Note: After selecting the day
of the week for the schedule to
occur, the keypad displays any
currently programmed ON OFF
times previously set for that day.
This feature allows you to review
programmed schedules at any time.
5. If ON OFF times display, the keypad
then displays DELETE KEEP. Select
DELETE to enter new times.
6. The keypad then displays ON TIME?.
This is followed by the display – :
AM PM.
• Enter a new output ON time and
select AM or PM.
• The display changes to OFF
TIME?. This is followed by the
display – : AM PM.
• Enter a new OFF time for the
output.
• Enter all schedule times using a
12 hour clock.
Page 35

7. The keypad returns to the day of the
week display allowing you to enter
another Output schedule. To exit
the user menu or to go back to the
SCHEDULES? display, press the back
arrow key.
8. To clear a schedule press DELETE
and then AM when the opening time
is requested.
ADDING A SUNRISE/SUNSET OUTPUT SCHEDULE
1. Access the User Menu.
2. Press CMD until SCHEDULES?
displays. Press any select key or area.
3. Press CMD to display SUNRISE
SUNSET.
4. The keypad displays PRM EXT OUT
FAV. Select OUT.
5. At the OUTPUT NO: – display, enter
the output number you want to
program. Press CMD.
6. The screen displays SUN MON TUE
Digital Monitoring Products, Inc. | XTLtouch System User Guide 31
WED. Press the CMD key to display
THU FRI SAT. Select the day that
you want to set up a schedule on.
7. The keypad displays TURN ON AT.
Press the second select key or area.
8. Select SUNRISE or SUNSET and then
use the select keys or areas below the
- and + to set an oset time. Choose
from 5, 10, 15, 30, 45, or 60 minutes
before or after sunrise or sunset.
9. Press CMD.
10. The keypad displays TURN OFF AT.
Press the second select key or area.
11. Select SUNRISE or SUNSET and then
use the select keys or areas below the
- and + to set an oset time. Choose
from 5, 10, 15, 30, 45, or 60 minutes
before or after sunrise or sunset.
12. Press CMD to save the schedule.
Page 36

ADDITIONAL SETTINGS
TURN OFF THE DISPLAY WHEN INACTIVE
A keypad Brightness setting of 1 allows the keypad display to turn o automatically after a
brief period of inactivity. The Arm/Disarm LED remains lit. A keypad Brightness setting of 0
allows both the keypad display and LED to turn o automatically after a period of inactivity. To
wake the display, tap any part of the touchscreen surface.
CHANGE SYSTEM WI-FI PASSWORD
When you change your network’s Wi-Fi password,
the system detects that the password has changed
and asks you to update it. To close the Incorrect
WiFi Password dialog and return to the main
menu, tap the Shield icon. To reopen the dialog
from the main menu, tap the Wireless icon.
1. Tap ENTER PASSWORD.
2. Use the onscreen keyboard to enter your
password:
• Press ABC to enter uppercase letters
• Press abc to enter lowercase letters
• Press !@# to enter special characters
• Press 123 to enter numbers
3. Tap CMD.
32 XTLtouch System User Guide | Digital Monitoring Products, Inc.
Page 37

CLEAN THE KEYPAD
Failure to follow cleaning recommendations may result in equipment damage.
• Do not use harsh cleaners to clean keypad surfaces.
• Do not oversaturate cleaning cloths or allow cleaner to make contact with internal
electronic components, cables, or power sources.
• Do not apply excessive force to keypad displays, touchscreens, keys, or housings
when cleaning.
• Do not spray cleaner directly onto the keypad. Use alcohol sprays or wipes that
contain 70% isopropyl alcohol.
1. Use an alcohol wipe or spray a small amount of rubbing alcohol onto a clean, dry
microfiber cloth to gently wipe down all keypad touch surfaces, removing any excess
cleaner.
2. Wait 10 seconds, then completely dry all keypad surfaces.
3. If necessary, use a clean, dry microfiber cloth to gently remove streaking.
Digital Monitoring Products, Inc. | XTLtouch System User Guide 33
Page 38

EVACUATION PLAN
The National Fire Protection Association recommends that you establish an emergency
evacuation plan to safeguard lives in the event of a fire or other emergency.
Early detection is the best way to survive a fire or other emergency. The installation of a fire
alarm system with smoke and carbon monoxide detectors in each room can greatly decrease
your risk of loss or injury.
Use the steps below to prepare yourself and others in the event of an emergency:
1. Draw a floor plan of your home or business
2. Develop escape routes
3. Decide where to meet
4. Practice your escape plans
34 XTLtouch System User Guide | Digital Monitoring Products, Inc.
Page 39

Page 40

DESIGNED, ENGINEERED, AND MANUFACTURED IN SPRINGFIELD, MISSOURI USING U.S. AND GLOBAL COMPONENTS.
INTRUSION • FIRE • ACCESS • NETWORKS
DMP.COM | LT-1791 | 20292 1.01
 Loading...