

Page 1
Page 2

SILENCING AN ALARM
When the alarm bell or siren is sounding, enter your user code
or present your key fob to your keypad.
IS THIS A FALSE ALARM? YES NO displays.
REAL ALARM
If the alarm is valid, press NO to confirm the alarm
and notify the central station that a real alarm is happening.
Your security system remains armed.
FALSE ALARM
If it’s a false alarm, press YES to cancel the alarm
and send an abort message to the central station.
Your security system disarms.
Note: For area systems, the false alarm question only displays
if the entered user code has the authority to disarm the area
Page 3

TABLE OF CONTENTS
Introduction 1
About Your Security System 1
Understanding the Keypad 2
Command (CMD) 4
Back Arrow 4
Select Keys or Areas 4
Entering Characters 4
Power/Armed Logo 6
Panic Functions 8
Arming Your System 9
Arming 10
Instant Arming 10
Bypass Zones 10
Disarming Your System 11
When There’s an Alarm 11
When You’re at Home 11
When You’re Opening an Armed
Door 12
Accessing Keypad Options 13
Accessing User Options 13
Special Wireless Displays 13
Special Keypad Displays 14
User Menu 16
User Menu Options 16
User Check-In 17
Zone Activity Check 18
Sensor Reset 19
Outputs On/O 19
Favorites 20
Wi-Fi Setup 21
Bypass Zones 21
Zone Monitor 22
System Test 22
Schedules 22
Time 22
Display Events 22
Request Service 22
Page 4

Working with User Codes 23
What is a User Code? 23
Adding A User Code 23
Editing a User Code 24
Deleting a User Code 24
Home Automation Options 25
Adding a Z-Wave Device 25
Viewing a Z-Wave Device 25
Removing a Z-Wave Device 25
Transferring Z-wave device
Information 26
Optimizing Z-Wave Device
Communication 26
Using Favorites 27
Accessing Favorites 27
Adding a Favorite 27
Editing a Favorite 28
Activating a Favorite 28
Z-Wave Device Settings 29
Working with Schedules 30
Adding a Permanent Schedule 30
Extending a Schedule 30
Adding a Schedule to a Favorite 31
Adding Output Schedules 31
Adding a Sunrise/Sunset Output
Schedule 32
Time and Date 34
Editing Time and Date 34
Appendix A 35
Display Events 35
Zone Activity Check 35
Zone Bypass Event 36
Arming/Disarming Event 37
User Check-in Event 37
User Code Change Event 38
Supervisory Event 38
System Monitor Event 38
Wireless Jamming Event 39
Page 5

Appendix B 40
Cell Phone Messages 40
MyAccess™ Messaging 40
Subscribe to Text Messages 44
Common Keypad Displays 45
Evacuation Plan 48
Page 6

Page 7

INTRODUCTION
ABOUT YOUR SECURITY SYSTEM
This guide covers every-day operation of your XTLplus system.
The system combines ease of use with a simple to understand keypad display to oer the
full range of features requested by today’s security system owners. Your security system can
protect both the interior and perimeter of your home or business while you are away or just
the perimeter when you are inside, giving you a wall of security and peace of mind.
You can turn portions of your protection on or o at any time by pressing a few keys. You can
add, delete, and change personal user codes at any time or check the status of all protection
devices in the system.
Test your system weekly
Test the burglary portion of your system at least once each week. Testing should involve an
active test of all doors, windows, and motion detectors connected to your system.
If your system also has fire protection, call the service department to find out how this portion
of your system should be tested.
Refer to the System Test section of this guide for instructions on testing the burglary portion of
your system.
Digital Monitoring Products, Inc. | XTLplus System User Guide 1
Page 8
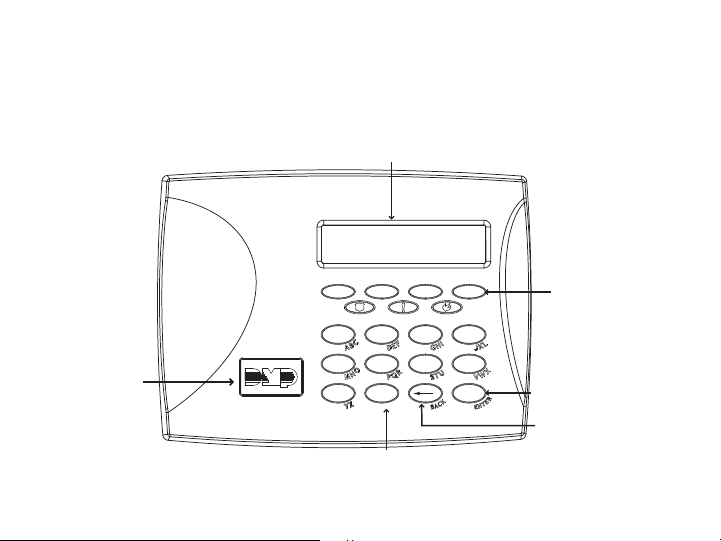
UNDERSTANDING THE KEYPAD
Your system has one of the following easy-to-use keypads.
9000 Series Wireless Keypad
32-Character Display
SMITH HOME
FRI 2:51 AM
Select Keys
Backlit Logo
and Proximity
Antenna
1 2 3 4
5 6 7 8
9 0 CMD
COMMAND Key
Back Arrow Key
Data Entry Digit keys
2 XTLplus System User Guide | Digital Monitoring Products, Inc.
Page 9
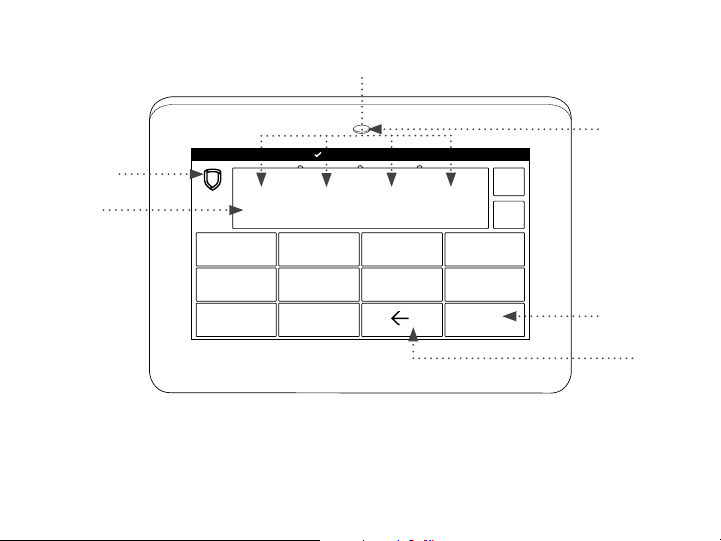
9800 Series Touchscreen Keypad
SELECT AREAS
POWER/
ARMED LED
BACK TO
HOME SCREEN
KEYPAD
DISPLAY
ENTER CODE:
1 2 3 4
ABC DEF GHI JKL
MNO PQR STU VWX
5 6 7 8
9 0
YZ
This guide will teach you how to use your keypad
to interact with your security system.
Digital Monitoring Products, Inc. | XTLplus System User Guide 3
CMD
ABC
!@#
COMMAND
(CMD)
BACK
ARROW
Page 10
COMMAND (CMD)
NUMBER KEY
SELECT AREA
1 2 3 4
1 A B C (
2 D E F )
3 G H I !
4 J K L ?
5 M N O /
6 P
Q
R &
7 S T U @
8 V W X ,
9 Y Z space _
0 - . * #
Use CMD to move forward through each
section of the user menu. Press CMD to save
information you have just entered.
BACK ARROW
Use the back arrow to back up one step while
in the user menu. Press the back arrow once
to erase the last character you entered.
2. Identify the correlating number key
and enter it in the keypad.
3. Identify the select area for that
number and press that select area
on the keypad.
4. When your letter or symbol displays
on the keypad, return to Step 1 or
press CMD if you are finished.
SELECT KEYS OR AREAS
Use the top row of select keys or select areas
to display a function or series of options on
the keypad.
When there are more than four options
available, press CMD to display the remaining
options. Press the back arrow to review the
previous four choices.
ENTERING CHARACTERS
Number Pad
1. Choose a letter or symbol from the
table.
4 XTLplus System User Guide | Digital Monitoring Products, Inc.
Page 11
Standard Keyboard
• Press ABC to enter uppercase
letters.
• Press abc to enter lowercase letters.
• Press !@# to enter symbols.
• Press 123 to enter numbers and to
return to the number pad. See the
screen below.
abc
123
!@#
Q W E R T Y U I O P
A S D F G H J K L
X C V B N M
Z
Graphic Touchscreen Keypad
Standard Keypad
Digital Monitoring Products, Inc. | XTLplus System User Guide 5
CMD
Page 12

POWER/ARMED LOGO
9000 Series Wireless Keypads
The backlit logo on the keypad indicates the panel armed status and the keypad power status.
The logo displays Red or Green depending on the operation. See table below.
COLOR AND ACTIVITY ARMED STATUS KEYPAD POWER STATUS
Green Steady Disarmed AC Power OK, Battery OK
Green Blinking Disarmed AC Power OK, Battery Trouble
No Light Disarmed AC Power Trouble, Battery OK
Red Steady Armed AC Power OK, Battery OK
Red/Blue Alternate Armed AC Power OK, Battery Trouble
Red Blinking Armed AC Power Trouble, Battery OK
The Armed LED is ON anytime any burglary protection area is armed and is OFF when ALL
areas are disarmed.
6 XTLplus System User Guide | Digital Monitoring Products, Inc.
Page 13

9800 Series Touchscreen Keypads
The LED indicates the Power and Armed status of the panel. Depending on the operation, the
LED displays in Red or Blue as listed in the table.
COLOR AND ACTIVITY ARMED STATUS KEYPAD POWER STATUS
Blue Steady Disarmed AC Power OK, Battery OK
Blue Blinking Disarmed AC Power OK, Battery Trouble
No Light Disarmed AC Power Trouble, Battery OK
Red Steady Armed AC Power OK, Battery OK
Red/Blue Alternate Armed AC Power OK, Battery Trouble
Red Blinking Armed AC Power Trouble, Battery OK
Digital Monitoring Products, Inc. | XTLplus System User Guide 7
Page 14
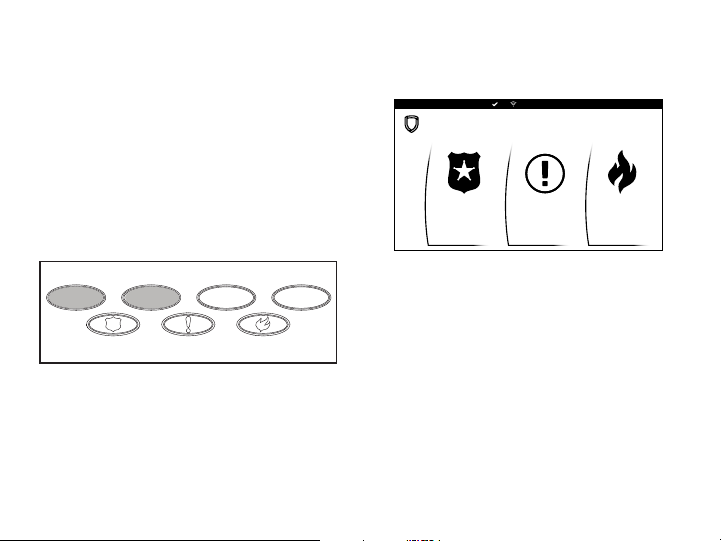
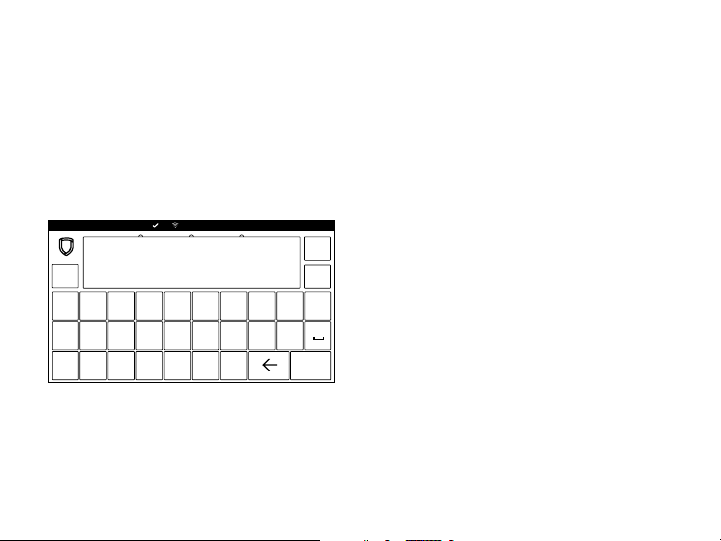
PANIC FUNCTIONS
Your keypad may be set up to send a Panic,
Emergency, or Fire report to the central
station. This function is optional. If this option
is programmed for your keypad, icons display
9800 Series Touchscreen Keypads
Touch the icon for 2 seconds until a beep is
heard.
PANIC OPTIONS
below the top row select keys or areas.
9000 Series Wireless Keypads
Press and hold the two select keys or areas
adjacent to the desired icon for 2 seconds
until the keypad beeps.
Top Row Select Keys
Panic Emergency Fire
Wireless Keypad Panic Keys
With Shaded Buttons To Indicate
Police Panic Keys
8 XTLplus System User Guide | Digital Monitoring Products, Inc.
POLICE EMERGENCY FIRE
Graphic Touchscreen Panic Icons
Page 15

ARMING YOUR SYSTEM
Your system operates in one of three ways: All/Perimeter, Home/Sleep/Away, or Area.
All
This arming type arms both the perimeter
and the interior of your home. Use this
when you are leaving the house and no
one will remain inside.
Perimeter
This arming type arms just the perimeter
of your home. Use this when you are
staying home, but would like to arm your
exterior doors and windows.
Home
This arming type arms the perimeter of
your home. Use this when you are staying
home, but would like to arm your exterior
doors and windows.
Digital Monitoring Products, Inc. | XTLplus System User Guide 9
If you have an Area system...
Your burglary protection is divided into up to six
areas. Each area can have a custom name, be turned
on or o independently of other areas, and limit
access to only those users with proper authority.
Sleep
This arming type arms the perimeter of
your home, as well as a portion of the
interior. Bedrooms and nighttime parts of
your home are left unarmed, allowing you
to access parts of your home during the
night. Other areas of the house that are
not used at night are armed.
Away
This arming type arms the perimeter,
interior, and bedrooms. Use this when
you are leaving the house and no one will
remain inside.
Page 16

ARMING
1. On the home screen, press the
center of the shield icon and release.
This displays ARMING options.
2. Choose your arming type. The Exit
Timer screen displays and begins
counting down your programmed
exit time.
Note: To cancel arming your system
during the exit timer count down,
press ENTER CODE TO CANCEL.
The keypad screen displays. Enter
your user code to stop the arming
process.
3. If any zones are faulted or bypassed,
the system displays those zones. See
Bypass Zones.
4. When the exit timer ends, the
keypad home screen displays with
the ARMED shield. Your system is
now armed.
10 XTLplus System User Guide | Digital Monitoring Products, Inc.
INSTANT ARMING
1. On the home screen, press and
release the shield icon to open
ARMING options.
2. Press INSTANT.
3. Instant arming bypasses the exit
timer and instantly arms the system.
BYPASS ZONES
If a problem exists on any zones, the zone
name and a brief description are shown
followed by OKAY BYPASS STOP.
• Select O K AY to force arm the
zone(s) before arming.
• Select BYPASS to bypass the
zone(s) before arming.
• Select STOP to stop the system from
arming. Correct the zone problem(s)
and then press OK.
Note: Panic, emergency, fire, flood detector,
and temperature sensor zones cannot be
bypassed.
Page 17

DISARMING YOUR SYSTEM
There are three main times when you will
disarm you system:
• Your system is in alarm
• You’re at home and already inside
• You’re opening an armed door
WHEN THERE’S AN ALARM
When you hear the alarm bell or siren, enter
your user code or present your key fob to
your keypad. IS THIS A FALSE ALARM? YES
NO displays.
• REAL ALARM
If the alarm is valid, press NO to
confirm the alarm and notify the
central station. Your security system
remains armed.
• FALSE ALARM
If it’s a false alarm, press YES to
cancel the alarm and send an abort
message to the central station. Your
security system disarms.
Digital Monitoring Products, Inc. | XTLplus System User Guide 11
WHEN YOU’RE AT HOME
1. On the home screen, tap the shield.
2. The screen displays ENTER CODE.
Enter your user code or show a key
fob to disarm the system.
3. The screen displays ALL SYSTEM
OFF. The shield outline indicates a
disarmed status.
Page 18

WHEN YOU’RE OPENING AN ARMED DOOR
1. When you open an armed door,
the prewarn tone sounds and the
keypad displays ENTER CODE. Enter
your user code or show a key fob
to disarm the system. Only areas
authorized for your user code will
disarm.
2. The tone silences when the first user
code digit is pressed. If a valid user
code is not entered within 5seconds
or an invalid user code is entered,
the tone begins again.
3. The screen displays ALL SYSTEM
OFF. The shield outline indicates a
disarmed status.
12 XTLplus System User Guide | Digital Monitoring Products, Inc.
Page 19

ACCESSING KEYPAD OPTIONS
ACCESSING USER OPTIONS
• LCD Keypads: Press and hold back
arrow and CMD at the same time
for 2seconds. At SET BRIGHTNESS,
press CMD to display the next option
or back arrow to exit.
• Touchscreen Keypads: Press
Options in the carousel menu.
Carousel Menu Options
Select which options appear in the carousel
menu by selecting or unselecting the
checkboxes under Display In Menu.
Digital Monitoring Products, Inc. | XTLplus System User Guide 13
SPECIAL WIRELESS DISPLAYS
Your system uses wireless transmitters to
send alarm and trouble information from the
protection devices to the panel. Wireless
systems have several unique keypad displays.
BACK DOOR -LOBAT - (low battery)
The battery in a wireless transmitter is low.
BACK DOOR is used as an example only.
BACK DOOR -MISNG - (missing)
The panel is not receiving the wireless
transmitter periodic test report.
WIRELESS -TRBL - (trouble)
Some part of your wireless system is
operating improperly. Call the service
department for assistance.
Page 20

WIRELESS RECEIVER JAMMED
-ALARM -
Your system may be programmed for wireless
interference detection and, if displayed, your
wireless receiver has detected an interfering
signal while the system is armed.
WIRELESS RECEIVER JAMMED -TRBL
- (Trouble)
Your system may be programmed for wireless
interference detection and, if displayed, your
wireless receiver has detected an interfering
signal while the system is disarmed.
SPECIAL KEYPAD DISPLAYS
Occasionally the keypad display will ask you
to enter a user code or describe a condition
on the system. Below are some examples of
the displays you may see.
ALARM NOT SENT
The alarm signal was aborted and was not
sent to the central station because a user
code was entered to disarm the system
before the alarm signal was sent to the
central station. Your system may be pre
programmed at installation to send an abort
signal to the central station.
ALARM CANCELLED
An alarm signal just sent to the central station
was cancelled because a user code was
entered after the alarm was sent. An alarm
cancel signal is sent to the central station.
ALARM VERIFIED
A valid burglar alarm has occurred and has
been manually verified by the user. The alarm
system also transmits a VERIFY message to
the central station.
ALARM
A 24-hour zone such as a fire, panic, or
armed burglary zone is faulted. Your system
may also sound wireless sirens.
14 XTLplus System User Guide | Digital Monitoring Products, Inc.
Page 21

ENTER CODE
Enter your personal user code. User codes
are used for turning the system on (arming)
and o (disarming) as well as other system
options.
As you enter your user code, the keypad
display shows asterisks (*) in place of your
digits. This prevents others from seeing your
user code on the display as you enter it.
INVALID CODE or TRY AGAIN
The user code is not recognized. Check the
user code and try again.
TEST IN PROGRESS
The system is currently being tested by an
installation or service technician.
MYACCESS™ TEXT MESSAGING
COMMANDS
Your system may be programmed to allow
simple text messages to be sent to the
security system and perform basic user
operations. By texting a message from
your cell phone, the following actions can
be performed: Arm/Disarm, check Armed
Status, Cancel Alarm, and turn Outputs On/
O.
TRBL (TROUBLE)
There is a problem with a protection device
or system component. This display includes a
description of the problem.
SYSTEM TROUBLE or
SERVICE REQUIRED
There is an electronic failure in your system.
Contact the service department as soon as
possible.
Digital Monitoring Products, Inc. | XTLplus System User Guide 15
Page 22

USER MENU
Accessing the User Menu
1. Press CMD until MENU? NO YES
displays.
2. Select YES. The keypad displays
ENTER CODE: — . Enter your user
code. You can now scroll down
through the list of system features
available to you.
USER MENU OPTIONS
USER CHECKIN
Check-in to indicate arrival on location.
ZONE ACTIVITY CHECK
Monitor a zone for non-activity.
SENSOR RESET
Clear fire and supervisory zone alarm and
trouble displays from the status list. Also
clear low battery displays from restored
wireless sensors.
16 XTLplus System User Guide | Digital Monitoring Products, Inc.
OUTPUTS ON/OFF
Turn on or o any of the outputs described in
System Setup.
FAVORITES
Activate any favorite described in System
Setup.
Z-WAVE SETUP
Add, list, remove, transfer, and optimize
Z-Wave devices.
WIFI SETUP
Add, remove, or test Wi-Fi service when
equipped.
BYPASS ZONES
Bypass a zone or reset an already bypassed
zone.
ZONE MONITOR
Add or remove a zone from the monitor
mode. Also has Chime option.
Page 23

SYSTEM TEST
Test the system siren, communication to the
central station, and backup battery.
USER CODES
Add, delete, or change user codes and
authority levels.
SCHEDULES
Add, remove, or change system schedules.
TIME
Change the time, day, and date.
DISPLAY EVENTS
View the last 100events on your system.
REQUEST SERVICE
Send a message to the central station
requesting service on the alarm system.
Digital Monitoring Products, Inc. | XTLplus System User Guide 17
USER CHECK-IN
Use this feature to monitor the arrival of
children from school or employees to work
by having a special Check-in Report sent to
your cell phone if programmed. Appendix D
describes the Cell Phone option.
Sending a Check-in Report
1. After disarming the system, access
the user menu.
2. At the USER CHECKIN? display,
press any select key or area. The
keypad displays USER CHECKIN: 22
(22 = user number).
3. The panel sends the Check-in Report
containing your account number
and user number to the cell phone
number.
Page 24

ZONE ACTIVITY CHECK
Use this feature to monitor a person for
non-activity.
When no activity is detected for the
programmed time period, your keypad
sounds a steady tone for a set period of time
and displays PRESS ANY KEY. Pressing any
key on the keypad, before the steady tone
stops, prevents your system from sending a
“User Activity Not Detected” report to the
central station. Pressing the key also restarts
the zone activity timer.
This could be used for a person living alone
to detect when they have not moved about
to trip a disarmed zone within a programmed
period of time. This feature is optional.
Note: The Zone Activity Check is disabled
when a schedule is activated to allow for
sleeping hours and is automatically enabled
when an area is disarmed.
18 XTLplus System User Guide | Digital Monitoring Products, Inc.
Selecting Zone Activity Check
1. At the ACTIVITY CHECK? display,
press any select key or area. The
keypad displays ENABLE? NO YES.
The default is YES.
2. When YES is selected, the keypad
displays CHECK ENABLED for four
seconds and then sends the Activity
Check Enabled message to the
central station.
3. When NO is selected, the keypad
displays CHECK DISABLED for four
seconds and then sends the Activity
Check Disabled message to the
central station.
Page 25

SENSOR RESET
Clears fire and supervisory zone alarms and
trouble keypad displays. Sensor Reset also
clears low battery displays from wireless
sensors that have restored.
Make sure all smoke is cleared from around
the area of the smoke detectors before
performing a Sensor Reset to prevent the
alarm from occurring again.
Resetting the Sensors
1. Access the user menu.
2. When SENSOR RESET? displays,
press any select key or area. The
keypad displays SENSORS OFF for
5seconds followed by SENSORS
ON.
3. The keypad returns to the status
display.
Digital Monitoring Products, Inc. | XTLplus System User Guide 19
OUTPUTS ON/OFF
Use this function to individually turn your
system outputs on and o. Use these outputs
to control interior and exterior lighting,
heating, air conditioning, or other appliances.
Turning the Outputs On and Off
1. Access the user menu and press
CMD until OUTPUTS ON/OFF?
appears.
2. Press any select key or area.
OUTPUT: - ON OFF appears.
3. Enter the output number you want
to turn on or o.
4. Select ON or OFF.
Page 26

FAVORITES
Use this function to create groups of up
to 25Z-Wave devices per favorite. The
20available favorites can only be activated,
not turned on and o.
For example, turning the lights on and
unlocking the front door would be one
favorite. Turning the lights o and locking the
front door would be a separate favorite.
20 XTLplus System User Guide | Digital Monitoring Products, Inc.
Z-WAVE SETUP
Note: For XTL+Z and XTL+WZ panels only.
Use this function to program Z-Wave devices
into your system.
• ADD: Add up to 140Z-Wave devices
to your system.
• LIST: Displays a list of Z-Wave
devices already in to your system.
• REMOVE: Remove a Z-Wave device
from your system.
• FAV : Add, edit, or remove a favorite.
• XFER: Transfer Z-Wave device
information into your system from a
separate system.
• OPT: Optimize the communication
path Z-Wave devices use to interact
with your system.
Page 27

WI-FI SETUP
Use this function to add, remove, or test
Wi-Fi networks in your system.
• WPS: Automatically connect a Wi-Fi
network to your system.
• LIST: Display a list of Wi-Fi networks
in range of your system. The system
will detect the network’s security
type and ask for the wireless key.
• MANUAL: Enter the Wi-Fi network
name (SSID) you want your system
to connect to. The system will detect
the security type and ask for the
wireless key.
• TEST: Verify your system is
connected to a Wi-Fi network.
Digital Monitoring Products, Inc. | XTLplus System User Guide 21
BYPASS ZONES
Use this function to bypass a zone before
arming the system.
1. Access the user menu and press
CMD until BYPASS ZONES? displays.
2. Press any select key or area. The
keypad displays ZONE - RST BYPS.
• To reset a zone, enter the
zone number and select RST.
Confirmation will be given when the
zone is reset.
• To bypass a zone, enter the
zone number and select BYPS.
Confirmation will be given when the
zone is bypassed.
Page 28

ZONE MONITOR
Zone Monitor and Chime provide the same
function. Use this function to allow the
system to monitor selected disarmed zones
(doors, windows, or motion detectors).
1. Access the user menu and press
CMD until ZONE MONITOR?
displays.
2. Press any select key or area. The
keypad displays PERIM ALL NBR.
Select one of the following:
• PERIM: Place all perimeter zones
into Zone Monitor.
• ALL: Place all zones into Zone
Monitor.
• NBR: Enter a specific zone number
for Zone Monitor.
USER CODES
Add, edit, and delete user codes on your
system. You will be required to enter your
user code to access this feature.
SCHEDULES
Add, edit, and delete schedules. You can also
assign schedules to outputs, favorites, and
auto-arming and auto-disarming features.
TIME
Set the time and date shown on your keypad.
DISPLAY EVENTS
View up to 100past events that occurred on
your system over the last 45days.
REQUEST SERVICE
SYSTEM TEST
Test the battery, alarm system, and
communication with the central station.
22 XTLplus System User Guide | Digital Monitoring Products, Inc.
Use this function to send a message to your
security provider requesting service on your
system.
Page 29

WORKING WITH USER CODES
WHAT IS A USER CODE?
• USER NUMBER: Each user on your
system is assigned a number (1-99).
This number identifies them to the
system and can be transmitted to
the central station when they arm or
disarm the system.
• USER CODE: Each user also has a
four-digit user code. They enter this
code when they disarm the system
from the keypad or app.
• USER NAME: The user’s name.
• AUTHORITY LEVEL: Determines
which user menu options are
available to each user. A user code
can be master or standard. Master
users can access the entire user
menu. Standard users cannot access
Z-Wave Setup, Wi-Fi Setup, User
Codes, Schedules, Set Time, and
Service Request.
Digital Monitoring Products, Inc. | XTLplus System User Guide 23
ADDING A USER CODE
1. Access the user menu and press
CMD until USER CODES? displays.
Press any select key or area. Enter
your user code and press CMD.
2. Select ADD.
3. At the USER NUMBER: — prompt,
enter a user number and press CMD.
4. At the CODE NO:. prompt, enter the
4-digit user code and press CMD.
5. At the MASTER? NO YES prompt,
leave YES selected to set the user’s
authority level to master or select
NO to set it to standard. If you select
NO, you might see TEMP CODE,
AREAS, and ARM ONLY options.
Page 30

• If TEMP CODE displays, select YES
to assign a number of days for the
user code to be active (1-250days).
After this period, the code expires.
• If AREAS displays, enter the area
numbers where this user should
have access. Press CMD.
• If ARM ONLY displays, select YES
to restrict the user to arming only.
Select NO to allow the user to arm
the system and access standard level
user menu options.
6. At the USER CODE IN LOCK? NO
display, choose whether or not to
send the user code to all of your
system’s Z-Wave locks.
Note: This option is only available
for user codes2-20. Once the lock
receives the user code, the user
code will lock the door or unlock
the door and disarm the system
depending on the user’s privileges.
24 XTLplus System User Guide | Digital Monitoring Products, Inc.
EDITING A USER CODE
1. Access the user menu and press
CMD until USER CODES? displays.
Press any select key or area. Enter
your user code and press CMD.
2. Select CHG. Enter the user code you
would like to edit and press CMD.
3. Press CMD to cycle through the
dierent parts of the user code.
Press a select area to edit the
displayed part of the user code.
DELETING A USER CODE
1. Access the user menu and press
CMD until USER CODES? displays.
Press any select key or area. Enter
your user code and press CMD.
2. Select DEL.
3. Enter the user code number you
want to delete and press CMD. The
system displays that the user code
has been deleted.
Page 31

HOME AUTOMATION OPTIONS
Z-Wave technology adds home automation
to your system. Using Z-Wave, you can
control lights, locks, small appliances, and
thermostats from your keypad, computer, or
smatphone.
ADDING A Z-WAVE DEVICE
1. Access the user menu and press
CMD until ZWAVE SETUP? displays.
2. Press any select key or area.
3. Press ADD.
4. Press the Z-Wave button on the
device you are adding and wait for
your keypad to recognize it.
Digital Monitoring Products, Inc. | XTLplus System User Guide 25
VIEWING A Z-WAVE DEVICE
1. Access the user menu and press
CMD until ZWAVE SETUP? displays.
Press any select key or area.
2. Press LIST.
3. All of the Z-Wave devices connected
to your system display on the
screen. Press CMD to cycle through
your devices, if needed.
REMOVING A Z-WAVE DEVICE
1. Access the user menu and press
CMD until ZWAVE SETUP? displays.
Press any select key or area.
2. Press REMOVE.
3. Press the Z-Wave button on the
device you are removing. Wait for
your keypad to display that the
device has been removed.
Page 32

TRANSFERRING Z-WAVE DEVICE INFORMATION
Replace your Z-Wave information with the
information from another system:
1. Access the user menu and press
CMD until ZWAVE SETUP? appears,
and then press any select area. Press
CMD to cycle through the Z-Wave
options and press XFER.
2. The system deletes your existing
Z-Wave devices from your panel
and asks if you want to continue the
transfer. Press YES.
3. The system deletes your existing
Z-Wave devices from your panel and
searches for another system from
which to import Z-Wave information.
26 XTLplus System User Guide | Digital Monitoring Products, Inc.
OPTIMIZING Z-WAVE DEVICE COMMUNICATION
If your Z-Wave devices aren’t functioning
properly, you may need to update the
communication path between your Z-Wave
devices and your system. Follow these steps
to optimize Z-Wave device communication:
1. Access the user menu and press
CMD until ZWAVE SETUP? appears,
and then press any select area. Press
CMD to cycle through the Z-Wave
options and press OPT.
2. The system displays the names of
your connected Z-Wave devices and
updates the communication.
3. When the update is complete,
the system displays OPTIMIZE
SUCCESS.
Page 33

USING FAVORITES
ACCESSING FAVORITES
1. Access the user menu and press
CMD until ZWAVE SETUP? appears.
Press any select key or area.
2. Press CMD to cycle through the
Z-Wave options and press FAV.
Note: You can also access favorites by
accessing the user menu and selecting
FAVORITES. However, you can only activate
or deactivate existing favorites. You cannot
add or edit favorites using this option.
Digital Monitoring Products, Inc. | XTLplus System User Guide 27
ADDING A FAVORITE
1. Access the user menu and press
CMD until ZWAVE SETUP? appears.
Press any select key or area.
2. Press CMD to cycle through the
Z-Wave options and press FAV.
3. Enter a new number for the favorite
(1-20) and press CMD. The screen
displays that the favorite is unused.
4. Press UNUSED, enter a name for the
favorite, and then press CMD. The
screen displays your new favorite.
5. Press ADD to add your connected
Z-Wave devices to the favorite.
Follow any on-screen prompts that
may appear when adding Z-Wave
devices to the favorite.
Page 34

EDITING A FAVORITE
1. Access the user menu and press
CMD until ZWAVE SETUP? appears.
Press any select key or area.
2. Press CMD to cycle through the
Z-Wave options and press FAV.
3. Enter the number of the favorite you
want to edit and press CMD. The
screen displays the favorite along
with several options.
4. Press EDIT. The Z-Wave devices
associated with the favorite appear.
Press CMD to cycle through the
devices. Press the device name to
edit the device settings.
5. To remove a device from a
favorite, return to the screen with
the favorite’s options and press
REMOVE. Select the device you
want to remove from the favorite.
Press YES.
28 XTLplus System User Guide | Digital Monitoring Products, Inc.
ACTIVATING A FAVORITE
1. Access the user menu and press
CMD until ZWAVE SETUP? appears.
Press any select key or area.
2. Press CMD to cycle through the
Z-Wave options and press FAV.
3. Enter the number of the favorite you
want to activate and press CMD. The
screen displays that the favorite is
activated.
Page 35

Z-WAVE DEVICE SETTINGS
Lights
Press any select key or area at SETTING: and
ON OFF DIM displays. Press the select key
or area under the desired setting.
• When you press ON or OFF, the
change is saved.
• When you press DIM, DIM LEVEL:
with the current setting displays.
Press any select key or area to enter
the new level (1 - 10). Press CMD.
Locks
Press any select key or area at SETTING: and
LOCK UNLOCK displays. Press the select key
or area under the desired setting.
Digital Monitoring Products, Inc. | XTLplus System User Guide 29
Thermostats
Press any select key or area at SYSTEM: and
OFF CL HT displays. Press the select key or
area under the desired setting.
• When you press OFF, FAN SETTING:
appears. Press any select key or
area. ON AUTO appears. Press the
select key or area under the desired
setting.
• When you press CL, COOL appears.
Press any select key or area. Enter
the new temperature. Press CMD.
• When you press HT, HEAT appears.
Press any select key or area. Enter
the new temperature. Press CMD.
Page 36

WORKING WITH SCHEDULES
ADDING A PERMANENT SCHEDULE
Permanent schedules are used for automatic
arming and disarming and always occur at
the same time until you edit or delete them.
1. Access the user menu and press
CMD until SCHEDULES? displays.
Press any select area.
2. SUN MON TUE WED displays. Press
CMD to display THU FRI SAT. Select
a day of the week you would like to
create a schedule for.
3. OPENING TIME? displays. Press
CMD and enter the time you want
the system disarmed. Use a 12-hour
clock only (12:00 to 11:59) and select
AM or PM.
4. CLOSING TIME? displays. Press CMD
and enter the time you want the
system to arm.
30 XTLplus System User Guide | Digital Monitoring Products, Inc.
EXTENDING A SCHEDULE
Extend today’s programmed closing time
schedule.
1. Access the user menu and press
CMD until SCHEDULES? displays.
Press any select key or area.
2. Press EXT.
3. The keypad displays – : AM PM.
Enter in the new time for the closing
schedule to expire.
Page 37

ADDING A SCHEDULE TO A FAVORITE
This option is only available for XTL+Z and
XTL+WZ panels.
1. Access the user menu and press
CMD until SCHEDULES? displays.
Press any select area.
2. Press FAV and enter the number of
the Z-Wave favorite you would like
to give a schedule to and press CMD.
3. SUN MON TUE WED displays. Press
CMD to display THU FRI SAT. Select
a day of the week you would like to
create a schedule for.
4. ACTIVATE TIME displays. Press any
select key or area to set the time.
Note: Z-Wave favorites are only
activated, not turned on and o.
Digital Monitoring Products, Inc. | XTLplus System User Guide 31
ADDING OUTPUT SCHEDULES
The Schedules function allows you to create
a schedule for each of the eight outputs
connected to your system to turn ON and
OFF automatically.
1. Access the user menu and press
CMD until SCHEDULES? displays.
Press any select key or area.
2. Select OUT.
3. Enter the OUTPUT NO: you want to
program and press CMD.
4. The keypad displays SUN MON TUE
WED. Press CMD to display THU
FRI SAT. Select the day you want to
program.
Note: After selecting the day
of the week for the schedule to
occur, the keypad displays any
currently programmed ON OFF
times previously set for that day.
This feature allows you to review
programmed schedules at any time.
Page 38

5. If ON OFF times display, the keypad
then displays DELETE KEEP. Select
DELETE to enter new times.
6. The keypad then displays ON TIME?
followed by the display – : AM PM.
7. Enter a new output ON time and
select AM or PM.
8. The display changes to OFF TIME?
followed by the display – : AM PM.
9. Enter a new OFF time for the output.
10. Enter all schedule times using a
12-hour clock.
11. The keypad returns to the day of
the week display allowing you to
enter another output schedule. To
exit the user menu or to go back to
the SCHEDULES? display, press the
back arrow.
12. To clear a schedule, press DELETE
and then AM when the opening time
is requested.
32 XTLplus System User Guide | Digital Monitoring Products, Inc.
ADDING A SUNRISE/SUNSET OUTPUT SCHEDULE
1. Access the user menu and press
CMD until SCHEDULES? displays.
Press any select key or area.
2. Press CMD to display SUNRISE
SUNSET. Select OUT.
3. At the OUTPUT NO: – display, enter
the output number you want to
program. Press CMD.
4. The screen displays SUN MON TUE
WED. Press CMD to display THU FRI
SAT. Select the day that you want to
set up a schedule on.
5. The keypad displays TURN ON AT.
Press the second select key or area.
Page 39

6. Select SUNRISE or SUNSET and
then use the select keys or areas
below the - and + to set an oset
time. Choose from 5, 10, 15, 30, 45,
or 60minutes before or after sunrise
or sunset. Press CMD.
7. The keypad displays TURN OFF AT.
Press the second select key or area.
8. Select SUNRISE or SUNSET and
then use the select keys or areas
below the - and + to set an oset
time. Choose from 5, 10, 15, 30, 45,
or 60minutes before or after sunrise
or sunset.
9. Press CMD to save the schedule.
Digital Monitoring Products, Inc. | XTLplus System User Guide 33
Page 40

TIME AND DATE
EDITING TIME AND DATE
1. Access the user menu. Press CMD
until TIME? displays. Press any select
key or area.
2. The keypad displays the current day
and time. Press CMD to display the
current date. Press CMD again to
make any changes.
3. The keypad displays TIME DAY
DAT E. Select TIME to change the
time. The keypad displays – : AM
PM. Enter the current time and
select AM or PM.
4. The display changes back to TIME
DAY DATE. Select DAY to change
the day of the week. The keypad
displays SUN MON TUE WED. If the
current day does not display, press
CMD. Select the correct day.
34 XTLplus System User Guide | Digital Monitoring Products, Inc.
5. Select DATE to change the date,
and press CMD to cycle through
the dierent parts of the date. The
keypad displays:
• MONTH: - Enter up to two digits for
the month.
• DAY : - Enter up to two digits for the
da y.
• YEAR: - Enter up to two digits for
the year.
6. The display returns to TIME DAY
DAT E. Press the back arrow to exit
the user menu.
Page 41

APPENDIX A
DISPLAY EVENTS
While in the Display Events function, use
CMD and back arrow to move forward or
backward through the list of events. To view
more information about each display, press
the select key or area as directed in the
explanations below.
Using the Display Events Function
1. Access the user menu. Press CMD
until DISPLAY EVENTS? appears.
Press any select key or area.
2. The keypad displays FIRST LAST.
3. Select FIRST to view events starting
from the oldest to the newest. Select
LAST to view events starting from
the newest to the oldest.
Digital Monitoring Products, Inc. | XTLplus System User Guide 35
ZONE ACTIVITY CHECK
This displays the date and time the Zone
Activity Check was enabled or disabled.
MSG 5:18P 10/17
ACT DISABLED
There are three event types:
• ACT DISABLED
• ACT ENABLED
• NO ZONE ACTIVITY
Zone activity check
was disabled at
5:18PM on 10/17.
Page 42

ZONE BYPASS EVENT
This displays the system zones bypassed.
BYP 5:18P 10/17
EAST WINDOW
Press any select key or area for the zone
number and user number.
There are three event types:
• BYP - Bypass
• RST - Restore
• FRC - Force Arm
Note: You may sometimes see the user as
SWG. This is short for Swinger Bypass which
is an automatic function that allows the
system to bypass a zone.
36 XTLplus System User Guide | Digital Monitoring Products, Inc.
The east window
zone was
bypassed.
ZONE EVENT
This displays alarms, troubles, and other
events that occur on your protection zones.
ALR 10:23P 10/17
BASEMENT DOOR
Press any select key or area to see the zone
number and zone type.
There are seven possible zone types:
• FIRE - Fire
• PANC - Panic
• BURG - Burglary
• EMRG - Emergency
• SUPV - Supervisory
• AUX1 - Auxiliary 1
• AUX2 - Auxiliary 2
An alarm
occurred at
10:23PM on 10/17.
Page 43

There are seven possible event types:
• ALR - Alarm
• TBL - Trouble
• RST - Restore
• FLT - Zone Fault
• SVC - Service Smoke Detector
• LOW - Low battery
• MIS - Missing wireless transmitter
Note: LOW and MIS are for wireless
systems only.
ARMING/DISARMING EVENT
This displays any system areas arming or
disarming.
ARM 5:10P 10/17
WAREHOUSE
Press any select key or area to display the
area number and user number.
There are two possible event types:
• ARM - User armed the system
• DIS - User disarmed the system
The warehouse
area was armed at
5:10PM.
USER CHECK-IN EVENT
This shows when a user selected the Check-in
feature from the user menu.
MSG 3: 31P 10/17
CHECKIN USER: 16
Digital Monitoring Products, Inc. | XTLplus System User Guide 37
User16 selected
Check-in at
3:31PM on 10/17.
Page 44

USER CODE CHANGE EVENT
This displays any user code additions,
deletions, or changes.
ADD 11:41A 10/17
US:19 BY US:12
There are three possible event types:
• ADD - User added
• DEL - User deleted
• CHG - User code or authority level
was changed.
At 11:41AM
user12 added
user19.
SUPERVISORY EVENT
This displays the automatic test report date
and time.
MSG 11:58P 10/17
AUTO RECALL
38 XTLplus System User Guide | Digital Monitoring Products, Inc.
The test report was
sent to the central
station on 10/17 at
11:58 PM.
SYSTEM MONITOR EVENT
This displays any problems with the system
AC power or battery.
TBL 11:41A 10/17
AC POWER
There are two event types:
• TBL - Trouble
• RST - Restore
There are two system monitors:
• AC POWER
• BATTERY
An AC failure
occurred at
11:41AM on 10/17.
Page 45

WIRELESS JAMMING EVENT
This displays wireless interference events that
have occurred.
ALR 11:41A 10/17
WIRELESS
There are three event types:
• TBL - Trouble (an interference
event occurred when the panel was
disarmed)
• ALR - Alarm (an interference event
occurred when any area was armed)
• RST - Restore
Digital Monitoring Products, Inc. | XTLplus System User Guide 39
The DMP wireless
receiver detected
interference on
10/17 at 11:41AM.
Page 46

APPENDIX B
CELL PHONE MESSAGES
You can receive reports of alarms, troubles, or
system armings and disarmings and know at
a glance your system status.
You can receive these types of messages:
• Zone Alarms by Zone Name
• Zone Troubles by Zone Name
• Zone Bypass by User
• Armings (Closings) by User
• Disarming (Openings) by User
• Late to Close
• Late to Open
• Early to Close
• AC Power (and restoral)
• System Low Battery
• Ambush
• Abort & Cancel by User
• Alarm Verified by User
• Check-in by User
• In-Activity
For alarm messages, the message provides
40 XTLplus System User Guide | Digital Monitoring Products, Inc.
the system name, zone name, zone number,
message type, and the time at which the
panel sent the message.
For alarm messages sent to a cell phone
number, you have the option to reply with
“cancel” to cancel the existing alarm.
MYACCESS™ MESSAGING
Your system may be programmed to allow
simple text messages to be sent to the
security system and perform basic user
operations. By texting a message from your
cell phone, the following actions can be
performed: Arm/Disarm, Cancel Alarm, turn
Outputs On/O, and check Armed Status.
The user that is texting commands to the
system must have the authority to perform
the commands as if it occurred at the keypad.
The cell phone number and user numbers are
setup during programming.
Page 47

After programming is completed, you will
receive a welcome message text from the
panel. Write down the phone number that
the message comes from. This will be the
number you use to text user operations to
the system.
Note: When texting commands listed below,
the commands can be either upper or
lowercase.
A list of text commands can be obtained by
texting “help” to the system phone number.
Store this number in your cell phone and
write the number on the Quick Reference
Wallet Card located at the back of this
manual.
Arming All Areas with Text Message
Commands
Text message your system panel with the
following command:
ARM, AWAY, or ALL: To arm all areas,
depending on your system
Digital Monitoring Products, Inc. | XTLplus System User Guide 41
Arming Partial Areas with Text
Commands
Text message your system panel with the
following command:
SLEEP: To arm the perimeter and interior of a
Home/Sleep/Away system.
HOME: To arm just the perimeter of a Home/
Away/Sleep system.
PERIM: To arm the perimeter of an All/
Perimeter system.
ARM “Area Number” or ARM “Area Name”: To
arm specific areas of an Area system.
The NAME should identify the area name. The
NUMBER should identify the area number.
Names and numbers can be mixed, and a
comma should separate the areas. If ARM is
sent without any other words, all areas are
armed.
If the system is already armed, you can arm it
again only if you are arming more areas than
were originally armed.
Page 48

Disarming All Areas with Text
Message Commands
Text message your system panel with the
following command:
DISARM: To disarm all areas.
Disarming Partial Areas with Text
Message Commands
Text message your area system panel with
the following command:
DISARM “Area Number” or DISARM “Area
Name”: To disarm
specific areas of an Area system.
The NAME should identify the area name. The
NUMBER should identify the area number.
Names and numbers can be mixed, and a
comma should separate the areas. If DISARM
is sent without any other words, all areas will
be disarmed.
If the system is already disarmed, you will
receive a message saying that the system is
already disarmed.
42 XTLplus System User Guide | Digital Monitoring Products, Inc.
Cancelling an Alarm with Text
Messaging
While the alarm siren sounds, you may
choose to cancel the alarm via text
messaging.
If a valid alarm has not occurred, text
CANCEL to disarm the system and cancel the
alarm.
Turning Outputs On/Off/Momentary
with Text Messaging
Allows you to set the state of any output to
on, o, or momentary.
1. To set the Output to ON Steady, text
ON followed by the Output name or
number. For example, to turn Output
3 on, you would text: ON Lights or
ON 3.
2. To turn the Output to OFF, text OFF
followed by the Output name or
number. For example, to turn Output
3 o, you would text: OFF 3 or OFF
LIGHTS.
Page 49

3. To turn the Output to ON
MOMENTARY (the output turns on
for one second, and then o), text
MOMENTARY (or MOM) followed
by the Output name or number.
For example, to turn Output 3
to momentary, you would text:
MOMENTARY 3 or MOM 3.
Check Armed Status Text Command
Allows you to check the system armed status.
If armed, the system will send a message
stating the type of system you have followed
by ON, such as ALL SYSTEM ON or HOME
SYSTEM ON. If disarmed and no open
zones, the system will send SYSTEM READY.
If disarmed with open zones, it will send
SYSTEM NOT READY followed by any open
zones. A message of AC POWER TROUBLE
will indicate when a power failure occurs. If in
alarm or trouble, the system will send ALARM
ON or TROUBLE ON followed by up to 3
zone names that are in alarm or trouble.
Digital Monitoring Products, Inc. | XTLplus System User Guide 43
To receive the Armed Status, text: STATUS.
Check Status of Lights, Locks, and
Thermostats Text Command
Allows you to check the status of Z-Wave
compatible lights, locks, and thermostats. The
status shows which devices are currently on
and any devices that are not responding
1. To receive the Status of Z-Wave
compatible lights, text: STATUS
LIGHTS.
2. To receive the Status of Z-Wave
compatible locks, text: STATUS
LOCKS.
3. To receive the Status of Z-Wave
compatible thermostats, text:
STATUS THERMOSTATS.
Page 50

SUBSCRIBE TO TEXT MESSAGES
Some systems allow you to set which text
messages you receive from the panel.
If your system is programmed to allow
text messages, you will automatically be
subscribed to ALL as described below. To
change your subscription status, follow the
instructions below for desired messages.
1. Text the words SUBSCRIBE STATUS
ALL to receive a text message for all
arming and disarming occurrences in
addition to any alarm.
2. Text the words SUBSCRIBE
STATUS NONE to not receive a text
message for arming and disarming
occurrences, but still receive a text
message for any alarm.
44 XTLplus System User Guide | Digital Monitoring Products, Inc.
3. Text the words SUBSCRIBE STATUS
OTHERS to receive a text message
for all arming and disarming
occurrences originating from other
users, in addition to any alarm. This
option will send a text message
for all arming and disarming
occurrences except for the ones you
initiate at a keypad.
4. Text the word SUBSCRIBE to show
the current subscription status and
the available subscription options.
Page 51

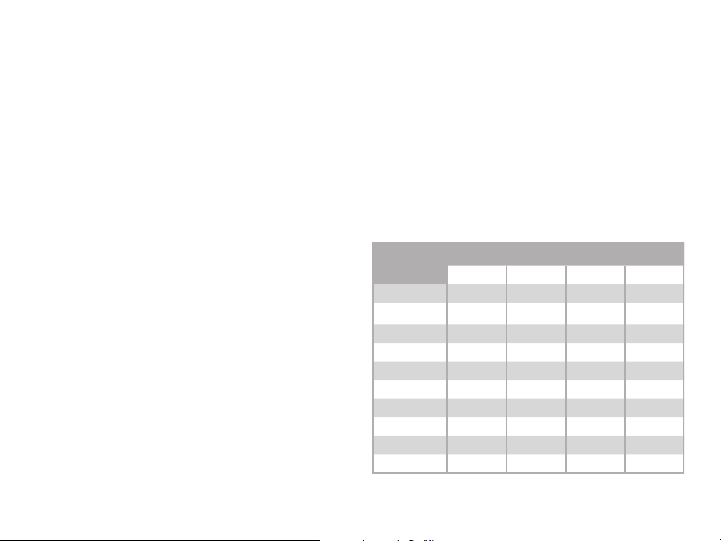
COMMON KEYPAD DISPLAYS
Listed below are several keypad messages you may see on the display. Follow the instructions
in the Possible Solutions column to correct the problem. In many cases, you need to call a
service person to correct the problem. Displays not discussed here indicate your service
representative should be called.
Message
INVALID CODE No
CLOSING TIME Yes
AC TROUBLE Yes
BATTERY
TROUBLE
Digital Monitoring Products, Inc. | XTLplus System User Guide 45
Tone at
Keypad
Yes
Meaning Possible Solutions
The user code is not
recognized by the system.
The schedule has expired
but the system has not
been armed.
The system is not getting
proper AC power.
The battery is either low or
missing.
Check the user code and try
again.
Users still on the premises are
reminded to arm the system or
extend the schedule to a later
time.
Contact your service person if
other electrical devices in your
home are working.
Contact your service person.
Page 52

SYSTEM
TROUBLE
or SERVICE
Yes
REQUIRED
SYSTEM BUSY No
There is a problem with
one or more components in
the system.
The system is performing
another task with a higher
priority.
Contact your service person.
Wait a few moments for the
system to complete the task.
Contact your service person if
the problem remains.
The panel has attempted
TRANSMIT FAIL Yes
to communicate with the
central station and has not
Contact your service person if
the problem remains.
succeeded.
Only one keypad at a
ZWAVE BUSY
No
time can access Z-Wave
Setup. If a user attempts
to access the menu
from a second keypad
Z-WAVE BUSY will be
The user must exit Z-Wave
Setup in one keypad before
accessing it in a second
keypad.
displayed.
46 XTLplus System User Guide | Digital Monitoring Products, Inc.
Page 53

9000 SERIES KEYPAD
SHORTCUTS
Hold down the keypad button for 2seconds
until the tone sounds to arm, monitor, or reset
your system.
Arm All for All/Perimeter, Arm Away for
1
Home/Sleep/Away
Sensor (fire) Reset on all systems
2
Arm Home for Home/Sleep/Away systems
3
Check-in Report on all systems
4
Chime (Monitor) on all systems
5
Arm Perimeter for All/Perimeter systems
6
Arm Sleep for Home/Sleep/Away systems
7
Easy Exit for Home/Sleep/Away systems
8
Digital Monitoring Products, Inc. | XTLplus System User Guide 47
Page 54

EVACUATION PLAN
The National Fire Protection Association recommends you establish an emergency evacuation
plan to safeguard lives in the event of a fire or other emergency.
Early detection is the best way to survive a fire or other emergency. The installation of a fire
alarm system with smoke and carbon monoxide detectors in each room can greatly decrease
your risk of loss or injury.
Use the following steps to prepare yourself and others in the event of an emergency:
1. Draw a floor plan of your home or business.
2. Develop escape routes.
3. Decide where to meet.
4. Practice your escape plans.
48 XTLplus System User Guide | Digital Monitoring Products, Inc.
Page 55

Page 56

LT-1442 1.01 19171
 Loading...