

Page 1

Film-Tech
The information contained in this Adobe Acrobat pdf
file is provided at your own risk and good judgment.
These manuals are designed to facilitate the
exchange of information related to cinema
projection and film handling, with no warranties nor
obligations from the authors, for qualified field
service engineers.
If you are not a qualified technician, please make no
adjustments to anything you may read about in these
Adobe manual downloads.
www.film-tech.com
Page 2

XD20 Media Player
Installation and
Operating Guide
Version 1.0
Effective Date: December 2008
Document # 9301H264001.0
DTS Digital Cinema
9631 Topanga Canyon Place
Chatsworth, CA 91311
USA
Page 3

XD20 Installation and Operating Guide Version 1.0
Notices
This product contains software proprietary to DTS Digital Cinema and protected by US and International copyright
law. Unauthorized reproduction or disclosure, in whole or in part, is strictly prohibited.
The software and methods implemented in this product may be protected by one or more of the following patents:
US Patent Nos. 6,741,323; 5,751,398; 5,450,146; 5,386,255; 5,155,510; and other US and International patents,
both issued and pending.
WARRANTY/LIMITATION OF LIABILITY
EXCEPT FOR THE LIMITED WARRANTY PROVIDED HEREIN, THIS PRODUCT IS PROVIDED "AS IS"
AND WITHOUT WARRANTY OF ANY KIND. DTS DIGITAL CINEMA EXPRESSLY DISCLAIMS ALL
OTHER WARRANTIES, EXPRESS AND IMPLIED, INCLUDING, BUT NOT LIMITED TO, THE IMPLIED
WARRANTIES OF MERCHANTABILITY AND FITNESS FOR A PARTICULAR PURPOSE. DTS DIGITAL
CINEMA DOES NOT WARRANT THAT THIS PRODUCT WILL MEET USER’S REQUIREMENTS, OR
THAT THE OPERATION OF THIS PRODUCT WILL BE UNINTERRUPTED OR ERROR-FREE, OR THAT
DEFECTS IN THIS PRODUCT WILL BE CORRECTED. UNDER NO CIRCUMSTANCES, INCLUDING
NEGLIGENCE, SHALL DTS DIGITAL CINEMA, OR ITS DIRECTORS, OFFICERS, EMPLOYEES OR
AGENTS, BE LIABLE TO USER FOR ANY INCIDENTAL, INDIRECT, SPECIAL OR CONSEQUENTIAL
DAMAGES (INCLUDING DAMAGES FOR LOSS OF BUSINESS PROFITS, BUSINESS INTERRUPTION,
LOSS OF BUSINESS INFORMATION, AND THE LIKE) ARISING OUT OF THE USE, MISUSE OR
INABILITY TO USE THIS PRODUCT OR RELATED DOCUMENTATION.
Copyright
XD20 Media Player Installation and Operating Guide, Version 1.0
© 2008, 2009 DTS Digital Cinema. All right reserved.
The content of this publication is subject to change without notice. DTS Digital Cinema assumes no obligation to
notify you of any changes or updates. While DTS Digital Cinema, Inc. believes this publication is accurate, due to
ongoing improvements and revisions, DTS Digital Cinema cannot guarantee the accuracy of printed material, nor
can it accept responsibility for errors or omissions. DTS Digital Cinema may periodically publish updates and
revisions to this publication as it deems necessary.
®
is a registered trademark of DTS, Inc.
DTS
Dolby is a trademark of Dolby Laboratories.
All other trademarks are the properties of their respective owners.
Manufactured under license from Dolby Laboratories. This product contains one or more programs protected under
international and U.S. copyright laws as unpublished works. They are confidential and proprietary to Dolby
Laboratories. Their reproduction or disclosure, in whole or in part, or the production of derivative works therefrom
without the express permission of Dolby Laboratories is prohibited. Copyright 1993 - 2002 by Dolby Laboratories.
All rights reserved.
Manufactured under license from DTS, Inc. under U.S. Patent #’s: 5,451,942; 5,956,674; 5,974,380; 5,978,762;
6,487,535; 7,003,467 & other U.S. and worldwide patents issued & pending. DTS, DTS Digital Surround and
Neo:6 are registered trademarks and the DTS logos and Symbol are trademarks of DTS, Inc. © 1996-2008 DTS,
Inc. All Rights Reserved.
Document No. 9301H264001.0
December 2008
Record of Changes
Manual Version / Date Description
1.0 / Dec 2008 Initial version
Document # 9301H264001.0
ii
Page 4

XD20 Installation and Operating Guide Version 1.0
Table of Contents
Introduction.............................................................................................................................. ix
How to Use this Guide............................................................................................................. ix
About XD20 Media Player .......................................................................................................x
Limited Warranty..................................................................................................................... xi
Contact Information................................................................................................................. xi
Product Improvements and Upgrades......................................................................................xi
Software License Agreement..................................................................................................xii
Installation Checklist .............................................................................................................xiii
1. OPERATING XD20 ...............................................................................................................1
1.1. Front Panel Controls and Indicators................................................................................. 1
1.2. Powering ON the XD20 Media Player............................................................................. 2
1.3. LED Indicators................................................................................................................. 2
1.4. LCD Screen...................................................................................................................... 3
1.4.1. Status Display.......................................................................................................................3
1.4.2. Configurable Information Line.............................................................................................4
1.4.3. Navigating through the Menus..............................................................................................4
2. LOADING AND PLAYING CONTENT..................................................................................6
2.1. Types of Content.............................................................................................................. 6
2.1.1. Soundtrack Content...............................................................................................................6
2.1.2. Preshow Video Content ........................................................................................................ 6
2.1.3. Alternate Content Video.......................................................................................................6
2.1.4. CSS Content.......................................................................................................................... 6
2.2. Content Delivery.............................................................................................................. 8
2.2.1. Types of DTS Discs..............................................................................................................8
2.3. Loading Content............................................................................................................... 8
2.3.1. DTS Soundtrack Discs..........................................................................................................8
2.3.2. Loading Soundtrack Discs.................................................................................................... 9
2.3.2.1. Compatibility with Legacy Soundtrack Discs.........................................................10
2.3.3. Handling a CD-ROM Read Error.......................................................................................11
2.3.4. Loading DTS Video Content Discs .................................................................................... 11
2.3.5. Loading a DTS Access™ Disc............................................................................................11
2.3.6. Loading ACV...................................................................................................................... 12
2.3.7. Loading Content via USB...................................................................................................14
2.3.8. Loading Film Content Using a Local Network................................................................... 14
2.4. Managing Disk Space .................................................................................................... 15
2.5. Playing Content with Film............................................................................................. 16
2.5.1. Playback Status Indicators.................................................................................................. 16
2.5.2. Change-overs......................................................................................................................16
2.5.3. Handling Film Breaks and Edits......................................................................................... 16
2.6. Playing Video Playlists.................................................................................................. 16
2.6.1. Video Playlists.................................................................................................................... 16
2.6.1.1. Slide-loop Playlist...................................................................................................16
2.6.1.2. Preshow and Intermission Playlists.........................................................................17
2.6.1.3. Playlists C through G..............................................................................................17
2.6.1.4. End Slides ...............................................................................................................17
2.6.2. Start and Stop Video Playlists.............................................................................................17
2.6.3. Preshow Playlist Schedules.................................................................................................17
2.6.4. Operation with Early/Late Preshow Presentations..............................................................17
Document # 9301H264001.0
iii
Page 5

2.6.4.1. Configuration..........................................................................................................18
2.6.4.2. Operations...............................................................................................................18
2.6.4.3. Manual Start/Stop ...................................................................................................18
2.6.5. Video Inhibit.......................................................................................................................18
2.6.6. Video Playlist Automation Sequence..................................................................................19
2.6.7. End of Playlist.....................................................................................................................19
XD20 Installation and Operating Guide Version 1.0
2.7. XD20 Indicators and Display for Video ........................................................................ 19
2.7.1. Video LCD Display ............................................................................................................ 20
2.7.2. Projector Warming Up Display...........................................................................................20
2.7.3. Display when Playing Playlist............................................................................................20
2.8. Video Projector Support................................................................................................. 20
2.8.1. Video Projector Settings.....................................................................................................22
3. XD20 PLAYBACK AND INFO MENUS...............................................................................23
3.1. Main Menu..................................................................................................................... 23
3.2. Playback Menu............................................................................................................... 23
3.2.1. Video Playback Functions .................................................................................................. 24
3.2.1.1. Start Playlist Functions ...........................................................................................25
3.2.1.2. Stop Playlist ............................................................................................................25
3.2.1.3. Video Control..........................................................................................................26
3.2.1.4. Video Contents........................................................................................................27
3.2.2. ACV Playback ....................................................................................................................28
3.2.3. Film Playback.....................................................................................................................31
3.2.3.1. TC Reader Offset ....................................................................................................32
3.2.3.2. Soundtrack Language..............................................................................................32
3.2.3.3. CSS Playback..........................................................................................................33
3.2.3.4. Contents Menu........................................................................................................36
3.2.4. External Input Mode........................................................................................................... 40
3.2.5. Load from USB...................................................................................................................41
3.3. Info Menu....................................................................................................................... 42
3.3.1. Version................................................................................................................................ 43
3.3.2. Licenses Menu....................................................................................................................43
3.3.3. MAC Address.....................................................................................................................43
3.3.4. System Monitor...................................................................................................................44
4. MAINTENANCE AND TROUBLESHOOTING....................................................................45
4.1. Routine Maintenance ..................................................................................................... 45
4.2. XD20 Playback Sound Check........................................................................................ 45
4.3. Frequently Asked Questions .......................................................................................... 46
4.3.1. I Have a DTS Print but No Discs ........................................................................................ 46
4.3.2. Film Is Not in Sync or Does Not Sound Right ................................................................... 46
4.3.3. Volume Is Too Loud........................................................................................................... 46
4.3.4. XD20 Does Not Play Soundtrack Audio to Film................................................................46
4.3.4.1. Timecode LED Is Blinking.....................................................................................46
4.3.4.2. Timecode LED is Solid, but Audio LED is not Lit.................................................47
4.3.4.3. Blue Audio LED is Flashing at Regular Intervals...................................................47
4.3.5. XD20 Switches Out of DTS Digital....................................................................................47
4.4. Display Error Messages ................................................................................................. 48
4.4.1. Program Fault......................................................................................................................48
4.4.2. Menus Do Not Function......................................................................................................48
4.5. Guide for a Seamless Change-Over............................................................................... 49
4.5.1. Sound Changes Before Picture ........................................................................................... 49
Document # 9301H264001.0
iv
Page 6

XD20 Installation and Operating Guide Version 1.0
4.5.2. Determining Roll-Down ..................................................................................................... 49
4.6. About the RAID Hard Drives......................................................................................... 49
4.7. System Monitor Information.......................................................................................... 49
5. HARDWARE INSTALLATION............................................................................................51
5.1. Unpacking System Components .................................................................................... 52
5.1.1. Preliminary Inspection........................................................................................................52
5.2. Installation Procedures................................................................................................... 52
5.2.1. Chassis Rack Mounting and Connection............................................................................ 52
5.2.2. Rack Mount Recommendations.......................................................................................... 53
5.2.3. Power Supply......................................................................................................................53
5.2.4. D600 Timecode Reader Head Installation.......................................................................... 53
5.2.5. Two Projector (Change-over) Theaters...............................................................................54
5.3. Connection to Cinema Processors.................................................................................. 54
5.3.1. Dolby® CP45, CP55, CP65, CP500, CP650, UltraStereo JS Series, Panastereo and
SMART Operation ........................................................................................................................... 54
5.3.2. Dolby® DA20 SR-D® System.............................................................................................54
5.3.3. Sony SDDS®.......................................................................................................................54
5.3.4. Panastereo CSP1200 and SMART......................................................................................54
5.3.5. Dolby® CP200 Operation....................................................................................................54
5.4. XD20 Calibration and Setup.......................................................................................... 55
5.4.1. Equipment Requirements....................................................................................................55
5.4.2. Setting and Adjusting Audio Output Levels.......................................................................55
5.4.2.1. Adjusting Levels.....................................................................................................55
5.4.3. A Note about DTS Subwoofer Output................................................................................ 56
5.4.3.1. Subwoofer Signal in the Surround Channels..........................................................56
5.5. Timecode Reader Sync Adjustment............................................................................... 56
5.5.1. Procedure Using Demo Reel............................................................................................... 57
5.5.2. DTS Special Venue Timecode Offset.................................................................................57
5.5.3. Verify Sound Performance..................................................................................................58
5.6. Check Automatic Fail-Safe (Default) Operation ........................................................... 59
5.7. Networking multiple XD20s.......................................................................................... 59
5.7.1. Stand-Alone System using Switches and Routers .............................................................. 59
5.7.1.1. Setup Procedure with a Network Switch ................................................................59
5.7.1.2. Setup Procedure with Router ..................................................................................60
5.7.2. Connecting to an Existing LAN.......................................................................................... 60
6. INSTALLING LICENSES AND UPGRADING SOFTWARE...............................................61
6.1. Options........................................................................................................................... 61
6.2. Options Setup and Testing ............................................................................................. 61
6.3. Installation of Licenses .................................................................................................. 61
6.4. XD20 Software Updates................................................................................................. 62
7. SETUP MENUS...................................................................................................................63
7.1. TC Reader Offset ........................................................................................................... 65
7.1.1. 35mm or 70mm Timecode Reader Offset........................................................................... 65
7.1.2. SMPTE................................................................................................................................66
7.1.2.1. SMPTE: Serial Number ..........................................................................................66
7.1.2.2. SMPTE: Reel Number ............................................................................................66
7.1.2.3. SMPTE: Offset........................................................................................................67
7.2. Audio Setup.................................................................................................................... 67
7.2.1. Level Adjustment................................................................................................................67
Document # 9301H264001.0
v
Page 7

XD20 Installation and Operating Guide Version 1.0
7.2.2. Audio Tests.........................................................................................................................69
7.2.3. Language Versions..............................................................................................................70
7.3. Video Setup.................................................................................................................... 70
7.3.1. Video Output Settings......................................................................................................... 71
7.3.1.1. Video Interface........................................................................................................71
7.3.1.2. Video Aspect...........................................................................................................72
7.3.1.3. Video Color Setting ................................................................................................72
7.3.1.4. Video Resolution.....................................................................................................72
7.3.1.5. Video Frame Rate Menu.........................................................................................73
7.3.2. Video Audio Setup..............................................................................................................74
7.3.2.1. Video Audio Delay .................................................................................................74
7.3.2.2. Video Audio Trim...................................................................................................74
7.3.3. Video Projector Setup.........................................................................................................75
7.3.3.1. Select Projector.......................................................................................................75
7.3.3.2. Lamp On/Off Control..............................................................................................75
7.3.3.3. Save Video Projector Settings.................................................................................76
7.3.3.4. Video Test Contents................................................................................................76
7.4. Cinema Subtitling System (CSS) Setup......................................................................... 77
7.4.1. Image Size...........................................................................................................................77
7.4.2. Vertical Offset.....................................................................................................................78
7.4.3. Test Patterns........................................................................................................................ 78
7.4.4. Options................................................................................................................................ 79
7.4.4.1. Select Projector.......................................................................................................79
7.4.4.2. CSS Text Color.......................................................................................................79
7.5. Automation / Control ..................................................................................................... 80
7.5.1. Format Automation............................................................................................................. 80
7.5.1.1. Pin Definitions ........................................................................................................81
7.5.1.2. Predefined Formats.................................................................................................81
7.5.1.3. Custom Formats......................................................................................................82
7.5.2. Fallback Format for Soundtrack ......................................................................................... 83
7.5.3. Automation Operating Mode.............................................................................................. 84
7.5.3.1. DTS-6D Emulation.................................................................................................84
7.5.3.2. AutoSwitch (Optical Formats)................................................................................84
7.5.3.3. Preselect Mode (SRD compatible)..........................................................................84
7.6. I/O Control ..................................................................................................................... 85
7.6.1. I/O Pin Definitions ............................................................................................................ .. 85
7.6.1.1. Input Control Pins...................................................................................................85
7.6.1.2. Output Control Pins ................................................................................................86
7.6.2. Language Setups.................................................................................................................87
7.6.2.1. Soundtrack Language Setups..................................................................................88
7.6.2.2. Subtitle Language Setups........................................................................................89
7.7. Playlist............................................................................................................................ 90
7.7.1. Video Start Delay................................................................................................................90
7.7.2. Output Start Pulse............................................................................................................... 91
7.7.3. Start Pulse Delay................................................................................................................. 91
7.7.4. Output End Pulse................................................................................................................91
7.7.5. End Pulse Delay..................................................................................................................92
7.7.6. Lamp off..............................................................................................................................92
7.7.7. Silent Video Format............................................................................................................92
7.7.8. End of Playlist Format........................................................................................................ 92
7.7.9. Loop at End of Playlist ....................................................................................................... 93
7.7.10. Automation Test..................................................................................................................93
Document # 9301H264001.0
vi
Page 8

XD20 Installation and Operating Guide Version 1.0
7.8. System Settings.............................................................................................................. 94
7.8.1. Button Assignments............................................................................................................94
7.8.2. USB Memory......................................................................................................................95
7.8.2.1. XD20 Configuration ...............................................................................................96
7.8.2.2. Master Settings........................................................................................................97
7.8.2.3. Copy........................................................................................................................99
7.8.2.4. Log Files ...............................................................................................................100
7.8.3. COM1 Configuration........................................................................................................100
7.8.4. Set Password..................................................................................................................... 101
7.8.4.1. Disable Password..................................................................................................101
7.8.4.2. Change Password..................................................................................................102
7.8.5. Network.............................................................................................................................102
7.8.5.1. Network Mode ......................................................................................................103
7.8.5.2. Static IP Address...................................................................................................103
7.8.5.3. View Network IP Address ....................................................................................105
7.8.5.4. Network Transfer..................................................................................................106
7.8.5.5. Notify Server .........................................................................................................106
7.9. Disk Space.................................................................................................................... 106
7.9.1. Film Reserved................................................................................................................... 107
7.9.2. Preshow Reserved.............................................................................................................107
7.9.3. View Space.......................................................................................................................107
7.9.3.1. View Space Film...................................................................................................108
7.9.3.2. View Space Video.................................................................................................108
7.9.3.3. View Space ACV..................................................................................................108
7.10. System Clock................................................................................................................ 108
7.10.1. Set Time Zone...................................................................................................................109
7.10.2. Set System Date................................................................................................................110
7.10.3. Set System Time ............................................................................................................... 110
7.11. LCD Setup.................................................................................................................... 110
7.12. DVD Drives.................................................................................................................. 111
7.13. RAID............................................................................................................................ 111
7.14. Software Revert............................................................................................................ 111
7.15. Display Language......................................................................................................... 112
Document # 9301H264001.0
vii
Page 9

XD20 Installation and Operating Guide Version 1.0
Appendixes
A. Connector Pin-outs
B. Cinema Processor Interface Wiring Diagrams
C. XD20 Wiring and Block Diagrams
D. Cable Assemblies and Breakout Boards
E. Timecode Reader Head Mounting Brackets
F. System Parts List
G. Specifications
H. Menu Structure
I. Technical Maintenance
J. Installing the CSS Option
K. Using the ACV Playlist Generation Software
L. Tech Notices
M. H260 DVD Drive Unit
Document # 9301H264001.0
viii
Page 10

XD20 Installation and Operating Guide Version 1.0
Introduction
This manual explains the XD20 Media Player setup and operation. It contains full instructions for
installing hardware and software, setting up audio playback, configuring the system, performing
maintenance and troubleshooting, and setting up and operating optional functions: high definition video,
CSS (subtitling, narration and captions), and digital audio out.
How to Use this Guide
The guide is divided into three parts. The first part covers operations for the projectionist or “operator”.
The second part covers the installation, setup and other theater technician functions. The appendixes
provide detailed information for the theater technician.
Part 1: Operation
1. Operating the XD20 Media Player
2. Loading and Playing Content
3. XD20 Playback Menus
4. Maintenance and Troubleshooting
Part 2: Installation and Setup
5. Hardware Installation
6. Installing Licenses and Upgrading Software
7. System Setup Menus
Appendices: Technician
A. Connector Pin-outs
B. Cinema Processor Interface Wiring Diagrams
C. XD20 Wiring and Block Diagrams
D. Cable Assemblies and Breakout Boards
E. Timecode Reader Head Mounting Brackets
F. System Parts List
G. Specifications
H. Menu Structure
I. Technical Maintenance
J. Installing the CSS Option
K. Tech Notes
L. Using the ACV Playlist Generation Software
M. H260 DVD Drive Unit
Document # 9301H264001.0
ix
Page 11

XD20 Installation and Operating Guide Version 1.0
About XD20 Media Player
The XD20 Media Player is the latest audio/video playback system created by DTS Digital Cinema. It has
been engineered to deliver eight channels of digital surround sound (plus a narration channel). It is a fullfeatured media solution with pre-show programming and networking capabilities.
Options that are enabled via licensing include:
• Soundtrack Playback (including playing 5.1 audio to timecode)
• HD Video
• CSS Cinema Subtitling System (subtitling, captions, and audio description).
A second hard drive (RAID) may optionally be installed into the XD20 chassis.
The XD20 Media Player has a large-capacity internal hard drive, which can store approximately 30 full-
length feature soundtracks. XD20 connects directly or via network to an external DVD drive unit (see
Appendix M).
To get the most out of your XD20, we suggest that you review this manual and keep it available during
system installation and initial operation.
We publish the Tech Talk newsletter with tips and updates for Service Technicians. Tech Talk is
published quarterly, and mailed. If you would like to be added to our mailing list, contact DTS Digital
Cinema Technical Support. It is also posted on the free online Support Center located on our website at
www.dtsdcinema.com/Support/.
Document # 9301H264001.0
x
Page 12

XD20 Installation and Operating Guide Version 1.0
Limited Warranty
DTS Digital Cinema software is warranted against defects for a period of 90 days from the date of the
original purchase. XD20 hardware is warranted against defects in material and workmanship for a period
of one year from the date of the original purchase. This warranty includes parts and labor. THIS
WARRANTY EXCLUDES UNITS THAT HAVE BEEN MODIFIED, REPAIRED BY
UNAUTHORIZED PERSONNEL, OR DAMAGED BY ABUSE, IMPROPER OPERATION, DIRT
MOISTURE OR STATIC ELECTRICITY. PROPER OPERATION OF THIS EQUIPMENT REQUIRES
THE USE OF A SURGE PROTECTOR. SUPPLYING POWER TO THE XD20 UNIT WITHOUT THE
USE OF A SURGE PROTECTOR WILL VOID THIS WARRANTY.
Products being returned under warranty
original or equivalent packaging. Please contact DTS Digital Cinem
should be sent to DTS Digital Cinema freight prepaid in the
a prior to shipping any parts or
merchandise to receive a Return Merchandise Authorization number. DTS Digital Cinema’s shipping
address is:
DTS Digital Cinema
Attn: RMA #
9631 Topanga Canyon Place
Chatsworth, CA 91311
U.S.A.
,
Contact Information
To contact DTS Digital Cinema’s Technical Support staff:
• - toll free telephone within USA and Canada (888)-428-2268
• - telephone worldwide +1-818-401-4253
• - fax +1-866-448-6802
• - email techsupport@dtsdcinema.com
Product Improvements and Upgrades
DTS Digital Cinema reserves the right to make changes and/or improvements to its products, without
notification and without incurring any obligation to incorporate such changes or improvements in
products previously sold or shipped.
To receive notification about upgrades or bulletins that may become available from time to time, please
complete the enclosed Warranty Card and mail or fax it to DTS Digital Cinema.
Document # 9301H264001.0
xi
Page 13

XD20 Installation and Operating Guide Version 1.0
Software License Agreement
IMPORTANT: READ THIS SOFTWARE LICENSE ("LICENSE") CAREFULLY BEFORE
USING THE DTS DIGITAL CINEMA SOFTWARE. THE SOFTWARE RESIDING ON THE
XD20 MEDIA PLAYER AND ANY ACCOMPANYING MATERIALS (COLLECTIVELY, THE
“SOFTWARE”) ARE LICENSED, NOT SOLD. BY USING THE XD20 MEDIA PLAYER, YOU
ARE ACCEPTING AND AGREEING TO THE TERMS OF THIS LICENSE. IF YOU DO NOT
AGREE TO THE TERMS OF THIS LICENSE, DO NOT USE THE XD20 MEDIA PLAYER.
1. Grant. Subject to your compliance with the terms of this License, DTS Digital Cinema hereby grants
you a non-exclusive, non-transferable, revocable, limited license to use the Software solely for your
internal business purposes and solely in connection with the XD20 Media Player. All rights not
expressly granted to you are reserved by DTS Digital Cinema.
2. Ownership. All right, title and interest in and to the Software, all physical copies thereof and all
intellectual property embodied therein are and shall remain vested in DTS Digital Cinema. You do
not own the Software, physical copies thereof or any intellectual property embodied therein.
3. Restrictions. You may not (i) copy, distribute, sublicense, lease, transfer or use for external purposes
the Software; (ii) reverse engineer, decompile, disassemble, translate, modify, attempt to reveal the
source code of the Software, or (iii) create derivative works from the Software.
4. Termination. DTS Digital Cinema may terminate this license at any time if you violate the terms of
this license. Upon termination, you must destroy the Software and related documentation.
5. LIMITATION ON WARRANTY. YOU EXPRESSLY ACKNOWLEDGE AND AGREE
THAT USE OF DTS DIGITAL CINEMA SOFTWARE AND HARDWARE IS AT YOUR
SOLE RISK. DTS DIGITAL CINEMA DOES NOT WARRANT THAT THE OPERATION
OF THE SOFTWARE OR THE HARDWARE WILL BE UNINTERRUPTED OR ERROR
FREE. TO THE MAXIMUM EXTENT PERMITTED BY APPLICABLE LAW, THE DTS
DIGITAL CINEMA SOFTWARE AND HARDWARE PROVIDED “AS IS,” WITH ALL
FAULTS AND WITHOUT WARRANTY OF ANY KIND, INCLUDING, WITHOUT
LIMITATION, THE IMPLIED WARRANTIES OF MERCHANTABILITY, FITNESS FOR A
PARTICULAR PURPOSES, AND NON-INFRINGEMENT OF THIRD PARTY RIGHTS,
ALL OF WHICH ARE HEREBY EXPRESSLY DISCLAIMED.
6. LIMITATION OF LIABILITY. UNDER NO CIRCUMSTANCES, INCLUDING, WITHOUT
LIMITATION, NEGLIGENCE, SHALL DTS DIGITAL CINEMA OR ITS DIRECTORS,
OFFICERS, EMPLOYEES OR AGENTS BE LIABLE FOR PERSONAL INJURY, OR ANY
INCIDENTAL, SPECIAL, INDIRECT OR CONSEQUENTIAL DAMAGES WHATSOEVER,
INCLUDING, WITHOUT LIMITATION, DAMAGES FOR LOSS OF PROFITS, LOSS OF
DATA, BUSINESS INTERRUPTION OR ANY OTHER COMMERCIAL DAMAGES OR
LOSSES, ARISING OUT OF OR RELATED TO YOUR USE OF THE DTS DIGITAL
CINEMA SOFTWARE OR HARDWARE, HOWEVER CAUSED, REGARDLESS OF THE
THEORY OF LIABILITY AND EVEN IF DTS DIGITAL CINEMA HAS BEEN ADVISED
OF THE POSSIBILITY OF SUCH DAMAGES. IN NO EVENT SHALL DTS DIGITAL
CINEMA’S LIABILITY EXCEED THE AMOUNT PAID BY YOU TO DTS DIGITAL
CINEMA. SOME STATES DO NOT ALLOW THE LIMITATION AND/OR EXCLUSION OF
LIABILITY FOR INCIDENTAL OR CONSEQUENTIAL DAMAGES, SO THE ABOVE
LIMITATION OR EXCLUSION MAY NOT APPLY TO YOU.
7. General. This License shall be governed by the laws of the State of California as applied to contracts
performed wholly therein. In any action brought by either party arising out of this License, the
prevailing party shall be entitled to recover its reasonable attorney’s fees and costs. If any provision
of this License is held by a court of competent jurisdiction to be unenforceable or if a provision of
this License is waived by either party, the remainder of this License shall remain in full force and
effect. You may not assign this License without the prior, express written consent of DTS Digital
Cinema.
Document # 9301H264001.0
xii
Page 14
XD20 Installation and Operating Guide Version 1.0
Installation Checklist
Use these checklists to make sure that important settings are completed before playing content to an
audience. There are separate checklists for installing XD20, the DTS Access™ option and the High
Definition Video Playback option.
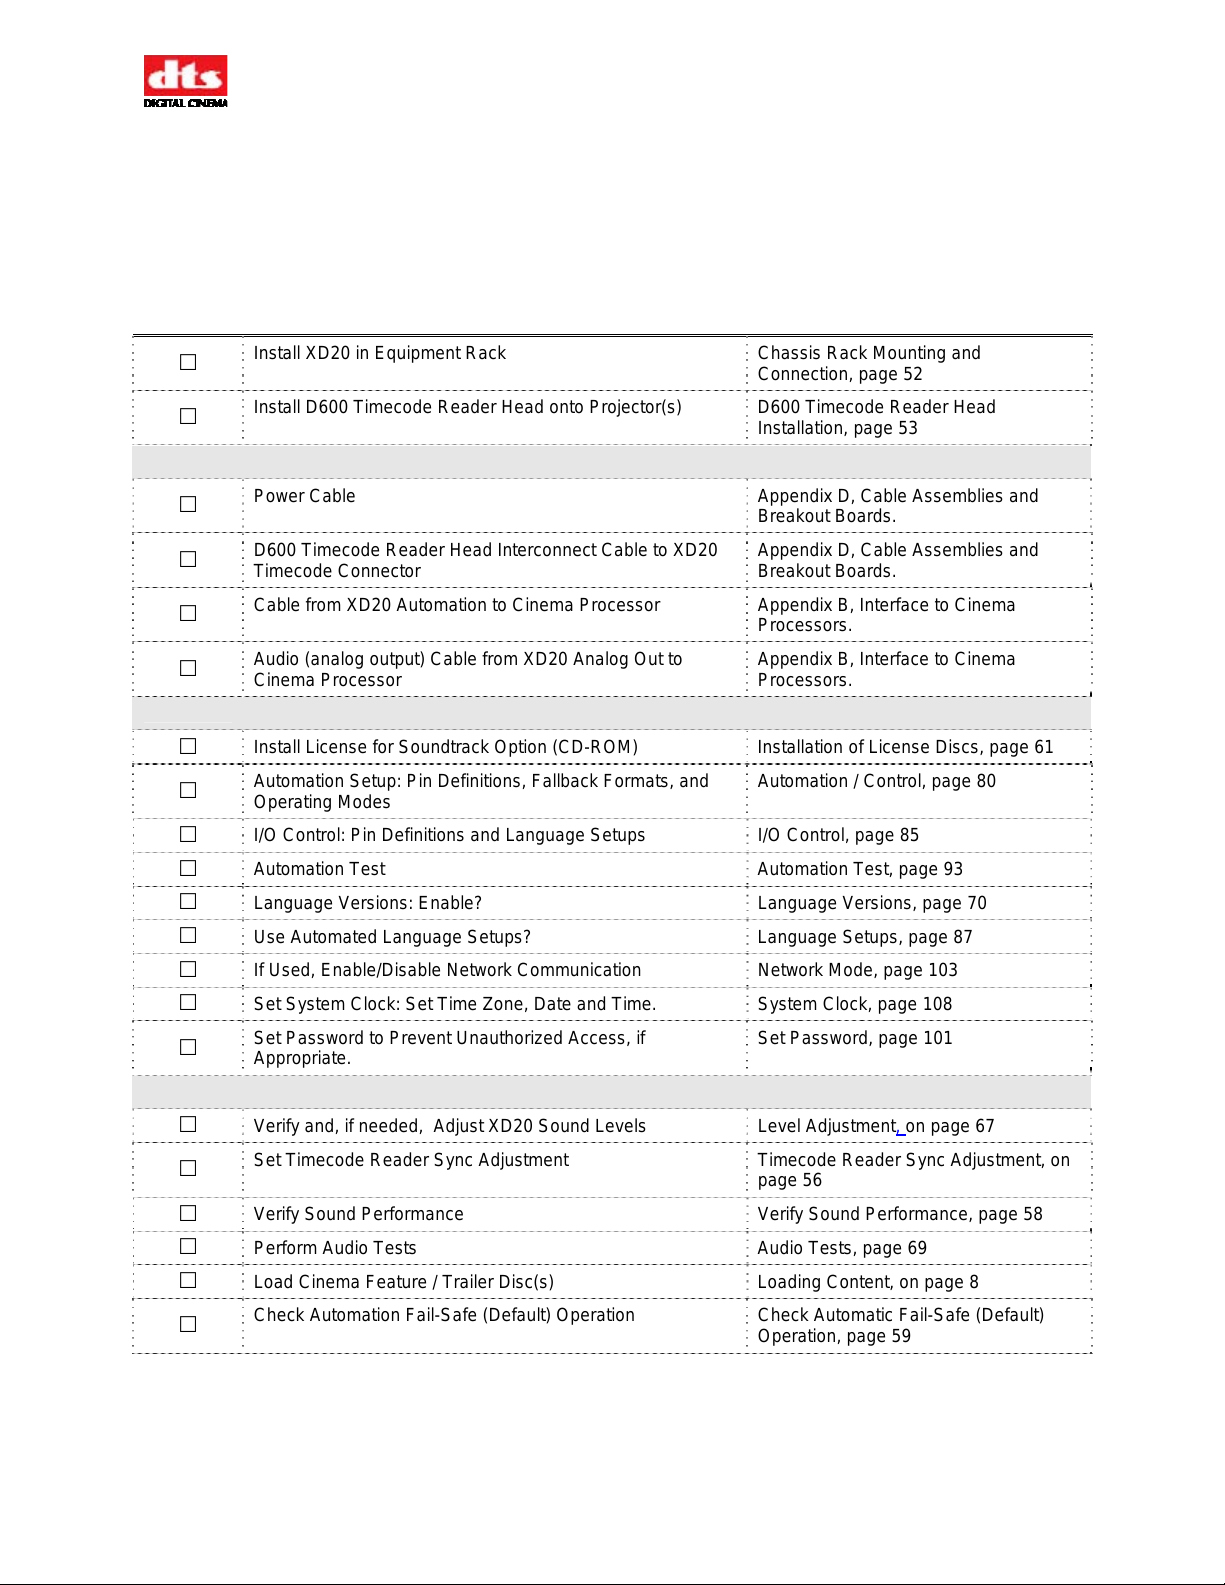
Table 1: XD20 Installation and Setup (Soundtrack Option)
Completed Task Refer to:
If the DTS Access™ (CSS) option is to be installed, complete the steps in Table 2.
Install XD20 in Equipment Rack Chassis Rack Mounting and
Connection, page 52
Install D600 Timecode Reader Head onto Projector(s) D600 Timecode Reader Head
Installation, page 53
CONNECT CABLING:
Power Cable Appendix D, Cable Assemblies and
Breakout Boards.
D600 Timecode Reader Head Interconnect Cable to XD20
Timecode Connector
Cable from XD20 Automation to Cinema Processor Appendix B, Interface to Cinema
Audio (analog output) Cable from XD20 Analog Out to
Cinema Processor
PROGRAMMING STEPS
Install License for Soundtrack Option (CD-ROM) Installation of License Discs, page 61
Automation Setup: Pin Definitions, Fallback Formats, and
Operating Modes
I/O Control: Pin Definitions and Language Setups I/O Control, page 85
Automation Test Automation Test, page 93
Language Versions: Enable? Language Versions, page 70
Use Automated Language Setups? Language Setups, page 87
If Used, Enable/Disable Network Communication Network Mode, page 103
Set System Clock: Set Time Zone, Date and Time. System Clock, page 108
Set Password to Prevent Unauthorized Access, if
Appropriate.
ADJUST AND TEST
Verify and, if needed, Adjust XD20 Sound Levels Level Adjustment, on page 67
Set Timecode Reader Sync Adjustment Timecode Reader Sync Adjustment, on
Verify Sound Performance Verify Sound Performance, page 58
Perform Audio Tests Audio Tests, page 69
Load Cinema Feature / Trailer Disc(s) Loading Content, on page 8
Check Automation Fail-Safe (Default) Operation Check Automatic Fail-Safe (Default)
Appendix D, Cable Assemblies and
Breakout Boards.
Processors.
Appendix B, Interface to Cinema
Processors.
Automation / Control, page 80
Set Password, page 101
page 56
Operation, page 59
Document # 9301H264001.0
xiii
Page 15
XD20 Installation and Operating Guide Version 1.0
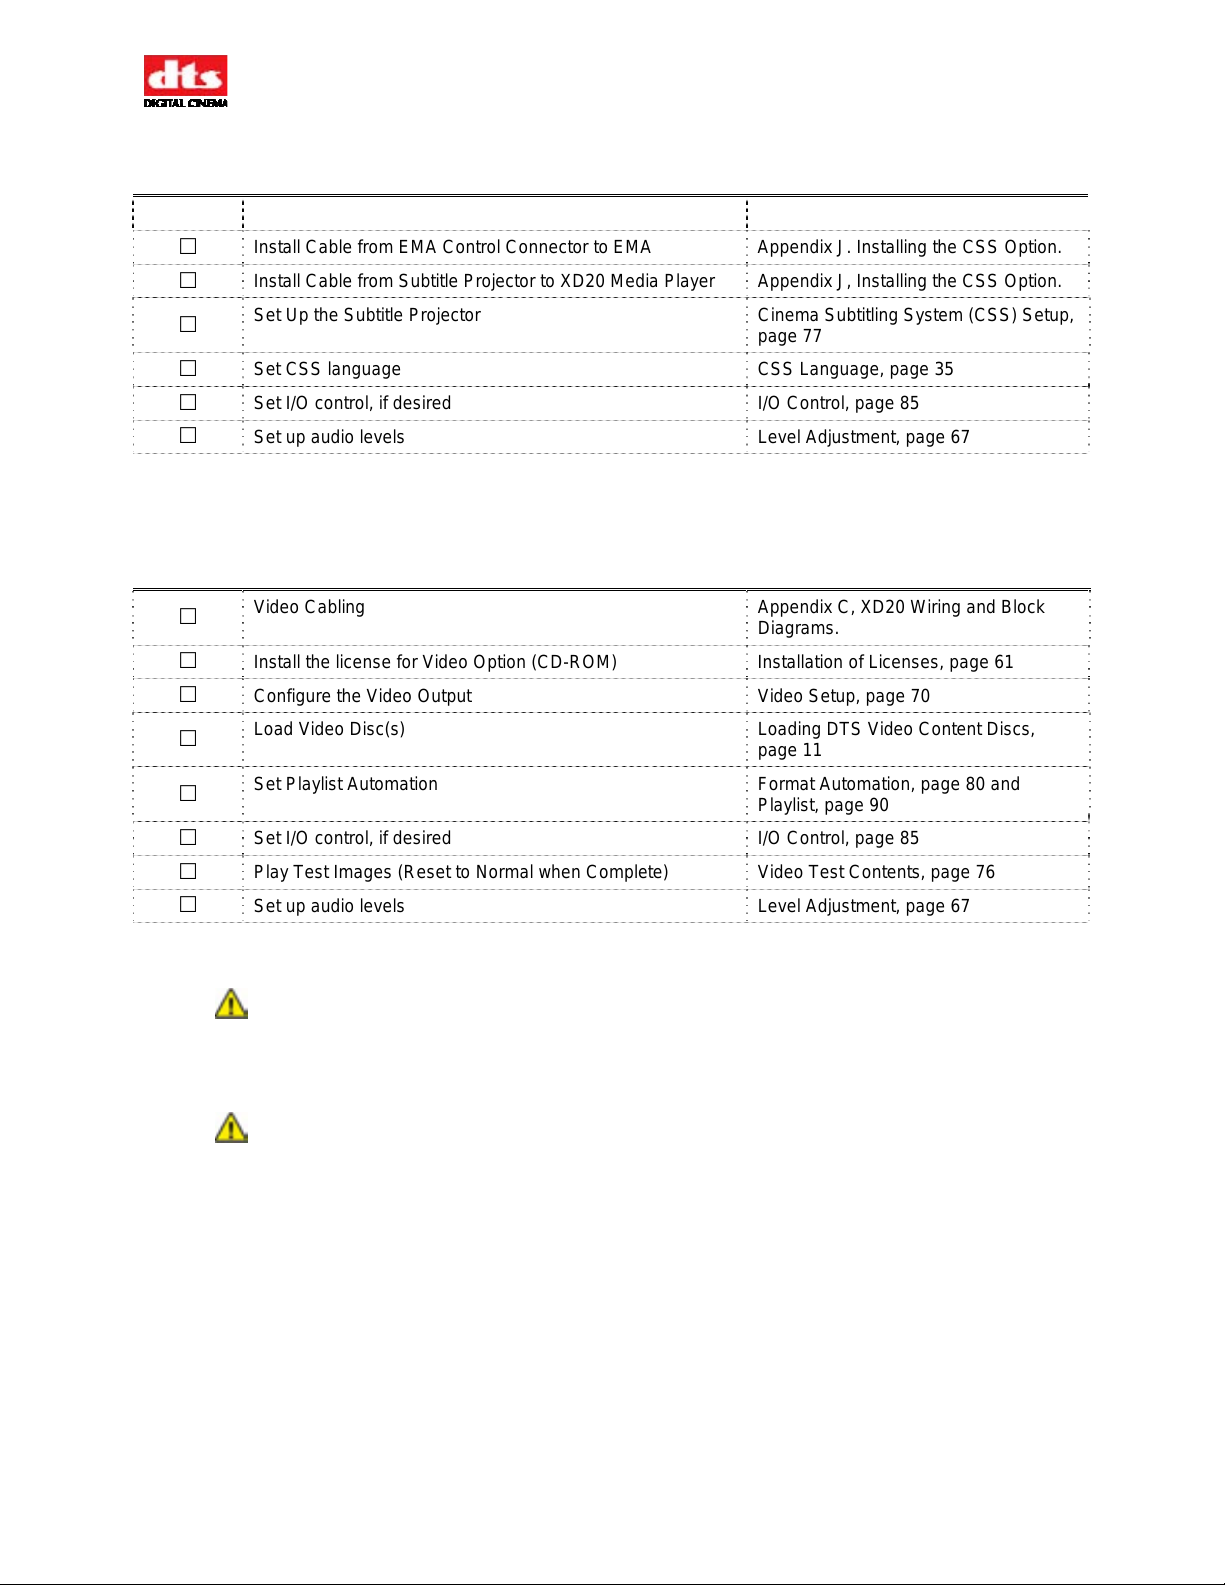
Table 2: CSS Installation and Setup
Completed Task
Install License for CSS Option (CD-ROM) Installation of Licenses, page 61
Install Cable from EMA Control Connector to EMA Appendix J. Installing the CSS Option.
Install Cable from Subtitle Projector to XD20 Media Player Appendix J, Installing the CSS Option.
Set Up the Subtitle Projector Cinema Subtitling System (CSS) Setup,
page 77
Set CSS language CSS Language, page 35
Set I/O control, if desired I/O Control, page 85
Set up audio levels Level Adjustment, page 67
If the Video option is to be installed, complete the steps in Table 3.
Table 3: Video Option Installation and Setup
Completed Task
Video Cabling Appendix C, XD20 Wiring and Block
Diagrams.
Install the license for Video Option (CD-ROM) Installation of Licenses, page 61
Configure the Video Output Video Setup, page 70
Load Video Disc(s) Loading DTS Video Content Discs,
page 11
Set Playlist Automation Format Automation, page 80 and
Playlist, page 90
Set I/O control, if desired I/O Control, page 85
Play Test Images (Reset to Normal when Complete) Video Test Contents, page 76
Set up audio levels Level Adjustment, page 67
Caution Notices
Lithium Battery for the XD20 Motherboard: Danger of explosion if battery is incorrectly
replaced. Replace only with the same or equivalent type recommended by the manufacturer.
Dispose of used batteries according to the manufacturer's instructions. See Appendix I,
Technical Maintenance.
Power Cord to the XD20 rear panel: The power cord is the main disconnect device. It
should be plugged into an easily accessible outlet. The power cord is to be used in a
minimum type SVT 18/3 rated 250 Volts AC, 10 Amps with a maximum length of 4.5 M,
with one end terminated in an IEC 320 attachment plug and the other end terminated in a
NEMA 5-15P Plug.
Document # 9301H264001.0
xiv
Page 16
XD20 Installation and Operating Guide Version 1.0
Part 1: Operation
The first four chapters of this manual describe the information the projectionist needs to operate the XD20
Media Player on a day-to-day basis.
• Operating XD20
• Loading and Playing Content
• XD20 Playback Menus
• Maintenance and Troubleshooting
1. Operating XD20
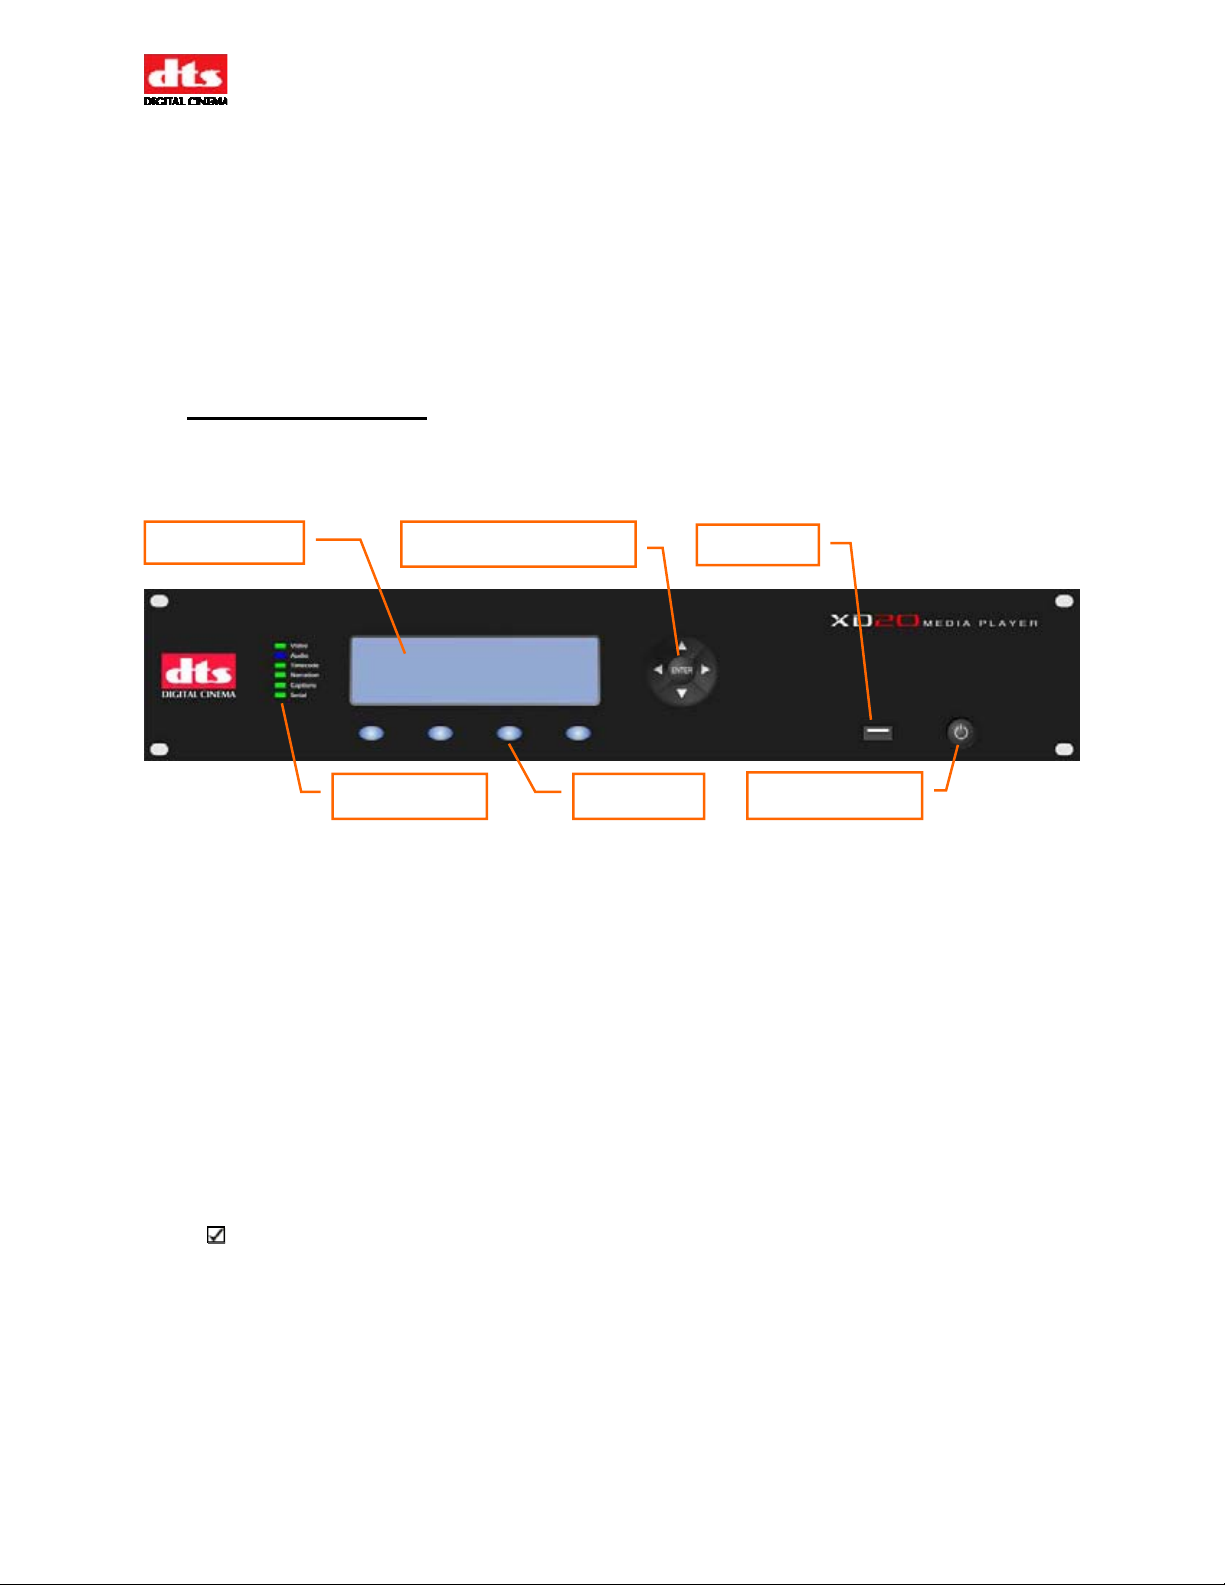
1.1. Front Panel Controls and Indicators
LCD Screen
Navigation buttons
USB port
Status LEDs
Figure 1: Front Panel Controls and Indicators
The front panel contains the following controls and indicators for operating XD20.
• LCD Screen: Four lines of text provide status messages and menus. Special characters for
foreign languages are not displayed.
• Navigation buttons: Four arrow keys and Enter are used to navigate menus and select
options.
• Soft keys: Four programmable buttons provide quick access to frequently used menus.
• Status LEDs: Six LEDs provide status information during playback.
• Power button: Turns the unit on and off.
• USB port: A USB memory device can be used to save and restore XD20 configuration
settings and load Preshow video content, ACV content, license files, and updates.
Note: DVD drives: An external DR-1 unit, containing two DVD drives is used to load
soundtracks, license files, software updates, trailers and video content onto the XD20’s hard
drive. See Appendix M.
Soft keys
Power button
Document # 9301H264001.0
1
Page 17
XD20 Installation and Operating Guide Version 1.0
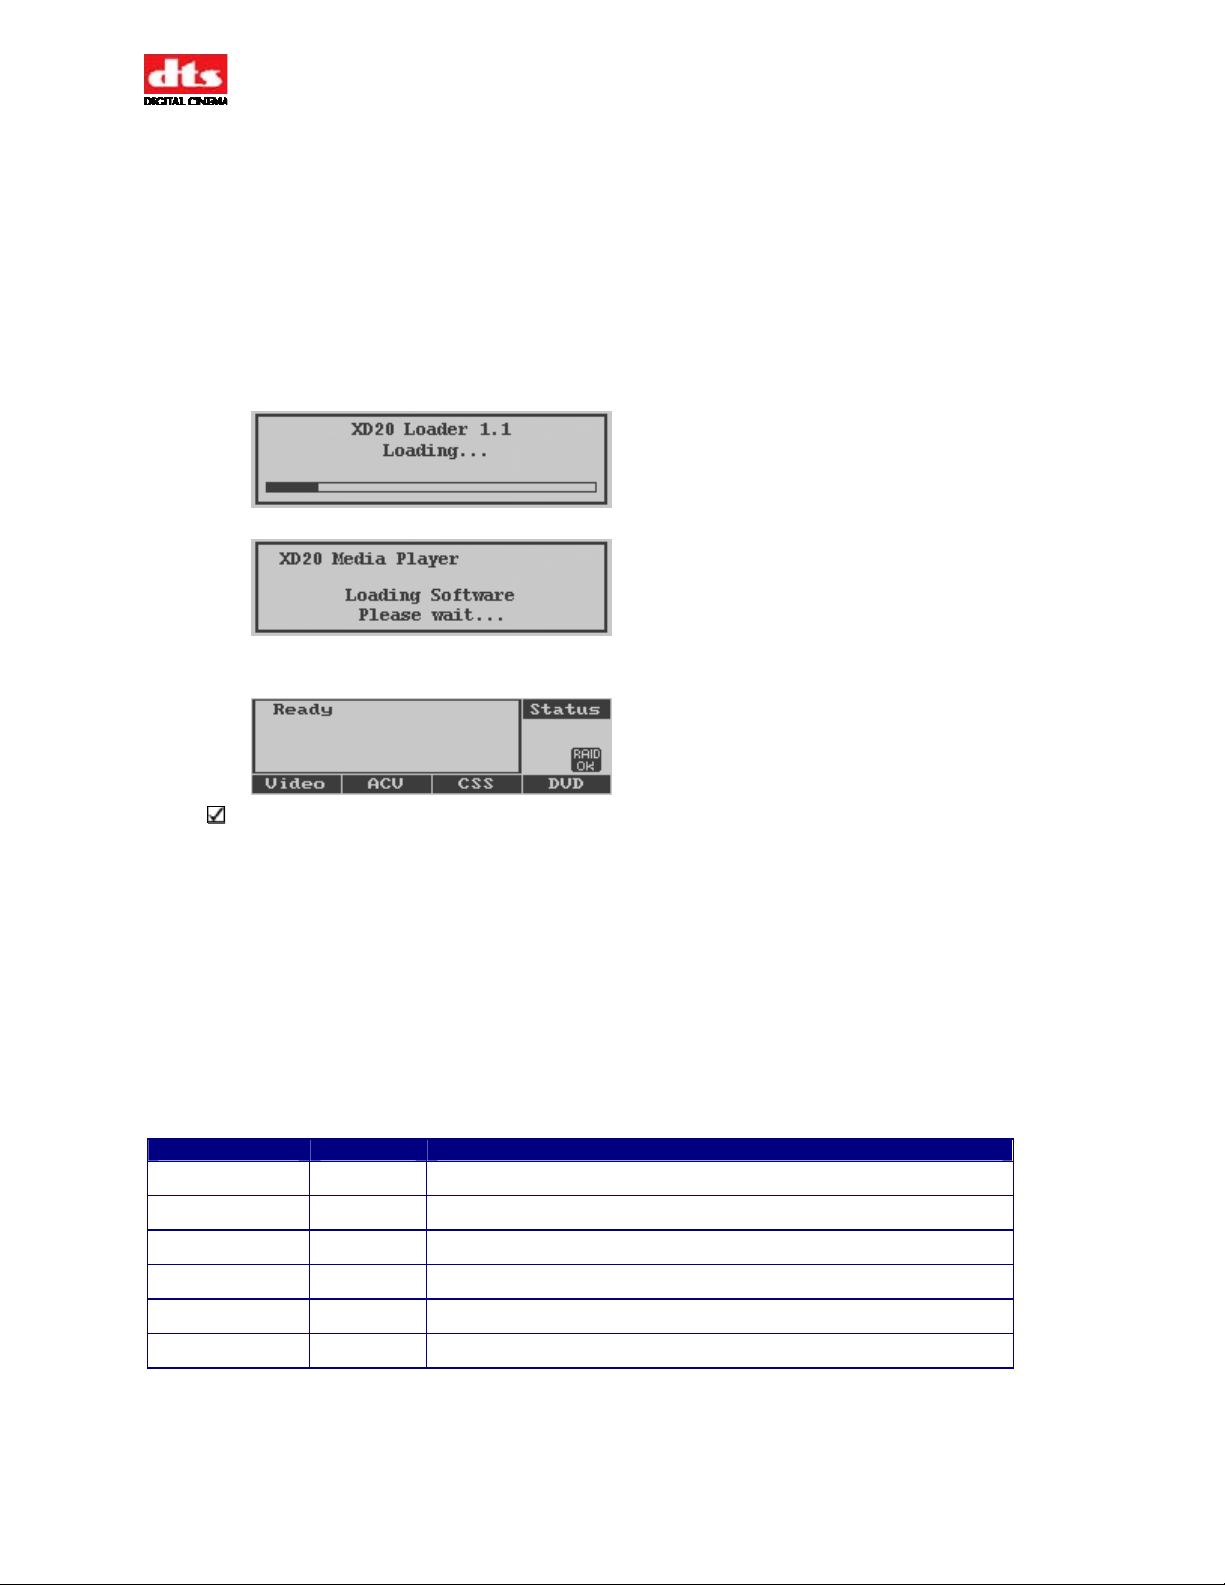
1.2. Powering ON the XD20 Media Player
Start by turning ON the front panel power button. It typically takes the system 90 seconds to initialize.
The XD20 boots from the Flash drive that is connected (internally) to its motherboard. It may take an
additional minute if the system is performing one of its periodic self diagnostics.
The Flash drive contains enough information to be able to check and repair the data on the hard drive.
The application software runs from the hard drive. Built-in diagnostics will check the hard drive and
software upon boot. A message appears on the display if a problem is found.
While the system is initializing, the following messages will appear on the LCD screen on the front panel
of the XD20 chassis.
Wait until the screen displays the Ready message before using it.
If no messages appear on the LCD screen after you have turned on the power switch, check the
following:
Is the power to the sound rack on? Has the sound rack breaker been tripped?
Is the power cable connected?
Are all internal cables connected and boards well seated?
1.3. LED Indicators
The table below describes the LED functions on the XD20 front panel. The AUDIO LED lights blue
when active. The other LEDs light green when active.
Table 4: Front Panel LED Indicators
LED Color Indication
VIDEO Green Playing video playlist or test material.
AUDIO Blue Playing audio playlist or test material.
TIMECODE Green Reading valid timecode from the reader head.
NARRATION Green Playing narration track to timecode.
CAPTIONS Green Playing CSS subtitles or captions.
SERIAL Green Serial text for data wall
Document # 9301H264001.0
2
Page 18
XD20 Installation and Operating Guide Version 1.0
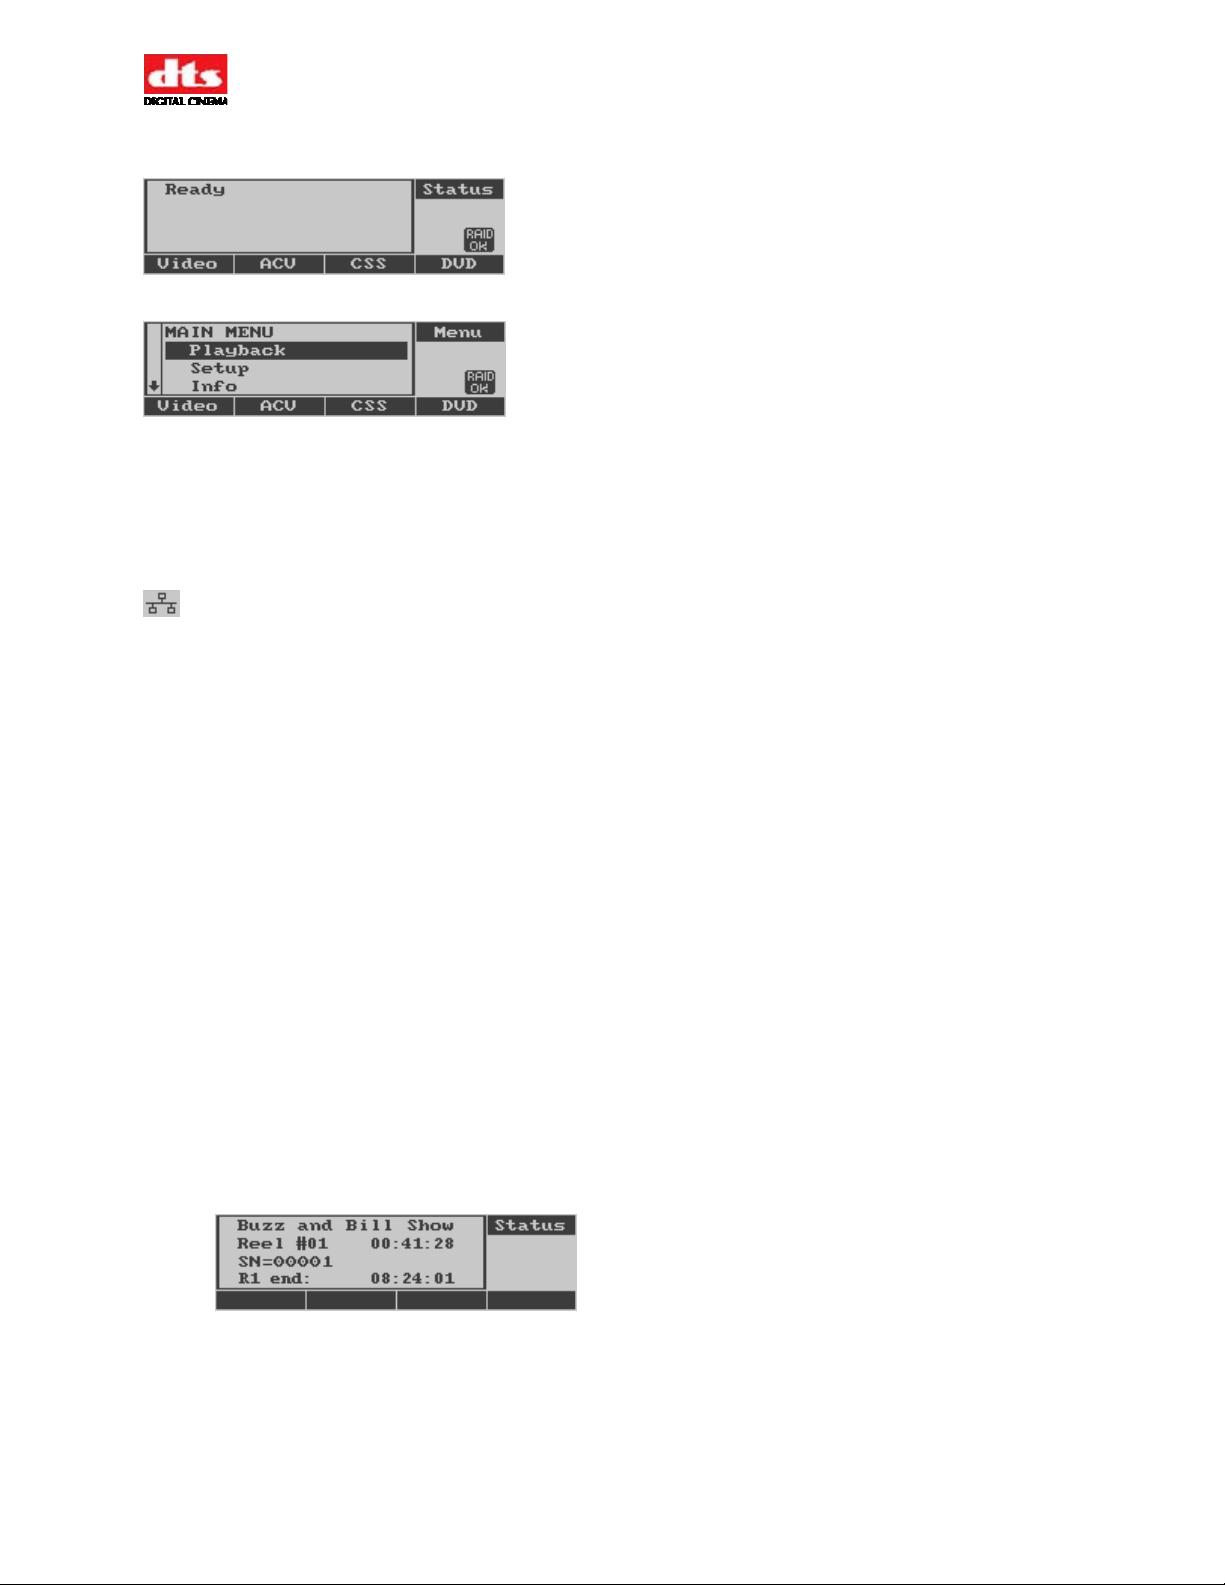
1.4. LCD Screen
Status mode (status is “Ready”)
Menu mode
On the left of the liquid crystal display (LCD) screen on the front panel of XD20 is the menu display area.
At times, there will be a scrollbar to its left to indicate additional choices off-screen. Use the up/down
arrows on the navigation pad to bring unseen choices onto the screen. The small area to the right indicates
what the left area is currently displaying, such as “Menu” or “Status”. It also contains iconic status
messages such as “RAID OK” (only displayed when the optional 2
indicating that a network connection has been established, or an icon of an exclamation mark (!) that
indicates a problem.
Along the bottom of the LCD screen are labels for several selectable soft keys, which change function
depending on what menu you are displaying. The soft keys themselves are located below the LCD
screen.
The LCD screen operates in two modes:
• Status mode. During playback, the screen displays information about the content currently
being played.
• Menu mode. In menu mode, the screen displays menus that can be used to view and adjust
playback settings.
The XD20 navigation buttons may be used to switch the display between the status mode and menu
mode.
nd
HDD is installed), a network icon
1.4.1. Status Display
The XD20 status display reads “Ready” when XD20 is ready to play but not actively receiving timecode
or playing content.
When XD20 receives timecode, the status display shows the following 4 lines:
• Line 1: Title of film or trailer
• Line 2: Serial number in the timecode that identifies the film.
• Line 3: Timecode reel number and elapsed timecode
• Line 4: Configurable information line
Document # 9301H264001.0
3
Page 19
XD20 Installation and Operating Guide Version 1.0
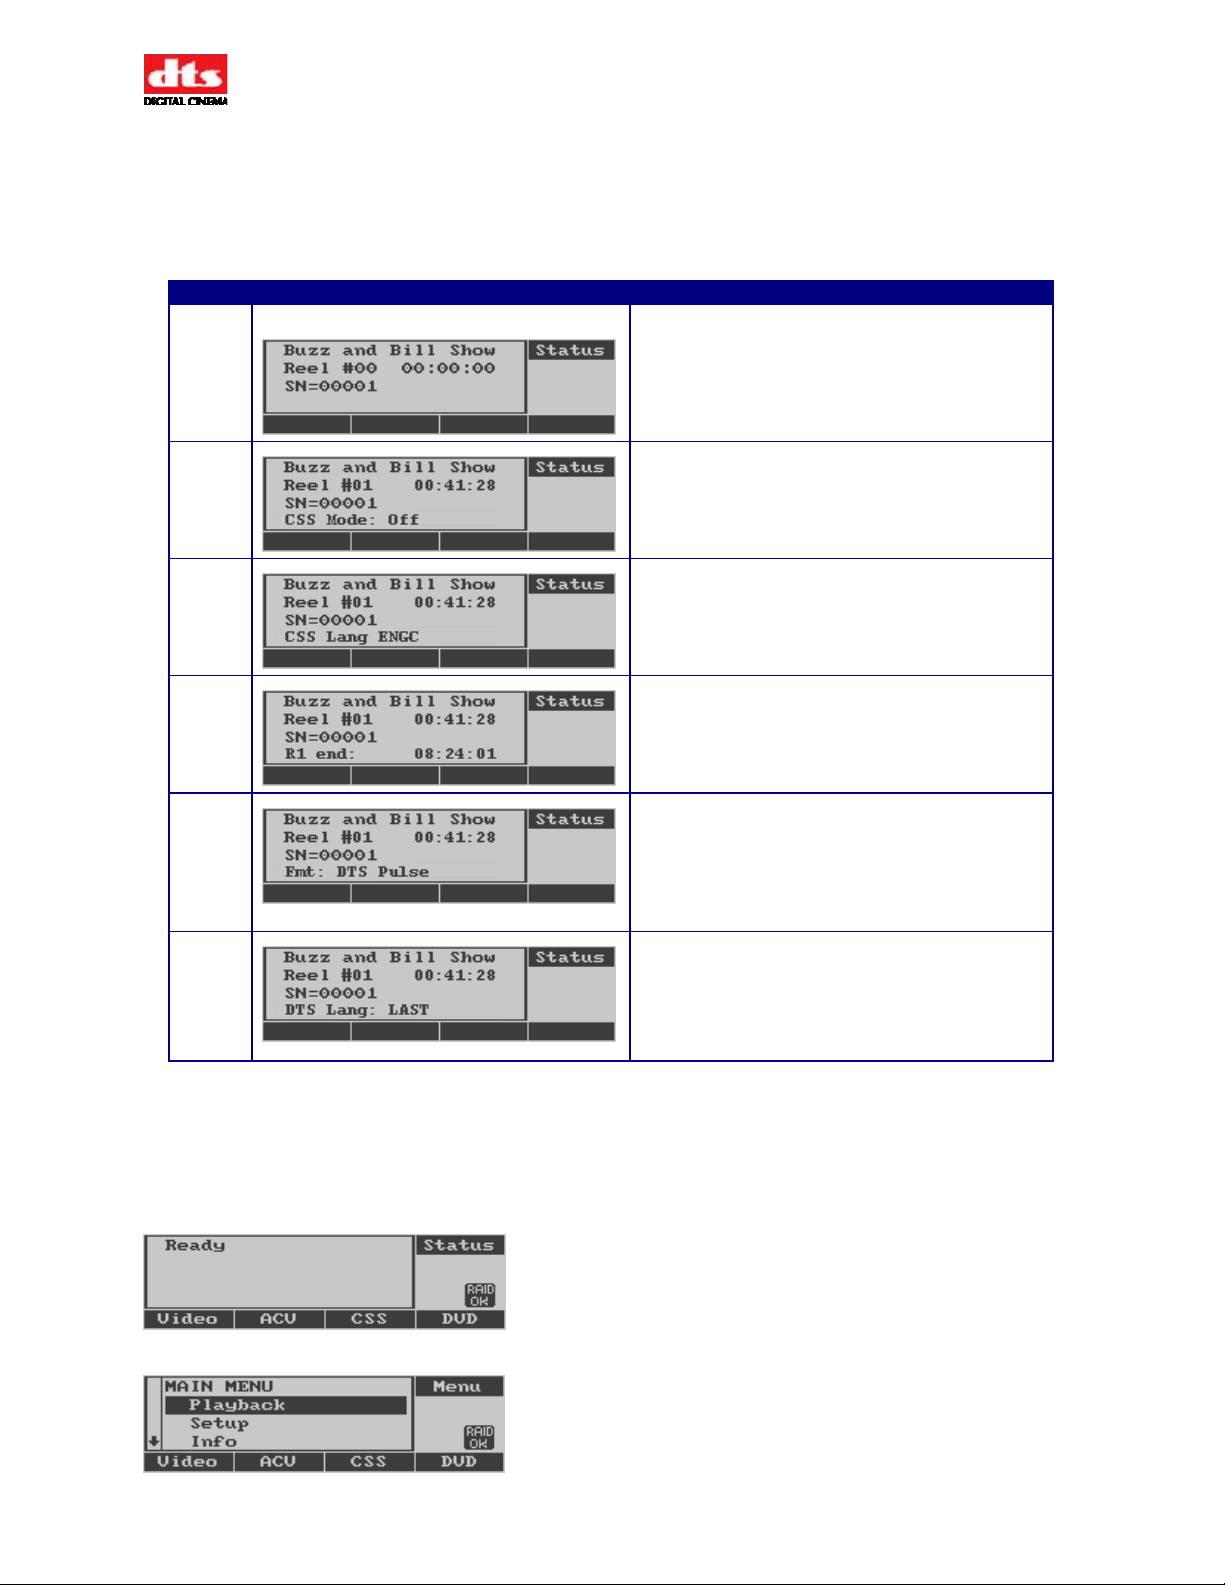
1.4.2. Configurable Information Line
Table 5 lists the options for Line 4. In the screen above, Line 4 displays End of Reel time. To select an
option for Line 4 use the up or down navigation buttons.
Table 5: Configurable Information Options
Option Example Indication
1
2
3
4
5
6
Blank. Bottom line does not display any
information.
CSS Mode. This displays the current On/Off
status of the CSS function. (See the section on
CSS Playback on page 33.)
CSS Lang. This displays the current language
selection for the CSS subtitles. (See the section
on CSS Playback on page 33.)
End of Reel Time. This choice displays the
timecode at which the audio for the current
soundtrack reel terminates. In normal operation,
the reel change occurs a few seconds before this
time is reached.
Fmt. This choice displays the current format
selected by XD20 to communicate with the
external automation system or Cinema Processor.
In some configurations XD20 may not recognize
external format changes. In those cases, this line
will display the last format selected by XD20.
DTS Lang. This choice displays the language
code for the soundtrack currently playing. (See
information on selecting a playback language in
Soundtrack Language, page 32.)
1.4.3. Navigating through the Menus
Use the navigation buttons (arrow keys and Enter) on the XD20 front panel to navigate through the
XD20 menus. These are shown in figure 1 on page 1.
When the status display reads “Ready”, as shown below, press the Enter button to access the menus.
After you press Enter, the Main Menu, shown below, will appear on the LCD screen.
Document # 9301H264001.0
4
Page 20

XD20 Installation and Operating Guide Version 1.0
Use the Up and Down keys to scroll up and down the menu of commands. Note that the LCD only
displays four lines of text at a time, but pressing the up and down buttons will cause the text to scroll up
and down to reveal the other lines. The highlighted item is the current selection. Pressing the up and
down keys causes the highlight to move.
To execute a command, highlight it and press the Enter button. Most menus contain an Exit Menus
command which returns to the status display.
Table 6: Navigation Keys
Front Panel Key Description
►
(Right arrow)
Moves forward to the next menu.
Used to move the cursor to the next field in some menus.
◄
(Left arrow)
▲
(Up arrow)
▼
(Down arrow)
Enter Selects and executes the command at the cursor or goes back to the previous menu
Goes back to the previous menu. When the menu at the top level of the menu
structure is reached, returns to the Status display.
Used to move the cursor to the next field in some menus.
Sometimes used as an Abort key
Moves the cursor up one line.
Used to increment a value in some menus.
Moves the cursor down one line.
Used to decrement a value in some menus.
in some cases.
Document # 9301H264001.0
5
Page 21

XD20 Installation and Operating Guide Version 1.0
2. Loading and Playing Content
2.1. Types of Content
The XD20 Media Player plays these types of content:
• Soundtracks (Features and trailers)
• Preshow Video (Standard and High Definition)
• CSS (Cinema Subtitling System: Subtitling, Captioning and Audio Narration)
• ACV (Alternate Content video)
2.1.1. Soundtrack Content
Soundtracks are DTS audio files for features and trailers. They are normally delivered on discs, which are
inserted in the drives of the external DVD drive unit and saved on XD20s hard drive. If the XD20 is
networked, soundtracks may be loaded via network using proprietary DTS Digital Cinema software.
2.1.2. Preshow Video Content
DTS video content can be delivered in several ways: discs that can be downloaded to XD20 or content
delivered via a network, or via USB hard drive or USB portable “memory stick”. The video content
includes a configuration file that determines the video playlists, schedules and automatic start times.
The creation of content discs is not covered in this manual.
XD20 will not play standard consumer DVD movies or music CDs. XD20 content DVDs for
cinema must be created using proprietary DTS Digital Cinema software.
2.1.3. Alternate Content Video
Playback of Alternate Content Video (ACV) is an XD20 capability that comes with the HD Video option.
There is reserved disk space for ACV, which is separate from the space for Film and Preshow content.
Multiple playlists can be loaded into the XD20. Unwanted playlists must be manually deleted.
Appendix K describes the process of creating ACV playlists and loading them onto XD20 using the ACV
Playlist Generation software.
2.1.4. CSS Content
The DTS Access™ system was designed to aid hearing impaired and visually impaired audiences. In
addition, it is also capable of language translations.
In order to use the CSS system, your XD20 Media Player must have a license for the CSS Option. Three
types of program content may be provided to a theater equipped with an XD20 that has the CSS option
installed.
• Projected Subtitles or Captions
• Captions for rear data wall
• Narration
The CSS content is not delivered with the feature soundtrack disc(s). They are delivered separately. CSS
discs will be labeled “DTS Access™” and with the same show title and serial number as the feature
soundtrack disc. The disc label also shows what type of CSS content is included, as not all types of CSS
content are included with all CSS discs.
Not all features provide a DTS Access™ disc. Check with your distributor or contact DTS
Digital Cinema for features that are available.
The CSS playback works the same as DTS feature audio playback, in the sense that the film contains
timecode that must match the assigned film and audio serial numbers. This prevents playback of the
wrong content with the wrong feature.
Document # 9301H264001.0
6
Page 22

XD20 Installation and Operating Guide Version 1.0
The projectionist threads the film through the D600 Timecode Reader Head on the projector, and when
the show starts, the CSS will play automatically, synchronizing the content to the film. Some operational
tasks can be performed by the projectionist. These are explained in more detail under Playback Menu, in
Chapter 3.
CSS Terminology
These are some of the terms associated with the CSS Option.
Table 7: Definitions of Terms
Term Definition
CSS Cinema Subtitling System. A system designed by DTS Digital Cinema that provides
DTS Access™ content.
DTS Access™ Group of delivery playback files that include subtitles, narration, and Rear Window™.
(Rear Window is a trademark of WGBH public broadcasting system in Boston.)
Subtitle Projected text of on-screen dialog. Often this has been translated into a language
different than the original version.
Caption “front captions” – Projected text on screen that contains both film dialog and sound
descriptions. This is also referred to as Open Caption.
Rear Window™ “rear captions” – This system consists of a LED reader board (display) mounted on the
rear wall of the theater. It receives serial data from the CSS and displays caption text
that is reflected on individual reflectors (rather than captions displayed on the screen).
Narration This is an audio description of on screen action during feature playback. It is normally
received via an IR (Infrared) or FM (Frequency Modulation) device to a head set worn
by an audience member.
CSP Cinema Subtitle Projector is a custom designed video projector for use only with the
CSS Option.
EMA External Masking Apparatus – A bracket that holds the CSP (cinema subtitling
projector). Also contains a special douser and masking system
Document # 9301H264001.0
7
Page 23

XD20 Installation and Operating Guide Version 1.0
2.2. Content Delivery
Most content is delivered on discs. Customers who have XD20 with the HD Video Option may make
arrangements with DTS Digital Cinema to receive video and ACV content via a network.
2.2.1. Types of DTS Discs
DTS theaters receive most content on CD-ROM discs. There are several types of discs.
• DTS Soundtrack discs for feature films.
Soundtrack discs are issued by the film studios' distribution companies and must be returned with
the prints. Feature film soundtrack discs sometimes include trailers.
• DTS Trailer discs. These discs only contain trailer soundtracks. Trailer discs are distributed by
DTS and do not have to be returned.
• DTS Video discs. These discs contain XD20 video content, playlist and schedule information.
These discs do not have to be returned.
• DTS Access™ discs are issued by the film studios' distribution companies and must be returned
with the prints. Access discs may include any or all of the following and will only play when the
XD20 Media Player has the CSS option:
o CSS subtitles or front captions (projected on the screen)
o “Rear” Captions (captions displayed at the rear of the theater and onto a “Rear
Window
o Audio Description that describes action on screen (Narration).
XD20 will only accept a disc made specifically for DTS cinema playback equipment. XD20
will reject consumer CD audio or DVD type discs.
TM”
display)
2.3. Loading Content
Generally, any DTS feature soundtrack disc (film or trailer), DTS Access™ disc (with CSS content), or
DTS video content disc will automatically load when inserted in the external DVD drive unit. The content
will be copied onto the XD20 hard disc for playback at a later time. XD20 will store several soundtracks
and/or DTS Access™ discs for multiple features and trailers.
XD20 will only accept a disc made specifically for cinema playback. XD20 will reject consumer CD
audio or DVD type discs.
Please note that DTS soundtrack feature discs do not contain CSS files for the feature. CSS content for a
feature is on a DTS Access™ disc, and must be loaded separately. It does not matter whether the DTS
Access™ or soundtrack disc is loaded first. The CSS content for a feature can be loaded and played
without the DTS soundtrack for the same feature.
2.3.1. DTS Soundtrack Discs
Soundtrack discs can be single discs or come as sets of double or triple discs.
• 1-disc soundtrack. DTS soundtrack for films running about 90 minutes or less may be delivered
with one disc. These discs are labeled as "one disc only".
• 2-disc soundtrack. Films running 90 minutes but less than three hours will likely require two
discs which are labeled “Disc A” and “Disc B”. These movie soundtracks discs must be loaded as
a set.
• 3-disc soundtrack. In rare cases, a soundtrack may require three discs (“Disc A”, “Disc B” and
“Disc C”) if it runs more than 3 hours. Loading a three disc soundtrack must be done in two
separate load processes.
• DTS trailer soundtrack discs. Trailer discs are always single discs.
Document # 9301H264001.0
8
Page 24
XD20 Installation and Operating Guide Version 1.0
2.3.2. Loading Soundtrack Discs
The XD20 must be licensed to enable it to load specific types of content:
• CSS content will not play from any XD20 not licensed for CSS.
• An audio disc will not load if not licensed for soundtrack.
• A video/ACV disc will not load if not video enabled.
Note: An exception to this occurs when network transfer is enabled. The XD20 will then load any film
(soundtrack or CSS) content so that it may be distributed to other units, but will not play back the content
if not licensed.
Refer to the Licenses Menu in section 3.3.2 to see which licenses are loaded.
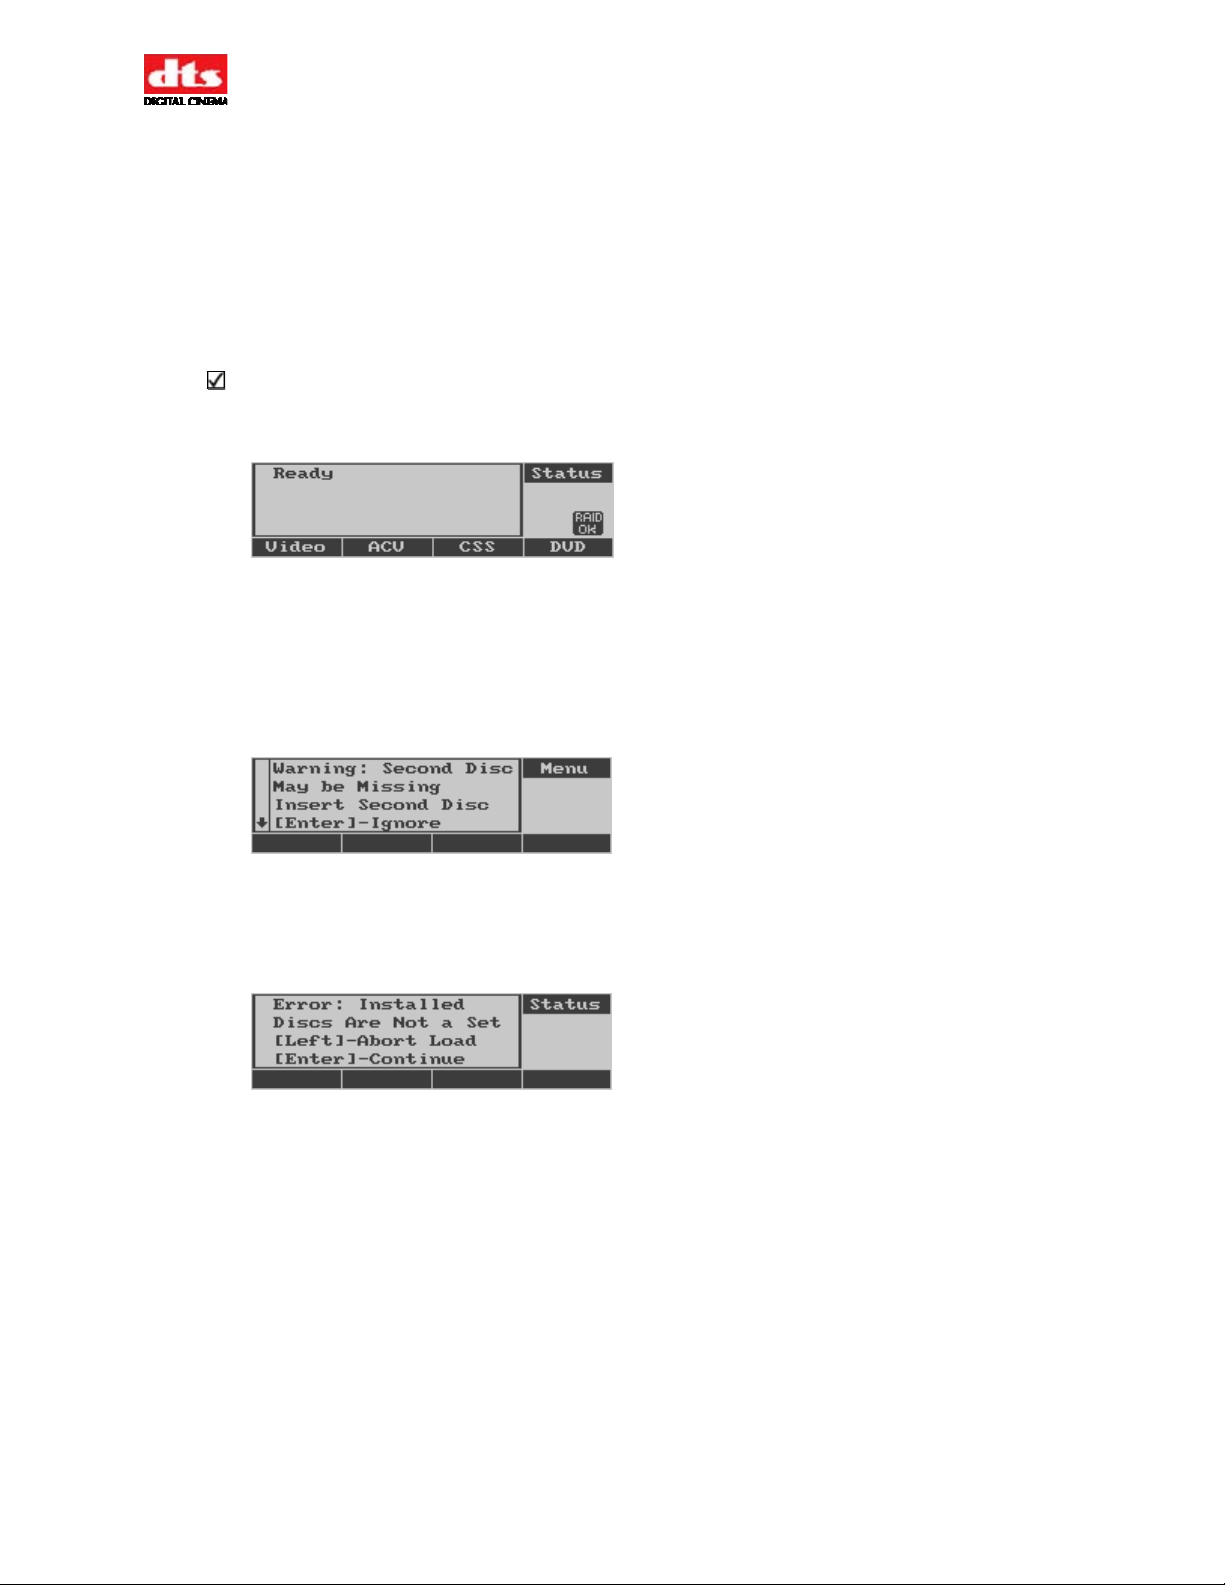
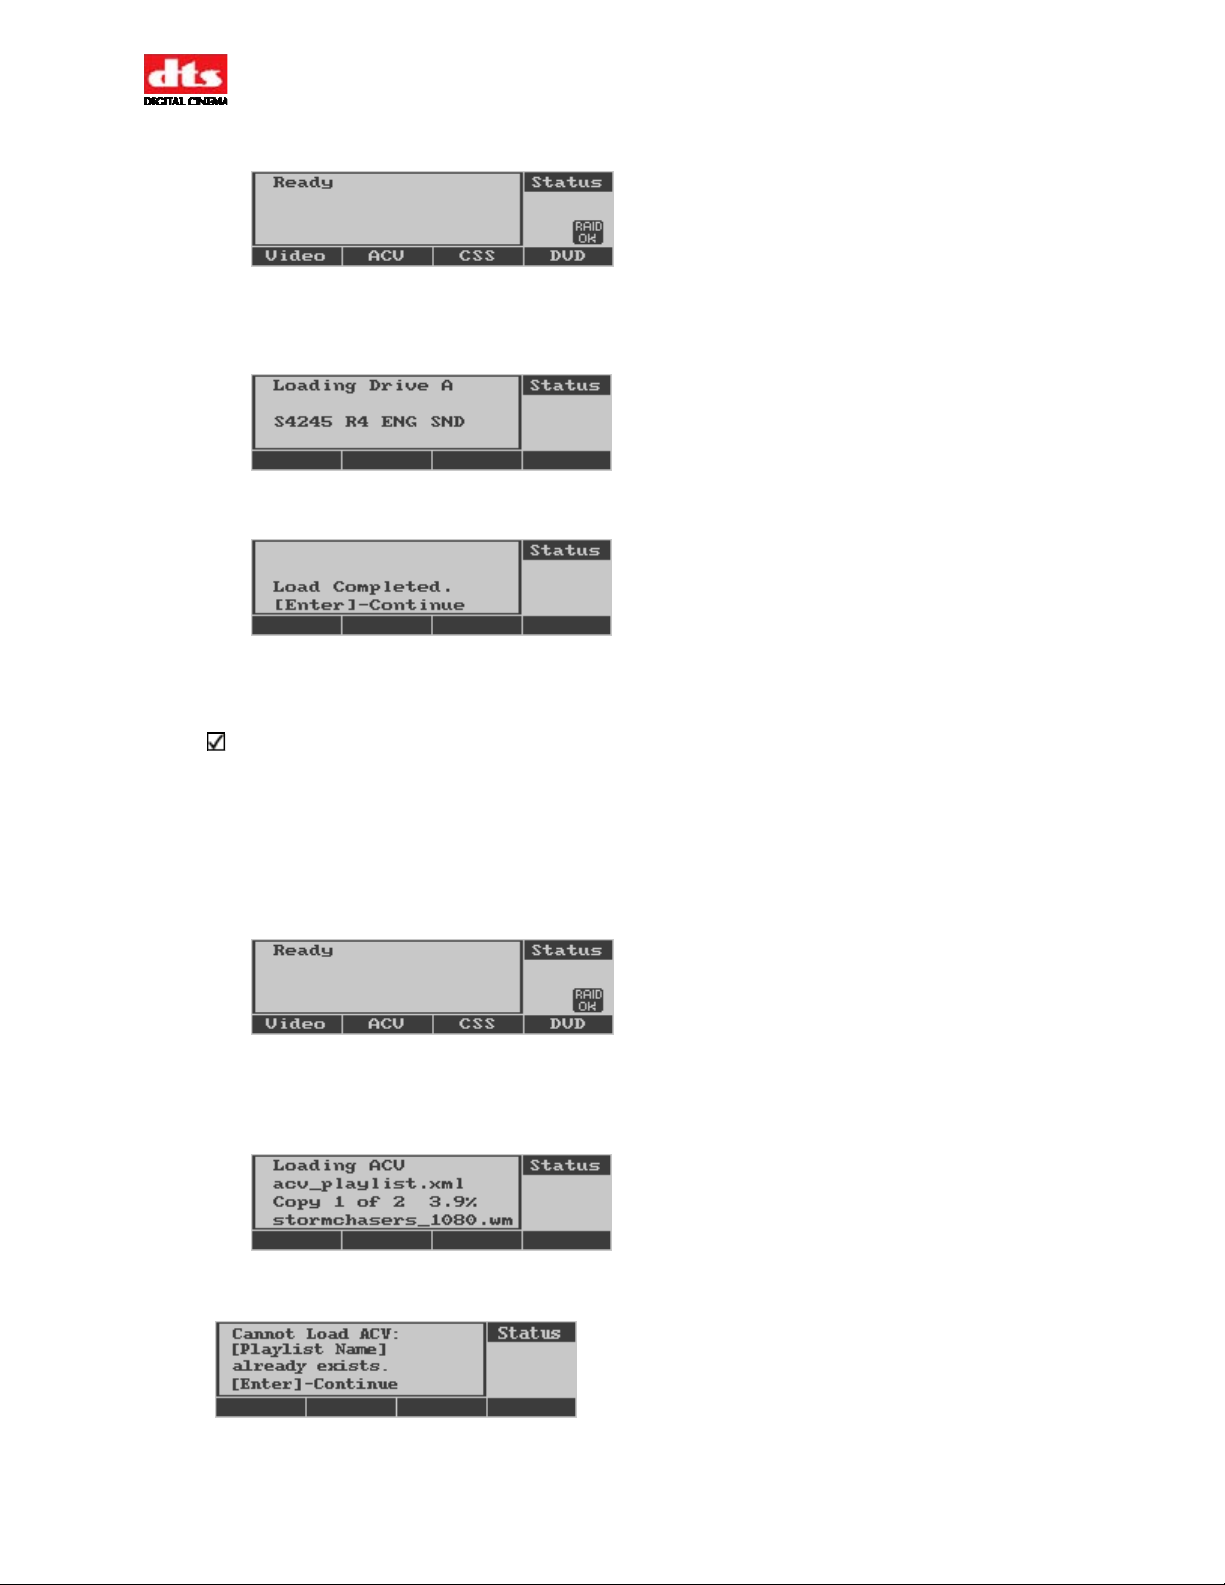
1 Start while XD20 is not playing content. The status display should read “Ready.”
2 Open the DVD drive (in the external DVD drive unit) by pressing the Open/Close button adjacent
to the tray. Place the disc in the tray with the printed side up. For a two-disc or three-disc
soundtrack, place disc A into drive A and disc B in drive B.
3 Close the tray by pressing the Open/Close button, and the external DVD drive unit will check the
contents of the disc before loading. If it detects an error, it will display one of the following
messages on the XD20 LCD display.
This warning message indicates that one disc of a two-disc set was not inserted. To add the
second disc, first eject the one disc and start over with both discs. This warning may also occur
for a three-disc set and can be ignored. Press Enter to ignore the warning and proceed to load the
contents.
This error message indicates that the two-disc set inserted in the drives is not a matching set. This
could be caused by any of the following:
o The discs are from different movies.
o The discs are for the same movie but one is in a different language.
o The discs are duplicates
o One of the discs is not a cinema movie disc.
4 Eject the disc and start over with the matching discs. Pressing Enter will ignore the error, but the
soundtrack loaded might be incomplete.
Document # 9301H264001.0
9
Page 25
XD20 Installation and Operating Guide Version 1.0
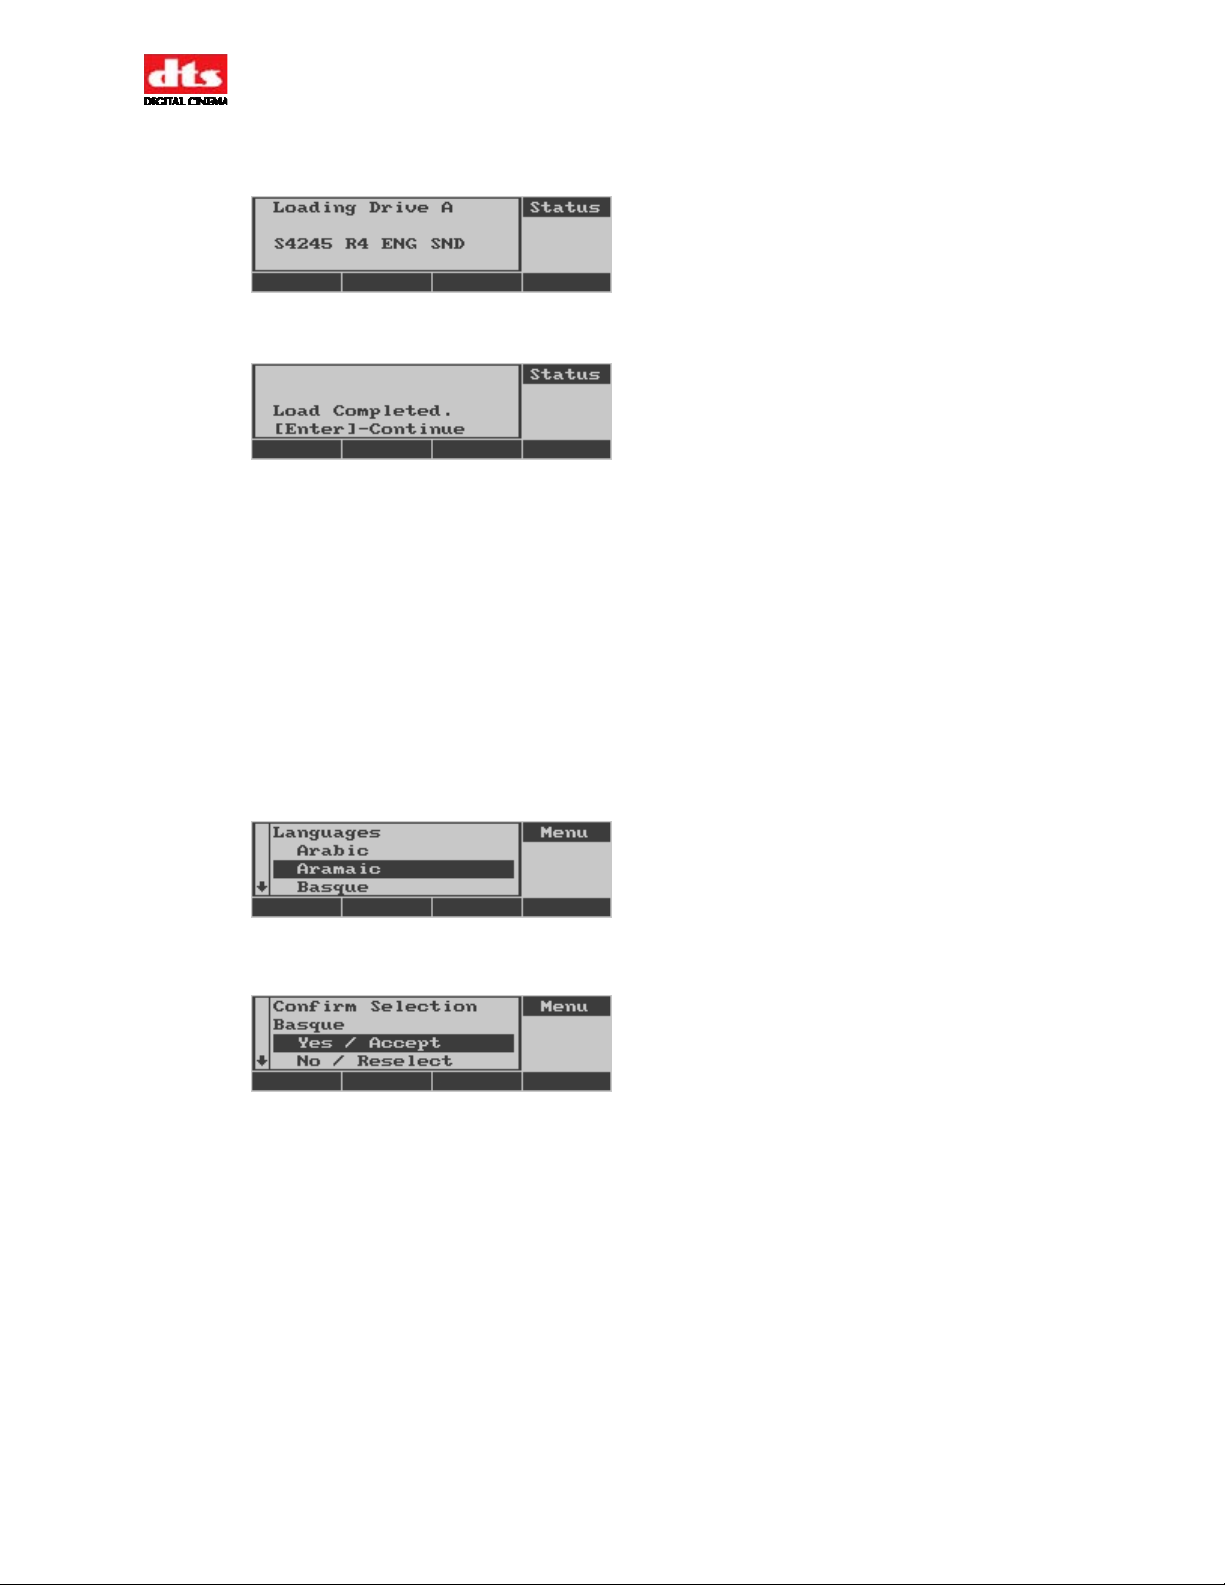
5 When the load process begins XD20 displays information about the content currently being
copied. For example:
Typical load time is three minutes per disc. The following message appears when the load is
complete.
6 Press Enter and the disc trays will open. Remove the disc(s) from the tray(s). Press the
“open/close” button to close the tray(s).
7 Repeat steps 1 through 6 for “Disc C” of a three-disc soundtrack.
8 Place the DTS soundtrack discs back in the film canisters for return to the depot.
2.3.2.1. Compatibility with Legacy Soundtrack Discs
Old DTS soundtrack discs did not contain a language ID. If you load an older disc that does NOT contain
a Language ID, and if Language Versions is enabled, XD20 will prompt you to identify the playback
language desired. If you are prompted, you must identify the playback language of the disc. If Language
Versions is disabled, XD20 will NOT prompt you to identify the language.
If you load a disc and are prompted for the language, you must select the language from the Languages
menu. The only selection you make should match the language listed on the disc label.
See Table 15 on page 89 for a list of available soundtrack languages.
After selecting a language, a confirmation screen will display.
Yes – Confirm the language is correct and load disc.
No – Go back to the language menu and make a new selection.
Abort – Stop the load process and eject the disc.
Document # 9301H264001.0
10
Page 26

XD20 Installation and Operating Guide Version 1.0
2.3.3. Handling a CD-ROM Read Error
The following message may appear on the screen if an error occurs while XD20 is loading the soundtrack
disc:
The options are:
Press Enter to continue loading the incomplete material, or
If you press Enter, then a portion of the audio data will be missing. When the soundtrack is played, it will
revert to the fallback format when it reaches the missing data. It will return to the DTS format when it
sees valid data. If you load the disc again, it will only attempt to copy the missing data.
Pressing ◄ aborts the loading process. The drives will open and eject the discs. The data that was already
copied from the hard drive will be deleted. Replacement discs for soundtracks can be requested from the
film distributor. Replacement discs for trailers and special options can be requested from DTS.
Press ◄ to Abort without loading any of the soundtrack.
2.3.4. Loading DTS Video Content Discs
DTS video content discs will only load on an XD20 that is equipped with the HD Video Option. The
procedure for loading DTS Video Content discs is:
1. Start while XD20 is not playing content. The screen will display the following message.
2. Open the DVD drive (in the external drive unit). Place the disc in the tray with the printed side
up.
3. Close the tray. The XD20 will check the contents of the disc before loading to ensure that it does
not reload preexisting video content.
When the load process begins, the XD20 will display information about the content currently
being copied. For example:
The following message will appear when the load is complete.
4. Press Enter and the disc trays will open. Remove the disc from the tray.
2.3.5. Loading a DTS Access™ Disc
DTS Access™ discs are always single discs labeled with the name of the feature film and the language of
the content on the disc. To load a DTS Access™ disc, follow these steps:
Document # 9301H264001.0
11
Page 27
XD20 Installation and Operating Guide Version 1.0
1. Start when “Ready” is displayed on the LCD screen on the XD20 front panel.
2. Open the drive (in the external drive unit), place the disc in the tray with the printed side up, and
close the tray. The XD20 will display information about the content being copied. For example:
The following message will appear when the load is complete.
3. Press Enter and the disc trays will open. Remove the disc from the tray and close
the tray.
DTS Access™ discs will load onto the XD20 even if the unit is not licensed for the discs.
However, they will only play back on XD20 units that have a CSS license.
2.3.6. Loading ACV
See Appendix K for information regarding creation of ACV playlists.
These menus apply whether the ACV is loaded from DVD or hard drive.
1. Start when “Ready” is displayed on the LCD screen on the XD20 front panel.
2. Open the drive (in the external drive unit), place the disc in the tray with the printed side up, and
close the tray. The XD20 will display information about the content being copied. The message
shown below displays while loading ACV content.
The following message appears if the Playlist already exists. Other playlists on the disc should be
loaded.
The following message appears if the content cannot be loaded due to space limitations. In the
example shown, the system ran out of disc space part-way through the playlist named
Document # 9301H264001.0
12
Page 28
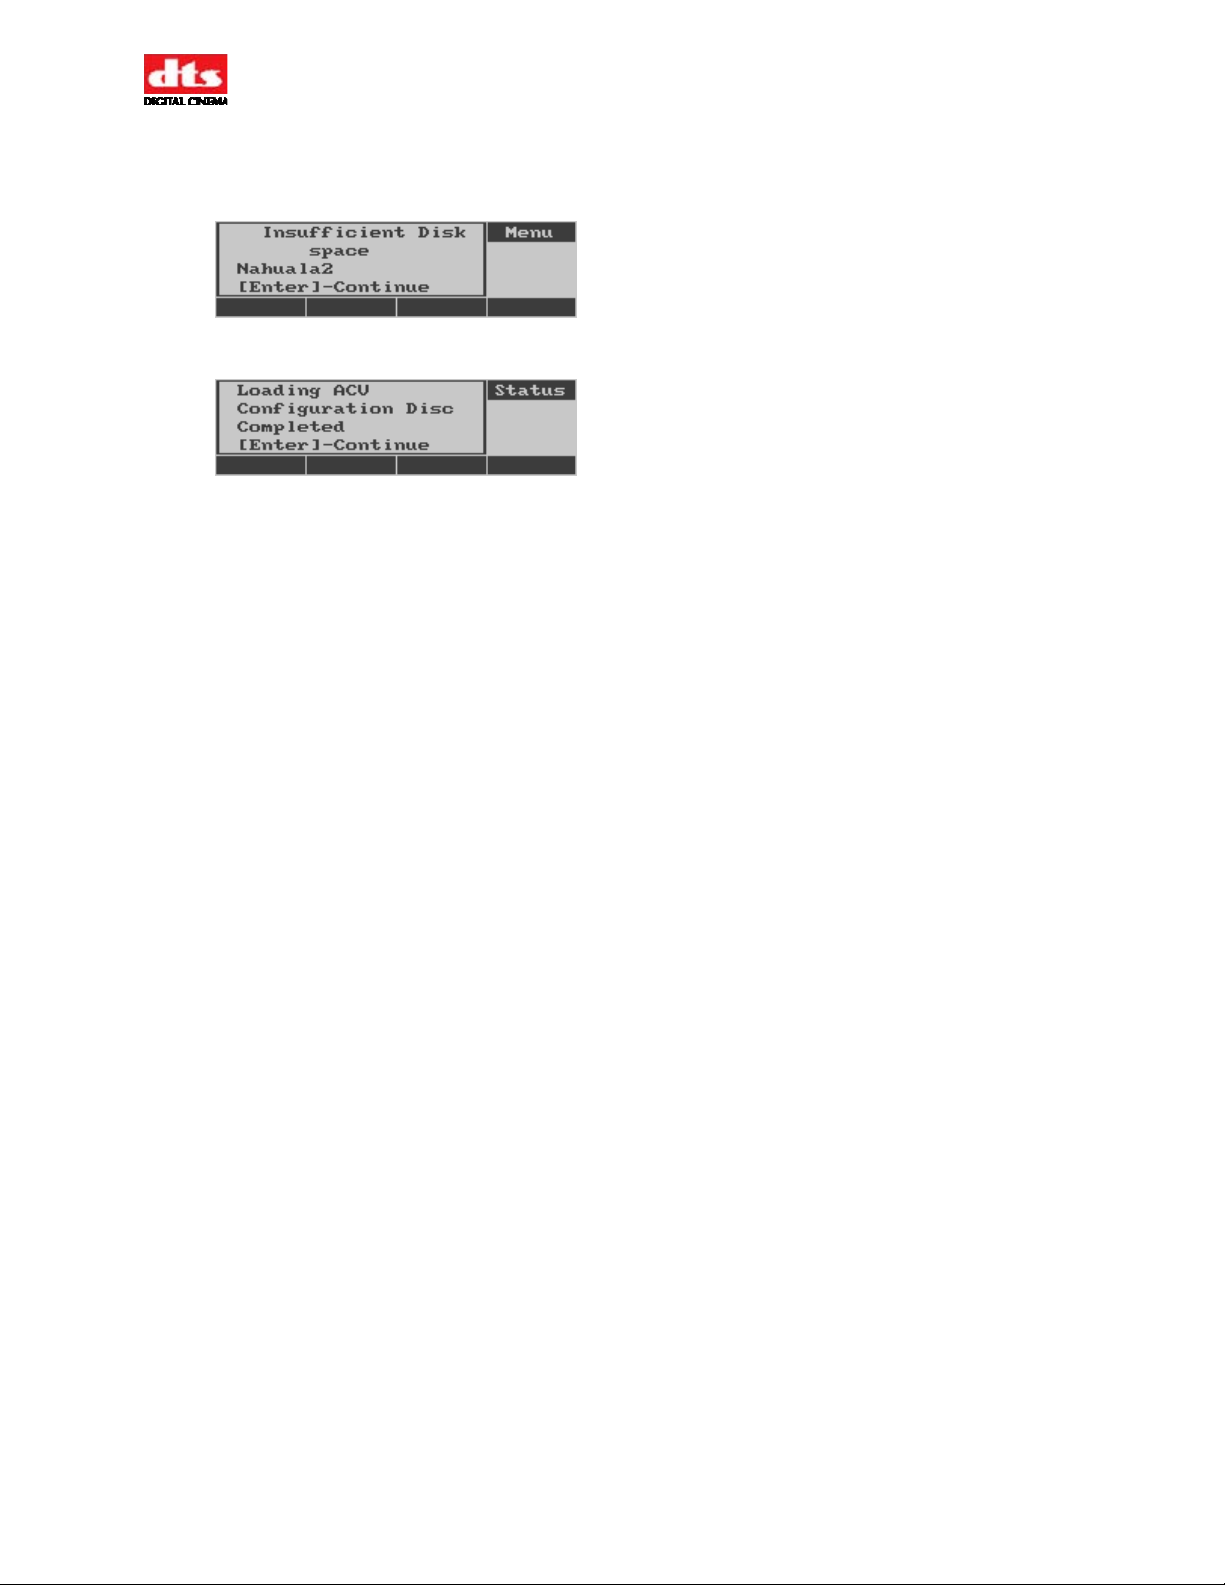
XD20 Installation and Operating Guide Version 1.0
“Nahuala2”. Any clips loaded from the playlist prior to reaching the limits of disc space will be
retained on the disc, but the playlist itself will not play. To load the new playlist in its entirety,
you must delete sufficient nonessential ACV content.
The following message appears if the all content and playlists were loaded without errors.
Document # 9301H264001.0
13
Page 29
XD20 Installation and Operating Guide Version 1.0
2.3.7. Loading Content via USB
A USB memory stick or a USB external drive can be used to load content into the XD20. See Section
3.2.5 Load from USB.Loading Film Content Using a Local Network
For a complete description of setting up and using your XD20 for Network loading, please see Section
7.8.5 Network.
For a local networked system, automated distribution of film content can be enabled (the default is OFF).
• Soundtrack and CSS content may be automatically distributed to all XD20s connected in a
closed or local network. Content distribution is limited only to other XD20s on a local
network and cannot be copied outside of the theatre.
• DVDs for Preshow or Alternate Content video will only load on the local XD20 unit and
cannot be distributed through the network automatically.
When connecting XD20s in a stand-alone network, Language Versions must be set the same on all
networked units. If this is not done, the soundtrack content loaded on a unit with Language Versions
disabled will not play on a unit with Language Versions enabled.
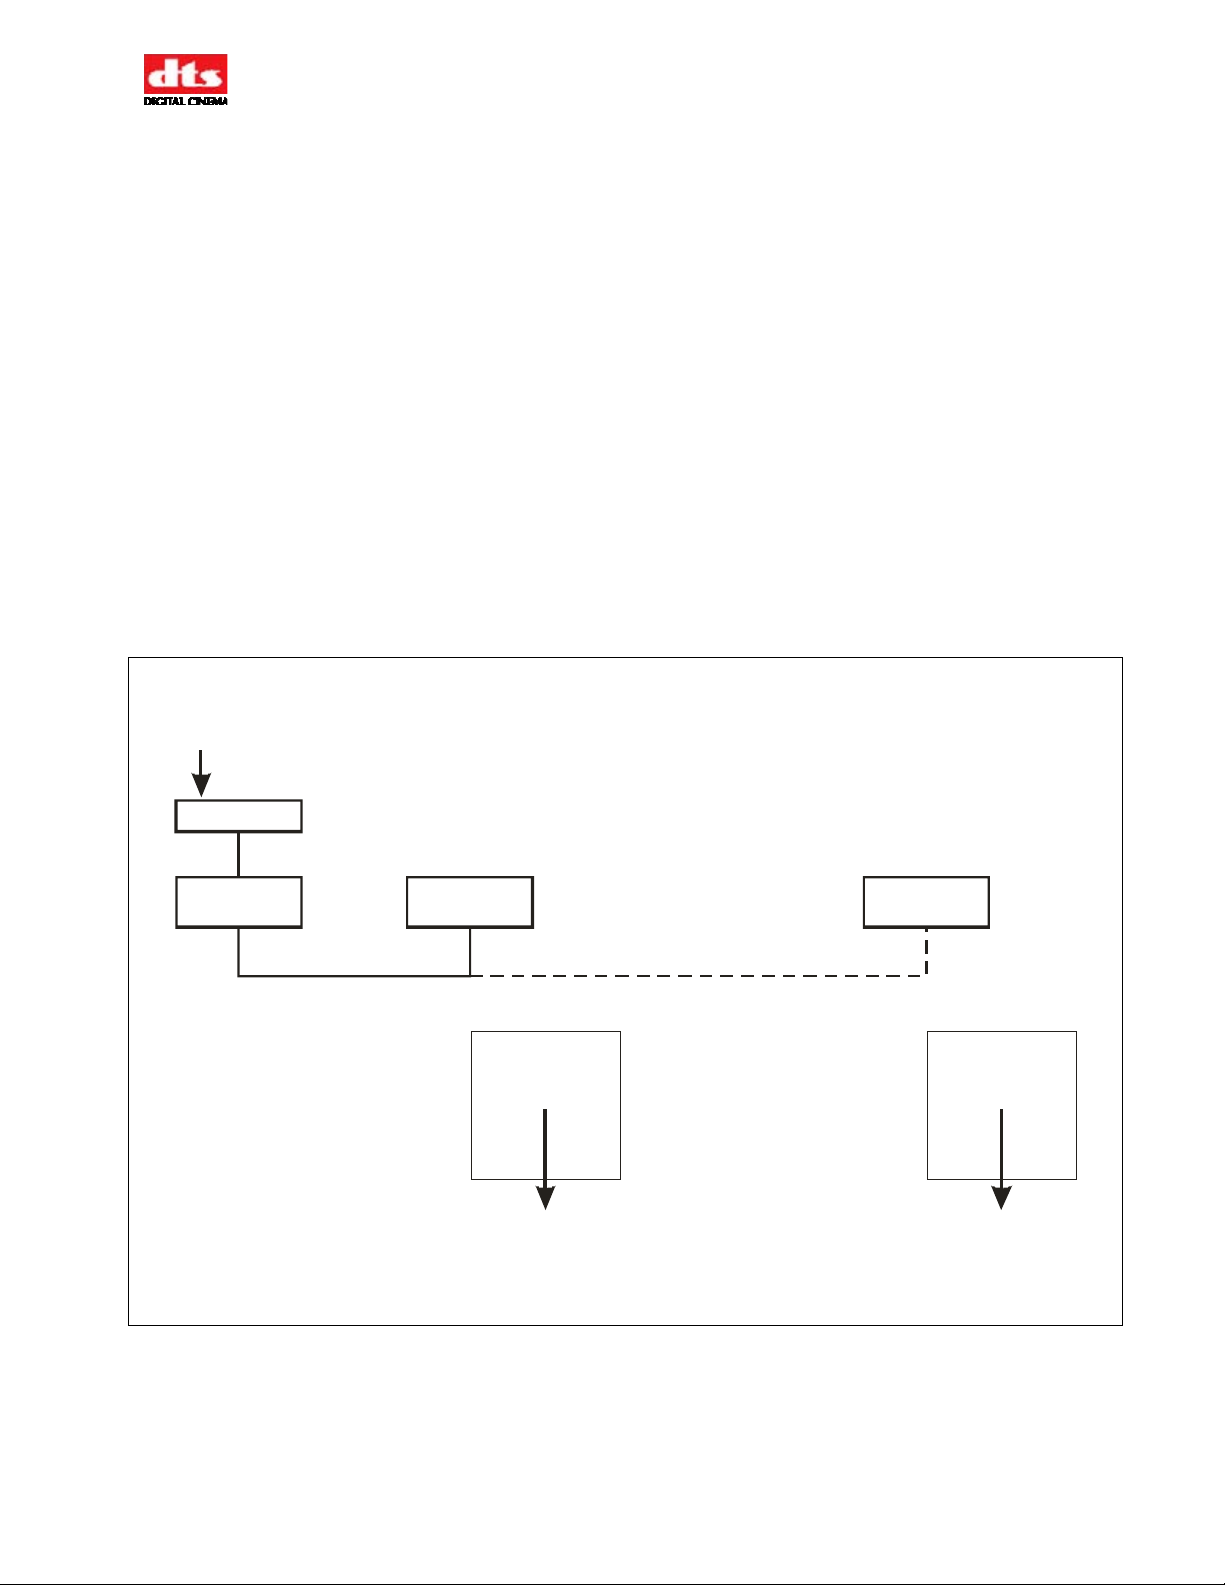
When content is loaded into a DR-1 that is connected to a network of XD20s, the content will be
distributed to all the XD20 players. See Figure 2, below.
Loading
5 new titles/week
Francisco's Folly just loaded i n to DR- 1 and
now playing on Scree n 2.
Francisco's Folly playing on S creen n.
not
DR-1
XD20 XD20
Screen 1
Screen 2
HDD-Scr een 2
(25GB for Film)
Francisco's Folly Francisco's Folly
Previous
Screen 2 Movie
Least Frequently
Played M ovie
on Screen 2
Figure 2: Network Content Distribution - 1
Due to the fact that the XD20 reserves 25GB of hard drive space for film content, a movie that plays for
an extended period of time may get deleted from the drives of any units that have not played that movie
for some time. For example, suppose that a busy multiplex loads 5 new titles per week into the DR1/XD20 network. After approximately 5 weeks of loading 5 movies per week, the 25GB of available
space on the hard drives will have been utilized. At this point, the least frequently shown movie on each
Screen n
XD20
HDD-Scr een n
(25GB for Film)
Current
Screen n M o vie
Least Frequently
Played Movie
on Screen n
Document # 9301H264001.0
14
Page 30

-
XD20 Installation and Operating Guide Version 1.0
XD20 will be deleted from the drive in order to make room for the newly loaded movie. (Each XD20
maintains its own “Priority List” of content titles.)
In the case shown in Figure 3 below, after 5 weeks, the popularity of Francisco's Folly has tapered off
such that the theater manager decides it should be shown on Screen “n” instead of Screen 2.
Unfortunately, since Francisco’s Folly has not been playing on Screen n for more than 5 weeks, it has
been deleted from Screen n’s hard drive to make room for other content. In order to get Francisco’s Folly
back onto the hard drive of Screen n, it must be loaded back into the DR-1. (This also holds true if the
content had been deleted manually rather than automatically.)
After 5 weeks
Loading
5 new titles/week
Decisi on is made to show Francisco's Fol ly
on Screen n i nstead of Scr een 2.
Francisco's Folly
DR-1
Screen 1
XD20 XD20
Screen 2
HDD- Screen 2
(25GB for Fi lm)
Screen 2 Movie
Francisco's Folly
Least Fr equently
Played Movie on
Figure 3: Network Content Distribution - 2
Screen n
Current
Screen 2
XD20
HDD- Screen n
(25GB for Film)
Last Movie
Played
Francisco's Folly
As an alternative to reloading the discs into the DR-1, it is possible to increase the space allocated on the
hard drive of any XD20 so that it will hold more film content. The necessary increase in space would
depend upon the rate of loading new titles and the number of weeks of play on a given screen. See - Film
Reserved, under the Disc Space section on page 107, for specifics on increasing allocated space for film
content.
2.4. Managing Disk Space
The XD20 250 gigabyte hard disk reserves 25 gigabytes of space by default for film soundtrack and CSS
content. (See Disc Space in section 7.9 for information on changing the amount of reserved space.) XD20
uses about one G-byte of space for an average two-hour feature with soundtrack including DTS Access™
content, such as subtitles. Alternatively, one G-byte can also hold content for approximately 50 threeminute trailers.
XD20 automatically ensures there is enough storage space on the hard drive before loading new feature
and trailer soundtracks. When necessary, it deletes old material to make room for new content. Old
material consists of the features and trailers that have not been played for the longest duration of time. All
content associated with the selected feature or trailer, such as different language versions, is deleted at the
same time.
Document # 9301H264001.0
15
Page 31

Content for features or trailers can be deleted manually as well. See Delete Contents on page 38 for more
information.
For XD20 units with the Video Option, the hard disk space for the video content is separate from the
space for the film content. Adding video content does not reduce the space for film content, and vice
versa.
XD20 Installation and Operating Guide Version 1.0
2.5. Playing Content with Film
Playback of content that is synchronized to the film is controlled by the signal from the D600 Timecode
Reader Head as the film passes through. Additionally, DTS timecode from D-Cinema content can be fed
into the XD20 “Timecode” connector. XD20 searches its internal hard drive for any soundtrack and/or
CSS content that matches the feature reel or trailer that is currently playing. The LED indicators on the
XD20 front panel show which content type is playing.
2.5.1. Playback Status Indicators
When film with DTS timecode passes through the D600 Reader head, the green light on the reader will
illuminate and the Timecode LED on the XD20 front panel will illuminate. The Timecode LED on the
XD20 will also light if valid DTS timecode is received from a D-Cinema player. At this point, the
corresponding DTS content will automatically play.
If a DTS soundtrack is playing, the blue Audio LED will illuminate. If CSS content is playing, then the
corresponding LED will illuminate (Narration, Serial or Captions).
2.5.2. Change-overs
When two projectors are used to run a film, the change-over from one projector to the other will be
handled differently with DTS than when the audio and douser are controlled entirely by the projectionist.
When timecode of the upcoming reel is read by the reader head, the DTS audio will change to the next
reel independently from the douser or optical change-over. Knowing this, if the DTS sound is cut off
prior to the end of the previous reel, it means that the upcoming reel was threaded too short – in other
words, timecode began early, therefore the sound changed early. If this is happening, we suggest that you
thread the incoming reel longer. If necessary, you may need to do some change-over tests to adjust your
threading position.
For more information, see Guide for a Seamless Change-Over, page 49.
2.5.3. Handling Film Breaks and Edits
The XD20 will automatically track any length of edit. A 30-millisecond cross fade will make the edit
transparent. In the unfortunate event of a film break, DTS playback can be started from that point after the
film repair is made. After restarting the show, verify that the cinema processor has switched to the DTS
digital format.
2.6. Playing Video Playlists
2.6.1. Video Playlists
Video playlists are defined by the video configuration disc, or its equivalent, if delivered through the
network. The playlists loaded on the XD20 can only be changed by providing a new configuration file.
The configuration may contain up to eight unique playlists.
2.6.1.1. Slide-loop Playlist
The slide-loop is a special type of playlist that may be played before the Preshow playlist. The slide-loop
is a series of images, video clips, and audio clips that continuously loop until the Preshow playlist starts.
The Preshow playlist may be started by menu, automation, or an automated start time determined by the
Document # 9301H264001.0
16
Page 32

XD20 Installation and Operating Guide Version 1.0
video configuration. When the Preshow start is given, XD20 finishes the current clip of the slide-loop
before beginning the Preshow playlist.
2.6.1.2. Preshow and Intermission Playlists
The Preshow playlist is normally shown before the film starts. The Intermission Playlist is normally
shown during the film intermission period. The timing of automation events may be programmed
individually for both types of playlists.
2.6.1.3. Playlists C through G
Playlists C through G do not have a predefined purpose. They are available if there is a need to have
separate playlists. The timing of automation events may be programmed individually for each of these
playlists.
2.6.1.4. End Slides
In some cases, an “end slide” is used as the last clip in the playlist. When the end slide is used, the playlist
does not automatically stop. Instead, the image continues to appear until XD20 receives the video Stop
command, or the Video Inhibit signal.
2.6.2. Start and Stop Video Playlists
There are two ways to start and stop video playlists: using menu commands or using automation.
Start and Stop Video with Menu Commands
XD20 menus may be used to start or stop a video playlist. See Playback Menu on page 23, for details.
Start and Stop Video through Automation
Functions to start and stop the video are also available through automation commands. The function must
be assigned to one of the automation pins through the XD20 setup menus. See the section on Pin
Definitions on page 81, for reference.
2.6.3. Preshow Playlist Schedules
The Preshow playlist schedule is defined by the video configuration file. The playlist schedule determines
which playlist will be shown, based on time and date. For example, the configuration file may define a
different playlist for the Preshow playlist when the playlist starts at night than when it starts during the
day. In order for the scheduling to be correct, the date and time for the XD20 clock must be set correctly.
If the XD20 Media Player is connected through the network and has a network time server configured,
then the clock is automatically set by the program. Otherwise, the clock must be set through the menus.
The clock battery must be replaced every few years (and the system clock must be reset) if the
XD20 unit is not connected to a network containing a Network Time Server.
2.6.4. Operation with Early/Late Preshow Presentations
The XD20 can operate with an Early Preshow (EPS) presentation, followed by a Late Preshow (LPS)
presentation, using a configurable Preshow End time to complete the LPS before the film starts.
The diagram below illustrates XD20 operation with an EPS followed by an LPS.
Document # 9301H264001.0
17
Page 33

XD20 Installation and Operating Guide Version 1.0
Figure 4: Operation with EPS and LPS
2.6.4.1. Configuration
A video configuration file is delivered to the XD20 that defines the EPS and LPS presentations, and an
optional end slide. The video configuration file also contains a set of “Preshow End” times that define
when the Preshow should complete and the film presentation begin. These definitions are created by the
server software and delivered to the XD20 through the network, or in some cases on a DVD.
2.6.4.2. Operations
In the XD20, the EPS presentation is named “Slide loop”, and the LPS is named “Preshow”. An
automation pulse on the START_SLIDELOOP control input pin is used to start the EPS. The EPS is
generally several minutes long and will loop as needed before the LPS starts.
The XD20 automatically starts the LPS so that it completes by the Preshow End time. Since the
configuration file may have several Preshow End times, XD20 automatically selects the closest Preshow
End time at the time that the slide loop began.
The XD20 completes the current clip of the EPS before transitioning to the LPS. This could delay the
time that the LPS will complete by up to the length of the longest clip of the EPS.
The LPS ends at around the time that the film presentation is expected to start. The “End Slide” is
projected in order to avoid a “dark” screen between the LPS and the start of the film presentation. The
“End Slide” has no defined time period and will remain on the screen until a VIDEO_END control pulse
is detected. The VIDEO_END pulse should be set to occur just before the film projector dowser opens.
2.6.4.3. Manual Start/Stop
Although the automation should be used for starting and stopping the playlist, in some cases the menus
can be used for testing. For details, refer to Video Playback Functions,on page 24.
To manually start the Slide loop (EPS):
Playback → Video → Start → Slide Loop
To advance to the LPS without waiting for the calculated LPS start time:
Playback → Video → Start → Preshow
Stop the End Slide (also stops EPS or LPS):
Playback → Video → Stop → Stop
2.6.5. Video Inhibit
The Video Inhibit function may be assigned to one of the automation pins through the XD20 setup
menus. See the information on Pin Definitions on page 81, to define these pins.
Document # 9301H264001.0
18
Page 34

XD20 Installation and Operating Guide Version 1.0
The XD20 will not start video playback as long as the video inhibit signal is active. The XD20 will also
stop video playback immediately if this signal becomes active during the video playback.
2.6.6. Video Playlist Automation Sequence
Start Command ( 1 ) End Pulse ( 2 )
Start Pulse Delay
XD20
Video Start Delay
Lamp ( 3 ) Video Start (4) Lamp (3 )
Vide
Projector
Cinema
Processor
Format: Unknown
2.6.7. End of Playlist
Start Pulse (2)
0 - 12 s
0 - 12 s
Lamp warm-up 1
DTS (5)
st
Video 2nd Video
Silent Video Fallback Pulse (6)
Format: Silent Video Fallback (for Video with no audio)
Format: DTS (for video with audio):
End Pulse Delay
-
60s to +60 s
..
Last Video Clip Lamp
End of Video
Fallback Pulse
Format: Video
Fallback
At the start of the playlist, a “Lamp on” command is immediately sent to the video projector through the
serial port. The first video clip can be delayed, programmable from 0 to 120 seconds after the start, to
allow the lamp to warm-up. A start pulse output may be programmed to occur from 0 to 120 seconds after
the “Playlist start” command.
For video clips with audio, the XD20 will trigger the cinema processor to switch to the DTS format. For
video without audio, the XD20 triggers the cinema processor to switch to the silent video format. These
formats are programmable through the XD20. The format pulse occurs only at the transition from audio to
no audio, or vice versa.
The XD20 may be programmed to send an end pulse near the end of the playlist. The end pulse timing
may be programmed to occur from between 60 seconds before to 60 seconds after the end of the playlist
(negative end pulse). The negative end pulse is useful for triggering a film projector to ramp up before the
playlist ends, so that the film starts immediately after the playlist ends. In cases where the playlist is
shorter than the negative end pulse offset, then the end pulse will occur at the playlist end.
The XD20 may be programmed to turn off the video projector at the end of the playlist. The XD20 may
also be programmed to switch the cinema processor to a predefined sound format at the end of the
playlist.
2.7. XD20 Indicators and Display for Video
The Video LED is lit whenever the XD20 is in process of playing a video playlist or video test content.
The Audio LED is lit whenever the Video playlist is currently playing audio. The XD20 pulses the
cinema processor to the DTS format when the Audio LED goes on. The XD20 pulses the cinema
processor to a specified Silent audio format or the end of the Preshow video when the XD20 Audio LED
goes off.
Document # 9301H264001.0
19
Page 35

XD20 Installation and Operating Guide Version 1.0
2.7.1. Video LCD Display
The XD20 front display shows the current status during the video playback. It is possible to enter the
XD20 menus and make adjustments while the video is playing.
Note that any changes made with playlist automation setup menus do not take affect until the
next playlist starts.
2.7.2. Projector Warming Up Display
The XD20 sends the Projector On command (to the video projector) as soon as the playlist starts. Then, it
waits for the video start delay period before displaying any video. The following shows the display during
that period.
2.7.3. Display when Playing Playlist
The following appears on the XD20 front display when the XD20 is playing video:
Display terms:
Playlist Name Name for the current playlist. The Playlist Name is assigned in the video
configuration file.
Segment Name The name of the current playlist segment. The Segment Name is assigned
in the video configuration file.
XX of YY XX is the current segment number, while YY is the total number of
segments in the current playlist.
Fmt: (Format) Identifies the XD20 format pin selected by the XD20 or by an external
automation system.
The following display text appears during the video playback when the XD20 is switching audio decoder
formats (internal to XD20):
The following text displays briefly when the playlist is ending or has been stopped. Following this, the
display returns to its normal state.
2.8. Video Projector Support
This software supports the following video projectors:
Document # 9301H264001.0
20
Page 36

XD20 Installation and Operating Guide Version 1.0
• Sanyo PLV-70
• Sanyo PLV-80
• Sanyo PLV-WF10
The software is designed to work in a fully automated fashion with these projectors. These projectors are
controlled via the XD20 serial port to support the following functionality:
• Auto-detection of connected video projector.
• Read lamp and projector hours. These values are placed in the playlist log.
• Save video projector settings to XD20.
• Restore video projector settings. The projector settings are sent to the video projector
whenever the playlist starts and the lamp is lit. The settings are not sent when the video is
played through the video test menu. This allows you to use the test menu to adjust the
projector settings on the video projector. You may then use the "Get Settings" menu
command to save the video projector settings.
Video projectors not listed can be used, but the XD20 will not have the functions listed
above and will require an external automation controller to turn their lamps
on and off.
Document # 9301H264001.0
21
Page 37

XD20 Installation and Operating Guide Version 1.0
2.8.1. Video Projector Settings
The following table lists the video projector settings that are saved by the menu command and restored
for each playlist. Some settings are forced to a certain value on the projector.
Table 8: Video Projector Settings
Option Value Comment
BRIGHT Brightness 000-063 Save/Restore Settings
CONT Contrast 000-063 Save/Restore Settings
COLOR Color 000-063 Save/Restore Settings
TINT Tint 000-063 Save/Restore Settings
SHARP Sharpness 000-015 Save/Restore Settings
GAMMA Gamma 000-015 Save/Restore Settings
WBAL-R White balance, red 000-063 Save/Restore Settings
WBAL-G White balance, green 000-063 Save/Restore Settings
WBAL-B White balance, blue 000-063 Save/Restore Settings
COLORTEMP Color temp 000-003 Save/Restore Settings
FANSPEED Fan Control Speed Save/Restore Settings
KEYSTONE Keystone setting Save/Restore Settings
CEIL When ON, image is top/bottom inverted Save/Restore Settings
REAR When Rear is ON, image is left/right reversed Save/Restore Settings
NZRED noise reduction ON/OFF Force OFF
PROGV progressive scan ON/OFF Force ON
IMAGE image mode (STAND, REAL, CINEMA, IMAGE1,
IMAGE2, IMAGE3, IMAGE4)
INPUT Select input 1-3 Save/restore
SOURCE Select Input source DIGITAL, ANALOG, VIDEO,
SVIDEO, YC, YPBPR, YCBPR, YCBCR, HD-SDI,
SD-SDI
SYSTEM SYSTEM OF CURRENT INPUT AUTO, NTSC,
NTSC443, PAL, PAL, SECAM, PAL=M, PAL-N,
1080I60, 1080I60, 1035I, 720P, 575P, 480P, 575I,
480I
SCREEN NORMAL (4:3), FULL (16:9) Force Full
TRUE ON - Select TRUE, OFF - Cancels TRUE Force ON
DISP Set/Cancel Display Force Off - Only on
Force STAND
Force Digital
Force AUTO
Projector 1
BBACK Turn on/off Blue background Force Off - Only on
Projector 1
LOGO Turn on/off Logo Display Force Off - Only on
Projector 1
LAMPMODE Full or Half Force Full, only works on
WF-10.
Document # 9301H264001.0
22
Page 38

XD20 Installation and Operating Guide Version 1.0
3. XD20 Playback and Info Menus
This chapter describes the Playback and Info menus, submenus and their functions.
3.1. Main Menu
The Main menu is the top level menu in the XD20 menu structure. Access it at the LCD screen on the
front panel when it is displaying the Ready state.
Press the Enter button and the Main Menu will display on the screen.
Main Menu
Playback Enter a sub menu to access all of the operator functions: playing
soundtracks, videos and CSS content, checking Video Playlist,
Soundtrack, CSS Playback, External S/PDIF, and Contents. See Section
3.2, Playback Menu.
Setup The menus included here are typically set in installation and are not used
in normal operation. See Setup Menus, Page 63, for setup menu
descriptions.
Entry to the Setup menus may be password protected to protect the
integrity of the configuration parameters.
Info Enter the Info menu to access information on the software version number,
licenses installed, and the system's MAC address.
Exit Menus Return to the status display.
3.2. Playback Menu
The Playback Menu contains the sub menus for the operator functions described below.
Main Menu → Playback
Video Use this menu to start, stop or control video playback; or to view video
contents. This menu is locked out if the XD20 does not have the HD Video
Option installed.
ACV Alternate Content Video. Use this menu to select and play the ACV
playlist. Some control functions are included, such as skip to the next clip,
start from a selected location, or resume playback. The user can also view
playlists and contents, or delete playlists and their contents to make room
for loading additional ACV content.
Document # 9301H264001.0
23
Page 39

XD20 Installation and Operating Guide Version 1.0
Film Use this menu to change playback parameters relating either to feature film
and trailer soundtrack or CSS playback.
External Input Use this menu to allow the XD20 to route audio from the external digital
or S/PDIF input on the rear panel through to the cinema processor.
Load from USB Enter this menu load XD20 Content (Video, ACV, CSS or Sountrack), or
load an XD20 software update or License file from a USB storage device.
Exit Menus Return to the status display.
3.2.1. Video Playback Functions
The Video Playback menu, shown below, contains functions to start, stop and control video playback.
Playback → Video
Start Start playing one of the playlists currently installed on the XD20. See Start
Playlist Functions,on page 25.
Stop Stop the playlist that is currently playing. See Stop Playlist,on page 25.
Control Control video using commands to fast forward, rewind, pause, resume, or
seek to a specific position in the currently playing clip.
See Video Control,on page 26.
Contents This menu displays information about videos and playlists installed on the
XD20. Note: The XD20 will delete old content automatically when the
hard drive is full. The user does not have the ability to selectively delete
video content on the XD20 unit.
See Video Contents,on page 27.
Exit Menus Return to the status display.
Note: Access is denied to this menu unless your XD20 has the Video Option installed. If the
XD20 has no license for the HD Video Option, the message shown below will display when
you try to access the Video Playlist.
If the video card is not installed or does not work, the following message will appear.
In the case of an installed video card not working, contact DTS Digital Cinema Technical
Support – see Contact Information, page xi.
Document # 9301H264001.0
24
Page 40

XD20 Installation and Operating Guide Version 1.0
3.2.1.1. Start Playlist Functions
Playback → Video → Start
Slide Loop Start slide loop playlist.
Preshow Start preshow playlist.
Intermission Start intermission playlist.
Playlist C Start playlist C.
Playlist D, E, F, G Start playlist D, E, F, or G.
Exit Menus Return to the status display.
To start a playlist, scroll to the desired playlist type and press Enter. The selected playlist will begin and
the asterisk will move to the left of the selection.
All of these playlist functions are also available as automation controls.
The playlist will not start while the XD20 is receiving timecode or the Video Inhibit signal is active.
Provided that the start command has been given through automation, the XD20 will automatically start
after timecode has stopped for 10 seconds as long as the timecode ends within one minute of the
command being given.
Note: If no playlist is loaded, the XD20 executes the entire automation sequence (lamp on,
start pulse, lamp warm-up delay) without playing any video.
3.2.1.2. Stop Playlist
Playback → Video → Stop
Stop Immediately stops the playlist that is currently playing.
Stop at End Stops the playlist that is currently playing once it reaches the end of the
current clip.
Exit Menus Return to the status display.
These functions are also available as automation controls.
Document # 9301H264001.0
25
Page 41

3.2.1.3. Video Control
Playback → Video → Control
FF/Rewind Enters a menu to control playback using commands to fast forward,
Seek Enters a menu to control playback by moving to a specific position in the
Exit Menus Return to the status display.
3.2.1.3.1. FF/Rewind
3.2.1.3.2. Seek
XD20 Installation and Operating Guide Version 1.0
rewind, pause, and play,
current clip.
Video → Control → FF/Rewind
Play (▲) Restarts playback after pause command.
Pause (▼) Pause the video playback.
Rew (◄) Rewind. Play video in reverse direction. Press again to
increase the reverse speed.
FF (►) Fast forward the playback. Press again to increase the forward
speed.
Enter Return to the previous menu.
This menu allows you to seek to a specific point in the currently playing clip. It displays the seek
position in terms of hours, minutes, and seconds. Use the keys to change the position and then start the
playback at that position.
This will only seek to a point in the clip that is currently playing; it will not seek across clips in the
playlist.
Video → Control → Seek
Up (▲) Increase the seek position by the amount at the cursor position.
Down (▼) Decrease the seek position by the amount at the cursor
position.
(◄ ) or (►) Move cursor, or exit menu if at the left-most position.
Enter Start the video playback at the position displayed.
Document # 9301H264001.0
26
Page 42

XD20 Installation and Operating Guide Version 1.0
3.2.1.4. Video Contents
Playback → Video → Contents
These menus display information about the playlists that are currently installed on XD20.
Content Files List of video clips/images.
Start Times List of preshow start times. Press down/up to scroll through start times.
Schedules List of preshow schedules. Press down/up to scroll through schedules.
Playlists List of preshow video playlists. Press down/up to scroll through playlists.
The example below shows the first of 5 Preshow playlists.
Press Enter to view the contents of the selected playlist.
Delete All Preshow Delete all preshow content, associated playlists and schedules.
Document # 9301H264001.0
27
Page 43

XD20 Installation and Operating Guide Version 1.0
Press Enter to continue with deletions. A confirmation screen will display.
Press Enter to confirm deletion.
Exit Menus Return to the status display.
3.2.2. ACV Playback
Main menu → Playback → ACV
Note: You cannot gain access to this menu (Main menu → Playback → ACV) unless your
XD20 has the Video Option installed. If XD20 has no license for HD Video Option, the
message shown below will display when you try to access the ACV Playlist.
Video license not installed
Playing the alternate content video is similar to the playback of a video playlist. Starting the ACV
playback is a two-step process: 1) select the desired playlist and 2) start the selected playlist.
The expected use for the ACV Playlist is to show alternate content video, not trailers or preshow content,
and not feature films. The ACV playback contains video clips with these supported audio formats: DTSCA (Coherent Acoustics), Dolby Digital (3/2 and 2/0), WMA, and PCM audio. ACV also supports still
images or audio wav files (PCM or CA), but not stills simultaneously with separate audio. See Appendix
K for information regarding creation of ACV playlists.
There are no schedules or auto-start times associated with ACV.
Select Select an ACV playlist.
Press up/down to view the list. Press Enter to select an ACV playlist.
Start/Stop This enters the ACV control menu that allows you to start/stop the playlist,
or other functions through the soft buttons. When the video is stopped, the
soft button options are Start, Select, and From, as shown below.
Resume video when video is stopped
Document # 9301H264001.0
28
Page 44

XD20 Installation and Operating Guide Version 1.0
In order to resume, there must be a valid resume point. There is a valid
resume point if the selected playlist has not completed its play-out and has
been playing for at least 20 seconds before being stopped.
Start Start the selected ACV Playlist. The display changes after the
start is selected to show the current playback state.
Select Select a new ACV playlist
From Start from a designated clip/position.
Resume
This option is available only when it is possible to resume playback
after the playlists stops without finishing the playlist. That would
include playback interruption due to a power failure. The Resume
point would occur slightly before the playback was stopped---within
20 seconds. The button will not be present if the playlist completes,
the playlist has changed, or if the playlist has not played for at least
20 seconds.
When ACV is playing the LCD shows the playlist name, clip name, clip
number, and the last selected CP format. The soft button functions change
to Stop or Skip.
Stop Stops any video playback
Skip Skip to the next video clip in the playlist.
From The From function allows you to start the ACV playlist from a selected
clip number and offset position.
Seg Clip number
Offset HH:MM:SS (SS in increments of 10)
Start Start from Start point.
Cancel Return to previous menu (do not Start)
(◄) Move cursor left.
(►) Move cursor right.
(▲) Increment the value at the cursor.
(▼) Decrement the value at the cursor.
Enter Start from Start point.
Contents View list of ACV play lists. Press up/down to view the list and press Enter
to select.
Document # 9301H264001.0
29
Page 45

XD20 Installation and Operating Guide Version 1.0
Content Files Select video contents. Press up/down to view the list and
press Enter to select.
Press Enter to select. The video clip details will display.
Playlists Displays ACV playlists. Press up/down to view the list
and press Enter to select and display the clips within the playlist.
The contents of the selected playlist will display.
Press Enter to select and display the clip details.
Playlist Delete Deletes ACV play list and any content associated with
the playlist provided that the content is not in use by another playlist.
Press up/down to view the list and press Enter to select a playlist to
delete.
A confirmation screen will display, to confirm deletion.
Select Yes and press Enter to delete.
Document # 9301H264001.0
30
Page 46

XD20 Installation and Operating Guide Version 1.0
Clean Drop Files Deletes directory used for temporary storage for
network download files.
Warning: Deleting the drop directory may interfere with partially transferred playlists.
Delete All ACV Press Enter to continue.
A confirmation screen will display.
Press Enter to continue deletion.
Exit Menus Return to the status display.
3.2.3. Film Playback
Main menu → Playback → Film
Use these menus to change parameters related to movie soundtrack and CSS playback.
TC Reader Offset Select the TCR offset to use.
Soundtrack Select the soundtrack language to play.
CSS Playback Select the CSS playback options.
Contents View film soundtrack and CSS content.
Exit Menus Return to the status display.
Document # 9301H264001.0
31
Page 47

XD20 Installation and Operating Guide Version 1.0
3.2.3.1. TC Reader Offset
This menu allows you to set the offset for either a 35mm or a 70mm timecode reader head.
Playback → Film → TC Reader Offset
35mm Use the timecode reader offset value for 35mm film playback
70mm Use the timecode reader offset value for 70mm film playback
Exit Menus Return to the status display.
This control is also available through automation.
3.2.3.2. Soundtrack Language
Some XD20 units may be configured to play different language versions (also known as dubs), provided
the soundtrack disc in the selected language for that film has been loaded. This feature is available only
when the Language Versions option is enabled during the XD20 setup.
If Language Versions is not enabled, then XD20 will only load and play one version of the soundtrack for
the feature or trailer. Loading a second language for a soundtrack will overwrite the first language. To
enable language versions see section 7.2.3.
The Soundtrack Language menu, shown below, is the second selection on the Playback menu. It is used
to select the language to be used with a particular soundtrack.
Playback→ Film→ Soundtrack
Automation Automation will select the playback language. This option is applicable
only if XD20 is setup to use automation for languages. See Language
Setups, page 87, for more information.
Last Installed Selects the language version last installed for the feature soundtrack being
played.
English English or other specific language. The feature soundtrack being played
will be played in the language that was specifically selected, provided that
soundtrack has been loaded.
<Additional Languages> Any language from loaded content.
Note: If the selected language does not exist on the hard drive, then the DTS soundtrack will
not play, and XD20 will switch the cinema processor to analog.
Language Versions Disabled
If Language Versions is not enabled, then the following message will appear when selecting Soundtrack
from the Film Playback menu.
Need Soundtrack License
Document # 9301H264001.0
32
Page 48

XD20 Installation and Operating Guide Version 1.0
If no license for soundtrack audio is detected, this message will display.
3.2.3.3. CSS Playback
The CSS Playback menu allows you to set the CSS Mode, set the CSS language and view the CSS
projector lamp hours. To access this menu, select CSS Playback from the Film Playback menu. The
following menu will appear on the screen.
Note: You cannot gain access to this menu unless your XD20 has the CSS Option installed.
Playback → Film → CSS Playback
CSS Mode Specify whether to show subtitles.
CSS Language Select the subtitle and caption languages.
CSS Lamp Hours View CSS Projector Lamp hours (for InFocus projector only).
Exit Menus Return to the status display.
Need CSS License
If no license for CSS is detected, this message will display.
If XD20 is not equipped with the CSS Option, the CSS Playback menu will be locked.
In order to use the CSS option, you must obtain a CSS license from DTS Digital Cinema. The license will
be “keyed” to your XD20 unit. CSS licenses cannot be shared with other XD20 units.
You can find out what licenses have been installed on your XD20 by selecting Main Menu → Info →
Licenses. Once your XD20 unit is licensed for the CSS Option, the CSS Playback menu will be available
to you.
Document # 9301H264001.0
33
Page 49

XD20 Installation and Operating Guide Version 1.0
3.2.3.3.1. CSS Mode
This menu allows enabling or disabling of CSS captions.
CSS Playback → CSS Mode
Off CSS is OFF. Do not show subtitles or captions.
One Show Only CSS is ON for one show only. This option turns the subtitle projector lamp
on and plays back all available CSS files for one show only. After the
show is over, the subtitle projector automatically turns off, after a short
cool-down period, and the CSS system remains off.
On CSS is ON and remains ON. When this option is selected, the subtitle
projector lamp stays on after every show and CSS files play back at every
show.
Exit Menus Return to the status display.
3.2.3.3.2. Shortcut to CSS Mode
To select a CSS mode without navigating the menu structure, make sure you have first programmed a soft
key for CSS Mode Toggle. (See section 7.8.1 for information on soft key programming.)
1. Use the “CSS:” soft key to scroll through the three options.
o Off
o One Show Only
o On
2. This selection has the same effect as entering a selection in the CSS mode menu.
Document # 9301H264001.0
34
Page 50

XD20 Installation and Operating Guide Version 1.0
3.2.3.3.3. CSS Language
This menu allows selection of the language for the subtitles and captions.
CSS Playback → CSS Language
Automation The language will be specified by Automation Controls. Use this selection
when CSS has been set up to switch automatically between languages
when controlled by the theater automation. See Appendix J, Installing
CSS, for more information.
English Captions Select English captions for subtitles and captions. As other languages are
added, they will appear as selections. English Captions is the default in
this system.
Exit Menus Return to the status display.
Note: A soft key may be used for quick access to this menu, (See section 7.8.1 for information
on soft key programming.)
3.2.3.3.4. CSS Lamp Hours
The CSS Lamp Hours feature works only
for the original DTS-CSP InFocus projectors. If other
projectors are used, an “Unavailable” message will display.
This menu displays the number of hours the cinema subtitling projector lamp has been used. This makes it
easy to replace the lamp before it fails. For example, if a lamp has been used for 20 hours, the following
message will appear on the screen.
CSS Playback → CSS Lamp Hours
Note: The DTS-CSP projector lamp must be replaced after 1,400 hours of use. If another
projector is used, consult the manufacturer for lamp maintenance/replacement.
If the cinema subtitling projector lamp is damaged, has failed, or has been removed from the projector,
the following message will appear on the screen.
Other reasons for receiving this message are:
• Power to the projector is not on.
• There are communication (cable) problems.
• The system is not connected to an InFocus projector.
Document # 9301H264001.0
35
Page 51

XD20 Installation and Operating Guide Version 1.0
3.2.3.4. Contents Menu
The film soundtrack and CSS content may be viewed and deleted through the Contents menus.
To access the contents menu, select Contents from the Film menu, and press Enter. The Contents menu,
shown below, will display.
Playback → Film → Contents
Features Lists any feature films titles that have soundtrack or CSS content on the
XD20.
Trailers List any trailers that have soundtrack or CSS content on XD20.
Delete Contents Delete selected contents from the XD20 hard drive. This includes the
following contents available through DTS Access™: subtitling, captions,
and narrations.
Exit Menus Return to the status display.
3.2.3.4.1. Display Feature Contents
From the Contents menu, select Features. XD20 displays a list of features for which soundtrack,
narration, CSS, or Rear Window content is loaded on XD20.
Film → Contents → Features
Feature films will be listed in the order of the last played or loaded onto XD20. Scroll up and down the
menu to view the entire list. Put the cursor on the feature name and press Enter to view content loaded
for that feature, as shown below. Use the Up and Down arrow buttons to scroll through all of the content
files for that feature.
Typical detail for soundtrack file
Line 1 Contains the feature name.
Line 2 Contains the feature serial number.
Line 3 File type: Subtitle, Captioning Text, Narrative, or Soundtrack.
CSS Subtitles require a unique file for each text size. The Subtitle
file size is listed on this line.
Line 4 Shows the language for the soundtrack or Subtitle file.
Document # 9301H264001.0
36
Page 52

XD20 Installation and Operating Guide Version 1.0
Subtitle File
The display status screen below shows an example of the display for a Subtitle file. Multiple subtitle files
may exist for each feature title, each having a different subtitle size.
Typical detail for subtitle file
Caption File
The display status screen below shows an example of the display for a Captioning Text file. There is only
one Captioning Text file per feature title.
Typical detail for captioning file
Narrative File
The display status screen below shows an example of the display for a Narrative file. Narrative files
require one file for each reel. An “L” after the reel number indicates that it is the last reel of the film (so
the fallback becomes nonsync near the end of the reel).
Typical detail for narrative file
Soundtrack File
The display screen below shows an example of a Soundtrack File. Like Narrative files, Soundtrack files
require one file for each reel. An “L” after the reel number indicates that it is the last reel of the film (so
the fallback becomes nonsync format near the end of the reel).
Typical detail for soundtrack file
3.2.3.4.2. Trailer Contents
From the Contents menu, select Trailers and XD20 displays a list of trailers for which soundtrack,
narration, CSS or Rear Window content is loaded on XD20.
Film → Contents → Trailers
Position the cursor next to the trailer name and press Enter to view content loaded for that trailer, as
shown above for features. Use the Up and Down arrow buttons to scroll through all of the content files for
that trailer.
Document # 9301H264001.0
37
Page 53

XD20 Installation and Operating Guide Version 1.0
Trailer File
The display below shows an example of the contents for a trailer file. The abbreviated name of the trailer
is shown, followed by the DTS serial number for that trailer, the type of content file, and the language.
Typical trailer file detail
3.2.3.4.3. Delete Contents
From the Contents menu, select Delete Contents to display the menu shown below. This menu allows
deletion of selected soundtracks for features or trailers, or all soundtrack and CSS files.
Film → Contents → Delete Contents
Test content cannot be deleted through these menus, although video content can be deleted.
Deleting All Contents
From the Delete Contents menu, select All to delete all feature and trailer contents loaded on XD20. The
menu shown below will request confirmation that all of the content is to be deleted.
No Do not delete any contents. The following message will display:
Yes Delete all feature and trailer content loaded on XD20. The following
message will be displayed while the content is being deleted.
After several seconds (depending on the number of files), the following
message will appear:
Exit Menus Do not delete any content and return directly to the status display.
Document # 9301H264001.0
38
Page 54

XD20 Installation and Operating Guide Version 1.0
Delete Features
The Delete Features menu allows you to delete all soundtrack and CSS content associated with a selected
feature. From the Delete Contents menu, select Features to display the menu below.
Move the cursor to the desired feature and press Enter. The following menu will display:
No Do not delete any contents. The following message will display:
Yes Delete all soundtrack and CSS content files for the selected feature. A
Delete in progress message will be displayed while the content is being
deleted.
After a few seconds (depending on the number of files), the following
message will appear:
Exit Menus Do not delete any content and return directly to the status display.
Delete Trailers
The Delete Trailers menu allows you to delete all soundtrack and CSS content associated with a selected
trailer. From the Delete Contents menu, select Trailers to display the menu below.
Move the cursor to the desired trailer and press Enter. The following menu will display:
No Do not delete any contents. The following message will display:
Document # 9301H264001.0
39
Page 55

XD20 Installation and Operating Guide Version 1.0
Yes Delete all soundtrack and CSS content files for the selected trailer. A
Delete in progress message will be displayed while the content is being
deleted.
The following message will appear immediately afterwards:
Exit Menus Do not delete any content and return directly to the status display.
3.2.4. External Input Mode
This menu allows XD20 to route audio from the external digital or S/PDIF input to the cinema processor
and select routing options for PCM audio. The selection will not be saved when XD20 restarts.
Main Menu → Playback → External Input
Disable Disables the S/PDIF or 8-Ch Digital In mode for normal operation.
8-Ch Digital In Route 8 channel audio from Digital Audio In connector.
DTS Decodes DTS CA bit-stream from the S/PDIF input to 5.1 channels. (Will
result in no audio if any other type of input is provided.)
PCM: L/R Accepts 2-channel PCM audio from the S/PDIF input and routes it to the
front left and front right channels.
PCM: LS/RS Accepts 2-channel PCM audio from the S/PDIF input and routes it to the
left surround and right surround channels.
PCM:L+LS/R+RS Accepts 2-channel PCM audio from the S/PDIF input and routes the left
channel input to the left front and left surround channels, and the right
channel input to the right front and right surround channels.
PCM: NEO:6 Accepts 2-channel PCM audio from the S/PDIF input and uses NEO:6
decoding to route it to all 6 channel outputs.
When the mode you selected is enabled, the Audio indicator will illuminate and XD20 status display will
indicate that the XD20 is processing audio from the external input.
The blue front panel LED goes on when selecting an external input.
Exit Menus Return to the status display.
Note: If the XD20 does not receive a valid digital audio signal on the selected input, then there
will be short blinks (25% off) on the blue audio LED until the signal appears.
Document # 9301H264001.0
40
Page 56

XD20 Installation and Operating Guide Version 1.0
3.2.5. Load from USB
This menu can be used to load the following from a USB device: Video playlists, video content, XD20
software updates, projector profiles, and XD20 option license(s).
From the Main Menu, select Playback, then select Load from USB.
Main Menu → Playback→ Load from USB
This option allows content that is stored on a USB storage device to be uploaded to XD20. The USB
device, which may be a drive or a memory device, must contain FAT32, EXT2, or NTFS file format. The
content must be present on the USB device in the exact format as it appears on the equivalent disc (such
as a video disc or software update disc). If the content contains folders, the top-level folder must be at the
root of the USB device. Any files not delivered in folders, also should be placed at the root of the USB
device.
Note: A full installation of XD20 software (not an update) cannot be loaded via USB.
The above menu appears until XD20 detects the USB device connected. The procedure then occurs
automatically with the same messages that appear when loading a disc.
Note: A soft key may be used for quick access to this menu, (See section 7.8.1 for information
on soft key programming.)
License File
If license files are found on the USB, they will load automatically. When finished, a menu similar to this
will display, listing all installed licenses.
Software Update
If a software update is found on the USB, a screen similar to this will display. It takes about five minutes
to load the XD20, following which it reboots.
Load Projector
If a new projector profile file is found on the USB device, a screen similar to this will display:
Press Enter, and then remove the USB device.
Document # 9301H264001.0
41
Page 57

XD20 Installation and Operating Guide Version 1.0
Load Preshow Video
Any video files not already stored on the XD20 will be recognized as new, and loaded automatically.
Load ACV Video
If an ACV configuration file is found on the USB device, the system will begin loading automatically and
display a screen similar to that shown below.
When the file has finished loading, the screen below will appear.
You may now remove the USB device.
See section 2.3.6 “Loading ACV” for more information on loading ACV content.
3.3. Info Menu
The Info Menu contains information about the XD20 software, licenses and MAC address. The MAC
address is used to uniquely identify the XD20 unit.
Main menu → Info
Version Displays XD20 software version information.
Licenses Shows which licenses are installed for this XD20.
MAC Address Displays the XD20 MAC address.
System Monitor Displays internal temperatures, fan speeds, voltages, etc.
Exit Menus Returns to the Status display.
Document # 9301H264001.0
42
Page 58

XD20 Installation and Operating Guide Version 1.0
3.3.1. Version
The Version Menu displays information about the software installed in the XD20 unit.
Main menu → Info → Version
Line 1 Identifies the software version number.
Line 2 Displays the software date and time.
Line 3 If display is other than “General Model”, then there something unique in
the software for loading specific video discs.
Line 4, 5 Displays the copyright notice.
Line 6 Displays hard drive information.
Line 7 USB version
Line 8 Serial number (of the XD20) (The serial number can also be read from the
rear panel of the XD20 chassis.)
Note: The image above is for illustrative purposes only. Your version screen may differ.
3.3.2. Licenses Menu
This menu displays which licenses are installed in the XD20 unit. You must use the Up and Down arrow
buttons to scroll to view all license options. An asterisk in the brackets indicates that the license type
described on the line has been installed.
Main menu → Info → Licenses
Soundtrack License for playing film soundtracks.
CSS License for playing CSS or DTS Access™ content. This includes CSS
subtitles or captions, Audio Description, and Rear Window™ captions. It
is NOT necessary to have a Video license (described below) to play CSS
subtitles or captions to a standard video projector.
Video High definition video license. This is part of the High Definition Video
option that also includes a hardware upgrade. The soundtrack license is
NOT required to play audio with the video playlist.
3.3.3. MAC Address
This menu displays the MAC address that uniquely identifies the XD20.
Main menu → Info → MAC Address
.
Document # 9301H264001.0
43
Page 59

XD20 Installation and Operating Guide Version 1.0
3.3.4. System Monitor
This menu displays system information for the XD20. The Enter key exits this screen and returns to the
Info menu. See section 4.7 below, on page 49, for details.
Main menu → Info → System Monitor
Document # 9301H264001.0
44
Page 60

XD20 Installation and Operating Guide Version 1.0
4. Maintenance and Troubleshooting
Check the DTS Digital Cinema Online Support site for the latest technical information at
www.dtsdcinema.com/Support/
software versions.
4.1. Routine Maintenance
• Every day: Use compressed air to blow dust off the Timecode Reader’s lens (on the
projector).
• Every six months – or as needed: Clean the DVD drives in the external unit using a DVD
cleaning disc.
• After three months service – and every six months afterwards: If your D600 Timecode
Reader Head does not have an RoHS sticker on it, check and recalibrate the Timecode Reader
Head’s voltage using TN-E550. (You can see TN-E550 on the free DTS Digital Cinema
Online Support site located on the DTS Digital Cinema website at
www.dtsdcinema.com/Support/
are RoHS compliant do not require this adjustment.
• Every two years: Have a technician change the battery on the motherboard. Instructions for
the technician are listed in Appendix I, Technical Maintenance.
for the latest information on maintenance, troubleshooting, and XD20
.) Timecode Reader Heads with stickers indicating that they
4.2. XD20 Playback Sound Check
After installing and setting up the unit—or doing a maintenance check—it is a good idea to play content
and stand in the theater while listening to the first few minutes of the movie. Check for the following:
• The overall sound level is comfortable and balanced.
• The DTS soundtrack quality is excellent and does not include extraneous noise.
• The dialog is in sync with the picture being projected.
• The surround speakers are heard at the correct level. (Please note that not all scenes will have
surround material.)
To adjust the overall sound level in the theater, adjust the main fader on the cinema processor.
If you are having soundtrack playback problems, first check the contents to be sure the
soundtrack that was loaded is the soundtrack for the film you are playing. Feel free to contact
DTS Digital Cinema Technical Support for assistance. (See Contact Information, page xi.)
Document # 9301H264001.0
45
Page 61

XD20 Installation and Operating Guide Version 1.0
4.3. Frequently Asked Questions
4.3.1. I Have a DTS Print but No Discs
1. Check the hard drive to see if the movie soundtrack has already been loaded. From the Ready
message on the LCD screen, press Enter → Playback → Film → Contents → Features to view
the list of all soundtracks loaded in the XD20 hard drive.
2. If the soundtrack is not listed in the XD20 contents, find the feature’s soundtrack disc and load it
into the XD20. If you cannot find the soundtrack disc, contact the film distributor and request the
disc.
Note: Remember that a film that runs less than 90 minutes will have only one movie disc. It
should be labeled “one disc only.” Movies running over 90 minutes will have two discs.
Occasionally, you may encounter a 3+ hour long film and those normally have three discs,
with special show instructions.
4.3.2. Film Is Not in Sync or Does Not Sound Right
Caution: Do not attempt to remedy these problems while playing in DTS.
1. Turn off the XD20 unit.
2. Listen and verify that the movie is playing properly in the analog (usually SR) format.
3. Let the film finish playing in analog.
4. Ask the theater technician to perform a full DTS quality check and verify sync with the demo
film. Give the technician at least one hour to complete the test and alignment. (See Sections 7.1,
TC (Timecode) Reader Offset, for sync, and 7.2.2, Audio Setups, for channel calibration.)
4.3.3. Volume Is Too Loud
Caution: Do not adjust the XD20 audio level from the menu controls.
1. Turn down the fader on the cinema processor.
2. If the sound level needs adjustment after the cinema processor has switched to DTS digital,
contact your theater technician and request a DTS sound check.
4.3.4. XD20 Does Not Play Soundtrack Audio to Film
4.3.4.1. Timecode LED Is Blinking
If the XD20 is not playing digital audio, first check to see if the timecode LED on the front panel is
illuminated. If it is illuminated, but is blinking, then check the following:
1. If the reader’s LED is dark, check to make sure that the film is threaded correctly through the
D600 Timecode Reader and that the film has a timecode strip (located between picture and analog
sound tracks).
2. If you do not see a timecode strip (dots & dashes) between the analog soundtrack and the picture,
call the film distributor and request a DTS print.
3. If the film does have timecode and the soundtrack is seen on the hard drive, then verify that the
timecode cable is connected from the reader to the XD20 TIMECODE rear panel connector.
Also, check the reader’s LED voltage using TN-E550. You can access the tech note via the online
Support site at www.dtsdcinema.com/support.
Caution: Never adjust the lens on the D600 Timecode Reader Head.
Document # 9301H264001.0
46
Page 62

XD20 Installation and Operating Guide Version 1.0
4. If the timecode LED is blinking, and the XD20 is dropping out of digital after the items listed
above have been checked, call your theater technician for a system test. Ask the theater tech to
refer to TN-E698, which is posted on the free online Support site at
www.dtsdcinema.com/support.
Note: Later versions of the reader head do not require adjustment. These heads can be
identified by the “RoHS” sticker on them.
4.3.4.2. Timecode LED is Solid, but Audio LED is not Lit
If the XD20 timecode LED is on solid, but the blue Audio LED is not lit, then check the following:
1. Verify that the soundtrack is loaded on the XD20 hard drive. From the Ready message on the
LCD screen, press Enter → Playback → Film → Contents → Features to view the list of all
soundtracks loaded in the XD20 hard drive
2. If it is not listed, find the disc and load it. The soundtrack must be loaded onto the hard drive
before you can play in the DTS digital format.
3. Verify that the DTS soundtrack discs match the film by checking the feature title on the disc label
and the feature language.
4.3.4.3. Blue Audio LED is Flashing at Regular Intervals
If the Audio LED is flashing at regular intervals, then XD20 is reporting that it is not in the DTS format.
This would occur in the following situations:
• The automation system may have selected a different audio format after XD20 had switched
to the DTS optical formats before switching to the DTS format.
• If the automation mode is set to auto-switch, then XD20 expects that the automation system
first selects one of the optical formats—Mono, A, SR(1) or SR (2)—before switching to the
DTS format. If one of the optical formats is not selected, then XD20 does not pulse the DTS
format, and the DTS Playback
LED blinks.
• If the automation mode is set to pre-select, then XD20 expects that the automation system
first selects the DTS format. If the DTS format is not selected first, then XD20 does not pulse
the DTS format, and the Audio LED blinks.
4.3.5. XD20 Switches Out of DTS Digital
1 If XD20 does not see timecode for four seconds, XD20 automatically switches the Cinema
Processor to the default analog (usually SR). Verify that the green LED on the D600 Timecode
Reader Head is glowing brightly and steadily while the film is running.
2 If the Timecode LED on XD20 or on the reader head is blinking, check the reader’s voltage,
using TN-E550. TN-E550 is posted on the online support site located at
www.dtsdcinema.com/Support/
3 If the timecode light still does not illuminate steadily while film with timecode is running, use
TN-E698 to troubleshoot the problem. TN-E550 is posted on the online support site located at
www.dtsdcinema.com/support.
4 Verify that all sound cues from automation are completed before timecode starts or after it ends.
If the sound format switches back to SR after the feature starts, then it is possible that automation
is switching the cinema processor and overriding the XD20 pulse to digital. To avoid this, add
some black leader before the start of timecode for the feature. It will give automation time to
pulse the cinema processor to SR. Then when DTS timecode is seen, XD20 will pulse the cinema
processor to digital, and it will stay there as long as valid timecode is seen by XD20.
Document # 9301H264001.0
47
Page 63

XD20 Installation and Operating Guide Version 1.0
5 As a last resort, force the unit to play in optical mode. Turn off the XD20 unit and verify that the
cinema processor switches to optical. If it does not, press the desired format button on the cinema
processor. Contact your Theater Technician and request a DTS system check.
4.4. Display Error Messages
4.4.1. Program Fault
The following message will appear on the XD20 front panel display if the XD20 program stops running
or gets “hung up” for any reason (an unspecified problem with the unit).
If this occurs when playing digital format, XD20 will switch the cinema processor to the predefined
fallback format (usually SR).
The error may disappear or the XD20 unit may reset itself after power is cycled (power off, then on
again). However, if the problem persists, contact DTS Digital Cinema Technical Support for assistance
(See Contact Information, page xi.)
4.4.2. Menus Do Not Function
Certain menus on XD20 are locked out because the functions are disabled, either due to a mode setting, or
because a license is required.
1. The following message appears when Video Playlist is selected from the Playback menu—or
Video is selected from the Setup menu—and the Video license is not installed on XD20.
Main menu → Playback → Video
2. The following message appears when Video Playlist is selected from the Playback menu—or
Video is selected from the Setup menu—and the video hardware is either not installed or not
working.
Main menu → Playback → Video
3. The following message appears when CSS Playback is selected from the Playback menu—or
CSS is selected from the Setup menu—and a CSS license is not installed on XD20.
Main menu → Playback → Film → CSS
Document # 9301H264001.0
48
Page 64

XD20 Installation and Operating Guide Version 1.0
4. Selected XD20 units with CSS or Video Options may be configured with the soundtrack audio
capability disabled. When the soundtrack audio is disabled, XD20 will not play DTS audio
soundtrack with film. However, the unit will still function for video sound playback or external
S/PDIF input.
If an XD20 unit does NOT have soundtrack capability, the following message will display.
Main menu → Playback → Film→ Soundtrack
4.5. Guide for a Seamless Change-Over
When you are running a DTS movie with dual projectors, the picture and sound may not change at the
same time during a change-over. The reason is that as soon as the first frame of action reaches the picture
aperture on the incoming projector, the DTS Digital Sound
®
Sound
changes independently of the projector’s douser position. Change-over anomalies are most
evident on movies that have very tight editing / scene-change tolerances from the end of one reel to the
start of the next reel.
When this occurs, perform one of the adjustment procedures below.
®
will change over to that reel. DTS Digital
4.5.1. Sound Changes Before Picture
When threading the incoming projector, roll down the film to a greater number of feet. If you normally
thread to “8”, try threading to “9” or “10.” Keep adjusting the roll-down setting until the picture changes
with the sound. Also, try hesitating a second before starting the incoming projector on the first cue.
4.5.2. Determining Roll-Down
Adjusting the roll down setting is a judgment call. Base it on the time delay of the picture vs. sound. One
second of delay equates to 24 frames, or 1.5 feet.
4.6. About the RAID Hard Drives
If the XD20 unit has within it a second (optional) hard drive (Raid1/mirroring) then the two operate in
synchronized fashion. RAID status “Clean” means they are synchronized and active. Provided the drives
are in sync to start with, synchronization is continuous and automatic.
If a drive fails, the behavior depends upon the failure mode. In the more likely case of a media problem,
or an issue reading/writing data, then immediately a problem is reported by the drive. That drive will be
put in a “fault” state, and XD20 operation continues with the other drive. If the drive electronics fail in
such a way as it does not respond to commands on the SATA interface, then the system will appear to be
non-operative or non-responsive as the driver waits for a response. Any playback will stop during this
interval. When power is turned off and then on again, the system will boot up using the remaining active
drive. Status message(s) will indicate the drive problem.
For details about monitoring the status of the hard drive(s), see RAID,on page 111.
4.7. System Monitor Information
The XD20 features built-in monitoring capability that will detect and report problems.
Table 9: System Monitoring Information
Monitored Component Details
Document # 9301H264001.0
49
Page 65

XD20 Installation and Operating Guide Version 1.0
Motherboard sourced
info
Cooling fans Chassis Fan: minimum RPM 4000
CPU Temperature
Hard disk drives
Front Panel
Temperature
H222 sourced voltages +15V, -15V, 5V, 5VUSB
Vcore: 0.85V->1.6V (nominal depends upon which CPU is used)
12V: 10.2V->13.8V
5V: 4.5V->5.5V
3.3V: 3.0V->3.6V
Failure on any of above would be caused by (a) bad power supply, (b) bad cabling or
(c) bad motherboard.
CPU Fan: No limits set (fan is speed controlled and can stop if CPU is cool)
CPU temperature maximum is 60.4°C.
Excess CPU temp would be caused by (a) CPU fan failure, (b) chassis fan failure, (c)
power supply fan failure, (d) excessive ambient temperature, or (e) mechanical failure
of thermal interface between CPU and heat sink.
Maximum temperature is 55°C.
Front panel temperature maximum is 50°C
Excessive FP temp would be caused by (a) chassis fan failure, (b) PSU fan failure,
(c) obstruction of ventilation holes, or (d) excessive ambient temperature.
All limits set to +- 9% of nominal
Error in these voltages would be caused by (a) power supply failure, (b) failure of
power cable to H222 board, or (c) internal failure of H222 board.
Note: Maximum ambient air temperature is 40°C.
Document # 9301H264001.0
50
Page 66

XD20 Installation and Operating Guide Version 1.0
Part 2: Installation and Setup
The remaining chapters in this manual describe the information the technician needs to install and
configure XD20. The chapters are:
• Hardware Installation
• Installing Licenses and Upgrading Software
• System Setup Menus
5. Hardware Installation
This chapter covers the following:
• Unpacking XD20 components
• Mounting and Connecting Cinema Media Player
• Power Supply
• Installing D600 Timecode Reader Head
• Connecting to Other Cinema Processors
Additional information can be found in:
• Appendix A: Pin-out Connectors
• Appendix B: Cinema Processor Interface Wiring Diagrams
• Appendix C: XD20 Wiring and Block Diagrams
• Appendix D: Cable Assemblies and Breakout Boards
• Appendix E: TC Reader Head Mounting Brackets
• Appendix F: System Parts List
• Appendix G: Specifications
• Appendix H: Menu Structure
• Appendix I: Technical Maintenance
• Appendix J: Installing CSS
• Appendix K. ACV Playlist Generation Software
• Appendix L: Tech Notes
• Appendix M: H260 DVD Drive Unit
Note: You may also refer to the Installation Checklist on page xiii near the beginning of this
guide.
Document # 9301H264001.0
51
Page 67

XD20 Installation and Operating Guide Version 1.0
5.1. Unpacking System Components
The following is a list of the standard components for an XD20 shipment. The exact contents will vary,
depending on the options you have ordered.
• XD20 chassis and power cord
• D600 Timecode Reader Head
• Reader Head mounting bracket and screws
• D600 Timecode Reader Head interconnect cable
• Audio and automation cables (the exact model of cables and other interface components will
vary, depending on the cinema processor the XD20 unit is connected to. See Appendix D, Cable
Assemblies and Breakout Boards and Appendix E, TC Reader Head Mounting Brackets, for
details.)
• Digital Output Cable
• Installation Hardware (screws, brackets)
• XD20 Installation and Operation Guide
• DTS trailer (logo) films, 2 scope and 2 flat
Note: Refer to the actual packing slip from your order to verify the contents of your shipment.
Contact DTS Digital Cinema immediately if items listed on your packing slip are missing.
5.1.1. Preliminary Inspection
Note: Before installing the XD20 unit, take a complete inventory of system components to
minimize problems or questions during installation. Additionally, save all packing materials
until installation is complete in case you need to return parts to the factory.
5.2. Installation Procedures
The XD20 chassis is the main component of the XD20 system. Installation procedures include:
• Mounting the XD20 chassis in a rack
• Connecting the XD20 unit to a cinema processor
• Connecting the XD20 unit to a power supply
• Installing the D600 Timecode Reader Head (for soundtrack or DTS Access™ content:
subtitling, captions and narration.
Note: If you have a license for the CSS Option, follow the procedures in Appendix J,
Installing CSS, after following the procedures in this chapter.
5.2.1. Chassis Rack Mounting and Connection
The XD20 unit is designed to integrate into your existing theater sound system without affecting normal
theater operation. All interconnects are standalone and most systems require no cuts or jumpers.
The XD20 chassis requires 2U of standard rack space for proper mounting. Select a space in the sound
rack within three feet of the cinema processor to which you are connecting.
1. Bolt the XD20 into the selected rack space.
Caution: Because the XD20, like any other computer-based system, can be damaged by
power line surges, we recommend using a computer-grade surge/spike suppresser.
2. Connect the analog and logic cables/cards to your cinema sound processor. (See Appendix B for
cinema processor interface wiring diagrams and Appendix D for cable assembly diagrams,
including installation into sound racks with digital sound systems from Dolby and/or Sony.)
Document # 9301H264001.0
52
Page 68

XD20 Installation and Operating Guide Version 1.0
3. When connecting to a SMART cinema processor, contact SMART directly at
(800) 45-SMART. DTS Digital Cinema does offer SMART interface cables: for MODVI or VII
use DDE part #E709.
4. Connect the supplied power cable between the XD20 unit and your power source.
5.2.2. Rack Mount Recommendations
Follow these recommendations if the XD20 unit is installed in a closed or multi-unit rack assembly.
• Determine the maximum and ambient temperatures within the rack, since they may be greater
than the maximum and ambient temperatures in the room. The maximum temperature for the
equipment in a closed or multi-rack assembly is 40°C (104F°)
• Ensure adequate airflow for cooling purposes on all sides of rack-mounted equipment. Make
sure that ventilation fans and louvers are not blocked.
• Check nameplate ratings to ensure there is no overloading of supply circuits that could have
an effect on over-current protection and supply wiring.
• Maintain reliable grounding of the equipment. Give particular attention to supply connections
when connecting to power strips, rather than direct connections to the branch circuit.
• Use a quality surge/spike suppresser power strip to protect the unit.
5.2.3. Power Supply
The XD20 power supply automatically switches itself to accommodate AC input between 110 VAC and
220 VAC.
The cooling fan in the power supply must be rotating after power is applied.
5.2.4. D600 Timecode Reader Head Installation
The D600 Timecode Reader Head is designed to be mounted onto most projectors with a single mounting
bracket.
1. Position the appropriate mounting bracket on the same bolt pattern as the reel arm and bolt
securely in place. (See Appendix E for reference.)
2. If both 35mm and 70mm reader heads are to be used on the same bracket, add spacer breakaway
plates to the readers. (See Appendix E for reference.)
3. Install the D600 Timecode Reader Head onto the mounting bracket and bolt into place with
supplied hardware.
4. Re-install the reel arm on the top bolt pattern of the mounting bracket.
5. Align the mounting bracket and the reel arm. Align the film along the path from the reel arm,
through the mounted D600 Timecode Reader Head, to the projector.
Caution: The D600 timecode reader MUST have a straight film path (no angles or twists)
and at least a small amount of tension. Use the auxiliary flanged roller on the D600 Timecode
Reader Head to avoid film “walk out” and to stabilize the film. (See the section on Installing
or Changing Auxiliary Timecode Reader Head Roller in Appendix I: Technical Maintenance,
for reference.) Additional guide rollers may be added to ensure proper film tension. This is
most critical on platter systems.
6. Connect the 9-pin timecode cable to the reader and route to the sound rack. Connect the other end
to the XD20 rear panel “Timecode” connector.
Document # 9301H264001.0
53
Page 69

XD20 Installation and Operating Guide Version 1.0
5.2.5. Two Projector (Change-over) Theaters
Use a timecode “Y” cable to connect two readers to one XD20. Be sure to place each reader at the same
location on each projector. This is to ensure the soundtrack plays in sync. The timecode offset values
(distance from D600 reader to the projector’s picture gate) must be the same for each projector.
5.3. Connection to Cinema Processors
The following instructions are generic procedures intended to supplement the processor installation
instructions for your specific manufacturer's system. Cinema processor interface wiring diagrams are
located in Appendix B of this manual. They show connections and sub-connections.
Refer to the Installation Checklist on page xiii near the beginning of this guide.
5.3.1. Dolby® CP45, CP55, CP65, CP500, CP650, UltraStereo JS Series,
Panastereo and SMART Operation
The XD20 will automatically send one pulse to the cinema processor, changing the format to DTS.
Whenever the XD20 drops out, a pulse will be sent to switch the cinema processor back to an analog
format (usually SR).
Set the automation/cues on the film so they will not override the format change once the DTS has started
to play, which can result in switching to an incorrect format. Be aware that after a film break, the cinema
processor may drop out of digital format. In this case, the blue Audio LED on the XD20 will begin to
blink and you may have to manually select the digital format (on the cinema processor) for DTS
playback.
• CP500: Must have the Cat. 685 (analog input card) installed. DTS is accessed through
Format 11.
• SMART: Mod VI and VII uses DDE interface cable E709.
For other SMART cinema processors, contact SMART directly at (800) 45-SMART or
+1.770.449.6698.
5.3.2. Dolby® DA20 SR-D® System
The XD20 can be connected to the Dolby SR-D® system without affecting performance of the Dolby
system.
The DA20 connects to the appropriate XD20 breakout board. When the XD20 unit is off, the DA20
output is routed through the breakout board. When the XD20 system is on and playing in digital, the
DA20 connection (to the cinema processor) is switched out on the breakout card and the DTS digital
soundtrack is output to the cinema processor.
®
In most instances, the SR-D
system should be powered down when playing in DTS.
5.3.3. Sony SDDS®
The XD20 system cannot connect to the DFP-D2000 and DFP-D2500. It can connect to the DFP-D3000
and DCP1000. See the interface and cable and interface drawings in Appendixes B and D.
5.3.4. Panastereo CSP1200 and SMART
There is an Automation Preset for Panastereo CSP1200 and SMART CP. For information, see section
7.5.1.2 Predefined Formats, on page 81 of this guide.
5.3.5. Dolby® CP200 Operation
When the XD20 switches to digital, the normal signal paths are interrupted, and DTS signals are inserted
just prior to the Dolby EQ cards, effectively taking over the cinema processor.
Note: For CP200, program the automation optical default format to either “04” A-TYPE
or “05” SR, whichever the film requires.
Document # 9301H264001.0
54
Page 70

XD20 Installation and Operating Guide Version 1.0
When the XD20 switches out of digital, the cinema processor is released and reverts to the format
previously selected.
Unless modified, these cinema processors do not have a subwoofer input. In this case, DTS inserts the
subwoofer signal post-fader; the fader or mute will functions not affect the subwoofer level.
Check diagrams for sub connection.
5.4. XD20 Calibration and Setup
This section describes procedures for XD20 audio level adjustment, timecode reader sync adjustment,
sound performance verification, and fail-safe operation verification.
5.4.1. Equipment Requirements
Complete checkout and adjustment of the XD20 unit requires (as a minimum) a multimeter, an SPL
meter, and the DTS Demo film (included in the DTS Technician’s Kit).
Note: The “B-Chain” calibration must be completed prior to adjustment of the XD20.
5.4.2. Setting and Adjusting Audio Output Levels
Channel setup tests and tones are pre-recorded onto the XD20 hard drive.
The audio playback level of the XD20’s built-in 1 kHz test tone has been fixed at 300mV RMS. This
level should match the audio buss level on the cinema processor that the XD20 is connected to. Verify the
buss level by consulting the manufacturer of your cinema processor.
The pink noise tests that are built into the XD20 are used only to make A-B comparisons to an alternate
sound source, such as magnetic sound track or analog sound.
5.4.2.1. Adjusting Levels
The XD20 contains several built-in audio tests described in Section 7.2.2. They can be accessed through
the following menu path: Setup → Audio → Audio Tests. Level adjustment audio tests for SPL
calibration are described in Section 7.2.1, which can be accessed through the following menu path: Setup
→ Audio → Level Adjustment.
The Level Adjustment menu provides two choices:
Reference Tone: This will play 1K tone @ 300mV RMS on all channels. The level can be
adjusted between +6.4 to -6.2 dB using the up and down arrow buttons.
Pink Noise: The input buss level for most cinema processors is 300mV input, so in
most cases it will be unnecessary to make any adjustments to the XD20
output level. When the level is set at +0.00 dB, the XD20 output is
300mV.
However, if necessary, each channel can be selected and adjusted individually using the arrow navigation
buttons. The up and down arrow buttons will adjust the levels from +6.4 to -6.2 dB. The left and right
arrow buttons will move back and forth among the channels.
When Pink Noise is selected, it will automatically start to play on the first channel (Left). This will be
indicated on the status display screen. The blue Audio LED will also illuminate, indicating that Pink
Noise is playing.
To adjust SPL settings, do the following:
1. Confirm that all amplifiers are on, mute is off, and masking and curtains are opened.
2. Before setting levels, confirm that SPL settings are completed on the cinema processor according
to their recommendations. When setting levels, the cinema processor should be set to calibration
level. In most cases, this is with the fader set to “7”.
3. Using a high-quality, calibrated SPL meter set the SPL levels according to the chart below. Note
that SPL readings for screen and surroundings should be measured un-weighted, or C-weighted,
Document # 9301H264001.0
55
Page 71

XD20 Installation and Operating Guide Version 1.0
with the meter set to slow. The proper level setting of the subwoofer should be calibrated with an
RTA.
Table 10: SPL levels
Channel Description SPL
1 Left 85 dB
2 Right 85 dB
3 Center 85 dB
4 Sub bass 91 dB*
5 Left Surround 82 dB
6 Right Surround 82 dB
7 Left Center 85 dB
8 Right Center 85 dB
* Subwoofer should be set to 10 dB of in-band gain (see SMPTE RP-200), which equates to
approximately 91 dBC (slow).
Note: Any change made with either Reference Tone or Pink Noise will affect the other. For
example, if you change the level of Reference Tone to +1.0 on Ch1, when you select Ch1 in
the Pink Noise test section, it, will also be at +1.0.
5.4.3. A Note about DTS Subwoofer Output
The XD20 subwoofer output level ranges from 20 Hz to 80 Hz and 20 Hz to 120 Hz (Coherent Acoustics
format), up to 27 dB above reference (85 dB).
Caution: Check your subwoofer’s specifications to avoid damage to the speaker.
If a subwoofer is driven below its low frequency cutoff, its driver(s) may become unloaded. When
unloaded, the voice coil can travel outside of the magnet’s gap, overheating and/or causing mechanical
damage to the speaker. Contact your speaker manufacturer for more information.
5.4.3.1. Subwoofer Signal in the Surround Channels
The subwoofer signal is derived by filtering the surround signals from 80 Hz and below, and then routing
this signal to its own “subwoofer” output on the XD20.
You can verify this while performing a B-chain alignment of a theater as follows:
1. Play the internal pink noise generator Subwoofer test. (Refer to Section 7.2.2, Audio Tests, in
Chapter 7, Setup Menus, in this guide.)
2. Turn off the subwoofer speaker and look at the pattern on the RTA.
You’ll see a dramatic roll-off at 80Hz. It is normal to see DTS subwoofer pink noise, above
80Hz, in the surround speakers..
5.5. Timecode Reader Sync Adjustment
This adjustment is easily performed using the numbered leader in front of the DTS Demo Reel. (The
demo reel is supplied with the DTS Technician’s Kit, which can be purchased from any DTS Digital
Cinema dealer.) See the steps (below on this page). To aid in calibration, the offset leader is available
separately (DDE part # 6800000201).
Document # 9301H264001.0
56
Page 72

W
XD20 Installation and Operating Guide Version 1.0
If you do not have a demo reel, the delay can be calculated by counting the number of picture frames
from the D600 reader head red LED (lens) to the projector’s picture (“film”) aperture. Multiply the result
by 1.25 and subtract 1. Round the resulting number to the closest ¼ (0.25). Set the OFFSET value in the
XD20 timecode menu (“TC Reader Offset”) to this number.
Example: 27 frames x 1.25 = 33.75
33.75 - 1 = 32.75
Set the OFFSET to 32.75
Remember: When using the counting frames method, frames are counted from the timecode
reader lens to the picture aperture.
FILM THREADED THROUGH READER
ARNING:
FACTORY SET
DO NOT ADJUST
GREEN LED - TIMECODE INDICATOR
RED LED
Figure 5: DTS Timecode Reader Head, Threading
5.5.1. Procedure Using Demo Reel
The Demo Reel has a specially printed leader for setting the timecode head offset.
1. Using the numbered leader, put the start mark 00 at the reader’s lens (red LED) and thread the
film through the projector as normal.
2. After threading, look at the film and read the number at the projector’s sound head. This is the
OFFSET value and that number should be entered into the XD20 timecode offset menu (“TC
Reader Offset”).
Caution: Make the same size film loops inside the projector when measuring offset as when
running a movie. Failure to do so will result in improper sync when the movie runs in DTS
Digital mode. For two-projector houses, the reader at each projector must have the same
OFFSET value.
5.5.2. DTS Special Venue Timecode Offset
Information on the delay setting for special venues is available in Appendix L: Tech Notes. There are two
pages of information:
• DTS Special Venue Timecode Offset
Document # 9301H264001.0
• Timecode Printing Offset for 35MM and 70MM Film.
57
Page 73

XD20 Installation and Operating Guide Version 1.0
5.5.3. Verify Sound Performance
1 Thread the DTS Demo reel (Buzz and Bill) through the projector and D600 reader. Be sure XD20
is fully booted and ready to play. The soundtrack for Buzz and Bill is factory-loaded on the hard
drive.
2 Start the projector. When the Audio LED lights, verify that the XD20 automatically switches the
cinema processor to the (DTS) Digital format. Verify that sound is heard in the monitor speaker.
Open the porthole (if possible) and verify that sound is heard in the auditorium.
3 While still in the booth, verify that the XD20 front panel display shows the film title, serial
number, reel number and running timecode. (Information in the display's fourth line is
configurable by the user. For more information on selecting the type of information to display in
Line 4, see Chapter 1, Operating the XD20 Media Player, in this manual.)
o Line 1: Film title
o Line 2: Film serial number
o Line 3: Reel number and running time
o Line 4: Can be selected by user. This example displays the format, which is DTS.
4 Go into the theater while the Demo reel is playing. Verify sound is in-sync, sounds well balanced
and has excellent digital sound quality.
If levels sound unbalanced, check the cinema processor’s output levels. Then be sure that the
XD20 output of 300mV RMS on all channels matches the buss level of your cinema processor.
XD20 MUST match the cinema processor’s buss level. (The buss level of your cinema
processor should be indicated in its manual, otherwise, consult the manufacturer.)
5 If the theater has two projectors, repeat this procedure for Projector 2.
Document # 9301H264001.0
58
Page 74

XD20 Installation and Operating Guide Version 1.0
5.6. Check Automatic Fail-Safe (Default) Operation
This procedure will verify that, should the D600 timecode reader fail for any reason, the system will
automatically switch to the predefined optical sound format.
1. While the demo film is running, block the timecode at the reader or unplug the 9-pin connector at
the reader.
To block the timecode reader, insert a business card between the film and the lens of the D600
Timecode Reader Head and keep it there for at least six seconds.
2. Verify that after 4 to 5 seconds of not seeing timecode, the XD20 switches to the SR optical
sound format.
There should not be a dramatic sound level difference when the cinema processor switches from
digital to analog during dialog scenes. If there is a dramatic difference, check the cinema
processor’s levels first, then check the XD20 levels, and test again.
Remember, the XD20 output level must match the cinema processor’s buss level.
3. Now, restore timecode and the XD20 should automatically switch the cinema processor to the
DTS digital format after about two seconds.
4. For two-projector theaters, repeat this procedure for Projector 2.
5.7. Networking multiple XD20s
Note: It is always advisable to consult with an IT professional when networking the players.
The Network Transfer feature enables the XD20s distribute feature audio and CSS content to all players
in the network. Video content will not be transferred. Content loaded into any of the XD20s using
network transfer will automatically be distributed to all players on the network. To connect multiple
XD20s in a local network, it is necessary to connect each XD20 using CAT 5e or CAT 6 Ethernet cable to
a network switch or router, depending on the requirements of your system. Whether using a network
switch, a router, or connecting to an existing LAN, it is necessary to make sure that Network Transfer is
set to “Enable” for each XD20 on the network. (Full menu path is Setup → System → Network →
Network Transfer) See section 7.8.5.4 for more details.
Notes –
1. When content is deleted from an XD20 (manually or automatically), then it is not copied from
the other unit(s). It will be copied if it is reloaded from a disk.
2. Delete all film content before adding a unit to the network - OR - delete all film content before
enabling the network. This will prevent all other units on the network from trying to update
their content with content from the newly installed unit.
5.7.1. Stand-Alone System using Switches and Routers
Two methods of connections can be done when using network transfer feature. If you have a closed
system and only the XD20s will be connected, a simple network switch (hub) can be used to allow all
XD20s to communicate with each other. This method requires each unit to be manually issued an IP
address.
You may also connect several XD20s in a closed system using a router. This method is simpler, and is
also discussed below.
5.7.1.1. Setup Procedure with a Network Switch
The following steps are done after Ethernet cables have been installed and connected to all XD20s and
passed through a network switch. See drawing H319 in Appendix B.
Document # 9301H264001.0
59
Page 75

XD20 Installation and Operating Guide Version 1.0
Note: When using a network switch only XD20s can be connected to each other. If other
computers or connections to the internet are to be used, it will be necessary to use a router. See
Setup Procedure with Router below for more information.
At each XD20 that is networked follow these menu setup steps:
1. Select Enter, then Setup → System → Network
2. Select Network Mode, then select Static IP.
3. Use left arrow button to go back to the Network Menu, scroll down and select Set Static IP
4. In the Static IP address menu Select IP Address.
Note: In the Static IP Address menu, no changes are needed to the Subnet Mask, Default
Gateway, Primary DNS, or Secondary DNS.
5. Using the navigation keys change the IP address to a unique number. Every XD20 connected
must have a different number. See example below:
Screen #1 – IP address 010.090.010.020
Screen #2 – IP address: 010.090.010.030
6. Return to the Network Mode menu, scroll down and select Network Transfer, then choose
Enable.
7. Reboot the XD20 for settings to take place. After reboot, if setup was successful, the network
icon should appear in the status screen and the boxes in the icon should blink.
Network connection icon
5.7.1.2. Setup Procedure with Router
When connecting multiple XD20 units together using a router, all units within the local network must be
set to use DHCP (Dynamic Host Configuration Protocol). This setting will allow the router to assign IP
addresses to each XD20 unit without any user intervention. (The full menu path is Setup → System →
Network → Network Mode).
The following steps must be completed for each XD20 that will be connected to the network:
1. Network Transfer must be set to “Enable”.
2. Network Mode must be set to “DHCP”
Note: DHCP automates the assignment of IP addresses, subnet masks, default gateway, and
other IP parameters. See section 7.8.5.1, Network Mode, for more details.
No other steps are necessary.
5.7.2. Connecting to an Existing LAN
When connecting an XD20 to an established local area network containing additional equipment, follow
the same procedure as in section 5.7.2.2, Setup Procedure with Router, above.
Document # 9301H264001.0
60
Page 76

XD20 Installation and Operating Guide Version 1.0
6. Installing Licenses and Upgrading Software
6.1. Options
These options are enabled via specific licensing from DTS Digital Cinema:
• High Definition Video option: a card is added, which provides high definition digital video
playback.
• CSS option provides subtitling and access options that include:
o Projecting subtitles or captions directly onto the screen via a video projector.
o Controlling WGBH Rear Window
diode (LED) text display are mounted in rear of theater. Patrons use transparent acrylic
panels attached to their seats to reflect the captions so they appear superimposed on or
beneath the movie screen.
o Output of descriptive audio narration for patrons who are visually impaired (via infrared
or RF transmitter and headsets).
Auxiliary equipment (data wall, reflective panels, transmitter and headphones) are not
available from DTS Digital Cinema.
®
Captioning, via serial connection to a light-emitting
6.2. Options Setup and Testing
For instructions to install and configure the High Definition Video and CSS options, see the appropriate
reference:
• HD Video Option – See Video Setup on page 70.
• Cinema Subtitling System (CSS) Option – See Appendix J, Installing CSS.
6.3. Installation of Licenses
1. Check that the MAC Address of the license matches the XD20 MAC Address. Licenses may be
received via email and loaded using a USB memory stick. Using your PC, copy the license to the
root directory of a blank USB memory stick. See section 7.8.2.1.2 for more details.
Licenses are unit-specific and cannot be used on multiple XD20 Media Players.
2. Turn on the XD20.
3. Insert the USB memory stick with the license into the XD20. On the XD20, press Enter →
Playback → Load From USB, and the license will download. Once loaded, remove the USB
stick.
When a license has been successfully installed, the list of currently installed (option) licenses will
be displayed, as shown below. Use the up and down arrow buttons to scroll through the list. Press
Enter to continue.
You can also view the licenses currently installed on your unit at any time by going to
Enter → Info → Licenses
Document # 9301H264001.0
61
Page 77

XD20 Installation and Operating Guide Version 1.0
The following message appears if the license did not install:
This message indicates that the license did not load in that specific XD20 unit.
Caution: If an error message appears, check the following.
Does the MAC Address of the license match the MAC Address of the XD20? (Press Enter
and select Info → MAC address).
If it matches but still does not load, contact DTS Digital Cinema Technical Service for
assistance.4.
6.4. XD20 Software Updates
XD20 software updates may be distributed in several ways. They can be included on feature or trailer
audio discs, on a separate software “update only” disc, or depending on the update, from the DTS Digital
Cinema web site. Updates can be loaded into the XD20 through the DR-1 disc drive unit, from a USB
drive, or directly from DTS Digital Cinema if the XD20’s are connected to a network. (To install an
update from a USB device, see Section 3.2.5 Load from USB.
When updating with a software update disc, the update will occur automatically when the disc is installed
in the XD20. The update will not affect any of the XD20 configuration or contents and there is no special
action required after the install takes place. If the update is included on a feature or software disc, the
update will load but not install while a show is playing. Only when no timecode is being received will the
update install. This is to prevent show interruptions if the disc is inserted while a show is playing.
Depending upon which delivery method is used you may see the following display:
After a short time, the file will begin to copy from the disc. If a software “update only” disc is used, the
following messages appear when finished loading. (If the update is on a feature or trailer disc, they will
load as normal and prompt you to select Enter to eject the discs.)
This message will appear when the update begins. To prevent show interruption, this will only happen
when no timecode is being received by the XD20.
Document # 9301H264001.0
62
Page 78

XD20 Installation and Operating Guide Version 1.0
At this point the XD20 software resets:
The software update is complete when the “Ready” message appears on the display.
7. Setup Menus
The Setup menu contains all configurable settings for XD20 that should be set by the technician and are
not expected to change during day-to-day operations. The setup menu can be password protected to
assure that the configuration does not change after the technician leaves.
Select Setup from the Main menu.
Select Setup
If the XD20 unit is password-protected, the menu shown below will appear. The default mode for XD20
is with the password disabled. If the password is disabled, this menu will not appear.
The cursor is the ‘*’ underneath one of the three digits.
► Moves cursor to the right.
◄ Moves cursor to the left, or returns to the Main Menu if at the first
position.
▲ Increments digit at cursor position. Wraps from 9 to 0.
▼ Decrements digit at cursor position. Wraps from 0 to 9.
Enter Press to enter the password.
If the correct password is entered and Enter is pressed, the System Setup menu will appear. If an
incorrect password is entered, the following message will appear.
Press Enter to reenter the correct password. If you forget the password, contact DTS Digital Cinema
Technical Support and a Technical Service Representative will help you to regain access to the XD20.
(See Contact Information, page xi.)
Document # 9301H264001.0
63
Page 79

XD20 Installation and Operating Guide Version 1.0
The following menu displays once the System Setup password is entered:
Main Menu → Setup
TC Reader Offset Sets the timecode reader offset. This must be set for playing Soundtrack
and CSS content to properly synchronize the content to the film.
Audio Sets test audio levels, plays audio test files and enables/disables language
selection. The Language Versions should be enabled in areas where
different languages should be played. The audio levels and test files are
used to set audio for either soundtrack or video with audio.
Video Sets the parameters for the Video projector. This menu is available only
with the HD Video Option.
CSS Sets the parameters for the projected CSS subtitles or captions. There are
no configurable items for narration and Rear Window™ in this menu.
This menu is available only with a valid CSS license.
Automation Contains the following configuration items: 1) Format automation pin
definitions and operating modes, 2) Define functions for general purpose
input and output control pins, 3) Configure Video Playlist Automation
parameters, 4) Test format automation signals and I/O control signals.
System Contains menus for the following system operations: 1) Assign functions
to the 4 “soft key” buttons below the LCD, 2) USB memory device
operations to save or restore configurations, or save log files, 3) Configure
COM1 for use by the Video Projector or CSS Rear Window™, 4) Set the
setup menu password, 5) Set system network parameters, 6) View or
redefine the amount of reserved disc space for Film and Preshow content,
7) Set XD20 time and date, 8) Set the LCD contrast and brightness, 9)
Identify drive A and drive B on the external DR-1 drive unit, 10) Check on
the status of the RAID, 11) Revert to an earlier XD20 software version.
Display Language Change the language used on the XD20 LCD display screen to one of the
following: English, French, German, Italian, or Spanish.
Document # 9301H264001.0
64
Page 80

XD20 Installation and Operating Guide Version 1.0
7.1. TC Reader Offset
This menu allows you to enter the offset required for your particular timecode reader location. See
Chapter 5, Section 5.5, , for information on calculating the correct settings. Adjustments can be made
while playing and will occur within two seconds.
To access this menu, select TC Reader Offset from the System Setup Menu, as shown below.
Setup → TC Reader Offset
35mm Set TC reader offset for 35mm reader head.
70mm Set TC reader offset for 70mm reader head.
SMPTE Set Serial number, reel number and offset for playback to SMPTE
timecode.
Exit Menus Returns to the Status display.
7.1.1. 35mm or 70mm Timecode Reader Offset
This menu sets the timecode reader offset for 35mm or 70mm timecode reader heads. The operator may
select between either 35mm or 70mm reader heads through a menu in the Playback →Film section.
Setup → TC Reader Offset → 35mm
Setup → TC Reader Offset → 70mm
Note: The operation for setting the two offsets is identical.
▲ Press one time to increase offset by 0.25 frames. Press and hold down to
repeat. Maximum possible number of frames is 100.
▼ Press one time to decrease offset by 0.25 frames. Press and hold down to
repeat.
Enter Return to previous menu.
Note: If not using 70mm, set the 70mm offset to match the 35mm. This will prevent problems
if the user selects 70mm by mistake.
Document # 9301H264001.0
65
Page 81

XD20 Installation and Operating Guide Version 1.0
7.1.2. SMPTE
Note: For more information on XD20 operation with SMPTE timecode, please refer to TN-
H171 in Appendix L. (It is also posted on the online support site located at
www.dtsdcinema.com/support.)
Setup → TC Reader Offset → SMPTE
Serial Number Assigns a serial number to the incoming SMPTE timecode.
Reel Number Assigns a reel number to the incoming SMPTE timecode.
Offset Apply a fixed offset to the incoming SMPTE timecode.
Exit Menus Returns to the Status display.
7.1.2.1. SMPTE: Serial Number
This menu assigns a DTS serial number to the incoming SMPTE timecode. If the value is set to zero, then
the serial number value comes from the user bits on the SMPTE timecode. The DTS serial number is used
to determine which film soundtrack will be used for playback.
TC Reader Offset → SMPTE → Serial Number
Right Move cursor one position to the right.
Left Move cursor one position to the left, or return to previous menu
if at the left-most position.
Up Increment serial number by 1 at * cursor.
Down Decrease serial number by 1 at * cursor.
Enter Return to previous menu.
7.1.2.2. SMPTE: Reel Number
This menu assigns a DTS reel number to the incoming SMPTE timecode. If the value is set to zero, then
the hours value from the incoming SMPTE timecode will be used for the reel number. The reel number
must be set to 1 in order to play long audio files (greater than one hour in length).
TC Reader Offset → SMPTE → Reel Number
Up Increment reel number (max 15).
Down Decrement reel number.
Enter Return to previous menu.
Document # 9301H264001.0
66
Page 82

XD20 Installation and Operating Guide Version 1.0
7.1.2.3. SMPTE: Offset
This menu sets an offset to the incoming SMPTE timecode. It does not have any affect when playing DTS
timecode. The offset can be set to plus or minus value.
TC Reader Offset → SMPTE → Offset
The fields set are [plus/minus] [Hours]:[Minutes]:[Seconds]:[Frames]. The cursor on the bottom line is
positioned below the field that will be modified.
Right Move cursor right.
Left Move cursor left, or return to previous menu.
Up Increment value at cursor or toggle +/-.
Down Decrement value at cursor or toggle +/-.
Enter Return to the previous menu.
7.2. Audio Setup
This menu allows you to set up and test the XD20 audio. It also allows you to enable or disable the
Language Versions function.
Main menu → Setup → Audio
Level Adjustment Adjust sound levels using audio generated by the XD20.
Audio Tests Play preloaded audio tests.
Language Versions Enable or Disable the language versions function.
Exit Menus Returns to the Status display.
7.2.1. Level Adjustment
This menu is the first in a series of menus for setting the XD20 audio output level.
Setup → Audio → Level Adjustment
Reference Tone Play 1 kHz reference tone on all channels for adjusting the level.
Pink Noise Play pink noise on the current channel for adjusting the level.
Select either Reference Tone or Pink Noise to use the level adjustment menu. Reference tone is a 1 kHz
test tone that has been preset at 300mV RMS when the output is set to 0.0 dB. This is what most cinema
processors suggest for input. Alternatively, Pink Noise may be used to verify level outputs on the XD20.
It is played only on the channel chosen for adjustment. The level adjustments are made the same,
regardless of whether you are using the reference tone or pink noise selection. The pink noise for the Sub
bass channel is not bandwidth limited.
Document # 9301H264001.0
67
Page 83

XD20 Installation and Operating Guide Version 1.0
For example, if you select Reference Tone for the left channel (Ch. 1), the following message will appear
on the XD20 status display.
Setup → Audio → Reference Tone or Pink Noise
▲ Increase level for selected channel. Maximum is +6.0 dB, except for Left
Surr and Right Surr, which are +3.0 dB. Increments are 0.5 dB.
▼ Decrease level for selected channel. Minimum is -6.0 dB. Increments are
0.5 dB.
► or Enter Previous channel or return to Level Adjust menu. If playing pink noise, it
will follow the current channel.
◄ Next channel or return to Level Adjust menu. If playing pink noise, it will
follow the current channel.
Table 11: Channel Sequence
Channel # Channel Name
1 Left
2 Right
3 Center
4 Sub Bass
5 Left Surr
6 Right Surr
7 Left Center
8 Right Center
9 Narration
Note: When 1K tone is selected, all channels will play.
When Pink Noise is selected, only the channel selected
will play. Any adjustments made in either test menu will
change the other.
Document # 9301H264001.0
68
Page 84

XD20 Installation and Operating Guide Version 1.0
7.2.2. Audio Tests
This menu allows you to play preloaded audio test content. See Table 8 for a description of the tests. Note
that the Buzz and Bill test will also play CSS content (captions, subtitles, and narration) if the XD20 is
licensed for CSS.
Scroll up and down the menu to select a test. Position the cursor next to your selection and press the
Enter button to start the test. Press ◄ to stop the test.
Table 12: Audio Tests
Name Description
Bill and Buzz Plays introduction track, but not movie clips, from DTS Demo reel Buzz and Bill. Contains
Pink Noise Cycle Plays pink noise on one channel for approx 5 seconds, then moves to next channel
1K all channels Plays continuous tone on all channels, so analog output can be calibrated for 300Mv RMS
Pink: Left Plays continuous pink noise on left channel
Pink: Left Surr Plays continuous pink noise on left surround channel
Pink: Center Plays continuous pink noise on center channel
Pink: Right Surr Plays continuous pink noise on right surround channel
Pink: Right Plays continuous pink noise on right channel
Pink: Sub Bass Plays continuous pink noise on sub bass channel
Digital Silence Plays continuous digital silence on all channels
Left Ch Sweep Plays continuous tone sweep from 25 Hz to 20 kHz on left channel
Left Surr Sweep Plays continuous tone sweep from 125 Hz to 20 kHz on the left surround channel
Center Ch
Sweep
Right Surr Sweep Plays continuous tone sweep from 125 Hz to 20 kHz on the right surround channel
Right Ch Sweep Plays continuous tone sweep 25 Hz to 20 kHz on right channel
Sub Bass Sweep Plays continuous tone sweep from 20 Hz to 80 Hz on the sub bass channel
ES CS Pink Plays continuous pink noise on back surround channel
ES CS 1K Plays continuous 1 kHz tone on back surround channel
Flying Disc plays Flying Disc DTS trailer
Sonic Landscape plays Sonic Landscape DTS trailer
Sparks Plays Sparks DTS trailer
Exit Menus Returns to the Status display
Setup → Audio → Audio Tests
soundtrack, narration, and captions/subtitles, which will play only with the CSS option.
Plays continuous tone sweep 25 Hz to 20 kHz on center channel
Document # 9301H264001.0
69
Page 85

XD20 Installation and Operating Guide Version 1.0
Pink Noise Cycle
• Track description: 5.1 channel
• Level: -20 dBFS level
• Duration: 10 seconds each
• Channel Sequence: L, C, R, LS, RS, SW
Subwoofer Bandwidth
• “5.1” tracks: 20 Hz to 125 Hz
• “6.0” tracks (Special Venue): 20 Hz to 20 kHz (Full Range / F.R.)
7.2.3. Language Versions
This menu is used to either enable or disable the Language Versions function. Language Versions allows
XD20 to play different soundtrack languages for the same film. XD20 may load several language versions
of a feature or trailer soundtrack, and play the selected language. The playback language maybe entered
by the projectionist or selected by automation.
Setup → Audio → Language Versions
Enabled Enables Language Versions.
Disabled Disables language versions. If your theater only plays soundtracks in one
language, it is a good idea to disable this option. XD20 only keeps the last
soundtrack language loaded into the XD20.
Exit Menus Returns to the Status display.
Note: When changing the Language Versions feature from disabled to enabled, you must
delete all soundtrack contents and reload in order for XD20 to identify the languages
you select.
7.3. Video Setup
The Video Setup menu is used to set the video configuration, audio parameters specifically for the video
playlists, and video projector settings.
Main Menu → Setup→ Video
Output Select settings to create the optimal image for the installed digital video
project or video monitor.
Video Audio Change the audio delay and the audio trim used when playing video
content.
Projector Settings used to select a profile for the video projector serial control.
Test Contents Enter menu to play video test contents.
Exit Menus Returns to the Status display.
Document # 9301H264001.0
70
Page 86

XD20 Installation and Operating Guide Version 1.0
If no video license is detected, the following message will display. To correct this problem, you must
install a valid video license. See Section 6 Installing Licenses, page 61.
7.3.1. Video Output Settings
The Video Output menu's submenus are used to select settings for the optimal image for the installed
digital video projector system or monitor.
Setup → Video → Output
Interface Select cable type being used with video projector or monitor.
Aspect Select appropriate aspect ratio for video projector or monitor.
Color Select appropriate color space for video projector.
Resolution Select optimal projector resolution.
Frame Rate Select appropriate frame rate for selected resolution.
Exit Menus Returns to the Status display.
7.3.1.1. Video Interface
The Video Interface menu is used to select the appropriate cable for the video projector or monitor being
used.
Setup → Video → Output → Interface
DVI Select if the video projector or monitor is connected using a DVI cable.
VGA Select if the video projector or monitor is connected using a VGA cable
Exit Menus Returns to the Status display.
Document # 9301H264001.0
71
Page 87

XD20 Installation and Operating Guide Version 1.0
7.3.1.2. Video Aspect
This menu is used to select the appropriate aspect ratio for the video projector or monitor.
Setup → Video → Output → Aspect
16x9 Select if the video projector or monitor has a 16 x 9 aspect ratio.
4x3 Select if the video projector or monitor has a 4 x 3 aspect ratio.
Exit Menus Returns to the Status display.
Note: Other aspect ratios are not supported.
7.3.1.3. Video Color Setting
This menu is used to select the appropriate color space for the installation.
Setup → Video → Output → Color
RGB 0-255
RGB 16-235
YUV 601
YUV 709
Exit Menus Returns to the Status display
7.3.1.4. Video Resolution
This menu is used to set the video output resolution. In most cases this should be set to the native
resolution of the video projector. Changing the video output resolution requires that both a resolution and
a frame rate be selected. For this reason, the frame rate menu will automatically appear after the
resolution is changed and the user exits this menu with the left key. Table 13 on page 73 lists all available
resolutions and frame rates.
Setup → Video → Output → Resolution
Frame Rate Go to Frame Rate menu.
Document # 9301H264001.0
72
Page 88

XD20 Installation and Operating Guide Version 1.0
7.3.1.5. Video Frame Rate Menu
This menu is used to set the video frame rate. The options are displayed in frames per second with an “i”
indicating interlaced, and “p” indicating a progressive frame rate.
The frame rates available depend on the selected resolution, and the video resolution must be set before
setting the frame rate. The frame rate menu displays the current resolution on the menu title. The menu
below shows the default frame rate menu for the resolution of 640x480. Table 13 below lists all frame
rates available for each resolution.
Setup → Video → Output → Frame Rate
Table 13: Available Frame Rates for Each Resolution
Resolution Available Frame Rates Resolution Available Frame Rates
640 x 480
800x600
1024x768
1280x720
1280x768
60p 60p
72p 75p
75p
56p
60p
72p 59.94p
75p
85p
43i
60p
70p
75p
85p
23p
24p
25p
29p
30p
59p
60p
60p
75p
85p
1280x1024
1360x768
1366x768
1600x1200
1920x1080
59p
60i
60p
1920x1200
85p
60p
50p
60p
60p
23p
24p
25p
29p
30p
47i
48i
50i
50p
59i
60p
Document # 9301H264001.0
73
Page 89

XD20 Installation and Operating Guide Version 1.0
7.3.2. Video Audio Setup
These settings affect the audio only when playing video content.
Setup → Video → Video Audio
Audio Delay Delay the audio to adjust for any frame delay in the video projector.
Audio Trim Attenuate the volume during playback of video content.
7.3.2.1. Video Audio Delay
This setting adds a delay to the audio in order to adjust for any frame delay in the video projector. It can
be changed in 10ms increments. The default value for this setting is 0. The minimum value for this
setting is 0 (no additional delay is applied) and the maximum value for this setting is 2000ms.
Exit Menus Returns to the Status display
Video → Video Audio → Audio Delay
Up Increase Delay
Down Decrease Delay
Left Return to previous menu
Enter Return to previous menu
7.3.2.2. Video Audio Trim
This setting will attenuate the volume during the playback for video content. It has no affect on the
volume for soundtrack. It can be set to a value between 0dB and -15dB.
Video → Video Audio → Audio Trim
Note: Change takes affect only after rebooting XD20.
Up Increase Trim
Down Decrease Trim
Left Return to previous menu
Enter Return to previous menu
Document # 9301H264001.0
74
Page 90

XD20 Installation and Operating Guide Version 1.0
7.3.3. Video Projector Setup
This menu provides functions to setup the serial control for the video projector.
Setup → Video → Projector
Select Projector Select a profile for the serial control of the video projector.
Lamp On/Off Test the lamp on/lamp off serial control function.
Save Settings Create a copy of the projector settings on the XD20. The settings are
restored to the projector upon the start of any video playlist.
Exit Menus Returns to the Status display.
Note: In order for XD20 to control the projector through the serial interface you also need to
set the serial port for Video Projector (not Rear Window).
Main Menu → Setup → System → Com1 Configuration = Video Projector.
7.3.3.1. Select Projector
This menu selects the profile for the serial control of the video projector. By default No Projector is
selected. If no projector is selected XD20 can still play video through the projector, but won’t be able to
do some things automatically like turn the lamp on and off, or restore the saved projector settings.
By default, the projector profiles for the Sanyo PLV-70, PLV-80 and PLV-WF10 projectors are
included in the XD20 software. Additional projector profiles can be created and loaded onto XD20
through the CD-ROM or USB memory. Contact DTS Digital Cinema Customer Service for assistance
with additional projector profiles.
Video → Projector → Select Projector
7.3.3.2. Lamp On/Off Control
This menu may be used to turn the video projector lamp on and off during testing or setup.
Video → Projector → Lamp on/off
On Select On to turn the projector lamp on.
Off Select Off to turn the projector lamp off.
Exit Menus Returns to the Status display.
Note 1: The video projector may take one to two minutes to respond to the Lamp On
command when the lamp is still warm from use.
Note 2: Only available for projectors supported by XD20 serial control.
Document # 9301H264001.0
75
Page 91

XD20 Installation and Operating Guide Version 1.0
7.3.3.3. Save Video Projector Settings
The Save Settings menu is used to save or delete projector settings.
Video → Projector → Save Settings
To save the settings, select “Yes” and press Enter. The following message will appear if the operation is
successful.
Video → Projector → Save Settings → Yes
The following message will appear if “No” is selected or if the communication to the projector was
unsuccessful:
Video → Projector → Save Settings → No
Note: Only available for projectors supported by XD20 serial control.
7.3.3.4. Video Test Contents
The Test Contents menu is used to play or stop video test contents that have been preloaded on factory
XD20 units with the HD Video Option.
Video → Test Contents
Stop Stops the play of video test content. This command does NOT turn the
lamp off---use lamp control to turn the lamp off when finished.
Still Image Displays a test pattern. The video projector lamp should go on
immediately after executing this command. The image remains until the
stop command is used.
Motion Image Plays a motion video clip with DTS audio. The video projector lamp
should go on immediately after executing this command. The clip repeats
until the stop command is used.
Exit Menus Returns to the Status display.
Document # 9301H264001.0
76
Page 92

XD20 Installation and Operating Guide Version 1.0
7.4. Cinema Subtitling System (CSS) Setup
This is the top level menu for all CSS projector setup menus and it is available only when XD20 has the
CSS option. These menus apply for installations using either the CSS cinema subtitling projector or other
video projectors for CSS projected subtitles.
For instructions on installing CSS, see Appendix J, Installing the CSS Option.
Main menu → Setup → CSS
Image Size Select size of subtitles
Vertical Offset Adjust vertical placement of subtitles
Test Patterns Display CSS test patterns.
Options Select projector or set text color.
If your XD20 is not equipped with the CSS Option, you will be locked out of the CSS option on the Setup
menu. When you try to access it, the following message will appear on the screen. To correct this
problem, you must install a valid CSS Option license. See Section 6 Installing Licenses, page 61.
Exit Menus Returns to the Status display.
7.4.1. Image Size
This menu allows you to select the size of subtitles/captions from the available sizes supplied on the CSS
subtitle or DTS Access™ disc. Check the disc label to see what sizes are available on the distributed
subtitles/captions. If you select a smaller size, and it is not available, the system will assign the next
smallest size available. (The CSS content delivered on the disc may not contain all sizes.)
Setup → CSS → Image Size
Image Size From 50% to 100% of size available for text for subtitles/captions. (Sizes
listed on the menu may not all be available in the CSS content delivered
on the disc.)
Exit Menus Returns to the Status display.
Document # 9301H264001.0
77
Page 93

XD20 Installation and Operating Guide Version 1.0
7.4.2. Vertical Offset
This menu allows you to make fine adjustments to the vertical placement (in pixels) of CSS subtitles.
When you enter this menu, XD20 projects a subtitle area pattern to use to reference the position. When
installing the projector, set the projector vertical offset to 0 and physically position the projector to project
in the subtitle area. Then use this menu to make fine adjustments.
Setup → CSS → Vertical Offset
▲ Move subtitle area up one pixel. Press and hold ▲ to increase
continuously.
▼ Move subtitle area down one pixel. Press and hold ▼ to increase
continuously.
Enter Return to CSS Setup menu.
7.4.3. Test Patterns
This menu allows you to select from an array of test patterns used for optimizing subtitle/caption display.
The EMA dowser opens when this menu is entered.
Setup → CSS → Test Patterns
Black All black, so minimum image level from projector can be checked.
Mask Area Subtitle area is all white. Size and location depend on the vertical offset
and image size.
View Area Subtitle area is a grid pattern. Size and location depend on the vertical
offset and image area.
White Entire projected area (not just subtitle area) is all white.
Full Screen Entire projected area (not just subtitle area) is a grid pattern.
◄ Close EMA dowser and return to the CSS Setup menu.
Exit Menus Close EMA dowser and return to the Status display.
Document # 9301H264001.0
78
Page 94

XD20 Installation and Operating Guide Version 1.0
7.4.4. Options
This menu lets you select the background color of subtitles and front projected captions. It will also let
you select between the two DTS supported CSS projectors
Setup → CSS → Options
Select Projector
Text Color White or yellow
7.4.4.1. Select Projector
This menu lets you select between the two DTS supported CSS projectors.
Exit Menus Returns to the Status display.
CSS → Options → Select Projector
7.4.4.2. CSS Text Color
This menu lets you select the color of the text in subtitles and projected captions.
CSS → Options → Text
White White text will be used in subtitles and captions.
Yellow Yellow text will be used in subtitles and captions
Exit Menus Returns to the Status display.
Document # 9301H264001.0
79
Page 95

XD20 Installation and Operating Guide Version 1.0
7.5. Automation / Control
This is the top level menu in the Setup menu structure for setting format automation and I/O Control
functions.
Main menu → Setup → Automation
Format Menu to define format pins and operating modes.
I/O Control Menu for defining functions for configuration of automation inputs and
outputs.
Playlist Menu for defining automation parameters for video playlist playback.
Test Test the functionality of automation pins 1-8, I/O control
pins 1-3, and the signal from the CINEMA SUBTITLING PROJECTOR
fan.
Exit Menus Returns to the Status display.
7.5.1. Format Automation
This menu is for defining format pins and operating modes.
Setup → Automation → Format
Pin Definitions Enter pin definitions for eight user-assignable format pins. Select
predefined pin formats or create custom formats to meet specific
installation requirements.
Fallback Formats Select a fallback format for soundtrack.
Operating Mode Test the functionality of the eight assignable automation pins, three I/O
pins, and the signal from the CINEMA SUBTITLING PROJECTOR fan.
Exit Menus Returns to the Status display.
Document # 9301H264001.0
80
Page 96

XD20 Installation and Operating Guide Version 1.0
7.5.1.1. Pin Definitions
The Format Pin Defs menu is used to select settings for eight user-assignable pins in the XD20 25-pin
Automation connector.
Automation → Format→ Pin Definitions
Predefined Formats Select predefined formats for commonly-used
cinema processors.
Custom Customize the pin formats by changing the pre-assigned
format of one or more pins.
Exit Menus Returns to the Status display.
7.5.1.2. Predefined Formats
The Automation Preset menu is used to automatically configure pins for cinema processors listed on the
menu.
Note: These presets are based on standard factory settings. If different formats are used, see
Custom Formats on page 82.
Format → Pin Definitions → Predefined Formats
DTS-6D Emulation
DTS-6AD/ECP
XD10P Analog
XD10P Digital
CP-65
CP-200
CP-500
CP-650
CSP1200
Smart CP
Sony D3000
UltraStereo JS
Exit Menus Returns to the Status display.
Document # 9301H264001.0
81
Page 97

XD20 Installation and Operating Guide Version 1.0
7.5.1.3. Custom Formats
The Format Pins menu is used to view or change the setting for any of the eight user-assignable format
pins.
Format → Pin Definitions → Custom
▲ and ▼ Scroll to the desired pin number (1–8) and position the
cursor next to it.
Enter Enter menu to change the definition of the selected pin, as shown
below.
To change the pin assignment, move the cursor to the desired pin number and press Enter to change the
value. A menu appears with all of the available input pin assignments, as shown below. The menu
heading displays the pin number that is being changed. In the following example, Pin 1 is being changed.
The Custom Format options are described in Table 14, below.
Table 14. Custom Format Options
Name Description
Unused XD20 ignores any input pulse on a pin defined as "unused"
Mono Switches CP to process mono signal from optical reader.
A Switches CP to process Academy signal from optical reader.
SR (1) Switches CP to process SR signal from optical reader.
SR (2) Informative format definition – no special meaning for XD20
SR-D Switches CP to the Dolby SR-D format.
External Informative format definition – no special meaning for XD20
Nonsync (1)
Nonsync (2) Informative format definition – no special meaning for XD20
Aux Informative format definition – no special meaning for XD20
User 1 Informative format definition – no special meaning for XD20
User 2 Informative format definition – no special meaning for XD20
DTS Pulse Use this definition to switch the CP to the XD20 input.
DTS Sustain
DTS ES
The nonsync signal is used as the fallback format when the DTS soundtrack is
interrupted within two minutes of the last reel of the feature.
Use only for CP that requires a sustained contact to switch to the
XD20 input.
Use this definition to switch the CP to the XD20 input and process as extended
surround (ES). This should not be used to replace the DTS pulse signal, but as
an alternate format used when XD20 detects that the soundtrack is encoded for
extended surround. If XD20 does not have a DTS ES pin defined, then the DTS
Pulse pin is used for both ES and non-ES soundtracks. A DTS-ES unit is
required to decode the ES signal.
Document # 9301H264001.0
82
Page 98

XD20 Installation and Operating Guide Version 1.0
7.5.2. Fallback Format for Soundtrack
The Soundtrack Fallback menu is used to choose the “fallback” format selected by the XD20 when the
DTS soundtrack stops playing.
When the XD20 starts playing in DTS playback, it pulses the cinema processor to the DTS format. When
the XD20 stops playing in DTS playback—either due to loss of timecode, missing audio file, or another
unexpected error—it pulses the cinema processor to switch to an optical format. In many cases, it
switches to the SR optical format on the film, but this menu can be used to set it to different fallback
formats.
The pulse to the DTS format occurs when the Audio LED becomes illuminated, provided that the
conditions of the format automation mode are met (See Section 7.5.3). The pulse to the fallback format
occurs when the Audio LED goes off, and is dependent on the conditions of the Soundtrack Fallback
mode, shown below.
Note: XD20 fallback format is always Nonsync (1) at the end of a feature film. The end of the
film is defined as the last two minutes of the last reel of film for the feature.
Setup → Automation → Format → Fallback Format.
Automatic The fallback format is selected by the header information in the DTS audio
file that is playing. Possible definitions are SR, A, or MONO. These
definitions are intended to reflect the optical format on the film. Almost all
DTS audio files will have SR defined as the fallback format. XD20 pulses
the SR (1) pin for the SR signal – not SR (2).
None There will be no fallback format pulse when the DTS audio stops.
Others The fallback format will be the selected pin. Table 14, above, provides
options for a selected pin.
Note: If the fallback format is set to SR (1) and that pin is not defined as one of the format
pins in the Pin Format menu, then XD20 will pulse the A format pin. If there is not an A
format pin, then it will pulse the MONO format pin.
Document # 9301H264001.0
83
Page 99

XD20 Installation and Operating Guide Version 1.0
7.5.3. Automation Operating Mode
This menu allows the operating mode of the format switching to be set to one of three ways. The default
setting is DTS-6D Emulation. The operating mode defines the conditions that need to be met for XD20 to
switch the CP to the DTS format. The operating mode applies only to format switching for film
soundtrack playback. It does not affect format switching for the video playlists soundtrack.
Setup → Automation → Format → Operating Mode
DTS-6D Emulation XD20 emulates the 6D. (See DTS-6D Emulation, below, for a detailed
explanation.)
Auto-Switch XD20 switches to DTS format only if it is in an optical format. (See
AutoSwitch (Optical Formats), below, for a detailed explanation.)
Preselect Mode The automation system must select the DTS format. (See Preselect Mode
(SRD compatible) below, for a detailed explanation.)
7.5.3.1. DTS-6D Emulation
XD20 pulses the CP to DTS format whenever it starts playing audio, regardless of the format previously
selected from the automation system. When XD20 audio completes or is interrupted, XD20 pulses the
fallback format. This format switching operation is the same as that of the DTS-6/6D products.
XD20 also pulses the fallback format when the audio stops and pulses the nonsync format when the end
of the feature is reached.
In the DTS-6D Emulation mode, XD20 will not react to format changes in the cinema processor. If a
projectionist—or the automation system—changes the format, XD20 ignores this. XD20 will not react or
attempt to pulse the format back to DTS. However, when this happens, the blue Audio LED on the front
panel will begin to blink. This is to alert the projectionist that DTS is playing, but XD20 is not in DTS
format.
7.5.3.2. AutoSwitch (Optical Formats)
XD20 pulses the cinema processor to the DTS format when it starts playing audio, provided that the
automation system has already selected either DTS or any of the optical formats—Mono, A, SR (1) or SR
(2). If any other format has been selected by the automation system, then XD20 will not switch the
cinema processor when audio starts.
If DTS format is selected by the automation system while XD20 is NOT playing audio, then XD20 pulses
the cinema processor to the SR (1) format—or A or mono, if SR (1) is not available.
If any of the optical formats—Mono, A, SR (1), or SR (2)—are selected while XD20 is playing audio,
then XD20 ignores the selection and immediately sends a DTS format pulse to the cinema processor.
When the audio completes or is interrupted, XD20 pulses the cinema processor to the assigned fallback
format or nonsync if the end of the feature is reached. If the automation system selects a different format
while the audio is playing (other than DTS or any optical format), XD20 will not output the fallback pulse
when the audio stops. This assures that XD20 will not override the user’s automation choice.
7.5.3.3. Preselect Mode (SRD compatible)
This mode allows the automation system to have more control over format switching on the cinema
processor. In this mode, the automation system must select the DTS format to activate XD20 automation.
Document # 9301H264001.0
84
Page 100

XD20 Installation and Operating Guide Version 1.0
The automation system should first pulse the DTS format before XD20 audio starts playing. In response,
XD20 will immediately pulse the SR (1) format—or A or mono, if SR (1) is not available. XD20 will
pulse the DTS format upon playing the XD20 audio. XD20 pulses the fallback format when the audio
stops, or pulses the nonsync format if the end of the feature is reached. The fallback pulse will not occur
if the automation system switched formats before the XD20 audio stopped.
7.6. I/O Control
The I/O CONTROL menu is used to configure the pin definitions, and to automate soundtrack and CSS
languages using the AUX I/O connector. (This is NOT the same as cinema processor automation control.)
Setup → Automation → I/O Control
Pin Definitions Enters menu to assign I/O pins to functions.
Language Setups Enters menu to define the soundtrack and subtitle languages for any of the
three language setups and the default languages.
7.6.1. I/O Pin Definitions
The I/O Pin Definitions menu is used to configure the auxiliary control input and output signals
on the AUX I/O connector..
Automation → I/O Control → Pin Definitions
Inputs Menu to assign functions to the input pins.
Outputs Menu to assign functions to the output pins.
7.6.1.1. Input Control Pins
This menu is used to assign functions to input control pins. The assigned function is executed when a low
level pulse is detected on the corresponding input pin. There are three separate input pins that can be
assigned. When entering this menu, the current assigned values are displayed next to the pin number, as
shown below.
Exit Menus Returns to the Status display.
I/O Control → Pin Definitions → Inputs
To change the pin assignment, move the cursor to the desired pin number and press Enter. A menu
appears with all of the available input pin assignments, as shown below:
Document # 9301H264001.0
85
 Loading...