


For best satisfaction of DigitAllWorld’s customer, we do our best for each product and
services.
Also we will support our customer through our local sales, service network and electronic
server system of DigitAllWorld.
DigitAllWorld supports you via its homepage with useful information and new software of the
STB.
When you have a question about this product or when you need for software upgrade,
please refer to the following homepage.
Homepage : http://www.digitallworld.com
To provide you with the convenience of usage DigitAllWorld has the right to make changes
and improvements to any of the products described in this manual and the manual of the
products without any notice in advance.
Copyright 2007. DigitAllWorld.Co.,Ltd. All rights reserved.
LIGHTNING 1. The STB must remain connected at all times to the power
supply and satellite dish.
2. However, Manufacture's instructions for safeguarding other
equipments connected to the STB, TV set, etc., must be
followed during the lightning.
3. Ensure lightning protection devices for the terrestrial antenna,
mains, and LNB are installed.
SERVICING 1. Service should be carried out by authorised service engineer.
Support & Copyright

Understanding the Remote Control Unit .........................................6 ~ 7
Connecting Your Equipment .................................................................8
Front Panel .....................................................................................................8
Rear Panel ......................................................................................................9
Connection .....................................................................................................10 ~ 11
Reference .......................................................................................................12 ~ 13
Setting Up Your System ..........................................................................14
Menu Tree .......................................................................................................14
Main Menu ......................................................................................................14
Installation(Satellite).......................................................................................15
Auto (Automatic Channel Search) .................................................................15 ~ 17
Manual (Manual Channel Search) ................................................................17
PID(PID Channel Search) .............................................................................17
Installation(Terrestrial)...................................................................................18
Automatic Channel Search for Television Services .......................................18
Manual Channel Search ................................................................................18
System ............................................................................................................19
Status & Diagnostic .......................................................................................19
Factor Reset ..................................................................................................20
Common Interface .........................................................................................20
Preferences ....................................................................................................20
Parental Control ............................................................................................21
Language Setting ..........................................................................................21
Time Setting & UHF Tuning ...........................................................................21
A/V Setting ....................................................................................................22
Channel Editing .............................................................................................22
Channel List ..................................................................................................22
Favorite ..........................................................................................................23
Menu Operation ..........................................................................................23
Basic Function ...............................................................................................23
Convenient Access Mode .............................................................................23
Channel List ..................................................................................................23
Program Guide (EPG) ...................................................................................24
Teletext Navigation ........................................................................................25
Troubleshooting .........................................................................................26
Technical Specifications .........................................................................27 ~ 28
WEEE ..............................................................................................................29 ~ 32
Contents

TELETEXT
FAVORITE
EXIT
17
MENU
18
TV/RADIO
16
CHANNEL
UP/DOWN
14
INFORMATION
15
PRE-CHANNEL
13
EPG
12
NUMERIC
BUTTONS
11
MUTE
STANDBY
TV/STB
SOUND
SUBTITLE
PAGE UP/DOWN
VOLUME UP/DOWN
OK
1
2
3
4
5
7
PAL/NTSC
20
SAT
21
TER
22
8
10
9
6
19
ZOOM
- 6 -
Digital Satellite Receiver
- 7 -
Digital Satellite Receiver
Understanding the Remote Control Unit Understanding the Remote Control Unit
Remote Control Unit
STANDBY
To switch between Operation and
Standby mode.
TV/STB
To switch between TV and Satellite receiver
mode.
SUBTITLE (Red)
To select the subtitle language list for the
current channel.
PAGE UP/DOWN
To move up or down a page in the
channel list.
SOUND (Yellow)
To select the sound track list in the current
channel.
VOLUME UP/DOWN
To increase or decrease the volume.
OK
To confirm your choice.
EXIT
To return to the normal viewing mode from a
menu.
TELETEXT
To navigate teletext pages.
FAVORITE
To move among the favorite lists.
MUTE
To enable or disable the audio.
NUMERIC BUTTONS
To select the channel and enter the channel
information and PIN Code.
EPG
To d isplay the TV/Radio program guide.
INFORMATION (Green)
To display the program information box on
the screen.
PRE-CHANNEL (Blue)
To return to the previous channel.
CHANNEL UP/DOWN
To change channels up and down.
MENU
To display the Main Menu on the screen or
return to the previous menu.
TV/RADIO
To switch between TV program and RADIO
only receiving mode.
ZOOM
To activate Zoom In / Out
PAL/NTSC
To switch between PAL and NTSC mode.
SAT
To select a satellite and display its channel
list.
TER
To move to Terrestrial channels.
Note! : The design of the Remote Control Unit may be changed without any notice
in advance.
1
2
3
4
5
6
7
8
9
10
11
12
13
14
15
16
17
18
19
20
21
22

- 8 -
Digital Satellite Receiver
- 9 -
Digital Satellite Receiver
Connecting Your EquipmentConnecting Your Equipment
STAND-BY To Switch between Operation and Standby mode.
CHANNEL- To change channels down.
To move down highlight marked cursor.
CHANNEL+ To change channels up.
To move up highlight marked cursor.
CAM Slots 2 Slots for Common Interface CAM with SmartCard
(Depending on model)
Front Panel
Rear Panel
1 2 3
4
3
4
4
1
2
1
(Depending on model)
VIDEO To connect video to a
TV using RCA jack.
AUDIO To connect audio R/L to
a TV or an Audio Amp
or System.
TV OUT To connect to a TV via a
coaxial cable.
ANT IN To connect to TV ANT
input.
VCR To connect this port to
that of a VCR via scart
cable.
TV To connect this port to
that of a TV via scart
cable.
OPTICAL To connect S/PDIF
cable.
RS-232 To connect to a PC for
S/W upgrade.
LOOP THROUGH To connect to the other
satellite receiver.
LNB To connect to a satellite
antenna.
ANT IN To connect the terrestrial
antenna here.
LOOP THROUGH Used to connect a RF
signal from the STB to
either the RF input
jack (antenna) on your
VCR or to the antenna
input of your TV
7
8
9
10
11
12
1
2
3
4
5
6
2 765 91210 1183 4

How to connect your STB to various systems
There are several ways of connecting the STB to your TV, VCR and/or Hi-Fi SYSTEM.
Consult your local supplier for assistance in setting-up your system best suited to your
requirements.
1. Connect STB to a TV set
Connect the scart cable between the main scart socket on the TV and the TV scart
on the STB. Alternatively you can use A/V, TV out (UHF) or S/Video jacks.
2. Connect STB to a VCR
Connect the SCART socket of VCR to the scart socket on your STB.
Alternatively you can use A/V, TV out (UHF) or Video jacks.
3. Connect STB to a Hi-Fi System
Connect a RCA stereo cable from the AUDIO L/R jacks S/PDIF on your STB to the
LINE, AUX, SPARE or EXTRA input jacks on your Hi-Fi System.
4. Loop Through
If you have another analogue or digital STB and you wish to use the same LNB
then you can connect it via the loop through. Connect one end of coaxial cable to
the LNB OUT on the STB and connect the other end to the LNB IN on your second
STB.
- 10 -
Digital Satellite Receiver
- 11 -
Digital Satellite Receiver
Connecting Your Equipment
Connection
Connecting Your Equipment
CAM (Conditional Access Module) and Smart Card
CAUTION
Please do not plug in the main power supply cord until you have finished all the
connections!
If you want to enjoy watching scrambled broadcasting channels,
you will need a Common Interface CA (Conditional Access) Module and a smart card
from a service provider (Program distributor).
If you are subscribing to services from more than one service provider,you might have
to change between different smart cards and/or CA modules.
Please note that a smart card and
CA module may only be valid for a
single service provider and due to
this, a specific range of channels.
The smart card and the CA
module may also provide access
to special menus not described in
this manual. If so, please follow
the instructions from the service
provider.
Only “Free To Air” channels are
available without the smart card
and/or the CA module.
Inserting Common Interface CAM and Smart card
This receiver supports DVB - Common Interface Function.
The CI CAMs include a built-in smart card reader.
The operation procedures are as follows :
1. Insert the smart card into the CAM gently with the gold colored chip upwards.
2. Insert the CA module fully into the slot behind the lid of the front panel of the STB.
3. Close the door.
- 12 -
Digital Satellite Receiver
- 13 -
Digital Satellite Receiver
Connecting Your Equipment Connecting Your Equipment
Reference
DiSEqC 1.0 Connection
Please refer to page 15.
All our receivers are designed to be DiSEqC 1.0 and DiSEqC 1.2 compatible.
This allows multiple antennas to be connected to the STB at the same time.
If you have two or more fixed antennas or LNBs then we recommend you use a DiSEqC
1.0 switch.
Connect the coaxial cable from the first LNB to the LNB 1 or LNB A input connector of the
DiSEqC switch.
Do the same for any other LNBs that you have.
Connect one end of a coaxial cable to the RF output connector of the DiSEqC switch,
connect the other end to the LNB IN socket on the STB.
DiSEqC 1.2 Connection
Please refer to page 16.
To the digital receiver, you can connect either a single satellite antenna directly or
LNB of multi-feed equipment.
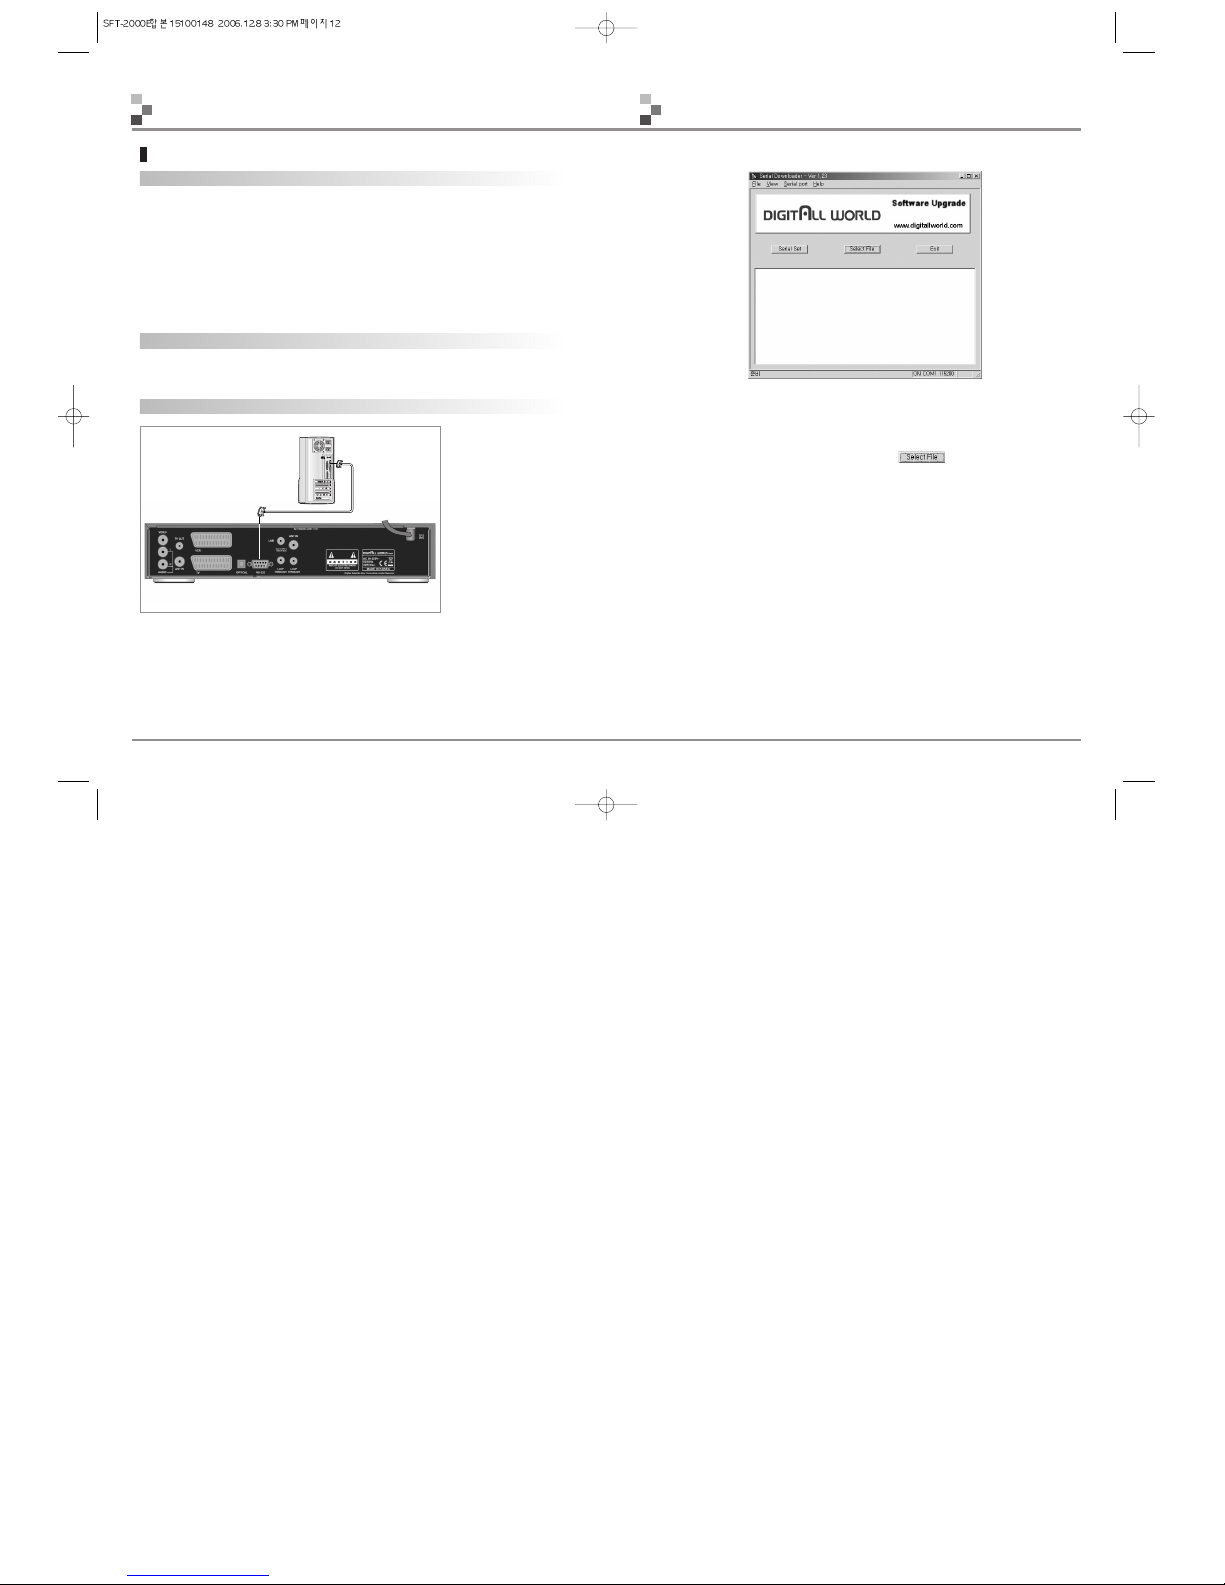
Software Upgrade procedure via personal computer
To maintain the STB
up-to-date, it will be
possible to upgrade the
software of the STB via
personal computer.
You can find the new
version of the software
may include new or
improved functions for
the latest one. If you
want to download and
upgrade the software
via personal computer,
visit our homepage
(http://www.digitallworld.com) to get more information and the new software.
1. Go to the Homepage and check the latest software to upgrade.
2. Download the latest software of your STB model to your PC directory.
3. Check the serial cable and COM1 port can work well. Connect a cable between the
COM1 port of your PC and RS-232 port of the STB.
4. Then, run the downloaded execution file by double click it on your PC or by pressing the
Stand-by button of RCU.
5. Then you can see the “S/W upgrade’ box, click the button and select the file
to upgrade.
6. Then, plugged out and in.
7. Then, upgrading starts, the progressive bar in the download window works, the PC will
shows the progress in window.
8. When upgrade is completed, the following message will be popped up on the window;
“S/W successfully upgraded. This program will be closed.” After you check this message,
the download program will be automatically closed.
9. Then, you have to power off and on for running new software.
10. You can check correct upgrading by comparing software version in system information of
Installation menu.
11. If any error occur during each steps, go to the step 4.

- 14 -
Digital Satellite Receiver
- 15 -
Digital Satellite Receiver
Setting up Your System Setting up Your System
Installation(Satellite)
This menu helps you to setup a variety of parameters necessary for receving signal and
managing the channel information. To avoid any loss of service, it is important to understand
the following before you make any changes.
Auto (Automatic Channel Search)
Automatic Channel Search helps you to automatically load the channel information of all
transponders contained in the selected satellite.
1. Select SATELLITE > DiSEqC switch or motor > LNB & the others in
order by pressing OK button.
Any unused port must be set " None"
• SATELLITE : You can select the satellite name.
• DiSEqC Version : You can use the DiSEqC 1.2 or USALS motorized system if it exists.
The Antenna automatically moves to the relevant Satellite Position when you select
channel from the channel list.
• DiSEqC Input : You can choose the DiSEqC Switch Number by pressing OK Button
• LNB Type/Frequency : You can select the predefined L.O Frequency by pressing OK and
LEFT/RIGHT buttons or manually enter a specific frequency in MHz unit by pressing
Numeric buttons.
• Search Type : Select the search mode of "All" or "FTA Only"
• Network Search : NIT channel search helps you to automatically load the channel
information of all transponders contained in a selected satellite.
• Provider Search : You can easily select & search the channel packages,which are pre-
defined as a default.
Main menu shows the following information.
Search Satellite, Search Terrestrial
Status, Diagnostic, Factory Reset, Common Interface
Parental control, Language Setting, Time Setting,A/V Setting
UHF Tuning
Games
Preferences
System
Installation
Channel List, Favorite
Channel Editing
Main Menu
1. Turn on TV and your STB, after you have
connected all peripheral devices to it.
2. Press the MENU button on the Remote
Control Unit. You will see the Main Menu on
the TV screen as follow:
3. You can move into the desired submenu using
UP/DOWN buttons.
4. Press the OK /
button to confirm your
selection.
Main menu shows the following information
5. Press the MENU button to return to the
previous menu or press the EXIT button to quit
the Menu system completely.
Menu Tree
Channel List
Favorite
Parental control
Language Setting
Time Setting
A/V Setting
UHF Tuning
Search(Satellite)
Search(Terrestrial)
Games
Preferences
Channel Editing
Status
Diagnostic
Factory Reset
Common Interface

- 16 -
Digital Satellite Receiver
- 17 -
Digital Satellite Receiver
Setting up Your System Setting up Your System
2. Press Red button (Auto) on the remote control in the Installation menu
to start the channel search.
• "Multi-Satellites search" is available after
setting each correct value.
3.
Press the MENU or EXIT button to save the data & exit from the current menu.
Manual (Manual Channel Search)
Manual channel search is more convenient to
search a specific transponder using its
predefined information.
1) Press Green button(Manual) on the remote
control in Installation menu
2) Select each TP by pressing OK &
Search
icon in the menu to start the search.
3) Press 'Add','Edit' & 'Delete' icon in the menu
as per your preference.
PID(PID Channel Search)
1) select the satellite in the installation menu
2) press Yellow button on the remote control
to begin the PID search on the selected
satellite.
You can find the channels by the specific
PID data
DiSEqC Motor
Select Satellite & Go to DiSEqC Motor menu by pressing OK button (Motor) in DiSEqC
Version menu.
1) Select the relevant value to search for the position.
2) Press OK button in "Drive" colume & start to run the motor pressing LEFT or RIGHT key.
The antenna is moving to the appropriate satellite position.
3) Press OK button to stop the motor & Save Position when the singal apprears in the menu
USALS
• Note : USALS can be selected on Motor
Type.
Please contact the installer of your satellite dish if you do not know the correct setting value
of each parameter listed in the above table.

- 19 -
Digital Satellite Receiver
- 18 -
Digital Satellite Receiver
Setting up Your System
This menu shows the system information &
Factory Reset.
Status & Diagnostic
•Status : display the system information of
Model name, S/W, H/W & Loader
version.
•Dignostic : Satellite name & current TP
information.
SystemInstallation(Terrestrial)
Setting up Your System
Automatic Channel Search for Television Services
-Press RED (SUB.T) button and the STB will automatically search all channels and save
them into the channel list. Once finished, your box is ready to be used.
Manual Channel Search
-Select the television service you want to search by pressing the UP/DOWN buttons
and the OK button. A tick will be shown beside your selection. You may select more
than one television service to manual tune.
-Press GREEN (Manual) button and the STB will begin to search all channels you have
chosen and save them into the channel list.

- 21 -
Digital Satellite Receiver
- 20 -
Digital Satellite Receiver
Setting up Your System
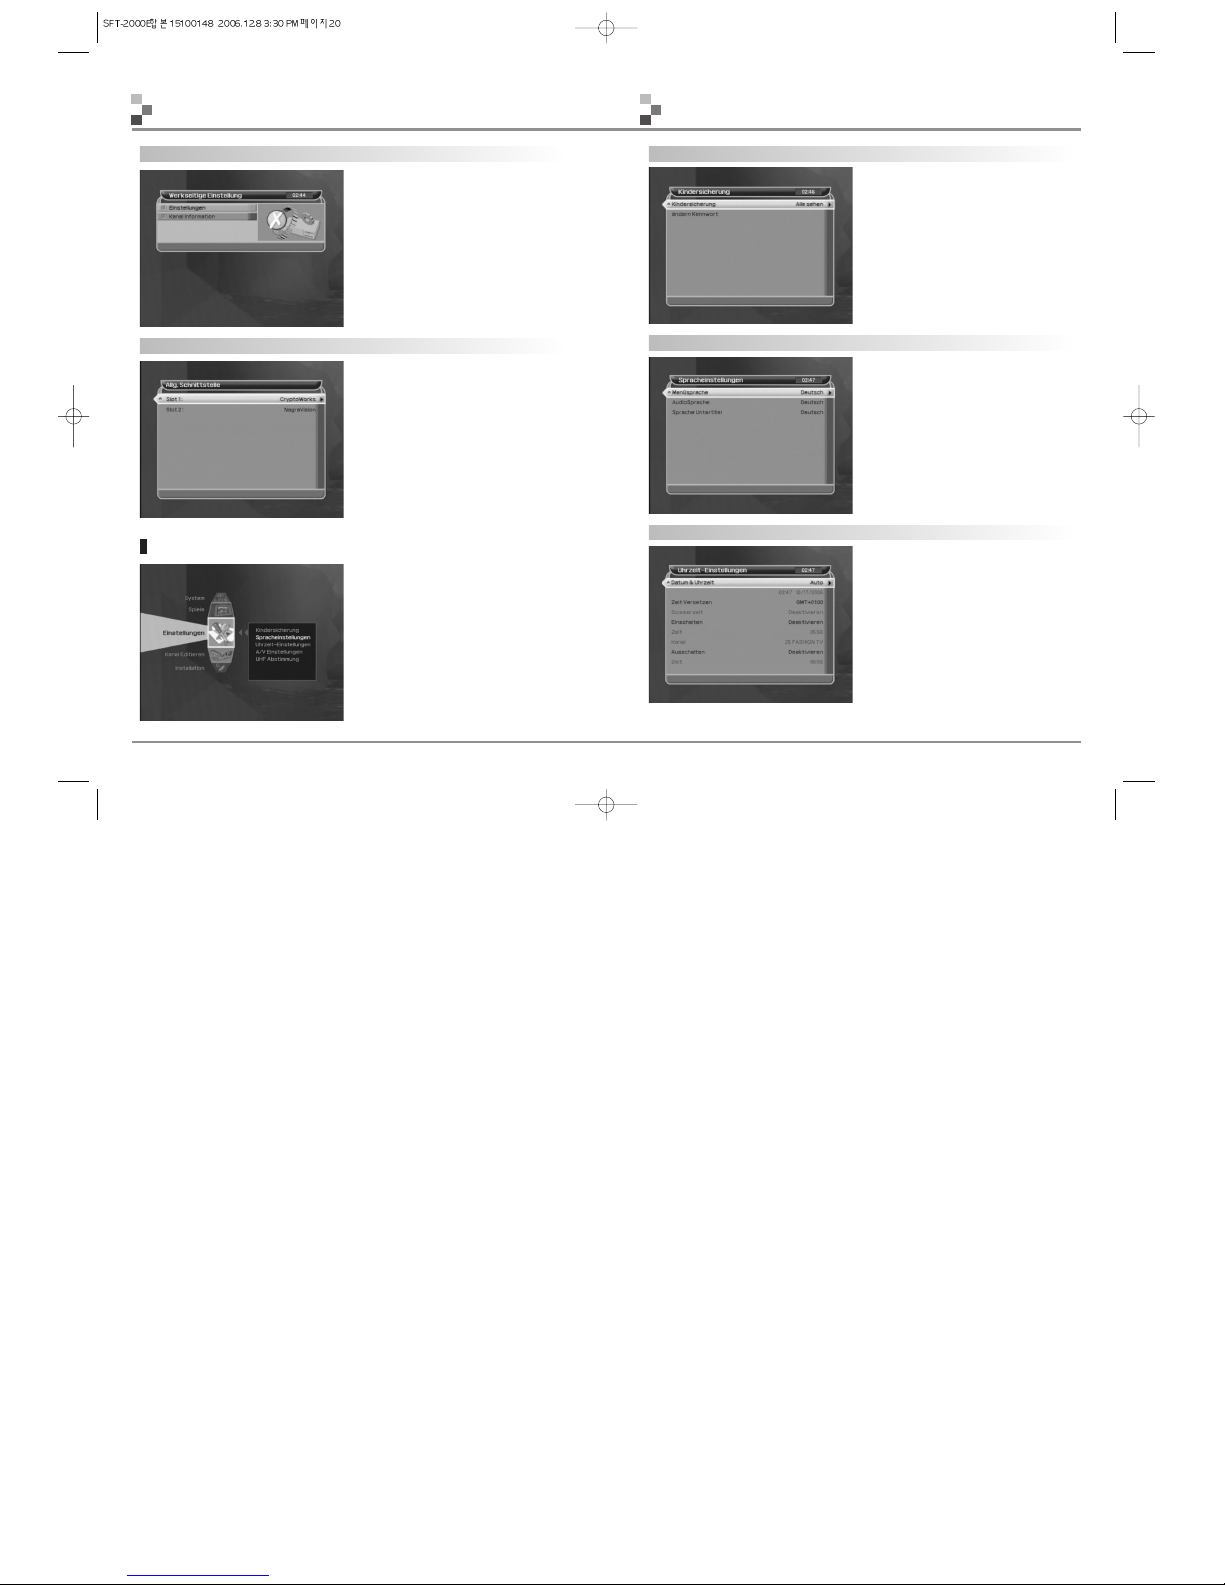
Parental Control
This function prevents children or unauthorized
people from watching programs.
Language Setting
Select the desired language of the Menu,
Audio & Subtitle.
Audio language: If any language is not selected
then the default language of current channel will
be automatically selected.
Time Setting
Set up your local time & enjoy the timer function
in this menu.
Setting up Your System
Factor Reset
-All data you are using will be deleted and the
default data will be loaded.
-If you select OK, it asks your confirmation.
-If you don't want to reset, press MENU or
EXIT button to exit this menu.
Common Interface
This receiver has two PCMCIA slots, which
enables the use of two CI CAMs (Viaccess or
Irdeto etc.).
When a Common Interface CAM is inserted
inside the PCMCIA slot, the system detects
the type of the CAM automatically and
displays it in the main menu.
On choosing the Menu, you will be able to
access to the submenu composed of
authorizations, pre-booking, package details
and etc.
This menu helps you to set up Parental
Control,Language Setting,Time Setting ,
A/V Setting, UHF Tuning.
Preferences

- 23 -
Digital Satellite Receiver
- 22 -
Digital Satellite Receiver
Menu Operation
Favorite
You can go to the Favorite group you edit.
After the channels have been programmed, you
will see the information(banner) box each time
you switch channels.
• Channel number.
• Program Name.
• Satellite Name. / Terrestrial.
• EPG
Channel List
In order to enable you to access the channel
information,which you have already sorted
and grouped according to your needs, you may
simply press OK button when there is no Menu
on the TV screen.
- Red button(Sort) : sort out the channels per TV,Radio,Favorite,Satellite,Scramble & SID
- Green button(Information) : display of TP & PID information.
- Yellow button(V-List) : display 4~16pictures.
Basic Function
Convenient Access Mode
A/V Setting & UHF Tuning
Set up TV Scart, Screen Ratio, Display UHF channel : 21CH ~ 69CH
Format, Screen Saver Time,OSD Display UHF mode : PAL I, PAL DK, NTSC M
Time, OSD Transparency, Skin Color & or PAL BG
Audio Priority Select the UHF channel and UHF mode.
The factory preset value is Channel 40.
You can edit channels on various channel list.
Setting up Your System
Channel List
- Move: You could place the channels to the
position where you prefer.
- Lock: Once the program is locked, every time
you try to watch the program, you will be asked
to enter PIN code.
- Delete: You could delete the channels in the
channel list.
- Rename: You could rename the channels.
Channel Editing

- 25 -
Digital Satellite Receiver
- 24 -
Digital Satellite Receiver
Menu Operation
Program Guide(EPG)
• Your STB has an Electronic Program
Guide(EPG) to help you navigate programs
through all the possible viewing options.
The TV Guide supplies information such as
program listings and starting and ending
times for all available programs.
• The information may include : current time,
name of the Now and Next Program, the
starting and ending time of the Now/Next
Program.
• Program information will be available only
when it is included in the transmission.
• Press the EPG button of remote control unit on the video mode and the Program Guide
screen will be displayed
- Red button(Sort) : sort out the EPG information as per Alphabetic or Numerical order.
- Green button(Detail) : display the detail information of the selected channels.
- Yellow button(Schedule) : display the schedule.
- Blue button(Weekly) : display weekly information.
• EPG Time setting: You can reserve the
specific channel in the EPG menu.
•EPG menu > Yellow(Schedule) button >
Green(Add) button
Menu Operation
Teletext Navigation
This STB has Teletext software emulator
which enables all TV sets to navigate Teletext
pages.
To start navigation of Teletext pages, press
Teletext button. When Teletext is activated,
buttons below mentioned will perform different
features by each mode.
To stop navigation & return to program press
“Teletext” button.
1) Teletext button : Toggle Teletext mode
2) Menu button : Jump to page100 in Teletext mode
3) Numeric button : Direct page selection in Teletext mode
4) Up/Down button : Next/Previous Page
5) Left/Right button : Next/Previous Subpage
If two subpages with a subcode between 1 and 99 are received, the subpage mode is
automatically activated and the subpage bar appears in the bottom row.
The symbol at the left side is the subpage overwrite mode.
In this mode the display is updated with the last received subpage.
6) Color (Red, Green, Yellow, Blue) buttons
6-1) Top Text Mode : The broadcaster usually sends Teletext in a way that each Teletext
page is linked with other four pages.
•
Red button : link #1
•
Yellow button : link #3
•
Green button : link #2
•
Blue button : link #4
6-2) Display Functions Mode : To select the display functions of the Teletext decoder the
user has to press the OK button on the RCU.
•
Red button : Toggle Hold mode
-The stop mode holds the currently displayed subpage.
-This means, that it can not be overwritten by a new incoming page with the same
subpage number.
•
Green button : Toggle Reveal mode
-The text marked as "conceal" is displayed as spaces when reveal mode is off.
-Enabling reveal mode displays the concealed text.
-Broadcasters use this feature, e.g. for a Teletext quiz(the answer is sent as a
'concealed' text).
•
Yellow button : Change Display size
-This command switches between three possible display sizes.
-normal size (all Teletext rows are displayed).
-double size of the upper half, only the upper half of the Teletext page is displayed.
-double size of the lower half, only the lower half of the Teletext page is displayed.
•
Blue button : Toggle Mix mode(transparent background)

- 27 -
Digital Satellite Receiver
- 26 -
Digital Satellite Receiver
Technical Specifications
Tuner & Channel(Satellite)
Input Connector : F-type, IEC 169-24, Female
Frequency Range : 950 MHz to 2150 MHz
Input Impedance : 75Ohm unbalanced
Signal Level : -25 to -65dBm
IF Frequency : 480 MHz
IF Band width : 36 MHz
LNB Power & Polarization : Vertical : +13V, Horizontal : +18V
Current : 500mA Max Overload protection
22 KHz Tone : Frequency : 22 4KHz
Amplitude : 0.6 0.2V
DiSEqC Control : Version 1.0 / 1.2 Compatible
Demodulation : QPSK
Input Symbol Rate : 1-45 Ms/s
FEC Decoder : Convolutional Code Rate 1/2, 2/3, 3/4,
5/6 and 7/8 with Constraint Length K=7
Tuner & Channel(Terrestrial)
Input Connector : 75 Ohms, 169-2, Female
Loop-Through : 75 Ohms, 169-2, Male
Frequency Range : 47MHz to 862MHz
Bandwidth : 7MHz/8MHz
Signal Level : -10dBm to -75dBm
Demodulation : COFDM
Guard Interval : 1/4, 1/8, 1/16, 1/32
Constalation : 16QAM, 32QAM, 64QAM
FEC Decoder : RS(204,188), T=8
Code Rate : 1/2,2/3,3/4,5/6 and 7/8
MPEG Transport Stream A/V Decoding
Transport Stream : MPEG-2 ISO/IEC 13818
Transport stream Specification
Profile Level : MPEG-2 MP@ML
Input Rate : Max 90 Mbit/s
Aspect Ratio : 4:3, 16:9
Video Resolution : 720 x 576
Audio Decoding : MPEG / MusiCam Layer I & II
Audio Mode : Single channel / Dual channel / Joint
stereo / 5.1 channel/S/PDIF(Optical)
Sampling : 32, 44.1 and 48KHz
Troubleshooting
Check the LNB - replace LNB if necessary.
Check the cable from the LNB.
Check the position of the dish
- realign dish if necessary.
If you are using a DiSEqC 1.0 switch, check
that you have connected the LNBs to the
correct connections on the switch.
Check the “Signal Strength” and the “Signal
Quality” in the channel list or channel search menu
Check the main power cord and check that it is
plugged into a suitable power outlet.
Check whether STB is in Standby mode.
Ensure that the STB is switched on (see
above).
Check the video output port (VIDEO or RF
OUT) is firmly connected to the TV or VCR.
Check that you have selected the correct
channel or Video Input on your TV.
Check the brightness level of the TV.
See “No Picture” above.
Check the signal level, if this is low then try to
adjust the alignment of your dish.
See “No Picture” above.
Check the volume level of the TV and STB.
Check the Mute status of the TV and STB.
Point Remote Control Unit directly towards the
STB.
Disconnect STB from power point for
30 seconds and re-connect.
Does not display any
message on the front panel
or STB has no power.
No Picture
Poor picture quality
No Sound
Remote Control does not operate
STB is locked and doesn t
operate
No or Bad Signal
Problem Solution
Something wrong with STB
About On-Screen Error Message

- 29 -
Digital Satellite Receiver
- 28 -
Digital Satellite Receiver
WEEE
Disposal of your old appliance <English>
1. When this crossed-out wheeled bin symbol is attached to a product it means the
product is covered by the European Directive 2002/96/EC.
2. All electrical and electronic products should be disposed of separately from the
municipal waste stream via designated collection facilities appointed by the
government or the local authorities.
3. The correct disposal of your old appliance will help prevent potential negative
consequences for the environment and human health.
4. For more detailed information about disposal of your old appliance, please contact
your city office, waste disposal service or the shop where you purchased the
product.
Élimination de votre ancien appareil <French>
1. Ce symbole, représentant une poubelle sur roulettes barrée d'une croix, signifie
que le produit est couvert par la directive européenne 2002/96/EC.
2. Les éléments électriques et électroniques doivent être jetés séparément, dans les
vide-ordures prévus à cet effet par votre municipalité.
3. Une élimination conforme aux instructions aidera à réduire les conséquences
négatives et risques éventuels pour l'environnement et la santé humaine.
4. Pour plus d'information concernant l'élimination de votre ancien appareil, veuillez
contacter votre mairie, le service des ordures ménagères ou encore la magasin
où vous avez acheté ce produit.
Smaltimento delle apparecchiature obsolete <Italian>
1. Quando su un prodotto è riportato il simbolo di un bidone della spazzatura barrato
da una croce significa che il prodotto è coperto dalla direttiva europea
2002/96/EC.
2. Tutti i prodotti elettrici ed elettronici dovrebbero essere smaltiti separatamente
rispetto alla raccolta differenziata municipale, mediante impianti di raccolta
specifici designati dal governo o dalle autorità locali.
3. Il corretto smaltimento delle apparecchiature obsolete contribuisce a prevenire
possibili conseguenze negative sulla salute umana e sull'ambiente.
4. Per informazioni più dettagliate sullo smaltimento delle apparecchiature obsolete,
contattare il comune, il servizio di smaltimento rifiuti o il negozio in cui è stato
acquistato il prodotto.
Kassering av din gamla apparat <Swedish>
1. När den här symbolen med en överkryssad soptunna på hjul sitter på en produkt
innebär det att den regleras av European Directive 2002/96/EC.
2. Alla elektriska och elektroniska produkter bör kasseras via andra vägar än de som
finns för hushållsavfall, helst via för ändamålet avsedda uppsamlingsanläggningar
som myndigheterna utser.
3. Om du kasserar din gamla apparat på rätt sätt så bidrar du till att förhindra
negativa konsekvenser för miljön och människors hälsa.
4. Mer detaljerad information om kassering av din gamla apparat kan får av
kommunen, renhållningsverket eller den butik där du köpte produkten.
Uw oude toestel wegdoen <Dutch>
1. Als het symbool met de doorgekruiste verrijdbare afvalbak op een product staat, betekent dit dat
het product valt onder de Europese Richtlijn 2002/96/EC.
2. Elektrische en elektronische producten mogen niet worden meegegeven met het huishoudelijk
afval, maar moeten worden ingeleverd bij speciale inzamelingspunten die door de lokale of
landelijke overheid zijn aangewezen.
Technical Specifications
Memory/Processor
Main Processor : STi-5105
Flash Memory : 4Mbyte
SDRAM for MPEG & Graphic : 16Mbyte
RF Modulator
RF-Connector : 75Ohm, IEC 169-2, Male / Female
Frequency : 470MHz to 860MHz
Output Channel : CH21-69 for the Remodulator
TV Standard : PAL K/G/I selectable by Menu
Preset Channel : CH40(or TBD)
Channel changeable by Menu
A/ V & Data In / Out
VIDEO (CVBS) : RCA/Cinch, Scart
Video Output (CVBS)
VIDEO (RGB) : Scart
AUDIO R/L : RCA/Cinch, Scart
Volume and Mute Control
(Resolution : 20bit DAC, max 2Vrms)
RS232C : Transfer rate 115,200 bps
9 pin D-sub Type
S/PDIF : Digital Audio Optical output
Power Supply
Input Voltage : AC 90 to 250V~ 50/60 Hzz
Type : SMPS (Switch Mode Power Supply)
Power Consumption : Max. 30W
Standby Power : 7W
Protection : Separate internal fuse
The input shall have lightning Protection
Physical Specification
Size (W x H x D) : 340 x 66 x 247 mm
Weight (Net) : 2.1Kg.
Operating Temp : 0°C to +45°C
Storage Temp : -10°C to +65°C
Storage Humidity : 5% ~ 95% RH (Non-Condensing)

- 31 -
Digital Satellite Receiver
WEEE
Cómo deshacerse de aparatos eléctricos y electrónicos viejos <Spanish>
1. Si en un producto aparece el símbolo de un contenedor de basura tachado,
significa que éste se acoge a la Directiva 2002/96/CE.
2. Todos los aparatos eléctricos o electrónicos se deben desechar de forma distinta
del servicio municipal de recogida de basura, a través de puntos de recogida
designados por el gobierno o las autoridades locales.
3. La correcta recogida y tratamiento de los dispositivos inservibles contribuye a
evitar riesgos potenciales para el medio ambiente y la salud pública.
4. Para obtener más información sobre cómo deshacerse de sus aparatos eléctricos
y electrónicos viejos, póngase en contacto con su ayuntamiento, el servicio de
recogida de basuras o el establecimiento donde adquirió el producto.
Eliminação do seu antigo aparelho <Portuguese>
1. Quando este símbolo de latão cruzado estiver afixado a um produto, significa que
o produto é abrangido pela Directiva Europeia 2002/96/EC.
2. Todos os produtos eléctricos e electrónicos devem ser eliminados separadamente
do lixo doméstico através de pontos de recolha designados, facilitados pelo
governo ou autoridades locais.
3. A eliminação correcta do seu aparelho antigo ajuda a evitar potenciais
consequências negativas para o ambiente e para a saúde humana.
4. Para obter informaçõs mais detalhadas acerca da eliminação do seu aparelho
antigo, contacte as autoridades locais, um serviço de eliminação de resíduos ou a
loja onde comprou o produto.
Likvidácia vásho starého prístroja <Slovak>
1. Ked’ sa na produkte nachádza tento symbol preciarknutej smetnej nádoby s
kolieskami, znamená to, ze dany produkt vyhovuje európskej Smernici c.
2002/96/EC.
2. Vsetky elektrické a elektronické produkty by mali byt’ zlikvidované oddelene od
komunálneho odpadu prostredníctvom na to urc
enych zbernych zariadení, ktoré
boli ustanovené vládou alebo orgánmi miestnej správy.
3. Správnou likvidáciou stary
ch zariadení pomôzete predchádzat’ potenciálnym
negatívnym následkom pre prostredie a 1’udské zdravie.
4. Podrobnejsie informácie o likvidácii starych zariadení nájdete na miestnom úrade,
v sluz
be na likvidáciu odpadu alebo u predajcu, kde ste tento produkt zakúpili.
Likvidace starych spotrebicu <Czech>
1. Pokud je u vyrobku uveden symbol pojízdného kontejneru v preskrtnutém poli,
znamená to, ze na vyrobek se vztahuje smernice Evropské unie císlo 2002/96/EC.
2. Vsechny elektrické a elektronické vyrobky by mely byt likvidovány oddelene od be
zného komunálního odpadu prostrednictvím sbernych zarízení zrízeny ch za tímto
úcelem vládou nebo místní samosprávou.
3. Správny zpusob likvidace starého elektrického spot rebice pomáhá zamezit moz
nym negativním dopadum na z ivotní prostredí a zdraví.
4. Bliz
sí informace o likvidaci starého spotrebice získáte u místní samosprávy, ve
sbe
rném zarízení nebo v obchode, ve kterém jste vyrobek zakoupili.
Uklanjanje starog aparata <Croatian>
1. Ako se na proizvodu nalazi simbol prekrizene kante za smece, to znaci da je proizvod pokriven
europskom direktivom 2002/96/EC.
2. Elektricni i elektronski proizvodi ne smiju se odlagati zajedno s komunalnim otpadom, vec u
posebna odlagalista koja je odredila vlada ili lokalne vlasti.
- 30 -
Digital Satellite Receiver
WEEE
3. De correcte verwijdering van uw oude toestel helpt negatieve gevolgen voor het
milieu en de menselijke gezondheid voorkomen.
4. Wilt u meer informatie over de verwijdering van uw oude toestel? Neem dan
contact op met uw gemeente, de afvalophaaldienst of de winkel waar u het
product hebt gekocht.
Vanhojen laitteiden hävittäminen <Finnish>
1. Tämä merkki tuotteessa tarkoittaa, että tuote kuuluu sähkö- ja
elektroniikkalaiteromusta annetun EU-direktiivin 2002/96/EY soveltamisalaan.
2. Kaikki elektroniset laitteet ovat ongelmajätettä, joten ne on toimitettava
paikalliseen keräyspisteeseen.
3. Vanhan laitteen asianmukainen hävittäminen ehkäisee mahdollisia ympäristöön ja
terveyteen kohdistuvia haittavaikutuksia.
4. Lisätietoa vanhan laitteen hävittämisestä saat ottamalla yhteyden paikallisiin
viranomaisiin, kierrätyskeskukseen tai myymälään, josta ostit laitteen.
Entsorgung von Altgeräten <German>
1. Wenn dieses Symbol eines durchgestrichenen Abfalleimers auf einem Produkt
angebracht ist, unterliegt dieses Produkt der europäischen Richtlinie
2002/96/EC.
2. Alle Elektro- und Elektronik-Altgeräte müssen getrennt vom Hausmüll über dafür
staatlich vorgesehenen Stellen entsorgt werden.
3. Mit der ordnungsgemäßen Entsorgung des alten Geräts vermeiden Sie
Umweltschäden und eine Gefährdung der persönlichen Gesundheit.
4. Weitere Informationen zur Entsorgung des alten Geräts erhalten Sie bei der
Stadtverwaltung, beim Entsorgungsamt oder in dem Geschäft, wo Sie das Produkt
erworben haben.
Sådan smider du dit gamle apparat ud <Danish>
1. Når der er et tegn med et kryds over en skraldespand, betyder det, at produktet er
omfattet af EU-direktiv 2002/96/EC.
2. Alle elektriske og elektroniske produkter skal smides ud et andet sted end gennem
den kommunale affaldsordning ved hjælp af specielle indsamlingsfaciliteter, der er
organiseret af staten eller de lokale myndigheder.
3. Korrekt bortskaffelse af dit gamle apparat er med til at forhindre mulige
skadevirkninger på miljøet og menneskelig sundhed.
4. Mere detaljerede oplysninger om bortskaffelse af dit gamle apparat kan fås ved at
kontakte dit lokale kommunekontor, renovationsselskab eller den butik, hvor du
købte produktet.
<Greek>

- 33 -
Digital Satellite Receiver
Memo
- 32 -
Digital Satellite Receiver
WEEE
3. Pravilno odlaganje starog proizvoda sprecit ce potencijalne negativne posljedice
po okolis i zdravlje ljudi.
4. Podrobnije informacije o odlaganju starog proizvoda potrazite u gradskom uredu,
sluz
bi za odlaganje otpada ili u trgovini u kojoj ste kupili proizvod.
Régi eszközök ártalmatlanítása <Hungarian>
1. A termékhez csatolt áthúzott, kerekes szeméttároló jel jelöli, hogy a termék a
2002/96/EC EU-direktíva hatálya alá esik.
2. Minden elektromos és elektronikai terméket a lakossági hulladéktól elkülönítve kell
begyujteni, a kormány vagy az önkormányzatok által kijelölt begyujto eszközök
használatával.
3. Régi eszközeinek megfelelo ártalmatlanítása segíthet megelozni az esetleges
egészségre vagy környezetre ártalmas hatásokat.
4. Ha több információra van szüksége régi eszközeinek ártalmatlanításával
kapcsolatban, tanulmányozza a vonatkozó környezetvédelmi szabályokat, vagy
lépjen kapcsolatba az üzlettel, ahol a terméket vásárolta.
Utylizacja starych urzadzen <Polish>
1. Kiedy do produktu dol/aczony jest niniejszy przekreslony symbol kol/owego
pojemnika na smieci, oznacza to, ze produkt jest objety dyrektywa 2002/96/EC.
2. Wszystkie elektryczne i elektroniczne produkty powinny byc utylizowane niezalez
nie od odpadów miejskich, z wykorzystaniem przeznaczonych do tego miejsc
skl/adowania wskazanych przez rzad lub miejscowe wl/adze.
3. Wl/asciwy sposób utylizacji starego urzadzenia pomoze zapobiec potencjalnie
negatywnemu wpl/ywowi na zdrowie i srodowisko.
4. Aby uzyskac wiecej informacji o sposobach utylizacji starych urzadzen, nalezy
skontaktowac
sie z wl/adzami lokalnymi, przedsiebiorstwem zajmujacym sie
utylizacja odpadów lub sklepem, w którym produkt zostal/kupiony.

- 35 -
Digital Satellite Receiver
- 34 -
Digital Satellite Receiver
MemoMemo

- 36 -
Digital Satellite Receiver
Benutzer
Handbuch
Free To Air/ CI
Digital Satellite Receiver
Memo

Für die größtmögliche Kundenzufriedenheit bemühen wir uns für jedes Produkt mit
umfangreichen Servicedienstleistungen.
Wir unterstützen unsere Kunden durch sowohl ein Netzwerk von Verkaufs-und
Servicepartnern als auch dem Serversystem.
Mittels der Homepage erhalten Sie nützvolle Information und neue Software für die STB.
Bei jeglicher Frage sollte also folgende Internetadresse Ihre erste Anlaufstation sein.
Homepage : http://www.digitallworld.com
Um Missverständnisse zu vermeiden behält sich DigitAll World vor Änderungen und
Verbesseungen sowohl an dem hier beschriebenen Produkt als auch am manual selber
vorzunehmen.
Copyright 2007. DigitAllWorld.Co.,Ltd. All rights reserved.
GEWITTER 1. STB muss mit Strohmnetz und LNB verbunden sein.
2. Andere angeschlossenen Geräte müssen korrekt geerdet sein.
z.B. TV oder Video.
3. Vergewissern Sie sich, dass ein Blitzschutz für die terrestrische
Antenne besteht.
SERVICE Eingriffe sollten nur von autorisiertem Fachmann erfolgen.
Support & Copyright
STROMSUPLY Benutzbar nur bei 90-250V AC 50/60Hz.
KABEL Benutzen Sie nur standarisierte und zertifiezierte Kabel, um
Fehler der STB vorzubeugen.
AUFSTELLORT Verhindern Sie Kontakt zu möglichen Gefahrenquellen wie zum
Beispiel Hauspflanzen, Leuchten, Regen oder diektem
Sonnenlicht.
SAUBERKEIT 1. Immer alle Kabel entfernen bevor STB gesäubert
wird.insbesondere Stromkabel.
2. Benutzen Sie ein trokenes Tuch und kein Lösungsmittel
BELASTUNG Überladen Sie nicht das Gehäuse oder Steckverbindungeben.
Daraus könnten Kurzschlüsse resultieren.
BELÜFTUNG 1. Blockieren Sie nicht die Belüftungsschlitze der STB.
2. Stellen Sie die STB nicht auf weichen Untergrund.
3. Ermöglichen Sie Luftzirkulation um die STB herum.
4. Setzen Sie die STB nicht direkter Sonnenbestrahlung aus.
5. Stapeln Sie keine anderen Geräter auf der STB.
FLÜSSIGEKEITEN Behüten Sie die STB vor dem Einfluss jeglicher Flüssigkeit.
keine Spritzer, nicht in Nähe von Vasen.
Vor dem Anschluss an die Parabolantenne ist die
Strohmversorgung zu diskonektieren. Missachtung kann zum
schaden am LNB führen. Das LNB Kabel muss gemäss
SANBS061 geerdet sein.
Sicherheits Instruktionen
Die STB ist nach internationalen Sicherheitsstandards gefertigt.
Bitte lesen Sie diese Sicherheitshinweise bevor Sie die STB benutzen.
ERSTVERBINDUNG ZUR
SATELLITENSCHÜSSEL
& LNB ERDUNG

Menü Bedienung .......................................................................................23
Basic Funkionen ............................................................................................23
Convenient Access Mode .............................................................................23
Programm Guide(EPG) .................................................................................24
Videotext / Teletext ........................................................................................25
Erste Hilfe .....................................................................................................26
Technische Spezifikationen....................................................................27~28
WEEE ...............................................................................................................29~32
Contents
Die Fernbedienung ....................................................................................6 ~ 7
Anschluss der STB ...................................................................................8
Frontansicht ....................................................................................................8
Rückansicht.....................................................................................................9
Verbindung ......................................................................................................10 ~ 11
Referenzen.......................................................................................................12 ~ 13
System Einstellungen ..............................................................................14
Menu Tree ......................................................................................................14
Hauptmenü ......................................................................................................14
Installation(Satellit) ........................................................................................15
DiSEqC Motor ...............................................................................................16
USALS ............................................................................................................16 ~ 17
Installation(Terrestrisch) ..............................................................................18
System ...........................................................................................................19
Einstellungen .................................................................................................20
Kanal Editieren .............................................................................................22
Contents

- 7 -
Digital Satellite Receiver
- 6 -
Digital Satellite Receiver
STANDBY
Wechsel zwischen Betriebs- und
Standby Modus.
TV/STB
Wechsel des Empfangmodus zwischen TV
und Satellit.
SUBTITLE (Rot)
Wahl der Untertitel des aktuellen Kanals.
PAGE UP/DOWN
Seite hoch / runter in Kanalliste.
SOUND (Yellow)
Sprachwahl.
VOLUME UP/DOWN
Lautstärken veränderung.
OK
Bestätigen einer Auswahl.
EXIT
Menuende - Zurück zum TV Modus.
TELETEXT
Videotext-Seiten zu Navigieren.
FAVORITE
Favorietensenderliste.
MUTE
Stummschaltung.
NUMERIC BUTTONS
Kanalwahl & Kanaleingabe
Eingabe von PIN Codes.
EPG
Elektronischer TV/Radio Programmguide.
INFORMATION (Grün)
Zeigt Programminformation OSD.
PRE-CHANNEL (Blue)
Vorheriger Kanal.
CHANNEL UP/DOWN
Wechsel der Sender hoch und runter.
MENÜ
Start des Hauptmenües bzw. Rückkehr
zumvorherigen Menü.
TV/RADIO
Umschaltung zwischen TV/RADIO Mobus.
ZOOM
zum Aktivierung zoom EIN/AUS
PAL/NTSC
Zwischen PAL und NTSC Modus zu
schalten.
SAT
Satellite und zugehörige Kanalliste zeigen.
TER
zu Terrestrischen Sendern wechseln.
1
2
3
4
5
6
7
8
9
10
11
12
13
14
15
16
17
18
19
20
21
22
Die Fernbedienung
Die Fernbedienung
Abbildung der Fernbedienung
TELETEXT
FAVORITE
EXIT
17
MENU
18
TV/RADIO
16
CHANNEL
UP/DOWN
14
INFORMATION
15
PRE-CHANNEL
13
EPG
12
NUMERIC
BUTTONS
11
MUTE
STANDBY
TV/STB
SOUND
SUBTITLE
PAGE UP/DOWN
VOLUME UP/DOWN
OK
1
2
3
4
5
7
PAL/NTSC
20
SAT
21
TER
22
8
10
9
6
19
ZOOM

- 9 -
Digital Satellite Receiver
- 8 -
Digital Satellite Receiver
Anschluss der STB
Rückseite
VIDEO Verbindung Video zum
TV mit RCA jack.
AUDIO Audioverbindung R/L
zum TV oder zur
Audioanlage.
TV OUT Verbindung zum TV mit einem
koaxial Kabel.
ANT IN Antennen Eingang.
VCR Anschluss für die Verbindung
eines Videorekorders über
Scartkabel.
TV Anschluss für die Verbindung
eines Fernsehers über
Scartkabel
OPTICAL Anschluss für S/PDIF Kabel.
RS-232 Serielle Schnittstelle zum
Verbinden des Receivers mit
einem Computer (SW-Update).
LOOP THROUGH
Anschluss zum andern
Satellitenreceiver.
LNB Antennenanschluss.
ANT IN Zum Anschluss der Terrestrischen
Antenne.
LOOP THROUGH
Dient zum Anschluss eines
zusätzlichen Empfängers.
eines VCR oder eines
vorhandenen TV-Gerätes.
1
2
3
4
5
6
1 2 765 91210 1183 4
7
8
9
10
11
12
Anschluss der STB
STAND-BY Wechsel zwischen Betriebs-und Standby Modus.
CHANNEL - Wechsel Kanal runter.
Bewegung Cursor runter.
CHANNEL + Wechsel Kanal rauf.
Bewegung Cursor rauf.
CAM Slots 2 slots für die Common Interface CAM mit Smartcard
(nur für CI Modell).
Frontansicht
3
4
1
2
(Modellabhängig)
4
(Modellabhängig)
1 2 3 4

- 11 -
Digital Satellite Receiver
- 10 -
Digital Satellite Receiver
CAM (Conditional Access Module) und Smart Card
Smartcards und CA Module
sind
jeweils für spezielle Provider
und Kanäle spezifiziert.
Je nach verwendetem Modul
können so spezielle Menus
erscheinen, welche in diesem
Handbuch nicht aufgefürt und
beschrieben sind.
Einsetzen einses CAMs
Dieser Receiver beinhaltet DVB - Common Interface Funktionen.
CI CAMs beinhalten einen eingebauten Smartcardleser.
Zur Genutzung gehen sie folgenden weg:
1. Schieben Sie die smartcard in den CAM mit dem goldfarbigen Chip nach oben.
2. Danach führen Sie das CAM in die STB ein.
3. Schliessen Sie die CAM Klappe.
Anschluss der STB Anschluss der STB
Wie verbinde ich die STB mit anderen Systemen
Es existieren Möglichkeiten die Box mit TV, VCR und Hi-Fi SYSTEM zu verbinden.
1. Verbinden STB - Fernsehen
Benutzen Sie ein Scartkabel zwischen TV (Haupscart) und der STB (TV scart).
2. Verbinden STB - Videorecorder
Benutzen Sie ein Scartkabel zwischen VCR und der STB (VCR scarct).
3. Verbinden STB - HIFI
Verbinden Sie Ihren digitalen Audiodecoder mit S/PDIF(Optical) auf Ihrem STB.
4. Signaldurchschleifung - Loop Through
Bei Benützung eines zusätzlichen analogen oder digitalen STB am gleichen
LNB sind diese am LOOP Anschluss zu konnektieren. Dazu verbinden Sie ein
Coaxial Kabel mit dem LNB OUT der STB mit dem LNB IN des zweiten
Recievers.
Achtung! Stecken Sie das Strohmkabel als letzes Kabel ein.
Verbindung

- 13 -
Digital Satellite Receiver
- 12 -
Digital Satellite Receiver
1. Besuchen Sie unsere Homepage und überprüfen Sie die aktuelle Software-Version.
2. Downloaden Sie die aktuelle Software-Version ihres Digitalreceivers direkt auf Ihrem
Computer.
3. Verbinden Sie Ihren Digitalreceiver über einem 0-Modemkabel an den COM1Steckplatz des Computers.
4. Schalten Sie Ihren Digitalreceiver in den Standby Modus. Mit einem Doppelklick
starten Sie das heruntergeladene Programm.
5. Danach sehen Sie die “S/W-Upgrade” Box, klicken Sie anschließend die
Button und wählen die zu kopierende Datei aus.
6. Danach Aus- und Einschalten.
7. Danach beginnt die Übertragung der Software vom PC auf den Digitalreceiver. Auf
dem Bildschirm des PCs können Sie den Verlauf des Übertragung mitverfolgen.
8. Nach der Übertragung erscheint auf dem Bildschirm folgende Nachricht “S/W
erfolgreich Übertagen, dieses Programm wird danach geschlossen”. Nachdem Sie
diesen Nachricht gelesen haben, wird die verwendete Programm automatisch
geschlossen.
9. Danach müssen Sie noch den Receiver einmal Aus und wieder Einschalten.
10. Sie können am Receiver über Hauptmenü/Setup/Andere Einstellungen/System
Information die aktuelle SW-Version ersehen.
11. Wenn während der SW-Update irgend ein Fehler auftreten sollte, gehen Sie bitte
wieder zur Punkt 4 zurück.
Anschluss der STB
Referenzen
Anschließen des DiSEqC 1.0.
Informationen hierzu finden Sie auf der Seite 15.
Alle unsere Receiver sind so entworfen, dass sie mit dem DiSEqC 1.0 und DiSEqC
1.2 Systems kompatibel sind.
Dadurch können mehrere Antennen gleichzeitig an die STB angeschlossen werden.
Falls Sie über zwei oder mehr feste Antennen oder LNBs verfügen, empfehlen wie
die Benutzung eines DISEqC 1.0 Schalters.
Verbinden Sie mit einem Koaxialkabel den ersten LNB mit dem LNB 1 oder LNB A
Eingangsstecker des DISEqC-Schalters.
Verfahren Sie bei allen weiteren LNBs genauso.
Schließen Sie ein Koaxialkabel an den RF-Ausgang des DISEqC-Schalters und an
den LNB IN-Stecker an der STB an.
Anschließen des DiSEqC 1.2
Informationen hierzu finden Sie auf der Seite 16.
An einem Digitalreceiver können Sie entweder eine einzelne Satellitenantenne direkt
oder verschiedene Antenne mittels eines Konverters anschließen.
Sie können auch an den Receiver den LNB einer Mehrfachversorgung anschließen.
Software Upgrade mit einem Computer
Sie können mit einem
Computer jederzeit die
aktuelle Software über die
serielle Schnittstelle
installieren.
Neue Software-Versionen
beinhalten Updates, neue und
oder verbesserte
Eigenschaften.
Auf unserer Homepage
(http://www.digitallworld.com)
können Sie die jeweils
aktuellsten SoftwareVersionen finden. Außerdem
finden Sie auch zusätzliche
Informationen.
Anschluss der STB

- 15 -
Digital Satellite Receiver
- 14 -
Digital Satellite Receiver
System Einstellungen
Installation(Satellit)
Auto (Automatishe Kanal Suche)
Automatische Kanal Suche hilt ihene die Kanalinformationen vonallen transpondern auf dem
ausgewaelten Satelliten a automatish zu laden.
1.Waehlen Sie Satellite Diese switch or motor LNB&die anderen der
Reihenfolge nach indem Sie OK drucken.
jeder nicht benutzte port muss auf
None stehen.
• Satellite : Sie koenen den Sattelitenname auswaehlen.
• DiSEqC Version : Sie koennen DiSEqC 1.2 oder USALS motorisiertes System nutzen
falls vorhanden. Die Antenne stellt sich automatish auf die relevante Satellitenposition
ein,wenn Sie channel aus der Kanalliste waehlen.
• DiSEqC Input : Sie koennen die DiSEqC Switch Nummer auswaehlen,indem Sie die OK
Taste drucken
• LNB Typen/Frequency : Sie koennen die vorbelegte L.O Frequenz auswaehlen indem
Sie OK drucken und die links/rechts Tasten, oder Sie koennen eine spezielle MHz
Frequenz manuell eingeben indem Sie numeric taste drucken.
• Serch type : waehlen Sie den Suchmodus ALL oder FTA Only.
• Netzwerk Suche : NIT Kanalsuche hilft Ihnen die Kanalinformationen aller transponder auf
demausgewaehlten Satelliten automatish zu laden.
• Provider Suche : Sie koennen einfach die Kanalpakete auswaehlen,die voreingestellt
sind.
System Einstellungen
Hauptmenü
1.
Schalten Sie TV & STB ein, nachdem alle
Geräte ordnungsgemäß angeschlossen sind.
2. Durch Drüken der MENÜ. Taste erhalten Sie
folgendes Bild auf dem Fernseher.
3.
Nun kann duch die verschiedenen
Menüefunktionen durch UP/DOWN gewechselt
werden.
4. Um den gewählten Kanal zu geben die OK/
Taste drücken.
5. Drücken von MENÜ ermöglich das Aufrufen des vorherigen Obermenus. EXIT
schließt das Menü insgesammt.
Menu Tree
Kanal-Auswahlliste
Bevorz.
Kindersicherung
Spracheinstellungen
Uhrzeit-Einstellungen
A/V Einstellungen
UHF Abstimmung
Suche Satellit
Spiele
Einstellungen
Kanal Editieren
Status
Diagnose
Werkseitige Einstellung
Allg. Schnittstelle
Suche Terrestrisch
Das Hauptmenue zeigt folgende Informationen
Installation
System
Spiele
Einstellungen
Kanal Editieren
Suche Satellit, Suche Terrestrisch
Status, Diagnose, Werkseitige Einstellung, Allg. Schnittstelle
Kindersicherung, Spracheinstellungen, Uhrzeit-Einstellungen
A/V Einstellungen, UHF Abstimmung
Kanal-Auswahlliste, Bevorz.

- 17 -
Digital Satellite Receiver
- 16 -
Digital Satellite Receiver
System Einstellungen
2. Drücken Sie die rote Auto Taste auf Ihrer Fernbedienung im
Installationsmenue um den Kanalsuchlauf zu starten.
• “Multi-Satellites search” ist moeglich nachdem
jeder wert korrekt eingestellt wurde.
3.
Drücken Sie die Menue oder Exit Tasten um die daten zu speichen um das
Menue zu verlassen.
Manuelle Kanal suche
Die Manuelle Kanalsuche ist bequemer um einen
speziellen transponder zu suchen indem die
vordefinierten Informationen werden.
1) Dr
ücken Sie die gruene(Manual)Taste auf Ihrer
Fernbedienung im Installationsmenue.
2) Waehlen Sie jeden TP indem sie OK drucken &
Seach icon im Menue um die Suche zu starten.
3) Drucken Sie Add, Edit & Delete icon im Menue
je nach Preferenz.
PID Kanal suche
1) Waehlen Sie den Satelliten im
Instalationsmenue.
2) Dr
ücken Sie die gelbe Taste auf Ihrer
Fernbedienung um die PID Suche auf dem
ausgewaehlten Satelliten zu starten.
Sie koennen die Kanalle ueber die spezifischen
PID daten finden.
System Einstellungen
DiSEqC Motor
Waehlen Sie Satellite und gehen Sie zu DiSEqC Motor Menue indem Sie die OK Taste Motor
drucken in der DiSEqC Version Menue.
1) Waehlen Sie die relevanten Werte um die Position zu suchen.
2) Drucken Sie die OK Taste in Drive und starten Sie den Motor indem Sie die links oder
reshts tasten drucken.
Die Antenne bewegt sich in die aprobate Satelliten tasten drucken.
3) drucken Sie die OK Taste um den Motor anzuhalten & Save Position wenn das Signal auf
dem Menue erscheint.
USALS
• Note : USALS kann nach Motortype
gewaehlt werden.
Bitte setzen Sie sich mit dem Installateur Ihrer Satelitenanlage in Verbindung,falls Sie die
rote Auto Taste auf Ihrer Fernbedienung im Installationsmenue um den Kanalsuchlauf zu
starten falls Sie die korrekten Einstellungswerte jedes parameter nicht wissen, die in obiger
Liste angegeben sind.

- 19 -
Digital Satellite Receiver
System Einstellungen
Diese Menue zeigt die system informationen
& Zuruecksetzen auf Fabrikkeinstellungen.
Status & Diagnose
•Status : zeigt die Systeminformationen
Modellname, S/W, H/W & Loader
version.
•Diagnose : zeigt Satellitenname & aktuelle
TP Informationen.
System
- 18 -
Digital Satellite Receiver
System Einstellungen
Automatische Sendersuche nach Fernsehsenderrn
Drücken Sie die rote Taste(SUB.T) sucht automatisch nach allenSendern und speichert
diese in der Senderliste.
nachdem dieser vorgang einsatzfähig.
Manuelle Sendersuche
- Wählen Sie den Fernsehservice den Sie Suchen möchten indem Sie UP/Down Taste und
die OK Taste drücken.
Eine Markierung erscheint neben Ihrer Auswahl.
- Sie können auch mehr als einen Fernsehsevice auf manuelle Einstellung umstellen.
Installation (Terrestrisch)
- 21 -
Digital Satellite Receiver
- 20 -
Digital Satellite Receiver
System Einstellungen
Kindersicherung
Diese Funtion verhindert, das Kinder oder nicht
authorisierte Person Programme ansehen.
Spracheinstellungen
waehlen Sie die gewuenschte Sprache aus dem
Menue, Audio & Subtitle.
Audio Sprache : Falls keine Sprache ausgewaehlt
wurde, wird automatisch die Originalsprache des
aktuellen Kanals gewaehlt.
Uhrzeit-Einstellungen
Stellen Sie Ihre aktuelle Zeit ein,und Geniessen
Sie die Timer Funtion in diesem Menue.
System Einstellungen
Werkseitige Einstellung
-Alle Daten die Sie benuetzen, werden
geloescht und die Urspungsdaten werden
geladen.
-Wenn Sie OK waehlen ,wird nach Ihrer
Bestaetigung gefragt.
-Wenn Sie die Einstellungen nicht
zuruecksetzen wollen ,druecken Sie die
Menue oder EXIT Taste um das Menue zu
verlassen.
Allg, Schnittstelle
Der Reciever besitzt eins PCMCIA slot,
welches den Betrieb von eins CI CAM
ermöglicht (Viaccess or Irdeto etc...).
Wenn Common Interface CAM in ein
PCMCIA Slot eigeführt ist, erkennt das
System den Typ des CAM automatisch und
zeigt diesen im Hauptmenü.
Die Auswahl innerhalb des Menües
erschient den Zugriff auf Einstellungen bzgl.
CAM Details (authorizations, pre-booking,
package details, etc.).
Diese Menüe hilft Ihenen die Funtionen fuer
Kindersicherung, Sprache, Zeiteinstellung, A/V
einzustellen, UHF Abstimmung.
Einstellungen

- 23 -
Digital Satellite Receiver
- 22 -
Digital Satellite Receiver
Menü Bedienung
Farvoriten
Sie koennen zu Iherer Favoritengruppe gehen.
Nachdem die Kanalle programiert sind, sehen
Sie das Informations(banner) fenster jedes mal
wenn Sie einen Kanal wescheln.
• Kanalnummer.
• Programmname.
• Satellitename/Terrestrisch
• EPG
Kanalliste
Um Zugang zu den Kanalinformationen zu
bekommen, die Sie bereits Ihrern Wuenschen
entsprechend sortiert haben, drucken Sie
einfach die OK Taste Falls kein Menue auf
dem Bildschrim ist.
- Roten Taste(Sort); die kanaele sotierten nach TV, Radio,Favoriten, Satelliten,
Scambe&SID.
- GrueneTaste(Informationen) : zeigt die TP & PID Information.
- Gelbe Taste(V-liste) : zeigt 4~16 Bilder.
Basic Funkionen
Convenient Access Mode
System Einstellungen
A/V Einstellungen
Fuer die Einstellung TV Scart, Bildschrim UHF Kanal : 21CH ~ 69CH
Ratio, Display Formate, Bildschrimschoner
UHF Modus : PAL I, PAL DK, NTSC M oder PALBG
Zeit. OSD Anzeige Zeit, OSD Wahl der UHF Kanal und UHF Modus Werte.
Transparenz,Skin Color & Audio Priotitaet. In der Werkseinstellung ist Kanal 40.
Sie koennen die Kanalle in den einzelnen
Kanallisten bearbeiten.
- Bewegen : Sie koennen die Kanalle auf die
von Ihenen gewuenschte Position legen.
- Sperren : Wenn Sie ein Programm gesichert
haben, wird jedes mal wenn Sie das
Programm sehen moechten ein PIN Code
verlangt.
- Löschen : Sie koennen Kanalle aus der
Kanalliste Loeschen.
- Umbenennen : Sie koennen die Kanalle
umbenennen.
Kanal Editieren
Kanal-Auswahlliste
- 24 -
Digital Satellite Receiver
- 25 -
Digital Satellite Receiver
Menü BedienungMenü Bedienung
Programm Guide(EPG)
• Das integrierte EPG ihrer STB hilft ihnen
mit verschieden Anzeigemöglichkeiten
überblich über die Programme und deren
Inhalt zu erhalten.
Es werden Informationen über Sender,
Senderlisten, Programmstart-und
Endzeitpunkten aller verfügbaren
Sendungen.
•
Möglich beinhaltete Informationen: Name,
Zeiten der aktuellen, bzw. folgender
Sendungen.
• Solche information sind nur verfügbar, wenn dieses vom Sender bereitgestellt
werden.
• Drueken Sie die EPG Taste auf Iher Fernbedienung im Video Mode und der Programm
Guide erscheint auf dem Bidschirm.
- Rote Taste (sort) : Suche der EPG Informationen in alphabetisher oder numerischer
Reihenfolge.
- Gruene Taste (Detail) : zeigt die detailierten Informationen des gewaehlten Kanals.
- Gelbe Taste(Schedule) : zeigt das Schedule.
- Blaue Taste (Weekly) : zeigt die Wochen informationen.
•
EPG Zeiteinstellung:Sie konnen
denspeziellen Kanal im EPGMenü
reservieren.
•
EPG Menü Gelbe (Schedule) Taste
Grüne (Add) Taste.
Videotext / Teletext
Dieser Receiver verfügt über einen
eingebauten Videotext/Teletext – SoftwareDecoder. Damit wird jedes angeschlossene
TV-Gerät Videotext-fähig. Zum Empfang des
Teletext-Dienstes drücken Sie bitte die
“TELETEXT” – Taste. Im Teletext-Betrieb
haben bestimmte Tasten Ihrer Fernbedienung
abweichende Funktionen.
Erneutes Drücken der “TELETEXT”-Taste
beebdet die Funktion und kehrt zum TV-Bild
zurück.
1) TELETEXT - Taste : Schaltet den TELETEXT-Modus aus und ein.
2) MENU -Taste : Ruft die Seite 100 (Inhalt) auf
3) Zehner -Tastatur : Dient zur direkten Seitenanwahl
4) AUF- / AB- Tasten : Springt zur nächsten / vorherigen Seite
5) Links-/Rechts Tasten : Springt zur nächsten / vorherigen Folgeseite
Wenn zwei Folgeseiten mit einer Nummer zwischen 1 und 99 empfangen werden, schaltet
sich die entprechende Funktion automatisch zu und wird in Form eines Balkens am
unteren Bildschirmrand angezeigt. Ein Symbol auf der linken Seite zeigt das automatische
Nachladen der Folgeseiten an.
Die jeweils aktuelle Folgeseite wird in diesem Modus angezeigt.
6) Farbige Tasten ( Rot, Grün, Gelb, Blau )
6-1) Seiten-Link : der Programmanbieter sendet zur jeweils aktuellen Seite bis zu 4
verbundene Seiten, die Sie mittels dieser Tasten anwählen können.
•
Rot : Seite #1• Grün : #2• Gelb : #3• Blau : #4
6-2) Anzeigefunktionen: Um die Anzeigefunktionen des Teletext-Decoders aufzurufen,
drücken Sie die “OK” –Taste auf der Fernbedienung.
•
Rote Taste : Schaltet in den Umschaltstop-Modus.
- Hält die aktuelle Seite im Bildschirm.
- Stoppt das automatische Weiterschalten der Folgeseiten.
•
Grüne Taste : Rätselfunktion.
- Versteckter Text wird als Leerzeichen dargestellt, wenn diese Funktion abgeschaltet ist.
- Drücken dieser Taste zeigt den versteckten Text an Verwendet wird diese Funktion
für Ratespiele u.Ä.
•
Gelbe Taste : Seitengröße
- Diese Taste ermöglicht die Darstellung in 3 Größen.
- normal size (all Teletext rows are displayed).
- Normal : Alle Zeichen werden dargestellt.
- Doppelt : Die obere oder die untere Hälfte wird in doppelter Zeichenhöhe angezeigt.
•
Blaue Taste : Transparent-Modus ein- / ausschalten
- Stellt den Text transparent vor dem Programmhintergrund dar.

- 27 -
Digital Satellite Receiver
- 26 -
Digital Satellite Receiver
Technische SpezifikationenErste Hilfe
Tuner & Senderkanäle
Eingangs Stecker : F-type, IEC 169-24, Female
Frequenzbereich : 950 MHz to 2150 MHz
Eingangsimpedanz : 75 Ohm unabgeglichen
Signalpegel : -25 bis -65dBm
Zwischenfrequenzy ZF : 480 MHz
ZF Bandbreit : 36 MHz
LNB Spannung und Polarisierung : Vertical : +13V, Horizontal : +18V
Strom : 500mA maximaler
Überlastungsschutz
22 KHz Signal : Frequenz : 22 4KHz
Amplitude : 0.6 0.2V
DiSEqC Steuerung : Version 1.0 / 1.2 Kompatible
Demodulation : QPSK
Einganssymbolrate : 1-45 Ms/s
FEC Dekoder : Kodierungsrate 1/2, 2/3, 3/4,
5/6 und 7/8 Mit Randbedingungslänge K=7
Tuner & Senderkanäle (Terrestrisch)
Eingangs Stecker : 75 Ohms, 169-2, Female
Loop-Through : 75 Ohms, 169-2, Male
Frequenzbereich : 47MHz to 862MHz
Bandwidth : 7MHz/8MHz
Signalpegel : -10dBm to -75dBm
Demodulation : COFDM
Guard Interval : 1/4, 1/8, 1/16, 1/32
Constalation : 16QAM, 32QAM, 64QAM
FEC Dekoder : RS(204,188), T=8
Code Rate : 1/2,2/3,3/4,5/6 and 7/8
MPEG Transport Stream A/V Dekodierung
Transport Stream : MPEG-2 ISO/IEC 13818
Transport stream Spezifikation
Profile Pegel : MPEG-2 MP@ML
Eingangsrate : Max 90 Mbit/s
Bildseitenverhältnis : 4:3, 16:9
Video Auflösung : 720 x 576
Audio Dekodierung : MPEG / MusiCam Layer I & II
Audio Mode : Mono / Zweikanal / Joint stereo /
S / PDIF(Optical)
Sampling : 32, 44.1 and 48KHz
Ist der Netzstecker in Steckdose?
Ist ggf. Standby-Modus aktiviert?
Versichern Sie sich, dass STB aktiviert.
Ist (VIDEO or RF OUT) richtig mit TV oder VCR
verkabelt?
Ist der Richtige Eingangskanal am TV gewählt?
Überprüfen vom "Brightness" Level am TV.
Siehe “Kein Bild” oben.
Überprüfe Signal Stärke. Wenn diese niedrig modifi-
ziere die Ausrichtung der Satschüssel.
Siehe “Kein Bild” oben.
Überprüfe Lautstärke von TV and STB.
Check the Mute status of the TV and STB.
Test in direkter Nähe der STB.
Überprüfung und Austausch der Batterien.
Überprüfen LNB und Austausch wenn nötig.
Teste Kabel vom LNB zur STB.
Überprüfe SatSchüsselausrichtung
Bei Nutzung eines DiSEqC 1.0 switch, überprüfe die
Richtigkeit der Verbindung vom LNB zum Switch.
Überprüfen von “Signal Strength” und “Signal
Quality” im Channellist Menü.
Keine Anzeige im Frontpanel
oder kein Power
Kein Bild
Beschränkte Bildqualität
Kein Ton
Kein Funktion der
Fernbedienung
Kein oder schlechtes Signal
Problem Lösung
Ist etwas falsch an der STB
Im Falle einer On-Screen Error Nachricht

- 29 -
Digital Satellite Receiver
- 28 -
Digital Satellite Receiver
WEEE
Disposal of your old appliance <English>
1. When this crossed-out wheeled bin symbol is attached to a product it means the
product is covered by the European Directive 2002/96/EC.
2. All electrical and electronic products should be disposed of separately from the
municipal waste stream via designated collection facilities appointed by the
government or the local authorities.
3. The correct disposal of your old appliance will help prevent potential negative
consequences for the environment and human health.
4. For more detailed information about disposal of your old appliance, please contact
your city office, waste disposal service or the shop where you purchased the
product.
Élimination de votre ancien appareil <French>
1. Ce symbole, représentant une poubelle sur roulettes barrée d'une croix, signifie
que le produit est couvert par la directive européenne 2002/96/EC.
2. Les éléments électriques et électroniques doivent être jetés séparément, dans les
vide-ordures prévus à cet effet par votre municipalité.
3. Une élimination conforme aux instructions aidera à réduire les conséquences
négatives et risques éventuels pour l'environnement et la santé humaine.
4. Pour plus d'information concernant l'élimination de votre ancien appareil, veuillez
contacter votre mairie, le service des ordures ménagères ou encore la magasin
où vous avez acheté ce produit.
Smaltimento delle apparecchiature obsolete <Italian>
1. Quando su un prodotto è riportato il simbolo di un bidone della spazzatura barrato
da una croce significa che il prodotto è coperto dalla direttiva europea
2002/96/EC.
2. Tutti i prodotti elettrici ed elettronici dovrebbero essere smaltiti separatamente
rispetto alla raccolta differenziata municipale, mediante impianti di raccolta
specifici designati dal governo o dalle autorità locali.
3. Il corretto smaltimento delle apparecchiature obsolete contribuisce a prevenire
possibili conseguenze negative sulla salute umana e sull'ambiente.
4. Per informazioni più dettagliate sullo smaltimento delle apparecchiature obsolete,
contattare il comune, il servizio di smaltimento rifiuti o il negozio in cui è stato
acquistato il prodotto.
Kassering av din gamla apparat <Swedish>
1. När den här symbolen med en överkryssad soptunna på hjul sitter på en produkt
innebär det att den regleras av European Directive 2002/96/EC.
2. Alla elektriska och elektroniska produkter bör kasseras via andra vägar än de som
finns för hushållsavfall, helst via för ändamålet avsedda uppsamlingsanläggningar
som myndigheterna utser.
3. Om du kasserar din gamla apparat på rätt sätt så bidrar du till att förhindra
negativa konsekvenser för miljön och människors hälsa.
4. Mer detaljerad information om kassering av din gamla apparat kan får av
kommunen, renhållningsverket eller den butik där du köpte produkten.
Uw oude toestel wegdoen <Dutch>
1. Als het symbool met de doorgekruiste verrijdbare afvalbak op een product staat, betekent dit dat
het product valt onder de Europese Richtlijn 2002/96/EC.
2. Elektrische en elektronische producten mogen niet worden meegegeven met het huishoudelijk
afval, maar moeten worden ingeleverd bij speciale inzamelingspunten die door de lokale of
Technische Spezifikationen
Memory/Processor
Main Processor : STi-5105
Flash Memory : 4Mbyte
SDRAM for MPEG & Gaphic : 16Mbyte
RF-Modulator
RF-Connector : 75Ohm, IEC 169-2, Stecker / Buchse
Frequenz : 470MHz to 860MHz
Ausgangskanal : CH21-69 für den Remodulator
TV Standard : PAL K/G/I im Menü wählbar
Voreingestellung : CH40(or TBD)
Software wechselbar bei Menü
A/ V & Daten Ein / Aus
VIDEO (CVBS) : RCA/Cinch, Scart
Video Ausgänge (CVBS)
VIDEO (RGB) : Scart
AUDIO R/L : RCA/Cinch, Scart
Lautstärke und Stummschaltung
(Resolution :20bit DAC, max 2Vrms)
RS232C : Transferrate 115,200 bps
9 pin D-sub Type
S/PDIF : Digital Audio Optischer Ausgang
Stromversorgung
Eingangsspannung : AC 90 to 250V~ 50/60 Hz
Art : SMPS (Switch Mode Power Supply)
Leistungsverbrauch : Max. 30W
Standby Leistung : 7W
Schutz : Inters seperate Sicherung.
Eingang verfügt über einen Blitzschutz
Physicalische Specifikation
Abmessung (W x H x D) : 340 x 66 x 247 mm
Gewicht (Net) : 2.1 Kg
Betriebstemperatur : 0°C bis +45°C
Umgebungstemperatur : -10°C bis +65°C
Umgebungsfeuchtigkeit : 5% ~ 95% RH (Keine Kondensierung)

- 31 -
Digital Satellite Receiver
WEEE
- 31 -
Digital Satellite Receiver
Cómo deshacerse de aparatos eléctricos y electrónicos viejos <Spanish>
1. Si en un producto aparece el símbolo de un contenedor de basura tachado,
significa que éste se acoge a la Directiva 2002/96/CE.
2. Todos los aparatos eléctricos o electrónicos se deben desechar de forma distinta
del servicio municipal de recogida de basura, a través de puntos de recogida
designados por el gobierno o las autoridades locales.
3. La correcta recogida y tratamiento de los dispositivos inservibles contribuye a
evitar riesgos potenciales para el medio ambiente y la salud pública.
4. Para obtener más información sobre cómo deshacerse de sus aparatos eléctricos
y electrónicos viejos, póngase en contacto con su ayuntamiento, el servicio de
recogida de basuras o el establecimiento donde adquirió el producto.
Eliminação do seu antigo aparelho <Portuguese>
1. Quando este símbolo de latão cruzado estiver afixado a um produto, significa que
o produto é abrangido pela Directiva Europeia 2002/96/EC.
2. Todos os produtos eléctricos e electrónicos devem ser eliminados separadamente
do lixo doméstico através de pontos de recolha designados, facilitados pelo
governo ou autoridades locais.
3. A eliminação correcta do seu aparelho antigo ajuda a evitar potenciais
consequências negativas para o ambiente e para a saúde humana.
4. Para obter informaçõs mais detalhadas acerca da eliminação do seu aparelho
antigo, contacte as autoridades locais, um serviço de eliminação de resíduos ou a
loja onde comprou o produto.
Likvidácia vásho starého prístroja <Slovak>
1. Ked’ sa na produkte nachádza tento symbol preciarknutej smetnej nádoby s
kolieskami, znamená to, ze dany produkt vyhovuje európskej Smernici c.
2002/96/EC.
2. Vsetky elektrické a elektronické produkty by mali byt’ zlikvidované oddelene od
komunálneho odpadu prostredníctvom na to urc
enych zbernych zariadení, ktoré
boli ustanovené vládou alebo orgánmi miestnej správy.
3. Správnou likvidáciou stary
ch zariadení pomôzete predchádzat’ potenciálnym
negatívnym následkom pre prostredie a 1’udské zdravie.
4. Podrobnejsie informácie o likvidácii starych zariadení nájdete na miestnom úrade,
v sluz
be na likvidáciu odpadu alebo u predajcu, kde ste tento produkt zakúpili.
Likvidace starych spotrebicu <Czech>
1. Pokud je u vyrobku uveden symbol pojízdného kontejneru v preskrtnutém poli,
znamená to, ze na vyrobek se vztahuje smernice Evropské unie císlo 2002/96/EC.
2. Vsechny elektrické a elektronické vyrobky by mely byt likvidovány oddelene od be
zného komunálního odpadu prostrednictvím sbernych zarízení zrízeny ch za tímto
úcelem vládou nebo místní samosprávou.
3. Správny zpusob likvidace starého elektrického spot rebice pomáhá zamezit moz
nym negativním dopadum na z ivotní prostredí a zdraví.
4. Bliz
sí informace o likvidaci starého spotrebice získáte u místní samosprávy, ve
sbe
rném zarízení nebo v obchode, ve kterém jste vyrobek zakoupili.
Uklanjanje starog aparata <Croatian>
1. Ako se na proizvodu nalazi simbol prekrizene kante za smece, to znaci da je proizvod pokriven
europskom direktivom 2002/96/EC.
2. Elektricni i elektronski proizvodi ne smiju se odlagati zajedno s komunalnim otpadom, vec u
posebna odlagalista koja je odredila vlada ili lokalne vlasti.
- 30 -
Digital Satellite Receiver
WEEE
landelijke overheid zijn aangewezen.
3. De correcte verwijdering van uw oude toestel helpt negatieve gevolgen voor het
milieu en de menselijke gezondheid voorkomen.
4. Wilt u meer informatie over de verwijdering van uw oude toestel? Neem dan
contact op met uw gemeente, de afvalophaaldienst of de winkel waar u het
product hebt gekocht.
Vanhojen laitteiden hävittäminen <Finnish>
1. Tämä merkki tuotteessa tarkoittaa, että tuote kuuluu sähkö- ja
elektroniikkalaiteromusta annetun EU-direktiivin 2002/96/EY soveltamisalaan.
2. Kaikki elektroniset laitteet ovat ongelmajätettä, joten ne on toimitettava
paikalliseen keräyspisteeseen.
3. Vanhan laitteen asianmukainen hävittäminen ehkäisee mahdollisia ympäristöön ja
terveyteen kohdistuvia haittavaikutuksia.
4. Lisätietoa vanhan laitteen hävittämisestä saat ottamalla yhteyden paikallisiin
viranomaisiin, kierrätyskeskukseen tai myymälään, josta ostit laitteen.
Entsorgung von Altgeräten <German>
1. Wenn dieses Symbol eines durchgestrichenen Abfalleimers auf einem Produkt
angebracht ist, unterliegt dieses Produkt der europäischen Richtlinie
2002/96/EC.
2. Alle Elektro- und Elektronik-Altgeräte müssen getrennt vom Hausmüll über dafür
staatlich vorgesehenen Stellen entsorgt werden.
3. Mit der ordnungsgemäßen Entsorgung des alten Geräts vermeiden Sie
Umweltschäden und eine Gefährdung der persönlichen Gesundheit.
4. Weitere Informationen zur Entsorgung des alten Geräts erhalten Sie bei der
Stadtverwaltung, beim Entsorgungsamt oder in dem Geschäft, wo Sie das Produkt
erworben haben.
Sådan smider du dit gamle apparat ud <Danish>
1. Når der er et tegn med et kryds over en skraldespand, betyder det, at produktet er
omfattet af EU-direktiv 2002/96/EC.
2. Alle elektriske og elektroniske produkter skal smides ud et andet sted end gennem
den kommunale affaldsordning ved hjælp af specielle indsamlingsfaciliteter, der er
organiseret af staten eller de lokale myndigheder.
3. Korrekt bortskaffelse af dit gamle apparat er med til at forhindre mulige
skadevirkninger på miljøet og menneskelig sundhed.
4. Mere detaljerede oplysninger om bortskaffelse af dit gamle apparat kan fås ved at
kontakte dit lokale kommunekontor, renovationsselskab eller den butik, hvor du
købte produktet.
<Greek>

- 33 -
Digital Satellite Receiver
- 32 -
Digital Satellite Receiver
Memo
WEEE
- 32 -
Digital Satellite Receiver
3. Pravilno odlaganje starog proizvoda sprecit ce potencijalne negativne posljedice
po okolis i zdravlje ljudi.
4. Podrobnije informacije o odlaganju starog proizvoda potrazite u gradskom uredu,
sluz
bi za odlaganje otpada ili u trgovini u kojoj ste kupili proizvod.
Régi eszközök ártalmatlanítása <Hungarian>
1. A termékhez csatolt áthúzott, kerekes szeméttároló jel jelöli, hogy a termék a
2002/96/EC EU-direktíva hatálya alá esik.
2. Minden elektromos és elektronikai terméket a lakossági hulladéktól elkülönítve kell
begyujteni, a kormány vagy az önkormányzatok által kijelölt begyujto eszközök
használatával.
3. Régi eszközeinek megfelelo
ártalmatlanítása segíthet megelozni az esetleges
egészségre vagy környezetre ártalmas hatásokat.
4. Ha több információra van szüksége régi eszközeinek ártalmatlanításával
kapcsolatban, tanulmányozza a vonatkozó környezetvédelmi szabályokat, vagy
lépjen kapcsolatba az üzlettel, ahol a terméket vásárolta.
Utylizacja starych urzadzen <Polish>
1. Kiedy do produktu dol/aczony jest niniejszy przekreslony symbol kol/owego
pojemnika na smieci, oznacza to, ze produkt jest objety dyrektywa 2002/96/EC.
2. Wszystkie elektryczne i elektroniczne produkty powinny byc utylizowane niezalez
nie od odpadów miejskich, z wykorzystaniem przeznaczonych do tego miejsc
skl/adowania wskazanych przez rzad lub miejscowe wl/adze.
3. Wl/asciwy sposób utylizacji starego urzadzenia pomoze zapobiec potencjalnie
negatywnemu wpl/ywowi na zdrowie i srodowisko.
4. Aby uzyskac wiecej informacji o sposobach utylizacji starych urzadzen, nalezy
skontaktowac
sie z wl/adzami lokalnymi, przedsiebiorstwem zajmujacym sie
utylizacja odpadów lub sklepem, w którym produkt zostal/kupiony.

- 34 -
Digital Satellite Receiver
Memo
 Loading...