

Page 1
PHONE User’s Manual
Version 1.4
By:
Digital Lighting Solutions Inc.
2719 Danube Avenue
Davis, CA 95616
530-792-0200
www.DigitalLightingSolutions.com
Page 1
Page 2

Safety and Legal
General:
Digital Lighting Solutions Inc. expressly prohibits the use of this device in systems where
people or property may be harmed if this device malfunctions or is misused. Digital
Lighting Solutions Inc. or any of its officers shall not be held liable for any lost revenue
resulting for the misuse or malfunction of this product.
DMX512 has done great things for our industry. Originally intended for just dimmers, it
has found many applications beyond that. Some applications like moving scenery or
triggering pyrotechnics are really bad ideas as DMX offers no built in safeguards or error
checking. When connecting things to a DMX system we need to always ask the
question: What would happen if this device operates at a bad time or in an unexpected
fashion.
Telephone Connection:
Never connect this device to an actual telephone line. Doing this could damage the
whole lighting system!!!
Non-Dim Loads:
Great care should be taken when connecting a non-dim load (such as an electric motor)
to a dimmer. Many lighting consoles provide non-dim settings for their outputs, but
these settings will have no effect on the dmxPHONE. The best way to configure for a
non-dim load is to set the dimmer itself to a non-dim mode. This is usually done at the
dimmer equipment itself not the lighting console.
Bypassing:
The dmxPHONE may be placed in a bypass mode where it passively relays the DMX
signal from its input to its output (see operation section). However, during
performances, it is strongly recommended that power be removed from the unit as an
added safety measure.
Page 2
Page 3

Setup
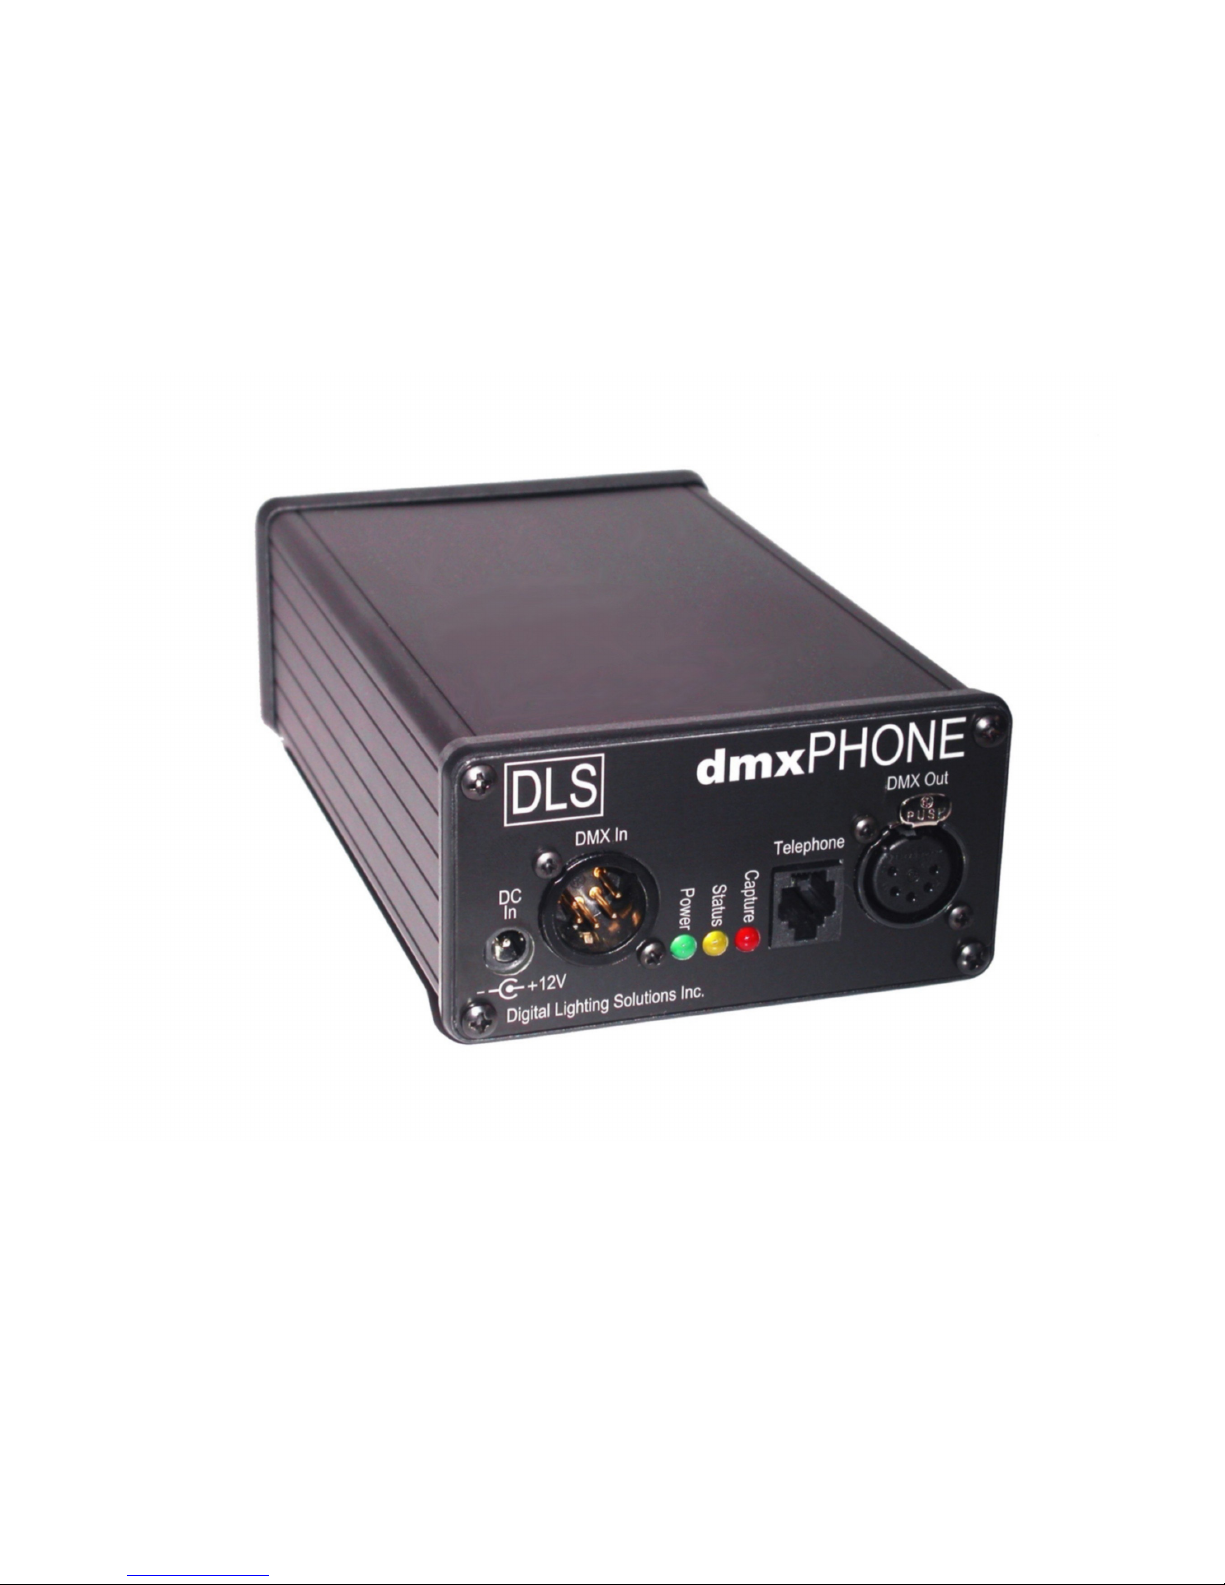
Connections:
“DC In” connects to the external power supply provided with the unit. If the power
supply has been lost, almost any 12VDC 500ma power supply with the proper connector
and polarity will work. Note: the DC output of any replacement power supply must be
isolated from the power lines.
“DMX In” connects to the lighting console’s (if used) DMX output. This is often labeled
“1-512” for the first DMX Universe.
“DMX Out” connects to the theater’s lighting system. This is typically a jack in the wall.
Please note that dmxPHONE only works with DMX512 and no other protocols.
“Telephone” connects to the cordless telephone. Never connect this to an actual
telephone line, as it could damage the whole lighting system.
Indicator Lights:
“Power” indicates dmxPHONE has power.
“Status” blinks the version number of the software at power up. During operation status
blinks once every few seconds to indicate stand-alone mode. Status will blink twice
every few seconds if DMX is detected at the input.
“Capture” indicates that the dmxPHONE is processing the DMX signal. See the
operation section for instructions on bypassing the unit.
Page 3
Page 4

Operation
Basic Use:
To begin, press the “talk” button or its equivalent on the phone. Between keying
commands it’s best to hang up the phone (usually by pressing the “end” button); this will
maximize the phone’s battery life.
The dmxPHONE’s syntax is very similar to most lighting consoles. It should be noted
that dimmer numbers must be used, not channel numbers. When a command is
understood by dmxPHONE it will make a high pitch beep. If a command is not
understood by the dmxPHONE it will make a low pitch beep.
Command Keystrokes
Dimmer 12 at 50% 12 # 50
Dimmers 1 through 6 at 75% 1 * 6 # 75
Dimmers 1 and 3 and 9 at 100% 1 * * 3 * * 9 # 100
or
1 * * 3 * * 9 # #
(Note that “# #” is a shortcut for “at 100%”)
Previous Selection at 30% # 30
All dimmers at 0% 000 # 00
All dimmers at 50% 000 # 50
Cancel a mistake * * *
Releasing Dimmers and Bypassing Unit:
Command Keystrokes
Release previous selection # *
Release 1 through 24 1 * 24 # *
Release all dimmers 000 # *
Bypass* the Unit 0000 # *
*Bypassing dmxPHONE will improve lighting console response time. It is suggested
dmxPHONE be put in bypass when its use is complete. Versions 1.3 and later will
make a distinctive medium-then-high tone when placed in bypass.
Page 4
Page 5

Dimmer Check Mode:
The dmxPHONE provides a mode for sequentially accessing dimmers. To use this
mode, first set a dimmer at a desired level then type “555 #”. The unit will make a
special high-medium-high sound to indicate the dimmer check mode.
Units with software version 1.3 and later will optionally provide a continuous background
tone to indicate dimmer check mode. This background tone may interfere with dtmf
(touch tone) signals from certain phones so it may be disabled by the user, see below.
Command Keystrokes
Enter dimmer check mode (set a dimmer at a level then key:) 555 #
Bring up next dimmer 2
Bring up previous dimmer 1
Exit dimmer check mode any key except 1 and 2
(The following commands are entered outside of dimmer check mode.)
Disable dimmer check background tone 902 * 902 * 0
Enable dimmer check background tone 902 * 902 * 1
Working with Presets:
The dmxPHONE will store and recall up to 20 presets. Presets are located on pseudo
dimmers 601 through 620. When presets are recorded the entire output of the interface
is recorded; including levels originating from the lighting console.
Command Keystrokes
Record preset 2 602 * 602 *
Recall preset 2 at 100% 602 # #
Recall preset 19 at 50% 619 # 50
Page 5
Page 6

‘Remote Takes Precedence’ Mode:
The factory default merging mode for dmxPHONE is ‘Highest Takes Precedence’. This
means that if a level provided by the lighting console is higher than the level keyed on
the remote, the console will take precedence. In “Remote Takes Precedence” mode
dmxPHONE will override the console output in all cases. This makes it possible to turn
off a dimmer that is up on the lighting console. This is a powerful feature but may cause
confusion for an inexperienced operator, thus it is not enabled in the factory default
setting. Note this mode change is stored in non-volatile memory and will persist even
after a reset.
Command Keystrokes
Set Remote Takes Precedence Mode 901 * 901 * 1
Set Highest Takes Precedence Mode 901 * 901 * 0
Page 6
Page 7

Reset and Restore Default Settings:
These functions are not normally needed but are provided for troubleshooting.
Command Keystrokes
Reset the unit to power on state: 9999 * 9999 *
Restore factory default settings: 65535 * 65535 *
Disable dimmer check background tone 902 * 902 * 0
Enable dimmer check background tone 902 * 902 * 1
Page 7
Page 8

Warranty
Digital Lighting Solutions Inc. will repair any defects in material or workmanship on
dmxPHONE for a period of one year from the date of sale. Digital Lighting Solutions Inc.
is not responsible for incidental damages, or damage as a result of misuse or abuse.
Please do not return anything without first contacting us.
Page 8
 Loading...