

Page 1
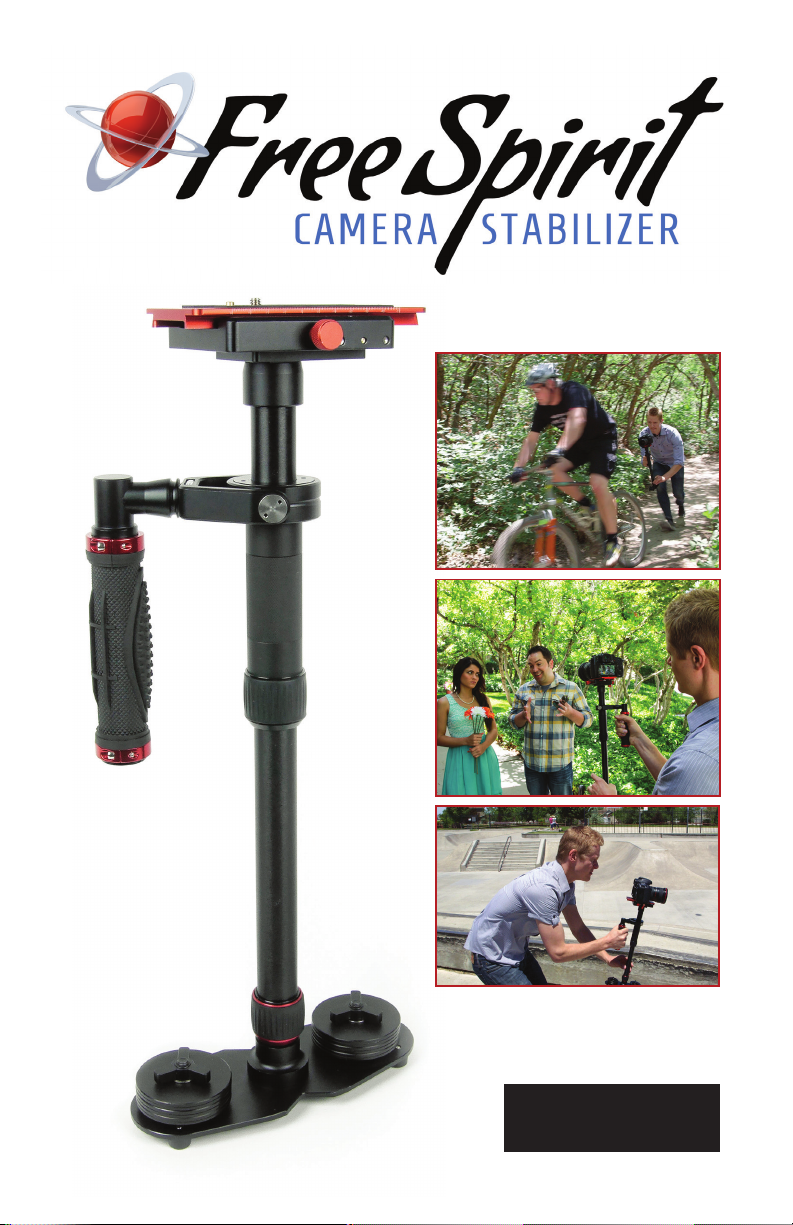
USER’S GUIDE
Page 2

Page 3

TABLE OF CONTENTS
About the Free Spirit Handheld Camera Stabilizer 2
Free Spirit Component Parts 3
Free Spirit Key Features 4
Using the Free Spirit Camera Stabilizer 5
Attaching your camera to the Free Spirit 5
Achieving balance with your camera 6
Horizontal Balance 6
Vertical Balance 8
Handling the Free Spirit 9
Shooting with the Free Spirit 9
Cautions & Warnings 11
Specications 11
Return Policy & Limited Warranty 13
Page 4
USER’S GUIDE
About the
Free Spirit
Handheld
Camera Stabilizer
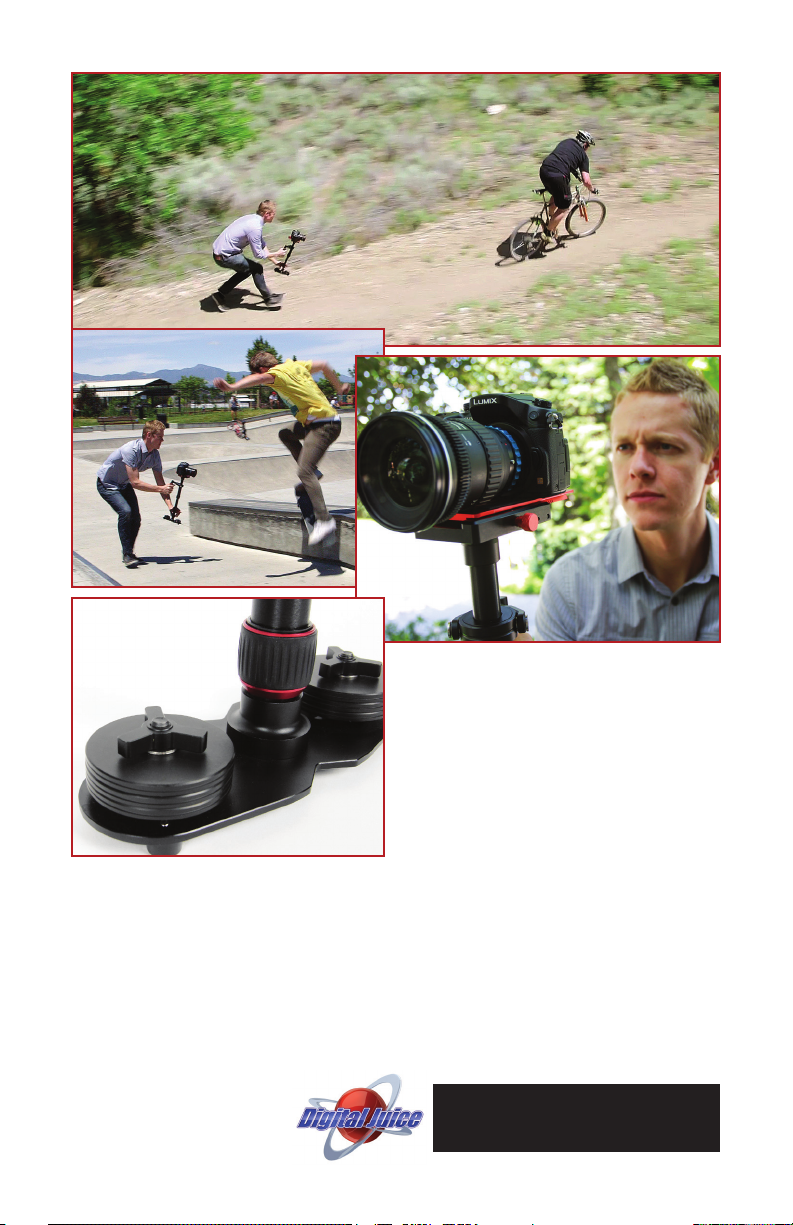
The Digital Juice Free Spirit Camera Stabilizer is an affordable,
lightweight, handheld camera stabilizing system designed to allow
you to walk, run, climb stairs or move over rough terrain without
camera shake or instability. Using this one piece of gear you can get
beautiful and stable moving shots with a very high production value.
And, since it weighs less than 3 pounds, it won’t break your back
when you need to hold both Free Spirit and camera for extended
periods of time. You can easily get smooth tilts and pans, even
jib or crane-like booms and fluid dolly-style maneuvers with the
device because of its offset-gimbaled handle grip, horizontal yoke,
telescoping center post and adjustable built-in quick-release camera
plate. With the right lens and the right balance, the shots you can get
with the Free Spirit are limitless.
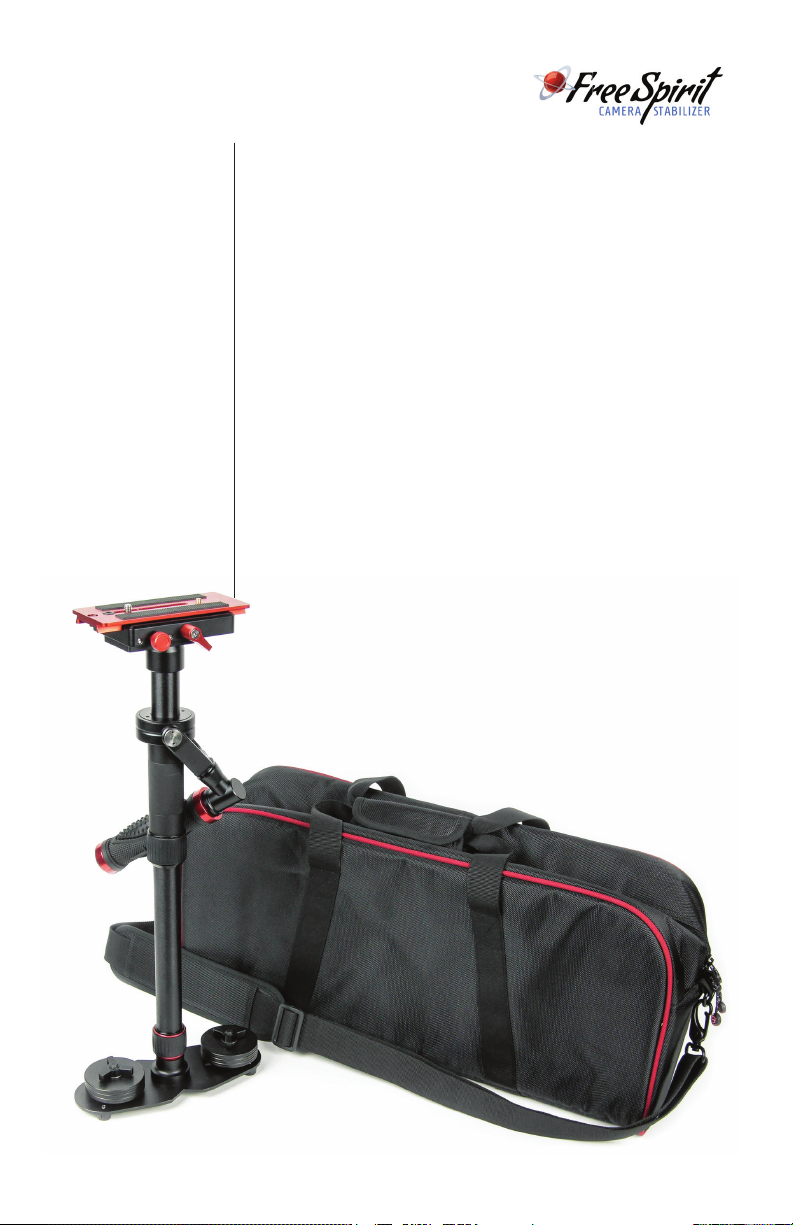
The Free Spirit unit collapses to 18.5 inches and extends to just over
30 inches. It can help you shoot continuous shots which range freely
in any direction you can move, while still producing stable, dynamic
imagery. You can use just about any professional camcorder, SLR
or DSLR camera weighing up to 8 pounds with the Free Spirit. Its bidirectional, adjustable baseplate includes 3/8” and 1/4”-20 adapters
that allow for easy mounting of a wide variety of quick release plates
and cameras. A precision 3-axis gimbal allows your camera to remain
stable and isolated from your hand shake and body movement, giving
you smooth steady camera motion over any terrain, whether it’s dirt,
rocks, pavement, or grass. The quick-release locking system with
micro adjustment knobs and the position-adjustable counterweight
rings on the base of the stabilizer allow for easy finetuning and
balancing when your camera is onboard.
2
Page 5
USER’S GUIDE
Free Spirit
Component Parts
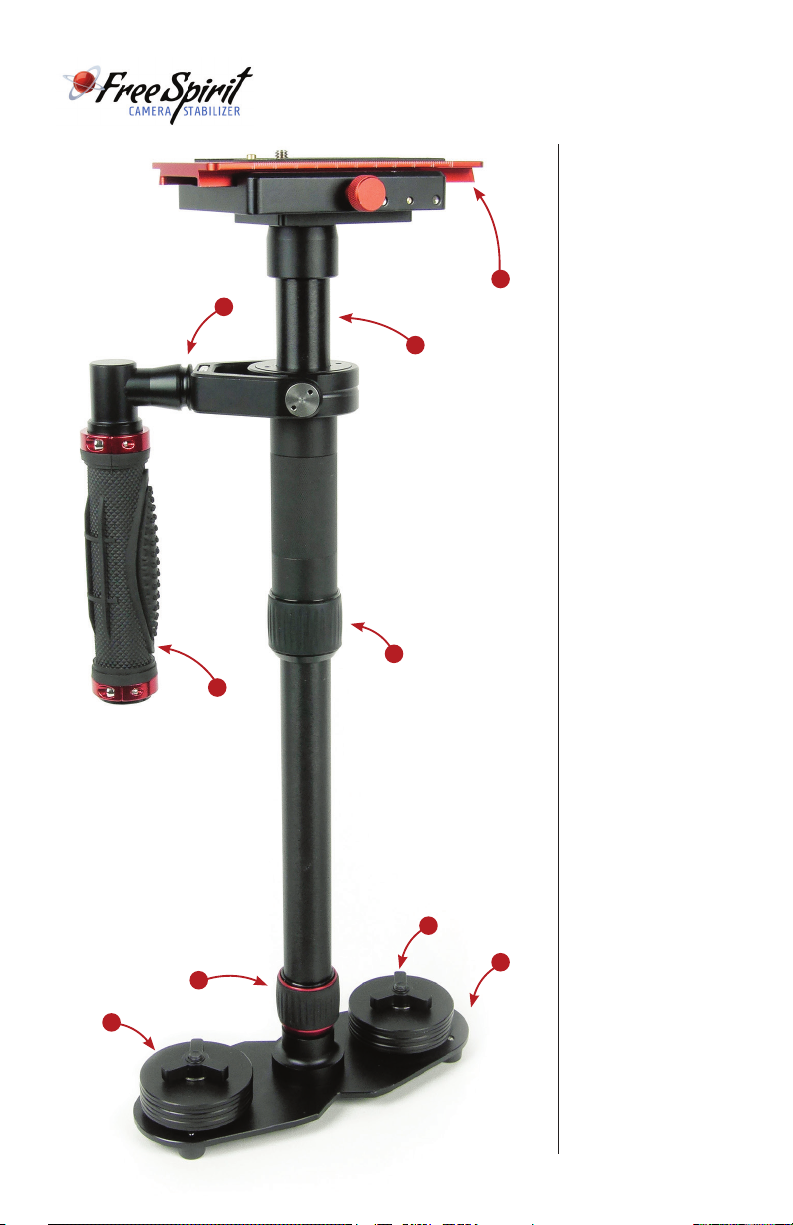
Quick release camera
base plate (1)
1
3
2
4
5
Center telescoping support column (2)
Offset gimbaled handle
grip and horizontal yoke
assembly (3)
Handle assembly up/
down adjustment and
locking ring (4)
Soft rubber, textured
handle grip (5)
Telescoping center column length adjustment
and locking ring (6)
Counterweight base
plate (7)
Six 3-ounce counterweight rings (8)
Counterweight stack
tie-down screw (9)
9
6
8
7
3
Page 6
USER’S GUIDE
Free Spirit
Key Features
10
12
13
14
15
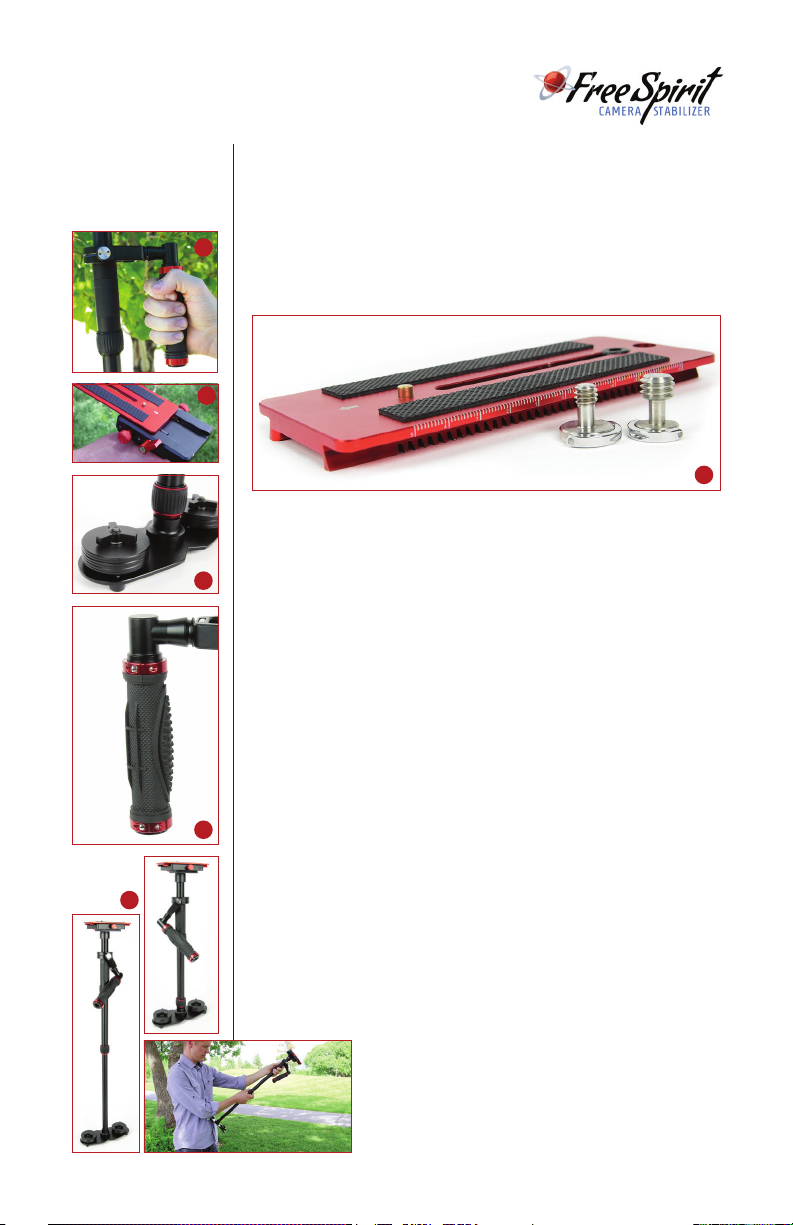
• The three-axis offset gimbaled handle-grip, enclosed bearing as-
sembly and horizontal yoke of the Free Spirit stabilizer (10) allow
your hand to move freely in every dimension, independently from
the stable camera and telescoping center post. This eliminates
the shake and instability inherent in handheld camera shots, while
allowing the freedom of constant smooth motion on three axes
which you can’t get from a typical jib or dolly setup.
11
• The adjustable, built-in quick-release camera-mounting platform (11)
includes 3/8” and 1/4”-20 adapters, allowing you to quickly and easily attach, remove or swap in just about any compact professional
camcorder, SLR or DSLR camera weighing under 8 pounds. The
bidirectional base plate has a finetuning system that can be adjusted
freely in any direction. The marks on the edge of the plate can
help you record the position of the plate for dynamic balance with
different setups. Pulling the adjusting knob on the side of the plate
separates the quick-release plate from the base (12).
• The counterweight plate at the bottom of the unit (13) helps you
finetune your camera’s dynamic balance and inertia using the
provided position-adjustable stacks of counterweight rings.
• The soft rubber, textured handle grip (14) makes the Free Spirit
stabilizer comfortable and easy to hold and operate.
• The telescoping central post (15) allows you to adjust the height
of the Free Spirit for shooting at a higher angle. The unit collapses
to 18.5 inches and extends to just over 30 inches.
• Precision enclosed bearings and lightweight all-aluminum preci-
sion CNC construction ensure you have a quality product that
will give you years of use. The included durable nylon carry bag
keeps the Free Spirit clean and protected for storage and when
travelling from location to location.
4
Page 7
USER’S GUIDE
Attaching your camera to the Free Spirit
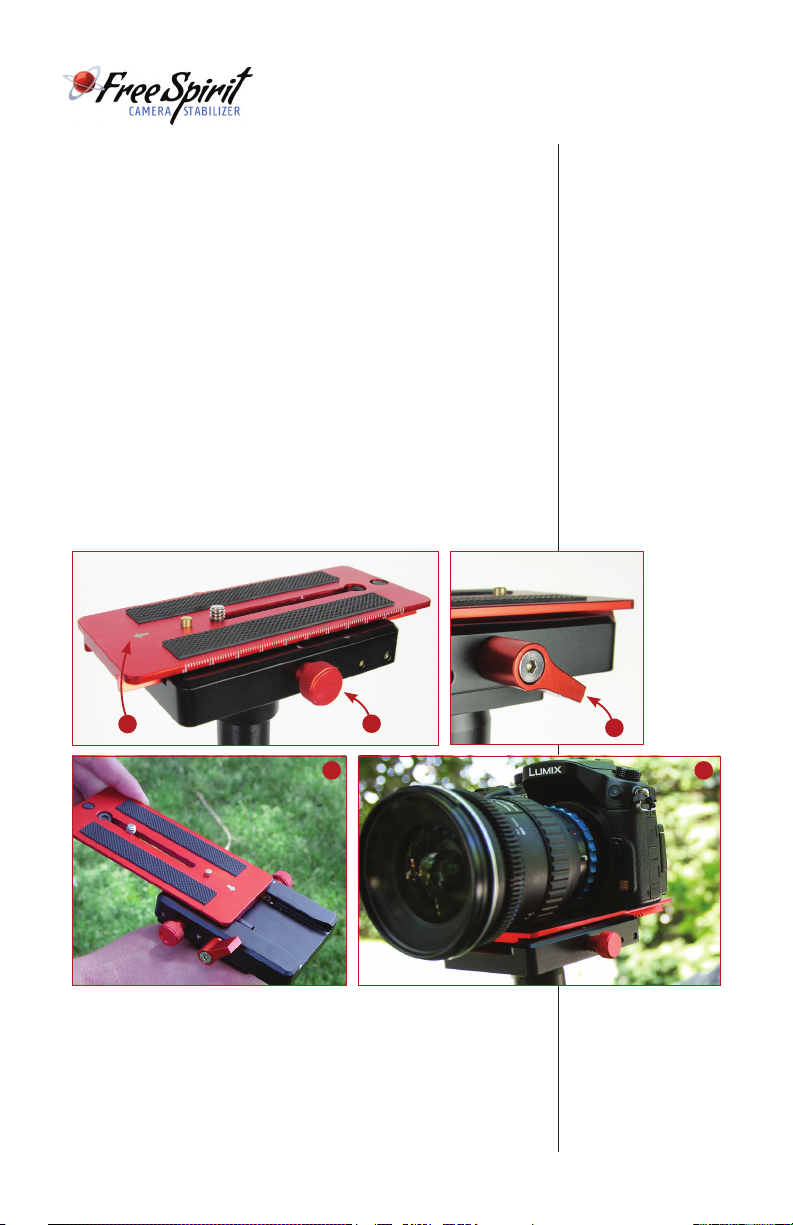
1. Remove the quick release plate from the top of the Free Spirit. To
do this, position the unit with arrow on top of quick release plate
(16) facing away from you, then loosen the quick release lever
knob on the right side (17) and pull on the red back-to-front fine
adjustment screw (18) on the left side of the quick release plate
unit. This will release the lock on the sliding plate and you can
slide it off the top of the Free Spirit in the direction of the arrow.
2. Find the threaded hole on the bottom of camera, and determine the
correct mounting screw to use with it. The Free Spirit quick release
plate features dual 1/4”-20 and 3/8” removable camera mounting
screws, so install whichever of these you need for your camera
through the bottom of the quick release plate’s long slot (19).
3. Screw the quick release plate onto the bottom of your camera.
4. Slide the camera onto the top of the Free Spirit by aligning the
quick release plate with its base and sliding it into place (20).
16
18
Using the
Free Spirit
Camera Stabilizer
17
19 20
5
Page 8

USER’S GUIDE
Using the
Free Spirit
Camera Stabilizer
(continued)
NOTE:
When checking
horizontal balance,
you should make
sure that you lift the
Free Spirit from a flat
and level surface,
such as a table, and
allow it to hang freely
as you hold it. If it is
balanced properly on
its horizontal axis, it will
be level and upright,
with the center shaft
in a perfect vertical
position. If it tilts to the
front, then you need
to shift the center of
gravity backwards. If
it is tilting to the back,
then you need to shift
the center of gravity
forwards. If the unit
leans to the right, you
will need to adjust
the plate and camera
to the left using the
left-to-right adjustment
knob on the mounting
plate. If the unit leans
to the left, you will need
to adjust the plate and
camera to the right
using the left-to-right
adjustment knob on the
mounting plate.
Achieving balance with your camera
on the Free Spirit Camera Stabilizer
You’ve got all of the control that you could want for front to back and
left to right adjustments to be able to really finetune the center of
gravity of your Free Spirit/camera setup—both by moving the camera
quick-release plate on the top of the unit in fine increments and by
adjusting the amount and position of the counterweights on the base.
Before you begin the finetuning/balancing process, make sure that
your camera is set exactly how you need it for shooting: remove the
lens cap, install the battery, attach the appropriate lens, and flip out the
camera LCD screen if you will be using it. You don’t want to make all
of your tweaks and adjustments and then have to change something
and start from the beginning to tweak it again.
Horizontal Balance
The goal in achieving correct horizontal balance is that the camera
should remain level during operation, unless you are intentionally
applying a pan, tilt or roll type of hand pressure to the Free Spirit unit.
In other words, if the Free Spirit is horizontally balanced correctly, then
the camera should remain level, and the center post should remain
vertical. The Free Spirit should always return to this level and vertical
position after you release any pan, tilt, or roll pressure on the center
shaft of the unit. To achieve horizontal balance you will need to make
sure your camera’s center of gravity is aligned properly with the center
of the Free Spirit unit.
1. First assess and adjust the position of attachment of your
camera on the quick release plate. Depending on what lenses or
accessories you have attached to your camera you may need to
shift the attachment point away from the center of plate.
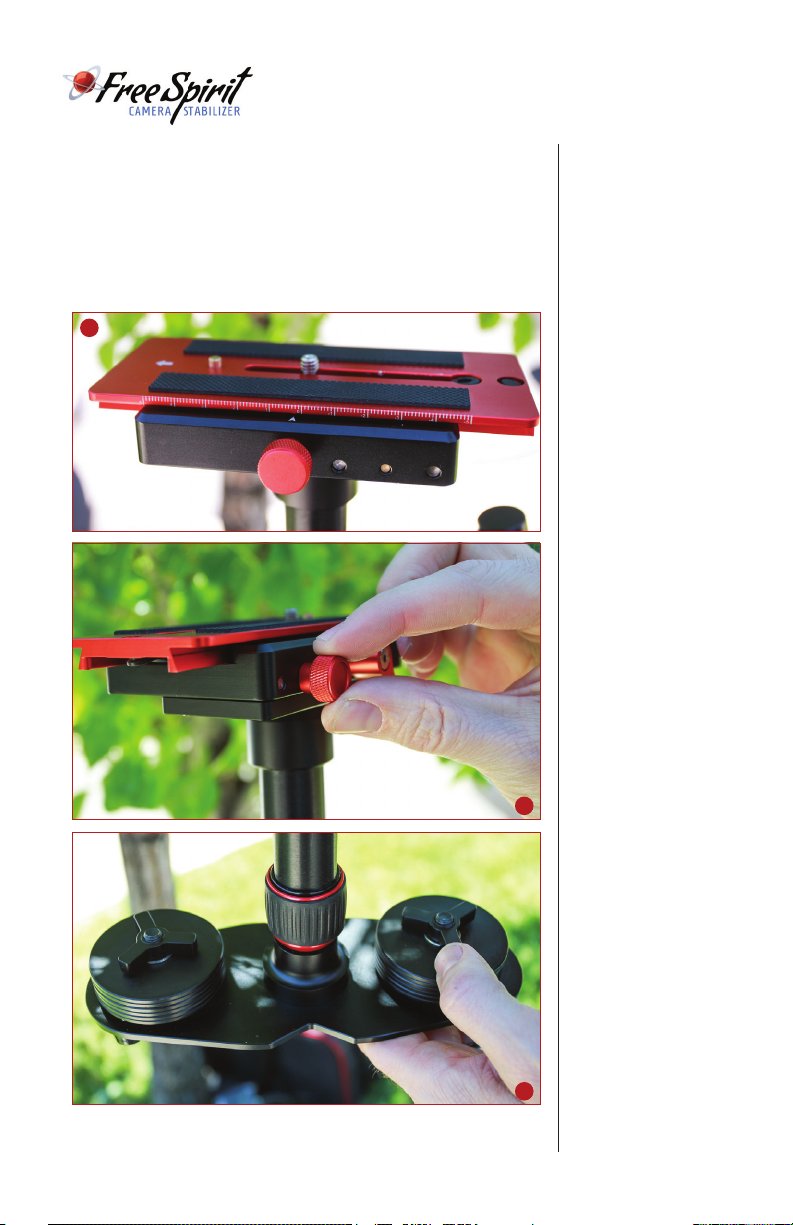
2. Once the quick release plate and camera are attached to the Free
Spirit, adjust camera position from front to back by turning the
front-to-back adjustment knob on the left side of the mounting
plate (21). Once you have reached a good front to back
equilibrium, you can lock down the position using the red lever
knob on the right side of the mounting plate.
3. Make finetuning adjustments of camera position from left to right
by turning the left-to-right adjustment knob on the right side of the
mounting plate (22).
4. After adjusting side-to-side balance, you may need to go back
and readjust front-to-back balance to obtain a fine balance of the
overall setup. You can use either your naked eye or a bubble level
to judge for correct horizontal balance.
6
Page 9
USER’S GUIDE
5. Another way to finetune horizontal balance is to move the position
of the counterweight ring stacks on the base plate at the base
of the unit (23). There are slots on the base plate on which the
weight stacks can move inwards and outwards from the main
shaft. Moving the counterweights away from the center on the
base plate will also increase panning stability. Make sure to lock
the counterweights back down after you move them.
21
Using the
Free Spirit
Camera Stabilizer
(continued)
22
NOTE:
Horizontal balance will
get less sensitive as
you increase weight at
the bottom of the unit
and then more sensitive
as the unit achieves
vertical balance.
23
7
Page 10

USER’S GUIDE
Using the
Free Spirit
Camera Stabilizer
(continued)
8
Achieving balance with your camera on the
Free Spirit Camera Stabilizer (continued)
Vertical Balance
Once your Free Spirit is horizontally balanced, its vertical balance
can be tested and properly adjusted. As with horizontal balance, the
objective in obtaining correct vertical balance is to get the camera
and Free Spirit unit to remain level during operation, unless you are
intentionally applying a pan, tilt or roll type of hand pressure.
Most importantly, the Free Spirit’s center shaft should remain vertical
when you are walking, running, or turning while using it. In other words,
if the Free Spirit is vertically balanced correctly, then the camera should
remain level, and the center post should remain vertical. The Free Spirit
should always return to this level and vertical position after you release
any pan, tilt, or roll pressure on the center shaft of the unit.
If the Free Spirit is not vertically balanced properly, it will swing like
a pendulum when you walk, run or turn. if the ver tical balance is set
correctly you will be able to move around quickly, as well as start or
stop suddenly, while the center shaft of the unit remains vertical.
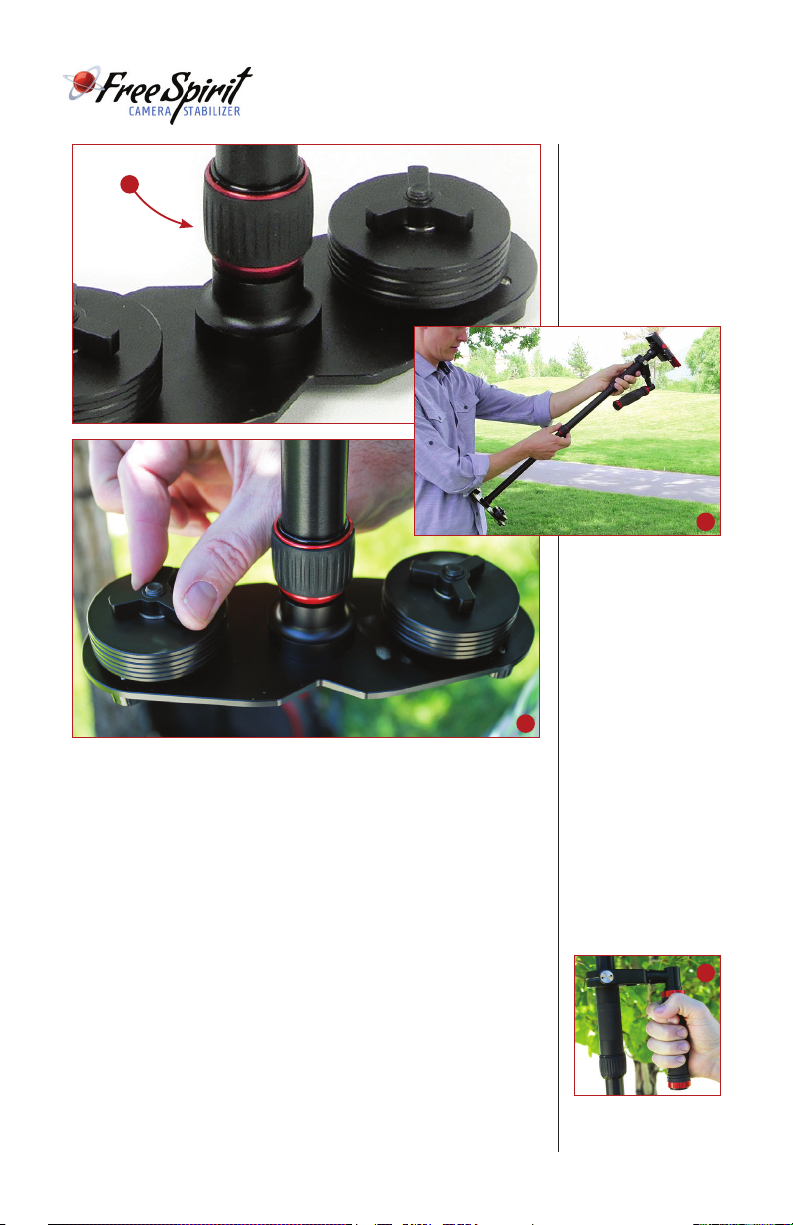
1. The best way to adjust ver tical balance is to telescope the center
shaft in or out from the counterweight base plate. To do this,
loosen the red-ringed height adjustment ring (24) on the center
column and slide the shaft up or down as required. Then, retighten the adjustment ring to hold the column at this length (25).
2. Another way to adjust the Free Spirit’s vertical balance is to add
or subtract counterweight discs on the bottom base plate of the
unit (26). To do this, you would remove the tie-down screw at the
top of the weight stacks on both sides of the base plate, and then
slide on or off one or more weight rings on each side.
3. To test for vertical balance you can hold the Free Spirit by the handle
with one hand and lift the base plate up until the center column
is horizontal to the ground with the other hand. Then, release the
baseplate and count how long the unit takes to drop and first return
to a vertical position. You want to count only until it passes the
vertical position the first time, not the subsequent swings back and
forth until it comes to rest. Before you achieve balance, this time will
likely be very fast, a second or less. The ideal time on a perfectly
balanced unit will be two to three seconds.
4. You can also test vertical balance by moving quickly forward carrying
the unit and stopping quickly. If the Free Spirit swings like a pendulum
away from the upright position, then it is not yet balanced properly.
5. Until you can perform these vertical balance tests succesfully,
you will need to make finetuning adjustments as outlined in Steps
1 and 2 above.
Page 11
USER’S GUIDE
Using the
24
Free Spirit
Camera Stabilizer
(continued)
25
26
Handling the Free Spirit Camera Stabilizer
The Free Spirit Camera Stabilizer is designed to work properly only
when using two hands to control it—one hand to hold the unit and the
other to guide it. Without a guiding hand, the camera can drift away
from its originally balanced position and you won’t be able to control
the direction it is shooting. With a second hand, you can gently guide
the camera in the direction you wish to shoot and aim the camera
properly for tilting and panning shots.
When holding the Free Spirit you should hold the handle firmly in
the center of the rubberized handle grip (27). The handle and gimbal
unit can slide up and down on the center column, depending on
where you want to hold it. If you will be aiming the camera up, down
or sideways, you may want to lower the position of the assembly
to avoid hitting your hand or knuckles on the camera or attached
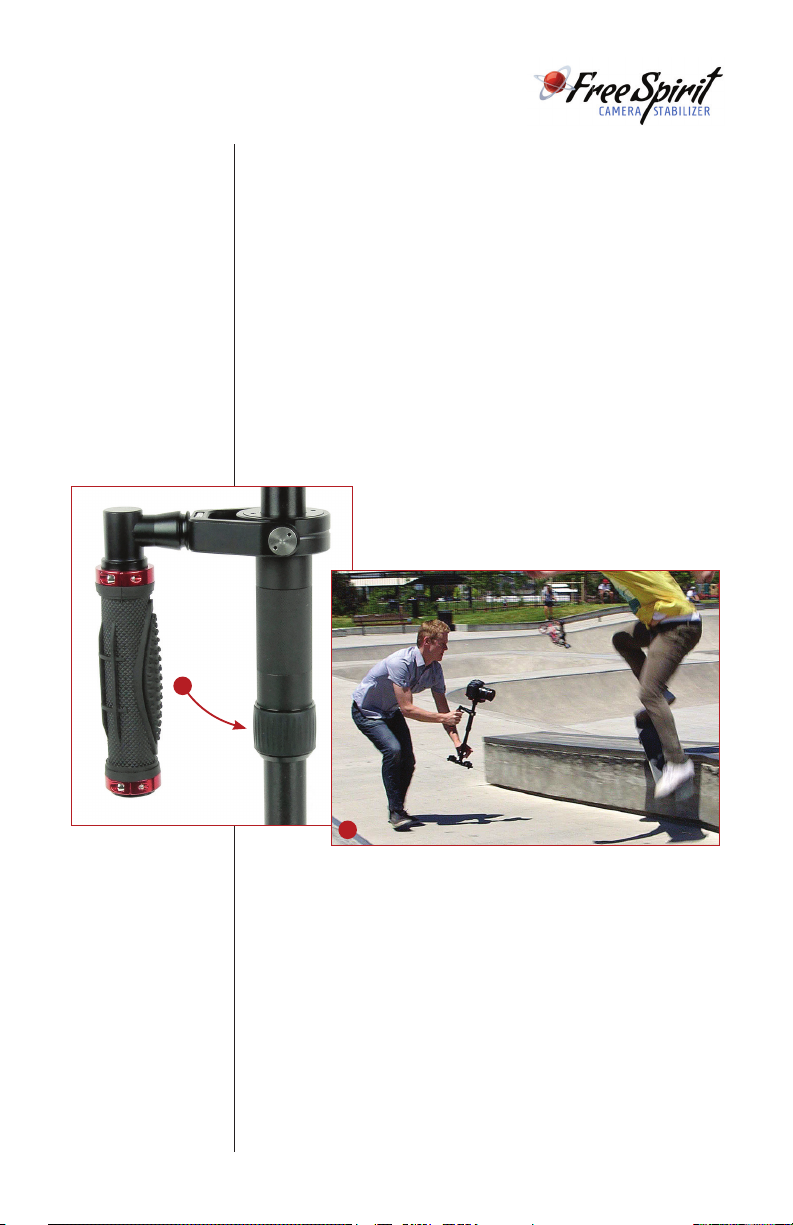
accessories. To adjust the position, just twist the black rubber
adjustment ring to loosen it, slide the handle assembly up or down
(continued on page 10)
27
9
Page 12
USER’S GUIDE
Using the
Free Spirit
Camera Stabilizer
(continued)
NOTE:
Make sure neither
hand touches the
gimbal assembly,
yoke or top camera
mounting plate
during shooting
as this can cause
unstable shots.
28
Handling the Free Spirit Camera Stabilizer (continued)
and re-tighten the black rubber ring (28) at the new position. You can
also hold the Free Spirit’s handle from behind the bar or in front of the
bar depending on whatever is most comfortable for you.
When you use your second hand to guide the Free Spirit, you will
want to gently hold onto either the area just below the handle and
yoke assembly or the area on the center column just above the
counterweight base plate, using thumb and forefinger and not the
entire hand. These two areas offer the easiest control of the unit
in use. Where you hold will depend on the kind of shots you are
taking. Usually you will want to use the area just below the handle
assembly, because it will allow you to subtly aim the camera
without disturbing its upright position and you will get the smoothest
shots when walking or running like this. For unconventional shots,
where you are aiming the camera up, down, or
at an angle, guiding the Free Spirit from the area
above the base plate will give you a greater degree
of control (29).
10
29
Shooting with the Free Spirit Camera Stabilizer
When operating a handheld camera stabilizer like the Free Spirit, you
cannot use the eyecup on the viewfinder without restricting the unit’s
ability to stabilize and eliminate camera shake. However, there are a
few ways you can more accurately frame your shots.
1. If your camera has a flip out LCD monitor then you can view your
shots on that while capturing footage.
2. You can attach an LCD color video monitor to the accessory shoe
on top of your camera.
3. You can watch the little monitor inside your camera viewfinder
from several inches away with the magnifying eyecup removed.
Page 13

USER’S GUIDE
4. You can rely on your own sight and judgment of what the camera
is shooting. This is easier to do if you camera is set up with a
wide angle lens so that you don’t miss any of the action. Also,
using a wide aperture setting will give you a wider depth of field
so that the precision of your focus is not as important. Estimate
the distance that you want to be from your subject and set the
focus there, and then try to stay as close as possible to that
distance from the subject while taking your tracking shots. With
the aperture high it will not be as critical if you move in and out a
little bit from the subject as you shoot.
• When handling and operating your stabilizer, always avoid violent
motion as it could cause damage to the unit or cause your camera
to come loose from the mounting plate.
• The Free Spirit does not work underwater and is not waterproof,
so you should avoid direct exposure to rain or water. It is also
not sand-proof, so avoid getting dirt or sand on it as this could
interfere with the smooth operation of the unit.
• Be very careful when using the Free Spirit at night or in low
light conditions. It is easy to focus so much on what you are
shooting that you don’t notice obstacles in your path. Plan your
shots before shooting, so that you do not trip or fall over, or into,
something along the way such as traffic or a water fountain. Be
extra cautious when shooting on stairs or rugged terrain, whether
in daylight or at night.
• If you plan to store your Free Spirit for an extended period of time,
store it upright in a dry or low humidity area whenever possible to
alleviate stress on the system. If this is not possible, place it in an
airtight plastic container or bag.
• Do not use solvents or harsh cleaners of any kind on the Free
Spirit unit. If it becomes dirty, use only a damp cloth or sponge
with water to gently rub clean.
Using the
Free Spirit
Camera Stabilizer
(continued)
Cautions &
Warnings
Load Capacity: Designed for compact, low-profile cameras weighing
up to 8 pounds
Dimensions: Free Spirit Height:18.5”/47cm in shortest mode,
30.5”/77.5cm in longest mode; Camera Quick Release Plate: 5.5” x
2.375” x 1.125/14cm x 6cm x 3cm; Counterweight Base Platform
Dimensions: 7.75” x 3.25/19.7cm x 8.25cm; Central Support Post:
1”/2.54cm diameter
Weight: Free Spirit Camera Stabilizer: 3.2lbs/1.45kg without Counter
Weights; Each Counterweight Disc: 3.5 oz/99g; 6 Counterweight
Discs: 21 oz/595g
Specifi cations
11
Page 14

USER’S GUIDE
Free Spirit
Return Policy &
Limited Warranty
Unless otherwise noted this warranty agreement is the only warranty
agreement between the parties. This agreement states the limits and
association of risk between the two parties. By use of the Product and
accessories the customer acknowledges understanding of this warranty and agreement and binding to the terms contained within.
Return Policy
• 30-day money back excluding shipping.
• A receipt dated within 30 days of purchase.
• All returns must be new, unused, and contain all original packaging, labels and accessories.
• The original product must be returned inside your shipping box.
• DJ suggests using a carrier that provides tracking and insurance.
DJ is not responsible for lost shipments.
Warranty
Digital Juice, Inc. warrants all Digital Juice products purchased
new by original owner to be free from defects in the material and
workmanship under normal use for a period of 12 months from the
date of purchase. Warranty is void when misuse or neglect is the
cause. THIS WARRANTY IS VALID ONLY IN THE UNITED STATES
AND CANADA.
12
Legal Indemnification
No other express warranty or guaranty, except as mentioned
above, given by any person or entity with respect to Digital Juice
products shall bind Digital Juice, Inc. This warranty supersedes all
other warranties expressed or implied. NO IMPLIED WARRANTIES,
INCLUDING ANY IMPLIED WARRANTY OF MERCHANTABILITY OR
FITNESS FOR A PARTICULAR PURPOSE APPLY TO DIGITAL JUICE
PRODUCTS AND ARE HEREBY DISCLAIMED.
In the event of a possible warranty claim, the defective product
must be returned to Digital Juice, Inc (hereafter “Digital Juice”). If
proven to be defective upon inspection, it will be exchanged for a
new or comparable rebuilt product, as determined by Digital Juice
and shipped back to the original purchaser. All shipping costs are the
responsibility of the customer. Warranty replacement shall not extend
the original warranty period of the defective Digital Juice Product.
Page 15

USER’S GUIDE
The customer’s remedies with respect to defective Digital Juice
Product and accessories shall be exclusively limited to the repair or
replacement remedy as above provided and in no event shall Digital
Juice be liable for loss of profits, revenues, savings, inconvenience,
associated costs, expense for equipment or service, use of capital,
facilities, services, storage charges, damage to property, or any other
special, incidental or consequential damages caused by the use or
misuse of, or inability to use, the Digital Juice Product or accessories,
regardless of the legal theory on which the claim is based, and even
if Digital Juice has been advised of such damages. In no event shall
recovery of any kind against Digital Juice be greater in amount than
the purchase price of the Digital Juice product sold by Digital Juice
and causing the alleged damage.
Without limiting the foregoing, the purchaser assumes all risk and
liability for loss, damage or injury to persons, animals or property
arising out of use or misuse of, or inability to use, the Digital Juice
Product and accessories. Digital Juice is not liable for third party
claims. This limited warranty shall not extend to anyone other than
the original purchaser of the Digital Juice product, or the person for
whom it was purchased as a gift, and states your exclusive remedy.
In no event shall Digital Juice be liable for incidental or consequential
damages to the full extent such may be disclaimed by law.
Unless otherwise noted this warranty agreement is the only warranty
agreement between the parties. This agreement states the limits and
association of risk between the two parties. By use of the Product
and accessories the customer acknowledges understanding of this
warranty and agreement and binding to the terms contained within.
Free Spirit
Return Policy &
Limited Warranty
13
Page 16
www.digitaljuice.com
 Loading...