

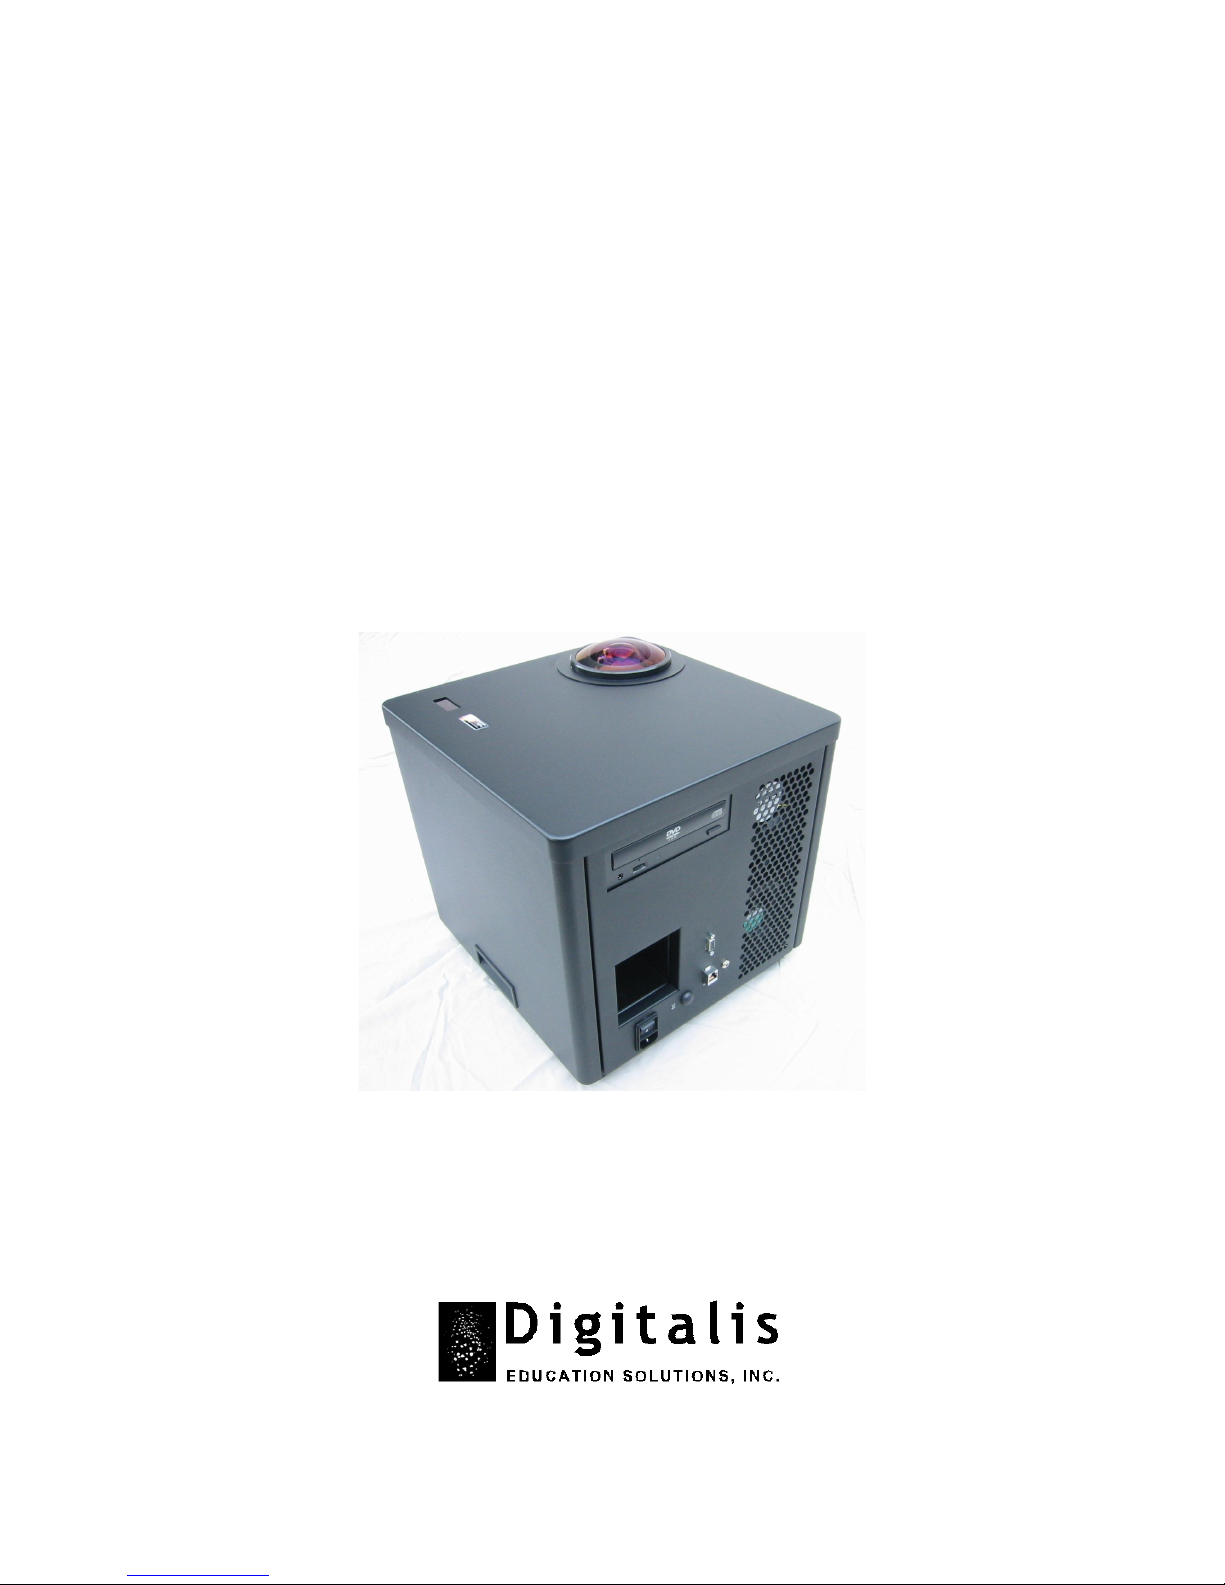
Digitarium Alpha
Portable Digital Planetarium Projector
User Manual
Version 1.20
February 23, 2006

Copyright 2004-2006, Digitalis Education Solutions, Inc. All rights reserved.
The Digitalis Education Solutions, Inc. logo, Digitarium,
and Digitarium Alpha are trademarks of
Digitalis Education Solutions, Inc.
PO Box 2976
Bremerton, WA 98310 USA
DigitalisEducation.com
Phone: 360.616.8915
Digitarium Alpha User Manual 2

Table of Contents
Introduction 4
Features of Note 4
Drawbacks 4
Safety 5
Feature Identifier 5
Set up and Turning on the Projector
Power On
Begin Projection
Stop Projection
Restart Projection
Turning off the Projector
Indicator Light States
Packing
Use
Remote Control
Normal Operating Mode
Menu Mode
Script Playback Mode
Media Mode (Using the DVD Drive)
Creating Multimedia Disks 22
Video-In Port 23
Maintenance
24
6
8
9
Updates
Lens Care
Lamp Life
Checking Remaining Lamp Life
Lamp Replacement
Troubleshooting 27
How to Get Help 29
Product Specifications 29
Warranty
Two year limited warranty
Limited liability
Software Licenses 30
Regulatory Information 31
Digitarium Alpha User Manual 3
30

Introduction
The Digitarium Alpha portable digital planetarium projector is a full-featured
projector ideal for portable or small fixed domes.
Our design goal was a planetarium projector for the small dome market that was
simple to set up and use, easily portable, full-featured, and affordable.
You will get the most out of your projector if you understand the components of
which it consists. The Digitarium Alpha is comprised of a computer, a DLP
projector, and two remote controls. The computer runs planetarium software
which is controlled by the Digitarium remote control. The computer produces
video output which is projected onto a dome by the DLP projector using a fisheye
lens. The DLP projector has its own remote control which is used to turn the
projector light on or off, as well as to view or reset bulb lifetime.
[This DLP projector remote control gives access to many projection specific
settings, but we recommend that you do not modify these, as improper settings
can potentially disable your Digitarium Alpha.]
Features of Note
• Easy, accurate, fast set up.
• Fixed focus regardless of dome size.
• Operated by hand-held remote control from anywhere in the dome.
• Updates itself over the Internet at your command.
• DVD drive for your own or third party images or video.
• Accounts for precession of the equinoxes.
• Adapts automatically to any power system in the world, using 110-240v 50-60
Hz AC power (with appropriate power cord).
Drawbacks
In the interest of affordability, some tradeoffs had to be made. You will probably
notice:
• Blue/violet chromatic aberration, especially near the horizon.
• The north horizon area is slightly dimmer than other areas.
We feel that neither of these should detract substantially from your audience's
enjoyment of the planetarium experience.
Digitarium Alpha User Manual 4
Safety
• Make sure vents are not blocked to avoid overheating.
• Do not stare into the lens while the projector is projecting as the light is very
bright.
• Change lamp after 2,000 hours of use, or catastrophic failure of the lamp can
result.
• Do not use projector when it is tilted toward either vent side. This can result in
significantly reduced lamp life.
• Be careful lifting the projector due to its weight.
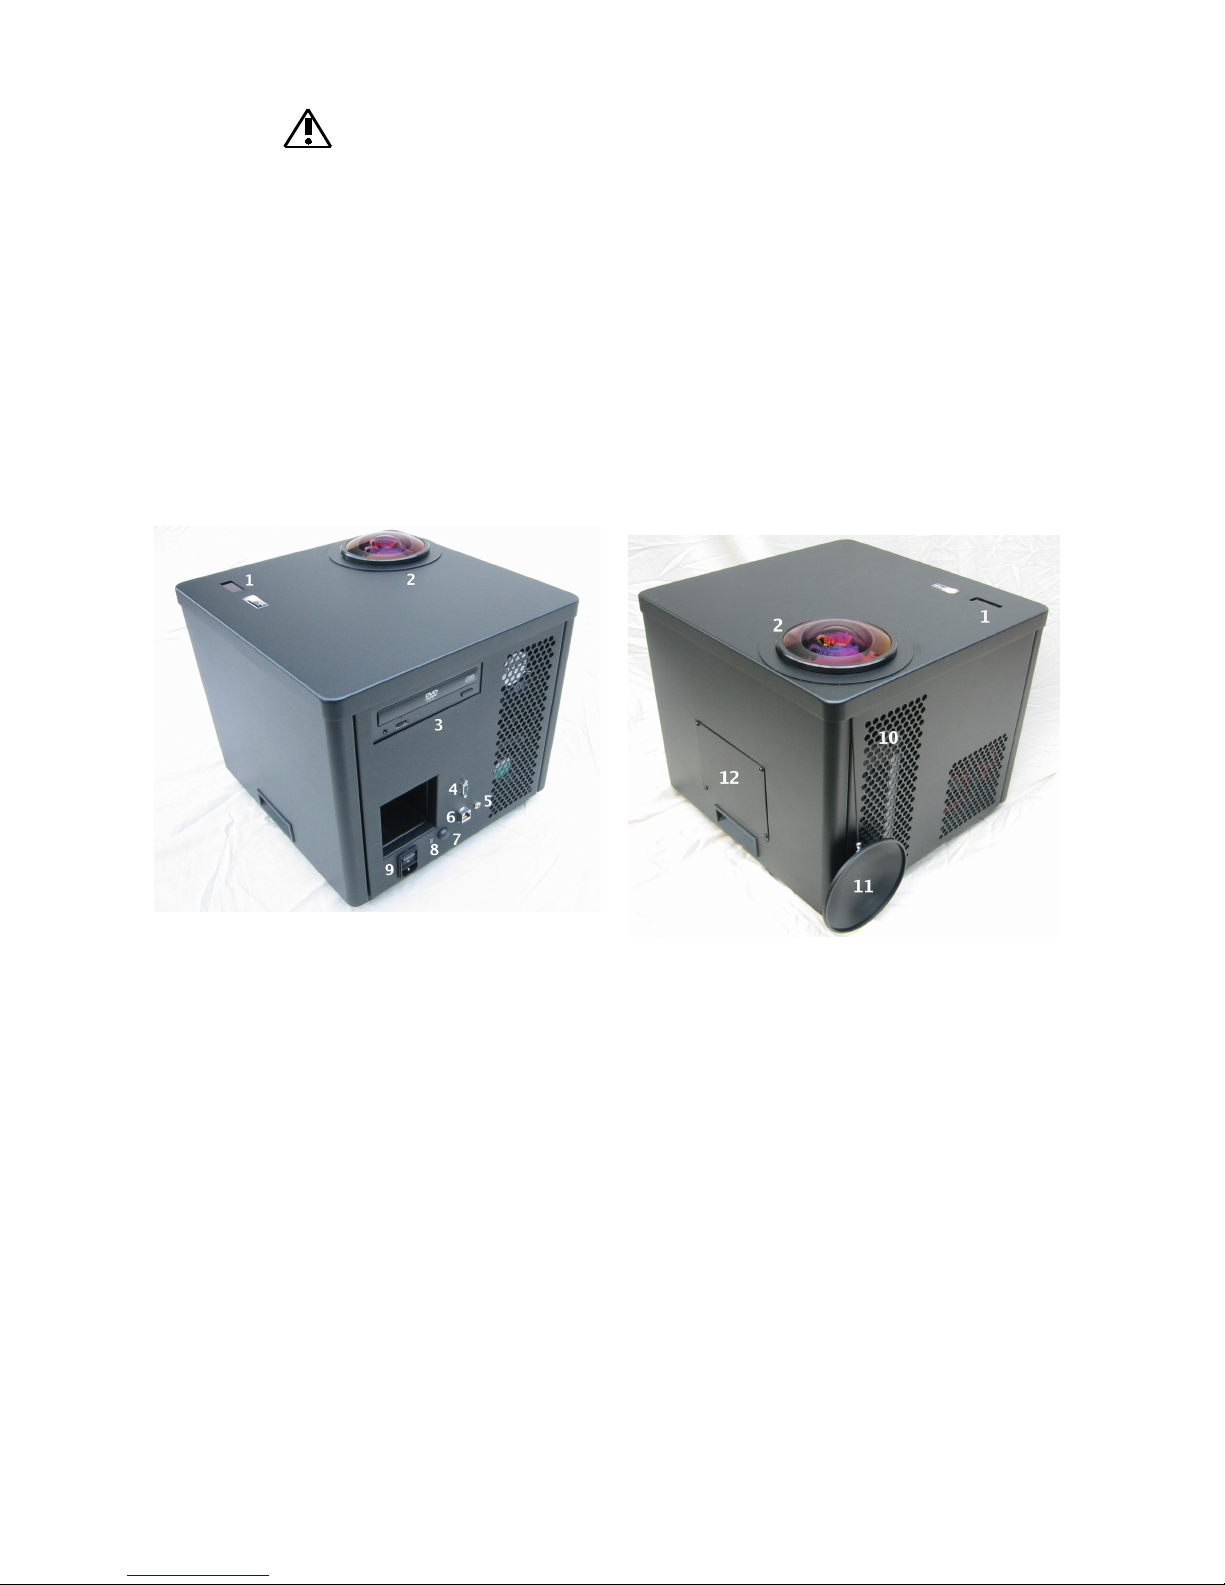
Feature Identifier
Features, as labeled above:
1. Infrared receiver for Digitarium Alpha projector remote control
2. Projection lens
3. DVD drive
4. Video-in port
5. Audio jack
6. Ethernet jack
7. Reset button
8. Indicator light
9. AC power jack and switch
10.Infrared receiver for DLP projector remote control
11.Lens cap (hanging on retention cord)
12.Lamp access door
Digitarium Alpha User Manual 5
Set up/Turning on the Projector
Before turning on the projector, be sure to read the section below for
instructions on turning off the projector. Do not simply switch it off, or you
could burn out the expensive projector lamp.
Set Up
1) Remove the transit case lid by the handles and place it on the floor in the
center of your dome.
2) Lift the projector out of the transit case base by the projector handles. Place
the projector on top of the transit case lid. Orient the projector so that the
projection lens is roughly centered under the zenith of the dome. Rotate the
projector to orient the projected sky to your preference.
3) Attach the power cord to the projector and plug the other end into a surge
protector, uninterruptible power supply (UPS), or AC power conditioner
plugged into an acceptable AC power outlet. These devices protect against
damage from different types of electrical power disturbances, which is not
covered under your warranty.
4) Remove the lens cap by lifting straight up. Do not twist the cap off as this can
rotate the lens. If the cap is tight, gently pry up one side with a key or other
lever.
Warning: Do not rotate the lens as this can seriously damage the lens or
internal components. The lens focus is fixed and not user adjustable. If your lens
is loose or projection seems blurry even after the projector has fully warmed up
(about three minutes), contact Digitalis technical support.
Power On/Begin Projection
1) Switch on the projector. The start up process takes about one minute.
Meanwhile, hold down the power button on the DLP projector remote control
for two or three seconds to turn on the projector light. You will need to be next
to the projector and aim into the vents near the lens. The indicator light will
start flashing green. It will take about 30 seconds for the lamp to reach full
intensity.
2) When ready, you will see the sky projected onto the dome above you. Note:
Deep sky object images load in the background, which takes about 45 more
seconds. While these are loading, the drawing refresh rate is limited.
3) When Stellarium starts up, it will automatically run a script called
“ /scripts/startup.sts” if one exists on the disk in the projector's DVD drive. For
more information about scripts, see the section entitled “ Script Playback
Mode.” Press if you want to cancel the script.
Digitarium Alpha User Manual 6
4) If you want to make sure you are in the center of the dome, press to bring
up an azimuthal grid. Move the projector as needed to center the grid on the
dome, and then turn off the grid.
5) Don't forget to change your latitude, longitude, and time zone, if necessary.
See the section entitled “ Menu Mode” for instructions on changing these
settings. If you modify settings and want those modifications to become your
default settings, you will need to save them as default, using the menu.
Stop Projection
To stop projecting onto the dome, aim the DLP projector remote control into the
vents near the lens. Press and hold the power button until a dialog pops up,
asking whether you really want to stop projecting. If you do, hold down the power
button again. Otherwise, do nothing.
It takes 90 seconds to shut off and cool down the projector lamp safely.
During these 90 seconds do not shut off power to the projector or you
could damage the lamp. You will not be able to resume projection until after this
cooling period is completed. While cooling, the indicator light will flash orange.
Once finished, it will be steady orange.
Note that the computer components of the Digitarium Alpha are still running.
To resume projection, turn on the projection lamp just as you did the first time.
If you will not be restarting projection soon, place the lens cap over the lens to
protect it.
Digitarium Alpha User Manual 7
Turning off the Projector
To turn off the projector completely, stop projection as described above. Once
projection has stopped and the indicator light is steady orange, it is safe to switch
off the projector with the power switch.
Indicator Light States:
Light Meaning
Off No power, OR, if power is on, there is a problem with bulb or
projector. Safe to turn off.
Steady orange Standby mode (projection stopped); safe to turn off.
Flashing green Lamp turning on. If projection turns off and light flashes green,
the projector temperature is too high. See the troubleshooting
section for possible causes and solutions.
Steady green Projecting at maximum brightness.
Flashing orange Lamp cooling off; will take approximately 90 seconds.
Flashing red Fan not functioning; projector will automatically shut down.
Contact technical support.
REMEMBER: Only turn off the projector when the light is steady orange
or off to avoid lamp damage.
Packing
To assist you in packing your Digitarium Alpha projector, a small white circle is
attached to one corner of the transit case base foam. The lens of the Digitarium
Alpha projector should be placed in the corner marked by this circle. This lines up
the lens with a hole in the foam-lined top of the transit case, putting less pressure
on the lens.
If your lens cap seems loose or you will be transporting your projector far, we
recommend using a strip of masking tape to keep the cap on and the lens
protected during transit.
Digitarium Alpha User Manual 8
Use
Remote Control
The Digitarium Alpha remote control is pictured below. There are four modes for
the remote control: normal operating mode, menu mode, script playback mode,
and media mode. The following pages will explain what the buttons do in each
mode.
For best reception, point the remote at the zenith while sending commands.
The remote control is backlit. To backlight the remote for a few seconds, push
the button. You must release the button before you push another button.
Digitarium Alpha User Manual 9
Normal Operating Mode
In normal operating mode, the buttons do what is shown by the icons on their
faces.
Button Normal Operating Mode Function
Zoom in on selected object.
Zoom out to sky.
Reserved.
Move pointer toward zenith.
Move pointer counterclockwise around the zenith.
Move pointer toward horizon.
Move pointer clockwise around the zenith.
Select an object.
Pause/continue movement of time.
Stop time.
Accelerate speed of time backward. Can be pressed multiple
times.
Move forward in real time.
Accelerate speed of time forward. Can be pressed multiple
times.
Turn on/off labels for bright stars.
Toggle between planet labels, planet labels with orbits, and no
labels or orbits. To show one planet orbit at a time, select a
Digitarium Alpha User Manual 10

Button Normal Operating Mode Function
planet. To resume showing all planet orbits, select an object
other than a planet.
Turn on/off labels for deep sky objects.
Turn on/off constellation line drawings. To show one
constellation at a time, select a star in the constellation you
wish to show. To resume showing all line drawings, select a
star not in a constellation.
Turn on/off labels for constellations. To show one label at a
time, select a star in the constellation you wish to label. To
resume showing all labels, select a star not in a constellation.
Turn on/off constellation artwork. To show one constellation at
a time, select a star in the constellation you wish to show. To
resume showing all artwork, select a star not in a constellation.
Turn on/off compass points.
Toggle between the ecliptic, planet trails, and no ecliptic or
planet trails. As time passes planet trails grow out to 60 days in
length. Zooming one level while in manual zoom mode allows
great views centered on a particular planet.
The ecliptic is the path of the sun across the sky. The planets and
moon also lie on or near this line.
Turn on/off the celestial equator.
The celestial equator is an extension of Earth's equator onto the sky.
Turn on/off Earth's atmosphere.
Toggle between celestial meridian, azimuthal grid, and no
celestial meridian or azimuthal grid.
The celestial meridian is a circle running through the north and south
celestial poles; it passes through the zenith and intersects the
observer's horizon at the north and south points.
The azimuthal grid consists of parallels and meridians, with
meridians crossing at the zenith (90 degrees above the horizon).
Turn on/off the equatorial grid.
The equatorial grid is analogous to lines of latitude and longitude. It
consists of parallels and meridians, with meridians crossing at the
north and south poles.
Move forward (+) or backward (-) in time the specified number
of days.
Digitarium Alpha User Manual 11

Button Normal Operating Mode Function
Turn on/off landscape.
Increase size of moon. Press a second time to return moon to
normal size.
Change time and date to default settings.
Access or exit menu mode.
Turn on/off time and object information display.
Toggle between background meteor rate, typical meteor
shower, exceptional shower, and world record shower.
Remember that the observed rate depends on the location of
the radiant, maximizing at the zenith. Will only display meteors
while at real time rate.
Access or exit media mode.
Hide/show pointer.
Cancel an object selection or other action.
Digitarium Alpha User Manual 12

Menu Mode
This product uses a text-based menu system to modify configuration settings.
The menu, activated by the button, is displayed along the southwest horizon.
The configuration menu is organized into categories. Browse categories with the
and buttons. Press to enter a category.
Once within a category, browse the available configuration settings in that
category with the and buttons. Use to begin editing
the currently displayed setting.
While editing, the setting value you are editing is displayed in white. Use the
number buttons 0-9 and “ .” or “ -” to enter a number.
To finish your edit, press . To cancel your edit press . To leave the
menu, press again.
Digitarium Alpha User Manual 13

Menu Tree
1. Set location
1.1 Latitude: Use + for north and – for south.
1.2 Longitude: Use + for east, - for west.
1.3 Altitude: In meters.
2. Set time
2.1 Sky time: Set your sky for a different time.
2.2 Set time zone: Select continent, then city in your time zone.
2.3 Preset sky time: Only used if startup time is set to “ preset.”
2.4 Sky time at start-up: Use the actual clock time when you start
2.5 Time display format: 12 or 24 hour format.
2.6 Date display format: Choose between system default;
These account for daylight savings, if any. Be sure to update the
time zone if you change longitude, or the time will not correspond
to the sky.
up, or use a preset time you have chosen.
yyyy/mm/dd; dd/mm/yyyy; and mm/dd/yyyy.
3. General
4. Stars
5. Effects
3.1 Sky culture: Select culture for constellations.
3.2 Sky language: Select language for star, planet, and
constellation labels.
4.1 Show: Display or hide the stars.
4.2 Star magnitude multiplier: Modify brightness of stars to make
more or fewer visible. 1 is the minimum; 30 is the maximum.
4.3 Maximum magnitude to label: Increase or decrease number of
stars labeled.
4.4 Twinkling: 0 equals no twinkle; 1 is the maximum.
5.1 Landscape: Change the projected landscape.
5.2 Manual zoom: Zoom in on selected object in small steps rather
than one large step.
5.3 Object sizing rule: To better display magnitude differences
between objects, you can choose to use more than one pixel per
star or planet in a full-sky view.
5.4 Magnitude sizing multiplier: When object sizing is based on
magnitude, this allows you to adjust the final size to your liking.
5.5 Milky Way intensity: Adjust the brightness of the Milky Way,
from 0 to 100. Default intensity is 1.
Digitarium Alpha User Manual 14

5.6Maximum Nebula Magnitude to Label: Increase or decrease
number of deep sky objects labeled based on their visual
magnitude, from 0 to 100. Please note: objects whose magnitude
is unknown (such as the Hubble Ultra Deep Field) are assigned a
magnitude of 99.
5.7Zoom duration: Amount of time (in seconds) it takes to zoom in
on an object.
5.8Cursor Timeout: Amount of time (in seconds) pointer will remain
visible in the sky, from 0 (no timeout) to 60. Moving cursor or
selecting/deselecting the cursor will make it reappear in the sky in
its last location.
6. Scripts
6.1 Local script: Select a built-in script to run. When you exit the
menu, the selected script will run.
6.2 CD/DVD script: Arrow down to load a list of scripts (from the
“ /scripts” directory) on CD or DVD. Select a script and exit the
menu to run.
7. Administration
7.1 Load default configuration: Return all settings to your default.
7.2 Save current configuration as default: Option says “ Do.”
Save all current settings as default. Includes state of all settings,
such as latitude, longitude, planet labels on or off, etc.
7.3 Update me via Internet: Option says “ Do.” See maintenance
section for directions.
7.4 Reset audio: If audio is not working, run this item.
7.5 N-S centering offset: Adjust sky centering north to south.
Deprecated: Use DLP projector remote to adjust vertical
position.
7.6 E-W centering offset: Adjust sky centering east to west.
Deprecated: Use DLP projector remote to adjust horizontal
position.
Digitarium Alpha User Manual 15

Button Menu Mode Function
Move up in list of options or increase number value being
edited.
Go down a level in menu tree.
Move down in list of options or decrease number value being
edited.
Go up a level in menu tree.
Select an option or finish editing a setting.
1
0
Enter the number 1.
2
3
4
5
6
7
8
9
.
Enter the number 2.
Enter the number 3.
Enter the number 4.
Enter the number 5.
Enter the number 6.
Enter the number 7.
Enter the number 8.
Enter the number 9.
Enter a decimal point.
Enter the number 0.
-
Enter negative values (for southern latitudes and western
longitudes).
Cancel a selection.
Digitarium Alpha User Manual 16

Script Playback Mode
Scripting makes it relatively easy to create your own prerecorded segments and
play these back on a Digitarium Alpha projector. This allows you to automate
repetitive or awkward tasks, customize aspects of Stellarium, or even create
complete prerecorded shows. See the separate document entitled “ Creating
Scripts for the Digitarium Alpha” for information on writing a script.
To run a script, bring up the menu in Stellarium and go to section 6, Scripts. You
can choose either a local script located in the projector (maintained by Digitalis),
or a script located on a data CD or DVD that is in the projector drive. Scripts on
CD must be located in a “ scripts” directory in the root directory of the CD.
While a script is playing, you can pause, fast forward, play, stop, and adjust the
volume as needed; you cannot rewind a script. You cannot affect Stellarium with
the remote as you normally would while a script is playing. If you press the menu
button before the end of the script, the script will stop. Currently you cannot
access the media browser while a script is playing.
Button Script Playback Mode Function
Pause/continue script playback.
Stop script playback.
Play script at normal speed.
Fast forward script. Can be pressed multiple times for faster
rates.
Decrease (-7) or increase (+7) script volume.
Digitarium Alpha User Manual 17

Media Mode
The Digitarium Alpha has an integrated DVD drive which allows you to show your
own or third-party content from a data CD, data DVD, or unencrypted video DVD.
Most common formats of still images and video are supported. Audio files in
WAV or OGG format can be played with an accompanying visualization. To show
your own content, burn the chosen files onto a DVD-R or CD-R. See the Creating
Multimedia Disks section for directions on burning disks.
Data CD or DVD:
1. Insert the disk into the disk drive.
2. Press the button. A media browser will pop up displaying the contents of
the root directory on your disk.
3. Use the and buttons to browse the directories and files.
Press or to select a subdirectory or file to view. Press to
go up a level in the directory tree.
4. If you are viewing a file, you can move between files without returning to the
media browser by using the and buttons. You can also
use the button to increase the size of a still image, and the button
to decrease the size. If the image is large, you can pan with the 2, 4, 6, and 8
buttons. Video volume is controlled by buttons -7 and +7.
5. To stop showing an image or video, press the , , or button.
6. To pause a video, press the button; to resume playing, press . Fast
forward by pressing the button, and slow playback by pushing the
button.
7. To return to the sky, press the button. The next time you press this button,
you will be returned to the last file or directory you were viewing.
Digitarium Alpha User Manual 18

Video DVD (unencrypted):
An unencrypted DVD is exactly like a movie DVD you would buy or rent at a
video store, but without the encryption. Due to murky legal issues, we do not
currently support playback of encrypted DVDs.
1. Insert the disk into the disk drive.
2. Press the button. The DVD's main menu will be displayed.
3. Use the arrow buttons to highlight menu items, then the button to select
an item.
4. To stop showing a video, press the or button. This will take you back
to the DVD main menu. Pressing either of these a second time will return you
to your position in the video.
5. To return to the sky, press the button. The next time you press this button,
you will be taken to the DVD main menu.
Note: You cannot open the DVD drive while in media mode as the disk drive
is being used.
Digitarium Alpha User Manual 19

Button Media Mode Function
Increase size of a still image.
Decrease size of a still image.
Move up to next item in directory or video DVD menu.
View selected file or subdirectory, or move right to next item in
video DVD menu.
Move down to next item in directory or video DVD menu.
Go up a level in directory tree if in media browser. Move left to
next item in a video DVD menu. Stop showing an image or
video.
View selected file or directory in media browser, or select a
menu item in video DVD.
Pause/continue playing video.
Stop displaying an image or video.
Slow video playback.
Resume playing paused video.
Fast forward video.
2
4
6
8
Pan up in a large image.
Pan left in a large image.
Pan right in a large image.
Pan down in a large image.
Decrease (-7) or increase (+7) video volume.
Reset audio system. See troubleshooting section for more
Digitarium Alpha User Manual 20

Button Media Mode Function
information.
Access or exit media mode.
Stop displaying an image or video.
Digitarium Alpha User Manual 21

Creating Multimedia Disks
Creating a data CD or DVD with images and/or videos allows you to cover any
topic in the dome. Create slide shows for use in your lessons, or just have extra
content on hand for questions that may come up.
You can find a huge amount of content on the Internet that is free to use (check
copyrights to be sure). You can also easily create your own images with an
image editor. A full dome image should be approximately 768 by 768 pixels. A
circle 768 pixels in diameter will project onto the dome, centered on the zenith. If
an image is larger than the projector resolution (1024 x 768), it will be scaled
down to fit when displayed.
Most common image and video formats should work. However, due to the huge
variety of video encoding formats available, you will probably encounter some
video formats which won't play. The only way to know for sure is to test your disk
in the projector. MPEG video is generally the best option, if you have a choice.
Please also note that the Digitarium Alpha projector does not support encrypted
video DVDs.
Burning a CD or DVD
To burn a CD or DVD, you will need a computer with a drive capable of burning
this media and “ burner” software. The Digitarium Alpha projector can read
DVD-R, CD-R, and CD-RW format disks.
Start by creating a directory where you will set up your disk content. If you want
to organize your content into categories, you can create subdirectories. You can
create any sort of directory tree you want, to as many levels as you need.
After you have created your directory, place your content into your directory tree
so that you will be able to find it easily.
Tips for naming files:
• Use logical, easily understandable names.
• Keep the file and directory names under 29 characters in length or they will be
abbreviated in the media browser.
• Keep the original file extension (.jpg, .mpg, .tif, etc.).
• Remember that subdirectories and files within a directory will be sorted
alphabetically in the media browser, and that subdirectories will always appear
before files in the list.
• If you want to create a slide show with images in a definite order, an easy
solution is to append a zero padded number to the name. For example,
• 01-start.jpg
Digitarium Alpha User Manual 22

• 02-intro.tif
...
• 19-conclusion.jpg
Once you are happy with your directory structure and content, use your CD or
DVD burning software to burn your content directory tree to a recordable disk.
Lastly, try your disk out in the projector to see how it turned out, and if you need
to make any changes.
Video-in Port
The video-in port allows you to project directly from another computer onto the
dome. The port accepts RGB input from a PC or Mac; a VGA cable for a PC is
included.
To switch back and forth between the internal video source and the external
video source, press the “ source” button on the DLP remote control TWICE.
Digitarium Alpha User Manual 23

Maintenance
Updates
This product is driven by software, and it can be updated easily over the Internet.
Software updates allow you to receive changes and enhancements that were
made after your purchase. Updates are free for the first two years after purchase.
To update the software:
1. Locate a 10 or 100 Mbps ethernet network that supports the DHCP protocol
and has Internet access. The projector will need to be able to open an
outgoing connection on TCP port 873. This is usually not a problem unless
you are behind a restrictive firewall. See your local technical support team if
you need assistance with this.
2. Plug a network cable into the socket located on the side of the enclosure.
3. Bring up the menu using the Digitarium Alpha remote control, and go to menu
section 7, Administration.
4. Scroll down to 7.3, “ Update me over the Internet” and press .
5. Press again to start.
Do not shut down your projector while performing an update. This
can lead to a corrupted system that won't function. Please be patient
with the update process. It is normal for the update progress bar to
pause for some time at 28 and 42% complete. If there is a problem, the
update will provide an error message, otherwise it is still working.
6. When done, you can unplug the network cable and return your Digitarium
Alpha to its usual use. If the update does not work, you will receive an error
message explaining what went wrong.
We strongly encourage you to have a technical person who is familiar with
your network assist you during your first attempt at software updating.
Some network changes may be required in order for the updates to occur.
Digitarium Alpha User Manual 24

Lens Care
To protect the lens, always attach the lens cap when you are not using your
Digitarium Alpha.
If you notice dust or dirt on the lens, clean it with a soft, lint-free tissue or cloth
and rubbing alcohol.
Lamp Life
The Digitarium Alpha planetarium projector is designed to require minimal
maintenance. However, the projector lamp will eventually grow dimmer and burn
out. It is important to keep track of the life remaining in the lamp, and to replace
the lamp when its design lifetime is reached, even if it is still apparently working
fine, in order to avoid catastrophic failure.
The projector lamp must be replaced after 2,000 hours of projection. It may be
necessary to replace it sooner if the lamp becomes noticeably dimmer or
projection will not start. To assist you, the DLP projector inside the Digitarium
Alpha keeps track of how many hours the lamp has been used.
We highly recommend that you always keep a spare bulb on hand to be
prepared for any eventuality. Otherwise, if your only bulb fails, you may have
extended downtime waiting for a replacement.
Checking Remaining Lamp Life
To view lamp life used, use the DLP projector remote control. With the projector
projecting, point the remote into the vents near the lens. Press the DLP menu
button and arrow left or right to the “ control” section of the menu. Lamp life used
is displayed at the bottom of this screen.
Digitarium Alpha User Manual 25

Lamp Replacement
1. Turn off and unplug the projector.
2. Make sure the projector has cooled off for at least 45 minutes.
3. Remove the bulb change covers located on one side of the projector. There
are two nested panels, each requiring a Phillips type screwdriver to open.
4. Unscrew three screws on the lamp assembly, and lift it out with the wire
handle.
5. Place a new lamp assembly into the projector and screw it in.
6. Replace the two cover panels.
Before you forget, IMMEDIATELY RESET THE USAGE COUNTER FOR
THE NEW BULB. To reset the lamp life counter in the DLP projector:
7. Remove the side panel of the Digitarium Alpha projector which is opposite the
the side with the DVD drive. To remove, unscrew the three screws along the
bottom of this side, then move the side down toward the base and the bottom
edge out away from the projector.
8. Plug in the projector and turn it on. Be careful not to touch anything inside the
projector to avoid damage to sensitive components or yourself.
9. Turn on projection with the DLP remote.
10.Locate the “ exit,” “ menu,” and “ left” buttons ON THE DLP PROJECTOR.
These buttons are lit and reachable between the DLP projector and the center
wall of the enclosure. Refer to the DLP projector manual for the button
locations if necessary.
11.The following three steps need to be done quickly in order to work correctly.
Due to the fisheye lens, the onscreen messages are not fully visible, which
means you won't have very good feedback from the projector. If at any point
the onscreen window mentioned below disappears, you will need to repeat
these three steps. Use a pencil to:
1. Hold down the DLP projector “ exit” button for three seconds. You should
see part of an onscreen window along the horizon.
2. Before the onscreen window times out, press the “ menu” button on the DLP
projector.
3. While the onscreen window is still visible, press the left arrow button on the
DLP projector.
12.Confirm that you have reset the lamp usage timer using the DLP projector
menu button. See the DLP projector manual for details.
13.Shut down the Digitarium Alpha projector as normal and unplug it.
14.Reattach the side you removed by reversing your steps.
15.Lamp replacement is now complete.
The projector lamps contain small amounts of mercury. Please dispose of
them in an environmentally friendly manner, such as at a hazardous waste
collection site.
Digitarium Alpha User Manual 26

Troubleshooting
Symptom Possible Solution
Nothing
projected.
Pointer stuck
at zenith.
Remote
buttons don't
seem to work.
1. Is there power to your projector?
2. Did you use the DLP remote control to turn on the projector
lamp?
3. Did you press and hold down the power button while
pointing the remote into the grille?
4. Is the DLP projector remote working? The laser pointer can
still function even if the batteries are too weak to
communicate with the projector. Replace the batteries and try
again.
5. Do you need to replace the bulb? See 'Indicator Light States'
table on page 7.
Press to get away from zenith, then move in desired
direction.
1. Are you in menu mode? If so, exit.
2. Are you aiming the remote control at the zenith?
3. Point the remote directly into the infrared receiver window on
top of the projector and push a button. The infrared receiver
will flash each time a signal is received.
4. Check remote control batteries if the buttons don't light up or
the infrared receiver did not flash.
5. If all else fails, reset the computer using the reset button.
Mouse won't
move.
Can't find
pointer.
Projection
seems off
center.
1. Make sure that you are not stuck at the zenith and that the
remote buttons are responding.
2. If neither of these is the cause, check to see if you are in
menu mode, and exit if you are.
1. Are you in menu or media mode? If so, exit.
2. If you are in normal operating mode, press the
button to move the pointer toward the zenith.
3. Have you hidden the pointer? Press the button to show
it.
Turn on the azimuthal grid. Use the DLP projector remote to
adjust the horizontal position (“ H Position” ) of the projection as
needed. This setting is accessible on the image menu section of
the DLP projector on-screen display.
Digitarium Alpha User Manual 27

Symptom Possible Solution
Thick or blurry
line drawings;
cursor
segments are
different pixel
thicknesses.
Lamp shuts off
unexpectedly.
You need to adjust the phase. Press the “ menu” button on the
DLP projector remote, then scroll to the “ display” sub-menu.
Once in the display sub-menu, scroll down to “ phase” and
adjust until lines are at their brightest and thinnest. Be sure not
to hit the “ auto” button again or you will need to make these
changes again.
If the indicator light is not lit, most likely the lamp is not
seated properly, is damaged, or is past its 2,000 hour lifetime.
Reseat the lamp (see below) or replace it as necessary.
If the indicator light is not lit, it is also possible that the DLP
projector is malfunctioning. If reseating or replacing the lamp
does not solve the problem, please contact technical support.
If the indicator light is flashing green, the DLP projector has
overheated and shut down.
The projector may have overheated due to high temperatures in
the dome. Lower the temperature in the dome by opening a
door. You will be able to turn the light back on after it has
cooled for approximately 90 seconds.
If the dome does not feel hot, the temperature sensor for the
projector lamp may be malfunctioning.
Short term solution: Wait approximately 90 seconds, then turn
projector lamp back on. If you have breaks between classes,
turn off the projector lamp but not the Digitarium Alpha to cool
the lamp. As soon as possible, follow the directions below for
long term repair.
Long term solution: Allow the projector to cool for 45 minutes,
then unplug the projector and remove the lamp following the
directions in the lamp replacement section above. Wait 15
minutes, then reinstall the lamp.
After performing the long term solution, run your projector
(preferably without an audience) for at least one hour. If the
lamp stays on for at least 60 minutes, the issue is resolved.
Digitarium Alpha User Manual 28

Symptom Possible Solution
No sound
when playing a
video.
1. Are you sure the video has an audio track?
2. Do you have speakers plugged in and turned on?
3. If you are playing a video DVD, press the button and
then exit media mode. If you are using a data CD or DVD, go
back to the directory view and hit the button. This will
reset the audio system.
4. If you play the video again, you should hear sound.
How to Get Help
If you are experiencing problems with your Digitarium Alpha, please:
1. Reread the manual to make sure you haven't missed a possible solution.
2. Check out the online support section of our website, DigitalisEducation.com.
This is frequently updated with answers to common questions and issues.
3. Contact technical support via:
• e-mail: info@digitaliseducation.com
• phone: 360.616.8915
• fax: 360.616.8917
Product Specifications
Pixels per degree 4.2 (average)
Projection type DLP
Colors 16.7 million
Bulb life 2,000 hours
Dimensions 14 x 14.25 x 14.75 inches
Weight Projector is 42 pounds; transit case is
approximately 20 pounds.
AC input 100-240 VAC
50/60 Hz
5-2 A
Operating environment 32-90 degrees F (0-32 degrees C)
Humidity: non-condensing
Avoid use in dusty environments.
Digitarium Alpha User Manual 29

Warranty
Two Year Limited Warranty
Your purchase is warranted against defects of workmanship and materials for a
period of two years from the original purchase date. Should there be a defect or
malfunction of the product, Digitalis will repair or replace the product, at Digitalis'
option, free of charge other than shipping charges.
Digitalis will not replace burned-out light bulbs, and can not guarantee that the
manufacturer's advertised bulb life expectancy will be reached.
This warranty is void if the product has been subjected to damage, unreasonable
use, improper service, or other causes not arising from defects in original
materials or workmanship.
There are no expressed warranties other than those stated herein.
Any expressed or implied warranties, including but not limited to merchantability
and fitness for a particular purpose are limited to the above two year warranty
period. Digitalis shall not be liable for any incidental or consequential costs,
expenses, or damages resulting from any failure, defect, or malfunction of a
product.
This warranty grants you specific legal rights, and you may also have other rights
which vary based on your local laws.
Limited Liability
In no case shall Digitalis be liable for more than the purchase price of the
product.
Software Licenses
The Digitarium Alpha projector is driven by software. There are two different
types of software included on the projector, each with their own licenses:
1. Software released under the GNU General Public License (GPL) can be
copied or modified. Source code is included on the accompanying Source
Code CD. See the file “ GPL” on the CD for the full text of this license. Source
code for internet updates are available in the “ Support” section of our website.
2. Software and other copyrighted files proprietary to Digitalis Education
Solutions are licensed for use only on Digitarium Alpha hardware and may not
be copied or modified without permission.
Digitarium Alpha User Manual 30

Regulatory Information
This equipment has been tested and found to comply with the limits for a Class B
digital device, pursuant to part 15 of the FCC Rules. These limits are designed to
provide reasonable protection against harmful interference in a residential
installation. This equipment generates, uses, and can radiate radio frequency
energy and, if not installed and used in accordance with the instructions, may
cause harmful interference to radio communications. However, there is no
guarantee that interference will not occur in a particular installation. If this
equipment does cause harmful interference to radio or television reception, which
can be determined by turning the equipment off and on, the user is encouraged
to try to correct the interference by one or more of the following measures:
Reorient or relocate the receiving antenna.
Increase the separation between the equipment and receiver.
Connect the equipment into an outlet on a circuit different from that to
which the receiver is connected.
Consult the dealer or an experienced radio/TV technician for help.
Modifications not expressly approved by the manufacturer could void the user's
authority to operate the equipment under FCC rules.
Digitarium Alpha User Manual 31
 Loading...