

Page 1
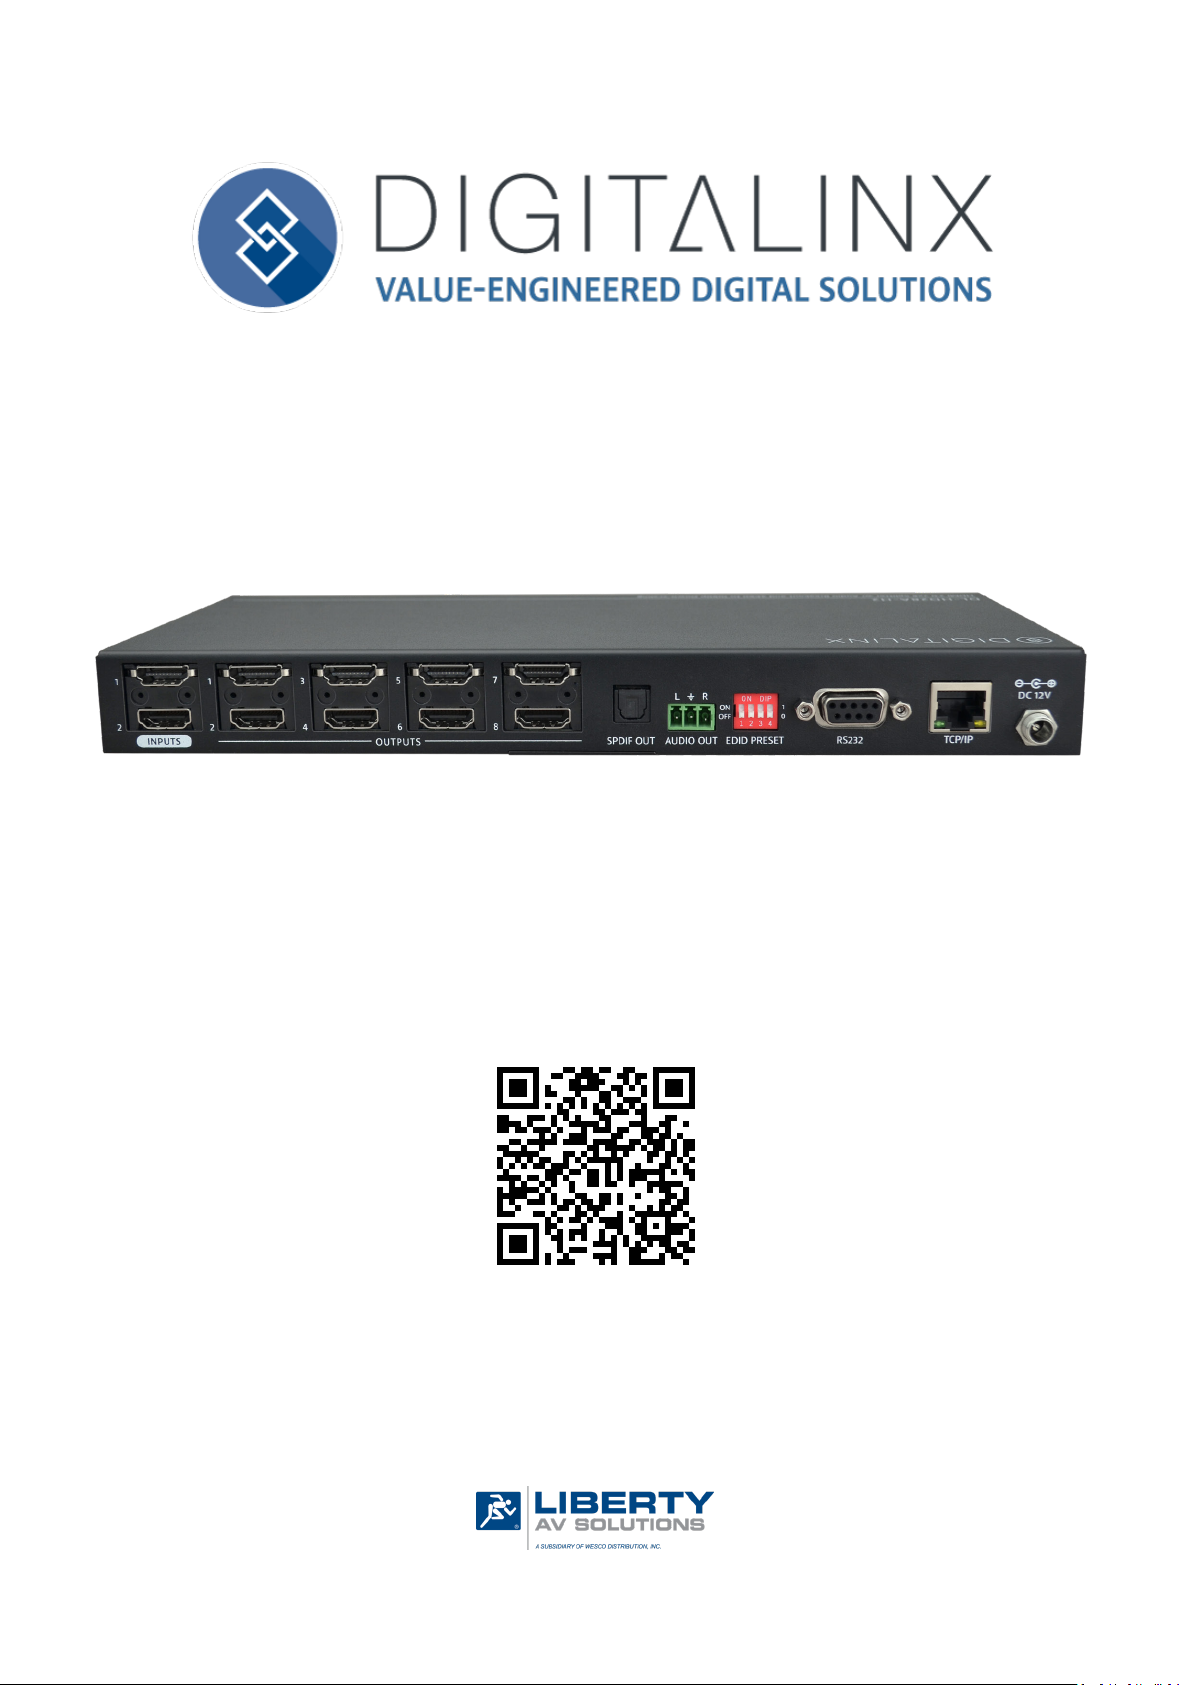
DL-HD28A-H2 Quick Install Guide
This guide is for quick installaon only.
For complete owners manual go to www.libav.com or use a QR reader to access the
manual via QR code below.
Rev 190501
Scan QR Code with your Smart-phone or Tablet
11675 Ridgeline Drive
Colorado Springs, CO
80921
Phone: 719-260-0061
Toll-Free: 800-530-8998
Fax: 719-260-0075
Page 2

Page 3
DL-HD28A-H2 Quick Guide
Product Overview
The Digitalinx DL-HD28A-H2 is an HDMI 2.0 compable 2:8 auto scaling and auto switching HDMI
distribuon amp / splier that features two HDMI inputs and either HDMI outputs. The spliers HDMI
outputs can switch as a group to either input via auto or manual switching methods and supports down
scaling so a 4K video input can automacally be down scaled to an 1080p output when connecng
a display that only supports resoluons up to 1080p. The DL-HD28A-H2 supports 4K signals up to
4K@60Hz / 4:4:4 / 8 bit color and features an easy EDID management opon using dip switches on the
rear panel of the unit. Analog and digital audio can be de-embedded from the selected HDMI input
and the DL-HD28A-H2 supports CEC control and is HDCP 2.2 compliant. The DL-HD28A-H2 can be
controlled via front panel buons, RS232 or by TCP/IP control.
Package Contents
• DL-HD28A-H2 2:4 Switching DA
• Quick Install Guide
• (4) Plasc Cushions
• (2) Mounng Clips with (4) Mounng Screws
• 12V DC Power supply with US, EU, UK and AU power adapters.
3
Page 4
DL-HD28A-H2 Quick Guide
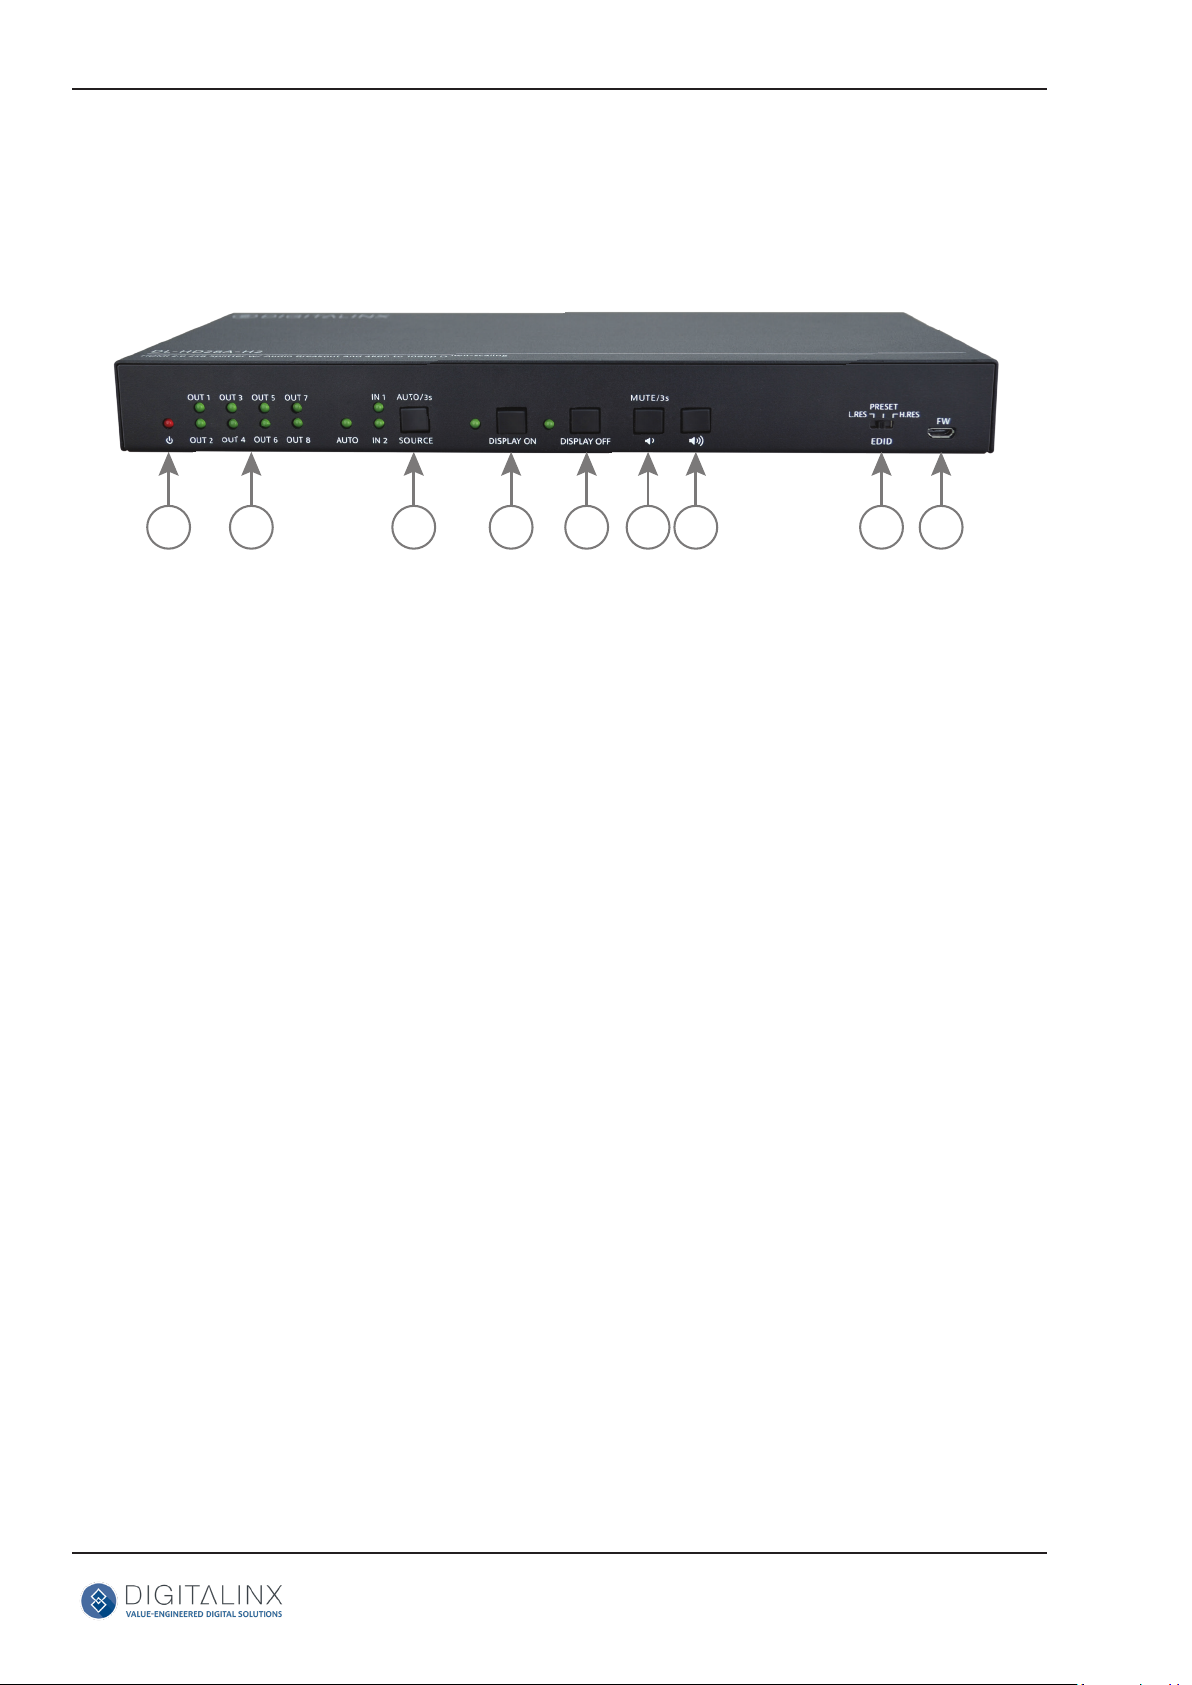
1 2 3 4 5 6 7 8 9
Front Panel View
1. POWER LED INDICATOR - Illuminates solid RED when device is powered ON
2. OUTPUT LED INDICATORS - Illuminates solid GREEN when there is an HDMI output on the
corresponding channel
3. SOURCE BUTTON and LED INDICATORS
AUTO - Switching mode indicator; illuminates solid GREEN when device is in auto switching mode, OFF
when in manual switching mode. To change switching modes, hold down the SOURCE buon for 3
seconds.
IN1 / IN2 - Input indicator; illuminates solid when corresponding input channel has been selected. To
change inputs, use the SOURCE buon to toggle between inputs. Front panel input control only works in
manual switching mode.
4. DISPLAY ON - Press buon to turn connected displays ON via CEC or RS232
5. DISPLAY OFF - Press buon to turn connected displays OFF via CEC or RS232
6. VOLUME DOWN/MUTE - Press buon to turn connected display volume down via CEC or
RS232. To mute audio press and hold buon down for 3 seconds
7. VOLUME UP - Press buon to turn connected display volume UP via CEC or RS232. Use up
buon to exit audio mute mode
8. EDID - EDID value sengs selector
9. FW - Micro USB connector for rmware updates
4
Page 5
DL-HD28A-H2 Quick Guide
Rear Panel View
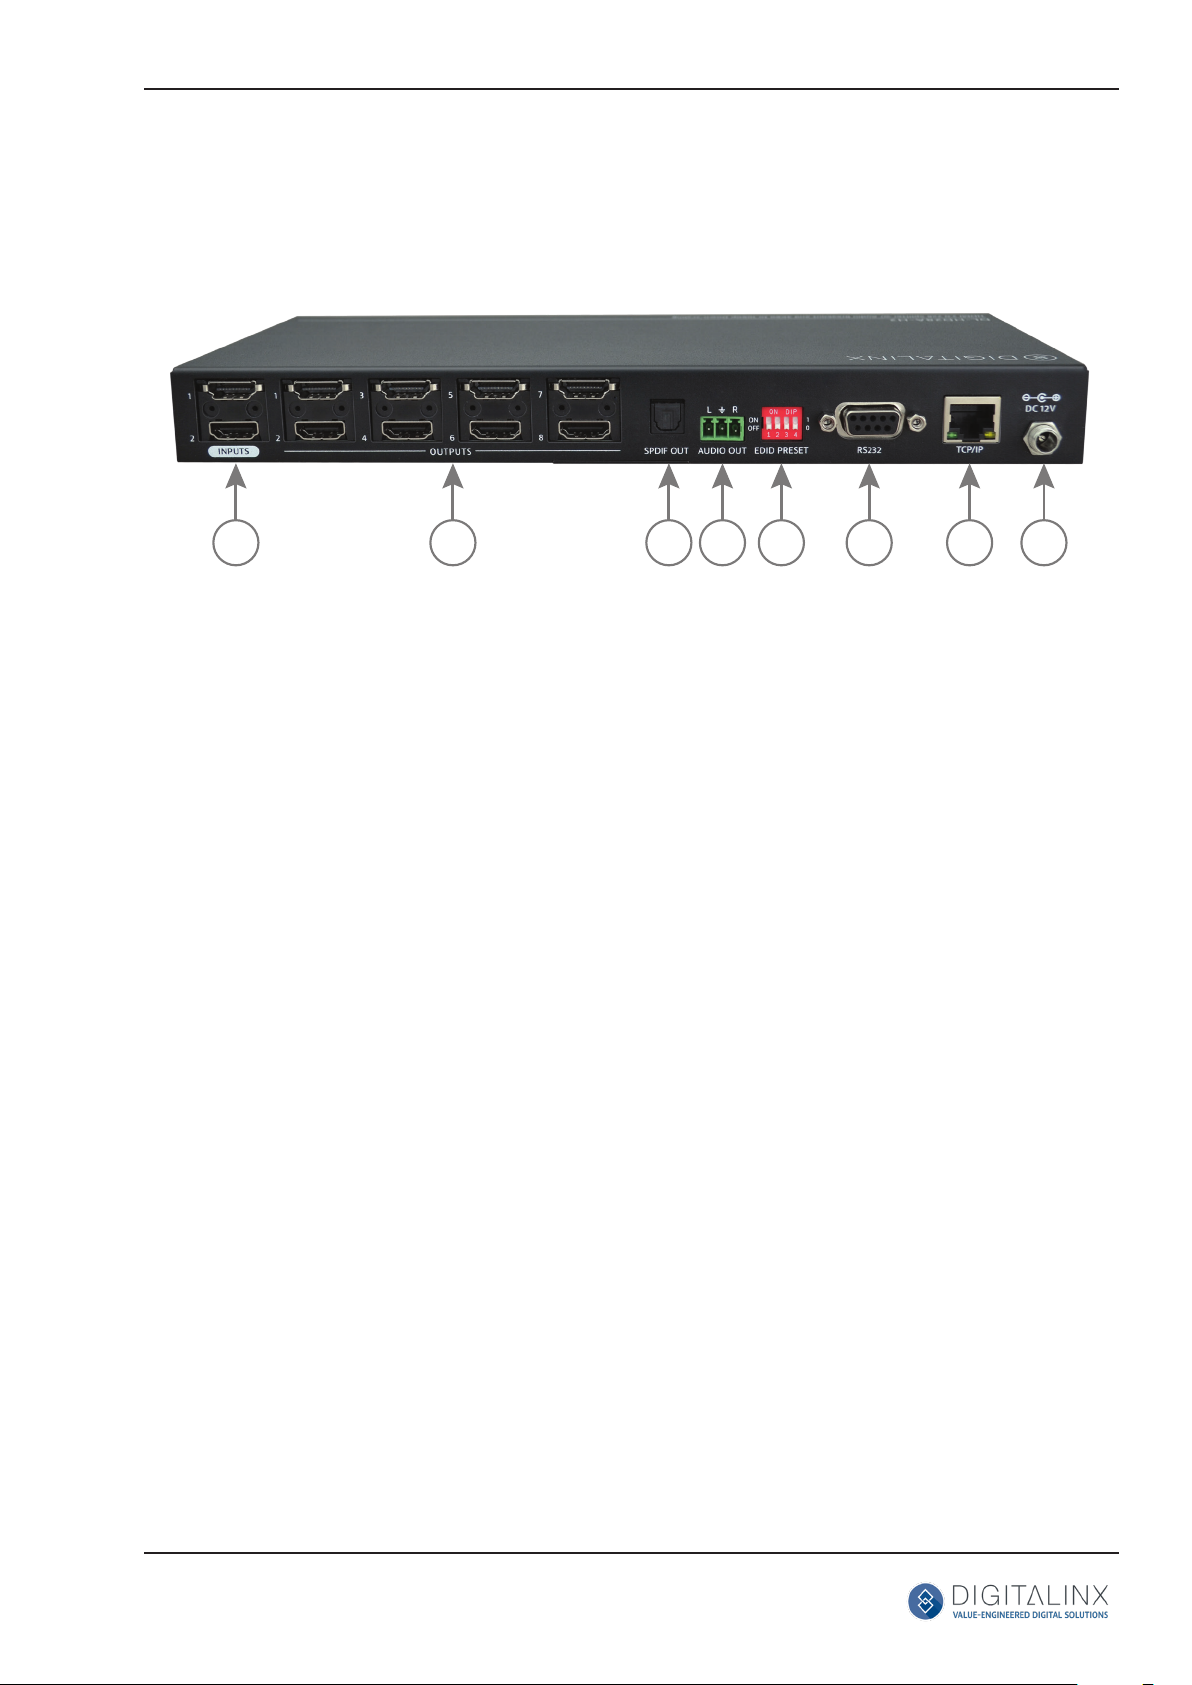
1 2 3 4 5 6 7 8
1. INPUTS - Two HDMI input ports to connect HDMI sources
2. OUTPUTS - Eight HDMI output ports to connect HDMI displays
3. AUDIO OUT -3 pin phoenix connector for analog audio output
4. SPDIF OUT - Toslink digital audio output port for digital audio output
5. EDID - 4 pin dip switches for EDID sengs
6. RS232 - DB-9 female connector for RS232 control
7. TCP/IP - RJ45 for Telnet or web GUI control
8. DC12V - 2-pin terminal block for external power supply
5
Page 6
DL-HD28A-H2 Quick Guide
Connecvity Instrucons
1. Verify all components included with the extender set are present before installaon.
2. Turn o power and disconnect the audio/video equipment by following the manufacturer’s
instrucons.
3. Connect the source devices to the HDMI inputs using HDMI cables that are less than or equal to 1.5
meters in length for 4k/60Hz signals. For source devices that are further away, it is highly recommended
to install an extender such as the Digitalinx DL-HD70, DL-HDE100 or DL-HD2100.
4. Connect the display devices to HDMI outputs using HDMI cables that are less than or equal to 7
meters in length for 4k/60Hz signals. For display devices that are further away, it is highly recommended
to install an extender such as the Digitalinx DL-HD70, DL-HDE100 or DL-HD2100.
5. Connect Ethernet and RS232 control connecons (oponal)
6. Connect and lock the power supply to the power connector by twisng the locking collar clockwise.
7. Power on aached audio/video devices.
6
Page 7
DL-HD28A-H2 Quick Guide
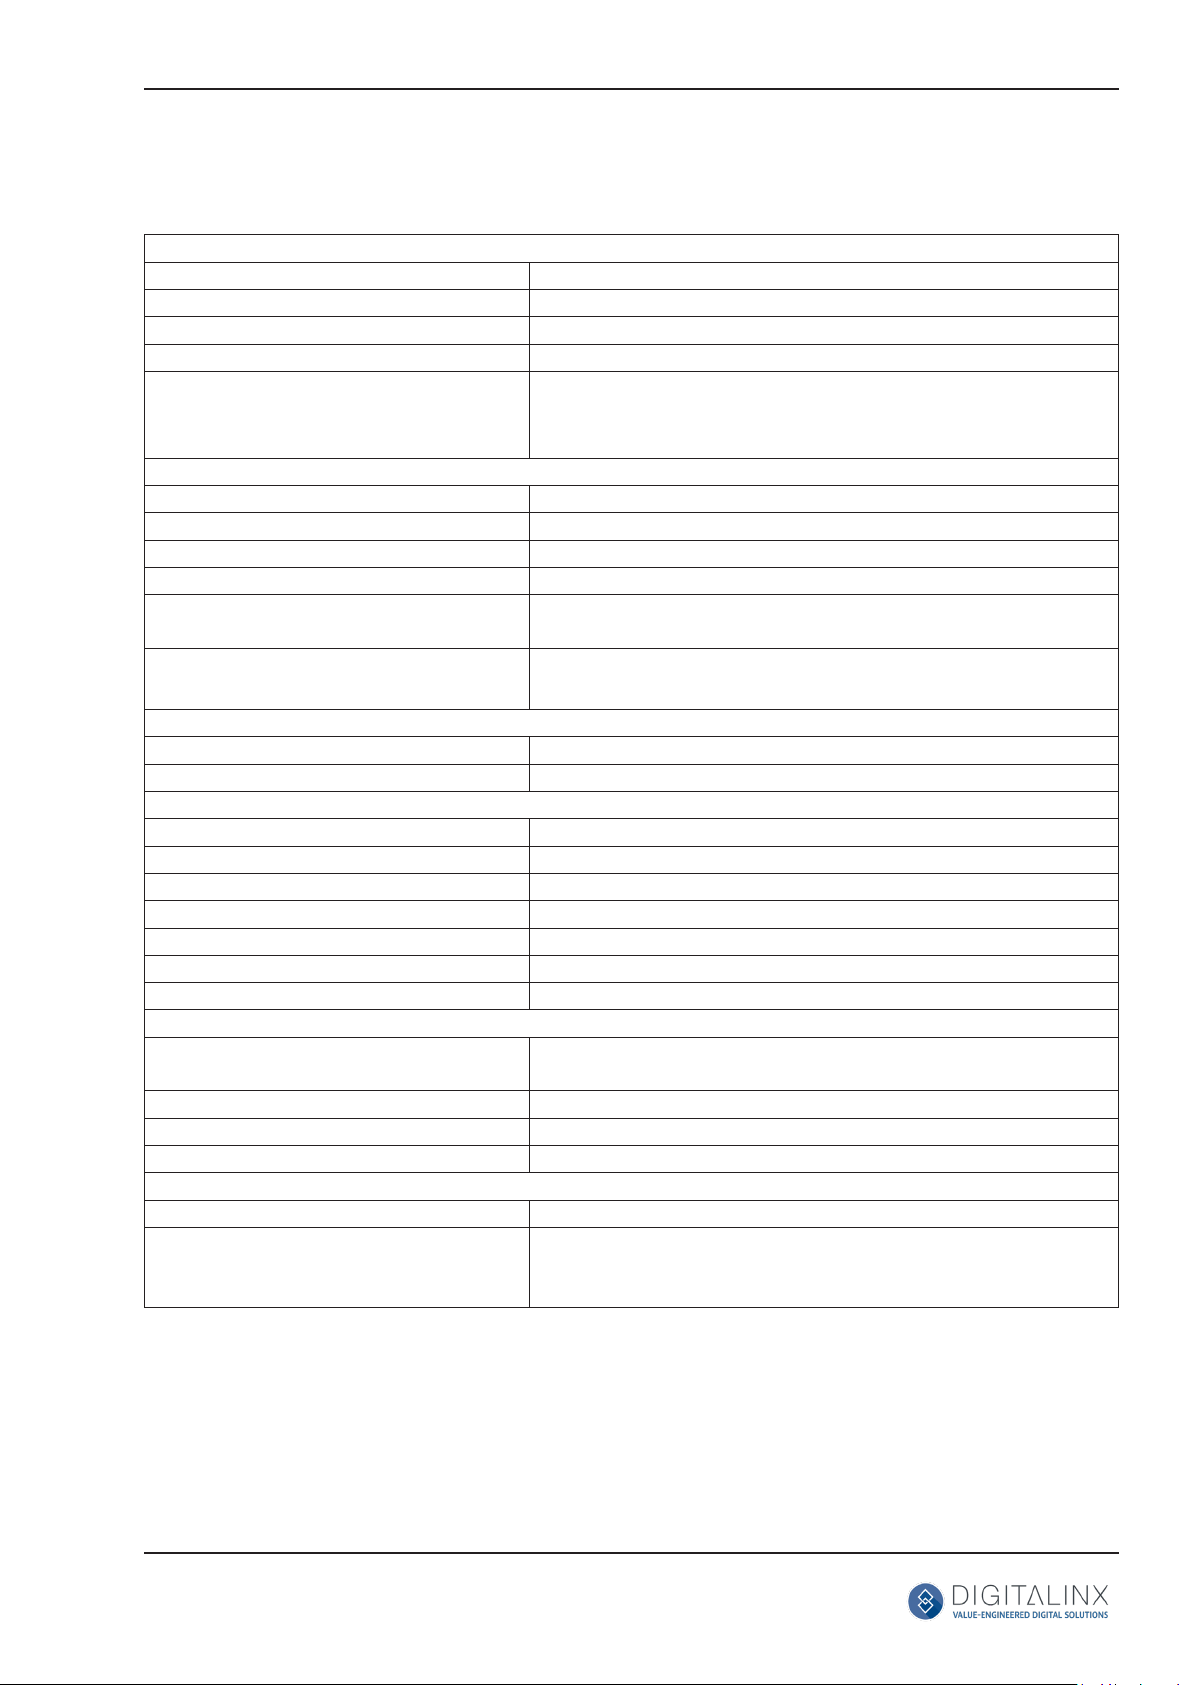
Technical Specicaons
Input/Output Connecons
HDMI Inputs Two (2) HDMI Type A Receptacles
HDMI Outputs Eight (8) HDMI Type A Receptacles
TCP/IP One (1) 8P8C Port (Shielded RJ45 Female)
RS232 One (1) Female DB9 Port
Audio - One (1) Analog L/R audio output, 3-Pin 3.5mm Phoenix
connector
- One (1) Digital SPDIF output, Toslink connector
Supported Audio, Video, and Embedded Control
Video Resoluons Up to 4K@60Hz 4:4:4 8 bit
Video Bandwidth 18Gbps
Maximum Passive HDMI Cable Distance 1.5m for 4k60 signal for input / 7m for 4K60 signal for output
Video Compliance HDMI 2.0b, HDCP 2.2 and CEC compliant
Embedded Audio LPCM 7.1 audio, Dolby Atmos®, Dolby® TrueHD, Dolby Digital®
Plus, DTS:X™, and DTS-HD® Master Audio™ pass-through.
De-embedded Audio Analog L/R Out: PCM
Digital Out: PCM, Dolby Digital, DTS, DTS-HD
Device Control Parameters
Ethernet 100BaseT
RS232 Baud Rate Up to 115200
Chassis and Environmental
Enclosure Painted Aluminum
Dimensions (H x W x D) 28.5mm x 265mm x 110mm (1.1 in x 10.4 in x 4.3 in)
Shipping Weight 830g (1.8 lbs.)
Operang Temperature -5° to +55° C (+23° to +131° F)
Operang Humidity 10% to 90%, Non-condensing
Storage Temperature -20° to +70° C ( -4° to +140° F)
Storage Humidity 10% to 90%, Non-condensing
Power, ESD, and Regulatory
Power Supply Input:100V-240VAC / 50-60 Hz
Output: 12VDC 1A
Power Consumpon 12W (Max.)
ESD Protecon 8kV air, 4kV contact
Product Regulatory FCC, CE, RoHS
Other
Standard Warranty 5 years
Included Accessories Quick Install Guide,(4) Plasc Cushions, Rack Mounng Ears with
Screws, (1) AC power adapter with US, UK, EU and AU power
plugs
7
Page 8

Thank you for your purchase.
For Technical Support please call our toll free number at
800-530-8998 or email us at [email protected]
www.libav.com
Digitalinx is a brand of:
11675 Ridgeline Drive
Colorado Springs, Colorado
80921 USA
Phone: 719-260-0061
Fax: 719-260-0075
Toll-Free: 800-530-8998
 Loading...