

Digital Innovation Life Actus Solo User Manual

Full HD Digital Satellite Receiver
Digital Innovation Life
User's Manual
ACTUS SOLO


INDEX
Precautions...............................................................................................................................5
1. Important Safety Instructions.................................................................................................... 5
2. Notice ....................................................................................................................................... 5
3. Copyright.................................................................................................................................. 6
4. Disclaimer................................................................................................................................. 6
5. Trademarks .............................................................................................................................. 6
Before You Begin .....................................................................................................................7
1. Main Features .......................................................................................................................... 7
2. Accessories.............................................................................................................................. 8
Hardware Description..............................................................................................................9
1. Front Panel Configuration ........................................................................................................ 9
2. Rear Panel Configuration ....................................................................................................... 10
3. Remote Control Unit................................................................................................................11
Connecting diagram ..............................................................................................................15
1. Receiver to A/C power............................................................................................................ 15
2. Receiver to TV with Digital A/V Output ................................................................................... 15
3. Receiver to TV with Analog A/V Output.................................................................................. 16
4. Connecting to Antenna Cable................................................................................................. 16
Guide of Functions ................................................................................................................18
1. Selecting a Service................................................................................................................. 18
1.1 Using CH UP/DOWN buttons............................................................................................ 18
1.2 Using Service List.............................................................................................................. 18
1.3 Using Simple Service List.................................................................................................. 18
1.4 Using Recent Service List ................................................................................................. 19
2. Information Window................................................................................................................ 19
3. Multi-Picture Display............................................................................................................... 19
4. Electronic Program Guide (EPG) ........................................................................................... 19
5. Favorite Group ....................................................................................................................... 20
6. Volume Control....................................................................................................................... 20
7. Pause ..................................................................................................................................... 20
8. Subtitle ................................................................................................................................... 21
9. Audio Control.......................................................................................................................... 21
10. Teletext................................................................................................................................... 22
11. PIP (Picture in Picture) ........................................................................................................... 22

PVR (Personal Video Recorder) Function...........................................................................24
1. Recording............................................................................................................................... 24
1.1 Recording methods ........................................................................................................... 24
1.2 Recording Edit................................................................................................................... 26
1.3 Long Time recording.......................................................................................................... 26
1.4 Pause during recording ..................................................................................................... 26
2. Time Shifting........................................................................................................................... 28
3. Playback (Play List)................................................................................................................ 29
3.1 Recorded Files .................................................................................................................. 29
3.2 Imported Files ................................................................................................................... 30
3.3 Music................................................................................................................................. 30
3.4 Photo................................................................................................................................. 30
4. Bookmark ............................................................................................................................... 31
5. Trick mode.............................................................................................................................. 31
Menu Map................................................................................................................................32
Main Menu of Guide...............................................................................................................33
1. System Tools.......................................................................................................................... 33
1.1 Storage Manager............................................................................................................... 33
1.2 Timer Settings ................................................................................................................... 34
1.3 Service List Manager......................................................................................................... 34
1.4 Data Transfer..................................................................................................................... 36
2. Configuration.......................................................................................................................... 37
2.1 Recording Option .............................................................................................................. 37
2.2 Parental Control ................................................................................................................ 38
2.3 Display Setting .................................................................................................................. 38
2.4 Time Setting ...................................................................................................................... 39
2.5 Language Setting .............................................................................................................. 39
2.6 A/V Output Setting............................................................................................................. 40
3. Installation .............................................................................................................................. 41
3.1 Dish Setting....................................................................................................................... 41
3.2 Positioner Setting .............................................................................................................. 41
3.3 Service Search .................................................................................................................. 42
3.4 Network Setting ................................................................................................................. 43
3.5 System Recovery .............................................................................................................. 44
3.6 System Information ........................................................................................................... 45
4. Utility ...................................................................................................................................... 45
4.1 Calculator .......................................................................................................................... 45
4.2 Calendar............................................................................................................................ 45
4.3 CAS (Conditional Access System) .................................................................................... 45
4.4 Plugin ................................................................................................................................ 46
4.5 Free TV+ ........................................................................................................................... 48
4.6 Internet TV+ ...................................................................................................................... 49
Troubleshooting.....................................................................................................................50
Specifications.........................................................................................................................51

Precautions
1. Important Safety Instructions
l Read these instructions.
l Keep these instructions.
l Heed all warnings.
l Follow all instructions.
l Do not use this apparatus near water.
l Clean only with dry cloth.
l Do not block any ventilation openings. Install in accordance with the manufacturer’s instructions.
l Do not install near any heat sources such as radiators, heat registers, stoves, or other apparatus
(including amplifiers) that produce heat.
l Do not reverse the safety purpose of the polarized or grounding-type plug. A polarized plug has two
blades with one wider than the other. A grounding type plug has two blades and a third grounding
prong. The wide blade or third prong is provided for your safety. If the provided plug does not fit into
your outlet, consult an electrician for replacement of the obsolete outlet.
l Protect the power cord from being walked on or pinched particularly at plugs, convenience
receptacles, and the point where they exit from the apparatus.
l Only use attachments/accessories specified by the manufacturer.
l Use only with the cart, stand, tripod, bracket, or table specified by the manufacturer, or sold with the
apparatus. When a cart is used, use caution when moving the cart/apparatus combination to avoid
injury from tip-over.
l Unplug this apparatus during lightning storms or when unused for long periods of time.
l Refer all servicing to qualified service personnel. Servicing is required when the apparatus has been
damaged in any way, such as power-supply cord or plug is damaged, liquid has been spilled or objects
have fallen into the apparatus, the apparatus has been exposed to rain or moisture, does not operate
normally, or has been dropped.
WARNING : To Prevent fire or shock hazard do not expose the set to rain or moisture.
2. Notice
l
These servicing instructions are for use by qualified service personnel only. To reduce the risk of
electric shock, do not perform any servicing other than that contained in the operating instructions
unless you are qualified to do so.
l The apparatus shall not be exposed to dripping or splashing and that no objects filled with liquids,
such as vases, shall be placed on the apparatus.
l The mains plug is used as the disconnect device. The disconnect device shall remain readily operable.

To reduce the risk of electric shock, do not remove
the cover (or back).
No user serviceable parts are inside.
Refer servicing to qualified service personnel.
The Lightning Flash with arrowhead symbol
within an equilateral triangle, is intended to
alert the user to the presence of un-insulated
"dangerous voltage" within the product
enclosure that may be of sufficient magnitude
to constitute a risk of shock to persons
The exclamation point within an
equilateral triangle is intended to alert
the user to the presence of important
operating and maintenance
(servicing) instructions in the
literature accompanying the product
NOTE : Contents of this manual and features/ specifications of the STB are subjected to
change without prior notice.
3. Copyright
This manual is protected by copyright laws.
Copy, use and reproduction of this manual in part or whole without Manufacturer’s prior written
approval are prohibited.
4. Disclaimer
The manufacturers, distributors and agents are not liable to any kind of damage caused by the
use of the information contained in this manual.
The instruction and descriptions which this manual contains are based on the time of this
manual's production.
The manufacturer constantly updates it with new functions and technology.
All the specifications are subject to change without prior notice.
5. Trademarks
HDMI, the HDMI logo and High-Definition Multimedia Interface are
trademarks or registered trademarks of HDMI Licensing LLC
Manufactured under license from Dolby Laboratories.
Dolby and the double-D symbol are trademarks of Dolby Laboratories.

Before You Begin
1. Main Features
ü Supports MPEG4 /MPEG2 - HD/SD and Fully DVB-S2 /DVB-S Compliant
ü Intelligent Blind Scan for both SD and HD TV & Multi-Satellite Search
ü Multi-LNB Controlled by DiSEqC Control Version 1.0, 1.1, 1.2 and USALS
ü HDTV PVR Receiver ( H.264/ MPEG4 HD )
ü Embedded Linux OS
ü Time Shifting, Recording & Playback with External HDD (USB 2.0)
ü Simultaneously Records upto 3 Channels and allows Viewing of 2 others (PIP) on the same
Transponder
ü Powerful Extended EPG supports Event Recording
ü Dual USB 2.0 Host ports (MP3 Player & JPEG Viewer)
ü MKV, Xvid file play back support
ü Ethernet Support
ü High Definition On-Screen Display
ü Favorite Groups
ü Powerful Service List Manager for Favorites, Lock, Skip, Move, Edit and Delete
ü Service Sorting by Name, Transponder and CAS
ü User Friendly & Multi-language Supported (OSD & Menu)
ü Teletext / Subtitles Supported
ü Maximum 10,000 Services(TV & Radio) Programmable
ü Picture-in-Picture (PIP) & Multi-picture Display
ü Parental Lock / System Lock / Installation Lock
ü HDMI Video & Audio Output
(576i, 576p, 720p, 1080i, 1080p)
ü CVBS(composite) Video & Audio Output via RCA
ü CVBS, RGB, Video & Audio Output via TV SCART
ü Optical Output for Digital Audio(SPDIF)
ü Software & Service channel Database upgrade via USB & RS-232C port
ü 1 Smart card reader and 2 Common Interface Slots
ü 1W Stand-by Power Consumption
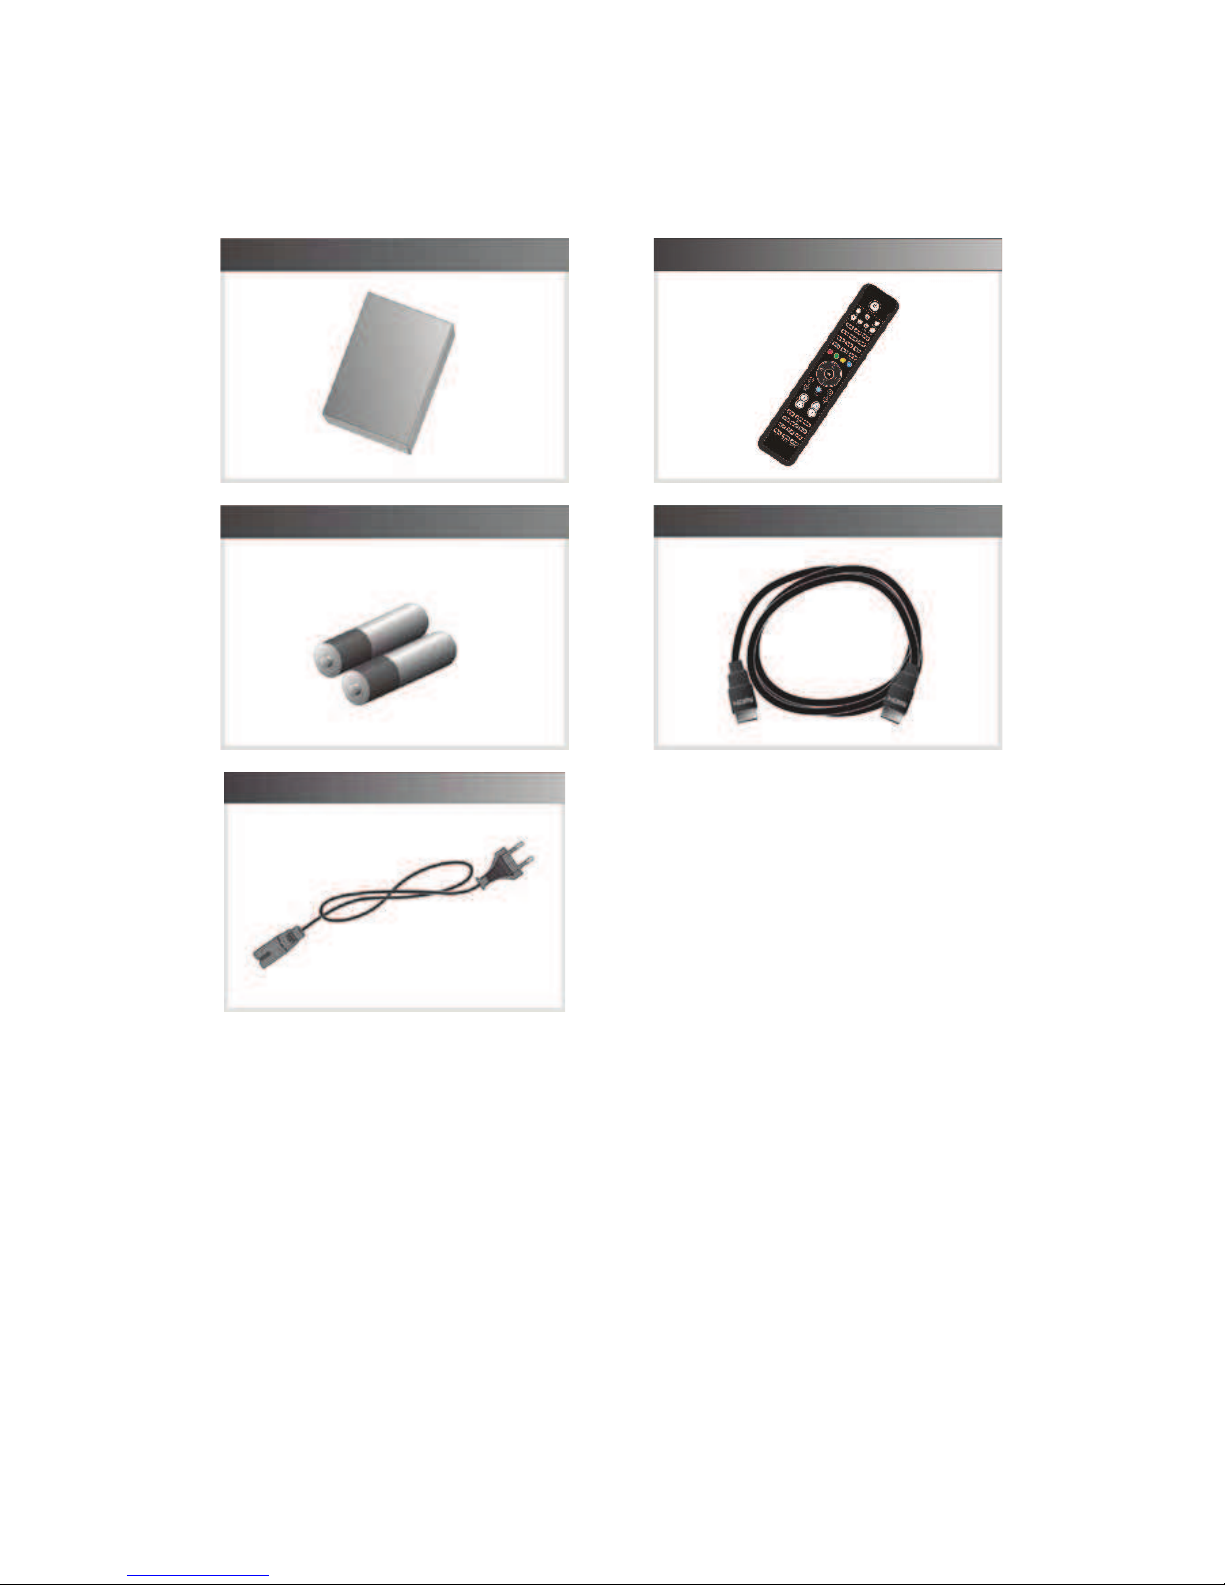
2. Accessories
NOTE : If any accessories listed above are missing, contact the sales representative where you
purchased this unit.
User's Manual
AAA size Batteries X2
AC Power Cord
Remote Control
HDMI Cable
Hardware Description
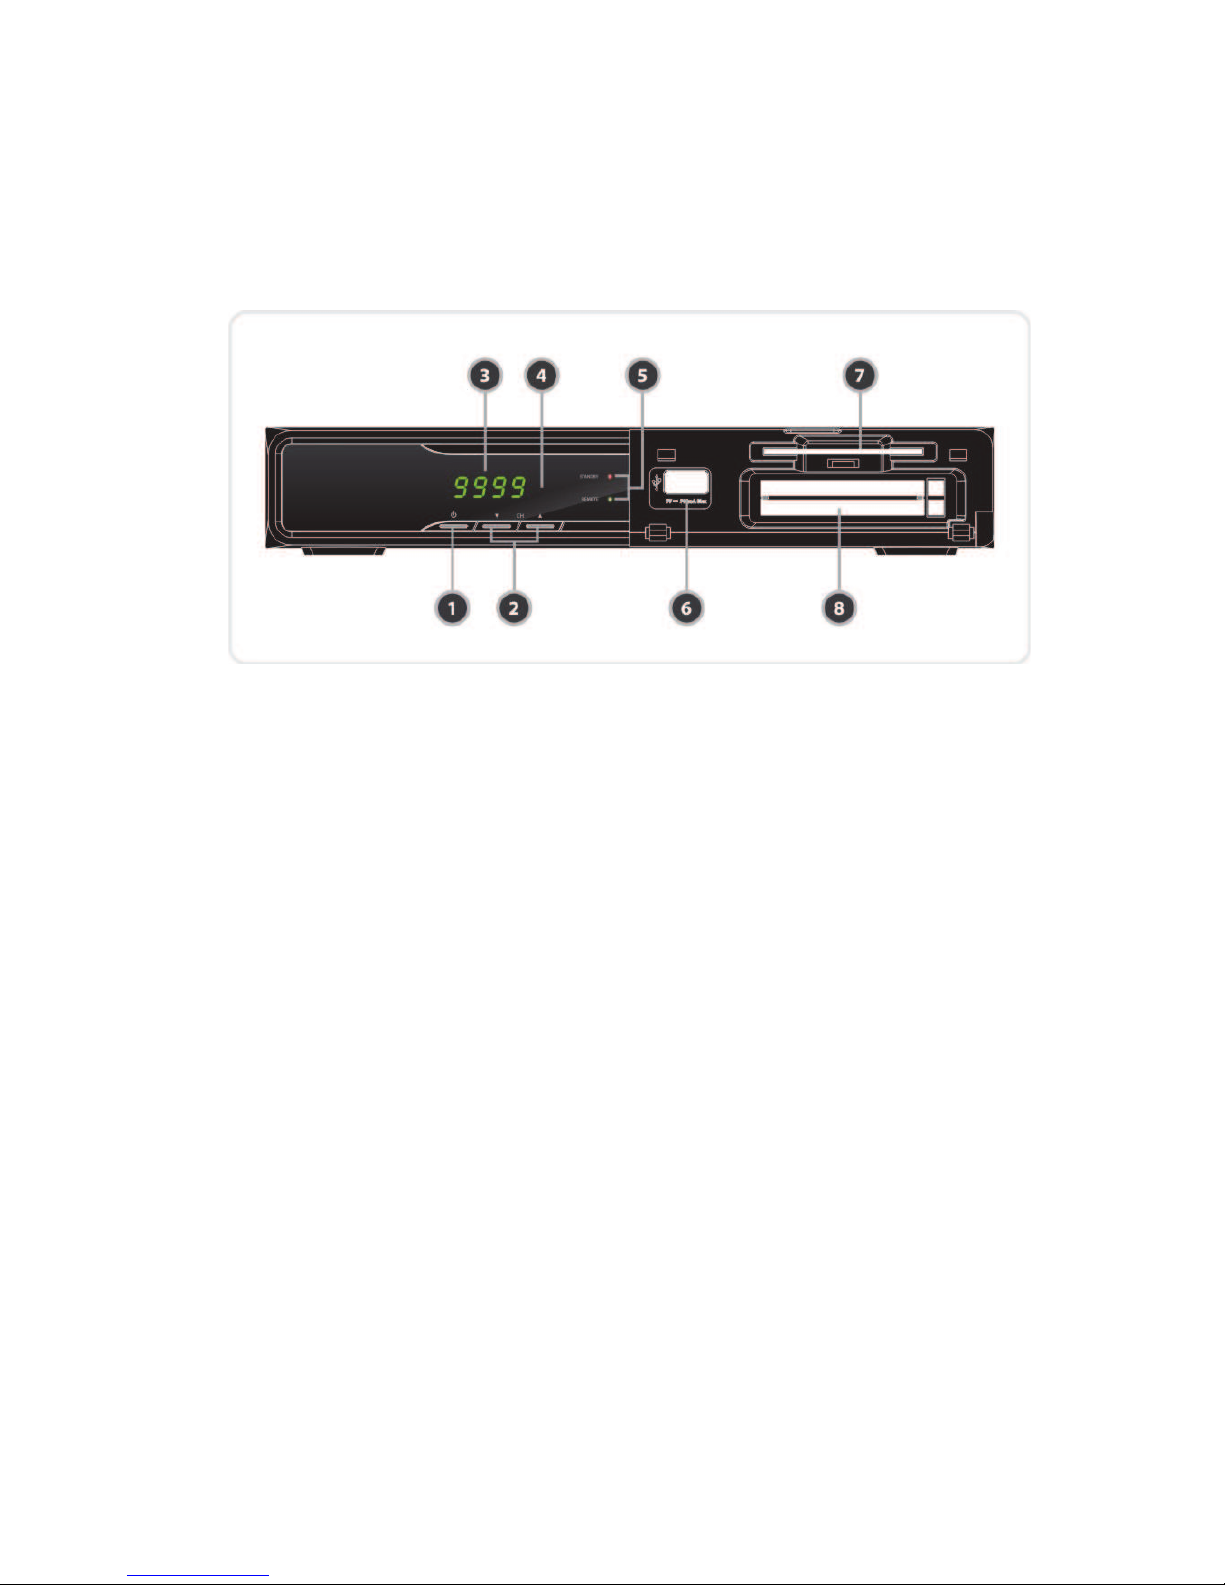
1. Front Panel Configuration
1. POWER BUTTON : Press to switch between STANDBY and POWER ON modes.
2. CH Up/Down BUTTON : Press to change services in normal mode, or to move highlighted-bar in
menu mode.
3. Display : The 4-digit shows service number or menu state in normal mode. Show local time in
standby mode.
4. Remote Sensor : Receives signal from remote controller.
5. STANDBY Indication LED(RED) : The LED lights on in standby mode.
REMOTE Indication LED(GREEN) : The LED lights on when a key on the Remote Control is pressed.
6. USB (Front) : Use it when connecting to external USB storage device.
7. SMART CARD READER : Insert smart card for encrypted service access.
8. PCMCIA : To receive other pay-tv service you need a CA-Module(Viaccess, Irdeto, Nagravison, etc.)
and a smart card from the service provider.

2. Rear Panel Configuration
1. LNB IN: Use to connect a satellite antenna.
2. LNB OUT: Use it when connecting to another STB for loop-through.
3. AUDIO L/R : Connects to the TV or VCR using a RCA cable. (Stereo audio output / White, Red)
4. VIDEO : Connects to the TV or VCR using a RCA cable. (Composite video output / Yellow)
5. SPDIF : Connects to the audio system using a S/PDIF cable. (digital audio)
6. TV SCART : Connects to the TV input using a TV SCART cable.
7. RS-232C : Serial port for firmware update and data transfer.
8. Ethernet : Local area network port for direct computer connection.
9. USB : Use it when connecting to external USB storage device.
10. HDMI : Connects to the TV by using a HDMI cable for the best quality picture and audio.
11. A/C Switch : Power switch
12. A/C power cable socket : Connects to A/C power cord.
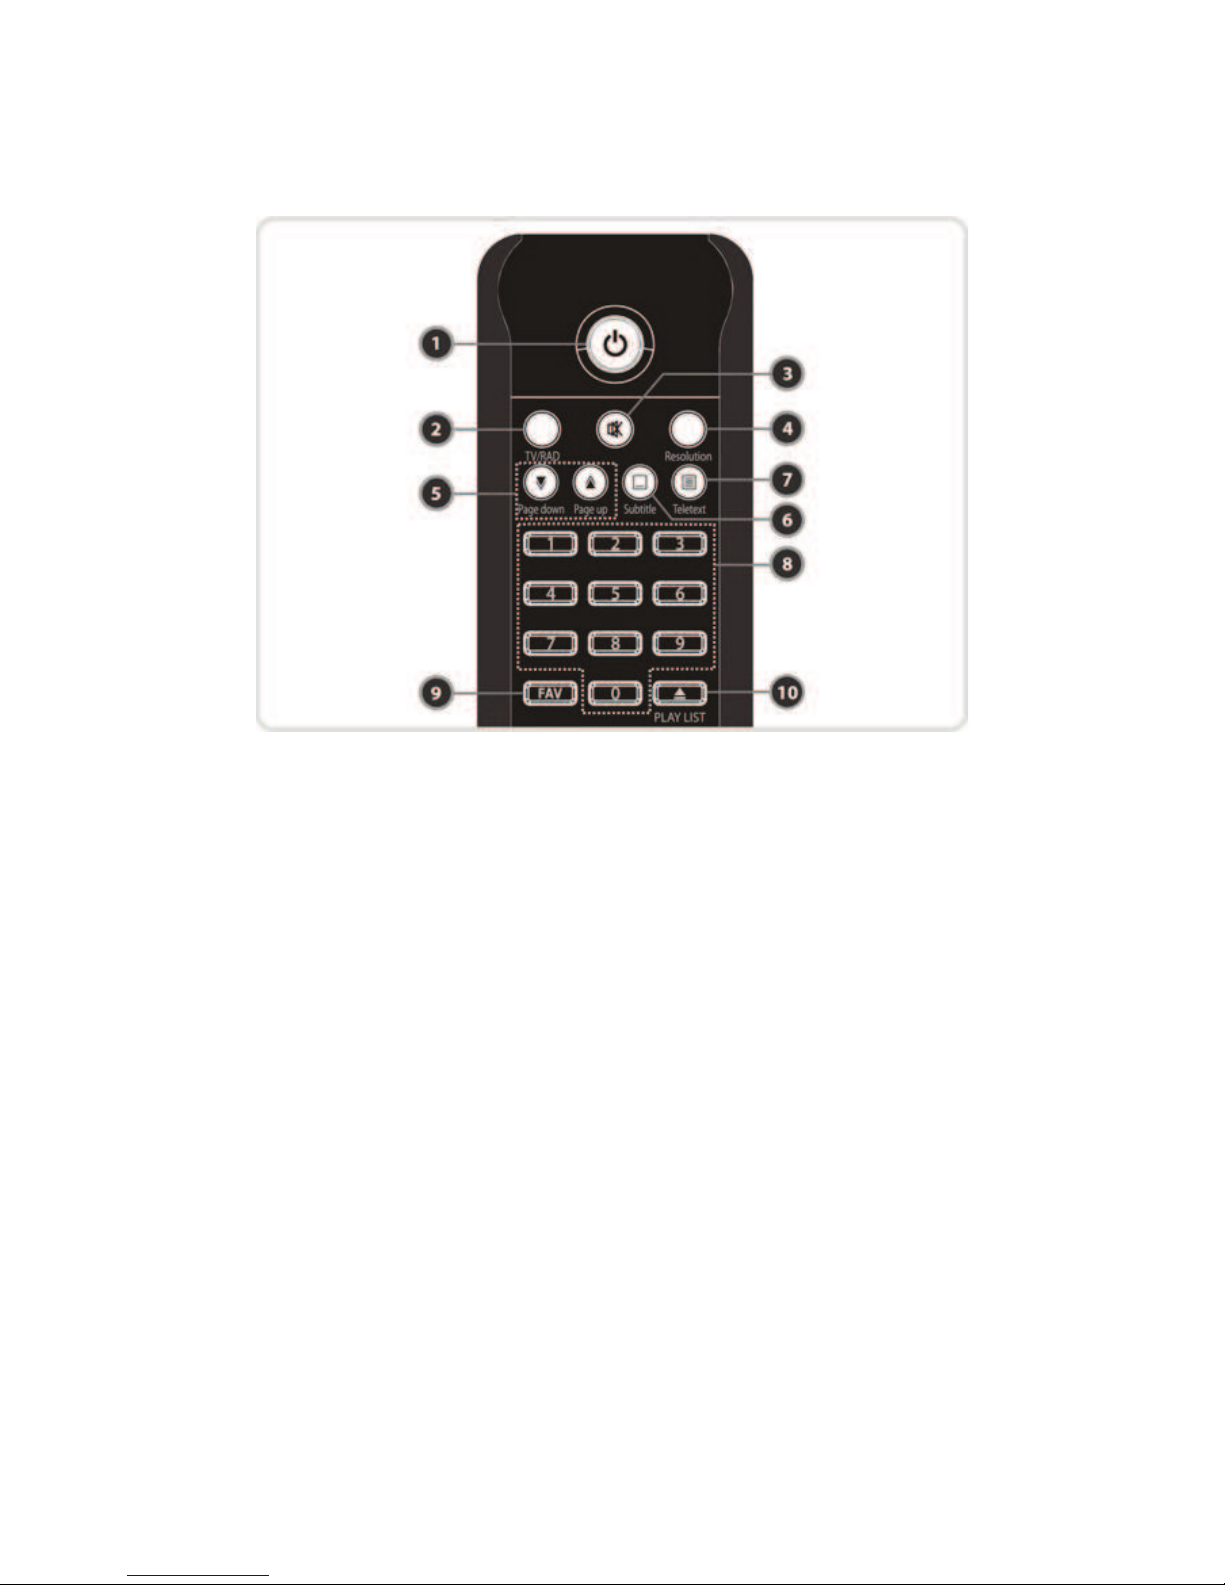
3. Remote Control Unit
1. POWER : Turns the STB On/Off.
2. TV/RADIO : Switches between TV and Radio.
3. MUTE : Turns the sound On/Off.
4. Resolution : To select the resolution format. Each time you press the Resolution button, the
resolution changes in the following sequence: 576i > 576p > 720p > 1080i > 1080P
5. Page Down & Up : Move to the next or previous page if more than one page are available. This button
also is change the location of sub picture in PIP.
6. Subtitle : To show multilingual subtitle.
7. Teletext : To show the digital teletext.
8. Numeric : Controls the numerical operation and service numbers directly.
9. Favorite : To display the satellite group and the favorite groups.
10. Play List : To show the file for USB Storage Device or the network drive.
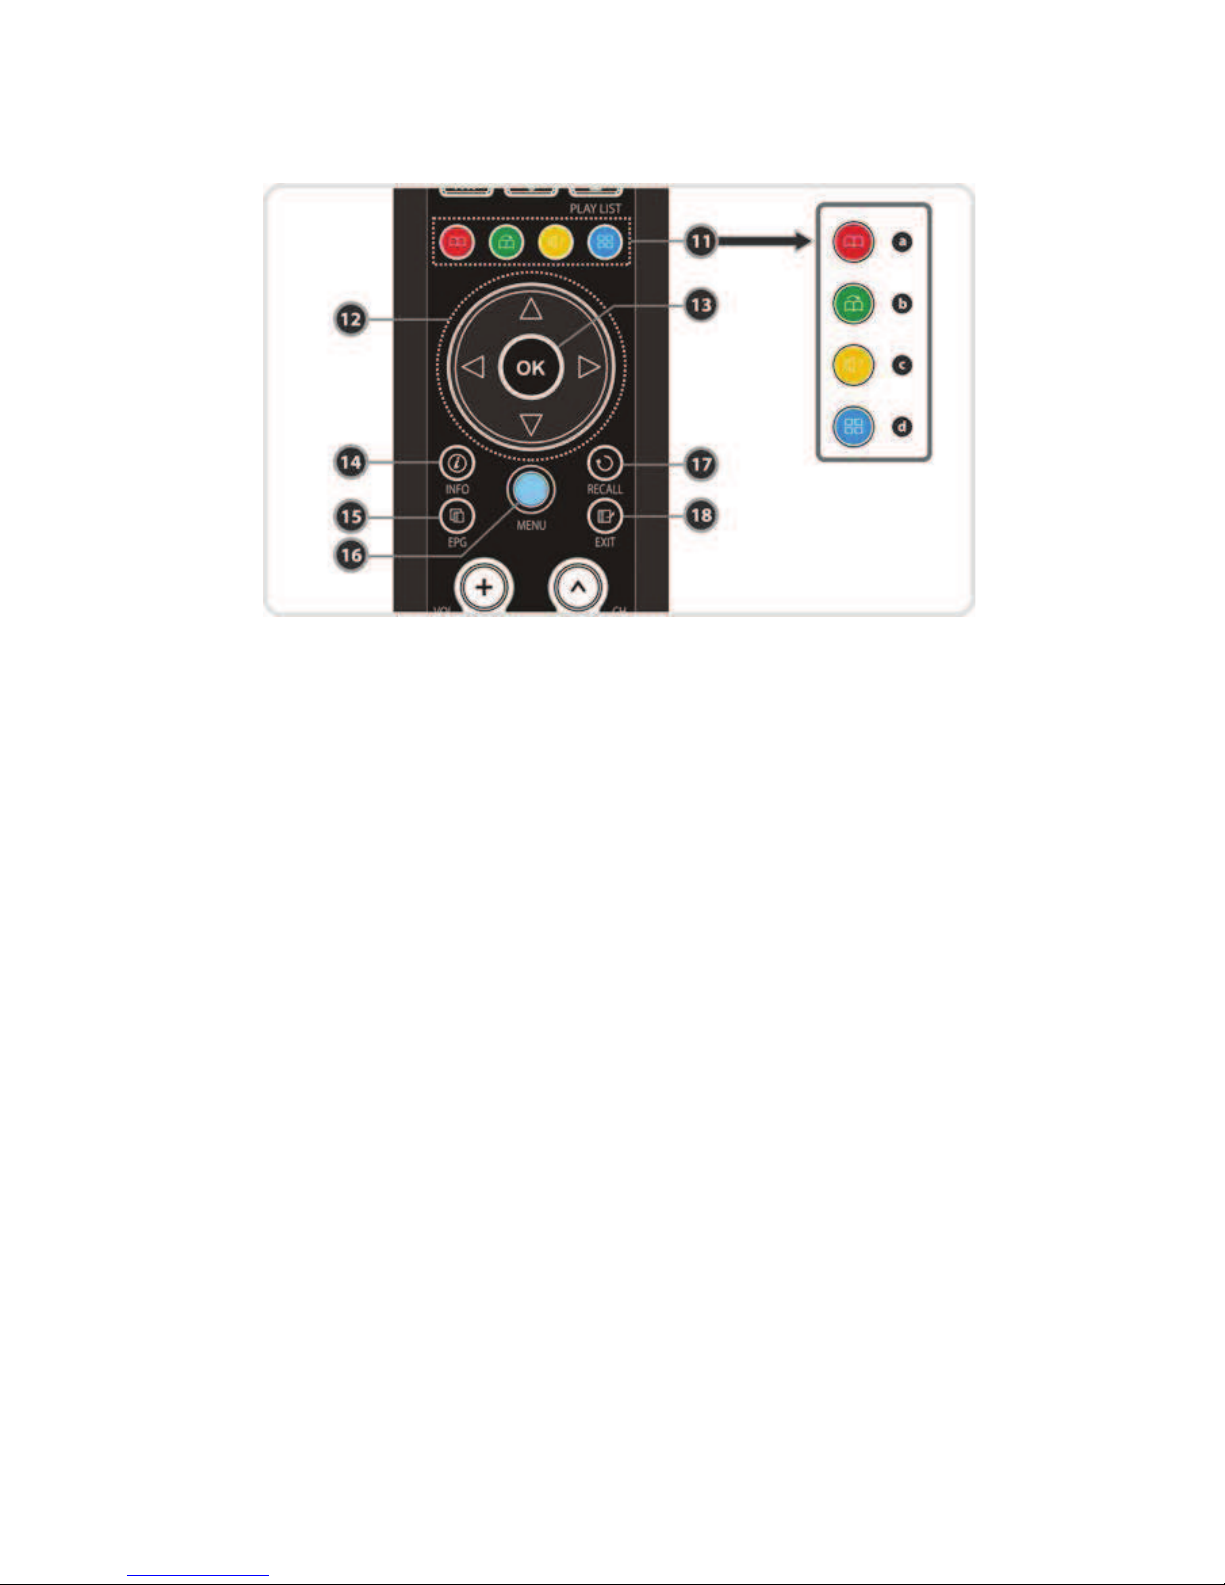
11. Color Buttons
a. RED : Used for special function in menu. RED key is used to sort lists in service list or go to previous
day search in EPG or make/delete the current position as a bookmark.
b. GREEN : Used for special function in menu. Green key is used to set favorites setting in service list
or go to the next bookmark position.
c. YELLOW : Used for special function in menu. Yellow key is used to find service in service list or
change the audio track.
d. BLUE : Used for special function in menu. Blue key is used to set service list option in service list or
display Multi-Picture.(*)
12. ARROW Buttons
a. Up & Down Buttons : To change the value of a selected item with preprogrammed values in menu.
b. Left & Right Buttons : To move the cursor left and right in menu.
13. OK or Service List : Show the service list in non-menu mode and select an item or confirm in menu
mode.
14. Information : Shows the information of the current program. If you press one more, detail
information box will be shown.
15. EPG(Electronic Program Guide) : Show the TV/Radio program guide.
16. Menu : To enter the main menu or to move to the previous menu.
17. Recall : Moves to previous service.
18. EXIT : Exit from the menu or pop-up window.
NOTE : (*) This Feature(Multi-Picture) will be supported later, by new s/w version by upgrading. Please
refer to your local dealer / distributor.
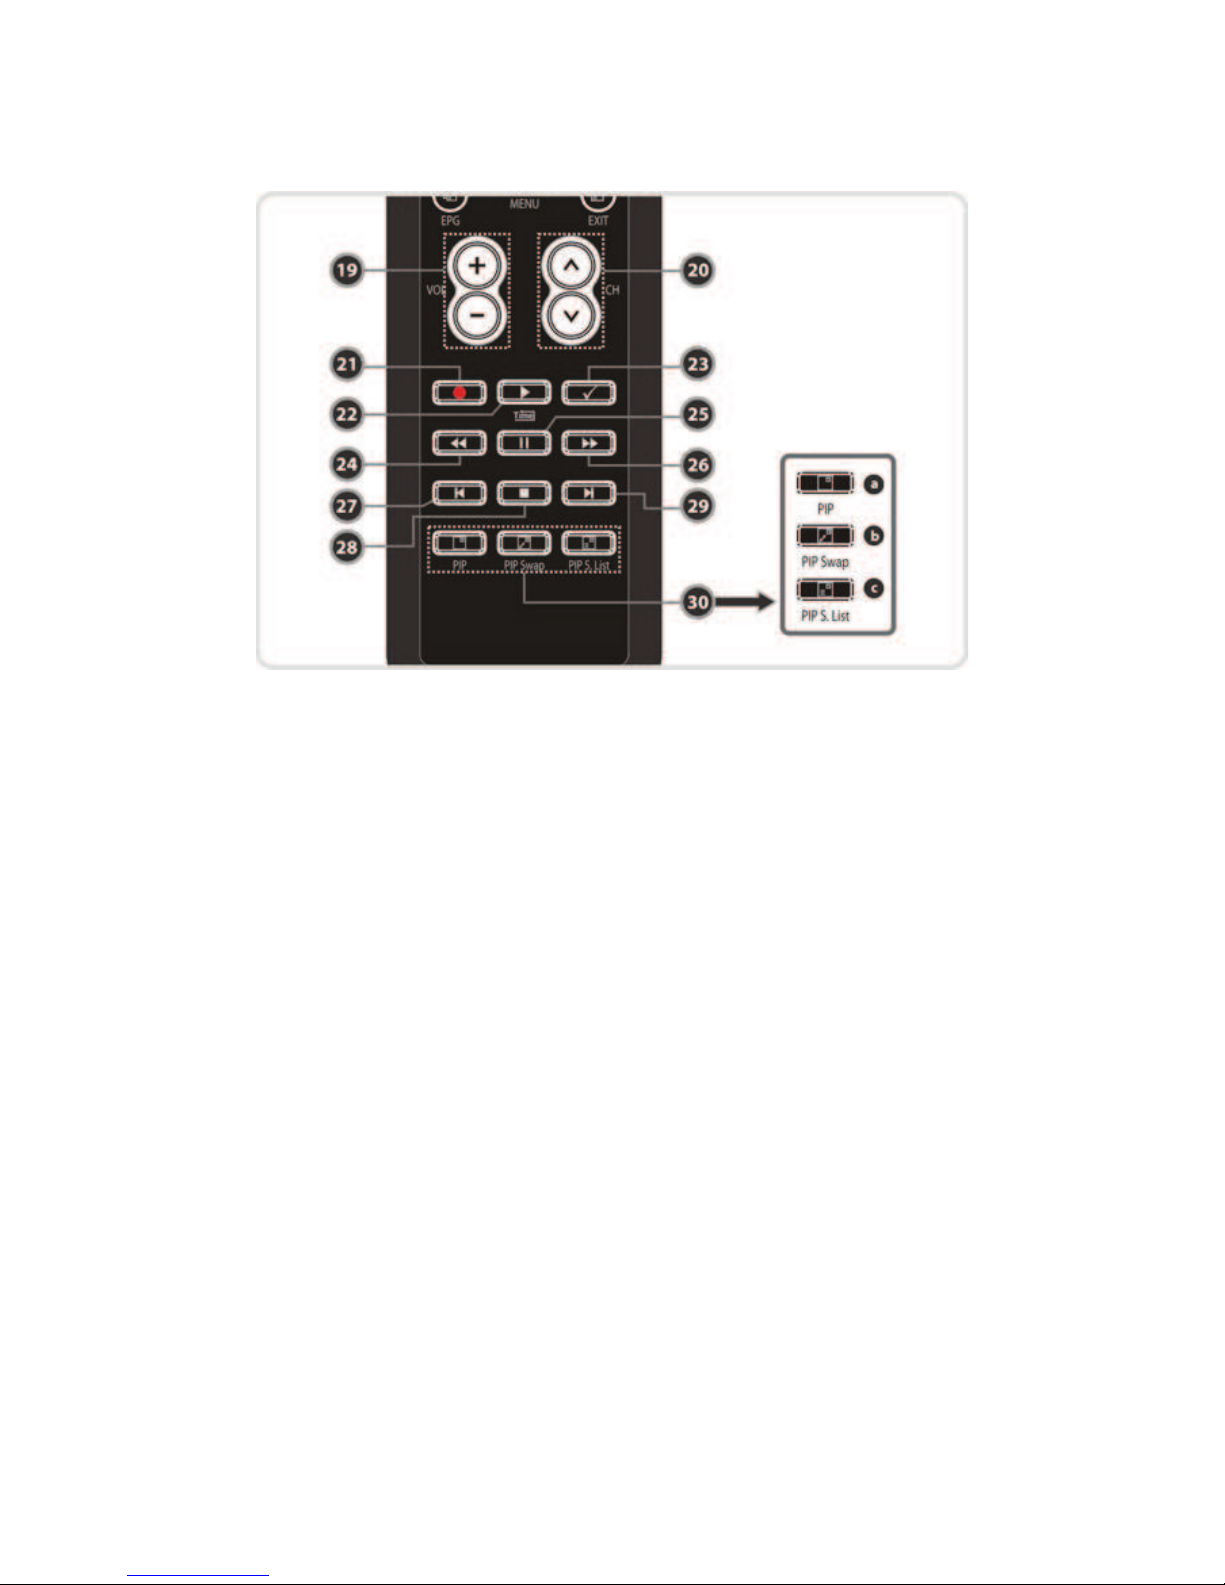
19. Volume Up & Down : To change the Volume.
20. Channel Up & Down: To change service channel.
21. Recording : To start Recording.
22. Play / Time shift : Display the progress bar of playback when no progress bar is displayed. Start
playback with normal speed. Return to normal speed from trick mode..
23. Repetition (*): This key is used to play back a recording repeatedly.
24. Rewind : Rewinds at high speed. Each time you press this button the rewind speed is increased.
25. Pause : This key is used to pause the video. Press once more to resume the video.
26. Fast Forward : Fasts forward at high speed. Each time you press this button the speed is increased.
27. Previous File : To play the previous MP3 file in MP3 play mode. This button is also used to jump back
to beginning of recording during a playback.
28. STOP : To stop time shifting, play back or recording.
29. Next File : To play the next file. This button is also used to jump to end of recording during a playback.
30. PIP Buttons
a. PIP(Picture in Picture) : To open the PIP window.
b. PIP Swap : Switching between main-picture and sub-picture
c. PIP(Picture in Picture) Service List : To shown the sub-picture service list.
NOTE : (*) This Feature(Repetition) will be supported later, by new s/w version by upgrading.
Please refer to your local dealer / distributor

Connecting diagram
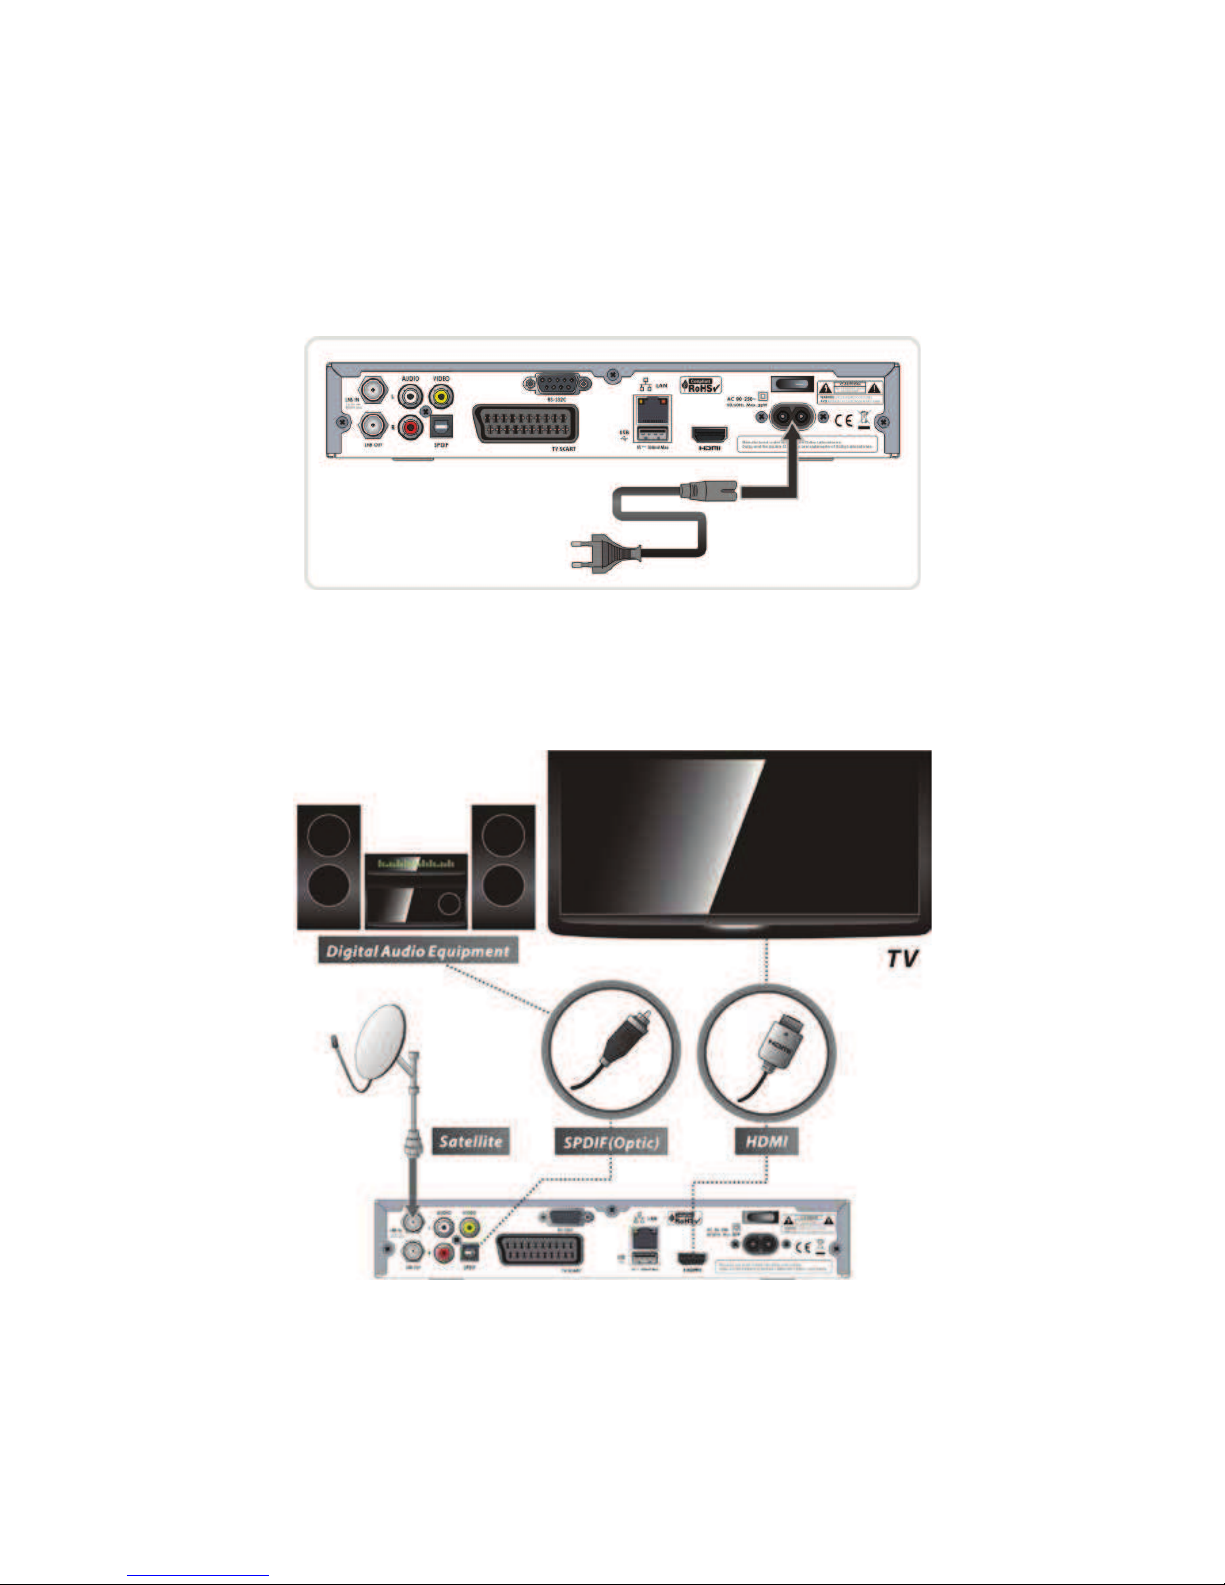
1. Receiver to A/C power
l
Connect the A/C power cord between A/C power cord socket of receiver and A/C outlet.
2. Receiver to TV with Digital A/V Output
l Connect the HDMI Cable to the HDMI Connector of the TV.
l Connect SPDIF to Digital audio input of the equipment(Digital Audio)
NOTE : Depending on the A/V equipment you own, there are various ways you can connect
the STB. To choose the best connection option, please refer to the manual of the
equipment you would like to connect to. To get High Definition playback of High
Definition content, we recommend that you connect your high definition display
with a HDMI cable. HDMI supports standard, enhanced or high-definition video
and multichannel audio in a single cable.

3. Receiver to TV with Analog A/V Output
l Connect the TV SCART to the SCART input of the TV.
l Connect the VIDEO and AUDIO L, R to VIDEO IN and AUDIO L, R IN of TV.
NOTE : The SCART cable connection is recommended for analogue TV or VCR
The composite connection(RCA cable) is recommended for analogue TV
You cannot view high definition video with the SCART and the composite video
connector.
4. Connecting to Antenna Cable
l Using Single DISH : Connect the Satellite Antenna cable to LNB IN.
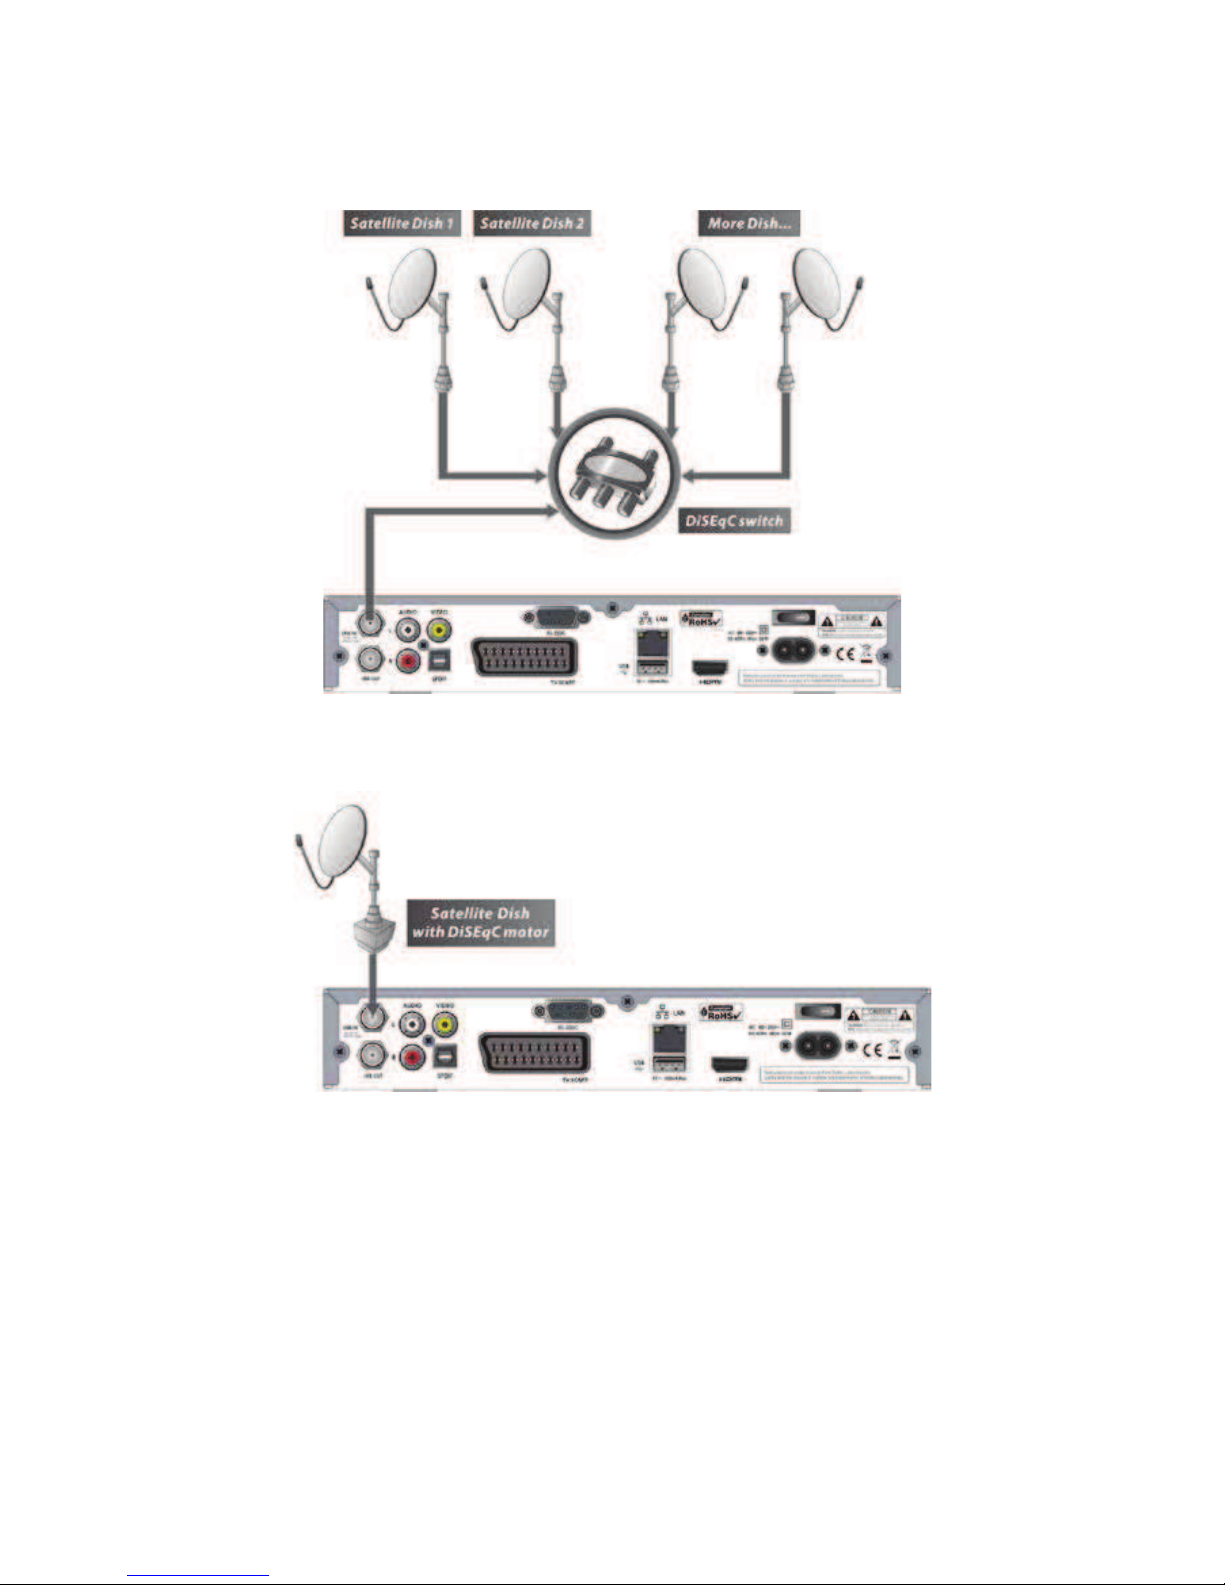
l Using DiSEqC switch : Connect the cable of DiSEqC switch to LNB IN.
l Using DiSEqC motor : Connect the cable of DiSEqC motor to LNB IN.
 Loading...