

Page 1
NW-STA-5016/5009/5004
USER MANUAL
USER MANUAL
Networked DVR
16CH/9CH/4CH
NW-STA-5016/5009/5004
Networked DVR Product Feature
1
16/9/4 CH Multiple camera Input
4
Able to record the CIF size(320*240) video
Image at the speed of 120/240/480 fps
(frame for second)
5
Large quantity HDD backup function by using
IEEE1394 and USB2.0 Memory and CD/DVD
6
MPEG4 H/W Compression with high compression rate 1~3K
8
Central Integration with CAMS Checker
For Real time Health Check
2
Embedded XP O/S of DOM(Disk On Memory)
solution Mounted
3
Pentapllex Multi tasking for Monitoring
And recording and searching and networking
9
Two Way audio communication and broadcastIng by CMS,CM Server
7
Intelligent camera move away detection
Page 2

2
Page:
NW-STA-5016/5009/5004 User Manual
User Manual
Contents
Contents
Chapter 1 Service Requirement
Chapter 2 Product Information
Chapter 3 Basic Product Operation
Chapter 4 System Setup
Chapter 6 Warranty
Chapter 5 Firmware Upgrade
3
4
6
24
49
52
Page 3

3
Page:
NW-STA-5016/5009/5004 User Manual
User Manual
Chapter 1
Limitation of warranty
We warrant that DVR series will be free from defects in materials and workmanship
under normal use and service for all parts excluding hard drives for a period of one year after
the date that the customer purchased the product.
If such a defect occurs, you should contact where you purchased and return the product to us
accompanied with the proof of purchase, we will either repair or replace the product through
our inspection. It is your exclusive remedy for breach of this warranty. However this warranty
shall not apply on repairs or replacements necessitated by any cause as listed below.
1) improper installation
2) acts of nature
3) accident
4) lack of proper maintenance
5) voltage fluctuations
6) unauthorized repair or modifications.
For more details on the limitation of warra nty, refer to entire limited warranty as appendix at
the end of this manual.
Service Information
• To avoid additional defects, do not attempt to repair this unit by yourself. Please contact
a local dealer/distributor/certified installer to get s ervice from authorized
technician. Unauthorized repairs will void the warrantee, may result in fire, el ectronic
shock or other hazards.
• All shipment for repair should be prepaid and properly packed with a note outlining the
defect.
• Send the product with purchase number or other related documents obtaining from Fore
Tech or its agent as proof purchasing the product.
Service Requirement
Page 4

4
Page:
NW-STA-5016/5009/5004 User Manual
User Manual
Chapter 2 Product Information
Enable integrated video monitoring and system management by networking with maximum
1000DVRs systems through CAMS(Central Automated Monitoring System) interface.
High quality video display and system stability through embedded operating system with
hardware MPEG4 video compression chip.
Support the max D1(720*480) quality resolution video display and 120FPS recording.
4/9/16 CH video input and 4 CH audio input.
X-Triplex multitasking for video recording, playback, transmission and backup.
Easy operation using remote-controller, full-page panel, GUI support.
Network transmission of 30 different types of system error management information per
system.
High-speed transmitted video monitoring of ST DVRs up to 64 channels through CMS
software network.
High-speed network video monitoring by internet explorer through WEB CMS server within
the system.
z Features
Watchdog function for hardware & software error
Robust design for physical impact and temperature
Generating 30 different types of network massages for system errors.
Application of low power and low heat features for industrial environment
z System Design
Advanced hardware MPEG 4
Embedded O/S ROM
4/9/16 Camera input
Auto-sequence screen division and PIP/POP function.
Real time display
Recording : 120fps-NTSC (PAL 100fps)
4 CH audio recording and two way audio communication.
CD, DVD RW, USB external saving devices
Ethernet 10/100Mbps, RS-232C network support
Maximum 16 ports sensor input and 4 port alarm output
X-plex multitasking, recording, playback, backup and network.
STATIC, DHCP, PPPOE support
z General Specifications
Page 5

5
Page:
NW-STA-5016/5009/5004 User Manual
User Manual
Firmware upgrade using network and USB port.
Remote upgrade using CMS
Free alarm (max 30secs), port alarm (max 120secs) recording
Watermarking
Private backup viewer
E-Map’s layout mapping
able to install maximum 4 HDD to save 2.5T
Page 6

6
Page:
NW-STA-5016/5009/5004 User Manual
User Manual
Chapter 3 General product operation
Page 7
7
Page:
NW-STA-5016/5009/5004 User Manual
User Manual
IV-STA-5016 (16ch)
13) POWER
System Power On/Off
1) VIDEO IN : BNC 16PORT
2) LOOP OUT(75Ω ON/OFF)
3) AUDIO IN : 4 PORT
4) ALARM/SENSOR/RS-485
Connect Port for Sensor (16Port), Alarm (4Port)
COM(1Port), RS-485 (2Port), GND(1Port)
5) SPOT OUT
Sequence video display
through AV monitor
6) VIDEO OUT
Output video
through AV Monitor
7) S-VIDEO
Output video through
S-VIDEO comport
8) AUDIO OUT
Out put audio
by 1 port
12) RS-232
Connect Port for Program Debug.
11) VGA
Output Video to a Computer
Monitor by Connected
9) ETHERNET:
Port for Cross cable.
( Possible to Remote Surveillance.)
10) USB
USB port for use the USB memory backup
and USB update.
FRONT CASE Button Description
FRONT CASE Button Description
REAR PANEL I/O Description
REAR PANEL I/O Description
IV-STA-5016 (16ch)
division button
Search button
Rec
. button
Menu button
Move button
USB Port:
2 PORT
USB port for use the USB
memory backup and USB
update
Records images
Shows the menu, moves to upper menus and complete setup
Moves to setup and menu. Operates PTZ camera
Numeric buttons
Applies setup details and select
channel
CD-ROM
Searches saved data
LED Indicator
SEQ. button
SPOT button
Setup SPOT monitor
PTZ. button
Play backward button
Stop button
Play forward button
Max. x 128 play forward.
Frame by frame play forward on playback
Stops playback and converts to surveillance mode
Max. x 128 play backward .
frame by frame play backward on data playback
Division rotating surveillance button
Operates Pan/Tilt camera
Setup Status, Audio, Backup, P/T/Z, SEQ, Log list
Function button
Indicate present system status information
Pause and playback the image
Pause button
1ch,4ch,9ch,16ch division button
Page 8
8
Page:
NW-STA-5016/5009/5004 User Manual
User Manual
13) POWER
System Power On/Off
1) VIDEO IN : BNC 9PORT
2) LOOP OUT:
Output video by BNC
9Port (75Ω AUTO)
3) AUDIO IN : 4 PORT
4) ALARM/SENSOR/RS-485
Connect Port for Sensor (9Port), Alarm (4Port)
COM(1Port), RS-485 (2Port), GND(1Port)
5) SPOT OUT
Sequence video display
through AV monitor
6) VIDEO OUT
Output video
through AV Monitor
7) S-VIDEO
Output video through
S-VIDEO comport
8) AUDIO OUT
Out put audio
by 1 port
12) RS-232
Connect Port for Program Debug.
11) VGA
Output Video to a Computer
Monitor by Connected
9) ETHERNET:
Port for Cross cable.
( Possible to Remote Surveillance.)
10) USB
USB port for use the USB memory backup
and USB update.
IV-STA-5009 (9ch)
FRONT CASE Button Description
FRONT CASE Button Description
REAR PANEL I/O Description
REAR PANEL I/O Description
IV-STA-5009 (9ch)
division button
Search button
Rec
. button
Menu button
Move button
USB Port:
2 PORT
USB port for use the
USB memory backup
and USB update
Records images
Shows the menu, moves to upper menus and complete setup
Moves to setup and menu. Operates PTZ camera
Numeric buttons
Applies setup details and select
channel
CD-ROM
Searches saved data
LED Indicator
SEQ. button
SPOT button
Setup SPOT monitor
PTZ. button
Play backward button
Stop button
Play forward button
Max. x 128 play forward.
Frame by frame play forward on playback
Stops playback and converts to surveillance mode
Max. x 128 play backward .
frame by frame play backward on data playback
Division rotating surveillance button
Operates Pan/Tilt camera
Setup Status, Audio, Backup, P/T/Z, SEQ, Log list
Function button
Indicate present system status information
Pause and playback the image
Pause button
1ch,4ch,9ch division button
Page 9
9
Page:
NW-STA-5016/5009/5004 User Manual
User Manual
7) ETHERNET:
Port for Cross cable
( Possible to Remote
Surveillance.)
12) DC POWER Input
Power Supply by
DC12V Adaptor
1) VIDEO IN
Input video by
BNC 4PORT
2) LOOP OUT
Output video
by IV-STA-5004 :
BNC 4Port
(75Ω AUTO)
3) VIDEO OUT
Output video
through AV
Monitor
5) S-VIDEO
Output video
through S-VIDEO
comport
6) AUDIO IN
Input audio
by 4 Port
4) AUDIO OUT
Output audio
by 1 Port
8) RS-232
Connect Port for
Program Debug.
10) ALARM/SENSOR/RS-485
Connect Port for Sensor (4Port), Alarm (4Port)
COM(1Port), RS-485 (2Port), GND(1Port)
8) RS-232
Connect Port for
Program Debug.
11) POWER
System Power On/Off
IV-STA-5004 (4ch)
FRONT CASE Button Description
FRONT CASE Button Description
REAR PANEL I/O Description
REAR PANEL I/O Description
IV-STA-5004 (4ch)
division button
Play backward button
Stop button
Play forward button
Pause button
1ch,4ch division button
Search button
Searches saved data
Stops playback and converts to surveillance mode
Pause and playback the image
Menu button
Move button
Shows the menu, moves to upper menus and
complete setup
Moves to setup and menu. Operates PTZ camera
Setup Status, Audio, Backup, P/T/Z, SEQ, Log list
Function button
Max. x 128 play forward.
Frame by frame play forward on playback
USB Port:
2 PORT
USB port for use the
USB memory backup
and USB update
Max. x 128 play backward .
Frame by frame play backward on data playback
CD-ROM
PTZ. button
Operates Pan/Tilt camera
Rec. button
Records images
Numeric buttons
Applies setup details and select channel
LED Indicator
Indicate present system status information
Page 10
10
Page:
NW-STA-5016/5009/5004 User Manual
User Manual
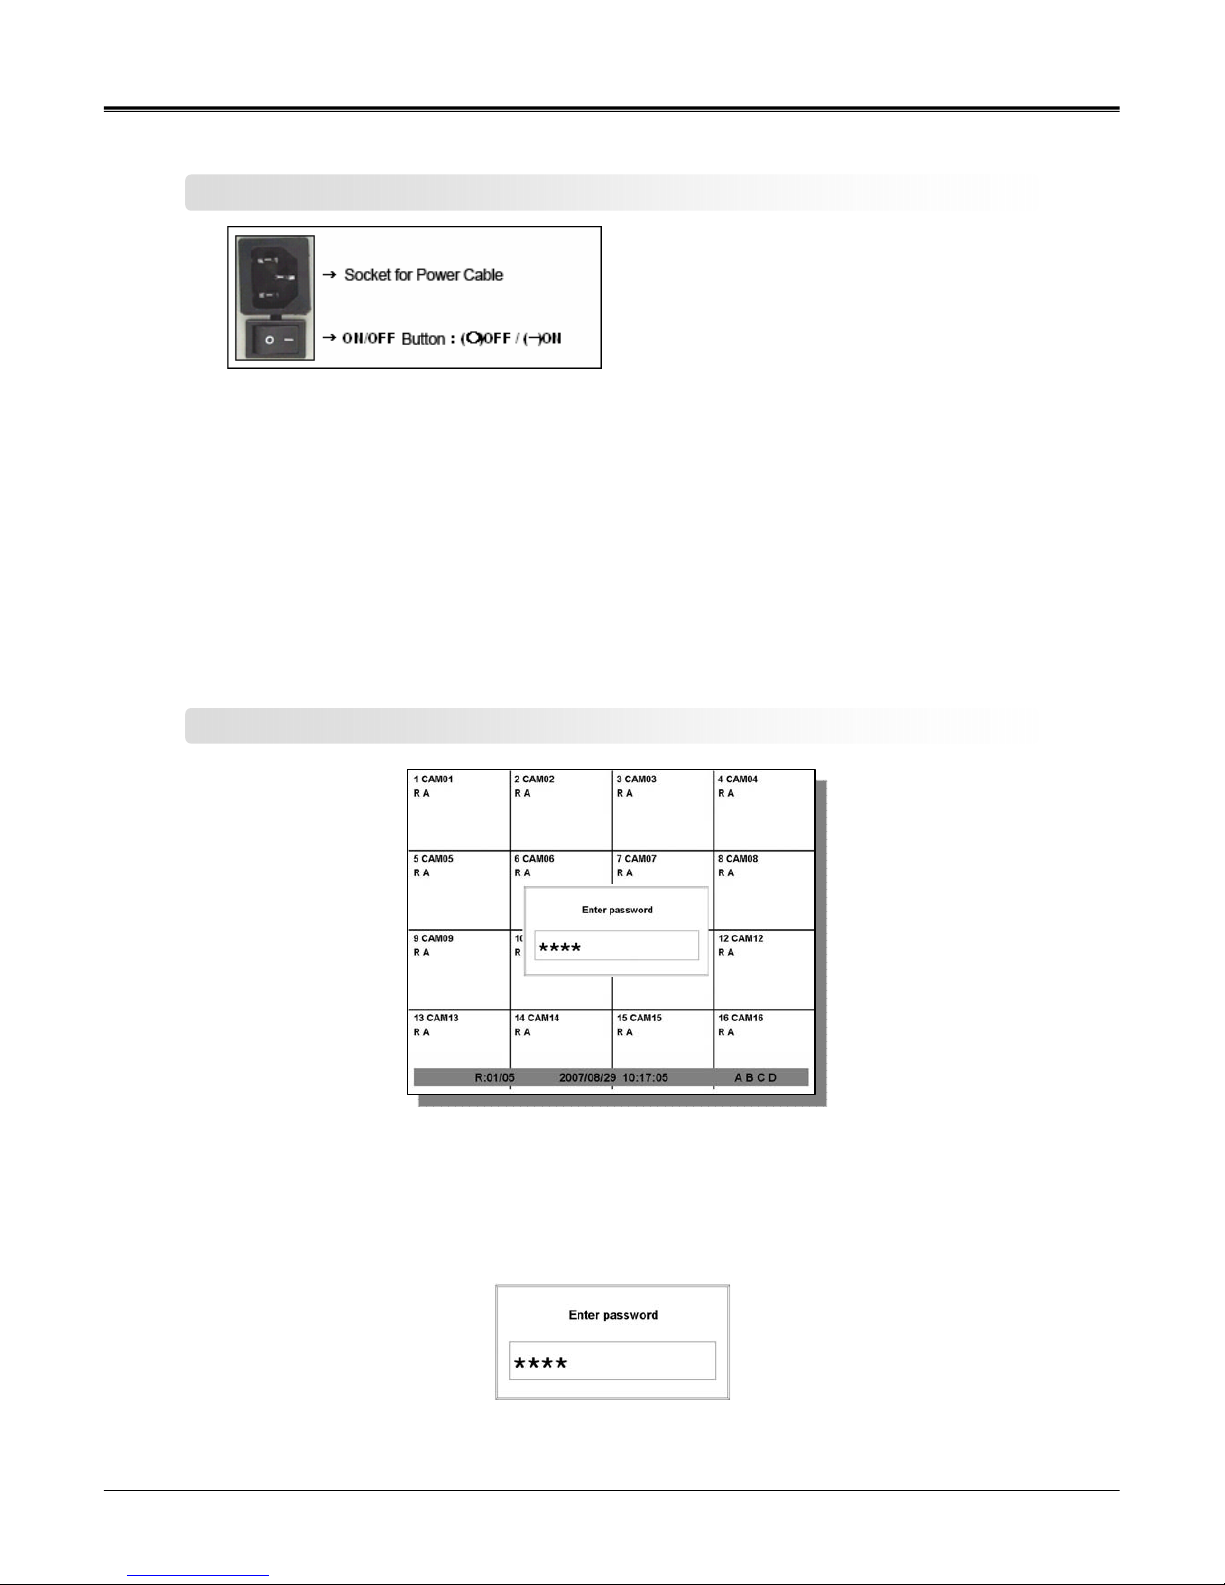
Power on/off
zPower on
Press the power button at the back to be ‘ON’ to turn it on after connecting the power
cable.
zPower off
① press ‘Menu’ button [menu Æ system Æ shutdown]
② select ‘Shutdown’ and press ‘Enter’ button.
③ sele ct ‘OK’ button after the message “ system will shutdown”. Press ‘Enter’ button.
④ press the power switch at the back to be ‘Off’.
System Login
zInput password
Input the password using number buttons at the password box.
☞
The default value is ‘0000’.
Page 11
11
Page:
NW-STA-5016/5009/5004 User Manual
User Manual
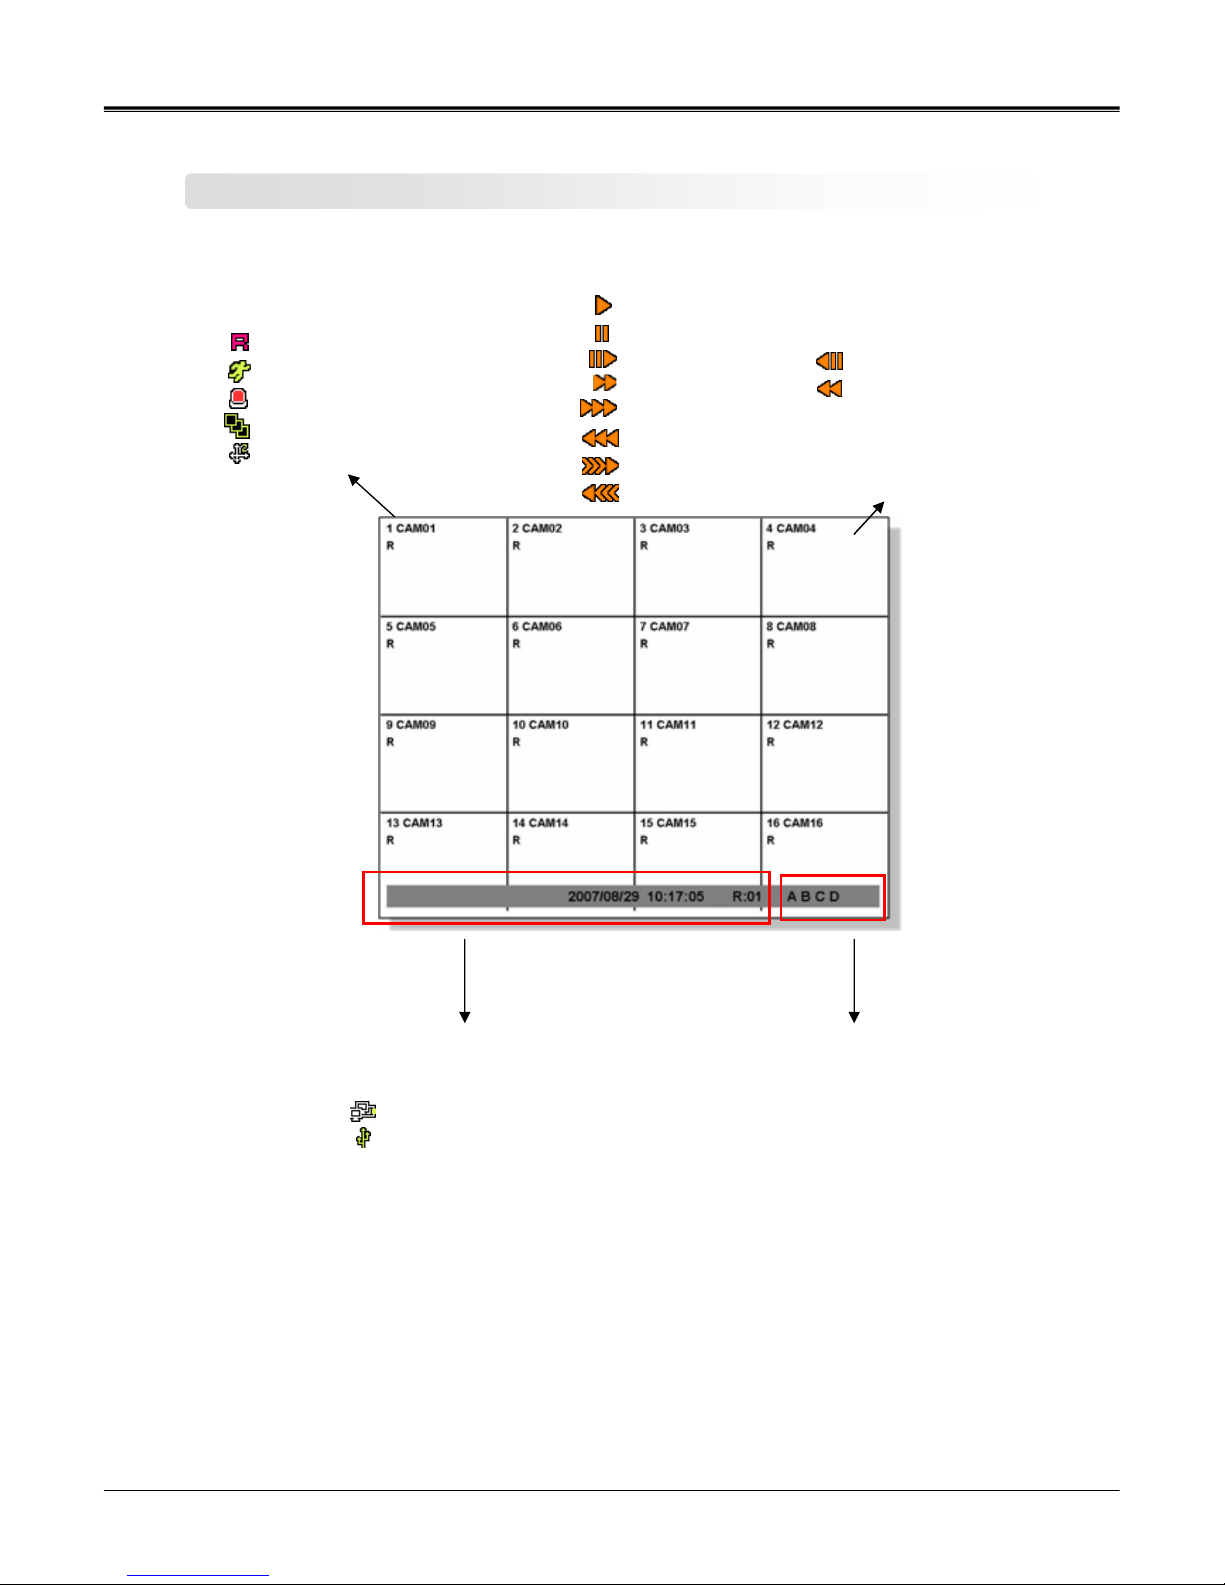
Screen display
[ Channel status ]
Channel number
Camera name
: Recording
: Motion detection in process
: Sensor detection in process
: Channel sequence indication
: PTZ indication
[ Playback status ]
: Playback in progress
: Pause
: Playback per frame : Play backward per frame
: Speed playback : Speed play backward
: Double speed playback
: Double speed play backward
: Triple speed playback
: Triple speed play backward
[ HDD status ]
HDD indication
A : master hard
B : slave hard
C : master hard
D : slave hard
* color icon indications
blue : HDD installed.
yellow : recording in progress
orange : Hard disk is full
red : Hard disk error
[ Slide bar ]
: CMS connection status
: USB device connection status
Date & time
Remote controller status
Page 12
12
Page:
NW-STA-5016/5009/5004 User Manual
User Manual
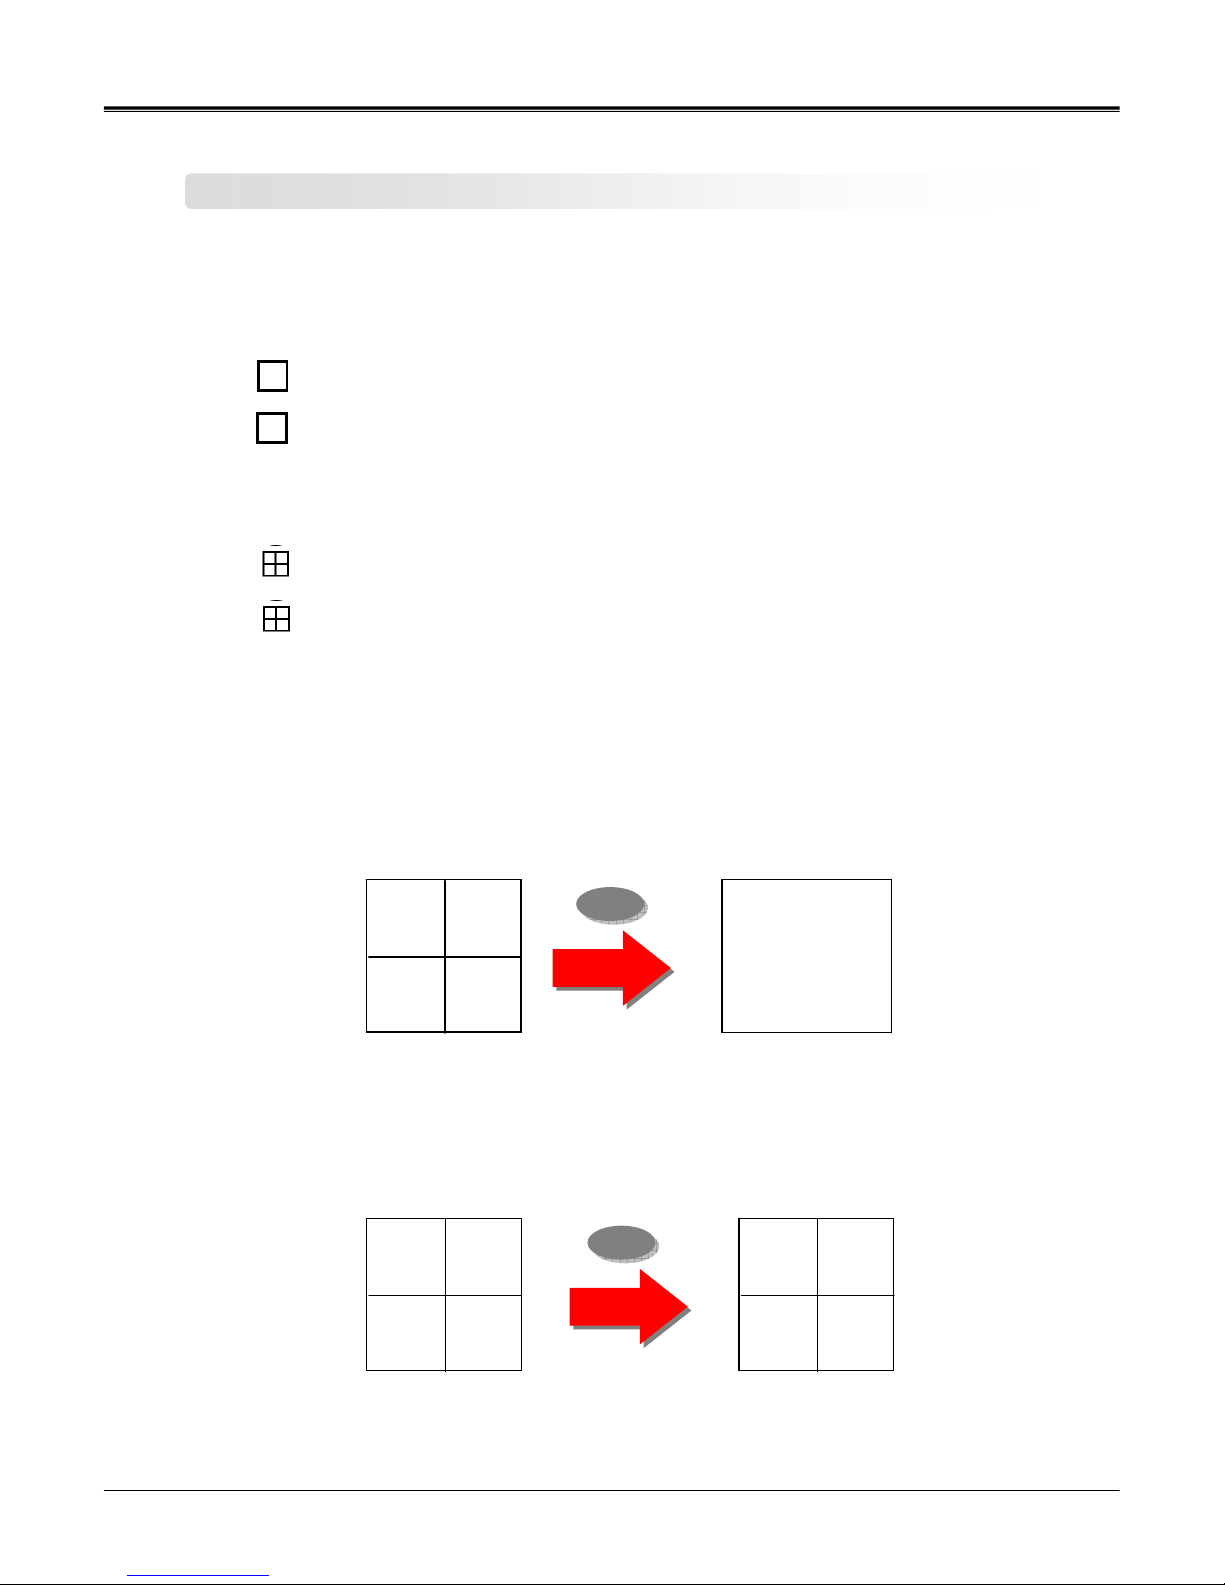
z Full screen mode
- press this button.
- shifts to next channel each time you press this button.
z Quad screen mode
- press this button.
- shifts to the next channel each time you press this button.
- If you press a channel number button on remote-controller while
being displayed in the current quad screen, the selected channel turns full screen.
Screen setup
1 CAM011 CAM01 2 CAM02
3 CAM03 4 CAM04
1 CAM01 2 CAM02
3 CAM03 4 CAM04
5 CAM05 6 CAM07
7 CAM07 8 CAM08
1
6
-If you press another channel number that is not being displayed in the current quad screen, it turns
another quad screen including the channel you selected.
Page 13
13
Page:
NW-STA-5016/5009/5004 User Manual
User Manual
OSD button
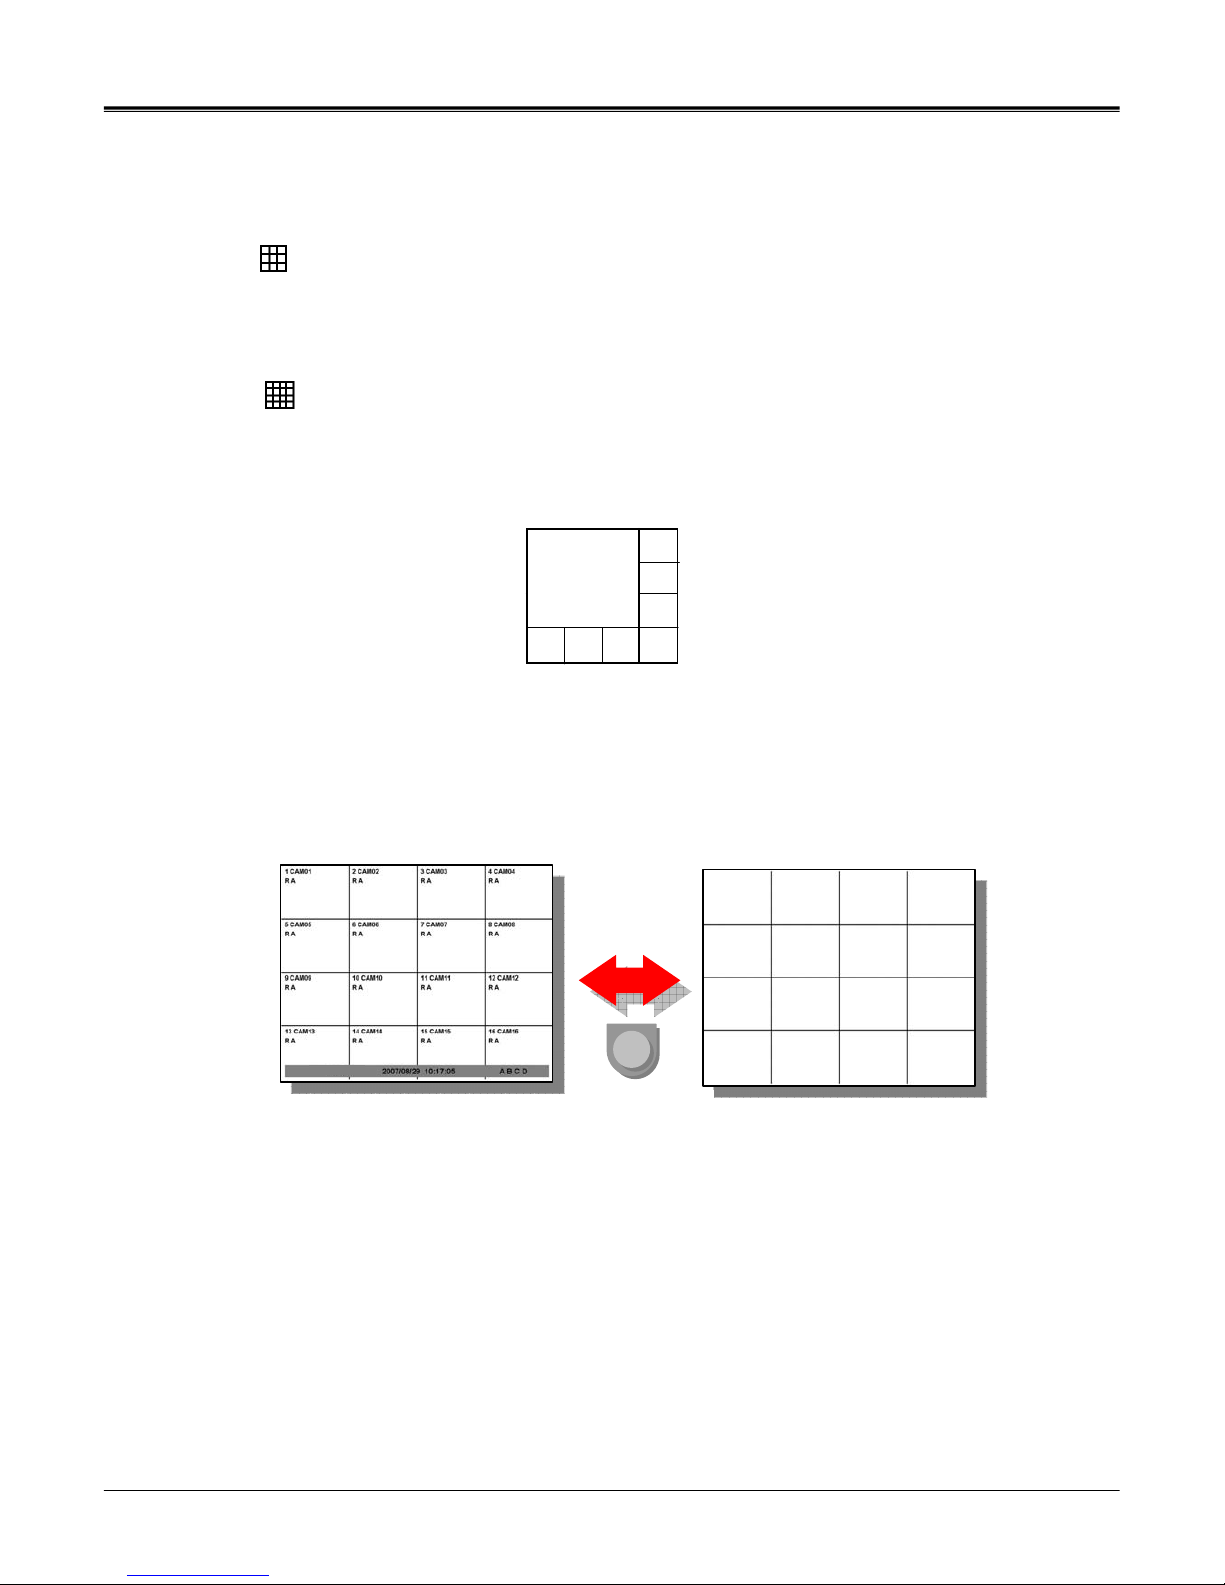
z9 division screen mode
- press this button
z16 division screen mode
- press this button
zPOP screen mode *only for 9Ch & 16Ch products
-press ‘POP’ button, it will display a certain channel larger than other channels.
zOSD mode
- press ‘OSD’ button, icons and channel status phrases will appear or disappear.
Page 14
14
Page:
NW-STA-5016/5009/5004 User Manual
User Manual
zPIP screen mode
You can monitor 2 screens at the same time with small screen inside of one screen.
(1) press ‘PIP’ button on the remote controller.
(2) press ‘PIP’ button one more time the display channels will be exchanged.
(3) If you press a channel number button on the controller, the channel will be displayed in
small screen.
Ex)
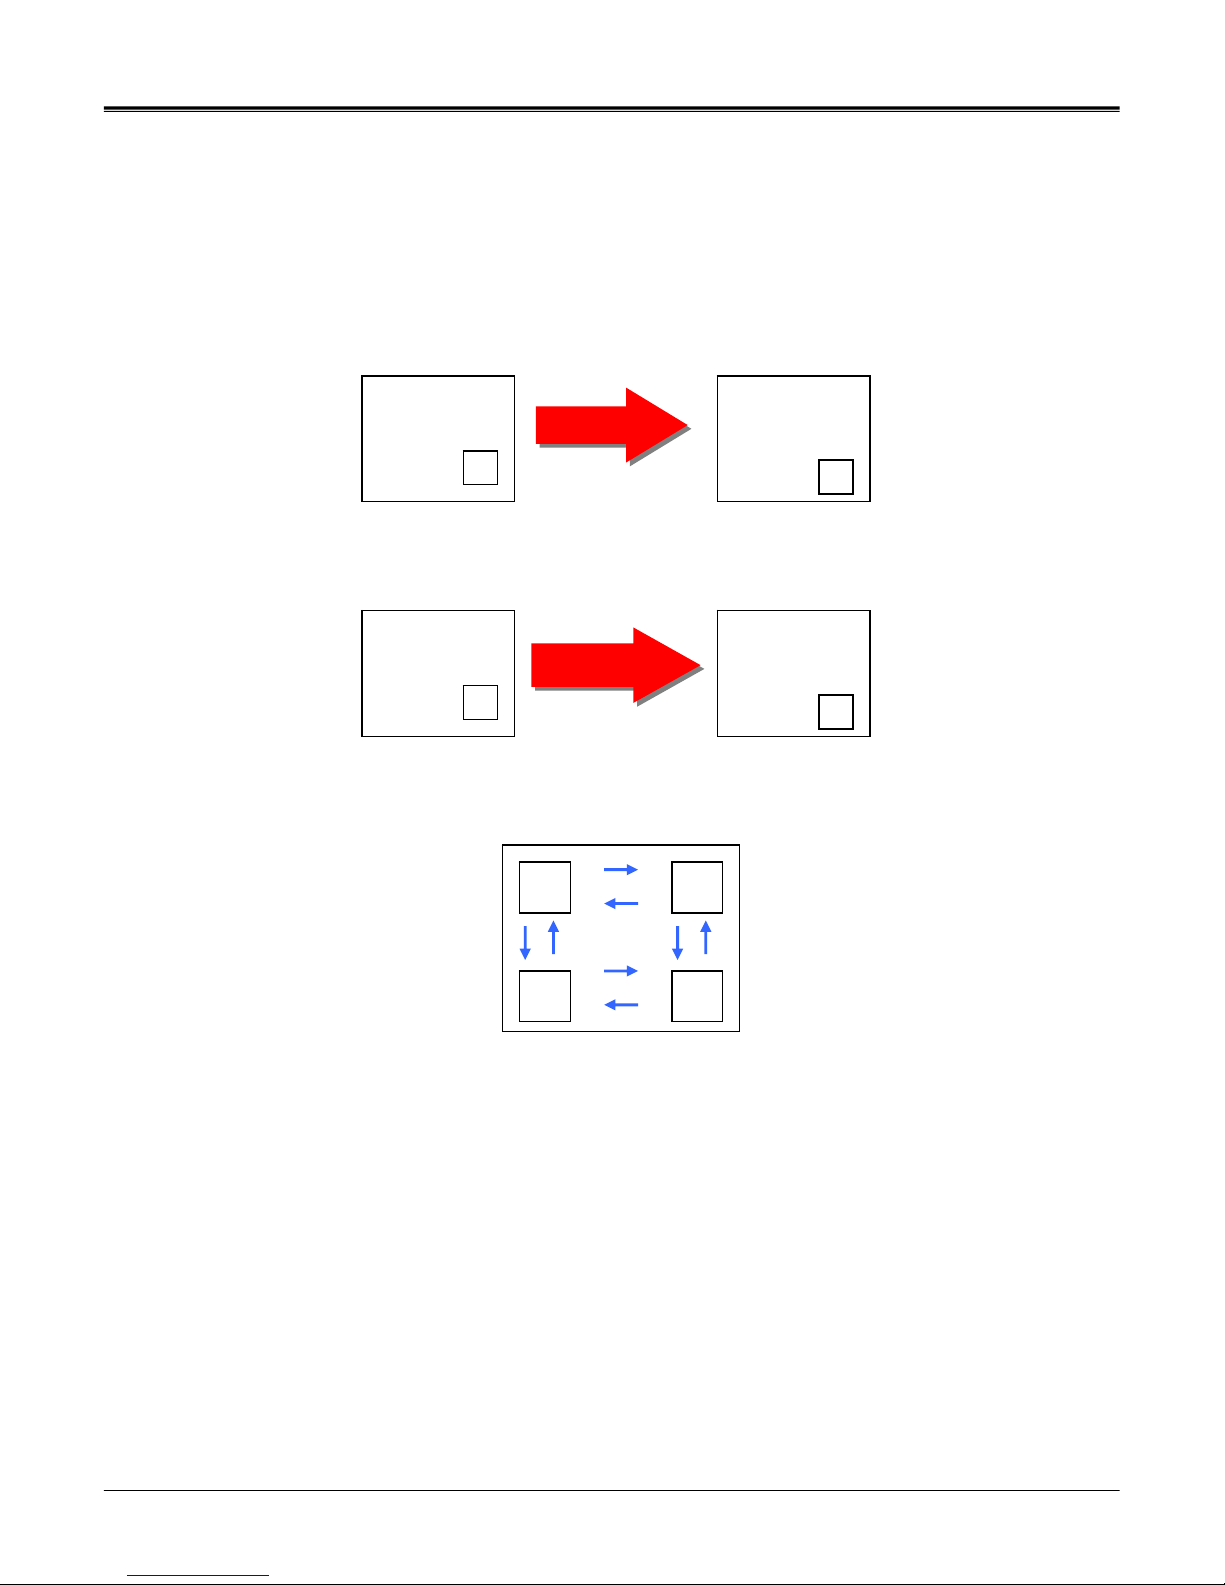
(4) you can move the small screen using arrow buttons.
z Sequence playback screen mode
- If you press ‘SEQ’ button, full screen or quad screen will be displayed in sequence.
- you can setup duration time at system menu.
1
2
‘PIP’ Button
‘PIP’ Button
2
1
1
2
Cam ‘3’ Button
Cam ‘3’ Button
1
3
Page 15
15
Page:
NW-STA-5016/5009/5004 User Manual
User Manual
zSPOT screen * only for 9Ch & 16Ch products
able to display real time screen of another screen-mode in different monitor using ‘SPOT OUT’ port
at the back of product.
▶Press ‘Function’ button and select ‘Spot’ to set up ‘SPOT’ screen.
(1) type
① single channel
▷playback only one selected channel in full screen
mode.
② sequence single
▷playback each channel in full screen mode in sequence.
▷you can setup duration time at system menu.
③ sequence quad
▷playback channels in quad screen mode in sequence.
[IV-STA-5009] [IV-STA-5016]
▷you can setup duration time at system menu.
No. Camera
1 Camera 1 ~ Camera 4
2 Camera 5 ~ Camera 8
3 Camera 6 ~ Camera 9
Quad No. Camera
1 Camera 1 ~ Camera 4
2 Camera 5 ~ Camera 8
3 Camera 9 ~ Camera 12
4 Camera 13~ Camera 16
SPOT
SINGLE CHANNEL
CH1
SINGLE CHANNEL
SEQ SINGLE
SEQ QUAD
SPOT
SINGLE CHANNEL
CH1
CH1
CH2
CH3
CH4
CH5
CH6
CH7
Page 16
16
Page:
NW-STA-5016/5009/5004 User Manual
User Manual
z press (ZOOM) button in full screen mode to active digital zoom.
z zoomed area moves as you press arrow buttons.
z size of zoomed area gets bigger and smaller as you press (ZOOM ) button one more time.
z press ‘Enter’ button, it shows the selected area bigger like the images below.
Digital zoom
Z/F
Z/F
Recording
z press ‘REC’ button to start recording.
Check before recording !!
(1) Check if hard disk is formatted.
(2) Check the camera output.
(3) Check if each channel names are correct.
(4) Set each channel’s recording quality.
(5) Set each channel’s recording frames.
Page 17

17
Page:
NW-STA-5016/5009/5004 User Manual
User Manual
Search
z press ‘SEARCH’ button. Then you can see the ‘Search’ menu like below.
z Search by time
(1) input the date and time to search. Press ‘Enter’ button.
z Search by calendar
(1) you can see ‘calendar’ menu like below if you select ‘Search by calendar’.
(2) select the date and time using arrow keys. Press ‘Enter’ button.
(3) lastly, select ‘OK’ and press ‘Enter button’.
SEARCH
SEARCH BY TIME
SEARCH BY CALENDAR
SEARCH BY EVENT
GO TO FIRST
GO TO LAST
SEARCH BY CALENDER
2008/ 2
SU MO TU WE TH FR SA
1 2
3 4 5 6 7 8 9
1011 12 13 14 15 16
1718 19 20 21 22 23
24 25 26 27 28 29
2008/02/16 13:00 OK
CLOSE
0 5 10 15 20
0 10 20 30 40 50
Page 18

18
Page:
NW-STA-5016/5009/5004 User Manual
User Manual
SEARCH BY EVENT
START TIME
END TIME
CAMERA ALL
CH1 CH2 CH3 CH4
CH5 CH6 CH7 CH8
CH9 CH10 CH11 CH12
CH13 CH14 CH15 CH16
EVENT MOTION SENSOR VLOSS
SEARCH CLOSE
2
2
3
3
4
4
z Search by event
(1) you can see the menu like below if you select ‘Se arch by ev e nt’ .
(2) input the beginning date/time and ending date/time to search.
(3) select channels to search.
(4) select events to search.
(5) lastly, select search and press ‘Enter’ button.
z Go to first
playback from the beginning part of recording.
z Go to last
playback from the recent part of recording.
Playback
z press ‘Playback’ button to start playback from the recent part of recording.
z you can choose various playback screen modes by screen mode buttons.
◀◀
Rewind
Frame playback
- Rewind during playback.
- Playback by frame during pause.
▶ Playback Playback the recorded screen.
∥ Pause Pause the screen.
▶▶
Fast forward
Frame playback
-Fast forward during playback.
-Playback by frame during pause.
■ stop Stop the playback.
Page 19

19
Page:
NW-STA-5016/5009/5004 User Manual
User Manual
Backup
z backup data using USB device.
(1) Connect ‘USB’ device to the DVR’s USB port.
(2) Press ‘Function’ button and select ‘Backup’
(3) Select options from menu.
9DEVICE – select the device to backup.
9MEDIA TYPE– select media ‘CD’,’DVD’ etc to backup.
9FORMAT – format the media before backup.
9CHANNEL – select channels to backup.
9FROM – input the date/time to start backup.
9TO – input the date/time to finish backup.
(4) Select ‘BACKUP’ and press ‘Enter’ button.
BACKUP
DEVICE
MEDIA TYPE
CHANNEL ALL
CH1 CH2 CH3 CH4
CH5 CH6 CH7 CH8
CH9 CH10 CH11 CH12
CH13 CH14 CH15 CH16
FROM
BACKUP CLOSE
FORMAT
TO
Page 20

20
Page:
NW-STA-5016/5009/5004 User Manual
User Manual
(1) open file : Load the backup data.
(2) save : save the playback images as bmp file.
(3) playback : playback the backup data. (playback, pause, speed playback, playback by
frame)
(4) division : 1 division, 4 division, 9 division, 16 division
(5) watermark : check if there is any modification of data.
(6) status box : display the status of backup viewer.
z Backup viewer
2
2
5
5
6
6
1
1
3
3
4
4
Page 21

21
Page:
NW-STA-5016/5009/5004 User Manual
User Manual
(1) Click ‘Open file’ button from the main screen.
(2) Select files to playback.
(3) After loading backup file is completed, you can playback backup data and save it as bmp files.
z Open file
Page 22

22
Page:
NW-STA-5016/5009/5004 User Manual
User Manual
z Save
(1) Save backup data.
(2) Select screen division.
(3) Click ‘save’ button.
(4) Name the ‘Bmp’ file and save.
Image of saved bmp file as 9 division screen
(1) Load files with audio data.
(2) Select and playback the channel, which audio is saved, it playbacks audio data at the same time.
z Audio playback
Page 23

23
Page:
NW-STA-5016/5009/5004 User Manual
User Manual
z Watermark
(1) Load files to check watermarking
(2) Click ‘watermark check’ button.
(3) Click playback or speed playback button.
(4) It shows the image with error message if there is any modification of data. It shows ‘Ok’ in
the status box if there is no modification of data.
Page 24

24
Page:
NW-STA-5016/5009/5004 User Manual
User Manual
PTZ
PTZ
zPTZ operation
press button to display in full screen and you can operate PTZ cameras.
press ‘Enter’ button in PTZ mode, you will see ‘PTZ-ADVANC’ menu.
zPTZ general movement
(1) moves pan/tilt camera from up/ down and right/ left using arrow keys.
(2) enlarge or reduce the screen size by ◀◀ / ▶▶buttons while using zoom camera.
(3) can move to other channels by number button on remote controller.
zPTZ ADVANCE
(1) adjust focus
① + : Focus in
② - : Focus out
③ AUTO : Auto focus mode
(2) Iris control
① + : Open iris
② - : Close iris
③ AUTO : Auto iris mode
(3) operating speed
① + : increase the speed.
② - : decrease the speed.
(4) preset
① scanning
② shortcut
NOTE: you can set ‘Preset’at System menu.
[Menu camera setup preset]
you can set ‘Scan list’ at System menu.
[Menu camera setup scan point]
NOTE: you can set ‘Preset’at System menu.
[Menu camera setup preset]
you can set ‘Scan list’ at System menu.
[Menu camera setup scan point]
PTZ-CH1
Z-
Z+
PTZ ADVANCE
FOCUS
AUTO - +
AUTO - +
IRIS
SPEED
PRESET
- 9 +
SCAN GO
Page 25

25
Page:
NW-STA-5016/5009/5004 User Manual
User Manual
Audio
Audio On : Turn on audio
Mute : Turn off audio
z Turn on/ off audio.
z you can playback the audio in full screen mode.
Log search
9 event type – select types of event to search
9 from – input date/time t o start se archi n g
9 to – input date/time to finish searching
z search every event happened during product operation.
z select ‘Search’ and press ‘Enter’ button to start log search.
AUDIO
AUDIO ON
LOG VIEW
EVENT TYPE ALL
SYSTEM HDD
RECORD DB
PROCESS NETWORK
FROM 2007/08/29 00:00:00
TO 2007/08/29 00:00:00
SEARCH CLOSE
Page 26

26
Page:
NW-STA-5016/5009/5004 User Manual
User Manual
Remote –controller ID
2007 9/3 20:00 R:01 A B 1%
1
1
R:01
R:02
Not working
working
Remote-controller ID : 02
z Remote-controller ID
(1) can use to operate several DVRs at one site with one remote-controller.
(2) can operate a certain DVR according to the registered ID value.
① DVR ID
z It will turn yellow if remote controller’s ID matches with DVR ID. Then you can operate the DVR.
z It will turn red if remote controller’s ID does not match with DVR ID. Then you cannot operate
the DVR.
z you can set the DVR IDs at System menu.
[menu system miscellaneous ]
z setting up remote-controller ID
(1) press ‘DVR-ID’ button on the remote-controller.
(2) it will beep. Then you can input ‘Remote-controller ID’.
(3) press the DVR ID to operate using number buttons.
Page 27

27
Page:
NW-STA-5016/5009/5004 User Manual
User Manual
Chapter 4 System setup
Page 28

28
Page:
NW-STA-5016/5009/5004 User Manual
User Manual
Before setting up system
z Starting system menu
(1) press ‘Menu’ button.
(2) input administrator’s password on the password box.
NOTE: default value: 0000
NOTE: default value: 0000
OSD
LIVE-SEQ(FULL)
LIVE-SEQ(QUAD)
SPOT-SEQ(FULL)
SPOT-SEQ(QUAD)
MISC
OSD
LIVE-SEQ(FULL)
LIVE-SEQ(QUAD)
SPOT-SEQ(FULL)
SPOT-SEQ(QUAD)
MISC
GENERAL
PTZ
PRESET
SCAN POINT
COLOR
POSITION
GENERAL
PTZ
PRESET
SCAN POINT
COLOR
POSITION
PROPERTY
SCHEDULE
MISC
PROPERTY
SCHEDULE
MISC
MOTION
SENSOR
ALARM
MOTION
SENSOR
ALARM
SETUP
DDNS
CLIENT
ACCESSLIST
USER
SERVER
SETUP
DDNS
CLIENT
ACCESSLIST
USER
SERVER
CONFIG
TIME
PASSWORD
SOFTWARE
LOG VIEW
MISC
SHUTDOWN
CONFIG
TIME
PASSWORD
SOFTWARE
LOG VIEW
MISC
SHUTDOWN
OSD
LIVE-SEQ(FULL)
LIVE-SEQ(QUAD)
SPOT-SEQ(FULL)
SPOT-SEQ(QUAD)
MISC
OSD
LIVE-SEQ(FULL)
LIVE-SEQ(QUAD)
SPOT-SEQ(FULL)
SPOT-SEQ(QUAD)
MISC
z Menu format
z How to use Menu
DISPLAY CAMERA RECORD EVENT STORAGE NETWORK SYSTEM
9 you can move menu cursor using arrow buttons.
9 press ‘Enter’ button to activate the selected menu or to go to sub menu.
9 press ‘Menu’ button to close system setup or go to the previous menu.
HDD FORMAT
BACKUP
AUTO-BACKUP
HDD FORMAT
BACKUP
AUTO-BACKUP
Page 29

29
Page:
NW-STA-5016/5009/5004 User Manual
User Manual
TEXT input box
1 ~ 8 9 ~ 16
Ex)
z Saving/Canceling menu setup
¾ saving menu setup : select ‘OK’ and press ‘Enter’ button.
¾ canceling menu setup : select ‘Cancel’ and press ‘Enter’ or ‘Menu’ buttons.
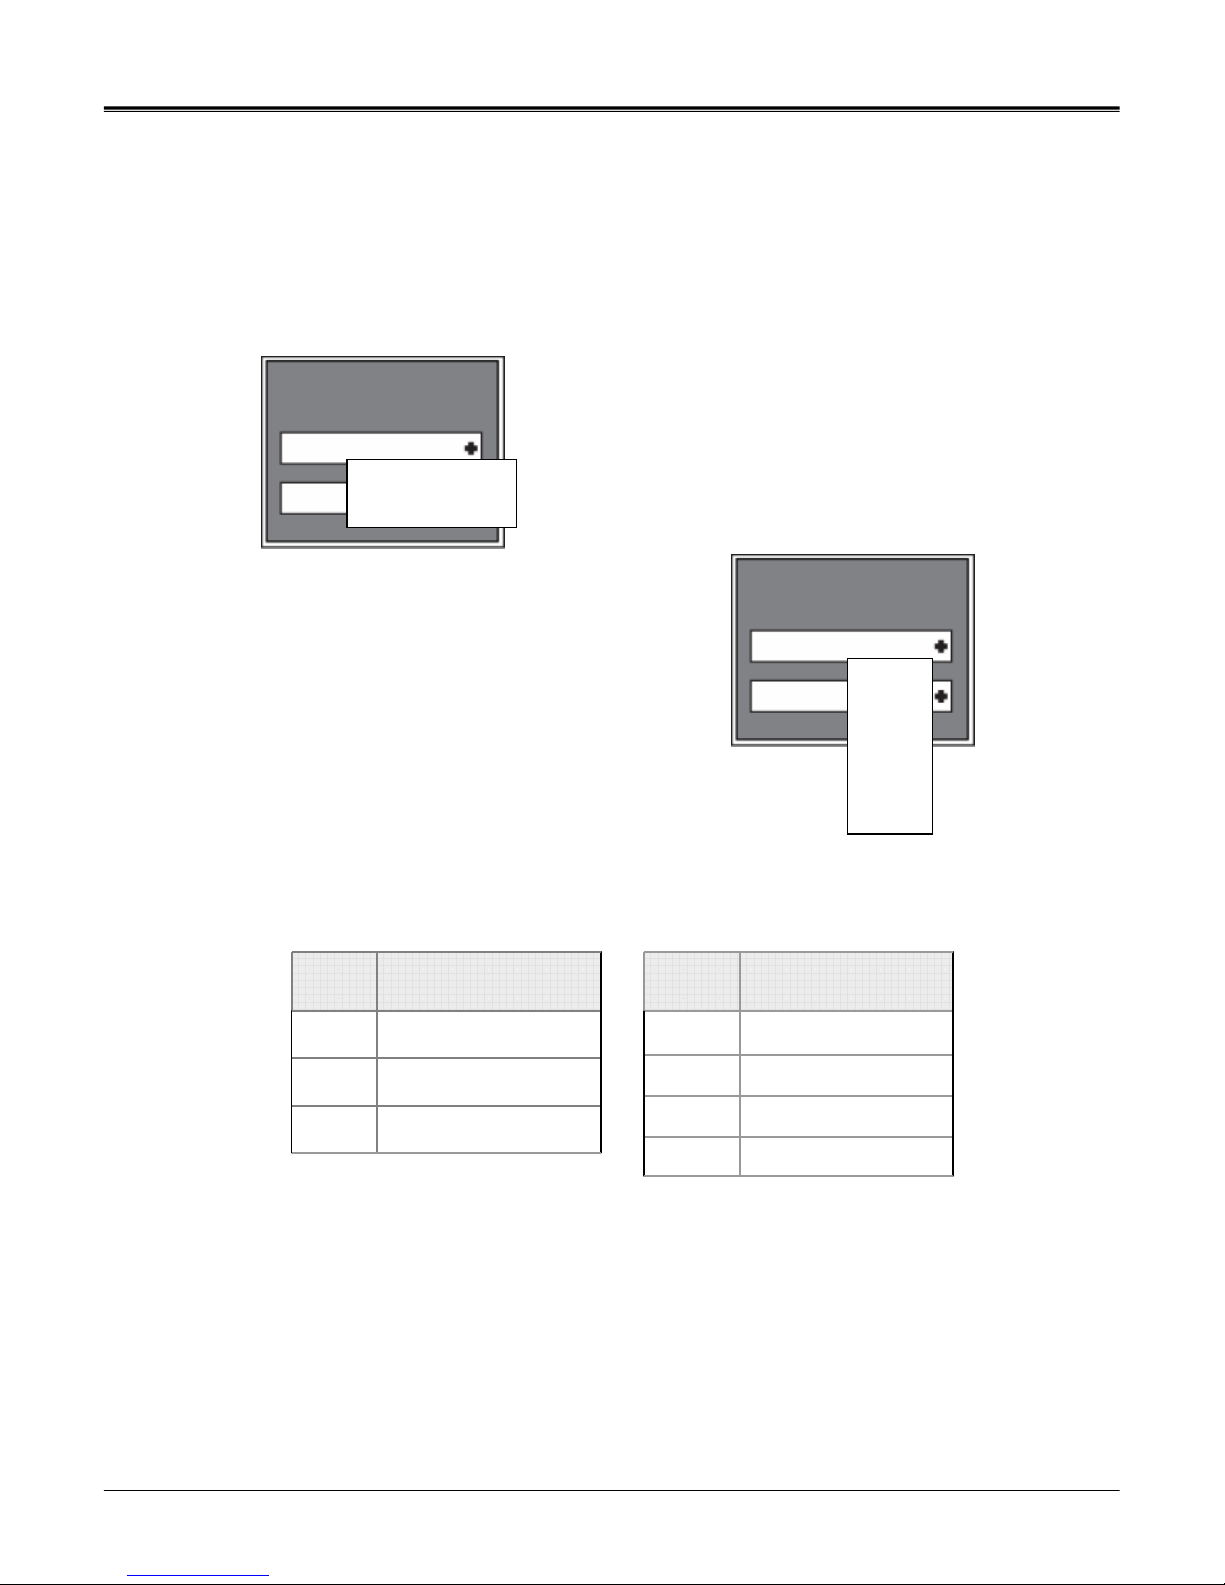
z Text input box
(1) select letters/symbols using arrow buttons.
(2) press ‘Enter’ button to select the letter/symbol.
(3) the selected letters/symbols will show on the t op text box .
z Moving to the next menu page
Press or button to move to the next menu page.
TEXT INPUT
0 1 2 3 4 5 6 7 8 9
. , _ + - * / @ # ?
A B C D E F G H I J
K L M N O P Q R S T
U V W X Y Z
CAP INS ÅÆBS DELCLS OK CANCEL
OK CANCEL
CAMERA - PTZ
CH ID PROTOCOL BAUD
1 000 PELCO_D 4800
2 000 PELCO_D 4800
3 000 PELCO_D 4800
4 000 PELCO_D 4800
5 000 PELCO_D 4800
6 000 PELCO_D 4800
7 000 PELCO_D 4800
8 000 PELCO_D 4800
1-8 9-16 OK CANCEL
Page 30

30
Page:
NW-STA-5016/5009/5004 User Manual
User Manual
Setting up screen display
Left margin
Bottom margin
Top margin
Right margin
zScreen display setup – On Screen Display
9 Status bar – indicate the status bar on the bottom of screen.
9 Camera title – indicate the name of each channel.
9Camera boarder – indicate the boarder-line of each channel.
9Language – select menu language.
9Left margin – adjust the left margin of OSD.
9Right margin – adjust the right margin of OSD.
9Top margin – adjust the top margin of OSD.
9Bottom margin - adjust the bottom margin of OSD.
DISPLAY - OSD
STATUS BAR
CAMERA TITLE
CAMERA BORDER
LANGUAGE
LEFT MARGIN
RIGHT MARGIN
TOP MARGIN
BOTTOM MARGIN
OK CANCEL
Page 31

31
Page:
NW-STA-5016/5009/5004 User Manual
User Manual
Quad screen
number
camera
1 Camera 1 ~ Camera 4
2 Camera 5 ~ Camera 8
3 Camera 9 ~ Camera 12
4 Camera 13~ Camera 16
Quad screen
number
camera
1Camera 1 ~ Camera 4
2Camera 5 ~ Camera 8
3Camera 6 ~ Camera 9
NOTE : can input maximum 99 second.
NOTE : can input maximum 99 second.
NOTE : can input maximum 99 second.
NOTE : can input maximum 99 second.
NOTE : can input maximum 99 second.
NOTE : can input maximum 99 second.
zScreen display setup – live sequence scanning (full screen)
Setup duration time for live sequence scanning in full screen.
zScreen display setup – live sequence scanning (quad screen)
Setup duration time for live sequence scanning in quad screen.
[IV-STA-5009]
[IV-STA-5016]
zScreen display setup –spot sequence scanning (full screen)
Setup duration time for spot sequence scanning in full screen.
DISPLAY - L IVE-SEQ(FULL)
CH
1
2
3
4
5
6
7
8
TIME
02
02
02
02
02
02
02
02
CH
9
10
11
12
13
14
15
16
TIME
02
02
02
02
02
02
02
02
OK CANCEL
DISPLAY - LIVE-SEQ(QUAD)
QUAD
1
2
3
4
TIME
03
03
03
03
OK CANCEL
DISPLAY - SPOT-SEQ(FULL)
CH
1
2
3
4
5
6
7
8
TIME
02
02
02
02
02
02
02
02
CH
9
10
11
12
13
14
15
16
TIME
02
02
02
02
02
02
02
02
OK CANCEL
Page 32

32
Page:
NW-STA-5016/5009/5004 User Manual
User Manual
Event
Quad screen
number
camera
1 Camera 1 ~ Camera 4
2 Camera 5 ~ Camera 8
3 Camera 9 ~ Camera 12
4 Camera 13~ Camera 16
Quad screen
number
camera
1 Camera 1 ~ Camera 4
2 Camera 5 ~ Camera 8
3 Camera 6 ~ Camera 9
NOTE : can input maximum 99 second.
NOTE : can input maximum 99 second.
zScreen display setup –spot sequence scanning (quad screen)
Setup duration time for spot sequence scanning in quad screen.
[IV-STA-5009]
[IV-STA-5016]
z Screen display setup – miscellaneous
z Deinterlace
prevent screen twittering during playback of image which is recorded in low frame
rate and 720X480 or 720X576 resolution.
z Event popup
if any motion/ sensor activity is detected, detected channel will show in full screen.
DISPLAY - SPOT-SEQ(QUAD)
QUAD
1
2
3
4
TIME
03
03
03
03
OK CANCEL
DISPLAY - M ISC
DEINTERLACE
EVENT POPUP
OK CANCEL
VGA FREQ
VIDEO DETECT
ON
OFF
60Hz
AUTO DETECT
Page 33

33
Page:
NW-STA-5016/5009/5004 User Manual
User Manual
zVGA frequency
setup the frequency of connected VGA monitor.
zAuto setup
AUTO DETECT : automatically detects video signals.
NOTE : it operates during system booting. It is booted as PAL or NTSC type according to the video
signal of channel 1.
NOTE : it operates during system booting. It is booted as PAL or NTSC type according to the video
signal of channel 1.
9SWITCH : detect video signals according to main-board jumper within the product.
9NTSC : set video signal as NTSC.
9PAL : set video signal as PAL.
VIDEO DETECT AUTO DETECT
AUTODETECT
SWITCH
NTSC
PAL
AUTODETECT
SWITCH
NTSC
PAL
Page 34

34
Page:
NW-STA-5016/5009/5004 User Manual
User Manual
Camera Setup
zCamera setup – general
¾ title – input channel names.
¾ show– show or hide channels.
¾ audio – select connected audio channels.
zCamera setup – PTZ
¾ ID – input camera IDs.
¾ protocol – select the registered protocol.
¾ baud – select the registered baud.
CAMERA - PTZ
CH ID PROTOCOL BAUD
1 000 PELCO_D 4800
2 000 PELCO_D 4800
3 000 PELCO_D 4800
4 000 PELCO_D 4800
5 000 PELCO_D 4800
6 000 PELCO_D 4800
7 000 PELCO_D 4800
8 000 PELCO_D 4800
1-8 9-16 OK CANCEL
CAMERA - GENERAL
CH
1
2
3
4
TITLE
CAM01
CAM02
CAM03
CAM04
5
6
7
8
CAM05
CAM06
CAM07
CAM08
SHOW
ON
ON
ON
ON
OFF
ON
ON
OFF
AUDIO
CH-01
CH-02
CH-03
CH-04
<NONE>
<NONE>
<NONE>
<NONE>
1 – 8 9 – 16
OK CANCEL
Page 35

35
Page:
NW-STA-5016/5009/5004 User Manual
User Manual
NOTE : system will record accordin g to pre s et po sitions of ca m er a.
check if camera supports preset function before setting up.
can setup 64 preset positions for each channel.
NOTE : system will record accordin g to pre s et po sitions of ca m er a.
check if camera supports preset function before setting up.
can setup 64 preset positions for each channel.
zCamera setup – preset
(1) Select camera.
(2) Select ‘Set’ button.
(3) Then the channel turns PTZ mode.
(4) Move the camera to get the position you want.
(5) Press ‘Enter’ button to save the preset.
9 camera – select cameras to setup preset positions.
9 page – move to the next page.
9 clear all – clear all the setup values.
CAMERA - PRESET
1 PTZ01 SET CLE 9 PTZ09 SET CLE
CLEAR ALL OK CANCEL
2 PTZ02 SET CLE 10 PTZ10 SET CLE
3 PTZ03 SET CLE 11 PTZ11 SET CLE
4 PTZ04 SET CLE 12 PTZ12 SET CLE
5 PTZ05 SET CLE 13 PTZ13 SET CLE
6 PTZ06 SET CLE 14 PTZ14 SET CLE
7 PTZ07 SET CLE 15 PTZ15 SET CLE
8 PTZ08 SET CLE 16 PTZ16 SET CLE
# NAME # NAME
CAMERA 1 PAGE 1
PTZ-CH1
Z-
Z+
Page 36

36
Page:
NW-STA-5016/5009/5004 User Manual
User Manual
CAMERA – SCAN POINT
CLEAR ALL OK CANCEL
8 OFF 03 16 OFF 03
# PRESET SEC # PRESET SEC
CAMERA 1 LIST 1
7 OFF 03 15 OFF 03
6 OFF 03 14 OFF 03
5 OFF 03 13 OFF 03
4 PTZ25 03 12 OFF 03
3 PTZ04 03 11 OFF 03
2 PTZ09 03 10 OFF 03
1 PTZ01 03 9 OFF 03
Ex)
Camera 1 will move following the path as below.
PTZ01 Æ 3secÆ PTZ09 Æ 3secÆ PTZ04 Æ 3secÆ PTZ25 Æ 3secÆ PTZ01 Æ……..
zScreen display setup – scan point
NOTE : you can move camera to follow the path by saved preset positions for each channel. You can set 4
scan point list for each channel.
NOTE : you can move camera to follow the path by saved preset positions for each channel. You can set 4
scan point list for each channel.
NOTE : you can setup total 4 lists.
one scan list is consist of total 16 preset position.
NOTE : you can setup total 4 lists.
one scan list is consist of total 16 preset position.
¾ camera – select a camera to set scan point.
¾ list – select a list to save scan point.
¾ preset – select preset position you want.
¾ clear all – clear all setup values.
Page 37

37
Page:
NW-STA-5016/5009/5004 User Manual
User Manual
zCamera setup – adjusting color
¾ camera – select a camera.
¾ bright – adjust color brightness.
¾ contrast – adjust color contrast.
¾ color – adjust camera color
¾ default value – set it as default value.
zCamera setup – adjusting position
¾ camera – select a camera
¾ right/left – move the camera to right and left.
¾ default value – set it as default value.
CAMERA - COLOR
CAMERA
CH1
OK CANCEL
BRIGHT
0
CONTRAST
0
COLOR
0
DEFAULT
CAMERA - POSITION
CAMERA
CH1
OK CANCEL
LEFT/RIGHT
0
DEFAULT
Page 38

38
Page:
NW-STA-5016/5009/5004 User Manual
User Manual
Record setup
NTSC PAL
720 x 480 720 x 576
720 x 240 720 x 288
352 x 240 352 x 288
Recording quality Display quality HDD capacity
needed
Basic Low Small
Normal Normal Medium
High Good Large
best Very good Very large
zRecord setup – recording quality
¾Frame rate
set frame rate for each channel.
¾ resolution – set recording resolution for each channel.
¾quality – set recording quality for each channel.
RECORD - PROPERTY
1-8 9-16 TOTAL: 120/120 OK CANCEL
CH RESOLUTION QUALITY FRAMERATE
1 360X240 NORMAL 8
2 360X240 NORMAL 8
3 360X240 NORMAL 8
4 360X240 NORMAL 8
5 360X240 NORMAL 8
6 360X240 NORMAL 8
7 360X240 NORMAL 8
8 360X240 NORMAL 8
ALL 360X240 NORMAL 8
Page 39

39
Page:
NW-STA-5016/5009/5004 User Manual
User Manual
C Continuous recording
E
Recording when even occurred
(Blank)
Not recording
zRecord setup – schedule
¾ system records according to se t sc he dule.
¾ see below to see how to set up schedule.
(1) Select a channel to set up schedule.
(2) Select day/time to record and press ‘Enter’ button.
(3) it shifts to different type as you press ‘Enter’ button.
RECORD - SCHEDULE
CHANNEL ALL OK CANCEL
ALL 0 5 10 15 20
SU C C C C C
MO
TU
WE
TH
FR
SA
E E E E
C: Continuous E: Event
Page 40

40
Page:
NW-STA-5016/5009/5004 User Manual
User Manual
zRecord setup – miscellaneous
¾ overwrite – erase previous video data and record over it when HDD is full.
¾ auto delete – automatically delete data after set date.
¾ continuous record – you cannot stop recording while it is in process as it continuously records.
¾ watermark – activate watermarking function.
RECORD - MISC
OVERWRITE ON
AUTO-DELETE 00 DAYS (0-99)
CONTINUE REC OFF
WATER-MARK ON
OK CANCEL
Page 41

41
Page:
NW-STA-5016/5009/5004 User Manual
User Manual
Event setup
NOTE : you have to set it as ‘Even recording’ at ‘Schedule record setup’ to use this function.
NOTE : you have to set it as ‘Even recording’ at ‘Schedule record setup’ to use this function.
Motion
detection area
zMotion
¾sensitivity – select level of motion sensitivity.
level of sensitivity : 0 < 1 < 2 < ….. <9
¾Alarm out – set to activate alarm system when any motion is detected.
¾Motion area – select area to detect motion.
(1) all – set the whole screen as motion area.
(2) part – set motion area by block unit.
(3) off – do not detect motion.
EVENT - MOTION
1-8 9-16 OK CANCEL
CH MOTION-AREA SENSITIVITY ALARM-OUT
1 ALL 5 NONE
2 ALL 5 NONE
3 OFF 0 NONE
4 OFF 0 NONE
5 ALL 5 NONE
6 ALL 5 NONE
7 ALL 5 NONE
8 ALL 5 NONE
EVENT - MOTION
SET ALL CLEAR ALL
OK CANCEL
Page 42

42
Page:
NW-STA-5016/5009/5004 User Manual
User Manual
zEvent setup - sensor
¾ record – selected channel will be recorded when the sensor is detected.
¾ type – set the type of connected sensor.
¾ alarm out – alarm is activated when the sensor is detected.
zEvent setup – alarm out
¾ pre-recording time – set recording time before event occurs.
¾ post-recording time – set recording time after event occurs.
¾ buzzer out – activate buzzer when the event occurs.
¾ alarm out time – set duration time to operate alarm system.
EVENT - SENSOR
1-8 9-16 OK CANCEL
SENSOR RECORD TYPE ALARM-OUT
1 OFF NO NONE
2 OFF NO NONE
3 OFF NO NONE
4 OFF NO NONE
5 OFF NO NONE
6 OFF NO NONE
7 OFF NO NONE
8 OFF NO NONE
EVENT - ALARM
OK CANCEL
PRE-REC TIME 04 SEC (0-30)
POST-REC TIME 04 SEC (0-120)
BUZZER ON
OUT TIME 005 SEC (0-120)
Page 43

43
Page:
NW-STA-5016/5009/5004 User Manual
User Manual
Storage
zStorage – format
¾You must format HDD when you install HDD.
(1) select installed HDD and format.
(2) system will reboot after formatting is completed.
STORAGE – HDD FORMAT
HDD1 698GB (ST3750640A) FORMAT
HDD2 465GB (ST3500641A) FORMAT
HDD3 NONE FORMAT
HDD4 NONE FORMAT
OK CANCEL
zStorage – AUTO-BACKUP
STORAGE – HDD FORMAT
TYPE OFF
OK CANCEL
USB-1 /dev/sda ▼ FORMAT SHOW
USB-2 /dev/sdb ▼ FORMAT SHOW
USB-3 NONE
USB-4 NONE
▼ FORMAT SHOW
▼ FORMAT SHOW
¾ AUTO-BACKUP –idview.com provides external USB TYPE storage. You can backup data
using.
TYPE : set operation types of AUTO-BACKUP.
(1) OFF: turn off AUTO-BACKUP function.
(2) EXTEND: when local hard is full, it will copy old data to USB hard to extend data save time.
(3) MIRROR: saves the same data saved in local hard to USB hard at the same time.
USB1~4 : select HDD of connected USB type.
FORMAT: format HDD of connected USB type.
SHOW: show saved file info of HDD of connected USB type.
Page 44

44
Page:
NW-STA-5016/5009/5004 User Manual
User Manual
Network
zNetwork – setup
¾ static – input static IP address and gateway, net mask.
¾ DHCP – system automatically recognizes IP address.
¾PPPOE – ADSL only, input registered ID and password.
NETWORK - SETUP
TYPE STATIC
OK CANCEL
IP ADDRESS 192.168.000.138
GATEWAY 192.168.000.001
NET MASK 255.255.255.000
MAC ADDRESS 00:0E:00:00:00:00
PPPOR ID
PASSWORD ****
NETWORK - SETUP
TYPE DHCP
OK CANCEL
IP ADDRESS 192.168.000.138
GATEWAY 192.168.000.001
NET MASK 255.255.255.000
MAC ADDRESS 00:0E:00:00:00:00
PPPOR ID
PASSWORD ****
NETWORK - SETUP
TYPE ADSL(PPPOE)
OK CANCEL
IP ADDRESS 192.168.000.138
GATEWAY 192.168.000.001
NET MASK 255.255.255.000
MAC ADDRESS 00:0E:00:00:00:00
PPPOR ID
PASSWORD ****
Page 45

45
Page:
NW-STA-5016/5009/5004 User Manual
User Manual
zNetwork - DDNS
NOTE : system supports free DDNS sites such as dyndns.com, ipupdater.com.
NOTE : system supports free DDNS sites such as dyndns.com, ipupdater.com.
¾ server – select registered server.
¾ server-URL – indicate registered server URL
¾ user ID – input ID registered to serv er.
¾ password – input password registered to server.
¾ group ID – input group ID registered to server.
¾ status – indicate operation status of DDNS.
¾ test – try to connect with ID and password registered to server.
¾ password - input password to connect to CMS S/W
(same as CMS Administrator’s passwoard.)
¾ client port – select port to connect.
¾ web port – select web port to connect to web browser.
¾ bandwidth - limit transmitting data capacity through the network.
¾DVR-ID - input DVR name to connect CMS S/W.
zClient
NETWORK - DDNS
SERVER DYNDNS.ORG
OK CANCEL
SERVER-URL www.dyndns.org
USER ID
PASSWORD
GROUP ID
STATUS DDNS OFF
TEST
NETWORK - CLIENT
PASSWORD ****
OK CANCEL
CLIENT PORT 7620 - 7624
WEB-PORT 0080
BANDWIDTH UNLIMITED
DVR-ID 135
Page 46

46
Page:
NW-STA-5016/5009/5004 User Manual
User Manual
z Access list
¾System can limit remote-PC, accessing network.
¾Able to register Static IP and only remote-PC with registered IP can access system.
NOTE : the system restricts all the other IPs, those are not registered if you once register an IP. If you want
to access with all IP addresses, do not register any IP.
NOTE : the system restricts all the other IPs, those are not registered if you once register an IP. If you want
to access with all IP addresses, do not register any IP.
z User
¾ you can add user’s ID and password for network connection.
NETWORK – ACCESS LIST
Client 1 000.000.000.000 Client 6 000.000.000.000
OK CANCEL
Client 2 000.000.000.000 Client 7 000.000.000.000
Client 3 000.000.000.000 Client 8 000.000.000.000
Client 4 000.000.000.000 Client 9 000.000.000.000
Client 5 000.000.000.000 Client 10 000.000.000.000
NETWORK – ACCESS LIST
USER-ID PASSWORD
OK CANCEL
NET-ID 1 ****
NET-ID 2 ****
NET-ID 3 ****
NET-ID 4 ****
Page 47

47
Page:
NW-STA-5016/5009/5004 User Manual
User Manual
z Server
¾CC IP – input connection info of CAMS CC.
¾PORT – input connection port of CAMS CC. (default value: 6500)
¾CMM IP – input connection info of CAMS CMM.
¾PORT – input connection port of CAMS CMM. (default value:7600)
NETWORK – SERVER
OK CANCEL
CC IP 192.168.000.131
PORT 6500
CMM IP 192.168.000.131
PORT 7600
Page 48

48
Page:
NW-STA-5016/5009/5004 User Manual
User Manual
SYSTEM - CONFIG
LOAD CONFIG
OK CANCEL
Device /dev/ sda
SAVE CONFIG
DEFAULT
SAVE CONFIG
FILE NAME config_16_00.cfg
OK CANCEL
System
zSystem – Configuration info
NOTE : you can save the set values for menu to USB storage.
NOTE : you can save the set values for menu to USB storage.
¾Default value – set it as default value.
¾Load configuration – loads saved configuration information.
¾Save configuration – save the values set in the current menu.
SYSTEM - CONFIG
LOAD CONFIG
OK CANCEL
Device /dev/ sda
SAVE CONFIG
DEFAULT
LOAD CONFIG
File List config_16_00.cfg
OK CANCEL
Page 49

49
Page:
NW-STA-5016/5009/5004 User Manual
User Manual
classification display
YY/MM/DD 2008/03/03
MM/DD/YY 03/03/2008
DD/MM/YY 03/03/2008
classification display
AM/PM 01:39:01 PM
24 HOURS 13:39:01
zSystem – Time management
¾Time zone – select the time different from standard time of time-server.
¾Summer time
set summer time period.
(1) starting time : input starting date/time of summer time.
(2) ending time : input ending date/time of summer time.
¾Current time – indicates current time of system.
¾Date format – select date format to display.
¾Time format – select time format to display.
SYSTEM - TIME
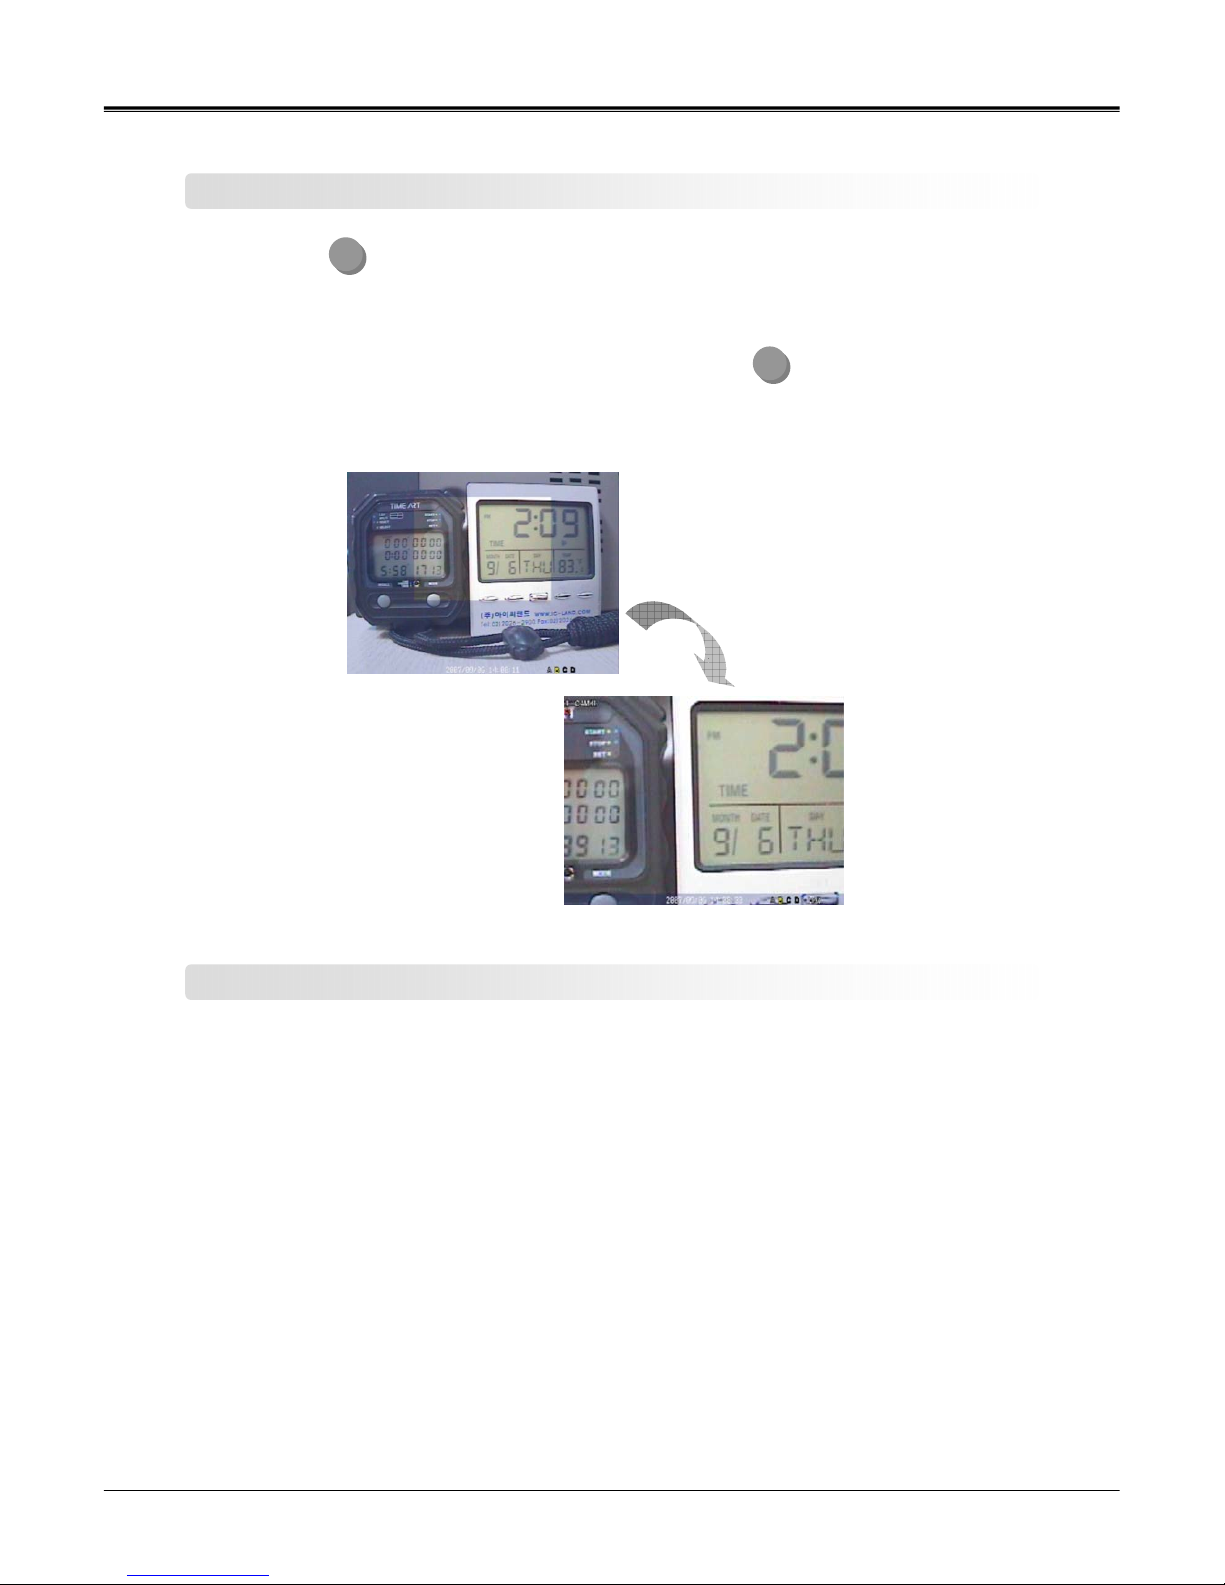
CURRENT TIME 2008/03/03 13:39:01
OK CANCEL
DATE FORMAT YY/MM/DD
TIME FORMAT 24HOUR
TIME ZONE +09: 00 Seoul
DAY LIGHT SAVING OFF
START 01/00 00:00
END 01/00 00:00
TIME SYNC OFF
SERVER IP TEST
CHANGE TIME
Page 50

50
Page:
NW-STA-5016/5009/5004 User Manual
User Manual
NOTE : be cautious when you change system time. Because if you set the system time earlier than the time
originally set, the saved data after changed system time will be deleted.
NOTE : be cautious when you change system time. Because if you set the system time earlier than the time
originally set, the saved data after changed system time will be deleted.
¾Time synchronization
System automatically connects to internet time-server to check current time.
¾Server IP – input time-server IP address.
Omit ‘www’.
Select ‘OK’ and check if time-server works.
example) time.kriss.re.kr correct input
www.time.kriss.re.kr wrong input
zSystem – Password management
9 administrator password – change administrator password.
9 user password – change user password.
9 setup check– set whether to input user password or not before accessing system menu.
9 login check– set whether to input user password or not after system booting.
9 record check – set whether to input user password or not when it starts/ends recording.
9 search check – set whether to input user password or not when searching record.
9 backup check– set whether to input user password or not when backup.
¾Change time – change system time.
SYSTEM - PASSWORD
ADIN PASSWORD ****
OK CANCEL
USER PASSWORD ****
SETUP CHECK ON
LOGIN CHECK OFF
RECORD CHECK OFF
SEARCH CHECK OFF
BACKUP CHECK OFF
Page 51

51
Page:
NW-STA-5016/5009/5004 User Manual
User Manual
zSystem – Software
¾Show current software version.
¾Upgrade firmware software.
zSystem – Miscellaneous
9 Remote-controller ID – input remot e co ntr oller ID.
9 KEYBOARD– control the system using keyboard contoller.
9 Key-tone – set buzzer sound on/off for pressing button.
9 Audio – set audio output on/off.
SYSTEM - SOFTWARE
ENC. FIRMWARE XXXXXXXX
OK CANCEL
DEC. FIRMWARE XXXXXXXX
BOOTLOADER XXXXXXXX
KERNEL XXXXXXXX
APP. VERSION XXXXXXXX
UI XXXXXXXX
DB XXXXXXXX
RECORDER XXXXXXXX
PLAYER XXXXXXXX
NETWORK XXXXXXXX
UPGRADE
SYSTEM – ID 01
SYSTEM - MISC
KEYBOARD NONE
KEY-TONE ON
AUDIO MUTE
OK CANCEL
zSystem – System shutdown
¾Select ‘’System shutdown’. If you see the message “system will shutdown”,
you can shutdown system.
Page 52

52
Page:
NW-STA-5016/5009/5004 User Manual
User Manual
Chapter 5 Firmware Upgrade
Page 53

53
Page:
NW-STA-5016/5009/5004 User Manual
User Manual
(1) Copy the provided firmware file to USB memory stick.
(2) Connect USB memory stick to system USB port.
(3) Press ‘Menu’ button and move to the next software.
[menu system software]
(4) You will see a new box if you select ‘Upgrade’
(5) You will see menu like below if you select ‘USB upgrade’.
(6) Device – select USB device with firmware file.
(7) File list – select the right firmware file.
(8) Select ‘OK’. System automatically upgrades. System will reboot after upgrade is completed.
NOTE : There are two ways to upgrade firmsare.
(1) USB upgrade – upgrade system using USB memory stick.
(2) NETWORK upgrade – upgrade system by internet connection.
NOTE : There are two ways to upgrade firmsare.
(1) USB upgrade – upgrade system using USB memory stick.
(2) NETWORK upgrade – upgrade system by internet connection.
USB upgrade
NOTE : firmware file should be saved in rout directory.
NOTE : firmware file should be saved in rout directory.
USB UPGRADE
Device /dev/sda
File List flash-gui16-ft_16-080
OK CANCEL
Page 54

54
Page:
NW-STA-5016/5009/5004 User Manual
User Manual
(1) Press ‘Menu’ button and move to the next software.
[Menu system software]
(2) You will see a new box if you select ‘Upgrade’.
(3) Select ‘Network upgrade’.
(4) Select ‘Server IP’ with firmware file and file name. then select ‘OK’.
(5) You can manually input server IP and file name if the system appointed server IP and file name
is different.
(6) System will automatically reboot after upgrade is completed.
Network upgrade
z Network upgrade
NETWORK UPGRADE
SERVER IP dvr-update.com
FILE NAME flash-16.tar.gz
OK CANCEL
Page 55

55
Page:
NW-STA-5016/5009/5004 User Manual
User Manual
Chapter 6 Warranty
WARRANTY
We warrant that DVR series(Product) will be free from defects in materials and
workmanship for a period of one year from the date the customer acquires the Product. If such a
defect occurs, return the Product to us and we will, at our opinion, either repair or replace Product.
This remedy is your exclusive remedy for breach of this warranty. The proof of purchase is
required for the warranty. This warranty shall not apply to repairs or replacements necessitated by
any cause beyond the control of idview.com, including, but not limited to,
1) improper installation
2) acts of nature
3) Accident
4) misuse,
5) lack of proper maintenance
6) voltage fluctuations
7) unauthorized repairs or modifications.
This warranty gives the customer certain legal rights. Other rights, which vary from state to state or
province to province, may be available to the customer.
LIMITATION OF WARRANTIES AND LIABILITY :
Except for the expressed warranty above, the Product is provided on an as is basis without an
other warranties or conditions express or implied, including but not limited to warranties of
1) Merchantable quality
2) Merchant ability or fitness for a particular purpose
3) Those arising by law, statue, usage of trade or course of dealing.
The entire risk as to the results and performances of the Product is assumed by you. Neither we
nor our dealers or suppliers shall have any liability to you or any other person or entity for any
indirect, incidental, special or consequential damages whatsoever, including but nor limited to, loss
of revenue or profit, or other commercial or economic loss, even if we have been advised of the
possibility of such damages or they are foreseeable: or for claims by a third party. Our maximum
aggregate liability to you, and that of our dealers and suppliers, shall not exceed the amount paid
by you for the product. The limitations in this section shall apply whether of not the alleged breach
or default is a breach of a fundamental condition or term, or a fundamental breach. Some
states/countries do not allow the exclusion or limitation of liability for consequential or incidental
damages so the above limitation may not apply to you.
Page 56

56
Page:
NW-STA-5016/5009/5004 User Manual
User Manual1200
Standalone DVR/GUI
Standalone DVR/GUI
USER MANUAL
USER MANUAL
 Loading...