

Digital Home System DHS-ZW-SNMT-01 User Manual

Z-Wave Motion Sensor
User Guide
DHS-ZW-SNMT-01
Works with:
VERA 2 / 3 / Lite
LAGOTEK

Table of Content
Product Overview 2
Z-Wave Operations 3
Integration with Vera2/3/Lite Home Controller 4
Prerequisites 4
Including the sensor into Vera Z-Wave Home Network 5
Exclusion (unpairing) of the sensor from Z-Wave home network 5
Inclusion (pairing) of the sensor with Z-Wave home network 5
Con guring the Motion Sensor 6
Con guring the Temperature Sensor 7
Calibration of the Temperature Sensor, using Temperature O set parameter 7
Selecting UPnP con guration les for the Temperature Sensor 7
Con guring the Illumination Sensor 8
Selecting UPnP con guration les for the Illumination Sensor 8
Using Motion sensor in Vera Scenes 9
Creating motion detected events in Vera scenes 9
Using Temperature Sensor in Vera Scenes 9
Creating conditions in Vera scenes based on temperature readings 10
Using Illumination Sensor in Vera Scenes 10
Creating conditions in Vera scenes based on illumination readings 10
Changing Wakeup Interval and pulling settings for Illumination Sensor in Vera 11
Frequently Asked Questions 11
Appendix 12
Indication mode 13
2
TRADEMARKS
All trademarks and registered trademarks are the property of their respective owners or
companies.
Product of Digital Home Systems Pty Ltd
See all range of compatible devices at www.digitalhomesystems.com.au or
www.zwave.com.au
Enquiries Sales and Marketing Email: contactus@zwave.com.au
© 2012 Digital Home Systems Pty Ltd. All rights reserved.
Installation
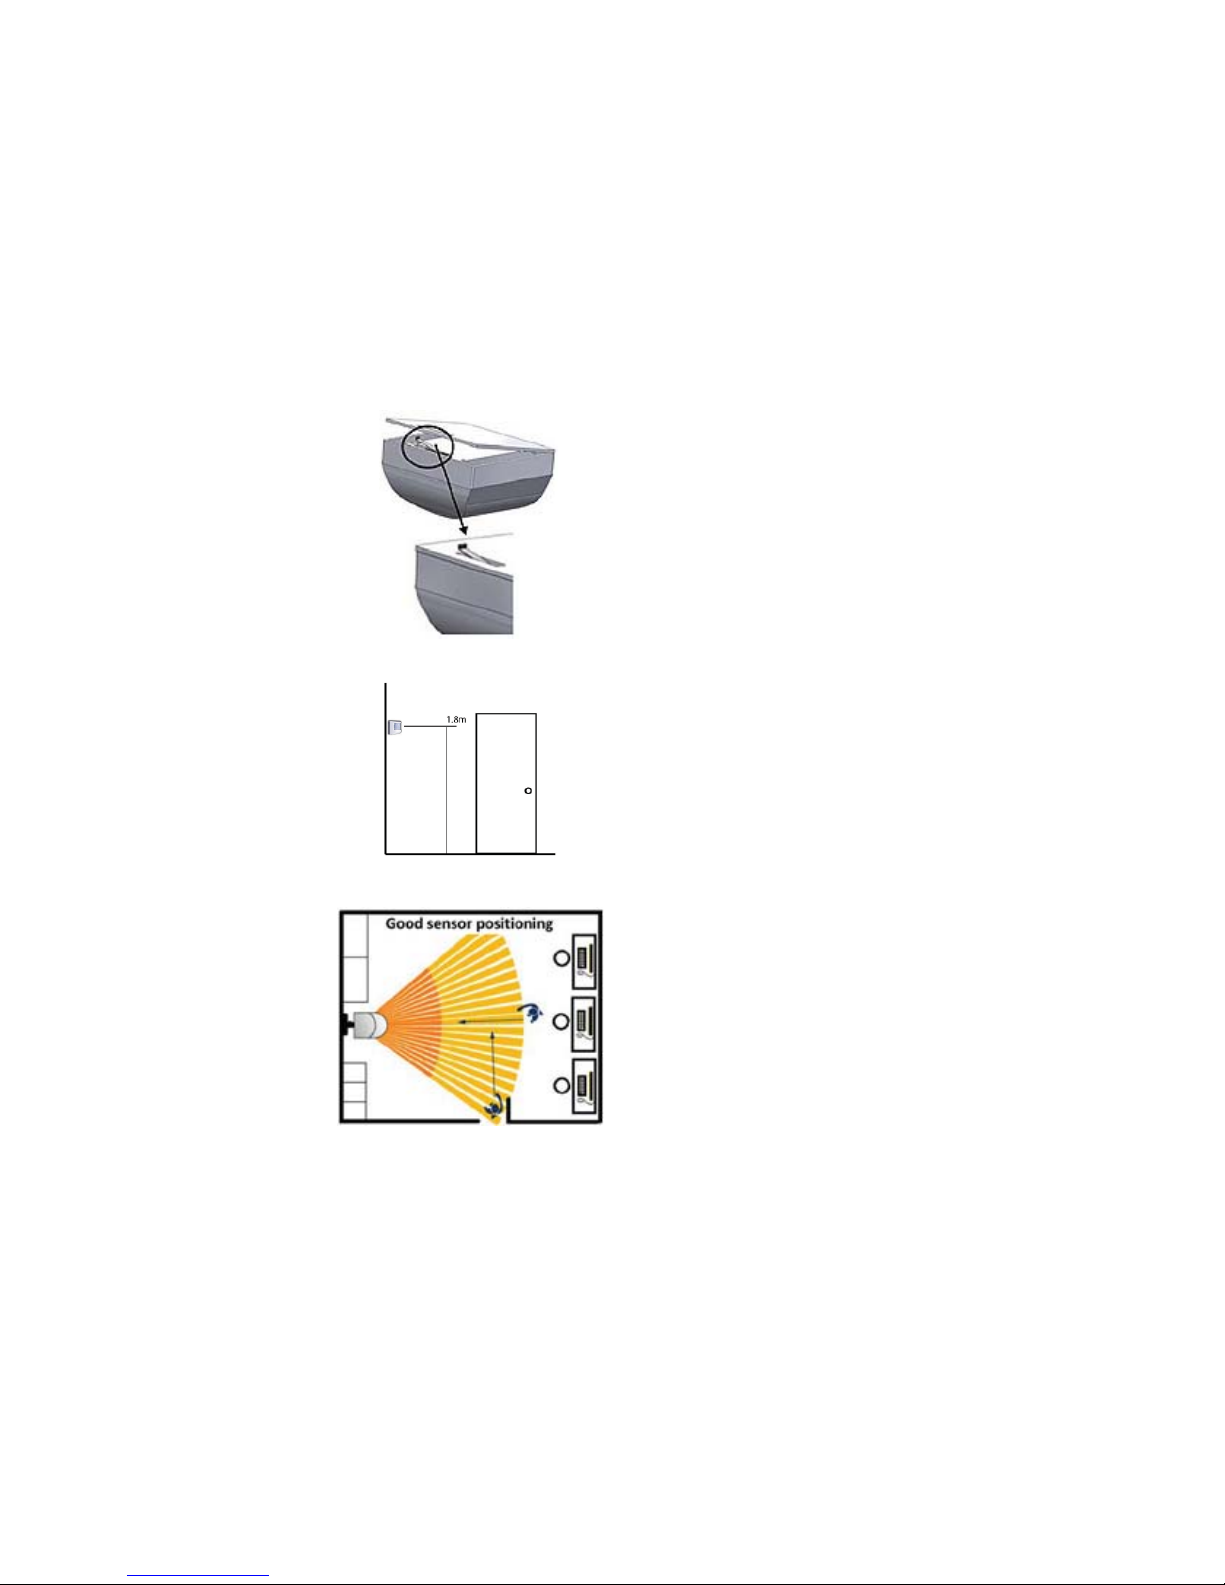
1. Use a at screwdriver at the inlets on
the sides to gently unlock the back cover.
2. Use the designated holes on the back
cover to screw mount of the Motion Sensor.
For optima l use, moun t the Motio n Sens or
between 1,8m and 2,4m above ground
(A rotating bracket is available to adjust the
direction the Motion Sensor is pointing to).
3. Place two AA 1,5V batteries into the device.
4. Mount the Motion Sensor onto the
back cover and be sure to close it on all
sides and that the tamper gets through
the back cover of the Motion Sensor (indication mode: Tamper pressed/released).
5. After 3 seconds start up routine begins
(indication mode: Ready for learn mode).
6. After 5 more seconds (8 seconds in total)
mounting is completed. (Indication mode:
Mounting successful).
7. Motion Sensor has to start up for 10 seconds.
8. After 10 seconds the Motion Sensor is
ready for detection.
Z-Wave Operations
The Z-Wave Motion Sensor can detect movement, measure light intensity and temperature and can trigger a security system.
NOTE: Before including the product to your Z-wave network it is advised to perform
removal procedure to reset network settings.
The Z-Wave Motion Sensor must be included into your Z-Wave home network before it
can send and receive Z-Wave commands. Z-Wave Motion Sensor can only communicate
to devices within the same Z-wave home network. Always follow your controller’s speci c
instructions for Z-wave inclusion, exclusion, association or temperature reading.
Inclusion to Z-wave home network – general instructions
There are two ways to include node:
1. NWI mode (only include node). After applying power (by putting the batteries), the
Sensor will stay in NWI mode for 30 seconds. Use your controller to include the sensor
to the network during this time. When Z-Wave sensor is not added in network within 30
seconds, it does not function correctly.
2. Classic mode. Please press the tamper switch at the back of the device for 3-8 seconds.
After 3 seconds, the led will blink; you can now release the button. Now it's ready for learn
mode (include/exclude/association). Use your controller to include the sensor to the network during this time.
Exclusion from Z-wave home network – general instructions
1. Please press the tamper switch at the back of the device for 3-8 seconds.
2. After 3 seconds, the led will blink; you can now release the button.
3. Now it's ready for learn mode (include/exclude/association). Use your controller to
include the sensor to the network during this time.
Network Wide Inclusion
When the Z-Wave Motion Sensor is not yet included, it will automatically start NWI for 120
seconds after placing the batteries. (Indication mode: Learn in progress (add)).
Make sure your Z-Wave controller is in the correct operating mode (inclusion).
3
Include or exclude mode
1. Make sure your Z-Wave controller is in the right operation mode (include or exclude).
2. When the Z-Wave Motion Sensor is mounted, remove it from the back cover as explained
in step one of the Mounting instructions.
3. Press and hold the tamper for 4 seconds (indication mode: Ready for learn mode). Now
release the tamper switch to start the inclusion or exclusion process (indication mode: Learn
in progress).
Indication mode
The indicator light gives various statuses of the device as follows:
1. Ready for learn mode: indicator light blinks every second
2. Learn in progress (add): indicator light 2 times every second.
3. Learn in progress (remove): indicator light 3 times every second.
4. Learn mode success: indicator light is on for one second.
5. Learn mode failed: indicator light blinks 8 times rapidly.
6. Tamper pressed/released: indicator light blinks 3 times rapidly.
7. Mounting successful: indicator light is on for 1 second.
Integration with Vera Home Controller
MiCasaVerde Vera2/3/Lite (refered later as Vera - some minor di erences in User Interface
UI4 and UI5 explained) is a fully featured, easy to install, con gure and use Home Automa-
tion controller with Z-Wave build-in interface.
More information about Vera is available at: http://wiki.micasaverde.com or
http://forum.micasaverde.com or http://www.zwave.com.au
Australian version of Vera Home Controller (921.42MHz build-in Z-Wave interface) is avail-
able at http://www.zwave.com.au
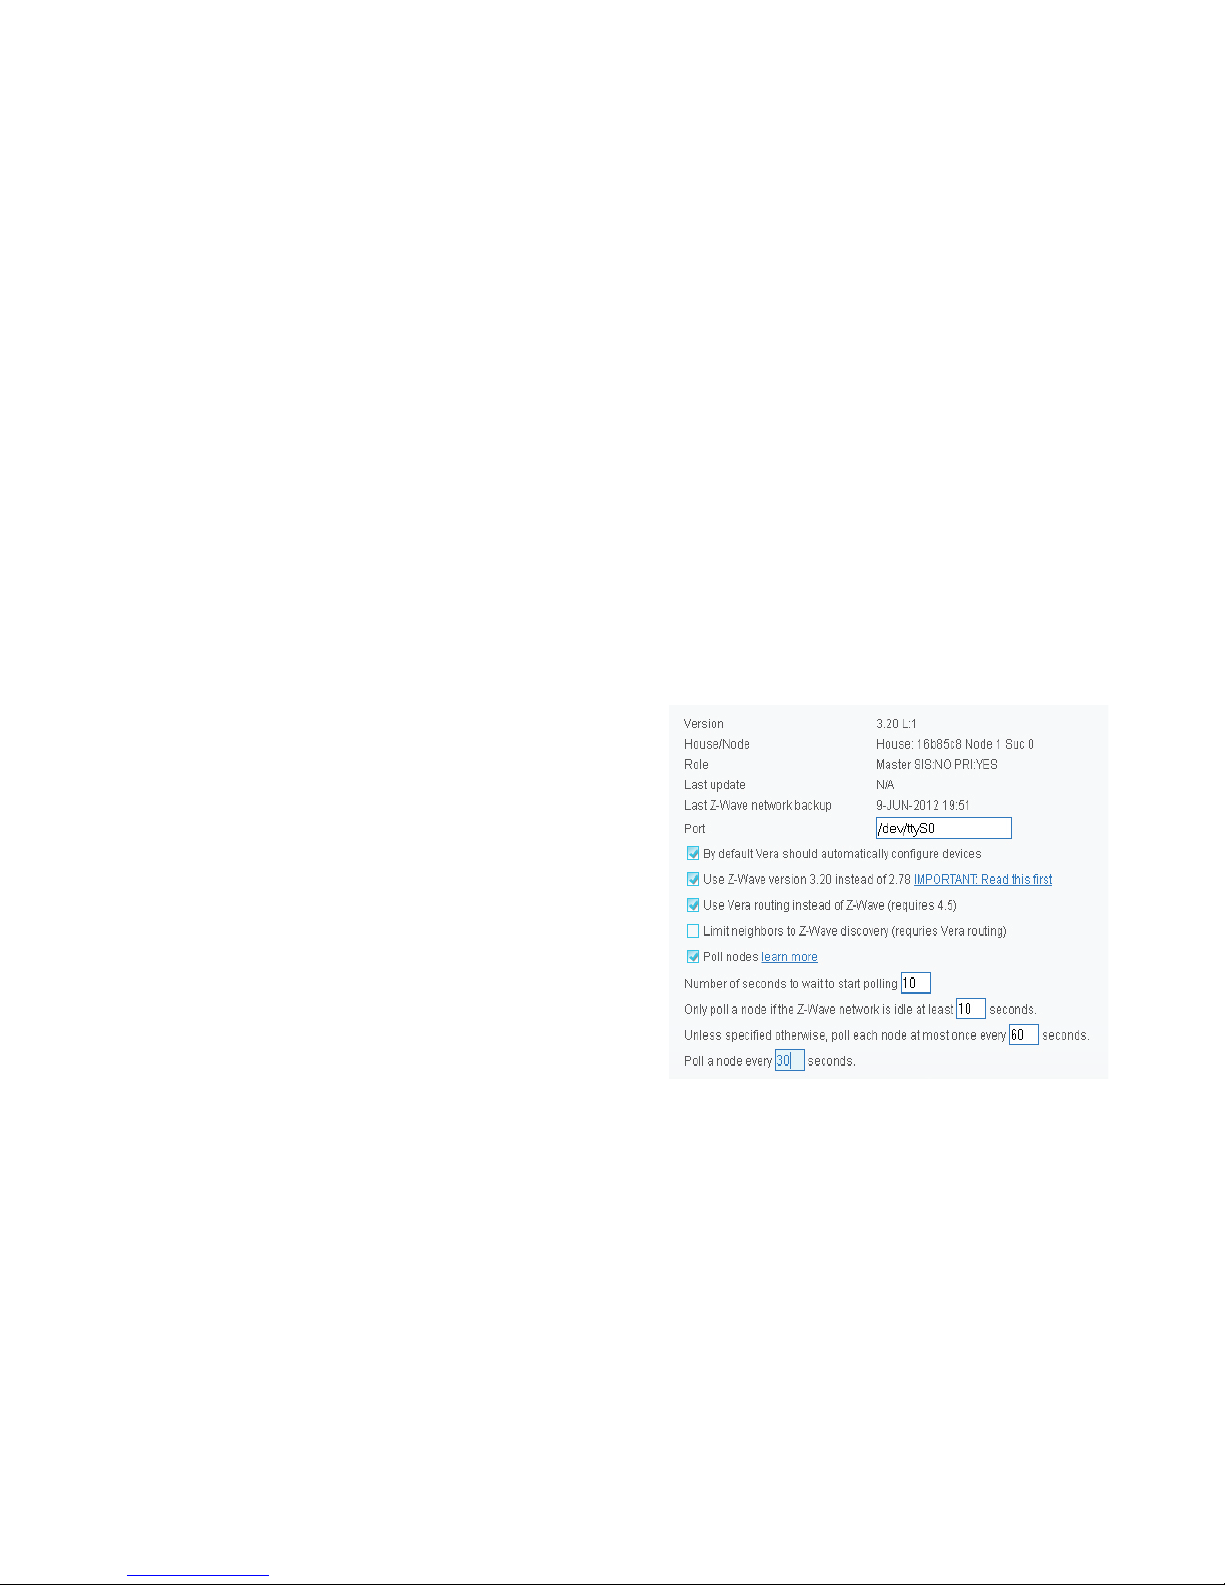
Prerequisites
Vera 2/3/Lite needs to work with Z-Wave interface in version 3.20. Please check the following options in your Vera2 Dashboard under “Z-Wave Device / Options” or Vera3 under “ZWave Settings”. Polling setting are just an example here and can be set up as you need.
If your settings are di erent, then change them as per above screenshot or follow the in-
structions on http://wiki.micasaverde.com to setup Z-Wave interface to version 3.20.
4
NOTE:
The Z-Wave Motion Sensor must be included into your Z-Wave home network
before it can send and receive Z-Wave commands. Z-Wave Motion Sensor can only
communicate to devices within the same Z-wave home network.
Before including the product to your Z-wave network it is advised to perform Exclusion procedure to reset network settings.
Exclusion (un-pairing) of the sensor from Z-Wave home network
1.Remove (if there were any) batteries from the sensor, and install them again.
2. Press and hold a Z-Wave button on the back side of a Vera for 3 seconds. After releasing the
Z-Wave button a Z-Wave led on front panel of the Vera should blink quickly. That means that
Vera is in Z-Wave exclusion mode.
3. Please press the tamper switch at the back of the device for 3-8 seconds.
4. After 3-5 seconds, the led will blink three times; you can now release the button.
5. Exclusion should start immediately. Very quick blinking on the Z-Wave led on Vera front
panel, followed by one second long, solid light of the sensor’s led indicates successful exclusion.
6. Press and release twice a Z-Wave button on the back side of a Vera.
7. Wait till Vera nish recon guration of the Z-Wave interface. Progress is presented in the
top, right hand side corner of the Vera dashboard.
8. Repeat the above steps if you haven’t observed indication of a successful Exclusion, as per
step 5 above.
Including the sensor into Vera Z-Wave Home Network
NOTE:
The method described is a Classic mode inclusion. The other, more advanced method, called NWI mode, is applicable for other Z-Wave controllers and for simplicity this
method is not presented here.
4. Please press the tamper switch at the back of the device for 3-8 seconds.
5. After 3-5 seconds, the led will blink three times; you can now release the button.
6. Exclusion should start immediately. Very quick blinking on the Z-Wave led on Vera front
panel, followed by 1 second long, solid light of the sensor’s led indicates successful inclusion.
7. Press and release a Z-Wave button on the back side of a Vera.
8. Wait till Vera nish recon guration of the Z-Wave interface. Progress is presented in the
top, right hand side corner of the Vera dashboard.
9. When Vera signals that it wait for the device to wakeup, press and keep temper button
on the device for 3-5 seconds. Once led on the Sensor blinks three times (once per second)
release the temper button.
10. Vera will now con gure your sensor with standard values and create an association.
Wait about 15-30 sec for Vera to nish this step.
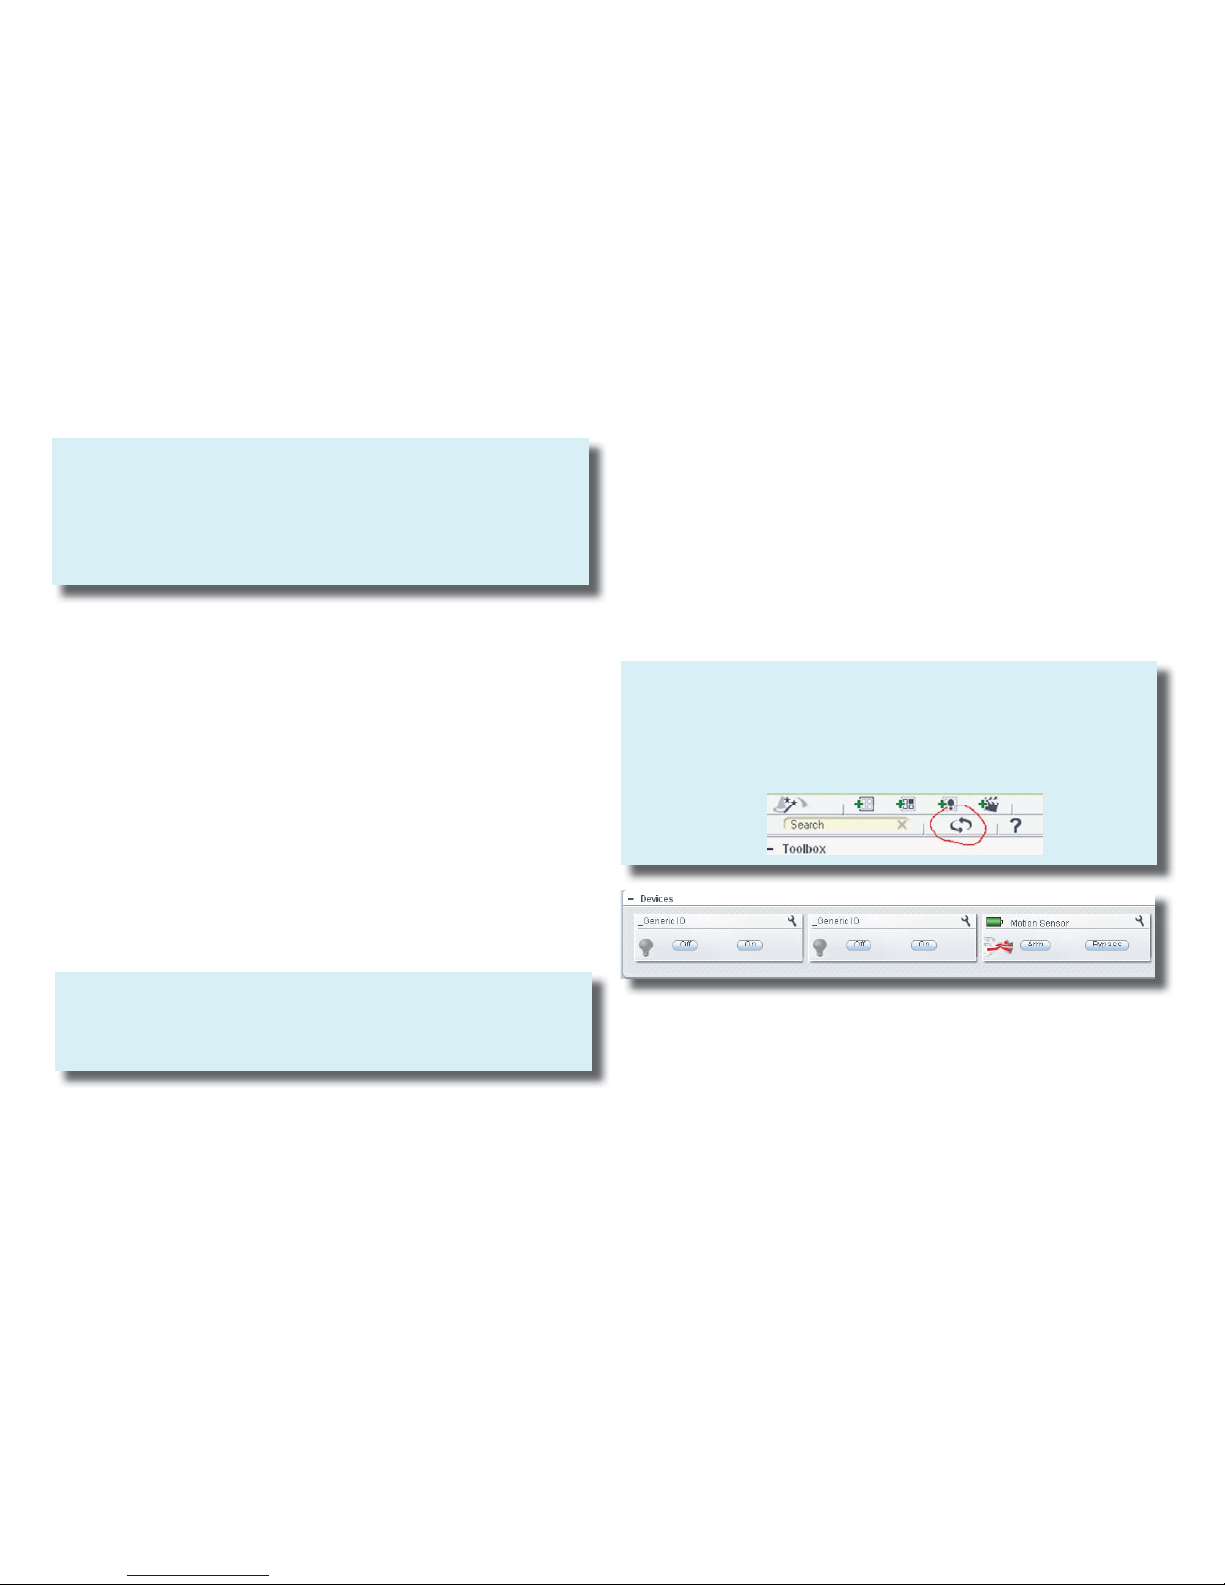
NOTE:
You should see by now the following screen. There should be three virtual devices.
If you see only one device “_Motion Sensor” that means Vera didn’t refreshed your
dashboard yet. Try to refresh it manually by clicking on the refresh button (see below
in red)
Inclusion (pairing) of the sensor with Z-Wave home network
1. Remove (if there were any) batteries from the sensor, and install them again.
2. Wait 2 minutes till blinking on the Sensor’s led (two blinks a second) stops.
3. Press and release a Z-Wave button on the back side of a Vera. Z-Wave led on front panel
of the Vera should blink slowly. That means that Vera is in Z-Wave inclusion mode.
11.Repeat the above steps if the inclusion was unsuccessful.
5
 Loading...