

Digital Gallery Global SPC936 User Manual
Instructions & Warranty
Thank yo u for y our purch ase of this q uality cl ock . The ut most care h as go ne into the d esign and m anu facture o f your
clock. P lea se read the se instru ctions an d sto re them in a sa fe place fo r fut ure refer ence.
The rece ive r unit has a cl ear, easy- to-read d isp lay that sh ows indoo r tem peratur e and humid ity, outdo or temper ature,
time, mo nth , date, day. Th e rem ote senso r transmi ts th e outdoor t emperat ure. To receiv e the o utdoor te mperatu re,
place th e sen sor anywh ere withi n 30 meters ; the 4 33.92MH z technol ogy m eans no wir e install ati on is re qui red.
The At omic Cloc k will alwa ys be a ccurate t o within on e second as i t rec eives dai ly WWVB upd ate s. Daylig ht Saving
Tim e also auto matical ly up dates so th ere is no nee d to re -set the cl ock manua lly!
IMPORTA NT: If the At omic Cloc k doe s not re cei ve the WWVB s ignal imm edi ately, wait over nig ht and it wil l be
set in the m orn ing.
The cloc k has a b uilt in rec eiver tha t automat ica lly synch ronizes i tse lf with the W WVB radio s ignal bro adc ast by the
US Gover nme nt’s N ational I nst itute of St andards & Tec hnology ( NIST) in Fo rt Collin s, Co lorado.
FEATURES :
1
DST
Atomic Clock
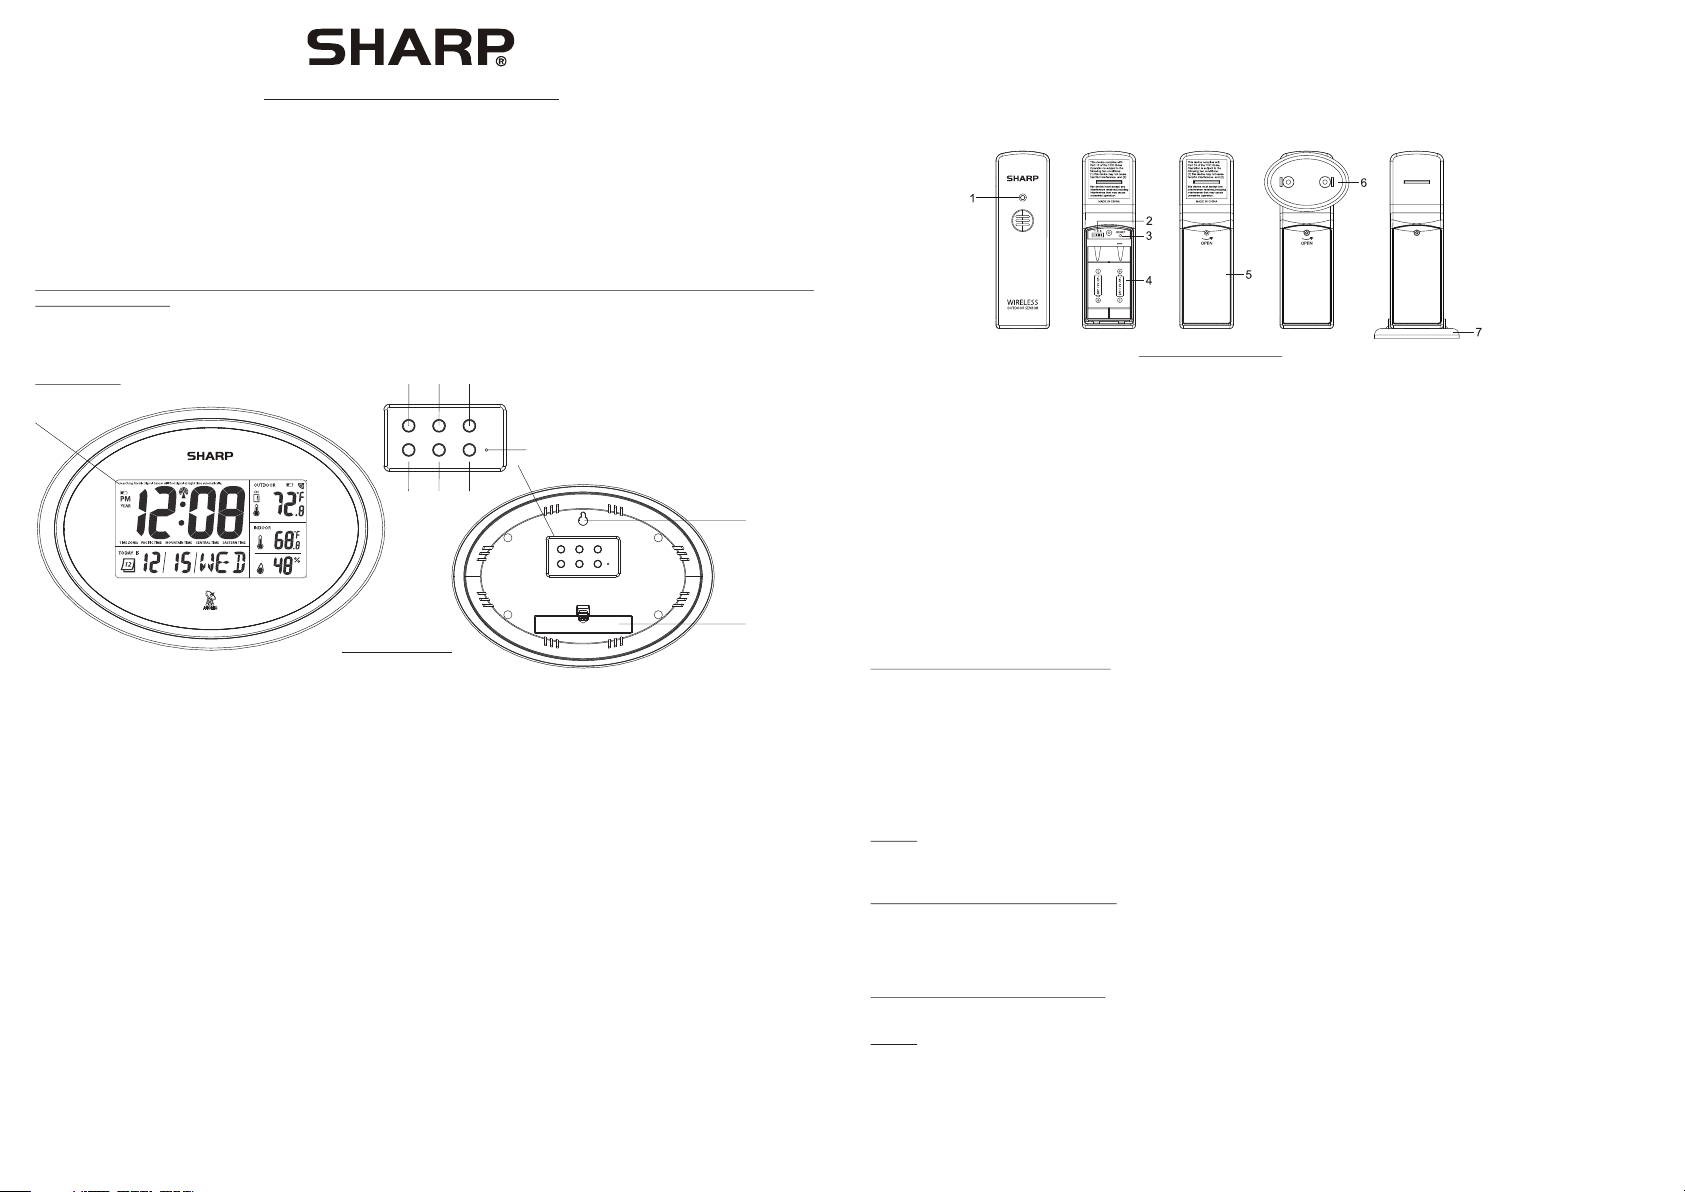
1. CLOCK D ISP LAY:
- Displa ys ti me in hours a nd minute s; calend ar di splay of da y, mont h and y ear; indo or temper atu re and humi dity;
outdoo r tem peratur e; signal s trength i ndi cator; da ylight sa vin g (DST); an d time zone .
2. Set BUT TON:
- In TI ME mo de, press a nd hold the S ET button t o enter the t ime s etting mo de.
- Press th e SET butto n to confir m the s etting an d enter the n ext setti ng.
3. Chann el BU TTON :
- In the nor mal m ode, pres s the butto n to switch t he be tween cha nnel 1, 2 and 3 t o rec eive the 43 3.92MHz s ignal;
press an d hol d the butto n for 3 secon ds will pai rin g with the ou tdoor rem ote s ensor.
4. + BUTTO N:
- In the TIM E setting m ode, pres s it to i ncrease t he settin g values. H old t he button f or 3 second s, th e disp lay w ill
change r api dly.
5. -/wav e BUT TON:
- In the TIM E setting m ode, pres s the b utton to de crease th e setting v alu es. Hold th e button fo r 3 sec onds, the
displa y wil l change ra pidly.
- In the nor mal m ode, pres s and hold th e button fo r 3 sec onds for re ceive the R CC si gnal imme diately.
- During t he RC C receivi ng period , press the b utt on again to s top the RCC r ece ption.
6. 12/24 B UTTON:
- In norma l mod e, press th e button to s witch 12/ 24 ti me displa y format.
7. ℃/℉ BUTTO N:
- In norma l mod e, press th e button to s witch tem per ature uni t ℃/℉.
2 4 6
+
Set
-/wave
Channel
3 5 7
12/24
Reset
℃/℉
8
9
10
8. Reset B UTTON:
- In case of m alf unction , press RES ET button t o reset all v alues to de fau lt values .
9. WALL MOU NT
10. BATTE RY COMPARTME NT AND D OOR:
- Use 2 AA si ze batter ies.
Remote Tr ansmitt er
1. LED IND ICATO R:
- LED Flas hes w hen the rem ote unit tr ansmits a r ead ing
2. CHANN EL SLIDE SW ITCH:
- Assign th e tra nsmitte r to channe l 1, 2 or 3 to rece ive 4 33.92MH z signal
3. RESET B UTTON:
- Press it t o res tart the tr ansmitt er and retu rn al l values to d efault va lue s.
4. BATTERY CO MPARTMEN T:
- Use 2 AA Si ze batter ies.
5. BATTERY DO OR
6. WALL MOU NT
7. TAB LE STAND
SETTIN G UP THE TRAN SMITTER :
1. Remov e the b attery do or and inse rt 2 AA batteri es in to the batt ery compa rtm ent and fol low the pol arities m ark ed.
2. Slide t he sw itch to Cha nnel 1. Pre ss the RESE T button to s et the tran smi tter.
3. Press t he CH ANNEL butt on at t he back of th e clock to se t cha nnel 1.
4. Lock th e tra nsmitte r battery d oor with th e scr ew.
5. Place t he un its away fr om metal ob jects and e lec trical ap pliance s to mi nimize in terfere nce. Posi tio n the recei ver
within t he effect ive trans mis sion rang e 30 meters i n usual cir cum stances .
6. If Chan nel 1 s ignal is no t receive d properl y, change th e transmi tte r slide but ton to Chan nel 2 o r 3. Press CH ANNEL
button o f the c lock to 2 or 3 re spectiv ely. Press a nd hold the C HANNEL button f or th ree secon ds. Th e uni t will star t
to find th e new c hannel.
NOTE:
1. To rec eiv e the trans mitter si gna l, the chan nels of rec eiver and t ran smitter m ust match e ach o ther.
2. Once th e cha nnel is ass igned to tr ansmitt er, yo u can only ch ange it by re mov ing the bat teries or r esettin g the u nit.
SETTIN G UP THE ATOMIC CL OCK:
1. Remov e the b attery do or from the b ack of the we ath er statio n and inser t 2 AA ba tter ies . Insert th em accord ing t o
the mark ed po larity.
2. Repla ce th e battery d oor.
3. Press t he RE SET bu tton on the b ack o f the clock t o set and syn chroniz e the t ransmit ter autom ati cally.
SIGNAL S TRENGTH I NDICATOR:
The sign al in dicator d isplays s ignal str eng th in 4 level s. Wav e segment f lashing m ean s time sign als are bei ng re ceived.
NOTE:
1. The uni t will auto mat ically se arch for th e tim e signal at 2 :00 (3:00 , 4:00, 5:0 0,6 :00 is also a vailabl e if th e signal wa s
not rece ive d at 2:00)
2. Close d area such a s air port, bas ement, to wer b lock or fac tory is not r ecommen ded .

SUGGES TIO N:
Make sur e you r ead the ins tructio ns before o per ating thi s clock. We h ave devel oped this s oph isticat ed instru men t for
the best r ece ption per formanc e; howeve r, the s ignal tra nsmitte d fro m USA Atomic Cl ock trans mitter wi ll be a ffec ted in
certai n sit uations . We adv ise y ou to note th e followi ng instru cti ons:
1. It is str ong ly recomm ended to st art this cl ock a t night and l et the cloc k rec eive the si gnal auto matical ly pa st midnig ht.
2. Always p lac e the unit aw ay from int erferin g sou rces such a s TV set , com puter, etc .
3. Avo id pl acing the u nit on or nex t to me tal plate s.
4. Areas wi th ac cess to win dows is rec ommende d for b etter rec eption.
5. Do not st art r eceptio n in moving a rticles s uch a s vehicle s or trains .
DAYL IGHT SAVIN G TIME (DST ):
The cloc k has p rogramm ed to autom aticall y swi tch when th e dayligh t sav ing time is i n effe ct. You r clock wil l show DST
during t he su mmer time i f you turn on t he DST.
TIME ZON E SET TING:
The defa ult t ime zone is PACIFI C. If y our locat ion is not in t he Pacifi c, se t the time zo ne by press ing - /wave but ton to
change t he Pa cific Time / Mountai n Time/ Cent ral Ti me/ Easte rn Time zone i n the n ormal tim e mode and wi ll di sapp ear
after se tti ng.
TIME AND CALEN DAR SETTI NG:
Tim e and calen dar can be se t man ually. As soon a s the trans mitter si gna l is receiv ed again, t he cl ock will au tomatic all y
synchr oni ze with the e xact time a nd calend ar.
1. Press a nd hold the S ET button o n the back of t he cl ock for 3 sec onds, the y ear d igits wil l be flash.
2. Press t he + button a nd -/ wave butt on to chang e the v alue.
3. Press t he SE T butt on once unt il th e Month dig it flashe s, press th e + but ton and -/w ave butto n to ch ange it's v alue.
4. Press t he SE T butt on once unt il th e Date digi t flashes , Press the + b utt on and -/wa ve button t o cha nge it's va lue.
5. Repea t the a bove oper ation to se t the below d ata i n this sequ ence: Mon th> Date>La nguage> Hour>Mi nut e>
DST(on /off).
6. Press t he SE T butt on to save an d exi t the setti ng mode; or l et it exit au tom aticall y 20 second s lat er withou t pressin g
any key.
BATT ERY RE PLACEME NT:
If the low b att ery indic ator appe ars besid e the o utdoor te mperatu re of m ain unit, i t indicat es that the t ran smitter
batter ies n eed repla cement. I f the low bat ter y indicat or is displ aye d at the top le ft corner, i t indicat es th at the atom ic
clock ba tte ries need r eplacem ent.
NOTE:
Attent ion ! Please di spose of us ed unit or ba tte ries in an ec ologica lly s afe manne r.
BATT ERY WAR NING:
- Clean th e bat tery cont acts and al so those of t he de vice prio r to batter y ins tallati on. Follo w the polar ity ( +) and (-)
to place b att ery.
- Do not mix o ld an d new batte ries.
- Do not mix Al kal ine, Stan dard (Car bon - Zinc) , or Re chargea ble (Nick el - Ca dmium) ba tteries .
- Incorr ect b attery pl acement w ill damag e the c lock move ment and ba tte ry may leak .
- Exhaus ted b attery is t o be remove d from the pr odu ct.
- Remove b att eries fro m equipme nt which is n ot to b e used for an e xtended p eri od of time.
- Do not dis pos e of batter ies in fire . Batteri es ma y explode o r leak.
USING TH E WALL MOUNT:
The rece ive r and trans mitter bo th have the d esk top and wal l mountin g str ucture.
- For the Ato mic C lock, use t he recess ed hold on th e bac k of the cloc k to hang it.
- For the Tra nsm itter, han g or place th e separat e wal l-mount ing part in a n are a protect ed from dir ect rain. O nce t he
stand is m oun ted, plac e the trans mitter in to th e stand on th e wall.
SPECIF ICATIONS :
MAIN UNI T
Recomm end ed operat ing range : 0℃ to 45℃, 32℉ to 113℉
Resolu tio n: 0.1℃/℉( abo ve 0℃/32℉), 1℃/℉(be low 0℃/32℉)
Humidi ty me asuring r ange: 20% R H to 95%RH
Recomm end ed operat ing range : 20% RH to 95% RH
Resolu tio n: 1%R H
Calend ar ra nge: from y ear 2000 to 2 099
Radio co ntr olled sig nal: WWVB
REMOTE T RAN SMITTER
Recomm end ed operat ing range : -50℃ to 70℃, -12 2℉ to 15 8℉
Resolu tio n: 0.1℃/℉( abo ve 0℃/32℉), 1℃/℉(be low 0℃/32℉)
Humidi ty me asuring r ange: 20% R H to 95%RH
Operat ing r ange: 20% R H to 95%RH
Resolu tio n: 1%R H
RF trans mis sion freq uency: 43 3.92MHz
Remote t ran smitter : 1 unit
RF trans mis sion rang e: maximu m 30 meters
Temperat ure s ensing cy cle: arou nd 50 secon ds
POWER
Main uni t: 3V, us e 2 x AA 1. 5V al kaline ba ttery
Remote t ran smitter : 3V, use 2 x AA 1. 5V alkali ne batter y
DIMENS ION
Main uni t: 300(W) x 2 10( H) x 25.5(D )mm
11.8 (W) x 8 .3(H ) x 1(D )inch
Remote t ran smitter : 40(W) x 130 (H) x 24(D) mm
1.6(W) x 5 .1(H) x 0.9 (D) inch
FCC INFO RMATION:
This equ ipm ent has bee n tested an d found to co mpl y with the li mits for a Cl ass B d igital de vice, pur suant to Pa rt 15 o f
the FCC Ru les . Thes e limits ar e des igned to pr ovide rea sonable p rot ection ag ainst har mfu l interfe rence in a re sid enti al
instal lat ion. Th is eq uipment g enerate s, us es, and can r adiate ra dio f requ enc y energy an d, if not ins tal led and use d in
accord anc e with the in structi ons, may ca use h armful in terfere nce t o radio com municat ions. How eve r, there is no
guaran tee t hat inter ference w ill not occ ur in a p articul ar instal lat ion. If thi s equipme nt does cau se ha rmful int erferen ce
to radio o r tel evision r eceptio n, which ca n be de termine d by turnin g the e quipmen t off an d on, t he user is en courage d
to try to co rre ct the inte rferenc e by one or mor e of th e followi ng measur es:
- Reorie nt or r elocate t he receiv ing anten na.
- Increa se th e separat ion betwe en the equi pme nt and rece iver.
- Connec t the e quipmen t into an out let on a circ uit d iffe rent from t hat t o which the r eceiver i s con nected.
- Consul t the d ealer or an e xperien ced radio /TV t echnici an for help .
This dev ice c omplies w ith Part 15 o f the FCC Rul es. O peratio n is subjec t to th e followi ng two cond itions:
(1) This de vice may no t cau se harmfu l interfe ren ce, and
(2) This de vice must a cce pt any inte rferenc e rec eived, in cluding i nte rfer enc e that may ca use undes ire d operati on.
SPC936
 Loading...