

Digital Gallery Global SPC658 User Manual
SPC658 LED Alarm Clock with B lu et oo th
Instruction Manual & Wa rr an ty
Thank y ou for yo ur purc has e of this q ualit y clock . The u tmo st care h as gone i nto the d esi gn a nd ma nufac ture of y our
clock . Pleas e read th ese i nstru ction s and sto re th em in a saf e place f or futu re re feren ce.
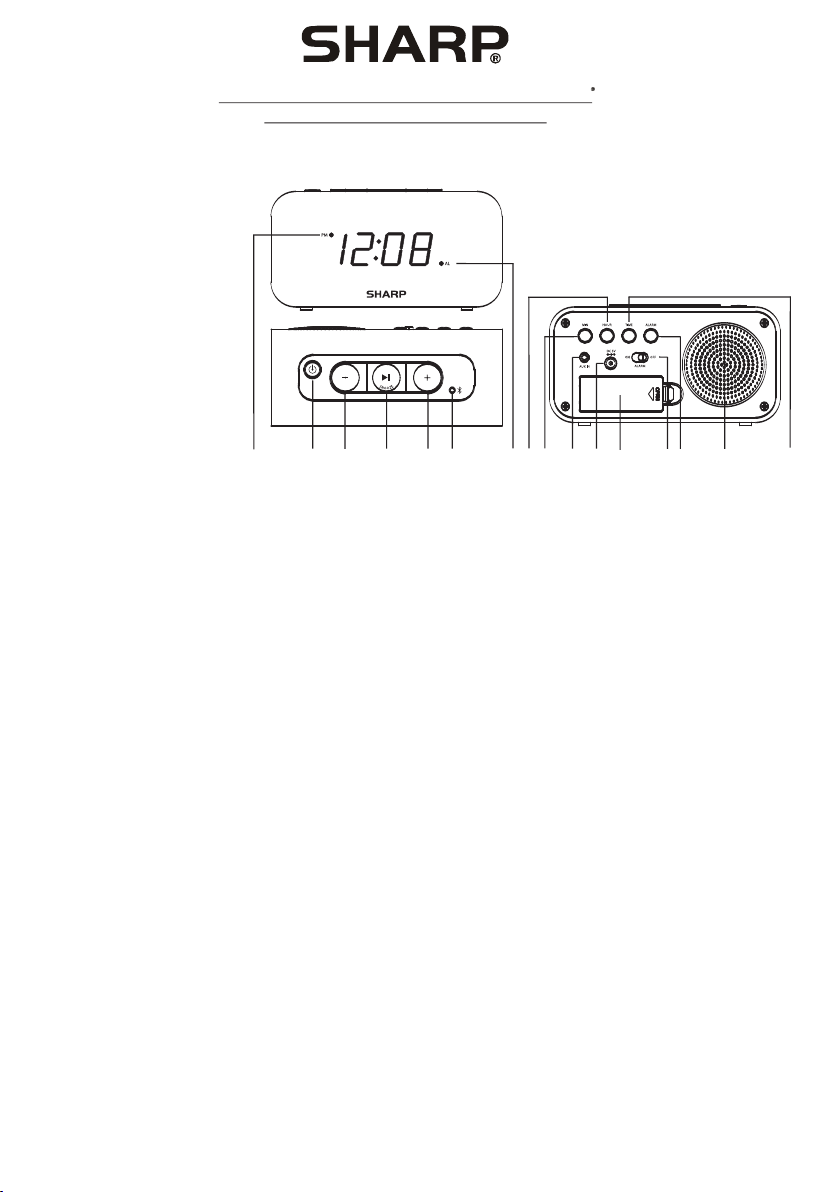
FEATURES
1. PM ind icato r
2. POWE R ON/OF F but ton
3. VOL - butto n
4. PLAY/PAUS E/
SNOOZ E butto n
5. VOL + butto n
6. Blue tooth i ndica tor
7. Alarm i ndica tor
8. HOUR b utton
9. MIN bu tton
10. AUX IN j ack
11. DC 5 V jack
12. Bat tery co mpa rt men t
13. ALAR M ON/OF F swi tc h
14. ALAR M butto n
15. Spe aker
16. TIME but ton
CONNE CTING TO THE P OWER SU PPLY
Inser t the AC ada ptor in to a 12 0V AC ~ 60Hz m ains ou tlet an d the o ther en d of the co rd into t he DC 5 V jack on t he
back of t he unit .
INSTALLIN G THE CLO CK & AL ARM B ACK UP BATTER IES
The clo ck time a nd alar m tim e (if set ) can be ma intai ned d uring a p ower fa ilure b y 2 x AAA/ L R03 bat terie s (not
suppl ied). H oweve r, onc e the pow er is res tarte d, ch eck the t ime to ma ke sure i t is ac curat e and res et if nec ess ary.
2
1
4
3
6
5
10
8
7
9
11
12 13
INSER TING TH E BATT ERIES
1. Open t he batt ery c om par tment a t the bac k of th e un it by p ressi ng on the c atch an d rem oving t he cove r.
2. Inse rt 2 x AAA/ L R03 b at ter ies (pr efera bly alk ali ne batt eries ) into th e bat tery co mpart ment, f oll owing t he pola rity
as show n on the di agram i nsi de the co mpart ment.
3. Repl ace the b atter y com partm ent cov er.
15
14
16
SETTI NG THE CL OCK
- Press a nd hold t he TIME b utt on down t o activ ate t im e set ting.
- While h oldin g down th e TIM E butto n, pres s the HOU R but ton to ad vance t o the cor rec t hour. Th e PM in dicat or will
light w hen the h our is ad van ced int o the PM ti me.
- While h oldin g down th e TIM E butto n, pres s the MIN b utt on to adv ance to t he corr ect m inute .
- Relea se the TI ME butt on wh en the co rrect t ime is sh own o n the dis play.
SETTI NG THE ALA RM
- Press a nd hold t he ALAR M but ton dow n to acti vate al arm s ettin g.
- While h oldin g down th e ALA RM butt on, pre ss the HO UR bu tton to a dvanc e to the co rre ct hour. T he PM i ndica tor
will li ght whe n the hou r is ad vance d into th e PM time .
- While h oldin g down th e ALA RM butt on, pre ss the MI N but ton to ad vance t o the cor rec t minut e.
- Relea se the AL ARM but ton w hen the c orrec t alarm t ime i s shown o n the dis play.
USING T HE AL ARM F UNCTI ON
- Slide t he ALAR M ON/OF F but ton to ON t o activ ate t he a lar m and the a larm in dic at or wi ll be lit .
- Slide t he ALAR M ON/OF F but ton to OF F to deac tiv at e the a larm an d the ala rm in di cat or no lon ger be vi sible .
SNOOZ E FUNCT ION
- Press ing the S NOO ZE b utt on afte r the ala rm so un ds wi ll caus e the ala rm to sto p and t he alar m will so und aga in in
9 minut es. This wil l happe n eac h ti me th e SNOOZ E butto n is pr essed .
USING B LUETOOTH F UNCTI ON
- Press t he POWE R ON bu tt on to e nter Bl uetoo th mo de. The P airin g Indic ato r wi ll fl ash blu e quick ly.
Whe n pairing, remain within 3 feet of the unit.
- Using t he nati ve cont rol s on your B lueto oth dev ice , selec t the “SPC 658” in yo ur Bl uetoo th sett ings to p air .

- When su ccess ful ly p air ed and co nnect ed, the P air ing Ind icato r will di spl ay a soli d blue li ght and a b eep w ill sou nd
from th e unit.
Aft er in itial pairing, the unit will stay paired unless unpaired manually by the user or erased due to a reset of the device.
- Use the n ative c ontro ls on t he conn ected B lueto oth d evice t o selec t a track .
- To play o r skip th e sel ec ted t rack, u se the na tiv e co ntr ols on th e conne cted Bl uet ooth de vice.
- To paus e the tra ck, use t he PLAY/PA USE b utton o n the ala rm cloc k.
- Audio p layed t hroug h the c onnec ted Blu etoot h dev ice wil l now be he ard thr oug h the spe akers .
- To adju st the vo lume, p res s the VOL +/- but ton o n th e ala rm cloc k.
USING AUX IN F UNC TION
- Conne ct the 3. 5mm aud io ca ble (no t inclu ded) to t he AU X IN jack o n the uni t and an au dio o utput o n an MP3 pl ayer
or othe r audio s ource .
- Press t he POWE R ON bu tt on to e nter AU X IN mode .
- Use the n ative c ontro ls on t he conn ected M P3 play er or o ther au dio sou rce to pl ay an d contr ol audi o playe d thr ough
the ala rm cloc k.
FCC WARN INGS
War ning: C han ges or mo dific ation s to th is unit n ot expr essly a ppr oved by t he part y respo nsi ble for c ompli ance co uld
void th e user’s autho rity to o perat e the e quipm ent.
NOTE: This e quipm ent has b een t ested a nd foun d to comp ly wi th t he li mits fo r a Class B d igi ta l dev ice, pu rsuan t to
Part 15 o f the FCC R ule s. Thes e lim its are d esign ed to pro vid e re aso nable p rotec tion ag ain st harm ful int erfer enc e in
a resid entia l insta lla tion. T his e quipm ent gen erate s, us es and ca n radia te radi o fre quenc y energ y and, if n ot in stall ed
and use d in acco rdanc e wit h the ins truct ions, m ay ca use har mful in terfe ren ce to rad io comm unica tio ns.
Howev er, ther e is no gua ran tee tha t inter feren ce wi ll not oc cur in a pa rticu lar i nstal latio n. If thi s equ ipmen t does
cause h armfu l inter fer ence to r adio or t elevi sio n recep tion, w hich ca n be de termi ned by tu rning t he eq uipme nt off and
on, the u ser is en coura ged t o try to co rrect t he inte rfe rence b y one or mo re of the f oll owing m easur es:
- Reori ent or re locat e the r eceiv ing ant enna.
- Incre ase the s epara tio n betwe en the eq uipme nt an d recei ver.
- Conne ct the eq uipme nt in to an out let on a ci rcuit d iff ere nt f rom t hat to wh ich the r ece iv er is c onnec ted.
- Consu lt the de aler or a n exp erien ced rad io/TV t ech nicia n for hel p.
SPC658
 Loading...