

Bluetooth Wireless Speaker Mode l No .: BTS68
Introdu ct ion
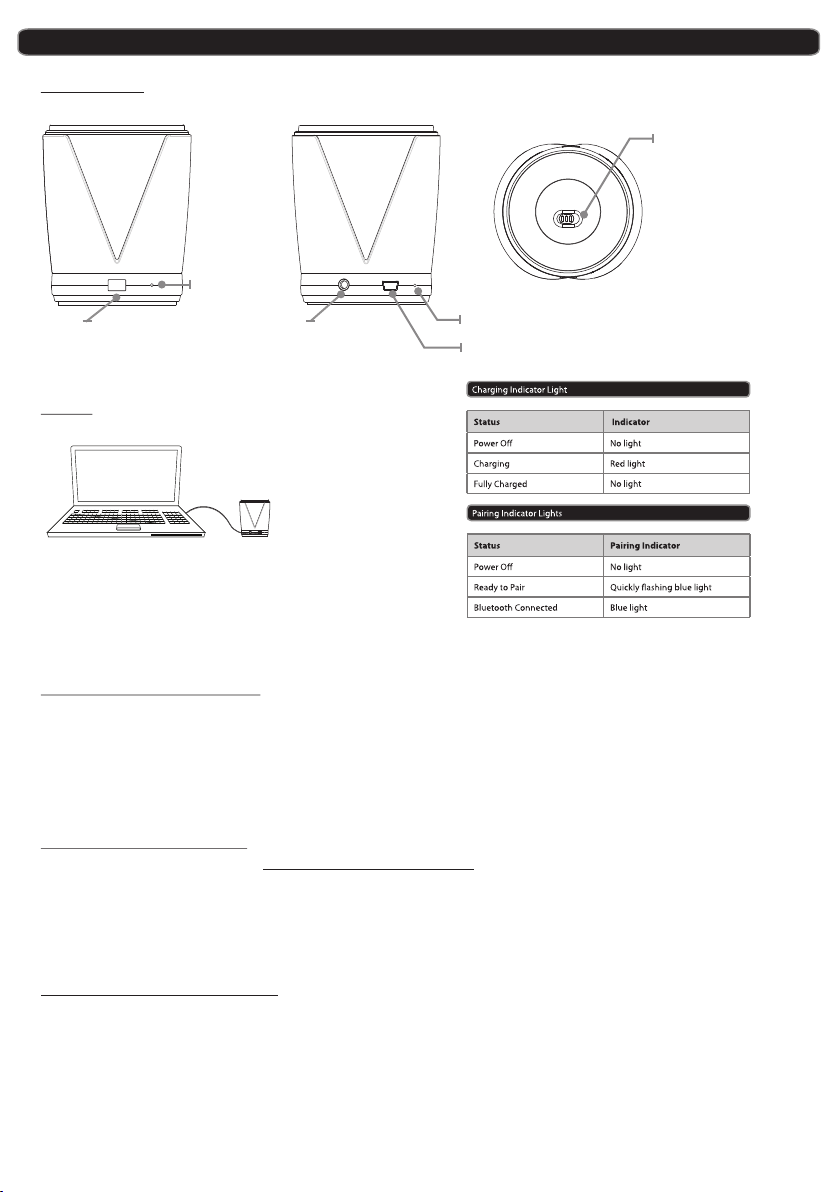
Pow er
Adjust the switch to tu rn
the u nit on or off. Alw ays
be sure to switch to the
ON OFF
OFF p osi tio n when not
in use.
PAIR
Pair
Pre ss to w ake the
Bluetooth signal
Pair
Ind ica tor
3.5 mm Au dio I npu t
Requires a 3.5mm audio
cable (not included)
Cha rging In dic ato r
Min i USB P ort
Power
USB Power
Requires a Mi ni USB to USB cab le (include d).
Note: PC m ust n ot be i n sleep mode.
Initial cha rge time 4 hour s using USB cab le. Please ma ke sure the uni t is fully char ged before us e.
Pairing a B lu etooth De vi ce
1. Tu rn on the unit. The Pairin g Indicat or w ill flash b lu e quickly.
Whe n pai rin g, re main within 3 feet of the unit.
2. Using the na tive contro ls on your Blue tooth devic e, select the “ BTS68” in you r Bluetooth s ettings
to pair.
3. When succe ssfully pai red and conne cted, the Pai ring Indica tor will disp lay a solid blu e light and
a beep will sou nd from the uni t.
Aft er in iti al pa iri ng, the unit will stay paired unless unpaired manually by the user or erased due to a reset of the device.
Playing Audio Wi relessl y
1. Follow the i nstructio ns for Pairin g a Bluetooth D evice.
2. Use the nati ve controls o n the connect ed Bluetoot h device to sel ect a track.
3. To play, pau se or skip the se lected trac k, use the nati ve controls o n the connect ed Bluetoot h device.
4. Audio play ed through th e connected B luetooth de vice will now b e heard throu gh the speake rs.
5. To adjust th e volume, use t he native con trols on the co nnected Blu etooth devi ce.
Using the 3 .5 mm Au dio Input
1. Plug one end o f a 3. 5mm audio i nput cable (n ot included ) into the 3.5m m Audio Input o n the unit.
2. Plug the oth er end of the cab le into the aud io output/h eadphone ou tput on an MP3 Pl ayer or other
audio sourc e.
3. Turn the u ni t on.
4. Audio play ed through th e connected d evice will no w be heard thro ugh the speak ers.
Note: An y aud io be ing p lay ed th rou gh a co nne cte d Blu eto oth D evi ce wi ll ce ase o nce t he 3. 5mm Au dio s our ce is c onn ect ed.

NOTE:
Changes or Mo dificatio ns not expres sly approve d by the party re sponsible c ould void the u ser's
authority t o operate thi s device.
NOTE: Thi s equipme nt h as been tes te d and found t o co mply with t he l imits for a C la ss B digita l de vice,
pursuant to P art 15 of the FCC R ules. The se limits a re d esigned t o pr ovide rea so nable pro te ction
against har mful interf erence in a res idential in stallatio n. This e qu ipment gene rates, uses a nd can
radiate rad io frequenc y energy and, i f not install ed and used in ac cordance wi th the instru ctions,
may cause har mful interf erence to rad io communic ations. How ever, there is n o guarantee t hat
interfere nce will not oc cur in a partic ular instal lation.
If this equ ip ment does cau se harmful in terferenc e to radio or tel evision rec eption, whi ch can be
determine d by turning th e equipment o ff and on , th e user is enc ou raged to tr y to c orrect th e
interfere nce by one or mor e of the follow ing measure s:
-- Reorient o r relocate th e receiving a ntenna.
-- Increase t he separati on between th e equipment a nd receiver.
-- Connect th e equipment i nto an outlet o n a circuit differen t fr om that to wh ic h the recei ve r is
connect ed .
-- Consult th e dealer or an ex perienced r adio/TV tec hnician for h elp.
 Loading...