

DIGITAL FORECAST X-MC User Manual
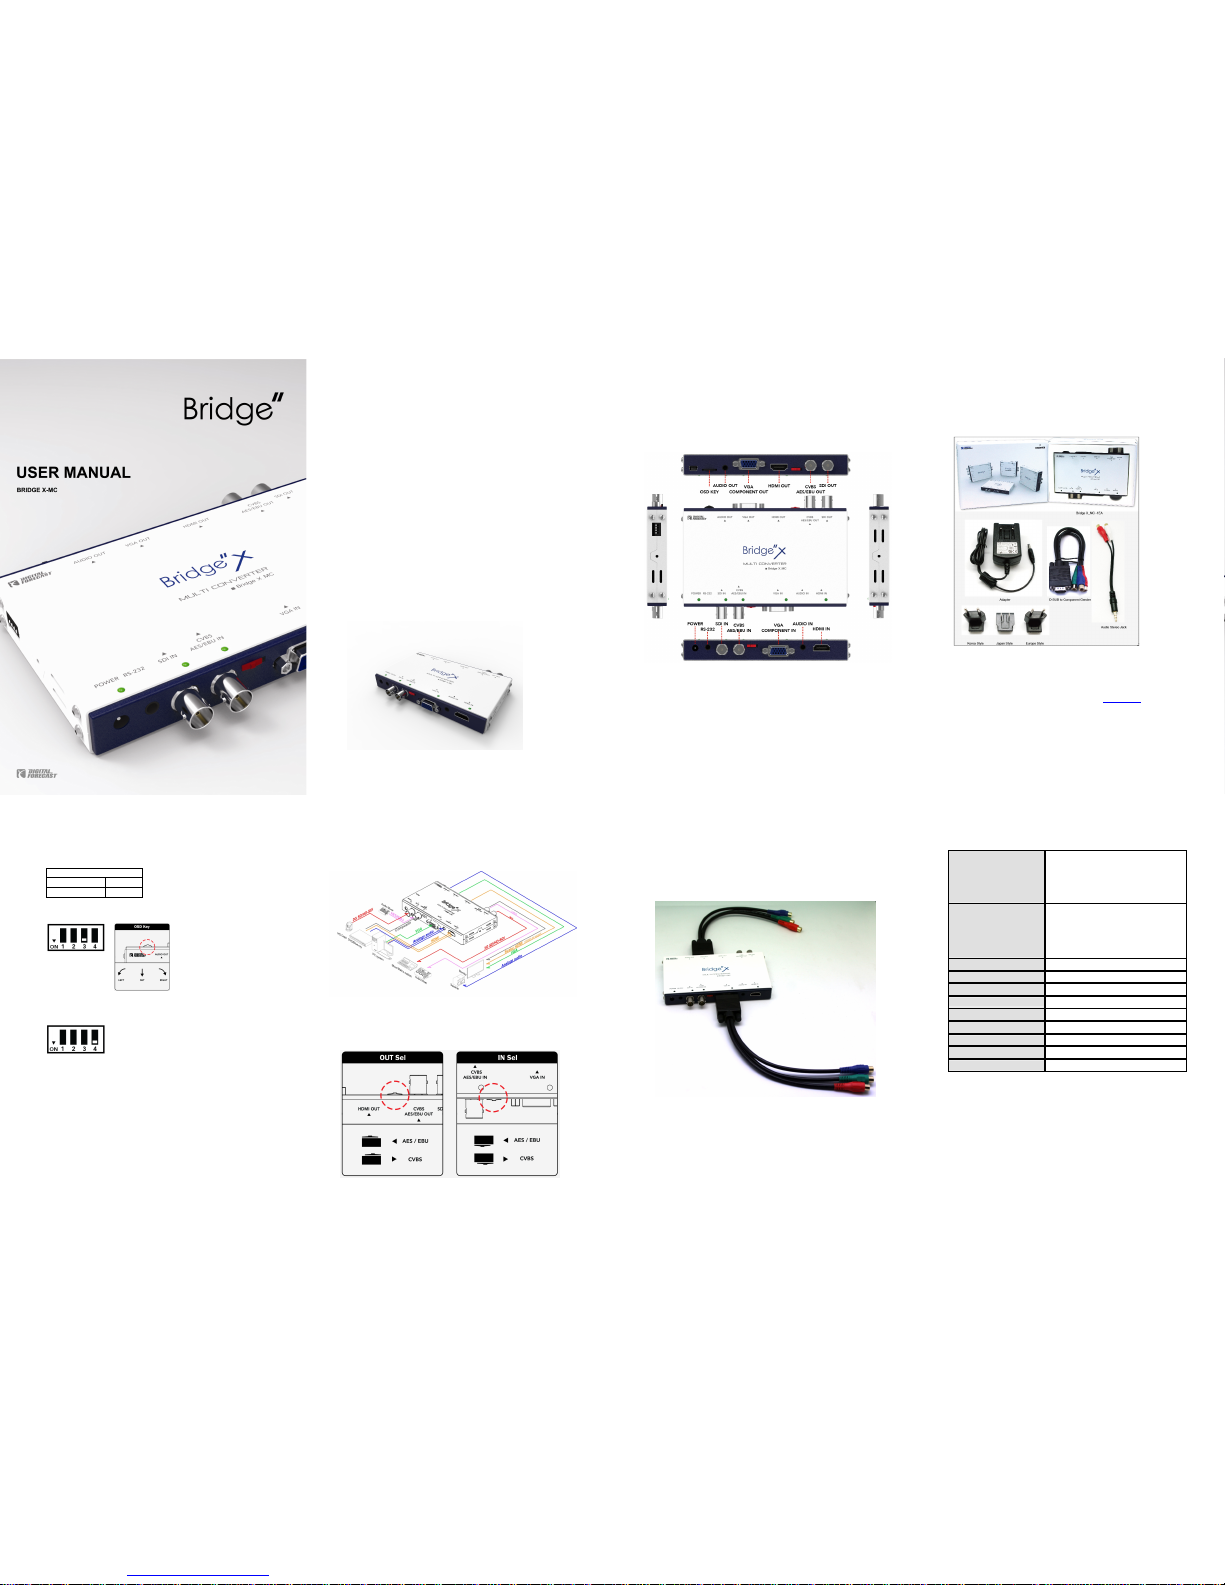
Description
Bridge X_MC is composed of the various types of input / output, which can convert a source into almost
all types of a demanded output. The supported input / output are HDMI, VGA, YPbPr (Component), CVBS
(Composite), SDI.
Moreover, its OSD provides the user-convenient operations as Input selection, Res olution & Audio
Setting, and so on. The OSD operation is made by using the switch loc ated on the top left of the product.
It is also available to control through RCP.
Main Functions
• Up/Down/Cross/Scan converter
• Audio Mux Function
• HDMI in/output
• Audio Mux Function
• Audio DeMux Function
• User selectable output format
• User selectable output ARC
• Multiple standard video/audio signal
(CVBS, AES/EBU, SDI, VGA, COMPONENT, Analog Audio, HDMI)
• Remote Control Support (option)
User’s Manual
3
Product Composition
Bridge X_MC
4
Product Components
Before use, please make sure that the following components are properly provided.
※ The Product Configuration or Specification may be changed without prior notice in purpose of
performance improvement.
※ In case of needing an additional Purchase of the components according to circumstances, please
contact the Manufacturer (Refer to the Digital Forecast Website : www.dfcast.co.kr
)
User’s Manual
5
How to use DIP S/W
Dip Switch Control
Upward Position OFF
Downward Position ON
- When the Third Dip S/W is "ON" like the lower-left figure, it enables the OSD key to select an Input type.
- In case of needing to activate "Fixed Mode", please turn "ON" the Fourth Dip S/W like below.
Configuration
X_MC is available to use l ike the below configuration.
CVBS or AES / EBU can be selected by the RED-marked switch located in the
below figure which describes how to select.
User’s Manual
7
Component Cable Connection
Component Input is available to use by means of connecting to VGA port after
applying the Conversion Gender of "D-SUB to Component". The use of
Component Output is also available by the same method.
Specifications
IN PUT CONNECTER
1 x BNC 75Ω[SDI]
1 x BNC 75Ω[CVBS or AES/EBU]
1 x D-SUB[VGA or Component]
1 x Phone Jack[Audio L/R]
1 x HDMI
OUT PUT CONNECTER
1 x BNC 75Ω[SDI]
1 x BNC 75Ω[CVBS or AES/EBU]
1 x D-SUB[VGA or Component]
1 x Phone Jack[Audio L/R ]
1 x HDMI
SDI SD-SDI, HD-SDI, 3G -SDI
Audio sample clock 48Khz
HDMI Version 1.3
IN/OUT Resolution Appendix
Remote Control Phone Jack[RS-232]
Firmware Update USB MINI B-Type
Power Supply DC 12V 1.2A
Dimension (WxHxD) 144 x 81 x 19.6(mm)
Weight 210 g
User Manual
9
Troubleshooting
When the screen is cracked or HDMI input noise is generated.
► A low-priced (or uncertified) HDMI cable may cause a data loss at more than 1080i resolution.
The verification method is to check the video quality of more than 1080i resolution on the monitor in direct
connection between a problematic HDMI cable and video display unit NOT as via X_MC.
If the HDMI cable is the cause, the display keeps showing the same symptom.
Therefore, Genuine HDMI cable is recommended.
When Analog audio is off.
► Please check the condition of Audio at Video Output of the SDI or HDMI which contains Audio
data. If the checked Audio is normal, it may be a temporary symptom by ESD(Electrostatic
Discharge)
In this case, please reboot the product as turning OFF and ON the product : forced RESET
Bridge X_MC
10
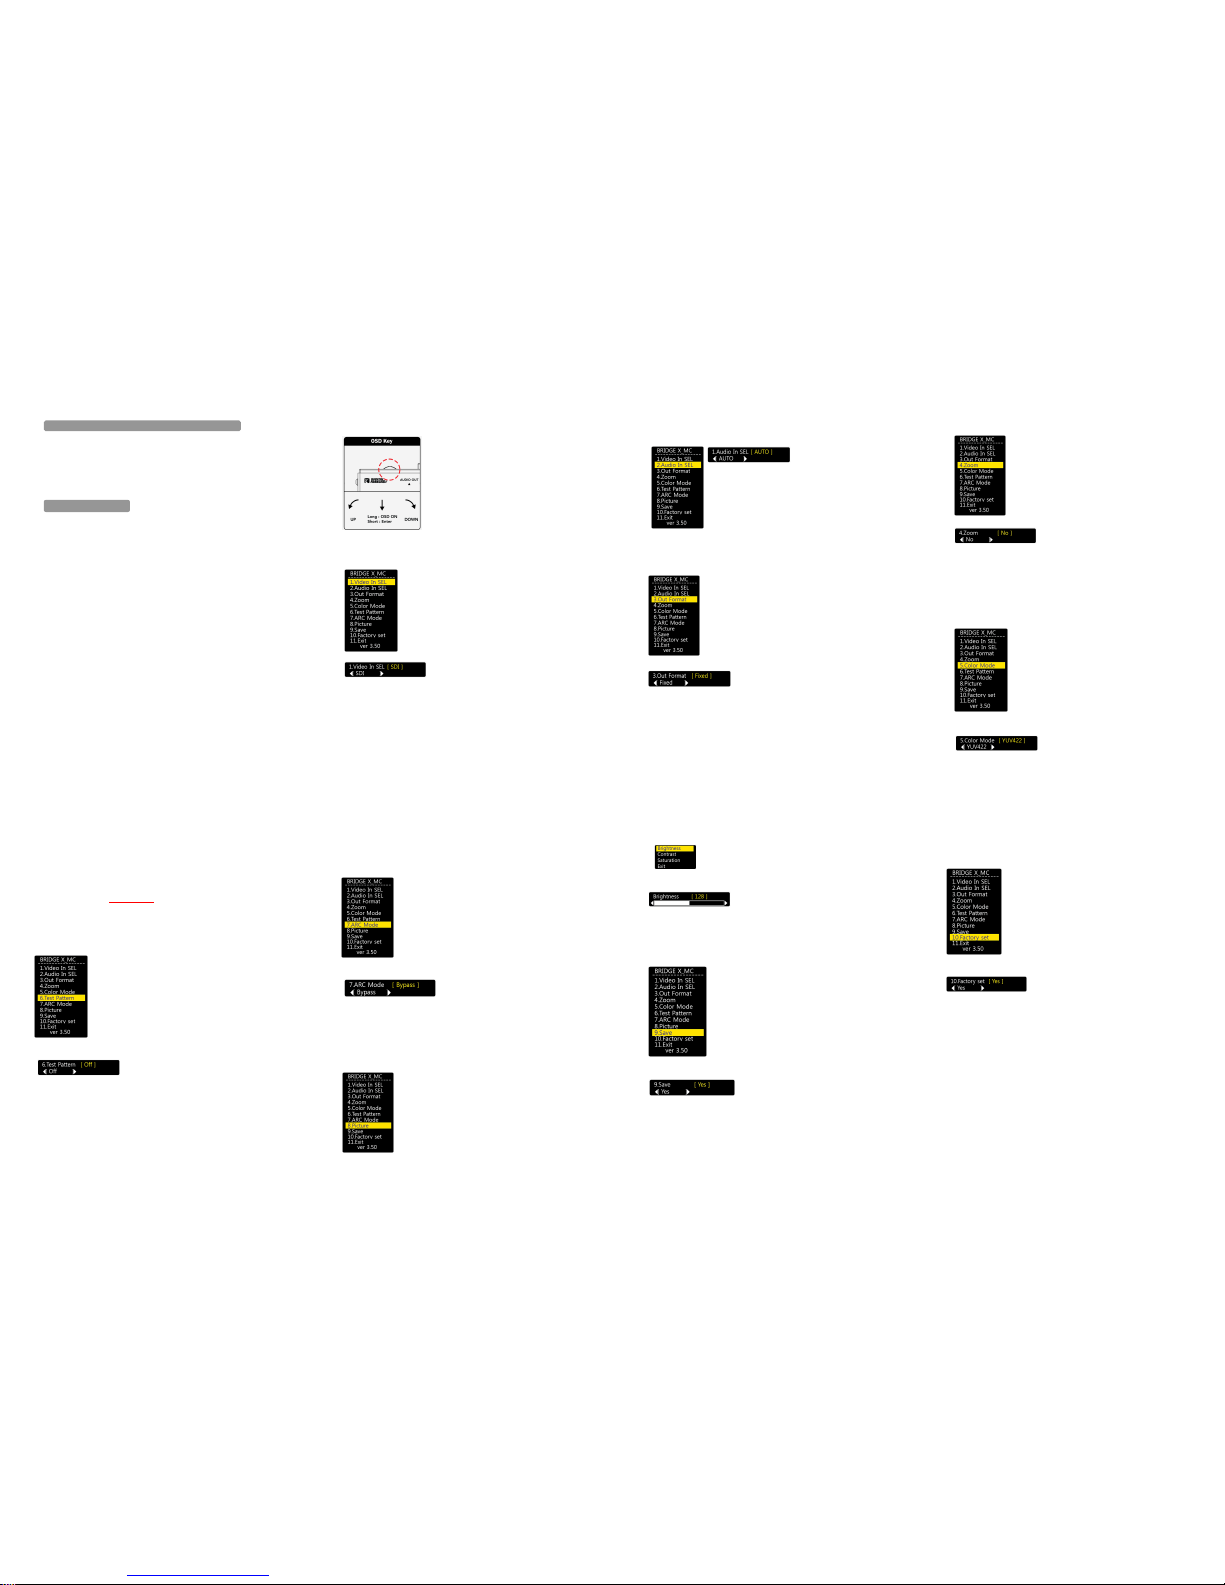
How to use OSD Menu
The OSD key (switch) is located on the top left of the product.
Selecting the input port
1. Press the OSD key and hold on for a while. Then OSD menu will appear like below.
2. When selecting ""Video In SEL", the following sub-menu is displayed.
3. The OSD key enables the user to select a needed Video Input type.
Optional : COMPONENT, HDMI, SDI, COMPOSITE, VGA
When the selection is made, the relevant Input LED is ON.
※
Notes
To use the COMPONENT, VGA, the input port must be equipped with an additional gender.
User Manual
11
4. "Audio In SEL" menu shows the selectable Audio inputs.
When "AUTO" is selected, the Audio input of the related Video is selected.
In other words, the video of SDI, HDMI contains Audio data.
If the other types of video input are selected, Analog Audio input is selected accordingly.
Optional : AUTO, Analog, AES / EBU
Selecting the resolution
1. Press the OSD key and hold on for a while in order to show the initial display menu.
And move to 3. Out Format.
2. When "Out Format" menu is selected, the following menu will be displayed.
3. A needed resolution can be selected by using OSD key.
4. "By pass" mode provides the same resolution of the input, excluding the PC resolution.
"Fixed 1080i" is fixed as the output resolution of 1080i (1080i50 or 1080i59, will be displayed depending on the
frequency)
Selectable Resolutions :
Bypass, 480i_NTSC, 576i_PAL, 720p50, 720p59, 720p60, 1080i50, 1080i59, 1080i60, 1080p24, 1080p25,
1080p30, 1080p50, 1080p59, 1080p60,
640x480p60, 800x600p60, 1024x768p60, 1280x1024p60,
1360x768p60, 1600x1200p60, 1440x900p60, Fixed 1080i
Bridge X_MC
12
Magnifying the Screen
1. Press the OSD key and hold on for a while in order to show the initial display menu.
And move to 4. Zoom.
2. When "Zoom" menu is selected, the following menu will be displayed.
3. The OSD key enables the user to select the following values
Selectable : No Zoom, 5%, 10%, 15%, 20%, 25%, 30%, 35%
Selecting the output Color
1. Press the OSD key and hold on for a while in order to show the initial display menu.
And move to 5. Color Mode.
2. When "Color Mode" menu is selected, the following menu will be displayed.
User Manual
13
3. The OSD key enables the user to select the following mode.
Optional : YUV422, RGB444
※
Notes
This feature can be used only available for VGA output
In case of selecting RGB444 mode for SDI, CVBS, and COMPONENT, the output mode will be abnormally
displayed, because those support YUV422 mode only.
Display Test Pattern
1. Press the OSD key and hold on for a while in order to show the initial display menu.
And move to 6. Test Pattern.
2. When "Test Pattern" menu is selected, the following menu will be displayed.
3. The OSD key enables the user to select whether to output.
Selectable : On, Off
The output screen display the Color bar, and the -20dB of Tone signal is contained in Audio 1 group consisting
of 2ch.
Bridge X_MC
14
Aspect Ratio Converter
1. Press the OSD key and hold on for a while in order to show the initial display menu.
And move to 7. ARC Mode.
2. When "ARC Mode" menu is selected, the following menu will be displayed.
3. The OSD key enables the user to select whether to output.
Selectable : Bypass, 4:3, 16:9
Adjusting the Screen
1. Press the OSD key and hold on for a while in order to show the initial display menu.
And move to 8. Picture.
User Manual
15
2. When " Brightness " menu is selected, the following menu will be displayed.
3. The OSD key enables the user to select the following values of "Brightness"output
The OSD key operation enables the user to change its value
The remaining "Contrast" and "Saturation" can be adjusted in the same way.
SAVE
1. Press the OSD key and hold on for a while in order to show the initial display menu
And move to 9. Save
2. When "Save" menu is selected, the following menu will be displayed.
3. The OSD key enables the user to select whether to save the changed configuration.
Choices: Yes, No
※
In spite of not saving through "SAVE" menu,
the changed setting is automatically saved when OSD menu disappears.
Bridge X_MC
16
Initialize
1. Press the OSD key and hold on for a while in order to show the initial display menu. And move to 10. Factory
Set.
2. When "Factory Set" menu is selected, the following menu will be displayed.
3. The OSD key to select whether to initialize the entire setting.
Choices: Yes, No
 Loading...