

Version 1.0.1-3
www.digitalfoci.com
3111 Via Mondo
Rancho Dominguez, CA 90221
USA
email: support@digitalfoci.com
phone: +1 (310) 763-9100
Copyright 2014. All rights reserved.
Picture Porter Advanced
5” Digital Photo Manager
User Guide
Thank you for choosing Digital Foci for your digital photo
management needs.
Please reference this User Guide to get familiar with your
Picture Porter Advanced and learn how to use it for your
specific applications and needs.
For more explanations on specific functions for your Picture
Porter Advanced or if you have unique questions, visit our
our online and tech support resources.
At Digital Foci, our mission is to enhance your life by
smart usage of digital technology.
We promise to provide you:
Easy-to-use products to help you manage and enjoy
your digital content
Attractive products to accentuate your unique style
Education and support to help you understand the
quickly changing digital technology
We aim to provide you a level of customer satisfaction
that exceeds your expectations.
Let Digital Foci help Optimize your Digital Living.
Congratulations on getting started with your
Picture Porter Advanced - 5” Digital Photo Manager
With Picture Porter Advanced you can:
Carry your entire collection of digital photos, music, videos,
and other digital files with you to enjoy anytime, anywhere
Backup precious vacation pictures directly from digital
camera memory cards for security and peace of mind as well
as to free up memory card space for taking more photos
Make backup to new folder or add to existing folder
View photo details with zoom, pan, and rotate functions
View EXIF information and histogram of photos
Manage your photos directly on the device with - Copy,
Cut, Paste, Rename, Delete, Export, Create new folder,
Select multiple items, and Add to Playlist
Connect to large screen TV or monitor by HDMI or RCA
cables for easier sharing with family and friends
Record and playback PhotoMemo® for individual photos
Connect external hard drive or USB flash drive to make
second backup added security and easier sharing/distribution
Use Playlist feature to create slideshows from all available
content on the device to view and share by Export
System Requirements
1) Connection to computer to use as external hard drive:
Windows and Mac: All versions
Linux: Version 2.4 & up (USB Mass Storage Device drivers)
(uses common USB Mass Storage Device drivers)
2) One available USB Port
For more information about Picture Porter Advanced and other
products from Digital Foci, please visit our website at:
www.digitalfoci.com
D
I
F CO
LATIGI
D
I
F CO
LATIGI
Page 1/8
Version 1.0.1-3
Package Contents
Picture Porter Advanced
Neoprene Carry Case with Velcro pocket
Wrist strap
Li-Ion battery (3700mAh @ 3.7V [13.7Wh])
AC adapter with USB output (5V/2.4A, 12W max.)
USB-to-DC Jack cable (for AC adapter)
microUSB/B to USB/A cable (for computer)
microHDMI/D to HDMI/A cable (for TV/monitor)
Component video cable (RCA-x3 to 3.5mm jack)
Composite video cable (RCA-x1 to 3.5mm jack)
Audio cable (RCA-x2 to 3.5mm jack)
Earphones (3.5mm jack)
User Guide
PPA Device Layout
Audio and Video Jacks
Memory Device Connectors
1
CF Slot
SD Slot
3
microSD Slot
3
USB Memory
2
Device
1) Insert memory devices with label side facing front.
2) See ‘Connecting External Hard Drive’ section for more details.
3) CAUTION: Connect only one of SD or microSD at any time.
4) Green LED will light when PPA powered on.
Red LED will light when battery charging and dim when full.
LED will be Orange when PPA both turned on and charging.
5) Blue LED will light to indicate hard drive data being is accessed.
6) See ‘Using the Control Cluster’ section on the next fold.
7) LED will light Green when PPA connected to computer.
Power On/Off
Mic
Speaker
Control
Cluster
6
Power/Charge LED
4
Data Access LED
5
DC Jack
HDMI Output
Internal_SD
microUSB
7
(to computer)
Wrist Strap Anchor
Battery
Door
Release
5” LCD Display
USB Connection LED
Memory Device Cover
Installing the Battery
Locate the Battery Door on the back of PPA.
Pull the Battery Door Release upward until the
clips release and the Battery Door detaches by
rotating up toward the top of the device.
Position Battery with text of battery sticker upside
down and metal contacts facing battery contacts
on PPA. Angle battery into position so contacts
touch and rotate into battery bay. Replace cover.
AC Adapter and Battery Charge Indicator
The AC Adapter has a USB jack as the output.
Connect the USB-to-DC Cable to the AC Adapter
and plug the AC Adapter into a power source. The
LED on the AC Adapter will light. Next, connect
the DC plug of the cable into the PPA DC Jack.
The PPA Power/Charge LED will light Red if the
battery is charging. Allow for 3-4 hours to charge
full. The Red LED will dim when battery full.
Getting Started
About this User Guide
This User Guide is intended to provide a quick
reference for basic understanding and operation
of the device. It is written in a conversational
tone to help users of all levels get started with
PPA quickly and easily.
For more detailed instructions or to ask specific
questions, please visit our website, email us, or
call us using the contact information provided.
Website: www.digitalfoci.com
Email: support@digitalfoci.com
Phone: +1 (310) 763-9100
Page 2/8

Version 1.0.1-3
Understanding the Basics
Powering PPA
Turn on PPA by pressing and releasing the Power
button at the top right side of the device. The
Power LED will light up Green. If the PPA battery
is charging at the same time, the Power LED will
be Orange (Green + Red).
After the Startup screen, PPA will show the Home
Screen. It may take a few seconds for PPA to
recognize and mount the HDD Internal Storage
device. You will see the HDD icon change from
semi-transparent to solid when it’s recognized and
becomes ready for use.
Turn off by holding Power button down for 3 sec.
Using the Control Cluster
The PPA control cluster consists of
a Joystick, Jog Dial, and 5 buttons
for easy navigation and operation
of all the PPA screens and functions.
ESC: Cancel or go up one folder level.
MENU: Show and hide menu options.
JOYSTICK: Move cursor 4 directions. Press for ENTER.
JOG DIAL: Scroll cursor forward or reverse.
DISPLAY: Show folder contents or thumbnail full screen.
VAL [-] / [+]: Change thumbnail size or volume/zoom.
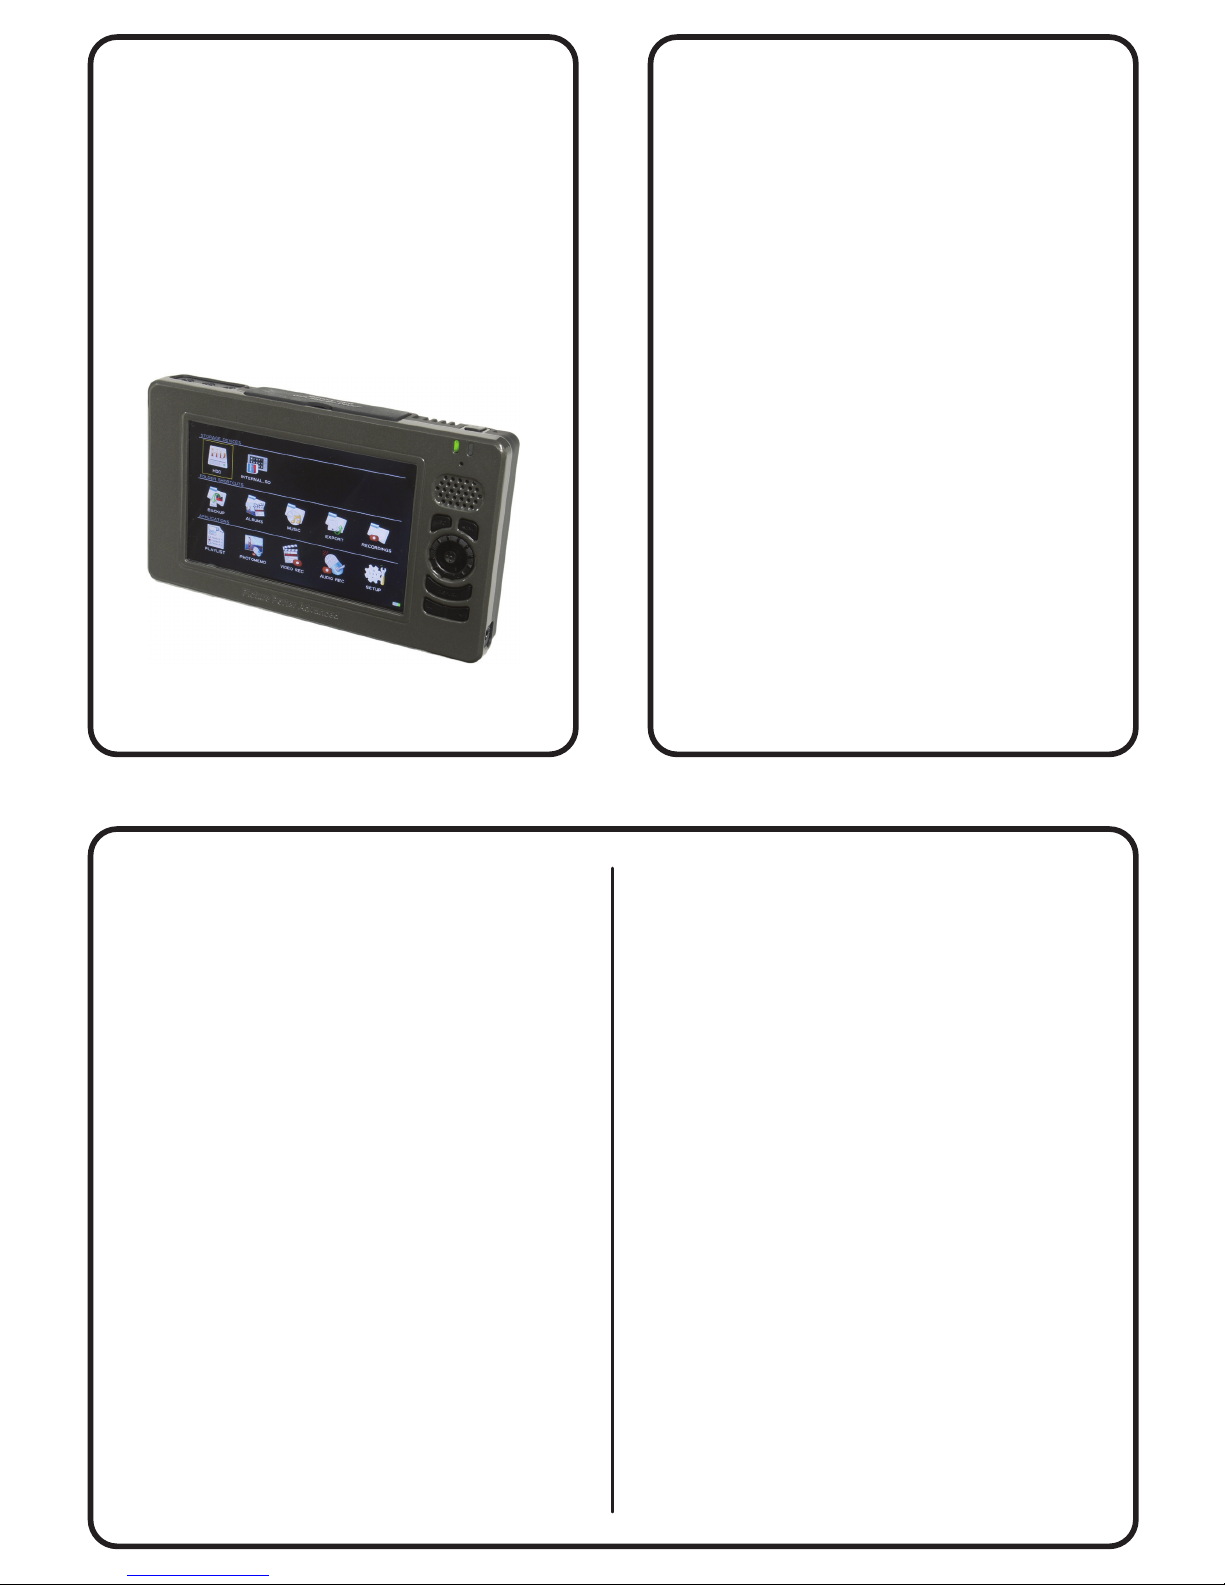
Home Screen
Layout
The Home Screen is divided into 3 sections as indicated
by the three separate rows on the Home Screen layout.
STORAGE DEVICES:
Shows all connected storage devices. The first two slots
are fixed as HDD and Internal_SD. They will show as
semi-transparent when the device is not connected or
turned off and solid when available.
The remaining three slots will show SD, CF, or USB when
the respective device is connected to PPA.
FOLDER SHORTCUTS:
A series of 5 shortcuts that will navigate directly to
Folder View of respective folder when selected.
APPLICATIONS:
A list of available applications on PPA consisting of:
PLAYLIST: Manage, view, and play Playlists.
PHOTOMEMO: Record, delete, and play audio
recordings paired with individual photos.
VIDEO REC: Make video recordings from external
composite and component video inputs.
AUDIO REC: Make audio recordings for general
memos, notations, and reminders.
SETUP: Enter Setup options to customize PPA for
maximum efficiently and increased productivity.
HDD INTERNAL_SD
SD CF USB
ALBUMS
MUSIC EXPORT RECORDINGS
BACKUP
PHOTOMEMO
VIDEO REC AUDIO REC SETUP
PLAYLIST
STORAGE DEVICES
FOLDER SHORTCUTS
APPLICATIONS
PPA HDD
ALBUMS
BACKUP
EXPORT
MUSICBOX
MUSIC
RECORDINGS
HDD Default Folder Structure
The internal HDD on PPA has a default folder
directory structure used for normal operations.
As shown in the diagram to
the right, these default
folders are coordinated
with the Folder Shortcuts
icons on the Home Screen.
Inside of the Music folder,
there is a folder named MusicBox
used for the MusicBox feature.
The MENU options for HDD has a Format selection
that will delete all the files and restore the default
folder structure of the HDD internal storage device.
MENU Options
Menu options for each storage device will vary
depending which other storage devices are
connected.
Some options are only available in the automatic
pop-up menu when a storage device is connected.
Storage Device Menu Options
Backup to HDD / Internal_SD / USB - When available.
View Contents - Open device (when device inserted).
Display Info - Show device information.
Format - Format device and erase all contents.
No Action - Close menu (when device inserted).
Power off/on HDD - Turn off/on HDD to save battery.
Page 3/8
Version 1.0.1-3
Memory Card Backup/Copy
Card Copy Basics
PPA is able to copy between different storage
devices depending on unique data management
requirements.
With the source and target storage devices for
the intended copy properly connected, a series of
on-screen dialogue boxes will provide information
and options to setup the copy as desired.
For added protection, a second copy can be made
to a different external storage device such as an USB
Flash Drive or an external USB hard drive enclosure.
Card Copy Connections
Available device connections for backup/copy task:
CF / SD / microSD ---> HDD
CF / SD / microSD ---> Internal_SD
CF / SD / microSD ---> USB
Internal_SD ---> HDD
Internal_SD ---> USB
USB ---> HDD
USB ---> Internal_SD
The Copy/Paste and Export functions can be used
to copy specific files between devices when required.
HDD INTERNAL_SD CF
ALBUMS MUSIC EXPORT RECORDINGSBACKUP
PHOTOMEMO VIDEO REC AUDIO REC SETUPPLAYLIST
STORAGE DEVICES
FOLDER SHORTCUTS
APPLICATIONS
Backup CF to HDD
Target Device: HDD
Folder Path: BACKUP
Folder Name: 14-03-25_CF_01
Free Capacity : 453.3 GB
Source: CF
Size of Copy : 15.4 GB
File to Copy: 1042
CANCEL RENAME FOLDER OK
Backup Dialogue Box
Choose the desired Backup option from the available
MENU choices. MENU automatically appears when
a memory device is connected. If MENU is not visible,
press MENUbutton with cursor on the memory device.
The Backup Dialogue Box will appear to show the
details and options. Available options are:
[OK] Accept default to copy the entire memory card
to a new copy target folder using default folder name.
[FOLDER] Make incremental copy and select existing
folder as target. Duplicate files will be skipped.
[RENAME] Change folder name of copy target folder.
[CANCEL] Cancel Backup and close dialogue box.
Top View of PPA with Memory Device Cover open
CF Slot
SD Slot
* microSD Slot
USB Memory
Device
SD CF USB
Internal Memory Devices on PPA
In addition to the memory devices that connect to
PPA through the slots at the top of the device, there
are 2 Internal memory device locations.
HDD is the HDD (or SSD) device that is installed in
the SATA bay* of PPA. HDD is the main storage device
used in normal operations. It can be turned off and
on from the MENU options to conserve battery life.
* Accessible by qualified technicians only.
Internal_SD is the SD card slot located on the left
side of PPA behind the flip-down door. The SD card
for Internal_SD can be inserted completely allowing
the door to close. Push to eject it for removal.
The icons on the Home Screen for
these internal devices will always
be visible. If device is not available
the icon will appear shaded.
Connecting Memory Devices
The memory device slots are located at the top of
PPA underneath the protective rubber cover. Open
the cover to reveal a 4 slots for various memory
devices that can be connected to PPA.
All memory devices are inserted with the label side
facing forward.
The icons for each device will
appear on the Home Screen
after the device is inserted.
* Special Note: For SD and microSD, only one of the
two SD formats can be inserted in a slot at any time.
HDD INTERNAL_SD
HDD INTERNAL_SD CF
ALBUMS MUSIC EXPORT RECORDINGSBACKUP
PHOTOMEMO VIDEO REC AUDIO REC SETUPPLAYLIST
STORAGE DEVICES
FOLDER SHORTCUTS
APPLICATIONS
Backup Summary
Target Device: HDD
Folder Path: BACKUP
Folder Name: 14-03-25_CF_01
Files Copied: 1042
Total Size Copied: 15.4 GB
Copy Speed: 14.4 MB/s
Total Time: 17 min 49 sec
VIEW OK
Backup Summary
After the copy completes, a Backup Summary will
appear to show the details of the backup.
[OK] Acknowledge copy and return to Home Screen.
[VIEW] Go to Folder View of copy target folder.
Page 4/8
Version 1.0.1-3
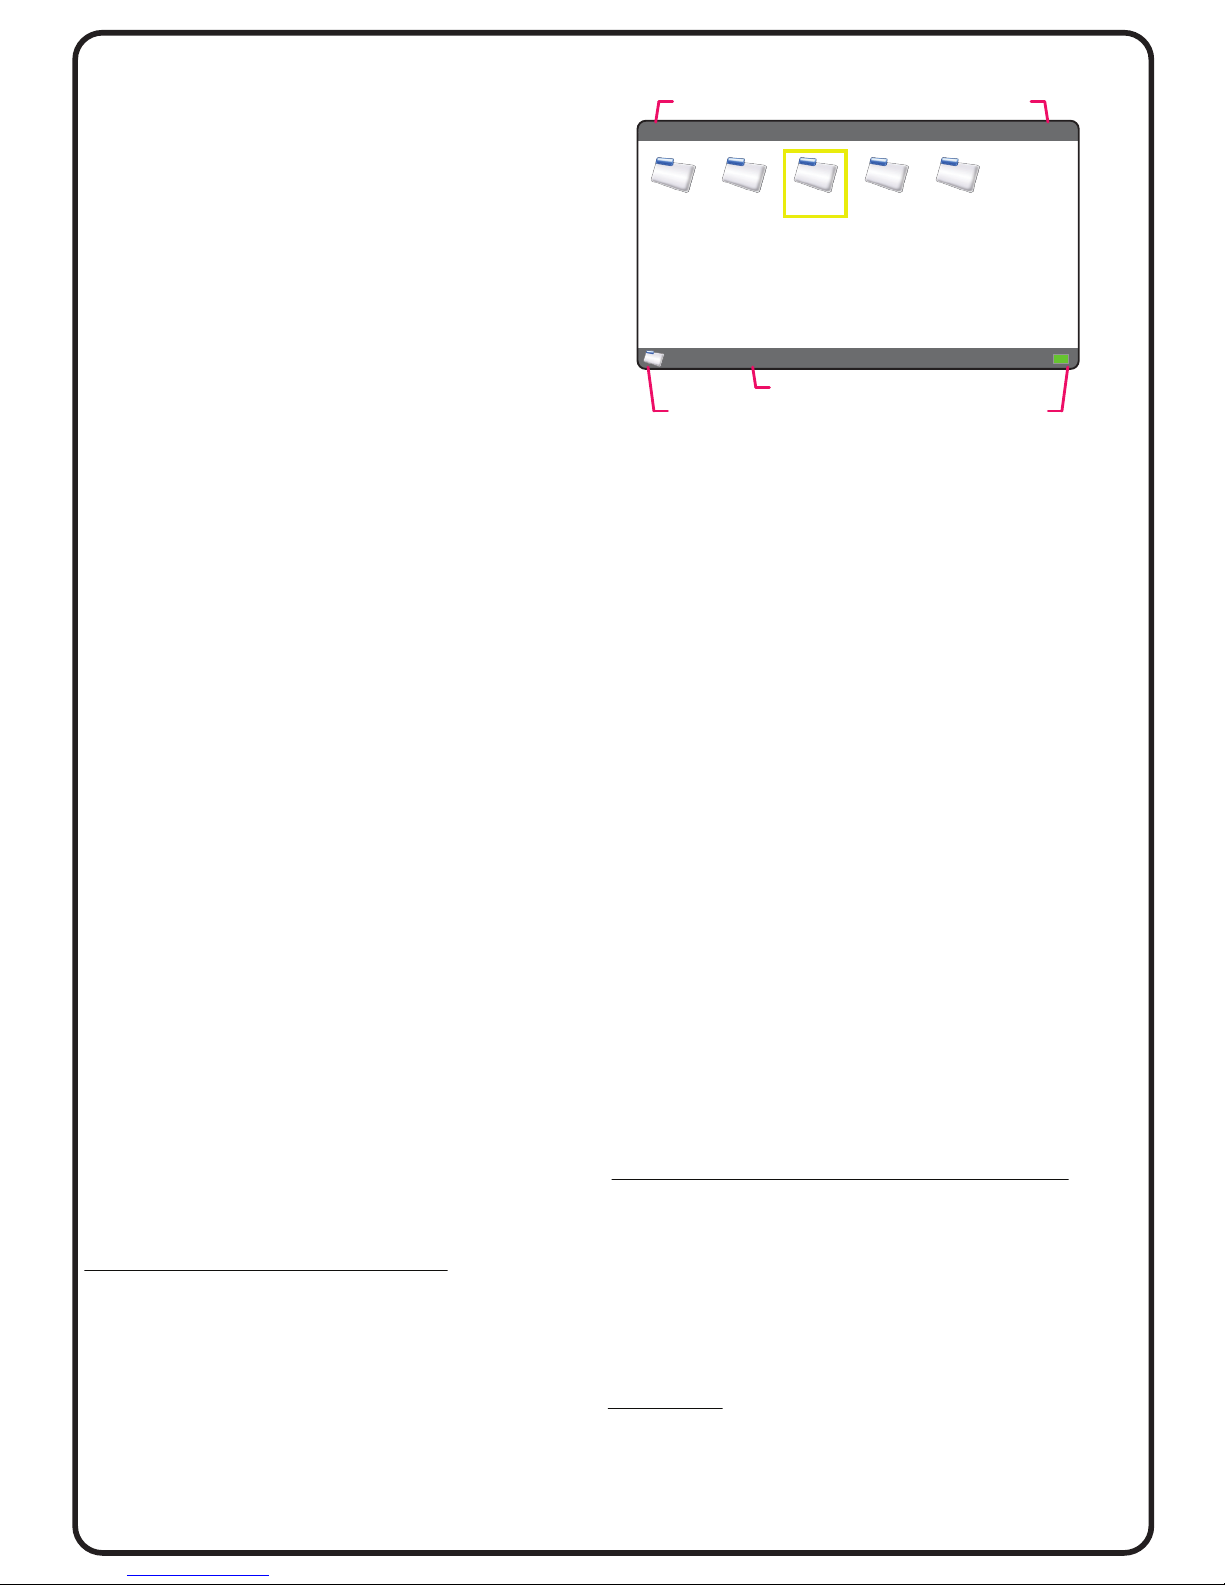
Folder View
Basics
Folder View is the main navigation method used
to view the folders and files on all connected
storage devices. After selecting a storage device
from the Home Screen by pressing [ENTER], the
screen will change to show the Folder View of
the selected storage device.
Change Thumbnail Size / View Mode
Press Val [-] / [+] to change the thumbnail size
displayed. Pressing Val [-] at the smallest thumbnail
size will change the view mode to List View. Press
Val [+] to exit List View and return to thumbnails.
Navigate Folders
Enter a folder by positioning the cursor on the folder
and pressing [ENTER]. Note that the navigation
directory path will update and reflect your current
directory location. To exit a folder and go up one
directory level, press [ESC]. Return to Home Screen
by pressing [ESC] repeatedly until exiting top folder.
Enter Full Screen Photo View
Enter Full Screen Photo View by pressing [ENTER]
with cursor positioned on target photo. Once in
Full Screen Photo View, all the photos in the current
folder will be available for full screen view. Tilt
Joystick left and right to view previous and next.
Exit and return to Folder View by pressing [ESC].
Enter Video Playback
Enter Video Playback mode by pressing [ENTER]
with cursor positioned on target video. Once in
Video Playback, all the videos in the current folder
will be available for playback. Tilt Joystick left and
right to play previous and next video. Exit and
return to Folder View by pressing [ESC].
Play Slideshow
Start Slideshow includes both Photo and Video
files by pressing MENU > Play Slideshow. Exit and
return to Folder View by pressing [ECS].
Add to Playlist
From Folder View, Full Screen Photo View, or
Selection Mode, single or selections of photos,
videos, and music files can be added to an
existing or new Playlist.
How to add files or create new Playlist:
1. For single file or completed selection, press
MENU > Add to Playlist.
2. Select Target Playlist dialogue box will appear:
[OK] Tilt Joystick Up/Down to select existing
Playlist. Select [OK] and add to select Playlist.
[NEW] Create new Playlist.
[CANCEL] Cancel and return to previous screen.
3. Playlist will be updated or created as specified.
Go to PLAYLIST from Home Screen to view and
manage Playlists.
/HDD/ Page 1/1
BACKUP, 2012/11/28, 12:33
ALBUMS EXPORTBACKUP MUSIC RECORDIN
Navigation directory path Page count
Folder name, Creation date, time
Folder View mode icon Battery indicator
Selection Mode
In Folder View, there is a Selection Mode that allows
selection of multiple items for File Management or
Add to Playlist functions.
Enter Selection Mode by pressing MENU > Selection.
In Selection Mode, the Folder View icon at the bottom
corner will change to be a check box. Navigation
will be limited the current folder during selection.
Move the cursor within the selected folder as normal
with the Joystick, Jog Dial and Val [-]/[+] buttons.
Press [ENTER] to select and de-select files and folders.
Once the selection is complete, press MENU and
select File Management or Add to Playlist.
In Selection Mode, choose selection options by
pressing MENU > Select > (All, Page, Range, Clear).
Exit and return to Folder View by pressing [ESC].
File Management Options
The file management functions can help to organize,
structure, and clean-up the photo, video, music and
other files stored on the device. The Copy and Paste
functions can be used to copy specific and selected
file(s) from one storage device to another.
To access File Management options, press MENU >
File Management for the following sub-menu:
Folder View > File Management - Menu Options
New Folder - Create new folder.
Rename - Rename existing folder or file.
Paste - Paste item(s) from most recent Copy/Cut.
Copy - Copy item(s) for Paste. Original item(s) remain.
Cut - Move item(s) for Paste. Original item(s) removed.
Export - Export item(s) to other device or Export folder.
Delete - Delete item(s).
Helpful Tip:
In Folder View Thumbnails or List View, press [DISPLAY]
button with cursor over folder to peek at the folder
contents. Pressing [DISPLAY] with cursor over photo,
shows an enlarged view of the photo.
Page 5/8
Version 1.0.1-3
Folder View (continued)
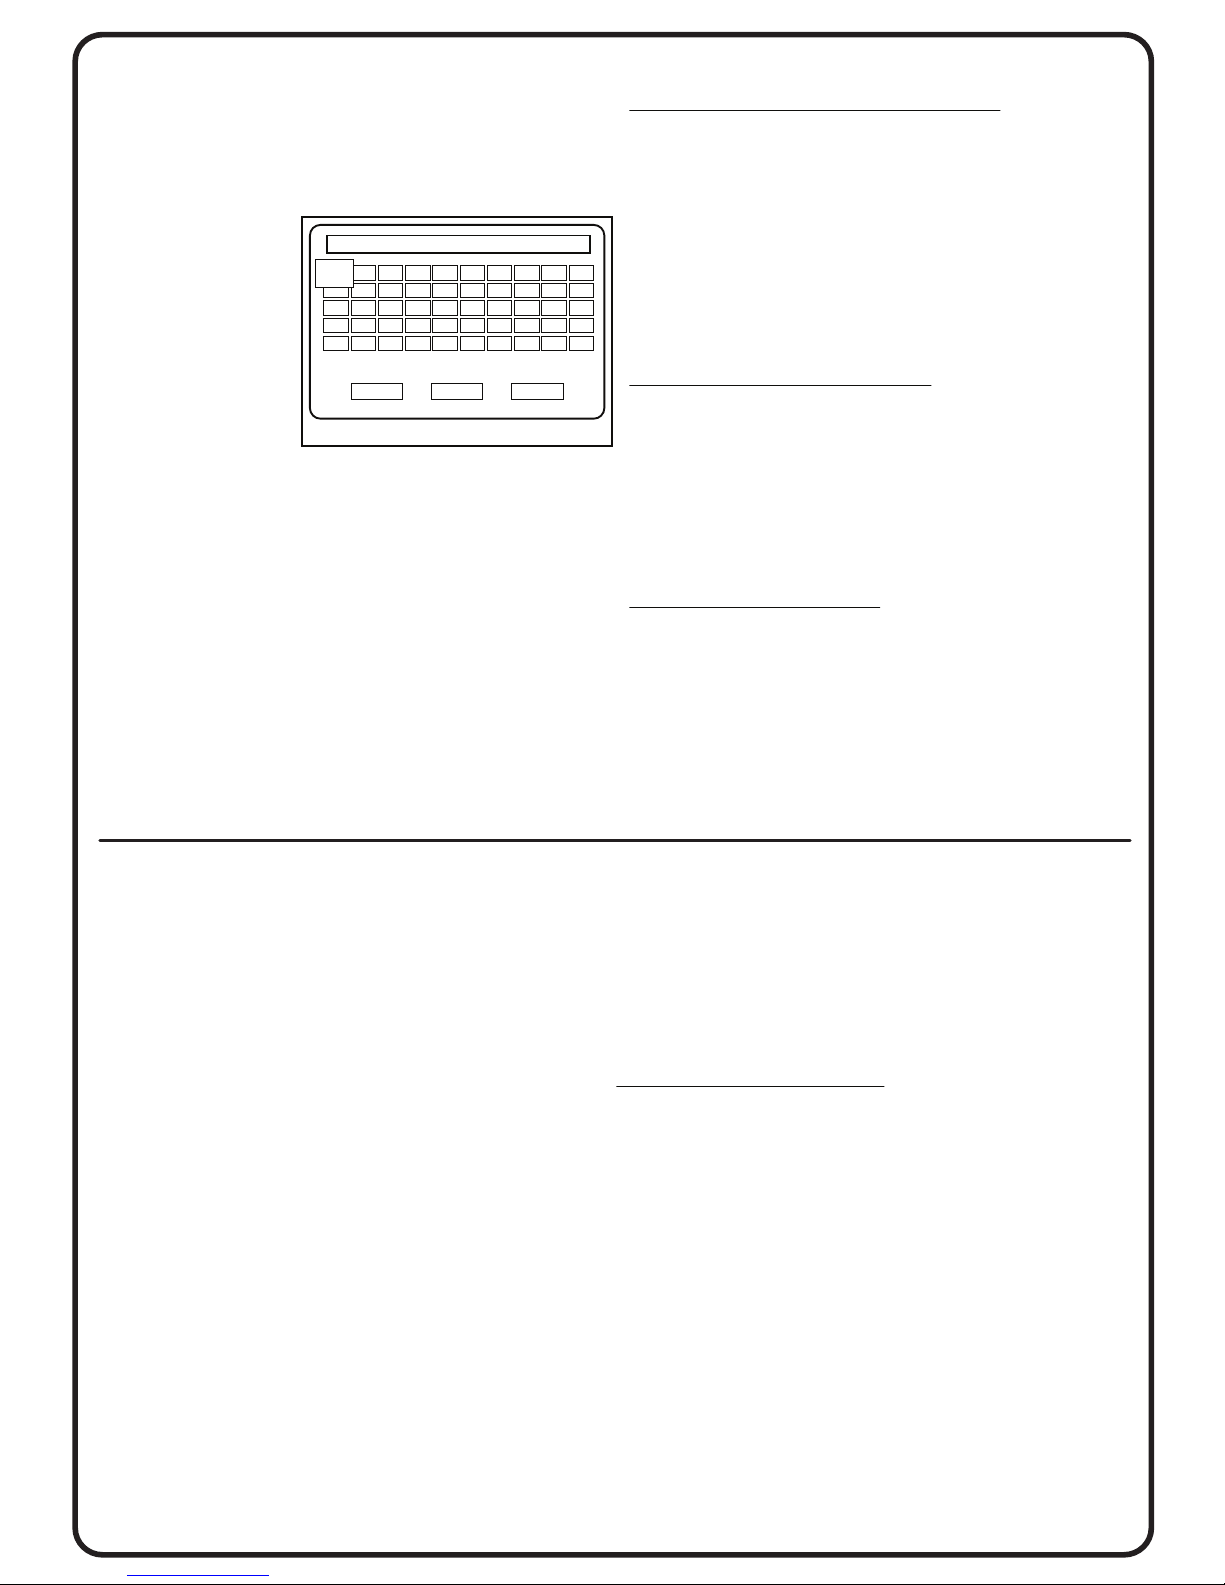
On-screen Keyboard
The on-screen keyboard becomes available when
creating new folders, playlists, or renaming items.
With keyboard visible, tilt the Joystick to move the
cursor. Press [ENTER]
to select character.
To delete character
in front of input
location select
or press [MENU].
To change input
location press
Val [-] / [+].
To change between lower and upper case letters
select CAPS or press and hold [ENTER].
Select OK to accept name or CANCEL.
Full Screen Display Information Overlays
When photos are displayed in Full Screen Photo
View or in Slideshow, various information overlays
are available for display. Similarly, overlay options are
available for Video playback.
The show/hide options for these overlays can be
selected through the MENU options, or they can be
accessed through the SETUP screen.
All the available MENU options for all three viewing
modes are shown in the list to the right.
Connecting to Other Devices
A Variety of Options
PPA is designed with a variety of options to
connect to other devices for input and output.
Connecting to Computer
PPA can be connected to a computer by USB 2.0. The
computer will recognize PPA as an external hard
drive for copying files between the devices.
When the USB cable connection is made, the PPA
screen will turn off and the green light next to the
PPA USB port will light up. At this time, all operations
will be done on the computer.
Display to TV or Monitor
To view photos and videos on a larger screen, PPA can
connect to a display device by HDMI or RCA plugs.
When the video output connection is made with the
display device, the PPA screen will turn off and send
the image to the display device. If no image appears,
check to make sure that the display device is set to
show the proper input.
For RCA Component and Composite video connections,
use the “V-Out” jack at the top left corner of PPA and
make sure to check the settings for
Setup > System > Settings > Display.
Full Screen Photo View - Menu Options
Play PhotoMemo - Play PhotoMemo audio file.
View IPTC - View photo IPTC information.
EXIF/Histogram Display - Show/Hide.
Counter/File Name Display - Show/Hide.
Date/Time Display - Show/Hide.
IPTC Comments - Show text comments with photo.
Photo View Mode - Select viewing format for photo.
File Management - Show File Management options.
Add to Playlist - Add current or selection to Playlist.
Video Playback - Menu Options
Video Repeat - Select repeat mode for videos.
Time Display - Select time display format or hide.
Video Progress Bar - Show/Hide.
Audio Mode - Select stereo or dedicated channel.
Counter/File Name Display - Show/Hide.
Date/Time Display - Show/Hide.
Video View Mode - Show/Hide.
Slideshow - Menu Options
Playback Mode - Select slideshow playback mode.
Transition Effect - Select transition effect.
Background Audio - Select background audio.
EXIF/Histogram Display - Show/Hide.
Counter/File Name Display - Show/Hide.
Date/Time Display - Show/Hide.
IPTC Comments - Show text comments with photo.
Photo View Mode - Select viewing format for photo.
Connecting External Hard Drive
An external hard drive can be connected to PPA using
the USB port at the top of the device. This allows an
an USB cable to connect PPA to an external hard drive.
For the external hard drive to be recognized by PPA,
it must be formatted in FAT32 file format.
Powering External Hard Drive: Since the external hard
drive will be using power from PPA to operate, it is
necessary to connect the AC power adapter before
connecting the hard drive. In some cases, where the
hard drive is still not able to get sufficient power,
charge the PPA battery to full before connecting the
hard drive. This will redirect the power from the
battery charging to support the external hard drive.
Input Video Stream for Video Rec
The Video Rec feature on PPA makes video recordings
in 640x480 resolution at 29 frames per second. The
video is recorded from the video signal provided via
the “V-In” jack at the top right side of the cluster of
three jacks. After the cable is connected, open
VIDEO REC from the Home Screen to start recording.
Either RCA Component or Composite video can be used.
Check settings in Setup > System Settings > Recording.
B C D E F
Val +/- = move cursor; MENU = delete
CAPS OKCANCEL
G H I J
K L M N O P Q R S T
A
U V
W
X Y Z SP
_
-
1 2 3 4 5 6 7 8 9 0
! @ # $ &
+
.
~
( )
NEW_FOLDER
Page 6/8
Version 1.0.1-3
Applications
The available applications for PPA can be found
at the bottom row of icons on the Home Screen.
PLAYLIST
The PLAYLIST application can be used to create
unique slideshows of photo, video, and music files
from files located in different folder locations on
the internal hard drive and Internal_SD card. The
Playlist slideshow will also supports PhotoMemo.
Playlist items are added by the Add to Playlist
Menu option from Folder View.
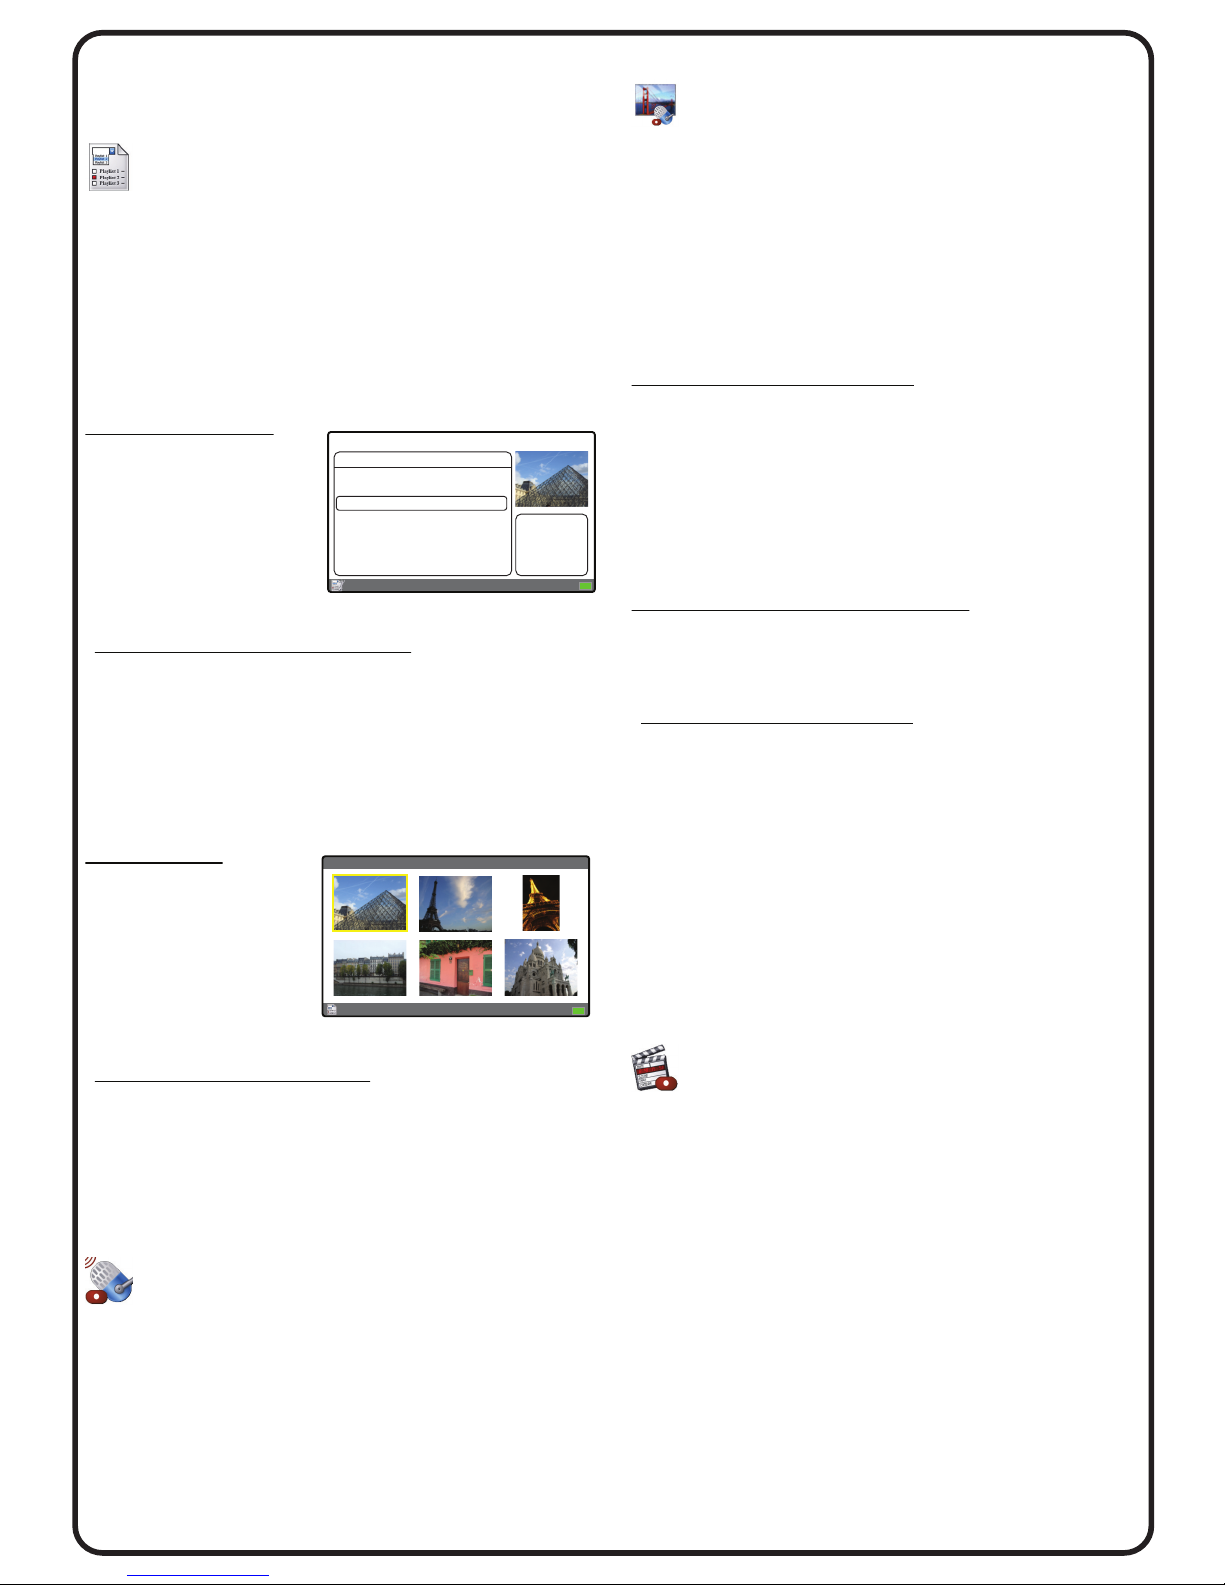
PLAYLIST MANAGER:
After selecting PLAYLIST
from the Home Screen,
the Playlist Manager
screen will show the
available playlists. A
thumbnail of the first
photo in the playlist is shown with basic information.
Playlist Manager - Menu Options
New Empty Playlist - Create empty playlist.
Duplicate - Duplicate selected playlist.
Rename - Rename playlist.
Export - Copy originals to folder or external device.
Delete - Delete playlist without deleting original files.
Press [ENTER] on desired Playlist to open Playlist View.
PLAYLIST VIEW:
In the Playlist View, the
navigation is similar to
Folder View for specific
folder. Menu options
allow the Playlist items
to be arranged in a
desired sequence for viewing and slideshow.
Playlist View - Menu Options
Play Slideshow - Start slideshow.
Move to First - Move item to first of list.
Move to Last - Move item to last of list.
Free Move - Move item by Joystick and press [Enter].
Export - Copy original to folder or external device.
Remove from Playlist - Remove item from Playlist.
AUDIO REC
Audio recordings can be made with PPA through the
on-board Mic or Line In device. AUDIO REC allows for
recording files as well as playback and management.
To make a new recording, press MENU > Record New
Memo and the device will start to record. Press
[ENTER] to stop and save the recording.
Additional recording options are available in MENU.
All recorded files are saved in the Recordings folder.
PHOTOMEMO®
The PHOTOMEMO application is used to make
audio recordings to pair with specific photos. These
PhotoMemo recordings can be played individually
by manual selection, or they can automatically play
with each photo in a slideshow.
Navigation in PhotoMemo is similar to Folder View
where pressing [ENTER] on a folder opens to show
its contents. Only photo files will be shown.
How to Record a PhotoMemo:
1. Move cursor to target photo and press [ENTER].
2. Observe the recording level box in the upper-right
corner of the screen and start recording once it
starts to show recording activity.
3. Press [ENTER] to stop and save recording.
After the recording is saved, a PhotoMemo icon will
appear in the upper-left corner of the photo.
PhotoMemo can be played back by:
PhotoMemo application through MENU option.
Full Screen Photo View through MENU option.
Slideshow (with proper Background Audio setting).
PhotoMemo - Menu Options
Play PhotoMemo - Play PhotoMemo.
Delete PhotoMemo - Remove PhotoMemo.
Recording Level - Adjust recording level.
Recording Source- Choose Mic or Line In.
Go to Folder View - Change to Folder View.
Icons at the bottom-left corner of the PhotoMemo
screen indicate current setting for Recording Level
and Recording Source.
In Folder View, if the PhotoMemo indicator icons
for the thumbnails are not visible, check the Setup
option in Playback Options > Photo.
VIDEO REC
The VIDEO REC feature records video input signals
as 640x480 resolution MP4 files at 29 frames per
second. The video input can come from either
Component or Composite video sources.
Connect the appropriate video cable to the “V-In”
jack and select VIDEO REC from the Home Screen.
Make sure to check the Video settings for
Setup > System Settings > Recording.
With the video source showing on the PPA screen,
press [ENTER] to start recording. Press [ENTER] again
to stop and save the recording.
Icons at the bottom-left corner screen indicate the
settings for Video Standard, Signal, and Target Device.
Additional recording options are available in MENU.
All recorded files are saved in the Recordings folder.
PLAYLIST MANAGER Page 1/1
Press ENTER to view Playlist.
Playlist Name Date Created Items
Mom’s 70th 2014/03/09 209
Reunion 2012 2012/05/19 139
Paris 2012 2012/06/21 43
# photos: 39
# music: 1
# videos: 3
DSC_2203.JPG
Paris 2012 Page 1/8
Page 7/8

Version 1.0.1-3
Setup
Basic Layout
The Setup options are divided
into three general categories
with four sub-categories each.
After selecting SETUP from the
Home Screen, the first screen
allows selection of the three
main categories.
Select category by tilting Joystick
Up/Down and pressing [ENTER].
After selecting a category, the
next screen shows four named
tabs and a list of setting options
on each tab. Tilt Joystick Up/Down
to move between the options on
the current tab. Tilt Joystick Left/
Right to change tabs. Press [ENTER]
to change setting. The setting will
turn Red to show the value can be
changed. Tilt Joystick up/down/
left/right to make desired changes
and press [ENTER] to save changes.
Playback Options
SLIDESHOW
Slideshow Interval
1, 5, 10 sec, ... , 24 hr
Transition Effect
Random, No Effect ,Fly In, Erase, Blocking
Background Audio
Local, MusicBox, PhotoMemo, Off
Playback Mode
Once, Repeat, Random
Counter / Hide, Show
File Name / Hide, Show
Time Display / Hide, Show
Date Display / Hide, Show
PHOTO
Photo View Mode
Fit Scrn, Fit Width, Max Visible, Fill Scrn
EXIF/Histogram Display
None, EXIF, Histogram, Both
IPTC Comments / Hide, Show
PhotoMemo Icon Display / Hide, Show
VIDEO
Video Repeat
Off, Once, Current, All, Random
Video Time Display
Elpsd, Remaining, Elpsd/Total, None
Video Progress Bar / Hide, Show
Audio Mode
Stereo, Left Channel, Right Channel
Video View Mode / Fill Screen, 100%
MUSIC
Music Play Mode
Play Single, Once, Repeat Current,
Repeat All, Random
Equalizer
Normal, Bass, Classic, Dance, Live,
Rock, Treble, User
System Settings
TIME
Time Set / AM/PM clock
Date Set / MM/DD/YYYY
DISPLAY
Screen Brightness / 1 - 10
Screen Saver / Off, 1-30 min
Video Out Standard / NTSC, PAL
Video Out Signal
Composite, Component/YPbPr
RECORDING
[Video Recording]
Video In Source Standard / NTSC, PAL
Video In Source Signal
Composite, Component/YPbPr
Target Recording Device
HDD, Internal_SD
[Audio Recording]
Level / Low, Medium, High
Recording Source /
Internal Mic, Line In
Target Recording Device
HDD, Internal_SD
Device
Navigation Sound
Off, On
Warning Sound
Off, On
Volume
0 - 10
Auto Shutdown
Off, 1-30 min
Unsupported File Formats
Show, Hide
File Delete
Enable, Disable
Sort Mode
A-Z, File Size, Date
Restore All Settings
Technical Information
(Information for display only.)
VERSION
Firmware Version
Hardware Version
Production Number
STORAGE
[HDD]
Used Space
Free Space
Total Capacity
Percentage Free
File Format
[Internal_SD]
Used Space
Free Space
Total Capacity
Percentage Free
File Format
BATTERY
Battery Status
Shows 50% when charging.
SUPPORT
Email
support@digitalfoci.com
Phone
+1-310-763-9100
Web
www.digitalfoci.com/support
Playback Options
System Settings
Technical Information
SLIDESHOW PHOTO VIDEO MUSIC
1, 5, 10, 30 sec, 1, 5, 10 30 min, 1, 2, 3, 6, 12, 24 hour
Slideshow Interval 10 sec
Transition Effect Random
Background Audio Local
Playback Mode Repeat
Counter Hide
File Name Hide
Time Display Hide
Date Display Hide
SLIDESHOW PHOTO VIDEO MUSIC
Page 8/8
 Loading...