

Page 1

Instruction Manual
Provided By
http://www.MyBinding.com
http://www.MyBindingBlog.com
DFG TitanWire
Heavy Duty
Binding Machine
Page 2
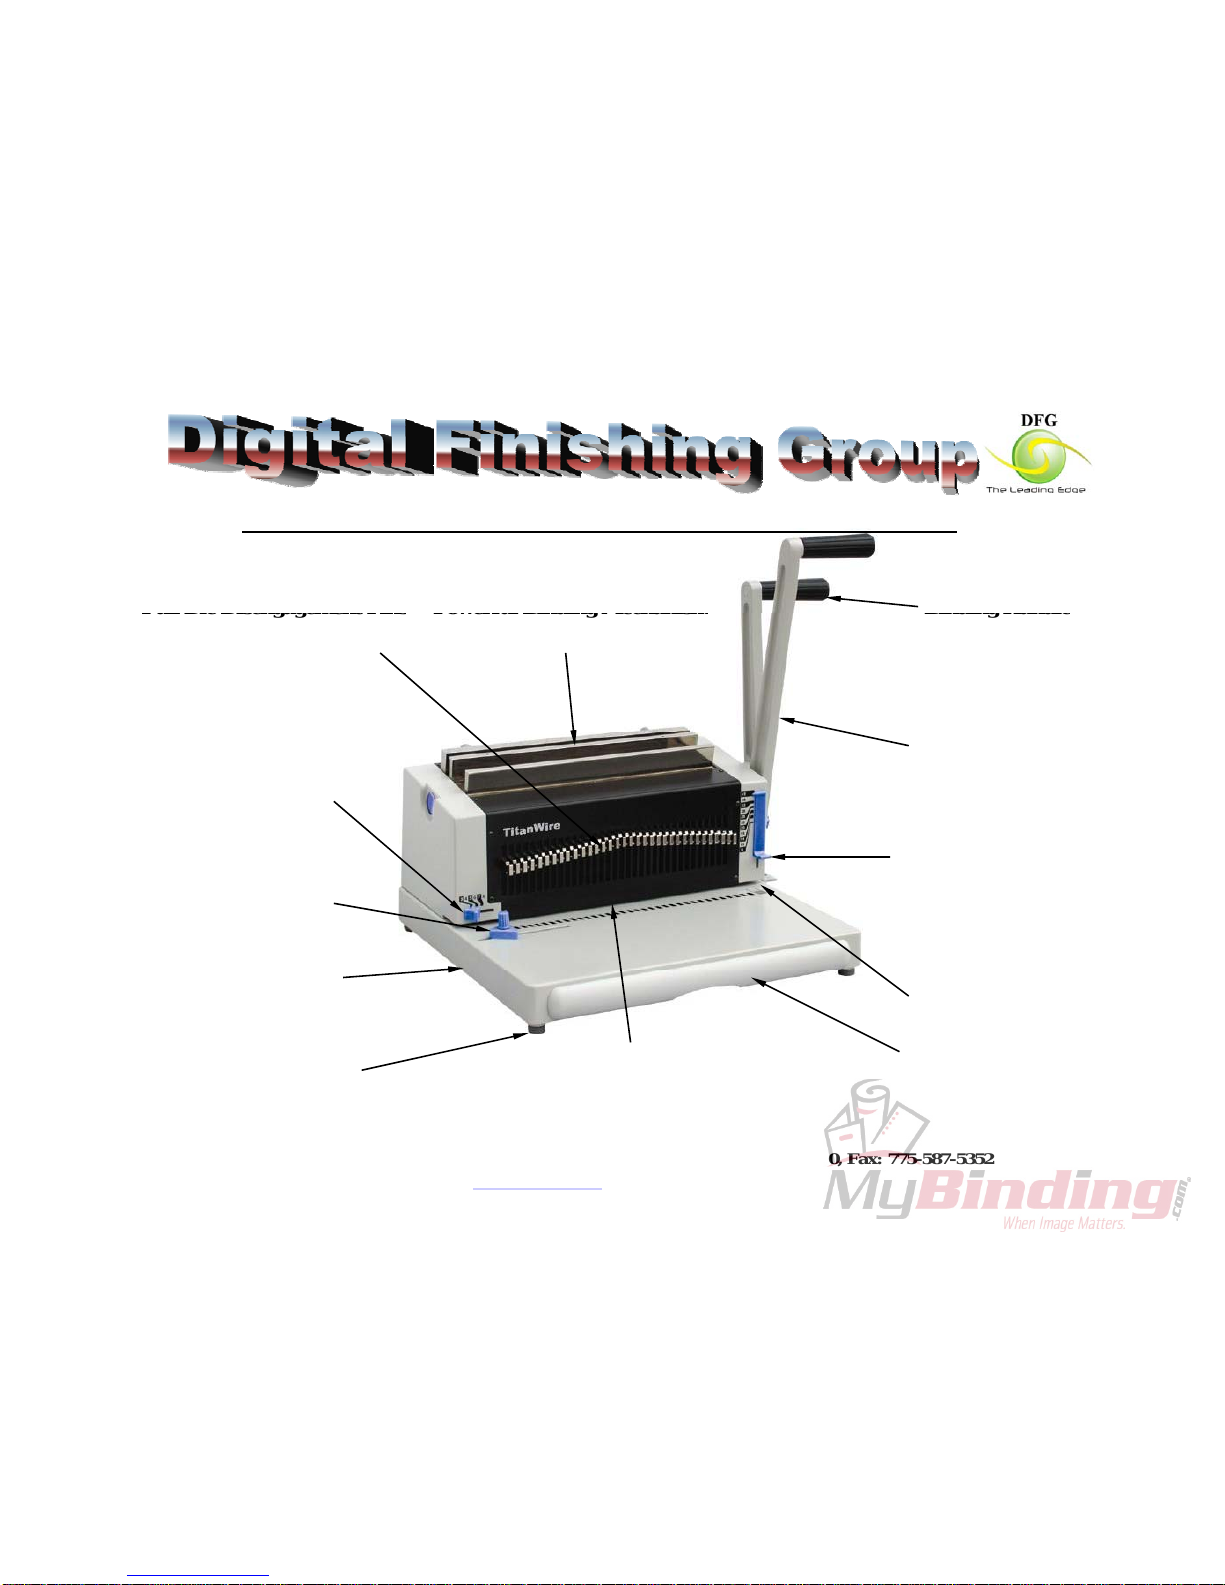
TitanW ire- Heavy Duty Wire Punch and Binding Machine
Powerful Binding Mechanism
3/16” to 1 ¼” wires
Full Die Disengagement Pins
For clean and complete punching
with different paper sizes
Binding Handle
Easy binding
Punch Margin Control
Maximizes the tear resistance
of all documents
Punching Handle
For punching up to 25
sheets (20 lbs)
Open Punch Throat
Wi
re Size Selector
For professional appearance
of all documents
Sturdy Die Cast
Side Margin Control
For evenly centered
document punching
Open Punch Throat
For punching larger
document sizes
Sturdy Die Cast
Metal Construction
Non Skid Feet
Manual Punch Capacity
2h
Large Trash Drawer
Digital Finishing Group
1260 Kempar, Madison Heights, MI, 4807, U.S.A. Phone:248-733-0400, Fax: 775-587-5352
Email: info@dfgus.com
Website: www.dfgus.com
Up to
25 sheets (20 lbs)
Page 3

TitanWire Machine Operation Manual
Dear Customer,
Thank you for purchasing our TitanWire machine. The following are basic installation
and operation instructions. For advanced binding instructions, please contact DFG.
Installation
1. Install punching handle and binding handle
2. Install the screws to lock the handles
Determine metal wire binding element size
There are two methods you can use: (ETitanCoil machine shown)
1. Use coil that is 2-3 mm (1/8” ) larger than book thickness
2. Use our coil size selector. Refer to picture (ETitanCoil machine shown)
Put book on machine base, under the
“Size Selector”. Move the “Size
Selector” down until its bottom
touches the top sheets of the book.
The top of the “Size Selector” will
point to a wire size on the scale you
can use
1260 Kempar, Madison Heights, MI 48071, U.S.A. Phone: 248-733-0400, Fax: 775-587-5352
Email: info@dfgus.com Website: www.dfgus.com
Page 4

Determine Side Margin (side guide) and Punch Margin (back gauge)
1. Select the punch margin (general
guideline: the thicker the book, the
larger the ideal punch margin.
However, you can use small punch
margins for any book thickness)
2. Set side guide to center the sheet
Punching
1. Align sheets and insert edge to be bound into punch throat
2. Push the sheets flush against the inner back wall of the punch throat
3. Slide the sheets leftward, against the side guide
4. Pull the punch handle to punch
You can punch up to 28 sheets of paper (20 lb. paper) at once.
Most people punch between 12 and 20 sheets at a time.
Binding
Set closing mechanism measurements, test wire closure, and
adjust to satisfactory close.
1260 Kempar, Madison Heights, MI 48071, U.S.A. Phone: 248-733-0400, Fax: 775-587-5352
Email: info@dfgus.com Website: www.dfgus.com
Page 5

Put punched sheets together into a complete book (also take
out the bottom page and place it on the top- see below) with
punched edge facing you. Prepare a wire element.
Starting at one side, place wire fingerloops in each individual hole. Do not
miss any holes; remaining wire will
quickly begin to fall into place at next
holes. Fingers should come to the other
side of the book easily.
Moving thumb gently along top of
wire, sliding hand down binding
edge should easily guide all wire
fingers into holes. Make sure that
all wire fingers go in all punched
holes, and turn coil so that fingers
reach completely through book.
Hold book together and lift with binding edge (and
binding wire) pointed downward. Wire should rest easily
and naturally in punched holes. Lower the binding edge
(and wire) into wire closure mechanism, placing wire
down onto steel surface, and close binding handle to close
wire.
Wire is now closed and book is bound. Back page should
be at front of book; turn back page around to back (open
the page all the way around to the back) to complete the
book with wire seam hidden behind last page. Bindi
completed.
Service
For service or warranty, please contact DFG at:
ng is
1260 Kempar, Madison Heights, MI 48071, U.S.A. Phone: 248-733-0400, Fax: 775-587-5352
Email: info@dfgus.com Website: www.dfgus.com
 Loading...